Imagine walking into a celebration where the dessert table is a feast for both the eyes and the taste buds—truly a showstopper! Dessert tables have become a favorite centerpiece at parties because they combine creativity, variety, and a touch of indulgence that excites guests of all ages.
In this article, you’ll discover a delightful array of dessert table ideas that will inspire your next event or special occasion. From elegant displays to fun, themed setups, these ideas will help you craft sweet displays that are as beautiful as they are delicious, perfect for making lasting memories.
1. Elegant Tiered Dessert Stands with Coordinated Treats
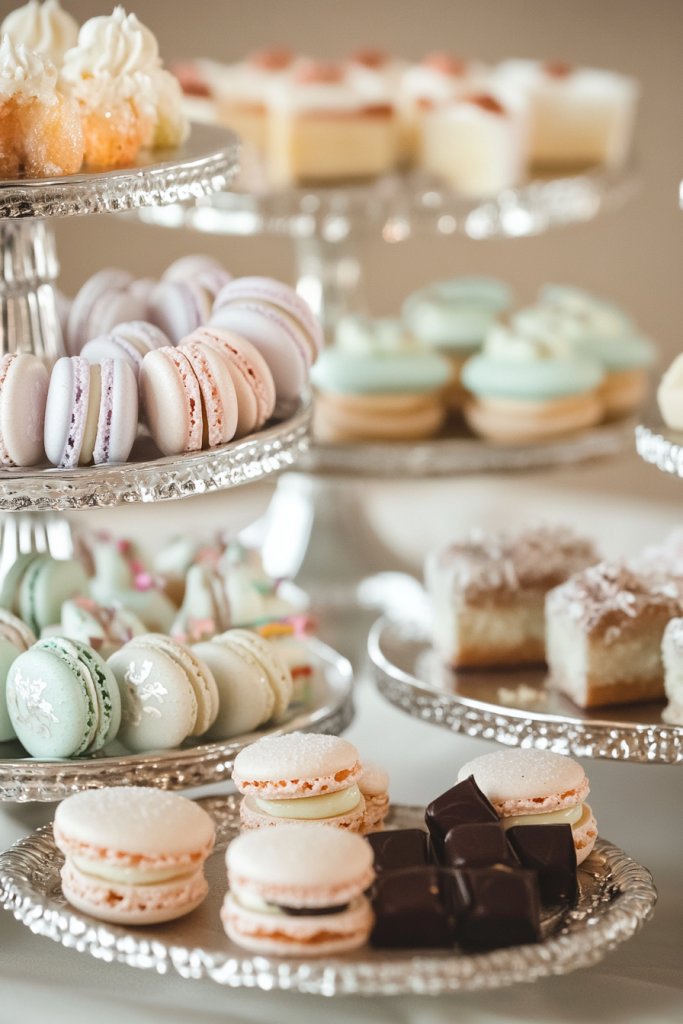
Ever hosted a party and felt like the dessert table just didn’t stand out enough? Or maybe you want to impress guests with a sophisticated presentation but don’t know where to start? Using elegant tiered dessert stands can elevate your display instantly. They turn simple treats into a polished centerpiece that screams style. Who wouldn’t want their sweets to look as good as they taste?
Picture a multi-layered stand with shiny metallic edges or clear acrylic that catches the light beautifully. Stacked with colorful cupcakes, shiny macarons, and tiny tartlets, it creates a sense of abundance without clutter. The tiers add height, making the treats more accessible and inviting. The contrast of textures and colors pops against a neutral backdrop, drawing eyes to your creation.
Mix and match stand styles to match your theme—gold for glam, silver for modern, or clear for minimalist. You can vary the number of tiers based on space or occasion, like a three-tier for a small gathering or a towering setup for larger events. Seasonal decor, such as pastel ribbons or metallic accents, can tweak the look for holidays. Even casual gatherings benefit from a sleek, coordinated setup.
Start with sturdy stands that can handle the weight of your treats. Choose materials that complement your overall decor—metallic for luxe or acrylic for contemporary. Arrange your treats thoughtfully—larger items on the bottom, delicate items on top—to balance the display. Use small doilies or cake boards for added elegance and stability. Consider spacing the tiers apart to avoid overcrowding and to ensure easy access. Clean the stands thoroughly before use for a spotless presentation.
Add personalized touches like custom labels or monogrammed toppers to make the display special. Incorporate themed elements—like mini flags or seasonal ornaments—around the base or on the tiers. You can also layer in decorative fabrics or ribbons underneath for extra color and texture. Switching up the placement of treats on each tier keeps the display fresh and engaging. Don’t forget to match your stand style with your overall party aesthetic for cohesion.
Using tiered stands gives you a professional look even if you’re just a home baker. It boosts confidence and makes your sweets feel gourmet. Plus, guests will be wowed by the presentation—who doesn’t love a dessert display that looks straight out of a magazine? So go ahead, stack those treats high and enjoy the compliments. Your dessert table just became the star of the show.
2. Rustic Wooden Crate Display with Vintage Glassware
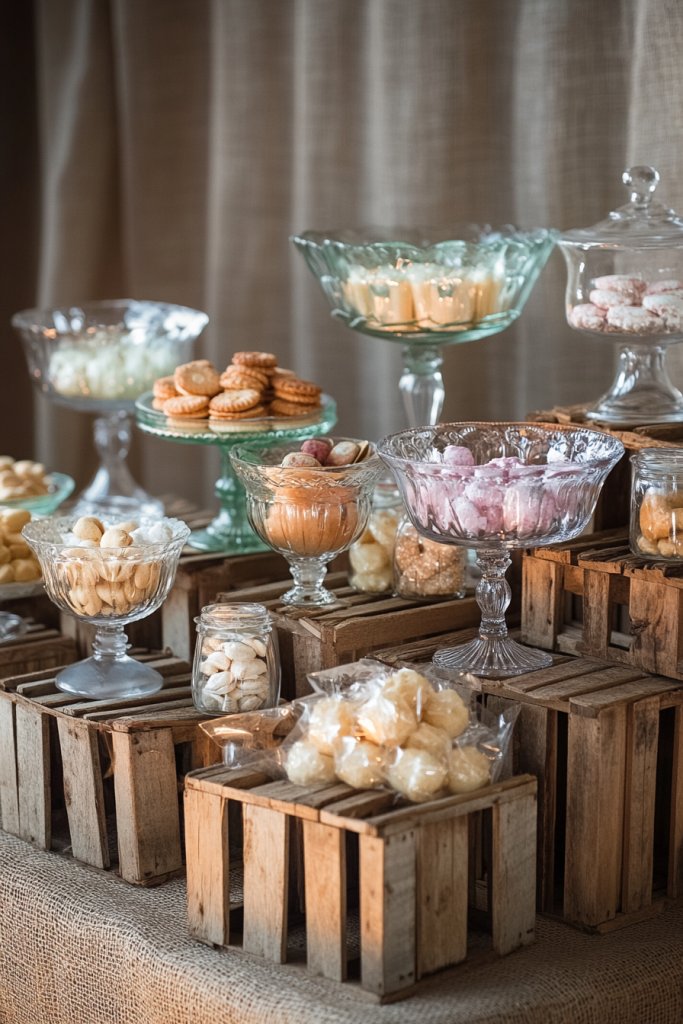
Ever feel like your dessert table lacks warmth and charm? Or maybe you’re tired of the same old plastic trays and want something more authentic? A rustic wooden crate display can change the game. It adds a cozy, farmhouse vibe that makes your treats feel homemade and inviting. Who says sweets can’t have a little vintage flair?
Imagine uneven, reclaimed wood crates stacked at different heights, filled with an assortment of sweets—think cookies, brownies, and mini cupcakes. Vintage glass jars and bowls filled with candies or nuts sit atop the crates, catching the light with their delicate curves. Twine, burlap, or lace accents enhance the rustic feel, creating a warm, nostalgic scene. The mix of textures invites guests to explore and indulge.
For outdoor settings, add weather-resistant elements like galvanized buckets or painted crates. Inside, you can soften the look with linen tablecloths or burlap runners. Switch treats seasonally—pumpkin-flavored goodies for fall, fresh fruit tarts in summer. Incorporate vintage-inspired signage or chalkboards for labels. Adjust height and arrangement to fit your space, creating a layered, inviting look.
Gather reclaimed wood crates in various sizes and a selection of vintage glassware, such as jars, bowls, and cake stands. Arrange the crates at different levels to add visual interest, using small blocks or books as risers if needed. Fill the jars with colorful candies, dried fruits, or small cookies. Decorate with twine, lace, or faux greenery—just avoid plants if restricted—to enhance the rustic charm. Place your sweets carefully, balancing colors and shapes for an appealing display. Clean all items thoroughly before setup.
Personalize the display with handwritten labels on chalkboards or paper tags tied with twine. Incorporate seasonal elements like mini pumpkins or pinecones for fall or fresh herbs for spring. Use different-sized jars and bowls to add visual variety. You could even add vintage utensils or small signs with fun quotes to make it more engaging. Keep it modest yet charming—it’s all about creating a warm, welcoming vibe.
A rustic wooden crate setup is perfect for backyard parties, bridal showers, or casual gatherings. It shows that beauty doesn’t need to be expensive or complicated. Your guests will appreciate the effort and cozy atmosphere it creates. Plus, it’s easy to update for any occasion—just swap out treats and accessories. Go ahead, embrace the vintage charm and make your dessert table truly memorable.
3. Color-Coordinated Candy Bar with Ombre Effect
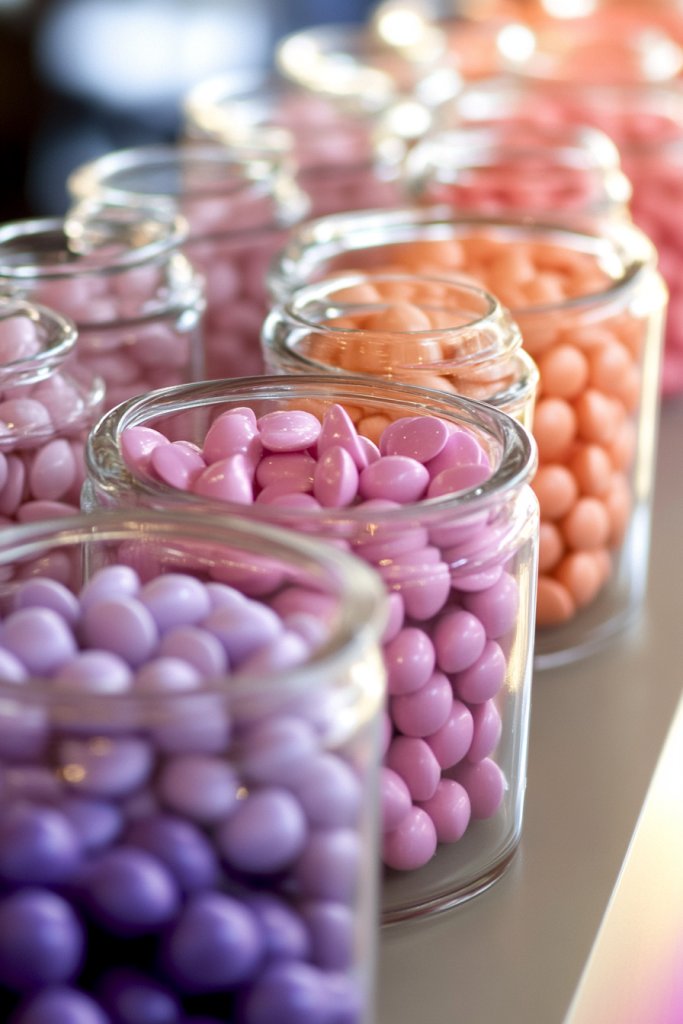
Tired of your candy jars looking messy and chaotic? Or maybe you want to create a striking visual impact that ties your party theme together? A color-coordinated candy bar with an ombre effect solves both problems. It transforms a simple sweets station into a captivating focal point. Plus, it’s surprisingly easy to pull off with a little planning.
Envision a row of bowls, jars, and containers arranged by shades—from deep reds and purples to soft pinks and peaches—creating a gradient that’s pleasing to the eye. The candies within match the tones, enhancing the seamless flow of color. Decorative labels and small touches like metallic scoops or paper fans add to the aesthetic. The overall effect is a smooth, eye-catching spectrum that draws guests in.
Adjust the color palette to match your theme—pastels for spring, jewel tones for winter, or bright hues for summer. Use matching or contrasting containers to emphasize the ombre effect. Incorporate decorative elements like ribbon, paper garlands, or fabric backdrops in coordinating shades. For smaller spaces, limit the color range or use tiered trays for height variation. It’s flexible enough for casual or formal settings.
Select clear or matching colored bowls and jars, then organize your candies by shade beforehand. Use decorative labels or tags to identify the sweet varieties. Arrange the containers in a gradient or layered pattern, ensuring a smooth transition from one color to the next. Fill each container with candies, chocolates, or gummies, and add small decorative accents for extra flair. Keep everything clean and organized for a professional look. Refresh supplies as needed for a full, vibrant display.
Personalize with themed labels, custom stickers, or handwritten notes. Add small decorative touches like metallic accents or glitter to certain candies for an extra pop. Incorporate themed signage or banners that match your color scheme. You can also include a few standout treats—like a cake or cookies—that complement the palette. The key is cohesion and visual flow, making your candy bar a true showstopper.
A color-coordinated candy bar elevates any celebration, from birthdays to weddings. It demonstrates that a little extra effort creates a big impact. Guests will be impressed by the thoughtful design and attention to detail. Plus, it’s easy to adapt for any theme or color scheme—so feel confident in creating your own masterpiece. Get ready for compliments galore!
4. Whimsical Balloon Arch Backdrop with Sweet Treats
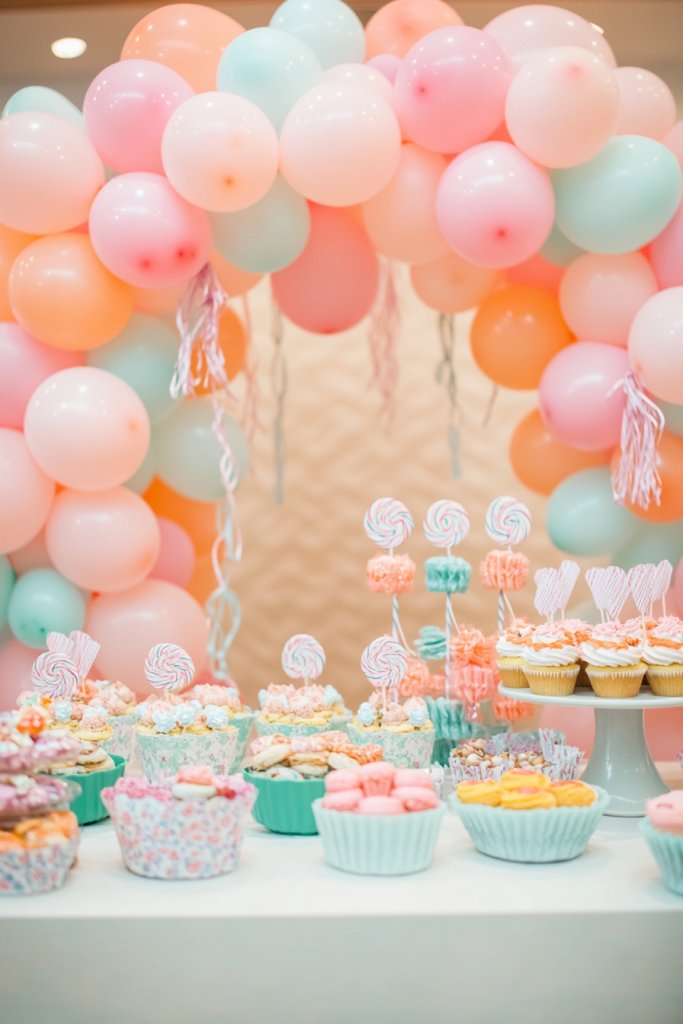
Looking to add a fun, playful vibe to your dessert setup? Or maybe you want a backdrop that makes your photos pop? A whimsical balloon arch is perfect for injecting color and energy into any celebration. It’s an easy way to create a memorable scene that guests will love to photograph. Plus, it sets the tone for a lively, joyful event.
Imagine a cascade of balloons in pastel shades or bold hues, arching overhead like a rainbow. The balloons frame your dessert table beautifully, giving it a lively sense of movement. Small decorative elements like tassels, confetti balloons, or metallic accents can add extra flair. The treats beneath are highlighted by the arch’s playful design, making everything feel festive and inviting.
Choose balloon colors that match your theme—soft pinks and blues for a baby shower, bright primaries for a kids’ party, or metallics for an elegant event. Adjust the size and density of the balloons for different spaces—dense for a statement or sparse for a subtle touch. Incorporate additional decorations like streamers, paper fans, or fairy lights for added dimension. Use a simple frame or arch kit for easy assembly, and customize height and width to fit your space.
Select high-quality balloons in your chosen colors and inflate them with a helium or air pump. Use a sturdy frame or arch kit to hold the balloons in place. Arrange the balloons in a gradual gradient or a random pattern for a whimsical look. Secure the balloons with twist ties or string, ensuring stability. Add small embellishments like metallic accents or tassels. Place your treats underneath, making sure the setup is secure and safe for guests to mingle around.
Personalize the arch with themed elements—like mini banners, paper flowers, or custom signage. Incorporate matching tablecloths, napkins, or treat wrappers to tie everything together. Use themed toppers or decorations on the treats that complement the balloon colors. You can also add fairy lights or glow-in-the-dark balloons for evening events. It’s all about creating a fun, cohesive scene that excites guests.
A balloon arch backdrop instantly makes your dessert table stand out and sets a cheerful tone. It’s a simple DIY project that yields big visual payoff. Guests will love the vibrant atmosphere and perfect photo ops. Don’t be afraid to mix colors or add extra decorative touches—be bold and playful. Your party will be unforgettable with this eye-catching feature!
5. Minimalist Monochrome Dessert Display
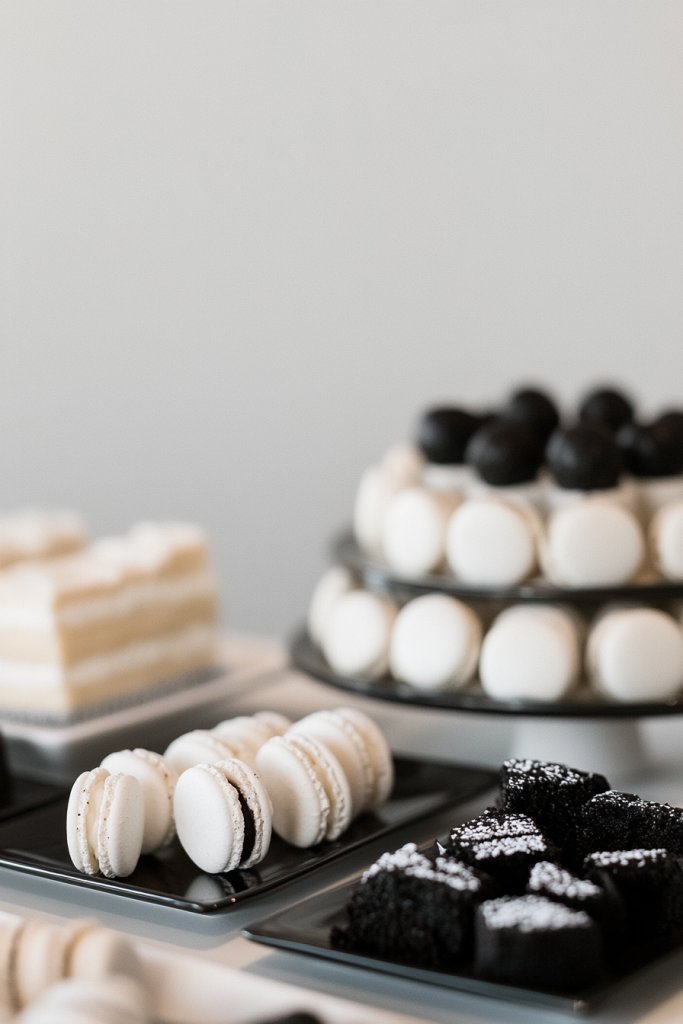
Ever feel overwhelmed by busy, cluttered dessert tables? Or want a sleek, modern look that feels effortlessly chic? A minimalist monochrome display offers a clean and sophisticated alternative. It emphasizes simplicity and elegance without sacrificing visual interest. Plus, it’s surprisingly versatile for many occasions.
Imagine all your treats—cookies, macarons, chocolates—arranged on sleek black or white trays, creating a striking contrast. The uniform color palette makes every treat pop, highlighting textures and shapes. A few geometric decor pieces or metallic accents add subtle sophistication. The overall aesthetic is calm, balanced, and ultra-modern, perfect for a contemporary vibe.
Choose monochrome themes that suit your event—black and white for elegance, pastel shades for softness, or bold primary hues for a modern twist. Play with textures—matte vs. glossy finishes or smooth vs. textured surfaces—to add depth. Incorporate geometric shapes or sleek stand designs to complement the minimalist feel. Seasonal variations can include metallic gold or silver accents for a touch of luxury.
Select monochrome trays, platters, and stands that match your chosen palette. Arrange your treats in a tidy, symmetrical pattern that emphasizes order and simplicity. Use clean, minimal labeling—perhaps engraved or printed in a matching color. Keep the display uncluttered by leaving space around each item. Incorporate simple decorative elements like a small cluster of metallic spheres or a geometric sculpture for visual interest. Regularly tidy up to maintain the sleek look.
Add a personal touch with subtle monogrammed signage or customized packaging in your color scheme. Use textured linens or napkins that match your palette for an extra layer of refinement. Incorporate subtle lighting—like LED strips or spotlights—to highlight your display without overpowering it. Keep decorations minimal but intentional for a polished, curated feel.
A monochrome dessert display proves that less is more, creating an effortlessly stylish vibe. It works beautifully for modern weddings, corporate events, or upscale parties. Guests will admire the clean lines and thoughtful simplicity. With a little planning, you can craft a stunning, cohesive look that’s both trendy and timeless. Confidence in your minimalist style will shine through in every detail.
6. Vintage Tea Party Style with Fine China and Lace
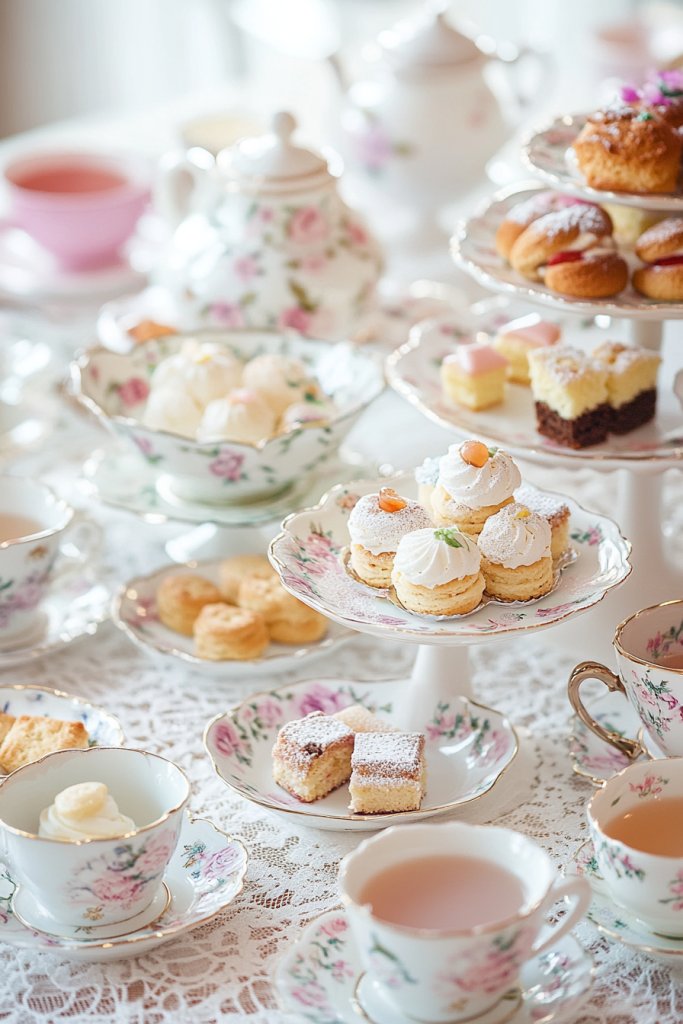
Dreaming of a charming, elegant gathering that feels timeless? Or maybe you want a dessert table that transports guests to a bygone era? Vintage tea party style combines delicate china, lace accents, and dainty treats for an atmosphere of grace. It’s perfect for bridal showers, garden parties, or just afternoon tea with friends. Who wouldn’t want to indulge in that vintage charm?
Picture a table dressed in a lace tablecloth, with mismatched fine china teacups and saucers, and tiered cake stands overflowing with petit fours, scones, and finger sandwiches. Soft pastel colors, floral patterns, and antique silverware set a refined mood. Dainty floral arrangements or faux floral garlands add to the romantic scene. The overall effect is nostalgic, inviting, and oh-so elegant.
Mix and match vintage china for a whimsical look or keep it uniform for more formal occasions. Incorporate lace, crochet, or embroidered fabrics to enhance the vintage feel. Adjust treats seasonally—fruit tarts and berry scones in summer, spiced cookies in winter. Add vintage-inspired signage or small decorative frames for labels. The style beautifully suits both indoor and outdoor settings with the right accessories.
Source vintage china, either through thrift stores, antique shops, or rental services. Arrange your treats on tiered stands, cake plates, and small trays, ensuring a balanced display. Use lace doilies or fabric runners as bases for your treats for extra elegance. Decorate with faux pearls, lace ribbons, or small vintage ornaments—avoid plants or modern decor. Keep everything clean and handle fragile pieces carefully. Place treats thoughtfully to create a layered, inviting scene.
Personalize with handwritten labels on delicate paper or vintage tags. Incorporate small, vintage-inspired accessories like antique keys or jewelry pieces. Use pastel-colored napkins and ornate cake toppers that match your theme. Small baskets or porcelain bowls can hold candies or nuts. These touches make the display feel curated and charming, perfect for special occasions.
A vintage tea party setup exudes elegance and grace, making any event feel special. It’s a wonderful way to showcase your love for classic style and attention to detail. Guests will feel pampered and transported to a more romantic time. With a little effort, your dessert table can become a nostalgic centerpiece that steals the show—and your heart.
7. Boho Chic with Tapestry Backdrops and Dreamcatchers
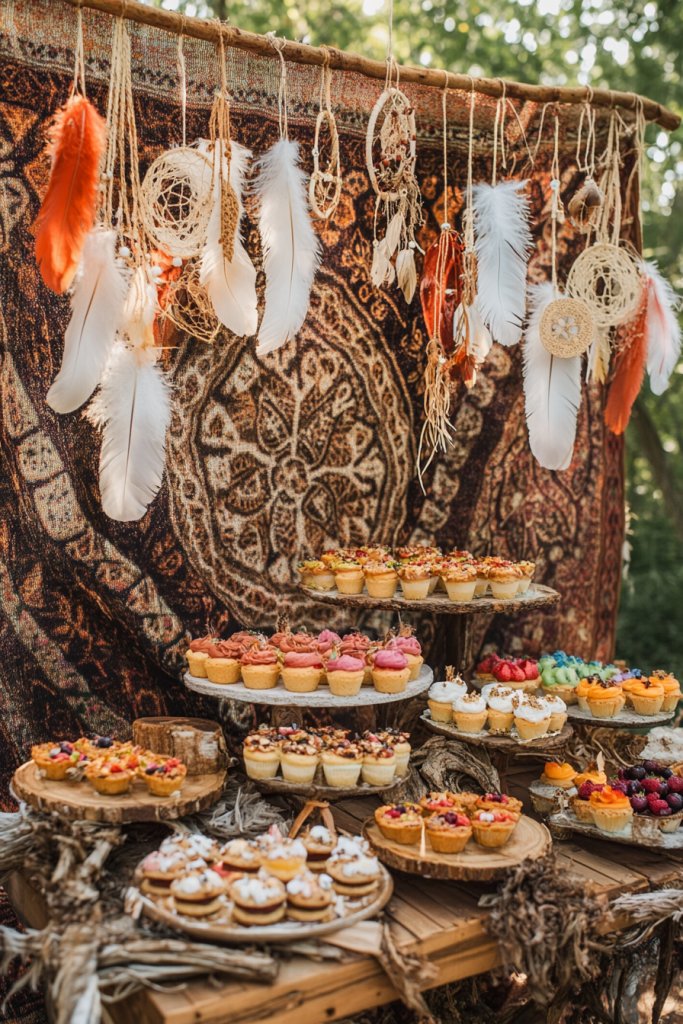
Feeling like your party needs a relaxed, artsy vibe? Or maybe you want a backdrop that’s as free-spirited as your guest list? Boho chic style creates a laid-back, stylish atmosphere perfect for outdoor gatherings, weddings, or bohemian-themed parties. It’s all about earthy tones, textured textiles, and a touch of whimsy. Ready to craft a scene that feels effortlessly cool?
Envision a tapestry hanging behind your dessert table, featuring intricate patterns in warm, earthy hues—terracotta, mustard, deep teal. Dreamcatchers, macramé accents, and hanging beads add layers of texture and movement. The treats sit on wooden or woven trays, surrounded by candles in vintage holders and scattered feathers or faux greenery. The overall vibe is inviting, relaxed, and full of personality.
Use colorful or neutral tapestries to match your theme—think boho patterns for a vibrant look or plain linen for understated elegance. Incorporate layered textiles like throws or cushions for extra comfort and style. Adjust the decor with seasonal touches—dried flowers or lanterns for fall, fresh blooms for spring. You can also introduce artisanal sweets or handmade treats to complete the handcrafted aesthetic. It’s adaptable for both indoor and outdoor settings.
Hang large tapestries or textiles as backdrops, securing with hooks or command strips to avoid damage. Decorate the space with dreamcatchers, hanging beads, or tassels, ensuring they complement the tapestry pattern. Arrange your treats on rustic wooden trays and woven baskets, creating a layered, textured display. Incorporate candles or fairy lights—preferably flameless for safety—to add warmth. Keep the setup relaxed and inviting, balancing the visual elements thoughtfully. Refresh treats and decorations as needed.
Add personal touches like custom dreamcatchers or embroidered patches on textiles. Incorporate meaningful symbols or colors that reflect your style or story. Use handcrafted treat wrappers or tags to emphasize the artisanal vibe. Incorporate small vintage finds or handmade jewelry for extra flair. The goal is a harmonious, eclectic scene that feels personal and inviting.
Boho chic is all about expressing your personality with ease. It’s perfect for outdoor weddings, brunches, or casual celebrations. Your guests will appreciate the relaxed, stylish atmosphere and cozy details. Remember, imperfections add charm—embrace the layered, imperfect aesthetic. With a little creativity, your dessert table will radiate free-spirited elegance and make lasting memories.
8. Themed Character or Fairytale Display with Colored Accents
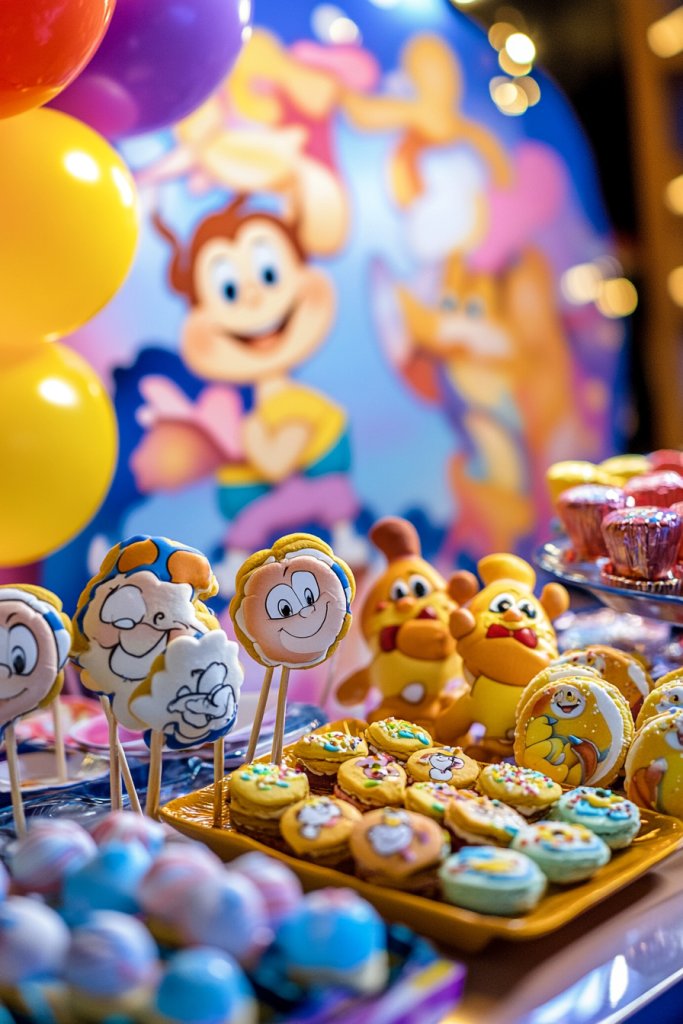
Want to wow kids and adults alike with a magical, storybook scene? Or maybe you’re planning a themed birthday or baby shower that needs a wow factor? A character or fairytale-themed dessert display brings fantasy to life. It’s a playful, colorful way to engage guests and turn your party into a storybook adventure. Ready to make your dreams come true?
Imagine a display filled with treats decorated as enchanted castles, magical wands, or whimsical creatures. Bright, bold colors and themed decorations—like crowns, fairy wings, or animal figurines—bring the scene alive. Arrange candies and cupcakes on themed platters or stands, adding decorative elements like faux moss, stars, or fairy dust (glitter). The scene sparks imagination and invites guests to indulge in a fairy tale.
Choose a central theme—princess, superhero, fairy, or pirate—and select colors accordingly. Use themed toppers, banners, or cake toppers to enhance the story. For outdoor parties, incorporate fabric tents or cardboard castles for extra magic. Adjust the treats to match the characters—think colorful lollipops, character cookies, or themed cake pops. It’s flexible enough for both kids’ parties and whimsical adult gatherings.
Decorate the backdrop with themed banners, banners, or large cutouts. Use colorful cupcake liners, wrappers, and toppers that match your story. Arrange treats on themed plates or tiers, adding character figurines or themed picks for extra detail. Incorporate themed signage or small props that reflect the story—like treasure chests or magic wands. Keep everything colorful and playful, and handle delicate decorations with care. Regularly check for stability and freshness.
Create custom labels or tags with characters’ names or story quotes. Incorporate small DIY elements—like hand-painted signs or themed confetti—to boost the fantasy feel. Use themed treat wrappers or boxes for guests to take treats home. Personalized banners or photo props help guests stay immersed in the theme. The key is to combine fun, color, and storytelling for an unforgettable scene.
A character or fairytale display sparks joy and imagination at any celebration. It’s a fantastic way to celebrate a love for stories or characters. Guests will be enchanted by the vibrant colors and thoughtful details. Don’t be afraid to go all out—your creativity will shine through. Your dessert table will be the highlight of the party, creating magical memories for everyone involved.
9. Modern Geometric Decor with Metallic Accents
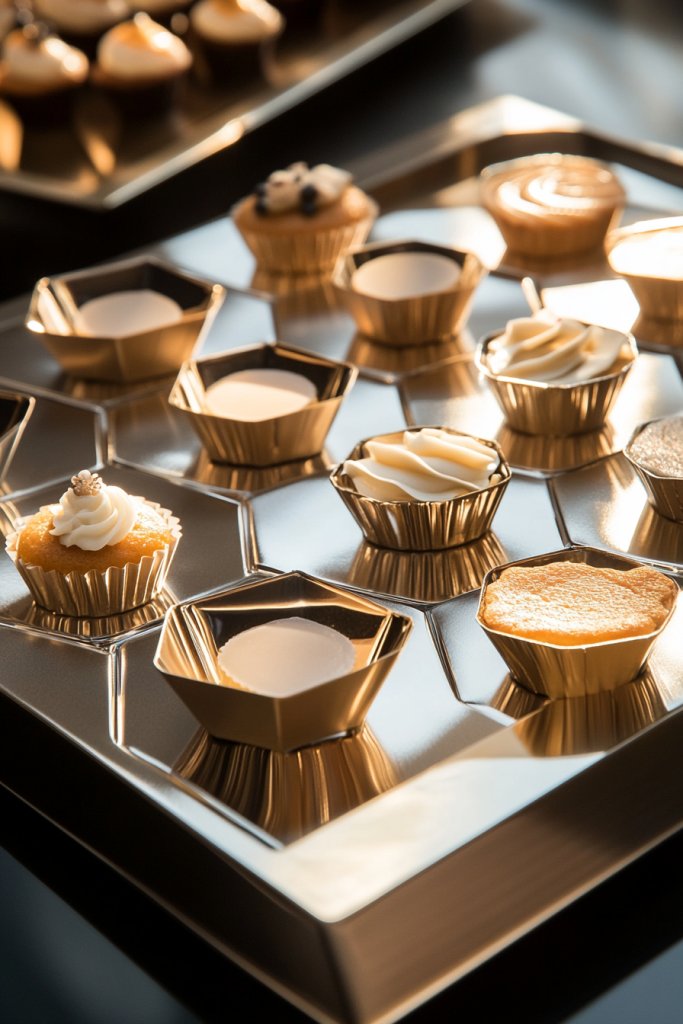
Looking for a dessert display that feels fresh, stylish, and totally on-trend? Or maybe you want a setup that pairs well with contemporary decor? Geometric shapes combined with metallic accents create a sleek, modern vibe that can elevate any celebration. It’s bold, clean, and perfect for those who love minimalist chic with a twist. Are you ready to add some edge?
Envision a display featuring geometric stands, hexagonal trays, and angular tiers in matte or shiny finishes. Metallic gold, silver, or rose gold details accentuate the shapes, catching the light and creating visual interest. Treats are arranged symmetrically or asymmetrically, emphasizing balance and contrast. The overall look is sharp, sophisticated, and eye-catching—perfect for modern weddings, birthdays, or galas.
Mix matte and shiny finishes for added depth, or stick to one for a more uniform look. Incorporate geometric decor elements like sculptures or wall decals to complement the setup. Use monochrome or metallic color schemes—think black, white, and gold—for a high-end feel. For a softer touch, add textured textiles or velvet tablecloths. It adapts easily to both large and small spaces, making a statement wherever it appears.
Select geometric stands, trays, and risers in your chosen metallic or matte finishes. Arrange treats—macarons, chocolates, mini cakes—in geometric patterns or lines for symmetry. Incorporate metallic accents like foil wrappers or decorative toppers to tie the theme together. Ensure everything is stable and level, especially on uneven surfaces. Use lighting to highlight the metallic details—spotlights or uplights work well. Keep the display clean and uncluttered for maximum impact.
Add custom geometric signage or monogrammed accents for a personalized touch. Mix in textured fabrics or velvet runners that match your color palette. Incorporate small metallic decor pieces, like spheres or cubes, to enhance the modern aesthetic. Incorporate your favorite sweets with metallic wrappers or toppers. Keep it sleek, stylish, and intentionally minimal for a refined look.
A modern geometric display elevates your event’s style and impresses guests with its bold design. It’s perfect for contemporary weddings, corporate parties, or milestone celebrations. The clean lines and metallic accents create a sense of luxury and sophistication. With simple shapes and a cohesive color scheme, you can confidently craft an impactful scene that feels both fresh and timeless. Go bold and let your decor do the talking.
10. Nature-Inspired Display with Faux Greenery and Natural Elements
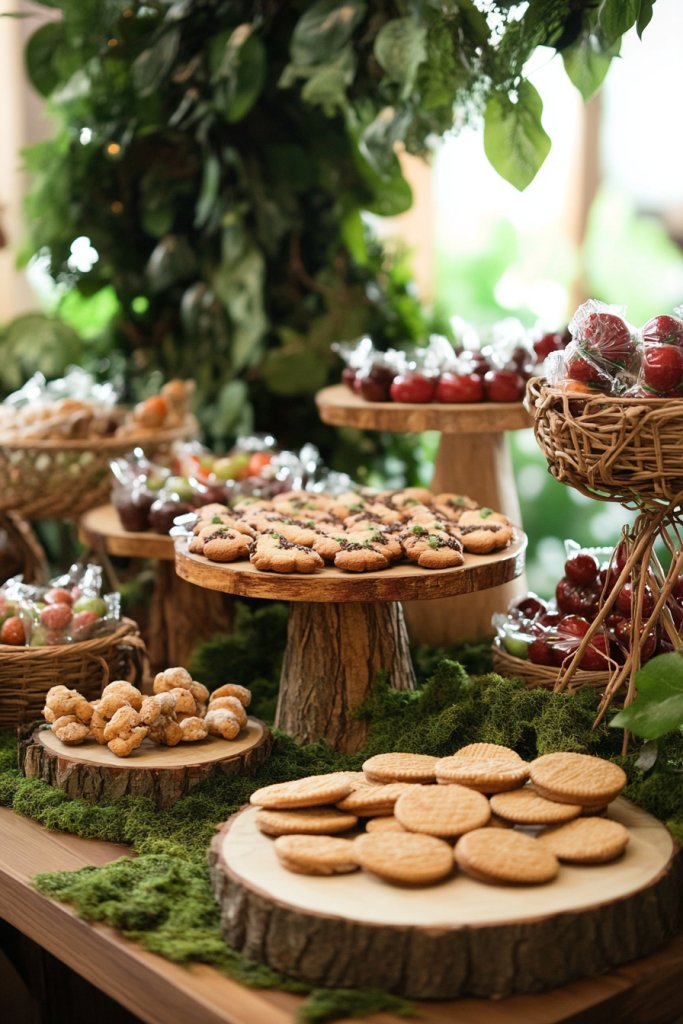
Craving a connection to the outdoors but stuck inside? Or want a nature-inspired aesthetic that feels fresh and calming? A nature-inspired dessert display uses faux greenery and earthy accents to bring the outdoors in. It’s perfect for garden parties, eco-friendly events, or anyone who loves that organic vibe. Ready to create a serene, natural setting?
Imagine a setup with wooden trays, bark accents, and faux moss or leaves framing your treats. The desserts—think fruit tarts, nut clusters, or rustic cookies—are nestled among natural elements. Small faux succulents or branches add texture and depth without the maintenance of real plants. Earth tones, textured fabrics, and stone-inspired decor enhance the organic feel, making everything look fresh and inviting.
Use reclaimed wood, stone, or bamboo for various surfaces and accents. Incorporate seasonal touches like dried flowers or berries for a more dynamic look. Adjust the color palette to match your theme—warm browns and greens for fall, fresh greens and pastel for spring. For outdoor events, weatherproof your setup with waterproof materials or covers. It’s flexible enough for both casual picnics and upscale garden parties.
Gather wooden trays, bark bases, and faux greenery. Arrange your treats in a natural, flowing fashion, mimicking the organic shapes found in nature. Use moss, faux grass mats, or small stones to anchor your display. Decorate with natural fiber ribbons or twine—avoid plants unless absolutely necessary—and ensure everything is stable and safe. Incorporate natural elements subtly so they complement rather than overshadow your treats. Regularly tidy and refresh the display for the best look.
Add small signs made from wood or chalkboard tags with rustic fonts. Incorporate seasonal elements—like mini pumpkins or acorns—to suit the occasion. Use eco-friendly packaging and treat wrappers to stay aligned with the natural theme. Personal touches like custom labels or small handcrafted decor pieces can elevate the scene further. Keep the look cohesive with a balance of natural textures and treats.
A nature-inspired display creates a calming, inviting atmosphere that guests will love. It’s ideal for eco-conscious celebrations or outdoor settings, blending beauty with sustainability. Your guests will appreciate the thoughtful details and organic vibe. With a few simple materials, you can craft a stunning, earthy scene that feels both fresh and timeless. Let nature be your decor muse and enjoy the compliments!
11. Sweet Treats on Tiered Cake Plates with Floral Accents
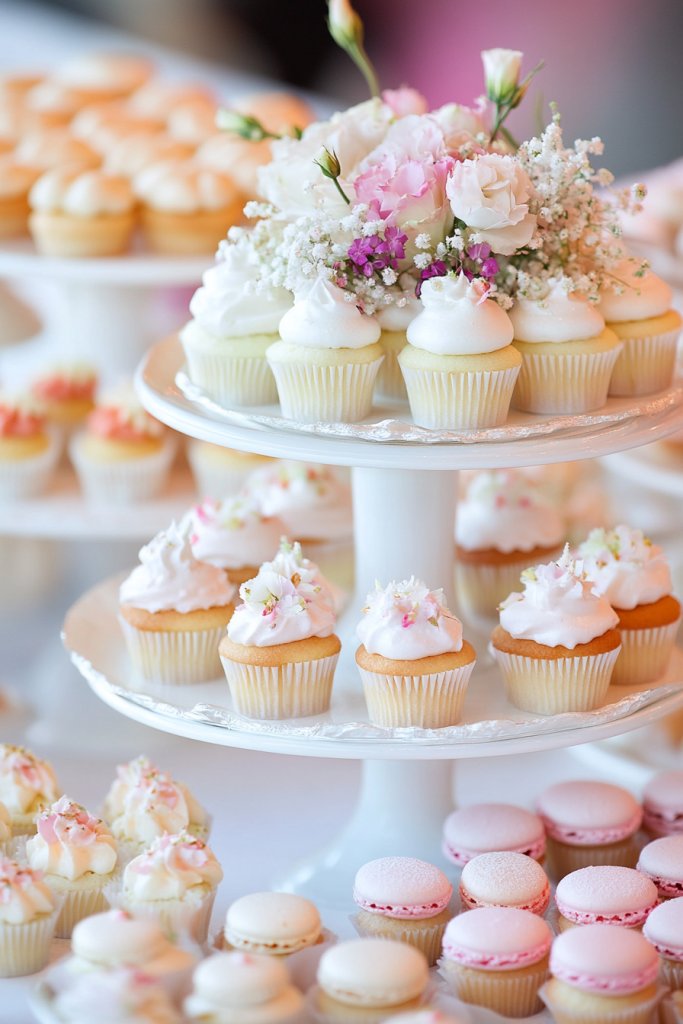
Want to add a touch of romance and elegance to your dessert table? Or need a way to display treats that’s both functional and beautiful? Tiered cake plates instantly elevate your sweets, creating a layered, eye-catching presentation. It’s perfect for weddings, bridal showers, or any romantic celebration. Ready to turn your treats into a work of art?
Imagine delicate tiers of porcelain or glass cake stands stacked at different heights, adorned with fresh flowers or faux floral garlands. The treats—macarons, petit fours, mini cakes—are arranged carefully to highlight their beauty. Soft pastel colors and floral accents soften the scene, making it feel like a fairy tale. The varying heights draw the eye and encourage guests to explore every layer.
Choose cake stands that match your theme—vintage, modern, or rustic. Incorporate floral elements that suit the season—roses and peonies for spring, dahlias for summer, or seasonal greenery in winter. Mix and match heights and styles for a more eclectic look or keep it uniform for classic elegance. Add small decorative touches like lace or ribbon for extra charm. Adjust the treats to fit your theme and space.
Arrange your tiered plates on a sturdy table, ensuring they are stable and level. Decorate the edges with fresh or faux flowers, and place your treats thoughtfully across each tier. Use small doilies or fabric overlays under the treats for added elegance. Keep everything neat and symmetrical for a refined appearance. Regularly check stability during the event to prevent accidents. Refresh treats and flowers as needed for peak freshness.
Personalize with custom labels, monogrammed cake toppers, or themed signage. Incorporate seasonal flowers or complementary decor that matches your color palette. Use delicate ribbons or fabric swaths to tie everything together. You can even add small lanterns or candles for a romantic glow. The focus should be on creating a harmonious, beautiful scene that guests will remember.
Displaying treats on tiered plates adds sophistication and charm to any event. It’s a simple way to elevate your presentation and impress your guests. With a little planning, your dessert table can look like it’s straight from a magazine. Embrace the beauty of floral accents and layered heights—your event’s centerpiece will shine. Confidence in your styling skills will grow with each perfect placement.
12. Retro Diner Style with Bright Colors and Neon Signs
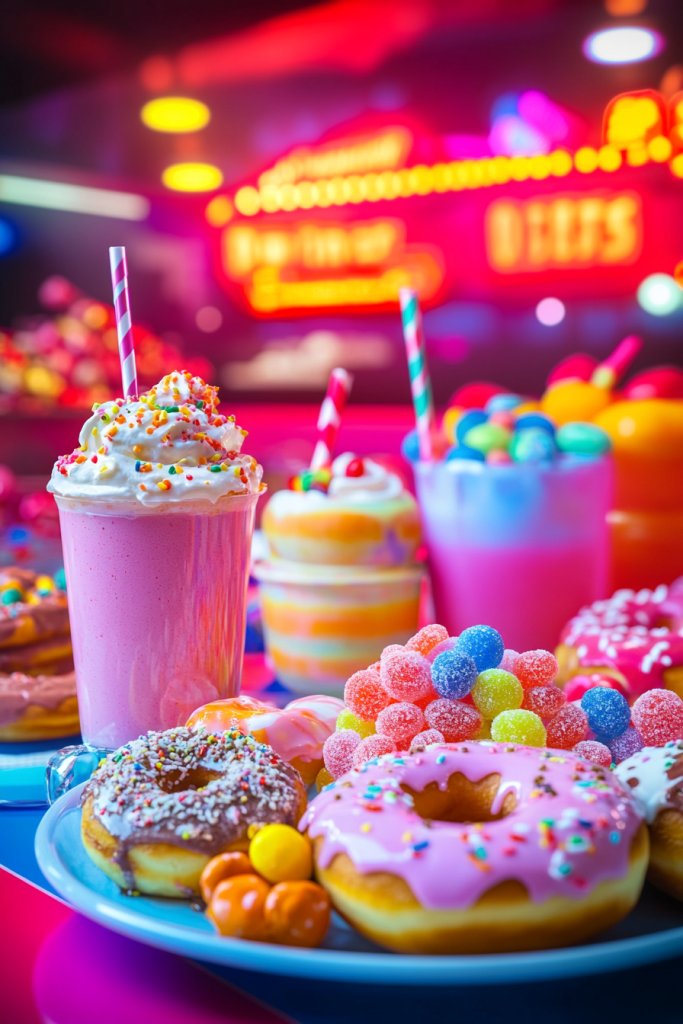
Craving a fun, nostalgic vibe that makes everyone smile? Or want a dessert display that screams retro cool? A diner-style setup with bright colors and neon accents is perfect for creating a lively, playful atmosphere. It’s a throwback to the golden age of diners and adds a unique, energetic touch to any celebration. Who says desserts can’t be cool?
Visualize a setup with bright red, turquoise, or yellow trays filled with classic treats—milkshakes, sundaes, donuts, and slices of pie. Neon signs or LED light strips spell out fun words or phrases, lighting up the scene with vibrant glow. Retro-inspired signage and checkered tablecloths enhance the theme. The overall look is bold, colorful, and full of personality, inviting guests to indulge and have fun.
Adjust the color scheme to match your favorite decade—50s pink and teal, or 80s neon. Use vintage-style trays, metal stands, and checkered or striped fabrics. Incorporate fun props like retro jukeboxes, vintage posters, or classic diner utensils. For outdoor events, add string lights or marquee signs. Keep the treats classic and colorful, and don’t forget the playful signage.
Source vintage or retro-inspired trays, stands, and decor elements. Arrange your treats in bright, contrasting colors—think vibrant frosting, sprinkles, or colorful candies. Use neon or LED signs to add lighting and atmosphere. Incorporate playful signage or chalkboards with fun slogans. Keep everything accessible for guests to serve themselves easily. Regularly check lighting and treat freshness for maximum impact.
Add themed signs with witty phrases, custom decals, or retro fonts. Incorporate vintage props like plastic jukeboxes or neon light shapes. Use colorful wrappers, straws, and napkins to match the theme. Personalize treats with retro toppers or themed packaging. The goal is to create a lively, nostalgic scene that captures the spirit of fun.
A retro diner setup makes your event unforgettable and full of energy. It’s perfect for milestone birthdays, themed parties, or casual gatherings. Guests will love the playful vibe and photo opportunities. Embrace the bold colors and vintage charm—your dessert display will be a hit. Have fun with the details, and enjoy the nostalgic applause!
13. Elegant Glass Cloche Displays with Assorted Sweets
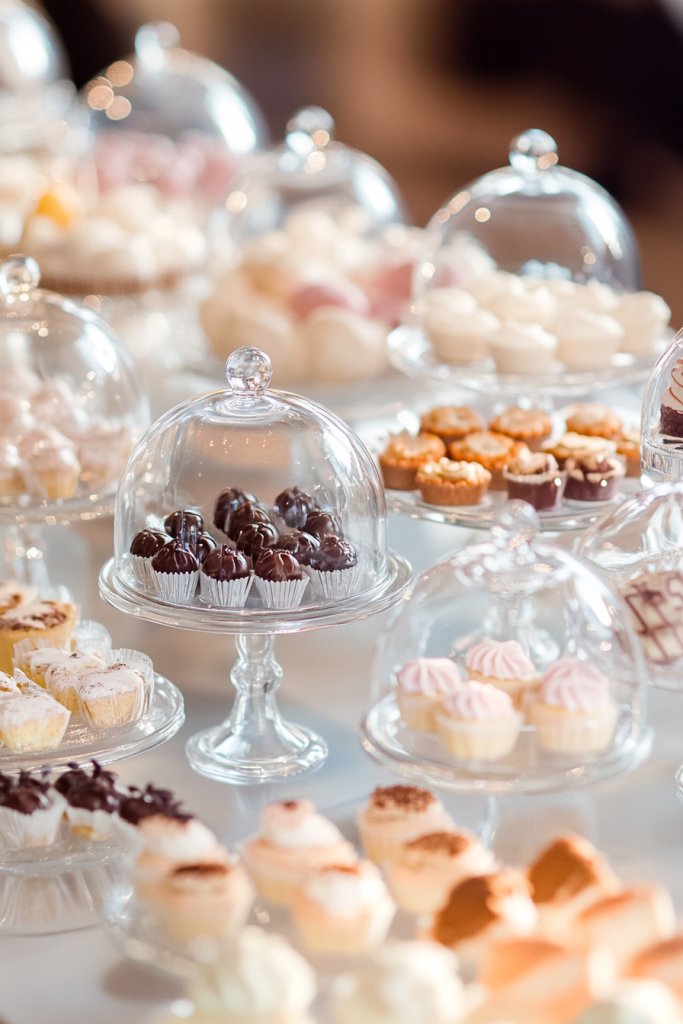
Want to showcase your treats with a touch of class? Or need a way to protect delicate desserts while keeping everything looking stylish? Glass cloche displays are perfect for elegant, refined presentations. They add a sense of mystery and sophistication, elevating your dessert game. Ready to impress with simple, chic elegance?
Imagine individual desserts—truffles, petit fours, mini tarts—under glass domes, each creating a mini display. The transparent covers showcase the treats’ textures and colors while protecting them from dust or curious fingers. The reflective surfaces and clean lines of the glass add a modern, luxe vibe. Soft lighting or candles nearby can enhance the sparkle and highlight the desserts’ beauty.
Use different sizes and shapes of cloches for variety—round, square, or dome-shaped. Incorporate a mix of textures—smooth chocolates, flaky pastries, or glossy candies—for visual richness. Pair with elegant platters or trays in metallic or neutral tones to keep the focus on the treats. For seasonal themes, swap out the contents or add subtle seasonal accents inside the cloches. It’s adaptable for both formal and casual events.
Select clear glass cloches in various sizes, ensuring they fit your treats comfortably. Arrange your desserts on matching trays or stands, then place the cloches over each grouping. Use small decorative bases or risers to add height and interest. Keep the treats fresh and dust-free by covering them immediately after display setup. Consider adding small decorative elements—like faux pearls or metallic accents—around the bases for a touch of luxury. Regularly check that the cloches are clean and properly sealed.
Personalize with custom labels or elegant tags attached to the cloches. Incorporate decorative bases that match your theme—marble, metallic, or mirrored surfaces. Use small floral arrangements or seasonal decor around the display for added charm, avoiding actual plants if restricted. Incorporate personalized signage or monograms for weddings or special occasions. Keep the display minimal but refined for maximum impact.
Glass cloche displays exude sophistication and make your treats feel special. They’re perfect for upscale weddings, anniversaries, or elegant parties. Guests will admire the attention to detail and presentation. With a simple yet stunning setup, you can create a memorable scene that speaks of class and style. Confidence in your elegant display will shine through every detail.
14. Whimsical Chalkboard Signage with Colorful Candy Jars
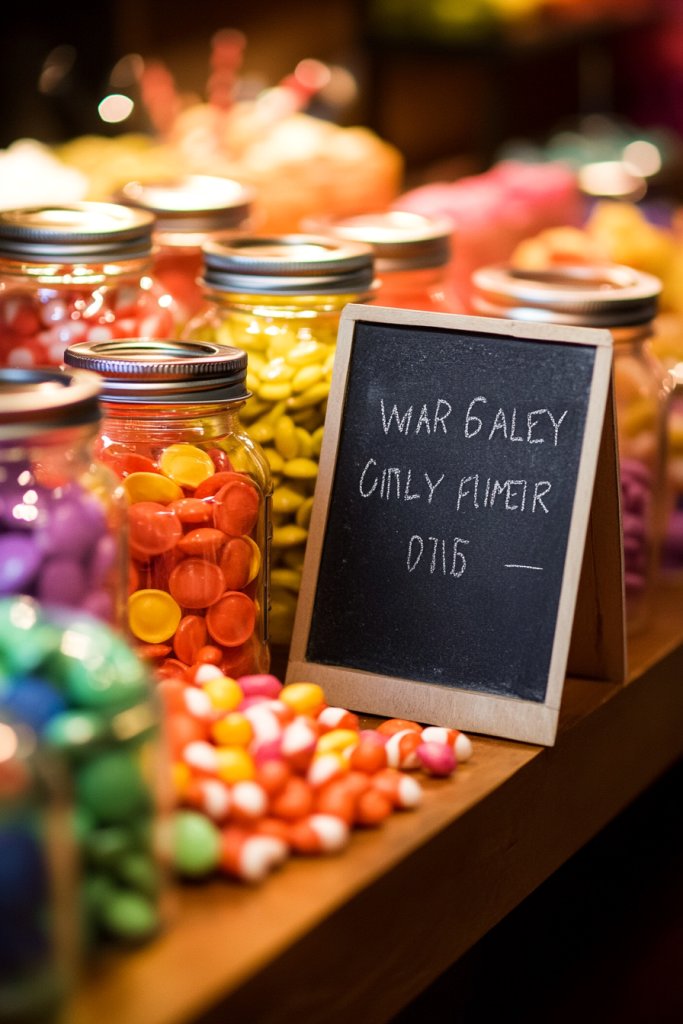
Looking for an inviting, playful way to organize your treats? Or want to add a personal touch that’s both functional and fun? Chalkboard signage paired with colorful candy jars creates an approachable, casual vibe. It’s perfect for birthdays, casual parties, or kid-friendly events. Who says your dessert table can’t be both cute and practical?
Imagine a series of jars filled with candies in bright hues—gummy bears, jelly beans, chocolates—lined up with handwritten chalkboard labels. The labels add a whimsical touch, guiding guests and adding personality. The jars’ bright colors contrast with the black chalkboards, creating a cheerful scene. Small decorative elements like ribbons or paper straws enhance the playful atmosphere.
Use different jar sizes and shapes to create visual interest, matching your color scheme or theme. Incorporate themed signage—funny quotes, sayings, or custom messages—on the chalkboards. For outdoor setups, consider weatherproof labels or laminated signs. Adjust the treat types based on your event—lollipops, chocolate bars, or mini cookies. This flexible setup works everywhere from casual picnics to festive birthdays.
Arrange your jars in a row or cluster on a table, ensuring good spacing. Write clear, fun labels on small chalkboards or chalk paper tags, and attach them with string or tape. Fill jars with your chosen candies, and add scoops or small tongs for easy serving. Decorate the table with colorful fabric or paper runners to tie the scene together. Regularly refill and clean the jars for a fresh look. Keep the chalkboards legible and charming.
Personalize with custom signs that match your theme—add names, date, or fun phrases. Use decorative ribbons or washi tape to accentuate the jars. Incorporate small themed props—like mini umbrellas, paper flowers, or confetti—to boost the visual fun. You can also create themed treat bags or boxes for guests to take goodies home. Keep everything playful, colorful, and inviting.
This setup creates a warm, friendly atmosphere that encourages mingling and fun. It’s easy to set up, customize, and update, making it perfect for any casual celebration. Guests will love the bright colors and playful signage. It’s a simple way to make your dessert table memorable and approachable. With a little creativity, your treat station will be the highlight!
15. Seasonal Harvest Display with Pumpkins and Autumn Hues
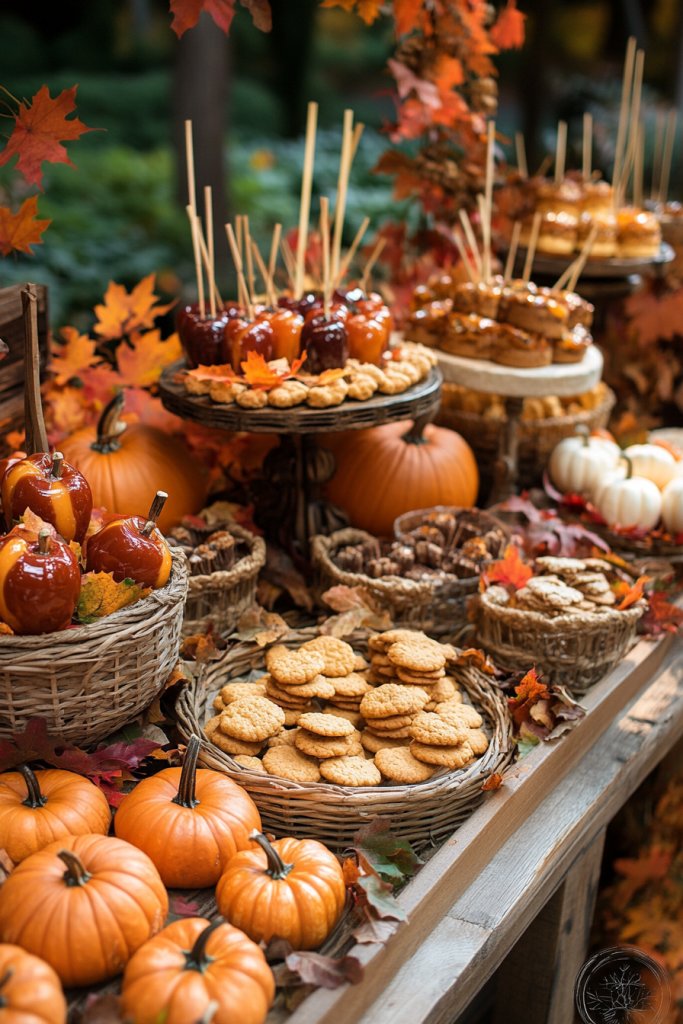
Want to celebrate the flavors and colors of the season? Or looking to create a cozy, inviting atmosphere for fall festivities? A seasonal harvest display with pumpkins, gourds, and warm-toned sweets captures the essence of autumn. It’s perfect for Thanksgiving, harvest festivals, or any fall gathering. Ready to embrace pumpkin spice and everything nice?
Visualize a table decorated with mini pumpkins, gourds, and leaves, surrounded by warm-colored treats—apple cider donuts, caramel apples, spiced cookies. The treats are arranged on wooden trays or baskets, with accents like cinnamon sticks or dried corn for added texture. Deep oranges, reds, and browns dominate the scene, creating a warm, inviting tableau. The mix of natural and edible elements evokes the harvest season perfectly.
Incorporate seasonal decor such as plaid cloths, burlap runners, and rustic signage. Use edible accents like cinnamon sticks, star anise, or pecans to enhance the theme. Adjust the display for indoor or outdoor settings—weatherproofing or cozy blankets can add comfort. Mix in seasonal fruits like apples and pears for freshness. Keep the display abundant but balanced, with ample space for guests to serve themselves.
Collect pumpkins, gourds, and fall-themed decor from farms or craft stores. Arrange the items at different heights using crates or stands for visual interest. Fill baskets with seasonal treats—spiced cookies, candied nuts, or caramel popcorn. Use natural elements like dried flowers or wheat stalks to add texture. Place labels on small chalkboards or leaf-shaped tags. Regularly replenish treats and adjust decor as needed to keep the scene fresh.
Add personal touches such as custom signage with seasonal quotes or family recipes. Incorporate themed treat wrappers or packaging—think kraft paper or plaid patterns. Use mini banners, faux hay bails, or string lights to enhance the harvest vibe. Personalize the display with heirloom or family favorites for a special touch. The goal is a warm, festive scene that celebrates the season.
A seasonal harvest display creates a cozy, nostalgic environment that guests will love. It’s easy to adapt each year with new decor or treats, keeping it fresh and exciting. Guests will appreciate the effort and seasonal spirit. It transforms your event into a warm, festive celebration that everyone remembers. Embrace the seasonal charm and enjoy the compliments!
16. Tropical Paradise with Bright Fruits and Palm Decor
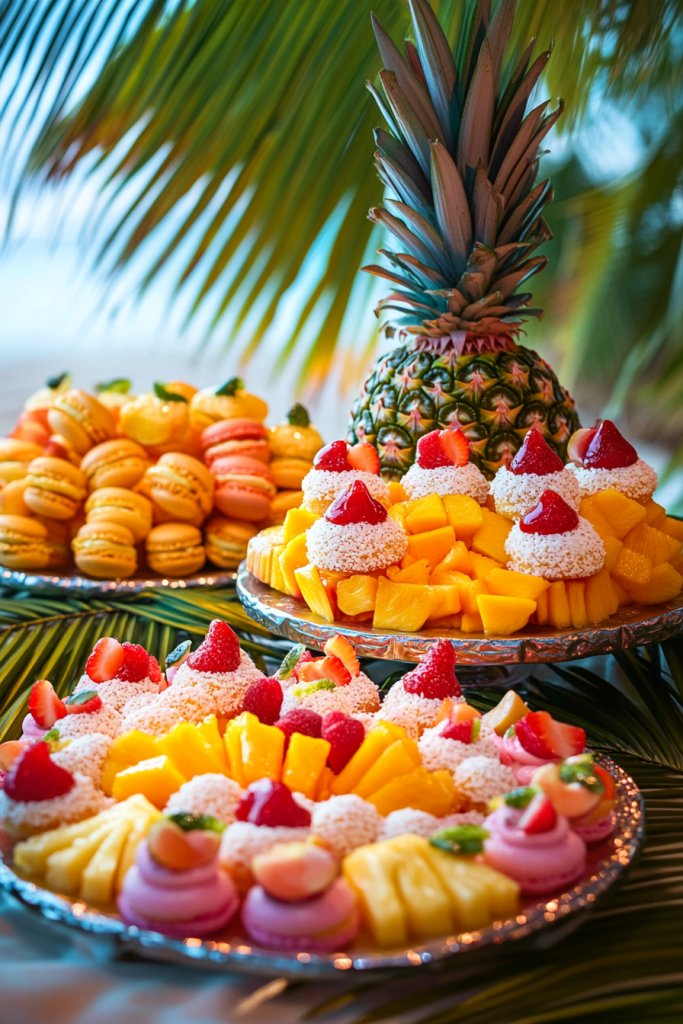
Craving a vacation vibe without leaving town? Or want to wow guests with a vibrant, exotic theme? A tropical paradise setup featuring bright fruits and beach-inspired decor creates an instant getaway. It’s perfect for summer parties, luaus, or poolside gatherings. Ready to bring sunshine and palm trees right to your table?
Imagine a display bursting with fresh pineapples, mangoes, papayas, and coconuts. Brightly colored paper umbrellas, tropical flowers, and faux palm fronds frame your treats. The colors—hot pinks, yellows, and turquoise—pop against neutral backgrounds, evoking a sunny beach scene. The treats—fruit skewers, tropical cupcakes, and coconut macaroons—invite guests to indulge in island flavors. The scene is lively, colorful, and full of vacation spirit.
Adapt the scene for indoor or outdoor settings by adjusting decor—use real or faux greenery, and incorporate shell or driftwood accents. Use bright tablecloths or runners in tropical patterns. Treat options can include tropical fruit salads, smoothies, or themed desserts like pineapple upside-down cake. Seasonal variations may feature citrus or exotic fruits. Keep the vibe relaxed, fun, and inviting.
Gather tropical fruits, colorful platters, and beach-inspired decor—like leis or faux palm trees. Arrange fruits in bowls, on skewers, or layered in a pineapple or coconut shell. Decorate the table with colorful paper umbrellas and faux flowers. Incorporate beach-themed accents like starfish or shells, avoiding plants if restricted. Use bright, cheerful linens to tie the scene together. Regularly replenish fresh fruit and keep everything visually appealing.
Add personalized labels or tags with fun tropical sayings. Incorporate themed signage or custom drink stirrers. Use vibrant napkins, straws, and wrappers to match the tropical palette. Create small DIY decor pieces like paper leis or pineapple centerpieces. Personal touches make the scene lively and memorable. Focus on color harmony and playful details.
A tropical paradise theme energizes any celebration, making it feel like a mini vacation. Guests will love the bright colors and fresh flavors. It’s easy to customize with different fruits and decor elements each year. Your event will radiate sunshine and good vibes, leaving everyone refreshed and happy. Embrace the tropical spirit and enjoy the compliments.
17. Chic Black and Gold Glamour with Sparkling Details
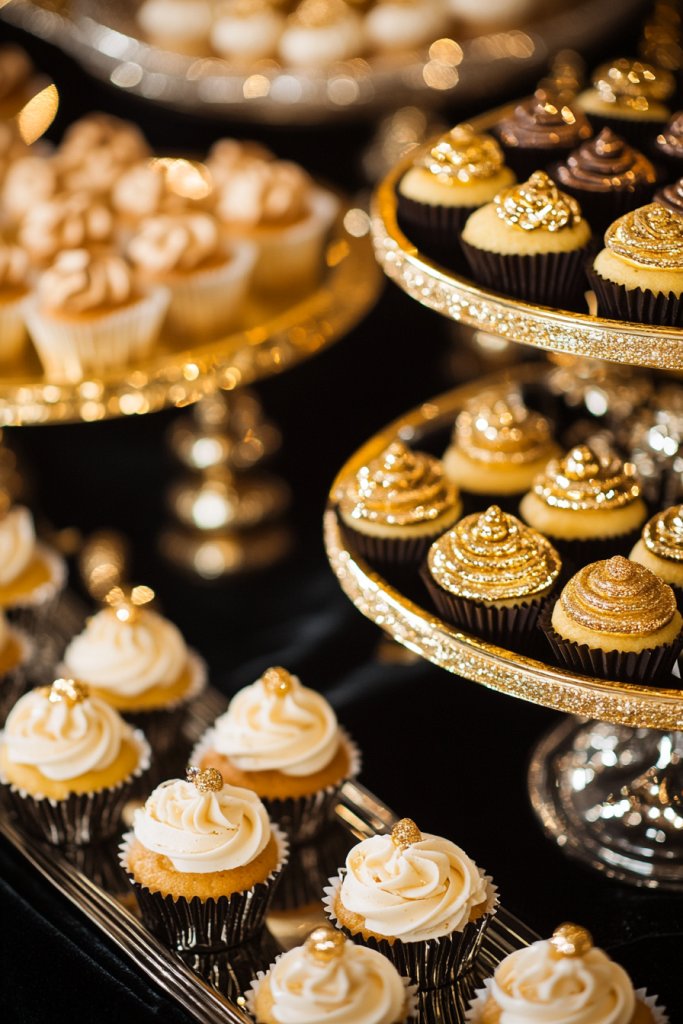
Looking to create a luxurious, high-end dessert display? Or want your treats to feel as glamorous as a red carpet event? A black and gold theme exudes sophistication, elegance, and a touch of sparkle. It’s perfect for weddings, milestone birthdays, or upscale parties. Ready to add some glitz and make your treats the star?
Visualize a sleek black tablecloth paired with gold accents—ribbons, trays, or decorative stands. Gold-dusted chocolates, dark velvet cupcakes with gold leaf, and shiny metallic treats shine against the dark backdrop. Sparkling details like glitter or sequins add extra glamour, catching the light beautifully. Elegant signage and subtle lighting complete the scene, making every detail feel luxe and inviting.
Play with matte and shiny finishes—matte black with glossy gold— for depth and interest. Incorporate mirrored surfaces or metallic geometric decor for a modern twist. Use dark-colored linens with gold embroidery or trim for added richness. Adjust the treats to match the theme—dark chocolates, gold-dusted macarons, or glittering candies. It’s versatile enough for both minimalistic and maximalist styles, depending on your taste.
Choose high-quality gold accents—foil wrappers, edible gold leaf, or gold spray. Arrange your treats on elegant stands or trays, adding shimmering elements like glitter or metallic toppers. Use ambient lighting—such as uplights or fairy lights—to enhance the sparkle. Incorporate decorative elements like gold-dusted nuts or candies to elevate the scene. Keep everything clean, polished, and well-organized for a cohesive, luxe look. Regularly check for dust or smudges.
Add custom monogrammed signage or metallic banners for a personalized touch. Incorporate elegant props like crystal vases or gold-rimmed dishes—avoiding vases if restricted. Use metallic or glittery treat wrappers and personalized tags. Small floral arrangements in black and gold containers can add subtle elegance. Focus on creating a cohesive, high-glamour scene that makes a statement.
A black and gold display transforms your event into a glamorous affair everyone will remember. It’s perfect for celebrating milestones or hosting an upscale gathering. Guests will be impressed by your eye for detail and sophisticated style. With a little planning, you can create a scene that feels both modern and timeless. Confidence in your glamorous presentation will shine through every detail.
Conclusion
With a diverse selection of dessert table ideas, you now have the tools to create stunning and delectable displays for any celebration. Whether you prefer chic, whimsical, or rustic styles, these ideas can be customized to suit your unique vibe. Don’t hesitate to try them out and turn your gatherings into sweet, unforgettable experiences—your guests will thank you!