Imagine walking into a kitchen that instantly feels organized and inviting—that’s the magic of simple and useful organization ideas! These solutions are popular because they combine practicality with ease, making everyday tasks smoother without the need for complicated setups.
In this article, you’ll discover a variety of clever tips that can transform your cluttered counters into streamlined spaces. From creative storage hacks to space-saving solutions, each idea is designed to boost efficiency and bring a fresh, tidy vibe to your kitchen environment.
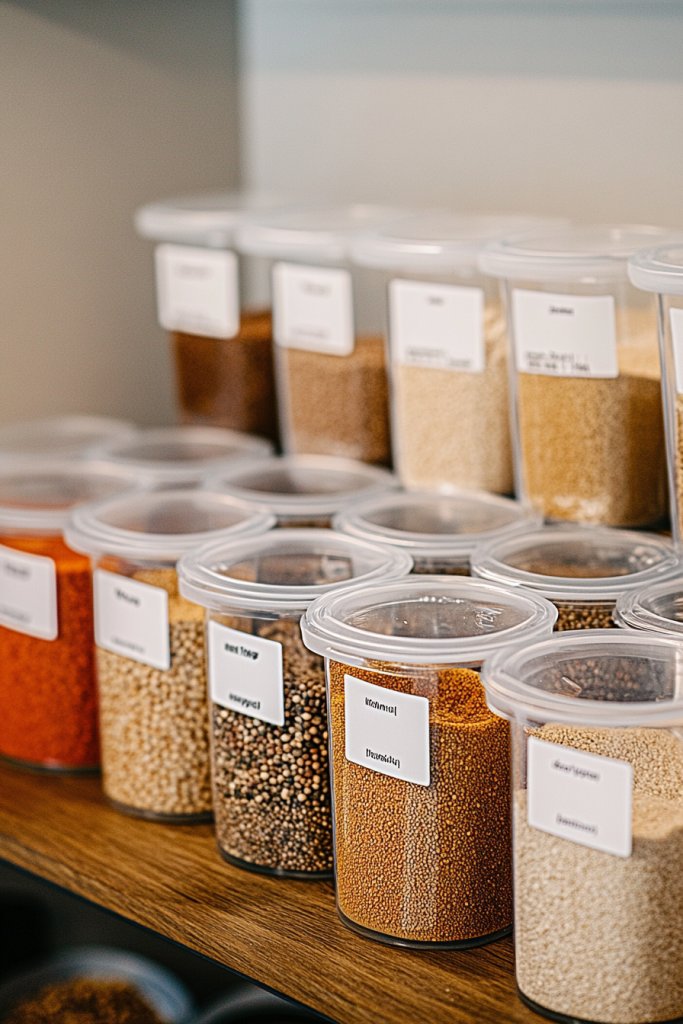
1. Use Clear Stackable Containers for Pantry Staples
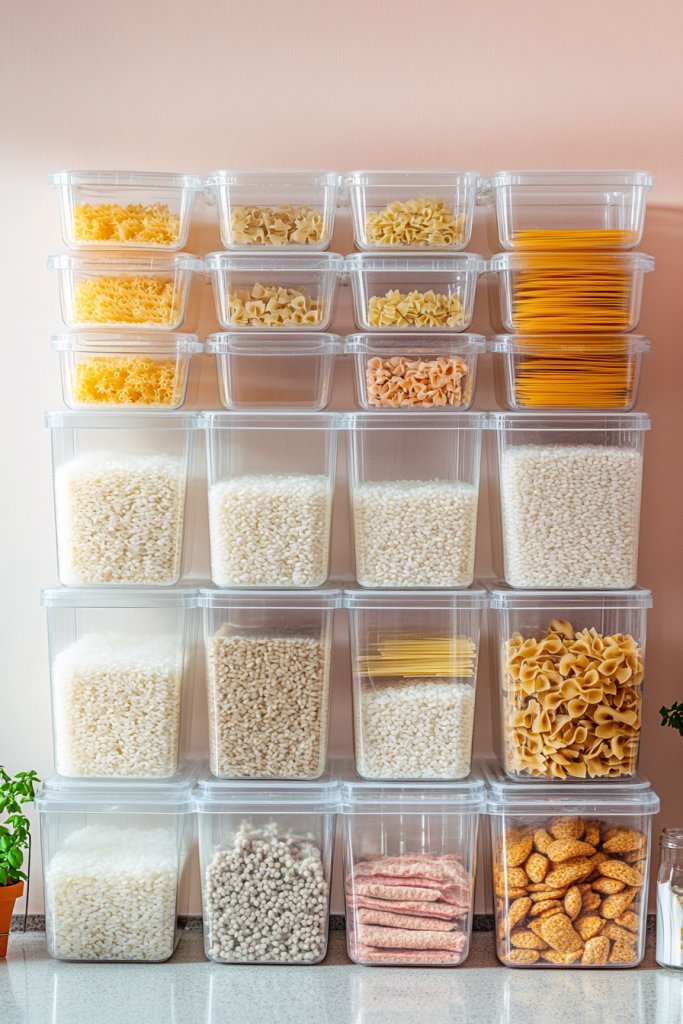
Ever opened your pantry and felt like you’re staring into a chaotic mess of bags and boxes? It’s frustrating trying to find that elusive bag of rice or those snack packs without creating a mini avalanche. Keeping pantry staples organized isn’t just about aesthetics; it’s about saving time and reducing stress every time you cook or snack.
Imagine a row of transparent, airtight containers stacked neatly on a shelf, each labeled with crisp, easy-to-read tags. The clear sides reveal colorful cereals, grains, and snacks, making your pantry look like a well-curated grocery store display. The airtight seals glint softly as you reach for your favorite oats or trail mix, with everything visible at a glance.
You can choose sleek glass containers for a modern vibe or vibrant colored plastic ones to add a pop of fun. If space is tight, opt for narrow, stackable units that maximize vertical storage. Seasonal adjustments might include swapping out labels or adding decorative touches like fabric covers or chalkboard labels for a rustic look.
Start by measuring your pantry shelves and selecting containers that fit snugly without wasting space. Look for airtight seals and stackable designs to promote stability. Label each container with a label maker or chalkboard sticker for quick identification. Wash and dry containers thoroughly before filling to prevent mold or odors. Place the most-used items at eye level for easy access, and store less frequently used staples on higher or lower shelves.
Personalize your containers with themed labels, colorful tape, or decorative stickers. Use different shapes or sizes to categorize items—small jars for spices, larger ones for grains. Incorporate a color-coded system to quickly identify sections, like blue for baking supplies or green for snacks. For a cozy touch, add a soft fabric liner or a decorative tray underneath grouped containers.
Clear, stackable containers turn a messy pantry into a visual delight and simplify your daily routines. With just a little effort, you’ll enjoy the satisfaction of an organized space that invites you to cook and entertain more confidently. Ready to transform your pantry into the envy of all your friends?
2. Install Over-the-Door Hooks for Utensil Storage
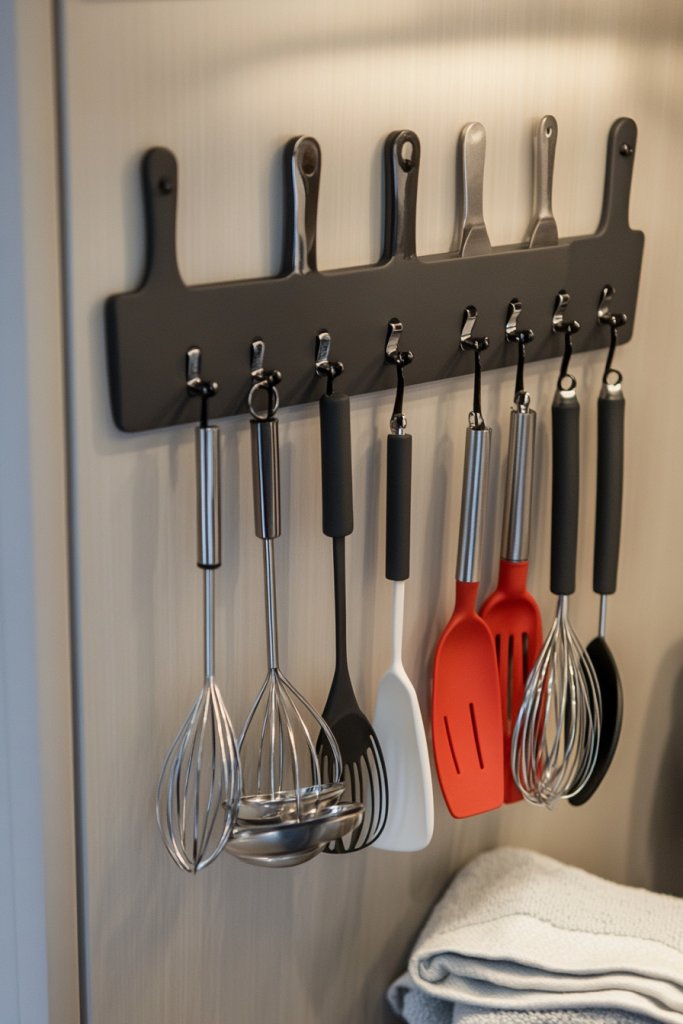
Tired of rummaging through drawers every time you need a spatula or a set of measuring spoons? Counter clutter and limited drawer space often mean these essentials end up in a jumbled mess. Installing hooks on the back of doors offers a quick fix to keep your utensils within arm’s reach and your counters clear.
Picture a sturdy hook mounted on the inside of your cabinet door or pantry door, holding a set of colorful silicone spatulas and shiny metal measuring spoons. It keeps everything visible and organized, turning a cluttered drawer into a sleek, accessible display. The hooks blend into your door’s surface, almost like hidden storage that’s always ready for action.
Choose hooks in different finishes—matte black, brushed nickel, or bright plastic—to match your kitchen decor. Use multiple hooks to create zones for different utensils like cooking tools, oven mitts, or small gadgets. During holidays or seasonal changes, swap out hooks for themed or decorative ones to add personality.
Identify the best spots on your cabinet or pantry doors that won’t interfere with closing or opening. Clean the surface thoroughly before attaching adhesive hooks or screws, depending on the weight of the items. For heavier tools, opt for screw-mounted hooks that provide extra stability. Arrange your utensils in a way that makes sense—most used at the top, specialty tools below.
Create a color-coded system for different utensil types or purposes, making it easy to grab what you need. Use decorative washi tape or painted hooks to add a pop of color or match your kitchen’s theme. Hang a small chalkboard or label stickers nearby to jot down new recipes or organize by frequency of use.
Installing over-the-door hooks is a simple, budget-friendly way to declutter your drawers and boost kitchen efficiency. It’s a small change that makes a big difference in how smoothly your cooking routine flows. Ready to hang up some order and make your kitchen more functional?
3. Incorporate Pull-Out Shelves in Lower Cabinets
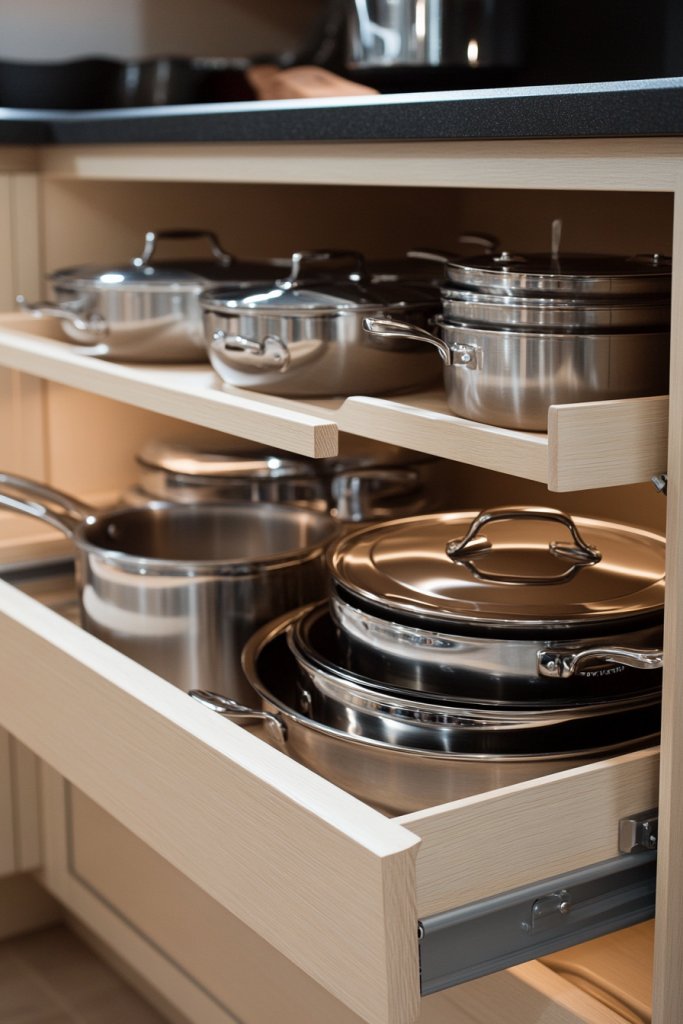
Bending, reaching, and crawling to find that elusive pot or pan can turn cooking into a workout you didn’t sign up for. Lower cabinets often become a black hole of clutter, making it tough to grab what you need quickly. Pull-out shelves promise to bring order and ease to your kitchen storage woes.
Envision smooth-gliding shelves that neatly slide out, revealing stacked pots, small appliances, and baking sheets in a tidy, accessible manner. The shelves are made of sturdy metal or wood, with a sleek finish that complements your cabinetry. When extended, they transform a difficult-to-reach space into a mini open-shelf display, reducing the need to crawl or dig.
Choose adjustable or fixed models depending on your needs. For smaller kitchens, opt for slim trays that fit tightly into tight spaces; larger households might prefer multi-tiered systems for maximum storage. Consider adding soft-close mechanisms for quieter operation or incorporating dividers for organizing lids and small gadgets.
Measure your cabinet openings carefully before purchasing. Install the pull-out mechanism securely to the cabinet’s base and sides, following the manufacturer’s instructions. Use a drill and screwdriver for screw mounting, and check that the slides glide smoothly without wobbling. Organize your items by size or type to maximize efficiency—heavier items go towards the front for stability.
Label the shelves or add color-coded bins for different categories. Use liners or non-slip mats to keep items steady during movement. Incorporate a small handle or decorative pulls that complement your kitchen’s style. For a more rustic look, opt for wooden shelves with metal hardware, or for a sleek modern vibe, choose glass or lacquered finishes.
Pull-out shelves turn a stubborn storage area into an organized, user-friendly space. They save time and reduce frustration, making cooking more enjoyable. Say goodbye to clutter and hello to a kitchen that works with you, not against you.
4. Utilize Magnetic Strips for Knife and Metal Tool Storage
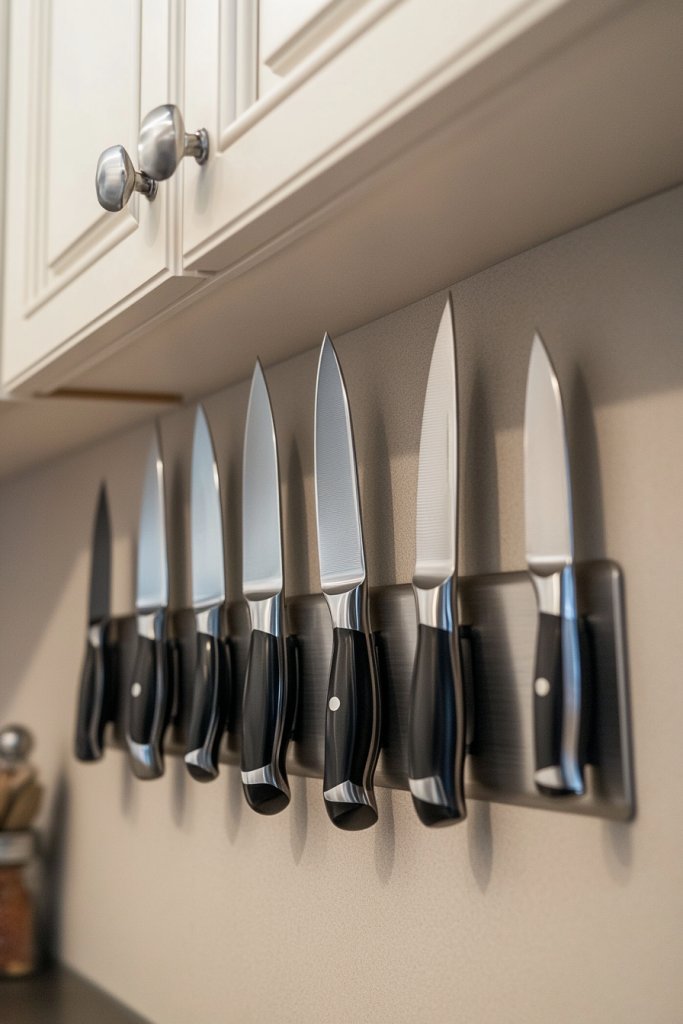
Are your knives buried under a pile of utensils in a cluttered drawer? Not only is that unsafe, but it also wastes precious space and makes finding the right blade a chore. Magnetic strips offer a sleek, safe way to keep your knives and metal tools visible, accessible, and organized.
Imagine a slim metal strip mounted on your kitchen wall or backsplash, holding a set of chef’s knives with their blades neatly aligned. The magnetic pull keeps them firmly in place, while the open design showcases your collection. Nearby, other metal tools like spatulas, scissors, or bottle openers also hang effortlessly, creating a tidy, functional display.
Choose strips in stainless steel for a modern look or painted wood for a rustic touch. Install multiple strips at different heights for varied tool storage—longer knives at eye level, smaller tools below. For a personalized touch, add decorative hooks or labels to designate zones for different tools or tasks.
Select a sturdy, appropriately-sized magnetic strip to hold your entire knife collection safely. Mount the strip securely into wall studs or use strong anchors if attaching to drywall. Use a level to ensure straight installation. Keep blades away from children by installing the strip at a safe height. Regularly clean the strip to prevent metal dust buildup that could reduce magnetism.
Customize your magnetic strip area with themed or colored magnetic holders, or add decorative elements like small tiles or paint behind it. Rotate or upgrade your knives and tools seasonally or as your collection grows. Use labels or engraved name tags for a professional look, especially if you have multiple family cooks.
Magnetic strips make your kitchen safer and more organized, giving you quick access to your favorite tools. This simple upgrade enhances both functionality and style, turning a cluttered drawer into a showcase. It’s a small change that can boost your cooking confidence and efficiency.
5. Add Drawer Dividers for Cutlery and Small Items
How many times have you dug through a cluttered drawer trying to find that one spoon or peeler? Messy drawers slow you down and make your kitchen look chaotic. Drawer dividers bring order to your silverware and gadget chaos, turning chaos into calm.
Visualize a deep drawer with neatly separated sections—each slot holding a fork, knife, or spoon in perfect alignment. Small compartments keep gadgets like peelers, bottle openers, and measuring spoons from mingling. The dividers are made of plastic, bamboo, or foam, and slide easily into place, creating a tidy, organized landscape.
Select adjustable dividers for flexibility or fixed ones for a more permanent solution. Choose colorful or neutral tones to match your drawer interiors. For a more decorative look, opt for bamboo or wood dividers that add a warm, natural touch. You can also customize compartment sizes based on your utensil collection.
Clear out your drawer and measure its dimensions. Select dividers that fit snugly without overcrowding. Install them by snapping into place or sliding into existing grooves, depending on design. Organize your cutlery by type and frequency of use—daily utensils front and center, specialty tools in the back. Regularly review and adjust as your collection changes.
Label sections with small tags or stickers for quick identification. Mix materials—bamboo, plastic, or acrylic—for visual interest. For added flair, line the bottom of the drawer with a decorative tray or fabric that complements your kitchen decor. Rotate or swap dividers seasonally to keep things fresh.
Drawer dividers make your kitchen more efficient and reduce the stress of clutter. They turn a chaotic drawer into a sleek, organized space that invites you to cook with confidence. Small upgrades like these add up to a more enjoyable, functional kitchen experience.
6. Use Tiered Shelf Risers in Cabinets and Pantries
Ever feel like your pantry is a disaster zone, with cans and plates buried behind each other? Stacking items is great until you can’t see what’s behind the front row. Tiered shelf risers help you make the most of vertical space, so nothing gets lost or forgotten.
Picture a set of adjustable or fixed plastic or metal risers placed inside your cabinets or pantry shelves. They create multiple levels, allowing you to stack plates, cups, and canned goods neatly. The angled tiers make everything visible at a glance, reducing fumbling and accidental spills.
Choose slim, stackable tiers for tight spaces or larger, more decorative risers for open shelves. Use different heights to accommodate various items—short for spices, tall for bottles or jars. During seasonal changes, swap out or reconfigure the risers to suit new storage needs or aesthetic preferences.
Measure your shelf depths and widths before purchasing risers. Install them on clean, dry surfaces, ensuring they sit level and stable. Organize items by frequency and size, placing the most used at the front. Adjust the height of the tiers for different item categories, and periodically review to optimize space.
Label each tier for quick identification or add decorative contact paper underneath. Incorporate color-coordinated or themed risers to match your kitchen decor. Use non-slip pads underneath to prevent slipping or sliding during use. Rotate your pantry items to keep everything fresh and accessible.
Tiered risers turn a cluttered, hard-to-see space into an organized, inviting pantry. They make it easier to find what you need and keep everything accessible. With a little setup, your kitchen becomes more functional and less stressful to manage.
7. Hang Pots and Pans on a Ceiling or Wall Rack
Trying to fit all your pots and pans into cabinets often results in a cluttered, hard-to-reach mess. Not to mention, it can make the kitchen feel cramped and chaotic. Hanging cookware creates a visual focal point and frees up cabinet space for other essentials.
Imagine a sleek, sturdy rack mounted above your stove or along an empty wall, with pots and pans hanging in a neat, organized row. The metal or wood rack complements your kitchen’s style—industrial, rustic, or modern. The cookware’s reflective surfaces catch the light, adding a professional touch to your space.
Choose ceiling-mounted pot racks with hooks or wall-mounted rails with adjustable hangers. For small kitchens, a ceiling rack with hooks saves space and adds a decorative element. In larger spaces, consider a multi-tiered or extendable system for more cookware. Incorporate hooks for lids, utensils, or even hanging utensils for added functionality.
Securely mount the rack into wall studs or ceiling beams using appropriate hardware. Measure and plan layout before drilling. Hang pots and pans by their handles or rims, ensuring they are balanced and not too heavy for the hooks. Organize cookware by size or frequency of use for convenience. Regularly check for stability and clean the rack to prevent dust buildup.
Add decorative elements like painted hooks, vintage-inspired hardware, or colorful accents to match your kitchen decor. Group similar items together or alternate finishes for visual interest. For a rustic look, use wooden beams with wrought iron hooks; for sleek modern, opt stainless steel or black matte finishes. Consider adding a small chalkboard sign for labeling or notes.
Hanging your cookware not only saves space but also elevates your kitchen’s style. It makes cooking more efficient and turns your pots and pans into a decorative feature. Plus, it’s a fun way to showcase your cookware collection and impress guests.
8. Install Under-Cabinet Hooks for Mugs and Accessories
Cluttering your counters with mugs, towels, and small tools makes the kitchen look messy and feels cluttered. Finding a dedicated spot to hang these essentials keeps your workspace clear and organized. Under-cabinet hooks are an easy, inexpensive solution to keep frequently used items within arm’s reach.
Visualize a row of hooks mounted beneath your upper cabinets, each holding a colorful mug or a neatly folded kitchen towel. The hooks are made of metal, plastic, or decorative wrought iron, and blend seamlessly into your cabinetry. This simple addition transforms a dull underutilized space into a functional display area.
Opt for hooks in different finishes—matte black, brushed nickel, or colorful plastics—to match your decor. Use multiple hooks for mugs, utensils, or small accessories like oven mitts. During seasons or special occasions, swap out items or add decorative hooks with themed designs to keep things fresh.
Measure the length of your cabinet bottom for even spacing of hooks. Securely screw or adhesive-mount the hooks, making sure they are level and firmly attached. Arrange mugs by size or color for visual harmony. Regularly check that hooks are tight and not sagging, and clean surfaces to prevent dust or grease buildup.
Personalize your hook area with custom engraved tags or painted accents. Coordinate mug colors or patterns with your kitchen theme. Add a decorative tray or small shelf underneath for storing coffee supplies or small gadgets. Rotate items seasonally to keep the display lively.
Installing under-cabinet hooks makes your kitchen more organized and adds a cheerful, inviting touch. It saves space on counters and makes your favorite mugs easily accessible. A simple upgrade that boosts your kitchen’s style and your daily convenience.
9. Repurpose Drawer Inserts for Spice and Bottle Organization
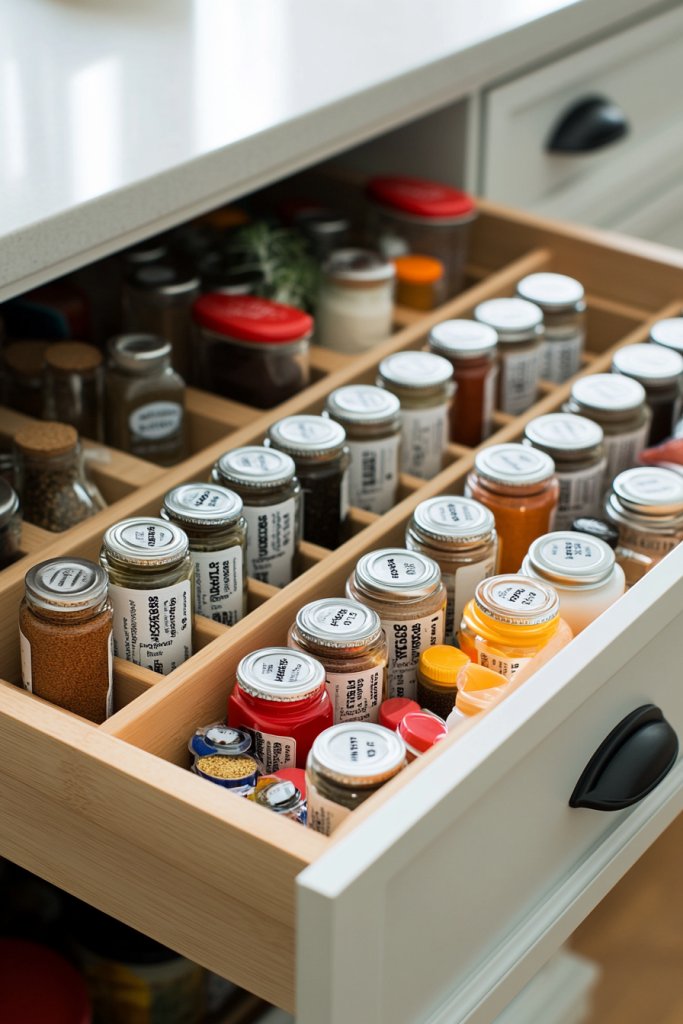
Spice jars and small bottles often end up in a jumbled mess, making cooking more frustrating than it needs to be. Searching for the right spice or oil can turn into a scavenger hunt. Repurposing drawer inserts helps keep everything upright, visible, and easy to grab.
Imagine a shallow drawer filled with adjustable or modular spice racks, each holding tiny jars and bottles in neat rows. The labels are facing up, making it effortless to find your favorite seasoning or oil. The organization creates a clean, minimal look that’s both functional and pleasing to the eye.
Choose adjustable dividers for flexibility or fixed inserts for a streamlined look. Use colorful or patterned liners underneath to add personality. For a rustic style, opt for wooden or bamboo inserts; for a sleek modern look, go for acrylic or metal options. Incorporate small bins or trays for loose packets or larger bottles.
Empty your drawer and measure its dimensions to select appropriate inserts. Install or place the inserts securely, ensuring they don’t slide around. Arrange your spices and bottles by size, frequency of use, or color for easy identification. Label the insert sections if needed, and regularly review to keep the system effective.
Add decorative labels, chalkboard tags, or color-coded stickers for quick reference. Use themed liners or mats to match your kitchen decor. Incorporate small containers for loose herbs or special seasonings. Rotate your collection seasonally or based on your cooking habits.
A well-organized spice drawer turns cooking into a more enjoyable experience. It saves time, reduces mess, and adds a professional touch to your kitchen. With a little effort, you’ll always find the right ingredient in seconds, boosting your culinary confidence.
10. Incorporate Lazy Susans in Corner Cabinets
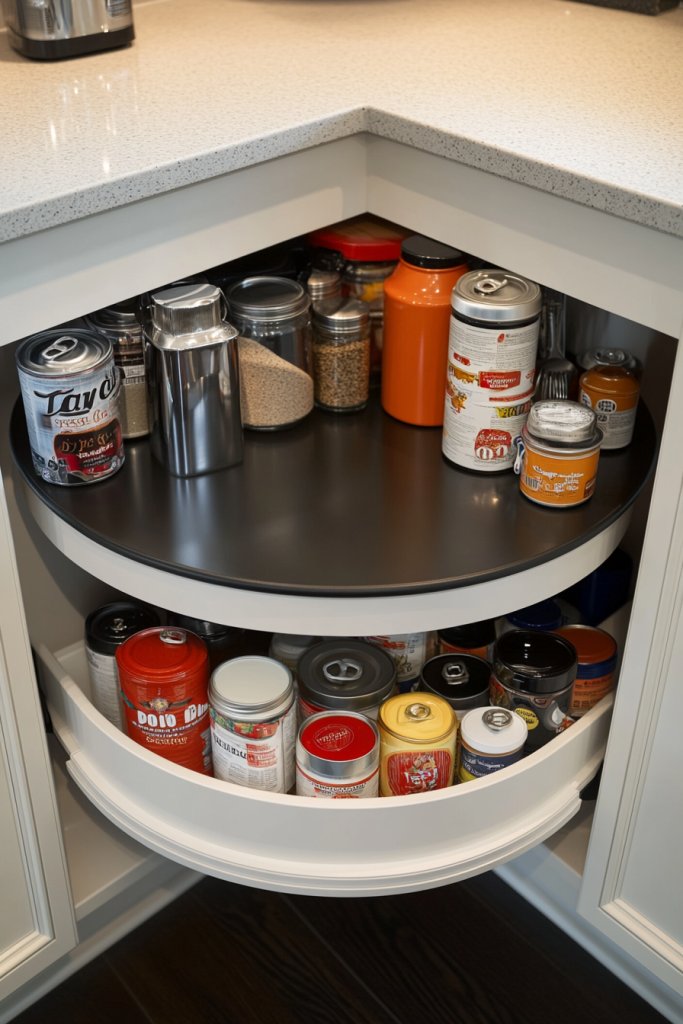
Corner cabinets are notorious for being dead zones where items get lost or forgotten. Reaching into those tight spaces is a hassle, and stacking things often results in a pile of chaos. Lazy Susans turn awkward corners into accessible, organized storage with just a spin.
Picture a rotating tray filled with spices, oils, or baking supplies, smoothly turning to reveal everything you need without kneeling or crawling. The sturdy, circular shelf is made of acrylic, wood, or metal, and fits snugly into your corner cabinet. It keeps your essentials visible and within easy reach, transforming a cluttered corner into a functional hub.
Choose fixed or adjustable Lazy Susans based on your storage needs. For small spaces, opt for compact, single-tier units; for larger cabinets, consider multi-tier or extra-large models. Use different materials—wood for warmth, acrylic for transparency, or metal for industrial chic. Customize with labels or dividers for specific categories.
Measure your corner cabinet’s diameter and interior height to select the appropriate Lazy Susan. Install the rotating tray securely onto a flat, level surface, following manufacturer instructions. Organize items by size and frequency of use, placing the most needed at the front. Regularly clean and reconfigure as your storage needs change.
Decorate the edges with paint or contact paper to match your kitchen theme. Add small baskets or trays on the Lazy Susan for loose items. Label sections for spices, oils, or baking supplies, and rotate items to keep the space engaging. Incorporate seasonal or themed containers for special occasions.
Lazy Susans make corner cabinets a star feature, turning dead space into a highly functional zone. They boost your kitchen’s efficiency and make cooking more enjoyable. With a simple spin, everything you need is right at your fingertips, making your culinary routines smoother and more satisfying.
11. Attach Labelled Baskets or Bins for Snack and Baking Supplies

Ever find yourself digging through a pile of plastic bags and loose boxes when baking or grabbing a snack? Disorganization leads to wasted time and frustration. Labelled baskets and bins keep your food categories tidy, visible, and easy to access.
Imagine a set of woven or plastic baskets sitting neatly on a pantry shelf, each with a clear label like ‘Snacks’, ‘Baking Supplies’, or ‘Cereal’. The labels are bold and easy to read, ensuring everyone in the household knows where everything belongs. The baskets hold bags, boxes, and loose ingredients, keeping them contained and clutter-free.
Select baskets in natural fibers for a rustic look or sleek plastics for a modern vibe. Use different sizes to fit various spaces and needs. Incorporate decorative labels, chalkboard tags, or printed stickers. For seasonal flair, add themed or colored baskets to match holidays or festivities.
Clear your shelves or pantry space and measure available areas. Choose baskets or bins with handles for easy removal. Label each container with a label maker, chalkboard label, or printed sticker. Organize items by category and usage frequency, placing the most used at the front for quick access. Regularly re-evaluate to keep everything fresh and orderly.
Personalize with decorative touches like washi tape or custom labels. Use color-coding to differentiate types of supplies or dietary needs. Add small chalkboards or tags for notes or expiration dates. Rotate contents seasonally or as your shopping habits change.
Labelled baskets turn a chaotic storage space into an inviting, organized area. They make finding ingredients quick and cooking more enjoyable. It’s a simple tweak that boosts your kitchen’s functionality and your confidence in meal prep.
12. Use a Magnetic Knife Strip for Space-Saving Blade Storage
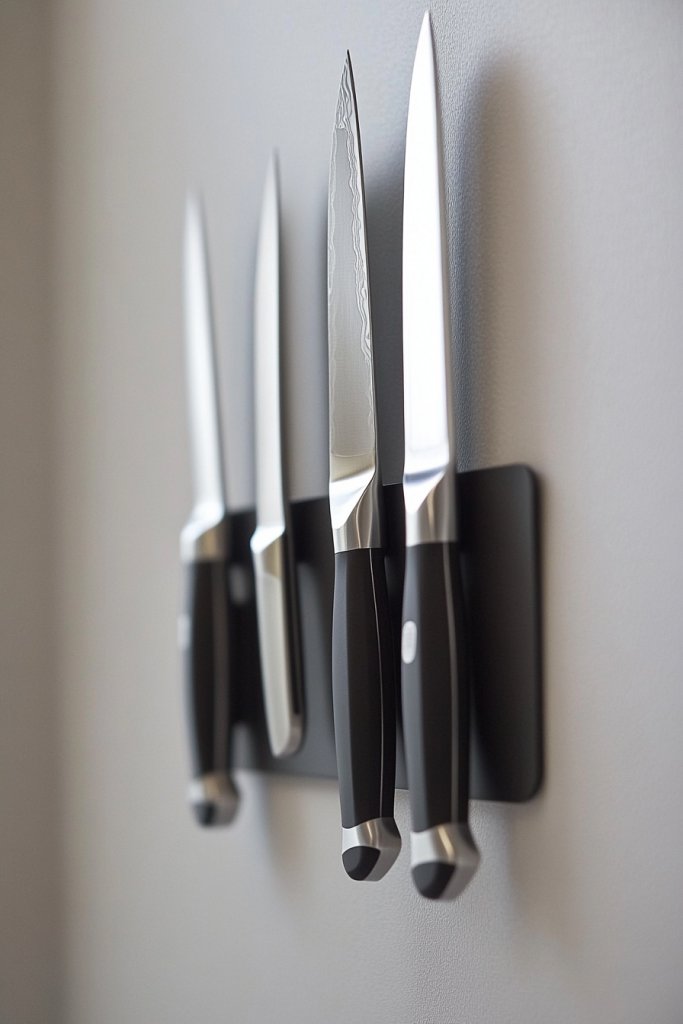
Storing knives in a drawer is unsafe and often leads to dull blades or accidental cuts. Cluttering your countertop with knife blocks takes up precious space. A magnetic strip offers a sleek, safe, and space-efficient way to keep your knives organized and accessible.
Picture a slim stainless steel or painted wood strip mounted along your backsplash, holding a collection of shiny knives by their handles. The blades are protected and visible, lined up neatly like a professional chef’s station. This minimalist display adds a modern touch to your kitchen and keeps blades sharp and ready.
Choose magnetic strips in different finishes—stainless steel, matte black, or painted wood—to match your decor. Install multiple strips if you have a large collection or specialized knives. For a decorative element, add a small shelf or utensil holder nearby for sharpening tools or other accessories.
Mount the strip at a safe height away from children and high-traffic areas. Use a level to ensure it’s straight, and secure into wall studs or anchors. Place knives with blades facing down or towards the wall for safety. Regularly clean the strip to remove dust or metal particles that could reduce magnetism. Periodically check that knives stay securely attached.
Label sections for different knife types or uses, like ‘Chef’s’, ‘Paring’, or ‘Bread’. Incorporate decorative or colorful magnetic strips for a personalized touch. Use a magnetic strip as part of a larger wall display with hooks for utensils or small tools. Rotate knives seasonally or add new specialty blades to keep the display fresh.
A magnetic knife strip keeps your blades sharp, safe, and within easy reach. It elevates your kitchen’s style and makes prep work smoother. With everything organized and visible, you’ll cook with more confidence and less clutter.
13. Create a Dedicated Charging and Gadget Station
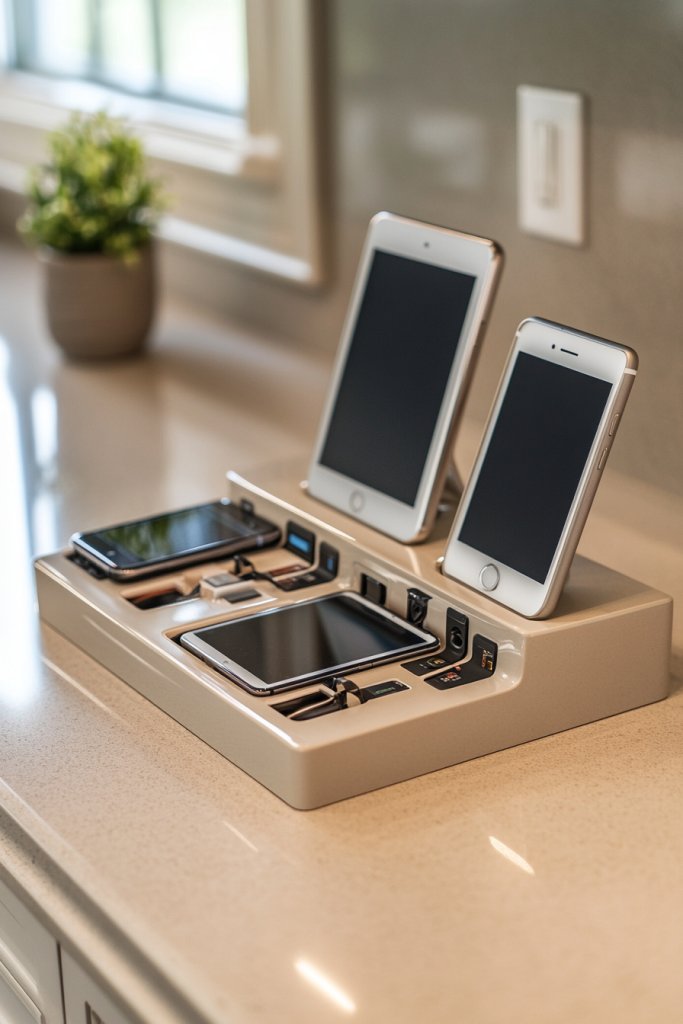
Charging multiple devices on the kitchen counter leads to clutter and tangled cords, making your space look messy and disorganized. A dedicated station streamlines charging routines and keeps your gadgets accessible without the hassle.
Visualize a sleek, designated corner with a charging dock, cable organizers, and small baskets or trays for storing phones, tablets, and smart kitchen gadgets. The area is tidy, with cords hidden neatly behind a decorative panel or inside a cable management box. It’s a tech oasis that declutters your countertops.
Choose materials like wood, acrylic, or metal for a modern or rustic look. Incorporate a power strip with USB ports to minimize wall socket clutter. Use small containers or clip-on holders for charging cables, or install a wire management channel. Add a small shelf or stand for devices during use.
Designate a specific area near an outlet with enough space for all your devices. Mount a power strip or outlet extender, and hide excess cords with cable clips or sleeves. Place trays or small baskets to hold chargers, cords, and accessories. Keep the station tidy by regularly unplugging and organizing cords, avoiding tangles. Use labels for quick identification of chargers and devices.
Decorate the station with themed or matching accessories—like colorful cable ties or custom labels. Add a small plant or decorative element away from cords to give it a cozy feel (no green plants, remember!). Use adhesive hooks or clips to keep cords neat and prevent tangling. Update the station seasonally with new tech gadgets or accessories.
A dedicated gadget station makes charging quick, safe, and clutter-free, helping you stay organized and efficient. It also protects your devices from accidental drops or spills. Creating this space boosts your tech confidence and keeps your countertops looking sleek and functional.
14. Install Drawer-Style Trash and Recycling Bins
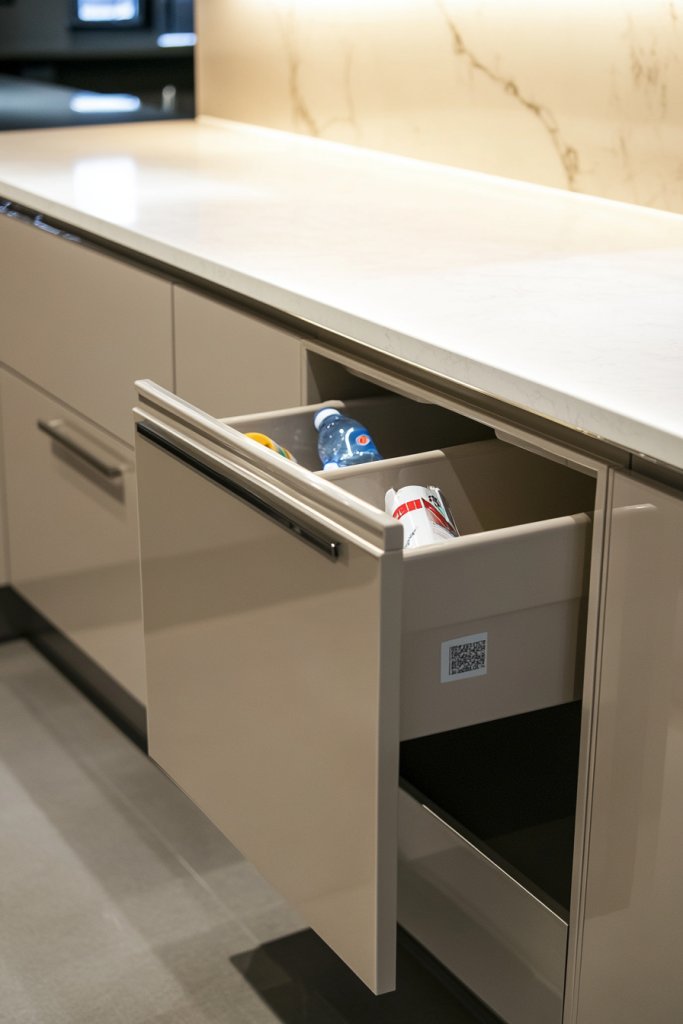
Trash and recycling bins are usually an eyesore sitting out in the open, cluttering your kitchen and taking up valuable space. An integrated drawer solution offers a clean, streamlined look while making waste disposal more convenient.
Imagine a sleek cabinet drawer that opens smoothly to reveal two compartments—one for trash, one for recyclables—hidden behind a matching cabinet door. The bins are made of stainless steel or durable plastic, easily removable for cleaning. When closed, the entire unit is flush with your cabinetry, maintaining a minimalist aesthetic.
Choose single or double drawers based on your waste needs. Install in lower cabinets near the prep area for maximum convenience. Opt for soft-close mechanisms to prevent slamming, and select bins with handles or wheels for easy removal. Match the cabinet finish or hardware for a seamless look.
Measure your cabinet opening and select a compatible drawer unit. Remove existing drawers or modify the cabinet as needed. Install the drawer slides securely, ensuring smooth operation. Place the bins inside, and attach any handles or latches if included. Regularly empty and clean the bins to prevent odors and pests.
Label the bins clearly for waste, recyclables, or compost to promote eco-friendly habits. Add decorative contact paper or paint to match your kitchen style. Incorporate a small step or pedal mechanism for hands-free operation. Periodically review your waste system to improve efficiency or update bins.
Drawer-style waste systems keep your kitchen looking tidy and modern, making cleanup less of a chore. They encourage better waste practices and reduce odors, enhancing your overall cooking environment. It’s a smart upgrade that combines form and function effortlessly.
15. Incorporate a Rolling Cart for Extra Counter or Storage Space
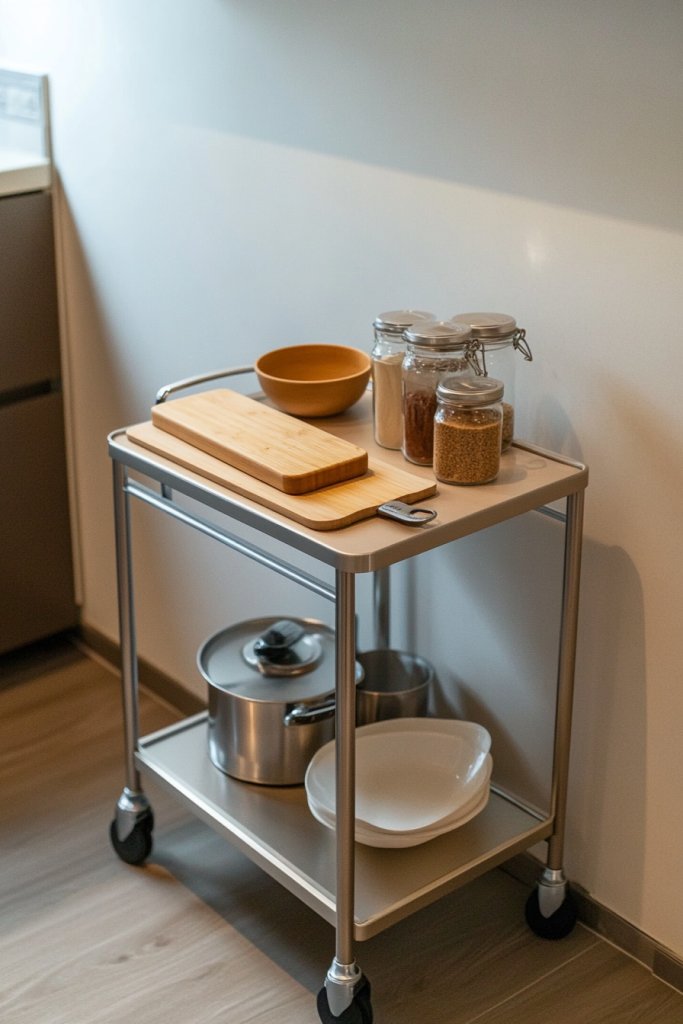
Limited counter space can turn meal prep into a juggling act, especially when hosting or cooking elaborate recipes. A rolling cart provides flexible extra workspace and storage that can be moved out of the way when not in use.
Picture a sturdy metal or wood cart on wheels, topped with a cutting board or prep area, holding bowls, utensils, or small appliances. When not needed, it can be rolled into a corner or out of the kitchen entirely. The cart’s open shelves and drawers organize cookware, ingredients, or cleaning supplies, giving your kitchen a clutter-free look.
Choose carts with multiple shelves, drawers, or collapsible features for versatility. Use materials that match your decor—industrial metal, rustic wood, or sleek lacquered finishes. Decorate with baskets or liners for a polished appearance. For seasonal uses, swap out accessories or add decorative accents.
Pick a sturdy cart that fits your space and needs. Assemble it following the manufacturer’s instructions, ensuring all wheels lock securely when stationary. Use it as a prep station, extra serving area, or storage for frequently used items. Regularly check wheel functionality and clean the surface to maintain appearance.
Add decorative touches like a colorful tablecloth, placemats, or painted accents. Use labels or tags for organization—like ‘Baking Supplies’ or ‘Snacks’. Incorporate small containers or baskets on the shelves for loose items. Rotate the cart’s purpose based on your cooking or hosting needs.
A rolling cart turns your kitchen into a flexible space, making cooking and entertaining more manageable. It’s a simple way to add extra storage without permanent renovations. Embrace the mobility to keep your kitchen efficient and stylish.
16. Use Pegboards for Customizable Tool and Utensil Display
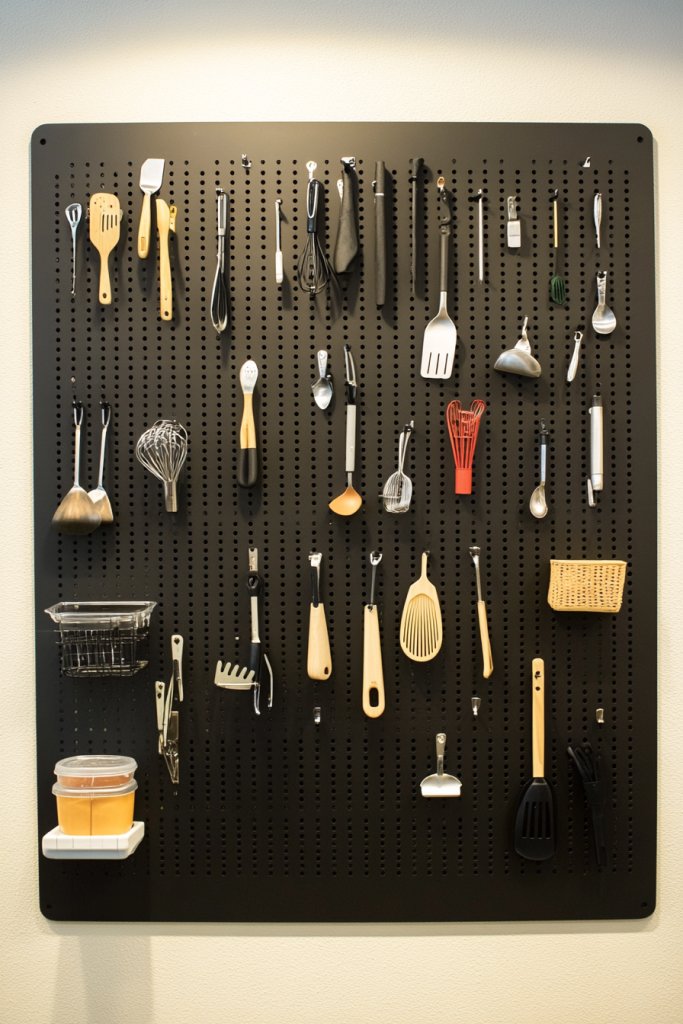
Messy drawers and cluttered countertops hide your kitchen tools and utensils, making everything harder to find. Pegboards offer a customizable, visual way to organize and display your essentials, turning functional items into decorative features.
Imagine a large pegboard mounted on a blank wall or inside a cabinet door, filled with hooks, baskets, and shelves holding spatulas, whisks, measuring cups, and more. The tools hang neatly, with their handles facing outward for quick grab-and-go access. The arrangement is both practical and visually appealing, adding an industrial or modern touch.
Choose pegboards in metal, wood, or painted MDF for different aesthetics. Customize with hooks, baskets, and small shelves to suit your collection. Use color coding or labels for categorization—baking tools, cooking utensils, or gadgets. During holidays or special events, swap out hooks or add themed accessories for variety.
Securely mount the pegboard into studs or wall anchors, ensuring it’s level and stable. Arrange hooks and baskets in a pattern that fits your workflow. Hang tools by their handles, and keep frequently used items within easy reach. Regularly dust and reorganize for efficiency and aesthetic appeal. Consider adding decorative elements like painted frames or themed decals.
Add labels or chalkboard tags to baskets or shelves for quick identification. Incorporate decorative paint or patterns around the pegboard to match your kitchen style. Use colorful hooks or grips to differentiate tool categories. Rotate tools seasonally or when trying new recipes to keep the display fresh and inspiring.
Pegboards turn your cluttered tool drawer into a stylish organizational feature. They make your utensils more accessible, speeding up meal prep and clean-up. It’s a creative, versatile upgrade that reflects your personality and makes your kitchen more enjoyable to cook in.
17. Add Labels to Shelves and Containers for Instant Clarity
Searching for the right spice or ingredient wastes time and causes unnecessary frustration. When everything has a designated spot with a clear label, your kitchen becomes a smooth-running machine. Labels provide instant clarity and help everyone in the household stay organized.
Picture neatly organized shelves with labels like ‘Pasta’, ‘Oils’, ‘Baking Supplies’, or ‘Snacks’. Containers and jars have matching labels, making it easy to find what you need without rummaging. The labels are bold, legible, and complement your kitchen style—chalkboard, printed, or handwritten.
Use labels on jars, bins, or shelf edges—whichever makes the most sense for your space. Choose materials like chalkboard stickers, printable adhesive paper, or engraved wood for a customized look. Incorporate color coding or icons for quick visual cues—green for healthy snacks, red for spices, etc. Change labels seasonally or when reorganizing.
Clean surfaces thoroughly before applying labels to ensure adhesion. Use a label maker or print stickers for professional results. Place labels at eye level or on the front of containers for visibility. Keep a small supply of labels handy for future updates or additions. Regularly check labels for wear and replace as needed.
Add decorative accents like washi tape or patterned labels for fun or thematic touches. Incorporate labels into your overall kitchen color scheme for cohesion. Use labels as part of a broader organization system—grouping related items or creating zones. Update labels periodically to reflect changing needs or new products.
Labels instantly transform your kitchen into an organized, efficient space. They reduce decision fatigue and make cooking less stressful. With clear, consistent labeling, you and your family will enjoy a more streamlined, enjoyable culinary experience.
Conclusion
Exploring these diverse and straightforward kitchen organization ideas can truly revolutionize your space. By trying out even a few of these tips, you’ll create a more functional and enjoyable cooking environment. Don’t wait—start organizing today and turn your kitchen into a beautifully efficient hub of activity!