Imagine turning a simple piece of barn wood into a stunning and functional wall calendar that adds rustic charm to your home. DIY barn wood wall calendars are gaining popularity because they combine practicality with a warm, vintage aesthetic that complements a variety of decor styles.
In this article, you’ll find a delightful mix of creative ideas and step-by-step guides to craft your own barn wood calendar. Whether you prefer minimalist designs or more intricate layouts, there’s something here to inspire your next DIY project and bring a personalized touch to your living space.
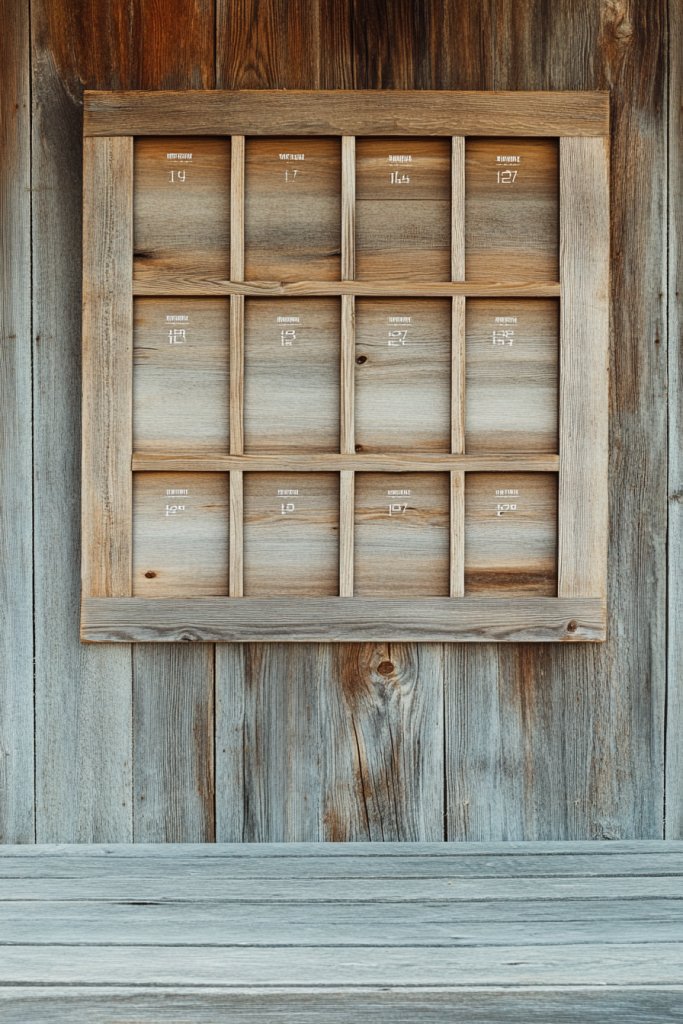
1. Floating Barn Wood Calendar with Wire Loop Pages
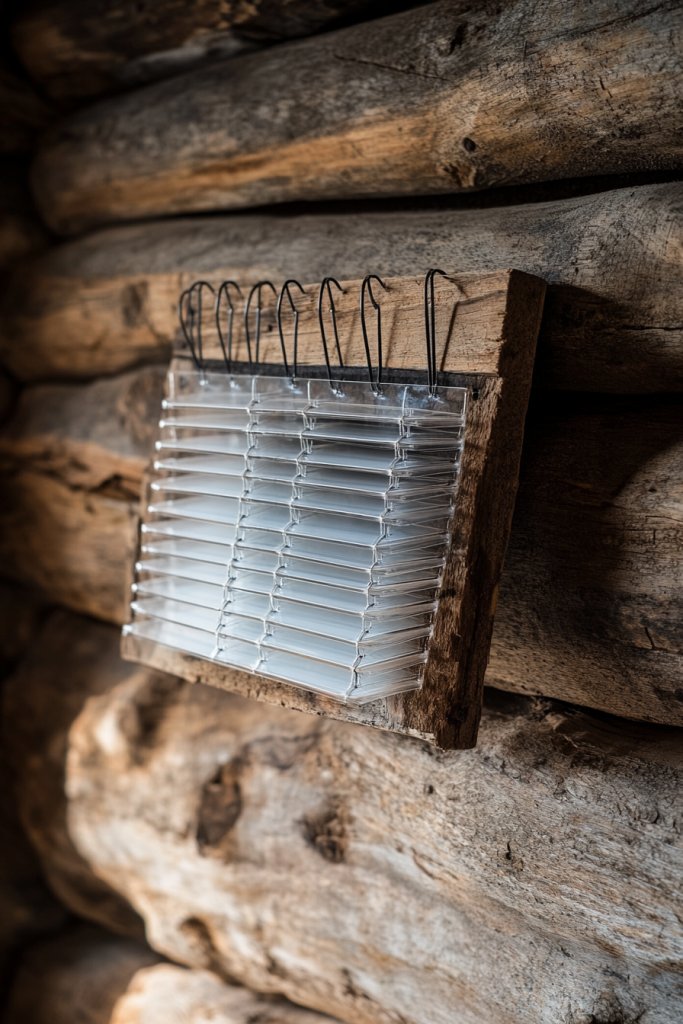
Tired of boring, static calendars that don’t inspire you? A floating barn wood calendar with wire loops makes planning feel fresh and modern. It combines rustic materials with a sleek design, giving your wall a minimalist yet cozy vibe. Plus, it’s super easy to update each month without fuss.
Picture a sturdy barn wood frame mounted flush against your wall, with shiny metal wire loops hanging from the top edge. Paper pages with printed or handwritten dates hang from these loops, flipping effortlessly like a classic flip calendar. The natural grain of the wood contrasts with the shiny metal, creating a balanced rustic-modern aesthetic. The pages sway gently with air movement, adding subtle life to the space.
You can customize the frame by staining or painting the barn wood to match your decor. Use different wire colors or thicknesses to suit your style—sleek silver for modern, black for industrial. For seasonal updates, switch to themed paper pages or add decorative borders. This system works well in kitchens, offices, or entryways, adapting to various sizes and needs.
Begin with reclaimed barn wood cut to your desired size, then sand and seal it for smoothness. Drill holes at the top for sturdy eye screws or hooks, and attach metal wire loops. Design or print your calendar pages on thick paper, punch holes at the top, and thread them through the loops. Replace pages monthly or as needed, flipping through effortlessly. Secure the frame to the wall with appropriate anchors.
Add decorative elements like small painted icons or seasonal motifs to your pages. Use colorful pens or markers to highlight important dates or deadlines. Consider labeling each wire loop with a month or category for easy sorting. For a cozy touch, incorporate textured paper or hand-drawn illustrations that reflect your personality.
This floating calendar elevates your planning game with its minimalist charm and easy usability. It’s a perfect project to add a handcrafted touch to your home while staying organized. Once set up, it invites you to engage with your schedule daily, making planning less of a chore and more of a pleasure.
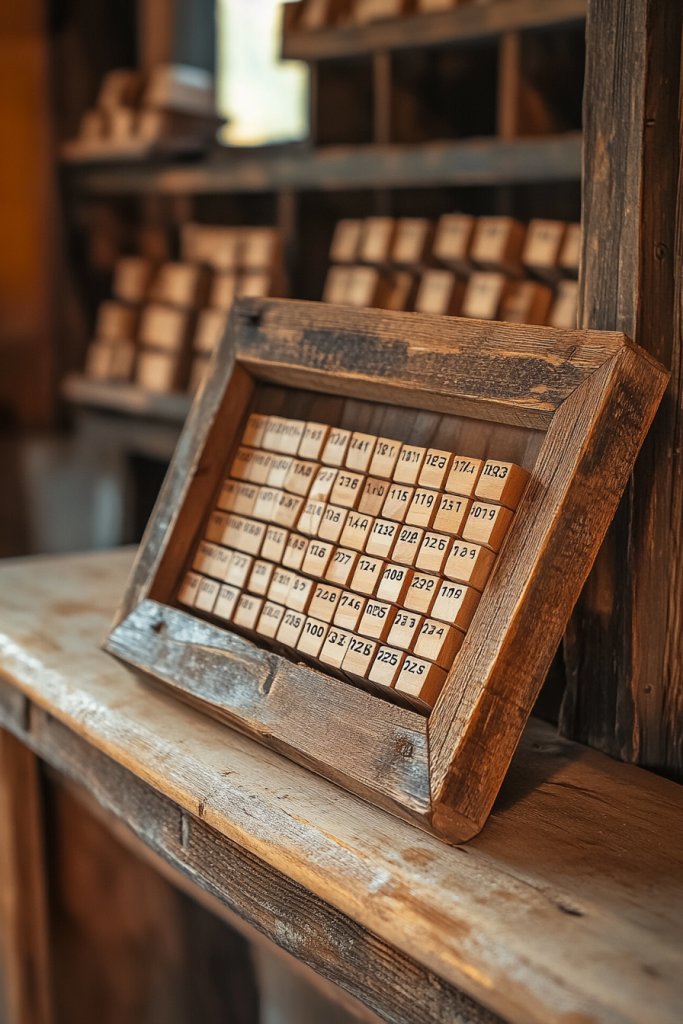
2. Barn Wood Framed Perpetual Calendar with Wooden Blocks
Frustrated with disposable calendars that become waste after a month? A barn wood framed perpetual calendar with wooden blocks offers a sustainable, stylish alternative. It keeps your schedule visible while reducing clutter and waste. Plus, it adds a rustic yet functional decor piece to your space.
Imagine a sturdy barn wood frame housing a set of engraved or painted wooden blocks. The blocks feature numbers, months, and days, which you can manually rearrange to display the current date. The raw wood texture of the blocks complements the weathered barn wood frame, creating a tactile and warm aesthetic. It’s a charming focal point on your wall that invites interaction.
Choose different finishes for the blocks—painted, stained, or natural—to match your decor. You can also customize the engravings with calligraphy or stamps for a personal touch. For a more playful vibe, use colored blocks or add decorative motifs. This setup works well in kitchens, home offices, or living rooms, fitting various sizes and styles.
Start with reclaimed barn wood for the frame, ensuring it’s sturdy and well-sanded. Create or buy wooden blocks with engraved or painted numbers and months, sealing them for durability. Mount the frame on the wall, then arrange the blocks to display the current date. You can attach small hooks or magnets on the back of the blocks for easy handling. Regularly update the blocks as days pass.
Personalize by carving initials, adding decorative etchings, or choosing themed colors for holidays. Incorporate small wooden trays or pockets nearby for holding extra blocks or notes. Use contrasting colors or fonts to enhance readability. For added charm, include a small wooden plaque with a motivational quote.
This perpetual calendar combines eco-friendly design with timeless appeal, making it a conversation piece in any room. It encourages a mindful approach to planning, helping you stay organized without waste. With a little effort, you create a functional decor piece that evolves with your life.
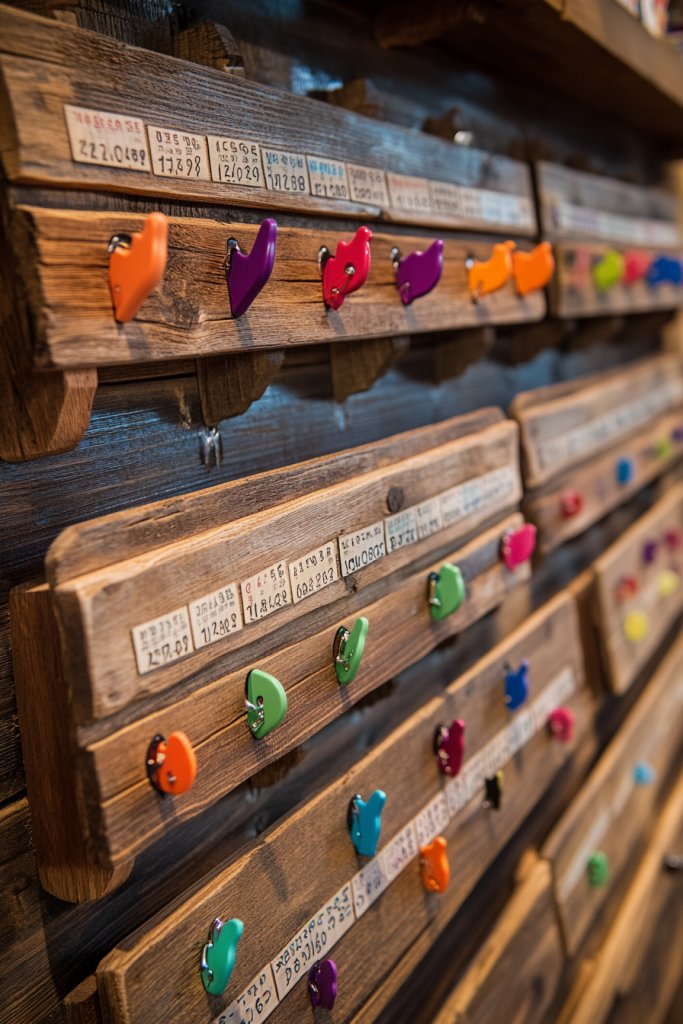
3. Multi-Panel Barn Wood Calendar with Magnetic Date Markers
Do you find traditional calendars too rigid or boring? A multi-panel barn wood calendar with magnetic date markers injects a bit of fun and flexibility into your planning. It combines rustic charm with interactive features, making scheduling feel less like a chore.
Visualize a series of weathered barn wood panels mounted side by side, each with magnetic strips along the top or sides. Magnetic markers with numbers, days, or notes cling firmly yet easily removable. The natural wood’s grain and imperfections add texture, while the magnetic elements provide a sleek contrast. It’s a dynamic display that invites daily engagement.
Customize panels by staining or painting them in neutral or bold colors. Use decorative magnets shaped like icons, symbols, or initials for a personalized touch. This system is adaptable for large family schedules, project planning, or seasonal menus. Change the layout by rearranging panels or markers based on your needs.
Begin with barn wood panels cut to your preferred size, then seal or stain them for durability. Attach magnetic strips or sheets along the top edges. Design or purchase magnetic date markers that fit your style—plain, decorated, or custom-shaped. Mount the panels securely on your wall, ensuring they’re level. Arrange magnetic markers to display the current date or upcoming events, swapping them easily as needed.
Add decorative magnetic icons for birthdays, appointments, or reminders. Use different colors for weekends or special occasions to improve visual clarity. Incorporate small chalkboard sections for notes or weekly goals. Personalize the overall look with your favorite rustic finishes or painted accents.
This magnetic multi-panel setup makes planning interactive and fun, encouraging regular use. It’s a creative way to keep everyone in the loop without sacrificing style. Once you get the hang of it, you’ll wonder how you ever managed without this rustic yet flexible system.
4. Vintage Style Barn Wood Calendar with Hand-Painted Month Headers
Ever wish your calendar had more personality than plain printed sheets? A vintage style barn wood calendar with hand-painted month headers brings a charming, artistic touch to your space. It turns your planning area into a piece of decor that’s as functional as it is beautiful.
Picture a series of aged barn wood planks, each with hand-painted month names in elegant script. The paint might be slightly distressed for that authentic vintage look, adding character and charm. Small decorative accents like floral motifs or scrollwork can enhance the rustic aesthetic. The textured wood combined with the delicate hand-painted details creates a warm, inviting atmosphere.
Adjust the color palette to match your decor—soft pastels for shabby chic or deep earthy tones for farmhouse style. You can also add hand-painted illustrations or borders around the months. For seasonal updates, incorporate small fabric or paper embellishments that tie in with holidays or themes. This calendar can be made in various sizes to suit your wall space.
Select reclaimed barn wood planks, then lightly sand and clean them. Use stencil or freehand techniques to paint the month names with acrylic or chalk paint, sealing each with a clear matte coat. Mount the panels on your wall with rustic hardware, spacing them evenly. Attach small chalkboard or whiteboard sections below for dates or notes. Consider adding a protective sealant for longevity.
Personalize by adding your own hand-lettered quotes or family initials. Use different font styles or colors to distinguish months or seasons. Incorporate small decorative elements like metal accents or fabric ribbons nearby. You can also change the painted headers yearly, allowing your calendar to evolve over time.
This vintage-inspired calendar blends artistry with utility, making every planning session feel special. It’s a handcrafted piece that adds history and warmth to your home. Creating your own design enhances your DIY skills and transforms routine planning into a creative ritual.
5. Minimalist Barn Wood Calendar with Cut-Out Date Windows
Fed up with cluttered calendars that distract more than they help? A minimalist barn wood calendar with cut-out date windows offers a clean, simple solution. It combines rustic warmth with a sleek design, making your wall a calm, organized focal point.
Envision a smooth, sanded barn wood panel with small rectangular or circular cut-outs arranged in a grid pattern. Behind each window, you can place transparent sheets or paper displaying dates or reminders. The natural grain of the wood frames the cut-outs, creating a subtle contrast that’s easy on the eyes. The overall effect is understated elegance with a rustic edge.
You can vary the size and shape of the cut-outs to suit your style—more geometric or organic. Paint or stain the wood in neutral tones for a modern look, or leave it in a natural state for authentic rustic charm. Add removable or sliding date cards behind the cut-outs for easy updates. This design adapts well to small spaces or contemporary interiors.
Choose a sturdy barn wood panel, then carefully mark and cut out the date windows with a jigsaw or hole saw. Ensure edges are smooth and sealed. Insert transparent sheets or paper behind each window, secured with adhesive or clips. Create small cards with dates, which you can slide or change regularly. Mount the panel securely on your wall, ensuring alignment and stability.
Decorate the edges with subtle painted borders or minimalist decals. Use colored or patterned transparent sheets for a pop of color. Consider adding small hooks or clips nearby for notes or additional reminders. Personalize the layout by spacing the windows differently, depending on your preferred calendar style.
This clean, simple calendar promotes focus and reduces visual clutter. It’s a great project for those who love minimalist design and want a durable, easy-to-maintain planning tool. With just basic tools, you can craft a sophisticated, rustic decor piece that keeps you organized effortlessly.
6. Barn Wood Calendar with Reclaimed Drawer Fronts for Monthly Pages
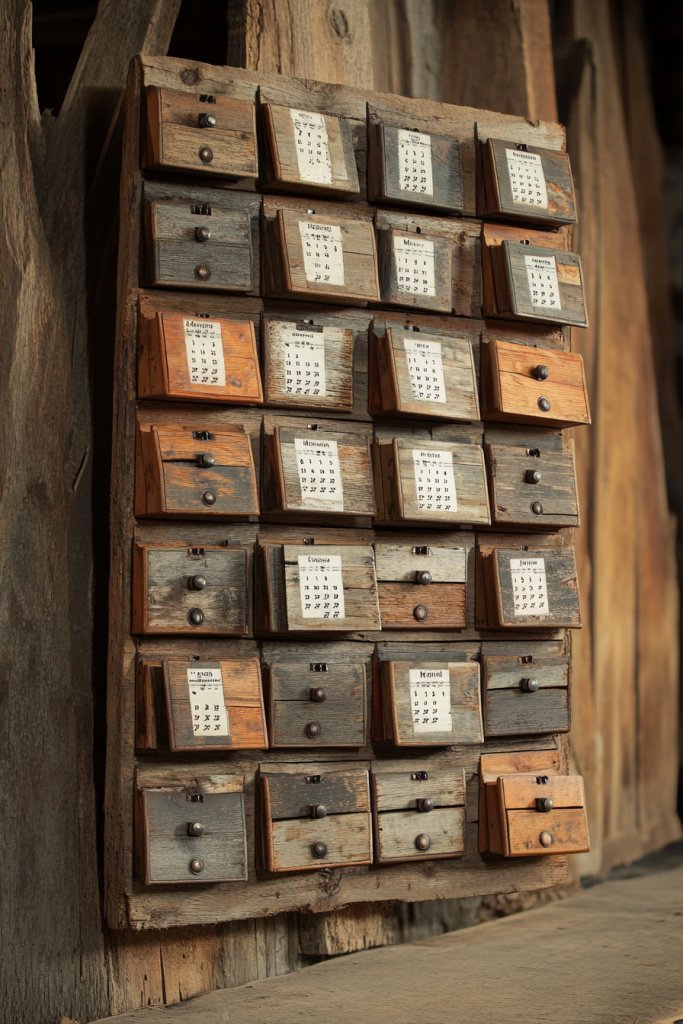
Looking for a unique way to keep your monthly schedule visible? Reclaimed barn wood combined with old drawer fronts creates a rustic, functional calendar that doubles as a piece of art. It’s perfect for those who love vintage finds and want to repurpose old furniture.
Imagine a series of weathered barn wood panels, each with a repurposed drawer front attached. The drawer fronts act as individual pages or holders for monthly info, with their original knobs or handles adding character. The rough textures and mismatched wood tones give a nostalgic, eclectic vibe. It’s a conversation starter that also keeps your dates organized.
Mix and match drawer fronts of different sizes, colors, or styles for a more eclectic look. Paint or stain the fronts to match your decor, or leave them in their original finish for authenticity. Incorporate labels or tags on the fronts for months or special dates. This setup adapts well to larger wall spaces or as a focal point in a vintage-inspired room.
Source reclaimed barn wood and drawer fronts from thrift stores or salvage yards. Sand and seal the wood to prevent splinters and preserve the finish. Attach the drawer fronts to the barn wood panels using screws or strong adhesive, ensuring they are level. Use chalkboard labels or tags for the months, attaching them with twine or magnets for easy change. Mount the entire piece securely on your wall.
Personalize by adding decorative hardware or painting the fronts with seasonal colors. Attach small hooks or clips to hold notes or small decorations. Label drawers with handwritten or stamped month names for a handcrafted touch. Incorporate personal memorabilia or vintage tags to make it truly yours.
This calendar blends sustainability with style, giving new life to old furniture parts. It’s a functional art piece that reflects your creativity and appreciation for vintage charm. Building it yourself offers a satisfying sense of accomplishment and a truly one-of-a-kind home accent.
7. Calendar with Barn Wood Backdrop and Rope-Hung Paper Sheets
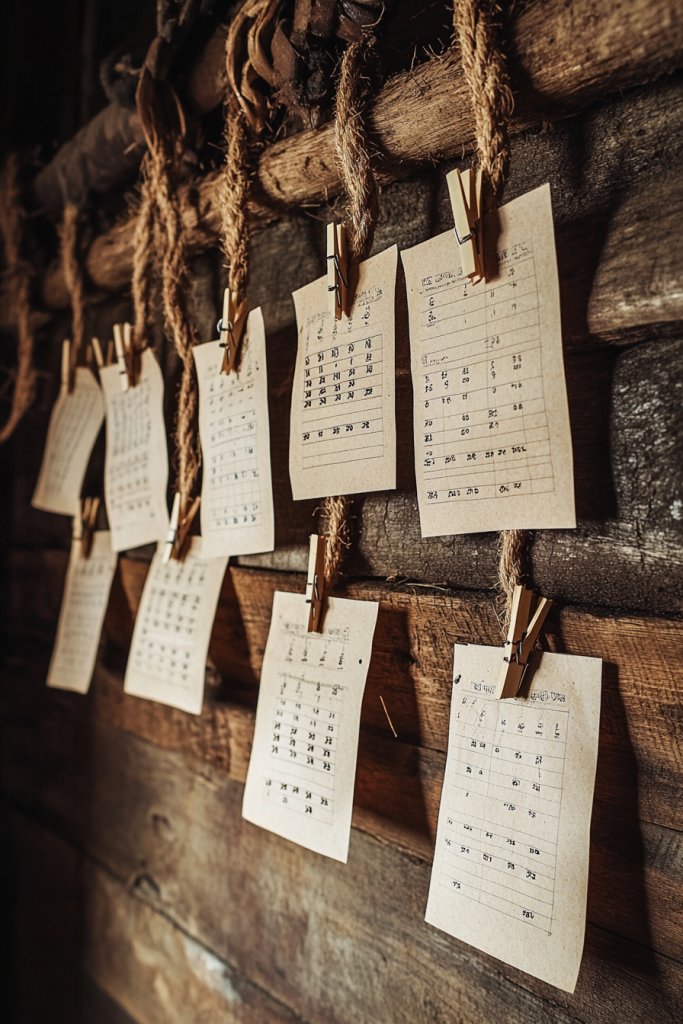
Do you struggle with rigid, unchangeable calendars that make updates a hassle? A barn wood backdrop with rope-hung paper sheets offers a flexible, rustic alternative. It’s easy to change, visually appealing, and adds a natural, handmade vibe to your planning space.
Visualize a large, textured barn wood panel mounted on your wall, with thick jute or hemp ropes hanging from hooks or nails. Large sheets of paper, marked with dates or notes, hang from these ropes with clothespins or knots. The rough wood and natural fibers create a warm, organic contrast, inviting touch and interaction. The hanging movement adds a soft, relaxing element.
Use different textured papers, such as kraft, recycled, or handmade varieties, to suit your style. Change the sheets seasonally or for special occasions, attaching decorative trim or stamps if desired. For a more streamlined look, use thinner ropes or minimalist clips. This system is versatile for kitchens, craft rooms, or entryways.
Select a sturdy barn wood panel and mount it securely. Attach heavy-duty hooks or nails at regular intervals. Cut large sheets of paper to size, then write or print your dates and plans. Use colorful or neutral ropes depending on your aesthetic, and secure them with knots or clips. Hang the sheets from the ropes, adjusting the length as needed. Replace sheets easily whenever necessary.
Decorate paper sheets with hand-lettered titles, doodles, or seasonal motifs. Add small decorative elements like fabric patches or stickers for visual interest. Incorporate a small basket or pocket nearby for extra sheets or supplies. Personal touches make the system more engaging and uniquely yours.
This hanging system makes planning interactive and adaptable, perfect for dynamic households. It encourages creativity and keeps your decor rustic yet functional. With minimal tools, you create a flexible, charming planning station that’s easy to update and maintain.
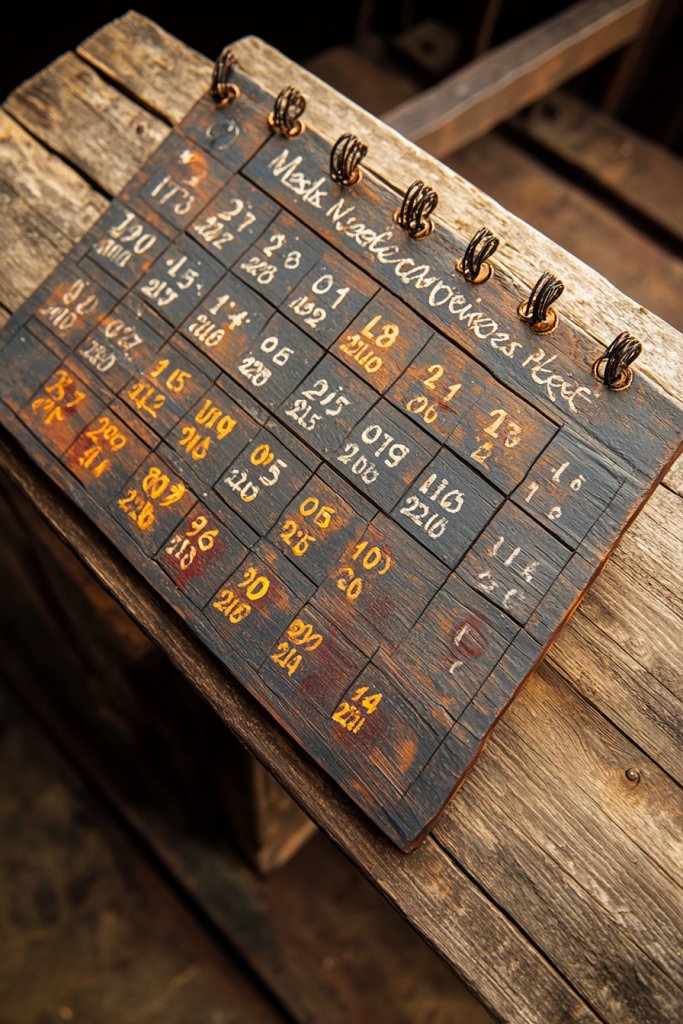
8. Vertical Barn Wood Slat Calendar with Layered Date Tiles
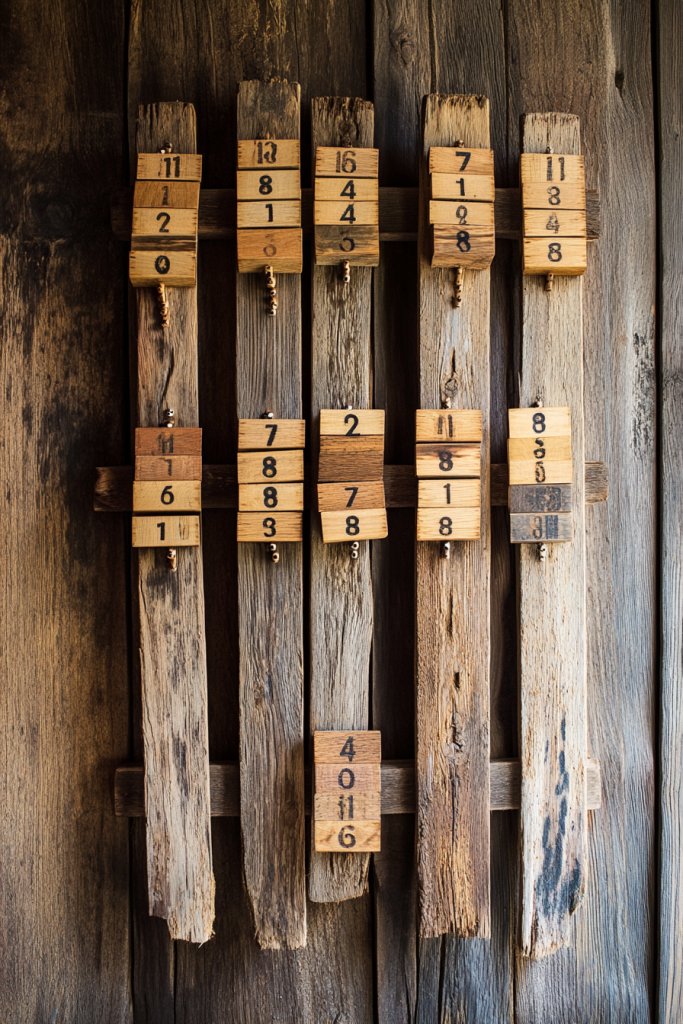
Ever want a calendar that’s both functional and adds a touch of craftsmanship? A vertical barn wood slat calendar with layered date tiles offers a DIY project that’s both practical and eye-catching. It’s perfect for those who love tactile decor and clear organization.
Imagine narrow barn wood slats arranged vertically, with small wooden tiles for dates layered on top. The tiles can be stacked or slid into slots, allowing easy movement for changing days. The natural, rough texture of the wood combined with smooth, painted tiles creates a rustic-meets-modern aesthetic. The layered effect adds depth and interest to your wall.
Paint or stain the slats in neutral or bold tones to match your decor. Use different colors or patterns for the date tiles to signify weekends, holidays, or special days. Incorporate seasonal themes by customizing the tiles with stickers or hand-painting motifs. This adaptable design works well in kitchens, offices, or entry halls.
Cut barn wood slats to your desired length, sand and seal for longevity. Create small wooden tiles with numbers or months, sealing them with a protective finish. Attach thin grooves or rails on the slats to hold the tiles, or use magnets if appropriate. Mount the slats on the wall, then layer the date tiles, rearranging as the days change. Regularly update by sliding or stacking tiles accordingly.
Decorate tiles with hand-painted accents or stickers for holidays. Use contrasting colors for weekends or important dates. Add a small chalkboard section at the bottom for notes or weekly goals. Personalize the overall look with your favorite stains or paint styles for a truly custom piece.
This layered calendar combines craftsmanship with practicality, making daily planning engaging. It’s a DIY project that boosts your decor’s rustic appeal while helping you stay organized. Once installed, it becomes a functional art piece that you’ll enjoy updating daily.
9. Barn Wood Calendar with Embedded Chalkboard Strips and Hooks
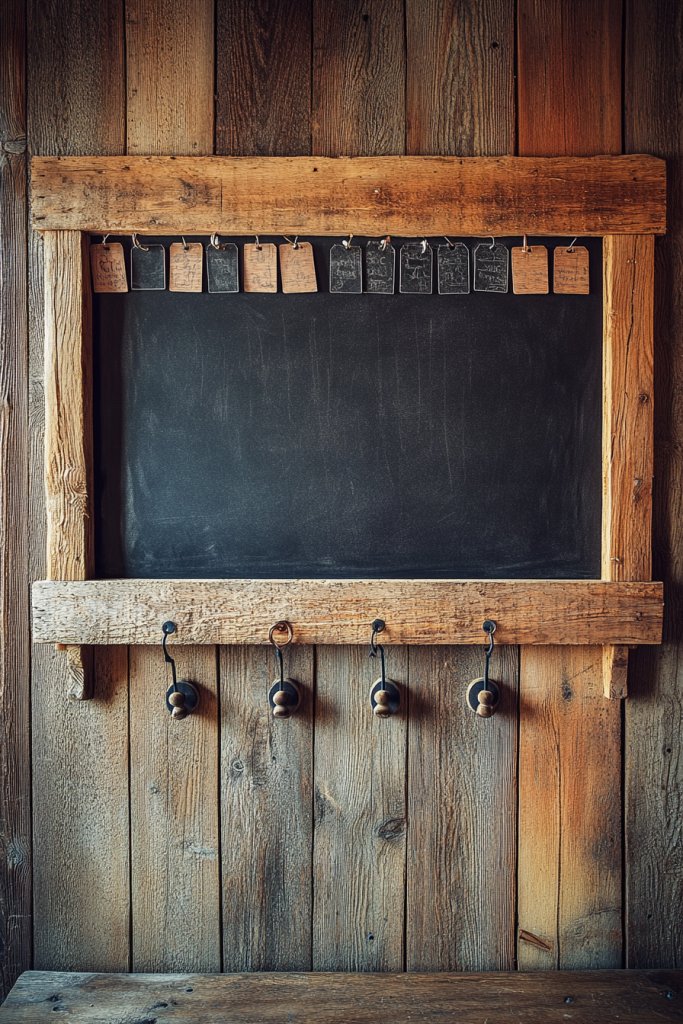
Tired of boring calendars that do little more than tell you the date? A barn wood calendar with embedded chalkboard strips and hooks offers a rustic, interactive way to stay organized. It combines visual appeal with functional flexibility, perfect for busy households.
Picture a wide barn wood board with several embedded narrow chalkboard strips, either painted directly or inset with chalkboard material. Hooks hang along the bottom or sides, ready for notes, keys, or reminders. The textured wood serves as a warm backdrop, while the chalk strips invite daily updates. This setup balances rustic charm with practical use.
Opt for dark-stained or natural wood backgrounds to match your decor. Use colorful chalk markers for highlights or special notes. The hooks can be replaced with decorative knobs or small baskets for added storage. This design can be scaled for entryways, kitchens, or offices, adjusting the number of strips and hooks.
Select a sturdy barn wood piece, then carefully inset or paint chalkboard strips with durable, erasable paint. Attach hooks with small nails or screws, ensuring they’re level and secure. Write or draw your dates, weekly plans, or motivational quotes on the chalkboard strips. Use the hooks for keys, lanyards, or notes, keeping everything accessible and organized. Mount securely.
Personalize with hand-lettered headings or decorative borders on the chalkboard strips. Change colors or add doodles for seasonal updates. Use small containers or clips on the hooks for organizing supplies. This setup encourages daily interaction, making planning a fun part of your routine.
This calendar elevates your home’s rustic appeal while providing a versatile planning tool. It’s an engaging way to keep your life organized and visually appealing. Once you see how easy and satisfying it is to update, you’ll wonder how you managed without this charming system.
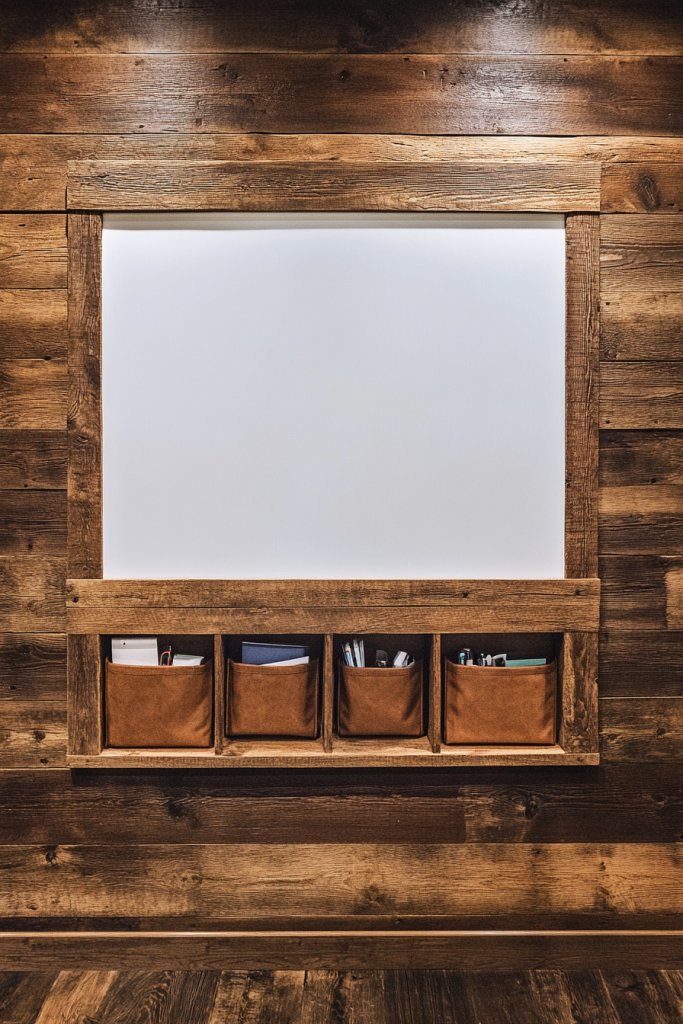
10. Multi-Functional Calendar with Storage Shelves and Barn Wood Frame
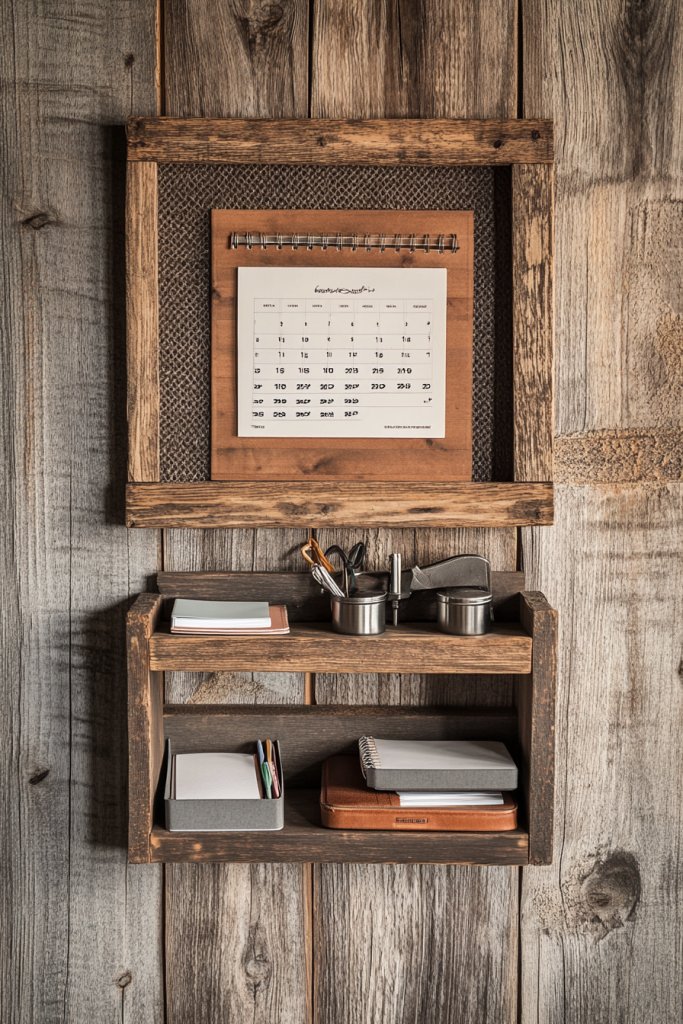
Struggling to keep your planning tools and everyday essentials in one place? A barn wood calendar with built-in storage shelves offers a stylish, practical solution. It combines rustic charm with everyday organization, reducing clutter and making your space more functional.
Envision a large barn wood framed panel with small, integrated shelves or cubbies along the bottom or sides. These shelves hold pens, notepads, or decorative items, while the calendar area displays dates or plans. The textured wood and simple design create a cozy, farmhouse vibe. It’s a visual anchor that keeps everything you need within reach.
Choose different stain or paint finishes to match your decor style—from light and airy to dark and moody. Incorporate small baskets or jars on the shelves for supplies. You can also customize shelf sizes for specific items, or add hooks for keys or utensils. This design fits well in kitchens, mudrooms, or home offices, adapting to your needs.
Start with a sturdy barn wood frame, then build or attach small shelves using scrap wood or repurposed materials. Seal and stain the wood for durability. Mount the frame securely on your wall, then organize your essentials on the shelves. Attach a simple calendar or whiteboard section for planning. Use wall anchors if necessary to support heavier items.
Add decorative labels, painted accents, or small signs to personalize the shelves. Incorporate small hooks or pegs for hanging tools or decor. Use coordinated colors for storage containers to keep everything tidy. This setup encourages a clutter-free, organized lifestyle while adding rustic character.
This multi-functional piece proves that style and utility can coexist beautifully. It helps you stay on top of daily routines while keeping your space tidy and welcoming. Building this yourself gives you a sense of pride and a durable, personalized decor element.
11. Large Barn Wood Calendar with Customizable Pegboard Sections
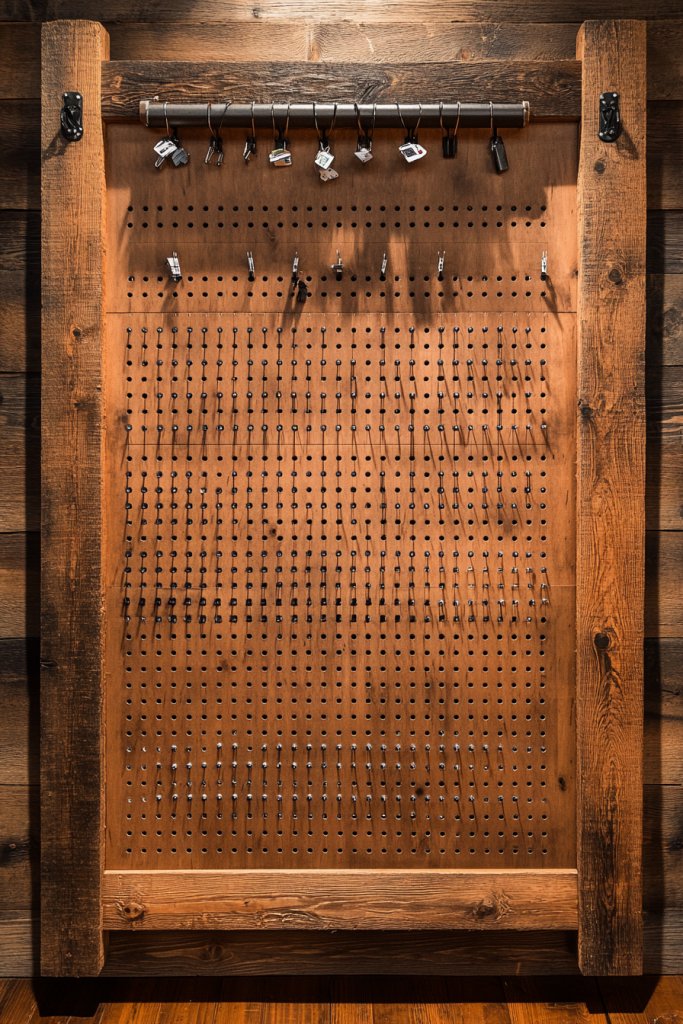
Ever wish your calendar could do more than just tell the date? A large barn wood frame with customizable pegboard sections turns your planning into a flexible, interactive experience. It’s rustic, functional, and adaptable to your evolving needs.
Imagine a substantial barn wood frame enclosing a central calendar area, flanked or topped with pegboard sections. The pegboards hold hooks for attaching note cards, small baskets, or decorative elements. The natural wood’s rough texture contrasts with the orderly arrangement of pegs and accessories, creating an eye-catching focal point. It’s a dynamic workspace that invites creativity.
Paint or stain the barn wood to match your decor. Use different pegboard colors or patterns for visual interest. Customize the hooks and accessories based on your needs—pens, small containers, or decorative items. This setup works well in kitchens, craft rooms, or garages, and can be scaled to fit large walls or compact spaces.
Select a large barn wood panel, then frame or attach pegboard sections securely. Use appropriate hooks and accessories to hold your notes, tools, or decorative items. Arrange the peg sections to organize different categories—meal plans, project ideas, or reminders. Mount the entire piece securely, ensuring stability and safety. Regularly update the pegboard contents as your schedule and projects evolve.
Personalize with custom labels, painted accents, or themed accessories. Incorporate small shelves or baskets onto the pegboard for extra storage. Use color coding or decorative elements to distinguish different sections. This makes your planning both functional and fun, especially for visual thinkers.
This large, adaptable calendar is a statement piece that boosts your organization skills. It’s a creative way to stay on top of everything while adding rustic charm to your home. Building it yourself ensures a personalized touch that’s both practical and inspiring.
12. Seasonal Barn Wood Calendar with Removable Wooden Tabs
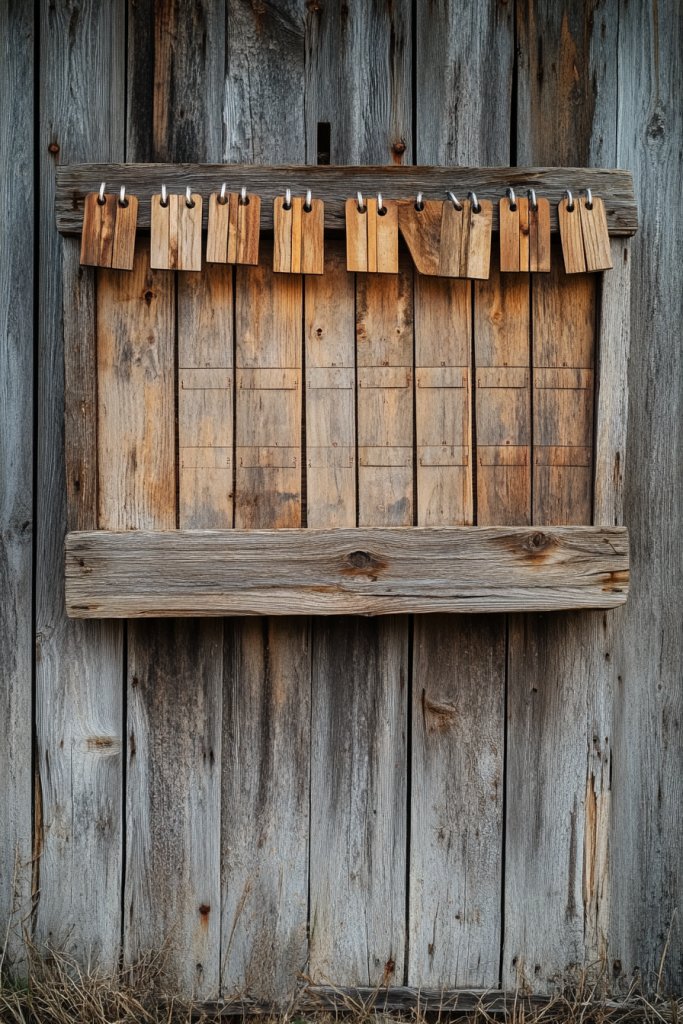
Are traditional calendars too static for your dynamic lifestyle? A seasonal barn wood calendar with removable wooden tabs makes it easy to update and personalize your planning. It’s a rustic, charming solution that keeps your space fresh all year round.
Visualize a sturdy barn wood panel with small wooden tabs labeled with months, seasons, or special dates. The tabs slide into slots or are attached with small pegs, allowing quick changes. Natural wood textures, combined with painted or stamped labels, create a warm, inviting look. The visual rhythm of tabs adds a tactile dimension to your planning.
Paint or stain the tabs in seasonal colors—reds and oranges for fall, cool tones for winter. Use decorative stamps or hand-lettered labels for a personal touch. You can also add themed icons or motifs on the tabs for holidays or special occasions. This design adapts to various wall sizes and can be part of a larger farmhouse or vintage decor scheme.
Begin with reclaimed barn wood, then cut and sand the panels. Make or buy small wooden tabs, labeling each with months or seasons. Attach slots or pegs on the panel to hold the tabs securely. Mount on your wall, then slide or attach the tabs according to the current season or month. Switch them out easily as time progresses. Keep extra tabs handy for quick updates.
Decorate tabs with hand-lettered calligraphy, stamping, or painted motifs. Use different textures or finishes to distinguish seasons. Add small decorative elements like metallic accents or fabric ribbons for a handcrafted touch. Organize extra tabs in a nearby container for easy access and updates.
This seasonal calendar keeps your decor lively and relevant throughout the year. It encourages mindful planning and adds a personal, artistic element to your space. Crafting it yourself deepens your connection to your home while making seasonal transitions fun and engaging.
13. Barn Wood Calendar with Embedded Dry Erase Board and Storage Pockets
Do you need a versatile, easy-to-update planning station? A barn wood calendar with embedded dry erase board and storage pockets offers a rustic, multifunctional solution. It’s perfect for quick notes, weekly plans, and organizing supplies all in one place.
Picture a large barn wood panel with a recessed or embedded dry erase surface, framed in weathered wood. Adjacent or below, small fabric or leather pockets hang for storing pens, papers, or small tools. The textured wood combined with sleek whiteboard surfaces creates a cozy yet modern vibe. It’s a hub of activity that invites interaction.
Choose different finishes—stains, paints, or natural wood—to match your decor. Decorate the pockets with labels, symbols, or colors to organize different categories. Use the whiteboard for weekly schedules, to-do lists, or motivational quotes. This setup suits kitchens, offices, or family command centers, adaptable in size.
Select a durable barn wood piece, then create or purchase a dry erase panel that fits within the frame. Attach small pockets or organizers with hooks or sewing. Mount the whole unit securely on your wall, ensuring easy access to pens and notes. Use high-quality markers and clean regularly for neatness. Keep extra supplies in the pockets for convenience.
Label pockets with hand-painted tags or stamped symbols. Decorate the frame with carved or painted accents for a personalized touch. Incorporate a small cork section or clip for additional notes or photos. Regularly update your schedules and inspire yourself with motivational quotes on the whiteboard.
This multifunctional calendar simplifies daily planning while adding rustic charm. It transforms a simple wall into an interactive hub that evolves with your needs. Building it yourself increases your confidence and creates a practical, stylish centerpiece for your home.
14. Compact Barn Wood Calendar with Recessed Date Slots and Minimalist Design
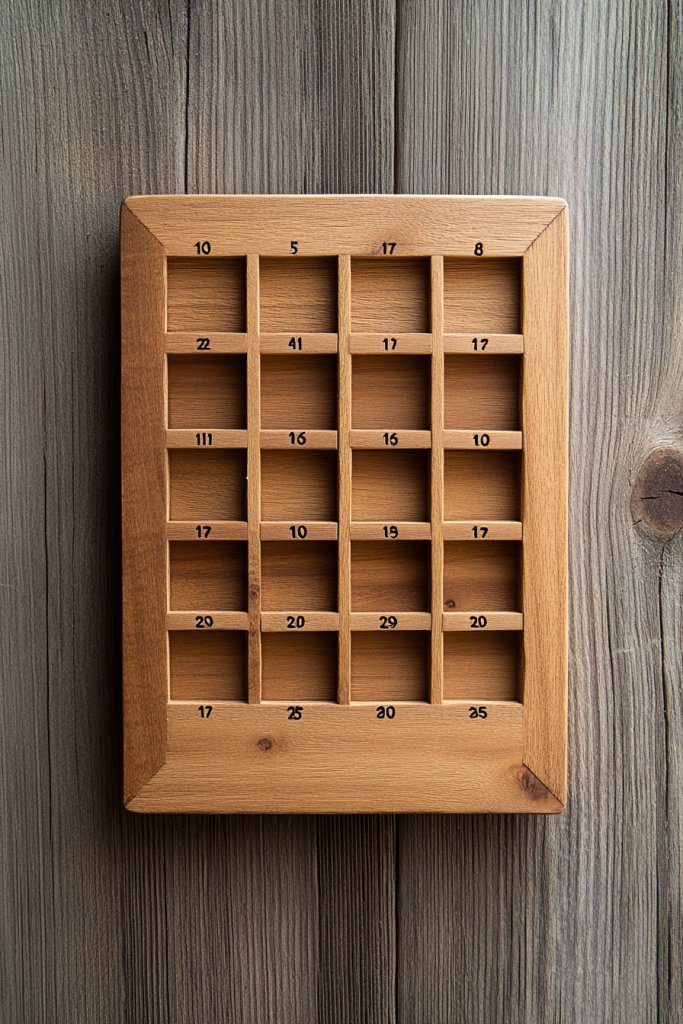
Limited space doesn’t mean you have to sacrifice style or functionality. A compact barn wood calendar with recessed date slots offers a minimalist yet effective way to keep track of days. It’s a sleek, space-saving project perfect for entryways or small offices.
Imagine a small, smooth barn wood panel with shallow recessed slots for date cards. The natural grain and subtle imperfections of the wood add warmth, while the simple slots keep the focus on the dates. The cards can be slipped in and out easily, changing with the days or weeks. It’s a clean, modern look with rustic appeal.
Stain or paint the wood in neutral tones for a contemporary look, or leave it in natural finish for rustic charm. Use color-coded date cards or add small icons for weekends and holidays. Perfect for small wall spaces, it can be combined with a whiteboard or chalkboard for notes. It adapts nicely to various decor styles.
Cut and sand a piece of barn wood to your preferred size, then create shallow slots using a router or chisel. Prepare date cards from thick paper or thin wood, writing the dates clearly. Insert the cards into the slots, updating daily or weekly. Mount securely with wall anchors, ensuring the slots are level. Regularly replace or rearrange the cards as needed.
Add a small painted or engraved label with your family name or a motivational quote. Use different colors for weekends or special dates to enhance functionality. Incorporate decorative edge trim or corner details for extra character. Personal touches make the calendar uniquely yours.
This compact, minimalist calendar proves that less is more, especially in small spaces. It’s a tidy, easy-to-use system that enhances your organization and decor. With simple tools and a bit of patience, you create a sleek focal point that keeps your schedule on track.
15. Multi-Color Barn Wood Calendar with Painted Monthly Sections
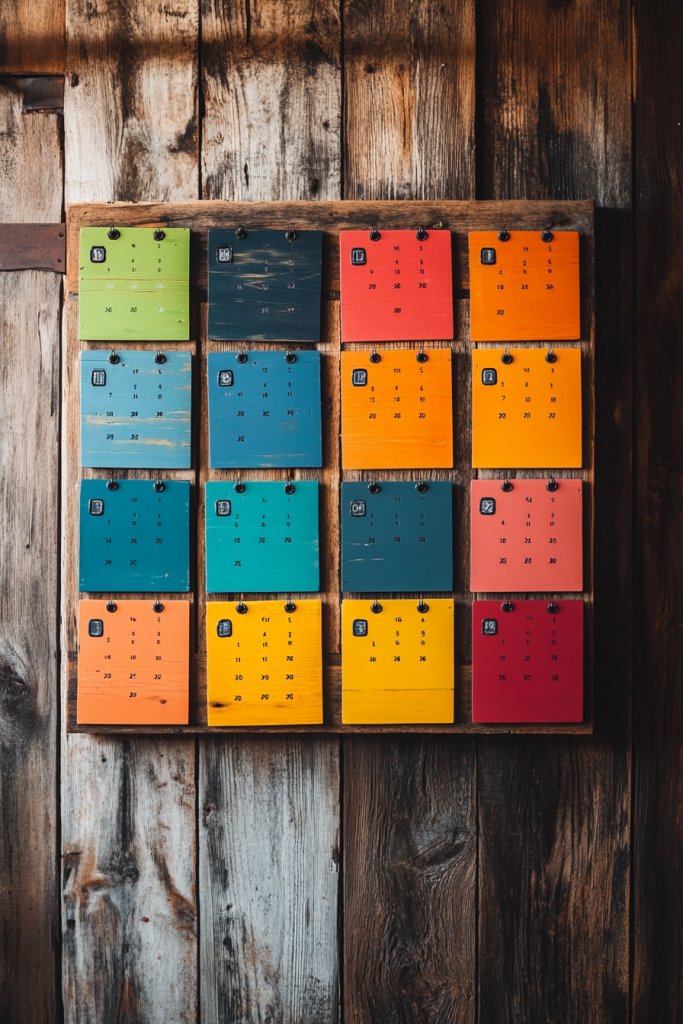
Want a calendar that’s both functional and full of personality? A multi-color barn wood calendar with painted monthly sections adds vibrancy and clarity to your planning. It’s a cheerful, eye-catching decor piece that motivates you every day.
Visualize a large piece of barn wood divided into sections, each painted in a different color to represent a month. The paint is slightly distressed for vintage charm, while the rustic wood grain peeks through. Hand-lettered or stenciled month names sit atop, making it easy to identify each section. Bright colors and textured finishes make this piece lively and inviting.
Use colors that match your decor palette—warm tones for cozy spaces, cool hues for modern interiors. Incorporate decorative motifs or patterns within each section for seasonal themes. Add small embellishments like fabric ribbons, painted icons, or stickers for special dates. This setup works well in kitchens, playrooms, or craft areas, adaptable in size.
Start with a solid barn wood board, then divide into sections using painter’s tape or wood strips. Paint each section with weatherproof or acrylic paint, sealing for durability. Write or stencil month names on top of each section, and attach a whiteboard or chalkboard strip underneath for dates. Mount the piece securely on your wall, ensuring each section stands out visually. Update monthly by changing or adding notes.
Personalize with hand-lettered quotes or family initials within each section. Use different textures—like metallic, matte, or gloss—to add depth. Incorporate seasonal accents or themed stickers for holidays. Keep extra labels or decorations nearby for quick updates throughout the year.
A multi-color, painted calendar infuses your space with energy and clarity. It turns daily planning into a joyful activity and reflects your creative spirit. Building it yourself allows you to tailor colors and themes, making it a personal statement piece.
16. Barn Wood Calendar with Wire Grid and Clip Holders for Flexibility
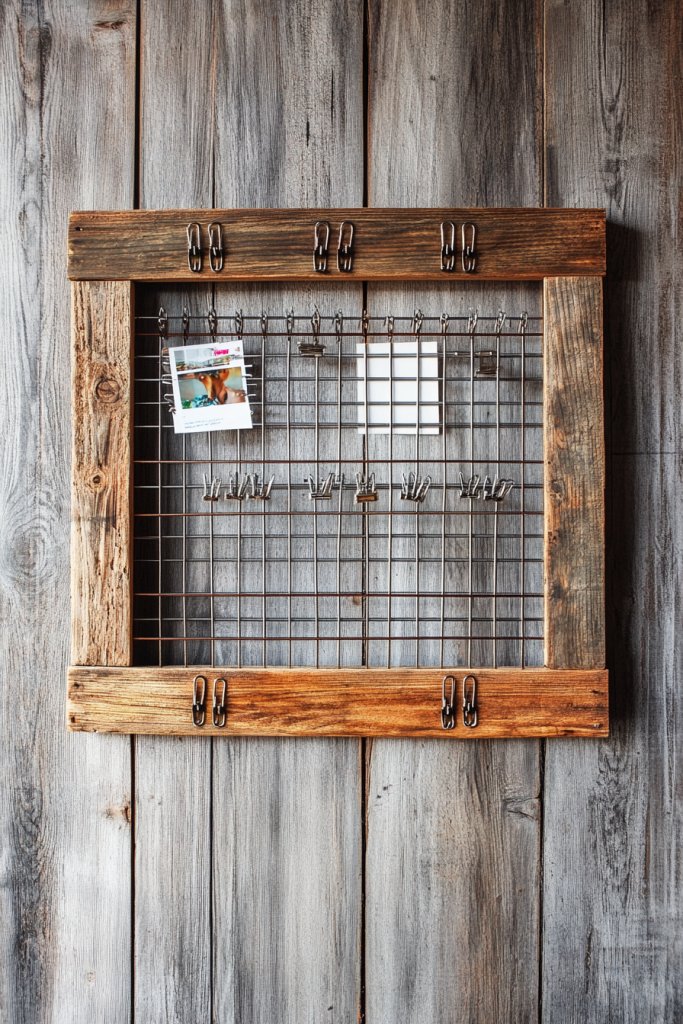
Looking for a versatile calendar that adapts to your changing needs? A barn wood framed wire grid with clip holders offers a flexible, rustic way to organize schedules, notes, and photos all in one spot. It’s perfect for those who love DIY projects and crave a mix of function and farmhouse style.
Visualize a large barn wood frame enclosing a metal wire grid, with clip holders hanging from the grid’s intersections. Photos, notes, or date cards clip onto the wire, making it easy to change content frequently. The textured, weathered wood contrasts with the sleek metal grid, adding rustic charm. It’s a dynamic display that feels both organized and inviting.
Paint or stain the barn wood in your preferred finish for personality. Use colorful clips or hooks for visual pop or to categorize items. Add small shelves or pockets behind the grid for extra storage. This setup is adaptable for family schedules, project planning, or displaying favorite memories, fitting various wall sizes.
Choose a sturdy barn wood frame and attach a metal wire grid using hooks or screws. Ensure the grid is taut and secure. Use clips or clothespins to attach date cards, notes, or photos, swapping them out as needed. Mount the entire assembly on the wall with appropriate anchors. Regularly update with new content, keeping things fresh and organized.
Decorate clips with paint or washi tape for a personalized look. Incorporate themed motifs or labels for different categories—like work, family, or events. Add decorative elements like small tags or signs to enhance visual interest. This flexible system encourages daily interaction and keeps your space lively.
This wire grid calendar transforms planning into a creative activity, making it easy to stay organized. Its rustic charm and adaptability make it a centerpiece in any room. DIYing it gives you pride in your home decor while keeping your schedule front and center.
Conclusion
From sleek, modern layouts to charming vintage-inspired designs, these DIY barn wood calendar ideas offer a versatile range of options to enhance your home decor. Embrace the creative process and customize each piece to match your style and needs. Dive into these projects and transform your walls into functional works of art that inspire you every day!