Ever dreamed of giving your guest bedroom a fresh, cozy look without spending a fortune or months of work? A DIY two-weekend makeover is the perfect way to achieve this, making it both achievable and incredibly rewarding. This approach is gaining popularity because it allows homeowners to transform their space with personal touches, budget-friendly ideas, and a manageable timeline.
In this article, you’ll find a variety of creative and practical ideas to help you turn your guest bedroom into a welcoming retreat. From simple decor upgrades to clever furniture hacks, these ideas will inspire you to create a space that feels warm, functional, and inviting—perfect for your guests and your everyday comfort alike.
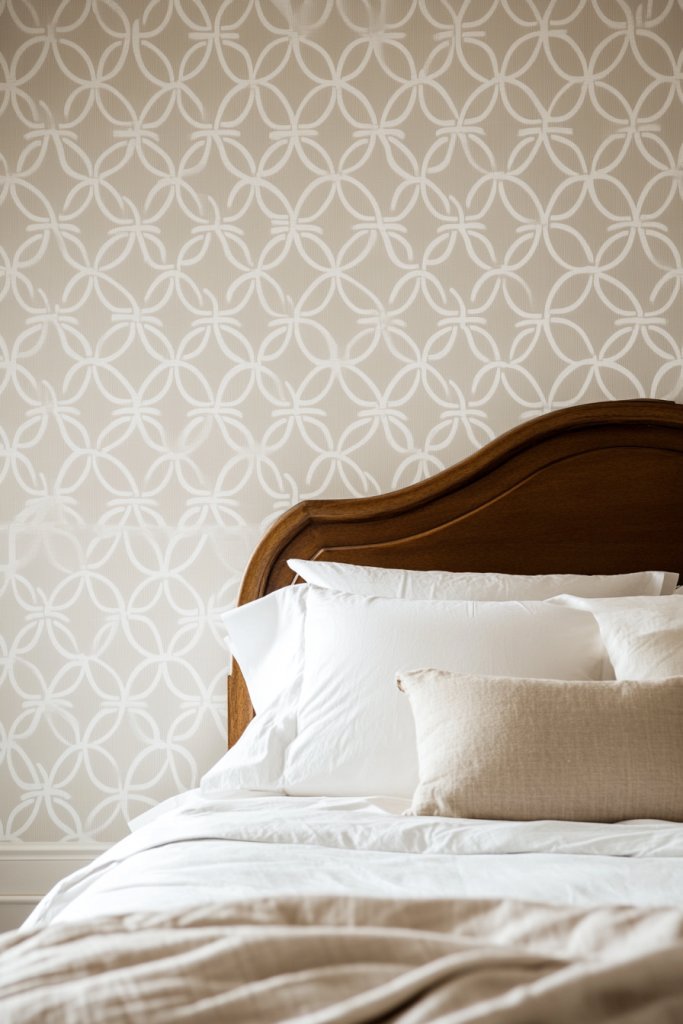
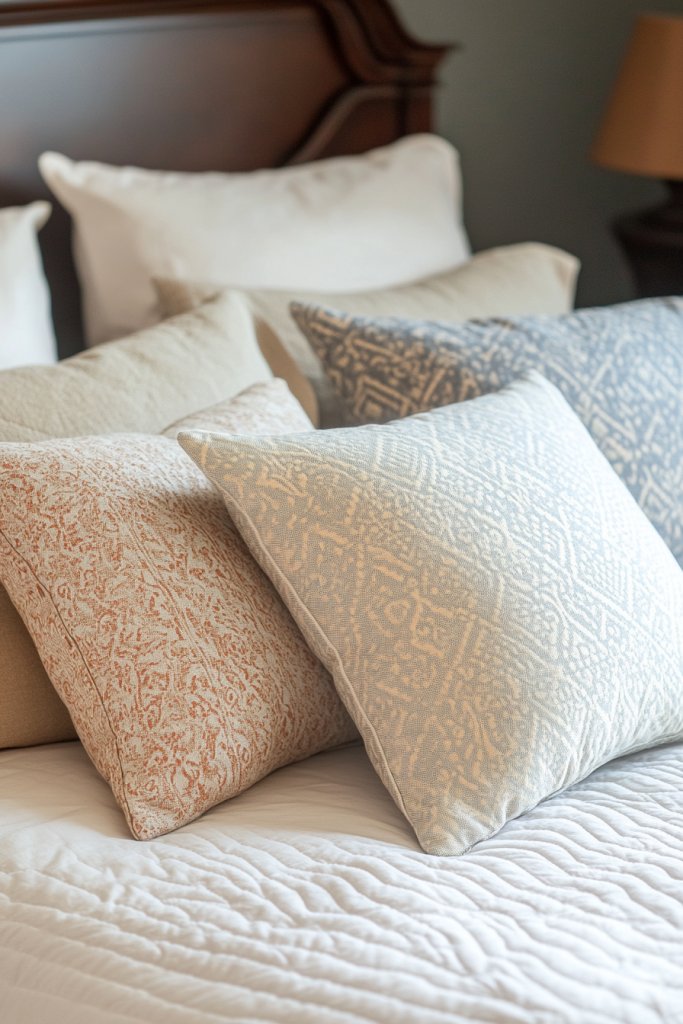
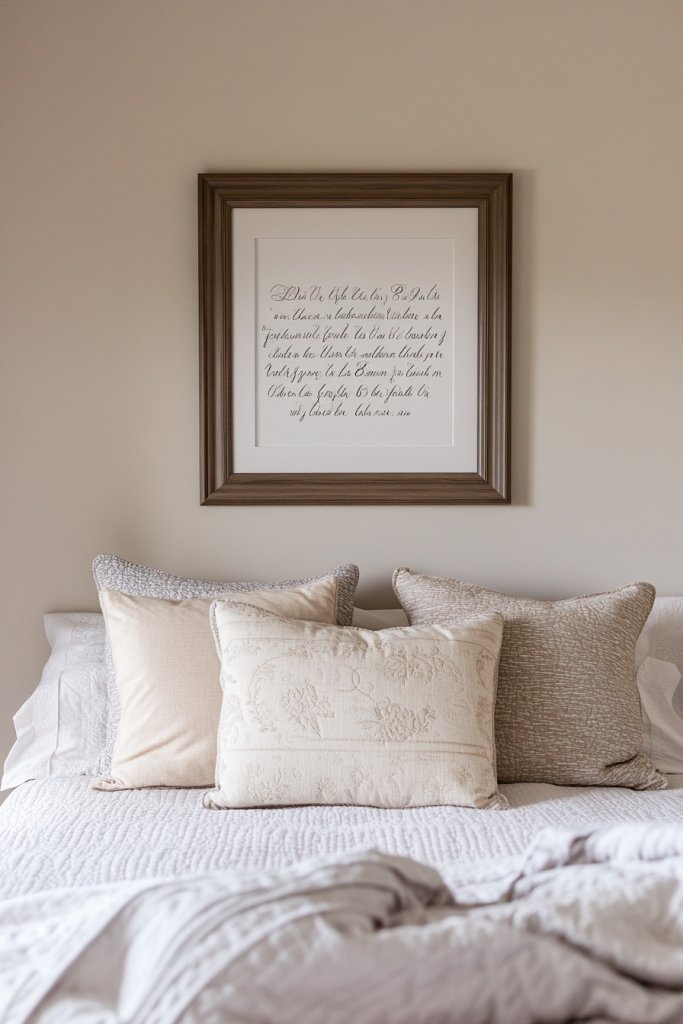
1. Create a Soft, Layered Bedding Sanctuary with Fluffy Throws and Cushions
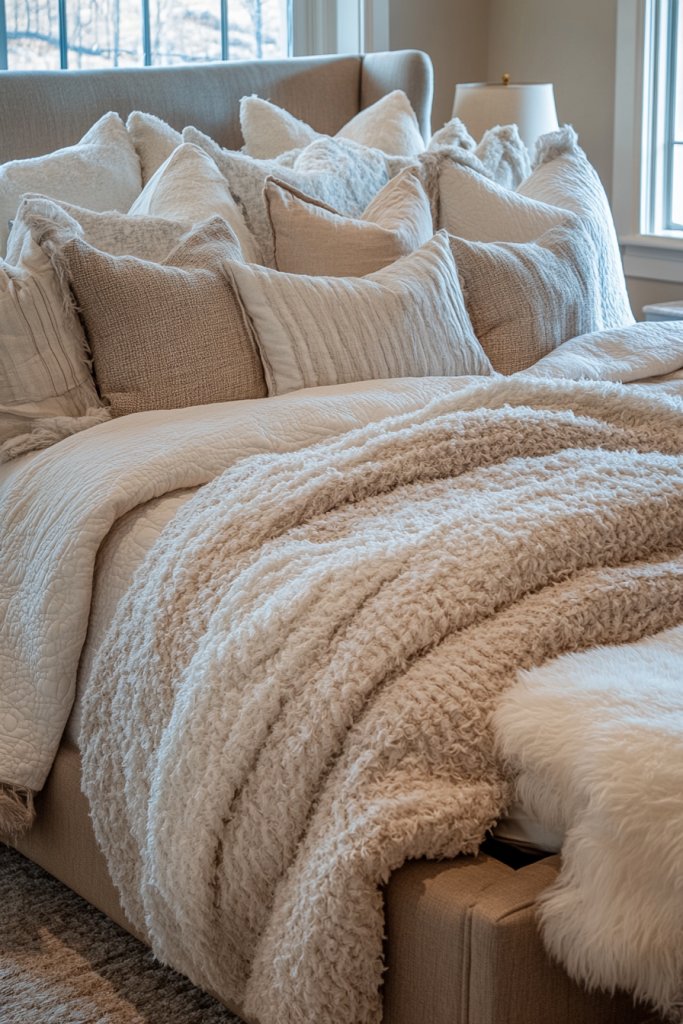
Ever stayed in a guest room that feels more like a prison cell than a cozy retreat? The bed often becomes the centerpiece that can either invite relaxation or repel it. Everyone wants their visitors to feel pampered, but sometimes the bedding setup just isn’t welcoming enough. That’s where a plush, layered bedding sanctuary can make all the difference, transforming a dull space into a haven.
Imagine slipping into a bed piled high with a variety of textured throws—soft creams, chunky knits, and silky smooth fabrics. Oversized cushions with vibrant covers and playful patterns add personality and comfort. The bed practically calls out to be jumped into, with a visual mix of plushness and color that screams relaxation. Light plays softly off the different textures, creating a warm, inviting glow.
You can tailor this look to match any style—think sleek monochrome for modern simplicity or a mix of boho textiles for a laid-back vibe. Seasonal swaps are simple: add a faux fur throw for winter or lightweight linen covers for summer. For a more luxurious feel, incorporate velvet cushions or silk pillowcases. The key is mixing textures and colors that reflect your personal taste.
Start by selecting a few key throws in different textures and thicknesses—perhaps a fluffy faux fur, a chunky knit, and a silky satin. Layer these on your bed, starting with the largest pieces at the bottom. Mix in cushions of varying sizes and shapes, and choose pillow covers in complementary colors. Don’t forget to fluff and arrange the cushions for maximum visual impact. Using a bed with a simple frame makes this look easier to achieve without clutter.
Add a personal touch by customizing your cushions with embroidery or fabric paints. Incorporate a favorite color scheme or pattern that matches the rest of the room. Swap out cushions or throws to match holidays or seasons, keeping the setup fresh and inviting. Use decorative trims or tassels to elevate the look further, making it uniquely yours.
A layered bedding sanctuary instantly elevates your guest room from forgettable to fabulous. It signals comfort, thoughtfulness, and a welcoming attitude. Plus, it’s a simple update that doesn’t require a full overhaul. Your guests will thank you for the cozy vibes, and you’ll love the chic look you’ve created.
2. Paint a Warm, Inviting Accent Wall with Easy DIY Techniques
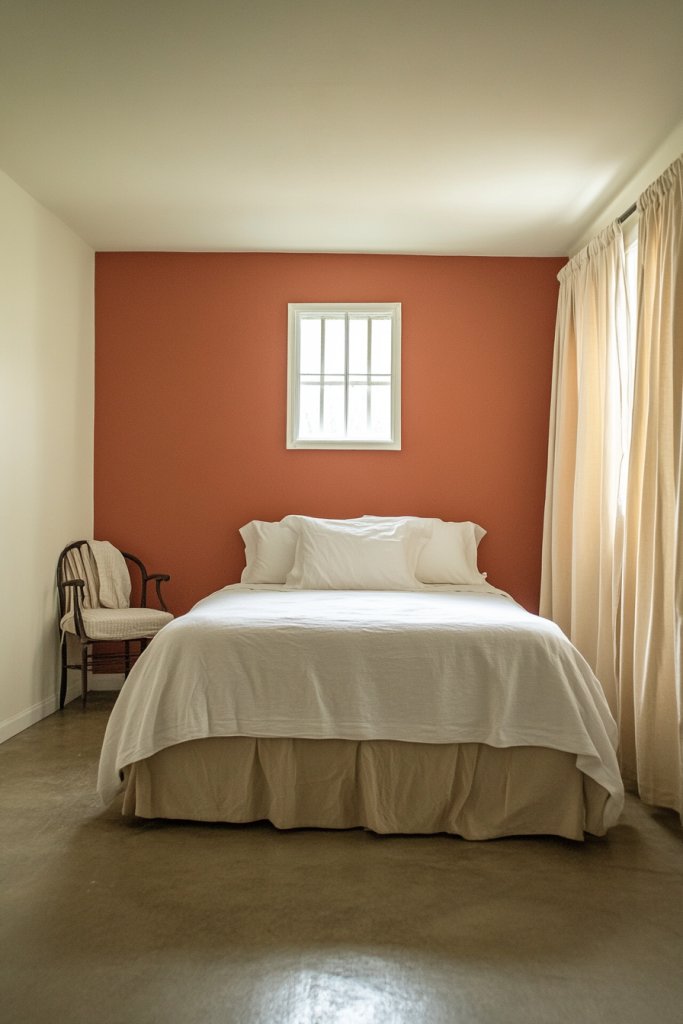
Let’s be honest—most guest rooms are pretty bland, right? A splash of color can change everything, but hiring a painter or splurging on wallpaper isn’t always feasible. The good news? Creating an accent wall with DIY techniques is a budget-friendly way to add warmth and personality. Plus, it’s surprisingly easy to do, even for beginners.
Picture a wall painted in a rich, warm hue like terracotta or deep mustard—instant coziness radiates from it. You might add subtle patterns with painter’s tape for stripes or geometric shapes that catch the eye. A matte finish absorbs light softly, making the room feel snug and inviting. This wall becomes the focal point, anchoring the entire space with its bold personality.
Choose colors based on the mood you want—soft pastels for a calming effect or dark jewel tones for drama. Seasonal color swaps can refresh the room: bright yellows or aqua for summer, deep reds or navy for winter. For a textured look, consider sponging or rag-rolling techniques that add depth without much effort. The design can be as simple or intricate as your skill level allows.
Begin by taping off the designated wall carefully, ensuring clean, straight lines. Use high-quality interior paint with a good coverage rate—don’t skimp on quality here. Apply a primer if your wall color is drastically different from your chosen hue. Use a roller for large areas and brushes for edges and corners. Multiple thin coats yield the best finish, so patience is key. Remove painter’s tape before the final coat dries for a crisp line.
Complement the accent wall with matching or contrasting textiles—think curtains, bed linens, or cushions that pick up the wall color. Hang minimalist artwork or framed photos nearby to enhance the style. You can even add a DIY stencil pattern for extra flair, using painter’s tape and a contrasting hue. Keep it simple and let the wall be the star.
A DIY accent wall adds instant personality and warmth without breaking the bank. It’s a creative project that’s totally doable and highly customizable. Once finished, you’ll feel a real sense of achievement—plus, your guests will love the bold, inviting vibe it creates. Who knew painting could be this fun?
3. Build a Custom Headboard with Reclaimed Wood or Upholstered Panels
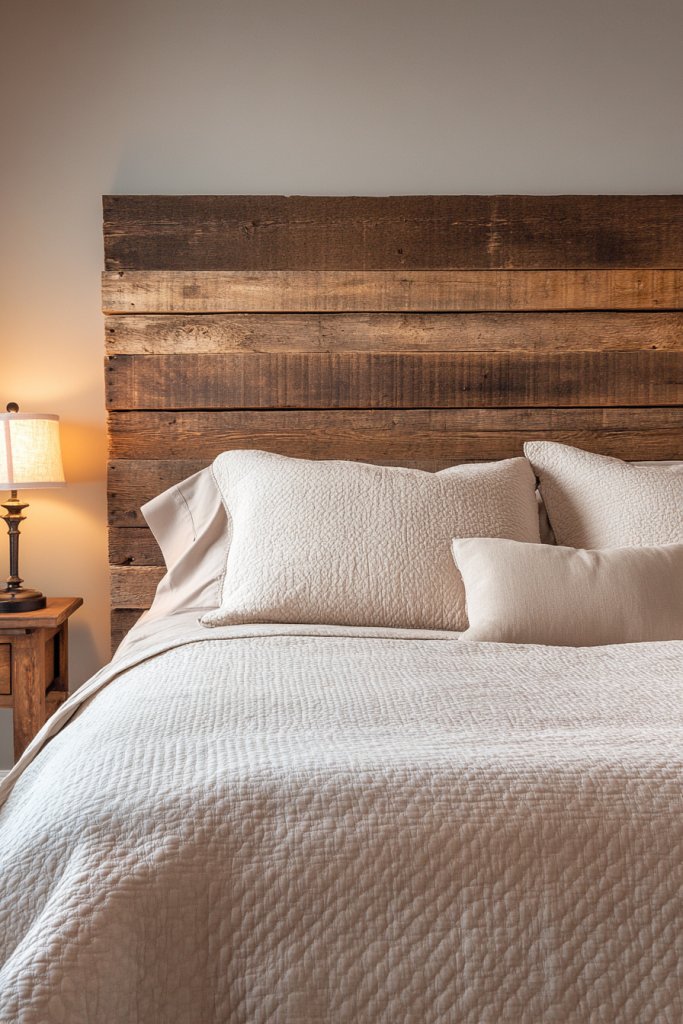
A plain, boring bed frame can make a room feel unfinished, right? A headboard instantly elevates the look, adding style and personality. But buying one can be pricey, and off-the-shelf options often lack character. Building a custom headboard with reclaimed wood or fabric panels is a smart, budget-friendly solution that adds charm and a personal touch.
Imagine a headboard made from weathered barn wood, showcasing natural grain and imperfections that tell a story. Alternatively, picture a plush upholstered panel in a bold fabric, tufted or smooth, adding softness and luxury. Both options serve as a visual anchor, drawing the eye and creating a cozy focal point behind the bed. The textures and colors set the tone for the entire room.
Reclaimed wood works well in rustic, industrial, or farmhouse styles, while upholstered panels suit modern or glam aesthetics. You can paint or stain the wood to match your decor, or leave it raw for a natural look. For upholstery, choose fabrics that complement your bedding and room palette—think velvet, linen, or even faux leather. Adjust the size to fit your bed—full, queen, or king—and your room’s proportions.
Start by measuring your bed’s width and deciding on the headboard height. For reclaimed wood, gather old pallets, barn wood, or reclaimed planks, and sand rough edges for safety. Cut to size and assemble with nails or brackets, then stain or paint if desired. For upholstered panels, build a wooden frame, attach foam padding, and cover with fabric, securing with a staple gun. Mount the finished piece securely to the wall behind the bed.
Add decorative nails or trim to upholstered panels for a tailored look. Incorporate personal details like monogrammed initials or contrasting piping. For reclaimed wood, embellish with metal accents or stencils for added character. Change up the fabric seasonally or for special occasions—think velvet for winter, linen for summer. The headboard becomes a true expression of your style.
A custom headboard transforms a basic bed into a stylish centerpiece and boosts the room’s overall vibe. It’s a project that combines creativity with practicality, and the results are utterly rewarding. Your guests will be impressed by the personal touch, and you’ll enjoy the cozy, designer-inspired look every night.
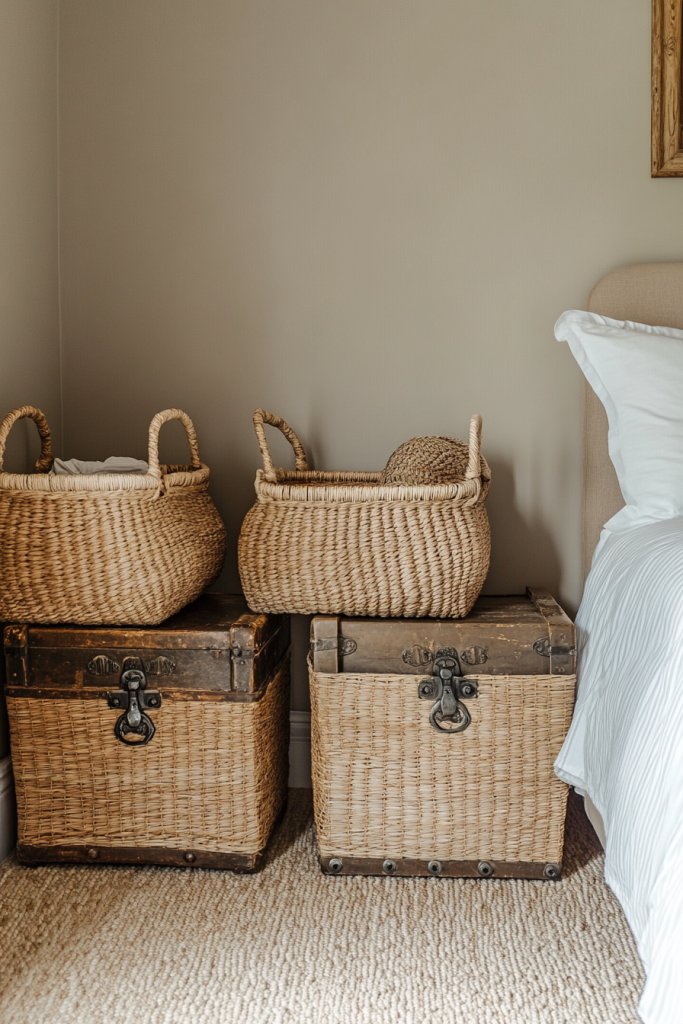
4. Repurpose Vintage Suitcases or Crates as Stylish Nightstands
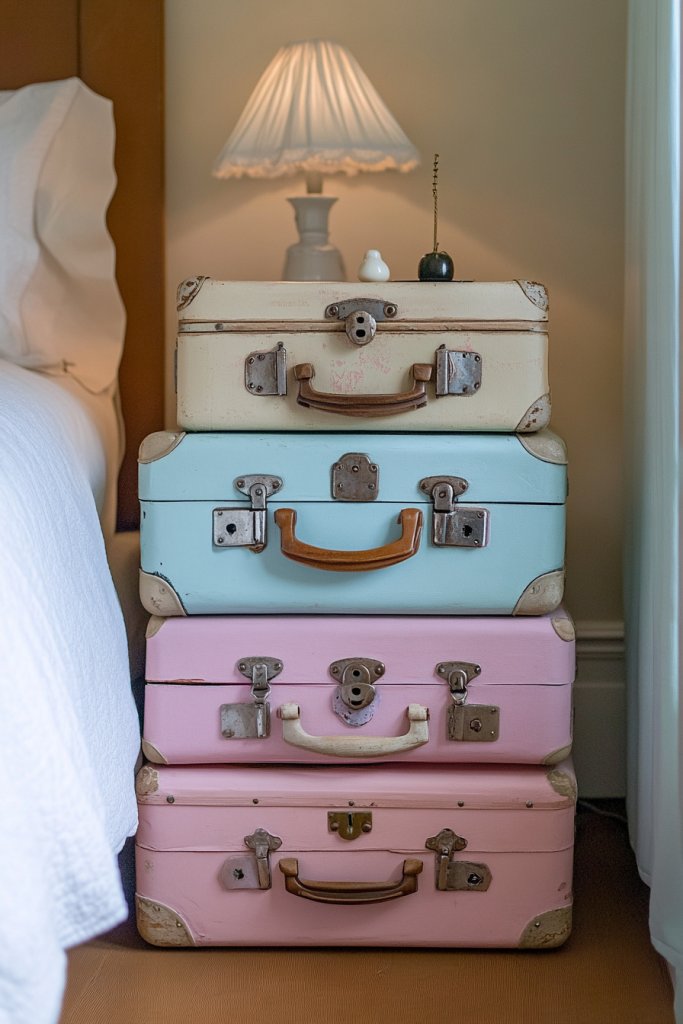
Tired of the same old nightstands that lack personality? Vintage suitcases and wooden crates are a quirky, budget-friendly alternative that add instant charm. Plus, they double as storage, keeping clutter out of sight yet easily accessible. Repurposing these items is a fun way to inject personality into your guest room without breaking the bank.
Picture a stack of aged suitcases, their leather straps and brass locks adding a touch of nostalgia. Or imagine a rustic wooden crate with fresh flowers or folded linens inside. These pieces bring a sense of history and character, creating a layered, eclectic look. When styled carefully, they serve as both practical storage and eye-catching decor elements.
Choose suitcases or crates in colors or finishes that match your room’s style—distressed paint, natural wood, or polished leather. Stack multiple for height variation or keep it simple with a single piece. Add a small tray or a decorative box on top for essentials like a clock or a glass of water. Consider casters for easy mobility or keep them stationary for a more refined look.
Start by selecting vintage suitcases or crates that are sturdy and in good condition. Clean and, if needed, repair or reinforce the structure. Stack or position them beside the bed, ensuring stability. You can add a soft cloth or a tray on top to create a flat surface. For extra flair, decorate the exterior with decals, stencils, or a fresh coat of paint. Secure the stack if necessary for safety.
Personalize with decorative touches like vintage labels, fabric liners, or small LED candles inside for ambiance. Use colorful or patterned textiles to line the inside of suitcases, turning storage into part of the decor. Incorporate small baskets or jars on top to keep everyday items organized. Play with height and arrangement to match your aesthetic—stacked or side-by-side.
Upcycling vintage suitcases or crates is a creative, sustainable way to add character and function. It showcases your personality and love for unique pieces. Once styled, these nightstands become conversation starters and reflect your personal style—plus, they’re remarkably affordable and versatile.
5. Install Floating Shelves for Practical Storage and Decor
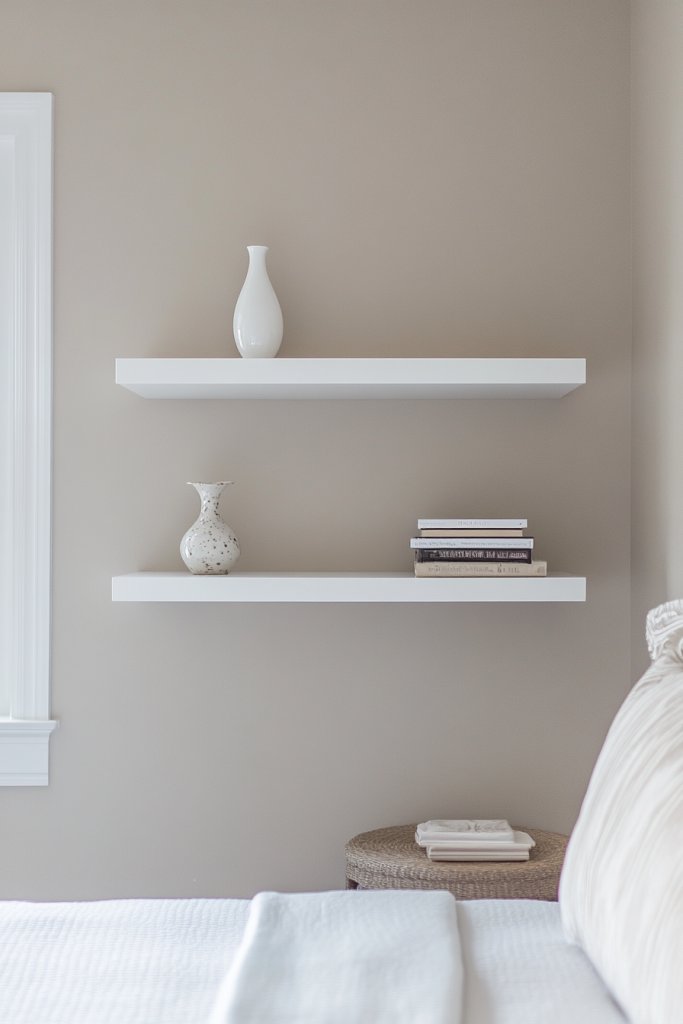
Cluttered guest rooms can quickly ruin the vibe of a cozy space. Floating shelves offer a sleek, space-saving solution to keep essentials organized while adding visual interest. They’re perfect for displaying decorative items or storing everyday necessities without taking up floor space. Plus, installing them is a simple DIY that instantly upgrades the room.
Picture slim, minimalist shelves mounted high on the wall, holding a collection of candles, books, or small baskets. The clean lines and unobtrusive design make the room feel more open and airy. The shelves cast subtle shadows that add depth, while the arrangement of items creates a curated, personal gallery. The overall effect is modern, functional, and stylish.
Choose floating shelves in wood, metal, or painted finishes to match your decor. Install at different heights or lengths for visual variety. Use them to display a rotating collection of curated decor, or keep them functional with baskets or small containers. For a more eclectic look, mix and match different styles and colors.
Start by measuring the space and marking where you want the shelves. Use a level to ensure perfect alignment. Choose sturdy brackets and anchors suitable for your wall type—drywall or brick. Attach the brackets securely, then place the shelves on top, securing them with screws if necessary. Arrange your items thoughtfully to balance aesthetics and practicality.
Add decorative touches like picture frames, small sculptures, or seasonal items to personalize the shelves. Use baskets or fabric-lined boxes to store smaller essentials, keeping the surface tidy. Change the display periodically to reflect your mood or season. Incorporate lighting like LED strips underneath for a warm glow at night.
Floating shelves are a minimalist’s dream—easy to install and endlessly versatile. They make a small room look larger and give you a stylish way to showcase your personality. Once in place, they’ll become your go-to solution for both decoration and organization. Your guest room will look polished and thoughtfully curated.
6. DIY Cozy Window Treatments with Layered Curtains or Roman Shades
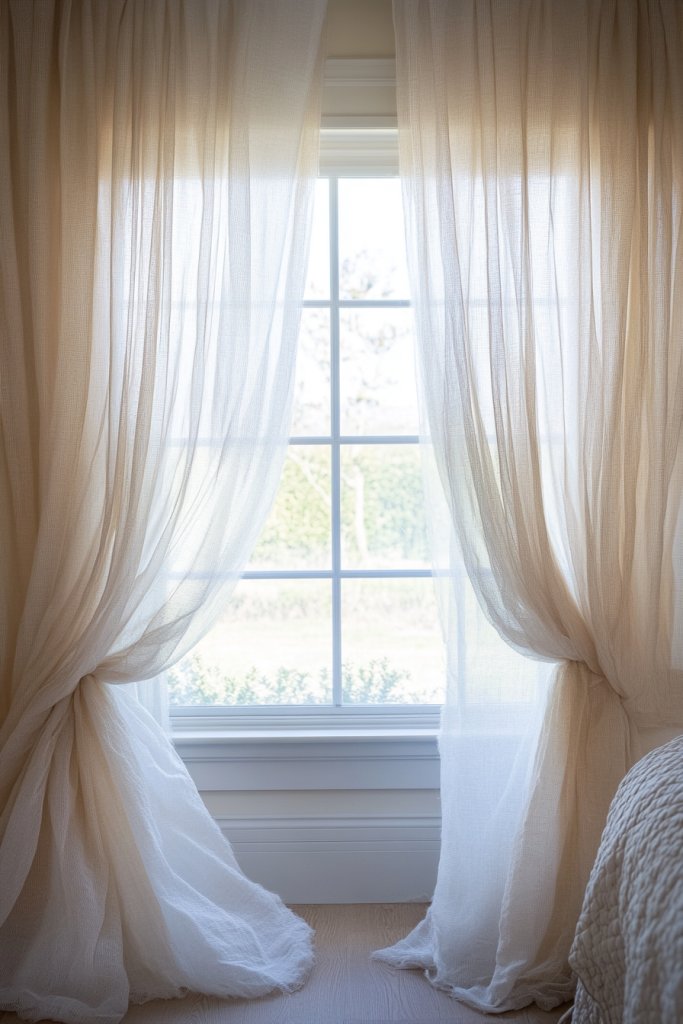
Few things ruin a cozy guest room faster than harsh, uninspiring window treatments. Budget-friendly DIY curtains or shades can add softness, privacy, and a finished look. Layered curtains give you control over light and atmosphere, making your space feel warmer and more inviting—plus, they’re a simple upgrade that anyone can do.
Imagine flowing sheer curtains in a soft blush or cream layered behind heavier, textured drapes in a deep hue. When drawn, the layers create a sense of depth and richness, framing the window beautifully. The fabrics gently sway with the breeze, adding movement and a touch of elegance. During the day, the light filters softly through, creating a peaceful ambiance.
Choose fabrics that suit your decor—linen for a casual look, velvet for luxe, or patterned cotton for a lively vibe. For a tailored look, sew simple Roman shades with decorative trim or tiebacks. Install a simple rod and hooks for layered curtains, ensuring they can be easily opened and closed. Adjust the layering thickness based on your privacy needs and light control preferences.
Measure your window carefully, allowing extra for hems and fullness. Sew or buy panels in coordinating fabrics, and attach rings or hooks for easy sliding. Install a sturdy curtain rod, making sure it’s level and securely anchored. Hang the layers, arranging them for maximum coverage and visual balance. Use tiebacks or holdbacks to create a charming, pulled-back look when you want more light.
Add decorative trims, tassels, or fabric embroidery for a bespoke touch. Layer different textures to make the window a focal point—think faux fur or metallic accents. Incorporate blackout lining for better sleep quality or sheer fabrics to maximize natural light. Change the curtain styles seasonally to keep the room feeling fresh.
DIY window treatments are a fantastic way to instantly cozy up a room. They’re simple, customizable, and cost-effective—plus, they give you a chance to showcase your sewing skills. Once finished, your guest room will radiate warmth and comfort, making every visitor feel at home. It’s a small touch with a big impact.
7. Add a DIY Rug or Floor Cushion Area for Extra Comfort
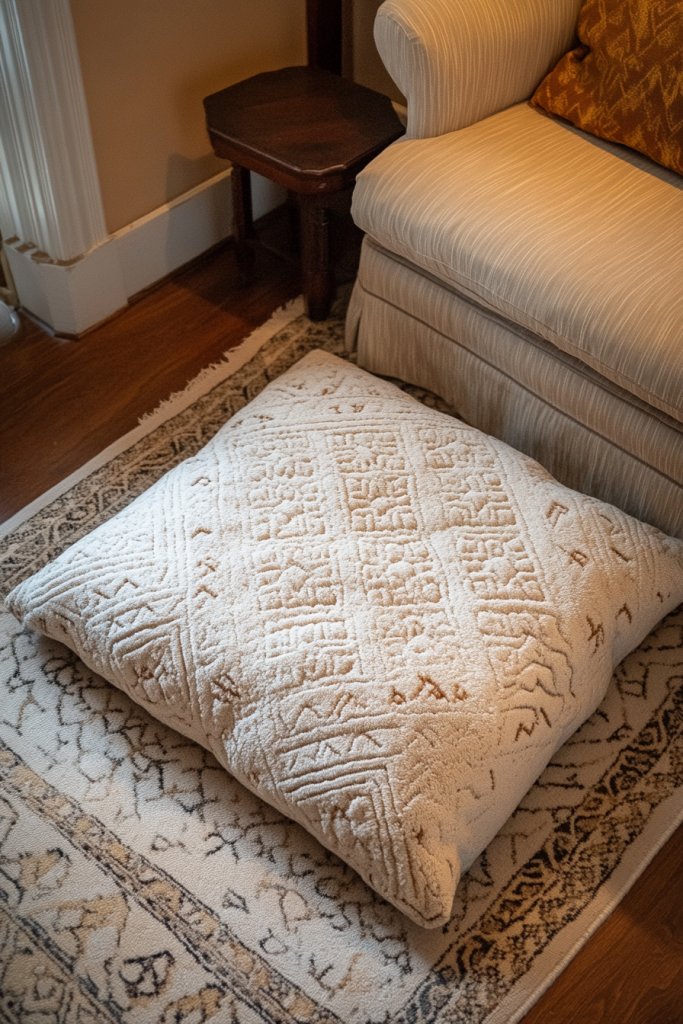
Nothing beats stepping onto a soft rug after a long day of travel. But store-bought options can be pricey or uninspired. DIY rugs or a cozy floor cushion nook can dramatically boost comfort and style in your guest space. Plus, they’re easy to customize to match your decor and budget.
Picture a large, patterned rug in warm tones anchoring the room, with plush floor cushions arranged in a semi-circle for lounging. The cushions feature vibrant covers, textured fabrics, and varied shapes, inviting guests to sit or even sleep comfortably. The rug’s intricate design adds visual interest, while the cushions create a relaxed, inviting vibe. Together, they transform the floor into a cozy retreat.
Use inexpensive textiles like old blankets, thrifted fabrics, or DIY painted rugs using stencils and fabric paint. For cushions, sew simple covers from durable, colorful fabric and fill them with foam or shredded foam for softness. Arrange them for a playful or elegant look—layered, scattered, or in a neat row. Seasonal covers can refresh the look or match holiday themes.
Start by choosing a large, comfortable floor cushion size or making your own from foam and fabric. For DIY rugs, lay out your fabric and cut into your preferred shape, then decorate with paint, stencils, or even tie-dye techniques. Secure the edges with binding or decorative trim. Arrange your cushions and rug in a corner or open space, ensuring enough room for movement and lounging. Add a subtle underlay or non-slip backing if needed.
Personalize cushions with embroidered initials or decorative buttons. Mix and match different fabrics to add visual interest. Incorporate small baskets nearby for extra throws or accessories. Use seasonal colors or patterns to keep the nook fresh and inviting. These touches make it feel like a dedicated, personalized relaxation zone.
Creating a rug or floor cushion area is a simple way to add comfort that guests will love. It’s a budget-friendly project that yields big results. Once set up, it becomes a favorite spot for lounging, reading, or even sleeping. Your guest room will stand out as a cozy, thoughtful space.
8. Craft a Handmade Wall Organizer Using Canvas and Wooden Frames
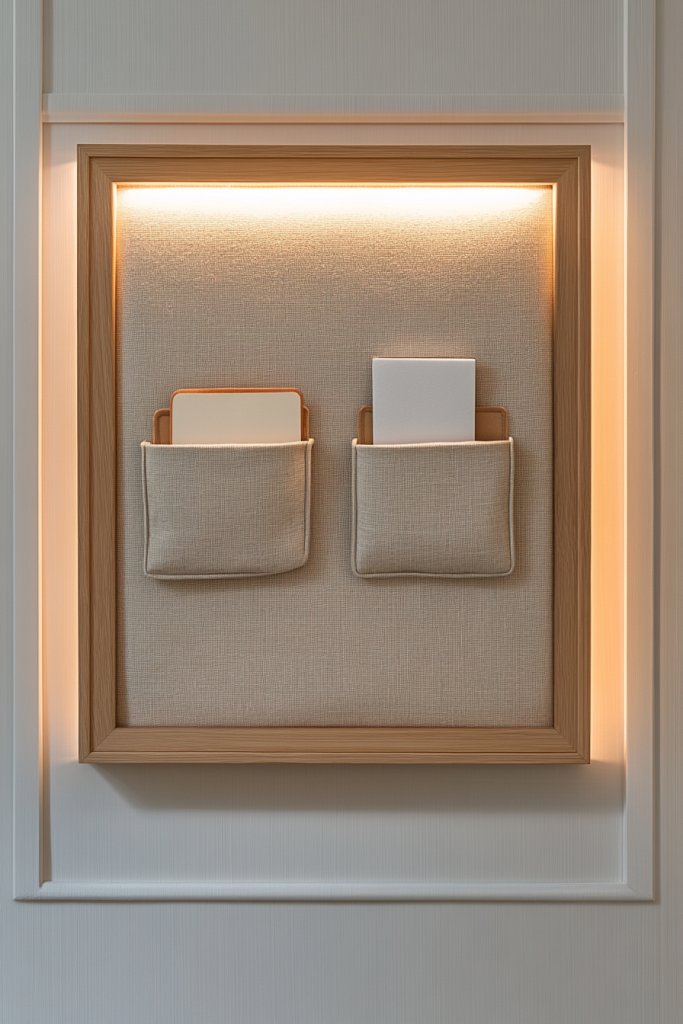
Cluttered surfaces and scattered essentials can ruin the vibe of a guest room. A handmade wall organizer keeps everything tidy and accessible, giving the space a polished look. Plus, crafting your own is a fun way to add a personal touch and avoid generic store-bought solutions. It’s practical and decorative, all in one.
Envision a large fabric pocket organizer hanging from a wooden frame, with each pocket labeled or decorated uniquely. Small clips or hooks hold keys, toiletries, or personal items, making everything easy to find. The fabric and wood combo offers a warm, rustic feel that complements any decor style. It’s a functional piece that adds charm and order to your wall.
Use canvas or heavy-duty fabric for durability, and paint or stencil designs to match your room’s theme. Wood frames can be stained, painted, or left natural for a rustic look. Pockets can be sewn from fabric or repurposed cloth bags. Label pockets with fabric paint or iron-on transfers for easy identification. Adjust size and number based on your space and needs.
Begin by measuring the space and deciding on the number of pockets or sections needed. Cut your fabric to size and attach it to the wooden frame with staples or nails. Sew or attach pockets to the fabric, adding labels if desired. Mount the frame securely on the wall using appropriate anchors. Fill the pockets with essentials such as toiletries, chargers, or guest notes for a welcoming touch.
Decorate the fabric with fabric paint, embroidery, or iron-on designs to match your decor. Add small hooks or clips for keys, jewelry, or small accessories. Incorporate decorative elements like tassels or trims to elevate the look. Change contents seasonally or for special occasions, keeping the organizer fresh and functional.
A handmade wall organizer is a practical, stylish addition that simplifies guest stays. It shows thoughtfulness and attention to detail, making guests feel cared for. Plus, it’s a project you can customize endlessly to suit your style. Once finished, it’s a reliable go-to for keeping your guest room neat and welcoming.
9. Incorporate DIY String Lights or Fairy Lights for Ambient Lighting

Bright, harsh lighting can kill the cozy vibe in a guest room. Instead, soft, ambient lighting creates a relaxing atmosphere that makes visitors feel at home. DIY string or fairy lights are an affordable, easy way to achieve this effect. Plus, they add a whimsical touch that instantly transforms any space.
Imagine delicate string lights draped along a headboard, around a window frame, or across the ceiling in gentle waves. The tiny bulbs cast a warm, inviting glow that mimics candlelight but safer and more versatile. When turned on, the room is bathed in a soft, flickering light that enhances textures and colors, making everything feel more intimate.
Choose string lights with warm white bulbs for a classic look or multicolored for a playful vibe. Wrap them around architectural features, drape across a wall, or hang in a zigzag pattern. For a more polished look, secure the lights with clear clips or hooks. Incorporate dimmers or remote controls for easy mood adjustments.
Start by deciding where you want to hang the lights—around the window, along the ceiling, or behind the headboard. Use hooks, clips, or adhesive strips suitable for your wall type. Carefully string the lights, ensuring they’re taut but not stretched. Plug into a nearby outlet, and test the setup for even, flicker-free illumination. For safety, avoid overloading circuits and opt for LED lights to save energy.
Add decorative elements like paper lanterns or DIY fabric covers for the bulbs. Incorporate small DIY lanterns or paper stars for added charm. Use color-coordinated cords or clips to match your decor palette. Switch up the lighting arrangement seasonally or for special occasions to keep the space feeling fresh.
String lights are a simple, inexpensive way to create a magical, cozy atmosphere. They’re a favorite for setting a romantic or peaceful mood and are highly customizable. Once installed, they’ll be a staple feature in your guest room, making every stay feel special and relaxed.
10. Refresh Walls with Removable Wallpaper or DIY Wall Decals
Walls can look tired or uninspired, especially in a guest room that doesn’t get much attention. Removable wallpaper or decals offer an easy, damage-free way to add pattern and personality. They’re perfect for renters or anyone hesitant to commit to permanent changes. Plus, they’re quick to install and even easier to remove.
Picture a wall covered with playful botanical decals or a bold geometric pattern in vibrant colors. When applied, they instantly transform the room, making it feel fresh and modern. The decals adhere smoothly, with no bubbles or peeling, creating a seamless visual effect. The room’s vibe shifts from plain to personalized with just a few stickers or a sheet of wallpaper.
Choose removable wallpaper in patterns or textures that match your style—floral, metallic, or abstract. DIY wall decals can be made using stencils and paint or adhesive vinyl sheets. Place them strategically—above the bed, around windows, or framing art for a cohesive look. Change designs seasonally or whenever you want a quick refresh.
Start by cleaning the wall surface thoroughly. Measure and plan your layout, then peel and stick the wallpaper or decals carefully, smoothing out air bubbles with a squeegee or credit card. Use a level or masking tape for straight lines. For DIY decals, cut shapes or patterns from adhesive vinyl and apply with a squeegee. Remove or reposition easily without damaging the wall.
Create custom decals with stencils or printable adhesive sheets. Combine patterns for a layered, textured look. Add metallic or glow-in-the-dark accents for extra flair. Pair with coordinating textiles and accessories to tie the room together seamlessly. Seasonal themes or special motifs can make the space feel fresh and dynamic.
Removable wall coverings are a game-changer for quick, impactful updates. They allow you to express your personality without permanence, perfect for temporary or rental spaces. Once finished, your guest room will feel thoughtfully decorated and stylish—ready to impress any visitor with minimal effort.
11. Upcycle Old Furniture with Paint or New Hardware for a Fresh Look
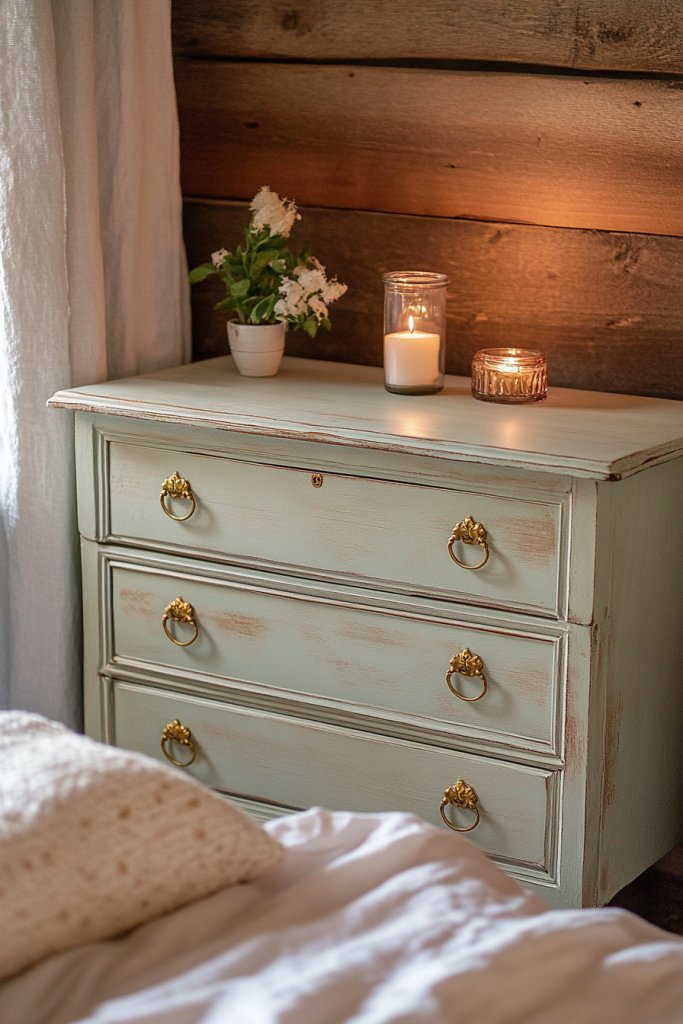
Old furniture can feel tired or outdated, dragging down the overall vibe of your guest room. Upcycling with paint and new hardware is an affordable way to breathe new life into tired pieces. It’s also a rewarding project that allows you to customize furniture to fit your style perfectly. Who knew giving furniture a makeover could be so satisfying?
Picture a vintage dresser painted in a soft pastel or bold jewel tone, with shiny new knobs replacing old, tarnished hardware. The transformation turns a plain piece into a statement. The fresh paint highlights the grain or texture of the wood, while new hardware adds a modern or vintage-inspired touch. The result is a piece that blends seamlessly with your decor, feeling brand new.
Choose paint finishes—matte for a muted look, gloss for shine, or chalk paint for a matte, textured effect. Swap out hardware with options in brass, matte black, or colorful ceramics. For smaller pieces, consider decoupage or stenciling for extra personality. Adapt the style to match your decor—rustic, modern, or eclectic—and experiment with color schemes.
Start by thoroughly cleaning and sanding the furniture to remove old paint or finishes. Apply a primer if needed, then paint with your chosen color using a brush or roller for even coverage. Allow each coat to dry thoroughly before adding another. Replace hardware with new knobs or pulls that complement your room’s style—these are often available at hardware stores or flea markets. Seal the paint with a clear protective finish for durability.
Personalize hardware with DIY painted designs or custom labels. Use decorative knobs to add a pop of color or texture. For a vintage vibe, distress the paint slightly or add a wax finish. Mix and match hardware styles across different pieces for an eclectic look. These small updates can make your furniture feel cohesive and personalized.
Upcycling furniture is a perfect way to make your guest room feel unique without spending a fortune. It’s a creative outlet that results in practical, stylish pieces. Your guests will notice the attention to detail, and you’ll enjoy the satisfaction of transforming a tired piece into a charming focal point. DIY furniture refreshes are totally addictive!
12. Build a Simple DIY Bookshelf or Ladder Shelf for Storage and Decor
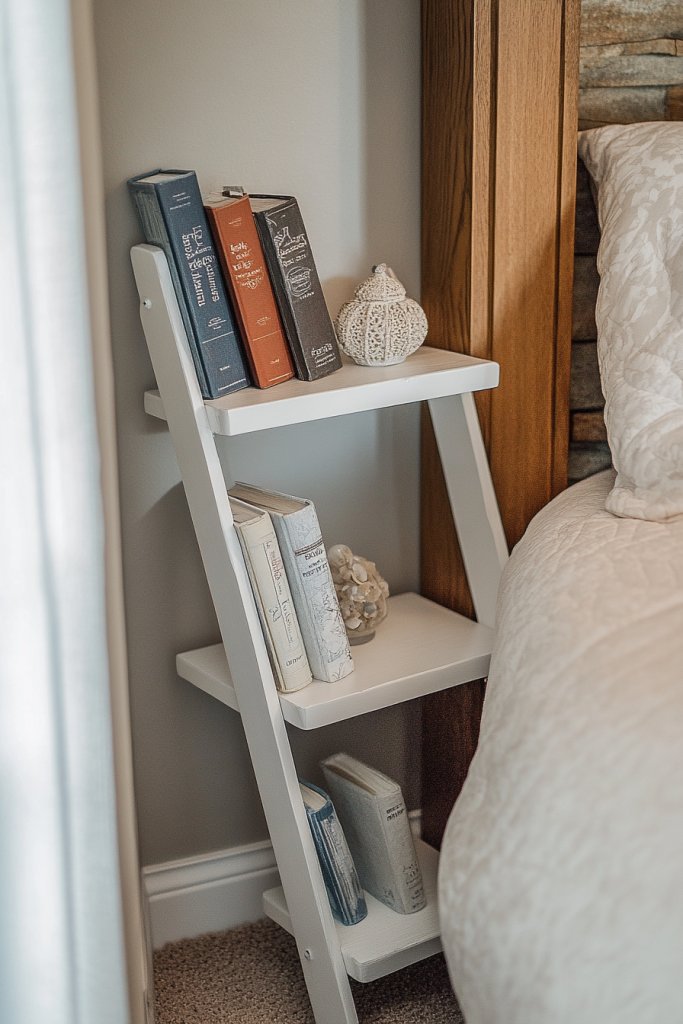
Cluttered floors and cramped corners make a guest room feel chaotic. A DIY bookshelf or ladder shelf offers a sleek, space-efficient solution for storage and display. It’s a great way to showcase books, decor, or even plants without sacrificing style. Plus, it’s an easy project that adds both functionality and personality.
Envision a slim wooden ladder leaning against the wall, with art books, candles, and decorative boxes arranged on its rungs. The open design keeps the space feeling airy, while the layered items create visual interest. The natural wood finish or painted color can complement your decor, making the piece blend seamlessly or stand out as a statement. It’s both practical and pretty.
Use reclaimed wood, plywood, or pre-cut shelf kits depending on your skill level. Adjust the height and width to fit your space—tall and narrow or wide and low. Add decorative brackets or paint the shelves in your favorite color for a cohesive look. Incorporate baskets or small containers for extra organization, especially for smaller essentials.
Start by measuring your available wall space and deciding on the shelf dimensions. Cut or assemble your shelf components, then sand and finish as needed. Secure the shelves to the wall using appropriate anchors and screws, ensuring they’re level and stable. Decorate with your favorite books, plants, or decorative objects. Keep the design simple for maximum versatility.
Paint or stain the wood for a custom look—think matte black, pastel, or natural finish. Add decorative trim or stencils for extra flair. Use small labels or tags to identify books or items for guests. Change the arrangement seasonally or for different occasions to keep the look fresh. Personal touches make the shelf both functional and welcoming.
A DIY bookshelf or ladder shelf is a straightforward project that instantly makes your guest room more organized and stylish. It’s a perfect blend of form and function, reflecting your taste and creativity. Once in place, it becomes a key feature that impresses visitors and makes your space feel complete.
13. Add a DIY Headboard Using Fabric-Covered Foam or Quilted Panels
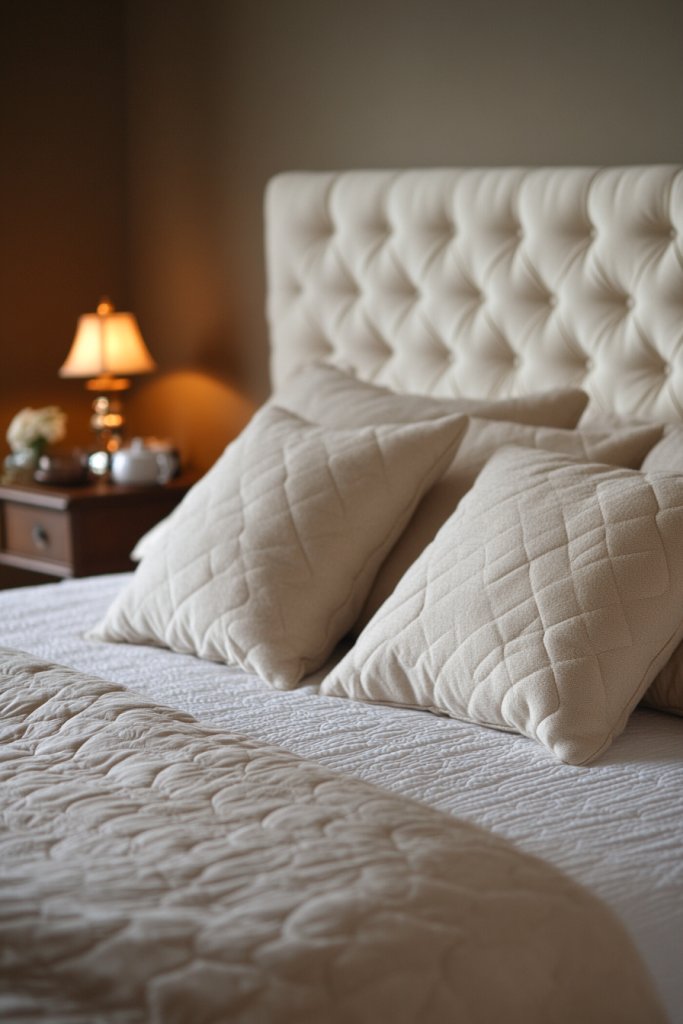
A plain wall behind the bed can make a room feel uninspired and dull. A DIY headboard adds a cozy, personalized touch that elevates the entire space. It’s surprisingly easy to make using foam, fabric, or quilted panels—no professional skills required. Plus, a custom headboard can be tailored to your style and comfort preferences.
Imagine a plush upholstered headboard in a soft, inviting fabric like velvet or linen, with decorative tufting or piping. Or picture a fabric-covered foam panel in a bold print, adding texture and color behind the bed. The headboard becomes the room’s focal point, anchoring the design and adding a sense of luxury. Soft lighting or decorative pillows further enhance the inviting vibe.
Choose fabrics that match your decor—neutral tones for subtle elegance, or vibrant prints for a lively look. Upholstered headboards can be attached directly to the wall or built onto a frame for extra support. Use quilting, buttons, or piping to add dimension. Adjust the size to fit your bed, from full to king, and incorporate personal details like monograms or trims.
Start by measuring your bed’s width and deciding on the headboard height. Cut foam to size, then cover it with batting for a smooth surface. Wrap your chosen fabric around the foam, pulling tight and securing with a staple gun on the back. Attach the finished panel to the wall with brackets or hooks, ensuring stability. For a more polished look, add decorative nails or trim around the edges.
Add embellishments like fabric paint, embroidery, or appliqué patches for extra flair. Choose fabrics that are durable and easy to clean—think performance or outdoor fabrics for longevity. Change covers seasonally or for special events. Incorporate small LED strip lights behind the headboard for a subtle glow.
A DIY headboard instantly upgrades the look of your guest room and adds a layer of comfort. It’s a project that combines creativity with practicality, resulting in a piece that’s both personal and functional. Guests will notice the extra effort, and you’ll enjoy the cozy, custom feel every night.
14. Personalize the Space with Handmade Throw Pillows and Cushions
Generic, store-bought cushions can make a guest room feel impersonal and flat. Handmade throw pillows and cushions give you a chance to express your style and create a warm, welcoming atmosphere. They’re an easy way to add color, texture, and personality without a big investment. Plus, DIY pillows are a fun craft project!
Imagine a mix of pillows in different sizes, shapes, and fabrics—soft velvet, embroidered cotton, or textured knits—all arranged on the bed or a corner chair. Bright colors or subtle neutrals work depending on your vibe. Decorative trims, tassels, or fabric paint can personalize each pillow further. The collection creates a layered, inviting look that says you care.
Use leftover fabric, thrifted textiles, or buy affordable upholstery fabric for your pillow covers. Sew or glue on embellishments like pom-poms, embroidery, or appliqué to add detail. Change pillow covers seasonally or for holidays to keep the room feeling fresh. Mix patterns and textures for a playful, eclectic style or keep it monochrome for modern simplicity.
Start by choosing pillow sizes—standard, square, lumbar, or bolsters. Cut fabric with a seam allowance, then sew or glue the edges, leaving an opening for stuffing. Fill with pillow inserts, foam, or shredded textiles for plushness. Attach decorative trims or embellishments before closing. Arrange the pillows on the bed or a chair, playing with placement until it looks just right.
Add embroidered initials, painted designs, or fabric patches for a personal touch. Use contrasting piping or trims to highlight the edges. Swap out pillow covers for different seasons or themes—think floral for spring, deep hues for autumn. Incorporate special fabrics like faux fur or metallics for a luxe effect. These small updates keep your decor dynamic.
Handmade throw pillows are a quick, impactful way to customize your guest room. They show off your creativity and make the space feel curated. Once you get the hang of it, you can make a whole collection tailored to your style. Guests will love the cozy, thoughtful touches—your room just got a whole lot more inviting.
15. Incorporate Practical Yet Decorative Storage Solutions (Baskets, Trunks)
Cluttered guest rooms are a major turn-off. Finding storage that’s both functional and attractive can be a challenge. Woven baskets, vintage trunks, or decorative storage boxes are perfect for hiding linens, clothes, or personal items while adding style. They’re a clever way to keep your space tidy without sacrificing decor.
Imagine a large, woven basket overflowing with extra blankets placed beside the bed or a vintage wooden trunk at the foot of the bed filled with guest essentials. The textures—rattan, distressed wood, or leather—add warmth and visual interest. These pieces can serve as statement decor or subtle storage, blending seamlessly into your room’s aesthetic.
Pick storage containers in colors and materials that match your decor—think neutral tones for understated elegance or painted exteriors for a pop of color. Use trunks as seating or side tables, and baskets for organizing toiletries, slippers, or laundry. Stack smaller baskets or boxes to maximize vertical space. Personalize with labels or decorative tags.
Select sturdy, attractive storage pieces based on your needs and space. For woven baskets, clean and, if necessary, treat the material for longevity. Trunks should be cleaned and possibly lined with fabric or felt. Position larger pieces strategically near the bed for easy access. Use smaller baskets inside larger ones for better organization. Keep the look cohesive by sticking to a color palette.
Decorate baskets with fabric liners, tags, or paint to match your theme. Add decorative hardware or metal accents to trunks for a vintage or industrial feel. Incorporate seasonal textiles or embellishments to keep the look fresh. Use labels or small chalkboards for quick identification of contents, making life easier for both you and your guests.
Smart storage solutions make your guest room look tidy and feel more welcoming. They showcase your sense of style and organizational skills, impressing visitors. It’s a practical upgrade that adds character and functionality. Your guests will appreciate the effort, and you’ll love the clutter-free space every day.
16. Create a DIY Reading Nook with a Comfy Chair and Side Table
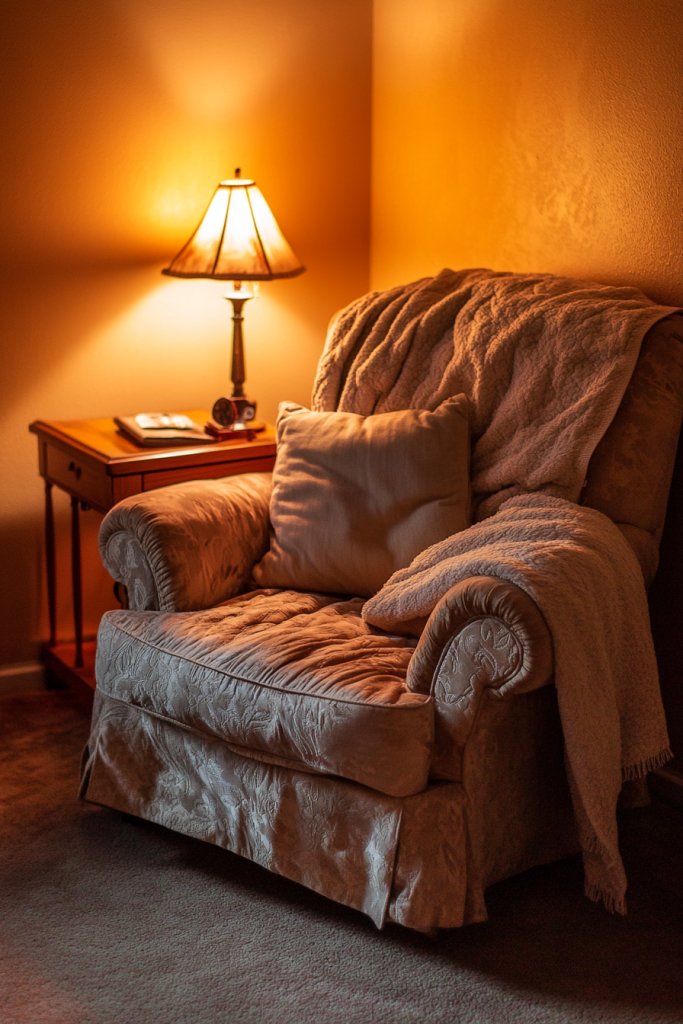
A guest room isn’t complete without a cozy spot to unwind and read. But finding space for a dedicated nook can be tricky. Creating a DIY reading corner with a comfy chair and a small side table transforms the room into a retreat. It’s a simple addition that invites guests to relax and feel at home.
Picture a plush armchair in a soft, inviting fabric, nestled in a quiet corner. A small wooden or upholstered side table holds a stack of books and a warm throw. Soft lighting, like a wall-mounted sconce or a DIY lantern, sets the mood. The space feels intimate, perfect for curling up with a good book or a hot cup of tea.
Choose a chair that reflects your decor—think vintage armchair, modern slipper chair, or a cozy accent chair. Use a small table or even a repurposed crate as a side table. Layer with a textured throw blanket and a few cushions. Decorate the area with personal touches—like a favorite book or a decorative lamp—without overcrowding.
Measure the corner or space where you want the nook. Select a comfortable chair that fits well without overwhelming the room. Find or make a small side table that complements the chair’s style. Add a cozy throw or cushion for extra comfort. Install a wall sconce or place a small lamp for ambient lighting. Keep the area tidy and accessible.
Decorate the side table with a small tray for keys or snacks. Add a few personal books, a candle, or a photo frame to make it feel lived-in. Use textiles that match your decor—think patterned cushions or textured throws. Change the setup seasonally to keep it feeling fresh. This nook becomes a favorite spot for both guests and hosts.
A dedicated reading nook elevates your guest room from functional to cozy and inviting. It shows you care about your guests’ comfort and offers them a personal retreat. Once set up, it becomes a cherished feature that encourages relaxation and leisure. Your guest room will be a memorable stay for everyone.
17. Upgrade Lighting with DIY Lampshades or Repurposed Light Fixtures
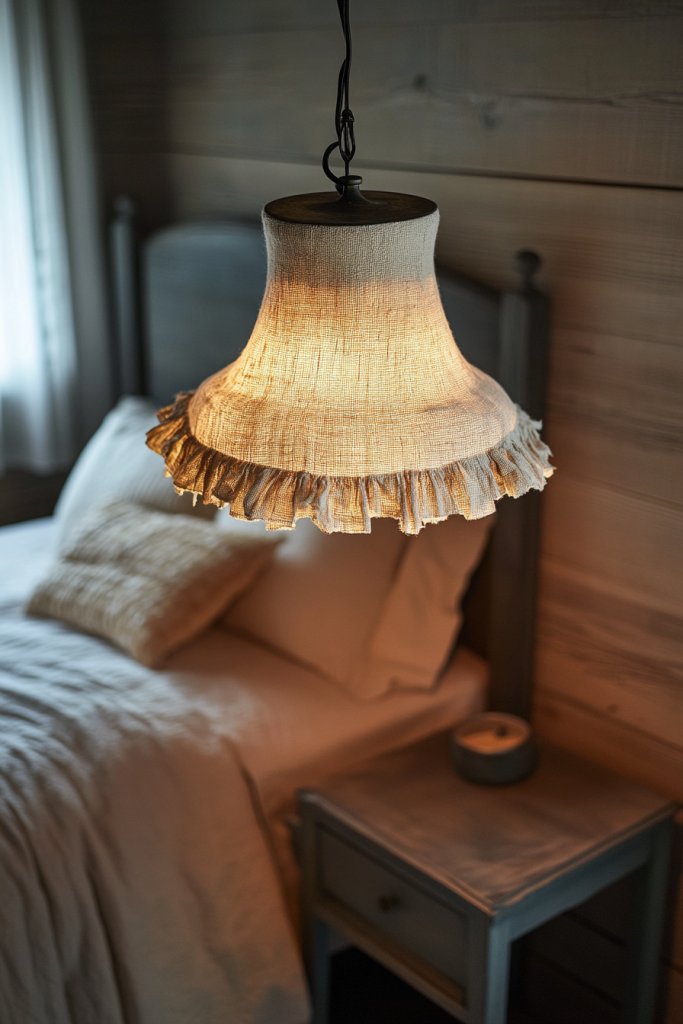
Harsh overhead lighting can make a guest room feel sterile and uninviting. Upgrading to softer, personalized lighting sets a cozy mood. DIY lampshades or repurposed fixtures are budget-friendly options that add character and warmth. They’re an opportunity to showcase your creativity while improving ambiance.
Imagine a simple pendant fixture with a handmade fabric or paper lampshade that diffuses warm light. Or picture an old chandelier painted in a bold color, hanging with new bulbs that cast a glow of elegance. These fixtures become statement pieces that elevate your decor and create a welcoming atmosphere. Subtle, warm lighting enhances textures and colors, making the room glow.
Create lampshades using fabric, burlap, or even paper—think DIY with simple supplies. Repaint or rewire existing fixtures for a fresh, modern look. Incorporate dimmers or string multiple small fixtures for layered lighting. Use different bulb styles—Edison, soft white, or colored—to set various moods. Match fixture finishes with other hardware in the room for cohesion.
Start by selecting the fixture or lamp you want to update or repurpose. If making a lampshade, measure the bulb size and cut fabric accordingly, sewing or gluing edges for a tailored fit. For existing fixtures, remove the old shade or cover, then attach your DIY version. Install the bulbs and test the lighting for warmth and coverage. Adjust height or positioning as needed.
Decorate your shades with fabric paints, trims, or stencils to add personality. Use vintage or themed elements—like lace or metallic accents—to match your decor style. Incorporate smart controls or remote dimming for added convenience. Changing lampshades seasonally or for holidays keeps the room feeling fresh and personalized.
Upgrading lighting is a simple, impactful way to enhance your guest room’s ambiance. It’s an easy project that yields big visual and mood benefits. Your guests will appreciate the warm glow, and you’ll enjoy the cozy, stylish atmosphere every night. It’s a smart upgrade that’s both fun and functional.
18. Add DIY Art and Wall Decor with Printable Quotes or Canvas Prints
Blank walls can make a guest room feel unfinished or impersonal. DIY art and wall decor offer a creative and affordable way to add personality and inspiration. Printable quotes, stenciled designs, or canvas prints can turn a plain wall into a focal point. They’re an easy project that anyone can customize.
Picture a large printable quote in elegant typography framed in a simple frame or directly adhered to the wall. Or imagine a canvas print with a bold abstract design or a favorite photo, adding color and interest. When hung strategically, these pieces create a curated gallery feel. The art sets the tone for the room and offers a personal touch that guests will appreciate.
Print or create designs that match your decor—minimalist black and white, vibrant colors, or calming pastels. Use inexpensive frames or DIY mount with washi tape or clipboards for a casual look. Create a gallery wall with a mix of quotes, photos, and patterns. Change artwork seasonally or for special occasions to keep it fresh.
Choose your favorite quotes or images and print them on quality paper or canvas. Frame or mount the prints using simple DIY methods—like attaching with clips or washi tape. Hang the artwork at eye level using hooks or adhesive strips. Arrange multiple pieces for a balanced, engaging display. Keep the setup simple for easy updates.
Decorate prints with handwritten notes, doodles, or embellishments to add charm. Incorporate your favorite colors or themes—nature, travel, or motivational quotes. Swap out art for holidays or special events, making the room feel dynamic. Combine with textiles and accessories for a cohesive, personalized aesthetic.
DIY art is a versatile, budget-friendly way to make your guest room uniquely yours. It reflects your personality and attention to detail, impressing visitors. Once you see how simple it is, you’ll want to create a whole gallery wall. Your space becomes a reflection of your style and creativity.
19. Finish with Small Details: Fresh Linens, Scented Candles, and Personal Touches
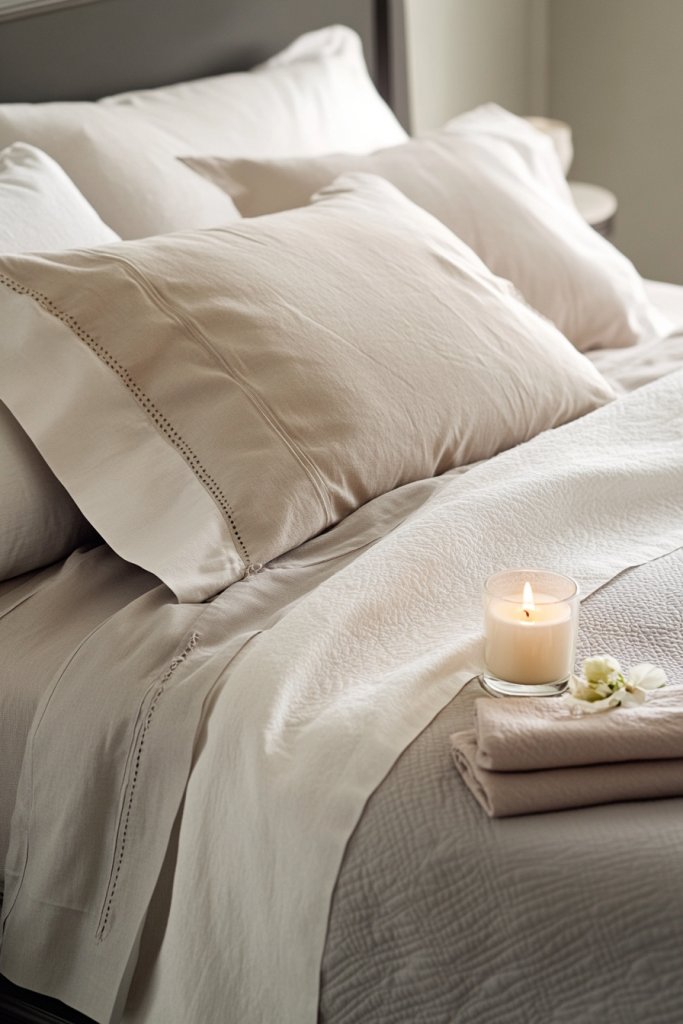
The little things often make the biggest difference in guest comfort. Fresh linens signal cleanliness, while subtle scents and personal touches create a welcoming atmosphere. These small details can elevate your guest room from ordinary to extraordinary without much effort or expense. It’s all about the finishing touches that leave a lasting impression.
Imagine crisp, clean sheets in neutral tones topped with a plush throw blanket and coordinating pillows. A softly scented candle flickers nearby, filling the room with a calming aroma. Personal touches like a handwritten note or a small tray of treats show thoughtfulness and hospitality. These details turn a simple room into a memorable retreat.
Use fresh, high-quality linens in your favorite colors or patterns—think crisp white or subtle pastel tones. Incorporate scented candles, diffusers, or essential oils to create a relaxing environment. Add personal touches such as a small box of chocolates, a handwritten welcome note, or a favorite book (without overloading the space). Rotate these details seasonally to keep things feeling fresh.
Start with clean, freshly laundered linens—consider high thread count or natural fibers for added luxury. Place scented candles or diffusers in strategic spots, ensuring they’re safe and unobtrusive. Leave a personalized note or small gift on the pillow or bedside table. Keep the overall decor simple and clutter-free to highlight these thoughtful touches. Refresh supplies regularly.
Choose linens and accessories that reflect your personal style—classic, modern, or boho. Use natural or subtle fragrances to appeal to sensitive noses. Personalize with monogrammed pillowcases or embroidered details. Small decorative accents, like a vintage tray or a decorative box, add charm without cluttering.
Finishing your guest room with these small details shows you care about your visitors’ comfort. It creates a warm, inviting environment that encourages relaxation and appreciation. These thoughtful touches are simple to implement but have a big impact. Your guests will leave feeling pampered and impressed.
Conclusion
This collection of DIY two-weekend guest bedroom makeover ideas showcases a range of creative solutions to elevate your space effortlessly. Whether you’re adding cozy textiles, smart storage, or charming DIY projects, these ideas can be tailored to fit your style and needs. Give these tips a try and watch your guest room transform into a welcoming haven. Take the first step today and create a space that invites comfort and joy for everyone who visits.