Ever thought about how open shelving can completely transform your kitchen’s look and feel? These stylish displays have skyrocketed in popularity because they combine practicality with aesthetic charm, making your space feel more inviting and personalized.
In this article, you’ll find a variety of creative open shelving ideas that cater to different styles, needs, and spaces. Whether you love a rustic vibe, a sleek modern look, or something in between, these ideas will inspire you to reimagine your kitchen storage and display options in fresh, exciting ways.
1. Rustic Wood Floating Shelves with Vintage Dishware
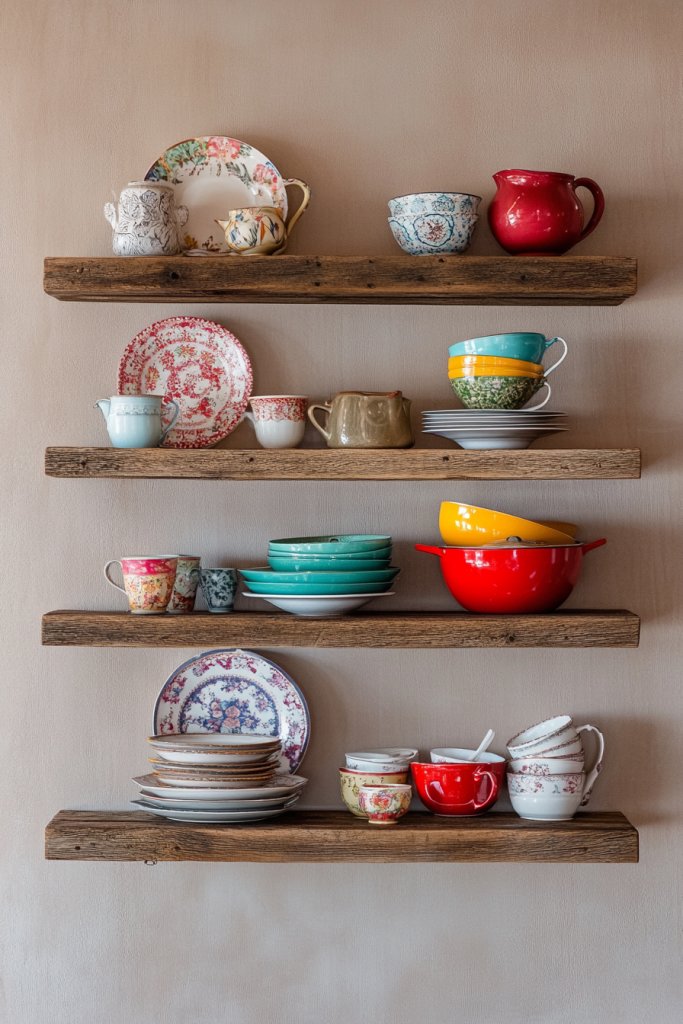
Ever feel like your kitchen’s personality is hiding behind dull, mass-produced cabinets? Want to add warmth and charm without tearing everything down? Rustic wood floating shelves paired with colorful vintage dishware can transform a plain space into a cozy farmhouse haven. It’s the kind of upgrade that makes everyone feel at home, instantly.
Imagine thick, reclaimed wood shelves with natural knots and rough edges, mounted seamlessly to the wall. Bright, mismatched dishware in cheerful hues sits atop, creating a lively, inviting display. The textures contrast beautifully—smooth ceramics against rugged wood—adding depth to your space. Soft light bounces off the glossy surfaces, making the colors pop.
Mix and match vintage plates and bowls for a more eclectic vibe or go uniform with a specific color palette. For a rustic winter feel, layer with cozy textiles like linen or burlap underneath. During the holidays, add seasonal touches like cinnamon sticks or dried citrus slices for a festive twist. In small kitchens, these shelves double as decorative storage, freeing up counter space.
Start by selecting sturdy reclaimed wood planks—look for ones with character, not perfection. Mount brackets or floating shelf supports hidden inside the wood for a clean look. Use heavy-duty anchors to ensure they hold your dishware safely. Arrange your vintage dishes in a way that balances colors and sizes, making sure the weight is evenly distributed. Finish with a clear sealant if you want added durability against moisture.
Personalize your shelves with handcrafted ceramic pieces, or add small decorative elements like vintage glass jars or woven baskets underneath for extra charm. You can also paint the edges in a contrasting color to make the shelves stand out more. Incorporate seasonal dishware or themed collections to keep the display fresh and engaging throughout the year.
This style proves that you don’t need to be a professional decorator to create a warm, inviting space. With just a few reclaimed planks and some vintage dishes, you can craft a centerpiece that sparks conversations. Your kitchen will feel more personal, fun, and uniquely yours. Ready to show off your eclectic side? 🙂
2. Minimalist Metal Shelves with Monochrome Cookware
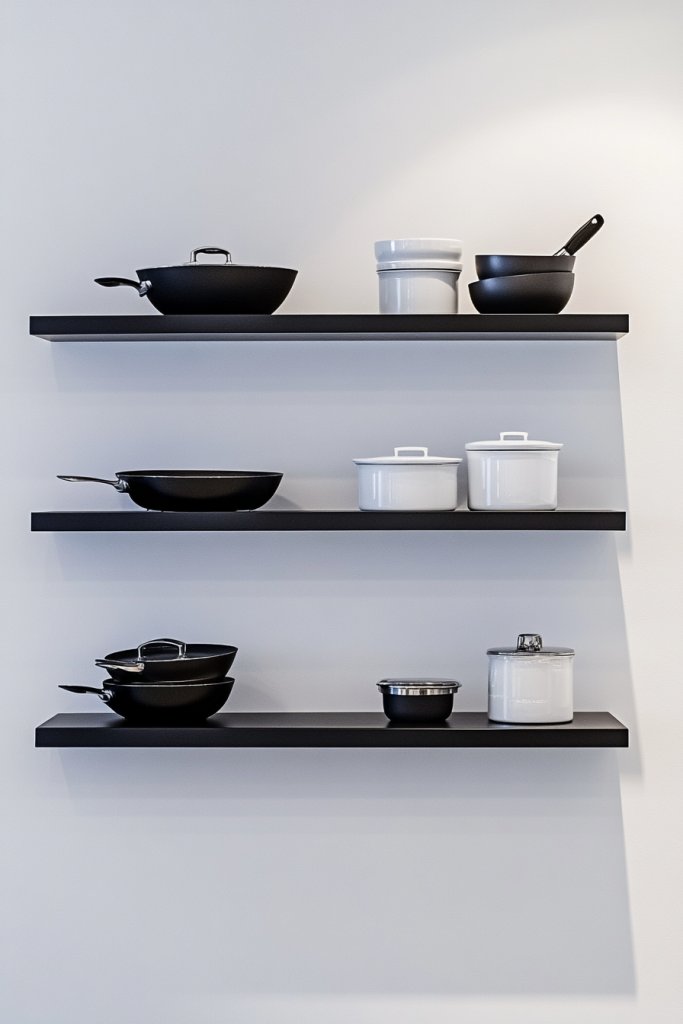
Tired of cluttered countertops and overwhelming color palettes? Dreaming of a sleek, modern kitchen that feels peaceful and organized? Minimalist metal shelving combined with monochrome cookware offers a simple yet striking solution. It’s perfect for achieving that clutter-free, contemporary vibe everyone seems to crave.
Picture slim, matte black metal shelves mounted high on a crisp white wall, creating a floating effect. On the shelves, uniform black and white pots and pans are stacked neatly, their clean lines echoing the shelves’ minimal design. The contrast between the metal and the monochrome cookware emphasizes simplicity and order. Soft ambient light highlights the sleek silhouettes, adding a touch of sophistication.
Opt for open shelves in black or stainless steel for a more industrial feel, or choose white metal for a softer aesthetic. You can also layer with subtle textured textiles like silicone oven mitts or silicone mats in matching tones. For a warmer look, add wood accents underneath the shelves or incorporate subtle lighting to make the monochrome palette pop. This approach adapts well to small kitchens or modern apartment setups.
Measure your wall space carefully before choosing your shelf length and spacing. Use sturdy metal brackets or floating support systems designed for heavier loads. Install the shelves at a height that allows easy access to frequently used cookware. Keep the arrangement uniform for a clean look—align handles and stacking for symmetry. Use high-quality mounts to prevent sagging, especially when storing heavier pots. Finish by organizing your cookware in a way that’s both functional and visually appealing.
Add subtle touches like matching storage jars for ingredients or minimalist utensil holders in monochrome shades. Incorporate small decorative elements such as geometric containers or textured silicone accessories for variety. For holidays, swap out some cookware for seasonal themed pieces in monochrome hues, making the overall look cohesive yet personalized. Keep clutter minimal to preserve the sleek aesthetic.
This look proves that less truly is more. It’s about curating a collection of essential, beautiful pieces that work together harmoniously. Once set up, your kitchen will radiate calm and order, making cooking a pleasure rather than a chore. Now, who said modern had to be cold? 🙂
3. Recessed Shelving Nooks with Decorative Storage Baskets
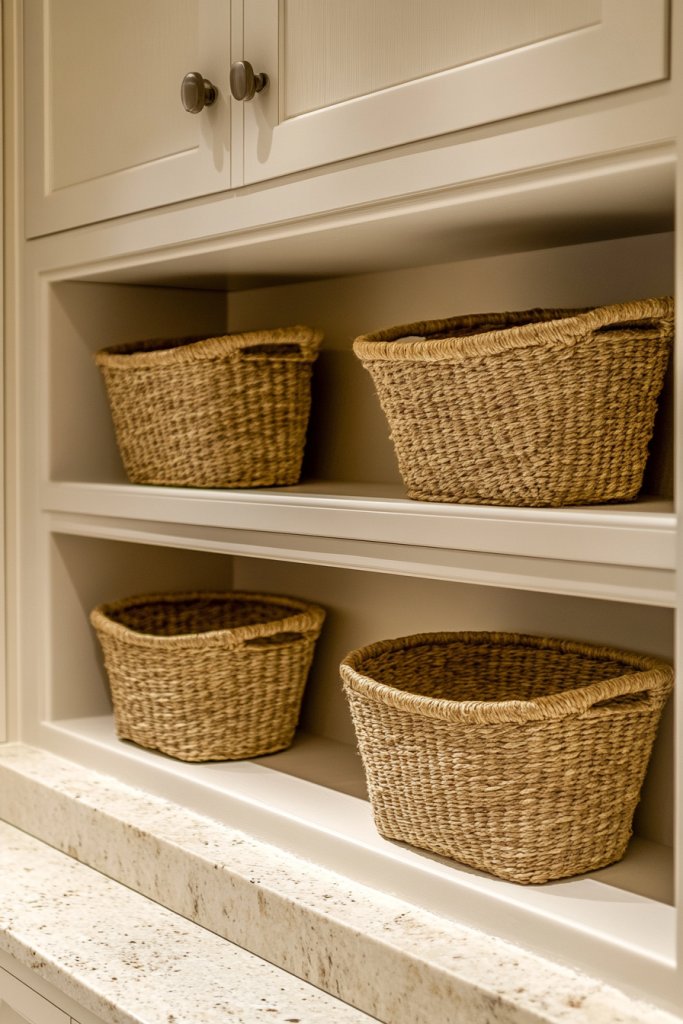
Ever wish your kitchen had more storage without sacrificing style? Hidden nooks and recessed shelves give you a clever way to add storage that blends seamlessly into your space. Paired with decorative baskets, they help keep essentials organized while making your kitchen look polished and intentional.
Visualize a shallow alcove built into the wall, with a smooth, plastered interior painted in a subtle hue. Inside, woven or fabric baskets sit neatly, holding spices, utensils, or small gadgets. The baskets add texture and warmth, contrasting with the sleek wall surface. Light spills softly into the nook, highlighting the organized chaos within—clean, functional, and inviting.
Recessed shelves can be customized for different purposes—use open spaces for frequently used items or add doors for a cleaner look. Opt for baskets in natural fibers like jute or seagrass for a rustic vibe, or go for fabric bins with fun patterns for a more playful style. Adjust the depth and width depending on your needs, and paint the interior in colors that complement your overall decor. These niches work well in both small apartments and large kitchens.
Identify wall areas suitable for carving out recessed shelves—usually between studs or existing wall cavities. Use a drywall saw or rotary tool to carefully cut out the space, then smooth the edges. Finish with drywall mud and paint that matches your wall. Place your baskets inside, choosing sizes that fit your items snugly. For added stability, secure the baskets with clips or adhesive strips if needed. This DIY project can be simple with basic tools, but precise measurements are key to a clean look.
Personalize these storage niches with decorative baskets in colors or textures that match your style. Add small labels or tags to baskets for easy identification. Incorporate seasonal touches like faux greenery or themed textiles—without plants, of course—to keep the space lively. You can also add small decorative trays inside for serving or display purposes, elevating the functionality.
Recessed shelving not only declutters your counters but also adds architectural interest. With a little DIY effort, you can create a custom storage solution that looks built-in and stylish. This approach maximizes small spaces and keeps everything within reach. Your kitchen will feel more organized and thoughtfully designed—ready for both everyday use and entertaining!
4. Multi-Level Shelves with Layered Items for Depth
Ever felt your kitchen looks flat or boring, even with all your effort? Want to add visual interest without cluttering? Multi-level shelves with layered items can give your space depth and dimension, making it feel more dynamic and inviting. It’s a simple trick that transforms flat walls into eye-catching displays.
Visualize a series of shelves at different heights, with objects arranged to create layers—think bowls, small appliances, and decorative pieces stacked in a visually appealing way. Use varying depths and lengths to add architectural interest. Place taller items towards the back and smaller ones in front to create a cascading effect. Warm lighting highlights the layers, drawing the eye across the display.
Mix open shelving with closed cabinets to balance openness and concealment. Use different finishes—matte, gloss, or textured—to create contrast. Incorporate color accents through dishware or textiles to add vibrancy. For seasonal variations, swap out items or add decorative elements like fabric runners or textured mats to refresh the look.
Install multiple shelves at varying heights according to your wall space and needs. Use sturdy brackets or floating supports designed for different depths. Arrange items in a layered manner, balancing weight and visual weight. Use risers or small stands to elevate certain pieces, creating multi-dimensionality. Keep the arrangement cohesive by following a color or style theme.
Add a personal touch with handcrafted pottery or heirloom dishes to enrich the layers. Incorporate textured textiles like woven placemats or cloths between shelves for added depth. Seasonal accessories like themed textiles or small decorative sculptures can keep the display fresh. Regularly update the layers to reflect your evolving style.
Layered shelves show off your creative side and make your kitchen more engaging. They are highly adaptable—perfect for showcasing your personality and taste. Once set, they create a sense of movement and flow that makes even simple dishes feel special. Your kitchen becomes a curated space that feels lively and thoughtfully designed.
5. Slim Line Shelves with Hanging Utensils and Hooks
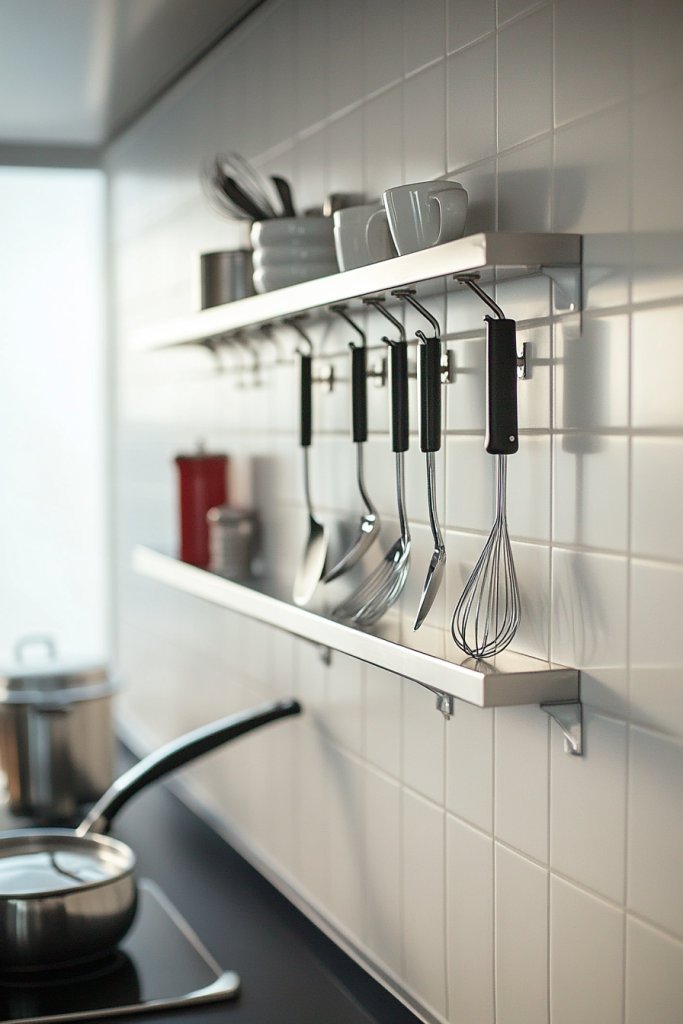
Feeling cramped with too many tools cluttering your counters? Want quick access to your favorite utensils without sacrificing style? Slim line shelves with hooks are a game-changer. They keep essentials within reach while maintaining a sleek, uncluttered look that’s both functional and stylish.
Picture narrow metal or wooden shelves mounted just below cabinets or on empty wall space. From hooks hang utensils, ladles, and measuring spoons—organized yet accessible. The hooks add a rhythmic pattern to the wall, giving the space a dynamic, organized feel. The shelves themselves can be minimalist, blending seamlessly into your decor. The combination of open space and hanging items creates a balanced, practical aesthetic.
Choose slim shelves in materials that match your kitchen’s style—metal for industrial, wood for rustic, or sleek composites for modern. Use hooks of different sizes for varied tools, creating visual interest. For a more decorative approach, incorporate sculptural hooks or custom shapes. This setup works well in small kitchens, above islands, or along pantry walls.
Install the shelves at a height that allows easy access to hanging utensils. Use sturdy anchors designed for your wall type—drywall, brick, or wood. Attach hooks securely, spacing them for different tools—large spatulas, small whisks, etc. Keep the shelves free of clutter to avoid visual overload. Regularly clean the hooks and shelves for a tidy appearance. You can also add small containers or magnetic strips for additional organization.
Personalize by choosing hooks with decorative finishes—brushed brass, matte black, or vintage-inspired designs. Use colorful or patterned textiles for hanging tools to add a pop of color. Incorporate a small chalkboard label or tag for each hook to track your most-used gadgets. You can also hang a few decorative elements like a small framed quote or a textured cloth for added charm.
This setup proves that organization can be beautiful and easy to maintain. It’s perfect for those who want instant access to tools without sacrificing style. Once installed, it simplifies cooking prep and adds a modern, functional touch to your kitchen wall. Get ready for a space that’s both practical and eye-catching!
6. Industrial Pipe Shelving with Reclaimed Wood Surfaces
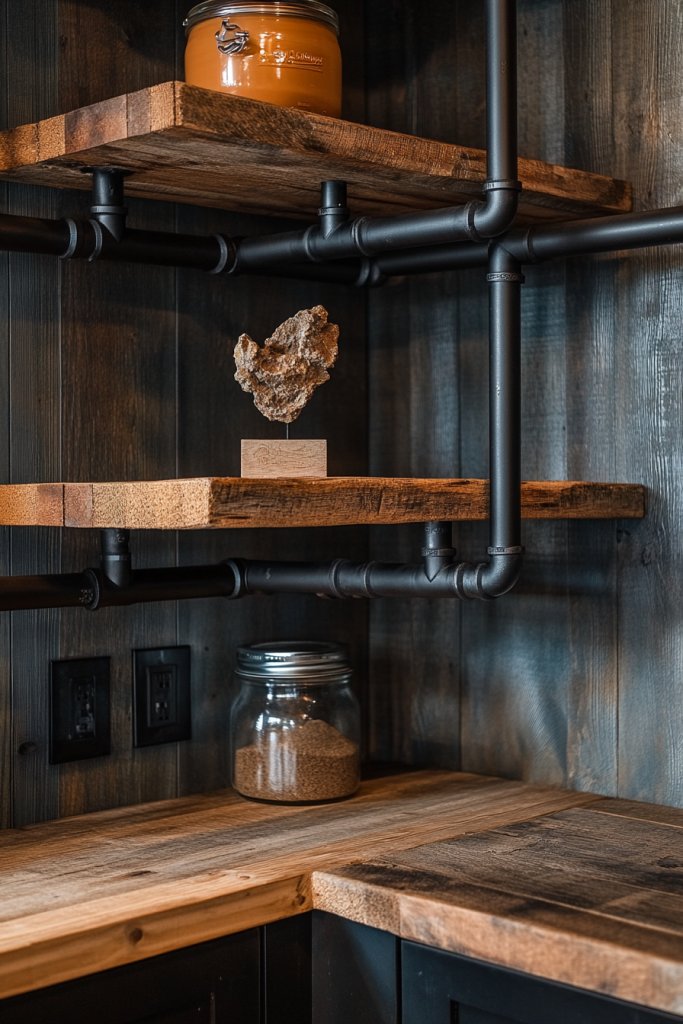
Craving an edgy, industrial look that also feels warm and inviting? Industrial pipe shelving with reclaimed wood is the perfect combination. It’s sturdy, stylish, and adds a rugged charm that elevates any kitchen space from basic to bold. Plus, it’s a conversation starter.
Imagine black metal pipes with exposed fittings supporting thick, weathered wood planks. The raw textures of both materials create a striking contrast—smooth, dark metal against rough, aged wood. Items like cast-iron pans or vintage jars sit atop, completing the industrial vibe. The open design allows your kitchen’s personality to shine through, with an overall aesthetic that’s both functional and decorative.
Use dark metals for a more industrial look or opt for brushed brass for a softer, vintage feel. The reclaimed wood can be finished with a matte sealant for durability or left natural for maximum character. You can install multiple shelves at different heights for a layered look or run a long shelf across an entire wall. This style pairs well with open kitchens, loft apartments, or rustic-modern blends.
Start by sourcing quality pipe fittings and reclaimed wood—check local salvage yards or specialty stores. Measure wall space carefully for shelf length and support placement. Assemble the piping frame using adjustable wrenches, then mount it securely to studs or wall anchors. Place the wood planks on top, securing them with screws if necessary. Organize your kitchen essentials on the shelves, balancing weight and aesthetics. Regular maintenance involves wiping down pipes and ensuring stability of the supports.
Add personal touches with vintage signs or custom-painted wood surfaces. Incorporate decorative piping elements or brass fittings for a bespoke look. Use the shelving to display unique cookware, antique jars, or textured baskets. Seasonal accents like cozy textiles or metallic ornaments can refresh the vibe without altering the core design.
Industrial pipe shelving makes your kitchen stand out with minimal effort. It’s a durable, stylish choice that ages beautifully and gets better with time. Perfect for DIY enthusiasts, it combines craftsmanship with design. Once set up, you’ll love how it transforms your space into a bold, functional showcase.
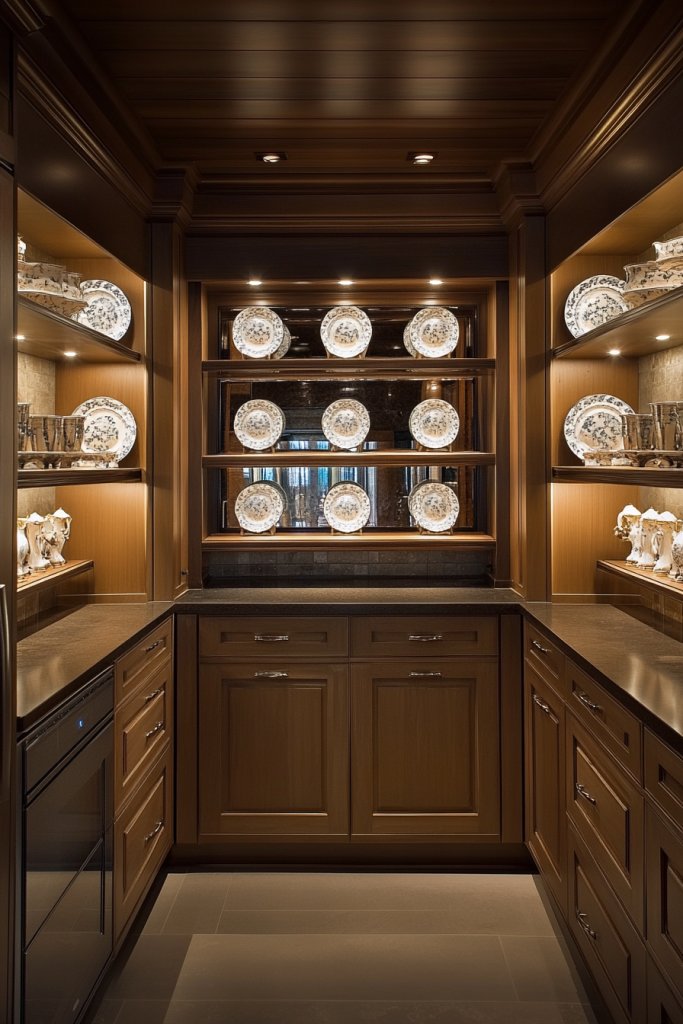
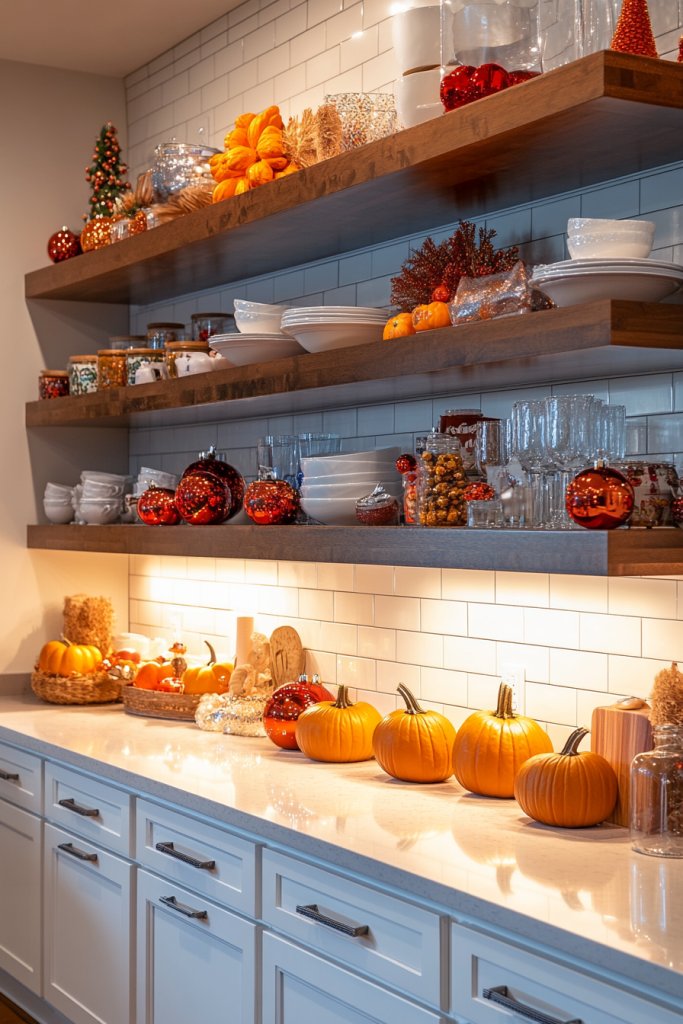
7. Open Shelves Paired with Under-Shelf Lighting
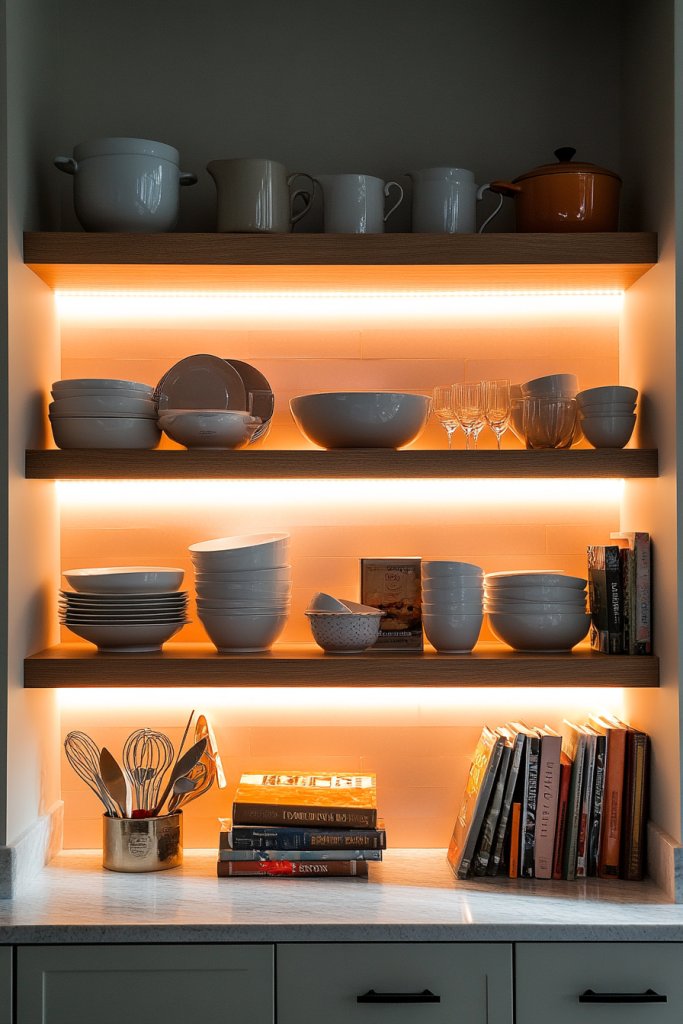
Wish your kitchen looked brighter and more inviting? Want to highlight your favorite dishware or cookbooks? Open shelves with under-shelf lighting create a warm glow that elevates your space and makes everything easier to see—no more squinting or searching.
Visualize sleek, floating shelves mounted high on the wall, with LED strips installed underneath. The soft, warm light illuminates the items on display—glassy jars, ceramics, or even decorative textiles—adding depth and ambiance. Shadows cast by the lighting add visual interest, creating a cozy yet functional atmosphere. The overall effect is both modern and inviting, perfect for entertaining or everyday comfort.
Choose warm white or daylight LED strips depending on your preferred ambiance. Install the lighting discreetly to keep the focus on your display items, or go for colorful LEDs for a playful touch. For a minimalist style, keep shelves sparse and let the lighting do the work. In more eclectic kitchens, layer with decorative accessories that catch the light, like textured ceramics or metallic accents.
Install the shelves securely using appropriate supports, ensuring they can handle the weight of your items. Attach LED strips to the underside of the shelves with adhesive backing or clips. Connect the lighting to a power source, preferably with a dimmer switch for adjustable brightness. Organize your display items thoughtfully to maximize the lighting effect—grouping by color or style. Regularly check the wiring and clean the LED covers for optimal glow.
Customize your lighting with color-changing LEDs or smart controls for different moods. Use decorative elements like textured baskets or fabric liners to add contrast. Add seasonal touches like fairy lights or themed colors to keep the display lively. Complement the lighting with matching accessories—like textured mats or decorative hooks—to tie the look together.
This setup makes your kitchen not just functional but also atmospheric. It’s an easy way to add a personal, cozy touch that impresses guests. Once installed, you’ll love how the lighting transforms your space after dark. It’s a simple upgrade with a big wow factor—perfect for modern living.
8. Corner Shelving Units for Maximizing Small Spaces
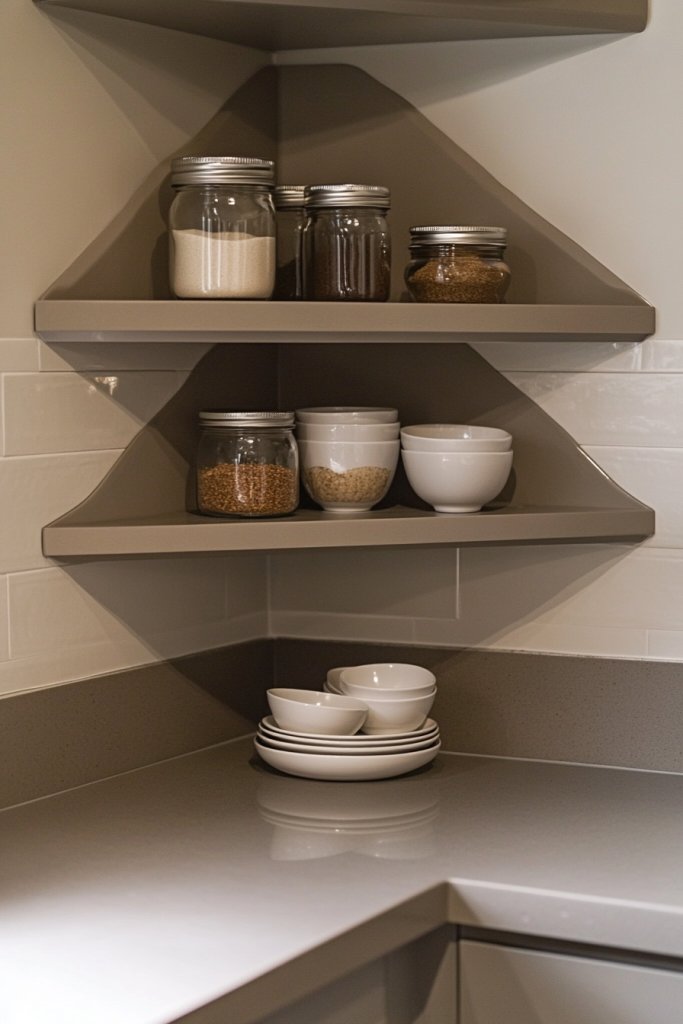
Small kitchen? No problem! Corners are often wasted space, but with clever shelving, they can become your new favorite storage spots. Corner shelving units help you utilize every inch efficiently, keeping your essentials handy without cluttering your main counters.
Picture a sleek triangular shelf snugly fitting into the corner, with small baskets and containers holding spices or utensils. The unit’s clean lines and minimal profile blend seamlessly into the space, visually expanding the room. Items are arranged in a way that balances function and style—some stacked, some nested—creating an organized yet lively corner. Light bounces off the surfaces, making the area feel open and inviting.
Choose corner shelves with open or closed fronts depending on your preference. For a more rustic look, opt for reclaimed wood with simple brackets. Metal or acrylic shelves give a modern touch, perfect for sleek city apartments. You can also add hooks underneath for hanging utensils or towels, maximizing utility. These shelves adapt well to all room sizes and decor styles.
Measure your corner space carefully before selecting or building your shelving unit. Use corner brackets or custom-cut supports to ensure stability. Install at a height that allows easy access to stored items—often eye level or slightly above. Arrange items by size and frequency of use, with everyday essentials at the front. Secure everything tightly to prevent shifting or falling. Regularly clean and re-arrange to keep the space functional.
Add decorative touches like colorful baskets or patterned liners inside the shelves. Incorporate seasonal or themed containers to keep the display fresh. Hang small utensils or accessories underneath for extra organization. You can also paint the shelves in bold colors to make the corner a focal point or keep it neutral for a seamless look.
Corner shelves show that smart design turns overlooked spaces into stylish features. They make small kitchens feel larger and more functional. With just a little effort, you can create a practical storage nook that’s both attractive and efficient. Your space will feel more open and thoughtfully arranged—ready for anything!
9. Floating Shelves with Built-In Chalkboard Labels
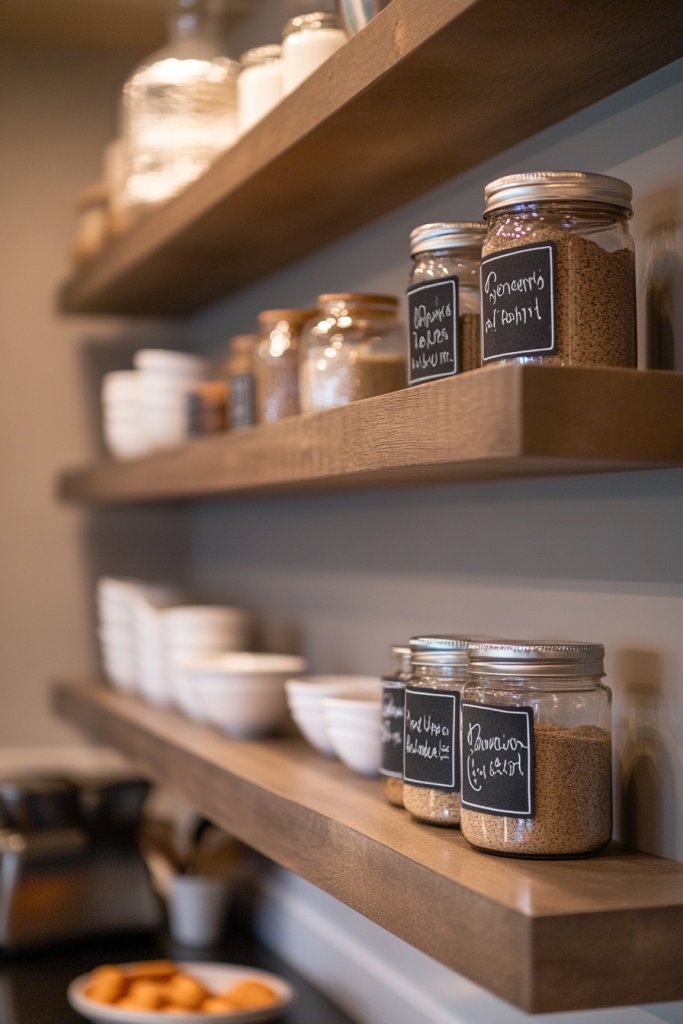
Struggling to keep your pantry or spice rack organized? Want a fun way to label and categorize your essentials? Floating shelves with built-in chalkboard labels offer a playful yet practical solution. They make organizing effortless and add a charming, interactive element to your kitchen.
Imagine sleek, minimalist floating shelves with small, attached chalkboard tags hanging from hooks or embedded into the shelf edge. The labels are handwritten with chalk, giving a casual, personalized vibe. The shelves display jars, containers, or small baskets, each clearly marked for quick identification. The black chalkboard surface contrasts with the colorful contents, creating a lively, organized display that invites interaction.
Use different shapes and sizes of labels to categorize items—round, rectangular, or custom shapes. Incorporate colorful chalks or markers for a vibrant touch. For a more polished look, opt for permanent labels painted directly onto the shelves or containers. Change labels seasonally or as your collection evolves, keeping the display fresh and functional. This approach works well in open kitchens or pantry areas.
Install floating shelves at heights that suit your storage needs, ensuring they’re level and securely anchored into studs or wall anchors. Attach chalkboard labels using adhesive backing, hooks, or small nails—whatever suits your style. Organize your jars or containers on the shelves, labeling each for quick access. Regularly update the labels to reflect new items or seasonal changes. Keep a stash of chalk nearby for easy edits.
Add decorative touches like colorful chalks, patterned labels, or themed stickers for special occasions. Use different fonts or handwriting styles for a playful effect. Incorporate small decorative elements like textured fabric liners or miniature signs near labels to add personality. Regularly refresh labels for variety and keep your storage system engaging.
This system makes organization fun and highly functional. It encourages you to keep things tidy and easy to find, reducing stress during busy mornings. Your kitchen will feel more inviting and personalized with a little creative labeling. It’s a simple upgrade that boosts both style and efficiency—go ahead, label away!
10. Layered Shelves with Trendy Color Accents
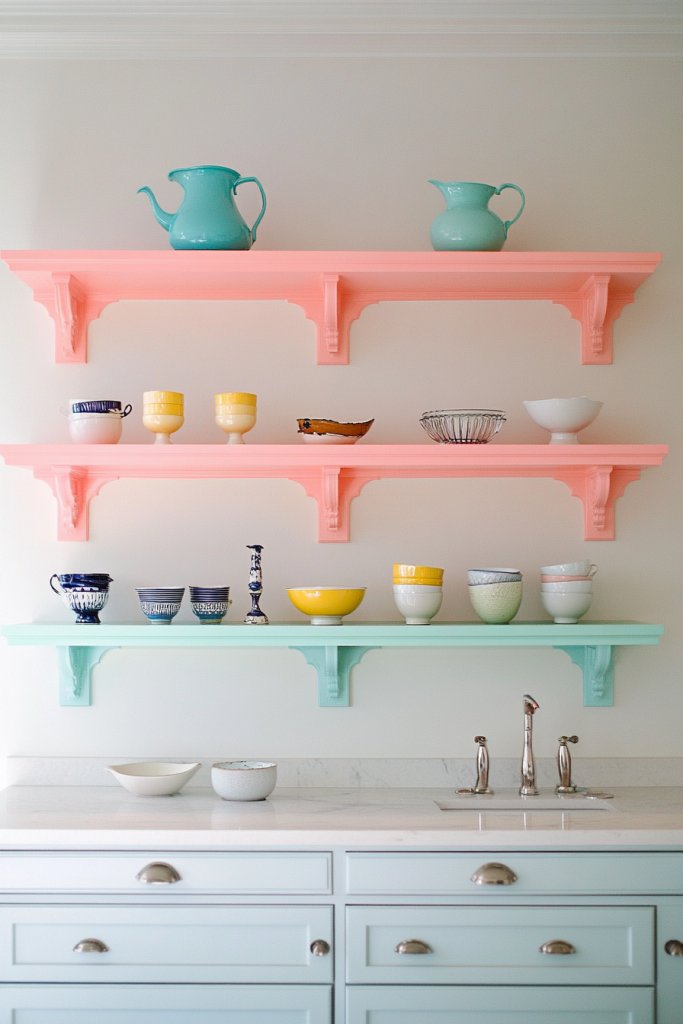
Feeling like your kitchen lacks personality? Want to inject some color and trendiness without overwhelming the space? Layered open shelves painted in bold or pastel hues can turn bland walls into vibrant focal points. It’s a fantastic way to showcase your style while keeping things organized.
Picture a series of shelves in a soft pastel shade, layered at different heights, with colorful dishware and accessories arranged to create depth. Textured textiles, like woven baskets or patterned cloths, complement the palette and add visual interest. Items are grouped by color or theme, forming a cohesive, colorful display. Soft lighting enhances the hues, making the space cheerful and lively.
Choose paint colors that match or contrast with your overall decor—think blush pinks, muted mint, or bold navy. Mix in neutral-colored shelves with vibrantly colored accessories for an eclectic look. Swap out items seasonally or for special occasions to keep the display fresh. You can also incorporate textured materials like rattan or textured ceramics for added depth.
Paint or install shelves in your chosen colors, ensuring a smooth finish for a professional look. Arrange dishes, glasses, and decorative objects in layered groups—placing taller items at the back and smaller in front. Use risers or stands to add height variation. Balance the colors across the shelves for harmony, avoiding clutter. Regularly update your display to reflect your evolving style.
Add personal touches like custom-painted signs or initials on plates. Incorporate seasonal or themed items in corresponding hues for holidays or celebrations. Use textured textiles or decorative paper behind selected items for contrast. Personalizing the color scheme makes your kitchen reflect your personality and keeps your displays engaging.
Vibrant, layered shelves prove that a splash of color can refresh your entire kitchen. They create a lively, inviting atmosphere that inspires you to cook and entertain. With a little planning, you can easily switch themes or colors to match your mood or season. Your space will feel fresh, fun, and uniquely yours—ready to impress!
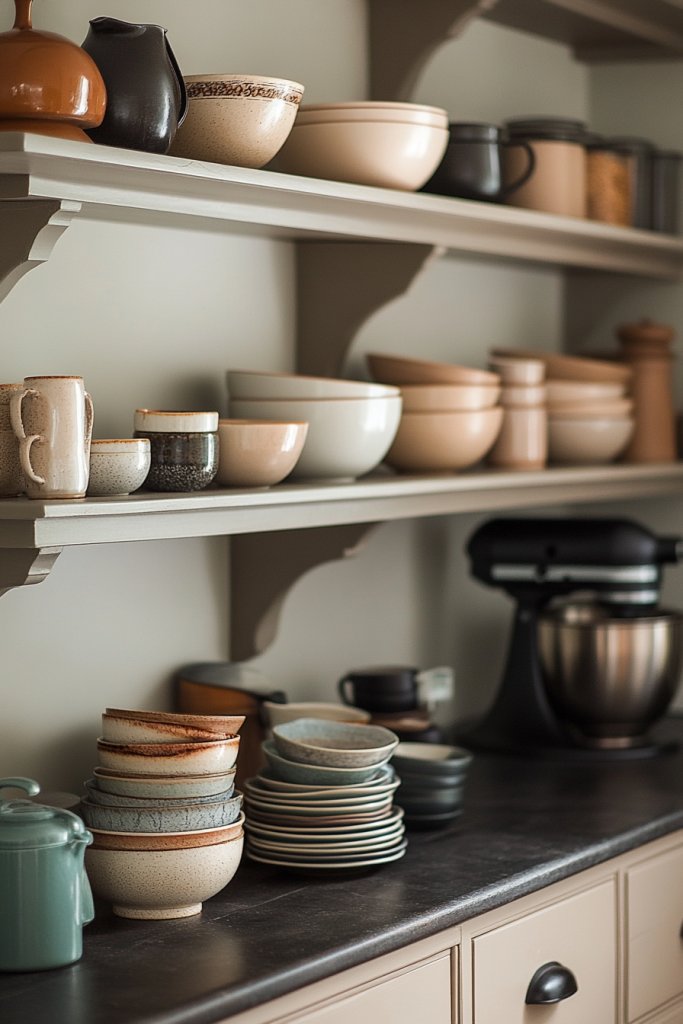
11. Open Shelves with Natural Elements and Textured Materials
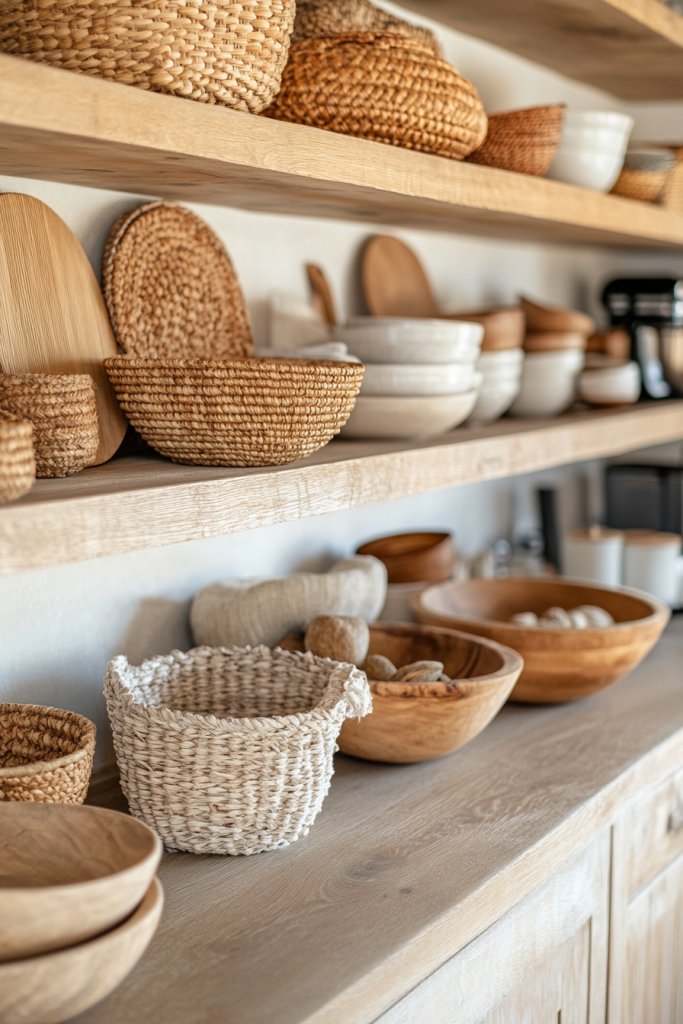
Craving a warm, organic feel in your kitchen? Want to add texture and natural beauty without clutter? Open shelves decorated with natural elements and textured materials can bring cozy, earthy vibes into your space. It’s the perfect way to create a calming, inviting environment.
Imagine shelves lined with woven baskets, rattan trays, and stoneware bowls, all arranged with care. Items in warm, neutral tones—creams, browns, soft grays—add depth and warmth. Textured elements like woven placemats or linen cloths complement the display, making it feel tactile and organic. Light filters softly through, emphasizing the richness of natural materials.
Mix and match natural textures—bamboo, rattan, linen, and clay—based on your style. For a boho vibe, add macramé hangings or textured textiles. Rustic kitchens benefit from reclaimed wood accents and clay pots. For a modern twist, incorporate sleek, matte-finished stone or concrete elements. Adjust the arrangement seasonally with cozy textiles or lightweight decorative objects.
Select shelves that can support textured and heavy items—wood, bamboo, or stone materials work well. Arrange woven baskets, ceramic jars, and textured bowls in a layered fashion, balancing weight and visual interest. Use small risers inside baskets to elevate items and create depth. Incorporate natural elements like faux greenery or dried florals for added warmth, avoiding real plants if restricted. Keep surfaces clean to highlight textures.
Add personal touches such as handmade ceramics or vintage baskets. Use textiles with interesting textures or patterns to complement the natural theme. Incorporate seasonal accents like pinecones or dried citrus slices in natural-hued containers. Regularly rearrange to keep the display fresh and reflective of your evolving style.
Natural elements and textured materials create a tranquil, inviting kitchen that feels connected to nature. It’s a timeless look that grows more beautiful with age. You’ll enjoy a space that’s both stylish and soothing—perfect for cooking, gathering, or simply relaxing. Embrace the organic charm and make it yours!
12. Symmetrical Shelving Arrangements for a Balanced Look
Does your kitchen feel cluttered or chaotic even when it’s clean? Want a tidy, harmonious look that feels intentional? Symmetrical shelving arrangements can bring order and balance to your space, making everything feel more cohesive and calming.
Visualize pairs of matching shelves flanking a window or stove, with balanced items like identical jars, plates, or bowls. The symmetry creates a sense of stability and order, making your space look polished. Items are arranged carefully, with similar heights and colors mirrored on each side. The overall effect is a visually satisfying, harmonious environment.
Use symmetrical arrangements in both open and closed shelving setups. Match the style, color, and size of items on each side for maximum impact. For a more modern look, keep accessories minimal and uniform; for a cozy feel, add textured textiles or decorative elements in pairs. You can also experiment with asymmetrical elements for a more relaxed, balanced vibe—sometimes imperfection is perfection.
Start by choosing a focal point—like a window or stove—and plan your shelves on either side. Use identical brackets or supports for balance. Arrange items in pairs or groups with similar visual weight. Keep the spacing consistent, and ensure the shelves are at equal heights. Regularly review the composition, removing clutter and adjusting for symmetry. Use matching containers or dishes for a cohesive look.
Incorporate personal or seasonal items in pairs—like two small vases or matching bowls—to keep the symmetry lively. Use a consistent color palette to unify the display. Add decorative elements like textured textiles or small sculptures for visual interest. Swap out or rotate items periodically to refresh the look without disrupting the balance.
Symmetrical shelving shows that good design is about balance and harmony. It creates a serene, orderly environment that feels intentional and stylish. With minimal effort, you can transform a cluttered space into a calming retreat. Your kitchen will look more put-together and welcoming—ready for anything!
13. Open Shelving with Display Stands for Cookbooks and Decor
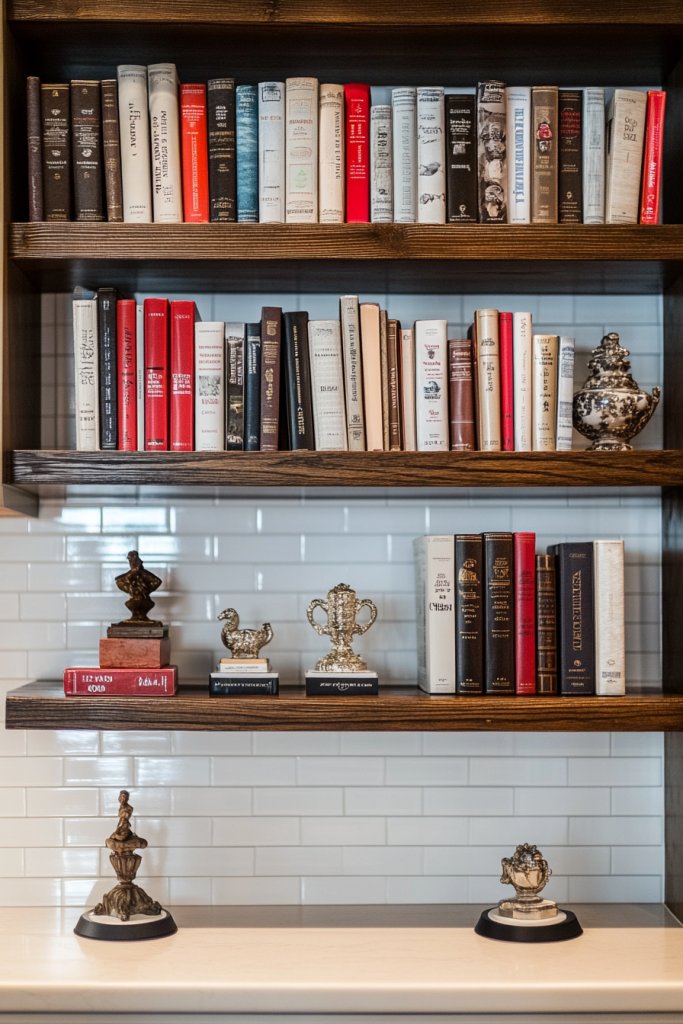
Want to showcase your favorite cookbooks and decorative pieces without cluttering countertops? Using display stands on open shelves allows you to elevate and organize your items beautifully. It’s a simple way to add layers and visual interest while keeping essentials accessible.
Picture a sleek shelf lined with colorful cookbooks propped on stylish risers or stands. Small decorative bowls, sculptures, or vintage tins are layered behind or beside the books for added dimension. The stands create visual hierarchy, making the display look curated and intentional. Light reflects off glossy covers and metallic accents, adding sparkle and depth.
Choose stands in metal, wood, or acrylic to suit your decor style. Use different heights and shapes to create visual rhythm. Mix open books with decorative items like textured ceramics or small sculptures for contrast. Arrange seasonal or themed displays to keep the setup fresh. This setup works equally well in modern, rustic, or eclectic kitchens.
Install shelves at eye level or slightly above for visibility. Use sturdy display stands or risers, securing them if needed, to prevent slipping. Organize your cookbooks by color, size, or theme for maximum impact. Add small decorative objects around the stands for a layered look. Regularly dust and rotate items to keep the display engaging and fresh.
Personalize with custom bookplates or decorative bookends. Incorporate unique collectibles or heirloom objects alongside your books. Use textured or patterned risers for an eclectic vibe. Seasonal decorations or themed objects can add a festive touch, making your display a conversation starter.
This approach transforms your shelves into mini galleries, showcasing your personality and interests. It’s a practical way to keep your favorite reads and decor on display while staying organized. With just a few stands and a bit of styling, your kitchen becomes a curated space full of charm and character—ready to impress.
14. Vintage Ladder Shelves for a Boho Vibe
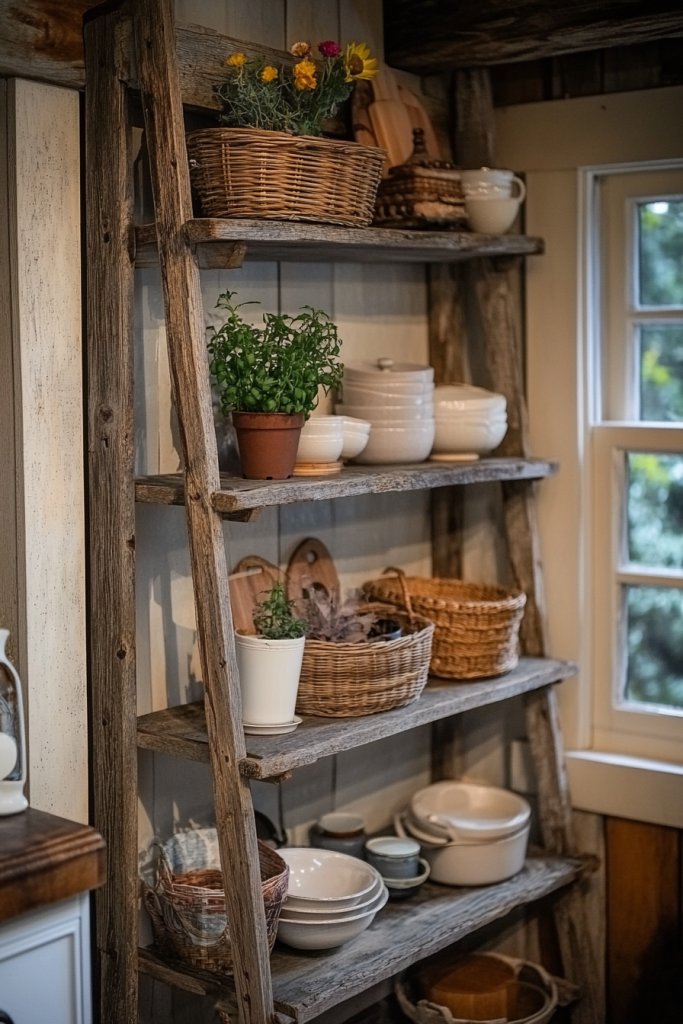
Looking to add a laid-back, bohemian touch to your kitchen? Vintage wooden ladders turned into shelves offer a relaxed, eclectic vibe. They’re versatile, charming, and a little bit unexpected—perfect for creating a cozy, personal space.
Imagine a weathered, vintage ladder leaning against a wall, with rungs decorated with woven baskets, textured textiles, and artisanal ceramics. The natural wood and aged paint add character, while the layered items create visual interest. Small hooks or pegs on the ladder’s sides hold utensils, towels, or hanging textiles, adding practicality. The overall look is warm, inviting, and full of personality.
Paint or stain the ladder in a color that complements your decor—think muted pastels or distressed finishes for more rustic charm. Use the rungs for small baskets, plants, or decorative objects like vintage glass bottles. Hang textiles or small utensils on hooks for added functionality. This style works well in open-plan kitchens, rustic farms, or boho-inspired spaces.
Find a sturdy vintage ladder or repurpose an old wooden one. Lean it securely against the wall, ensuring stability. Decorate with woven baskets and textured fabrics, layering items for depth. Use the rungs for hanging utensils, small pots, or towels, secured with hooks or clips. Keep the arrangement balanced, and periodically refresh the decor for seasonal updates. It’s a simple DIY project with a big visual payoff.
Add your personal touch with handmade textiles, vintage signs, or seasonal accents like dried flowers or fairy lights. Use baskets and textiles in colors that match your overall decor theme. Incorporate personal memorabilia or small collectibles to make the space uniquely yours. Regularly reconfigure the display to keep it fresh and interesting.
Vintage ladder shelves inject personality and charm into your kitchen space. They are easy to move and reconfigure, making them perfect for flexible styling. This look encourages creativity and showcases your unique taste. Get ready to enjoy a stylish, relaxed atmosphere that feels both vintage and personal—your new favorite corner!
15. Over-the-Door Open Shelves for Extra Storage
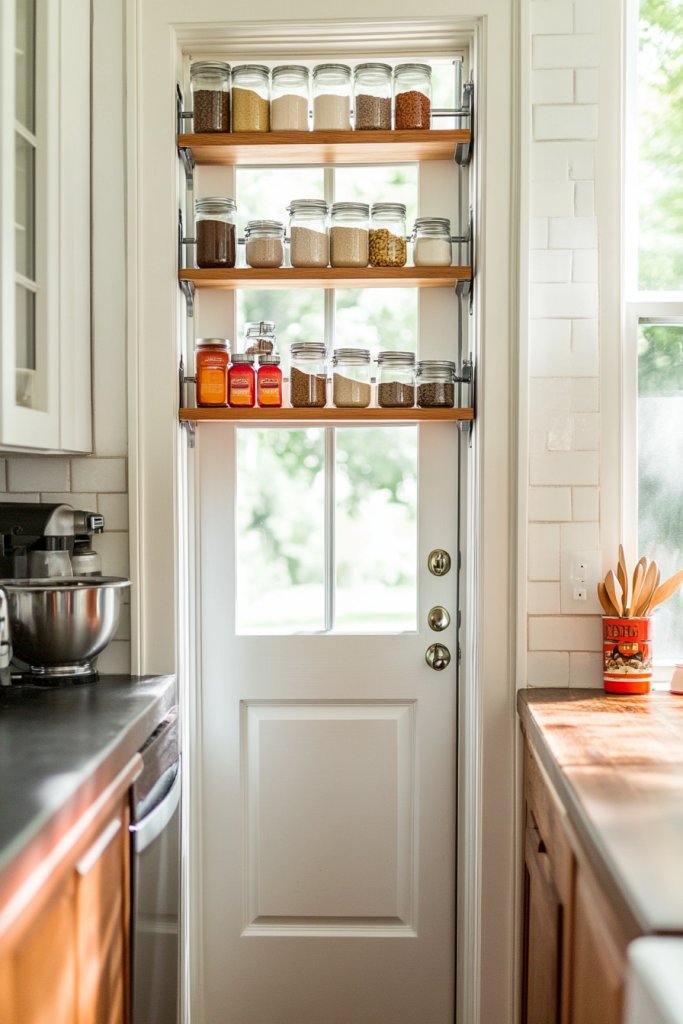
Running out of storage and counter space? Over-the-door open shelves are a clever way to utilize underused wall space above doorways or narrow spots. They’re perfect for keeping essentials within reach without crowding your main kitchen area. Plus, they add a touch of functional style.
Visualize a slim shelf mounted above a pantry or door frame, with small baskets or containers holding spices, utensils, or snacks. The open design keeps everything visible and accessible, while the placement keeps clutter off your counters. The shelves are often minimalist metal or wood, blending seamlessly into the space. The display is practical yet visually clean.
Choose shelves in materials that match your decor—metal for industrial, wood for rustic, or painted finishes for a pop of color. Add hooks underneath for hanging mugs or small tools. Adjust shelf height based on what you plan to store—higher for larger containers, lower for smaller items. This setup is perfect for small kitchens or spaces with limited wall area.
Securely mount the shelves into wall studs or anchors, ensuring they can support weight. Use brackets or floating supports that are slim and hidden for a clean look. Organize your items in small baskets or directly on the shelves, keeping similar items grouped for easy access. Regularly check stability and clean the surfaces for longevity. Consider adding labels or tags for quick identification.
Personalize with decorative baskets or containers in colors that match your style. Use small decorative hooks for hanging utensils or cups. Seasonal or themed containers can add variety and personality. Keep the display neat, swapping out items as your needs or decor themes change.
Over-the-door shelves maximize vertical space efficiently without permanent modifications. They’re a stylish solution for extra storage where you need it most. Once installed, they keep your essentials accessible and your space organized. Perfect for renters or those wanting a flexible, functional upgrade!
16. Shelves with Modular, Interchangeable Components
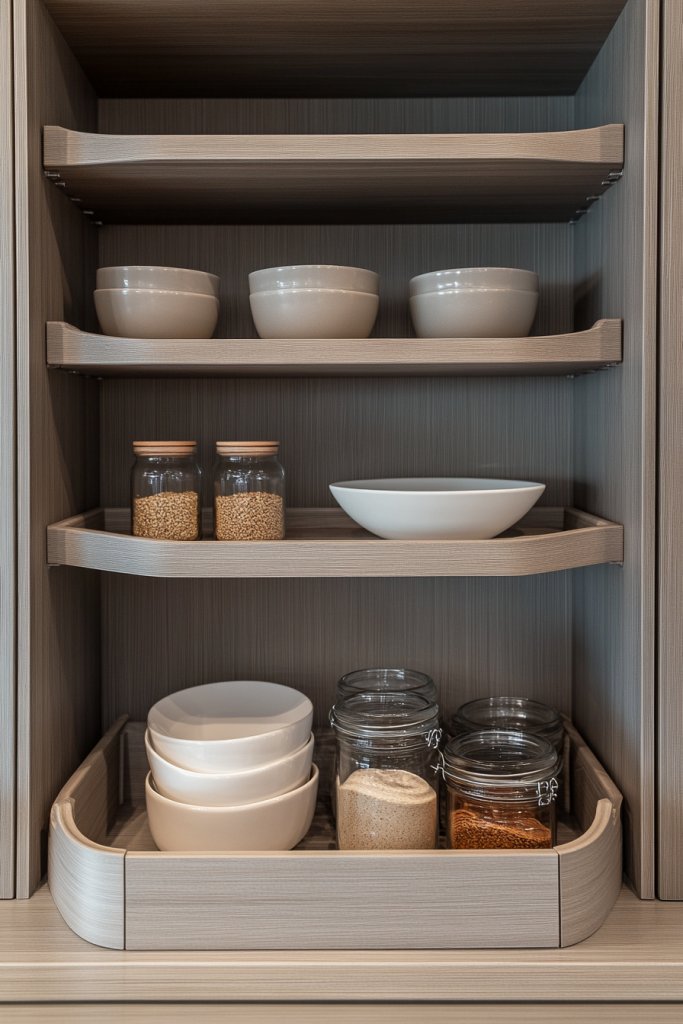
Want a flexible storage solution that adapts as your needs change? Modular, interchangeable shelving components let you customize your kitchen storage without a full redesign. They’re perfect for those who love variety and want to keep their space fresh and functional.
Imagine a set of sleek, minimalist shelves with modular panels and supports that can be reconfigured at will. You can add or remove sections, change heights, or swap out materials—wood, metal, or acrylic—to suit your mood. Items like neatly stacked dishware, storage jars, or decorative objects are arranged to emphasize the modular nature, creating a dynamic, adaptable display. The overall look is modern, clean, and customizable.
Use different colors or finishes for each module to create a layered, eclectic look or keep everything uniform for a streamlined aesthetic. Incorporate adjustable heights or fold-out sections for added versatility. These modules can be combined with other storage solutions like baskets or racks, making your setup expandable and adaptable. Ideal for small or evolving spaces.
Select a modular shelving system compatible with your wall space and style. Install supports securely into studs or anchors, following manufacturer instructions. Arrange modules in a way that balances weight and visual flow. Customize by adding shelves, hooks, or compartments as needed. Regularly reconfigure your setup to optimize storage and style, keeping accessories organized in matching containers or baskets.
Personalize with color accents, decorative hardware, or themed modules for seasons or celebrations. Use labels or tags for easy identification. Incorporate small decorative objects, textiles, or lighting to enhance the modular look. Keep an eye on your evolving needs, and don’t hesitate to experiment with different configurations.
Modular shelving offers a playful, innovative approach to storage that evolves with you. It encourages creativity and makes organizing fun. Once you master the system, your kitchen will feel adaptable, stylish, and uniquely yours. Embrace the freedom to change and grow your space over time—no limits!
17. Open Shelves with Seasonal or Themed Decor
Looking for a way to keep your kitchen fresh and lively all year round? Incorporating seasonal or themed decor on open shelves transforms your space into a dynamic, engaging environment. It’s a simple trick to reflect your personality and celebrate each season.
Picture shelves decorated with seasonal dishware, textiles, and accessories—think pumpkin-shaped bowls in fall or colorful Easter eggs in spring. Mix in themed textiles or small decorative objects that evoke holidays or seasons. The display is layered and curated, with items arranged to create a lively, inviting scene. Lighting highlights these seasonal accents, making your kitchen feel alive and festive.
Switch out items with the seasons—swap out textiles, dishware, or small decor pieces. Use themed containers or labels for a playful touch. Incorporate seasonal colors, textures, and motifs—like snowflakes or flowers—to suit the time of year. This approach works in any style, from modern to rustic, adding a personal touch to your everyday space.
Designate specific shelves or sections for seasonal decor, making swaps easy. Use removable hooks or adhesive strips for lightweight decorations, or simply arrange items on the shelves. Store off-season items in labeled containers or bins for quick access. When changing themes, clean the shelves and re-arrange items for a fresh look. This keeps your decor exciting and reflective of current seasons or celebrations.
Create a dedicated storage box or basket for seasonal decor to keep everything organized. Personalize with handcrafted ornaments or DIY decorations that hold sentimental value. Use textured textiles or colorful dishware that can be easily swapped out. The key is to curate a collection that reflects your style and makes your space feel vibrant year-round.
Seasonal and themed displays keep your kitchen feeling fresh and personal. They show off your creativity and attention to detail, making everyday routines more joyful. With just a few swaps, your space can celebrate every holiday or season beautifully. Get ready to impress guests and enjoy a constantly evolving, charming kitchen!
18. Integrating Open Shelving with Hidden Storage Solutions
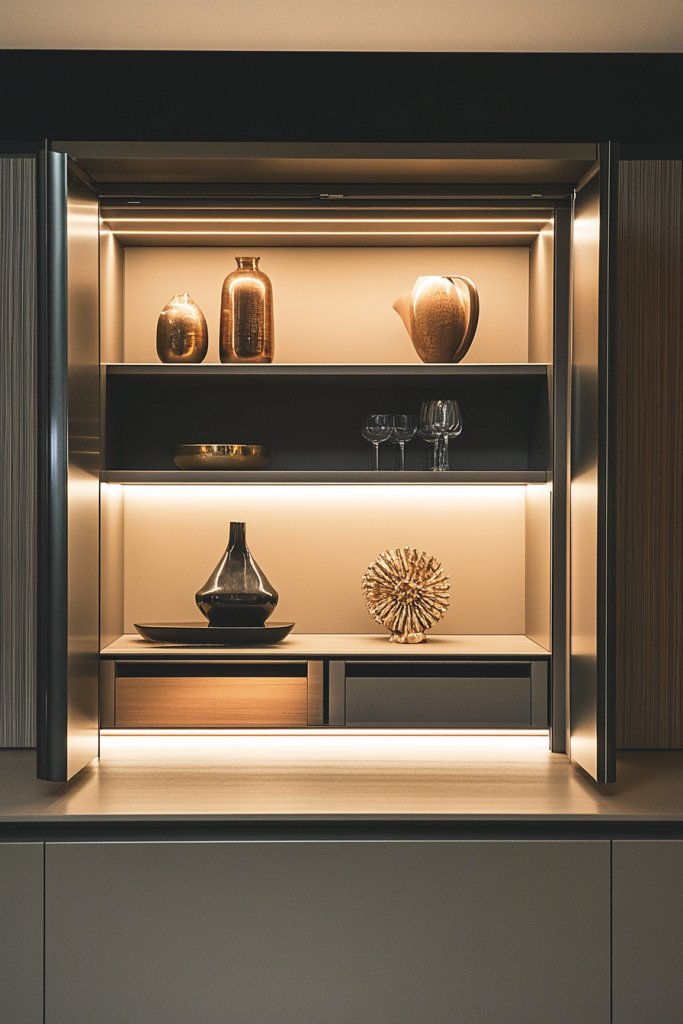
Want a sleek, clutter-free kitchen without sacrificing storage? Combining open shelves with hidden storage options offers the best of both worlds. It allows you to showcase decorative items while keeping everyday essentials tucked away—perfect for a tidy, stylish space.
Visualize open shelves displaying curated dishes, glassware, or decor, with concealed cabinets or drawers underneath. The hidden storage keeps clutter out of sight, maintaining a clean and modern look. The open displays are thoughtfully arranged, emphasizing style, while the concealed spaces hide less attractive items or bulk supplies.
Use sleek, handleless cabinets for a seamless look, or opt for decorative fronts that match your decor. Incorporate pull-out drawers, hidden compartments, or secret niches for specialized storage. This approach is adaptable to both contemporary and traditional styles, depending on finishes and hardware. It’s ideal for small kitchens where space is at a premium.
Plan your layout to integrate open shelving with concealed cabinets—consider flow and accessibility. Install sturdy supports for shelves and secure cabinets into studs or wall anchors. Organize items on open shelves for visual appeal, reserving hidden compartments for less attractive or bulkier items. Use labels or internal organizers to maximize efficiency. Regularly assess your storage needs and reconfigure for better flow.
Personalize with custom cabinet fronts, decorative hardware, or integrated lighting inside cabinets. Use attractive containers or baskets inside hidden spaces for neat storage. Incorporate textured finishes or contrasting colors to add visual interest. Seasonal or themed touches can make the space feel lively and tailored to your personality.
Blending open and hidden storage elevates your kitchen’s style and functionality. It’s a smart way to keep your space looking clean while still being practical. Once mastered, this system makes every inch work for you—organized, beautiful, and effortless. Your kitchen will look more spacious, modern, and thoughtfully designed—ready for any occasion.
Conclusion
From minimalist setups to eclectic arrangements, the open shelving ideas shared here showcase the endless possibilities for elevating your kitchen decor. Embrace these creative solutions to showcase your favorite dishes, stylish cookware, or decorative accents. Take the leap and transform your kitchen into a beautiful, functional space that reflects your personality and flair!