There’s something undeniably charming about old windows that makes them perfect for creative decor projects. Their vintage appeal adds character and a sense of history to any space, making them a popular choice for DIY enthusiasts and interior lovers alike.
In this article, you’ll find a variety of inspiring ideas to repurpose old windows into stunning decorative pieces. From rustic wall hangings to charming photo displays, these ideas will help you infuse your home with vintage charm and unique personality. Get ready to transform forgotten windows into beautiful focal points that tell a story!
1. Repurposed Window Frame as a Rustic Coffee Bar Display
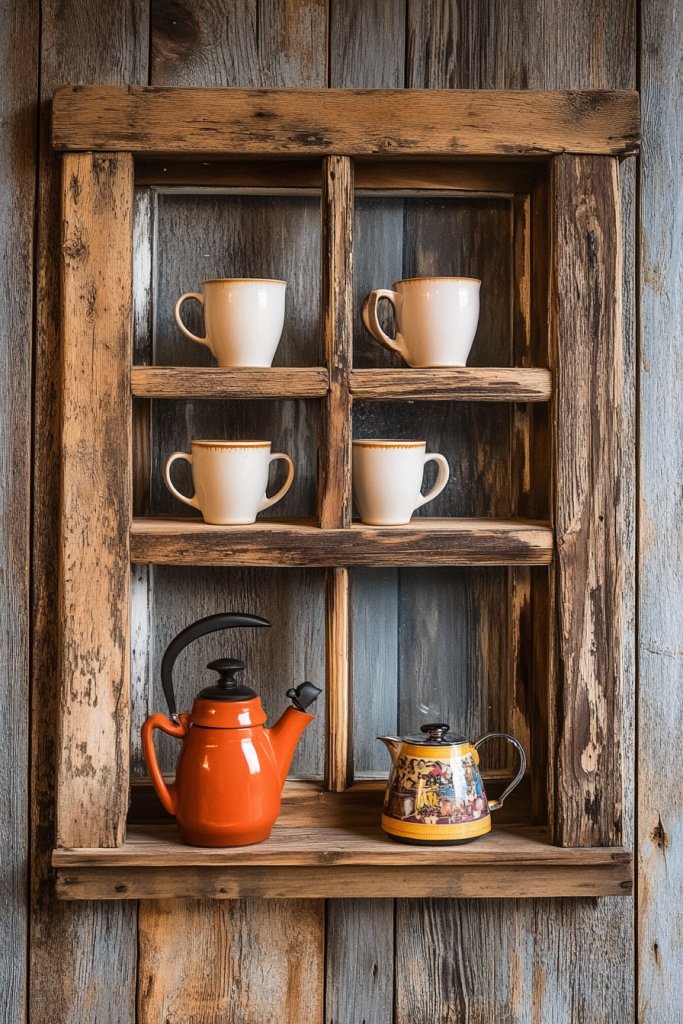
Ever wish your kitchen or living space could feel more charming and personalized without a huge overhaul? Repurposing old windows into coffee bar displays offers a cozy, nostalgic vibe that instantly elevates your space. It’s a simple fix that makes your mornings feel more special, even if you’re just brewing a quick cup.
Recommended Products to replicate this idea
No products found.
No products found.
Plus, it’s a fun way to recycle and add character to your home. Imagine a vintage window frame mounted on your kitchen wall, painted in soft pastel hues.
Small hooks hold your favorite mugs, while tiny wooden shelves display vintage tins or jars filled with coffee beans and spoons. The glass panes are decorated with chalkboard labels or delicate decals.
The overall setup exudes warmth and invites you to start your day in a charming, personalized space. It’s like having a rustic café right in your home.
You can customize this idea based on your style—go for a distressed farmhouse look, or opt for sleek, modern finishes. For smaller kitchens, a single window frame works perfectly, while larger spaces can handle multiple frames stacked or side-by-side.
Seasonal touches like fairy lights or fabric curtains can add a cozy touch during holidays or colder months. Use different paint finishes or hardware to match your existing decor for a seamless look.
Start by sourcing an old window frame, either from thrift stores or salvage yards. Clean it thoroughly and sand down rough edges.
Attach small hooks or knobs for hanging mugs, and add thin wooden shelves inside the panes if you like extra storage. You might want to secure the frame to the wall with brackets or hooks—just ensure it’s stable.
Decorate the glass with vinyl decals or chalkboard paint for labels. Finish with a protective sealant if you plan to handle spills or condensation.
Personalize your coffee bar by adding small vintage signs, framed photos, or even a small chalkboard for daily quotes. Use fabric or paper backgrounds behind the panes for seasonal themes or color coordination.
Incorporate your favorite coffee accessories in decorative jars or baskets nearby. You can also paint or distress the frame to match your kitchen’s color palette, giving it a truly bespoke feel.
The key is to keep it functional yet charming. This project transforms a simple window into a focal point that sparks conversation and adds warmth.
It’s a low-cost upgrade that makes your home feel instantly cozier. Plus, it’s a great conversation starter for guests, who will love the vintage charm. Ready to turn old windows into your new favorite coffee station? Let your creativity run wild and enjoy the process of creating something uniquely yours.
2. Vintage Window as a Charming Mirror Frame
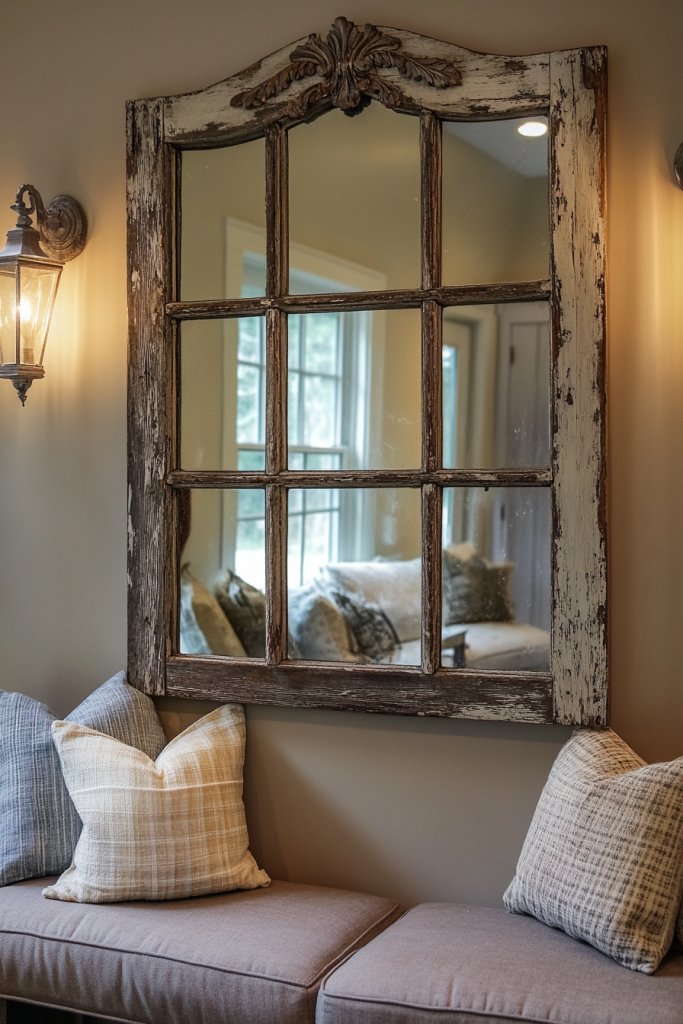
Looking for a unique way to add a touch of nostalgia to your decor? Using a vintage window as a mirror frame combines functionality with charm, creating a statement piece that’s both practical and pretty. It’s perfect for entryways, bedrooms, or bathrooms where you want a splash of personality.
Recommended Products to replicate this idea
No products found.
No products found.
Who says mirrors have to be boring or generic? Picture a weathered window frame hung on a wall, its paint slightly chipped for that authentic shabby chic look. A large mirror is fitted into the glass pane, reflecting natural light and making the room feel bigger.
Around the edges, you might add a few vintage-inspired hooks or decorative elements, but the main focus remains the mirror’s rustic charm. The result is a piece that feels like a window into the past, brightening your space.
You can customize this idea by choosing frames with different styles—ornate, distressed, or minimalist. For small spaces, a single frame can serve as a full-length mirror, while multiple frames can create a gallery wall.
For a coastal vibe, paint the frame in light blues or whites; for a farmhouse look, opt for distressed finishes. You can also layer different-sized frames for an eclectic aesthetic.
Select a vintage window frame that fits your space and style. Remove any old glass or add a new mirror cut to size for a perfect fit.
Secure the mirror with mirror adhesive or clips designed for glass. Mount the frame on your wall using sturdy hooks or brackets, ensuring it’s level and stable.
For added personality, consider decorating the frame with small embellishments like rope, beads, or vintage hardware—just keep it lightweight. Finally, place it in a spot with good lighting for maximum impact.
Personal touches include adding a distressed finish with chalk paint or applying decorative decals on the glass. Surround the mirror with vintage frames or photos for a curated look.
Use decorative hooks for hanging scarves or jewelry nearby, blending functionality with style. You could also add a small shelf underneath for keys or small accessories, making it a versatile piece.
A vintage window mirror instantly adds character and a nostalgic vibe to your home. It’s a conversation starter that combines history with modern use.
Plus, you get a functional mirror that feels like a piece of art. Ready to transform a battered window into your new favorite decor piece? Embrace the charm of vintage and enjoy the unique story it brings to your space.
3. Window Frame as a Shabby Chic Jewelry Organizer
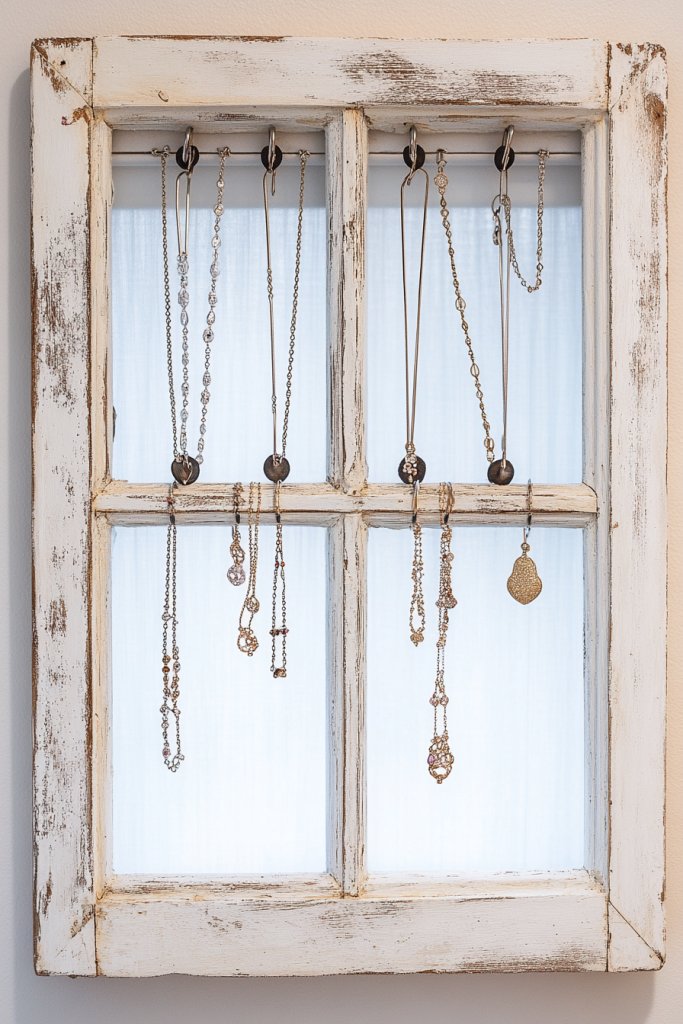
Ever struggle with tangled necklaces or lost earrings cluttering your vanity? A vintage window frame turned jewelry organizer offers a stylish solution to keep your accessories neat and accessible. It adds a touch of shabby chic charm to your bedroom or dressing area while solving your clutter problem.
Recommended Products to replicate this idea
No products found.
No products found.
Who knew that such a simple idea could make your mornings less stressful? Imagine a distressed white window frame mounted on the wall, its panes filled with delicate hooks or wires. Necklaces hang in a gentle cascade, earrings dangle from tiny knobs, and bracelets are neatly arranged on twine or wire.
Decorative ribbons or fabric strips add softness and color, making the display both functional and beautiful. The overall effect is like a vintage boutique, inspiring you to style your accessories with care.
Choose a frame with ornate details for a more romantic look or a simple, rustic style for a farmhouse vibe. You can add small baskets or trays inside the frame for rings or watches.
For a seasonal twist, swap out ribbons or fabric accents to match holidays or decor themes. If space is limited, a smaller frame with fewer panes works just as well.
Start by cleaning and lightly sanding the window frame for a shabby chic finish. Attach small hooks, nails, or wire across the panes, securing them tightly.
Mount the frame on your wall with sturdy hooks or brackets, ensuring it’s level. Decorate the panes with fabric or decorative paper for a background that complements your decor.
Arrange your jewelry by type or color for easy access and visual appeal. Add small decorative touches like vintage brooches or charms pinned onto the fabric background.
Use ribbon or lace to create sections for different accessories, making everything look curated. Incorporate small vintage-inspired containers nearby for additional storage.
Regularly update the display to keep it fresh and inspiring. This jewelry organizer turns daily dressing into a delightful ritual.
It’s a beautiful reminder of your style and personality, displayed proudly on your wall. Plus, it keeps your accessories from tangling or getting lost. Ready to give your jewelry a vintage makeover? Embrace this charming solution and enjoy a more organized, stylish space.
4. Rustic Window Shelf for Seasonal Decor
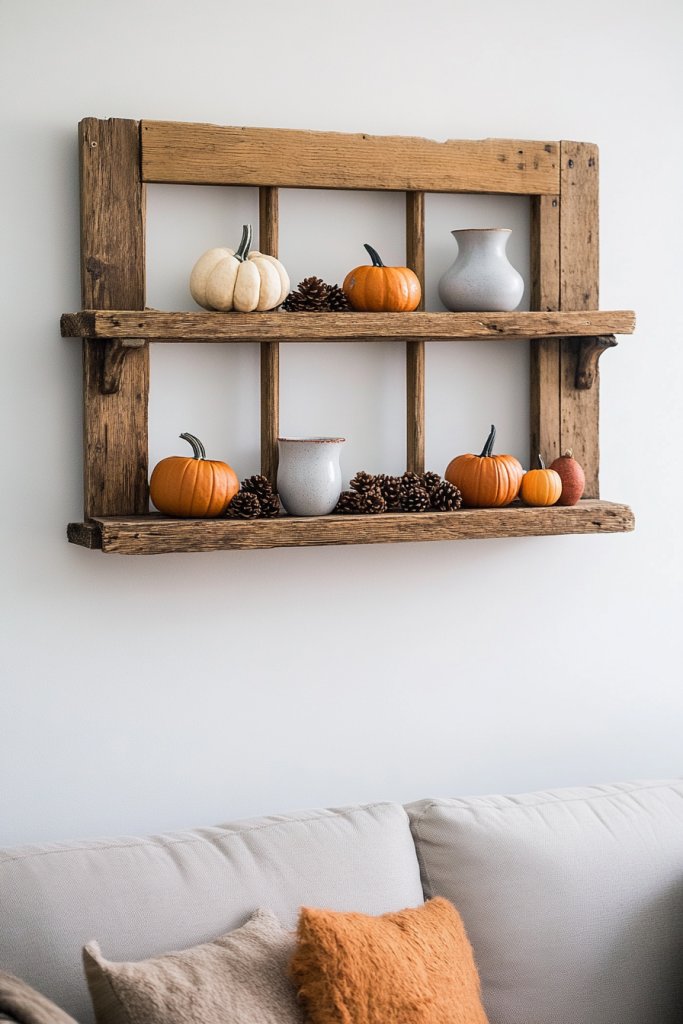
Tired of cluttered surfaces and empty walls in your home? A rustic window shelf offers a charming way to display seasonal decor without taking up extra space. It’s a simple project that adds warmth and personality, making every season feel special.
Recommended Products to replicate this idea
No products found.
No products found.
Plus, it’s a great way to showcase your favorite candles, plants, or vintage collectibles. Picture a weathered window frame mounted horizontally on a wall, with wooden planks resting inside the panes to create multiple layered shelves.
Candles flicker softly on the shelves, surrounded by small potted herbs or dried floral arrangements. The distressed paint and natural wood textures add rustic charm, transforming an ordinary wall into a focal point.
It’s like having a miniature outdoor market stall inside your home. Use different wood tones or painted finishes to match your decor style—from shabby chic to boho.
Adjust shelf heights to accommodate larger or smaller decor items, and change the arrangement seasonally. In summer, fill the shelves with bright-colored candles and faux fruits; in winter, add pinecones, berries, or mini wreaths.
For small spaces, a single window frame with fewer shelves keeps it simple yet impactful. Select an old window frame, clean it thoroughly, and remove any glass to create an open-back look or keep the glass for added protection.
Secure wooden planks inside the panes using nails or brackets, making sure they’re level. Mount the frame on your wall with heavy-duty hooks or brackets, placing anchors if needed for extra stability.
Decorate the shelves with your chosen seasonal items, stacking and layering for visual interest. Regularly swap out items to keep the display fresh.
Paint the frame in seasonal colors or distressed finishes for a vintage look. Add small hooks underneath for hanging lightweight decorations or fairy lights.
Incorporate decorative elements like fabric bunting or mini banners for celebrations. Personalize each shelf with meaningful items—family heirlooms, souvenirs, or handcrafted pieces—to make it truly yours.
This rustic window shelf turns a simple frame into a versatile seasonal display that can evolve throughout the year. It’s a practical yet decorative addition that highlights your personal style.
Plus, it’s an easy project that can be tailored to any space or budget. Ready to give your home a seasonal makeover? Let your creativity shine with this charming, easy-to-make decor.
5. Decorative Window Frame as a Botanical Wall Art Backdrop
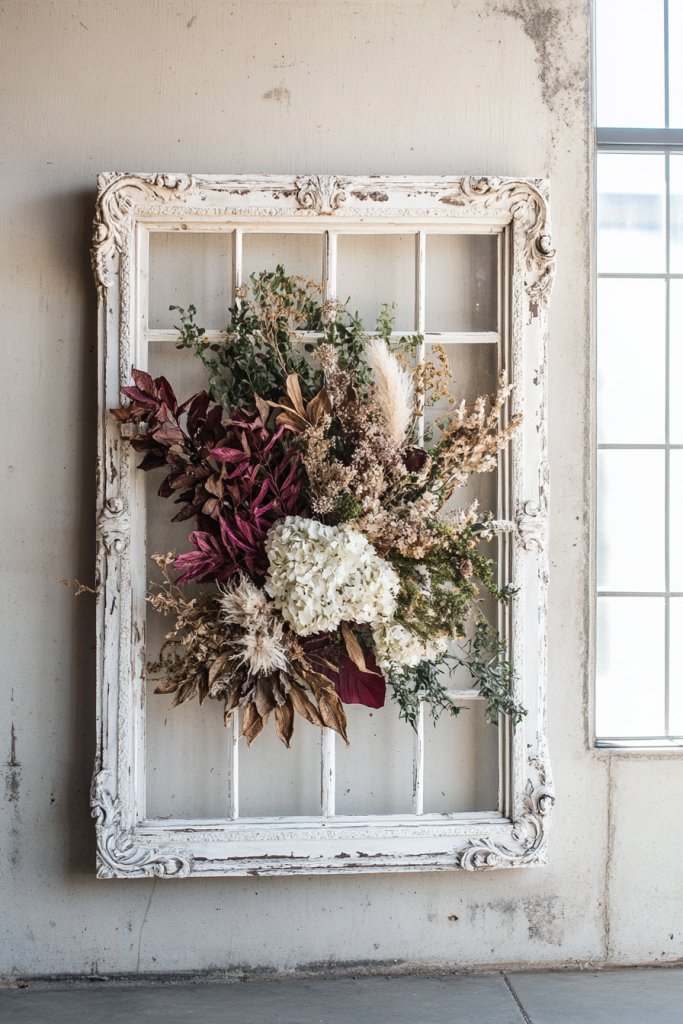
Feeling like your walls are missing a touch of nature? A decorative window frame can serve as a stunning botanical backdrop, bringing freshness and life to any room. It’s an easy way to add a natural element without needing actual plants, which can be tricky to care for.
Recommended Products to replicate this idea
No products found.
No products found.
Who says you can’t have a bit of greenery without the upkeep? Picture a vintage window frame mounted on a wall, its panes filled with faux or dried flowers, herbs, or greenery. The arrangement spills out of the frame, creating a lush, layered effect.
Soft natural light filters through, highlighting the textures and colors of the botanicals. The frame’s weathered finish enhances the rustic, vintage vibe, making it look like a preserved piece of nature’s art.
Select different frame styles—ornate for romantic floral arrangements or distressed for rustic charm. Incorporate dried or faux botanicals for low maintenance, or add small hanging ornaments for seasonal variations.
You could also paint the frame in neutral or bold colors to match your decor. Use similar botanical themes across your space for a cohesive look.
Clean and lightly sand your vintage frame before decorating. Secure faux or dried flowers inside the panes with hot glue or wire, creating a dense, layered look.
Mount the frame on your wall using heavy-duty hooks or brackets. Arrange the botanicals to spill over the edges for a natural feel.
To add extra depth, layer with canvases or textiles behind the frame for an artistic effect. Refresh the arrangement seasonally for ongoing freshness.
Customize by adding small vintage-style tags, labels, or handwritten notes about each botanical element. Incorporate fabric or textured backgrounds behind the frame for added depth.
Mix in small decorative elements like vintage keys or ribbons to enhance the vintage vibe. Personal touches make it a true reflection of your style and love for nature.
This botanical wall art creates a calming, organic focal point that elevates your decor effortlessly. It’s a conversation starter and a reminder of nature’s beauty, even indoors.
Plus, it’s a versatile project that you can adapt to your style and space. Ready to bring a touch of outdoor freshness inside? Let your creativity bloom!
6. Window Pane as a Windowpane Terrarium

Ever wish you could have a mini indoor garden that’s both stylish and low-maintenance? A window pane turned terrarium offers a sleek, vintage-inspired way to display succulents or air plants. It’s a charming centerpiece that adds life and greenery without the mess or fuss of traditional potted plants.
Recommended Products to replicate this idea
No products found.
No products found.
Who knew a piece of old glass could house a tiny jungle? Visualize a vintage window frame with its glass panes removed or replaced with clear acrylic. Inside, tiny succulents and air plants are arranged on layered rocks, moss, or decorative gravel.
The transparent panes create a mini greenhouse effect, trapping humidity and sunlight. Soft light filters through the glass, highlighting the textures of the plants and creating a cozy, mini indoor oasis.
It’s perfect for desktops, countertops, or wall displays. Use different frame styles—distressed or polished—to match your decor.
Fill the terrarium with a variety of succulents or cacti for a desert vibe, or choose air plants for a minimalist look. Incorporate decorative stones, sand, or tiny figurines for added visual interest.
For a seasonal touch, add small fairy lights or ornaments that can be swapped out. Remove the glass from your vintage window frame carefully.
Clean the frame thoroughly and secure a backing if needed. Arrange your plants on a bed of gravel or sand, then secure with moss or decorative filler.
Place the terrarium in a well-lit spot—preferably near sunlight or with grow lights. Water sparingly, as succulents and air plants prefer dry conditions.
Regularly trim and maintain for long-lasting beauty. Add tiny decorative items like miniature figurines or shells for a personalized touch.
Use decorative stones or colored gravel to match your decor theme. Incorporate small labels or tags for plant names or care instructions.
You could also paint the frame in a color that complements your interior palette for a polished look. This vintage terrarium turns a repurposed window into a captivating mini garden, perfect for brightening any space.
It’s an engaging DIY project that combines style with nature, offering a calming retreat indoors. Ready to create your own vintage indoor jungle? Dive into this project and enjoy a fresh, green focal point that’s uniquely you.
7. Repurposed Window as a Wall-Mounted Key and Mail Organizer
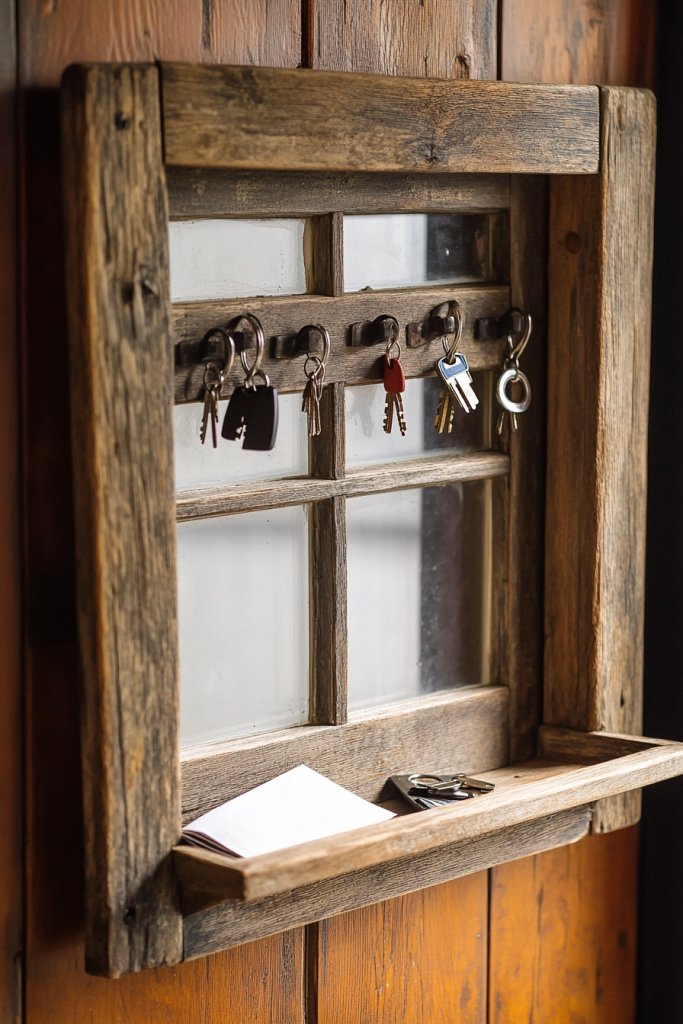
Constantly losing keys or digging through piles of mail? A vintage window frame repurposed as a wall-mounted organizer keeps your essentials in check while adding rustic charm. It’s an easy fix that transforms clutter into a curated display.
Recommended Products to replicate this idea
No products found.
No products found.
Plus, it’s a great way to reuse an old piece of history in a practical way. Picture a weathered window frame mounted near your entryway, with hooks or small baskets attached inside the panes.
Keys hang in a neat row, while mail and envelopes are tucked into small vintage-style baskets or trays. Decorative knobs or hooks add visual interest, turning everyday clutter into a charming, organized station.
The distressed finish and vintage hardware enhance the nostalgic feel. Choose a frame with ornate details for a romantic vibe or a simple, rustic style for farmhouse charm.
You can add small labels or tags to designate different hooks for keys, mail, or sunglasses. Incorporate small trays or baskets that match your decor for a cohesive look.
Seasonal accents like ribbons or banners can be added for holidays. Clean and sand the vintage frame to remove rust or peeling paint.
Attach hooks or small baskets inside the panes using screws or adhesive suitable for your materials. Mount the frame securely on your wall with heavy-duty hardware, ensuring it’s level.
Organize your keys, mail, and accessories thoughtfully, grouping similar items together. Regularly update and tidy the display for ongoing organization.
Add decorative elements like vintage tags, painted labels, or small charms to each hook or basket. Personalize the look by choosing hardware finishes that match your decor—brushed nickel, antique brass, or rustic black.
You might also incorporate a small chalkboard section for notes or reminders. Keep the station tidy for maximum efficiency.
This vintage window organizer turns a functional necessity into a decorative feature that greets you every day. It’s a simple way to keep your home neat and stylish—no more lost keys or cluttered countertops. Ready to give your entryway or mudroom a nostalgic upgrade? Embrace this charming, practical solution and enjoy the organization.
8. Vintage Window as a Seasonal Wreath Holder

Want a versatile way to display seasonal decor without cluttering your space? Using a vintage window as a wreath holder offers a simple solution that’s both functional and decorative. It allows you to swap wreaths or fabric banners throughout the year, keeping your decor fresh and festive.
Recommended Products to replicate this idea
No products found.
No products found.
Who says your walls can’t change with the seasons? Imagine a distressed window frame hung on your porch or wall, with seasonal wreaths or fabric garlands draped across it. The frame’s weathered finish enhances the rustic, vintage vibe, making each season’s decor stand out.
During fall, you might add a wreath of faux leaves, while in winter, a fabric banner or snowy scene decor can take its place. It’s a versatile backdrop that adapts effortlessly.
Choose frames with different styles—ornate for formal occasions or simple for casual settings. Swap out wreaths or banners depending on the holiday or season.
For a more layered look, add ribbons, faux berries, or small ornaments to the wreaths. Use different paint finishes or distressing techniques to match your decor style.
Securely hang the vintage window frame on a sturdy wall or porch, using appropriate hardware for your wall material. Attach hooks or small nails inside the frame to hang wreaths or banners easily.
Consider adding a small shelf or ledge underneath for seasonal accents like pumpkins or lanterns. Make sure everything is stable and well-balanced to handle seasonal swaps.
Decorate the frame with seasonal paint, stencils, or embellishments to match your theme. Personalize each wreath or banner with handmade touches, like fabric flowers or personalized signs.
Incorporate fairy lights or small ornaments to add sparkle or texture. Keep your seasonal decor organized in storage boxes for easy swapping each year.
This vintage window wreath display elevates your seasonal decor game with minimal effort. It’s a charming focal point that adds warmth and personality to your space.
Plus, it’s an easy project that pays off year after year. Ready to make your decor more dynamic and nostalgic? Transform your walls into a seasonal showcase.
9. Old Window as a Rustic Candle Display
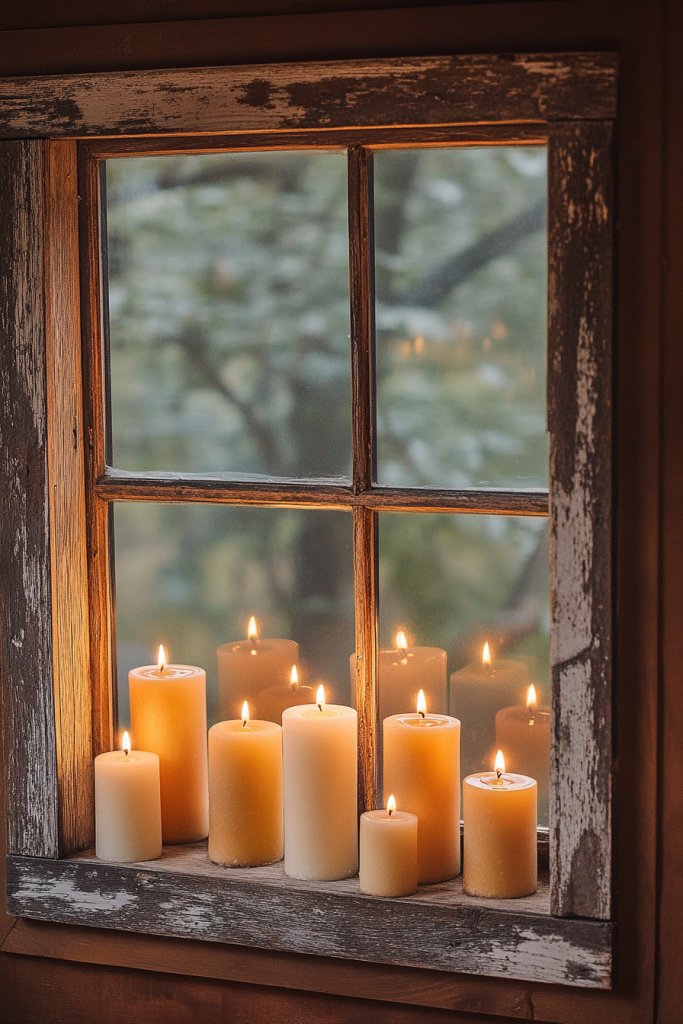
Looking for an inviting way to create ambiance in your home? A vintage window turned candle display offers a warm, romantic glow that’s perfect for cozy nights or entertaining. It’s a simple project with a big impact—no fancy fixtures needed—just candles and a little creativity.
Recommended Products to replicate this idea
No products found.
No products found.
Who doesn’t love a space filled with soft candlelight? Visualize a weathered window frame with old glass panes replaced or left out, filled with pillar candles, lanterns, or small votives. The candles flicker softly, casting a warm glow through the frame’s distressed edges.
Dried flowers, pinecones, or decorative stones can be added around the candles for a layered, textured look. The entire scene exudes rustic charm and invites relaxation.
Use different types of candles—tall pillars for drama, small votives for intimacy, or lanterns for a vintage festival vibe. Paint or distress the frame in colors that match your decor, such as whites, creams, or metallics.
For seasonal decor, swap out accessories and candle holders to reflect holidays or moods. Incorporate battery-operated candles for safety if needed.
Clean the vintage frame and remove any glass if necessary. Arrange candles securely on the window sill or inside the panes, using holders or trays for stability.
Mount the frame on a wall or place it on a sturdy table or mantel. Add decorative elements around the candles to enhance the ambiance—think dried florals, small branches, or fabric accents.
Decorate the frame’s edges with metallic paint or stenciled designs for a personalized touch. Use different candle styles or colors for each season.
Incorporate small vintage trinkets, charms, or initials for a personal vibe. Keep extra candles handy for quick updates or special occasions.
A vintage window candle display creates a cozy, inviting atmosphere that transforms any room. It’s a DIY project that combines style with comfort and is sure to impress guests.
Plus, it’s a versatile decor piece that you can update throughout the year. Ready to cast a warm glow with vintage charm? Light it up and enjoy the ambiance.
10. Frame as a Vintage-Inspired Jewelry or Accessory Organizer

Tired of tangled belts, scarves, or jewelry cluttering your space? Turning a vintage window frame into an organizer is an elegant way to keep your accessories tidy and stylish. It’s functional decor that transforms chaos into charm.
Recommended Products to replicate this idea
No products found.
No products found.
Who knew that a simple frame could do so much? Imagine a distressed window frame hung on your wall, with hooks and knobs attached inside the panes. Scarves drape gracefully from the hooks, belts hang in neat loops, and jewelry is displayed on small knobs or wires.
The vintage finish adds character, making your accessories part of your decor instead of hidden away. It’s a display that’s both practical and pretty.
Choose ornate or rustic frames based on your style. Add small, decorative knobs or hooks for different types of accessories.
Incorporate fabric or ribbon backgrounds for added softness and color. For a modern twist, keep the hardware sleek and minimalist.
Use the frame in your bedroom, closet, or even entryway for maximum utility. Clean and prepare your vintage frame, then attach hooks, knobs, or wires inside the panes with appropriate hardware.
Mount securely on your wall, ensuring it’s level. Organize your accessories by type and color for easy access.
Consider decorating the edges with paint, decals, or fabric for a customized look. Regularly update the display to keep it fresh and inspiring.
Add decorative touches such as vintage jewelry charms or painted accents. Use different finishes—antique bronze, distressed white, or bold colors—to match your decor.
Incorporate small baskets or trays for additional storage. Personalize with engraved tags or labels for a truly bespoke piece.
This vintage-inspired organizer turns everyday accessories into a beautiful display. It’s a stylish way to stay organized and showcase your personal style.
Plus, it makes accessorizing quicker and more fun. Ready to turn a repurposed window into your new favorite organizational piece? Embrace the vintage charm today.
11. Reclaimed Window as a Decorative Wall Art with Fabric or Tapestry
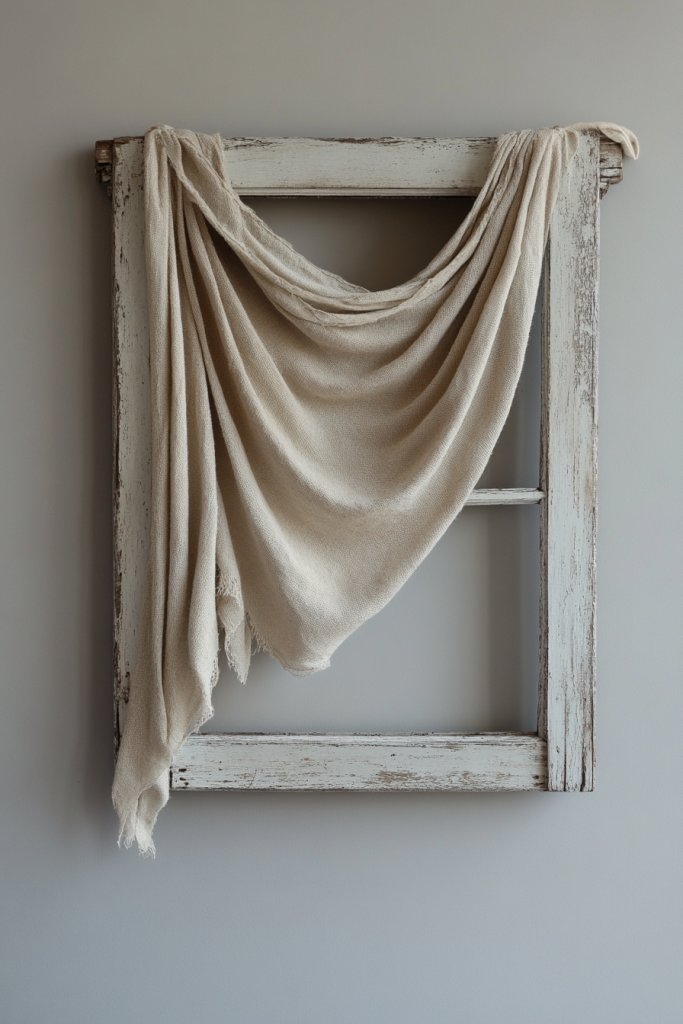
Feeling like your walls lack softness and texture? Using a reclaimed window as a backdrop for fabric or tapestry adds warmth and visual interest without overwhelming your space. It’s an easy way to create a focal point that feels cozy and inviting.
Recommended Products to replicate this idea
No products found.
No products found.
Plus, it’s a great DIY project for adding a personal touch. Visualize an old window frame hung on a wall, with vibrant or neutral fabric draped or stretched across the panes.
Lace, velvet, or linen materials can add different textures, while colorful textiles bring a lively touch. The distressed frame enhances the vintage vibe, making it look like a piece of art from a bygone era.
Light filters through the fabric, creating a soft, inviting glow. Choose fabrics or tapestries that match your interior style—think boho, shabby chic, or rustic.
Change the textiles seasonally to reflect holidays or moods. You can attach the fabric with clips, staples, or sew it directly onto a backing for a cleaner look.
Layering with additional textiles or small trims adds depth and richness. Clean and lightly sand your vintage frame to prepare for decorating.
Secure your fabric or tapestry across the panes using staples, clips, or sewn edges. Mount the frame on your wall using appropriate hardware, ensuring it’s sturdy.
Adjust the fabric for smoothness and aesthetic appeal. Consider adding decorative elements like tassels, fringe, or embroidery for extra charm.
Personalize by choosing fabrics with patterns, textures, or colors that reflect your personality. Add small decorative pins or embroidery to enhance the look.
Incorporate seasonal themes or motifs for special occasions. Keep swapping fabrics for a fresh look, turning your wall into a dynamic, textured gallery.
This fabric-adorned window frame creates a soft, inviting atmosphere that elevates any room. It’s a simple project with a big visual impact, perfect for DIY lovers.
Plus, it’s easily changeable to suit your mood or decor updates. Ready to add texture and warmth to your walls? Get creative with textiles and enjoy the cozy results.
12. Old Window as a Hanging Plant Display with Faux or Dried Arrangements
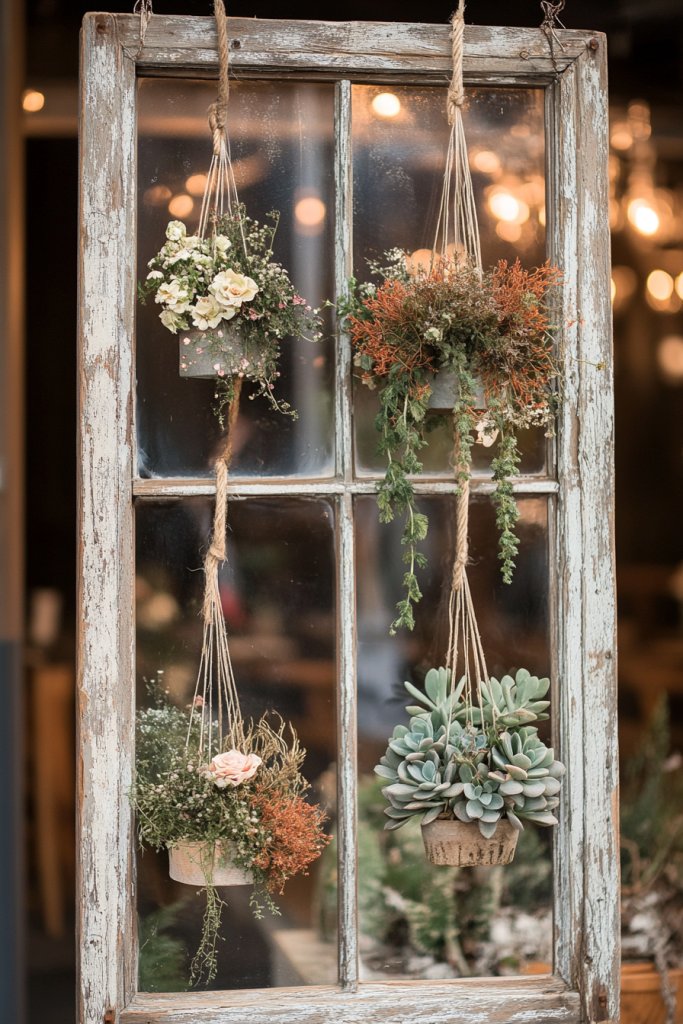
Craving a touch of nature but worried about maintenance? An old window can be transformed into a charming hanging plant display that uses faux or dried arrangements. It’s a low-care option that still brings beauty and a vintage touch to your home.
Recommended Products to replicate this idea
No products found.
No products found.
Who says you need live plants to enjoy greenery? Imagine a weathered window frame hung on a wall, its panes filled with faux succulents, dried flowers, or preserved greenery. Small baskets, pots, or clusters of faux foliage hang from hooks or wires inside the frame.
The combination of textures and muted colors creates a rustic, layered look that feels both natural and nostalgic. Light filters softly through the faux or dried botanicals, enhancing their charm.
Select different frame styles—ornate for romantic vibes or distressed for farmhouse appeal. Incorporate a mix of faux and dried plants for variety and low maintenance.
Swap out arrangements seasonally, adding small decorative accents like ribbons, charms, or vintage tags. For small spaces, a single frame with a few hanging arrangements works just fine.
Clean the vintage frame and prepare hooks or wires inside the panes. Attach faux or dried floral arrangements securely with wire, glue, or small hooks.
Mount the frame on your wall with sturdy hardware, ensuring it’s level. Arrange the botanicals thoughtfully to create a layered, cohesive display.
Regularly dust or replace arrangements to keep it looking fresh and vibrant. Personalize with small tags, handwritten notes, or vintage charms clipped onto the arrangements.
Use ribbons or lace for a softer, romantic look or metallic accents for industrial charm. Add small decorative elements like vintage keys or buttons to enhance the nostalgic feel.
Keep the display balanced and visually appealing. This vintage plant display offers a lush, green vibe without the fuss of watering or sunlight.
It’s a decorative focal point that feels timeless and warm. Plus, it’s an easy DIY that allows for endless customization. Ready to enjoy a touch of nature’s beauty indoors? Embrace the vintage charm and create your own botanical gallery.
13. Window Frame as a Unique Room Divider with Vintage Charm
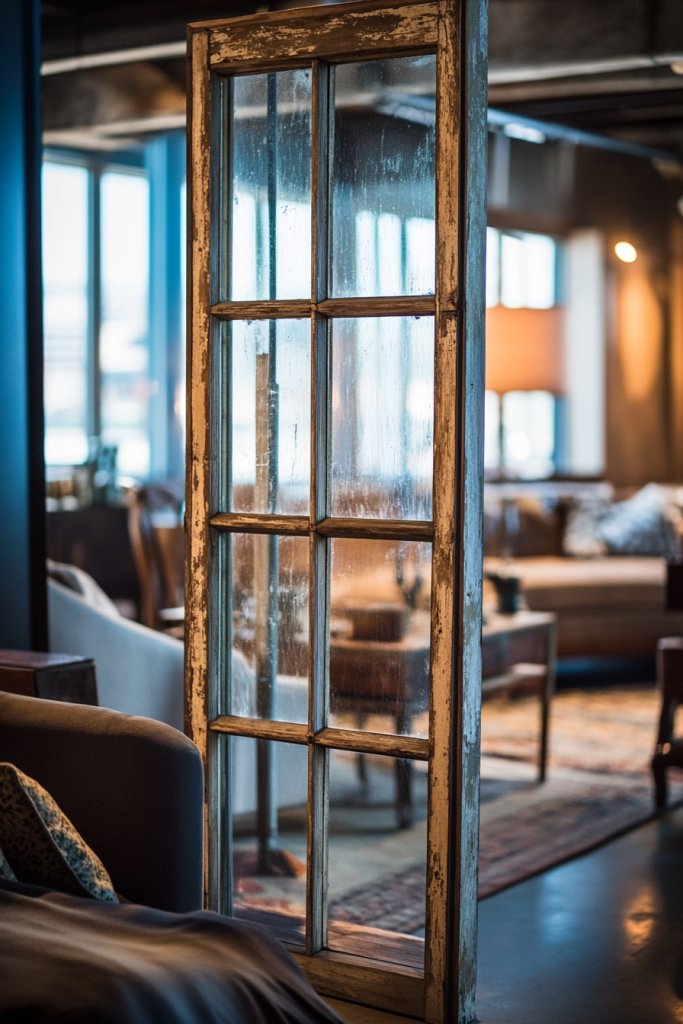
Need a way to define spaces without sacrificing openness? A vintage window frame as a room divider provides a stylish, semi-private partition that adds character. It separates areas while maintaining a flow that feels inviting and lived-in.
Recommended Products to replicate this idea
No products found.
No products found.
Who says privacy and charm can’t go hand in hand? Picture several vintage window frames mounted side-by-side or connected with hinges, creating a semi-permanent partition. The weathered paint and aged glass give it a nostalgic, timeless appeal.
You can leave the panes open, add curtains, or install decorative film for privacy. It’s a versatile backdrop that brings warmth and personality to your space.
Use multiple smaller windows for a more intricate, antique look or larger frames for a bold statement. Decorate the frames with paint, decals, or distressed finishes to match your decor.
Incorporate fabric panels or curtains inside the panes for added privacy or softness. Adapt the number and placement of frames based on your space and needs.
Securely attach each window frame using heavy-duty hooks, hinges, or brackets, ensuring they are level and stable. Connect multiple frames with hinges if desired, or mount them independently for flexibility.
Consider adding decorative elements like vintage hardware or paints to unify the look. Position the divider where it best separates your space without blocking light or flow.
Adjust as needed for balance. Decorate the frames with stenciled patterns, painted motifs, or decals that complement your decor.
Add small hooks or shelves inside for hanging lightweight decor or storage. Incorporate textiles like curtains or drapes for adjustable privacy.
Personal touches turn this functional piece into a true statement of style. This vintage window room divider introduces a nostalgic, artsy vibe that’s both practical and beautiful.
It creates defined zones without making the space feel closed off. Plus, it’s a DIY project that’s customizable and full of vintage charm. Ready to redefine your space with a touch of history? Let this rustic divider be your stylish solution.
14. Upcycled Window as a Vintage-Inspired Coat or Hat Rack
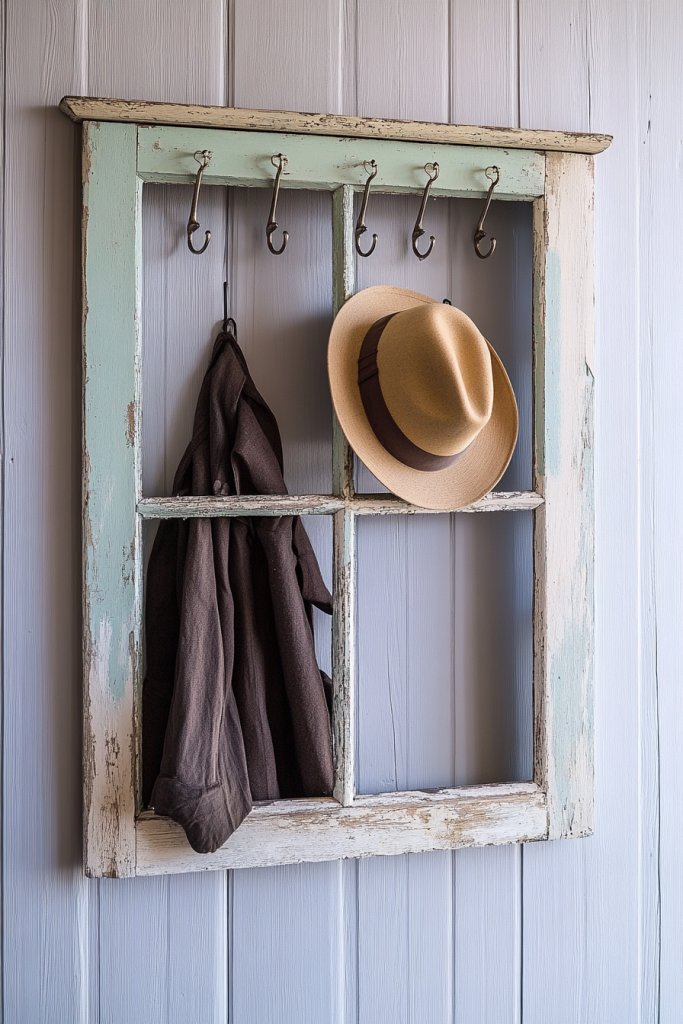
Cluttered entryways and overflowing closets are the bane of organized living. An upcycled vintage window can be transformed into a charming coat or hat rack, making your space both functional and decorative.
Recommended Products to replicate this idea
No products found.
No products found.
It’s a smart, stylish solution to keep everyday essentials within reach. Who says storage can’t be pretty? Imagine a weathered window frame mounted on your mudroom wall, with vintage hooks or pegs attached inside the panes.
Coats, hats, and scarves hang neatly from the hooks, creating a layered, textured display. The distressed paint and rustic hardware add a nostalgic, farmhouse feel.
It turns a simple utility into a focal point that adds warmth and personality. Choose ornate frames for a romantic look or simple, distressed ones for farmhouse charm.
Attach hooks or pegs in different sizes and styles for variety. Decorate the frame with paint, decals, or embellishments to match your decor.
For smaller spaces, a single panel may suffice; larger entries can handle multiple frames or panels. Clean and lightly sand your vintage frame, then attach sturdy hooks or pegs inside the panes using appropriate hardware.
Mount securely on your wall, making sure it’s level and stable. Arrange coats and hats for easy access, grouping similar items together.
Add decorative elements like vintage hardware or painted accents to enhance the aesthetic. Regularly update and tidy for ongoing appeal.
Personalize with painted or stenciled accents, or add small vintage tags for a whimsical touch. Incorporate decorative ribbons or fabric strips for a softer look.
Use matching hardware finishes—antique brass, black, or distressed white—to unify the design. Incorporate additional shelves or baskets for extra storage if needed.
This vintage coat rack not only keeps your entryway organized but also adds nostalgic charm. It’s a conversation piece that elevates your decor and makes everyday routines more delightful.
Plus, it’s an easy project that yields big style points. Ready to hang your way to a more charming home? Embrace the vintage look and stay organized.
15. Old Window as a Framed Chalkboard Calendar or Planner
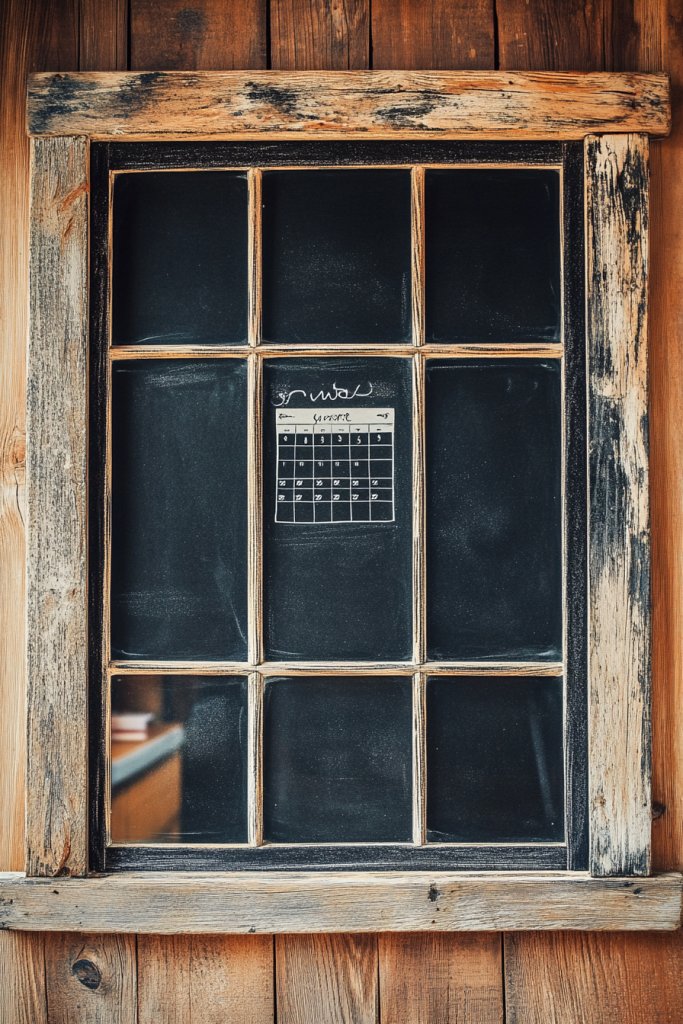
Struggling to keep track of appointments and deadlines? An old window turned into a vintage-inspired chalkboard calendar simplifies planning while adding character. It’s a functional piece that keeps your schedule front and center, all while enhancing your decor.
Who says organizing can’t be charming? Picture a distressed window frame with its glass painted over with chalkboard paint. You write dates, reminders, or weekly plans with colorful chalk, creating a dynamic, ever-changing display.
The weathered finish and rustic hardware add a nostalgic touch that makes planning feel less like a chore and more like an art form. It’s both practical and pretty.
Choose frames with ornate details or keep it simple for a minimalist look. Create sections for days, weeks, or different categories using stencils or decorative borders.
Incorporate small hooks or trays inside for pens, erasers, or sticky notes. Change the layout seasonally or for special events to keep it fresh.
Clean the vintage frame thoroughly, then apply multiple coats of chalkboard paint on the glass or wood surface, allowing each coat to dry. Mount the frame securely on your wall with appropriate hardware, ensuring it’s level.
Keep chalk, erasers, and markers nearby for easy updates. Add decorative touches like stenciled borders or vintage decals to personalize it.
Regularly erase and update for ongoing utility. Personalize with handwritten quotes, motivational words, or family schedules.
Use colorful chalk or chalk markers for visual appeal. Decorate the frame’s edges with paint or decals matching your decor.
Incorporate small vintage tags or labels for a curated, organized look. Regular updates make it a lively part of your daily routine.
A vintage chalkboard calendar turns everyday planning into a charming, artistic activity. It keeps your schedule organized while adding a nostalgic touch to your home.
Plus, it’s a creative way to engage the whole family. Ready to organize in style? Get your chalk and start planning beautifully.
16. Reclaimed Window as a Wall-Mounted Art Display with Clipboards or Clips
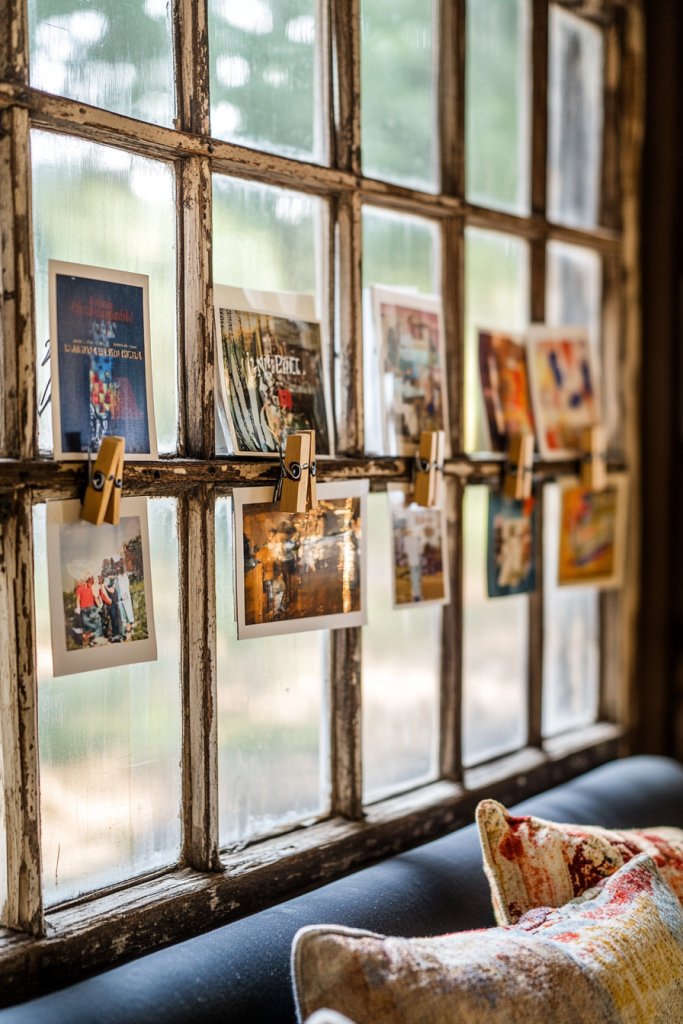
Want a flexible, stylish way to showcase your favorite art, photos, or fabric swatches? Reclaimed windows with clips or small hangers turn a vintage piece into a dynamic display that’s easy to update. It’s a perfect solution for rotating your personal collection and adding a creative flair to your walls.
Recommended Products to replicate this idea
No products found.
No products found.
Who says art can’t be functional? Imagine a weathered window frame mounted on the wall, with clips or small hangers attached inside the panes. You clip vintage postcards, fabric swatches, or small artworks to create a layered, textured gallery.
The distressed wood and simple clips give it a relaxed, artsy vibe that’s perfect for a studio, craft room, or living area. Light reflects softly through the open panes, highlighting your curated collection.
Use different clip styles—metal, wood, or vintage-inspired—to match your decor. Change the display frequently with new artwork or photos, keeping it fresh and engaging.
Incorporate small shelves or ledges for additional decorative items or small frames. Adjust the layout based on your space, creating a grid or freeform arrangement.
Carefully clean and prepare your vintage frame. Attach clips or small hangers inside the panes using appropriate hardware—screws, hooks, or adhesive if lightweight.
Mount securely on your wall, ensuring stability. Arrange your art or photos in a balanced composition, securing each piece with clips.
You can add small decorative elements like washi tape or ribbons for extra style. Personalize with decorative clips painted in colors that match your decor or themed for seasons.
Incorporate handwritten labels or tags for art titles or dates. Mix in small fabric or paper swatches for texture.
Regularly rotate the display to feature new projects or memories, keeping your wall lively. This vintage art display transforms a simple window into a flexible gallery, perfect for creativity and personal expression.
It’s an easy, DIY solution that adds personality and charm to any room. Plus, it’s a conversation starter that showcases your style. Ready to curate your own vintage art wall? Dive in and enjoy the creative process.
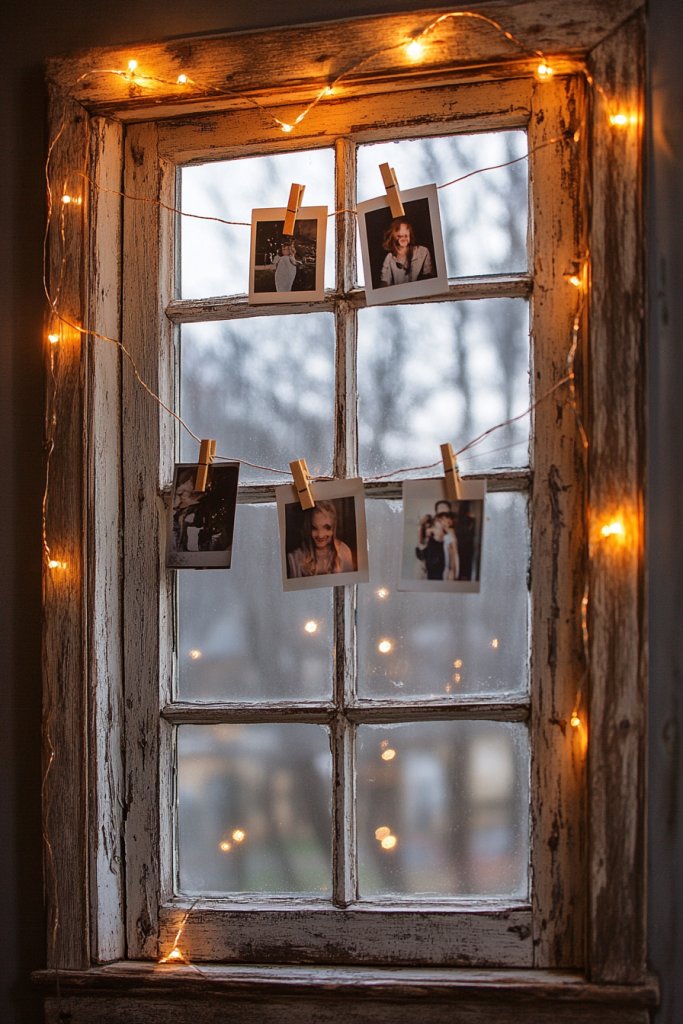
17. Vintage Window as a DIY Photo or Inspiration Board with String Lights
Looking for a cozy, inspiring way to display your favorite photos, notes, or artwork? A vintage window with string lights creates a warm, nostalgic focal point that’s both functional and decorative. It’s perfect for bedrooms, craft rooms, or living areas where you want a personal touch.
Who says inspiration can’t shine bright? Imagine a weathered window frame hung on the wall, with fairy lights woven through the panes. Photos, notes, or small art pieces are clipped onto strings stretched across the frame, illuminated by the soft glow of the lights.
The mix of vintage texture and warm lighting makes the display inviting and full of personality. It feels like a cozy nook from a storybook.
Use different types of string or wire—metal, twine, or decorative cords—to suit your style. Change the photos or notes seasonally, or for special occasions, to keep the display fresh.
Incorporate small decorative elements like vintage clips, charms, or banners for added flair. Adjust the length and placement of the lights for the perfect glow.
Prepare your vintage window frame by cleaning and securing it on the wall with strong hooks or brackets. Weave fairy lights through the panes, securing the wiring carefully.
Attach clips or small hangers to the strings for your photos or notes. Arrange the display to maximize light and visual balance.
Turn on the lights to check the ambiance and adjust as needed. Add personal touches like handwritten notes, family quotes, or small mementos clipped alongside photos.
Use decorative clips or colored string for a playful look. Incorporate seasonal decor like paper snowflakes or paper flowers.
Keep updating the display to reflect your mood, memories, or current projects. This vintage photo board creates a warm, inviting space that’s full of life.
It’s a DIY project that combines light, memory, and style effortlessly. Plus, it’s a great way to display your creativity and keep your space feeling fresh. Ready to light up your walls with nostalgia and inspiration? Get your string lights and start clipping!
Conclusion
Exploring these old window decor ideas shows just how versatile and charming vintage windows can be. Whether used as mirrors, message boards, or decorative frames, each idea offers a creative way to add personality to your home.
Don’t hesitate to try these projects and make your space uniquely yours. Embrace the charm of the past and let your creativity shine!