Ever wish your small kitchen could do more than just serve as a cooking space? Small kitchen islands have become a game-changer, offering both style and practicality without overwhelming limited square footage. Their popularity lies in how they maximize functionality while adding a charming focal point to your kitchen.
In this article, you’ll find a variety of creative ideas to transform your compact kitchen into a versatile gathering spot. From multi-purpose designs to space-saving solutions, these ideas will inspire you to make the most of your small space and turn it into a welcoming hub for family and friends.
1. Compact Rolling Island with Storage and Prep Space
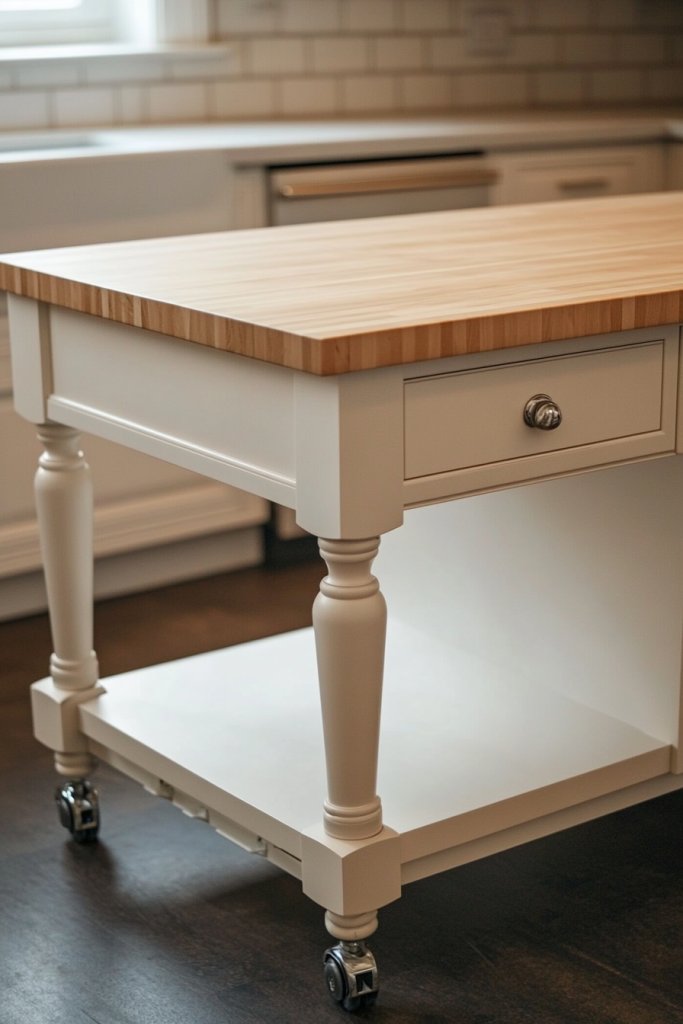
Ever find yourself constantly juggling space in a tiny kitchen? An island that moves around might just be your new best friend. It offers a flexible spot for prepping food without cluttering your counters. Plus, it makes hosting easier when you need extra surface area on demand.
Recommended Products to replicate this idea
| # | Preview | Product | |
|---|---|---|---|
| 1 |

|
IRONCK Rolling Kitchen Island Table on Wheels with Drop Leaf, Storage Cabinet, Drawer, Spice/Towel... | Buy on Amazon |
| # | Preview | Product | |
|---|---|---|---|
| 1 |
|
OKZEST 3-Tier Rolling Pantry Floor Organizer and Storage Cart with Wheels, Stackable Wire Pantry... | Buy on Amazon |
Imagine a sleek, sturdy cart on smooth casters, topped with a durable stone or wood surface. Its shelves are filled with neatly stacked bowls, utensils, and small appliances, ready for action. You can roll it over to your cooking zone or tuck it away when not in use. Bright colors or matte finishes bring a modern vibe that keeps the space lively.
Choose a finish that matches your decor—metallic for industrial, painted wood for farmhouse charm, or a minimalist laminate for simplicity. Add baskets or bins underneath to organize tools or ingredients. You can also opt for a compact size if space is tight or a larger version for more prep area. Wheels with locks keep it steady when needed.
Start by measuring your available space and selecting a cart that fits comfortably. Look for models with sturdy casters, ideally with locking mechanisms. Use a resilient surface like butcher block or stone for durability. Install a towel holder or hooks for utensils. Assemble following manufacturer instructions, and consider adding custom storage accessories for extra versatility.
Customize your island with a colorful chalkboard side for notes or recipes. Attach a small magnetic strip for knives or utensils. Decorate with a patterned runner or place a decorative tray on top for a pop of style. You can even paint it in a bold hue to make it a statement piece.
A mobile island transforms your workspace and makes entertaining a breeze. It adapts to your needs, whether for meal prep or casual gatherings. Once you see how much easier cooking becomes, you’ll wonder how you ever managed without it. Ready to roll into smarter kitchen living?
2. Multi-Level Island for Visual Interest and Functionality
Does your tiny kitchen lack visual depth and organized zones? A multi-level island can break the monotony and define different functional areas. It adds architectural interest while serving multiple purposes at once. Who says small spaces can’t have big style?
Recommended Products to replicate this idea
| # | Preview | Product | |
|---|---|---|---|
| 1 |
|
IDEALHOUSE Rolling Kitchen Island with Drop Leaf Countertop, Charging Station & Ample Storage -... | Buy on Amazon |
| # | Preview | Product | |
|---|---|---|---|
| 1 |

|
3 Tier Rolling Kitchen Cart with Wood Tabletop, Kitchen Island Carts with Wheels & Slider Shelf,... | Buy on Amazon |
Picture a sleek island with a raised bar section for seating and a lower workspace for prep. Use contrasting materials—like a marble top with a wooden raised section—to create dimension. Soft ambient lighting highlights the different levels, drawing the eye and making the space feel larger. It’s like a mini architectural feature built into your kitchen.
Adjust heights for comfort—standard counter height plus a bar-height seating area. Incorporate open shelving or closed cabinets at different levels for storage. Seasonal accents like cozy textiles or decorative bowls can change the look. For a more modern vibe, keep the lines clean and materials sleek.
Start with a sturdy base that can support multiple levels. Use a combination of materials—wood, stone, or metal—to add texture. Build or buy a custom top that integrates both levels seamlessly. Install lighting fixtures to accentuate the different heights. Make sure the taller section is comfortable for sitting and the lower for working.
Add a row of colorful cushions or sleek bar stools for extra comfort. Use decorative trays or bowls to organize everyday essentials. Incorporate a small herb garden or decorative plants on the higher level for greenery without clutter. Personal touches like monogrammed placemats or unique pendant lighting can tie it all together.
A multi-level island creates a dynamic focal point that elevates your kitchen’s style. It encourages social interaction and makes cooking feel more like a gathering. Once set up, it’s a versatile centerpiece that adapts to your changing needs. Ready to add depth and dimension?
3. Drop-Leaf Extension for Extra Surface Area
Struggling with limited counter space during gatherings? A drop-leaf extension can solve that dilemma by offering extra surface when needed. After the party, simply fold it away to save space. It’s the perfect trick for small kitchens that host big events.
Recommended Products to replicate this idea
| # | Preview | Product | |
|---|---|---|---|
| 1 |

|
MAHANCRIS Kitchen Island on Wheels with Drop Leaf, Folding Countertop Kitchen Island Cart, Kitchen... | Buy on Amazon |
| # | Preview | Product | |
|---|---|---|---|
| 1 |

|
Space Saving Folding Dining Table for 2-4, Farmhouse Foldable Dining Table with Drawer and Storage... | Buy on Amazon |
Visualize a compact island with one or two sides featuring fold-down panels. When extended, these create a larger, seamless work surface or dining area. Use a contrasting wood or finish on the leaf to make it stand out when open. When tucked away, it looks sleek and unobtrusive, blending into the kitchen decor.
Choose a sturdy, lightweight material for easy handling—like plywood with a veneer finish. Install sturdy hinges and support brackets for stability. Use a simple latch system to keep the leaf secure when in use. Match the style to your kitchen’s aesthetic—rustic, modern, or traditional.
Start by measuring your available space and selecting a design with a reliable hinge system. Attach support brackets underneath to hold the extended leaf securely. Use a durable surface, such as butcher block or laminate, that’s easy to clean. Consider installing a small storage compartment underneath to hold tableware or utensils.
Personalize by painting or staining the leaf a bold color for contrast. Add a decorative edge or trim to give it a finished look. Use a patterned or textured surface to elevate the overall aesthetic. Consider adding a small, portable cart nearby for additional serving or prep space.
This flexible extension makes your kitchen more functional without sacrificing style. It’s a clever way to host friends without permanently sacrificing your space. Once you master the fold-away trick, entertaining becomes effortless. Who knew small kitchens could be so adaptable?
4. Minimalist Island with Built-In Wine Rack
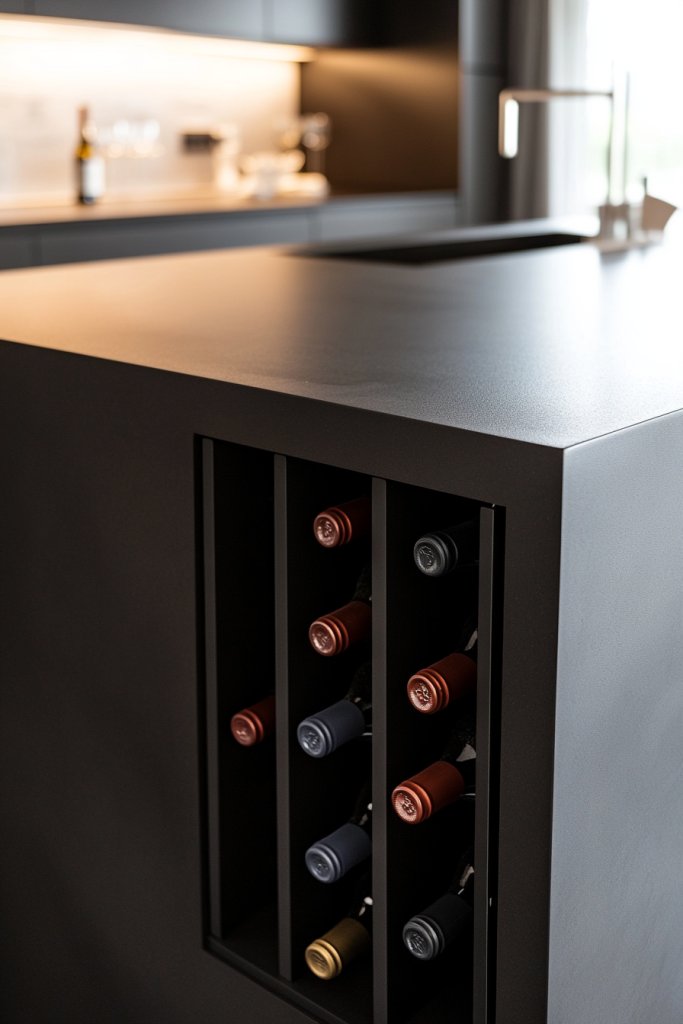
Ever wish your kitchen had a touch of elegance without clutter? A minimalist island with a built-in wine rack combines sleek design with functionality. It’s perfect for wine lovers who want style and storage in one compact piece. Cheers to smart design!
Recommended Products to replicate this idea
| # | Preview | Product | |
|---|---|---|---|
| 1 |

|
Tribesigns Kitchen Island, Kitchen Shelf Bar Table with 5 Open Storage Shelves and Large Worktop,... | Buy on Amazon |
| # | Preview | Product | |
|---|---|---|---|
| 1 |

|
2 Pack 12 Bottle Wall Wine Rack for 24 Wine Bottles, DIY Detachable Wall Mount Wine Rack, Wine... | Buy on Amazon |
Picture a streamlined island with smooth, matte cabinetry and a quartz or concrete top. A vertical wine rack is seamlessly integrated into the side, holding bottles at an angle. The clean lines, neutral tones, and subtle hardware create a sophisticated, clutter-free look. Soft under-cabinet lighting highlights the storage without overpowering the space.
Choose monochrome finishes like black, charcoal, or white for a sleek look. Incorporate hidden drawers or cabinets for additional storage. Opt for a slim profile to keep the footprint small. For a more rustic twist, use reclaimed wood with metal accents for the wine rack.
Select a sturdy, moisture-resistant cabinet base for your island. Build or install a custom wine rack that fits your bottle collection, ensuring it’s well-ventilated. Use high-quality hinges and soft-close drawers for a premium feel. Keep the top surface clutter-free by hiding small appliances or utensils inside cabinets.
Decorate with a few well-chosen accessories—like a sleek decanter or a set of minimalist glasses—on the countertop. Add a small tray for wine accessories or a decorative bowl to hold corks. Personalize the color scheme to match your kitchen’s palette for a cohesive look.
A minimalist wine island elevates your kitchen’s style while serving a practical purpose. It’s a conversation starter and a statement piece that shows off your taste. Once installed, you’ll feel more confident entertaining guests and showcasing your collection. Cheers to a smarter kitchen!
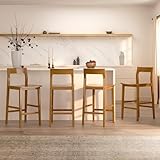
5. Breakfast Bar-Style Island with Overhang Seating

Craving a casual dining spot in your small kitchen? A breakfast bar with an overhang creates a perfect spot for quick meals or morning chats. It’s a friendly, informal way to enjoy your space while maximizing utility. Who said small kitchens have to be boring?
Recommended Products to replicate this idea
| # | Preview | Product | |
|---|---|---|---|
| 1 |

|
IRONCK Kitchen Island with Storage, Rolling Island Table on Wheels with Cart Drop Leaf and Trash Can... | Buy on Amazon |
| # | Preview | Product | |
|---|---|---|---|
| 1 |

|
VASAGLE EKHO Collection - Bar Stools Set of 2, Counter Height Bar Stools, Synthetic Leather with... | Buy on Amazon |
Imagine a sleek, elongated island with a generous overhang on one side. Comfortable stools are tucked underneath, inviting friends or family to gather. The surface could be a warm wood tone or a polished quartz, adding to the cozy vibe. Pendant lighting above the bar adds a soft glow, making it a focal point.
Choose a durable, easy-to-clean material—like quartz or sealed wood—that withstands spills. Use a slightly rounded edge for safety, especially if kids are around. For a more modern look, opt for monochrome colors and sleek stools. Seasonal textiles or cushions can add a touch of comfort.
Start by measuring the space for the overhang—at least 12 inches is recommended for comfortable seating. Reinforce the underside of the countertop with brackets or a sturdy support frame. Install a countertop that extends beyond the base cabinetry to create the overhang. Add a row of stylish stools and pendant lights for ambiance.
Personalize with colorful cushion covers on the stools or a decorative runner on the counter. Incorporate a small centerpiece like a bowl of fruit or a decorative sculpture. Change out the stools seasonally for different looks—metal for winter, woven for summer.
A breakfast bar transforms your kitchen into a social hub, perfect for mornings or casual evenings. It encourages interaction and makes small spaces feel more inviting. Once you set it up, you’ll love having a dedicated spot for quick bites and lively conversations.
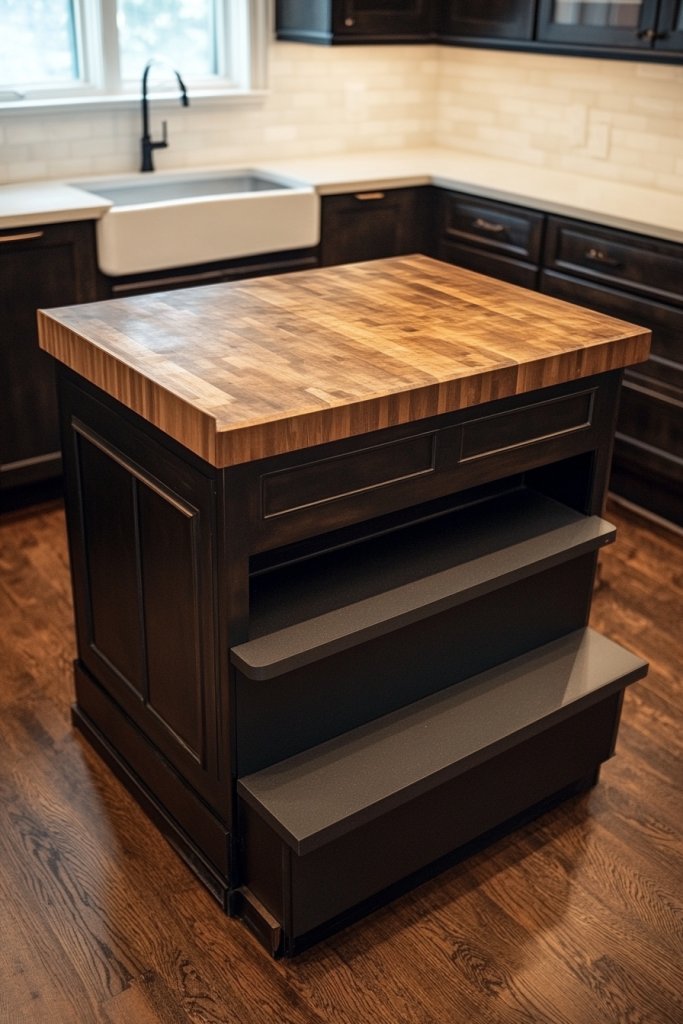
6. Rustic Wooden Island with Open Shelves
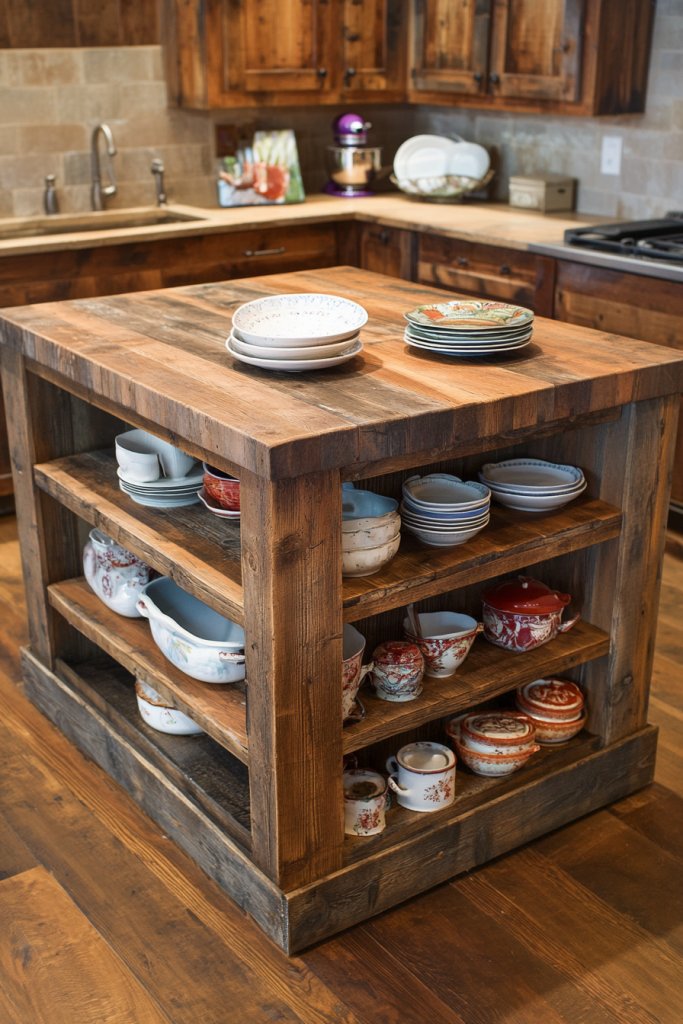
Looking to add warmth and charm to your small kitchen? A rustic wooden island with open shelves offers a cozy, inviting vibe. It’s perfect for showcasing your dishware or storing essentials within easy reach. Who says small spaces can’t feel like a farmhouse retreat?
Recommended Products to replicate this idea
| # | Preview | Product | |
|---|---|---|---|
| 1 |

|
IRONCK Rolling Kitchen Island Cart with Drop-Leaf and Wine Rack, Microwave Rack Serving Cart on... | Buy on Amazon |
| # | Preview | Product | |
|---|---|---|---|
| 1 |

|
Giantex Buffet Sideboard, Wooden Cupboard, Kitchen Pantry w/Spacious Countertop, Large Open Shelf, 3... | Buy on Amazon |
Visualize a sturdy reclaimed wood base topped with a thick, live-edge wood surface. Open shelves line the sides, displaying rustic bowls, mugs, and decorative jars. The natural wood grain, knots, and imperfections create a textured, tactile aesthetic. Metal brackets or pipe supports add an industrial touch, balancing rustic charm with modern edge.
Opt for lighter wood tones for a Scandinavian-inspired look or darker finishes for a more vintage feel. Incorporate baskets or fabric bins on the shelves for organization. For a more polished look, seal the wood with a matte finish or clear coat. You can add a small foldable leaf for extra surface area when needed.
Start by selecting durable reclaimed or FSC-certified wood. Construct a solid base with sturdy legs or a frame that can support weight. Attach open shelving with brackets, ensuring they are level. Seal the wood with a food-safe finish to prevent damage. Decorate with vintage accessories to enhance the rustic feel.
Add personal touches like a set of vintage coffee mugs or handcrafted ceramics. Incorporate a soft fabric runner or a set of decorative candles on the surface. Use distressed paint or staining techniques to match your overall decor theme. It’s your chance to create a truly unique focal point.
A rustic wooden island with open shelves brings a warm, lived-in feel to your kitchen. It’s functional and full of character, making everyday cooking a joy. Once styled, it becomes a conversation piece that reflects your personality and taste. Ready to add some countryside charm?
7. Compact Island with Integrated Trash and Recycling Bins
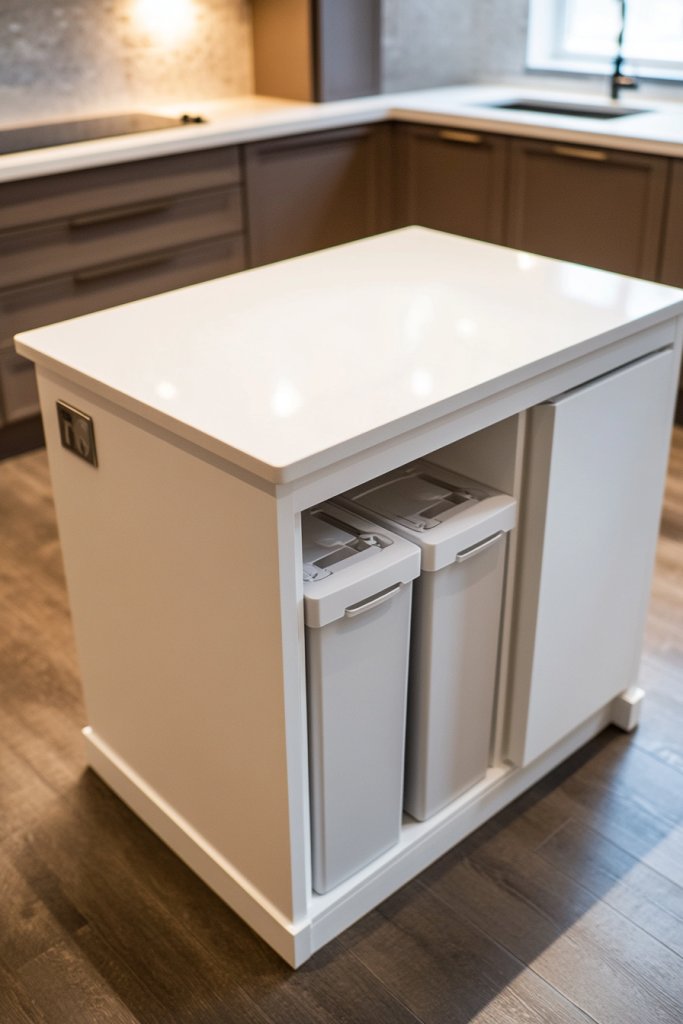
Is clutter and mess taking over your small kitchen? An island with built-in trash and recycling bins keeps waste out of sight and your counters clear. It streamlines cleanup and makes your space look tidy, even during busy cooking sessions. Who knew waste management could be so stylish?
Recommended Products to replicate this idea
| # | Preview | Product | |
|---|---|---|---|
| 1 |

|
60" Kitchen Island with Power Outlet & Drop Leaf, Kitchen Rolling Island with Spice Rack & Towel... | Buy on Amazon |
| # | Preview | Product | |
|---|---|---|---|
| 1 |

|
Rev-A-Shelf 2-Pack 35 Quart Polymer Replacement Trash Bin, Recycle Waste Garbage Container for... | Buy on Amazon |
Picture a sleek island with cabinet doors that hide a pull-out trash can and recycling bins. The surface is durable and easy to wipe clean, perfect for chopping and prep. The bins are designed to be discreet yet accessible, with a soft-close mechanism that prevents slamming. When closed, the island looks seamless and clutter-free.
Choose a finish that matches your cabinetry—matte, gloss, or textured—to blend seamlessly. For small spaces, opt for a narrow, streamlined design. You can also customize with color-coded bins for easy sorting. Incorporate a small built-in cutting board or drying rack on top for added functionality.
Start with a sturdy base that can support the weight of multiple bins. Use high-quality, odor-proof containers designed for easy removal and cleaning. Install a sliding or pull-out system that keeps everything hidden when not in use. Ensure the bins are well-ventilated to prevent odors. Regularly clean and replace filters or liners for freshness.
Decorate the surface with a decorative tray or a set of utensils in a container. Label the bins for straightforward sorting—e.g., compost, recyclables, trash. Add a small, decorative element like a candle or a bowl of fruit on the countertop for a lively touch. Personalize the handles or trim for a custom look.
Keeping your kitchen tidy becomes effortless with integrated waste stations. It minimizes mess during cooking and simplifies cleanup afterward. Once installed, you’ll wonder how you ever managed without it. It’s a small change with a big impact on your daily routine.
8. U-Shaped Small Island for Efficient Workflow
Feeling cramped in your tiny kitchen? A U-shaped island maximizes workspace and creates a natural flow for cooking and prep. It makes the entire kitchen feel more organized and accessible. Who says small kitchens can’t be efficient?
Recommended Products to replicate this idea
| # | Preview | Product | |
|---|---|---|---|
| 1 |
|
18'' Wider New Upgrade Faucet Mat for Kitchen Sink with U-Shape Hole, Super Fast Drying Diatomite... | Buy on Amazon |
| # | Preview | Product | |
|---|---|---|---|
| 1 |

|
Kitchen Island with 3 Shelves, Rolling Kitchen Cart with 6 Hooks and Protective Shelf, Microwave... | Buy on Amazon |
Imagine a compact U-shaped counter that encircles your cooking zone, with open shelving or closed cabinets on the outer sides. The central area is perfect for chopping, mixing, or setting up a buffet. The design creates an inviting island for family or guests to gather around comfortably. Bright, neutral colors keep it airy and spacious.
Use light-colored surfaces to enhance openness or darker finishes for contrast. Incorporate a mix of open shelves and closed cabinets for versatility. For small spaces, keep the footprint tight but functional, with rounded edges for safety. Add accessories like a spice rack or utensil holder for efficiency.
Start by measuring your kitchen’s dimensions and designing a U-shape that fits comfortably. Use durable materials like quartz or laminate for the top. Build or buy a modular base with enough storage to keep clutter away. Install easy-access drawers and pull-out trays for maximum convenience. Ensure the layout supports smooth traffic flow.
Decorate with colorful utensils, a patterned backsplash, or a textured countertop to add personality. Integrate a small seating area if space allows—think compact stools or a built-in bench. Personal touches like a decorative jar or a vintage clock can make it uniquely yours. Keep it functional yet inviting.
An efficient U-shaped island turns your kitchen into a well-oiled machine. It’s ideal for multitasking and entertaining at the same time. Once set, it boosts confidence in your cooking skills and makes every meal prep feel seamless. Ready to streamline your small kitchen?
9. Two-Tiered Island with Bar-Height Seating
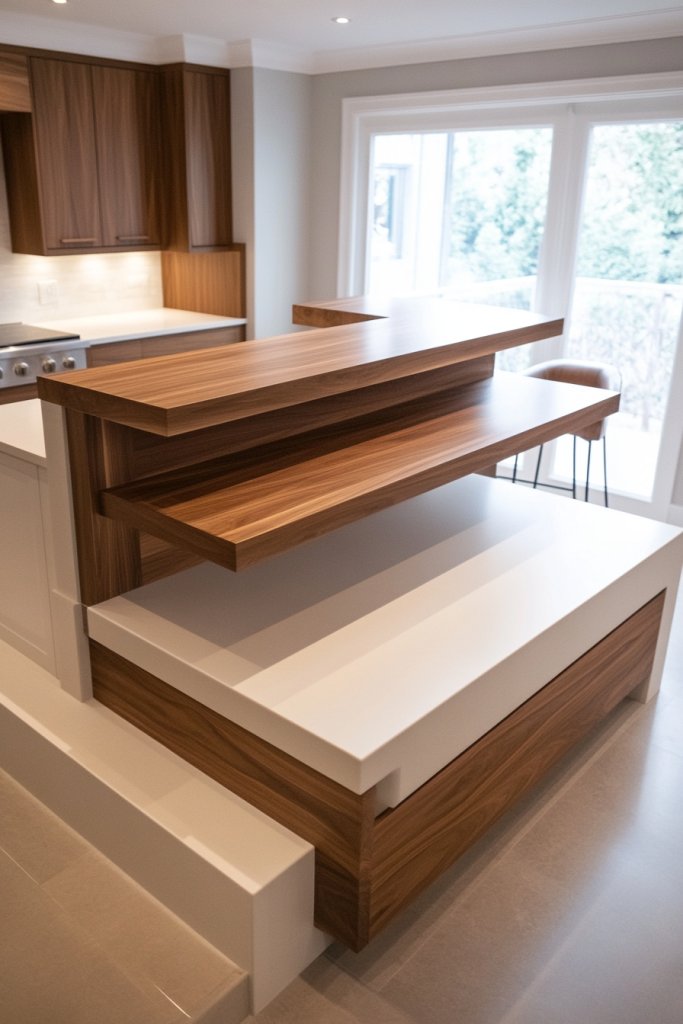
Do you want a kitchen that feels more like a social hub? A two-tiered island offers separate zones for prep and seating, making your space more functional and friendly. It’s perfect for small kitchens where you want to maximize every square inch. Who says tiny can’t be trendy?
Recommended Products to replicate this idea
| # | Preview | Product | |
|---|---|---|---|
| 1 |

|
Merax 53.2" Two-Tier Kitchen Island with Storage, Farmhouse Kitchen Island with Power Outlet, 4 Door... | Buy on Amazon |
| # | Preview | Product | |
|---|---|---|---|
| 1 |

|
DUMOS 26 Inch Counter Height Bar Stools Set of 4, Modern Faux Leather High Barstools with Back and... | Buy on Amazon |
Picture a sleek, dual-level surface with a lower section for chopping and prepping, and an upper bar-height section for casual dining. The different heights create visual interest while defining zones. Use contrasting materials—like a wood lower deck with a stone or quartz upper—to add texture. Pendant lights or sleek fixtures hang above, framing the space.
Adjust the heights for comfort—standard counter height for prep, and 42 inches for seating. Keep the surfaces durable and easy to clean. You can add open shelves underneath the lower level for extra storage. The upper bar can be a simple ledge or a more elaborate overhang with decorative trim.
Start with a sturdy base that supports the two levels—consider reinforced framing or custom carpentry. Use moisture-resistant materials for the top surfaces. Install the upper level with support brackets or a cantilevered design for stability. Place bar stools underneath for an inviting, social vibe. Finish with lighting that highlights the multi-level design.
Add cushions or personalized bar stools to match your style. Decorate with a few carefully chosen accessories—like a small plant or a decorative bowl—on the upper level. Use different finishes or colors to distinguish the zones further. Seasonal elements like a cozy throw or festive accents can refresh the look.
A two-tiered island elevates your kitchen’s style and social potential. It encourages conversations and makes every meal prep a social event. Once you set it up, you’ll wonder how you ever cooked without this multi-functional centerpiece. Elevate your small space confidently!
10. Floating Island with Under-Cabinet Lighting
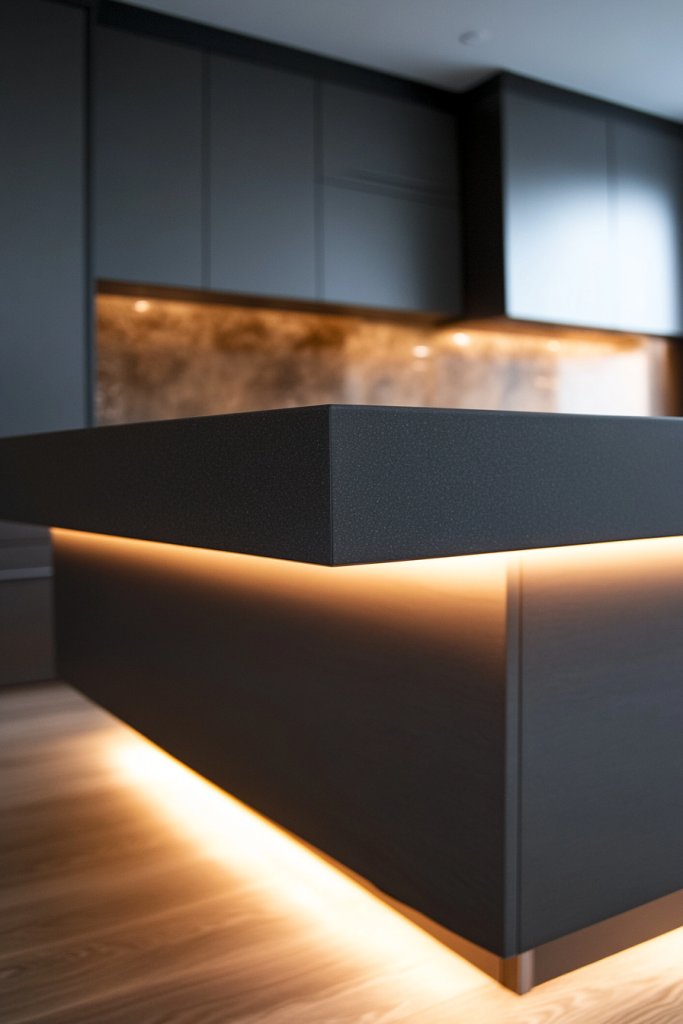
Tired of a cluttered, dark kitchen? A floating island with under-cabinet or under-surface lighting brightens up your space and creates a modern vibe. It’s a sleek way to add illumination and make your small kitchen look bigger. Who says you need a huge budget for a bright, stylish kitchen?
Recommended Products to replicate this idea
| # | Preview | Product | |
|---|---|---|---|
| 1 |
|
IRONCK Kitchen Island with Storage, Rolling Island Table on Wheels with Cart Drop Leaf and Trash Can... | Buy on Amazon |
| # | Preview | Product | |
|---|---|---|---|
| 1 |
|
Govee White LED Strip Lights, Upgraded 16.4ft Dimmable LED Light Strip 6500K Bright Daylight White,... | Buy on Amazon |
Visualize a wall-mounted or cantilevered island that appears to float with no visible supports. Soft LED lighting under the surface highlights the workspace and adds ambiance. The surface could be a polished stone, glass, or sleek laminate that reflects light. The combination of modern materials and lighting creates a clean, airy atmosphere.
Choose slim, integrated LED strips for an unobtrusive look. You could also opt for color-changing lights for a fun, customizable touch. Keep the surfaces simple and smooth—think glass or high-gloss finishes—to enhance the floating effect. Minimal hardware and concealed supports make the design seamless.
Start by fixing the support brackets securely to the wall or ceiling. Install LED lighting strips underneath, ensuring they are hidden but accessible for maintenance. Use durable, easy-to-clean surfaces on the floating section. Connect the lighting to a dimmer switch or smart system for adjustable ambiance. Finish with a sleek, minimal base or no base at all for a true floating look.
Incorporate accent lighting or color-changing LEDs to match your mood. Decorate the top with a statement tray, decorative textiles, or a few essential accessories. Use contrasting textures or finishes to make the floating island stand out even more. Add a small, portable cart or a decorative box nearby for extra storage.
A floating island makes your kitchen feel more open and contemporary. It’s a subtle, sophisticated upgrade that impresses guests and boosts your confidence in design. Once installed, it transforms your cooking space into a sleek, bright haven. Ready to float your style?
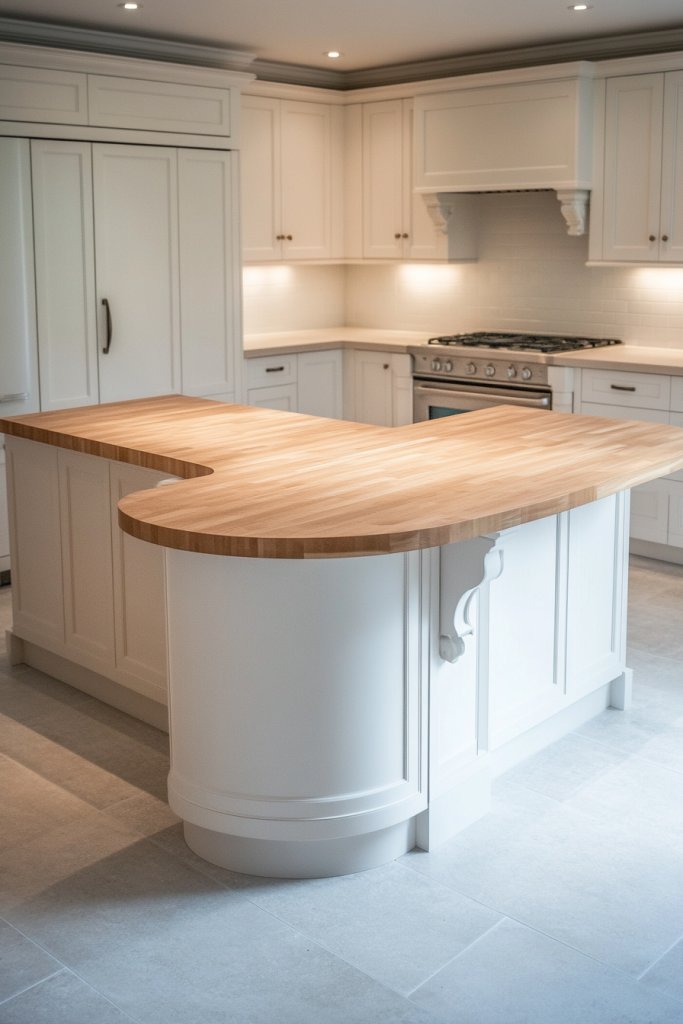
11. Corner Kitchen Island for Optimal Space Utilization
Facing awkward corners or underused spaces in your small kitchen? A corner island maximizes every inch by transforming dead space into a functional zone. It’s a smart move to boost storage and prep area without sacrificing flow. Who knew corners could be so clever?
Recommended Products to replicate this idea
| # | Preview | Product | |
|---|---|---|---|
| 1 |

|
ThreeHio Rolling Kitchen Microwave Cart, 3 Tier Microwave Table Stand with Storage, Kitchen Utility... | Buy on Amazon |
| # | Preview | Product | |
|---|---|---|---|
| 1 |

|
Spirich Floor Corner Cabinet with Two Doors and Shelves, Free-Standing Corner Storage Cabinets for... | Buy on Amazon |
Imagine a custom-built island snugly fitting into your kitchen corner, with open shelving or cabinets facing outward. It creates a cozy nook for cooking and casual dining. The design can blend seamlessly with your existing cabinetry, using matching finishes or contrasting textures for visual interest. Bright lighting overhead makes the space inviting.
Opt for a compact, L-shaped or triangular design that fits your corner precisely. Use durable, easy-to-clean surfaces like quartz or sealed wood. Incorporate a mix of open and closed storage to keep essentials accessible yet tidy. For a more decorative touch, add a small backsplash or decorative trim along the edges.
Measure your corner carefully to determine the perfect size. Build or buy a custom unit that snugly fits the space. Attach sturdy supports or legs, ensuring stability. Install a durable countertop—think granite or laminate—that handles daily use. Consider adding small appliances or utensils nearby for efficiency.
Decorate with colorful containers or a patterned cloth on top. Add a small plant or decorative object that fits the space without overcrowding. Personalize with hardware or paint colors that complement your existing decor. Seasonal accents can refresh the look throughout the year.
A corner island turns wasted space into a valuable part of your kitchen. It improves workflow and adds charm, especially in compact kitchens. Once you see how it maximizes your layout, you’ll wonder why you didn’t do it sooner. Make the most of every inch confidently!
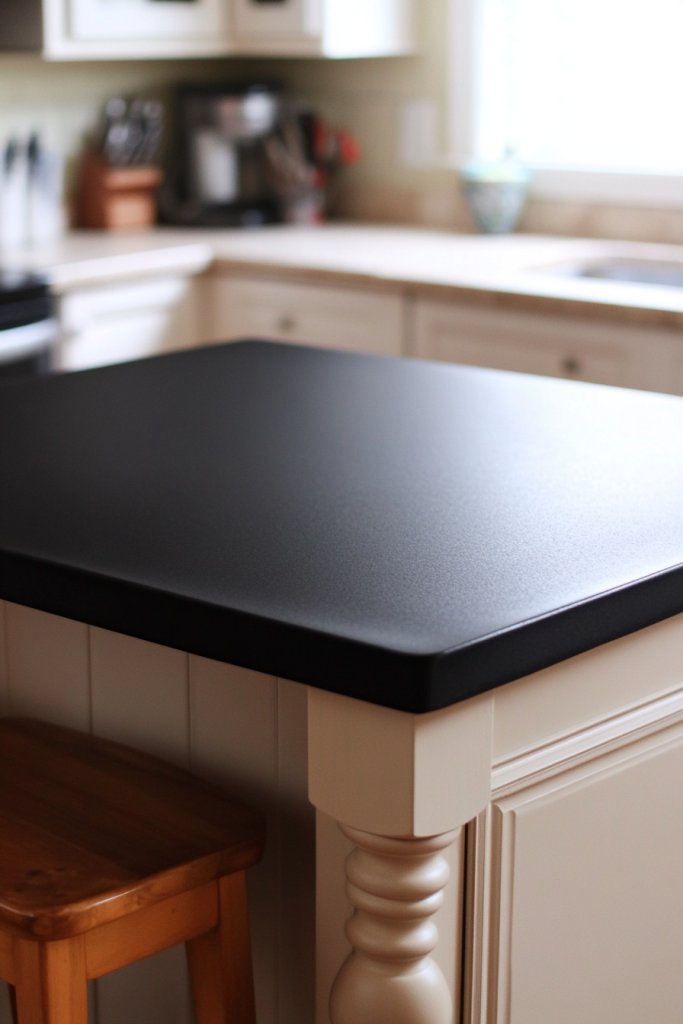
12. Modern Monochrome Island with Matte Finish

Looking for a sleek, timeless centerpiece in your small kitchen? A monochrome island with a matte finish offers a modern, cohesive look that elevates your space. It’s perfect for those who love minimalist style with a touch of sophistication. Who says small can’t be chic?
Recommended Products to replicate this idea
| # | Preview | Product | |
|---|---|---|---|
| 1 |

|
South Shore Olio Kitchen Island Matte Black and Faux White Marble, Contemporary | Buy on Amazon |
| # | Preview | Product | |
|---|---|---|---|
| 1 |

|
Nalupatio Modern Bar Stools Set of 2, Adjustable Faux Leather Upholstered Swivel Bar Stools, Counter... | Buy on Amazon |
Picture a streamlined island in matte black, charcoal, or soft gray. The matte finish absorbs light, reducing glare and adding depth. The surface is smooth and seamless, with hidden hardware for a clean look. Complement it with matching cabinetry and subtle hardware for a unified aesthetic. Soft lighting enhances the muted tones.
Opt for a monochrome palette—black on black, or gray on gray—to create a bold statement. Incorporate textured surfaces or subtle patterning to add visual interest. Use sleek, integrated handles or go handleless for a minimalist approach. Add a pop of color with accessories or textiles if needed.
Choose high-quality, matte-finish materials like laminate, lacquer, or powder-coated metal. Ensure the surfaces are durable and resistant to fingerprints or smudges. Install handleless drawers or push-to-open mechanisms for a seamless look. Pair with matching countertops—like quartz or concrete—for durability. Keep the overall design simple and uncluttered.
Add a decorative element like a textured rug or layered textiles nearby. Use minimalist bar stools or seating with simple lines. Incorporate subtle metallic or matte accents in hardware or fixtures. Small decorative objects or a statement piece in a contrasting color can break the monochrome scheme.
A monochrome matte island creates a sleek, modern vibe that impresses at first glance. It’s a versatile look that complements various decor styles and ages beautifully. When you see how polished and effortless it looks, you’ll feel confident in your design choices. Style your space with bold simplicity!
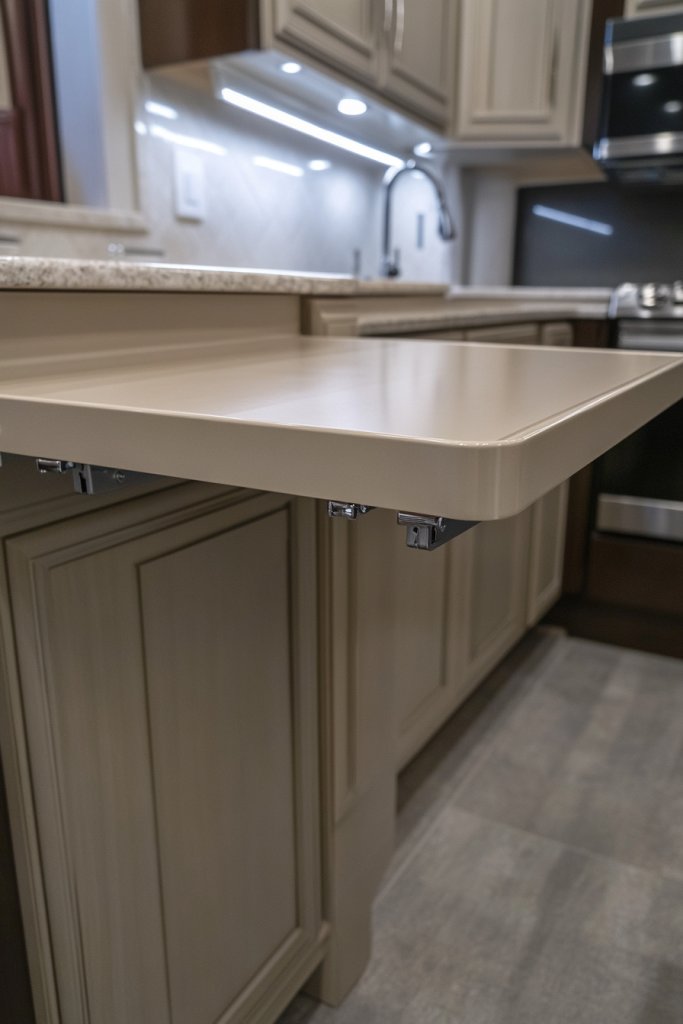
13. Fold-Down Counter Extension for Temporary Seating
Need extra seating or prep space without sacrificing your small kitchen? A fold-down counter extension offers a clever solution that can be deployed when needed and tucked away afterward. It’s like having an instant dining table without the permanent footprint. Genius, right?
Recommended Products to replicate this idea
| # | Preview | Product | |
|---|---|---|---|
| 1 |

|
COSTWAY Wall Mounted Folding Table, 31.5" x 23.5" Drop-Leaf Floating Writing Desk for Small Spaces,... | Buy on Amazon |
| # | Preview | Product | |
|---|---|---|---|
| 1 |

|
AUTOHJ Folding Shelf Brackets - 16 Inch 2 Pcs Heavy Duty Stainless Steel Collapsible Triangle Shelf... | Buy on Amazon |
Visualize a sleek, minimalist island with a hidden fold-down panel on the side. When lowered, it becomes a sturdy surface for meals or additional prep. When folded up, it blends seamlessly with the rest of the cabinetry. Use a matching finish or a contrasting color to make it stand out or disappear as desired. Soft lighting highlights the functionality.
Choose lightweight, durable materials—like plywood with a veneer or laminate finish—for easy handling. Install sturdy hinges and support brackets to ensure stability. Opt for a simple latch or magnetic catch to keep it secure when folded. Match the finish to your existing cabinetry for a cohesive look.
Start by measuring the available wall or side panel space and selecting a suitable fold-down mechanism. Attach the support brackets or legs to the underside to provide stability when in use. Finish with a durable, wipeable surface. Consider adding a small, portable cart or stools for convenience.
Decorate the fold-down surface with a colorful placemat or decorative tray. Use matching hardware or painted accents to personalize it further. When folded up, keep the panel flush with the cabinet for a clean appearance. Seasonal or themed decals can add a playful touch.
A fold-down extension maximizes functionality without cluttering your space. It’s perfect for hosting or quick meals, making your small kitchen feel larger and more versatile. Once installed, it’s a game-changer for daily living and entertaining. Ready to fold into smarter design?
14. Vintage-Painted Island with Charm and Character
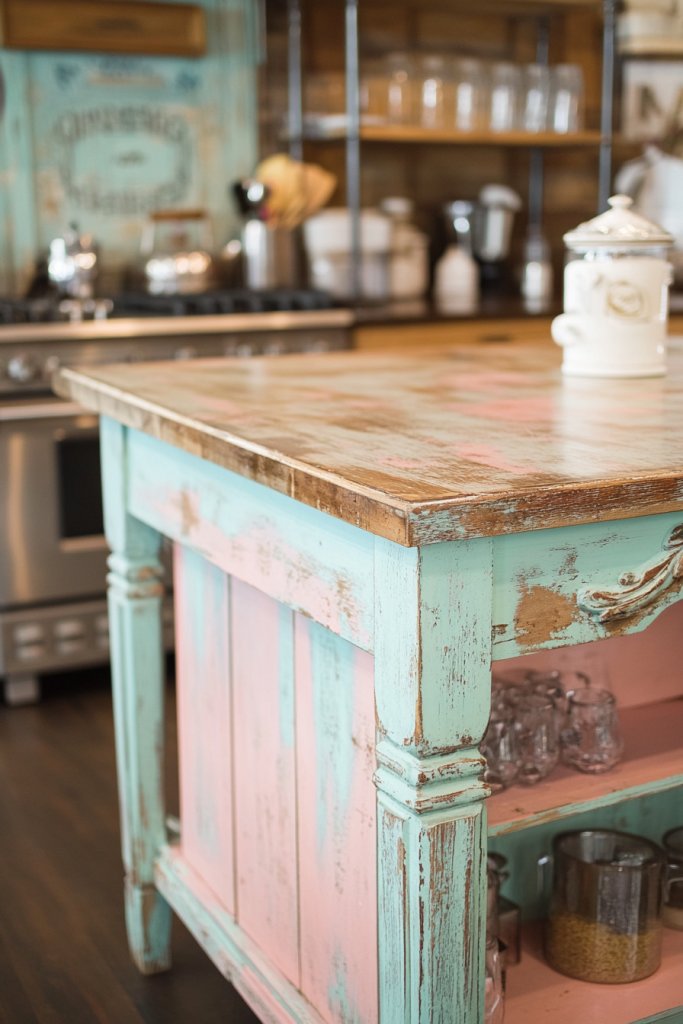
Craving a kitchen with personality and charm? A vintage-painted island can transform your space into a cozy, eclectic haven. It adds character and a sense of history, making every meal feel special. Who says small kitchens can’t have big personality?
Recommended Products to replicate this idea
| # | Preview | Product | |
|---|---|---|---|
| 1 |

|
Tribesigns Kitchen Island with Seating and Storage Shelves, 55.1-Inch Breakfast Counter Farmhouse... | Buy on Amazon |
| # | Preview | Product | |
|---|---|---|---|
| 1 |
|
FolkArt Home Décor Chalk Finish Paint Set (2 Ounce), PROMOFAHDC | Buy on Amazon |
Imagine a distressed, pastel-colored island with chipped paint and antique hardware. Open shelves display vintage dishware or decorative jars, while a worn finish tells a story. The surface might be a rustic wood or distressed paint, adding layers of texture. A charming curtain or fabric apron covers open storage underneath.
Choose soft pastel shades—mint, blush, or light blue—for a shabby chic look. Darker, more dramatic colors like navy or forest green create a vintage industrial vibe. Add decorative hardware like brass or porcelain pulls for authentic charm. Incorporate a small, foldable leaf or extendable surface for versatility.
Start with a sturdy base that can withstand paint or distressing. Use chalk paint or milk paint for authentic vintage finishes. Seal with a matte or low-gloss topcoat to protect against spills. Attach vintage-style hardware and add decorative accents. Consider distressing techniques like sanding or peeling paint for extra character.
Add decorative knobs or handles in vintage brass or ceramic. Use a patterned or floral fabric as a curtain or cover for open shelving. Personalize with small collectibles, antique utensils, or framed vintage prints nearby. Change accents seasonally to keep the look fresh and inviting.
A vintage-painted island infuses warmth and personality into your kitchen. It’s a statement piece that echoes your love for nostalgic charm. Once styled, it becomes a focal point and conversation starter. Embrace the imperfect beauty of vintage design—your space will thank you.
15. Narrow, Carousel-Style Island with Rotating Storage

Limited counter space but need accessible storage? A narrow carousel-style island with rotating shelves offers compact convenience. It keeps essentials within arm’s reach while saving space. Who knew rotation could be the key to smarter storage?
Recommended Products to replicate this idea
| # | Preview | Product | |
|---|---|---|---|
| 1 |
|
HSH 72.4” Rolling Kitchen Island with Swivel Table, Storage Cabinet, Drawers & Shelves, White... | Buy on Amazon |
| # | Preview | Product | |
|---|---|---|---|
| 1 |

|
SUNMORY 4 Tier Rotating Bookshelf Tower, Revolving 360 ° Spinning Bookcase, Hexagonal Corner Book... | Buy on Amazon |
Imagine a slim, vertical island with a circular top and rotating tiers underneath. Each shelf spins smoothly, revealing spices, utensils, or small tools. The design maximizes storage in tight quarters and adds a playful, functional element. Brightly colored or metallic finishes make it a standout feature.
Use durable, lightweight materials—like plastic, acrylic, or metal—for easy rotation. Incorporate adjustable or removable shelves for customization. Choose finishes that match or contrast your existing decor. Keep the footprint narrow but functional, fitting into small corners or tight spots.
Start by designing a compact, sturdy base with a spinning mechanism underneath. Attach circular shelves securely, ensuring smooth rotation. Use resilient, easy-to-clean surfaces on top—like stainless steel or sealed wood. Install a central axis that’s durable and quiet. Keep everything simple for everyday use.
Decorate the top with a small tray or decorative item that complements your style. Use color-coded or labeled shelves for easy sorting. Add a few personal touches like a small sculpture or favorite spice jars on top. Change accessories seasonally for fresh appeal.
A carousel island turns storage into a fun and functional feature. It’s ideal for small kitchens craving both style and practicality. Once you see how it streamlines your workflow, you’ll wonder how you managed before. Make rotation your new best friend in the kitchen!
16. Glass-Top Island for an Open and Airy Feel
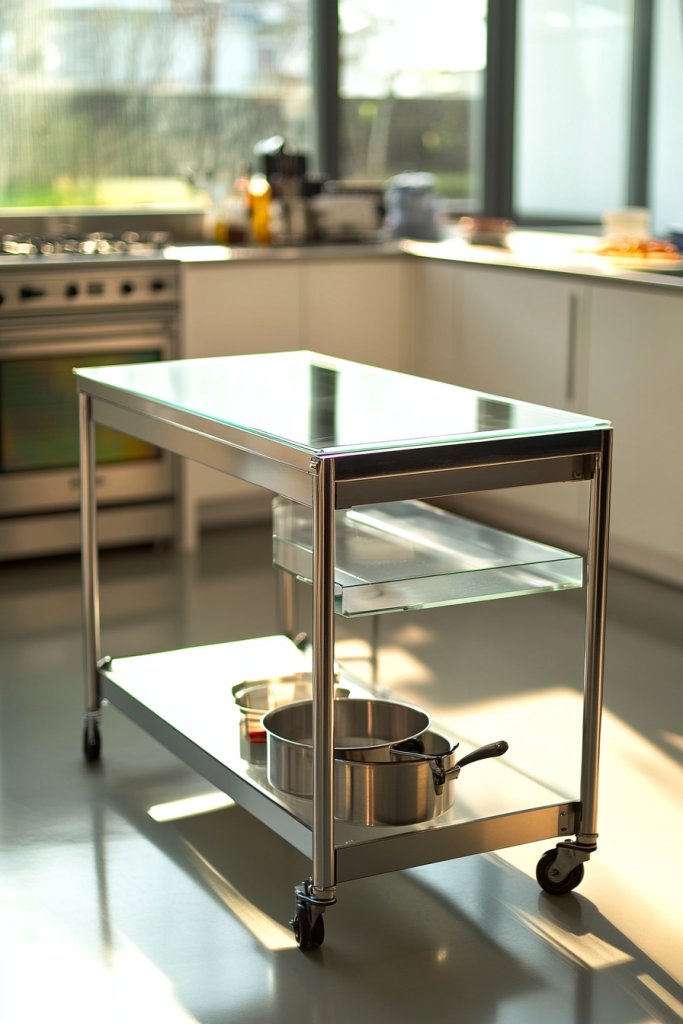
Want your small kitchen to feel larger and more open? A glass-top island creates visual transparency, making the space seem bigger and brighter. It adds a contemporary touch without overwhelming your decor. Who says small can’t be expansive?
Recommended Products to replicate this idea
| # | Preview | Product | |
|---|---|---|---|
| 1 |

|
TAMUNE 77” Kitchen Island with Glass Doors and Light, Large Kitchen Storage Island with Drawers... | Buy on Amazon |
| # | Preview | Product | |
|---|---|---|---|
| 1 |

|
Flash Furniture Laney 25.75" Indoor/Outdoor Counter Height Transparent Dining Stool with Foot Ring,... | Buy on Amazon |
Picture a sleek island with a tempered glass surface that reveals a stylish base underneath—whether wood, metal, or a combination. The glass reflects light and adds depth, making the room feel more spacious. Minimal hardware and clean lines keep the look modern and uncluttered. Soft lighting enhances the transparency.
Opt for frosted or tinted glass for a softer look or clear glass for maximum openness. Use a sturdy, moisture-resistant frame—metal or sealed wood—to support the glass top. Incorporate sleek, integrated storage inside the base to keep clutter hidden. Pair with minimalist stools or seating.
Start by selecting a durable, tempered glass top and a supportive frame. Secure the glass firmly to prevent movement. Finish the base with a protective coating or paint that resists moisture and stains. Install lighting beneath or around the island to highlight its transparency. Keep the design simple for maximum effect.
Decorate nearby with minimalist accessories—like a few metallic or ceramic pieces. Add a textured rug or a colorful seat cushion for contrast. Use varied textures or finishes on the base to complement the glass’s transparency. Change decor seasonally to keep it fresh.
A glass-top island transforms your kitchen into a bright, open space. It’s a statement of modern elegance that impresses guests and boosts your design confidence. Once installed, you’ll enjoy a more spacious, inviting environment every day. Shine with clarity and style!
17. Foldable Table-Style Island for Versatile Use
Short on space but need extra dining or prep area? A foldable table-style island offers versatility without permanent clutter. It’s perfect for small kitchens that host friends or need multiple functions in one spot. Who says flexible design can’t be stylish?
Recommended Products to replicate this idea
| # | Preview | Product | |
|---|---|---|---|
| 1 |

|
Mythinglogic Foldable Kitchen Storage Cart, 3-Tier Rolling Cart with Solid Oak Top, Heavy-Duty Metal... | Buy on Amazon |
| # | Preview | Product | |
|---|---|---|---|
| 1 |

|
Jela-USA Solid Pine Wood 7 Drawer Wide Rolling Cart, White | Buy on Amazon |
Imagine a compact island with a fold-down or extendable tabletop that can be used for meals, prep, or even as a workspace. When not in use, it folds away neatly against the wall or cabinet. Use a sleek finish—like lacquer or sealed wood—to match the rest of your decor. Bright, functional lighting makes it inviting.
Choose lightweight, durable materials—like laminated plywood or MDF with a veneer finish—for easy folding. Use strong hinges and support brackets for stability. Match the surface to your existing cabinetry for a seamless look. Add storage underneath for utensils or small appliances.
Start by measuring available wall space and choosing a fold-down mechanism that supports your needs. Attach sturdy hinges and support arms to hold the table when open. Finish with a durable, wipeable surface—such as laminate or sealed wood. Install a small shelf or drawers beneath for extra storage. Practice folding and unfolding to ensure smooth operation.
Decorate with colorful placemats or a patterned table runner for special occasions. Incorporate hooks or small containers nearby for utensils and condiments. Personalize with hardware or paint that matches your style. Seasonal accessories like a cloth cover or decorative magnets can add flair.
A foldable table-style island maximizes functionality while saving space. It adapts effortlessly to your needs, whether for cooking, dining, or working. Once set up, you’ll enjoy a versatile, clutter-free kitchen environment. Flexibility has never looked so good!
18. Scandinavian-Inspired Light Wood Island with Clean Lines
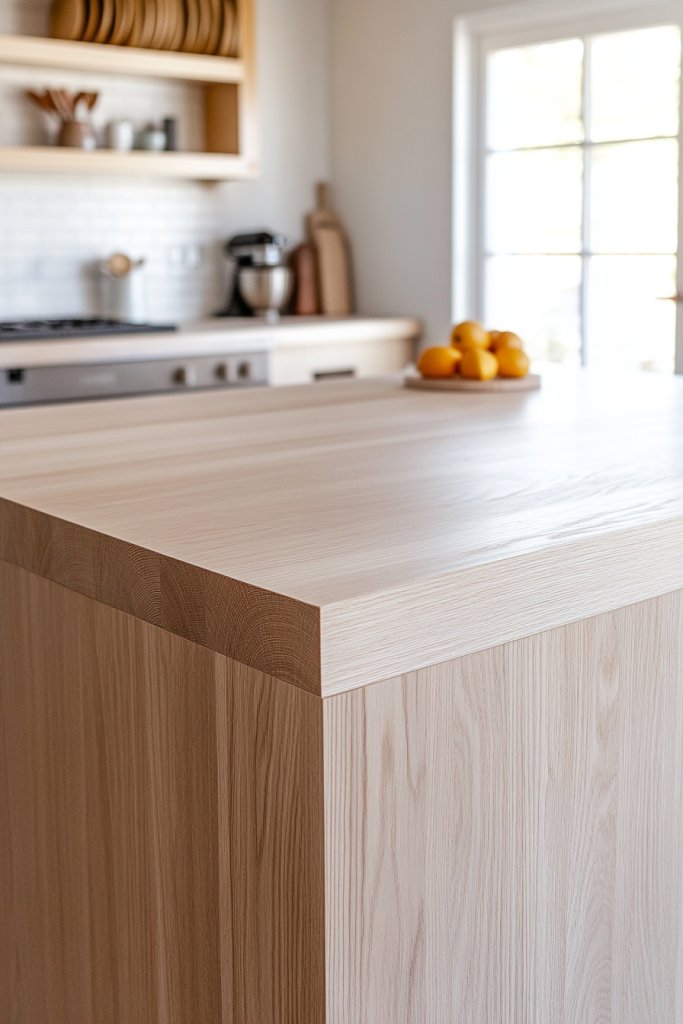
Craving a bright, airy, clutter-free kitchen? A Scandinavian-inspired light wood island can bring warmth and simplicity to your small space. Its clean lines and natural tones create a calming atmosphere. Who says minimalism can’t be cozy?
Recommended Products to replicate this idea
| # | Preview | Product | |
|---|---|---|---|
| 1 |

|
Modern Pendant Lights,12.6 inch,Natural Wood Cap,Simple Hanging Light Fixture for Kitchen... | Buy on Amazon |
| # | Preview | Product | |
|---|---|---|---|
| 1 |
|
EYYTHUNG Farmhouse Wooden Bar Stools Set of 4, Mid Century Modern Counter Height Stools with Solid... | Buy on Amazon |
Visualize a sleek, pale wood island with a smooth surface and unobtrusive hardware. The light finish reflects natural light, making the space feel larger. Open shelving or hidden cabinets keep clutter out of sight. Soft textiles or subtle decor accents enhance the serene vibe. Natural textures and minimal ornamentation define the aesthetic.
Choose light woods like birch, ash, or oak with a matte or satin finish. Keep the design simple—flat-front drawers and no ornate details. Pair with matching or contrasting light-colored stools or chairs. Add textiles like linen or cotton for softness without overwhelming the look.
Start with quality, sustainable wood that’s finished with a clear, matte sealant. Construct a sturdy yet minimalist base, with a focus on clean lines and hidden hardware. Install a durable, easy-to-clean surface—such as quartz or sealed wood. Use recessed lighting or simple pendant lights for illumination. Keep accessories minimal but functional.
Decorate with natural textiles—like a woven runner or linen cushions. Incorporate small, handcrafted ceramics or wooden bowls for warmth. Personalize with subtle color accents—like a soft throw or painted hardware—aligned with your decor palette. Seasonal changes can refresh the look easily.
A Scandinavian-inspired island brings a fresh, clean aesthetic that elevates your entire kitchen. It’s a versatile base for both everyday cooking and entertaining. Once styled, it helps you create a peaceful, organized environment that boosts your confidence in design choices. Embrace the beauty of simplicity!
19. Compact Island with Built-In Charging Station and Outlets
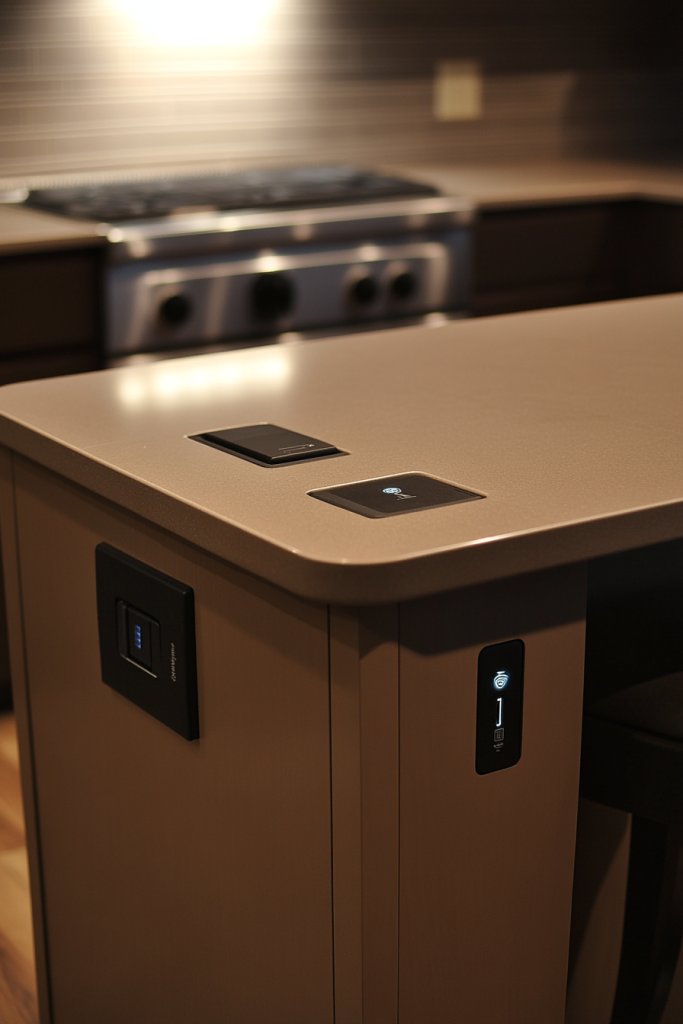
Tired of tangled cords and dead devices in your small kitchen? A compact island with built-in outlets and charging stations solves that problem effortlessly. It keeps your tech organized and within reach, making multitasking easier. Who knew kitchen upgrades could be so tech-savvy?
Recommended Products to replicate this idea
| # | Preview | Product | |
|---|---|---|---|
| 1 |
|
60" Kitchen Island with Power Outlet & Drop Leaf, Kitchen Rolling Island with Spice Rack & Towel... | Buy on Amazon |
| # | Preview | Product | |
|---|---|---|---|
| 1 |
|
CHOEZON Kitchen Island Cart with Storage, Bar Cart with Charging Station, Kitchen Island on Wheels,... | Buy on Amazon |
Picture a sleek island with a hidden power strip or built-in USB ports integrated into the side or surface. The surface is durable and easy to wipe clean—like quartz or sealed wood. Discreet outlets keep clutter out of sight, while a small area for devices adds convenience. Soft, warm lighting highlights the tech features.
Opt for a minimalist design with a clean surface—free of clutter—paired with hidden outlets. Choose finishes that match your cabinetry—matte, gloss, or textured. Incorporate a small, decorative tray or stand for devices. Keep cords organized with cable clips or sleeves for a tidy look.
Start by selecting a durable, water-resistant surface with integrated power options. Install electrical outlets or USB ports during the build or retrofit existing cabinetry. Use high-quality, safety-certified components to prevent hazards. Conceal wiring with a pass-through or channel system. Test all outlets for safety and functionality. Keep the setup accessible for maintenance.
Add a stylish stand or holder for phones and tablets. Use decorative cable organizers or wraps that match your decor. Personalize with a small, decorative element—like a sculpture or a colorful container—near the outlets. Seasonal or thematic accessories can make the space more inviting.
A built-in charging station makes your kitchen smarter and more functional. It seamlessly integrates technology into your daily routines, boosting efficiency. Once installed, you’ll enjoy a clutter-free, tech-ready space that feels both modern and practical. Stay connected effortlessly!
20. Chalkboard or Whiteboard Surface for Interactive Hosting
Looking to add a fun, interactive element to your small kitchen? A chalkboard or whiteboard surface turns your island into a hub for notes, menus, or doodles. It’s perfect for family organization and spontaneous gatherings. Who says small spaces can’t be playful?
Recommended Products to replicate this idea
| # | Preview | Product | |
|---|---|---|---|
| 1 |

|
Extra Large Chalkboard Peel and Stick Paper 9 Feet roll (108 inches) + (5) Color Chalk Included - by... | Buy on Amazon |
| # | Preview | Product | |
|---|---|---|---|
| 1 |

|
ANLIOTE Magnetic Dry Erase Board Fridge White Board Sheet 20x13 inch, Flexible Large Refrigerator... | Buy on Amazon |
Imagine a sleek, smooth surface on the side of your island—either chalkboard paint or dry-erase board—ready for notes or artwork. Use colorful chalks or markers for a lively touch. The surface invites everyone to participate, whether for planning meals or leaving friendly messages. Complement it with minimal hardware for a clean look.
Choose a durable, wipeable surface that resists stains and ghosting. Frame it with a simple trim or keep it flush for a seamless appearance. Use vibrant, erasable markers or chalks to add color and personality. Incorporate a small ledge or tray for holding markers or chalks nearby.
Apply chalkboard paint or install a peel-and-stick whiteboard sheet on your island. Seal the surface with a protective clear coat if necessary. Attach mounting hardware securely, ensuring it’s flush and stable. Keep cleaning supplies handy—like a microfiber cloth or eraser—for quick updates. Use markers or chalk in colors that match your decor.
Personalize with themed messages, daily menus, or motivational quotes. Decorate the surrounding area with colorful magnets or decorative clips. Use it to track grocery lists, recipes, or family chores. Change the message regularly to keep it fresh and engaging.
An interactive surface makes your kitchen more engaging and organized. It encourages family participation and makes daily routines more fun. Once you see how it sparks creativity and communication, you’ll love having this playful feature. Make your kitchen a lively hub!
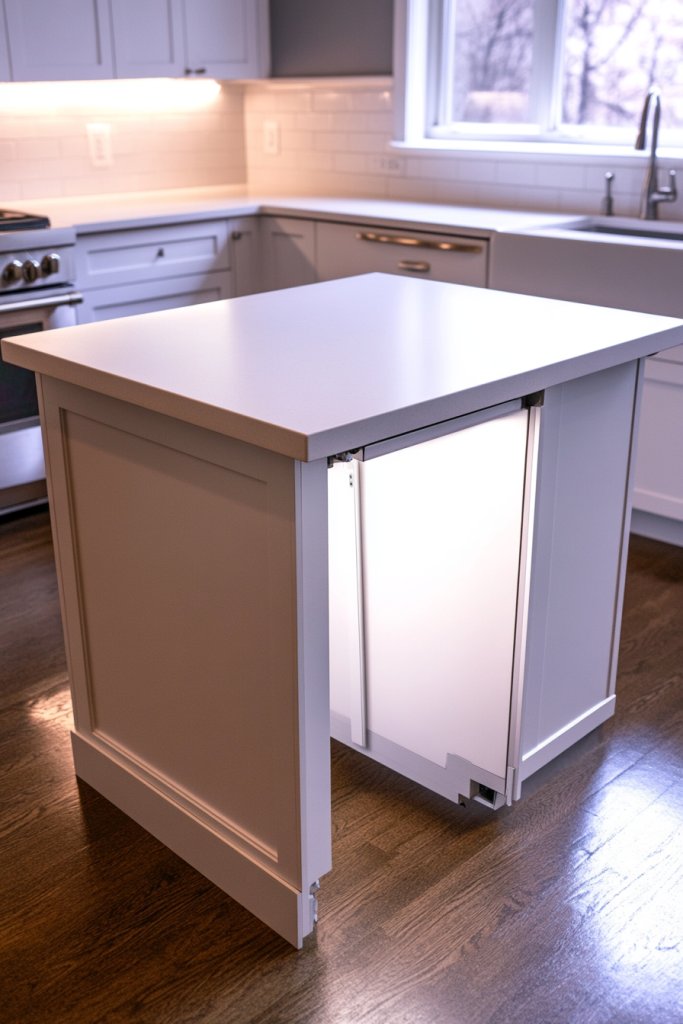
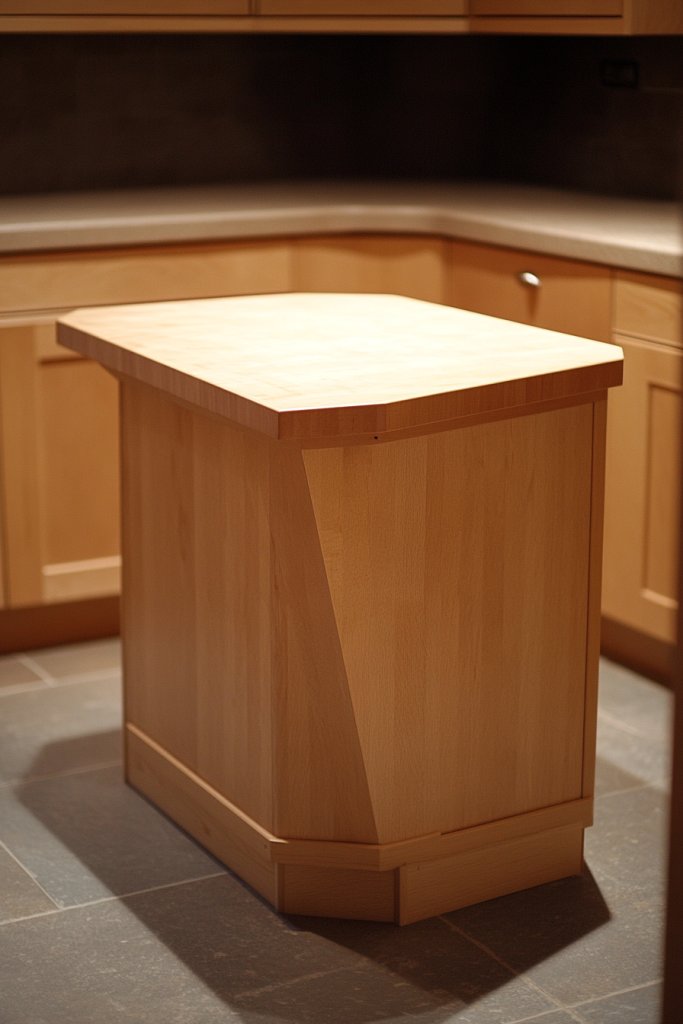
21. Hidden Storage with Pull-Out Countertop for Surprising Functionality
Ever wish your small kitchen had more hidden storage? A pull-out countertop with concealed compartments offers surprising versatility. It keeps clutter out of sight and provides extra workspace on demand. Who knew smart storage could be so sleek?
Recommended Products to replicate this idea
| # | Preview | Product | |
|---|---|---|---|
| 1 |

|
Dotexion Countertop Organizer for Kitchen with Drawer& Wire Basket- Sturdy Hardwood Shelf for Coffee... | Buy on Amazon |
| # | Preview | Product | |
|---|---|---|---|
| 1 |

|
Bostitch Konnect Under Desk Drawer, Self-Adhesive Slide Out Storage Organizer with 4 Customizable... | Buy on Amazon |
Visualize a smooth, flush surface that slides out or folds away to reveal hidden compartments underneath. When extended, it doubles as a prep area or serving station. The surface looks seamless when closed, maintaining a clean aesthetic. Use high-quality hardware and finishes for a polished look.
Choose materials that match your existing countertops—like quartz, laminate, or sealed wood—for a cohesive design. The compartments can be divided into sections for utensils, cutting boards, or small appliances. Consider a mechanism that’s easy to operate and durable for daily use.
Start with precise measurements for the pull-out mechanism and compartments. Install a sturdy sliding system that can support the weight of the countertop and stored items. Finish with a durable, easy-to-clean surface. Reinforce the base to handle frequent pulling and pushing. Test for smooth operation and safety.
Add a decorative trim or paint to match your decor. Use labeled compartments for organization—think spices, tools, or baking supplies. Incorporate a small decorative element—like a ceramic or textured handle—to personalize it. Change the arrangement seasonally for fresh appeal.
A hidden pull-out countertop turns your small kitchen into a multi-functional space. It’s a clever way to maximize storage and surface area without sacrificing style. Once you master the setup, you’ll feel confident in your innovative design skills. Surprise yourself with smarter storage!
Conclusion
With a diverse range of small kitchen island ideas, you’re equipped to enhance your space with both function and flair. Whether you’re opting for a compact cart, a built-in solution, or a stylish multi-use piece, these ideas can be tailored to your needs. Don’t hesitate to experiment and bring your vision to life—your perfect small kitchen gathering spot is just an idea away!
Last update on 2026-03-01 / Affiliate links / Images from Amazon Product Advertising API