Your mailbox is more than just a functional spot for your mail—it’s a charming first impression of your home! Decorated mailboxes have gained popularity as a fun and creative way to add personality, color, and style to your entryway, making every arrival feel special.
In this article, you’ll find a variety of mailbox decor ideas that can suit any style, from rustic and vintage to modern and whimsical. Whether you’re looking for simple upgrades or bold statements, these ideas will inspire you to transform your mailbox into a delightful focal point that welcomes guests with charm and flair.
1. Paint a Bold Color or Pattern on Your Mailbox for Instant Cocal Impact
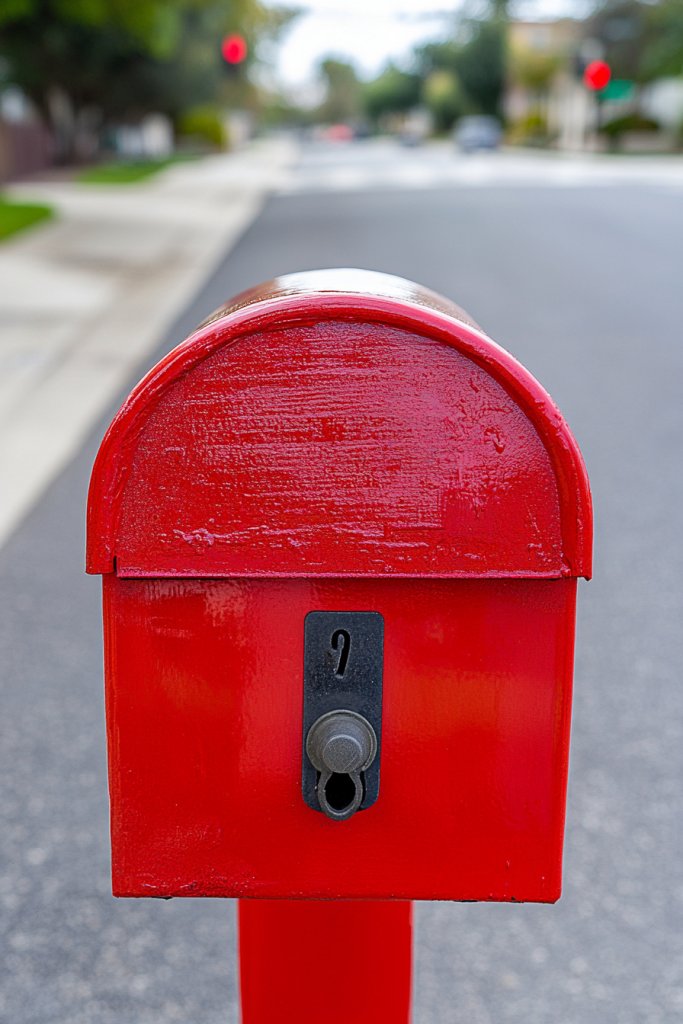
Ever looked at your mailbox and thought it blends into the background more than standing out? A splash of bold color or a striking pattern can turn a boring box into a focal point that catches everyone’s eye. It’s a simple way to boost curb appeal without breaking the bank. Plus, it makes your home instantly recognizable from the street.
Recommended Products to replicate this idea
| # | Preview | Product | |
|---|---|---|---|
| 1 |

|
FolkArt Outdoor Acrylic Paint in Assorted Colors (2 Ounce), 1654 Metallic Pure Gold | Buy on Amazon |
| # | Preview | Product | |
|---|---|---|---|
| 1 |

|
20pcs 4 Inch Plastic Number Stencils (0-9) for House Numbers, Reusable Curb Stencil Kit for Address... | Buy on Amazon |
Picture a classic white mailbox transformed with a vibrant teal hue, or decorated with a playful chevron pattern in black and white. The glossy finish reflects sunlight, making it pop against lush greenery or a neutral-colored house. Imagine walking up to a mailbox that feels more like a piece of art than an afterthought. Bright colors and bold patterns create a cheerful, inviting vibe.
You can personalize your mailbox with seasonal colors, like red and green for holidays or pastel shades for spring. For a rustic look, opt for distressed paint or chalky finishes. Geometric patterns suit modern homes, while floral motifs work well with cottage styles. The key is matching your choice to your overall exterior aesthetic.
Start by cleaning and lightly sanding your mailbox to ensure paint adheres well. Choose weather-resistant exterior paint in your preferred color or pattern. Use painter’s tape for clean lines or stencils for intricate designs. Apply multiple thin coats, allowing each to dry thoroughly. Consider sealing with a clear outdoor topcoat for extra durability. This DIY project is straightforward and quick.
Add a custom touch with hand-painted initials or a small welcome message. Incorporate metallic accents like gold or silver stripes for a touch of glam. For extra flair, pair it with matching house numbers or a decorative post. Seasonal touches like festive motifs or themed patterns can keep the look fresh year-round.
A bold, patterned mailbox instantly elevates your home’s exterior and shows off your personal style. It’s a small detail that makes a big impact, making your entryway more inviting and memorable. Just imagine the compliments from neighbors and visitors alike – all thanks to a little paint and a lot of creativity.
2. Wrap Your Mailbox in Decorative Vinyl Wraps or Stickers for a Custom Look
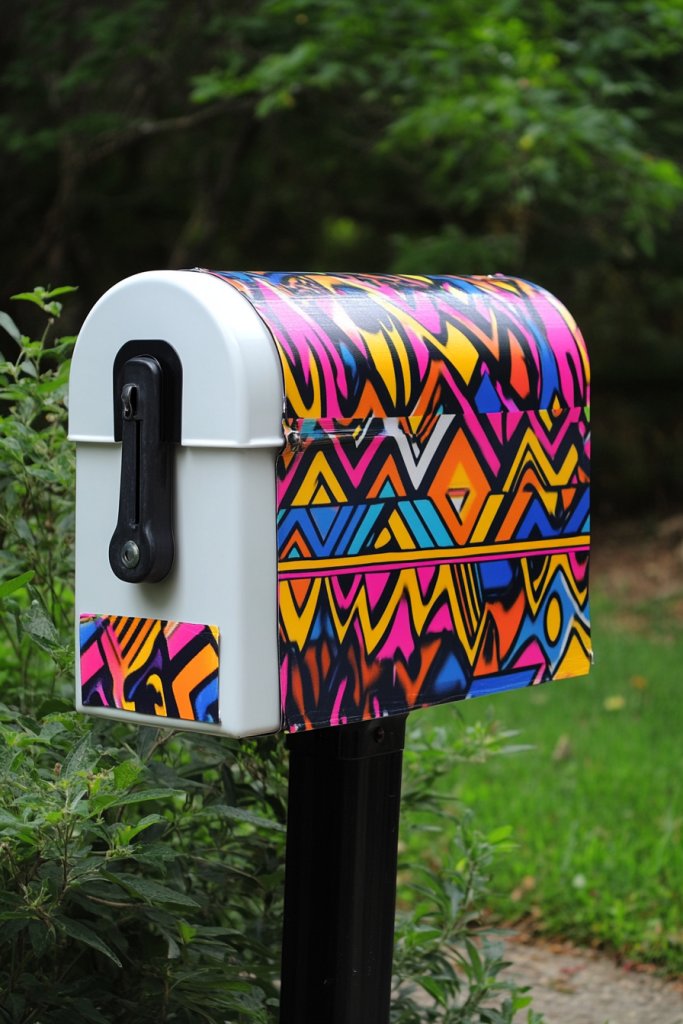
Tired of your plain, generic mailbox? Want a quick update that feels personalized without a full repaint? Vinyl wraps and stickers offer an easy, no-fuss way to customize your mailbox. They’re perfect for adding flair without the commitment of paint or permanent modifications. Plus, you can change designs as often as your mood or season demands.
Recommended Products to replicate this idea
| # | Preview | Product | |
|---|---|---|---|
| 1 |

|
FOSHIO Vinyl Magnets Window Tint Kit, 6PCS Car Wrap Magnets & Vinyl Wrap Gloves, Felt Squeegee and... | Buy on Amazon |
| # | Preview | Product | |
|---|---|---|---|
| 1 |

|
10 Sheets 500 Pcs Vinyl Letter Stickers, 2 inch Self-Adhesive Alphabet Numbers Stickers Waterproof... | Buy on Amazon |
Imagine peeling off a vibrant floral vinyl wrap that transforms your mailbox into a garden scene, or applying a sleek geometric sticker in metallic shades for a contemporary look. The textured finish of vinyl adds depth and dimension, making your mailbox stand out from the usual. Seasonal decals, like snowflakes or pumpkins, can be swapped out to reflect the time of year. The possibilities are endless and removable.
Choose wraps that complement your home’s color palette or contrast for a bold statement. For a beachy vibe, go for nautical themes with anchors or stripes. For a whimsical touch, opt for fun patterns like polka dots or chevron. These wraps can also be used to create themed setups for holidays or special occasions.
Start by thoroughly cleaning your mailbox surface to remove dirt and grease. Measure and cut the vinyl or stickers to fit precisely, avoiding bubbles or wrinkles. Use a squeegee or a credit card to smooth out air pockets. For curved surfaces, heat the vinyl slightly with a hairdryer to make it more pliable. Finish by sealing edges with a clear outdoor spray if desired for extra durability.
Add initials, house numbers, or small icons to make it uniquely yours. Layer different decals for a collage effect or create custom designs with printable vinyl sheets. Incorporate seasonal or thematic stickers to keep the look fresh and relevant. You can even create your own designs using graphic software for a truly one-of-a-kind look.
Vinyl wraps and stickers are a cost-effective way to refresh your mailbox with minimal effort. They’re versatile, removable, and customizable, making them ideal for renters or those who love changing styles regularly. With a little patience, you can turn an ordinary mailbox into a personalized statement piece that reflects your personality and taste.
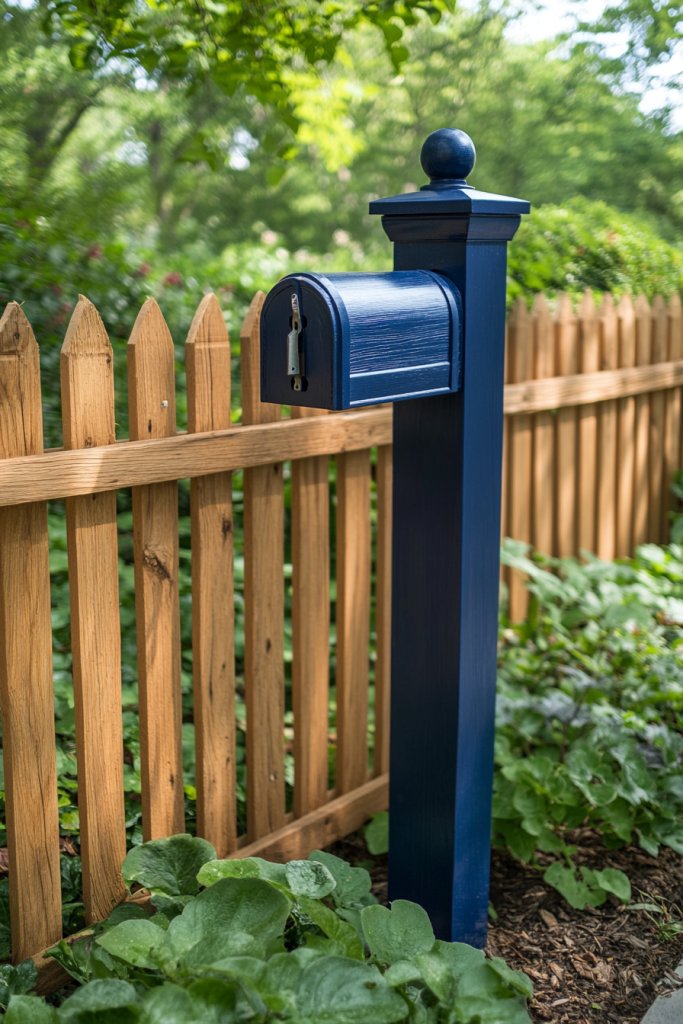
3. Add a Charming Mailbox Post with Decorative Finials or Paint Accents
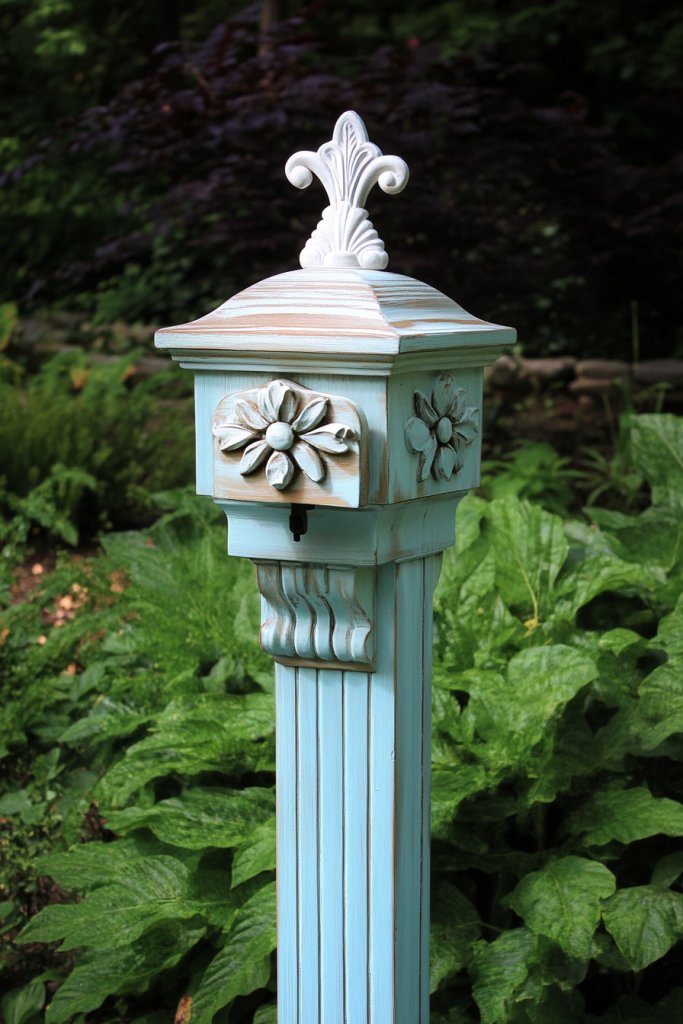
Is your mailbox looking a little tired or uninspired? The post it sits on can be just as important as the box itself. Upgrading your mailbox post with decorative finials or painted details instantly elevates the entire look. It’s a simple upgrade that adds charm and character to your curb appeal.
Recommended Products to replicate this idea
| # | Preview | Product | |
|---|---|---|---|
| 1 |

|
Alumina Products, Inc. F8 Acorn Cast Aluminum Mailbox Finial Topper (fits a 3″ Pole) | Buy on Amazon |
| # | Preview | Product | |
|---|---|---|---|
| 1 |

|
Olympic WaterGuard 11 oz. Clear Exterior Waterproofing Wood Sealer Spray | Buy on Amazon |
Picture a classic wooden post painted in a soft pastel hue, topped with an ornate finial that resembles a tiny lantern or a vintage urn. Or imagine a sleek metal post with intricate scrollwork and hand-painted accents that complement your home’s color scheme. These details create a focal point that draws the eye and adds personality to your entryway. The textures and finishes can add a rustic, vintage, or modern vibe.
Choose from painted wood, wrought iron, or metal posts depending on your style preferences. For a rustic look, opt for distressed finishes or faux wood grain patterns. For a more contemporary style, go for sleek, minimalist posts with metallic or matte finishes. Seasonal finials or painted accents can be swapped out to match holidays or your mood.
Start by removing the existing post and inspecting its condition. Sand and prime wood posts before painting to ensure a smooth finish. Select finials that fit your post’s top—metal, ceramic, or wooden options work well. Use weatherproof paint or spray for accents, and carefully apply decorative finials with strong adhesive or screws. Consider adding decorative bands or paint stripes along the post for extra detail.
Personalize with custom-painted motifs, monograms, or family initials. Incorporate contrasting colors or metallic paints for decorative bands. For a vintage feel, attach antique-style finials or lanterns, or paint a faux chalkboard panel for messages. These small touches make your mailbox stand out and reflect your style.
A charming mailbox post with decorative accents instantly boosts curb appeal and showcases your creativity. It turns a mundane fixture into a decorative feature that invites guests and passersby to admire your home. With just a few tools and some paint, you can craft a personalized entry that feels both welcoming and stylish.
4. Attach a Small Lantern or Solar Light for Functional Charm
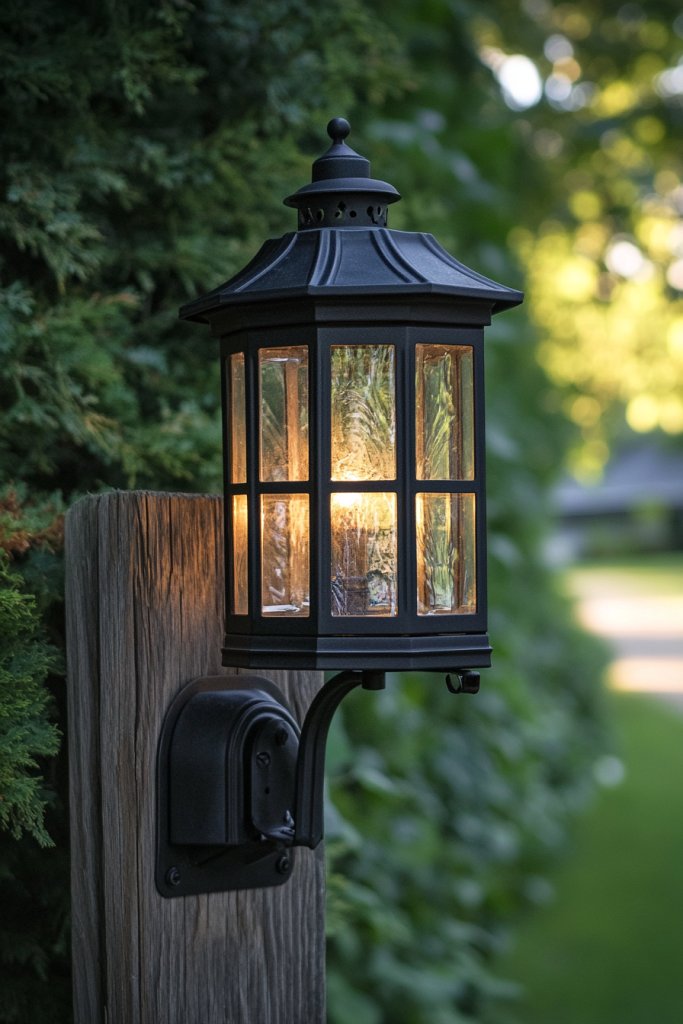
Ever struggled to find your mailbox in the dark or wished it had a little extra charm? Adding a small lantern or solar light isn’t just practical; it creates a cozy, welcoming vibe. It also improves safety by illuminating your walkway and mailbox area. Who says functionality can’t be stylish?
Recommended Products to replicate this idea
| # | Preview | Product | |
|---|---|---|---|
| 1 |

|
Peasur 4x4 Solar Post Cap Lights Outdoor with 3 Lighting Modes, 2 Packs LED Post Light Solar Powered... | Buy on Amazon |
| # | Preview | Product | |
|---|---|---|---|
| 1 |

|
MAXvolador Outdoor Wall Lantern, Exterior Waterproof Wall Sconce Light Fixture, Black Anti-Rust... | Buy on Amazon |
Imagine a vintage-inspired lantern casting a warm glow over your mailbox as evening falls. Or a sleek solar-powered LED light that lines the path with soft, white illumination. The gentle light flickers or glows steadily, highlighting your mailbox’s details and making it easy to spot from a distance. The contrast of metal, glass, or weatherproof materials adds to the charm.
Select from rustic lanterns with distressed finishes, modern minimalist LED fixtures, or whimsical hanging lanterns for a playful look. Solar lights come in various shapes and sizes, allowing you to match your style—be it vintage, contemporary, or eclectic. You can also choose fixtures that blend into your landscape or stand out as statement pieces. Seasonal covers or decorative elements can be added to customize further.
Position your lantern or solar light near the mailbox post, ensuring it’s protected from the elements. For solar lights, install in a spot with direct sunlight for maximum charging. Use mounting brackets or stakes to secure the fixture firmly. Adjust the angle for optimal illumination, and test the light at night to confirm coverage. For lanterns, consider installing a hook or mounting plate, then hang or attach securely.
Decorate your lantern with seasonal ribbons, small charms, or paint accents to match your home’s theme. For a vintage look, choose lanterns with distressed finishes or antique brass tones. Combine with pathway stones or decorative gravel for added charm. You might even add a tiny flag or monogram decal for a personal touch.
A well-placed lantern or solar light transforms your mailbox from a simple utility to a charming focal point. It enhances safety and adds a cozy glow that invites visitors in. With minimal effort, you can create an outdoor space that’s both functional and irresistibly inviting.
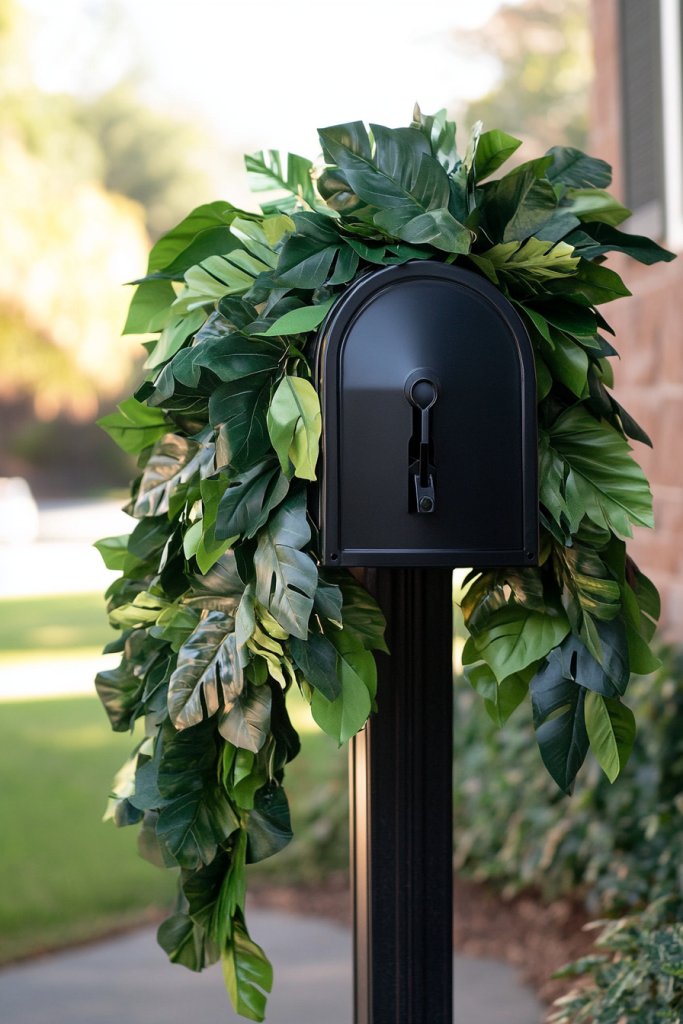
5. Decorate the Surrounding Area with Seasonal Flowers or Wreaths
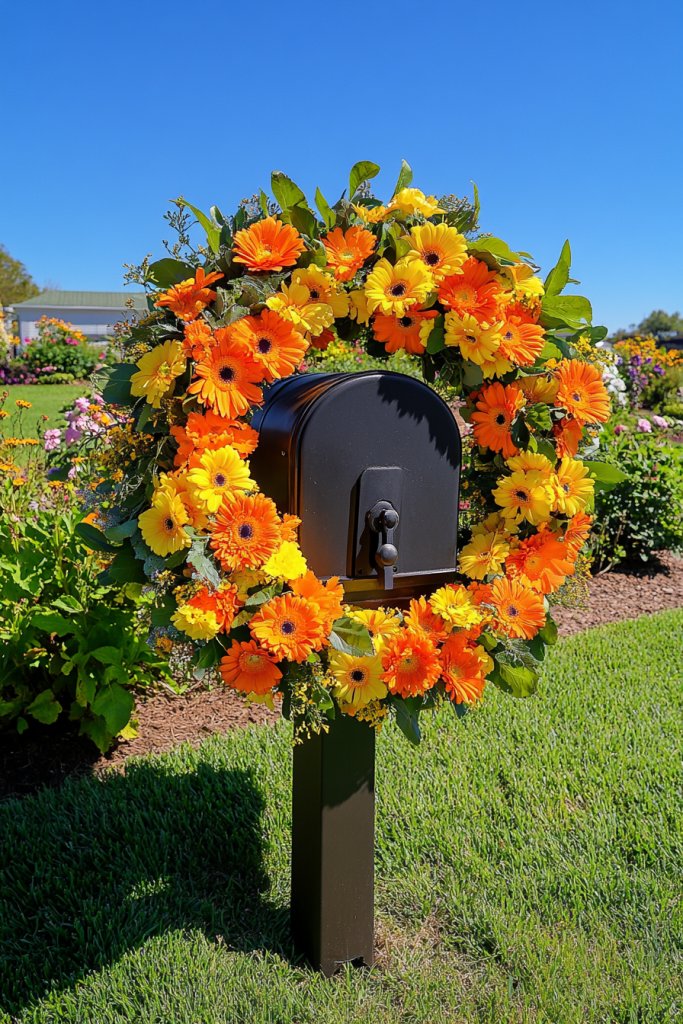
Feeling like your entryway lacks personality or warmth? Adding seasonal flowers or wreaths around your mailbox instantly creates a welcoming atmosphere. It’s a simple way to refresh your curb appeal and celebrate each time of year. Plus, it’s an easy DIY project that anyone can do.
Recommended Products to replicate this idea
| # | Preview | Product | |
|---|---|---|---|
| 1 |

|
HomeKaren Wreaths for Front Door 22 Inch, All Season Greenery Wreath Olive Eucalyptus Leaves and... | Buy on Amazon |
| # | Preview | Product | |
|---|---|---|---|
| 1 |

|
Ouddy Decor 24 Bundles Artificial Flowers for Outdoors Fake Silk Flowers UV Resistant Faux Plastic... | Buy on Amazon |
Picture a lush arrangement of autumnal mums, pumpkins, and faux corn stalks framing your mailbox in fall. Or a vibrant wreath of fresh spring blooms and greenery hanging on a decorative post. The textures, colors, and natural elements add life and charm, transforming a mundane mailbox into a focal point of your landscape.
Use potted flowers, hanging baskets, or decorative planters for a flexible approach. Seasonal wreaths, made of faux or real materials, can be swapped out monthly. For a minimalist aesthetic, opt for a single statement bloom or a simple greenery garland. For a more elaborate look, combine flowers, ribbons, and decorative picks for a layered effect.
Arrange potted plants or flowers in containers that complement your home’s exterior. Secure wreaths with weatherproof hooks or decorative brackets. When planting live flowers, ensure they’re suitable for your climate and soil conditions. Water regularly and replace seasonal arrangements as needed. Use decorative gravel or mulch around pots to keep everything tidy.
Personalize with custom-made wreaths featuring initials, family names, or holiday symbols. Incorporate decorative stones or figurines that match your theme. For a whimsical touch, add fairy lights or small lanterns near the floral arrangements. Change decorations seasonally to keep your entry fresh and inviting.
Decorating around your mailbox with flowers and wreaths instantly boosts curb appeal and adds a personal touch. It’s a charming way to celebrate the seasons and make your home feel more welcoming. Easy to swap out and customize, this idea keeps your entryway lively all year long.
6. Incorporate a Wooden Crate or Small Shelf for Mail and Decor
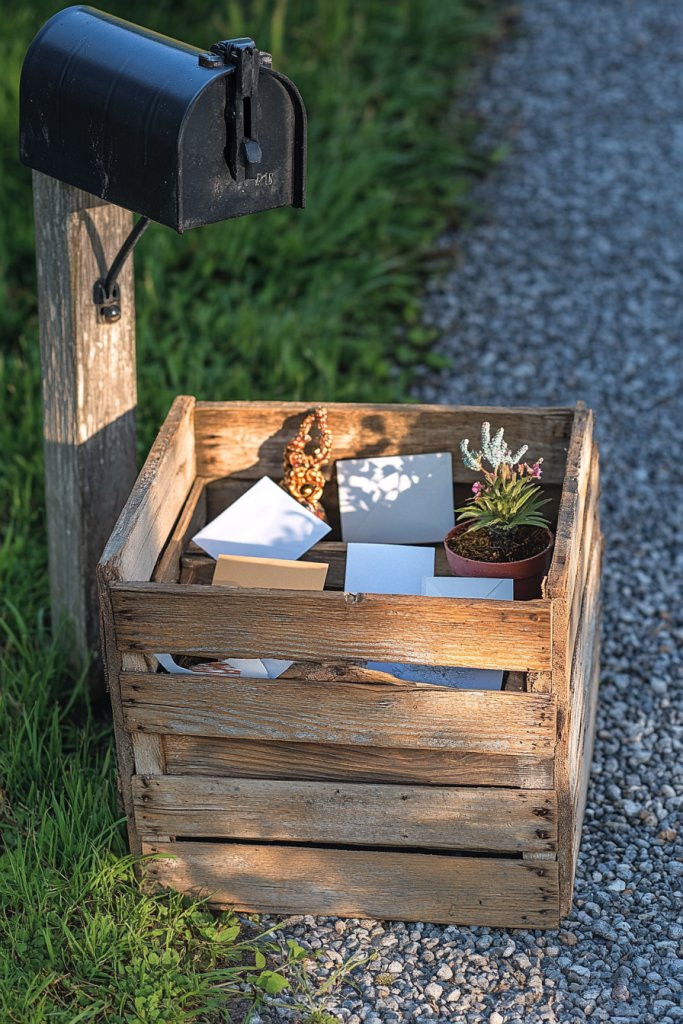
Tired of cluttered mail piling up or losing small items? Adding a wooden crate or mini shelf near your mailbox creates a designated spot for mail, keys, or decor. It’s a practical solution that also adds rustic charm to your entryway. Who says storage can’t be stylish?
Recommended Products to replicate this idea
| # | Preview | Product | |
|---|---|---|---|
| 1 |

|
Edergoo Wooden Crates 2 Pack, Rustic Handmade Wood Crate with Handles, Durable Large Wooden Crates... | Buy on Amazon |
| # | Preview | Product | |
|---|---|---|---|
| 1 |

|
YOHOM No Drilling File Holder Wall Mails Magazines Organizer Adhesive Door Mount, Single Pocket,... | Buy on Amazon |
Imagine a weathered wooden crate mounted on your post, filled with neatly stacked mail and a few seasonal accents like pinecones or faux berries. Or a small wall-mounted shelf with hooks underneath for umbrellas or outdoor accessories. These elements add texture and dimension, making your entryway look organized yet inviting. The natural wood tones add warmth and character.
Choose from open crates, closed boxes, or multi-tiered shelves depending on your needs. For a beachy vibe, opt for distressed whitewashed wood; for a farmhouse look, use reclaimed barn wood. Incorporate hooks or small baskets beneath for additional storage. Seasonal decorations like mini pumpkins or holly can be added for festive flair.
Secure your crate or shelf to the post or ground using appropriate hardware—screws, brackets, or hooks. Select weatherproof wood or treat your wood with sealant to withstand the elements. Organize mail with small dividers or baskets inside the crate. Keep the area tidy by regularly clearing out old mail and swapping seasonal decor. For added charm, paint or stain the wood to match your style.
Personalize with painted labels, family initials, or decorative hardware. Use small planters or lanterns on the shelf for extra visual interest, provided they’re weatherproof. Incorporate themed decorations that reflect holidays or your personal hobbies. Regularly update seasonal accents to keep the look fresh.
A wooden crate or small shelf elevates your entryway’s style and keeps clutter at bay. It’s a functional piece that adds rustic charm and shows off your organizational skills. With just a few tools and some creative touches, you can craft a welcoming, tidy entrance that feels uniquely yours.
7. Use Rope or Twine Wraps for a Coastal or Rustic Look
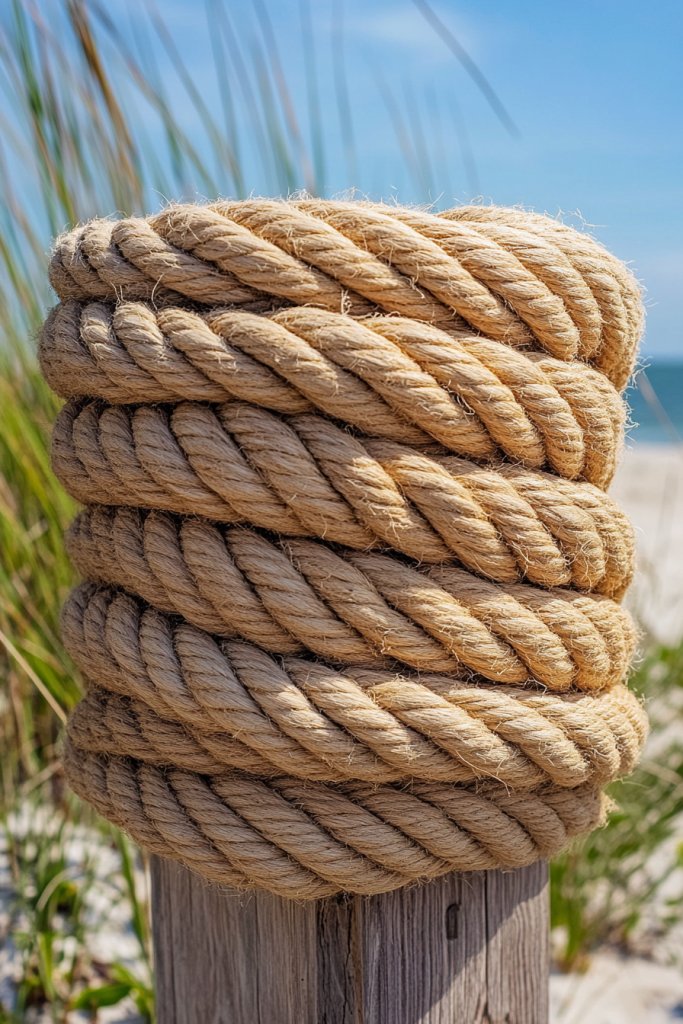
Looking to add a bit of seaside charm or farmhouse warmth to your mailbox? Wrapping the post with rope or twine instantly creates a cozy, rustic vibe. It’s a simple DIY touch that adds texture and visual interest without much effort. Who knew twine could be so transformative?
Recommended Products to replicate this idea
| # | Preview | Product | |
|---|---|---|---|
| 1 |

|
Radix Rope Natural Jute Twine, 8MM x 50FT Jute Rope Roll, Heavy Duty Thick Twine for Cat Scratching... | Buy on Amazon |
| # | Preview | Product | |
|---|---|---|---|
| 1 |
|
Natural Hemp Twine, Hemp Cord Spool (3mmX100ft (30m)) | Buy on Amazon |
Imagine a sturdy wooden post wrapped in thick jute rope, with the natural fibers contrasting beautifully against the painted mailbox. For a coastal feel, use nautical rope with blue accents or knots resembling sailor’s knots. The tactile texture invites touch and adds a handcrafted charm to your outdoor decor. It’s a subtle detail with a big impact.
Mix different types of rope—jute, sisal, or nautical—depending on your style. For a more refined look, choose thinner twine and wrap it neatly; for a relaxed vibe, leave it loose and textured. You can also add decorative knots or bows for extra flair. Colors can be natural or dyed to match your color scheme.
Wrap the post tightly with natural or colored rope, securing the ends with weatherproof adhesive or small nails. Use a hot glue gun for extra hold on the rope’s ends. For a clean finish, wrap with painter’s tape underneath. Make sure the wrapping is even and smooth, avoiding gaps or loose sections. Consider sealing the rope with a clear outdoor spray for longevity.
Incorporate decorative elements like small shells, charms, or nautical flags into the rope for a themed look. Use contrasting colors or painted accents to highlight knots or wraps. You can also add a small sign or plaque attached to the post for a personal touch. Seasonal bows or ribbons can be tied around the rope for special occasions.
Using rope or twine is an easy, budget-friendly way to add charm and texture to your mailbox area. It’s a versatile technique that suits coastal, rustic, or boho styles. With minimal tools and some creative flair, you can craft a unique, inviting entry that feels both natural and stylish.
8. Hang a Small Wind Chime or Decorative Tag for a Playful Touch
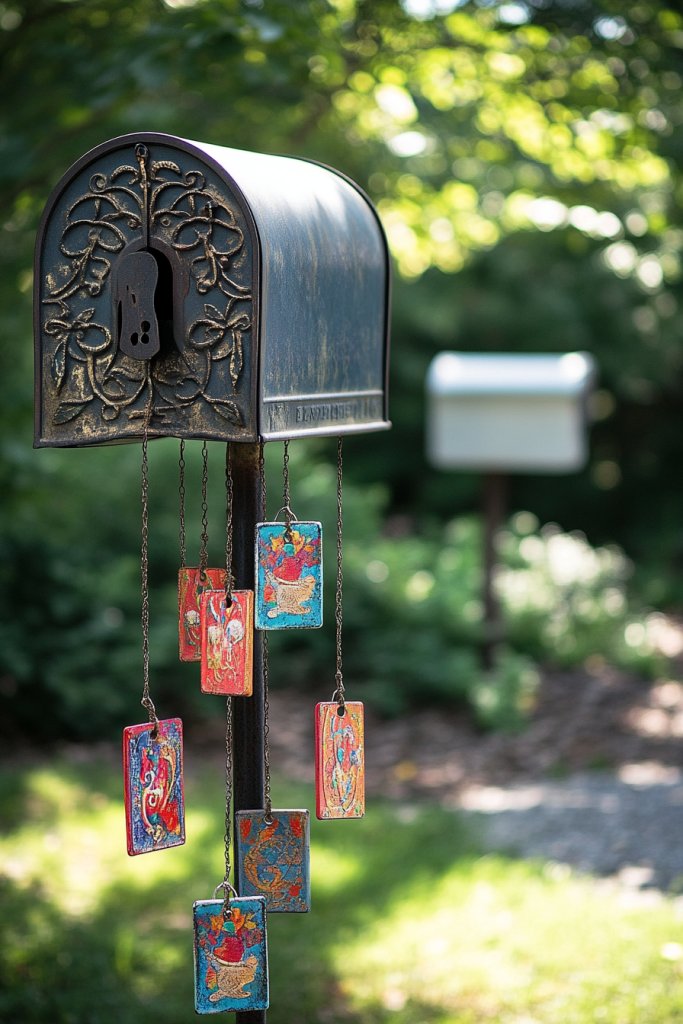
Want to add a bit of whimsy and gentle sound to your entryway? Hanging a small wind chime or decorative tag from your mailbox or post can make your curbside more lively and inviting. It’s a simple way to add personality and a relaxing auditory element. Who doesn’t love a little music with their mail?
Recommended Products to replicate this idea
| # | Preview | Product | |
|---|---|---|---|
| 1 |

|
Howarmer Small Wind Chimes for Outside, Wind Chimes Outdoor with 6 Tuned Tubes, Memorial WindChimes... | Buy on Amazon |
| # | Preview | Product | |
|---|---|---|---|
| 1 |

|
CALFOVERA 60Pcs 3 Styles Metal Handmade Tags Alloy Antique Label Pendant Bronze Round Oval Rhombus... | Buy on Amazon |
Picture a delicate metal wind chime with tiny bells swaying softly in the breeze, casting a subtle tinkling sound. Or a charming metal tag engraved with a welcoming message or family initials, hanging on a decorative hook. These small details create visual interest and evoke a cozy, homey vibe. The movement and sound make your outdoor space feel alive.
Choose from rustic, modern, or vintage-inspired chimes and tags. For a whimsical look, opt for colorful beads or playful shapes. For a more elegant aesthetic, select sleek metallic finishes or minimalist designs. Seasonal or holiday-themed tags can be swapped out for variety throughout the year.
Securely hang the chime or tag using weatherproof hooks, nails, or brackets. Ensure it’s at a height where it can catch the breeze but won’t swing into the mailbox or post. Test the movement to prevent tangling or damage. For added durability, choose metal or weather-resistant materials designed for outdoor use.
Engrave or paint the tags with names, quotes, or symbols meaningful to you. Add decorative tassels, beads, or charms to the wind chimes for extra flair. Match the metal finishes to your mailbox hardware for a cohesive look. Seasonal decorations or small flags can be incorporated for holidays.
A simple wind chime or decorative tag can make your mailbox area uniquely yours. It adds a playful, musical element that makes the outdoors feel welcoming and lively. With a few hooks and some creative choices, you can craft a charming detail that sparks joy every time the wind blows.
9. Create a DIY Painted or Stenciled Mailbox with Artistic Designs
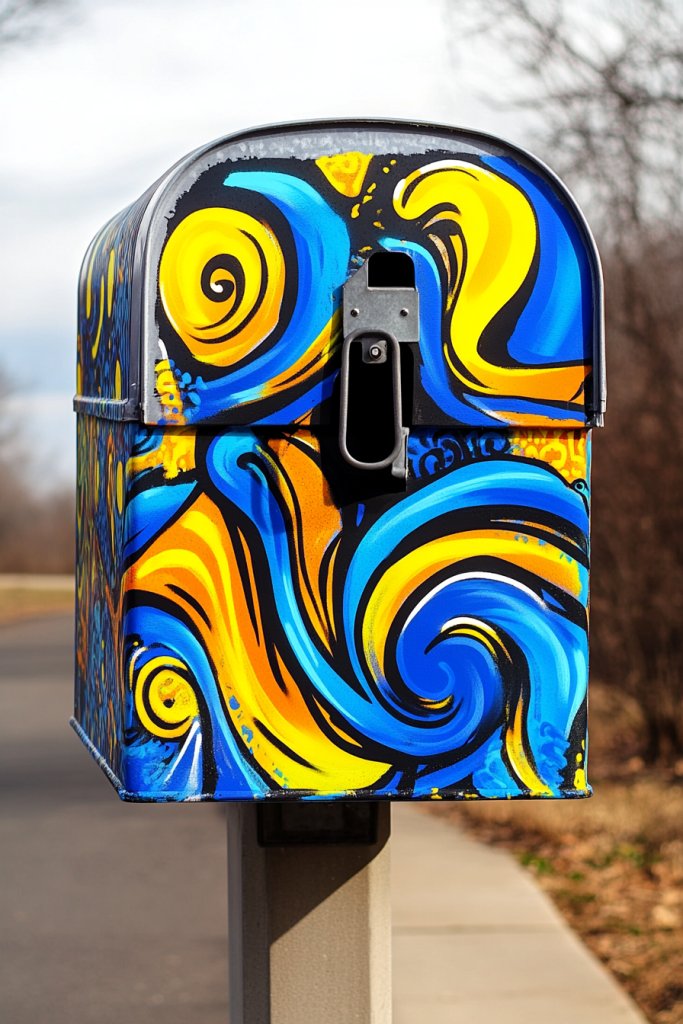
Bored with the standard mailbox look? Want to showcase your artistic side? Painting or stenciling your mailbox allows you to add personal flair and turn a mundane object into a mini masterpiece. It’s an affordable way to express your creativity and make your home stand out.
Recommended Products to replicate this idea
| # | Preview | Product | |
|---|---|---|---|
| 1 |
|
3,4,5 Inch Number Stencils, 30Pcs Plastic Reusable Washable Curb Stencil Kit for Address Painting,... | Buy on Amazon |
| # | Preview | Product | |
|---|---|---|---|
| 1 |

|
DANG Prime Spray Paint Set of 12 Popular Colors, 400ml Cans, Matte Graffiti Art Supplies, Weather... | Buy on Amazon |
Imagine a mailbox adorned with intricate floral patterns, whimsical quotes, or bold geometric shapes. Bright, contrasting colors pop against the neutral background, drawing attention and adding personality. The texture of brushstrokes or the crisp lines of stencils create a unique visual effect that’s all your own. It’s a canvas waiting for your artistic touch.
Choose themes that match your personality or home decor—rustic, modern, vintage, or playful. Use stencils for clean, repeatable patterns or freehand painting for a more organic look. Seasonal motifs, like snowflakes or suns, can be added for variety. Incorporate metallic or glow-in-the-dark paints for special effects.
Clean your mailbox thoroughly to remove dirt and grease. Use painter’s tape to mask off areas you want to keep unpainted. Select weatherproof outdoor paints suitable for metal or plastic surfaces. Use stencils or brushes to apply your design, working in thin layers. Seal with a clear outdoor varnish or topcoat for longevity. Allow drying time between coats.
Add your initials, favorite quotes, or small symbols to further personalize your design. Combine different colors or metallic accents to enhance the visual impact. For a professional look, consider using spray paint with stencils. Change designs seasonally or for special occasions to keep your mailbox fresh.
A painted or stenciled mailbox is a bold statement of creativity that adds charm and uniqueness. It’s a fun project that boosts your confidence in DIY skills. Your mailbox becomes a small piece of art that tells your story and adds vibrancy to your home’s exterior.
10. Add a Brightly Colored or Patterned Mailbox Cover for Easy Changeups
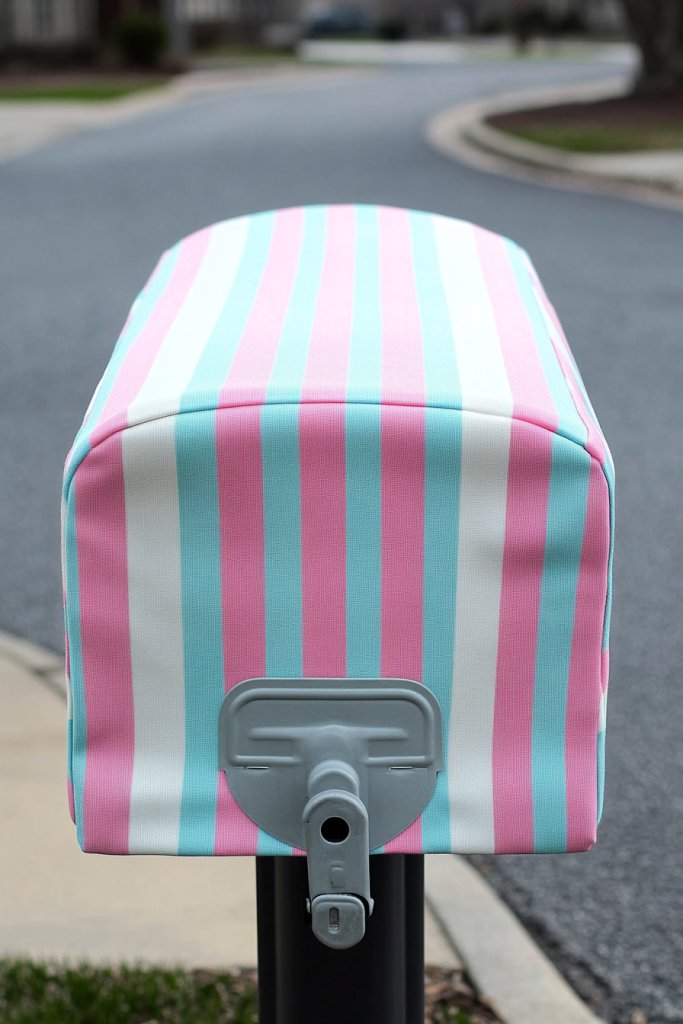
Looking for a quick way to refresh your mailbox without permanent changes? A colorful or patterned cover can instantly transform its look. It’s perfect for seasonal updates, holidays, or just changing your style whenever you feel like it. No mess, no fuss, just a simple swap.
Recommended Products to replicate this idea
| # | Preview | Product | |
|---|---|---|---|
| 1 |

|
Neeklinny American Eagle 21"x18" Welcome Magnetic Mailbox Covers Suitable for 19 "x6.5 Standard... | Buy on Amazon |
| # | Preview | Product | |
|---|---|---|---|
| 1 |

|
Kingdder 12 Pcs Magnetic Seasonal Mailbox Covers Standard Size 18 x 21 Inch Spring St. Patrick's Day... | Buy on Amazon |
Imagine slipping on a vibrant floral cover for spring, then switching to a festive plaid for winter. The covers come in various designs, from fun patterns to elegant solids, and are made of weather-resistant materials. They add a layer of visual interest, making your mailbox a lively focal point. The textures and colors make it feel fresh and inviting.
Choose covers that match your home’s color scheme or create contrast for a bold statement. For a playful look, pick fun patterns like polka dots, stripes, or seasonal motifs. For a more elegant vibe, opt for solid colors or subtle textures. Change covers frequently to keep your curb appeal dynamic.
Measure your mailbox to select the right size cover. Slip it over the mailbox, ensuring it fits snugly without slipping or bunching. Some covers come with elastic edges or Velcro for a secure fit. For added durability, choose waterproof or UV-resistant materials. Store extra covers in a dry place for easy seasonal swaps.
Add decorative patches, decals, or personalized labels to the cover for extra flair. Coordinate with seasonal decorations or house colors for a cohesive look. You can also DIY your own covers using fabric or vinyl for a custom touch. Use contrasting trims or embellishments to enhance visual interest.
Mailbox covers are a fun, inexpensive way to keep your curb appeal fresh and adaptable. They let you experiment with styles and themes without a long-term commitment. With minimal effort, you can make your home more inviting and expressive, season after season.
11. Place a Decorative Fence or Border Around the Mailbox Base
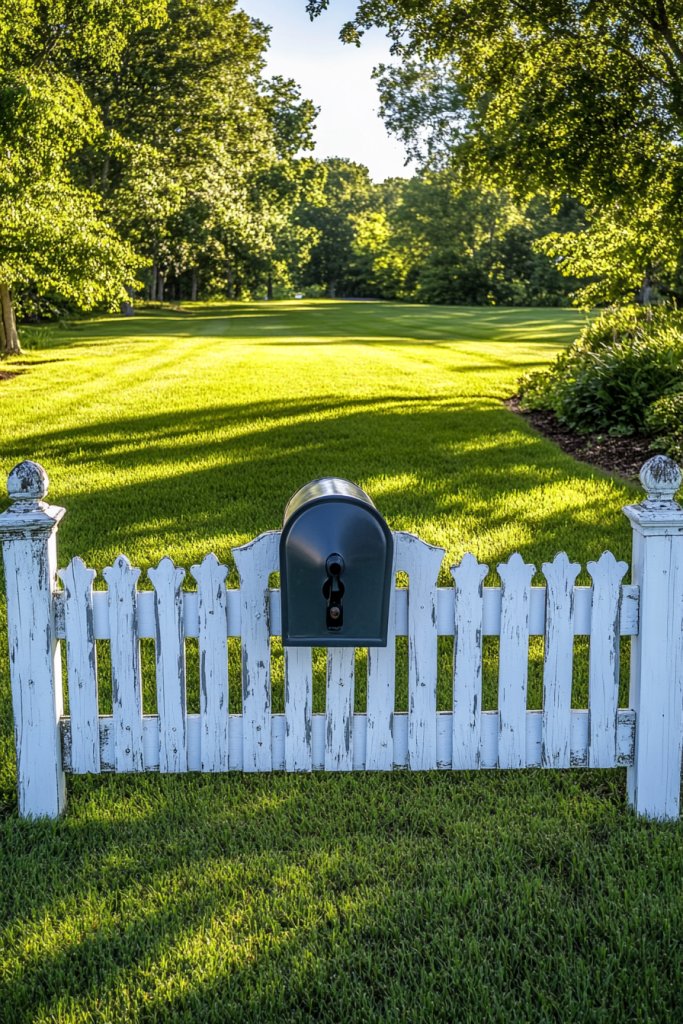
Does your mailbox blend into the landscape instead of standing out? Adding a decorative fence or border can define the space and give it a polished, intentional look. It’s an easy way to add charm and structure to your entryway. Plus, it helps keep the area neat and tidy.
Recommended Products to replicate this idea
| # | Preview | Product | |
|---|---|---|---|
| 1 |

|
Decorative Garden Fence 17in x10ft, 10 Pack Rustproof Metal No Dig Fence Animal Barrier for Dog,... | Buy on Amazon |
| # | Preview | Product | |
|---|---|---|---|
| 1 |

|
50FT Black Corrugated Metal Landscape Edging – Flexible & Rustproof Garden Edging Border,... | Buy on Amazon |
Imagine a white picket fence enclosing a small garden bed around your mailbox, filled with colorful blooms or lush greenery. Or a sleek metal border with decorative finials framing the base, adding sophistication. These elements create a visual boundary that draws attention and adds curb appeal. The contrast between the fence and your landscape creates a cohesive look.
Choose from classic picket fences, wrought iron designs, or modern metal edging depending on your style. For a cottage look, opt for painted wood or lattice panels. For a contemporary vibe, go for sleek black metal or minimalist concrete borders. Incorporate seasonal decorations within the border for extra charm.
Measure the area around your mailbox to select a fence or border that fits proportionally. Secure the fence posts into the ground with concrete or stakes, ensuring stability. For borders, use landscape staples or adhesive to attach to the ground or sidewalk. Add decorative elements like small stones or mulch inside the border for finished look. Keep the border tidy and repair any damage periodically.
Paint or stain wooden fences in colors that match your house trim or shutters. Add decorative motifs or family initials on the fence panels. Incorporate solar-powered lanterns or small statues within the border for a personalized touch. Change seasonal accents inside the border for variety.
A decorative fence or border frames your mailbox beautifully and elevates your entire yard’s aesthetic. It creates a defined, charming space that feels intentional and cared for. With simple materials and some DIY effort, you can craft a polished, inviting entry that complements your home perfectly.
12. Mount a Small Flower Basket or Hanging Planter on the Post
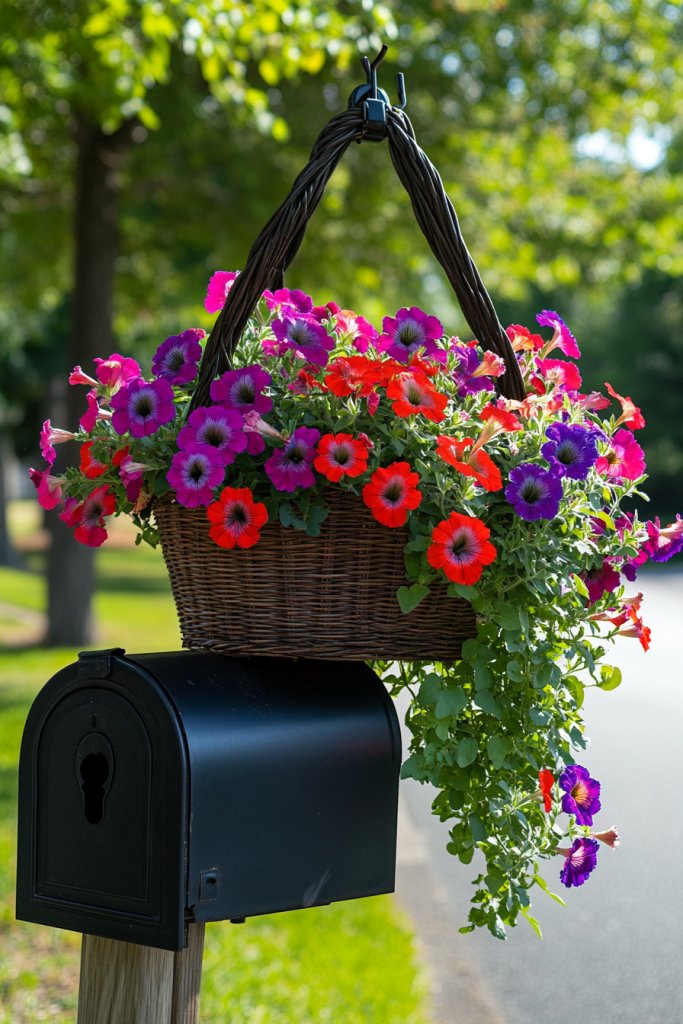
Looking to add a splash of color and freshness to your mailbox area? Hanging a small flower basket or planter can bring charm and vibrancy. It’s a quick way to brighten up your curb appeal and showcase your gardening flair. Who says mailboxes have to be plain?
Recommended Products to replicate this idea
| # | Preview | Product | |
|---|---|---|---|
| 1 |

|
Wall-Mount Mailbox with Flag, Large Capacity Mailboxes for Outside House with Planter & 3 Sets of... | Buy on Amazon |
| # | Preview | Product | |
|---|---|---|---|
| 1 |

|
Legigo 3 Pack 12 Inch Hanging Basket Coco Liners Replacement, 100% Natural Round Coconut Coco Fiber... | Buy on Amazon |
Imagine a weatherproof planter filled with cascading petunias, succulents, or seasonal blooms hanging from a decorative hook on your mailbox post. The lush greenery and colorful flowers create a lively, inviting scene. The contrast of the planter’s material—metal, ceramic, or woven basket—adds texture and interest. It’s a small detail that makes a big difference.
Choose from hanging baskets, wall-mounted planters, or decorative pots depending on your space and style. For a cottage look, go for vintage-style metal or ceramic planters. For a modern aesthetic, sleek black or metallic planters work well. Change out the plants seasonally to keep the look fresh.
Securely attach hooks or brackets to your mailbox post or nearby support. Fill your chosen planter with well-draining soil and your favorite seasonal plants or greenery. Water regularly and ensure drainage to prevent root rot. Position the planter at a height that’s visible but doesn’t obstruct mailbox access. Consider using lightweight containers for easy maintenance.
Add decorative stones, fairy lights, or small ornaments inside the planter for a personalized touch. Mix different plant types for texture and color variation. Incorporate seasonal themes with mini pumpkins, faux berries, or holiday decorations. Keep your plants healthy and vibrant with weekly care.
A hanging flower basket or planter adds instant charm and a welcoming vibe. It reflects your love for gardening and enhances your home’s exterior. With minimal effort, you can create a lively, colorful entryway that makes visitors smile every time they approach.
13. Incorporate Reclaimed Wood Accents for a Rustic or Vintage Style

Want to add a warm, rustic touch to your mailbox? Using reclaimed wood accents offers a charming, eco-friendly way to do it. It’s perfect for creating a vintage or farmhouse vibe that feels both cozy and stylish. Plus, it’s a sustainable choice that gives new life to old materials.
Recommended Products to replicate this idea
| # | Preview | Product | |
|---|---|---|---|
| 1 |
|
Rustic Weathered Reclaimed Wood Planks for DIY Crafts, Projects and Decor (6 Planks - 24" Long) | Buy on Amazon |
| # | Preview | Product | |
|---|---|---|---|
| 1 |

|
Ilyapa No Dig Mailbox Post Planter Box - 16x16x14 Inch Cedar for Free Standing Mailboxes Outside -... | Buy on Amazon |
Picture a weathered wood panel attached to your mailbox or post, with rough edges and visible grain for authenticity. Or think of a small reclaimed wood sign painted with your family name or house number, mounted with vintage hardware. These accents evoke a sense of history and craftsmanship. The natural textures and warm tones add depth and character.
Use reclaimed wood in planks, panels, or decorative trims depending on your style. For a farmhouse look, opt for distressed, whitewashed, or stained wood. For a more industrial or modern rustic style, choose dark, charred, or treated wood. Combine with metal hardware or brackets for contrast. Incorporate these accents into existing structures or new installations.
Source reclaimed wood from local suppliers, salvage yards, or repurposed pallets. Cut and sand the wood to fit your design, ensuring smooth edges. Attach panels or signs securely with weatherproof screws or brackets. Seal the wood with a clear outdoor finish to protect against moisture and weathering. Mount onto your mailbox or post with sturdy hardware.
Paint or stencil designs, initials, or decorative motifs onto the wood accents for a personalized touch. Combine with vintage hardware like handles or hooks. Add decorative metal brackets or corner protectors for extra detail. Change or update your accents seasonally for variety.
Reclaimed wood accents add warmth and authenticity to your outdoor decor, making your home feel inviting and nostalgic. It’s an eco-conscious choice that shows off your craftsmanship and style. With a few simple tools and some creativity, you can craft a rustic masterpiece that stands out beautifully.
14. Add a Welcome Sign or Seasonal Message for a Personal Touch
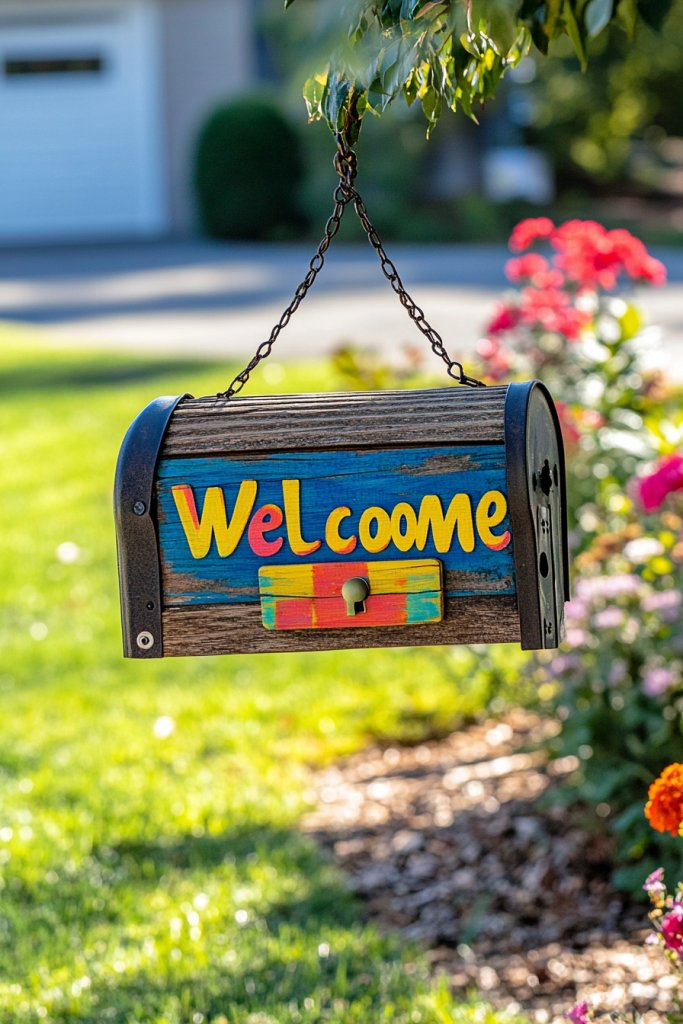
Looking for a way to make your entryway feel more welcoming? A personalized welcome sign or seasonal message instantly transforms your curb appeal. It’s a charming gesture that greets visitors and makes your home feel warm and inviting. Who doesn’t love a friendly greeting?
Recommended Products to replicate this idea
| # | Preview | Product | |
|---|---|---|---|
| 1 |
|
Personalized Wooden Sign Address Sign Welcome Family Cabin Established Sign | Buy on Amazon |
| # | Preview | Product | |
|---|---|---|---|
| 1 |

|
Yalikop Interchangeable Welcome Sign for Front Porch 47 x 7.9 Inch Wooden Porch Sign with 30... | Buy on Amazon |
Imagine a handcrafted wooden sign painted with a cheerful ‘Welcome’ or seasonal greeting like ‘Happy Holidays’ or ‘Spring Has Sprung.’ Or a chalkboard message board with changeable quotes and doodles. These signs add personality and can be styled to match your home’s vibe—rustic, modern, or playful. The message acts as a friendly invitation that sets the tone.
Choose from painted wood, metal, or chalkboard signs depending on your aesthetic. For a rustic look, go for distressed wood with hand-painted lettering. For a sleek, modern style, opt for minimalist fonts and simple designs. Change your messages seasonally or for special occasions to keep things fresh and relevant.
Secure your sign using weatherproof hooks, brackets, or stakes, ensuring it’s visible and stable. If using a chalkboard, mount it at eye level for easy updating. For painted signs, seal with weatherproof varnish or paint to withstand the elements. Position it where it’s clearly visible to approaching guests or passersby.
Add decorative elements like painted borders, motifs, or small embellishments to match your style. Incorporate your family’s initials or favorite symbols for a personal touch. Seasonal decorations like miniature pumpkins or snowflakes can be attached for holidays. Keep the message light-hearted or heartfelt.
A personalized welcome sign makes your home immediately approachable and friendly. It’s a simple DIY project that adds a lot of warmth and personality. With a little creativity, you can craft a message that truly represents your family’s spirit and style.
15. Use Metal or Wire Mesh for a Modern, Industrial Feel
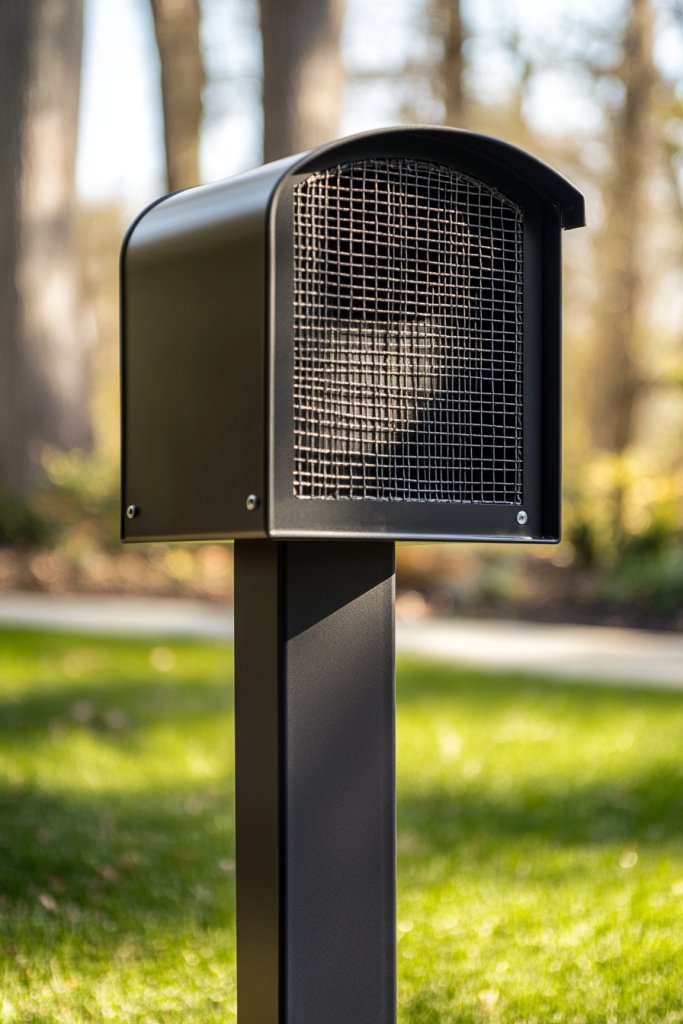
Craving an edgy, modern look for your mailbox area? Incorporating metal or wire mesh creates a sleek, industrial vibe that’s both stylish and functional. It adds a contemporary touch that pairs well with minimalist or urban decor. Who knew metal could be so versatile?
Recommended Products to replicate this idea
| # | Preview | Product | |
|---|---|---|---|
| 1 |

|
Carligo Decorative Metal Sheet, 304 Stainless Steel Metal Grate, Lattice Panel 11.8" x 24" (30cm X... | Buy on Amazon |
| # | Preview | Product | |
|---|---|---|---|
| 1 |

|
Galvanized Metal Sheet 8" x 12" x 1/32" Inch Galvanized Steel Sheet Plates for Magnetic Mount Board... | Buy on Amazon |
Picture a sturdy metal frame surrounding your mailbox, with wire mesh panels giving a grid-like pattern. The metallic finish reflects light and adds texture, creating visual interest. You might add geometric accents or decorative rivets for extra detail. The open mesh allows for visibility and airflow, blending form with function.
Opt for black matte, brushed nickel, or weathered steel finishes to suit your style. Use wire mesh in different patterns—hexagonal, square, or diagonal—to match your aesthetic. Combine with other metal elements like brackets or hardware for a cohesive look. The design can be minimalist or ornate depending on your preference.
Cut the mesh panels to size using heavy-duty scissors or a metal cutter. Attach to your mailbox frame or post with rust-proof screws, brackets, or zip ties. Ensure all connections are secure and smooth to avoid injuries or damage. For added stability, reinforce joints with metal clamps or welding if you have the skills.
Add decorative elements like custom metal cutouts, initials, or symbols. Incorporate LED strip lighting along the edges for a nighttime glow. Painting or powder-coating the mesh in bold colors can create a striking visual contrast. Mix materials like wood or stone for a mixed-media look.
Metal or wire mesh accents give your mailbox a sleek, contemporary edge that’s sure to impress. It’s a durable, low-maintenance choice that withstands weather and time. With simple tools and a bit of metalwork, you can craft an eye-catching, modern outdoor feature.
16. Incorporate a Small Birdhouse or Decorative Element for Whimsy
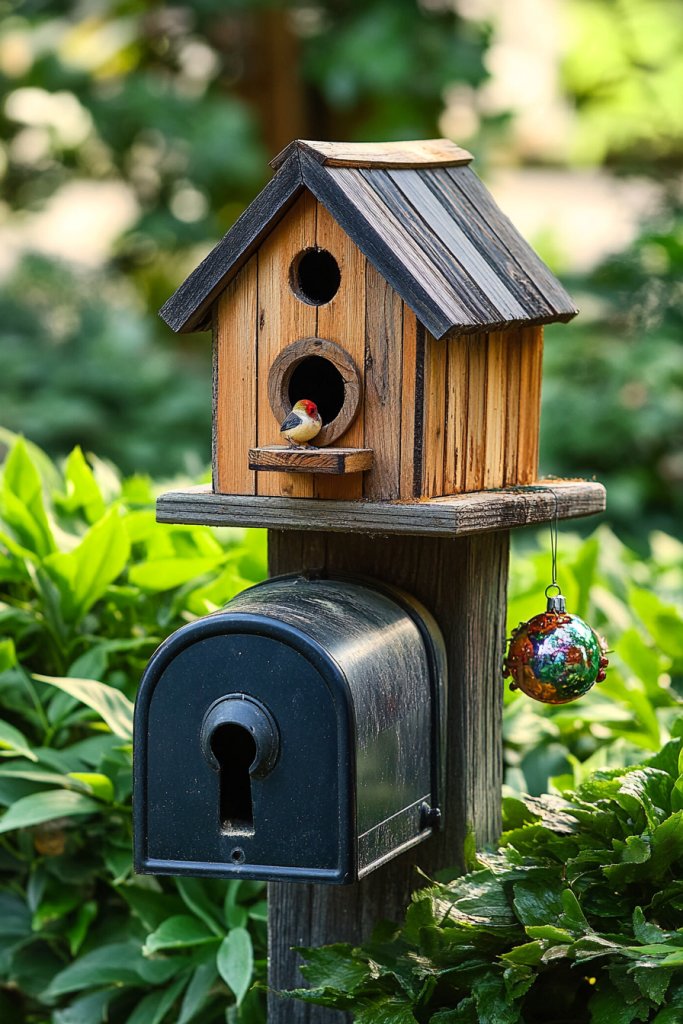
Want to add a dash of charm and fun to your mailbox area? Incorporating a tiny birdhouse or decorative ornament can bring personality and a touch of nature-inspired whimsy. It’s a delightful detail that makes your outdoor space feel lively and inviting. Who says mailboxes have to be serious?
Recommended Products to replicate this idea
| # | Preview | Product | |
|---|---|---|---|
| 1 |

|
GINTBN Bird Houses for Outside, 6inch Outdoor Hanging Bird Nests, Cute Resin Mini Birdhouse for... | Buy on Amazon |
| # | Preview | Product | |
|---|---|---|---|
| 1 |
|
burton+BURTON North Pole Post Tin Mailbox Ornament, 6.5-Inch, Multicolor | Buy on Amazon |
Imagine a miniature wooden birdhouse painted in cheerful colors, perched atop your mailbox post or mounted nearby. Or a playful metal or ceramic ornament shaped like a squirrel, owl, or flower. These small elements add visual interest and a sense of storytelling, inviting curiosity and smiles from visitors.
Choose from rustic, vintage, or modern styles based on your overall decor. For a cottage style, go for distressed wood or charming painted designs. For a sleek look, opt for metallic or monochrome ornaments. Mix and match small decorative elements for a personalized, eclectic vibe.
Secure the birdhouse or element using weatherproof brackets, nails, or adhesive. Position it at a height that’s visible but protected from the elements. Ensure it’s stable to withstand wind and weather. Regularly clean and maintain the decorative element to keep it charming and in good condition.
Paint or decorate the element with your favorite colors, motifs, or themes. Add small accents like faux flowers, miniature signs, or seasonal charms. Personalize with your family initials or a welcoming message painted on the base or nearby.
A whimsical birdhouse or decorative element adds instant charm and personality to your outdoor space. It’s an easy project that can be tailored to your style and interests. With a little creativity, you create an entryway that’s both charming and memorable.
17. Decorate with Weatherproof Faux Greenery for Ease and Elegance
Want the lush look of greenery without the hassle of watering and maintenance? Weatherproof faux plants provide an elegant, evergreen touch to your mailbox area. They’re perfect for adding texture and color all year round, no matter the weather. Who says low-maintenance can’t be beautiful?
Recommended Products to replicate this idea
| # | Preview | Product | |
|---|---|---|---|
| 1 |

|
Vlorart 24 Inch Faux Round Boxwood Wreath, Weatherproof Front Door Large Wreaths Artificial Spring... | Buy on Amazon |
| # | Preview | Product | |
|---|---|---|---|
| 1 |

|
Winlyn 3-Pack Artificial Potted Plants - Faux Eucalyptus, Rosemary, Boxwood Greenery in Small Black... | Buy on Amazon |
Imagine a faux ivy vine wrapping around your mailbox post, or a cluster of faux succulents in a decorative container nearby. The rich green hues and realistic textures add depth and freshness to your outdoor decor. The faux greenery looks just as vibrant in winter as in summer, creating a lush backdrop that lasts.
Select from cascading vines, potted plants, or wall-mounted garlands depending on your space and style. For a classic look, use trailing ivy or boxwood panels; for a modern vibe, choose sleek, sculptural succulents. Mix different textures and shades for a layered, natural effect. Seasonal berries or faux flowers can be added for variety.
Attach faux greenery securely using weatherproof zip ties, clips, or adhesives suitable for outdoor use. Wrap vines around posts or railings, or position potted faux plants for maximum impact. Ensure they are stable and well-secured to prevent damage during storms. Clean periodically with a soft brush or rinse to remove dust and dirt.
Add decorative stones or mulch around the base of faux plants for a finished look. Incorporate small decorative elements like miniature lanterns or signs among the greenery. Use different shades of green and textures to mimic nature’s diversity. Change out seasonal accents to keep the display fresh.
Weatherproof faux greenery provides a lush, vibrant look without ongoing effort, making your outdoor decor effortlessly beautiful. It’s an elegant way to make your mailbox area feel lively and cared for all year long. With minimal maintenance, you can enjoy a lush, inviting entryway that stays picture-perfect.
18. Paint or Stain the Post and Surrounding Features for a Cohesive Look
Does your mailbox post look tired or mismatched with your home’s exterior? A fresh coat of paint or stain can tie everything together and give your entryway a polished appearance. It’s a simple upgrade that makes your curb appeal pop. Who knew a little color could make such a difference?
Recommended Products to replicate this idea
| # | Preview | Product | |
|---|---|---|---|
| 1 |

|
MOLLOR Wood Stain, 16 Oz Water Based Wood Stain and Sealer in One - No Priming, No Top Coat... | Buy on Amazon |
| # | Preview | Product | |
|---|---|---|---|
| 1 |
|
Rust-Oleum 7798830 Stops Rust Spray Paint, 12 oz, Semi-Gloss Black | Buy on Amazon |
Picture a weathered wooden post transformed with a rich stain that highlights the grain, or a painted post in a bold color that matches your shutters. The surrounding features—like a decorative post cap or base—are also painted to create a unified look. The result is a cohesive, inviting scene that feels intentional and well-designed.
Choose from classic wood stains, vibrant paints, or weatherproof finishes depending on your style. For a rustic farmhouse, go for distressed or whitewashed finishes; for a modern look, opt for sleek black or bold colors. Consider using contrasting shades for posts and trims to add visual interest. Seasonal color changes can keep the look fresh.
Start by cleaning, sanding, and priming the surface for optimal paint or stain adhesion. Select weatherproof, outdoor-grade products suitable for your material—wood, metal, or composite. Apply with brushes or sprayers in thin, even coats, allowing proper drying time. Seal with a protective topcoat if needed. Regular touch-ups preserve the look.
Add decorative stenciled patterns, monograms, or painted motifs to personalize your post. Use contrasting colors to highlight architectural details or accents. Incorporate seasonal color themes for special occasions. Matching your mailbox hardware or nearby structures enhances harmony.
Painting or staining your mailbox post creates a tidy, coordinated appearance that boosts your home’s curb appeal. It’s a simple DIY project that shows pride in your home and attention to detail. With a little effort, you craft a welcoming, stylish entrance that leaves a great first impression.
19. Use Bright, Reflective Tape or Paint for Safety and Style
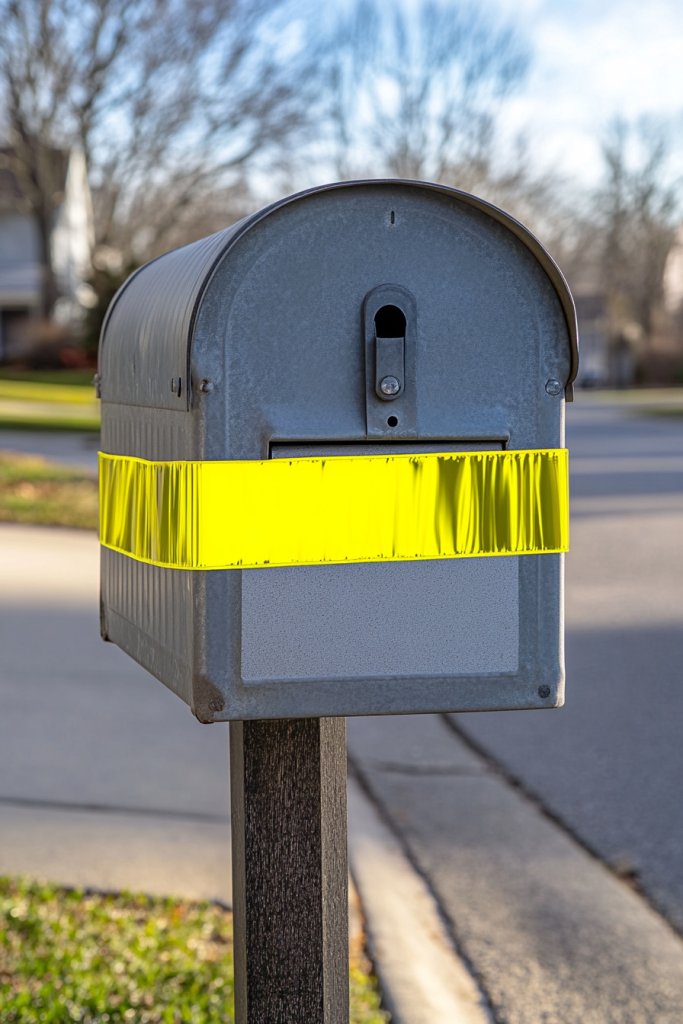
Ever worry about seeing your mailbox at night or during foggy mornings? Adding reflective tape or paint can dramatically improve visibility while giving your entry a modern, stylish edge. It’s a safety upgrade that also adds a sleek, contemporary touch. Who says you can’t be safe and stylish?
Recommended Products to replicate this idea
| # | Preview | Product | |
|---|---|---|---|
| 1 |

|
SWRT Reflective Tape 2 Inch x 30 Feet DOT-C2 Shining Star Fade Resistant Green Reflective Outdoor... | Buy on Amazon |
| # | Preview | Product | |
|---|---|---|---|
| 1 |

|
Rust-Oleum 214944 Specialty Reflective Finish Spray, 10 oz | Buy on Amazon |
Imagine a mailbox outlined with reflective tape that glows softly under headlights, or painted with reflective accents that catch the light in the dark. The shiny strips or paint enhance visibility and create a crisp, clean look. The contrast of reflective elements against matte surfaces makes your mailbox stand out with subtle sophistication.
Apply reflective tape in geometric patterns, stripes, or borders that complement your mailbox’s shape. For a more understated look, use reflective paint for fine detailing or small accents. Combine with bold colors or patterns for a striking effect. Seasonal or holiday-themed reflective designs can add fun and function.
Clean the surface thoroughly before applying tape or paint. For tape, cut to size and carefully adhere, smoothing out air bubbles. For paint, use weatherproof, reflective-grade paint in thin, even coats. Wait for complete drying before handling or exposing to weather. Reapply or update as needed for longevity.
Add custom decals or symbols made from reflective material to personalize your mailbox. Use contrasting colors for extra pop, and consider combining with solar-powered lights for enhanced nighttime visibility. Seasonal or holiday-themed reflective decals can be swapped in for variety.
Reflective tape and paint are simple, effective ways to improve safety while adding a modern style element. It’s an easy upgrade that can be done with minimal tools and effort. Ensuring your mailbox is visible at night keeps your home safer and more stylish.
20. Incorporate Artistic Mosaic or Tile Accents on the Base or Post
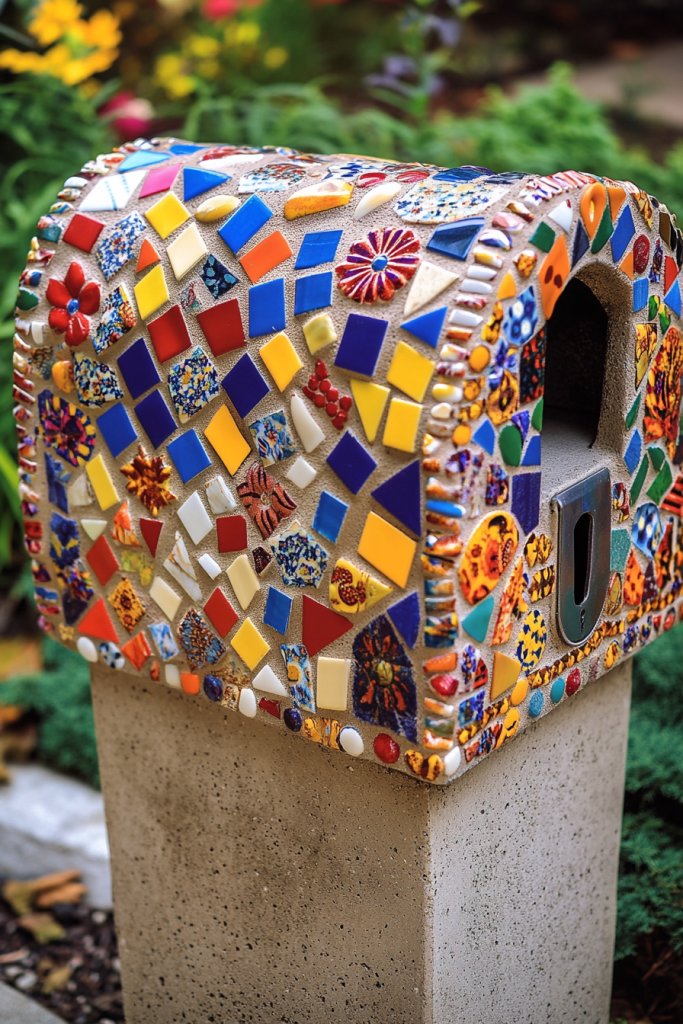
Looking for a truly unique way to elevate your mailbox? Artistic mosaic or tile accents turn a simple post or base into a stunning piece of outdoor art. It’s a bold statement of creativity and craftsmanship, transforming your curb into a gallery. Who wouldn’t want a mailbox that’s a conversation starter?
Recommended Products to replicate this idea
| # | Preview | Product | |
|---|---|---|---|
| 1 |

|
URBN Contemporary Emerald Green Iridescent Glass Mosaic Tile for Indoor and Outdoor - Single Sheet... | Buy on Amazon |
| # | Preview | Product | |
|---|---|---|---|
| 1 |

|
Architectural Mailboxes Whitley Plastic Mailbox Post, Compatibility Code A, B, C, WP000WAM, White | Buy on Amazon |
Imagine a colorful mosaic of weatherproof tiles arranged in intricate patterns or images, adorning the base or sides of your mailbox post. The textured surface and vibrant colors add depth and personality. It’s like a miniature outdoor masterpiece that reflects your artistic flair and love for detail. The mosaic catches sunlight and glows in the evening.
Choose from geometric patterns, floral motifs, or abstract designs depending on your style. Use durable, weatherproof tiles like porcelain or glass, arranged with high-quality adhesive. Incorporate accent tiles with metallic or textured finishes for added visual interest. Match the color palette to your home’s exterior for harmony.
Start by planning your design layout on paper or a digital tool. Prepare the surface by cleaning and leveling it. Apply a waterproof adhesive suitable for outdoor tiles, then carefully place each tile, ensuring even spacing. Fill gaps with grout designed for outdoor use, and seal the entire mosaic with a weatherproof sealant. Allow ample curing time.
Add custom images or initials with special tiles or decals. Incorporate decorative borders or framing elements for a finished look. Change or update the mosaic over time for fresh inspiration. Use complementary paint or stain on the post to highlight the mosaic accent.
A mosaic or tiled accent turns your mailbox into an artistic statement piece that’s both durable and beautiful. It showcases your creativity and adds a vibrant focal point to your landscape. With patience and a bit of craftsmanship, you create a unique outdoor feature that’s sure to impress.
Conclusion
With a diverse range of mailbox decor ideas, you now have plenty of inspiration to enhance your entryway and showcase your personal style. From charming paint finishes to creative embellishments, these ideas are easy to try and customize. Don’t hesitate—start decorating your mailbox today and turn your curb appeal into a true reflection of your home’s personality. Your stylish entryway awaits!
Last update on 2026-03-01 / Affiliate links / Images from Amazon Product Advertising API