A stylish kitchen is more than just a place to cook—it’s the heart of your home where functionality meets personality. Cool kitchen ideas are gaining popularity because they allow homeowners to express their unique style while enhancing practicality, making everyday tasks more enjoyable.
In this article, you’ll find a diverse range of clever and creative ideas to elevate your kitchen’s look and efficiency. From innovative storage solutions to trendy design touches, these ideas are perfect for transforming your space into a stylish and highly functional culinary haven.
1. Open Shelving with Colorful Dishware for a Bright, Modern Look
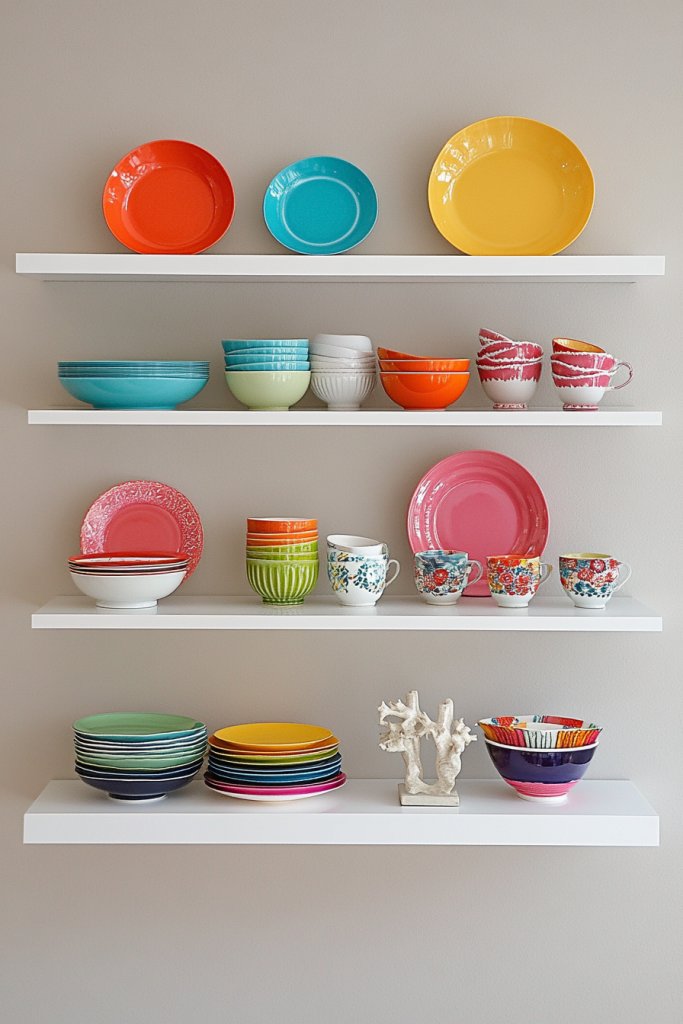
Ever stare at your kitchen and feel like it’s missing personality? Boring cabinets and dull dishware just don’t cut it anymore. People crave a space that feels lively and inviting, where style meets function. Open shelving with bright dishware is the quick fix to turn a bland kitchen into a cheerful hub.
Imagine sleek, matte black shelves holding an array of vibrant plates, bowls, and cups—each piece popping against the backdrop. The mix of colors and textures creates a lively mosaic that catches the eye. Soft lighting highlights the dishware, casting a warm glow that makes the space feel cozy yet modern. It’s like a mini art gallery right in your kitchen.
You can swap out colorful dishware for seasonal themes—pastel for spring, earthy tones for fall. For small kitchens, narrow shelves keep the look airy, while open wall space in larger areas allows for more display. DIY enthusiasts can paint or customize their dishware to match different decor styles, from rustic to ultramodern. The key is balancing practicality with aesthetic flair.
Start by selecting sturdy, wall-mounted open shelves that can handle the weight of your dishware. Use brackets that complement your style—metal for industrial, wood for rustic. Arrange your dishware by color or size for visual harmony. Secure shelves properly into studs to prevent accidents, especially with heavier items. Organize your most-used pieces for quick access and reserve decorative ones for display.
Add decorative elements like patterned placemats or textured cloths underneath the dishes for extra visual interest. Incorporate personal touches such as vintage cups or handmade bowls. Use dishware with unique shapes or patterns to create focal points on the shelves. Mixing different heights and styles keeps the display dynamic and engaging.
Open shelving with colorful dishware transforms your kitchen into a lively, personalized space. It’s a simple update that makes a big impact—perfect for Instagram-worthy shots or just feeling happier while cooking. Ready to add some personality to your kitchen? Go ahead, make it a space you love to show off.
2. Under-Cabinet Lighting to Enhance Ambience and Workspace Visibility
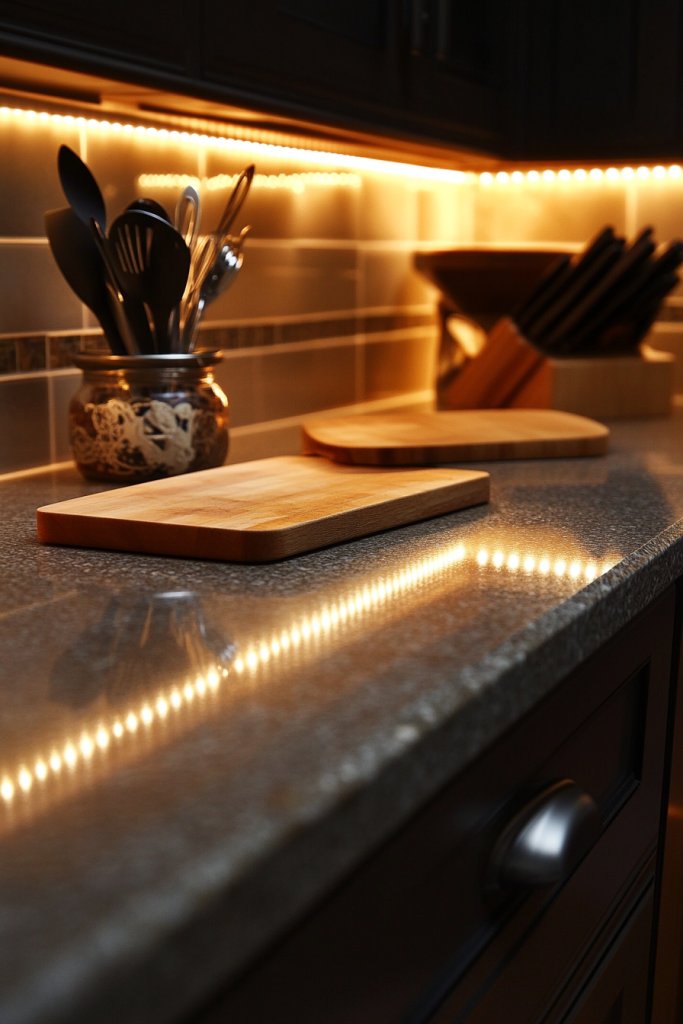
Tired of struggling to see what you’re chopping or mixing? Poor lighting can make even the simplest kitchen tasks frustrating. Plus, your space might lack that cozy, inviting glow that makes cooking feel special. Installing under-cabinet lighting is the quick fix to brighten your workspace and set the mood.
Picture warm LED strips hugging the underside of your cabinets, casting a gentle, diffused light across the countertop. The soft glow eliminates shadows, making prep work safer and more enjoyable. When you turn on the lights, the kitchen instantly feels more welcoming—like a cozy café or a stylish restaurant. It’s a little upgrade that makes a big difference.
Choose between warm white, cool white, or color-changing LEDs depending on your vibe. For rustic kitchens, warm tones enhance wood accents; sleek modern spaces look sharper with cool whites. Install dimmers for adjustable ambiance—bright for cooking, dim for relaxing. Also, consider flexible strips that can be repositioned or extended to cover larger areas.
Start by measuring your cabinet underside and selecting LED strip lights that fit perfectly. Use a good-quality adhesive backing or mounting clips for secure attachment. Connect the strips to a power source—preferably with a switch or dimmer for control. Make sure wiring is neat and hidden for a polished look. Test your setup before final installation to ensure even lighting.
Add motion sensors or remote controls for hands-free operation. Use color-changing LEDs to match your mood or holiday themes. Consider installing small, directional puck lights for focused task lighting. Pair with soft accents like scented candles or a textured fabric runner to enhance ambiance without clutter.
Under-cabinet lighting instantly elevates your kitchen’s style and functionality. It’s a simple update that transforms your cooking zone into a bright, inviting space. Plus, it’s a DIY project most can handle—so why not give your kitchen that glow-up it deserves?
3. Multi-Functional Kitchen Island with Built-In Storage and Seating
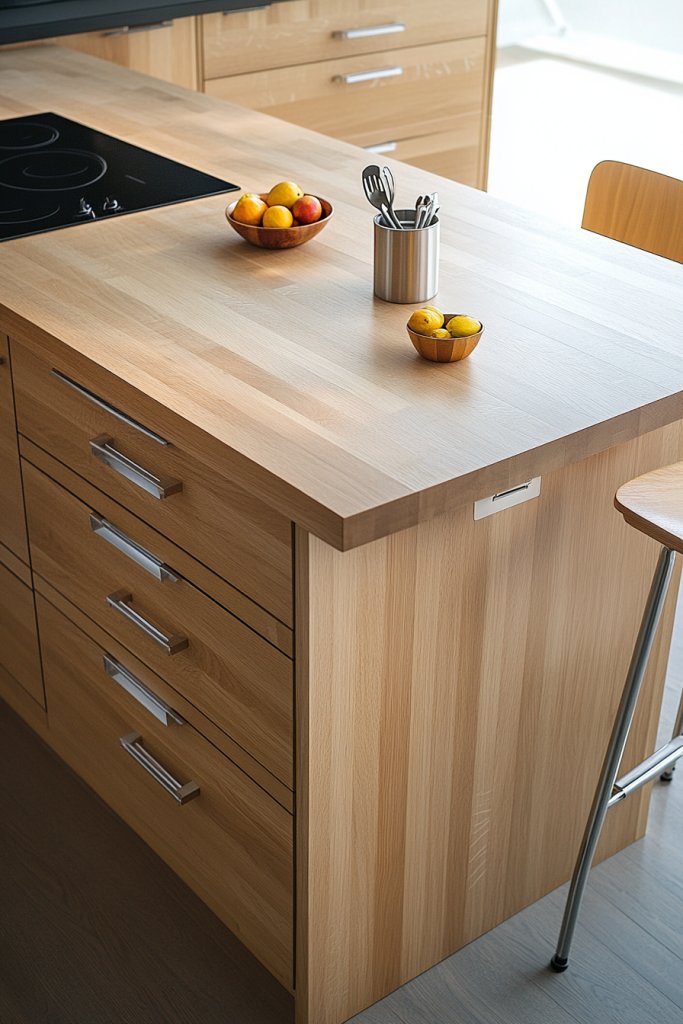
Does your kitchen feel cramped and cluttered? A multi-functional island can be the hero you need, offering prep space, storage, and seating all in one. It’s perfect for small homes or open-plan layouts where maximizing every inch matters. Plus, it creates a natural gathering spot for family and friends.
Envision a sleek, sturdy island with a smooth wooden top that doubles as a dining surface. Built-in shelves and drawers hide away pots, pans, and utensils, keeping clutter out of sight. The seating area features comfy stools tucked neatly underneath, inviting casual chats or quick meals. The entire setup radiates a balanced mix of style and practicality.
Opt for a minimalist design with clean lines in a monochrome palette, or go rustic with distressed wood and open shelving. For smaller spaces, choose a compact island with fold-away features. Add a pop of color with cushions or a decorative runner for personality. Seasonal tweaks can include swapping out the seating or adding a small tray for outdoor-style dining.
Begin by measuring your space and determining your storage needs. Select a durable, easy-to-clean surface—granite, butcher block, or engineered quartz work well. Incorporate drawers, cabinets, or open shelves based on your storage priorities. Secure the island to the floor if needed for stability, especially in high-traffic zones. Finally, match the style of your stools and countertop for a cohesive look.
Add decorative cushions or seat covers that reflect your personality. Incorporate a small herb garden or a bowl of fresh fruit for a lively vibe. Use handles and hardware in trendy finishes like matte black or brushed brass. Consider extending the countertop for extra seating or prep space during parties.
A well-designed multi-functional island can redefine your kitchen experience, making it more efficient and social. It’s a statement piece that combines form and function effortlessly. You’ll love how it transforms your daily routines and hosting capabilities—time to make that upgrade!
4. Magnetic Knife Strips for Safe, Space-Saving Tool Organization
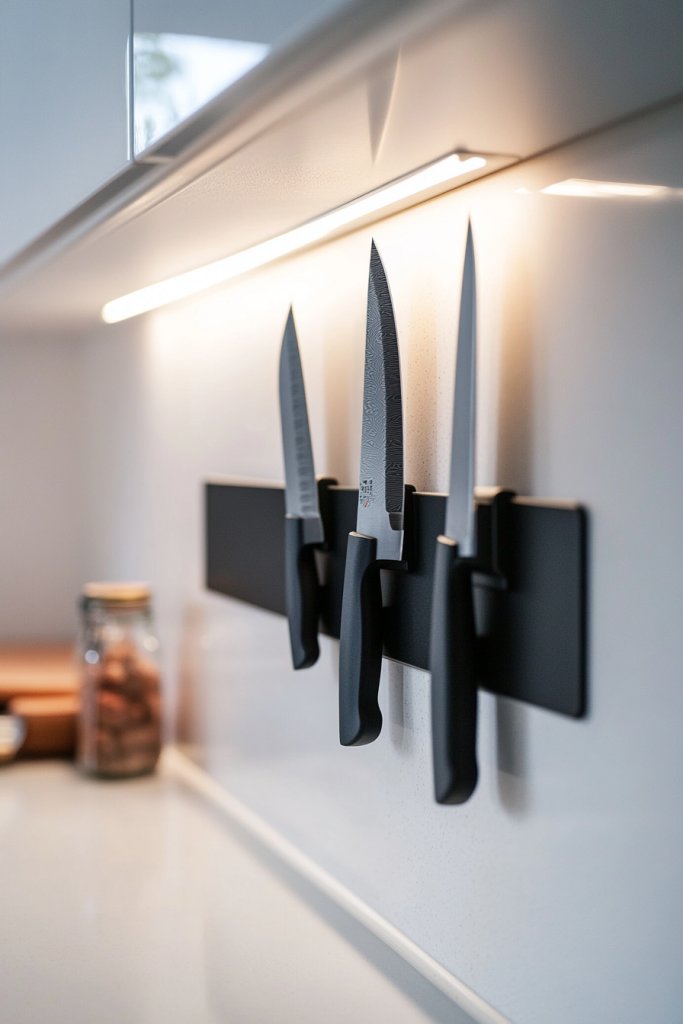
Are your drawers cluttered with knives and sharp tools? Not only is that dangerous, but it also wastes precious storage space. Magnetic knife strips offer a sleek solution to keep your blades within reach and out of harm’s way. Plus, they add a modern, minimalist touch to your kitchen decor.
Imagine a slim metal strip mounted on your backsplash or wall, holding your knives with magnetic force. The blades hang neatly, with their handles easily accessible. The shiny metal contrasts with colorful tiles or painted walls, creating a striking visual focal point. It’s a functional art piece that keeps your workspace tidy and stylish.
Choose from stainless steel, copper, or painted finishes to match your kitchen’s aesthetic. Install the strip at ergonomic height—easy to grab, but out of the way of daily traffic. For a more organized look, group knives by size or type, or add small magnetic containers for utensils and tools. This system works well in both traditional and contemporary kitchens.
Start by measuring your knife collection and selecting a strip length that fits your space. Mount the strip securely into wall studs or using appropriate anchors for drywall. Clean the surface thoroughly before applying adhesive or screws. Arrange your knives with handles down for safety and easy identification. Regularly check for stability and clean to prevent buildup of dust or grease.
Add a decorative element by choosing a colored or textured magnetic strip. Incorporate a small magnetic clip holder for scissors or other sharp tools. Use engraved handle labels for quick identification. Keep your knives sharp and polished to complement the sleek look of the strip.
Magnetic knife strips streamline your workflow and elevate your kitchen’s modern vibe. They make cooking safer and more efficient—plus, they look pretty cool. It’s a simple upgrade that delivers big style points and peace of mind. Ready to tidy up and upgrade your knife game?
5. Statement Backsplash with Patterned or Textured Tiles
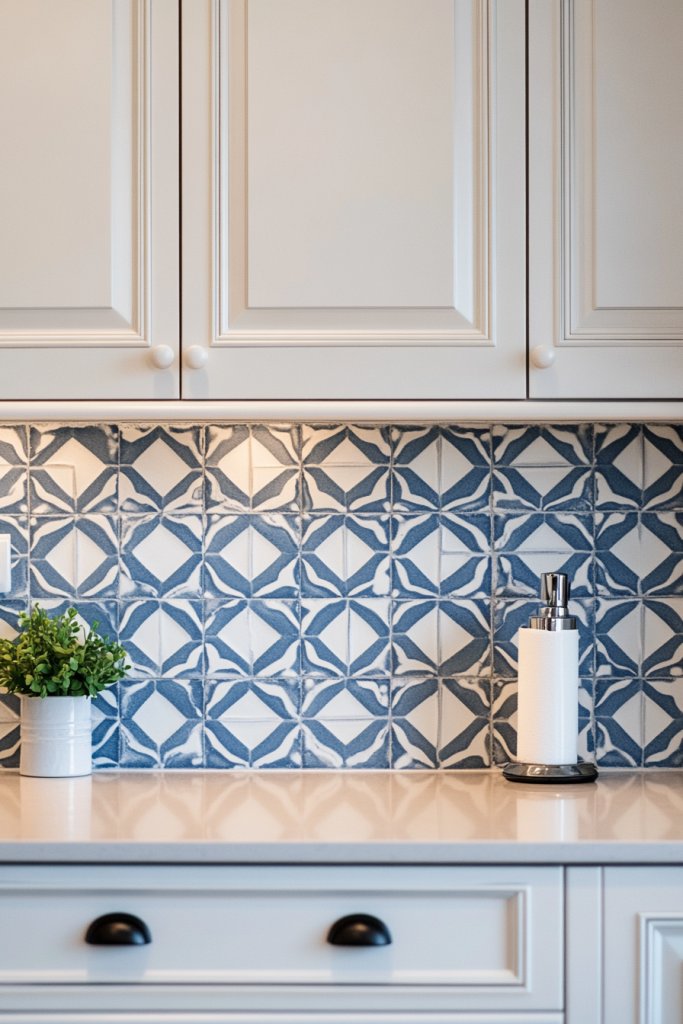
Tired of a plain, uninspired kitchen wall? A bold backsplash can instantly add personality and visual interest. It’s a chance to showcase your style, whether you prefer classic patterns or modern textures. Plus, it protects your walls from splashes and stains, making cleanup easier.
Picture vibrant geometric tiles or textured subway patterns stretching behind your stove and sink. The interplay of colors and textures creates depth, turning a functional wall into a focal point. Light reflects off glossy surfaces or plays with shadows on textured tiles, adding dynamic visual effects. It’s like a piece of art you get to live with daily.
Choose tiles that match your overall decor—matte finishes for a subdued look, glossy for glamour, or matte with textured patterns for a rustic vibe. Mix and match shapes or colors for a custom mosaic effect. For small kitchens, light-colored tiles can make the space feel larger, while dark, patterned tiles add drama in bigger rooms.
Begin by selecting durable, water-resistant tiles suited for kitchens. Prepare the wall surface with proper cleaning and leveling. Use spacers for even grout lines and choose grout colors that complement or contrast your tiles. Apply adhesive evenly and press tiles firmly into place, allowing for a day of curing before grouting. Seal the grout for longevity and easy cleaning.
Incorporate metallic accents or glass tiles for extra sparkle. Use custom-shaped tiles to create unique patterns or borders. Add decorative trims or inlays for a luxe touch. Keep the design cohesive with your countertops and cabinetry for a seamless look.
A statement backsplash transforms your kitchen into a showcase space. It’s a bold move that pays off, making your cooking area feel curated and stylish. Whether subtle or dramatic, this feature reflects your personality and elevates your entire home’s aesthetic.
6. Open-Concept Design with a Breakfast Nook for Cozy Functionality
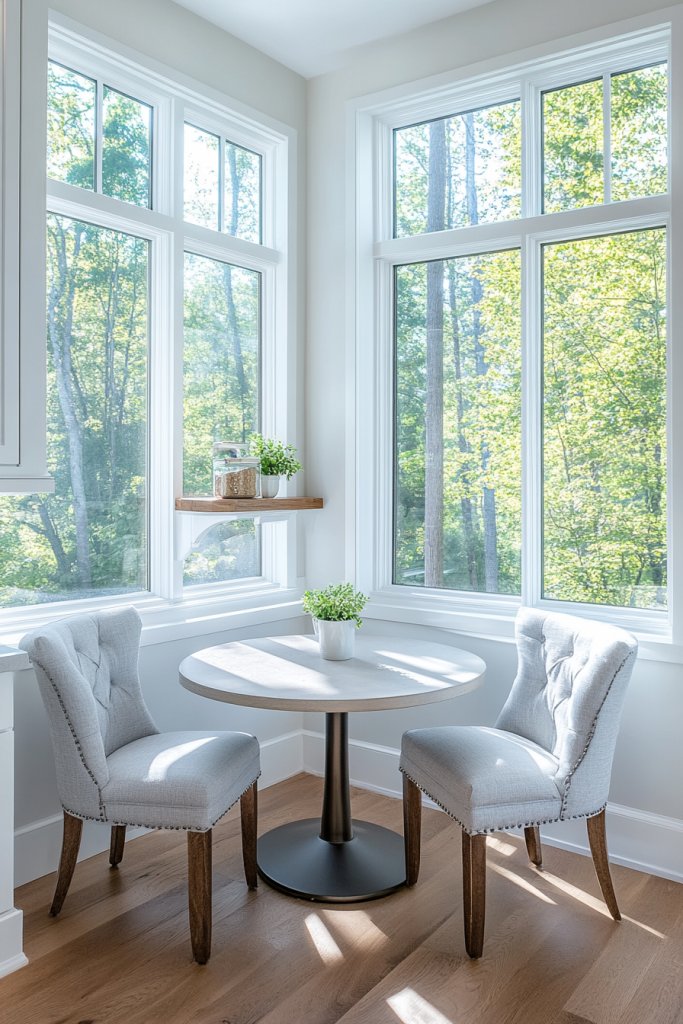
Do walls and closed-off kitchens make your space feel cramped? An open-concept design with a cozy breakfast nook invites socializing and makes daily routines more relaxed. It’s perfect for smaller homes or for creating a seamless flow between cooking and living areas. Plus, it encourages family bonding over casual meals.
Imagine a corner of your kitchen transformed into a snug dining spot with built-in bench seating and a small table. Soft cushions and a textured throw add comfort and personality. Large windows flood the area with natural light, making it feel bright and airy. The open layout makes your entire space feel larger and more inviting.
Choose a round or rectangular table depending on your space; round tables foster conversation, rectangles maximize seating. Incorporate a mix of upholstered benches and chairs for variety. Seasonal accessories like cozy blankets or decorative pillows can update the look. For small spaces, fold-away or extendable tables keep flexibility high.
Identify the designated area for your nook and clear space accordingly. Install built-in seating with storage underneath for added functionality. Select a durable, easy-to-clean table surface—laminate, wood, or composite. Use light-colored paint or wallpaper to brighten the zone, and add a rug to define the space. Ensure ample lighting overhead or on the table for evening meals.
Decorate with personal touches like framed photos or a small centerpiece. Use cushions in your favorite fabrics or colors to add comfort. Incorporate a small sideboard or wall-mounted shelves nearby for extra storage. Seasonal textiles can refresh the look throughout the year.
A cozy breakfast nook makes your kitchen more functional and welcoming. It’s a small change with a big impact on daily routines. Gathering loved ones or enjoying a quiet coffee becomes something you look forward to every day, turning your kitchen into a true heart of the home.
7. Minimalist Cabinet Hardware in Brass or Matte Black for a Chic Finish
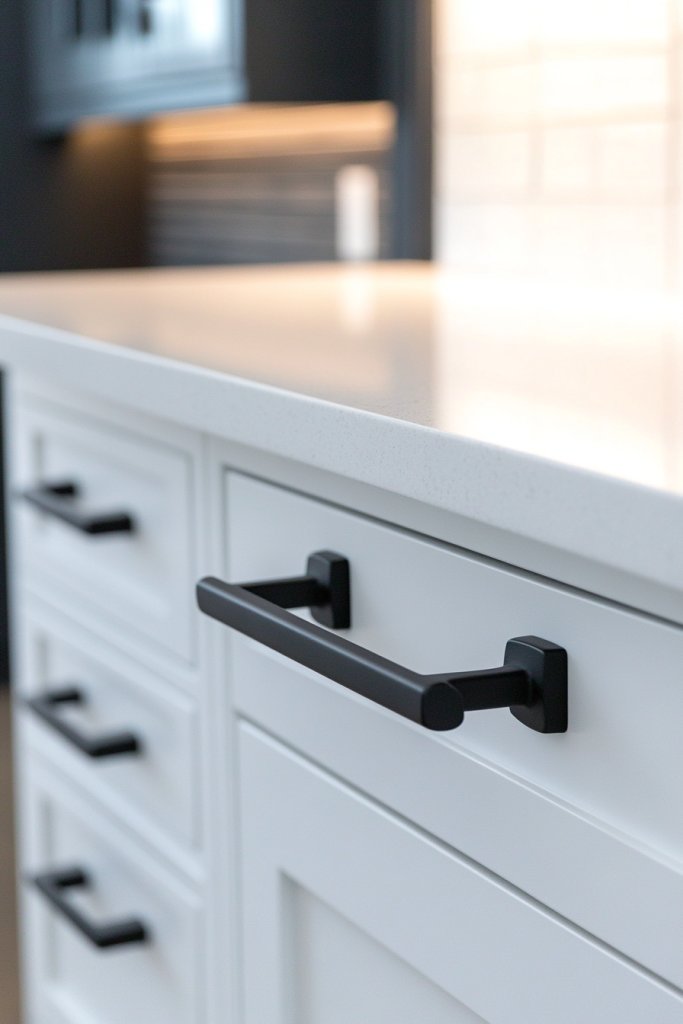
Are your cabinet handles looking tired or mismatched? The right hardware can elevate your entire kitchen aesthetic instantly. Minimalist finishes like brass or matte black offer a sleek, modern touch that complements any style. Plus, changing hardware is one of the easiest, most affordable upgrades.
Picture cabinet doors adorned with slim, streamlined handles in matte black, creating a bold contrast against light-colored cabinets. Alternatively, brass pulls add a warm glow that complements wood accents or neutral palettes. The clean lines and simple shapes give your kitchen a sophisticated, clutter-free appearance. It’s like jewelry for your cabinets.
Mix and match hardware styles—pair sleek bar pulls with round knobs for visual interest. Choose hardware sizes that suit your cabinet doors—longer pulls for large doors, smaller for drawers. For a more eclectic look, combine different finishes but stay within the same color palette. Seasonal hardware swaps can refresh your kitchen’s vibe.
Remove existing handles and clean the surface thoroughly. Measure and mark the placement of new hardware, ensuring consistent spacing for a balanced look. Drill pilot holes if necessary, then attach the new handles securely. Consider using a template or measuring jig for perfect alignment. Tighten screws firmly but avoid overtightening, which can damage cabinets.
Add decorative accents like leather pulls or textured grip handles for variety. Coordinate hardware finishes with other fixtures—faucets, light fixtures—for a cohesive style. Use labels or color-coded tags for different zones, and swap hardware seasonally for a fresh look. Keep spare handles on hand for future updates.
Minimalist hardware transforms your kitchen’s look with a simple swap. It’s a quick project that delivers high style without breaking the bank. Small details like this boost your confidence to tackle bigger upgrades and make your space uniquely yours.
8. Incorporate a Chalkboard or Writable Wall for Notes and Recipes
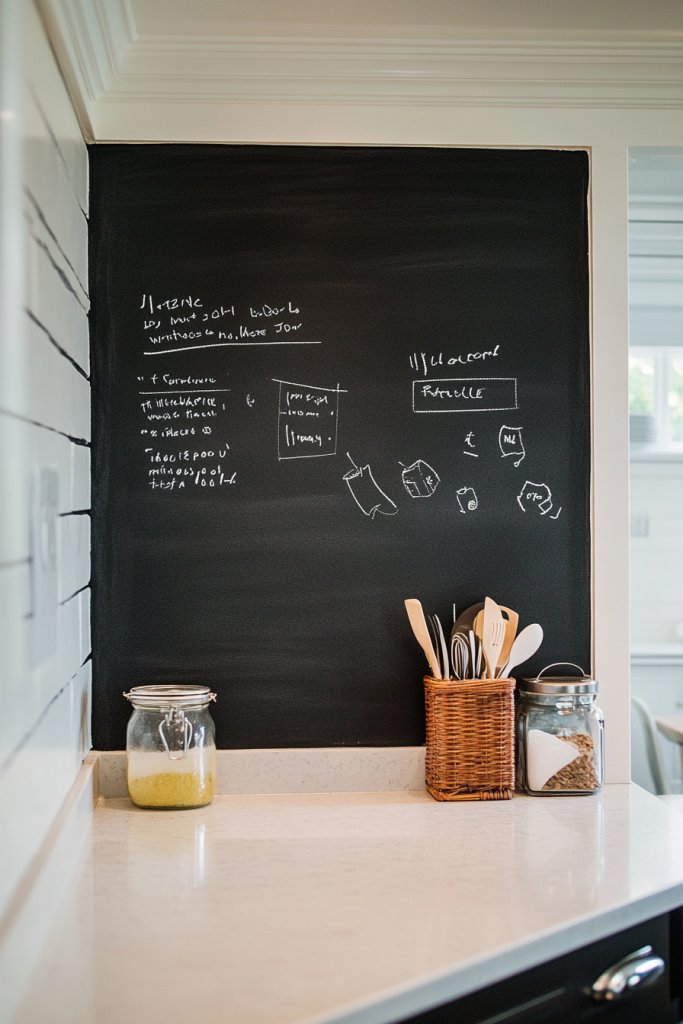
Forget cluttered fridge doors or scattered sticky notes—your kitchen needs a central spot for recipes, reminders, or inspirations. A chalkboard or writable wall turns an ordinary space into a functional canvas. It’s perfect for organizing your life and adding a playful, creative element.
Visualize a large blackboard painted on a blank wall or framed with a decorative border. It’s filled with handwritten recipes, grocery lists, or motivational quotes. Chalk dust adds a nostalgic, tactile feel, while colorful chalks make the space lively. The wall becomes a dynamic feature that evolves with your daily needs.
Choose from traditional chalkboard paint, magnetic surfaces, or erasable whiteboard panels. Frame it with wood for a rustic look or sleek metal for modern appeal. Use different sections for meal planning, shopping lists, or kids’ drawings. Keep accessories like chalk, erasers, and markers nearby for quick updates.
Prepare the wall surface—clean and sand if necessary. Apply chalkboard paint in smooth, even coats, following manufacturer instructions. Once dry, add a frame or border for a finished look. Use painter’s tape for clean edges. Stock up on chalk and erasers, and designate a specific spot for each.
Decorate the border with washi tape or decorative molding. Add a small ledge or tray underneath for holding chalk or notes. Personalize with handwritten art, seasonal messages, or inspiring quotes. Let family members contribute their ideas, making it a shared creative space.
A writable wall keeps your kitchen organized and fun. It encourages creativity and makes meal prep interactive. No more forgotten grocery items or missed appointments—your kitchen becomes a hub of activity and personality.
9. Use of Open Storage Bins for Bulk Items and Daily Essentials
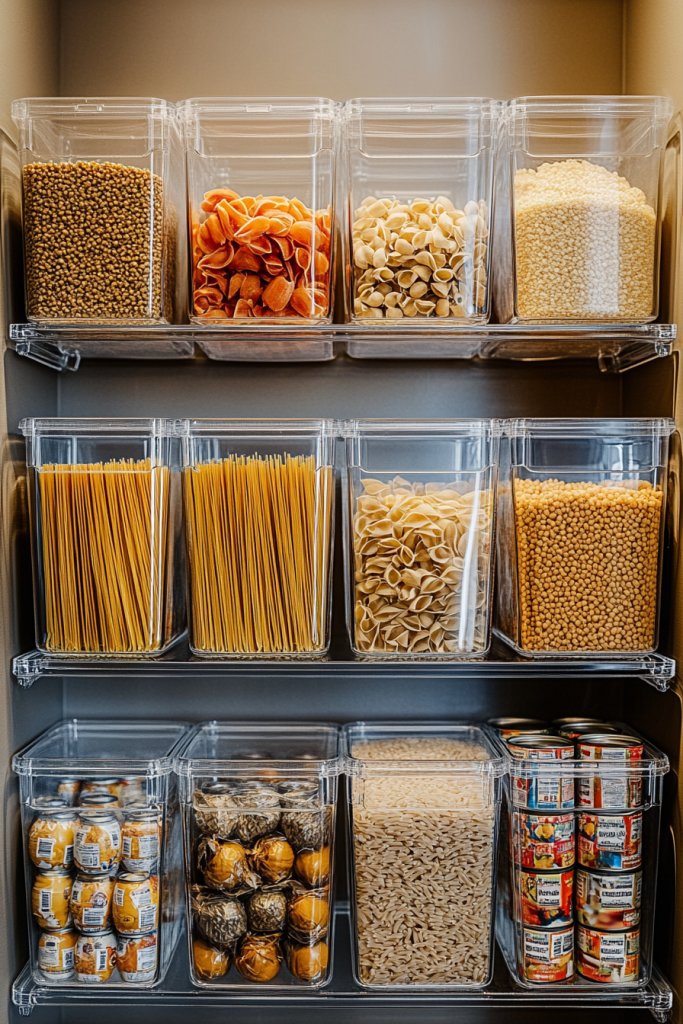
Cluttered counters and messy cabinets drive anyone crazy. Open storage bins offer a simple way to organize bulk items and daily essentials visibly and accessibly. They help you grab what you need fast and keep your kitchen looking tidy and inviting. Plus, they add a casual, trendy vibe.
Imagine clear plastic or woven baskets neatly arranged on open shelves or inside cabinets. Each bin holds snacks, grains, or utensils, labeled for quick identification. The uniformity of containers creates a clean, streamlined look, while the contents are always visible. It’s like having your pantry or storage closet on display.
Use different materials—glass jars for a vintage feel, metal bins for industrial style, or woven baskets for rustic charm. Incorporate colorful lids or labels for an added pop. Adjust container sizes based on your needs—smaller for spices, larger for grains or potatoes. Group similar items together for maximum efficiency.
Start by decluttering your space and sorting items into categories. Choose containers that fit your space and needs—consider stackability and ease of cleaning. Label each bin clearly with chalk, stickers, or printed tags. Place frequently used items at eye level or within easy reach. Regularly check and reorganize to maintain order.
Decorate labels with fun fonts or colors to make organization enjoyable. Incorporate decorative touches like patterned liners or fabric wraps for a personalized feel. Use matching containers for a cohesive look or mix textures for visual interest. Add small risers or stacking systems to optimize vertical space.
Open storage bins turn chaos into order effortlessly. They make your daily routines smoother and your kitchen more attractive. It’s a practical, stylish solution that encourages ongoing organization and pride in your space.
10. Installing a Pot Filler Faucet for Convenient Cooking
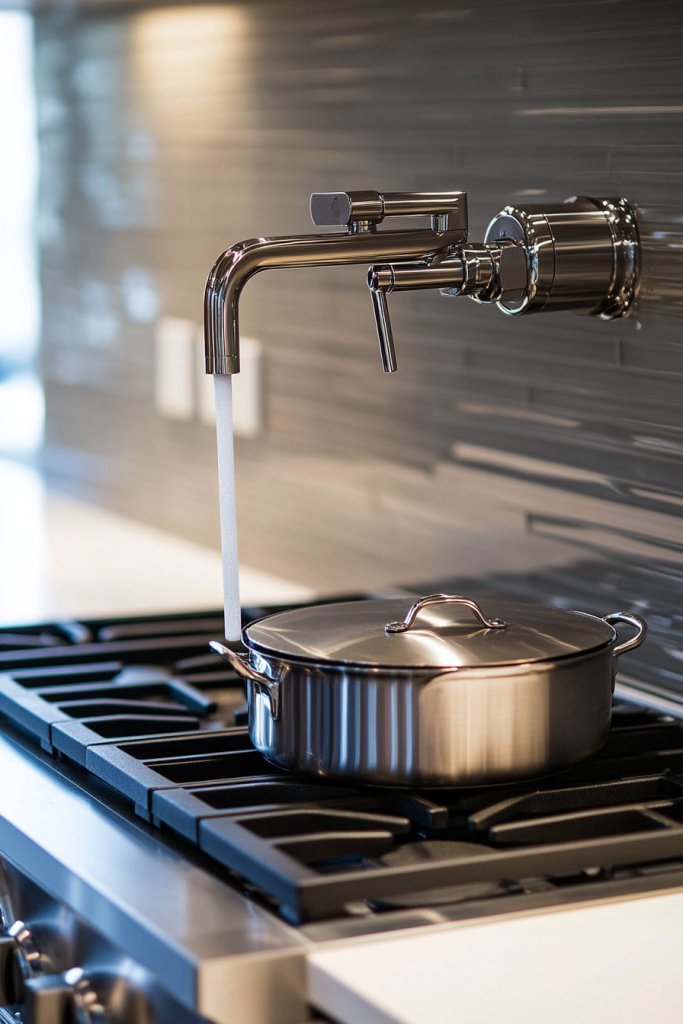
Carrying heavy pots from sink to stove is a hassle—especially when you’re juggling multiple tasks. A pot filler faucet mounted above the stove simplifies this process, letting you fill pots directly where you cook. It’s a small upgrade that saves time and spares your back.
Picture a sleek, chrome or matte black faucet extending from the wall right above your cooktop. When in use, it’s a graceful, functional feature that blends seamlessly with modern or industrial kitchens. The ease of filling large stockpots without dragging them across the kitchen adds a sense of luxury and convenience.
Choose finishes that match your faucet or hardware—brushed nickel, matte black, or polished chrome. Opt for a flexible, high-arc spout for maximum reach or a fixed one for a minimalist look. Install a dual-handle setup for precise control or a single lever for simplicity. The placement should be ergonomic yet unobtrusive.
Measure the distance from your water inlet to the desired faucet location. Hire a plumber if needed to ensure proper installation and leak-proof connections. Select a model with a shut-off valve for safety. Mount it securely on the wall or behind a backsplash, ensuring clearance for large pots. Test for water pressure and flow before completing the install.
Add a touch of style by choosing a finish that complements your fixtures. Consider installing a matching soap dispenser or spray nozzle for additional functionality. Use a wall-mounted hook nearby to hang utensils or towels. Seasonal upgrades could include decorative covers or colored handles.
A pot filler is a game-changer for serious cooks and weekend chefs alike. It elevates your kitchen’s efficiency and adds a touch of professional flair. Once installed, you’ll wonder how you ever managed without it—cooking becomes a whole new experience.
11. Incorporate a Hidden Trash and Recycling Center for Cleanliness
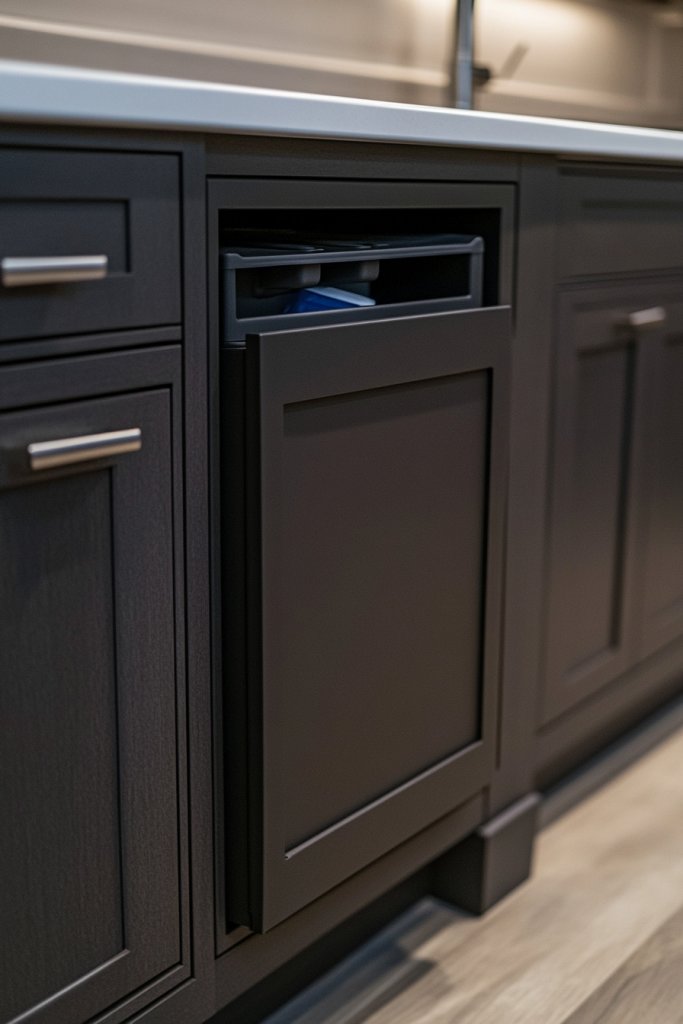
Trash and recycling bins clutter your kitchen and ruin the sleek look you’re after. Hidden centers keep waste out of sight, maintaining a tidy, stylish space. Plus, they make sorting and disposal more convenient, encouraging eco-friendly habits without sacrificing design.
Envision a slim cabinet tucked beside your main workspace, with pull-out drawers for trash and recyclables. The doors blend seamlessly with your cabinetry, hiding unsightly bins. When opened, the compartments are neatly organized, with labeled bins for waste, recyclables, and compost. It keeps your kitchen looking polished and clutter-free.
Choose pull-out systems with different sizes tailored to your household’s waste volume. Use custom cabinetry panels to match your kitchen style—shaker, flat-panel, or traditional. For a modern look, opt for sleek, handleless fronts or soft-close mechanisms. Consider adding a small countertop for sorting before disposal.
Measure the space adjacent to your main work zone to fit the pull-out cabinet. Install the cabinet frame and slides, ensuring smooth operation. Label each compartment clearly for waste, recycling, and compost. Use durable, easy-to-clean materials and seal the edges for longevity. Regularly empty and sanitize for hygiene.
Decorate the cabinet with custom paint or veneer to match your cabinets. Add a small step or foot pedal for hands-free operation. Use color-coded bins to encourage sorting in the household. Keep extra liners and cleaning supplies nearby for maintenance.
A hidden trash and recycling center keeps your kitchen pristine and eco-conscious. It’s a simple change that elevates cleanliness and organization. Once set up, you’ll enjoy a more pleasant cooking environment and feel good about your eco habits—win-win!
12. Incorporate a Butcher Block or Wooden Countertop for Warmth and Durability
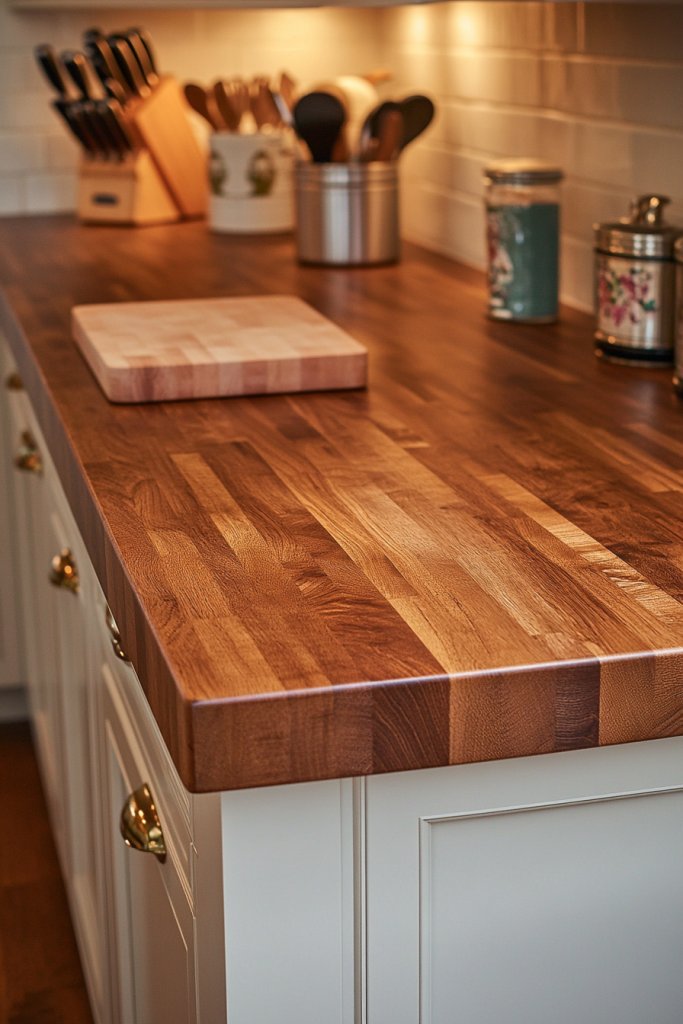
Stainless steel and stone countertops are functional but can feel cold and sterile. A butcher block or wooden surface adds warmth, texture, and a touch of rustic charm. It’s perfect for food prep, offering a forgiving surface for chopping and kneading.
Imagine a large, rich wood countertop with a natural grain pattern, contrasting beautifully with sleek cabinetry. The surface shows subtle knife marks that tell a story of daily use, adding character. Soft lighting highlights the warm tones, creating an inviting, homey vibe that makes cooking less of a chore.
Choose from different wood types—oak, maple, walnut—based on color and durability. For a modern look, opt for a smooth, finished surface; for rustic charm, keep the natural edges and knots visible. You can combine wood with other materials like metal accents or ceramic tiles for a mixed-material aesthetic. Seasonal accessories like a fruit bowl or a soft cloth enhance the cozy feel.
Start by selecting high-quality, sustainably sourced wood. Sand the surface smoothly and treat it with food-grade mineral oil or beeswax for protection. Seal any seams or edges to prevent moisture damage. Regularly oil the surface to maintain its luster and prevent drying out. Consider adding a protective barrier or a cutting board overlay for heavy-duty prep.
Customize with engraved patterns, family names, or motifs. Use decorative legs or apron details to match your kitchen style—industrial, farmhouse, or Scandinavian. Incorporate small hooks or rails for utensils and towels. Seasonal accents like a cozy cloth or decorative tray can refresh the look.
A butcher block or wooden countertop creates a warm, inviting kitchen environment. It combines functionality with natural beauty, making every meal prep feel special. With proper care, it ages beautifully, becoming a treasured part of your home.
13. Use of Stylish, Functional Bar Stools for Additional Seating

Need extra seating but don’t want to clutter your space? Stylish bar stools are the perfect solution—adding function and flair to your kitchen or breakfast bar. They encourage casual chats and quick meals, making your space more social.
Picture a row of sleek stools with leather or woven seats tucked under a high countertop. The design complements your decor—modern, industrial, or rustic. The variety of frame finishes and cushion styles adds personality and comfort. When not in use, they slide neatly beneath the counter, keeping the space open.
Select from different heights, styles, and materials—metal, wood, or upholstered. For small kitchens, opt for stackable or foldable stools that can be stashed away. Use cushions or decorative covers to match seasonal themes or personal taste. Coordinate the finish with your fixtures to create a cohesive look.
Measure your counter height to choose the right seat height—generally 10-12 inches below the countertop. Securely attach the stools to prevent tipping if needed, especially for homes with kids. Consider adding footrests for extra comfort. Arrange them in a straight line or in a semi-circle for social gatherings. Regularly check stability and clean fabrics or finishes.
Add cushions in fun patterns or textures for comfort and style. Use decorative trim or embroidery for a personalized touch. Swap out covers seasonally or for special occasions. Pair with matching or contrasting pendant lighting or textiles for a layered look.
Stylish bar stools instantly boost your kitchen’s vibe and functionality. They turn your space into a welcoming, social hub—perfect for entertaining or family dinners. It’s a simple upgrade that makes your kitchen more livable and stylish.
14. Install a Pot Rack or Ceiling Hooks for Hanging Cookware
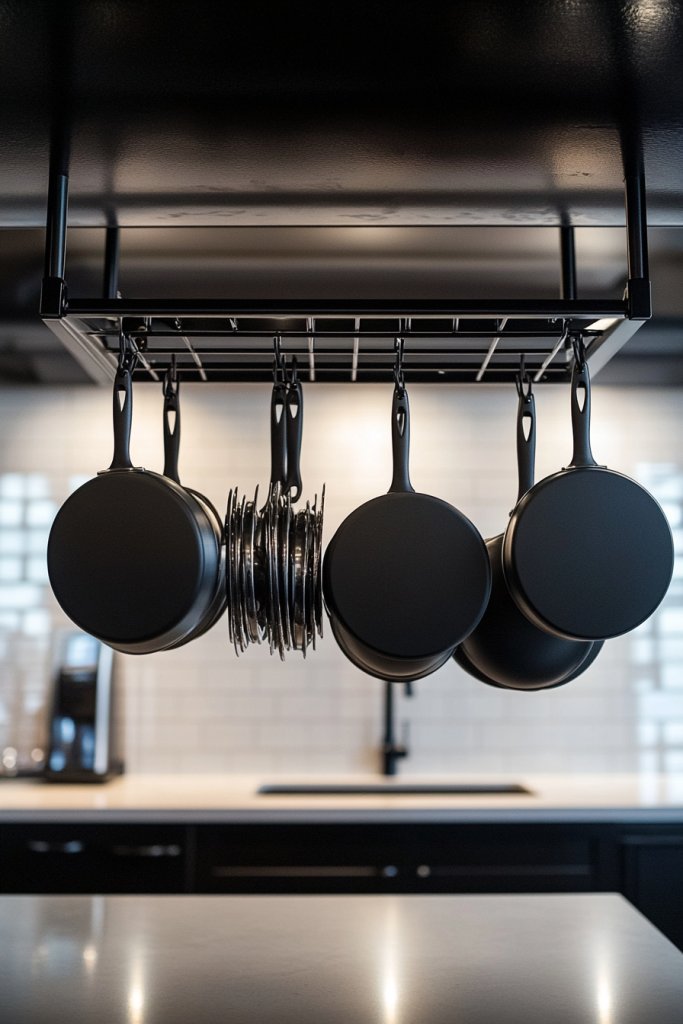
Cluttering drawers and cabinets with pots and pans? Hanging cookware on a pot rack or ceiling hooks frees up space and adds a professional, industrial look. It also keeps your favorite pieces within easy reach, making cooking more efficient and fun.
Imagine a sleek metal or wooden rack mounted above your island or stove area, with pots, pans, and utensils hanging neatly. The exposed cookware creates a dynamic visual that emphasizes functionality and style. The open display allows you to showcase your best pieces while keeping them accessible.
Choose between wall-mounted racks, ceiling-mounted hooks, or a combination—depending on your space. Use hooks of different lengths and styles for variety. Incorporate decorative elements like vintage utensils or colorful cookware to add personality. For smaller kitchens, consider collapsible or fold-away racks that can be tucked away when not in use.
Measure the available space and select a sturdy mounting system—screws into studs or ceiling joists. Install the rack following the manufacturer’s instructions, ensuring it’s level and secure. Hang your cookware by handles for safety and ease of access. Balance the weight across multiple hooks to prevent stress on the mounts. Regularly inspect and clean the hooks for safety.
Decorate with a mix of vintage and modern cookware for visual interest. Use colorful or patterned handles for added flair. Incorporate small baskets or utensil holders underneath for additional storage. Change up the arrangement seasonally or when you acquire new pieces.
A pot rack or ceiling hooks make your kitchen look more professional and organized. They turn cooking into a display of your style and skills. Plus, your cookware becomes part of the decor rather than hidden away—ready for action and admiration.
15. Designated Coffee Station with Storage and Accessories
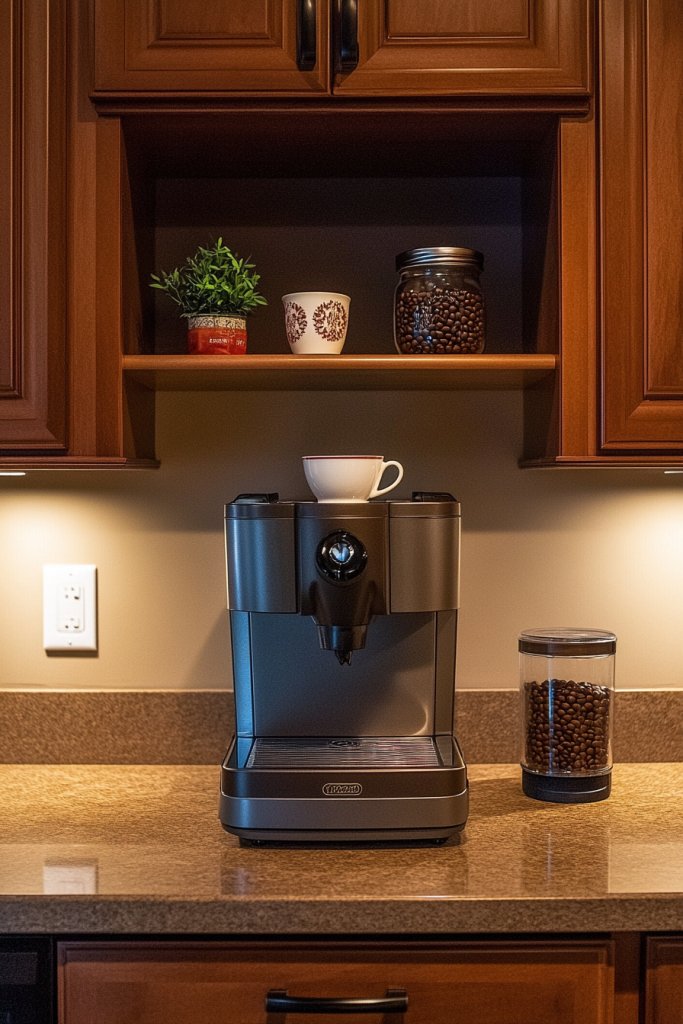
Are coffee supplies cluttering your countertops? A dedicated coffee station keeps everything organized and within reach. It turns your morning routine into a streamlined, enjoyable ritual. Plus, it adds a cozy, personalized touch to your kitchen.
Visualize a small nook with open shelves holding jars of beans, mugs, and brewing equipment—all neatly arranged. A compact cart or countertop space hosts a coffee maker and accessories. Decorative containers and coordinated colors make the setup inviting and stylish. It’s a little corner that feels like your personal café.
Use open shelving for easy access or closed cabinets for a cleaner look. Incorporate baskets or containers for sugar, filters, and stirrers. Choose a theme—industrial, rustic, or modern—and match accessories accordingly. Add a small chalkboard or label tags for organization. Adapt the size based on your coffee habits and available space.
Clear a small area near your main kitchen zone. Install floating shelves or use a dedicated cart. Arrange your coffee essentials—beans, filters, mugs—in labeled containers. Place your coffee machine at an ergonomic height for ease of use. Keep cleaning supplies nearby for quick maintenance. Regularly refill and tidy the station to maintain order.
Decorate with a vintage coffee sign or personalized mug hooks. Use matching or contrasting colors for containers to add visual appeal. Incorporate seasonal touches like festive mugs or themed accessories. Keep a small plant or fresh flowers nearby (avoiding restricted items, of course) for a lively vibe.
A dedicated coffee station elevates your morning routine and adds charm to your kitchen. It’s a small project that makes a big difference—more organized, more stylish, more you. Enjoy your coffee moments in a space designed just for that.
16. Incorporate Compact Appliance Garages to Hide Clutter
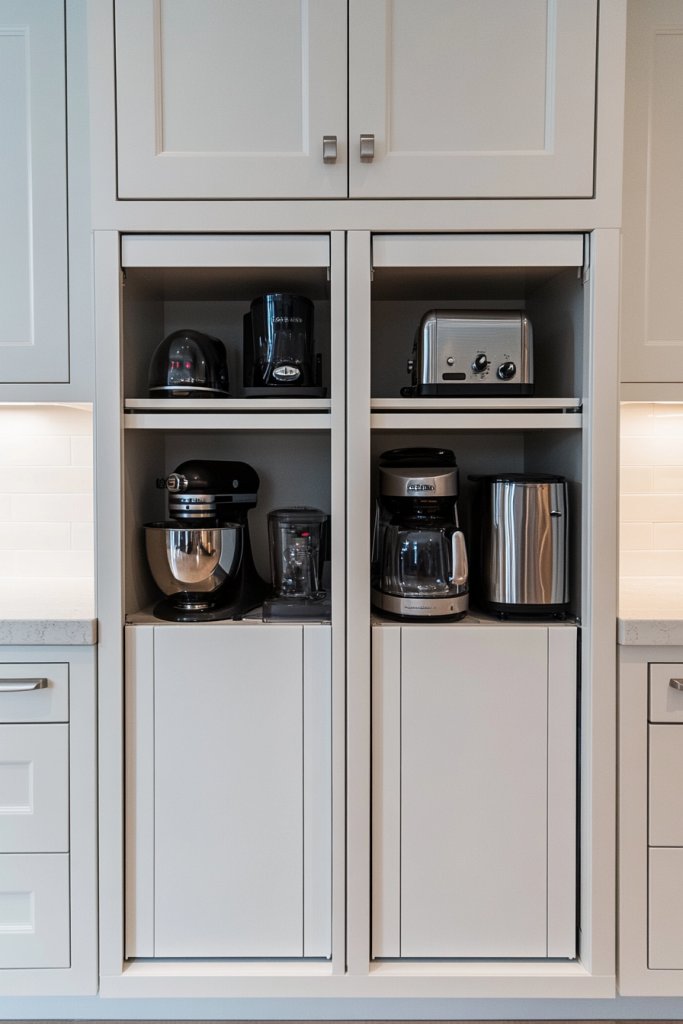
Counter clutter from small appliances like toasters, blenders, and mixers can make your kitchen look chaotic. Appliance garages hide these gadgets out of sight, keeping your countertops sleek and tidy. It’s a smart way to blend functionality with a clean aesthetic.
Imagine a cabinet with a roll-up or lift-up door that conceals your appliances when not in use. When open, the countertop is clear and clutter-free. The garage’s interior can include wire racks or small bins to organize cords and accessories. The smooth exterior maintains a seamless look, enhancing your kitchen’s modern vibe.
Choose from different door styles—paneled, flat, or with decorative trim—to match your cabinets. Incorporate soft-close mechanisms for quiet operation. For small spaces, opt for slim or corner-designed garages. Paint or veneer the interior in a contrasting color for a subtle surprise when opened.
Measure your appliances and identify suitable cabinet locations. Install the garage door hardware and ensure it opens and closes smoothly. Organize cords and small accessories inside with adjustable racks or bins. Seal edges and test for stability. Regularly clean to prevent dust buildup and ensure easy access.
Decorate the interior with peel-and-stick wallpaper or paint for a pop of color. Use labels or icons to organize items inside. Add a small power strip or outlet inside for convenience. Swap out doors seasonally or upgrade hardware for a fresh look.
Appliance garages keep your countertops sleek and free, making your kitchen appear larger and more organized. They also protect appliances from dust and damage. It’s a functional upgrade that boosts your confidence in maintaining a tidy, stylish space.
17. Add a Vertical Garden or Herb Wall for Fresh Flavors and Greenery

Craving fresh herbs but tired of losing them in the fridge or garden? A vertical garden or herb wall brings greenery into your kitchen in a space-saving way. It supplies fresh flavors for cooking and adds a lively, natural vibe—no green thumb required.
Picture a wall-mounted system with small pots or pocket planters filled with basil, thyme, and parsley. The vibrant green contrasts beautifully against a neutral wall or patterned backsplash. The herbs grow lush and healthy, filling the space with a fresh aroma. It’s a living piece of decor that’s both functional and eye-catching.
Use modular wall-mounted planters, magnetic containers, or recycled materials like old pallets for a DIY look. Incorporate watering systems or self-watering planters for low maintenance. Arrange herbs by type or height for visual balance. Seasonal herbs like mint or cilantro can refresh your culinary options.
Choose a suitable wall space with good light—near a window or under grow lights. Install planters securely, ensuring proper drainage. Fill with quality potting soil and plant your herbs, watering thoroughly. Maintain with pruning and occasional fertilizing. Consider adding a small shelf or hooks for tools and scissors nearby.
Decorate the planters with colorful paint or decorative wraps. Label each herb with rustic tags or engraved markers. Incorporate small decorative stones or pebbles for aesthetic appeal. Change up the herbs seasonally or rotate new varieties for fresh inspiration.
A vertical herb garden makes your kitchen more vibrant and practical. It’s a sustainable, stylish way to enjoy fresh flavors daily. Plus, it’s a fun project that connects you with your food and boosts your confidence in growing something alive indoors.
18. Use of Textured or Patterned Rugs to Define Zones and Add Comfort
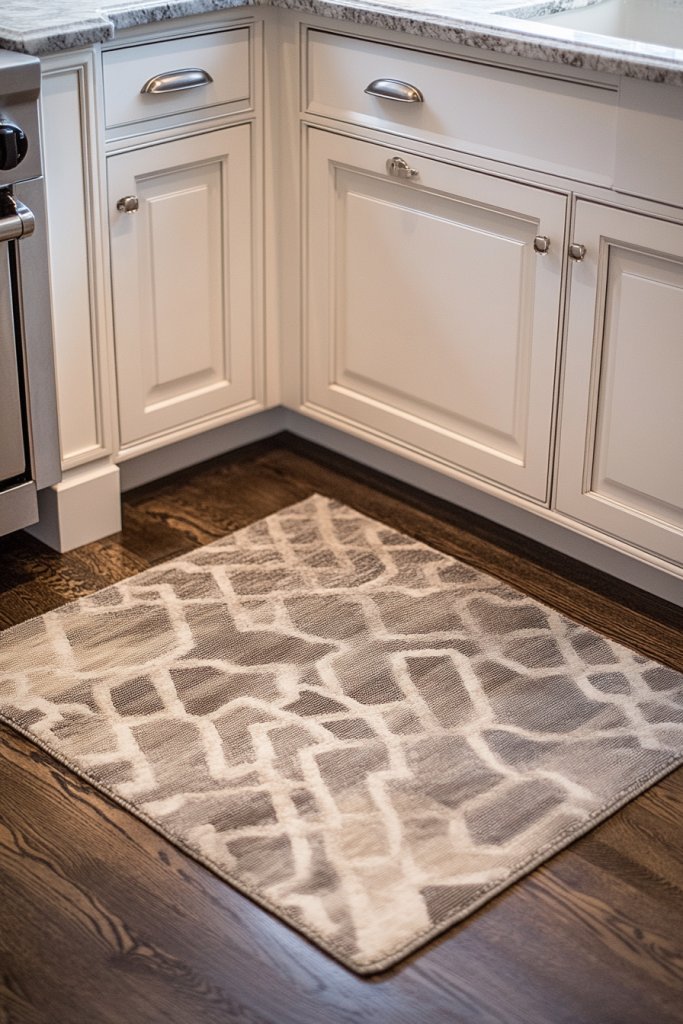
Bare floors in high-traffic or open kitchens can feel cold and impersonal. Textured or patterned rugs define zones, add warmth, and boost comfort underfoot. They bring personality and softness to your space, making it more inviting and cozy.
Imagine a plush, patterned rug anchoring your cooking and prep zone, with rich textures and vibrant colors. The tactile surface cushions your steps and adds visual depth. The pattern complements your cabinets, backsplash, or flooring, tying the look together. It’s a cozy mat that invites you to linger longer.
Select rugs made from durable, easy-care fibers—jute, wool, or synthetic blends—suited for kitchens. Play with bold patterns, geometric designs, or subtle textures depending on your decor style. Layer rugs or use runners to define different areas like the sink, stove, or prep station. Change the rug seasonally for fresh updates.
Measure your space carefully before choosing a rug size. Lay it flat and ensure it’s non-slip—add a pad if necessary. Position the rug to anchor key zones and prevent tripping hazards. Clean regularly to maintain appearance and safety. Rotate or replace when worn for a refreshed look.
Incorporate rugs with personal meaning—handmade, vintage, or with custom patterns. Use coordinating textiles or cushions nearby to create a layered, inviting feel. Add seasonal accents like festive motifs or neutral tones to match your decor mood. Keep a small broom or vacuum handy for quick cleanups.
A textured or patterned rug elevates your kitchen’s style and comfort. It makes spending time in your space more enjoyable and welcoming. Small, strategic updates like this can boost your confidence to experiment with more significant design changes—your kitchen is your canvas.
Conclusion
Exploring these cool kitchen ideas shows how a blend of style and practicality can truly transform your cooking space. Whether you choose sleek modern touches or cozy vintage accents, implementing these ideas can make your kitchen more inviting and efficient. Don’t be afraid to experiment and put your own spin on these concepts—your dream kitchen is just an idea away!