Imagine stepping into a backyard that feels like a personal oasis without breaking the bank—sounds too good to be true? Affordable landscaping ideas have gained popularity because they allow homeowners to create stunning outdoor spaces without overspending, proving that you don’t need a big budget to achieve big beauty.
In this article, you’ll uncover a variety of clever, budget-friendly landscaping tips and tricks that can transform your outdoor area into a charming retreat. From simple DIY projects to smart plant choices, these ideas are perfect for anyone looking to enhance their yard’s appeal while keeping costs low and creativity high.
1. Create a Cozy Fire Pit Area with Budget-Friendly Materials
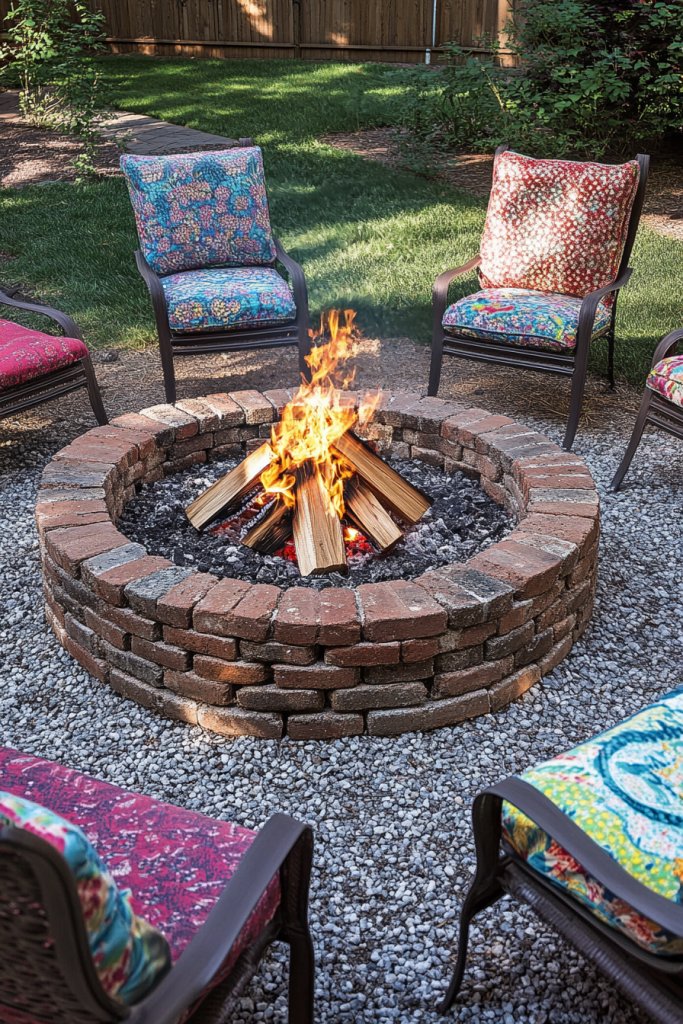
Ever wish you had a warm gathering spot in your backyard that doesn’t cost a fortune? An inviting fire pit area can turn your outdoor space into a cozy retreat without breaking the bank. The idea of roasting marshmallows or sharing stories around a crackling fire is appealing, but premium setups often seem out of reach. Luckily, with some creative thinking, you can craft a charming fire zone on a budget.
Imagine a circle of rough-hewn stones or inexpensive concrete pavers arranged neatly on a bed of gravel. The flickering glow of a simple fire pit made from a repurposed metal drum or bricks creates a warm focal point. Surround it with a few weathered wooden benches or even large outdoor cushions for seating. The scent of burning wood mingles with fresh grass, inviting friends to gather and relax in a rustic yet inviting space.
You can customize your fire pit to match your style—think sleek modern with clean lines or a more natural, woodsy look using fallen branches and stones. Seasonal touches like string lights or decorative lanterns add ambiance, while different seating options can suit small or large groups. For colder months, add a weatherproof blanket or a fire-resistant rug nearby to create a cozy vibe. The design flexibility makes it easy to adapt to any yard size or aesthetic.
Start by selecting a flat, non-flammable surface like gravel or compacted dirt. Gather inexpensive pavers or stones from a local supplier or reuse old bricks. Create a circular outline, then fill the center with gravel or sand for stability. Build your fire pit using heat-safe materials—stack bricks or arrange large stones—making sure to leave proper clearance. For seating, repurpose wooden pallets or use large, smooth stones. Always ensure safety and local fire regulations are followed.
Add finishing touches like a metal grate or a decorative ring around the fire area. Incorporate outdoor cushions made from durable, weatherproof fabric for comfort. You can also place a few lanterns or solar-powered lights nearby to extend the ambiance into the evening. Personalize with custom painted stones or a small, decorative sculpture to reflect your personality. It’s all about making the space uniquely yours.
Creating your own fire pit shows that stunning outdoor spaces can be affordable and fun to build. It’s a great way to gather your loved ones and enjoy nature without spending a fortune. Once complete, you’ll feel a sense of accomplishment every time you light a fire and share a laugh around it. Remember, even simple materials can turn into cherished memories—happy camping in your backyard!
2. Design a Vibrant Container Garden Using Recycled Containers
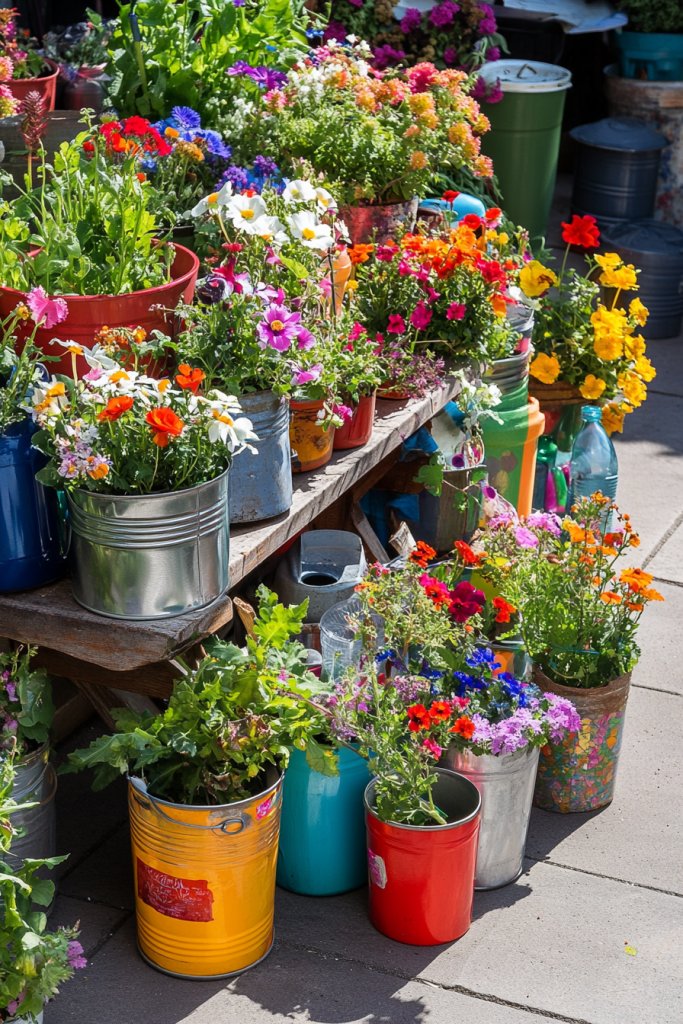
Want to add a splash of life to your outdoor space but feel overwhelmed by expensive plant setups? Container gardens are a fantastic way to bring color and freshness without a major investment. Plus, if you’re short on space or have poor soil, containers give you the flexibility to grow anywhere. Recycled containers make it even more affordable and eco-friendly.
Visualize a row of mismatched cans, old buckets, or wooden crates painted in cheerful hues lining your patio or garden path. Filled with lush herbs, colorful flowers, or succulents, these containers burst with vibrancy. The textures vary from the smooth surface of painted cans to the rustic charm of weathered wood. As the breeze sways the foliage, it creates a lively, inviting scene that’s as charming as it is practical.
Choose containers that suit your style—think vintage teapots, plastic buckets, or even repurposed shoe organizers for small plants. You can cluster them for a lush look or space them out for a more minimalist vibe. Seasonal plant choices let you refresh the display—spring bulbs, summer blooms, or fall foliage. For small spaces, vertical stacking or hanging baskets maximize limited real estate.
Start by collecting used containers from thrift stores, garage sales, or around your house. Ensure they have drainage holes; drill additional ones if needed. Fill them with affordable potting mix, then transplant seedlings or plant directly using low-cost seeds. Group similar plants together for easier maintenance and visual harmony. Position containers where they’ll get appropriate sunlight, and water regularly. Use labels or paint to personalize each container’s contents.
Add decorative stones or shells on top of soil for extra flair. Incorporate small sculptures or painted rocks among your plants for a whimsical touch. You can also tie fabric ribbons or burlap around containers for seasonal updates. Creating a theme—like a herb corner or a flower border—helps your space look intentional and coherent. Personal touches make your container garden uniquely yours.
Recycled container gardens prove that green thumbs don’t have to cost a fortune. They’re easy to rearrange or expand as your collection grows. Plus, they make lovely gifts for friends or family. Seeing your plants thrive in repurposed containers fuels confidence and inspires more eco-friendly choices. Your outdoor space will bloom with personality and sustainability—who knew gardening could be so budget-friendly?
3. Install a DIY Pathway with Gravel or Stepping Stones
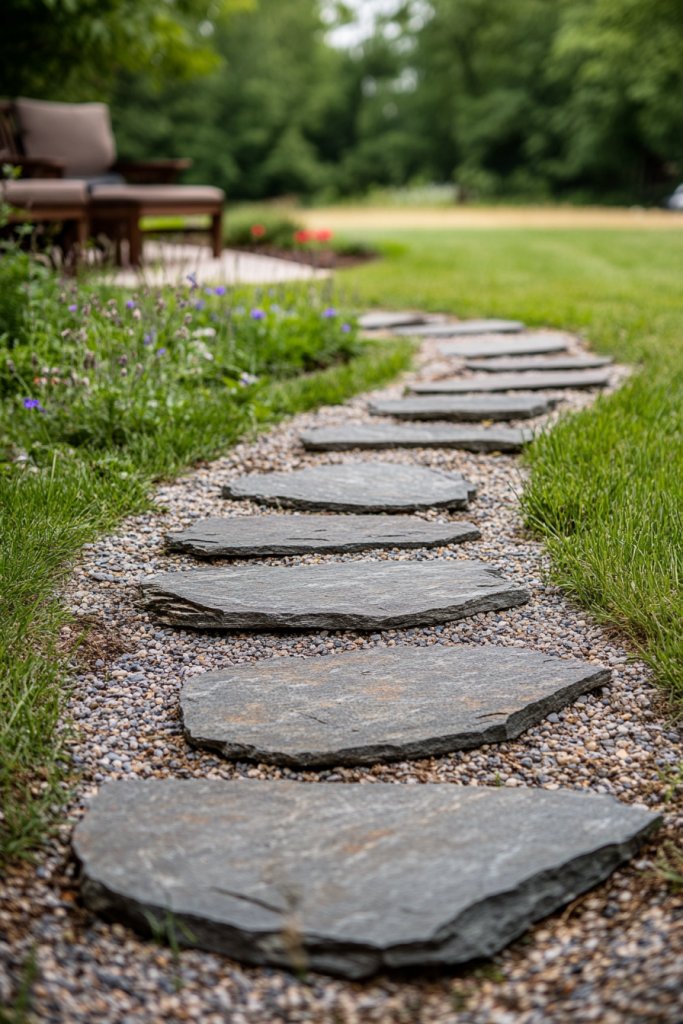
Tired of slogging through muddy patches or uneven grass just to reach your backyard oasis? A simple, affordable pathway can transform your yard into a welcoming, navigable space. Plus, it’s an easy DIY project that upgrades your outdoor aesthetics without draining your wallet. No need for fancy paving—gravel and stepping stones do the trick.
Picture a winding path made of irregular flat stones embedded in a bed of fine gravel. The stones vary in size and color, adding a natural, rustic charm. As you walk along, the gravel softens your steps, and the stones create a visual route guiding you through flower beds or seating areas. Surrounding greenery and garden accents frame the pathway, inviting exploration and tranquility.
Opt for straight lines for a formal look or a meandering curve for a more natural feel. You can choose larger, flat stones for a sturdy, classic look or smaller pavers for a delicate, cottage vibe. For different seasons, consider adding solar-powered lights along the edges or planting low-growing ground covers beside the path. Adjust width to suit your yard size—wider for entertaining, narrower for a subtle trail.
Begin by marking your desired route with stakes and string. Dig a shallow trench along the outline—about 4-6 inches deep—and level the base with compacted gravel. Lay your chosen stones or pavers, spacing them evenly or irregularly depending on style. Fill the gaps with small gravel or sand, then tamp everything down for stability. For extra durability, edge the pathway with landscape edging or bricks. Regularly top up gravel as it settles.
Decorate your pathway with decorative stones or incorporate small sculptures or lanterns at intervals. For seasonal flair, add potted plants or floral arrangements beside the path. If you want a softer look, plant creeping ground covers like thyme or moss along the edges. Using different textures and colors keeps the pathway visually interesting and inviting. It’s all about making your yard a walkable, welcoming space.
A DIY pathway is a straightforward upgrade that adds charm and function to your yard. It’s rewarding to see your handiwork turn into a beautiful, practical feature. Plus, it encourages outdoor activity and exploration, making your space feel more expansive. No fancy tools or skills required—just some patience and a bit of creativity. Your garden will thank you for the effort, and so will your feet!
4. Build a Vertical Garden Wall with Pallets or Mesh Panels
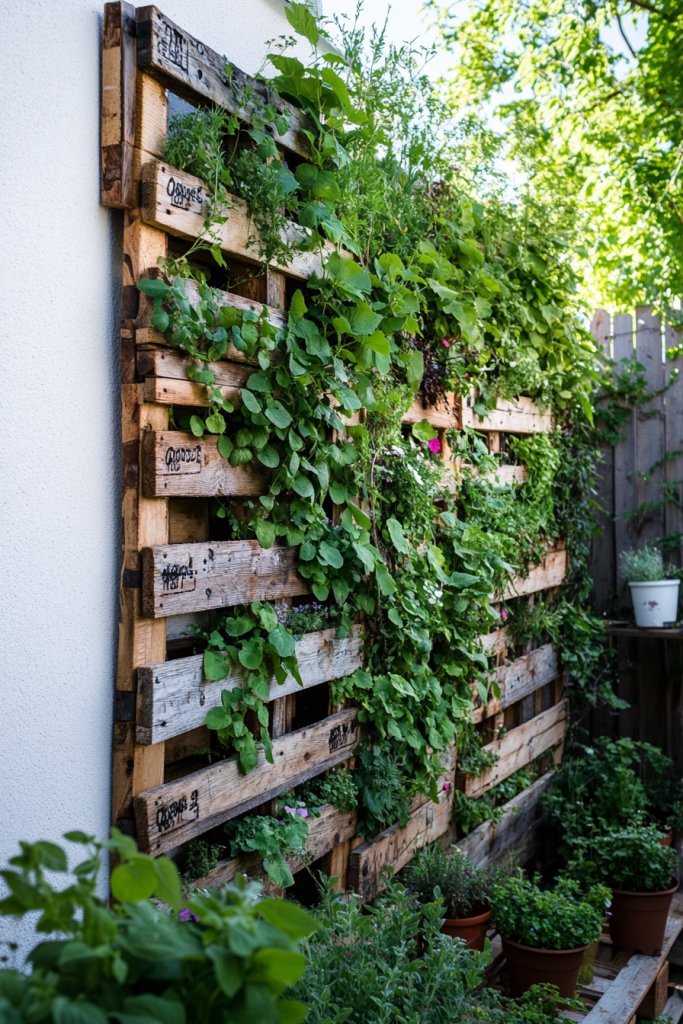
Struggling to grow more in limited space or want to add a lush focal point? A vertical garden wall is the perfect solution to maximize your garden’s potential. It’s a clever way to display plants, herbs, or blooms without taking up precious ground area. Plus, it adds a striking visual element to any yard or balcony.
Imagine a reclaimed wooden pallet attached securely to a fence or wall, filled with small pots or pockets holding vibrant plants. Alternatively, a wire mesh panel becomes a green tapestry, with plants cascading down and filling every gap. The textures of the vertical greenery contrast beautifully with plain walls or fences, creating a living artwork. The scent of herbs or flowering plants drifts through the air, evoking a peaceful, garden-like atmosphere.
Choose between pallets for a rustic look or sleek metal grids for a modern vibe. You can grow herbs, succulents, or flowering plants depending on sunlight and climate. For different seasons, swap out plants or add decorative accessories like small fairy lights or decorative stones. Mount multiple panels vertically for a layered effect or keep it simple with a single wall feature. Adaptability makes this idea suitable for balconies, patios, or even small yards.
Securely attach your pallet or mesh panel to a stable surface using hooks or brackets. Fill pockets or attach small containers with waterproof screws, ensuring they are well-drained. Use a high-quality potting mix tailored to your chosen plants, filling each pocket or container. Arrange your plants based on sunlight needs, with taller or sun-loving plants at the top. Regular watering and pruning keep the vertical garden thriving. Consider adding a drip irrigation system for ease.
Decorate the edges of your vertical garden with decorative stones or small sculptures. You can also paint or stain the pallet for a personalized touch. Incorporate small decorative elements like wind chimes or lanterns nearby to enhance the ambiance. Rotating plants seasonally or adding flowering varieties keeps the display fresh and exciting. Your vertical garden can become a dynamic feature, reflecting your evolving style.
Vertical gardens prove that even small spaces can host lush, vibrant greenery. They’re a statement piece that’s both functional and artistic. Building one yourself boosts confidence and inspires more creative landscaping ideas. Plus, it’s incredibly satisfying to see plants thrive in a compact setup you assembled. Your space will feel instantly more alive and inviting—without spending a fortune!
5. Incorporate Low-Cost Native Perennials for Year-Round Color
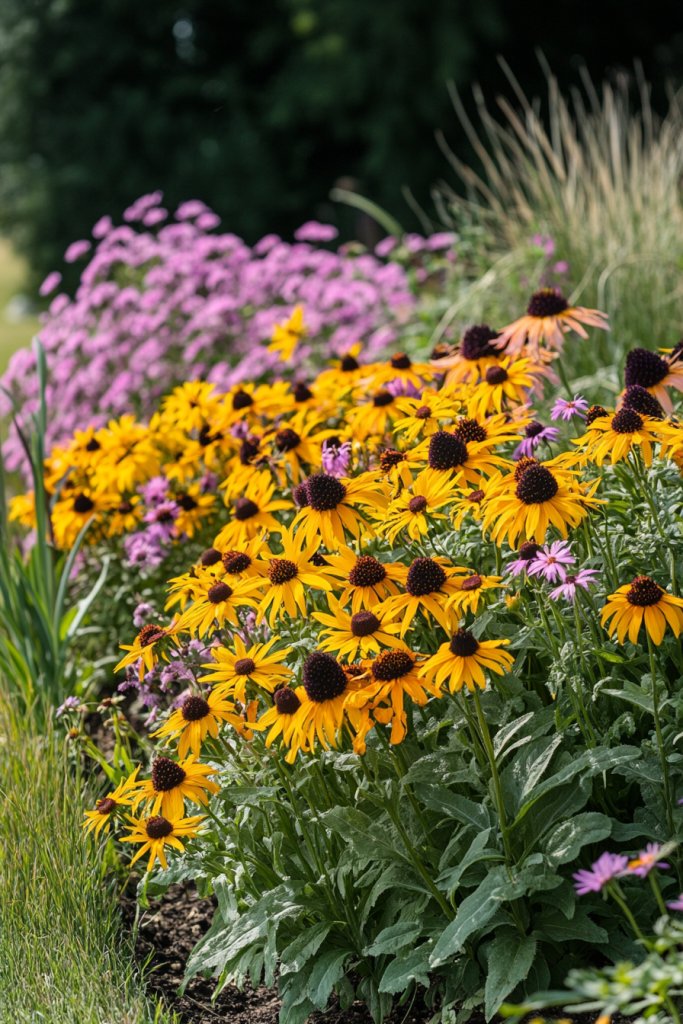
Want a garden that looks beautiful across seasons but hate constant replanting or high maintenance? Native perennials are the answer—hardy, low-cost, and usually flowering for months. They thrive in your local climate, requiring minimal water and care. Plus, they support local wildlife, making your yard eco-friendly and vibrant.
Picture a lush bed of native coneflowers, yarrow, and coreopsis blooming in succession, with butterflies fluttering around. The textures vary from soft, feathery grasses to sturdy, colorful blooms. Over time, the plants fill in gaps, creating a layered, natural look that feels both wild and intentional. The colors shift with the seasons, from fresh greens to fiery reds and mellow yellows, providing year-round visual interest.
Choose native perennials suited to your soil and sun exposure—consult local gardening resources for guidance. You can mix flowering perennials with ornamental grasses or ground covers for added texture. For different climates, select drought-tolerant varieties or shade-loving species. Incorporate mulch or natural stones to reduce weeds and retain moisture. Create a natural meadow or a structured flower bed—the choice is yours.
Start by preparing your soil—clear weeds, loosen the earth, and add compost if needed. Plant your native perennials in groups for visual impact and easier maintenance. Follow planting instructions for each species regarding spacing and depth. Water them well initially, then reduce watering as they establish. Regularly remove dead or faded flowers to encourage more blooms. Over time, they will establish a resilient, self-sustaining garden.
Add decorative stones or natural wood mulch to create borders or pathways. Incorporate artistic plant labels or small sculptures among the blooms for a personalized touch. Consider planting a few native grasses or wildflowers in less formal areas for a more natural look. Combining different textures and colors showcases your garden’s natural beauty.
Native perennials are a smart, sustainable choice for long-term beauty with minimal effort. They teach patience and appreciation for natural growth patterns. Your yard becomes a haven for pollinators and wildlife, adding a lively, authentic feel. Once established, these plants require less attention, making your landscaping both beautiful and easy—truly a win-win.
6. Set Up a Simple Outdoor Seating Area with Pallet Furniture
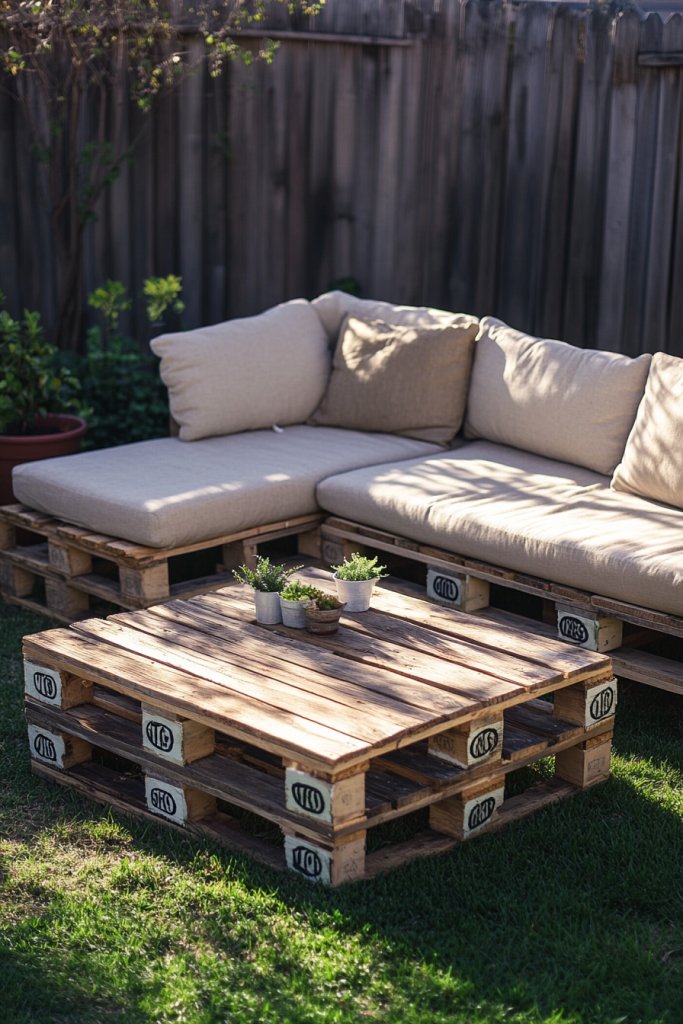
Craving a cozy spot to relax outdoors without spending a fortune? DIY pallet furniture makes it easy and affordable to create inviting seating. It’s perfect for lazy afternoons, backyard chats, or outdoor dinners. Plus, it’s a fun project that adds a rustic charm to your yard or patio.
Imagine a sturdy bench or coffee table built from reclaimed wooden pallets, painted or left natural for a weathered look. Cushions with vibrant covers soften the seating, inviting you to lounge for hours. The rough texture of the wood contrasts with plush textiles, creating a laid-back, welcoming vibe. String lights or outdoor lanterns cast a warm glow, making the space magical at dusk.
You can customize your pallet furniture by adding armrests, creating sectional arrangements, or stacking pallets for height. Use weatherproof paint or sealant to extend durability. Incorporate multifunctional pieces like a table with storage underneath or a bench that doubles as a garden planter. Seasonal cushions or throws are easy updates to match your mood or decor.
Begin by sourcing sturdy pallets—check local stores or online marketplaces. Sand all surfaces thoroughly to prevent splinters. Join pallets using screws or nails, creating stable frames. Finish with outdoor-grade paint, stain, or sealant for weather resistance. Add cushions or fabric covers for comfort. For extra charm, decorate with small planters or lanterns nearby. Simple tools and patience are all you need.
Personalize your setup with painted patterns or stenciled designs on the wood. Mix and match cushion fabrics to reflect your style. Incorporate small side tables made from leftover pallets or crates. You might also add a foldable canopy or shade cloth for sunny days. The versatility makes it easy to adapt your seating area as your needs evolve.
Pallet furniture proves that you don’t need to spend a lot to get a stylish, functional outdoor space. Building it yourself boosts confidence and makes your yard uniquely yours. It’s a practical project with big visual payoff—just grab some pallets and get started. Soon, you’ll have a cozy outdoor retreat that’s perfect for making memories.
7. Add Mulch and Ground Cover for a Lush, Well-Maintained Look
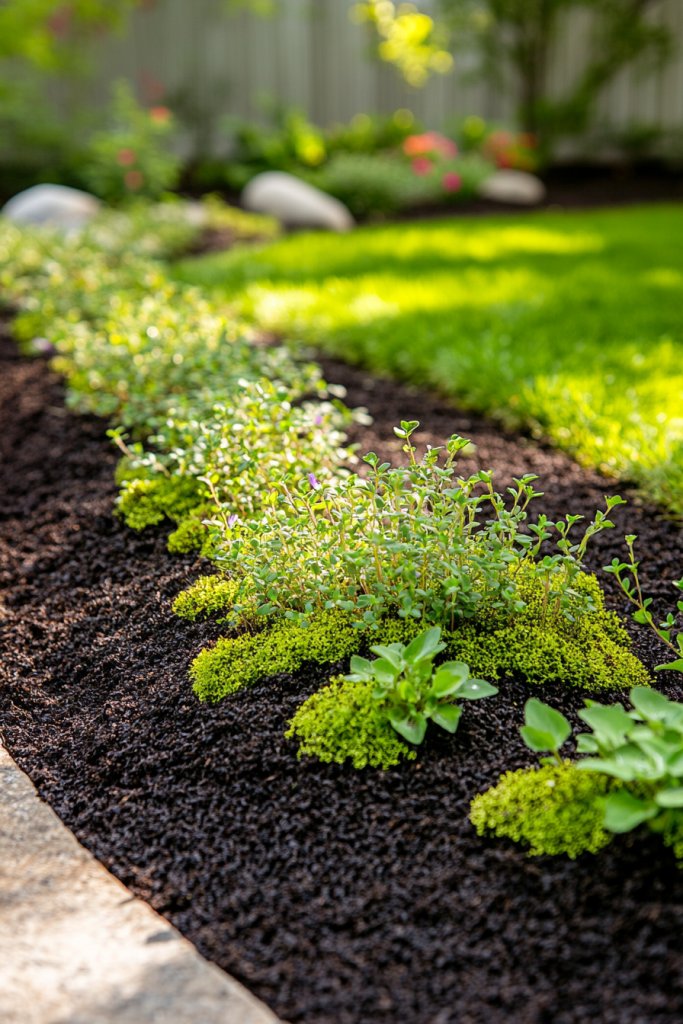
Struggling with weeds or patchy soil that ruins your garden’s look? Mulch and ground cover plants are the budget-friendly heroes that can make any yard look tidy and lush. They help conserve moisture, suppress weeds, and create a finished appearance—all without a hefty price tag.
Visualize a garden bed layered with dark wood chips or straw mulch, with low-growing ground covers like creeping thyme or clover filling the empty spaces. The mulch creates a clean, uniform backdrop that makes flower colors pop. As the sun filters through, the ground cover adds a soft, textured carpet that invites barefoot walks. The overall effect feels polished yet natural, elevating your landscape instantly.
Choose mulch types—bark, straw, or gravel—based on aesthetic preference and climate. Ground covers can be selected for shade tolerance or drought resistance, aligning with your yard’s conditions. Use mulch around trees, flower beds, or vegetable patches to create clear boundaries. Seasonal adjustments like adding fresh mulch or replacing ground cover help maintain the look.
Start by clearing the area of weeds and debris. Lay down a landscape fabric to further reduce weed growth, then spread your chosen mulch evenly to a depth of about 2-3 inches. Select ground cover plants suited to your light and water conditions—plant them with enough space to fill in over time. Water thoroughly and maintain by replenishing mulch annually. Regularly prune or weed out unwanted growth to keep the area neat.
Decorate the mulched areas with decorative stones or small statues for added interest. Use colorful mulch for a bold statement or natural tones for a subtle look. Incorporate edging materials like bricks or metal to define borders. You can also plant seasonal flowers in designated spots to add bursts of color amid the ground cover.
Adding mulch and ground cover transforms unruly patches into a cohesive, tidy landscape. It’s a simple, cost-effective way to boost curb appeal and reduce maintenance. Seeing weeds diminish and plants thrive will inspire you to keep experimenting and improving your yard. Remember, a little mulch goes a long way toward a more polished outdoor space!
8. Install Solar-Powered Pathway Lighting for Ambiance
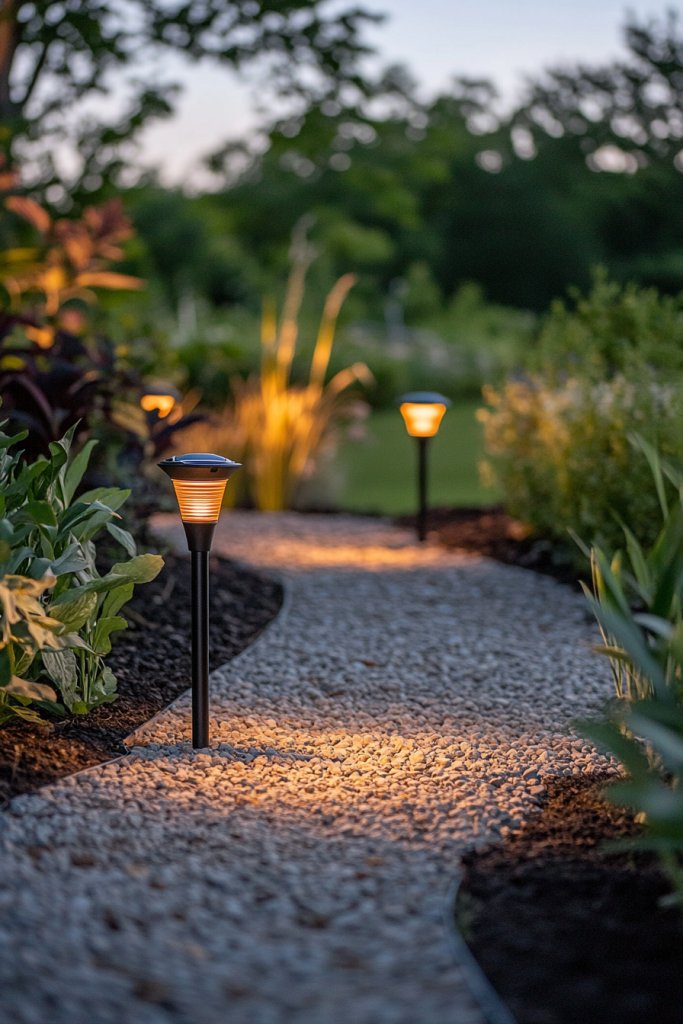
Want to enjoy your backyard after sunset without racking up electric bills? Solar pathway lights are an easy, eco-friendly way to add ambiance and safety. They require no wiring or complicated installation, making them perfect for DIYers and budget-conscious homeowners. Plus, they turn your yard into a magical space that beckons after dark.
Picture a winding garden path softly illuminated by small, stake-mounted solar lights. The gentle glow highlights the texture of paving stones or gravel, creating a cozy, inviting atmosphere. Shadows dance on nearby plants or fences, enhancing the sense of depth and tranquility. As evening falls, the landscape transforms from functional to enchanting, with the lights flickering like fireflies.
Choose from various styles—classic lantern shapes, modern sleek designs, or whimsical motifs—based on your yard’s aesthetic. Install lights along the edges of your walkways, patios, or flower beds, spacing them evenly for uniform illumination. For larger areas, cluster several lights for a more dramatic effect, or install motion-activated lights for added security. Use filters or colored bulbs for seasonal or themed lighting.
Select weatherproof solar lights compatible with your yard size and style. Simply stake them into the ground along your desired path, ensuring they are exposed to direct sunlight during the day. No wiring is required—just make sure the solar panel faces the sun for optimal charging. Adjust the angle and height to achieve the desired glow. Test the lights at dusk and make tweaks as needed. Regularly clean the solar panels to maximize efficiency.
Add decorative elements like small planters or stones around the lights. Use colored bulbs or string lights to create themed atmospheres for parties or holidays. Incorporate dimming or flickering options for a more dynamic experience. You can also attach fairy lights to fences or trees for a layered, magical effect. Personal touches make your outdoor lighting truly unique.
Installing solar pathway lights is a simple upgrade that elevates your yard’s nighttime appeal. They’re a practical way to extend outdoor living and create memorable evenings. Seeing your yard glow beautifully after sunset boosts confidence in your landscaping skills. Best of all, it’s a cost-effective, eco-friendly choice that requires minimal maintenance—what’s not to love?
9. Create a DIY Water Feature with a Birdbath or Small Fountain
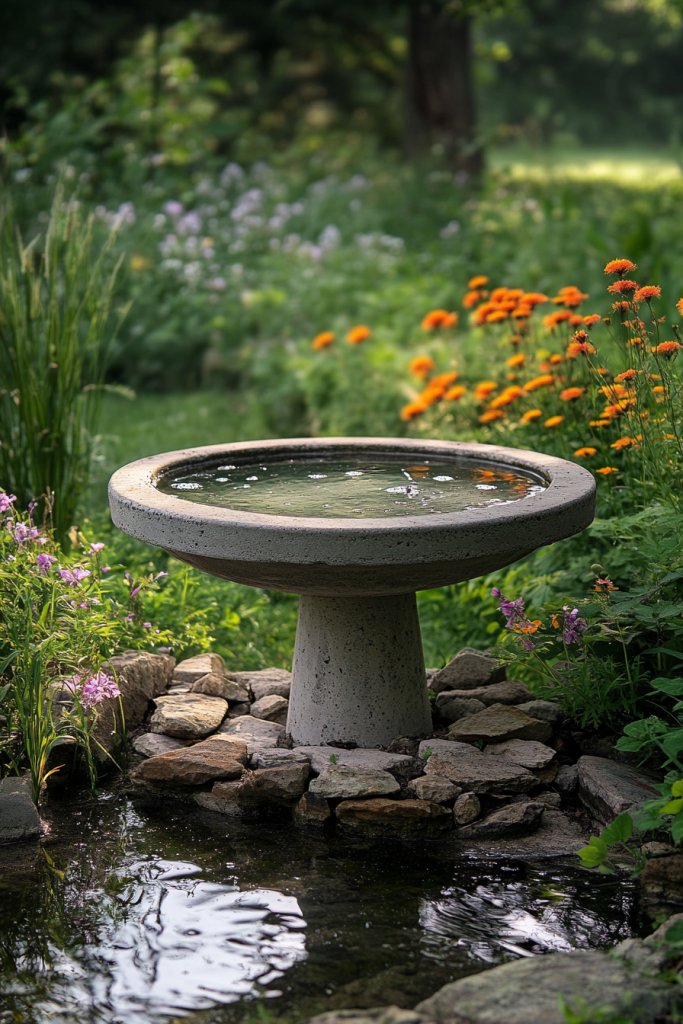
Craving the soothing sound of flowing water but don’t want a costly, complicated setup? A simple water feature like a birdbath or small fountain can add tranquility and attract wildlife to your yard. It’s an affordable way to bring movement and life into your outdoor space, even if you have limited budget or DIY skills.
Imagine a vintage birdbath nestled among flowering bushes, or a small, self-contained fountain made from repurposed containers. Water gently bubbles or cascades, creating ripples that catch the sunlight. Birds come to bathe and drink, while the soothing sound of running water turns your yard into a peaceful oasis. Vibrant flowers and greenery frame the feature, completing the inviting scene.
Choose from decorative birdbaths, repurposed bowls, or small solar-powered fountains. Place them where they can be seen from seating areas, patios, or windows. For a natural look, surround the water feature with stones, pebbles, or plants that tolerate moisture. Seasonal updates like decorative stones or plantings can refresh the look, making it suitable for any style or climate.
Pick a stable, level surface—pavers, concrete slabs, or even a sturdy patch of ground. Fill the basin with water, ensuring it’s deep enough for birds or the fountain’s pump. Use a solar-powered pump or a simple submersible one, depending on your budget. Secure the pump and hide the cords with rocks or plants. Regularly clean the basin to prevent algae buildup and refill water as needed.
Decorate the area with decorative stones, driftwood, or small sculptures. Add floating candles or LED lights for evening ambiance. Surround the feature with colorful flowers or fragrant herbs to enhance the sensory experience. Seasonal accents like pinecones or ornaments can make the water feature festive and fun.
A DIY water feature shows that you can create a calming outdoor retreat without spending a lot. It’s a simple project that adds value and attracts nature. Seeing birds or enjoying the gentle sound inspires a deeper appreciation for your outdoor space. With minimal effort and investment, you can enjoy a tranquil, lively yard that feels like a private spa.
10. Plant Edible Gardens with Kitchen Scraps and Affordable Seeds
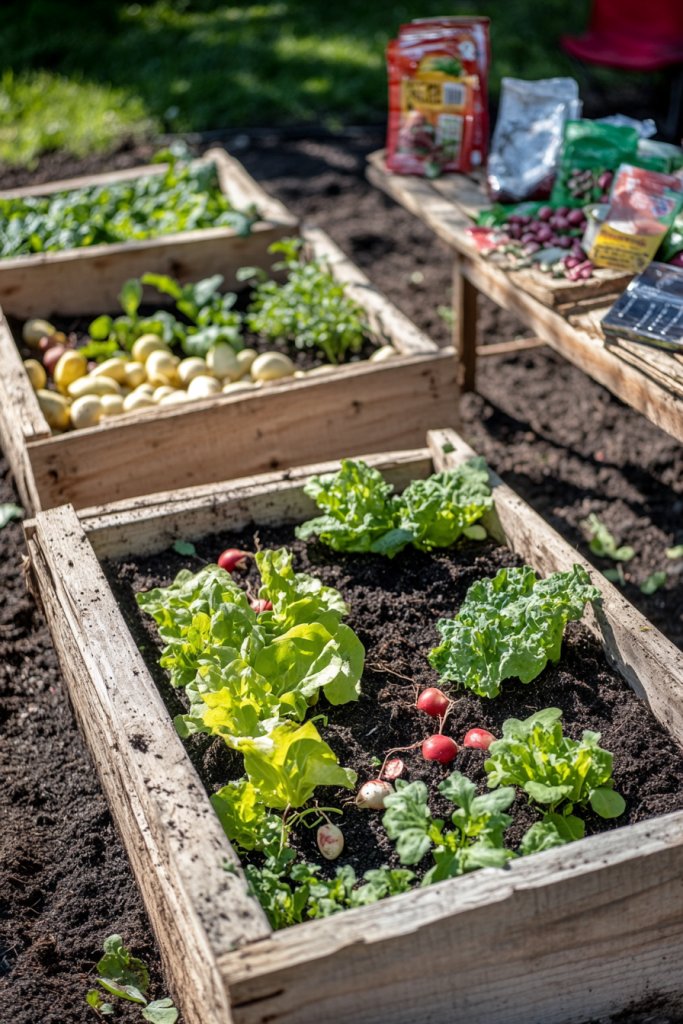
Looking to grow your own food but think it’s too complicated or expensive? An edible garden using kitchen scraps and low-cost seeds is a clever, budget-friendly way to start. It’s satisfying to harvest your own herbs, lettuce, or strawberries, and reduces grocery bills. Plus, it’s a fun project that reconnects you with nature.
Visualize a series of containers and garden beds filled with lush greens and vibrant herbs. Tomato plants climb trellises, while basil and mint thrive in recycled jars or pots. The garden bursts with fresh produce, ready for your next meal. The scent of herbs wafts through the air, and colorful vegetables add a cheerful touch to your yard. It’s a living, edible tapestry that’s both functional and beautiful.
Grow your garden in raised beds, containers, or even windowsills—whatever fits your space. Use kitchen scraps like green onion roots, lettuce cuttings, or potato eyes to jumpstart new plants. Choose affordable seeds for seasonal vegetables and herbs, planting in succession for continuous harvests. Incorporate trellises or small fences to support climbing plants, and rotate crops annually for soil health.
Start by identifying sunny spots and preparing soil with compost or recycled organic matter. Plant seeds or transplant seedlings, following spacing guidelines. Use recycled containers or inexpensive pots—drill drainage holes if needed. Water consistently, especially during dry spells, and harvest regularly to encourage new growth. Compost scraps to feed your garden and reduce waste. Keep the space tidy and free of weeds.
Label your plants with homemade tags or painted sticks. Add decorative touches like colorful pots, small scarecrows, or themed plant markers. Incorporate a small compost bin or worm farm for sustainability. You can also create a mini herb arch or a vertical garden to maximize space. Personal touches make gardening more engaging and visually appealing.
Growing your own food from scraps and seeds proves that gardening is accessible and affordable. It boosts confidence and encourages healthier eating habits. Watching your edible garden flourish inspires ongoing effort and creativity. Plus, it’s a rewarding way to reduce your ecological footprint while enjoying fresh, organic produce—what’s not to love?
11. Use Reclaimed Wood for Borders and Garden Edging
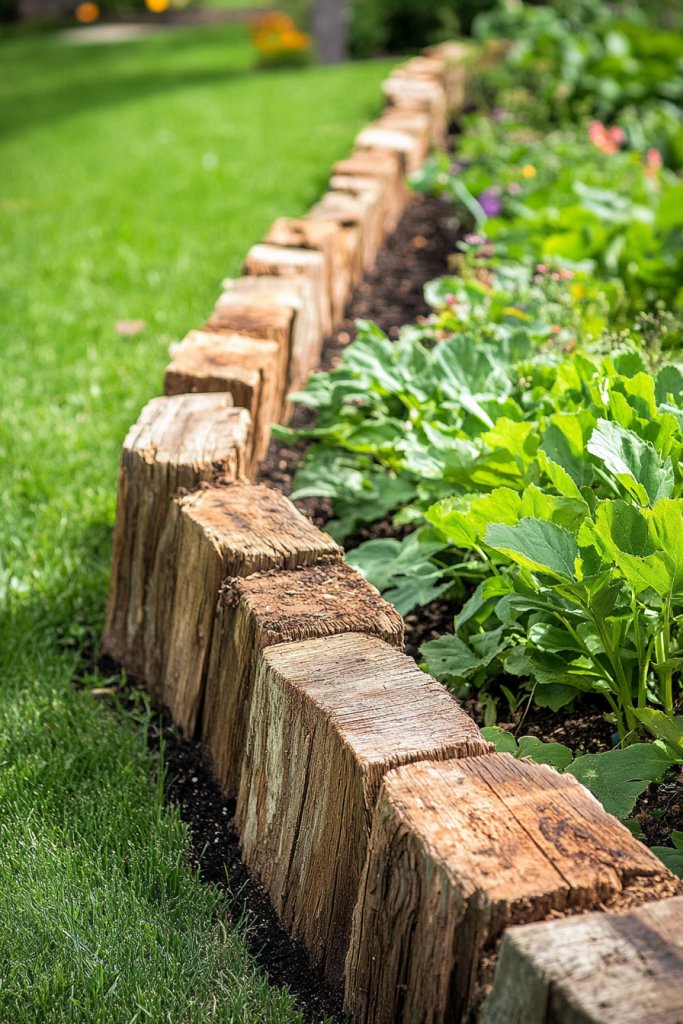
Want to define your garden beds without spending a fortune on plastic or metal edging? Reclaimed wood offers a rustic, eco-friendly alternative that brings warmth and character. It’s easy to install, customizable, and adds a natural touch to your landscape.
Picture weathered wood planks or logs arranged along the edges of flower beds or vegetable patches. The textures range from rough-hewn logs to smooth, aged boards, blending seamlessly with natural elements. The warm tones of reclaimed wood contrast beautifully with vibrant flowers or lush greenery. Over time, the wood develops a charming patina that enhances your garden’s character.
Use split logs for a more natural, woodland look or cut planks to create neat, uniform borders. Stack wood vertically for a raised edge or lay it flat for a low-profile border. You can also incorporate decorative elements like old pallets or reclaimed crates for a DIY fence or divider. Adjust the height and style based on your garden’s design and function.
Source reclaimed wood from salvage yards, online marketplaces, or local sawmills. Treat the wood with non-toxic sealants or preservatives if desired, but many prefer untreated for a more authentic look. Measure and cut the wood to your desired lengths, then secure in the ground with stakes or bury the base for stability. Ensure the edges are smooth or sanded for safety. Regularly check for rot or pests and replace damaged sections.
Paint or stain the wood in colors that complement your garden’s palette. Add decorative stones or moss along the border for extra texture. Incorporate small planter boxes or hanging baskets on the wood for added greenery. Use reclaimed wood to build custom garden features like benches, trellises, or arbors—integrating functionality with style.
Using reclaimed wood demonstrates sustainable living and creative reuse. It’s a cost-effective way to craft personalized, durable garden borders that tell a story. Building with your own hands boosts confidence and adds a handcrafted charm. Your garden will look uniquely yours—warm, inviting, and full of history.
12. Design a Minimalist Gravel or Crushed Stone Zen Garden

Feeling overwhelmed by busy, cluttered outdoor spaces? A minimalist gravel or crushed stone Zen garden offers a retreat for calm and reflection. It’s a low-maintenance, affordable way to create a peaceful corner that promotes mindfulness and tranquility. Who says serenity has to be expensive?
Visualize a simple, flat area covered in fine white gravel or dark crushed stone, carefully raked into patterns. Large, smooth stones or boulders are placed thoughtfully to resemble natural formations. A small, weathered bench or a simple wooden sculpture completes the scene, inviting quiet contemplation. The muted color palette and clean lines evoke a sense of calm that’s perfect for unwinding.
Choose between classic raked patterns or more organic, freeform designs. Add a few larger stones or bonsai-like miniature trees for subtle accents—just avoid overdoing it. Seasonal elements like a small water basin or lanterns can be added for variety, but keep the core minimalist aesthetic. Adjust size based on available space, making it as compact or expansive as you like.
Clear the designated area and level the ground. Lay down a weed barrier or landscape fabric to prevent weeds from growing through the gravel. Spread the gravel evenly, then use a rake to smooth the surface. Create patterns or designs with a broom or rake for visual interest. For added stability, edge the gravel with bricks or metal strips. Regularly top up the gravel to maintain a fresh, neat look.
Add a few decorative elements such as a stone lantern, a small sculpture, or a tiny sand rake for authenticity. Incorporate a bench or a meditation cushion nearby to encourage use. Use different gravel colors or add moss patches to introduce subtle variations. Keep the space uncluttered, emphasizing simplicity and balance.
A Zen garden is a perfect project for cultivating peace and mindfulness without high costs. It’s a space that encourages meditation, relaxation, and mental clarity. Seeing a simple design come together gives a sense of achievement and inspires ongoing mindfulness practices. Your outdoor sanctuary awaits—serene, simple, and budget-friendly.
13. Hang String Lights or Lanterns for Magical Evening Atmosphere
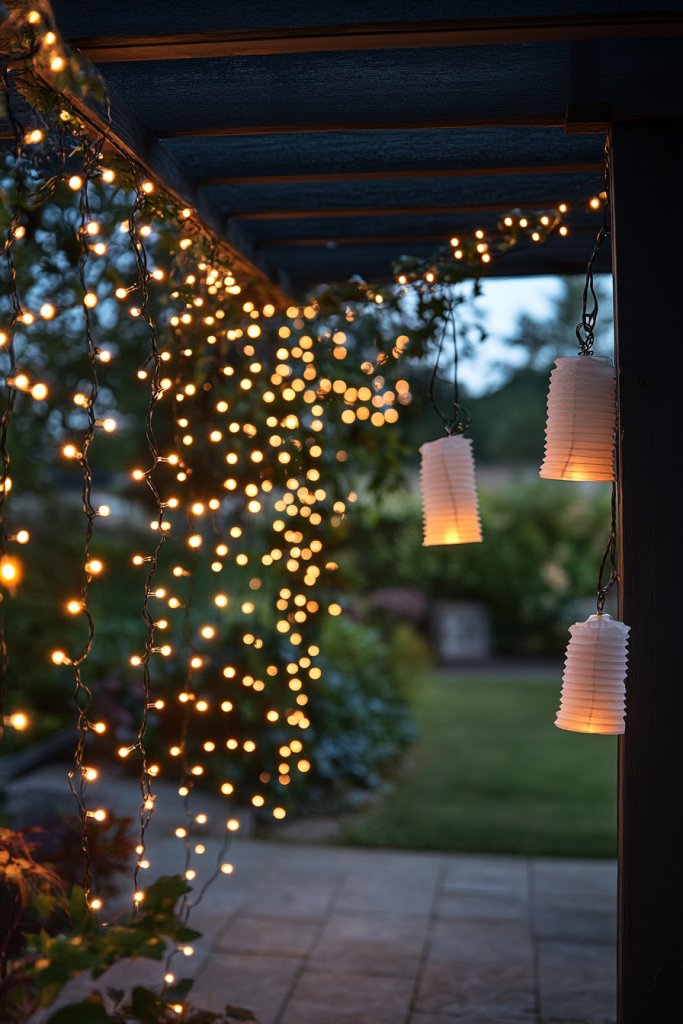
Wish your outdoor space felt more magical as the sun sets? String lights and lanterns are the easiest way to create a cozy, enchanting atmosphere without a big investment. They turn any yard into a dreamy retreat perfect for entertaining or relaxing after dark. Plus, they’re simple to install and remove, making them versatile for any season.
Imagine a canopy of warm, glowing string lights draped over a pergola or fence, casting a gentle light on your patio or garden. Lanterns hung from tree branches or placed on tables add a charming, tactile glow. The combination of soft light and fluttering fabrics or natural textures makes the space feel intimate and inviting. As evening falls, your yard transforms into a fairy-tale setting, inspiring lingering conversations and peaceful moments.
Choose from classic incandescent bulbs, solar-powered LED strings, or vintage Edison-style lights for different looks. Hang lights in straight lines, crisscross patterns, or cascading arrangements based on your space and style. Use a mix of lanterns or paper lamps for variety, and incorporate weatherproof cords and hooks for easy setup. Seasonal options like colored bulbs or themed lanterns keep the ambiance fresh and exciting.
Decide where you want ambient lighting—over dining areas, along fences, or around trees. Attach hooks or clips to secure the lights, ensuring they’re taut and evenly spaced. For safety, use outdoor-rated extension cords and check connections regularly. Solar lanterns can be placed anywhere with direct sunlight; no wiring needed. Test the setup at dusk, and adjust the height or spacing for optimal effect. Regular maintenance involves cleaning fixtures and replacing batteries or bulbs as needed.
Decorate lanterns with ribbons, floral accents, or DIY paint designs. Pair lighting with outdoor textiles like curtains or cushions to amplify the cozy vibe. Use timers or smart switches to automate lighting and save energy. Seasonal decor such as snowflakes or paper snowmen can be added during holidays. Personal touches turn your outdoor space into a magical night-time retreat.
Adding string lights or lanterns is a simple upgrade that instantly elevates your outdoor ambiance. It’s an affordable way to create memorable evenings with friends or family. Seeing your yard glow beautifully boosts your confidence in DIY decor. It’s proof that transforming your outdoor space doesn’t require a big budget or complicated skills—just a little creativity and some light strings!
14. Incorporate Potted Plants to Add Color and Flexibility

Looking for an easy way to brighten your outdoor space without a full garden overhaul? Potted plants are perfect—they’re portable, affordable, and instantly add bursts of color. You can switch out plants seasonally or move them around to suit your mood or occasion. It’s a flexible approach that keeps your landscape fresh and lively.
Imagine a collection of colorful pots filled with blooming flowers, lush foliage, or ornamental grasses placed on your patio, steps, or garden corners. The variety of shapes, sizes, and textures creates a layered, vibrant scene. Weathered terracotta, modern ceramic, or recycled containers add character, while the plants themselves bring color and movement. The overall effect feels curated yet relaxed—a lively mosaic of nature and design.
Use uniform pots for a sleek, modern look, or mix different styles for an eclectic vibe. Stack or cluster pots for visual impact, or place them along pathways for guiding the eye. Choose plants based on sunlight, water needs, and seasonal interest—think trailing vines, flowering annuals, or evergreen shrubs. Incorporate decorative stones or mulch in pots for added personality.
Select pots with drainage holes and fill them with high-quality potting mix suited to your chosen plants. Arrange the pots in appealing groupings, balancing height and color. Water regularly, especially during dry spells, and fertilize as needed. Rotate seasonal plants to keep the display fresh or replant with new varieties. Elevate smaller pots on stands or crates to add visual interest.
Paint or decorate plain pots with DIY designs, or wrap them with natural fibers for a rustic look. Incorporate decorative garden stakes or LED fairy lights for added charm. Plant herbs in decorative containers to use in your kitchen, or fill large pots with tropical plants for a vacation vibe. Personal touches make your outdoor decor uniquely yours.
Potted plants prove that creating a colorful, engaging outdoor space can be simple and affordable. They’re easily rearranged, allowing you to experiment with layout and plant combinations. Watching your pots flourish builds confidence in your gardening skills. It’s a rewarding way to bring life and personality to any outdoor setting without a big investment—just some creativity and care.
15. Repurpose Old Furniture as Garden Decor or Planters

Got old furniture cluttering your garage or basement? Why not transform it into charming garden decor or planters? Repurposing tired pieces is a budget-friendly way to add personality and function to your outdoor space. Plus, it’s a fun project that reduces waste and showcases your creativity.
Imagine a vintage chair turned into a flower planter, with bright blooms spilling over the sides. An old ladder becomes a vertical herb garden or a display stand for potted plants. Weathered trunks or trunks serve as rustic tables or plant stands, blending seamlessly into a shabby chic yard. The mix of old and new creates a layered, inviting scene full of character.
Choose furniture pieces that can withstand outdoor conditions—think metal, treated wood, or plastic. Add drainage holes to furniture like dressers or chairs before filling with soil. Use paint or stain to refresh the look or leave it weathered for a vintage feel. Mix different types and heights for visual interest, or keep it uniform for a clean, curated look. Incorporate small shelves or hooks for added display options.
Clean and prep furniture thoroughly, making repairs if necessary. Drill drainage holes where needed to prevent waterlogging. Fill with heavy-duty landscape fabric or gravel at the bottom for stability and drainage. Add soil and plant your chosen greenery—flowering plants, succulents, or herbs. Secure pieces to prevent tipping and position them where they’ll receive appropriate sunlight. Regular maintenance involves watering, pruning, and repainting as needed.
Decorate furniture with DIY painted patterns, stencils, or fabric cushions. Hang small planters or lanterns from hooks or arms. Use vintage or themed accessories to match your style—think retro, shabby chic, or industrial. Personalize with plaques, signs, or painted messages. Your repurposed furniture becomes a storytelling element in your outdoor space.
Using old furniture in the garden shows that you don’t need to buy new to create a stylish, personalized landscape. It’s a rewarding way to reuse and recycle, giving new life to items that might otherwise be discarded. As you see your DIY creations flourish, your confidence in crafting and design grows. Your yard becomes a one-of-a-kind showcase of creativity and sustainability—cost-effective and charming!
16. Create a Shade Area with DIY Pergola or Shade Cloth
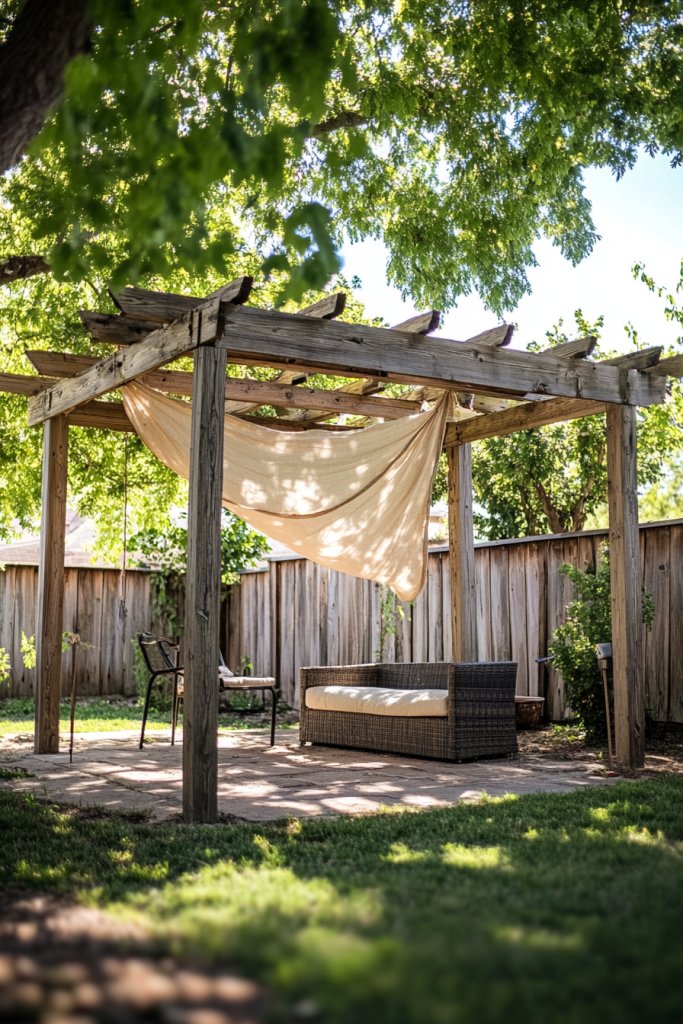
Wish you had a cool, shaded spot to relax even during the hottest days? Building a simple pergola or hanging shade cloth is an affordable way to add comfort and style. It creates a cozy retreat, encouraging more outdoor time without the expense of high-end structures. Plus, it’s a project that can be customized to your space and budget.
Imagine a wooden pergola made from inexpensive lumber, draped with flowing fabric or climbing vines, providing dappled sunlight underneath. Alternatively, a durable shade cloth stretched between posts creates an instant canopy over your seating area. The interplay of light and shadow, combined with comfortable furniture and outdoor textiles, transforms your yard into an inviting sanctuary. It’s an oasis that beckons at any hour.
Choose between a rustic, open-beam pergola or a sleek, modern frame with clean lines. For shade cloth, select breathable fabrics in neutral or vibrant colors, attaching securely with hooks or zip ties. Add curtains, string lights, or hanging plants for extra flair. Adjust height and size based on your yard’s dimensions, and incorporate side panels or privacy screens if needed. Seasonal updates with fabric or plantings keep it fresh.
Start by planning your structure’s footprint and gathering affordable lumber or metal pipes. Build or assemble the frame using basic tools like a saw, drill, and level. Attach shade cloth or fabric with weatherproof fasteners, ensuring proper tension and secure anchoring. Position the structure in a shady spot or one that catches prevailing breezes. Treat wood with sealant for longevity, and add decorative touches like hanging planters or outdoor cushions.
Decorate your pergola with string lights or lanterns for evening ambiance. Use outdoor fabric in patterns or colors that match your decor. Add side curtains or bamboo screens for privacy and shade variation. Incorporate cozy furniture, outdoor rugs, and cushions to enhance comfort. Seasonal accents like fairy lights or fabric drapes can make your space festive and inviting.
A DIY shade area is a practical, budget-friendly project that significantly enhances your outdoor living. It’s a space you’ll use often, and completing it yourself builds pride and confidence. The ability to customize and adapt makes it a rewarding part of your landscape. With just a little effort, you can create a cool, stylish haven that’s perfect for relaxing or entertaining—no pro needed!
17. Plant a Wildflower Meadow for Natural Beauty and Ease
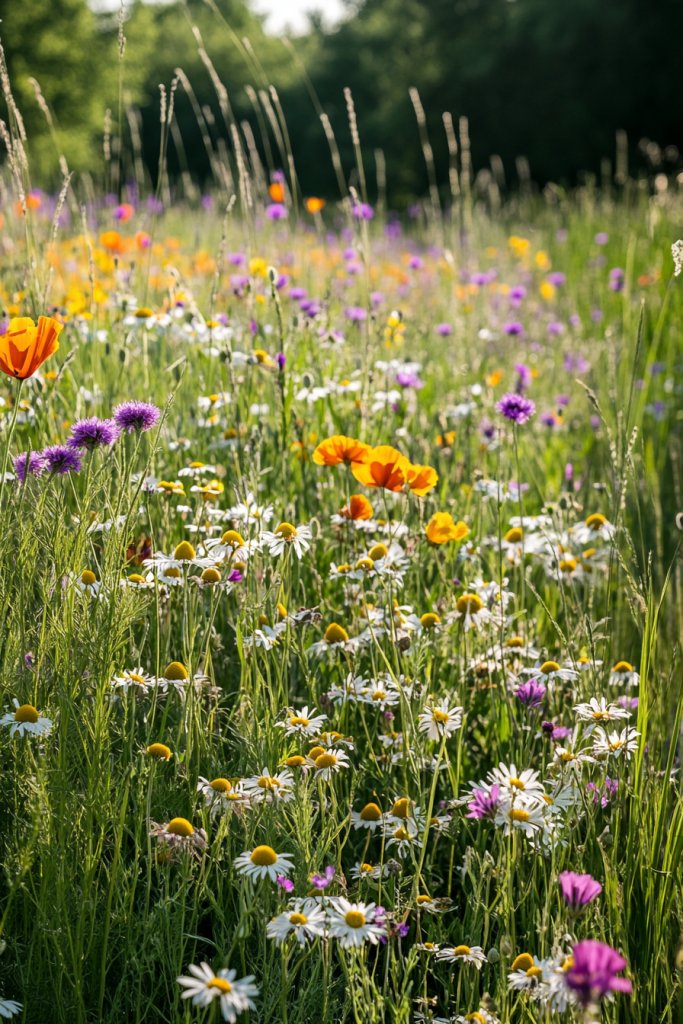
Looking for a low-maintenance way to add color and attract pollinators? A wildflower meadow is the perfect solution—beautiful, eco-friendly, and ridiculously easy to establish. It transforms a dull patch of land into a vibrant, natural scene that requires minimal intervention. Who knew that letting nature do its thing could look this stunning?
Visualize a sprawling patch of native wildflowers—blues, yellows, reds—swaying gently in the breeze. Tall grasses and cheerful blooms create a layered, untamed look that feels both wild and deliberate. Butterflies and bees flit from flower to flower, adding life and movement. The natural mix of colors and textures makes it a lively, inviting landscape that needs little upkeep.
Choose native wildflower seeds suited to your climate and soil. Mix different types to ensure continuous bloom and resilience. Prepare the soil by clearing weeds and loosening the earth; sow the seeds directly onto the ground. For smaller areas, create seed mixes for borders or patches; for larger spaces, consider full meadow planting. Incorporate native grasses for added texture and movement.
Clear the area of weeds and debris, then loosen the soil. Spread your wildflower seed mix evenly across the surface—no need for elaborate soil prep. Lightly rake or press the seeds into the ground for better germination. Water lightly until established, then rely on seasonal rainfall. Minimal fertilization and weed control are required afterward. Over time, let the plants self-seed for ongoing growth.
Add decorative natural elements like driftwood, large stones, or small sculptures to enhance the meadow. Incorporate pathways or sitting spots made from natural materials for strolling and enjoying the view. Plant native shrubs or trees nearby for shade and structure. Maintain the area by annual overseeding and controlling invasive species to keep the meadow thriving.
Planting a wildflower meadow shows that beautiful landscapes can evolve naturally and affordably. It’s a sustainable choice that supports local ecosystems. Watching your meadow flourish encourages ongoing care and learning. It’s a simple, stunning way to create a natural, peaceful retreat that’s both budget-friendly and ecologically smart. Your yard will become a haven for wildlife and a source of pride.
Conclusion
With a diverse array of affordable landscaping ideas, you now have the tools to turn your outdoor space into a beautiful haven on any budget. Whether you opt for easy plant swaps, DIY features, or clever layout changes, these ideas empower you to create a stunning outdoor environment. Don’t wait—start experimenting today and watch your outdoor living space flourish into something truly special!