First impressions count, and your mailbox is often the first thing visitors see when they arrive at your home. Well-designed mailbox landscaping not only enhances curb appeal but also adds a welcoming touch that reflects your personal style. It’s no wonder that creative landscaping ideas for mailboxes have become a popular way to boost home aesthetics.
In this article, you’ll explore a variety of inspiring ideas to elevate your entryway. From charming flower beds and decorative fencing to modern planters and whimsical accents, these ideas will help you turn a simple mailbox into a stunning focal point that invites guests and makes your home stand out.
1. Vibrant Flower Bed Borders for a Cheerful Welcome
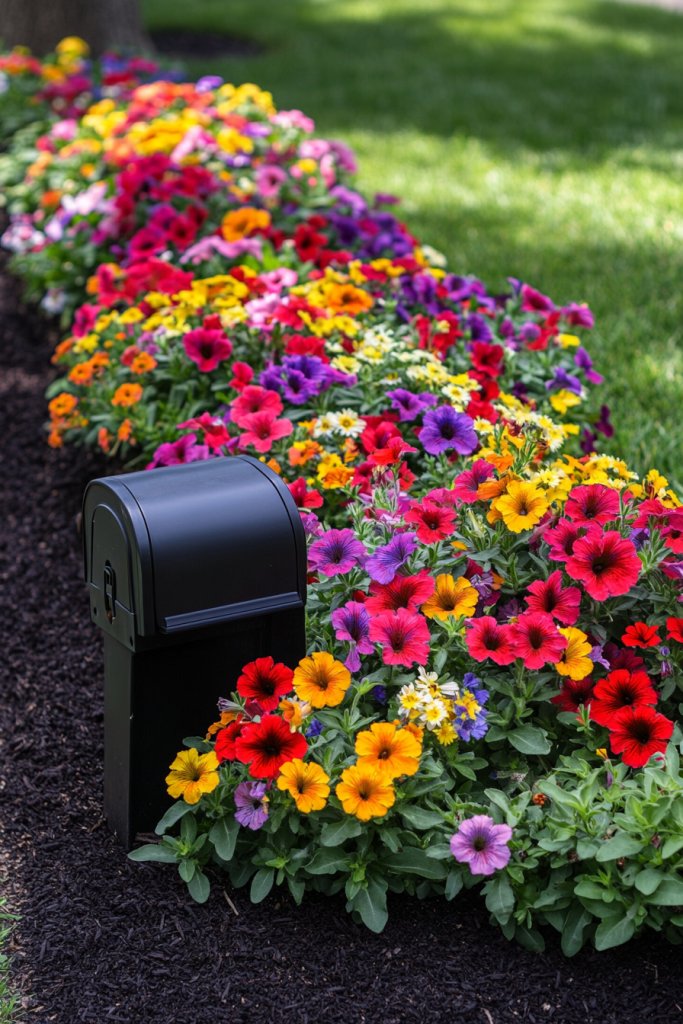
Ever wish your mailbox could greet visitors with a splash of personality? A bland mailbox can feel like an afterthought, making your whole curb look uninspired. You want that charming, welcoming vibe that instantly signals you care about your home’s first impression. Bright, lively borders can turn an ordinary mailbox into a cheerful focal point that sparks joy.
Imagine a lush bed of petunias and marigolds cascading around your mailbox, their vibrant colors contrasting beautifully with the crisp white or black mailbox. Soft blooms spill over the edges, creating a natural tapestry of reds, yellows, and purples. The scent of fresh blossoms fills the air, while bees and butterflies dance around, adding lively movement. The whole scene radiates warmth and friendliness.
You can customize this idea based on your climate and style preferences—think more subdued pastels or bold, tropical hues. Seasonal adjustments are easy: swap out flowers for spring bulbs or autumn chrysanthemums. Container arrangements allow flexibility, so you can change colors or plant types whenever the mood strikes. For a modern look, consider geometric mulch beds with monochrome blooms.
Start by selecting a sturdy, weather-resistant border material like bricks or decorative stones. Prepare the soil by loosening it and mixing in compost for healthy growth. Plant a mix of perennials and annuals suited to your sunlight exposure. Water regularly and mulch to retain moisture and suppress weeds. If you prefer low-maintenance, choose drought-tolerant varieties like succulents or sedum in decorative containers.
Add personalized touches like painted rocks with inspiring messages or a small, decorative garden statue tucked into the beds. Use colorful edging or painted fencing to define the space clearly. Incorporate a theme that reflects your personality—beachy, vintage, or minimalist—by choosing corresponding plants and accessories. Seasonal decor like fairy lights or mini pumpkins can elevate the charm during holidays.
A vibrant flower border transforms your curb appeal and makes your home feel inviting. With just a little effort, you create a picture-perfect entrance that welcomes guests and lifts your spirits. Ready to add a pop of color and personality? Your mailbox can be a cheerful greeting every time you come home.
2. Rustic Stone Path Leading to the Mailbox

Tired of tripping over uneven grass or muddy patches every time you fetch your mail? A well-defined path can make your entryway safer, cleaner, and way more charming. Plus, it adds a rustic, timeless appeal that instantly upgrades your curb presence. Who doesn’t love a welcoming walkway that combines function and style?
Picture stepping stones or gravel laid out along a gentle curve leading up to your mailbox. The rough texture of natural stone contrasts beautifully with lush greenery, creating a cozy, cottage-like vibe. The pathway’s irregular shapes and earthy tones blend seamlessly into the landscape, inviting visitors to walk with purpose and ease. Soft moss or low-growing plants border the stones, adding to the organic feel.
Choose between flagstone, cobblestone, or gravel depending on your style and budget. For a more formal look, straight lines and uniform pavers work well; for a relaxed feel, irregular shapes and smaller stones add charm. Seasonal tweaks include adding solar-powered lanterns or planting seasonal flowers alongside the path. You can also extend the path to create a small patio or seating area.
Begin by mapping out the desired route with stakes and string. Excavate the area, removing grass or roots, and level the ground. Lay a foundation of crushed gravel or sand for stability. Install your chosen stones or gravel, ensuring they are level and tightly packed. Finish with edging to prevent shifting and add decorative elements like small boulders or planters. Regular raking and weed removal keep it pristine.
Add personal touches like engraved stones with family initials or a favorite quote. Incorporate solar lights along the edges for nighttime visibility. You might also border the path with native plants or herbs for added scent and utility. Seasonal accents such as mini pumpkins or pinecones can give it a festive look during holidays. The goal is a functional, aesthetic route that feels uniquely yours.
A rustic stone path makes your entrance more inviting and practical. It’s a simple upgrade that dramatically improves safety and curb appeal. Plus, with DIY-friendly options, you can craft it yourself without breaking the bank. Step outside and enjoy your new, charming pathway—your mailbox’s grand approach.
3. Elegant Planter Pots Flanking the Mailbox
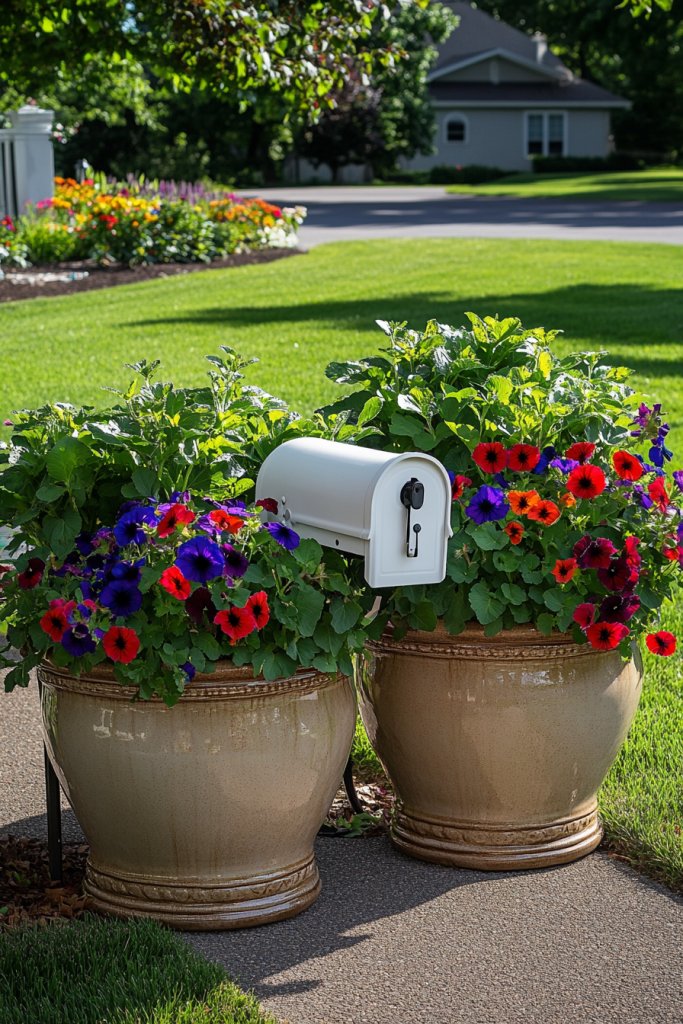
Ever feel like your mailbox looks lonely or uninspired? Adding matching planters on either side instantly creates a balanced, inviting look. It’s like giving your mailbox a fancy outfit that says, ‘Hey, I care about style!’ Plus, it’s a simple way to boost your curb appeal without major landscaping work. Who knew a couple of pots could make such a difference?
Imagine symmetrical ceramic or stone planters filled with lush greenery or colorful blooms framing your mailbox. The containers have elegant curves or textured surfaces that catch the eye. Surrounding the pots, the landscape is lush and tidy—perhaps with a small patch of grass or mulch. The result is an oasis of charm that draws visitors in, making your entrance feel polished and intentional.
Choose planters in styles that match your home—sleek modern, rustic terracotta, or vintage metal. You can swap out plants seasonally, such as tulips in spring or evergreens in winter. For smaller spaces, tall, narrow planters create height without clutter. Incorporate decorative stones or gravel at the base for added texture and stability. For a more whimsical look, consider painted or patterned containers.
Select durable, weather-resistant pots suited for your climate. Fill them with quality potting soil and choose plants based on sunlight exposure—full sun, shade, or part shade. Position the pots at a comfortable height, ensuring they don’t obstruct mailbox access. Water regularly and consider using slow-release fertilizers for sustained growth. Keep the area neat by periodically trimming and cleaning the pots.
Add personal flair with decorative stones or small statues inside or beside the planters. Personalize with themed plants—like herbs for a culinary touch or native species for local charm. You can also paint or stencil the pots with patterns or initials for extra personality. Seasonal arrangements, like mini pumpkins or holiday accents, can make your setup festive. The idea is to reflect your style effortlessly.
Flanking your mailbox with elegant planters creates a welcoming vibe that boosts curb appeal instantly. It’s a low-cost, high-impact update that feels sophisticated yet achievable. With a little creativity, your mailbox becomes a charming vignette that reflects your personality. Ready to give your entryway some stylish symmetry? Your neighbors will definitely notice.
4. Low-Growing Evergreen Ground Cover for Year-Round Greenery

Is your mailbox area looking a bit neglected or dull? A low-maintenance ground cover can turn that space into a lush, green haven that stays vibrant all year long. No more seasonal planting or constant trimming—just consistent beauty with minimal effort. It’s perfect for busy homeowners who want a neat, natural look without the fuss.
Visualize creeping thyme or sedum spreading evenly around your mailbox base, softening the edges with their dense, low-growing foliage. These plants create a carpet of emerald green, contrasting beautifully with decorative stones or mulch. In spring, tiny flowers bloom, adding subtle pops of color. During winter, the evergreen nature keeps the area looking fresh and alive, regardless of the weather.
Choose ground covers that suit your climate—like juniper for colder regions or ice plant for warmer zones. You can combine different varieties for texture and color variation. For a more formal look, keep the cover trimmed into a defined shape; for a natural feel, let it grow freely. Seasonal accents like small ornaments or stepping stones can enhance the look without overshadowing the greenery.
Start by clearing the area around your mailbox and removing weeds. Level the soil and mix in compost if needed. Spread the ground cover seeds or plants evenly, following package instructions for spacing. Water thoroughly and keep the area consistently moist during establishment. Mulch lightly to suppress weeds and retain moisture. Minimal trimming or fertilizing keeps maintenance low.
Incorporate decorative rocks or miniature sculptures at the edges of the ground cover for added interest. Use contrasting mulch or gravel to define the planting area. You could also add small solar-powered lights or miniature fairy garden accessories for a whimsical touch. Choose native plants to support local pollinators and biodiversity. The goal is a lush, lasting green backdrop that enhances your mailbox’s charm.
Low-growing evergreen ground covers offer a permanent, tidy look that keeps your mailbox area looking fresh year-round. They require minimal effort but deliver maximum visual impact. This simple upgrade makes your home appear well cared for and inviting. Ready to enjoy a green, maintenance-friendly landscape? You’re just a few steps away from that perfect, evergreen look.
5. Modern Metal Frame with Climbing Vines
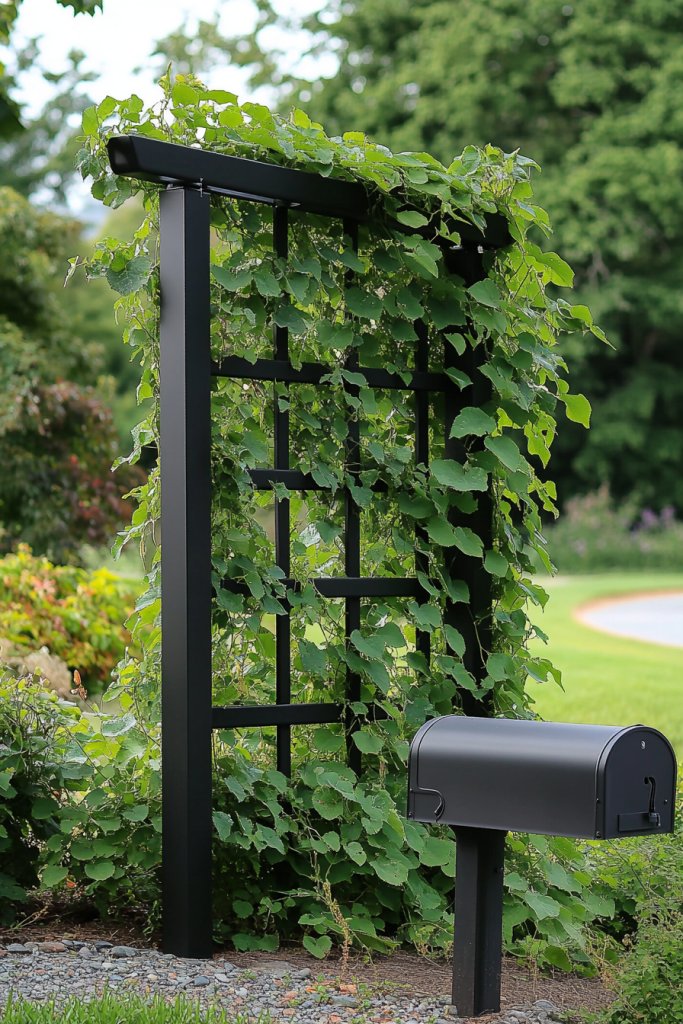
Looking to add height and drama to your mailbox landscape? A sleek metal frame or trellis can elevate your entryway’s style and create a focal point. It’s an eye-catching feature that adds sophistication and visual interest. Plus, it cleverly incorporates nature while maintaining a modern aesthetic—who says you can’t have both?
Picture a minimalist metal frame standing tall beside your mailbox, with climbing vines like clematis or jasmine winding their way upward. The lattice pattern creates shadows and texture, adding depth to the design. In bloom, the vines burst with color or fragrance, making the space lively and inviting. The frame’s clean lines contrast beautifully with organic, flowing greenery, blending structure with nature.
Choose a sleek, powder-coated metal frame for a contemporary look or go rustic with a wrought iron finish. You can grow flowering vines or even edible ones like peas or beans if space allows. Seasonal wraps—like string lights or fabric accents—can be added for holidays or special occasions. The structure can also serve as a support for hanging garden ornaments or decorative lanterns.
Begin by anchoring the metal frame securely into the ground with concrete or sturdy stakes. Select climbing plants suited for your climate and sunlight; plant at the base of the frame and guide the vines upward. Regularly prune to control growth and encourage healthy blooms. Install additional supports or wire guides if needed for taller growth. Keep the area tidy by removing dead or overgrown sections.
Decorate the frame with small fairy lights or seasonal ribbons for added charm. Incorporate decorative stones or sculptures at the base to anchor the look. Use plant tags or personalized markers to identify your favorite vines. You could also add small decorative birdhouses or insect hotels to support local wildlife, making your landscape both attractive and eco-friendly.
A modern metal frame with climbing vines transforms a simple mailbox into a vertical garden masterpiece. It’s a stylish, space-efficient way to add greenery and height without cluttering the ground. Plus, with minimal maintenance, it’s a manageable project for any DIY enthusiast. Your entryway will stand out as a contemporary, nature-inspired showcase.
6. Brightly Painted Mailbox with Coordinated Landscaping
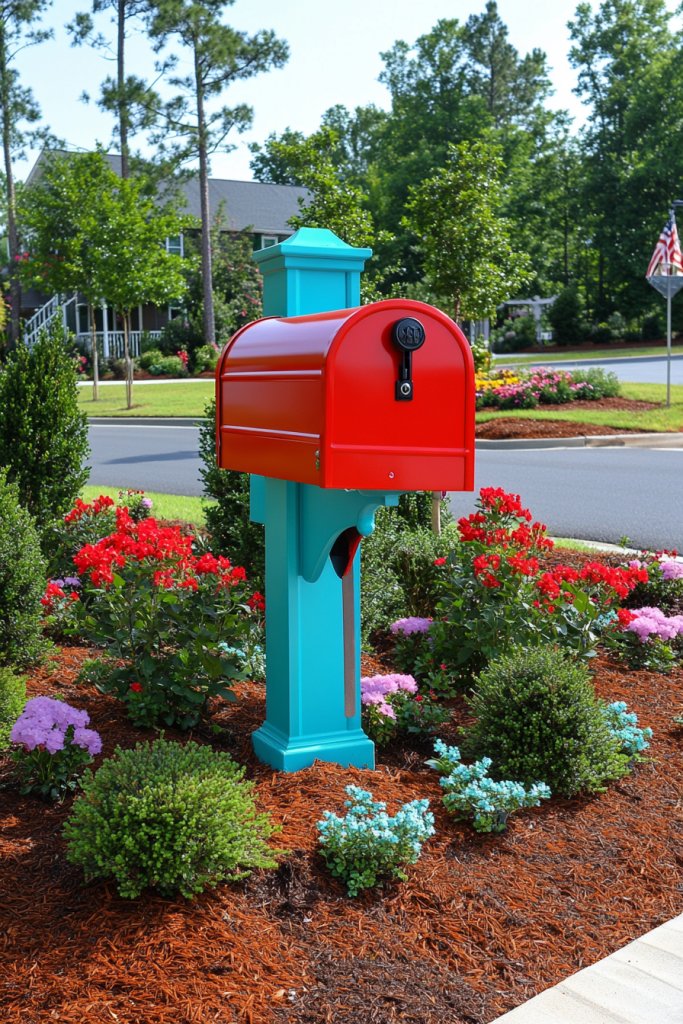
Tired of your mailbox blending into the background? A bold paint job can turn it into a cheerful statement piece. When coordinated with your landscaping, it creates a cohesive, eye-catching entry that boosts curb appeal. It’s a quick, affordable way to refresh your home’s first impression and show off your personality.
Imagine a bright turquoise or fiery red mailbox sitting amidst lush greenery and colorful flowers. The paint’s glossy finish catches the sunlight, making it pop against the natural backdrop. Surrounding the mailbox, neatly edged flower beds or mulch layers enhance the vibrant color, creating a harmonious palette. This cheerful focal point invites smiles from passersby and makes your home memorable.
Choose colors that complement your home’s exterior or stand out for a playful vibe. Coordinate with the color scheme of your flower beds, fences, or decorative stones. Seasonal accents like painted or themed accessories can add charm during holidays. For a subtle approach, opt for pastel shades that blend softly with your landscape, or go bold with neon hues for maximum impact.
Start with a high-quality outdoor paint suitable for metals or plastics. Clean and sand the surface for better adhesion, then apply primer if needed. Use painter’s tape to create clean lines or geometric patterns for a modern look. Seal the paint with a weatherproof clear coat for durability. Coordinate the surrounding landscape by planting flowers or shrubs that match or complement your chosen color palette.
Add decorative touches like personalized name plaques, or attach small garden ornaments that match your color scheme. Incorporate contrasting mulch or decorative stones around the base for added visual interest. You can also create a themed vignette with matching garden furniture or accessories nearby. Regular touch-ups keep the paint fresh and vibrant for years to come.
A brightly painted mailbox is a fun, simple way to express your style and brighten your home’s exterior. When paired with coordinated landscaping, it creates a polished, inviting look that makes your home stand out. It’s a project anyone can tackle with a little paint and some creative planning. Get ready for compliments and a renewed sense of pride in your home’s curb appeal.
7. Edging with Decorative Mulch or River Rocks
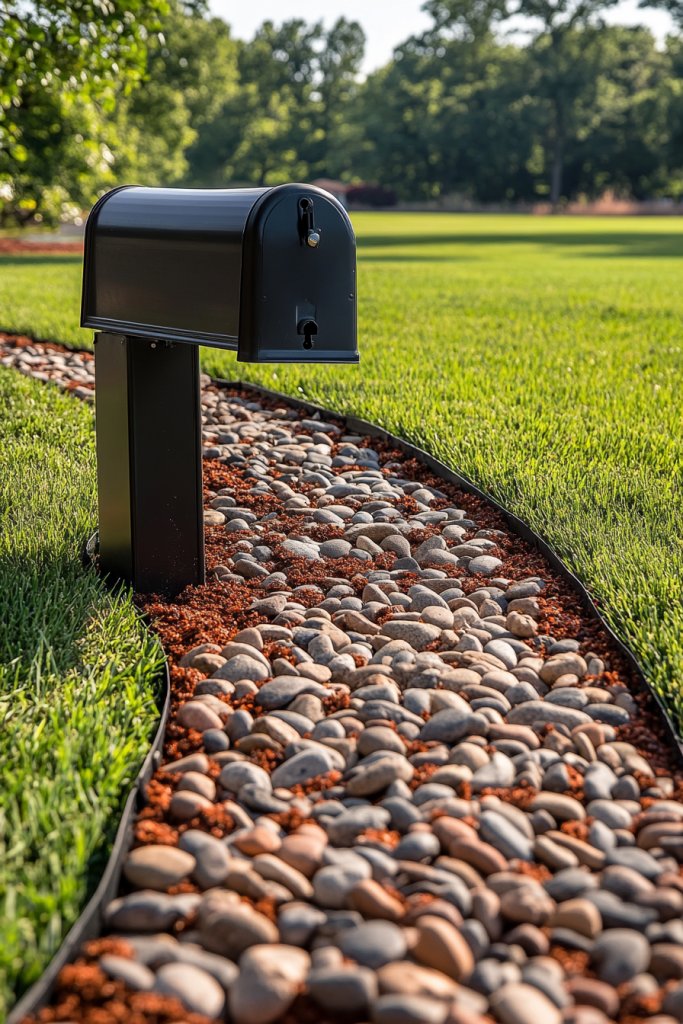
Does your mailbox area look messy or unfinished? A clean, defined edge can instantly tidy up the space and make everything look more intentional. Using decorative mulch or river rocks adds texture and polish, turning plain landscaping into a professional-looking design. It’s an easy upgrade that makes your entire yard feel more organized and attractive.
Visualize a crisp border of dark brown mulch or shimmering river rocks outlining your mailbox bed. The contrast between the smooth stones and lush plants creates a layered, textured effect. The border defines the space, making it look neat and well-maintained. During rain, the rocks shed water easily, preventing erosion and mud splashes from reaching the mailbox. The overall scene feels balanced and visually appealing.
Choose between natural colored stones, polished river rocks, or colored mulch depending on your aesthetic. For a modern look, opt for uniform, sleek stones; for a rustic vibe, go with irregular shapes and earthy tones. You can also combine mulch with decorative stones for a layered effect. Seasonal accents such as mini pumpkins or holiday ornaments can be added temporarily to enhance the look.
Start by excavating a shallow trench around your mailbox to create a clean edge. Lay a flexible border or edging material to keep the mulch or rocks contained. Fill the area with your chosen material, leveling it off for a smooth finish. For a polished look, add a layer of gravel beneath the mulch or stones. Regular raking or topping off keeps the border looking tidy and fresh.
Personalize your border by adding engraved stones or painted accents. Incorporate small garden statues or solar-powered lights along the edge for added charm. Use colored mulch or stones to match your overall landscape theme or seasonal palette. Refresh the border periodically to keep it looking crisp and inviting.
A defined edging with mulch or rocks instantly elevates your landscape’s appearance. It’s a simple, low-cost tweak that creates a clean, professional look. With minimal effort, your mailbox area looks curated and cared for—making your entire home feel more welcoming. Ready to define your curb with style and precision?
8. Incorporating Seasonal Decorations for Festive Charm
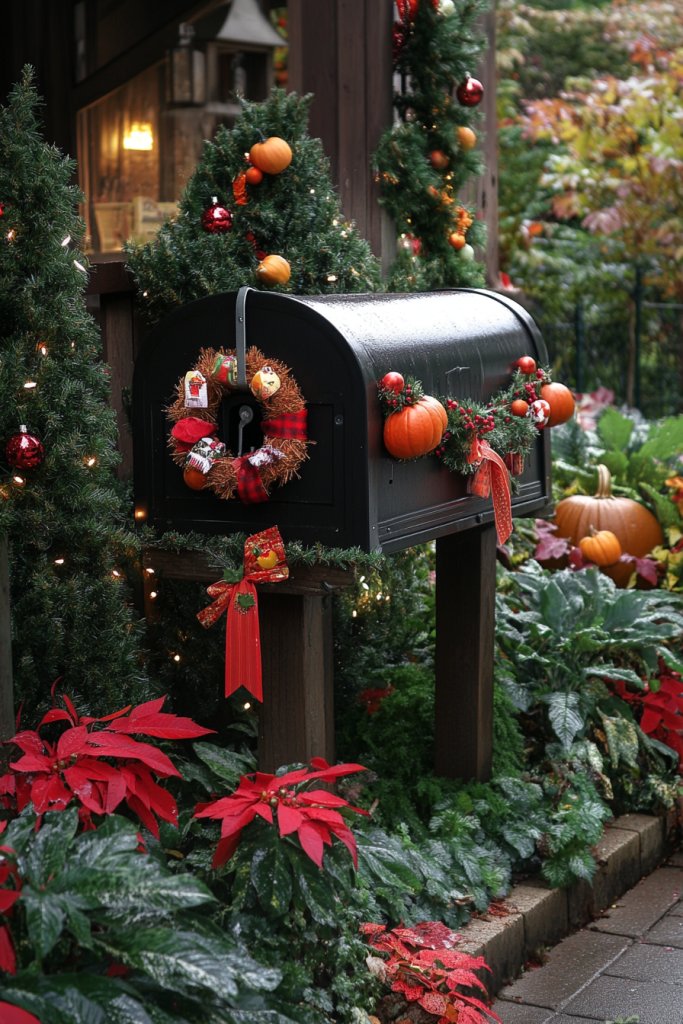
Does your entryway feel a bit dull or generic year-round? Seasonal decorations add instant personality and festive spirit, making your home welcoming no matter the time of year. They’re easy to swap and update, giving your curb a fresh look that celebrates holidays or seasons. Who doesn’t love a little extra cheer at the front door?
Picture a wreath of faux autumn leaves or a string of fairy lights draped around your mailbox during winter holidays. Pumpkins, gourds, or mini hay bales create cozy fall vibes, while bright tulips and pastel eggs announce spring. These accents instantly transform the landscape into a themed vignette, full of warmth and charm. At night, soft lighting or lanterns enhance the cozy, festive atmosphere.
Use weatherproof decorations to withstand the elements—think durable wreaths, artificial floral arrangements, or waterproof lights. Change decorations seasonally: snowflakes and pinecones in winter, shells and sand dollars in summer. Incorporate reusable elements like fabric banners or themed signs that you can switch out easily. For a more sophisticated look, coordinate colors with your house or garden palette.
Plan your decoration calendar ahead of each season. Attach lightweight, weatherproof ornaments securely to your mailbox or nearby posts. Use hooks, zip ties, or suction cups for easy changeovers. Keep extra decorations handy in a storage box for quick swaps. When installing lights, ensure cords are safely tucked away and weatherproofed. Consider solar-powered options to save energy.
Create a mix-and-match theme by adding personalized signs or family-themed ornaments. Incorporate small, seasonal planters with themed florals or herbs for added scent and color. Add a splash of seasonal color with painted stones or decorative picks inserted into flower beds. Keep decorations tasteful yet fun—your curb should reflect your personality.
Seasonal decorations keep your home feeling fresh and festive all year long. They’re an easy way to surprise visitors and boost your home’s charm without a big investment. With just a little planning, your mailbox becomes a centerpiece of holiday cheer. Ready to celebrate every season with style?
9. Small Shrubs for Privacy and Structure
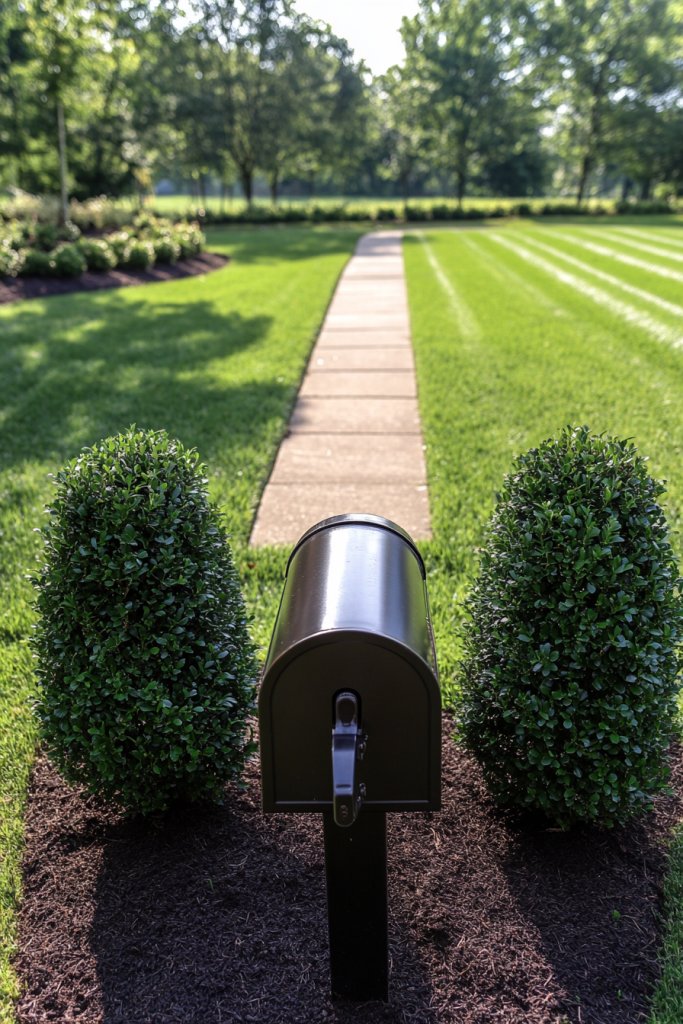
Want a bit more privacy around your mailbox without sacrificing style? Small shrubs can create a natural barrier, giving your entryway a cozy, semi-private feel. They also add structure and height, making your landscape look more balanced and mature. Who says privacy can’t be pretty?
Visualize a row of compact boxwoods or dwarf junipers lining the base of your mailbox. Their dense foliage offers a lush green backdrop that softens the landscape while maintaining visibility. The shrubs are neatly trimmed, creating a clean, organized look. During different seasons, they provide a consistent green or subtly change color, adding year-round interest.
Select shrub varieties suited for your space—compact, slow-growing, and low-maintenance types work best. You can shape them into balls or cones for a formal look or let them grow naturally for a softer, cottage feel. Mix in flowering shrubs or evergreens for variety. Seasonal pruning enhances their shape and health, keeping your landscape tidy.
Start by measuring the space around your mailbox to decide the number and size of shrubs needed. Dig planting holes twice as wide as the root balls, and mix in compost for nutrients. Position the shrubs at a consistent depth and water thoroughly. Mulch around the base to retain moisture and suppress weeds. Regular trimming keeps them looking sharp and prevents overgrowth.
Personalize with decorative stones or mulch at the base for added texture. Use plant markers or custom signs to add a personal touch. Incorporate seasonal accents like small fairy lights or decorative ornaments in the shrub beds. These shrubs not only add privacy but also serve as a natural artful boundary.
Strategically placed small shrubs create a welcoming, private enclave that enhances your landscape’s structure. They’re an investment in curb appeal that pays off in aesthetic and functional value. With minimal upkeep, they provide a lush backdrop that complements any style. Your mailbox becomes part of a harmonious, inviting scene.
10. Creative Use of Vertical Garden Elements

Running out of ground space but still want a lush, leafy look around your mailbox? Vertical garden elements let you maximize planting space upward, creating a striking focal point. They add height, texture, and color without cluttering your yard. Who says you need a sprawling garden to make a statement?
Envision wall-mounted planters or pocket gardens attached to a nearby fence or post, filled with vibrant flowers or textured succulents. These vertical pockets burst with color and form, drawing the eye upward and adding layers of visual interest. The design creates a mini-green wall that contrasts beautifully with the mailbox’s sleek surface. Nighttime lighting can highlight the lush greenery for added drama.
Use modular planters in various sizes and shapes to suit your space and style. Choose lightweight, weather-resistant materials like metal or recycled plastics. Mix flowering plants with textured succulents or herbs for both beauty and utility. For a more contemporary look, install geometric or asymmetrical arrangements. Seasonal decor like fairy lights or small ornaments can be added for special occasions.
Secure planters or pockets to a sturdy wall, fence, or post using brackets or hooks. Fill with high-quality potting mix and select plants based on sunlight and moisture levels. Regular watering and pruning keep the plants healthy and attractive. You can also incorporate drip irrigation systems for low-maintenance watering. Consider the view from different angles to ensure a balanced, lush appearance.
Personalize your mini vertical garden with decorative plant markers or painted pots. Add small decorative accents like stones or mini sculptures within the planting pockets. Change out plants seasonally to keep the display fresh and engaging. Use color-coordinated plants or containers to match your home’s exterior for a cohesive look.
Vertical gardens are a modern, space-saving way to introduce greenery into tight spots. They create a lush, layered effect that elevates your landscape’s style. Plus, with simple watering systems, they’re easy to care for—even if you have a black thumb. Your mailbox area will look fresh, vibrant, and full of life.
11. Bright Accent Stones or Pathway Markers
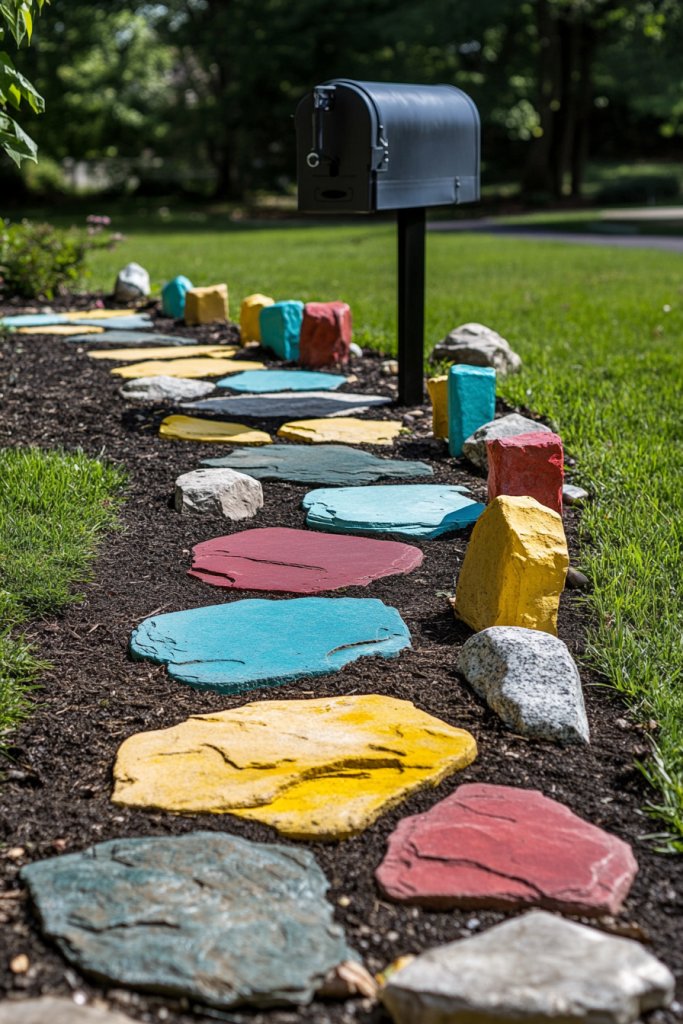
Looking for a fun way to guide visitors and add personality to your curb? Bright accent stones or pathway markers can do just that—creating a playful, inviting pathway that leads straight to your mailbox. They’re a simple yet effective way to add color and character without much effort. Who said pathways have to be dull?
Envision colorful stepping stones or painted rocks arranged along a meandering path. Each stone is a burst of color—reds, blues, or yellows—that catches the eye. The stones are spaced evenly, creating a lively rhythm that guides visitors smoothly. During the day, they add visual interest; at night, solar-powered lights can make them glow softly, adding charm and safety.
Choose stones with bold patterns or vibrant colors for a playful look, or opt for metallic or iridescent finishes for a modern twist. You can create a themed pathway—like ocean-inspired with blues and shells or woodland with earthy tones and leaf patterns. Incorporate larger stones or sculptures at key points for added impact. Seasonal decorations or small garden flags can also be integrated.
Lay out your pathway design with stakes and strings, then excavate a shallow trench. Set the stones into the ground, ensuring they are level and stable. Secure loose stones with sand or gravel underneath if needed. Fill gaps with additional gravel or sand to keep stones in place. Regularly sweep or wash the stones to maintain their bright appearance and replace any damaged ones.
Add personalized touches like engraved initials or family symbols on select stones. Incorporate small solar lights or decorative pebbles alongside the pathway. Use contrasting colors or patterns to create visual interest. You can also add a decorative border or edging to frame the pathway and keep everything tidy. Seasonal accents like mini pumpkins or holiday symbols make it extra festive.
Bright accent stones turn a dull pathway into a lively, eye-catching feature. They’re a playful, low-cost way to boost your curb appeal and guide visitors with style. With minimal effort, your pathway becomes a conversation starter and a reflection of your creativity. Ready to add some color and personality to your entry?
12. Container Garden with Mixed Plants for Texture

Want a vibrant, manageable garden right at your mailbox? Container gardening offers endless possibilities for mixing plants, textures, and colors without needing a large yard. It’s perfect for small spaces and allows you to change your look whenever inspiration strikes. Who says you can’t have a lush garden in a tiny spot?
Picture a collection of pots filled with ornamental grasses, succulents, and flowering annuals, each with unique textures. Tall, wispy grasses contrast with smooth, plump succulents, while bursts of bright flowers add pops of color. Arranged at different heights, these containers create a layered, dynamic scene that feels lively and curated. The variety invites touch and curiosity, making your mailbox area irresistibly inviting.
Mix and match containers in different shapes, sizes, and materials—think ceramic, metal, or woven baskets. Use a theme, such as tropical, desert, or cottage garden, to guide your plant choices. Change out seasonal plants to keep the display fresh. Incorporate decorative stones or shells in the pots for added visual interest, or add small ornaments for a personalized touch.
Choose containers with drainage holes for healthy roots. Fill each with high-quality potting mix suitable for the selected plants. Position the containers on pedestals, stands, or directly on the ground for variety. Water regularly, especially during hot months, and fertilize as needed. Group containers close together for a cohesive look, but leave enough space for air circulation. Rotate plants seasonally for maximum impact.
Label your containers with decorative markers or painted stones. Add small decorative accents like miniature figurines or fairy lights. Use matching color schemes to tie the display together or contrast for a bold statement. Incorporate edible herbs or vegetables for functionality. Regularly refresh the plantings to keep the scene vibrant and engaging.
A container garden offers a flexible, beautiful way to brighten your mailbox area. It’s a DIY project that lets you experiment with colors and textures easily. Plus, it’s low-commitment but high-impact, making it perfect for any skill level. Your mailbox corner will be a colorful, textured oasis everyone admires.
13. Incorporating Solar-Powered Landscape Lighting
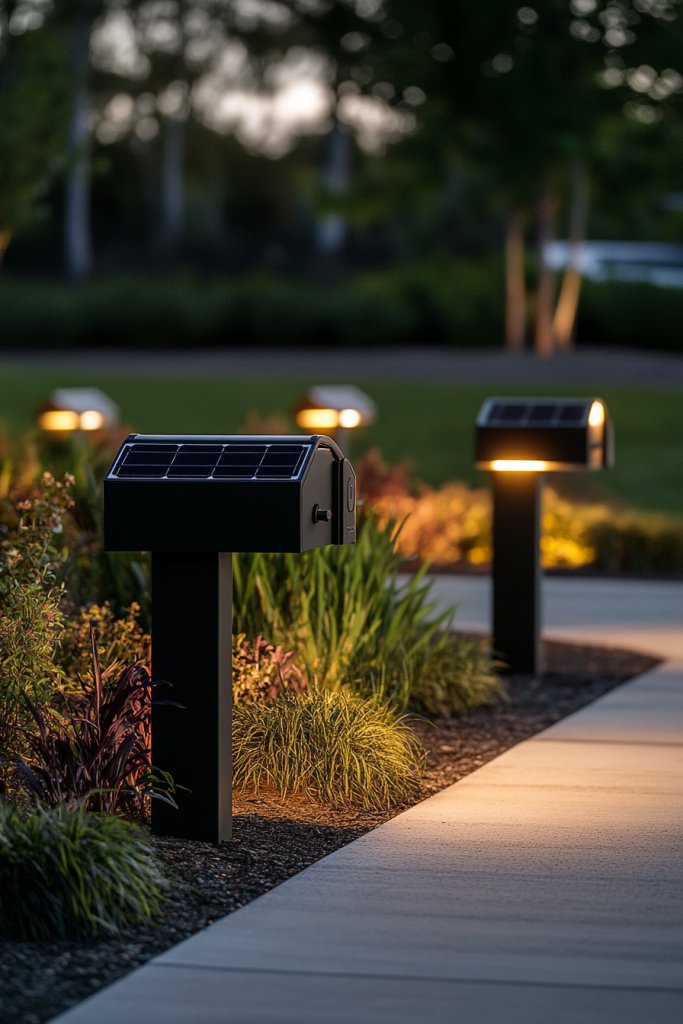
Ever wish your mailbox was visible at night without adding clutter or increasing your energy bill? Solar-powered landscape lighting is the perfect solution—eco-friendly, easy to install, and effective. It makes your curb look warm and inviting after sunset, enhancing safety and style. Who knew that the magic of sunlight could brighten your home’s entrance?
Imagine soft, amber glow emanating from discreet solar lights lining your pathway or spotlighting your mailbox. The gentle illumination highlights landscaping features and creates a welcoming atmosphere. During the night, the glow flickers softly, giving your home a cozy, festive feel. These lights are subtle but effective, adding a layer of charm without overwhelming the scene.
Choose from stake lights, string lights, or embedded ground lights depending on your style. For a sleek look, install ground-mounted spotlights that shine directly on your mailbox or landscape features. String fairy lights along fences or trees for a whimsical touch. Use timers or motion sensors to automate lighting and save energy. Seasonal light displays can be added during holidays for extra festivity.
Select high-quality solar lights with a clear, rechargeable battery and weatherproof casing. Install them in areas with direct sunlight during the day for maximum efficiency. Position stake lights along pathways or at strategic points to highlight key features. Avoid shading the solar panel with trees or structures. Regularly clean the solar panels to ensure optimal charging and longevity.
Coordinate the lighting with your landscape theme—warm tones for cozy vibes, cool white for modern elegance. Add decorative lantern covers or colored bulbs for special occasions. Use lighting to accentuate specific plants, sculptures, or architectural features. Keep extra batteries or replacements handy for long-term maintenance and keep the scene fresh with seasonal updates.
Solar landscape lighting transforms your curb into a nighttime showcase, increasing safety and curb appeal. It’s an eco-conscious, hassle-free upgrade that delivers instant impact. With minimal effort, you create a luminous, welcoming environment that’s perfect for evening gatherings or quiet nights. Brighten your home’s first impression effortlessly.
14. Edible Plant Additions for Functional Beauty
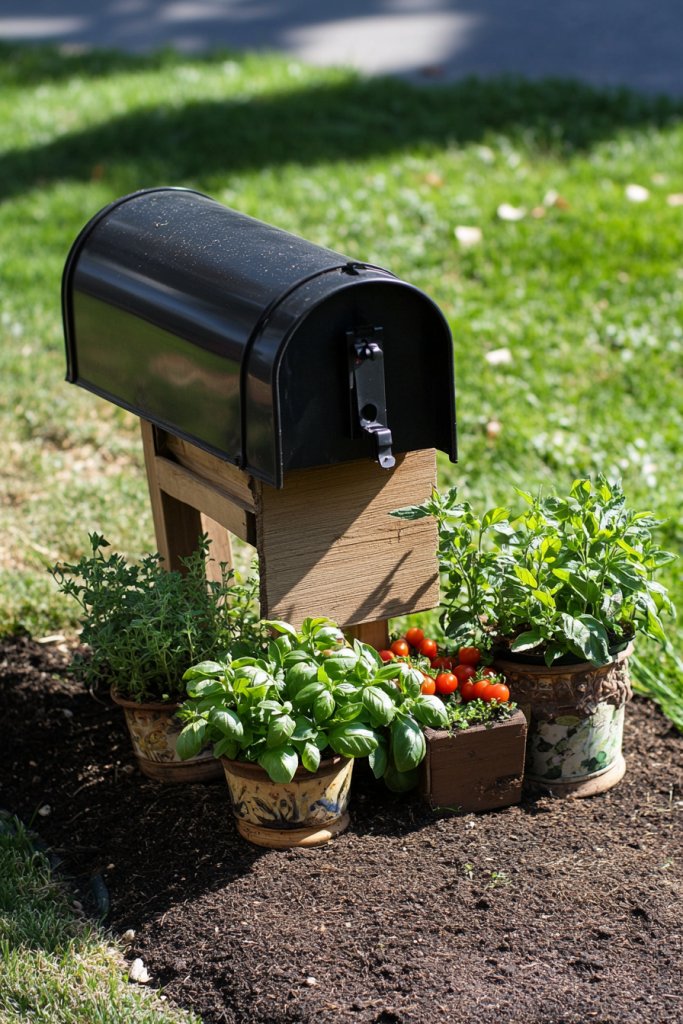
Looking to combine beauty and utility around your mailbox? Edible plants like herbs or small vegetables provide fresh flavor and a charming, natural aesthetic. They turn your landscape into a mini kitchen garden that’s both pretty and practical. Who says your curbside can’t be functional and fun?
Picture a small herb garden with fragrant basil, thyme, and mint growing in decorative pots or raised beds near your mailbox. Bright green leaves and tiny flowers add color and texture, turning your yard into a lush, edible oasis. The fragrance of herbs fills the air as you pass by, making every visit a sensory delight. It’s a delightful mix of form and function.
Choose containers that complement your home’s style—rustic wooden boxes, modern ceramic pots, or vintage metal buckets. Incorporate edible plants that suit your climate and culinary preferences. Mix with decorative stones or mulch for a tidy look. Seasonal herbs like cilantro or chives can be rotated in and out to keep the garden fresh and useful. Use vertical supports or trellises if space is limited.
Select high-quality, well-draining containers and fill with nutrient-rich soil. Plant herbs or small vegetables, spacing appropriately for growth. Position the containers where they receive adequate sunlight—at least 4-6 hours daily. Water regularly, and use organic fertilizers to promote healthy growth. Keep an eye out for pests and harvest frequently for continuous flavor. Incorporate companion plants to enhance growth and deter pests.
Label your herbs with decorative markers or hand-painted signs. Add small decorative accents like stones or tiny garden gnomes. Incorporate seasonal flowers or edible flowers for visual charm. Create a small, dedicated space that reflects your culinary tastes while adding visual interest. Regularly harvest and refresh the plants for continual productivity and aesthetic appeal.
Edible plants bring a fresh, lively touch to your landscape and connect you with your food source. They’re easy to grow and maintain, offering ongoing rewards. Plus, fresh herbs on hand make cooking more enjoyable and flavorful. Ready to turn your mailbox area into a functional beauty spot with tasty, vibrant plants?
15. Minimalist Gravel and Succulent Arrangement
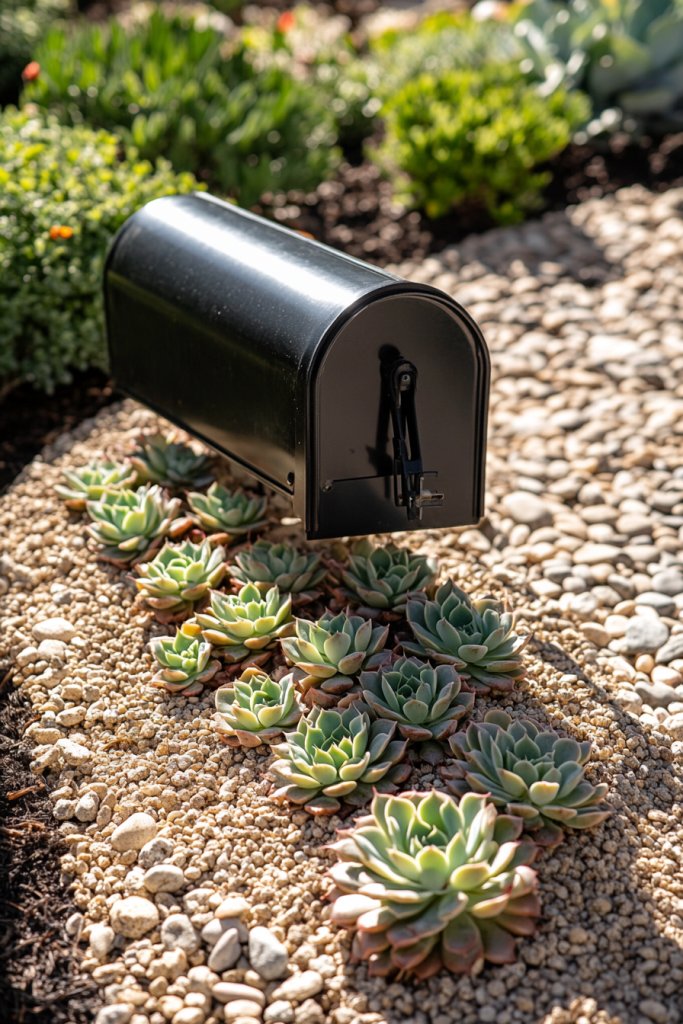
Craving a sleek, low-maintenance landscape that still looks stunning? A minimalist gravel and succulent arrangement fits the bill perfectly. It offers a modern, clean aesthetic that requires very little care. This style is perfect for busy homeowners or those who love a tidy, clutter-free look.
Imagine smooth, light-colored gravel forming a simple bed around your mailbox. Low-profile succulents with fleshy leaves and geometric shapes are arranged neatly, creating a calm, organized scene. The textures contrast beautifully—rough gravel against smooth, plump succulents—adding subtle visual interest. During the day, the arrangement looks cool and contemporary; at night, subtle lighting can highlight the textures.
Opt for different succulent varieties—pearls, echeveria, or aloe—based on your climate and aesthetic. Keep the layout simple or add a few sculptural stones or small decorative elements for contrast. Use monochrome gravel for a unified look or mix textures for more visual depth. Seasonal changes can include swapping out succulents or adding tiny decorative accessories.
Clear the area around your mailbox and lay a weed barrier if desired. Spread a layer of gravel evenly, then arrange succulents in a geometric pattern or cluster. Choose drought-tolerant, low-water plants to keep maintenance minimal. Water sparingly and add gravel or additional succulents seasonally. Ensure proper drainage to prevent root rot, and consider installing small edging for a clean border. Regularly remove dead or overgrown parts.
Personalize with decorative stones, miniature sculptures, or painted rocks. Use contrasting gravel colors to highlight specific plants or create patterns. Incorporate small, solar-powered lights or unique pots for added flair. Keep the design simple yet striking, and choose plants that reflect your style—whether sleek and modern or rugged and natural. Refresh the arrangement as needed to keep it looking fresh.
A minimalist gravel and succulent display offers a chic, easy-to-maintain landscape upgrade. It’s a perfect choice for modern homes or anyone who prefers simplicity. With just a little effort, your mailbox area becomes a stylish, drought-tolerant oasis. Ready to enjoy a clean, contemporary look that saves time and effort?
16. Raised Bed with Layered Planting for Height Variation
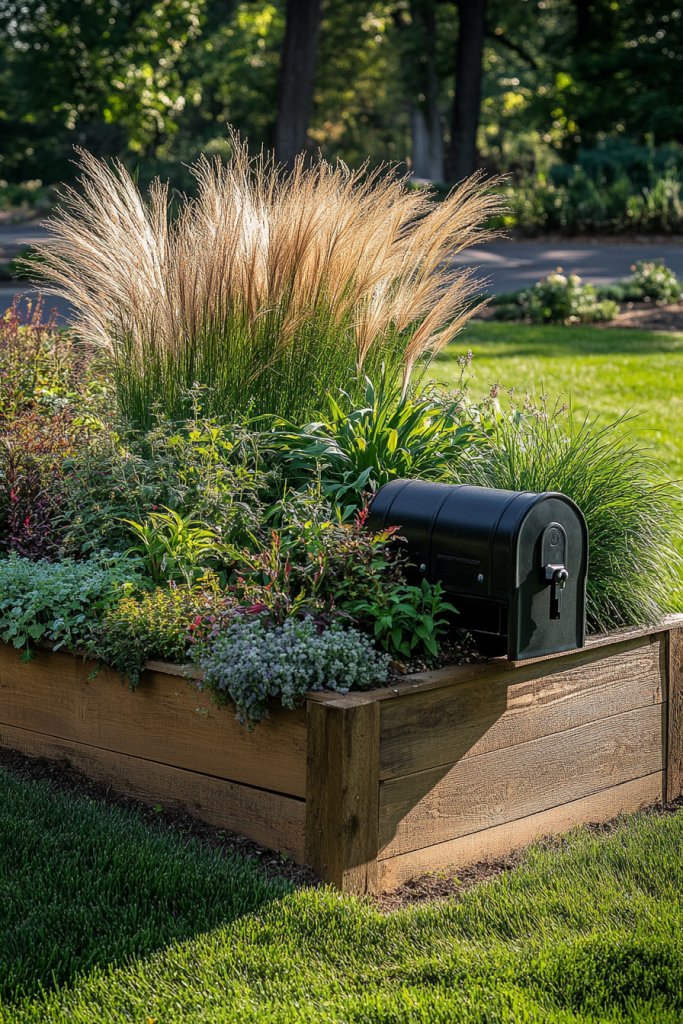
Want to add dimension and visual interest to your mailbox landscape? A raised bed with layered planting can do just that, creating a focal point that commands attention. It elevates your landscape, making the scene more dynamic and inviting. Who says your mailbox has to be at ground level for maximum impact?
Imagine a small, wooden or stone-raised planter around your mailbox, filled with a mix of tall grasses, medium shrubs, and low ground cover. The layering adds depth, guiding the eye upward and around. The different heights and textures create a rich tapestry that feels lush and intentional. Seasonal flowers can be added for pops of color, making the scene come alive.
Choose materials that match your home’s style—natural wood for a rustic look, concrete blocks for a modern vibe. Mix plants with varying heights, colors, and textures to keep the arrangement lively. For smaller spaces, keep the layers shallow; for larger areas, go for more dramatic height variations. Incorporate decorative stones or mulch for a polished finish. Seasonal accents like pumpkins or holiday décor can enhance the theme.
Construct or purchase a raised bed that fits your space—either pre-made or DIY. Fill it with quality soil and plant a variety of species suited to your climate. Arrange taller plants at the back or center, with shorter ones in front. Water thoroughly and maintain with pruning and fertilizing. Mulch the surface for moisture retention and weed control. Consider adding edging or decorative elements to define the space.
Personalize with engraved stones, decorative markers, or themed plant selections. Incorporate seasonal décor—like hay bales or scarecrows in fall, or fairy lights in winter. Use color-coordinated plants or containers to unify the look. Add small sculptures or decorative stakes for extra flair. Refresh the layers and plants periodically to keep the display fresh and vibrant.
A layered, raised bed brings height and sophistication to your landscape, making your mailbox a true focal point. It’s a versatile, eye-catching upgrade that elevates your curb appeal. With simple DIY steps, you can create a stunning, personalized scene that lasts for seasons. Your home will stand out as stylish and thoughtfully designed.
17. Artistic Rock or Stepping Stone Accents
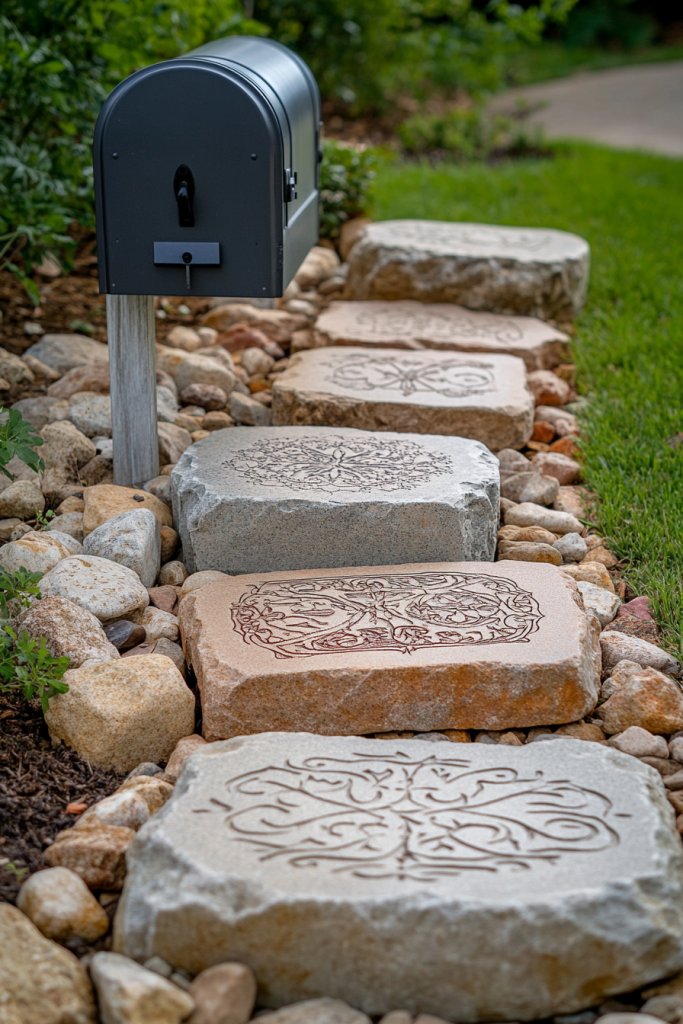
Looking for a creative way to express your personality at your entryway? Artistic rocks or engraved stepping stones turn a plain landscape into a personal statement. They add a touch of artistry and uniqueness that reflects your style. Who says landscaping can’t be a form of self-expression?
Picture large decorative stones with engraved patterns, quotes, or symbols placed strategically around your mailbox. The stones serve as focal points, guiding visitors along a pathway of your choosing. The textures, colors, and carvings create a layered, artistic scene that’s both functional and beautiful. Night lighting can cast fascinating shadows, adding an element of surprise.
Choose stones with patterns, motifs, or personal engravings that tell a story or match your theme—rustic, modern, or whimsical. Mix large artistic stones with smaller decorative pebbles or gravel to create contrast. You could also carve family initials or favorite symbols for a personal touch. Incorporate engraved stepping stones into existing pathways or garden beds for an artistic upgrade.
Select durable stones suitable for outdoor use—consider natural stone, concrete, or slate. Plan your layout by positioning stones where they will be most visible and functional. Secure larger stones with gravel or sand foundations, ensuring stability. Use weatherproof engravings or paint for any designs. Regularly clean and maintain the stones to keep the carvings sharp and the scene attractive.
Add decorative elements like painted accents, small sculptures, or themed motifs that reflect your personality. Incorporate lighting to highlight the stones at night, creating dramatic effects. Use contrasting materials—such as metal or wood accents—to frame your artistic stones. Seasonal decorations can be added temporarily for holidays, blending art with festivity.
Artistic rocks and engraved stones turn your landscape into a gallery of your personal style. They’re a long-lasting, creative way to make your home memorable. With a little effort, you craft a landscape that’s both functional and full of personality. Your mailbox becomes a signature piece in your outdoor space.
Conclusion
With a diverse array of mailbox landscaping ideas, you have plenty of options to transform your entryway into a charming and inviting space. Whether you prefer lush greenery, colorful blooms, or unique decorative touches, these ideas are easy to adapt for any style. Give your mailbox a fresh new look and create an entrance that welcomes everyone with warmth and personality. Your perfect entryway is just a few creative tweaks away!