Dreaming of a beautiful home without breaking the bank? Cheap home improvement ideas are gaining popularity because they allow you to refresh your space without the hefty price tag, proving that you don’t need to spend a fortune to create a stunning environment.
In this article, you’ll find a variety of budget-friendly tips and creative hacks to enhance every corner of your home. From simple DIY projects to clever decor updates, these ideas will inspire you to transform your living space into a more inviting, stylish sanctuary—all while keeping costs low and your creativity high.
1. Transform Walls with DIY Peel-and-Stick Wallpaper or Removable Wall Decals
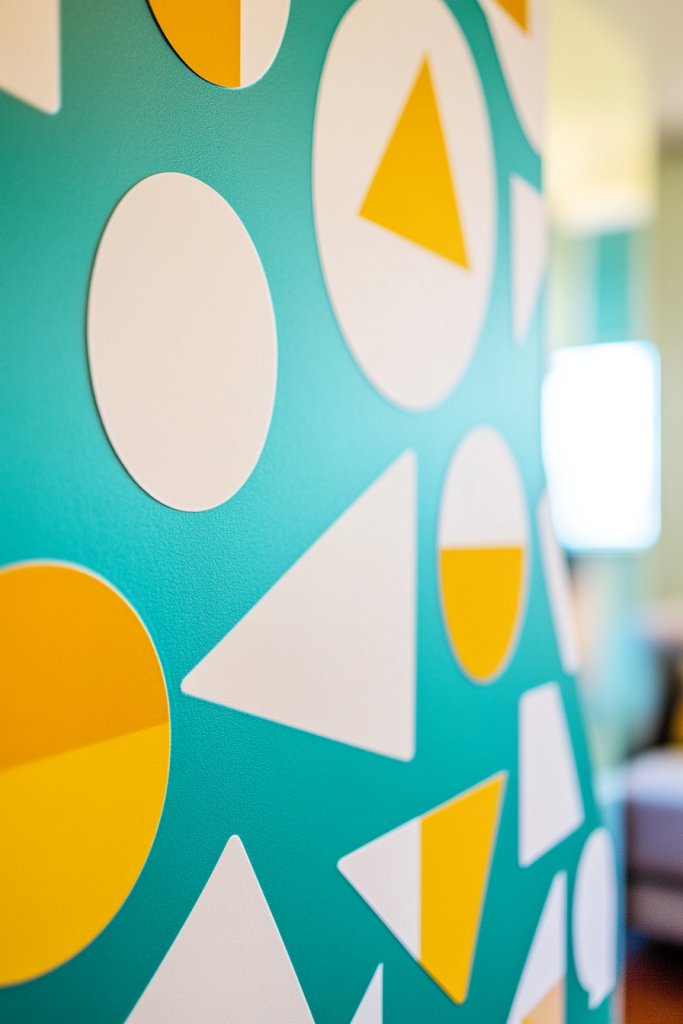
Ever felt your walls are just plain boring or dull? Want to add personality without breaking the bank? Peel-and-stick wallpaper or decals are perfect for transforming a space instantly. They offer a quick upgrade and a chance to showcase your style without permanent commitment. Plus, they’re surprisingly affordable and easy to remove.
Imagine a feature wall covered in a vibrant geometric pattern or floral design that instantly livens up your room. Picture sleek, matte finishes or textured decals adding depth, while bold colors catch the eye. These stickers adhere smoothly, creating a seamless look that mimics painted walls. You can even layer them for a more dynamic effect, making your space uniquely yours.
Choose designs that match your vibe, whether minimalist, boho, or eclectic. Seasonal themes, like winter snowflakes or autumn leaves, can refresh your decor throughout the year. Small spaces benefit from vertical stripes or subtle patterns, while larger walls can handle bold murals. For renters, removable decals allow you to switch styles without fuss.
Start by measuring your wall area and selecting peel-and-stick options that suit your style. Prepare the surface by cleaning it thoroughly to remove dust and grease. Carefully peel the backing and align the decal or wallpaper, smoothing out air bubbles with a squeegee or credit card. For larger walls, work in sections for precision. No special tools are needed, just patience and a steady hand.
Add a personal touch by combining decals with other DIY elements like framed photos or wall-mounted shelves. Create a collage effect by overlapping different designs or adding metallic accents. You can also customize decals with stencils or paint for a layered, textured look that’s truly one-of-a-kind. Experimenting with placement helps reflect your personality.
Transforming your walls with peel-and-stick decals is a fun, budget-friendly way to boost your space’s appeal. It’s an easy project that delivers high impact with minimal effort. Soon, your room will feel fresh, personalized, and stylish — all without the expense or mess of traditional wallpaper. Ready to give your walls a quick makeover?
2. Refresh Cabinets with Budget-Friendly Paint or Reversible Veneer Wraps
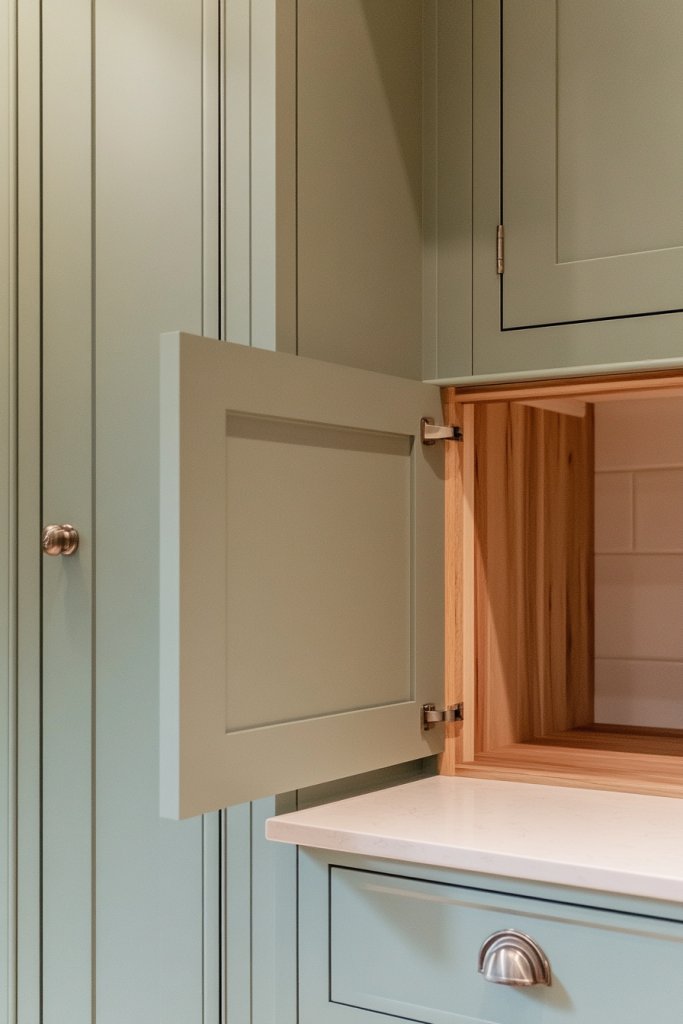
Tired of outdated or scratched cabinet faces but hesitant to invest in costly replacements? Giving your cabinets a fresh look can dramatically change your space. Paint or veneer wraps are affordable, quick, and reversible options that breathe new life into tired furniture. Who says you need to splurge for a stylish upgrade?
Imagine sleek, matte navy cabinets contrasting with warm wood countertops or bright pastel hues adding a cheerful vibe. Picture a smooth, uniform surface with no streaks or brush marks, making the entire kitchen or bathroom look brand new. The texture of a painted finish or the faux wood grain of veneer adds depth and character, transforming the space from dull to dazzling.
Choose bold colors for a statement look or soft neutrals for a calmer environment. Reversible veneer wraps work well for temporary updates or rental properties, allowing easy removal later. For a vintage touch, opt for distressed paint techniques or antiqued finishes. Seasonal color shifts or matching color schemes with accessories make styling flexible and fun.
Start by cleaning the cabinets thoroughly to remove grease and dirt. Lightly sand the surface to help paint adhesion if needed. Apply primer if you’re painting, then follow with at least two coats of your chosen color, allowing dry time in between. For veneer wraps, measure carefully, cut to size, and peel off the backing, smoothing out air bubbles as you go. Use a roller or squeegee to ensure a tight, bubble-free finish.
Add unique hardware or painted accents to personalize your cabinets further. Consider contrasting colors for doors and drawers or adding decorative stencils for a custom look. Layering with new knobs or handles can elevate the design without a major investment. Small details like these make a big difference.
Refreshing cabinets with paint or veneer is an achievable project that instantly upgrades your space. It’s a cost-effective way to enjoy a new look without the hassle of replacements. With a bit of patience, your cabinets will look professionally finished and totally on-trend—who knew DIY could look this good?
3. Upgrade Lighting with Stylish, Inexpensive Pendant or Clip-On Fixtures
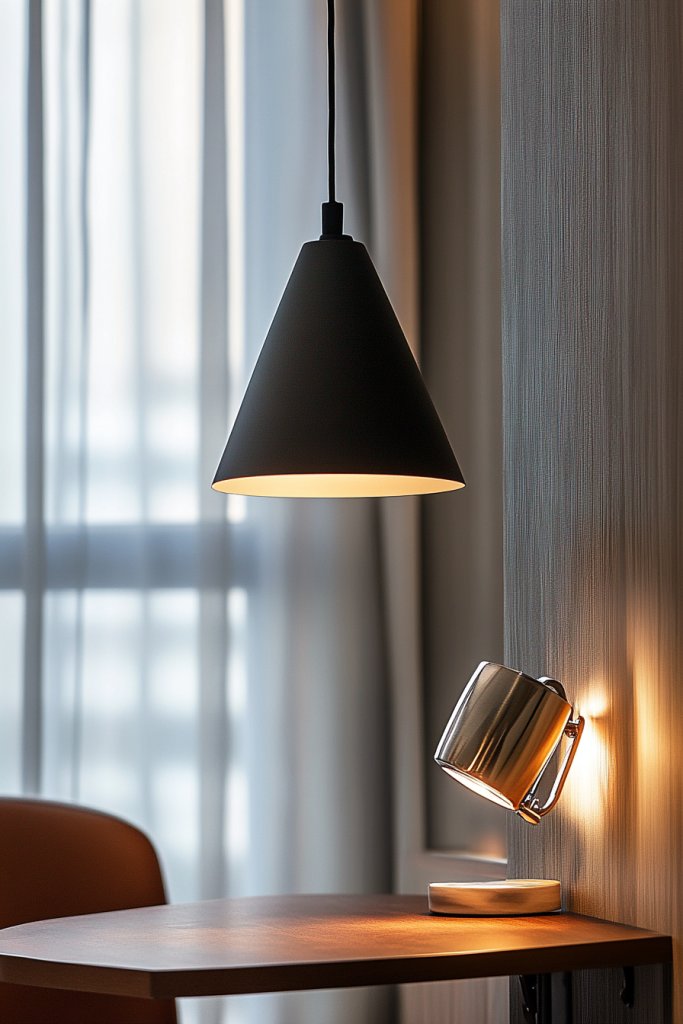
Does your home feel flat or poorly lit? Outdated fixtures can drag down your decor and mood. Swapping in affordable pendant lights or clip-on lamps can instantly add warmth and style. No need to spend a fortune or hire an electrician—simple upgrades make a huge difference.
Imagine a cluster of sleek black pendant lights hanging above your kitchen island, casting a cozy glow. Visualize a set of vintage-style clip-on lamps on your desk, adding character and task lighting. String lights with Edison bulbs create a warm ambiance in any room. These fixtures, with their variety of finishes and styles, instantly elevate your space’s aesthetic.
Choose minimalist designs for modern spaces or ornate fixtures for a vintage vibe. For seasonal flair, swap out shades or add decorative bulbs. In small rooms, go for compact fixtures to avoid clutter. In open-concept areas, use multiple lighting sources to create zones and ambiance. DIY options include spray-painted fixtures or repurposed materials for a personalized touch.
Start by assessing your existing wiring and fixture placement. For plug-in options, simply hang and plug into nearby outlets—no wiring needed. For hardwired fixtures, a quick connection to your existing circuit may be required, but many models come with straightforward instructions. Use a drill and level to ensure proper hanging height. Consider dimmable options for flexibility.
Add decorative elements like patterned lamp shades or colored bulbs for custom flair. Mix and match finishes—matte black, brass, or chrome—to match your decor. Use dimmer switches for adjustable mood lighting or layer with candles for extra warmth. Play with scale and placement to highlight architectural features.
Upgrading your lighting is one of the simplest ways to refresh your entire home. It’s affordable, easy to do, and instantly cozy up your space. Soon, your home will feel brighter, more inviting, and totally on-trend—who knew lighting could be so transformative?
4. Add Color and Texture with DIY Fabric or Removable Wall Coverings

Feeling your walls are lackluster or too plain? Want a quick way to add personality without permanent changes? Fabric panels or removable wall coverings are your new best friends. They’re budget-friendly, easy to install, and can be swapped out whenever you fancy a style refresh.
Imagine a wall covered in a soft, patterned fabric that adds warmth and coziness. Visualize textured washi tape creating stripes or geometric shapes that pop against a neutral background. Layering different fabrics or textures introduces depth, making your space feel more inviting. The tactile quality gives your home a crafted, personalized look.
Choose lightweight fabrics like linen or cotton for a breezy look, or thicker textiles for added texture. For a modern aesthetic, go for sleek, monochrome patterns; for a boho vibe, opt for colorful, eclectic prints. Seasonal fabric swaps can refresh your decor quickly. Use removable adhesive strips or hooks to keep things renter-friendly.
Measure your wall areas carefully and cut fabric or wallpaper to size. Secure fabric with double-sided tape or adhesive strips designed for temporary use. For wallpaper, peel-and-stick options work similarly, adhering smoothly without damage. For extra texture, consider layering fabrics or adding decorative trim. Be sure to smooth out wrinkles or bubbles for a clean finish.
Create a gallery wall by combining fabric panels with framed photos or art. Use sewing techniques or decorative trims to add interest. Mix textures and patterns for a dynamic look. For a cozy vibe, drape fabrics in a layered fashion or add tassels and fringes for fun accents.
Adding fabric or removable coverings is an inexpensive, creative way to customize your walls. It allows for endless experimentation without commitment. Before long, your walls will look stylish, textured, and completely tailored to your taste—who knew DIY fabric could be so chic?
5. Enhance Storage with Clever DIY Shelving and Repurposed Crates
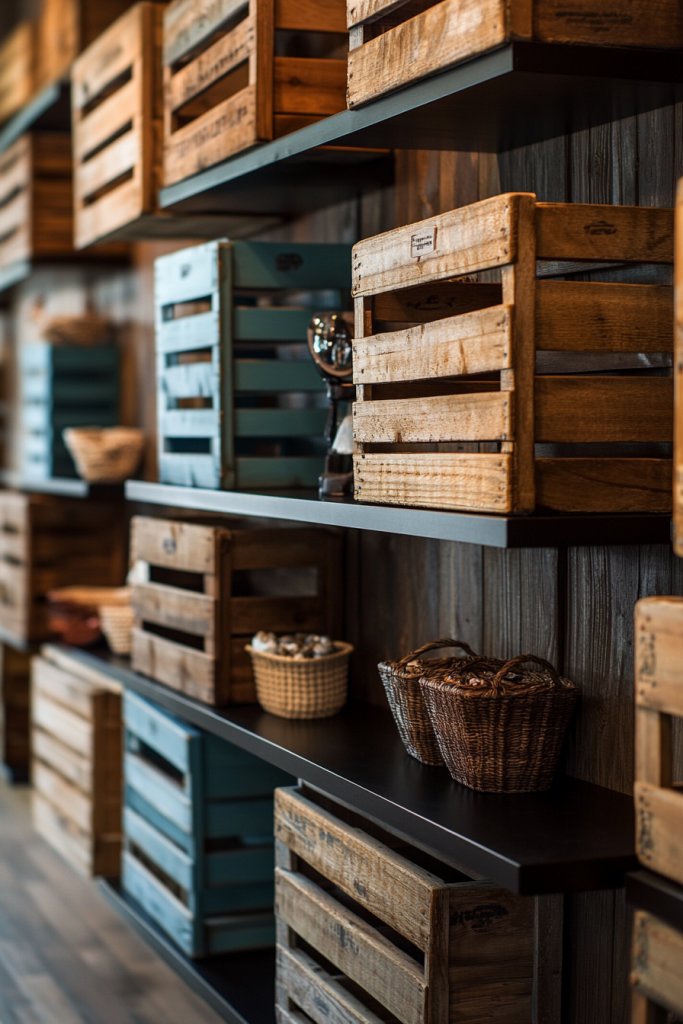
Cluttered spaces drive everyone crazy, but buying new storage solutions can be pricey. Instead, get creative with DIY shelves or repurposed crates for stylish, functional storage. They’re budget-friendly and perfect for organizing everything from books to kitchen supplies.
Visualize a wall lined with wooden crates stacked in an asymmetrical pattern, painted in coordinating colors. Imagine sleek floating shelves holding neatly arranged baskets or decorative objects. The mix of open and closed storage adds visual interest while keeping essentials within reach. The rustic and modern blend creates a cozy yet chic vibe.
Use crates for a rustic or farmhouse look, or paint them in bold colors for a contemporary feel. Floating shelves can be installed in kitchens, bathrooms, or living rooms depending on your needs. Adjustable shelving or modular units let you customize as your storage needs change. Incorporate baskets or fabric bins inside crates for concealed storage.
Start by measuring your space and selecting sturdy crates or shelf materials. For crates, sand edges and paint or stain for a finished look. Mount floating shelves with proper anchors and level carefully to prevent tilting. Stack crates to create a vertical storage tower or mount them on the wall for easy access. Secure everything tightly for safety, especially if holding heavy items. Use brackets or hooks for additional support.
Add labels or decorative stickers for a personalized touch. Mix different sizes and shapes for visual variety. Incorporate decorative elements like vintage signs or small plants (if allowed) to enhance the look. Change up the arrangement periodically to keep your space fresh.
Custom storage solutions show that you don’t need to spend a lot to stay organized and stylish. DIY shelving and crates help you maximize space and add character. Soon, your home will feel more spacious and organized, proving that smart storage is just a project away.
6. Refresh Your Boring Floors with Peel-and-Stick Vinyl Tiles or Rugs
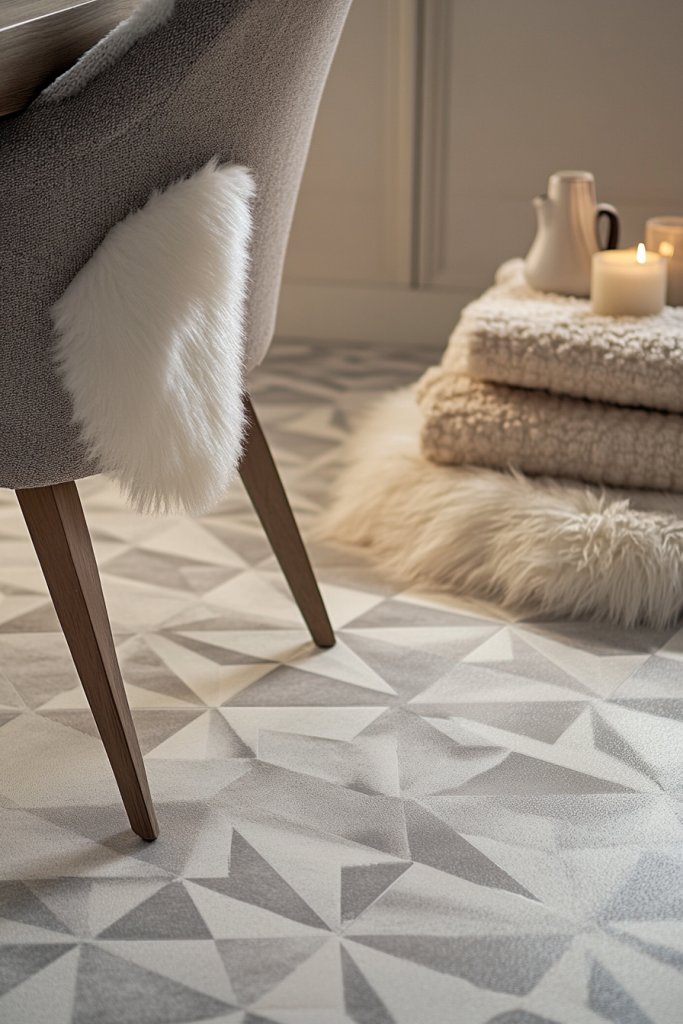
Old, scuffed, or dull floors can ruin the overall look of a room. Replacing flooring is expensive and disruptive, but peel-and-stick vinyl tiles or layered rugs are a quick fix. They instantly add style, warmth, and personality without the hefty price tag.
Imagine a geometric patterned vinyl tile in a dining area, creating a modern focal point. Picture a plush, layered rug in a cozy corner, inviting you to sit and relax. Textured tiles or colorful rugs define zones and add visual depth to your space. The combination of patterns and textures makes your floor a statement piece.
Choose tiles with bold patterns for a modern look or subtle tones for a minimalist vibe. Layering rugs allows for seasonal changes, or to update your decor without permanent commitment. Small spaces benefit from patterned or textured tiles that hide wear better. For larger areas, consider a focal rug to anchor the room.
Start by cleaning the existing floor thoroughly. Measure the area accurately and cut tiles or rugs to fit. For vinyl tiles, peel off the backing and carefully lay down, smoothing out air bubbles. For rugs, use non-slip pads underneath for safety. Overlap edges slightly for a seamless look. No professional tools needed—just patience and a steady hand.
Mix different tile patterns or colors for a custom mosaic effect. Add decorative borders or trim to define the space further. Layering rugs with different textures enhances comfort and style. Consider adding small, decorative accents like floor cushions or poufs nearby.
Refreshing your floors with peel-and-stick solutions is an easy, cost-effective way to update your home. It’s a project anyone can tackle, and the results are striking. Soon, your floors will look fresh, stylish, and completely personalized—no demolition required.
7. Personalize Spaces with DIY Canvas Art or Painted Mason Jars
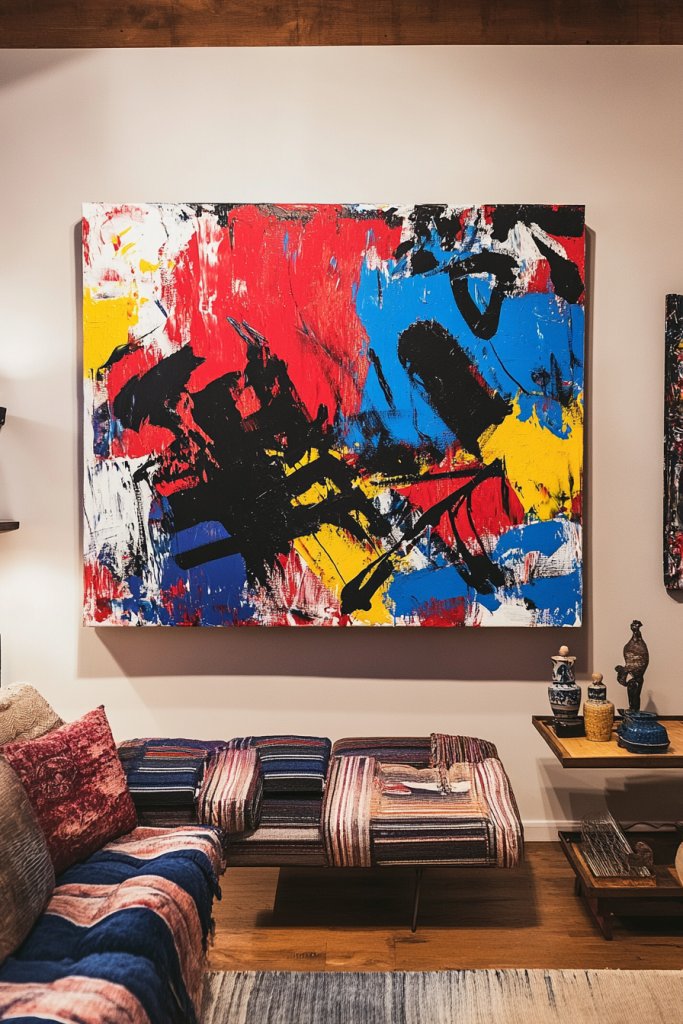
Blank walls and plain decor leave rooms feeling uninspired. Want a personal touch that’s easy on the wallet? DIY canvas art or painted mason jars are perfect for adding color and character. They’re simple projects that turn everyday items into statement pieces.
Visualize a vibrant abstract painting on canvas, adding a splash of energy to your living room. Or imagine painted mason jars filled with fairy lights or fresh flowers, bringing warmth to your space. These DIY projects lend a handcrafted, cozy vibe that’s both stylish and meaningful. The textures of brushstrokes or painted surfaces add visual interest.
Use bold colors and patterns for a modern aesthetic, or soft pastels for a calming effect. Customize with stencils, tape, or freehand designs to match your decor style. Small canvases can be grouped for a gallery wall, or individual jars can be placed on shelves or tables. Seasonal themes, like holiday motifs, keep things fresh.
Start with a blank canvas or clean mason jars. Use acrylic paints or spray paints for quick coverage. For canvases, experiment with brushes and techniques—try layering or blending colors. For jars, use stencils or freehand designs, sealing with a clear coat for durability. Mount or display your art with simple hooks or stands. It’s a fun, mess-free process that anyone can master.
Add personal quotes or meaningful symbols to your artwork. Incorporate textured elements like fabric or metallic paints for extra dimension. Mix and match different sizes and shapes for dynamic displays. Change your decor seasonally or whenever you want a fresh look—versatility is key.
Creating your own art is a rewarding way to personalize your home. It’s affordable, fun, and surprisingly easy to produce professional-looking results. Your walls and tables will thank you for the extra personality—and friends will ask where you got such unique pieces.
8. Upgrade Window Treatments with Budget-Friendly Curtains or DIY Rods

Are your windows feeling dull or out of place? Fancy drapes and curtains can elevate your entire room, but quality window treatments often come with a hefty price tag. Luckily, affordable curtains or DIY rods are easy to install and can dramatically improve your decor.
Imagine light, airy curtains fluttering in the breeze, softening the window frame. Or picture sleek, blackout curtains adding a modern, streamlined look. DIY curtain rods made from piping or reclaimed wood give a rustic charm. The right window treatment sets the tone for the entire room, blending function with style.
For a cozy vibe, choose thick, textured fabrics. For a bright, airy feel, opt for sheer or linen curtains. Recycled materials or industrial piping can serve as unique curtain rods—painted or left raw for different effects. Layering curtains with sheers and blackout shades offers flexibility for light control and privacy. Seasonal fabric swaps help keep the look fresh.
Measure your window width and length accurately, adding extra for hems and fullness. Hang a sturdy curtain rod using brackets, ensuring it’s level and secure. Install the curtains on rings or clips for easy opening. For DIY rods, use piping, broomsticks, or reclaimed wood, attaching hardware with brackets or clamps. Hem curtains as needed for a polished look. It’s a straightforward project anyone can do.
Add decorative tiebacks or curtain holdbacks for a tailored appearance. Choose fabrics that complement your color scheme or add trims and tassels for extra flair. Experiment with different lengths and layering styles. Personal touches like embroidery or fabric paint can make your curtains uniquely yours.
Updating your window treatments instantly upgrades your decor with minimal effort and cost. It’s a simple project that pays off by making your home look more polished and inviting. Soon, every time you look at your windows, you’ll feel proud of your creative handiwork—and enjoy better light and privacy too.
9. Revamp Furniture with Paint, Stencils, or Contact Paper

Is your furniture looking tired or mismatched? Instead of buying new pieces, give your old furniture a fresh look with paint, stencils, or contact paper. It’s a budget-friendly way to personalize your space and achieve a trendy, cohesive style. Plus, it’s surprisingly simple and fun.
Imagine a vintage dresser painted in bold matte black, accented with gold stenciled details. Or picture a tabletop covered in stylish contact paper mimicking marble or geometric patterns. These techniques transform plain furniture into statement pieces, adding depth and personality. The textures of paint and contact paper create a layered, curated aesthetic.
Choose colors and patterns that match your decor style—classic, modern, or eclectic. Use stencils or painter’s tape to create intricate designs or geometric shapes. Contact paper comes in various patterns and can be applied to drawers, shelves, or entire surfaces. Seasonal or thematic updates are easy by swapping out colors or patterns.
Clean the furniture thoroughly, sanding if necessary to help paint or contact paper adhere better. Prime surfaces with a suitable primer, then apply at least two coats of paint, letting each dry completely. For stenciling, tape the design in place and use a sponge or brush to apply paint. Contact paper is cut to size and smoothed onto the surface, removing air bubbles with a squeegee. Seal with a clear coat for durability if desired.
Add decorative hardware or painting details to elevate the look further. Mix colors or patterns for a playful vibe. Use stencils to personalize with initials, motifs, or borders. Refinish or distress for a vintage look, or keep it sleek for a modern aesthetic.
Revamping furniture with paint or contact paper is a fun way to express your style and save money. It’s a quick project that yields big results, making your home more stylish and personalized. Soon, your furniture will look professionally updated, and you’ll have the satisfaction of a DIY win.
10. Mold a Cozy Nook with DIY Cushions and Thrifted Textiles
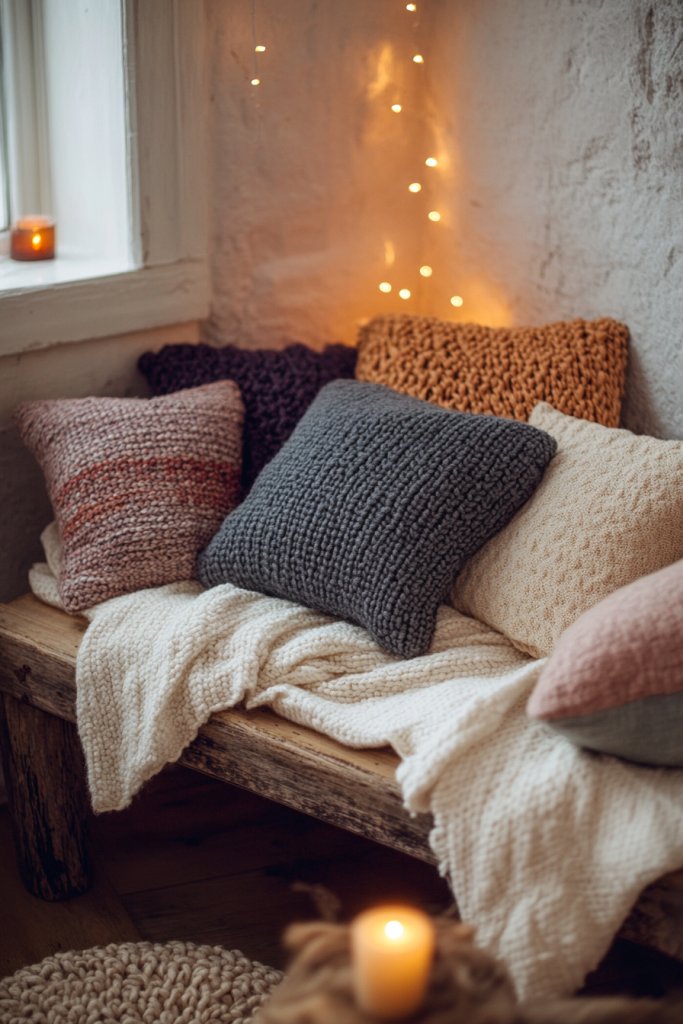
Every home needs a cozy corner to unwind, but creating one can seem costly. A DIY nook with cushions and thrifted textiles makes a space inviting without breaking the bank. It’s perfect for reading, relaxing, or just escaping daily chaos.
Picture a small corner with a soft cream throw blanket, layered with chunky knit cushions in muted tones. Imagine a corner with a low, handmade wooden bench topped with mismatched, colorful pillows. Textured fabrics like wool, velvet, or linen add warmth and depth, making the space feel lived-in and welcoming. Soft lighting, like a string of fairy lights or candles, completes the cozy vibe.
Use thrifted or DIY-sewn cushions to match your decor style—boho, minimalist, or rustic. Layer textiles like blankets, throws, and rugs for added comfort and visual interest. For small spaces, a simple window seat or corner bench works well. Seasonal fabrics, patterns, and colors help keep the space fresh and engaging.
Gather cushions, throws, and textiles from thrift stores or your closet. Sew or repurpose existing cushions with new covers made from affordable fabrics. Arrange cushions on a bench, floor, or window seat. Add a small side table or basket for books and snacks. Lighting options like battery-powered candles or lanterns enhance the ambiance. Keep it clutter-free for maximum coziness.
Incorporate personal items like vintage finds or handmade crafts. Use different textures and colors to suit your mood or season. Add a small rug or faux fur for extra softness underfoot. Personal touches turn a simple nook into a special retreat.
Creating a cozy nook is an easy, inexpensive way to add comfort and personality. It’s a space you’ll love escaping to, and it proves that small touches can make a big difference. Soon, your home will have that warm, inviting vibe everyone craves—without spending a fortune.
11. Improve Entryway Appeal with Repainted or Upcycled Hooks and Shoe Racks
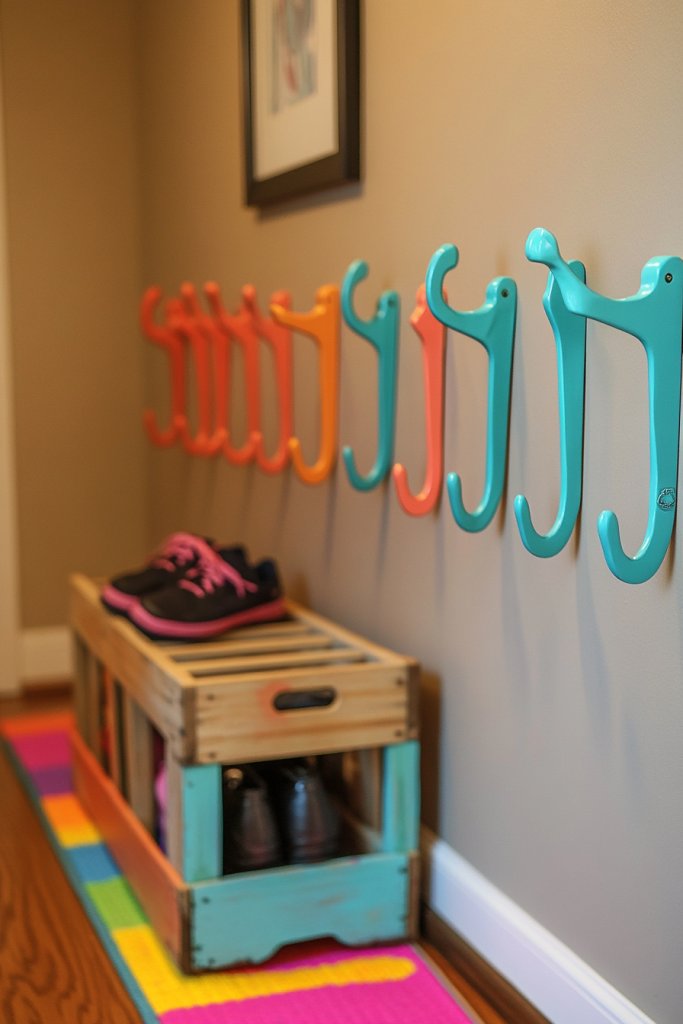
Is your entryway cluttered and unwelcoming? A tidy, stylish entrance sets the tone for your home. Repainting or upcycling hooks and shoe racks is an affordable way to create a functional, attractive space. It’s an easy project with big impact.
Picture a row of vintage hooks painted in a bright, cheerful color that pops against neutral walls. Imagine a repurposed wooden crate turned into a shoe rack, with fresh paint and organizational dividers. Small decorative elements like a colorful mat or wall art complete the look. The result is a welcoming, organized entry that invites guests in.
Choose bold colors or distressed finishes for rustic or industrial styles. For a minimalist look, go for sleek, matte black hooks and simple racks. Repaint existing hardware to match your decor palette. Use different heights and sizes for visual interest and to accommodate various items.
Clean and sand existing hooks or racks to prep for painting. Use spray paint or brush-on paint suitable for metals or wood, applying thin, even coats. Reinstall or attach hooks and racks with proper hardware, ensuring stability. Arrange shoes and accessories thoughtfully to avoid clutter. Add a decorative storage basket or umbrella stand to finish the space.
Decorate with labels or tags for shoes and accessories. Mix painted hooks with natural elements like twigs or fabric for a layered look. Change the color scheme seasonally or whenever you want a fresh update. Incorporate small, decorative elements like a mirror or wall art for added style.
Upgrading your entryway with simple, DIY touches makes a noticeable difference. It’s a quick project that creates a more organized and attractive welcome. Soon, your visitors will be impressed by your stylish, functional entry—proof that a little creativity goes a long way.
12. Add Statement with Colorful or Patterned Area Rugs
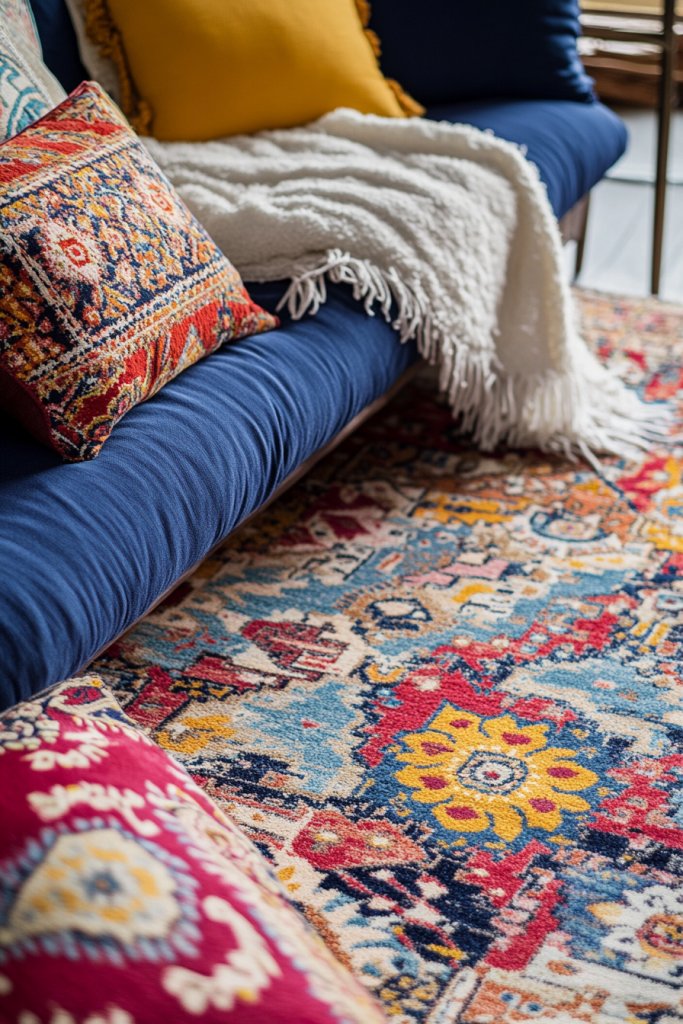
Blank or mismatched floors can make a room feel cold or unfinished. A bold, colorful rug instantly adds personality and warmth. It’s an affordable way to define spaces and make a statement without major renovation. Rugs are a simple, impactful upgrade.
Imagine a vibrant, patterned rug anchoring a seating area, elevating the entire space. Visualize a cozy, textured rug layered with plush cushions and throws, inviting you to relax. The right rug can add splashy colors or subtle patterns, tying your decor together in a cohesive way. It’s a quick fix that transforms the room’s vibe.
Choose bright, bold colors or muted, neutral tones based on your style. Geometric, floral, or abstract patterns can create different moods. Layering rugs is an option for added texture and visual depth. Small rugs work well in bedrooms and entryways, while large ones define open-plan living rooms.
Measure your space accurately to select the right size. Lay the rug on a clean, dry surface, adjusting for alignment. Vacuum thoroughly before placement. Ensure the rug lies flat and smooth out any wrinkles or bubbles. Use non-slip pads underneath for safety, especially on hardwood or tile floors. No special tools are needed—just some patience.
Coordinate your rug with other textiles like cushions and curtains. Add decorative tassels or fringes for extra flair. Swap out rugs seasonally or when you want a fresh look. Personalize with DIY paint or stencil accents on the edges for a custom touch.
A statement rug is an easy way to elevate your decor and make your space feel complete. It’s a budget-friendly project with high visual impact. Soon, your home will feel warmer, more inviting, and on-trend—who knew a simple rug could do all that?
13. Simplify Decor with Minimalist DIY Shelves and Functional Hooks
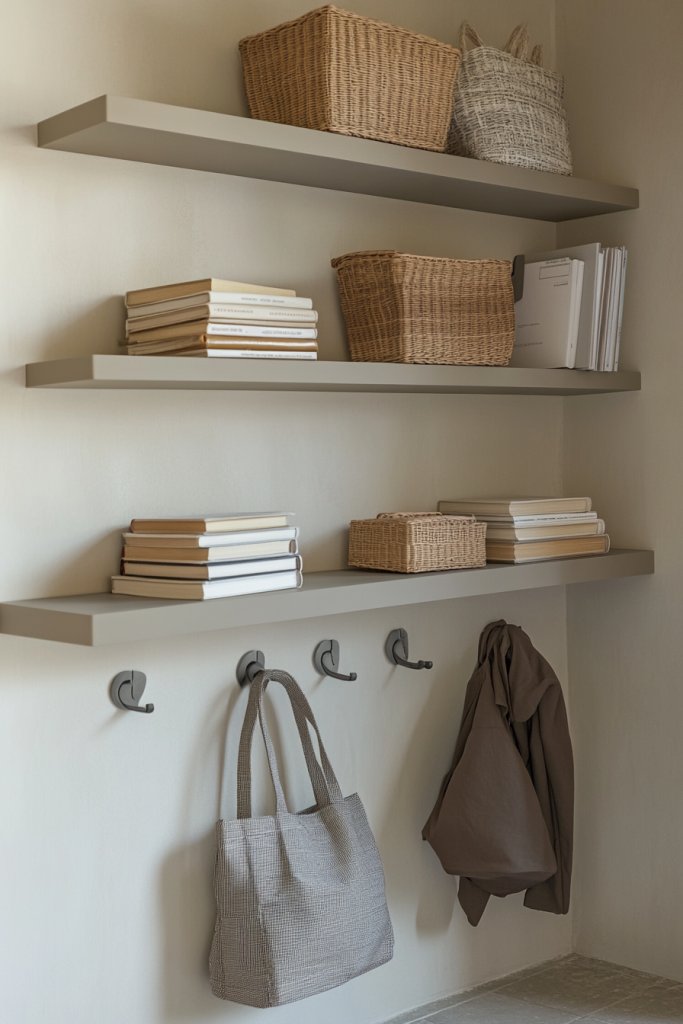
Clutter can make even the most stylish home feel chaotic. Stripping back to simple, functional storage solutions creates a calm, organized environment. DIY shelves and hooks are a budget-friendly way to reduce clutter and highlight your essentials. Less really is more.
Picture sleek, floating shelves in a neutral tone holding neatly stacked books or baskets. Imagine minimalist hooks holding coats, bags, or kitchen utensils in an orderly fashion. Clean lines and open space make rooms appear larger and more serene. The focus is on practicality and understated elegance.
Choose simple materials like wood or metal for a modern look. Use open shelving in kitchens or bathrooms for easy access. Incorporate hooks at different heights for versatility—perfect for entryways or bedrooms. Seasonal swaps, like hanging holiday ornaments or accessories, keep it fresh.
Measure wall space and select lightweight, durable shelves. Mount with appropriate anchors or brackets, ensuring stability for heavier items. Use a level to keep everything straight. Decorate with minimal objects—think small plants, candles, or storage bins. Regularly declutter to maintain the minimalist vibe.
Paint or stain shelves in colors that match your decor. Add labels or tags for easy organization. Incorporate decorative elements like small sculptures or meaningful objects. Keep the look clean and simple, avoiding overcrowding for a truly calming effect.
Minimalist shelves and hooks demonstrate that functional design can be beautiful. They make your home appear larger and more organized with little effort. Once set up, you’ll enjoy a clutter-free, peaceful space that’s easy to maintain—proof that simple solutions work.
14. Create a DIY Herb or Flower Wall with Mason Jars or Small Planters
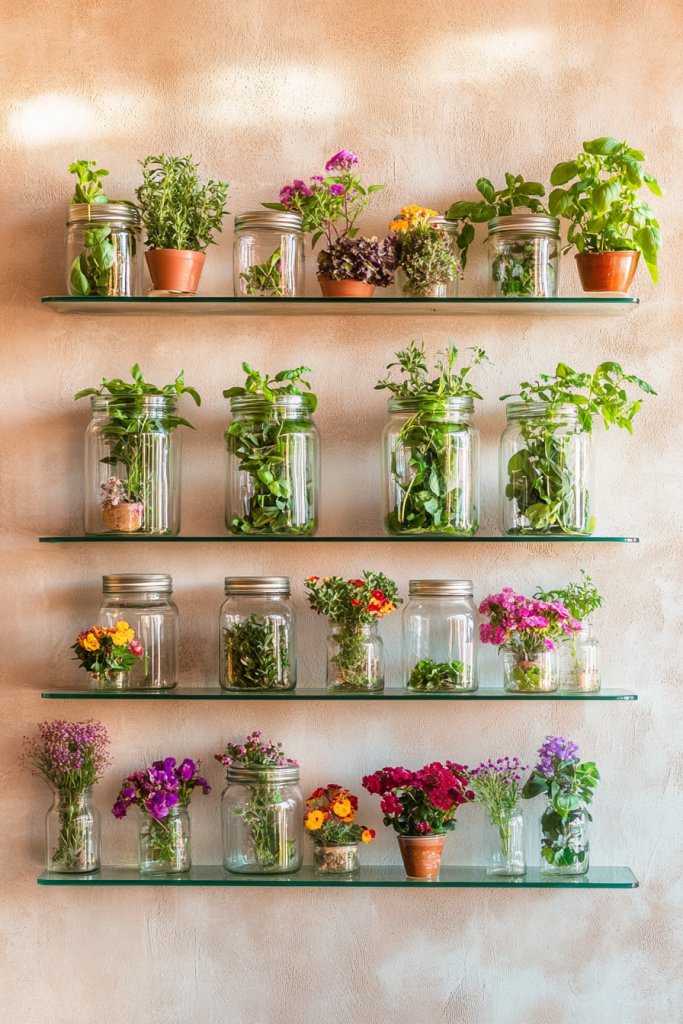
Lacking a green thumb but craving a touch of nature indoors? A DIY herb or flower wall is an attractive, practical project that adds life to your space. Mason jars or small planters are inexpensive and versatile options for creating a lush, vibrant display. Perfect for small spaces or kitchens.
Imagine a vertical wall lined with glass jars filled with fresh herbs like basil and thyme, ready for cooking. Or picture a colorful array of small flower pots bursting with blooms, adding cheer and freshness. The arrangement creates a lively, textured backdrop that’s both functional and decorative. It’s a mini garden you can enjoy every day.
Use recycled jars, painted or decorated for added style. Arrange the jars in a grid, or stagger them for a more organic feel. Incorporate different plant types for variety—herbs, succulents, or small flowering plants. Adjust the height and spacing to fit your wall and aesthetic preferences. Seasonal arrangements keep things lively.
Start by cleaning and decorating jars with paint, labels, or twine. Mount sturdy hooks or a wooden frame to hold the jars securely. Fill jars with soil and plants, watering carefully. Arrange the jars on the hooks or in a grid pattern, ensuring stability. Regular watering and pruning keep the plants healthy and attractive.
Add decorative touches like painted lids or personalized tags. Mix herbs and flowers for a colorful, fragrant display. Incorporate small tools or watering cans nearby for convenience. Change plants seasonally or replace with new favorites for variety.
Creating a herb or flower wall is a rewarding, budget-friendly way to bring nature indoors. It’s a functional art piece that adds freshness and personality. Soon, you’ll enjoy homegrown herbs and beautiful blooms—proof that green thumbs aren’t necessary for a thriving plant display.
15. Make Over Small Spaces with Clever Paint Techniques or Decorative Tape
Small spaces often feel cramped or bland, but clever paint tricks can make them appear larger and more lively. Decorative tape adds a playful, customizable touch without permanent changes. These inexpensive methods are perfect for sprucing up tiny corners or alcoves.
Imagine a tiny nook painted with bold, contrasting colors that define its boundaries. Or picture decorative washi tape creating a geometric pattern on a blank wall, adding visual interest. Use stencils or tape to create stripes, chevrons, or color blocks that add personality and dimension. The space feels bigger and more intentional.
Try contrasting colors for a modern look or soft pastels for a calming effect. Use painter’s tape for sharp lines or decorative tape for quick accents. Techniques like color blocking or accent walls work well in small rooms. Seasonal colors or patterns can refresh the look whenever desired.
Prepare the surface by cleaning and taping off areas carefully. Use high-quality paint for crisp lines and smooth coverage. For tape, apply firmly and press down edges to prevent lifting. Remove tape at the right time to reveal clean lines. Consider layering different techniques for a unique effect.
Add subtle details like hand-painted motifs or small decals. Incorporate metallic or glitter tape for a touch of glam. Use color schemes that complement your existing decor. Switch up patterns seasonally or for special occasions to keep the space feeling fresh.
Small spaces benefit hugely from thoughtful paint techniques and creative tape designs. They’re affordable, quick, and highly customizable. Before long, your tiny corners will feel more spacious and styled—proof that clever tricks make a big difference.
16. Rejuvenate Beds and Sofas with Slipcovers or DIY Cushion Covers
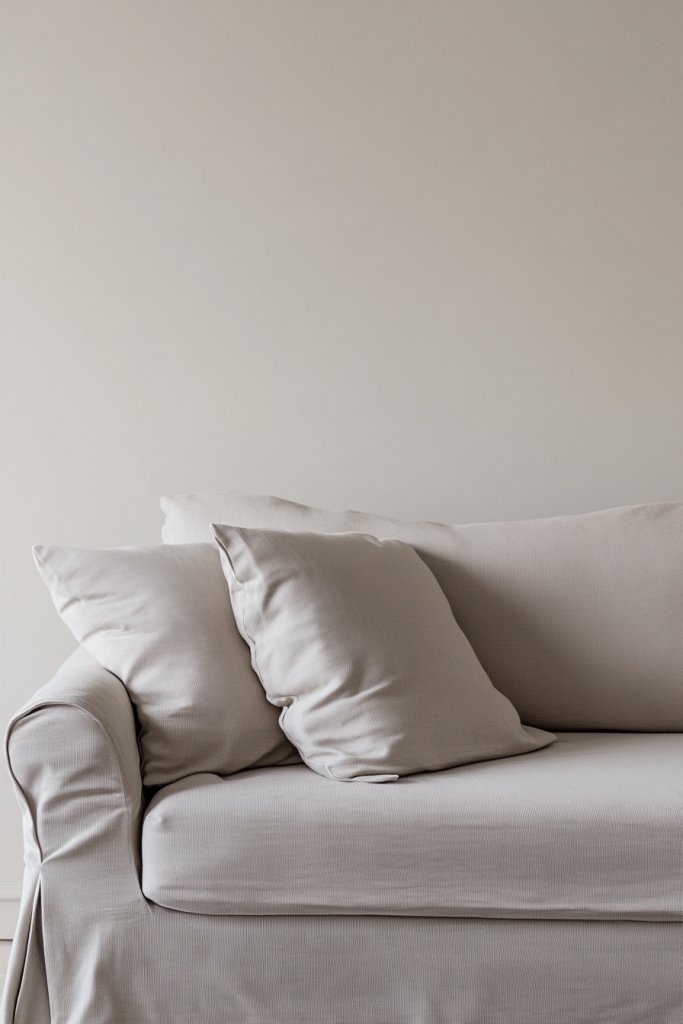
Old, stained, or mismatched furniture can make your entire room look tired. Rejuvenating beds and sofas with slipcovers or DIY cushion covers is an affordable way to refresh your decor. It’s a simple project that instantly upgrades your furniture’s look and feel.
Picture a soft, tailored slipcover in a neutral tone that makes your sofa feel brand new. Or imagine colorful cushion covers with playful patterns that add personality and comfort. These covers can be swapped seasonally or whenever you want a change, making your furniture versatile and stylish.
Choose slipcovers in fabrics like linen, cotton, or velvet depending on your style. For cushions, sew or repurpose covers from leftover fabric or thrifted textiles. Incorporate decorative buttons, piping, or embroidery for extra flair. Mix and match patterns and textures for a personalized, eclectic look.
Measure your furniture carefully to select or sew the right-sized slipcovers or cushion covers. Use a slipcover with elastic or ties for a snug fit. For cushions, cut fabric with seam allowance, sew edges, and insert cushions. Secure covers with zippers or Velcro for easy washing and maintenance. Style with throw blankets or additional pillows to finish the look.
Add decorative trims or embroidery to customize further. Use fabric paints or stencils for unique designs. Incorporate seasonal fabrics or themes to keep the look fresh. Reupholstering isn’t necessary—just covers that fit well and look great.
Rejuvenating furniture with slipcovers or cushion covers proves that you don’t need to buy new pieces to get a fresh look. It’s an easy, budget-friendly way to make your home more inviting. Soon, your furniture will look stylish, fresh, and perfectly tailored to your taste.
17. Organize Clutter with DIY Storage Bins and Labeling
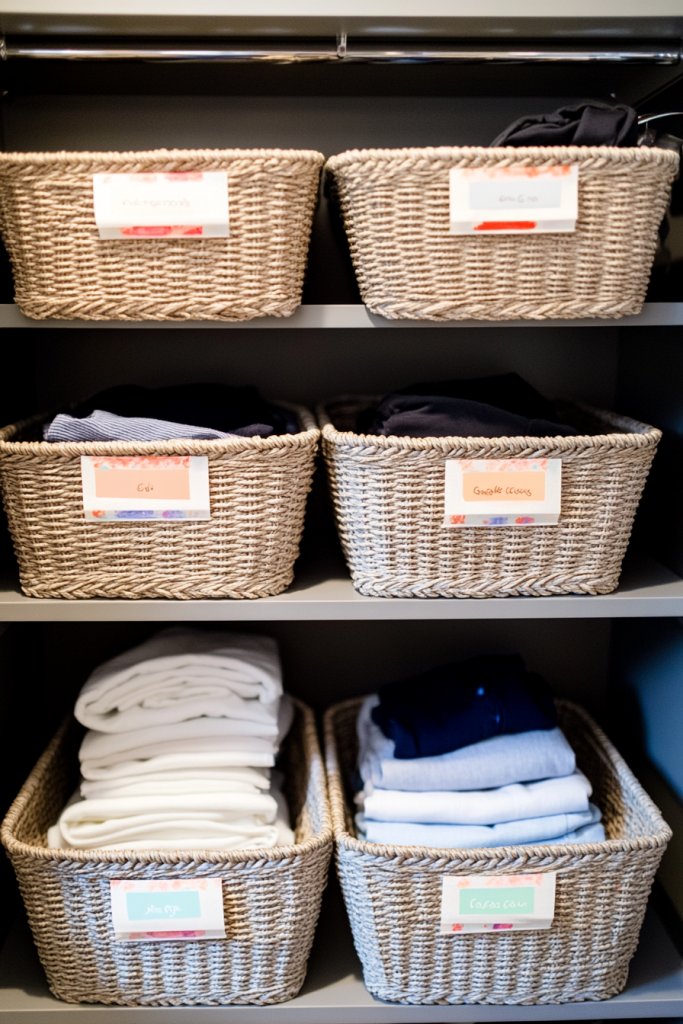
Clutter makes any space feel chaotic and overwhelming. DIY storage bins and labels are a simple way to bring order and style to your home. They help you keep things tidy and accessible without spending a fortune on expensive organizers.
Imagine uniform storage baskets in a closet, each labeled with its contents, creating a cohesive look. Picture open bins on shelves with neatly folded clothes or supplies, making everything easy to find. Clear containers or painted labels add a personal touch while maintaining functionality. The overall effect is organized bliss.
Use baskets, bins, or boxes made from cardboard, wood, or fabric depending on your needs and budget. Label with hand-written tags, printed labels, or chalkboard paint for a rustic look. Color-code your storage for quick identification. Incorporate decorative elements like washi tape or stickers to make labels pop.
Gather containers that fit your space and purpose. Clean and decorate them as desired—paint, stencil, or wrap with decorative paper. Label each bin clearly, using a label maker or handwritten tags. Organize items by category or frequency of use. Place labels where they’re easy to see for quick access, and revisit periodically to maintain order.
Create themed bins for seasonal items, hobbies, or family members. Use fabric liners or decorative trims for a polished look. Incorporate small, decorative tags or charms for added personality. Keep updating labels and contents as your needs evolve.
DIY storage and labeling are simple yet powerful tools for transforming chaos into calm. They show that organization can be stylish and budget-friendly. A tidier home boosts your mood and productivity—proof that small changes create big impacts.
18. Add Visual Interest with DIY Wall-mounted Planters or Vertical Gardens

Want to bring some green life indoors but lack space or a green thumb? Wall-mounted planters or vertical gardens are an attractive, space-saving solution. They add freshness and a natural vibe without needing a yard or large pots. DIY options make it affordable and customizable.
Imagine a row of small, geometric planters filled with lush herbs or succulents lining a kitchen wall. Or picture a vertical garden of cascading plants adding texture and color to a dull corner. The layered greenery creates a lively, textured backdrop that energizes your space. It’s a perfect blend of design and nature.
Use recycled materials like wooden pallets or metal frames for the structure. Paint or decorate planters to match your decor. Fit different sizes and styles of containers for variety. Arrange plants in patterns or randomly for a more natural look. Change plants seasonally for ongoing freshness.
Secure wall mounts or frames into studs or anchors for stability. Fill planters with soil and choose plants suited for indoor conditions. Arrange the planters on the wall, spacing evenly or in a pattern. Water regularly and prune to keep plants healthy. Use waterproofing or trays to prevent damage to walls.
Add decorative stones, pebbles, or mini figurines inside planters. Incorporate personalized labels or painted designs. Mix in small decorative elements like fairy lights or wind chimes (non-vase, non-wall art). Rotate plants to keep your display fresh and lively.
A DIY wall garden is a beautiful, affordable way to add nature’s touch to your home. It’s a creative project that rewards you with a lush, personalized display. Soon, your space will feel more vibrant and alive—proof that green design isn’t just for gardens.
19. Paint or Stencil Floors for a Budget-Friendly Makeover
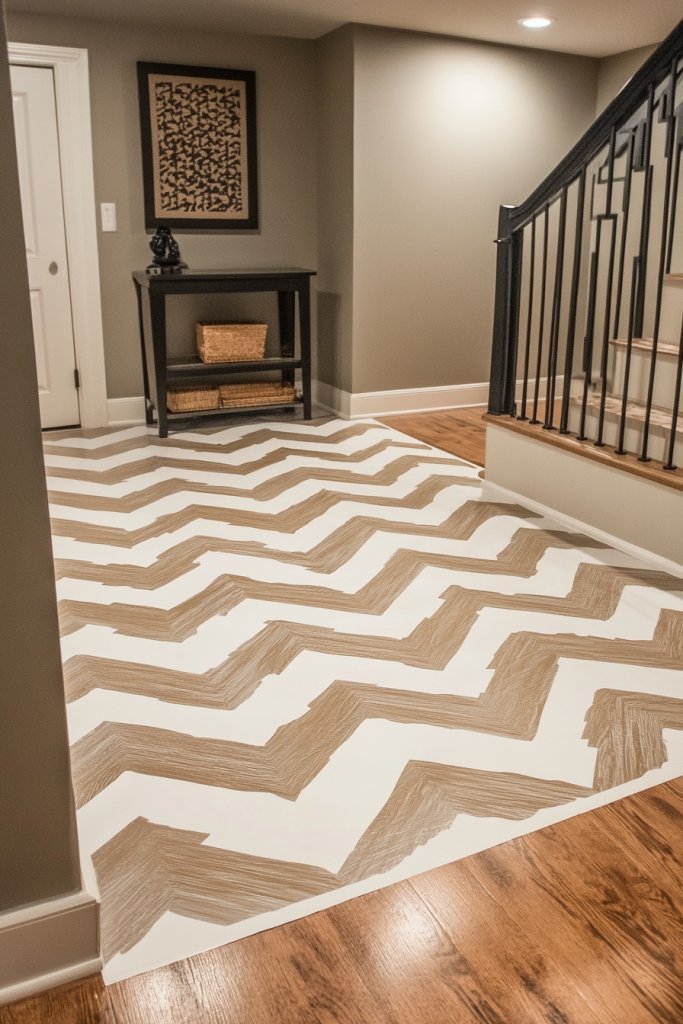
Dull, outdated, or stained floors can drag down your entire decor. Replacing floors is costly and disruptive, but painting or stenciling offers an affordable alternative. It’s a creative way to add personality and modern flair without ripping up your existing surface. Who says floors have to stay boring?
Imagine a patterned chevron or geometric design painted onto a basement or entryway floor. Visualize a faux wood or tile look created with stencils, transforming a plain surface into a statement piece. Textured or matte finishes add depth, making your floors look professionally done. The result: a fresh, modern aesthetic that complements your decor.
Select colors and patterns that suit your style—bold, monochrome, or subtle. Use painter’s tape or stencil templates for precise designs. Consider color blocking or stripes to add visual interest. Seasonal or thematic patterns keep your floors lively and interesting. Use durable, floor-safe paint for longevity.
Thoroughly clean and prep the surface, repairing any cracks or flaws. Use painter’s tape to outline your design. Apply a primer if necessary, then paint with high-quality, floor-grade paint. For stencils, tape them securely and use a sponge or roller for even application. Seal with a clear, protective coat for durability. Allow ample drying time before walking on the surface.
Add borders or accents with contrasting colors. Incorporate DIY stenciled motifs or borders for a custom look. Change your design seasonally or for special occasions. Keep the design simple or elaborate depending on your skill level and space.
Painting or stenciling floors is a cost-effective, fun DIY project. It offers a high impact upgrade that refreshes your space and expresses your style. Soon, your floors will look vibrant, modern, and uniquely yours—proof that a little paint can do wonders.
Conclusion
With a wide range of affordable home improvement ideas, you now have endless opportunities to upgrade your space without overspending. Whether it’s a quick paint job, clever organization hacks, or DIY decor projects, each idea can make a big impact. Don’t wait—start trying these budget-friendly tips today and turn your house into the home you’ve always envisioned!