Imagine walking into a room where every detail exudes warmth and rustic charm—that’s the magic of wood trim accent walls. These walls have gained popularity for their ability to add texture, character, and a cozy ambiance to any space, making them a favorite among homeowners seeking a touch of natural elegance.
In this article, you’ll discover a variety of inspiring wood trim accent wall ideas that cater to different styles and preferences. Whether you love a classic farmhouse vibe, modern minimalism, or eclectic charm, there’s a perfect idea waiting for you to transform your home into a rustic sanctuary full of personality and style.
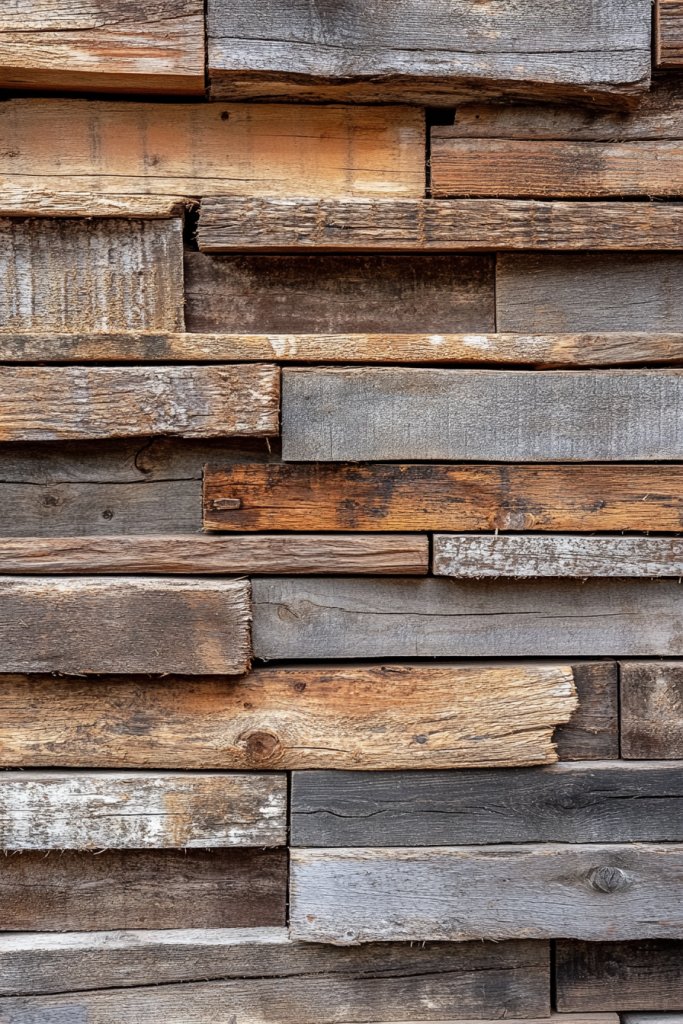
1. Reclaimed Wood Plank Wall with Weathered Finish
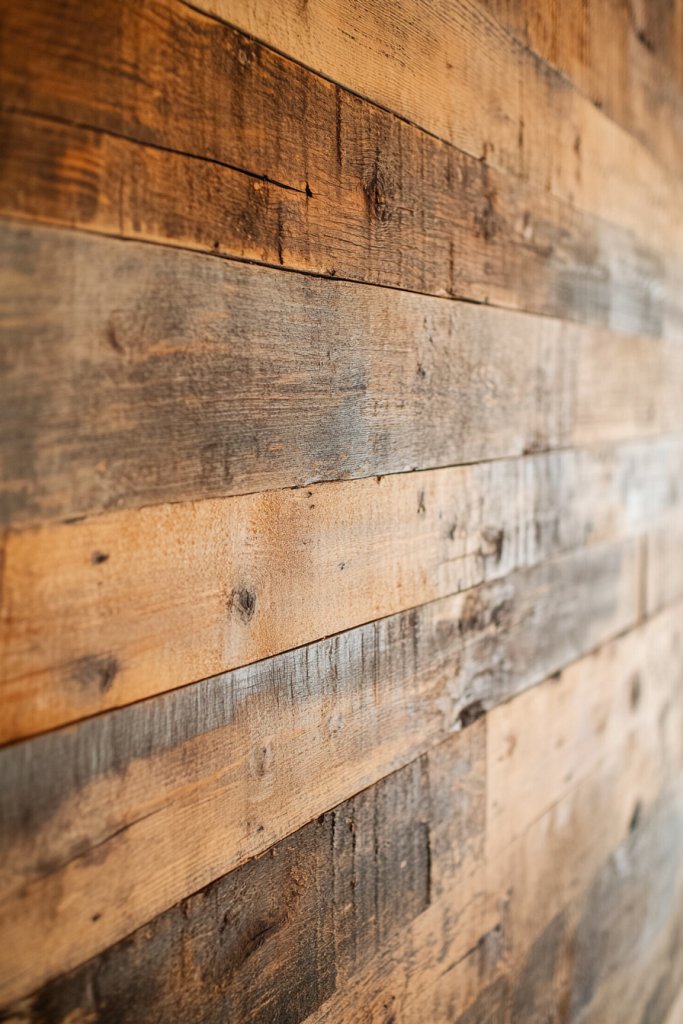
Ever wish your home felt warmer and more inviting without breaking the bank? Reclaimed wood planks offer that rustic charm many crave but often find hard to achieve. It’s like giving your space a story, a history that makes it instantly more interesting. If your walls feel dull or sterile, this idea promises a cozy, character-filled transformation.
Imagine walking into a room where the wall is a mosaic of textured, weathered wood with shades of gray and brown. The wood’s natural knots and imperfections add depth, making the space feel lived-in and authentic. The rough surface catches the light differently throughout the day, creating subtle shadows and highlights. It’s a tactile experience that invites you to run your hand along the grain.
You can opt for lighter weathered finishes for a Scandinavian vibe or darker, richer tones for a more dramatic look. For small spaces, a single accent wall is enough to make a statement, while larger rooms can feature entire walls. Seasonal tweaks like adding soft textiles or warm lighting can enhance the rustic effect further. Plus, mixing reclaimed wood with modern elements creates a balanced, eclectic style.
Start by sourcing reclaimed wood from salvage yards or specialty suppliers—look for sustainably harvested options. Prepare the wall by cleaning and leveling it, then measure and cut your planks to size. Use nails or a staple gun to attach the wood securely, ensuring the pieces snugly fit together. Seal or treat the wood with a matte finish to preserve the weathered look and prevent deterioration. Consider adding a clear protective coat for durability.
Personalize by staining the wood in different shades or leaving it raw for a more organic feel. Incorporate metal or leather accents nearby to emphasize the rustic vibe. You might also add decorative hooks or shelves made from reclaimed wood for functional decor. Customizing the layout—horizontal, vertical, or herringbone—lets you tailor the look to your space and taste.
Reclaimed wood walls breathe life into any room, making it feel authentic and warm. This DIY-friendly project can be a rewarding weekend upgrade, boosting your confidence in home styling. Once finished, your space will radiate rustic elegance, impressing guests and making everyday living more inviting.
2. Horizontal Wood Beadboard Paneling with Whitewashed Finish
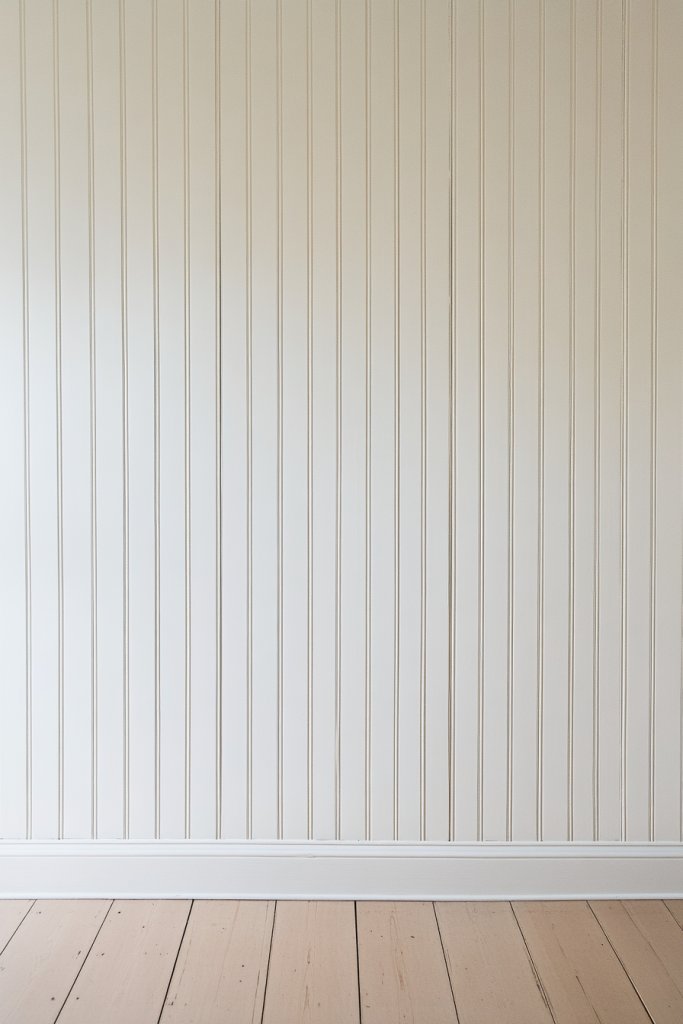
Feeling like your space needs a fresh, classic upgrade? Beadboard paneling offers timeless charm but can sometimes feel too formal or old-fashioned. Whitewashing, however, softens its look, making it perfect for those craving rustic elegance with a breezy, airy vibe. If your walls feel flat or uninspired, this is your ticket to instant character.
Picture a wall lined with narrow, horizontal beadboard panels painted in a soft, diffused white with hints of gray. The bead detail adds a subtle texture that catches the light, adding depth without overwhelming the space. The light finish makes a room feel larger and more open, while the horizontal orientation emphasizes width. It’s like a gentle whisper of coastal charm mixed with rustic warmth.
Use a pure white for a clean, modern rustic look, or choose a slightly tinted wash for more depth. For a coastal or farmhouse style, pair the paneling with distressed wood furniture and linen textiles. In smaller rooms, keep the paneling continuous from floor to ceiling to elongate the space. Seasonal accents like cozy throws or textured curtains can amplify the rustic-modern vibe.
Begin with measuring your wall to determine how many panels you need. Choose beadboard panels that come pre-primed or ready for painting. Sand lightly before applying a whitewash stain or diluted paint to achieve that soft, worn look. Attach the panels using nails or adhesive, making sure to align the bead details evenly. Finish with a sealant or matte topcoat to protect the surface and maintain the washed-out effect.
Add decorative molding or trim at the top or bottom for a more finished look. Customize the whitewash tone by adjusting the stain concentration—more dilute for a subtler effect. Incorporate vintage-inspired hardware or distressed furniture to complete the rustic aesthetic. Or, add textured textiles nearby to soften the look and bring in cozy warmth.
This paneling style transforms plain walls into charming focal points without much fuss. It’s a DIY project that can elevate your space with minimal tools and effort. Once done, you’ll be proud of how a simple whitewashed finish can make your home feel fresh, inviting, and timeless.
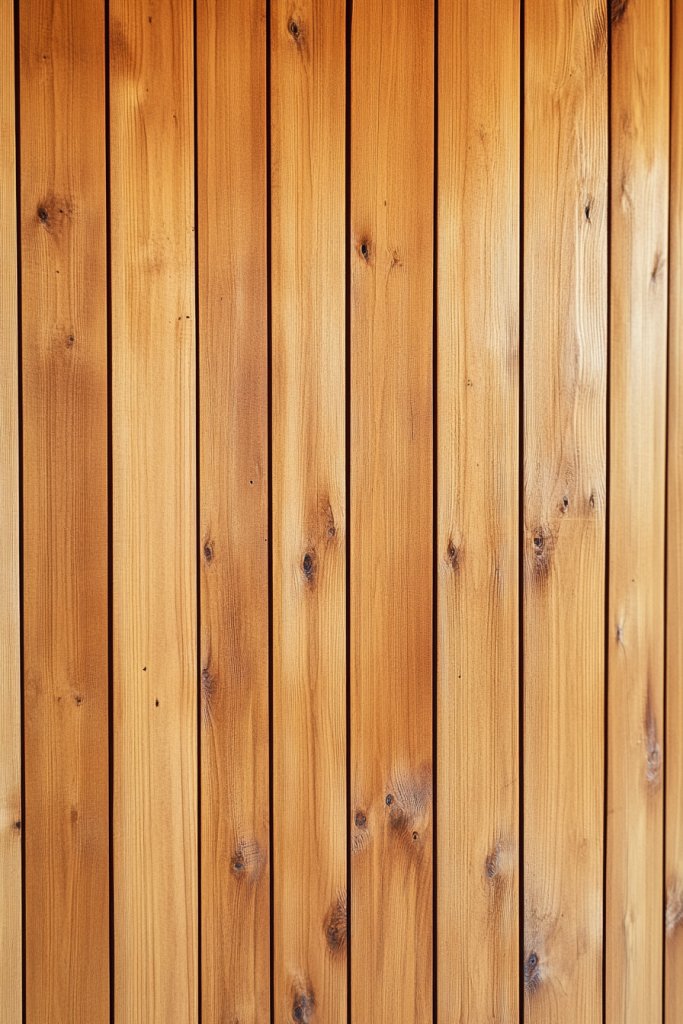
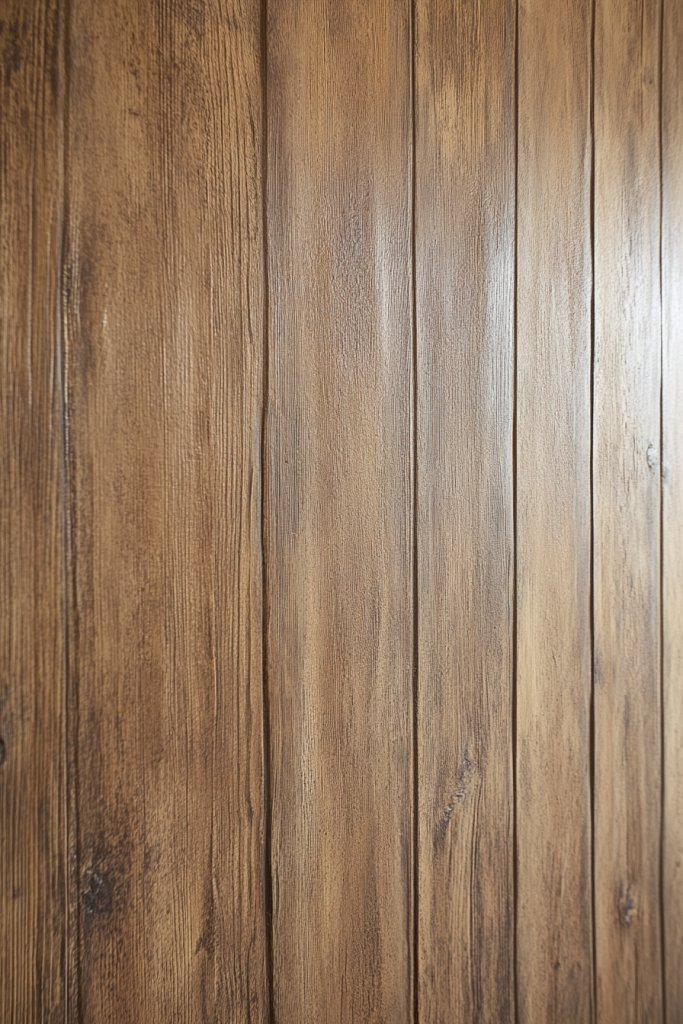
3. Wide Pine Board Wall with Natural Oil Finish

Ever wanted your walls to feel warm and inviting, almost like a mountain cabin? Wide pine boards with a natural oil finish can turn that dream into reality. They bring a cozy, rustic vibe that’s both timeless and easy to maintain. If your current walls feel cold or sterile, this idea offers an instant upgrade.
Imagine a wall clad in broad, textured pine planks with a matte, natural oil that enhances every knot and grain. The warm honey tones glow softly, creating a sense of intimacy and calm. The wide boards add a sense of scale and grandeur, especially in larger rooms. The natural finish emphasizes the wood’s organic beauty, making the space feel alive and genuine.
Opt for a lighter oil for a Scandinavian-inspired look, or a darker stain for a richer, more traditional feel. Pair with vintage or distressed furniture to enhance the rustic vibe, or keep it simple for a modern farmhouse aesthetic. In small rooms, the wide planks make the space feel larger and more cohesive. Seasonal touches like layered textiles or cozy throws can complement the wood’s warmth.
Start by sourcing high-quality pine wide planks from reputable suppliers. Prepare the wall by cleaning and leveling it thoroughly. Sand the planks lightly to open the wood grain for better absorption. Apply the natural oil with a brush or cloth, following the grain, and wipe off excess for an even finish. For durability, add a second coat after drying, and avoid over-saturating to prevent warping. Use nails or adhesive to attach the planks securely, ensuring tight joints.
Customize by mixing different oils or stains to create a unique hue. Add decorative trim or molding to frame the wall for a polished look. Incorporate textured textiles or woven baskets nearby for a tactile contrast. You could also install subtle lighting fixtures to highlight the natural grain and knots, adding ambiance.
This classic pine wall exudes rustic elegance and a warm, inviting atmosphere. It’s surprisingly straightforward to install and maintain, making it perfect for DIY enthusiasts. Once complete, your space will radiate cozy charm, reminiscent of mountain retreats and countryside cottages.
4. Slim Vertical Wood Trim in a Herringbone Pattern
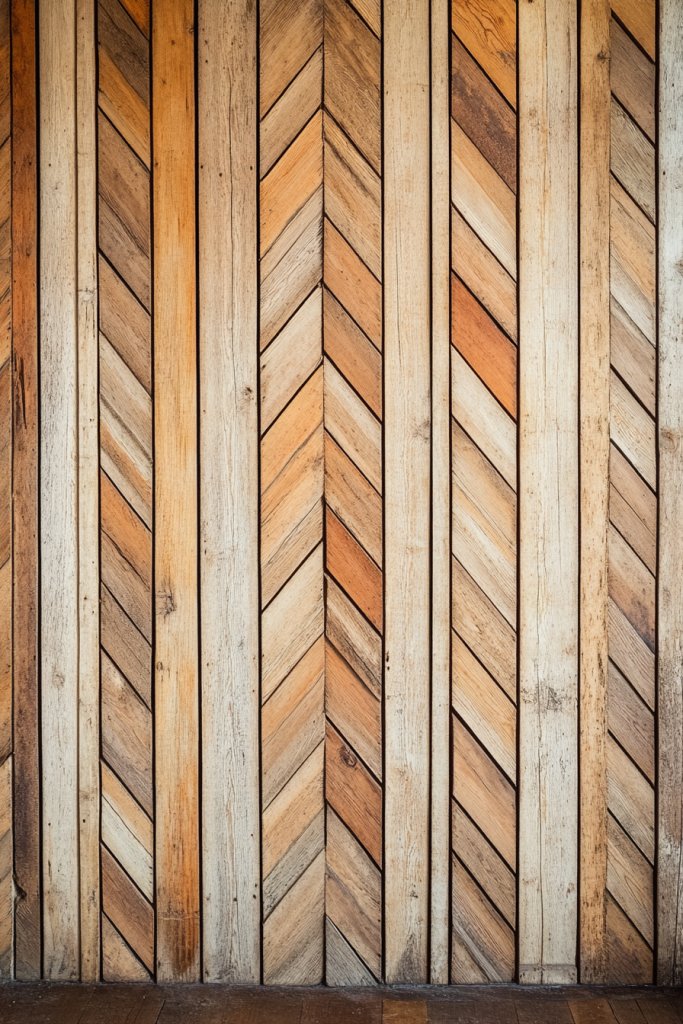
Looking to add a touch of sophistication to your rustic decor? A herringbone pattern with slim vertical wood trims offers a chic twist on traditional rustic walls. It creates visual interest and elevates the space without overwhelming the senses. If your walls feel too plain or monotonous, this pattern injects personality and elegance.
Visualize narrow, vertical wooden strips arranged meticulously in a zigzag pattern across your wall. The pattern’s subtle complexity draws your eye and adds texture, while the natural wood tones keep it grounded. The precise layout creates a rhythmic flow that guides your gaze across the room. The pattern’s symmetry balances rustic warmth with a refined, modern edge.
Use lighter woods like ash or maple for a bright, airy feel, or darker woods such as walnut for contrast. This pattern works well in both contemporary and traditional spaces, blending seamlessly with various furniture styles. For smaller rooms, keep the pattern narrow to prevent visual clutter. For a seasonal twist, layer in textiles or paint accents that complement the wood tones.
Begin by planning the pattern layout with precise measurements and chalk lines. Use slim wood strips, ideally around 1-2 inches wide, cut to height. Attach the trims vertically with nails or strong adhesive, ensuring they are perfectly aligned and evenly spaced. For a seamless look, hide nail heads or use countersunk screws. Finish with a clear sealant or oil to preserve the wood’s natural beauty. Ensure the pattern remains consistent by double-checking measurements at every step.
Add a stain or tinted oil to customize the color, or combine different wood types for a mixed-tone effect. Incorporate metallic or matte-finish corner accents to frame the pattern. Complement with textured textiles or woven wall hangings nearby to soften the geometric design. You might also experiment with lighting angles to cast shadows and emphasize the pattern’s depth.
This pattern adds a sophisticated, handcrafted feel that immediately boosts your decor’s originality. It’s a project that combines precision and creativity, perfect for DIYers who love detail work. Your space will stand out with this elegant yet rustic touch, making every room a conversation piece.
5. Mixed Wood Tones with Diagonal Paneling
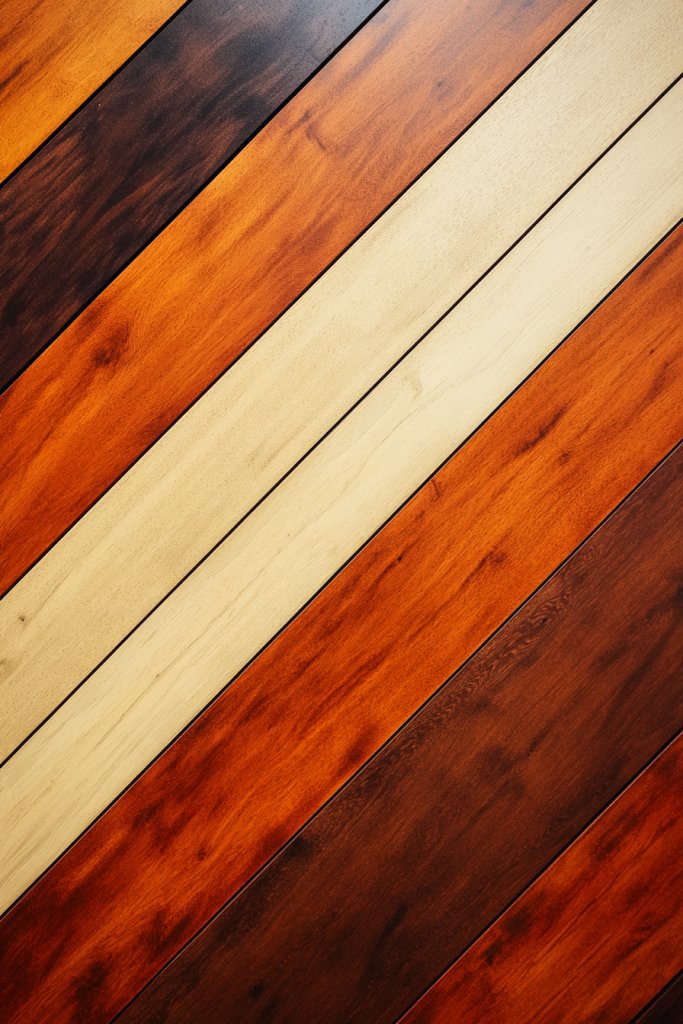
Tired of uniform, boring walls? Mixing wood tones in a diagonal pattern injects energy and personality into your space. It’s a bold move that breaks the mold of traditional wall paneling, creating a dynamic visual effect. If your decor feels flat, this idea promises a vibrant, textured focal point that sparks interest.
Picture a wall composed of various wood panels in shades from honey to deep espresso, arranged diagonally. The different tones create a mosaic-like effect, adding depth and richness. The diagonal layout elongates the room visually, making ceilings feel higher and corners more dramatic. Light plays across the varied textures, emphasizing the contrast and movement.
Use contrasting wood types like oak, cherry, and walnut for a striking effect, or vary stain intensities for a subtler look. In small rooms, keep the pattern tight and the tones harmonious to avoid chaos. For larger spaces, a bold mix can become a statement wall, especially when paired with minimalist furniture. Seasonal accents like textiles and decorative objects can further enhance the eclectic vibe.
Start by selecting different wood species or stains that complement each other. Cut panels diagonally, ensuring precise angles for a seamless pattern. Attach the panels with nails or adhesive, aligning edges carefully to maintain the diagonal flow. Use spacers or guides for consistent spacing and alignment. Finish with a clear sealant or oil to protect the surface and accentuate the tones. Regular maintenance involves simple cleaning and occasional re-oiling.
Incorporate a border or trim in a neutral or contrasting color to define the pattern. Customize the look by adding textured finishes or matte topcoats. Complement with furniture and decor in solid, neutral shades to let the wall stand out. For a modern rustic twist, add metal accents or geometric shelving nearby.
This bold mix of wood tones makes your walls a true work of art. It’s a creative project that allows you to play with colors and textures, boosting your confidence as a DIY decorator. Once finished, your space will radiate personality and style, perfect for hosting or relaxing in a truly unique environment.
6. Beveled Wooden Frame Accent with Neutral Paint
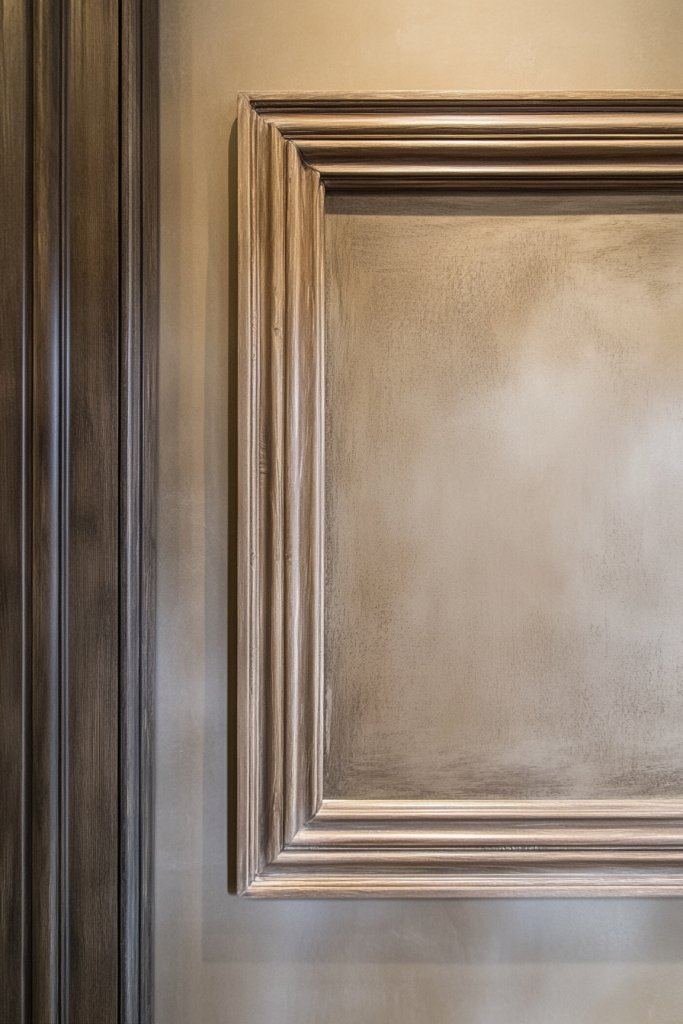
Ever want a subtle yet impactful way to frame a wall? A beveled wooden frame around a painted section offers a sophisticated rustic touch without overwhelming the room. It creates a sense of structure and elegance, perfect for highlighting a particular area. If your walls lack definition, this idea provides a clean, polished solution.
Visualize a neutral-colored wall with a rectangular or square wooden frame carved with a beveled edge. The natural wood’s warm tones contrast beautifully against soft, matte paint in shades like taupe or cream. The bevel catches light differently, adding depth and dimension. It’s like framing a piece of art, but the art is your entire wall, subtly emphasizing its presence.
Use contrasting wood stains—light for a Scandinavian look, dark for a more dramatic statement. Frame either the entire wall or a section, such as behind a built-in shelf or reading nook. For a seasonal change, swap out the paint color or add textured textiles inside the frame. This approach adapts well to various room sizes and styles, from modern to traditional.
Begin by measuring and marking the frame’s outline on your wall. Cut the wood to size, ensuring beveled edges are clean and precise. Attach the frame using nails or strong adhesive, making sure it’s level and square. Fill nail holes and sand smooth for a seamless look. Paint the interior section in your chosen neutral shade, and seal the wood for longevity. The result is a built-in feel with minimal effort.
Add decorative corner accents or inlays to elevate the frame’s design. Paint the wall outside the frame in a contrasting color or leave it neutral for a subtle effect. Incorporate textured wall coverings or fabrics inside the frame for added depth. Complement with warm lighting to highlight the beveled edges and craftsmanship.
This framing technique elevates any wall with a refined rustic touch. It’s a straightforward DIY project that instantly adds elegance and structure. Once finished, your space will look thoughtfully designed, inspiring confidence in your home decor skills.
7. Rustic Barn Door-Inspired Wood Paneling
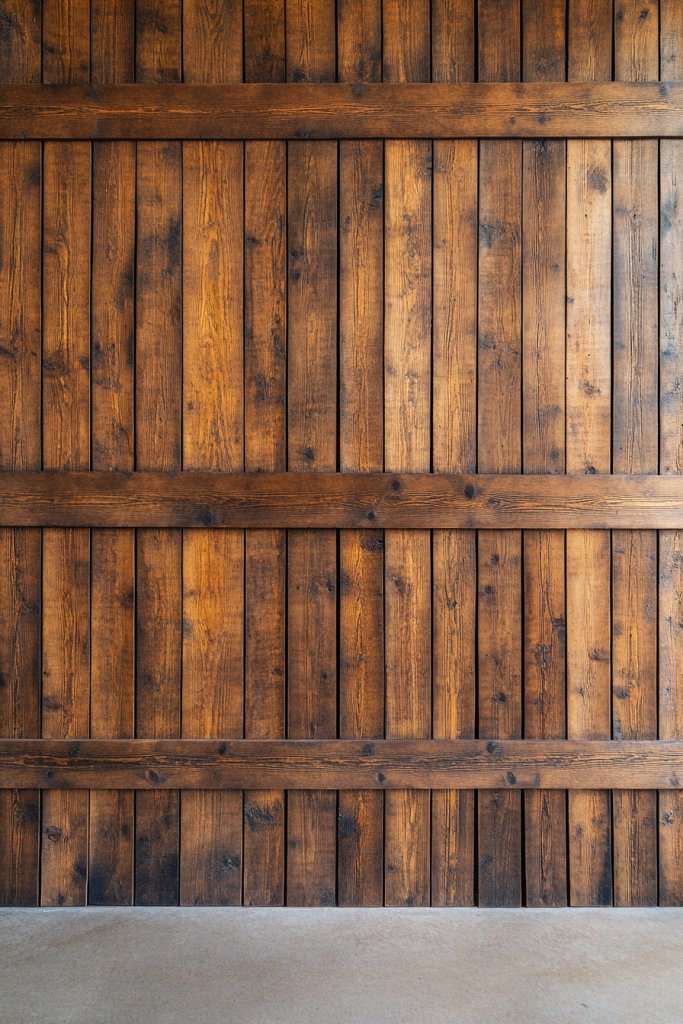
Ever admired barn doors and wondered how to bring that rustic charm indoors? Barn door-inspired wood paneling captures that farmhouse vibe with a practical, stylish twist. It adds a bold statement to any room, blending function with rustic beauty. If your space needs a focal point that’s both functional and charming, this idea ticks all boxes.
Imagine a wall covered in horizontally installed wooden planks resembling a barn door, complete with black iron hardware accents. The weathered wood’s texture and natural imperfections evoke a mountain cabin or countryside retreat. The hardware adds a touch of industrial flair, contrasting beautifully with the rustic wood. The overall effect is warm, inviting, and undeniably authentic.
Choose reclaimed or distressed wood for maximum authenticity or opt for smooth, stained panels for a sleeker look. Incorporate sliding hardware or vintage-style handles for added detail. This paneling works well in entryways, bedrooms, or even as a room divider. Seasonal touches like cozy textiles or vintage accessories further enhance the farmhouse aesthetic.
Start by measuring your wall and selecting appropriate-width wooden planks. Install horizontal supports or rails to attach the panels securely, mimicking barn door tracks. Use nails or heavy-duty adhesive for attaching each plank, ensuring they’re level and evenly spaced. Add hardware or faux hinges to complete the look, securing with screws. Finish with a protective sealant to preserve the weathered appearance.
Customize with painted or stained finishes to match your decor. Add decorative hardware or faux latch details for authenticity. Incorporate a sliding barn door or a faux version for extra functionality. Pair with vintage or rustic furniture to complete the theme, creating a cozy, cohesive space.
This paneling instantly transforms a plain wall into a rustic focal point. It’s a project that combines practical design with artistic flair, perfect for DIY enthusiasts. Once done, your home will exude warmth and character, making every visitor feel the charm of rural living.
8. Tongue-and-Groove Paneling with Matte Sealer
Looking for a classic wall treatment that’s both rustic and refined? Tongue-and-groove paneling offers that timeless look but can sometimes feel a bit formal. Applying a matte sealer softens its appearance, making it more versatile for rustic modern spaces. If your walls lack texture or depth, this approach provides a simple yet elegant solution.
Visualize narrow wooden planks fitted tightly together with a subtle groove between each, painted in a muted, matte finish. The texture reveals the craftsmanship and adds visual interest. The matte sealer dulls any shine, giving the wall a soft, velvety appearance that’s both cozy and sophisticated. It’s like a warm embrace for your room.
Use natural or stained wood for a warm, rustic look, or paint the paneling in neutral shades for a modern vibe. Incorporate this paneling in bedrooms, dens, or even as a feature behind a fireplace. Combine with textured textiles or layered rugs to enhance the rustic ambiance. Seasonal accents can easily be swapped to reflect your mood or decor updates.
Start by measuring your wall and selecting tongue-and-groove panels that fit your style. Sand the panels lightly before installation to ensure smoothness. Attach the panels using nails or adhesive, maintaining tight joints and even spacing. After installation, apply a matte sealer with a brush or roller to eliminate gloss and enhance the rustic feel. Finish by filling nail holes and sanding smooth if necessary.
Add decorative trim or molding for a more polished look. Choose a stain or paint that complements your decor, and consider distressing the finish for extra rustic charm. Incorporate textured fabrics or upholstered furniture to soften the look. Use lighting that highlights the matte finish for cozy ambiance.
This classic paneling elevates your walls with a subtle rustic elegance. It’s straightforward to install and maintain, making it ideal for DIY projects. The result is a warm, inviting space that feels both timeless and personal, perfect for creating a cozy retreat at home.
9. Overlapping Pallet Wood Design for a Textured Effect
Want a quick, budget-friendly way to add rustic texture and charm? Overlapping pallet wood creates a highly tactile, layered wall that screams rustic authenticity. It’s an easy DIY project that instantly transforms plain walls into conversation starters. If you’re craving a cozy, handcrafted look, this idea delivers big time.
Imagine a wall composed of recycled pallet wood pieces layered in an overlapping fashion, with varied shades of weathered gray and brown. The uneven edges and layered textures add depth and visual interest. The rough surface catches light at different angles, creating shadows and highlights that change throughout the day. It’s like bringing a piece of the outdoors inside.
Use different types of reclaimed wood for unique textures or keep it uniform for a more cohesive look. For a more refined feel, lightly sand the surfaces or add a matte sealant. This design works well in casual kitchens, living rooms, or even as a feature wall in bedrooms. Seasonal additions like cozy textiles or vintage accessories can complement the layered look.
Begin by sourcing pallets—preferably untreated and in good condition. Carefully disassemble and cut the wood into manageable pieces. Overlap each piece, attaching with nails or screws, and stagger the layers for a natural, random appearance. Seal the entire surface with a weatherproof or matte finish to protect against wear. Mount the layered paneling securely, ensuring stability and safety.
Mix in different wood stains or leave some pieces raw for a rustic contrast. Add decorative accents like vintage metal hardware or rough-hewn hooks. Incorporate nearby textiles—such as a chunky knit throw or burlap cushions—to enhance the handcrafted vibe. You can also incorporate LED strip lighting behind the layers for a subtle glow.
This textured pallet wall adds instant warmth and personality, perfect for DIYers on a budget. It’s a project that rewards your effort with a truly unique feature. Once finished, your space will radiate rustic charm and a sense of personal achievement, making your home feel more welcoming.
10. Framed Wood Tape Molding in a Grid Pattern
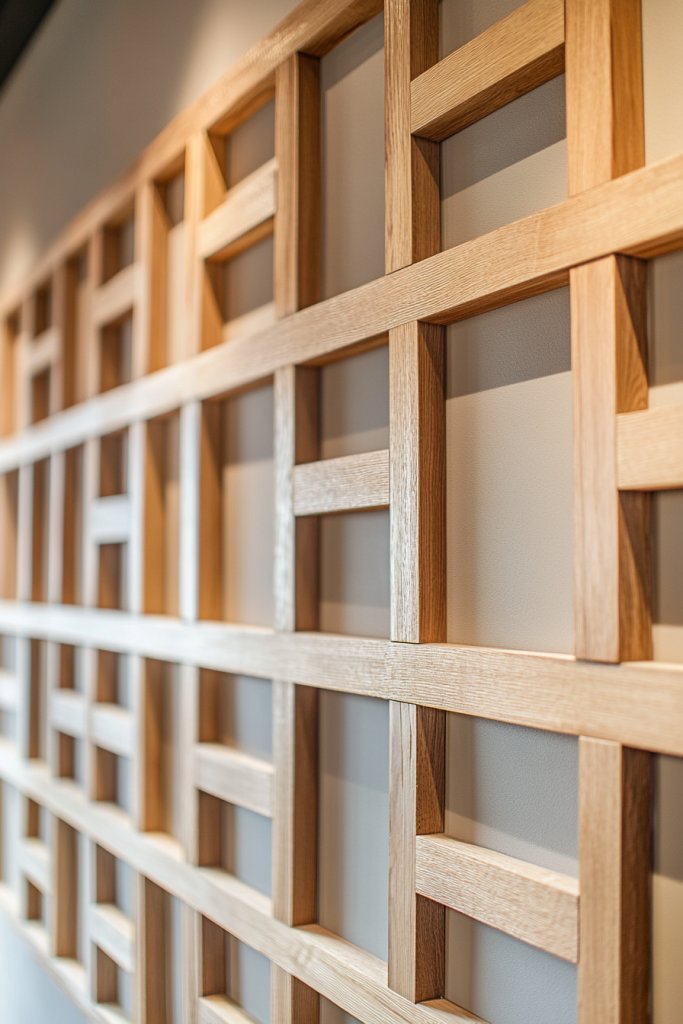
Craving a modern twist on rustic walls? Framed wood tape molding in a grid pattern offers a sleek, geometric look that adds structure and style without sacrificing warmth. It’s an eye-catching design that elevates plain walls into works of art. If your space needs a fresh, contemporary update, this idea is a perfect fit.
Picture a wall divided into large rectangles by thin, natural wood tape molding. The grid creates visual segmentation that guides the eye and adds rhythm. The natural wood’s warm tones contrast beautifully with a painted or neutral background, emphasizing the pattern. The result is a balanced blend of rustic charm and modern sophistication, perfect for contemporary spaces.
Use light or dark wood tape depending on your color palette, or combine different wood types for visual interest. Keep the grid simple for a minimalist look or add decorative elements within each section for more personality. This technique adapts well to large open-plan areas or smaller accent walls. Seasonal decor can be layered in for changeable accents.
Measure and mark the wall to create an even grid layout. Cut thin strips of wood tape or molding, ensuring clean, straight cuts. Attach the strips with adhesive or nails, aligning carefully to maintain uniform spacing. Fill gaps or nail holes with wood filler and sand smooth. Paint or finish the background before installing to achieve a polished look. Seal the wood for durability.
Customize by staining or painting the tape to match your decor. Add small decorative elements or textured finishes inside each grid compartment. Incorporate lighting fixtures or small shelves within some sections for functional decor. Experiment with different grid sizes or orientations for a more dynamic appearance.
This grid pattern adds a sophisticated yet rustic touch that showcases your design flair. It’s a manageable project that transforms a blank wall into a focal point. Your space will feel more organized and stylish, boosting your confidence in tackling geometric design ideas.
11. Rustic Log-Style Wood Cladding for a Cozy Nook
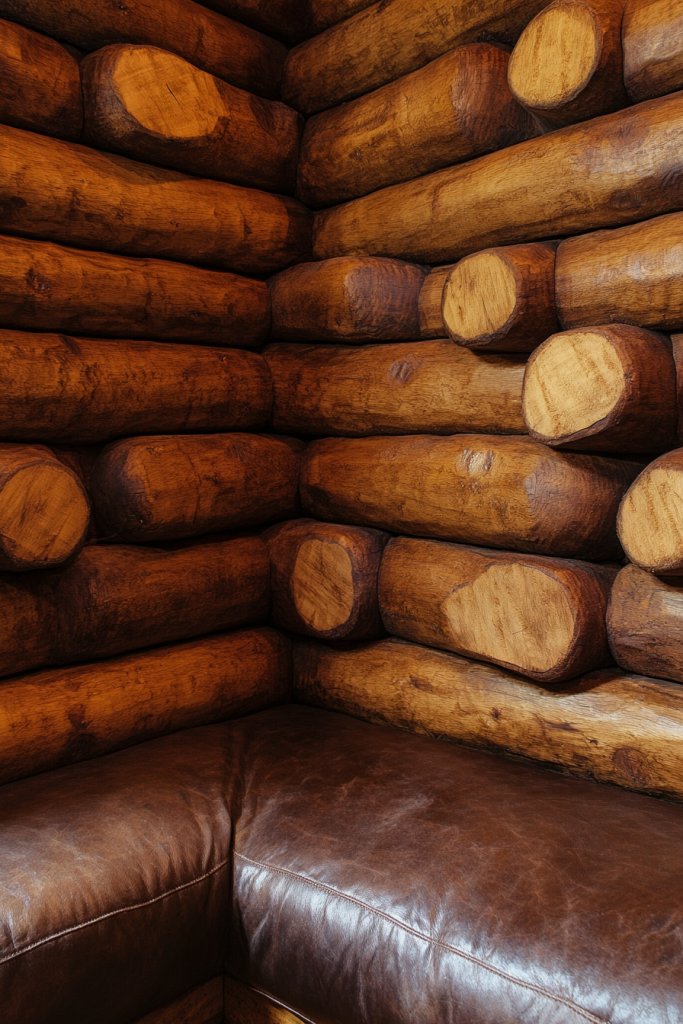
Dreaming of a cozy corner that feels like a mountain cabin? Log-style wood cladding brings that rustic, warm vibe into your home effortlessly. It’s perfect for creating a special nook or accent wall that invites relaxation. If your space needs a boost of natural charm, this idea delivers a high-impact, cozy atmosphere.
Envision a wall covered in round, log-like wood slices or panels with bark edges intact. The natural textures and varied sizes create a tactile, inviting surface. The warm, rich tones of the wood evoke a sense of comfort and connection to nature. Light plays on the uneven surfaces, emphasizing the rugged beauty and craftsmanship.
Use real logs or faux versions made from lightweight materials for easier installation. For a more refined look, choose uniform sizes and finishes, or go for a more organic, uneven arrangement. This cladding works beautifully in reading nooks, dens, or even as an accent behind a bed. Seasonal textures like wool throws or woven baskets complement the rustic vibe.
Source log-style panels or slices from specialty suppliers or craft your own from reclaimed wood. Prepare the wall by cleaning and leveling it. Attach the logs using nails or adhesive, focusing on securing bark edges and uneven surfaces. Seal with a clear, matte finish to protect against wear and enhance the natural beauty. Arrange the logs in a tight or staggered pattern for visual interest.
Stain the logs in warm or cool tones for a customized look. Incorporate faux torch or candle lighting to create a cozy glow. Add woven textiles or rustic decor accents nearby to complete the mountain cabin feel. Mixing in some reclaimed wood pieces or vintage accessories can deepen the rustic charm.
This log-style cladding transforms any space into a cozy retreat straight out of a storybook. It’s a project that celebrates craftsmanship and nature, perfect for DIY enthusiasts. Once finished, your home will radiate warmth and inviting rustic charm, inspiring confidence in your decorating skills.
12. Carved Wood Panel Inserts for Artistic Texture
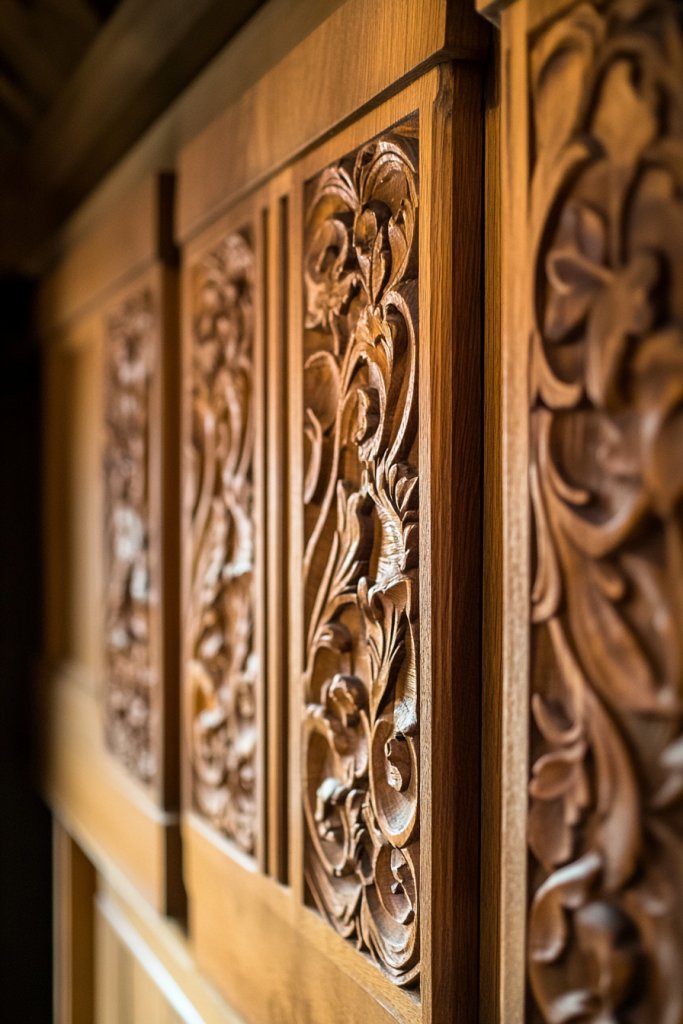
Want to add an artistic, handcrafted touch to your rustic decor? Carved wood panels bring detailed craftsmanship and visual intrigue to plain walls. They serve as statement pieces that elevate your space with artisan flair. If you’re craving a unique, personalized feature wall, this idea combines art and rustic warmth.
Visualize intricately carved wood panels with floral, scroll, or geometric motifs set within a simple frame. The craftsmanship’s detail adds layers of texture, inviting closer inspection. The warm tones of the carved wood contrast with neutral or painted backgrounds, creating a focal point that’s both artistic and rustic. Light and shadow bring the carvings to life, emphasizing depth.
Choose from traditional carvings or modern abstract designs, depending on your style. Incorporate these panels into a gallery wall or as standalone accents. Finish with natural oils or stains that highlight the carvings’ details. Seasonal textiles or lighting can enhance the artistic effect, creating a cozy, gallery-like atmosphere.
Start by selecting or commissioning carved wood panels from artisans or specialty stores. Attach them securely with nails or adhesive, ensuring they’re flush and stable. Consider framing or mounting on a backing board for added stability. Finish with a protective oil or sealant to preserve the carvings and prevent damage. Position the panels at eye level for maximum impact.
Customize with different stain colors or paint finishes to match your decor. Incorporate accents like wrought iron or vintage hardware for a layered aesthetic. Use lighting to cast shadows and highlight the carvings’ depth. Combine with textured textiles or handmade accessories to enhance the artisanal feel.
Carved wood panels are a testament to craftsmanship and creativity, making your space truly one-of-a-kind. They boost your confidence in adding artistic, handcrafted elements to your decor. Once installed, they create an inspiring environment that celebrates rustic artistry and personal style.
13. Whitewashed Shiplap with Natural Edge Trim
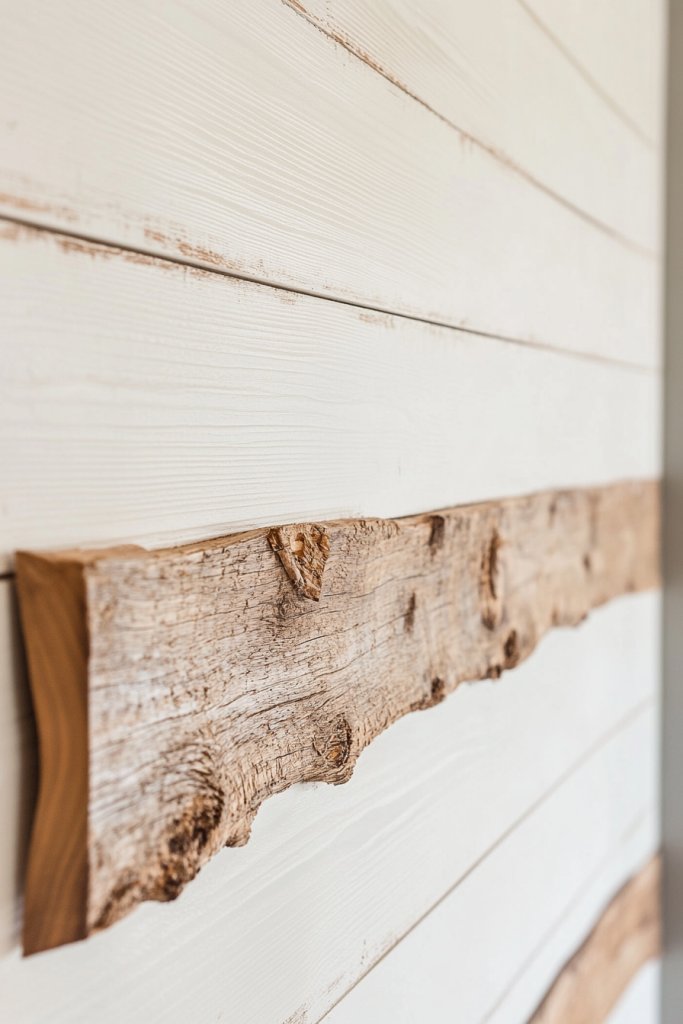
Craving a soft, rustic-modern vibe? Whitewashed shiplap paired with natural edge trim offers a gentle, inviting look that balances rustic charm with contemporary simplicity. It’s perfect for creating a light, airy focal wall that feels both fresh and warm. If your walls seem dull or lifeless, this idea breathes new life into your space.
Imagine horizontal shiplap boards painted in a whitewash finish that reveals glimpses of the wood grain underneath. The natural edge trim adds an organic, imperfect contrast that softens the overall look. The textured surface catches light subtly, creating a cozy, textured backdrop. The whitewash’s translucency enhances the wood’s natural beauty while brightening the room.
Use different shades of white or light gray for varied effects, or add a hint of color for a personalized touch. Keep the trim in its natural state for a raw, organic feel, or stain it darker for contrast. This style works well in bedrooms, kitchens, or living rooms, especially when paired with neutral textiles. Seasonal accents like chunky throws or woven baskets further enhance its rustic-modern appeal.
Begin by measuring your wall and selecting pre-primed or unfinished shiplap boards. Lightly sand the boards before applying a diluted whitewash or tinted sealer. Attach the boards horizontally with nails or adhesive, ensuring tight joints. Install the natural edge trim at the edges or framing the wall, securing with nails. Finish with a clear matte sealer to protect the surface without adding shine. Touch up paint or stain as needed for a uniform look.
Vary the whitewash density for different degrees of translucency. Incorporate decorative corner trims or niche accents for added detail. Use textiles, rugs, or baskets in natural fibers to complement the organic vibe. Highlight the textured surface with directional lighting or sconces for cozy ambiance.
This style creates a fresh yet rustic backdrop that feels effortlessly stylish. It’s an easy DIY project that instantly lifts the decor and mood of your space. Once complete, your home will radiate calm, inviting energy that’s both modern and timeless.
14. Layered Wood Strips with Depth and Shadow Lines
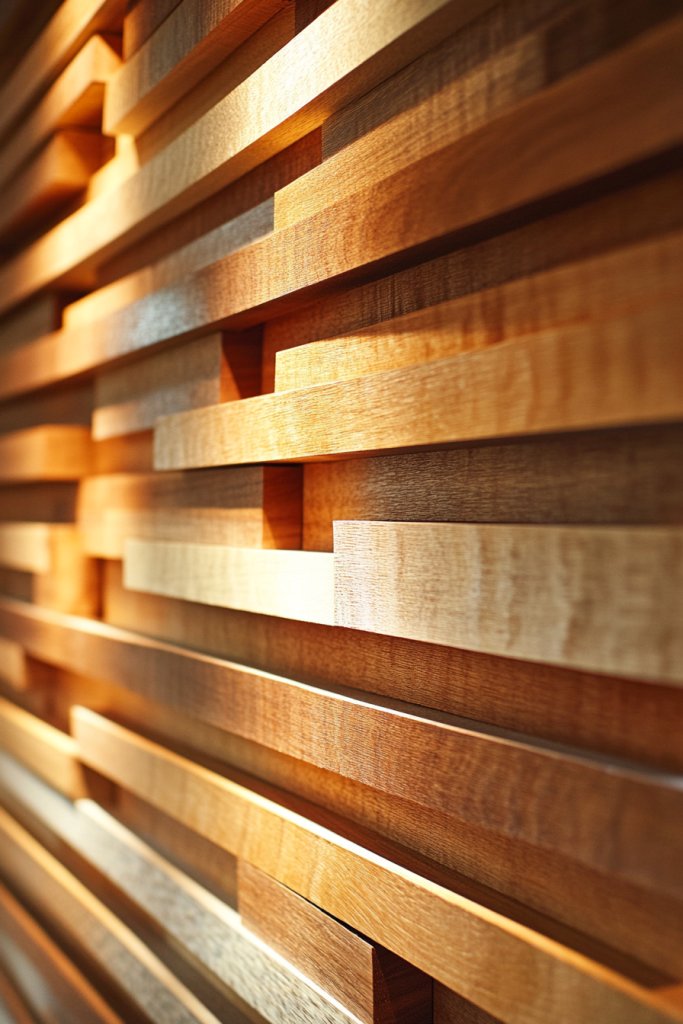
Looking for a way to add dimension and visual interest to your walls? Layered wood strips with varying depths create a stunning, textured effect that plays with light and shadow. It’s a bold statement that transforms flat surfaces into dynamic focal points. If your walls need a boost of personality, this approach delivers an eye-catching upgrade.
Picture multiple thin wood strips mounted at different depths, creating a stepped, layered appearance. The varied heights cast subtle shadows that shift with the light, adding movement and intrigue. The natural wood tones range from pale to dark, enhancing the layered effect. It’s like a sculptural relief that invites touch and exploration.
Use different wood types or stains to emphasize the layers’ depth. Keep some strips raw and others stained for contrast. Adapt the design to smaller spaces by reducing the number of layers or keeping the layers shallow. For larger walls, experiment with more dramatic depths for maximum impact. Pair with minimalist furniture and textiles to let the wall stand out.
Start by planning your layout with precise measurements and spacing. Cut the wood strips to varying lengths and depths, then attach with nails or screws at different heights. Use spacers to ensure consistent depth variations. Seal the wood with a matte or semi-gloss finish to protect and enhance the layers’ visual effect. Organize the installation from bottom to top for stability. Ensure all layers are securely mounted and aligned.
Add color accents or metallic finishes to some layers for extra flair. Incorporate lighting effects like LED strips behind or within layers to enhance shadows. Mix in different textures or materials nearby for contrast. Personalize by customizing the depth and arrangement for your space’s unique architecture.
Layered wood strips turn a simple wall into a piece of sculptural art. They challenge you to think creatively about depth and light. Once finished, your space will radiate a modern rustic charm that’s both bold and refined, inspiring confidence in your design skills.
15. Warm Mahogany Accent with Iron Detailing
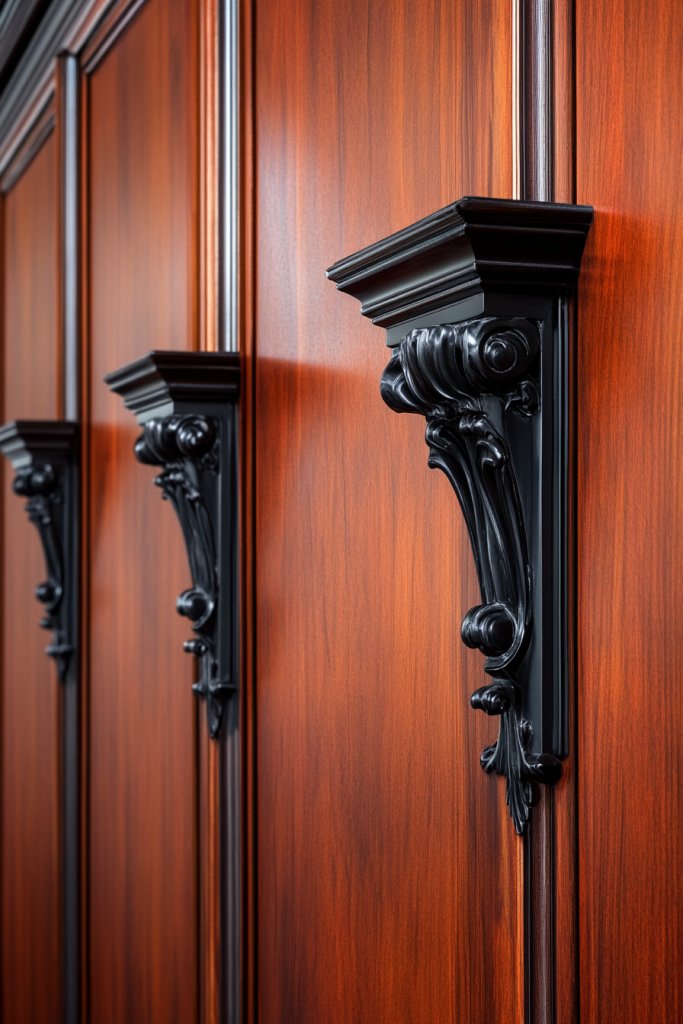
Seeking a touch of luxury within your rustic decor? Mahogany’s rich, warm hues paired with iron accents create a stunning contrast that exudes elegance. It’s an ideal choice for a statement wall that balances rustic warmth with sophisticated detailing. If your space needs a refined upgrade, this idea combines opulence and authenticity.
Imagine a deep mahogany wall with a smooth, polished finish, accented by wrought iron brackets or decorative hardware. The dark, glossy surface reflects subtle light, adding depth and richness. Iron details provide a textural contrast, giving the wall a handcrafted, artisanal feel. The overall effect is warm, inviting, and undeniably upscale.
Use high-quality mahogany for a premium look or opt for stained lighter woods for a more rustic, aged appearance. Incorporate decorative iron hardware, such as brackets or faux hinges, for authentic detailing. Pair with leather furniture and textured textiles for a cozy yet luxurious vibe. Seasonal accents like velvet or silk textiles can further elevate the look.
Source mahogany panels or planks, ensuring they’re properly finished and polished. Attach the panels securely using nails or adhesive, aligning carefully to maintain a smooth surface. Install iron hardware or decorative accents with appropriate fasteners. Finish with a durable, glossy sealer to protect the wood and enhance the color depth. Consider adding a contrasting trim or molding in dark metal or painted wood.
Customize the iron detailing by choosing different styles—scrolls, brackets, or decorative hinges. Stain the wood in warm tones like cherry or deep walnut for added richness. Incorporate layered textiles or plush furniture to complement the luxurious feel. Use lighting to highlight the contrast between wood and metal, creating a focal point.
This combination of mahogany and iron elevates rustic decor to a new level of sophistication. It’s a project that combines craftsmanship with style, boosting your confidence in creating upscale rustic interiors. Once finished, your space will radiate warmth, richness, and timeless elegance, inspiring you to explore further design ideas.
16. Minimalist Light Wood Trim with Neutral Wall Base

Craving a sleek, understated rustic-modern look? Light wood trims paired with neutral walls create a clean, minimal aesthetic that feels fresh yet warm. It’s perfect for those who want subtle elegance without clutter or fuss. If your walls feel dull or boxy, this idea offers a quiet but impactful upgrade.
Picture a wall painted in a soft beige or taupe, framed by slim, pale wood trims. The simple lines add definition without overpowering the space. The natural light wood tone complements the neutral background, creating a harmonious, calming effect. The minimal contrast emphasizes the clean, modern aesthetic while maintaining rustic warmth.
Choose woods like ash or maple for a light, airy feel, or stain the trims slightly darker for contrast. Keep the design simple with narrow trims or add subtle corner details for a finished look. This style suits open-plan living areas, bedrooms, or offices. Seasonal accents like textured pillows or woven rugs can add cozy touches.
Measure and cut the trim precisely to fit your wall’s edges and corners. Attach the trims with nails or adhesive, ensuring they’re flush and level. Finish with a clear or matte sealant to protect the wood’s natural color and grain. For a seamless look, fill nail holes and sand lightly. Keep the design minimal, avoiding ornate molding or elaborate details.
Add small decorative elements like textured wall panels or subtle lighting to enhance the simplicity. Incorporate textiles in natural fibers to soften the look. Personalize with artwork or accessories that match the wood’s tone and style. The key is to maintain the clean, uncluttered aesthetic for a modern rustic feel.
This minimalist approach proves that less can be more, especially when combining natural textures with neutral colors. It’s a project that’s easy to execute and maintain, giving you confidence in creating a sleek, rustic-modern space. Your home will feel calm, balanced, and effortlessly stylish, inspiring further design experimentation.
17. Faux Wood Paneling with Textured Paint Finish
Want the look of wood without the installation hassle? Faux wood paneling with textured paint finishes offers a budget-friendly, versatile alternative. It mimics the rustic charm of real wood while allowing for customization and quick DIY execution. If you’re short on time or tools but crave that warm, rustic feel, this idea is your best friend.
Visualize a wall covered in textured paint that resembles aged, weathered wood planks. The surface has a tactile quality, with grooves and ridges that catch light and shadow. The color palette can range from soft whites and grays to dark browns, mimicking natural wood tones. You get the visual richness without any actual wood panels, making it ideal for quick updates.
Experiment with different textures—rough, crackled, or distressed—to match your aesthetic. Use layered paint techniques or textured rollers to create realistic wood grain effects. This method works well in rental spaces or areas where permanence is an issue. Seasonal decor and textiles can further enhance the rustic charm without adding physical weight.
Start by prepping the wall with a good clean and primer. Use textured paint or create your own by mixing joint compound with paint to add grit. Apply with brushes, rollers, or sponges to mimic wood grain and weathering. Finish with a protective sealant to ensure durability. For added realism, incorporate faux boards or planks painted directly onto the wall with stencil patterns.
Add faux nail holes or knots with darker paint for authenticity. Combine with decorative textiles or vintage accessories to deepen the rustic feel. Use lighting to emphasize the textured surfaces, highlighting the painted grain. Personal touches like stenciled patterns or custom colors can make it uniquely yours.
Faux wood paneling is a quick, creative way to achieve rustic charm on a budget. It’s a project that allows experimentation with textures and colors, building confidence in DIY decor. Once completed, your walls will look convincingly rustic, cozy, and full of character, inspiring further creative upgrades.
Conclusion
With these diverse wood trim accent wall ideas, you have the perfect tools to elevate any room with rustic elegance. Don’t hesitate to try out different styles and techniques to create a truly personalized space. Embrace the beauty of wood and let your creativity shine—your dream rustic wall is just a project away!