Imagine turning ordinary rocks into vibrant works of art that can brighten up any garden—sounds delightful, right? DIY painted rock flowers are gaining popularity because they combine creativity, outdoor charm, and a touch of personal expression, making garden spaces uniquely yours.
In this article, you’ll find a variety of inspiring ideas to craft your own painted rock flower garden. From realistic blooms to whimsical designs, these projects are perfect for all skill levels and can add a splash of color and personality to your outdoor oasis. Get ready to unleash your inner artist and transform simple stones into captivating garden decor!
1. Bright Sunflower Rocks for a Cheerful Garden Path
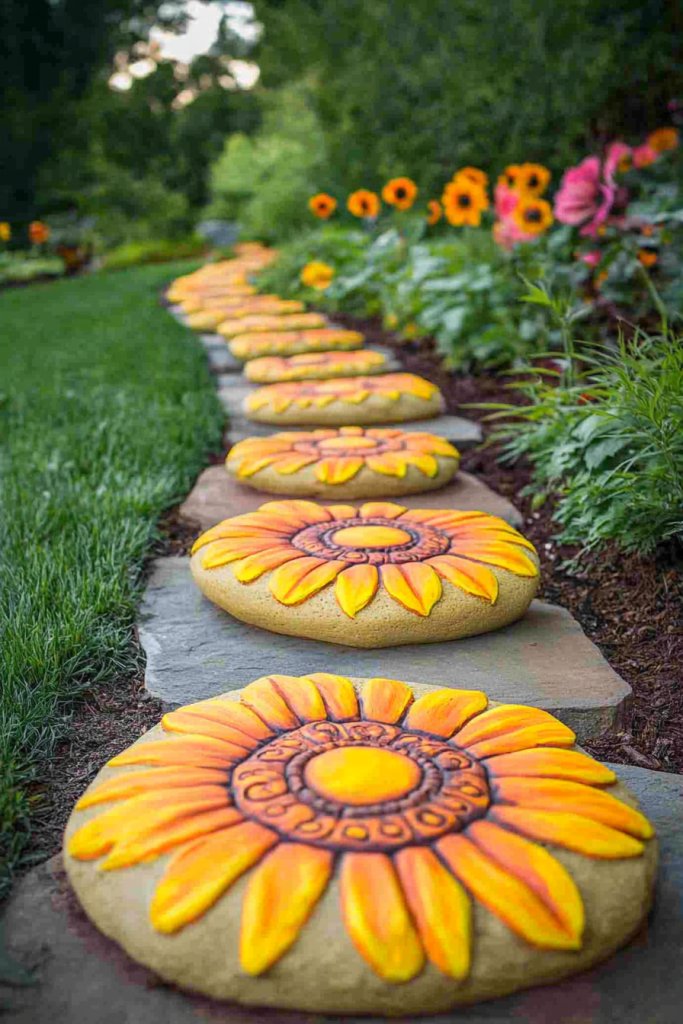
Ever walk down your garden path and wish it felt a little brighter and more inviting? Sometimes, all it takes is a splash of cheerful color to turn a dull walkway into a cheerful route. Painted rocks might seem simple, but they pack a punch in transforming outdoor spaces. If you love the idea of adding a sunny vibe without major renovations, this DIY project is perfect.
Picture a winding garden path lined with vibrant yellow sunflower painted rocks. The petals are layered with subtle shading, giving a realistic yet playful look. The centers have tiny black dots, mimicking real sunflower seeds, and the bright yellow stands out beautifully against lush greenery. As you walk, these cheerful blooms seem to smile back at you, making every step happier.
You can customize the sunflowers to match your garden theme—big and bold, or small and dainty. For a springtime touch, add pastel backgrounds or combine with other flower designs. Seasonal color swaps, like orange for fall or white for winter, can refresh the look throughout the year. Or, create a mixed border with different flower types for a more natural wildflower effect.
Gather smooth, flat rocks and acrylic paints in yellows, browns, and blacks. Start by sketching the sunflower outlines with a pencil, then fill in the petals with bright yellow, blending shades for depth. Use a fine brush for detailing the centers and tiny seed patterns. Seal your artwork with a weatherproof varnish to protect against rain and sun. Place the rocks along your walk or in garden beds for a delightful, sunny pathway.
Add personal touches by painting initials or small messages within the sunflower centers. Incorporate other elements like ladybugs or bees to create a mini ecosystem vibe. Use different shades of yellow and green to match your existing garden palette. For extra flair, embed small decorative stones or glitter on the petals for shimmer in the sunlight.
Creating sunflower rocks is a fun way to brighten your outdoor space without needing a green thumb. Plus, it’s a project that anyone can do, even kids or beginner artists. Imagine the compliment from guests when they see your cheerful garden path—your creativity really shines through. Ready to add a sunny smile to your garden?
2. Whimsical Fairy Flower Stones for Magical Corners
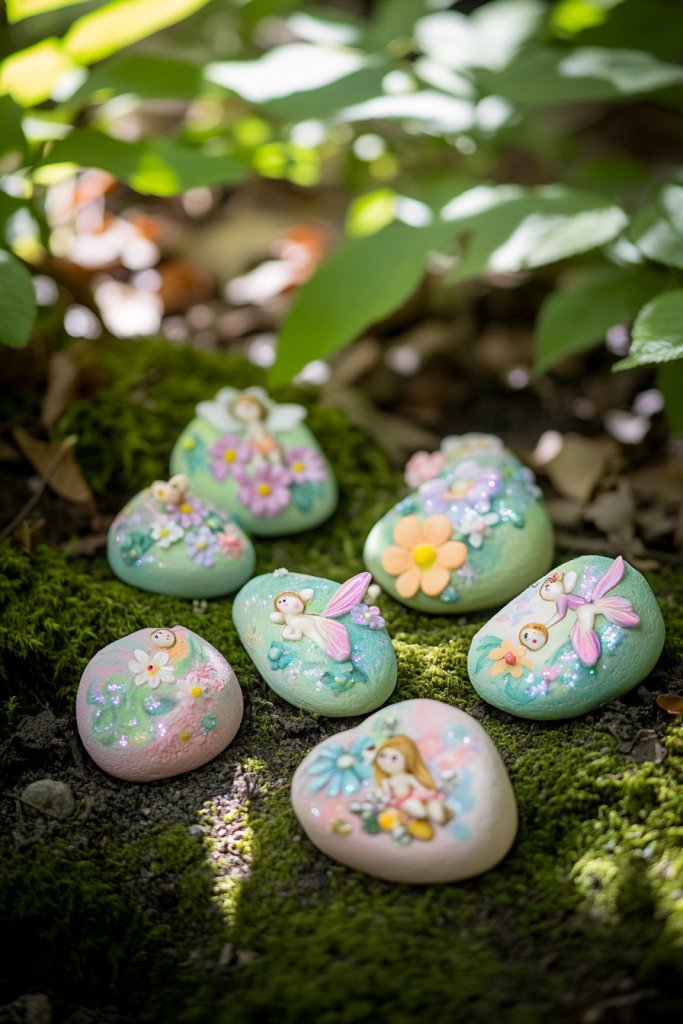
Dreaming of creating a magical escape right in your backyard? Fairy-themed gardens evoke wonder and transport you to a fairy tale land. But you don’t need elaborate fairy sculptures—simple painted rocks can do the trick. If you crave a corner that sparks imagination and joy, these fairy flower stones are your answer.
Imagine tiny, delicate flowers painted on small, smooth rocks, surrounded by shimmering accents. The flowers are whimsical—soft pinks, blues, and purples with tiny white highlights, giving a fairy-like glow. Scatter these stones around a shaded nook with twinkle lights or a cozy bench, and you have a secret garden spot that feels enchanted.
Use pastel or metallic paints for a more ethereal look, or opt for bold, jewel-tone shades for a vibrant fairy garden. Add tiny fairy silhouettes or wings painted on some stones for extra magic. Seasonal themes, like snowflakes or autumn leaves, can give your fairy corner a fresh look all year round. Mix and match with decorative elements like miniature toadstools or tiny lanterns for a complete enchanted vibe.
Start with small, smooth stones and acrylic paints in soft pastel shades. Sketch simple flower shapes with fine brushes, then fill in with gentle strokes. Use metallic or glitter paints for accents to mimic fairy dust or magic sparkles. Seal with weatherproof varnish for durability. Position the stones among shaded plants or under a trellis for a secret fairy hideaway. Regular touch-ups keep the magic alive.
Add initials or tiny messages on some stones, like “Dream” or “Wonder,” to personalize your fairy corner. Incorporate tiny painted fairy wings or crowns for added whimsy. Use glow-in-the-dark paint on some flowers for nighttime sparkle. Create a story by painting a sequence of stones that tell a fairy tale or scene.
Transforming small rocks into fairy flowers is an easy, affordable way to add magic to your garden. It’s a project that nurtures your creativity and invites curiosity. Everyone loves discovering a secret fairy nook—your friends will be amazed. Ready to craft your own enchanted corner?
3. Elegant Rose Blooms on Smooth River Rocks
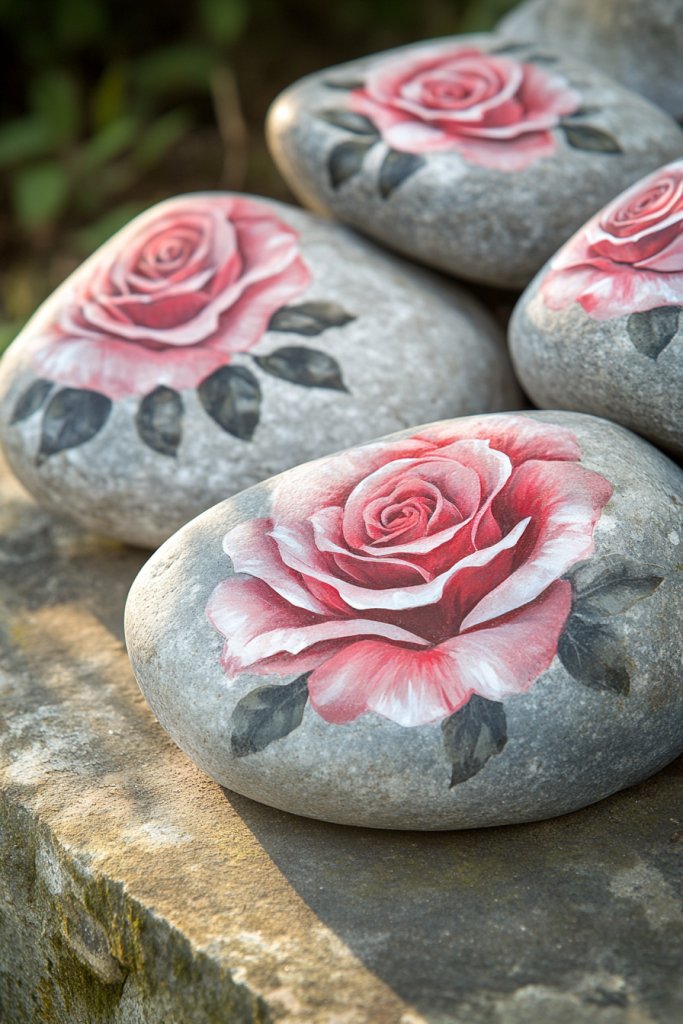
Ever wanted to bring a touch of romance and elegance to your garden without planting a single flower? Painted rocks can mimic the timeless beauty of roses and add a sophisticated vibe. If you love classic floral motifs but prefer low-maintenance decor, these rose blooms are a perfect fit.
Visualize smooth river rocks transformed into delicate roses with layered petals in shades of red, pink, or white. The petals are shaded to show depth, with fine details on edges to mimic real blooms. The leaves are painted in lush green, with veins adding realism. These stones are arranged in a small cluster or border, giving a romantic, vintage feel.
Use monochrome pinks for a soft, vintage look or bold reds for a striking display. For a more modern aesthetic, combine the roses with geometric patterns or metallic accents. Seasonal variations like snow-dusted white roses or deep burgundy ones can tailor the look to your decor. Pair with decorative wrought iron or wooden elements for extra charm.
Select smooth, flat river stones and acrylic paints in reds, pinks, and greens. Sketch the rose outline lightly with a pencil, then layer the petals with varying shades to add depth. Use a fine brush for petal details and leaves, blending colors for a realistic effect. Seal the paint with a weatherproof varnish. Arrange the stones along pathways or garden beds for effortless elegance. Regular touch-ups keep the roses fresh.
Personalize your roses by painting initials or small messages on the stones’ backs. Mix different shades within the same flower for a more natural look. Incorporate tiny dew drops with clear gloss paint for added realism. Combine with small decorative figurines or vintage ornaments to enhance the romantic vibe.
Creating rose stones is a timeless, simple way to add elegance without gardening. It’s a craft that elevates your outdoor space instantly. Whether for a romantic garden or a cozy patio corner, these painted roses make a stunning statement. Ready to craft your own floral masterpiece?
4. Colorful Tulip Rocks for Springtime Charm
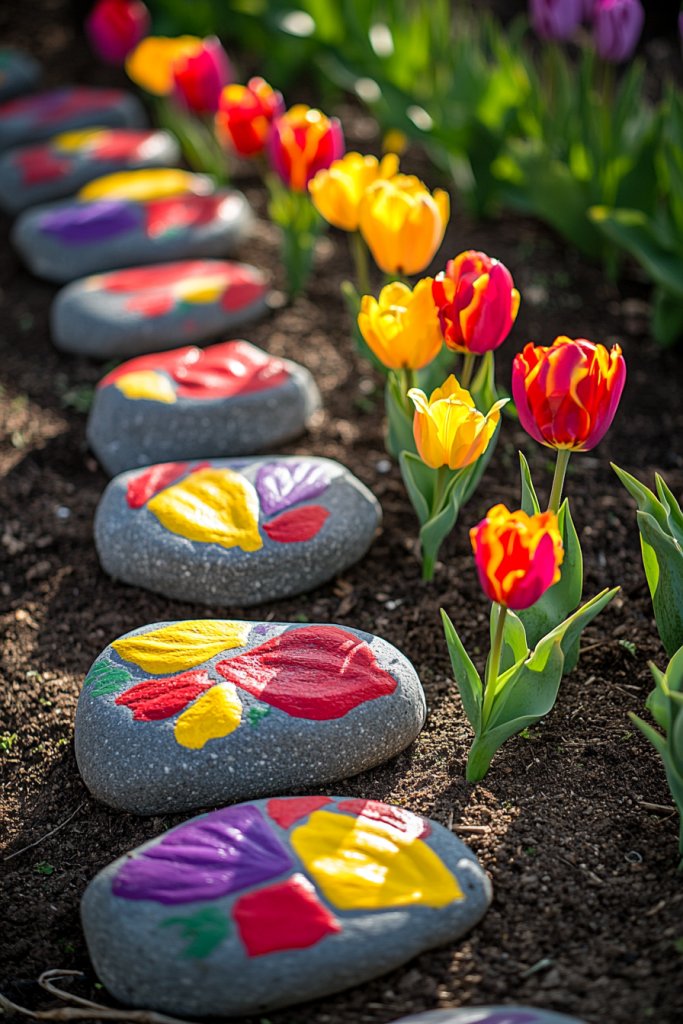
Looking to inject some lively energy into your garden as seasons change? Bright tulips are the perfect symbol of spring’s renewal, and painting them on rocks offers a cheerful alternative to real flowers. If you want a splash of color that lasts year-round, tulip painted rocks might be just what you need.
Imagine a collection of rocks painted with bold, vibrant tulips in reds, yellows, and purples. The petals are layered with varying shades to give a lively, dynamic appearance. The green stems and leaves add contrast, and some stones might feature tiny watering cans or bees for extra charm. These rocks could be arranged in flower beds or as a border, creating a lively springtime scene.
Use bright, cheerful colors like hot pinks or sunny yellows for an energetic look. For a more subdued palette, go with pastel shades for a soft, romantic vibe. Seasonal accents like snowflakes or sun motifs can transform the design for winter or summer. Combine tulip rocks with other spring flowers or herbs for a fresh, natural look.
Gather smooth, flat rocks and acrylic paints in your chosen tulip colors, along with green for stems. Sketch tulip shapes lightly, then fill in with bold strokes, blending shades for petals. Use fine brushes for petal details and leaves. Seal with waterproof varnish, and place along pathways or in garden beds. Grouping them in clusters enhances visual impact and creates a mini spring garden.
Add tiny details like ladybugs or watering cans, or personalize with initials on some stones. Mix different tulip varieties or colors for variety. Incorporate glitter or metallic accents for extra sparkle. You can also paint small messages or quotes on the stones for a personal touch.
Bright tulip rocks are a joyful, easy way to celebrate spring all year long. They bring energy and color without needing watering or sunlight. Your garden will feel more inviting, and your creative skills will shine. Ready to bloom with your own painted tulips?
5. Dainty Daisy Rocks for a Cottagecore Look
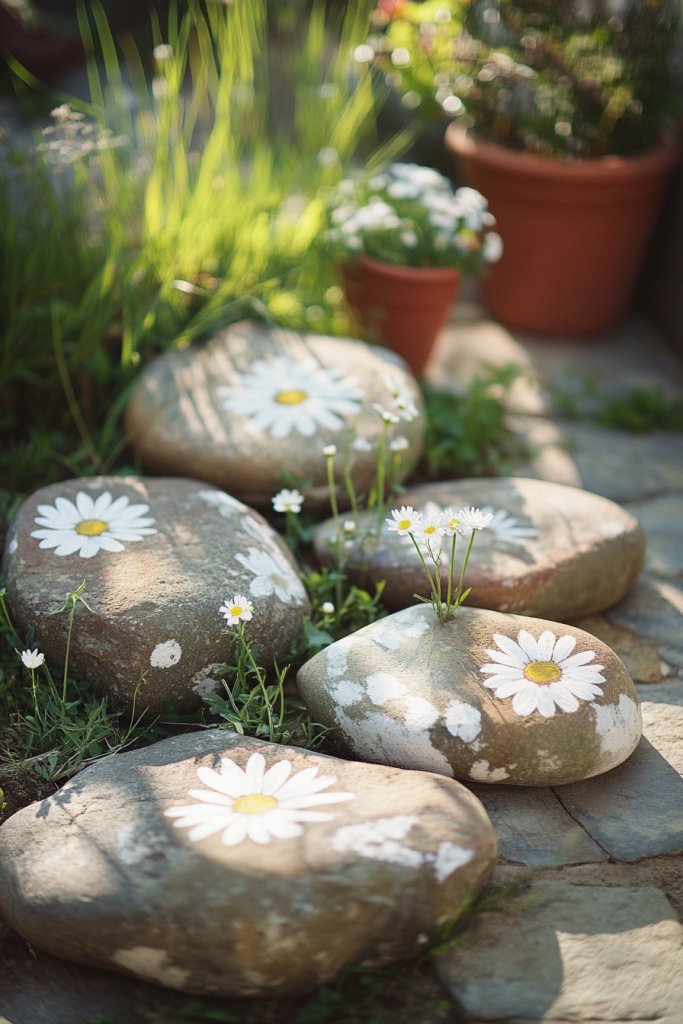
Craving that cozy, countryside vibe in your garden or patio? Daisies evoke simplicity and charm, perfect for a cottagecore aesthetic. Instead of planting masses of daisies, why not paint them onto rocks for a low-maintenance, adorable display? If you love the idea of a quaint, rustic touch, these daisy rocks are calling your name.
Picture small, smooth stones decorated with cheerful white petals and bright yellow centers. The petals are painted with soft strokes, giving a delicate, natural look. These rocks can be scattered along garden paths or clustered in a small bed, creating a whimsical, country-inspired scene. The overall effect feels fresh, light, and inviting.
Opt for white petals with yellow centers for classic daisies, or experiment with pastel backgrounds for a softer look. Add tiny green leaves or stems for more realism. Seasonal variations include adding frost effects for winter or vibrant backgrounds for summer. Pair with other cottagecore elements like burlap or lace accents for a complete vibe.
Start with smooth, rounded stones and acrylic paints in white, yellow, and green. Lightly sketch daisy outlines, then fill in with gentle strokes, blending for a soft petal effect. Use fine brushes for details and highlights to mimic light reflection. Seal each stone with weatherproof varnish. Arrange the daisies in flower beds or along garden borders for a charming, rustic look.
Personalize daisies by adding initials or tiny messages in the centers. Mix petal sizes for variety and realism. Incorporate tiny painted insects like bees or butterflies for extra whimsy. For a vintage touch, add subtle crackle effects or distressing to the stones.
Daisy rocks are a simple, joyful craft that instantly boosts the cottagecore charm of any garden. They’re perfect for beginners and add a whimsical touch that delights visitors. Your outdoor space will radiate cozy, country vibes—just like a storybook. Ready to create your daisy wonderland?
6. Artistic Lotus Flowers for Zen Garden Accents
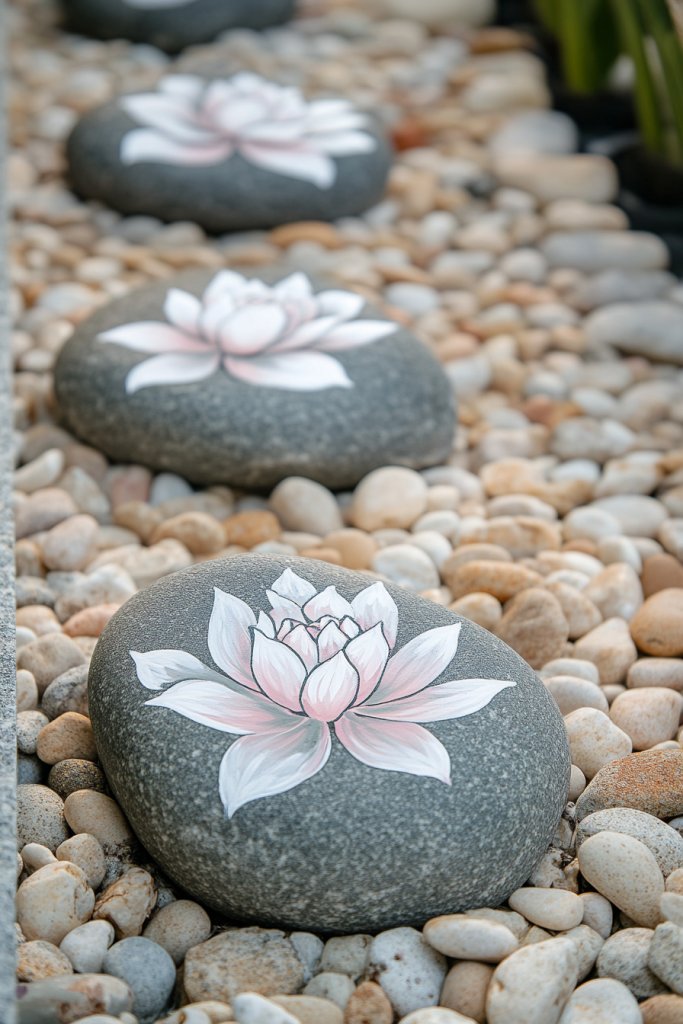
Seeking serenity and balance in your outdoor space? Lotus flowers symbolize purity and tranquility, making them ideal for Zen-inspired gardens. Painting lotus blooms on rocks adds a calming aesthetic without the maintenance of real plants. If peace and mindfulness are your goals, these artistic lotus rocks are a perfect addition.
Visualize flat, smooth stones painted with soft, blended pastel hues that mimic watercolor lotus blossoms. The petals are layered with subtle shading, radiating calmness and elegance. Surround the stones with gravel, bamboo, or smooth pebbles to enhance the Zen vibe. A few carefully placed lotus rocks can create a meditative focal point.
Use monochromatic shades like whites and soft pinks for a minimalist look, or incorporate gentle blues and purples for a more artistic feel. Add subtle metallic accents for a hint of elegance. Seasonal elements like small painted koi fish or bamboo can complement the lotus theme. Keep the overall palette muted and harmonious.
Begin with flat, smooth rocks and watercolor or acrylic paints in soft pastel shades. Sketch the lotus outline lightly, then fill with gentle, blended strokes, emphasizing fluidity. Use a fine brush for petal details and shading. Seal with a clear weatherproof varnish to protect against moisture. Arrange the stones thoughtfully in your Zen corner, perhaps on a bed of gravel or sand. Regular touch-ups maintain the tranquil look.
Add subtle touches like tiny painted insects or water ripples to enrich the scene. Personalize with small inspiring words or symbols painted discreetly on the stones. Combine with lanterns or statues made of natural materials for a complete Zen aesthetic. Incorporate textured finishes to mimic water or stone for added depth.
Creating lotus rocks is a simple yet powerful way to cultivate peace in your outdoor space. It’s a mindful craft that encourages relaxation and focus. Your Zen garden will radiate calm, inviting you to pause and breathe. Ready to craft your own peaceful oasis?
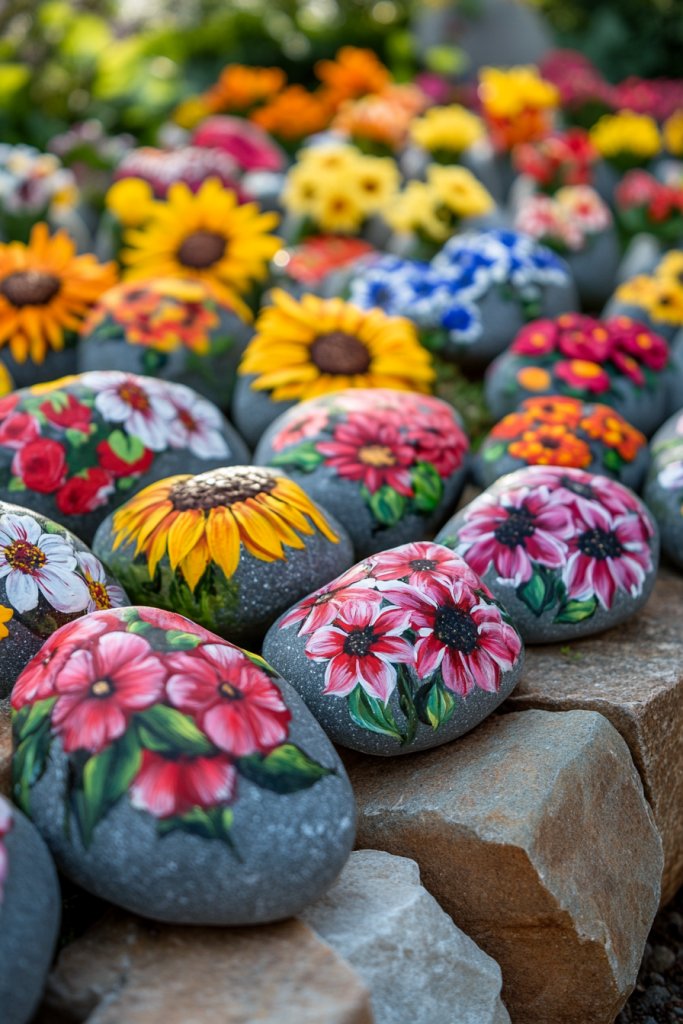
7. Vibrant Poppy Rocks for Eye-Catching Borders
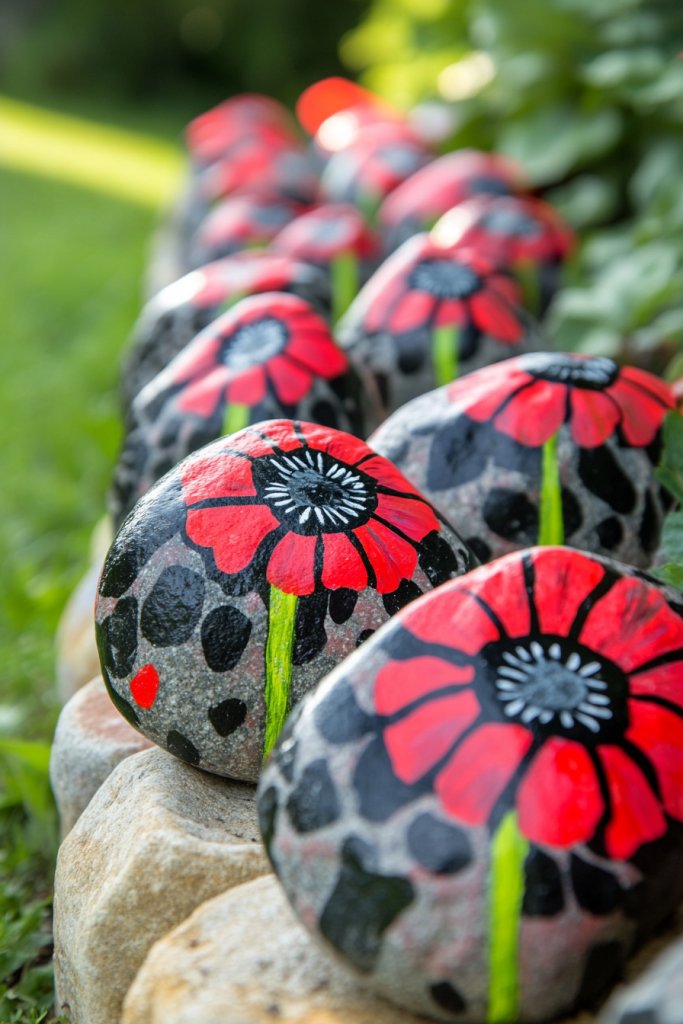
Want to make your garden border pop with color and personality? Poppies are bold, striking flowers that symbolize remembrance and beauty. Painting them on rocks allows you to create an eye-catching, low-maintenance border that lasts year after year. If you love vivid shades and dramatic designs, these poppy rocks are your new best friend.
Imagine a row of rocks painted with fiery reds, oranges, and deep greens. The petals are layered with different shades to mimic the natural variation, while the centers feature tiny black dots. The leaves are painted with jagged edges for a wildflower look. These stones line a garden bed or pathway, creating a border that commands attention and adds vibrancy.
Use bright reds and oranges for a fiery look, or opt for darker shades like maroon and burgundy for more drama. Incorporate yellow accents or gold detailing for extra richness. Seasonal tweaks include adding frost effects or dew drops. Combine with other wildflowers or grasses for a natural, untamed border.
Start with smooth, flat stones and acrylic paints in bold colors. Sketch the poppy outline, then fill in with layered strokes, blending for depth. Use a fine brush for petal details, highlighting the edges. Paint the centers with tiny dots and add leaf details with jagged edges. Seal with weatherproof varnish, then place along garden edges or pathways. Grouping several stones together enhances visual impact.
Personalize by painting initials or small messages on the stones’ backs or sides. Vary the size and shape of the poppies for a more natural look. Mix in other wildflower motifs or insects like bees for added interest. Use metallic paints for stems or accents to increase visual appeal.
Bold poppy rocks are a fun way to add a splash of color and personality to any garden border. They bring a lively, dramatic touch that’s hard to ignore. Your outdoor space will look professionally curated without any gardening skills. Ready to create your own vibrant border?
8. Miniature Flower Garden on Painted Flat Rocks
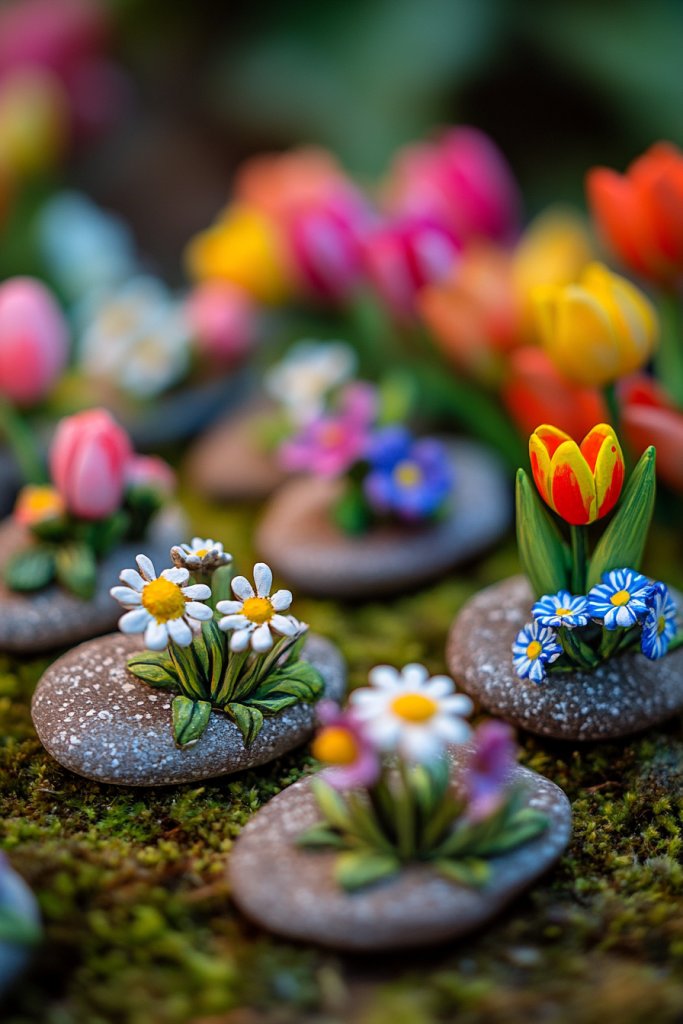
Ever wanted a tiny, manageable garden that packs a visual punch? Miniature painted flower rocks are perfect for small spaces or tabletop displays. They let you create a detailed, charming garden without the fuss of real plants. If you love intricate details and a playful aesthetic, this project is just for you.
Picture a shallow tray or garden bed filled with tiny, painted rocks resembling a miniature flower garden. Each stone depicts a different flower—daisies, tulips, or lavender—with bright colors and fine details. The stones are arranged with tiny pathways or decorative gravel to mimic a real garden scene. The result is a whimsical, miniature landscape that delights the eye.
Use a variety of flower types and colors for diversity. Incorporate tiny garden accessories like painted benches or fountains on some stones for added charm. Seasonal themes, like snow or autumn leaves, can be painted for variety. You can also combine these miniature gardens with fairy or Zen themes for a personalized touch.
Start with small, flat stones, and sketch simple flower shapes with a fine brush. Fill in with bright, opaque paints, adding shading and highlights for depth. Use tiny brushes to detail petals and leaves, making each flower unique. Seal with waterproof varnish and arrange in a shallow container or tray. Add miniature painted accessories or tiny pebbles to complete the scene.
Personalize with tiny painted signs, messages, or initials. Mix flower types and colors to reflect your favorite blooms. Use metallic or glitter paints for a special touch. Display your miniature garden indoors or outdoors, adjusting details seasonally if desired.
Creating miniature flower gardens on rocks is a delightful way to express artistry and add charm. It’s perfect for small spaces or as a gift. Your tiny garden can be as detailed or simple as you like, making each one special. Ready to craft your own miniature floral paradise?
9. Rustic Wildflower Rocks for Natural Garden Vibes

Want your garden to feel more like a wild, untouched paradise? Rustic wildflower painted rocks can bring that natural, free-spirited vibe without the mess of real weeds. They’re perfect for creating a relaxed, boho look that feels organic and effortless. If you love the charm of wild meadows, these rocks are your new best friends.
Envision rugged stones painted with a variety of wildflowers—blues, yellows, purples—with irregular shapes and loose petal strokes. The flowers are scattered across the rocks with some overlapping to mimic a natural meadow. These stones can be placed among tall grasses, driftwood, or natural mulch to enhance the rustic, organic feel.
Use earthy tones and muted colors for a more subdued, natural look, or brighten with vivid hues for a lively meadow scene. Incorporate different flower shapes—cone-shaped poppies, daisy-like asters, or bell-shaped bluebells. Seasonal variations include adding frost effects or tiny painted insects for added realism. Mix with natural elements like twigs or bark to complete the rustic aesthetic.
Select rough, uneven stones and paints in earthy shades. Sketch wildflowers with loose, quick strokes, then fill in with vibrant colors, blending softly to mimic natural petals. Add details like grass blades or tiny insects with fine brushes. Seal with weather-resistant varnish. Arrange the stones loosely in garden beds or along pathways, blending seamlessly with natural surroundings for an organic look.
Add personalized touches by painting small messages or initials, or incorporate tiny painted insects like bees or butterflies. Vary the size and shape of rocks to increase natural randomness. Use textured paint effects to mimic moss or lichen for more realism. Group the stones with natural garden elements for a truly wild vibe.
Wildflower rocks are a simple way to foster a relaxed, natural outdoor space. They’re easy to make and add a charming, unkempt beauty that feels authentic. Your garden will evoke the peacefulness of a wildflower meadow—no green thumb required. Ready to embrace the rustic charm?
10. Monochrome Flower Designs for Modern Elegance
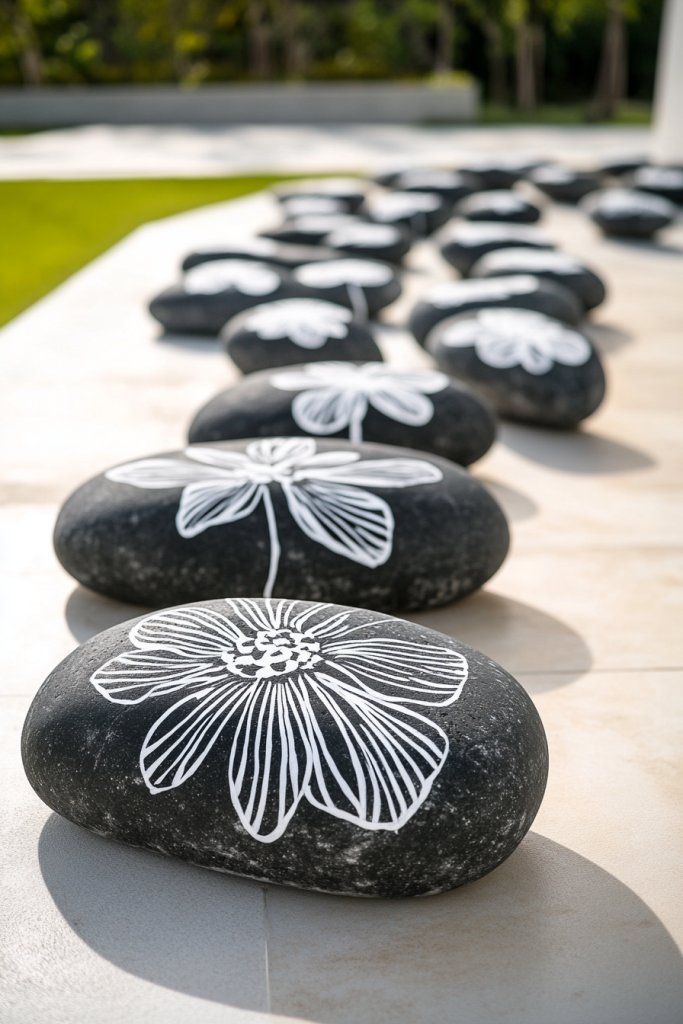
Craving a sleek, contemporary look for your garden or patio? Monochrome flower designs offer a minimalist, elegant aesthetic that fits modern decor effortlessly. Painting flowers in black, white, or shades of gray transforms ordinary rocks into stylish accents. If you love clean lines and understated beauty, these monochrome flowers are your new go-to.
Imagine smooth stones painted with crisp, simple flower outlines in black or white. The designs are sleek—just minimal lines and shapes—yet striking in their simplicity. Arrange these stones as a border, or scatter them in a dedicated corner for a chic, modern vibe. The high contrast makes the flowers stand out against lush greenery or neutral backgrounds.
Use bold black on white stones for a high-contrast look, or opt for white on black for a more dramatic statement. Add geometric accents or fine line patterns for extra flair. Seasonal variations include adding metallic or gloss finishes for a touch of luxury. Combine with other monochrome decor elements like sculptures or furniture for a cohesive aesthetic.
Choose smooth, flat stones and sketch minimal flower outlines in pencil. Use fine brushes to outline and fill in with black or white acrylic paint, emphasizing clean, sharp lines. Keep the designs simple—think outlines, silhouettes, or abstract shapes. Seal with a clear weatherproof varnish. Place them in modern garden beds or along walkways for a sleek, artistic statement.
Personalize by adding small initials or dates within the flowers for a subtle touch. Experiment with different line thicknesses to create depth. Incorporate metallic accents or spot gloss to add dimension. These stones work well with contemporary outdoor furniture or architectural features.
Monochrome flower designs elevate your garden with their timeless, modern appeal. They’re a simple way to introduce elegance without clutter or fuss. Your outdoor space will look polished and stylish, perfect for entertaining or relaxing. Ready to embrace minimalist beauty?
11. Watercolor-Style Flower Art on Large Stones
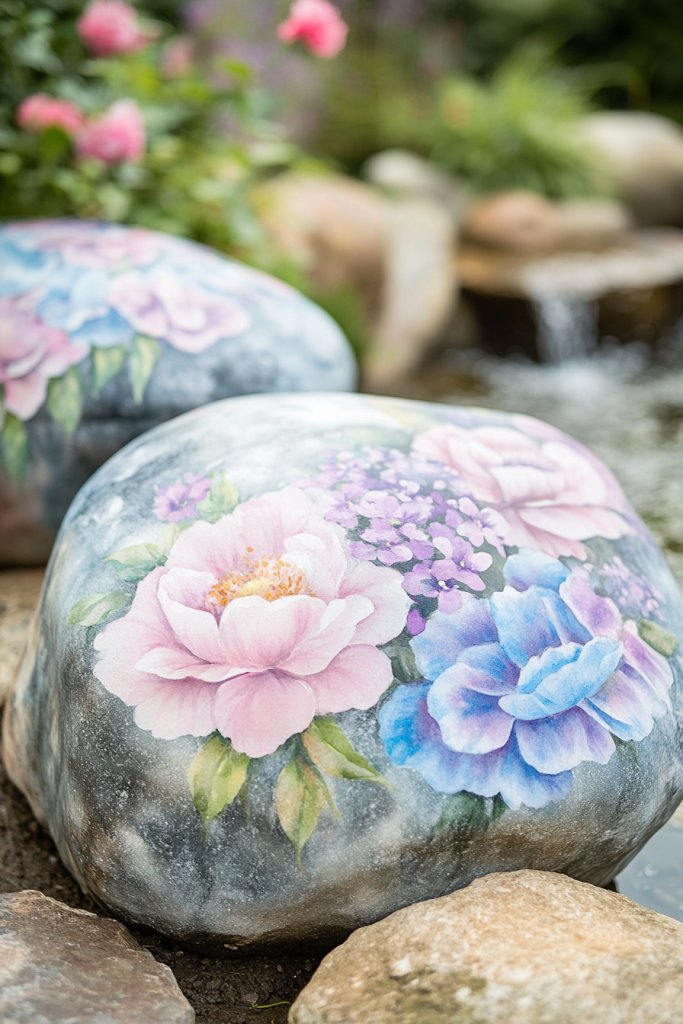
Looking for a sophisticated way to add subtle beauty to your garden? Watercolor-style flowers on large stones create a soft, artistic effect that’s both calming and elegant. Unlike bold, cartoonish designs, these mimic real watercolor paintings with gentle blends and delicate details. If you love art-inspired decor, this project is a perfect fit.
Envision large, flat stones painted with flowers that appear to be softly blurred, with colors blending seamlessly into each other. Pinks, purples, or blues fade into the background, creating a dreamlike effect. These stones are placed in quiet corners or along pathways, offering a poetic, artistic vibe. The watercolor effect invites contemplation and adds a touch of class.
Use pastel or muted tones for a subtle, elegant look, or go bold with vibrant colors for a more striking statement. Incorporate subtle gold or silver accents for a luxurious feel. Seasonal themes could include autumn leaves or winter snowflakes, painted in watercolor style. Pair with textured fabrics or natural materials to enhance the artistic ambiance.
Start with large, smooth stones and watercolor paints in your chosen hues. Use soft brushes and light, fluid strokes to blend colors naturally. Sketch flowers lightly in pencil first, then build up layers gradually, allowing colors to bleed slightly for authentic watercolor effects. Seal with a protective varnish designed for outdoor use. Position in garden beds or on patios for an artistic centerpiece.
Add tiny metallic or glitter highlights for extra shimmer, mimicking the reflective qualities of watercolor paper. Personalize with small, handwritten messages or initials for a special touch. Combine with other watercolor or abstract art pieces in your garden for a cohesive artistic theme. Rotate or update the designs seasonally for fresh inspiration.
Watercolor flower stones bring a refined, artistic touch to any outdoor setting. They’re perfect for art lovers or anyone wanting a peaceful, beautiful garden. Crafting these stones boosts your artistic confidence and transforms your space into a gallery. Ready to paint your own watercolor masterpiece?
12. Seasonal Flowers for Year-Round Garden Decor
Tired of decorating your garden for just one season? Why not make it vibrant all year with painted rocks that celebrate each season’s signature flowers? From cherry blossoms to poinsettias, this approach keeps your outdoor decor fresh and festive. If you love changing things up, seasonal flower rocks are your answer.
Imagine a variety of rocks painted with blossoms from each season—pink cherry blossoms in spring, bright sunflowers for summer, warm orange marigolds in fall, and deep red poinsettias for winter. Each stone captures the essence of its season through colors and details. Grouped together, they tell a story of the year’s natural cycle, adding color and meaning to your garden.
Vary your color palettes to match seasonal themes—soft pastels for spring, bold tropical shades for summer, earthy tones for fall, and icy blues or reds for winter. Incorporate small seasonal symbols like snowflakes or pumpkins alongside flowers. Swap out or add new stones each season to keep the display lively and relevant.
Choose smooth, flat stones and paint with acrylics in seasonal colors. Sketch flowers corresponding to each season, then fill in with appropriate shades. Add details like snowflakes or leaves to enhance the theme. Seal with weatherproof varnish. Arrange stones in clusters or borders, switching out stones seasonally for update flexibility. Keep a small stash for quick swaps.
Personalize each stone with initials, dates, or tiny messages marking the season. Incorporate mini figurines or decorative accents that reflect the current season—like mini pumpkins or snowflakes. Use metallic or glow-in-the-dark paints for winter and night displays. Create a storytelling sequence with the stones for added charm.
Celebrating each season with painted stones keeps your garden lively and engaging year-round. It’s an easy, cost-effective way to refresh your decor regularly. Your outdoor space will always feel fresh and intentional, and you’ll love the creative process. Ready to cycle through the seasons?
13. Personalized Flower Rocks with Initials or Messages
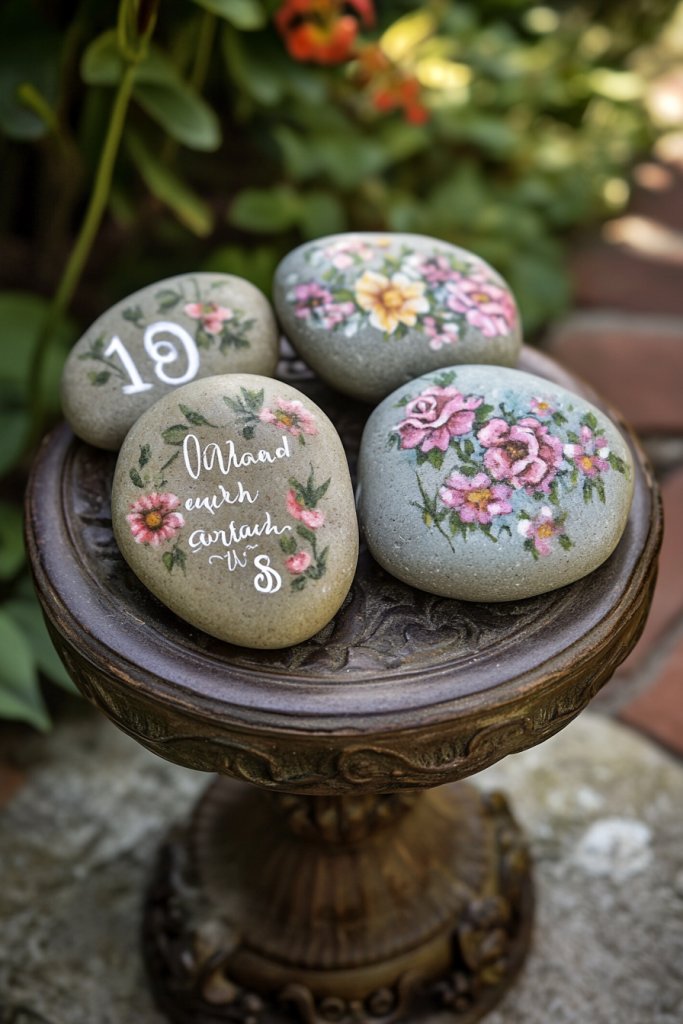
Want your garden decor to feel truly yours? Personalized painted rocks with initials or messages turn simple stones into meaningful tokens. They make thoughtful gifts and special keepsakes, adding a heartfelt touch to your outdoor space. If you love DIY projects that carry personal significance, this idea is a winner.
Visualize rocks painted with delicate flowers and tiny handwritten initials or short messages like ‘Love’ or ‘Joy.’ The designs are subtle but meaningful, blending floral motifs with personal words. Scatter these stones throughout your garden or place them near important spots, creating a personal narrative within your outdoor decor.
Use elegant script fonts or playful handwriting depending on your style. Incorporate small icons—hearts, stars, or tiny flowers—to complement the messages. Seasonal themes can include holiday greetings or special dates. Mix different font styles and colors for variety and visual interest.
Start with smooth, flat stones and fine brushes. Lightly sketch your message or initials, then carefully fill in with acrylic paints, choosing colors that match your overall theme. Use a steady hand for lettering or stenciling for precision. Seal with weatherproof varnish. Place these personalized stones in strategic locations—entrances, garden beds, or pathways—to add personal charm.
Combine messages with floral motifs or tiny decorative accents. Personal touches like painted borders or backgrounds enhance the design. Use metallic or glitter paints for special occasions or to add a bit of sparkle. Consider making a set for gifts or memorials for loved ones.
Personalized flower rocks turn your outdoor space into a reflection of your personality and love. They’re a heartfelt, creative project that elevates simple decor into meaningful art. Your garden will feel more welcoming and uniquely yours. Ready to add your personal touch?
14. Boho-Chic Painted Rock Flower Mobiles
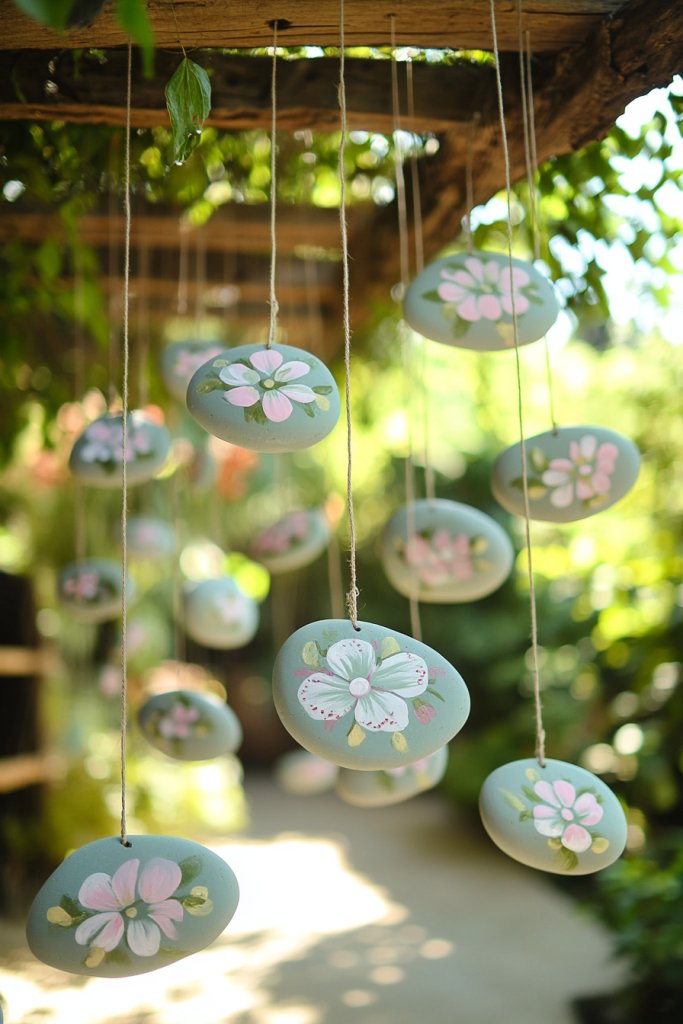
Looking to add a whimsical, boho touch to your outdoor decor? Painted rock mobiles with floral motifs bring gentle movement and charm to patios, decks, or garden corners. They’re a playful alternative to traditional wind chimes and add a personalized, artistic vibe. If you love bohemian style, these mobiles are your new favorite project.
Picture a string of painted rocks hanging from a driftwood or metal frame, each decorated with delicate flowers, feathers, or abstract patterns. The stones sway softly in the breeze, creating a calming visual rhythm. Combine bright colors or earthy tones to match your aesthetic. These mobiles evoke a carefree, artistic spirit that makes your outdoor space feel cozy and artistic.
Use vibrant, contrasting colors for a lively look or muted, natural shades for a more subdued vibe. Incorporate small beads or feathers for added texture. Seasonal variations might include painted snowflakes or leaves. Hang the mobile near a sitting area or entryway for maximum visual impact.
Select smooth, oval stones and paint floral or abstract designs with acrylics. Drill small holes in each stone for hanging, or attach with strong, outdoor-safe glue if drilling isn’t an option. Tie the stones with durable string or wire to a sturdy frame or driftwood piece. Seal the painted surfaces with weatherproof varnish. Hang the mobile where it can sway freely, and enjoy the gentle, artistic movement.
Add charms, beads, or tiny bells between stones for extra sound and movement. Personalize by painting favorite flowers or symbols. Use color schemes that match your outdoor furniture or overall decor. Change out stones seasonally to keep the mobile fresh and interesting.
Creating a flower mobile with painted rocks is a fun, creative way to bring movement and personality to your outdoor space. It’s easy to customize and maintain, making it a rewarding DIY project. Your garden will have a playful, artistic feeling that invites relaxation and joy. Ready to craft your own mobile?
15. Vintage Botanical Flower Prints on Flat Rocks
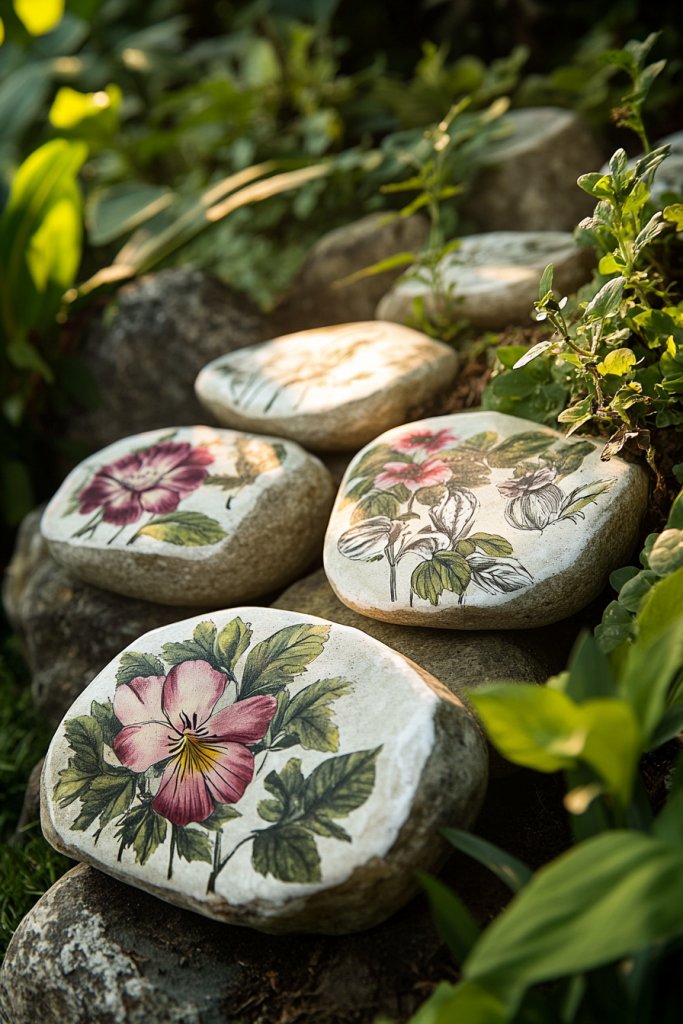
Are you a fan of vintage charm and botanical illustrations? Reproducing classic flower prints on stones offers an elegant, timeless touch to your garden decor. It combines art history with DIY fun, allowing you to create small masterpieces. If you love antique aesthetics, these vintage-inspired flower rocks are perfect.
Imagine flat stones painted with detailed, vintage-style flower prints reminiscent of old botanical books. Fine lines, delicate shading, and subtle color palettes evoke a sense of history and refinement. Arrange these stones as a border or focal point in your garden, transforming your outdoor space into a living vintage botanical print.
Use muted tones like sepia, faded greens, and soft pinks for an authentic vintage look. Incorporate ornate borders or labels similar to old plant catalogues. Seasonal adaptations include adding tiny painted insects or weathered effects. Combine with vintage garden furniture or antique planters for a cohesive aesthetic.
Start with smooth, flat stones and fine-tipped brushes. Sketch detailed floral illustrations using reference images or vintage prints. Use inks or acrylic paints to replicate fine lines and shading, mimicking vintage engravings. Seal with a matte, weatherproof varnish for authenticity. Place the stones strategically to create a nostalgic garden scene, perhaps near a bench or fountain.
Add handwritten labels or initials in a vintage script. Incorporate tiny decorative elements like Victorian scrolls or botanical labels. Use antique-style frames or miniature easels to display the stones temporarily. Mix with other vintage decor for a curated, timeless look.
Vintage botanical print stones bring an elegant, scholarly feel to your garden. They’re a perfect project for lovers of art and history, adding a layer of storytelling to your outdoor space. Your garden will feel like a curated vintage gallery—ready to impress?
16. Multi-Layered 3D Flower Paintings on Rocks
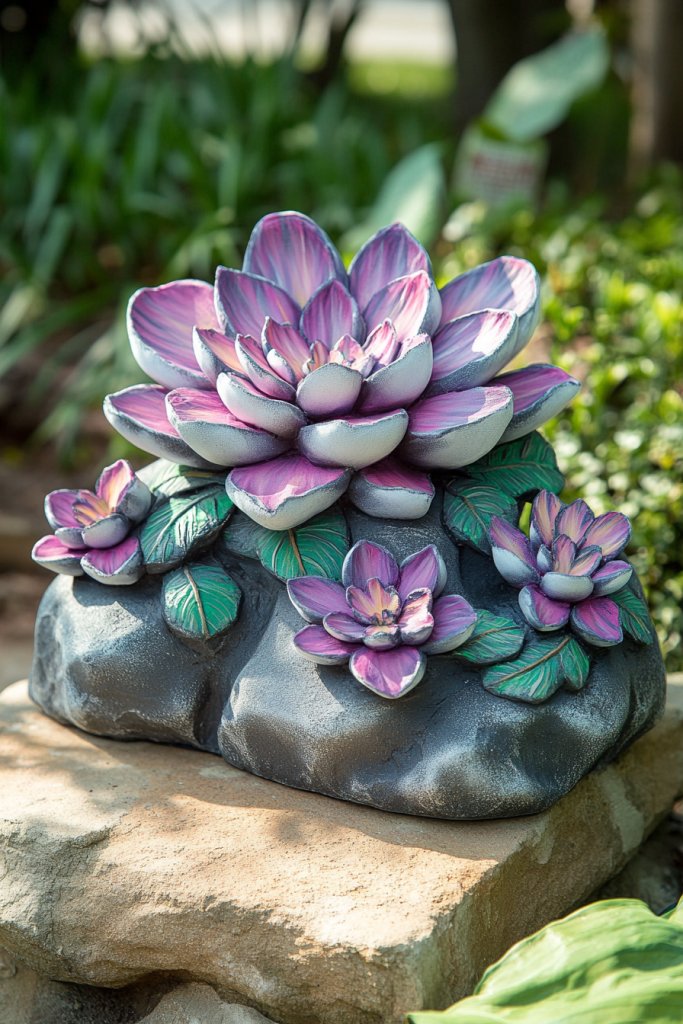
Want to add dimension and texture to your garden decor? Multi-layered 3D flower paintings on rocks create a striking visual effect that turns simple stones into tactile art. Perfect for those who love a bit of drama and depth, this project elevates your outdoor aesthetic. If you’re craving a display that truly stands out, these layered flowers are your answer.
Picture rocks with layered petals created through multiple paint layers, giving a realistic, three-dimensional look. The flowers seem to pop off the surface, with carefully shaded petals and textured centers. Arrange these stones in clusters or along pathways for a garden that feels alive with depth and movement. The effect mimics real, blooming flowers with an artistic twist.
Use vibrant, contrasting colors for maximum impact or softer pastel shades for a subtle effect. Incorporate textured paints, gels, or even small sculptural elements for extra dimension. Seasonal variations include adding tiny painted insects or dew drops. Pair with sculptural garden ornaments or textured backgrounds for a richer aesthetic.
Start with smooth stones and sketch your flower outlines with pencil. Apply multiple layers of paint, building from base colors to details, with drying time in between. Use textured or sculptural paints for petal edges to create a 3D effect. Add shading to enhance depth, then seal with weatherproof varnish. Place the stones where they can catch natural light—like near a fountain or a garden bench—to showcase their textured beauty.
Add tiny beads or sculptural details to the centers for extra realism. Personalize with initials or small messages within the flowers. Use metallic or iridescent paints for highlights. Mix different flower types and sizes for variety, creating a miniature floral tableau.
3D layered flower rocks are a fun way to combine art and nature, adding texture and depth to your garden. They’re a rewarding challenge for DIY enthusiasts and a conversation starter for visitors. Your garden will feel dynamic and alive—ready to bloom?
17. Bright Neon Flower Rocks for Nighttime Gardens
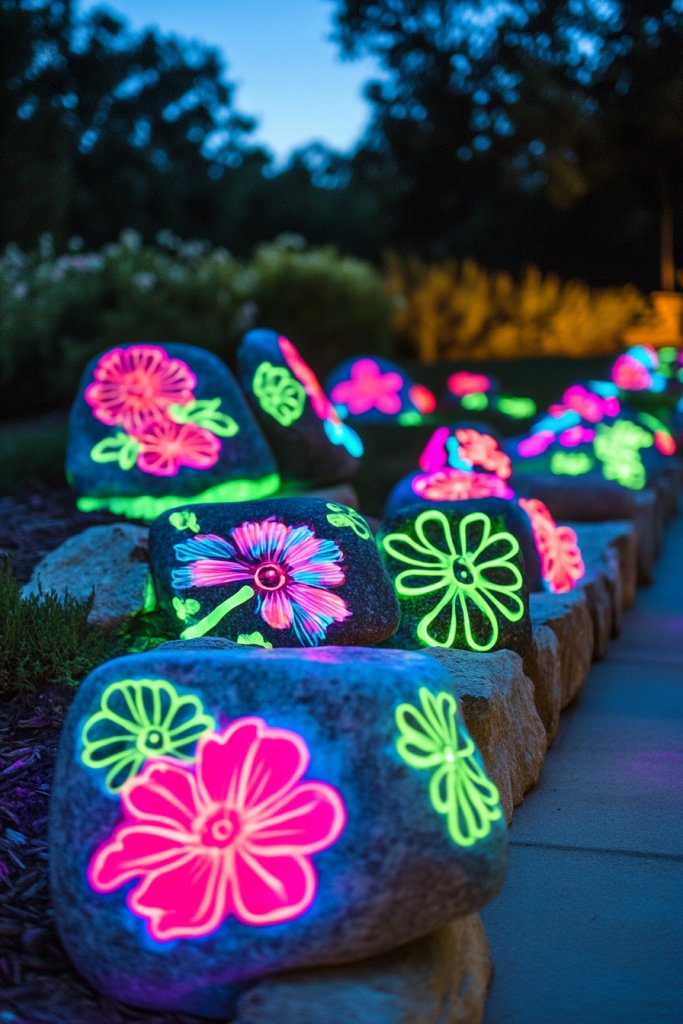
Want your garden to dazzle both day and night? Neon and glow-in-the-dark painted rocks create a vibrant, eye-catching display after sunset. They add a modern, playful touch that transforms your outdoor space into a lively nighttime retreat. If you love bold colors and fun surprises, these neon flower rocks are perfect.
Imagine rocks painted with bright neon flowers—hot pinks, electric blues, and luminous greens—that glow under moonlight. The designs are simple yet striking, with bold outlines and vibrant fills. Place them along pathways or in dark corners to create a surreal, glowing garden scene that beckons after dark. The neon glow adds an electrifying atmosphere.
Use fluorescent paints for maximum glow or incorporate glow-in-the-dark pigments mixed into regular paint. Combine neon flowers with reflective or metallic accents for extra impact. Seasonal adaptations might include painted fireflies or stars. Pair with LED string lights or solar-powered lamps to enhance the luminous effect.
Select smooth, flat stones and paint with neon or glow-in-the-dark acrylics. Sketch simple flower shapes first, then fill in with vibrant colors. Use multiple coats for brightness and durability. Seal with a UV-resistant, outdoor-safe varnish. Position the stones in shady spots or areas away from direct sunlight during the day to maximize glow at night. Recharge with sunlight or UV light for consistent glow.
Add tiny painted insects or abstract designs with neon accents. Personalize with initials or symbols that glow. Mix different neon colors for a vibrant mosaic effect. Use reflective paints on borders or stems for extra shimmer under moonlight.
Neon flower rocks turn your garden into a dazzling nighttime spectacle. They’re a fun, creative way to showcase your bold style and make your outdoor space unforgettable. Your garden will be the talk of the neighborhood—bright, lively, and full of surprises. Ready to glow?
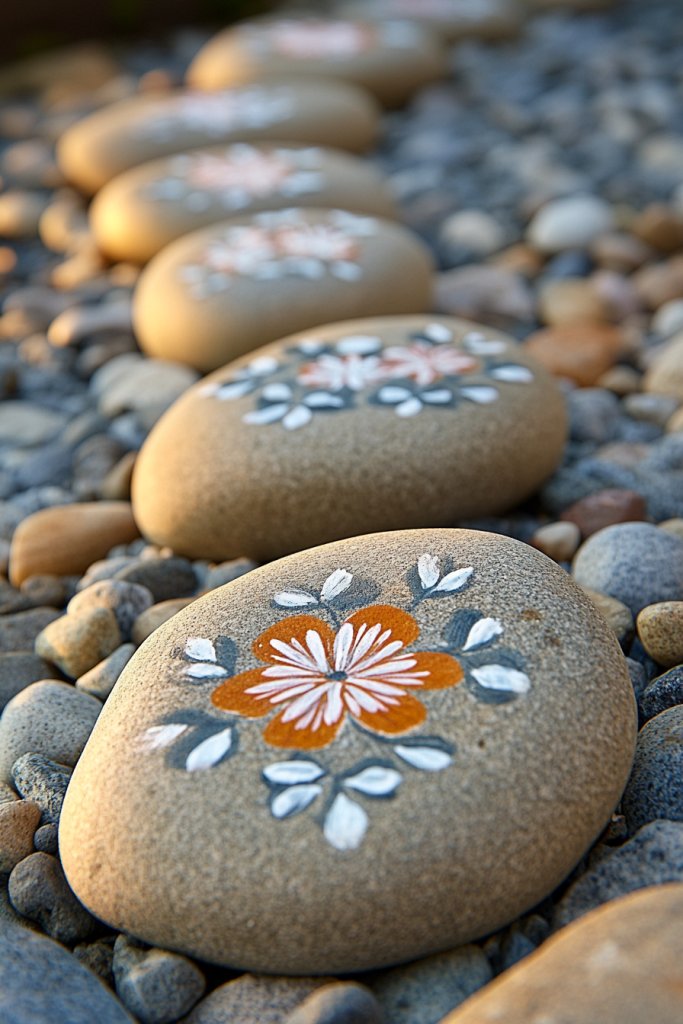
18. Mosaic-Style Flower Designs with Colored Pebbles

Looking for a textured, eye-catching garden accent? Mosaic-style flower designs with tiny colored pebbles turn ordinary stones into vibrant works of art. This technique adds depth and tactile interest, making your garden truly unique. If you love intricate patterns and vibrant textures, this project is perfect.
Imagine a large, flat stone decorated with a mosaic flower pattern—petals made from tiny, colorful pebbles arranged in a radial pattern, with a contrasting center. The textured surface invites touch and creates a stunning visual effect. These stones can be placed as focal points or borders, adding a splash of color and texture that catches the eye.
Use a variety of colored pebbles—blues, reds, yellows—for a lively mosaic. Create complex patterns like spirals or abstract shapes, or keep it simple with single flowers. Seasonal themes can include autumn leaves or winter snowflakes, made from earthy or icy tones. Combine with other textured elements like gravel or bark for a layered look.
Start with a smooth, large stone and plan your design. Use strong, outdoor glue or thinset mortar to affix tiny pebbles in your chosen pattern. Work in sections, pressing pebbles firmly into the surface. Fill gaps with grout or fine sand for a seamless look. Seal with a clear, weatherproof coating to protect the mosaic. Place in your garden as a centerpiece or border for maximum impact.
Create custom designs—initials, symbols, or favorite flowers—with different colored pebbles. Incorporate reflective or metallic pebbles for extra shine. Add painted accents or tiny decorative elements around the mosaic for more detail. Personalize by matching your color scheme or garden theme.
Mosaic flower stones bring a rich texture and vibrant color to your garden. They’re a rewarding craft that combines art with outdoor decor. Your garden will stand out as a colorful, tactile masterpiece. Ready to craft your own mosaic?
19. Minimalist Line Art Flowers on Smooth Stones

Seeking a sleek, modern aesthetic for your garden? Minimalist line art flowers on stones offer a simple yet sophisticated look that complements contemporary decor. They’re perfect for those who appreciate clean lines and subtle elegance. If you want understated beauty, these line art rocks are your new favorite.
Envision smooth stones decorated with delicate, continuous line drawings of flowers—like a single stroke creating a daisy or orchid. The designs are monochrome, often black or white, and emphasize simplicity and elegance. Arrange these stones in a linear pattern or scattered for a sleek, artistic effect.
Use fine liners and contrasting colors—black on white, white on dark stones—for maximum impact. Incorporate geometric shapes or abstract lines for added modernity. Seasonal adaptations include adding tiny colored accents or metallic lines. Pair with minimalist furniture and architectural elements for a cohesive look.
Choose smooth, flat stones and sketch flowers with a fine-tipped marker or paint pen. Keep the lines simple and continuous, avoiding unnecessary details. Seal with a clear, weatherproof varnish. For a more polished look, consider stenciling or tracing designs for precision. Place the stones in minimalist garden beds or along pathways to enhance the modern aesthetic.
Personalize by adding small geometric or abstract elements around the flowers. Use metallic or glossy finishes for a touch of luxury. Combine with other line art or geometric motifs for a cohesive style. You can also add tiny colorful dots or accents for a playful twist.
Minimalist line art flowers bring a chic, contemporary vibe to your garden with minimal effort. They’re accessible for beginners and add a touch of artistic sophistication. Your outdoor space will look effortlessly stylish and modern—ready to impress?
20. Whimsical Cartoon Flower Characters for Playful Gardens
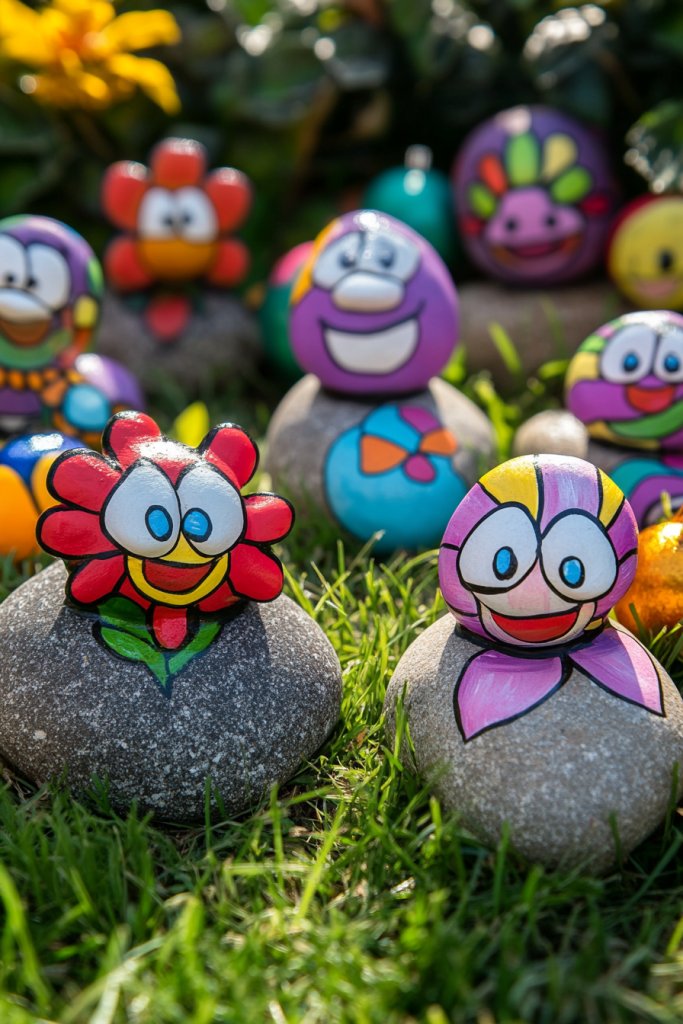
Want to inject fun and personality into your outdoor space? Cartoon flower characters are playful, charming, and perfect for a casual, inviting garden. Painting expressive faces on flowers turns simple rocks into adorable characters everyone will love. If you’re looking for a project that sparks joy, this is it.
Imagine rocks painted with bright, cheerful flowers featuring big eyes, smiling mouths, and tiny arms or accessories. These characters are full of personality—some might wear tiny hats or sunglasses. Scatter them among plants, along pathways, or near seating areas to create a friendly, whimsical atmosphere that invites smiles.
Use bold, vibrant colors and exaggerated features for maximum cuteness. Create different characters—happy, sleepy, surprised—to add variety. Seasonal themes could include holiday costumes or seasonal accessories. Combine with other playful decor like painted stones shaped like animals or insects for a full whimsical scene.
Start with small, smooth stones and sketch cartoon flower faces with a fine brush or marker. Use bright acrylic paints for vibrant expressions and clothing. Add tiny details like eyelashes or blush for extra charm. Seal with weatherproof varnish. Position these characters along garden paths or in flower beds for maximum cuteness.
Personalize characters with names or funny captions. Mix and match different flower types and facial expressions for a lively scene. Incorporate tiny painted accessories like hats or bows for extra character. You can also create a story with a series of stones to entertain visitors.
Whimsical cartoon flower characters make your garden fun and inviting, perfect for families or playful spirits. They’re a joyful, creative project that adds personality and charm. Your outdoor space will be full of smiles and good vibes—ready to make your own characters?
21. Zen-inspired Zen Garden Rocks with Simple Flower Motifs
Looking to cultivate tranquility in your outdoor space? Zen-inspired rocks with simple flower motifs create a peaceful, minimalist atmosphere that promotes calmness and mindfulness. If you love subtle, elegant decor that encourages relaxation, these stones are your ideal project.
Visualize flat stones painted with very simple, stylized flowers—just a few lines or shapes in neutral or soft colors. The designs evoke serenity and balance, blending seamlessly into a Zen garden setting. Place them among gravel, sand, or raked patterns to enhance the meditative environment. These subtle accents invite quiet contemplation.
Use monochrome or muted tones—white, gray, beige—for a calming effect. Keep the floral motifs minimal—just a single line or a tiny blossom. Seasonal variations could include snowflake or leaf symbols for a gentle change. Pair with natural materials like bamboo, stones, or smooth wood for a cohesive, tranquil aesthetic.
Select smooth, flat stones and sketch basic flower shapes with a fine brush or ink pen. Keep the designs extremely simple—just outlines or minimalist symbols. Seal with a matte, weatherproof varnish to reduce glare and maintain the subtle look. Arrange the stones thoughtfully within your Zen garden, complementing raked patterns and natural elements for ultimate serenity. Regular touch-ups keep the motifs crisp.
Add tiny, meaningful symbols or initials in a discreet corner for a personal touch. Use textured or matte finishes to reinforce the minimalist vibe. Incorporate small natural elements like pebbles or moss to enhance the Zen atmosphere. These stones serve as quiet focal points in your garden’s overall design.
Simple, understated, and elegant, Zen garden rocks with flower motifs foster peace and mindfulness. They’re a subtle, sophisticated project that elevates your outdoor space’s tranquility. Embrace the calm, and create your own peaceful retreat—ready to Zen?
Conclusion
This collection of DIY painted rock flower garden ideas showcases a wide range of styles and techniques to inspire your next project. Whether you prefer realistic floral designs or playful, imaginative creations, there’s something here for everyone. Give these ideas a try and watch your garden come alive with colorful, handcrafted beauty. Start creating today and let your garden bloom with your artistic touch!