A stylish headboard can completely transform the vibe of your bedroom, but high-quality options can often come with a hefty price tag. That’s why affordable headboard fixes are gaining so much popularity—they offer a budget-friendly way to refresh your space without sacrificing style.
In this article, you’ll find a variety of creative and easy ideas to upgrade your headboard on a dime. From DIY projects to clever repurposing, these ideas will inspire you to craft a personalized focal point that combines comfort and charm—all without breaking the bank.
1. Transform an Old Door into a Vintage Headboard
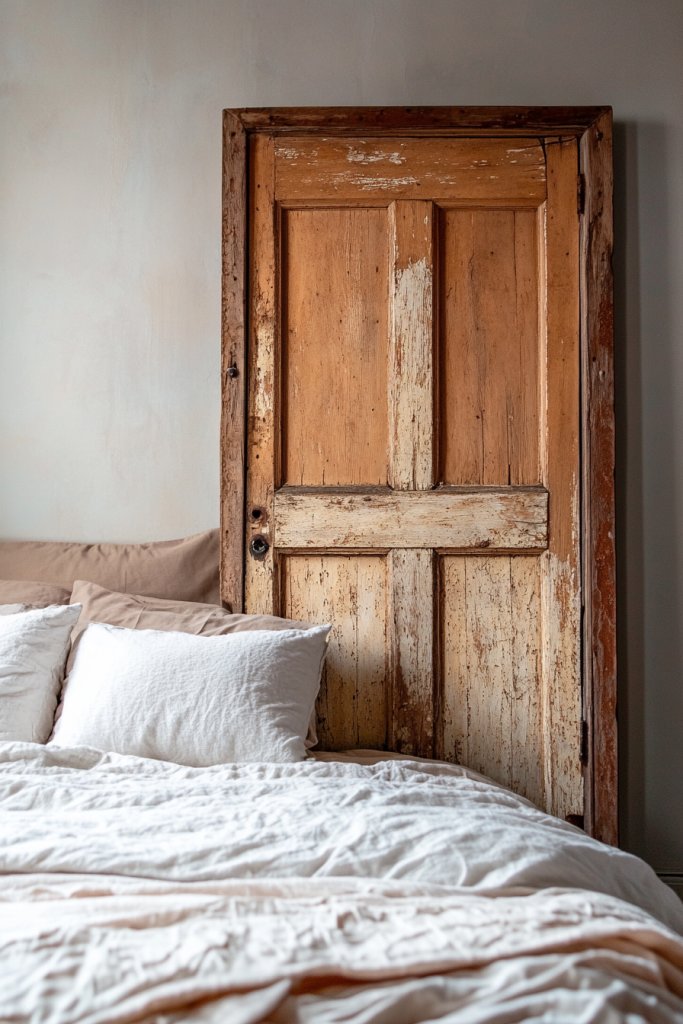
Ever feel like your bedroom lacks character or feels a bit plain? Turning a simple, old door into a headboard can add instant charm and personality. It’s a budget-friendly way to infuse rustic or vintage vibes without splurging on store-bought options. Plus, it’s a fun DIY project that gives your space a unique touch.
Recommended Products to replicate this idea
| # | Preview | Product | |
|---|---|---|---|
| 1 |

|
Luxdecor Real Reclaimed Wood Planks for Wall-10 Pieces Easy Nail-Up Shiplap Rustic Style 6" Wide... | Buy on Amazon |
| # | Preview | Product | |
|---|---|---|---|
| 1 |

|
18 Pack Door Hinges Antique Brass 3.5 Inch Interior 3 1/2" Round 5/8" Radius Heavy Duty Metal... | Buy on Amazon |
Picture a weathered wooden door with peeling paint, leaning against the wall behind your bed. The distressed texture adds a layer of history, while maybe a splash of bold color or stencil art elevates its character. Imagine the soft glow of string lights or candles reflecting off the aged surface, creating a cozy, inviting atmosphere. It’s like bringing a piece of history into your modern sanctuary.
You can customize the look by painting it in bright hues for a playful touch or distressing it further for a more vintage feel. For small rooms, a narrow door creates a subtle headboard, while larger, panel-style doors make a statement in spacious bedrooms. Seasonal styles might include adding a floral wreath or hanging lightweight fabric for a breezy vibe. This approach easily adapts to both rustic and modern decor.
Start by sourcing an old door from flea markets, salvage yards, or online marketplaces—think reclaimed wood for authenticity. Clean and sand the surface, then decide if you want to paint, stencil, or distress it. Mount the door securely to the wall using heavy-duty brackets or hooks, ensuring it’s level and stable. Add padding or fabric along the edges if you want a softer look or to prevent wall damage. Finish by accessorizing with a few decorative items or greenery on nearby shelves.
Personalize your vintage door headboard by adding decorative hardware, painted patterns, or even attaching small shelves for books or decor. Incorporate your favorite colors or motifs to match your personality. You could also hang framed photos or fabric swatches on the door itself for a layered, eclectic look. This DIY allows for endless customization, making the piece truly yours.
Transforming an old door into a headboard is a practical way to craft a statement piece without breaking the bank. It also encourages creative thinking and resourcefulness. Your friends will be impressed by your ability to turn trash into treasure, proving that style doesn’t have to come at a high cost.
2. Create a DIY Upholstered Headboard with Foam and Fabric
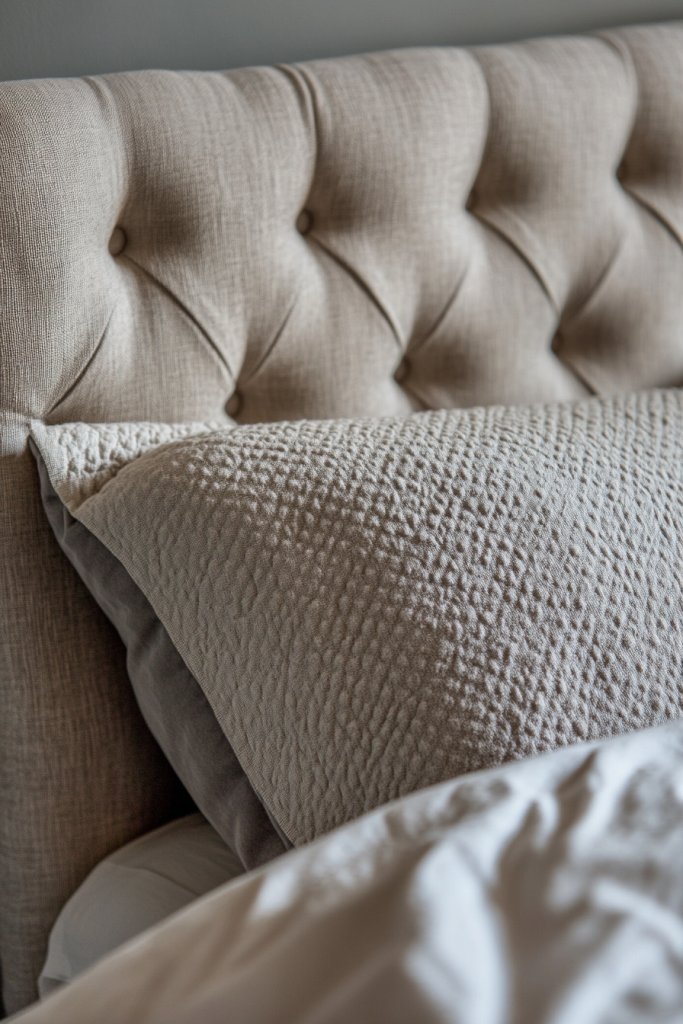
Want a plush, cozy headboard but think it’s too expensive or complicated? A DIY upholstered headboard is a perfect solution to add softness and style without the hefty price tag. It’s easier than you think to create a custom piece that feels luxurious and inviting.
Recommended Products to replicate this idea
| # | Preview | Product | |
|---|---|---|---|
| 1 |

|
GoTo Foam 1" Height x 24" Width x 72" Length 44ILD (Firm) Upholstery Cushion Made in USA | Buy on Amazon |
| # | Preview | Product | |
|---|---|---|---|
| 1 |

|
Huatean Home Tufted Upholstered Headboard Queen Size, Sturdy and Durable Solid Wood Bed headboard,... | Buy on Amazon |
Imagine a cushioned panel covered in a soft fabric, with a slightly tufted or smooth surface, sitting confidently behind your bed. The fabric’s texture could be a plush velvet, linen, or even a vibrant patterned cotton, adding visual interest. The foam provides a puffy, supportive feel, while the fabric adds color and texture. The result is a welcoming, hotel-like ambiance in your bedroom.
Choose fabrics that match your decor, from neutral tones for a calming vibe to bold prints for a statement. For small spaces, a narrow, tall panel can elongate the wall, while in larger rooms, a wider headboard makes a bold focal point. Change the fabric seasonally or for different moods—think lightweight linens for summer or textured knits for winter. You can also add decorative buttons or piping for extra flair.
Start by measuring your bed and deciding on the headboard size. Purchase foam, batting, and fabric from craft stores—look for budget-friendly options or remnants. Cut the foam to fit your frame, then wrap it with batting to smooth out wrinkles. Stretch and staple your fabric tightly around the foam, ensuring no sagging or loose areas. Attach the finished panel to a wooden or metal frame using screws or brackets, and place it directly against the wall or mount it for extra stability.
Add personal touches like decorative stitching, contrasting piping, or tufting to elevate the look. Use fabric paints or embroidery to incorporate initials, patterns, or motifs. Incorporate a mix of textures—like velvet with linen—to create visual depth. For a more finished look, attach a wooden trim or frame around the upholstered panel.
Creating your own upholstered headboard saves money and lets you express your style fully. It’s a rewarding project that transforms your bedroom into a cozy retreat. Once finished, you’ll feel proud knowing you crafted a piece that’s both functional and beautiful, encouraging more DIY adventures.
3. Hang a Tapestry or Fabric Wall Hanging as a Headboard Alternative
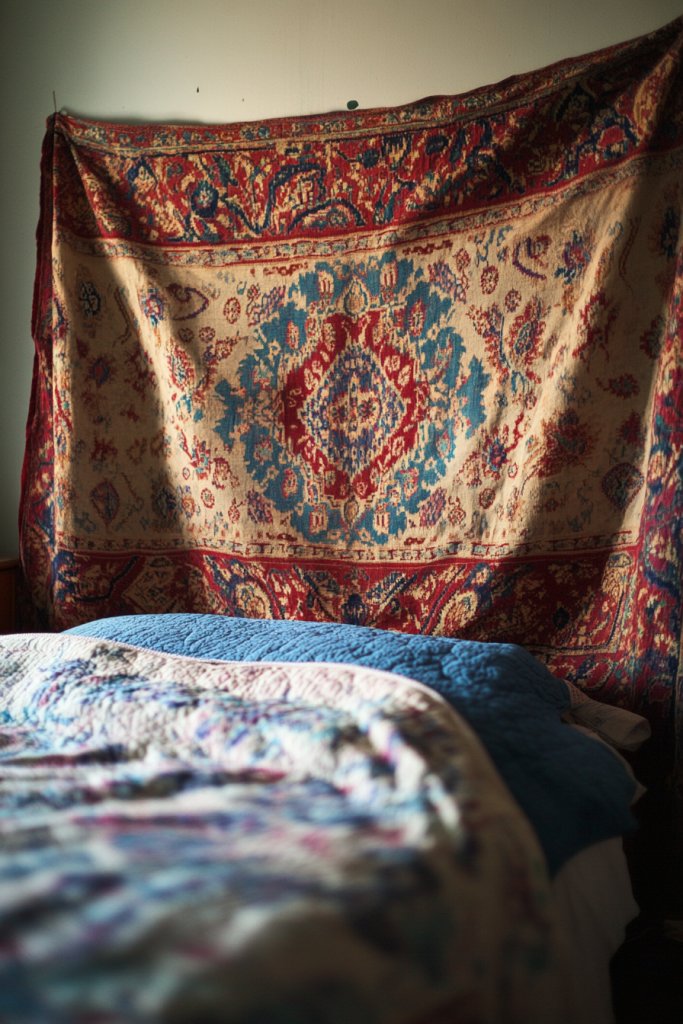
Looking for a quick, inexpensive way to add color and texture to your bedroom? Hanging a tapestry or fabric wall hanging can serve as a stylish headboard alternative. It’s perfect for renters or anyone wanting a non-permanent, versatile decor piece.
Recommended Products to replicate this idea
| # | Preview | Product | |
|---|---|---|---|
| 1 |

|
Apdidl Boho Tapestry Wall Hanging for Bedroom Aesthetic, Bohemian Vintage 70s Rainbow Sun Tapestries... | Buy on Amazon |
| # | Preview | Product | |
|---|---|---|---|
| 1 |

|
Tapestry Hanging Telescopic Rod 17-32 inch for Lightweight Aesthetic Tapestries Room Deco Scalable... | Buy on Amazon |
Picture a vibrant, patterned textile draped behind your bed, cascading down to the floor. The fabric’s rich colors and textures create an instant focal point, transforming a plain wall into an artful display. Soft, woven fibers add warmth and coziness, while bold prints inject personality. Imagine the gentle sound of fabric moving softly with air, adding a calming ambiance.
Choose a tapestry that reflects your style—boho, modern, or eclectic. For a layered look, combine multiple textiles or add a decorative fringe. Change the look seasonally by swapping out different fabrics or patterns. Mount the tapestry with removable hooks or rods for easy changeability, making it adaptable for different moods or themes.
Select a large textile or wall hanging that fits your space and style. Use Command hooks, adhesive strips, or a tension rod for easy hanging without damaging walls. Ensure the fabric is clean and wrinkle-free before mounting. For a more polished look, attach a wooden dowel or decorative rod at the top or bottom for added structure. Consider layering with string lights or LED strips behind for a subtle glow.
Personalize your wall hanging by sewing on patches, embroidery, or fabric paint. Incorporate meaningful symbols or favorite colors to make it truly yours. You can also hang small decorative elements like tassels, charms, or lightweight ornaments to add dimension. Use contrasting trim or piping around the edges for a finished, tailored appearance.
A fabric wall hanging is an easy, affordable way to elevate your bedroom decor. It’s a flexible technique that allows for quick updates and seasonal changes. You’ll gain confidence in your decorating skills and enjoy a space that feels uniquely yours, all without breaking the bank.
4. Mount a Large Mirror for a Stylish, Space-Enhancing Headboard
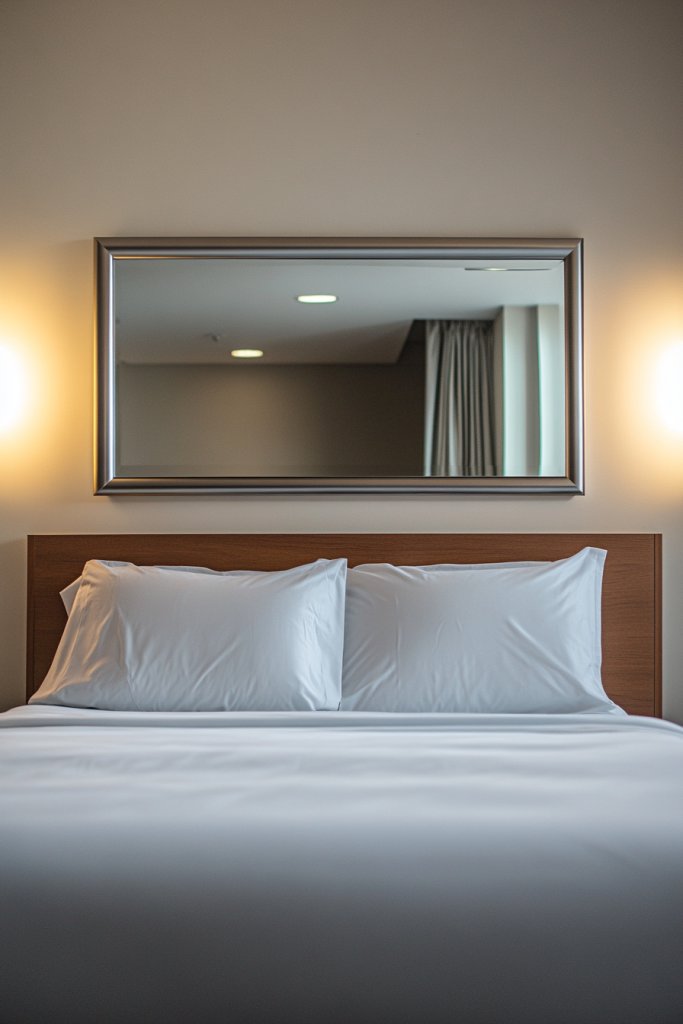
Ever wish your bedroom felt bigger or brighter? Mounting a large mirror behind your bed is a smart way to enhance space and add a touch of elegance. It’s a stylish solution that combines function with fashion, making your room appear more open and airy.
Recommended Products to replicate this idea
| # | Preview | Product | |
|---|---|---|---|
| 1 |

|
Simple Deluxe Arched Full Length Mirror, 71"x26"Large Floor Mirrors, for Wall Door Bedroom Bathroom... | Buy on Amazon |
| # | Preview | Product | |
|---|---|---|---|
| 1 |
|
Blulu 20 Pack Mirror Holder Clips for 6 mm in (6/25) Glass Mirror Hanging Kit for Wall Mounting... | Buy on Amazon |
Imagine a sizable mirror with an ornate or sleek frame, reflecting natural light and your cozy bedding. The reflective surface doubles your space visually, creating a sense of depth. Soft light bounces off the mirror, illuminating the room without extra lamps. The mirror’s frame can complement your decor—be it vintage, modern, or minimalist—adding personality and style.
Choose a frameless mirror for a minimalist look or a decorative frame for a vintage or glam style. Large rectangular or oval shapes work well in spacious rooms, while smaller, grouped mirrors suit more compact areas. Match the frame color or material with your existing furniture for cohesion. You can also layer multiple mirrors or add frosted or textured glass for visual intrigue.
Select a mirror that fits your wall and decor theme. Secure it with heavy-duty wall anchors and brackets, ensuring it’s perfectly level. For extra stability, use a mounting board or cleat system. Consider placing the mirror at eye level for maximum reflection and impact. Keep safety in mind—use proper tools and anchors suited for your wall type. Finish by arranging your bedding and accessories to complement the reflective surface.
Frame the mirror with decorative molding, LED strip lighting, or paint accents for a custom look. You can add small shelves or ledges beneath to display candles or decor (avoiding restricted items). Incorporate textures like wood, metal, or resin in the frame to match your style. Layering textiles or bedding colors that echo the mirror’s frame creates a cohesive vibe.
A large mirror is a practical and stylish upgrade that improves your space instantly. It’s a simple DIY that makes your room look bigger and more luxurious. Once you see the transformation, you’ll feel inspired to experiment with other decor tweaks to elevate your entire home.
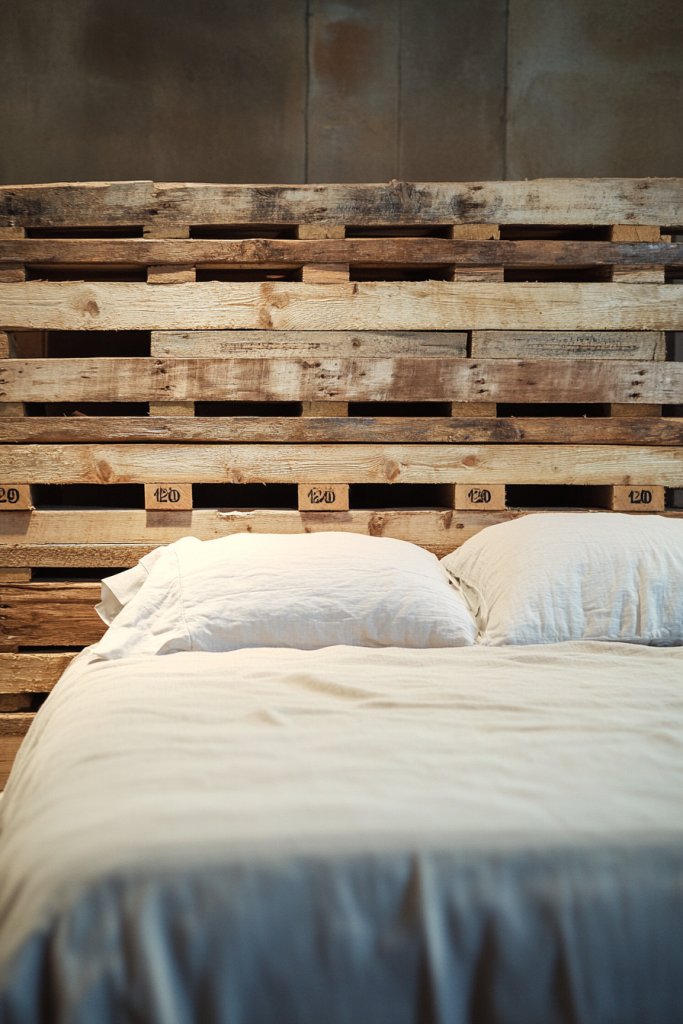
5. Use Wooden Pallets for a Modern, Industrial Headboard
Craving a headboard that’s cool, industrial, and budget-friendly? Wooden pallets are your answer. They’re easy to find, customizable, and give your bedroom a modern edge. Plus, repurposing pallets feels a little rebellious and eco-conscious.
Recommended Products to replicate this idea
| # | Preview | Product | |
|---|---|---|---|
| 1 |

|
Headboard Brackets for Bed Frame, Adjustable Brackets for Headboard, Universal with Footboard... | Buy on Amazon |
| # | Preview | Product | |
|---|---|---|---|
| 1 |
|
Pallet Board Co. - 20 Sq. Ft. Bundle of Reclaimed Pallet Boards - Nail Up Application - Rustic... | Buy on Amazon |
Visualize a series of raw, reclaimed wooden pallets stacked horizontally or vertically behind your bed. The natural grain and imperfections add texture and character. You might paint or stain the pallets for different effects—weathered, rustic, or sleek. The rough-hewn surface creates a cozy yet edgy vibe, perfect for urban or rustic decor styles.
Arrange pallets in a single row for a minimalist look or layer multiple for depth. Paint them in neutral shades or bold colors to match your room theme. For a softer feel, add fabric or cushions on the headboard. This approach works in small bedrooms by creating a focal point or in large rooms as a statement piece. You can even add hooks or shelves to the pallets for extra functionality.
Start by sourcing pallets from local stores, warehouses, or online. Clean and sand the wood thoroughly to remove splinters and dirt. Decide whether to leave the wood natural or stain it for color and protection. Mount the pallets directly onto the wall using heavy-duty brackets or screws. Ensure each piece is level and secured well to withstand daily use. Finish with sealing or waxing if desired for durability.
Personalize by painting stenciled patterns, adding metal accents, or distressing the wood for a vintage look. Incorporate decorative hooks for hanging accessories or lightweight decor. You can also attach small LED strip lights along the edges for a subtle glow. Combining multiple textures—metal, fabric, or even concrete—can elevate the industrial aesthetic.
Using pallets as a headboard shows that stylish decor doesn’t have to be expensive or complicated. It’s a creative DIY that adds edge and personality to your bedroom. Seeing your own handiwork come to life will boost your confidence in tackling more home projects, proving that resourcefulness is always in style.
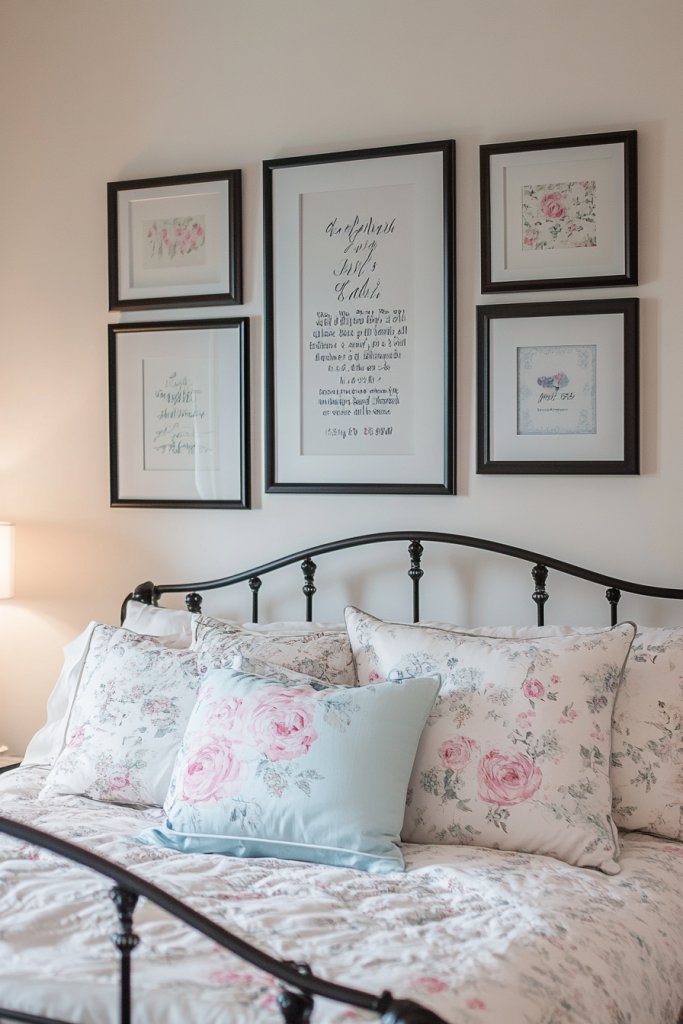
6. Attach a Gallery Wall of Framed Prints and Photos
Feeling like your bedroom lacks personality? A gallery wall of framed prints and photos can instantly personalize your space. It’s a creative way to showcase your favorite memories, artwork, or quotes without breaking the bank. Plus, it turns a blank wall into a focal point full of meaning.
Recommended Products to replicate this idea
| # | Preview | Product | |
|---|---|---|---|
| 1 |

|
eletecpro 12x12 Picture Frames Set of 9 with Mat for 8x8 Photos or without Mat for 12x12, Square... | Buy on Amazon |
| # | Preview | Product | |
|---|---|---|---|
| 1 |

|
KURUI 303Pcs Picture Hanging Kit, Picture Hangers Assorted Kit with Heavy Duty Picture Hanging... | Buy on Amazon |
Picture a curated collection of framed images arranged in a balanced, eye-catching pattern behind your bed. Mix and match different frame styles and sizes for an eclectic look or keep it uniform for sleek sophistication. The photos or prints add color, texture, and a story to your bedroom, making it feel lived-in and loved. The arrangement draws the eye upward and creates a sense of depth.
Arrange the frames in a symmetrical grid for a modern aesthetic or in a loose, asymmetrical pattern for boho charm. Switch out images seasonally or for special occasions to keep the display fresh. For small bedrooms, a compact cluster works best, while larger rooms can accommodate expansive wall layouts. Use a mix of black-and-white and colorful prints to add visual interest.
Gather your favorite images, quotes, or artwork, then choose matching or contrasting frames. Use painter’s tape or a level to mark where each frame will hang for a precise layout. Secure each frame with appropriate hooks or nails, ensuring they’re level and evenly spaced. For a polished look, align the tops or centers, and consider adding a decorative ledge for easy swapping. Keep the arrangement balanced and avoid overcrowding.
Add personal touches by including handwritten notes, ticket stubs, or fabric swatches alongside your prints. Incorporate thematic elements—like travel or nature—to tell a visual story. Use custom mats or colored backing papers to add layers and depth. Mix in small decorative objects like vintage keys or ceramics on nearby shelves for added interest.
A gallery wall transforms your bedroom into a personal art gallery, making the space uniquely yours. It’s an affordable, flexible project that grows with your tastes. Once complete, you’ll feel proud of your creative effort and inspired to keep customizing your home décor.
7. Wrap a Corded or Twisted Rope with Fairy Lights for a Cozy Glow
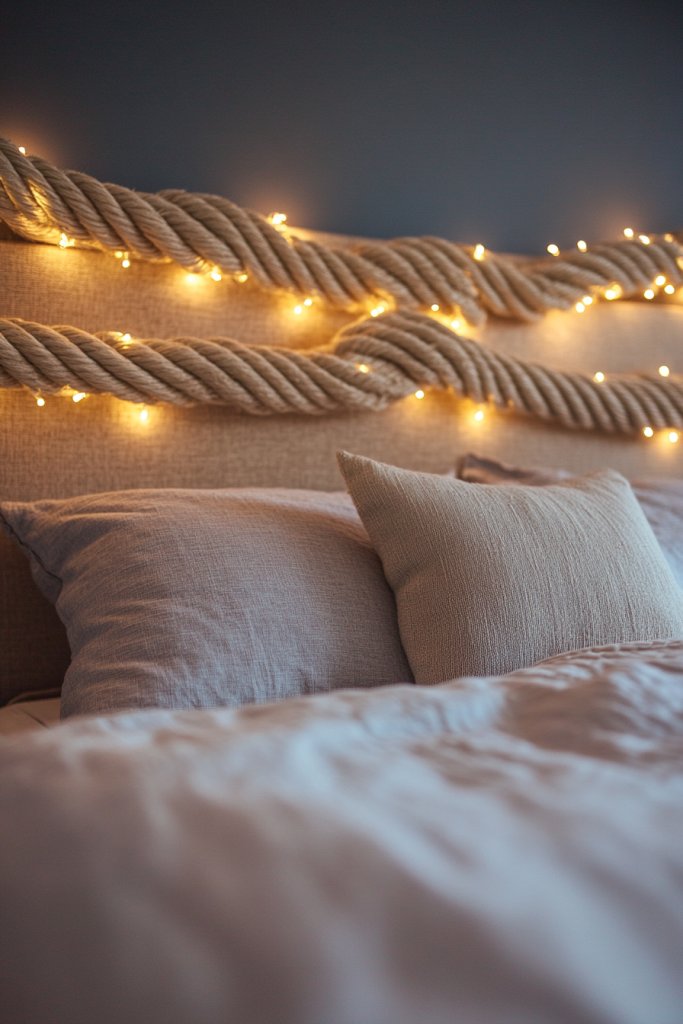
Want to add a warm, inviting glow to your bedroom without installing complex lighting? Wrapping a corded or twisted rope with fairy lights creates a soft, ambient headboard that’s both functional and charming. It’s an inexpensive way to add texture and mood lighting.
Recommended Products to replicate this idea
| # | Preview | Product | |
|---|---|---|---|
| 1 |

|
NOANTA Natural Macrame Cord 3mm x 109Yards, Beige Macrame Rope, Cotton Cord for Wall Hanging, Plant... | Buy on Amazon |
| # | Preview | Product | |
|---|---|---|---|
| 1 |

|
Brightown 12 Pack LED Fairy Lights Battery Operated String Lights - 7ft 20LED Waterproof Silver Wire... | Buy on Amazon |
Visualize a thick, textured rope framing your bed, shimmering with tiny fairy lights woven through its fibers. The glow casts gentle shadows, creating a cozy nook that feels both rustic and magical. The tactile quality of the rope adds visual interest, contrasting beautifully with smooth bedding and sleek furniture. It’s like camping indoors, but with style.
Opt for different rope materials—jute for rustic charm, braided cotton for softness, or metallic for a glam effect. Wrap the rope tightly around a sturdy frame or wall-mounted hooks, following your preferred shape. For seasonal updates, switch out fairy lights for colored or dimmable options. Combine with fabric drapes or lightweight curtains for layered textures.
Start with a thick, durable rope and a string of fairy lights with a low wattage to prevent overheating. Secure the rope along the wall or around a frame using hooks, nails, or adhesive strips—whatever works best for your surface. Weave the lights through the rope, ensuring even distribution. Plug in and test the lighting, then make adjustments for a uniform glow. For added stability, secure the ends with adhesive or clips.
Add decorative elements like tassels, fabric wraps, or metallic accents to the rope for extra flair. Use color-changing or dimmable fairy lights to set different moods—romantic, relaxing, or festive. Incorporate a few lightweight decorative items, like feathers or charms, to enhance the tactile appeal. Keep the setup simple enough to change with your mood or decor theme.
This DIY headboard idea proves that simple materials can create a stunning effect. It’s a quick project that yields big visual impact, perfect for renters or those new to home decor. Once you see the cozy glow, you’ll be inspired to experiment with other creative lighting ideas for your entire home.
8. Repurpose a Sweater or Quilt as a Soft, Textured Headboard Cover
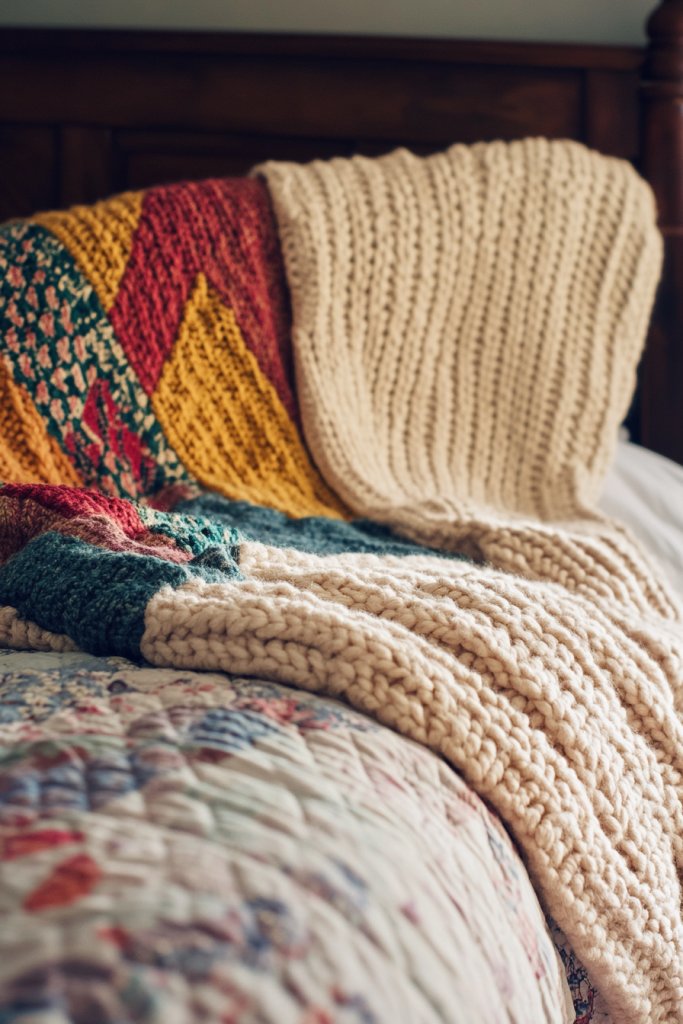
Looking for a warm, inviting look that feels cozy and personal? Repurposing a chunky knit sweater or colorful quilt as a headboard cover adds instant softness and texture. It’s a simple, budget-friendly way to upgrade your bed’s look while showcasing your favorite textiles.
Recommended Products to replicate this idea
| # | Preview | Product | |
|---|---|---|---|
| 1 |

|
L'AGRATY Chunky Knit Blanket Throw,Soft Chenille Yarn Throw Blanket 50x60,Handmade Cable Knit... | Buy on Amazon |
| # | Preview | Product | |
|---|---|---|---|
| 1 |

|
Travan 3-Piece Quilt Set Quilted Bedspread Lightweight Coverlet Set Garden Style Floral Printed... | Buy on Amazon |
Imagine a large, knitted sweater draped over a board or directly on the wall behind your bed. The chunky stitches and vibrant colors create a tactile surface that invites touch. Alternatively, a patchwork quilt with rich patterns and textures hangs like a tapestry, adding depth and warmth. The combination of textiles creates a layered, cozy aesthetic that’s perfect for fall or winter.
Choose oversized sweaters in neutral or bold shades for different moods. For quilts, layer multiple patterns or colors to match seasonal themes. Secure the textile with staples or hooks on a wooden board or directly on the wall. For a more polished look, add decorative trim or fringe along the edges. Change the cover seasonally to keep your space feeling fresh.
Select a sturdy backing board or frame to attach your textile. For sweaters, stretch the fabric over the board and staple or pin it in place, ensuring no sagging. For quilts, fold and pin or sew the edges for a neat finish. Mount the assembled piece against the wall or attach it directly with heavy-duty hooks or brackets. Adjust the placement until it’s perfectly aligned.
Add personal touches like embroidered initials, decorative buttons, or patches to your textile. Mix different textures—like velvet, fleece, or linen—to create visual interest. Incorporate a border or piping for a finished look. You could also layer a throw blanket or decorative pillows nearby to complement the textile.
Using textiles you love transforms your bedroom into a cozy retreat. It’s a DIY project that combines comfort and style, perfect for adding a personal touch. Seeing your creative choices come together will inspire you to explore more textile-based decor ideas.
9. Attach a Slipcovered Panel to a Wooden Frame for a Casual Look

Want a relaxed, casual headboard that’s easy to change and clean? Attaching a slipcovered panel to a wooden frame offers a laid-back vibe and easy customization. It’s a simple way to add softness and color, perfect for changing seasons or moods.
Recommended Products to replicate this idea
| # | Preview | Product | |
|---|---|---|---|
| 1 |

|
Gorkett Peel and Stick Upholstered Wall Mounted Headboard Queen Size, 9 Panels Tufted Fabric... | Buy on Amazon |
| # | Preview | Product | |
|---|---|---|---|
| 1 |

|
Headboard Brackets for Metal Bed Frame, Universal Adjustable Brackets for Headboard with Footboard... | Buy on Amazon |
Picture a lightweight fabric panel, loosely draped or fitted over a sturdy wooden frame, resting behind your bed. The fabric’s relaxed folds and textures create a cozy, inviting feel. You might choose linen, cotton, or a light quilted material in calming colors or patterns. The overall look is effortless yet stylish, perfect for a casual bedroom aesthetic.
Use different fabrics to match your decor—think chambray for a beachy feel or plaid for a country vibe. Change the slipcover seasonally or for special occasions. For a more tailored look, sew the fabric into a slipcover that fits snugly over the frame. You can also layer with decorative pillows or throws for added comfort and style.
Construct or buy a simple wooden frame that fits your bed width. Sew or pin a large piece of fabric to serve as the slipcover, ensuring it’s large enough to drape comfortably. Attach the fabric securely to the frame with staples or sewing. Position the frame behind the bed, leaning against the wall or mounting it. Secure the frame to the wall if needed for stability. Adjust the fabric for a relaxed, natural look.
Decorate the fabric with embroidery, painted designs, or appliqués to add a personal touch. Mix textures, such as adding a knitted panel or a fringed border. Incorporate decorative trim or piping along the edges. Change the slipcover periodically to refresh your bedroom’s look or match seasonal themes.
A slipcovered panel headboard offers a relaxed, approachable vibe that’s easy to update. It’s a great way to experiment with fabrics and textures without a big commitment. Completing this project will boost your confidence and inspire more DIY decor projects for your home.
10. Use Wall-mounted Shelves with Decorative Items for a Functional Headboard
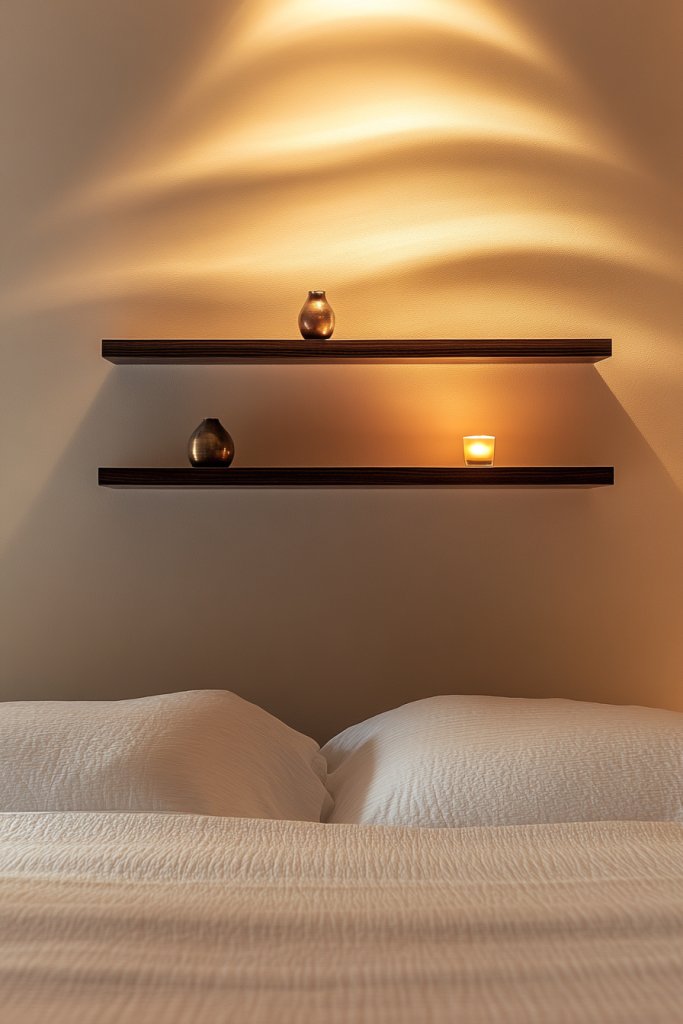
Looking for a practical yet stylish headboard? Wall-mounted shelves provide space for essentials and decor, making your bedroom both functional and attractive. It’s an easy way to add storage and personal touches without a bulky piece of furniture.
Recommended Products to replicate this idea
| # | Preview | Product | |
|---|---|---|---|
| 1 |
|
BAYKA Floating Shelves for Wall, Wall Mounted Rustic Wood Shelves for Bathroom, Bedroom, Living... | Buy on Amazon |
| # | Preview | Product | |
|---|---|---|---|
| 1 |

|
AMOIENSIS Retro Jack Knick Knacks Gold Accent Decor Set of 2 Small Antique Decorative Objects for... | Buy on Amazon |
Imagine sleek floating shelves positioned behind your bed, holding candles, books, or decorative objects. The layered arrangement adds depth and interest to the wall, transforming it into a curated display. Use different lengths and heights to create a dynamic, personalized look. The combination of open storage and decor elevates the space visually.
Opt for minimalist shelves in metal or wood for a modern vibe or ornate vintage-style units for a classic look. Arrange personal items like framed quotes, small sculptures, or cherished souvenirs. Change the decor seasonally or for special occasions. For small rooms, a few narrow shelves suffice; larger rooms can handle multiple layers.
Select sturdy wall-mounted shelves that can hold your desired items. Use appropriate anchors and screws suited for your wall type. Position the shelves at eye level or slightly above for easy access and visual balance. Secure each shelf firmly, then arrange your decorative items thoughtfully, balancing color and size. Keep frequently used items within reach and avoid clutter.
Personalize the setup with small potted plants, decorative boxes, or themed collections. Use lighting—like small LED puck lights—mounted underneath the shelves to highlight your display. Mix different styles of decor for an eclectic look or stick to a cohesive theme. Regularly refresh the items to keep the display lively.
Using shelves as a headboard is a smart, customizable approach that combines utility and style. It’s an easy DIY project that instantly elevates your bedroom decor. Seeing your personal collection come together will give you confidence for future creative decor ideas.
11. Hang a Large Woven Wall Hanging for Natural Texture
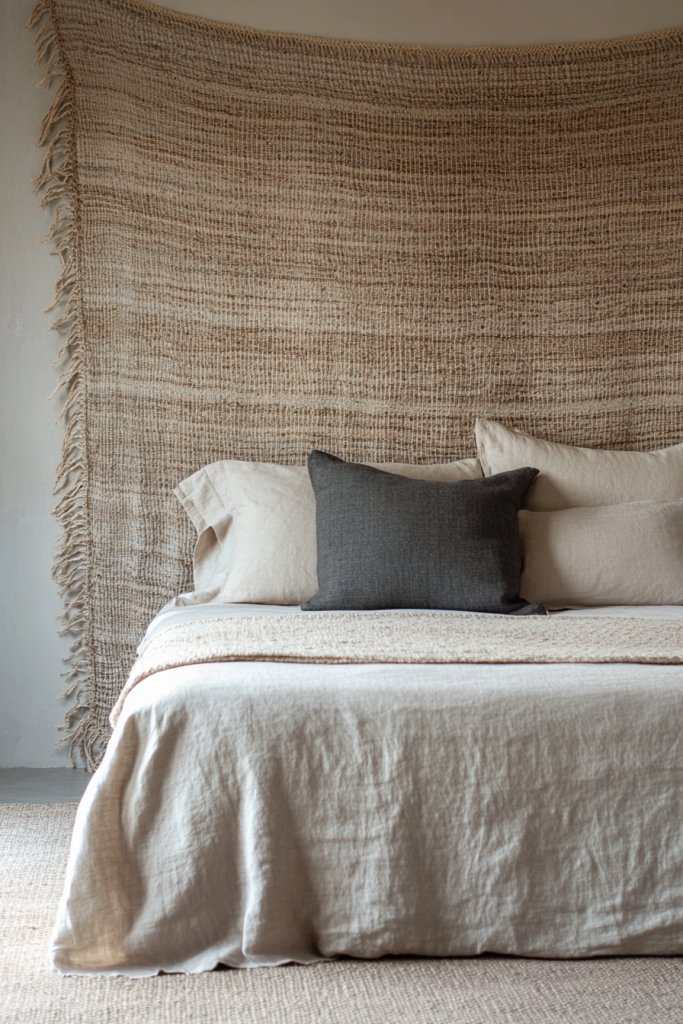
Craving a calming, natural vibe in your bedroom? A large woven wall hanging introduces texture and warmth effortlessly. It’s an affordable way to add visual interest without needing paint or complicated decor. Plus, it brings a touch of boho charm that feels relaxed and inviting.
Recommended Products to replicate this idea
| # | Preview | Product | |
|---|---|---|---|
| 1 |

|
Flber Macrame Wall Hanging Macrame Wall Decor Large-Scale Tie-Dye Tapestry Living Home Room Wall... | Buy on Amazon |
| # | Preview | Product | |
|---|---|---|---|
| 1 |

|
KHOYIME Large Macrame Wall Hanging Boho Woven Tapestry, Chic Home Decor Modern Bohemian Handmade... | Buy on Amazon |
Picture a spacious, textured textile with intricate weaving patterns and earthy tones, draped behind your bed. The tactile fibers add depth and softness, transforming a plain wall into a focal point. The natural materials absorb ambient light, creating a cozy glow. It’s like bringing a piece of nature into your personal sanctuary.
Choose from macramé, woven tapestries, or braided textiles depending on your style. Large, symmetrical designs work well in spacious rooms, while smaller or asymmetrical pieces suit cozy nooks. Hang it with a simple rod, hooks, or clips for an effortless look. Incorporate color accents or metallic threads for added flair.
Purchase or craft a large woven wall hanging that complements your color scheme. Mount it securely on the wall using hooks or a decorative rod, ensuring it’s centered and level. Consider layering with lighting—like hidden LED strips behind—to enhance texture. Balance the size of the hanging with your bed’s width for harmonious proportions. Keep the wall clean and dust-free for longevity.
Add small decorative elements like tassels, beads, or feathers to customize your textile. Mix with other natural decor—like wooden or ceramic elements—to amplify the earthy vibe. Change the hanging seasonally or add new textures to keep the look fresh. Incorporate subtle lighting for a soft, glowing effect at night.
A woven wall hanging elevates your decor with minimal effort and cost. It’s a statement piece that evokes calmness and connection to nature. Completing this project will encourage you to explore more handmade or natural decor ideas, fostering a creative and restful space.
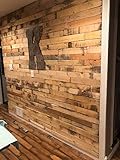
12. Repurpose a Headboard from Reclaimed Wood or Crates
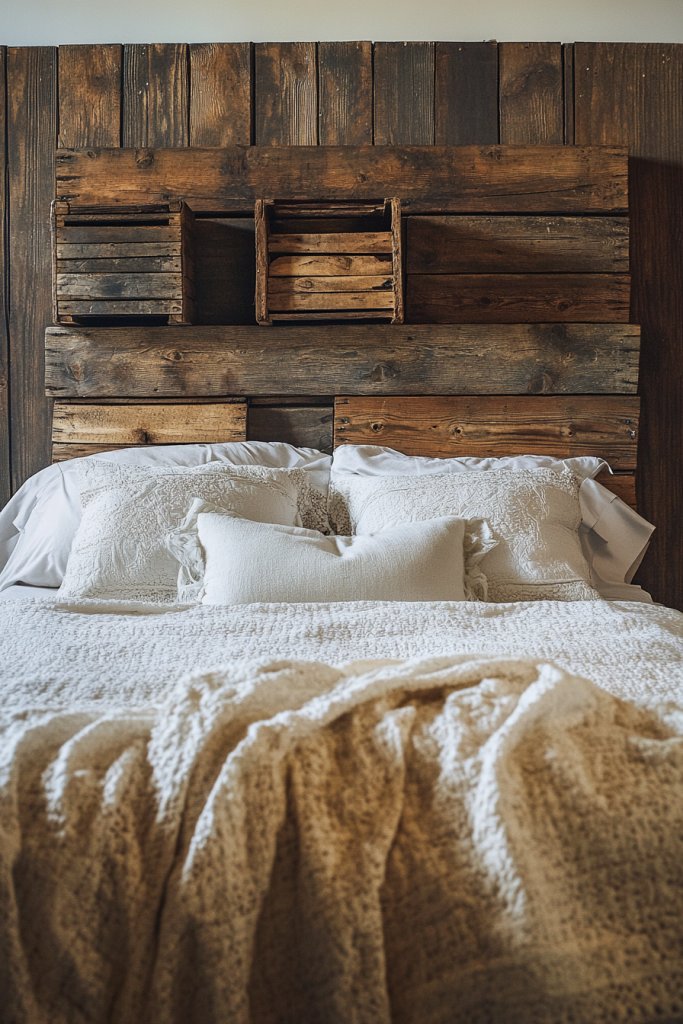
Looking for a rustic, eco-friendly headboard that’s budget-conscious? Repurposing reclaimed wood or wooden crates gives your bedroom a layered, textured look. It’s a clever way to add character and storage without overspending while helping the environment.
Recommended Products to replicate this idea
| # | Preview | Product | |
|---|---|---|---|
| 1 |

|
Signature Design by Ashley Neilsville Butcher Block Panel Headboard, Queen, Brown | Buy on Amazon |
| # | Preview | Product | |
|---|---|---|---|
| 1 |

|
CHOEZON Wall File Organizer, 6-Tier Vertical Mount Hanging Holder with 2 Side Hooks, Vintage Wooden... | Buy on Amazon |
Visualize a headboard made from stacked wooden crates, each with a weathered patina. The varied sizes and textures create an eye-catching focal point. Alternatively, horizontal planks of reclaimed wood give a sleek, barnyard vibe. The natural imperfections tell a story of sustainability and craftsmanship, adding warmth and authenticity.
Arrange crates in a grid, staggered pattern, or stacked for different effects. Paint or stain the wood in neutral or bold shades to match your decor. For a softer look, add fabric liners or cushions inside crates. Incorporate hooks or small shelves for extra functionality, and adapt the height for your room size.
Source reclaimed wood or crates from salvage yards, thrift stores, or online marketplaces. Clean and sand the surfaces to remove splinters and rough edges. Secure the crates or planks to the wall using heavy-duty brackets or screws, ensuring stability. Arrange the pieces to create a cohesive look, and add finishing touches like stain or paint. Mount the entire piece behind the bed for a sturdy, layered effect.
Personalize with stenciled patterns, painted borders, or decorative hardware. Incorporate small storage solutions—like baskets or hooks—on the crates for practicality. You can also add fairy lights or string lights around the crates for a cozy glow. Keep the overall aesthetic rustic or modern by adjusting color tones and finishing techniques.
Repurposing wood or crates combines sustainability with style, giving your bedroom a custom, handcrafted feel. It’s a project that shows your resourcefulness and creativity. Seeing the finished product will motivate you to explore more eco-friendly and DIY decor ideas for your home.
13. Install Adhesive Wall Panels or Peel-and-Stick Tiles for a Patterned Accent
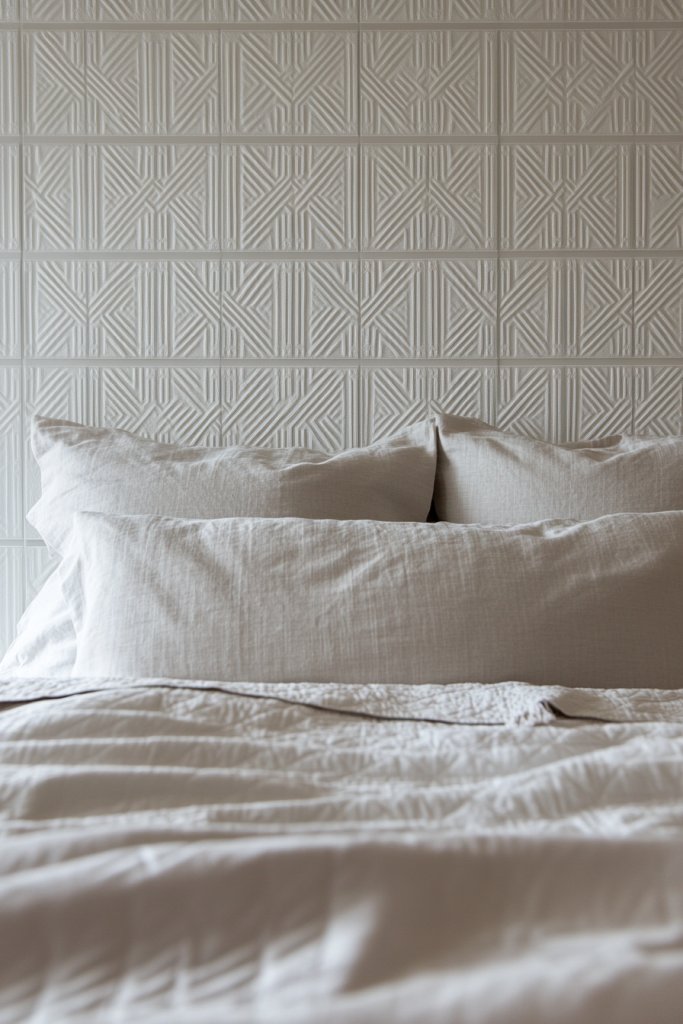
Want a quick, affordable way to add pattern and texture to your bedroom wall? Adhesive wall panels or peel-and-stick tiles are perfect for creating a statement headboard or accent wall. They’re simple to install, removable, and come in countless designs.
Recommended Products to replicate this idea
| # | Preview | Product | |
|---|---|---|---|
| 1 |

|
White Caulk Tape Self Adhesive Waterproof, Bathroom Peel & Stick Caulking Strip Floor Tile Wallpaper... | Buy on Amazon |
| # | Preview | Product | |
|---|---|---|---|
| 1 |

|
Heikki 30 Pack 3D Wall Panel for Interior Wall Décor, PVC Flower Textured Wall Panels for Living... | Buy on Amazon |
Imagine geometric or textured panels arranged behind your bed, adding depth and visual interest. The patterns can be modern, boho, or classic, depending on your choice. The tiles’ surface reflects light differently, creating a dynamic, textured backdrop. Even in small spaces, they can make a room feel larger and more styled.
Choose from various patterns, colors, and finishes—matte, glossy, or textured—for different effects. Combine different styles for an eclectic look or keep it uniform for sleek minimalism. Install them in a grid pattern, herringbone, or random layout. Switch out tiles easily to refresh your decor or match seasonal themes.
Clean the wall thoroughly before installation. Follow the manufacturer’s instructions to peel and stick each panel securely, ensuring no air bubbles. Use a level and measuring tape for precise placement. For uneven surfaces, apply a thin layer of adhesive or use mounting strips. Finish by aligning the panels carefully and trimming edges if necessary. Maintain the surface by cleaning with a soft cloth.
Customize with paint, metallic accents, or contrasting colors on the panels. Add decorative decals or small hooks to hang lightweight items, avoiding bulky decor. Use lighting—like LED strips—around the panels to highlight their texture. Regularly update the pattern or color scheme to keep your space fresh.
Patterned wall panels are an easy DIY upgrade that delivers high-impact results. They’re perfect for renters or anyone wanting a quick decor boost. Seeing the transformation will inspire you to experiment further with wall textures and patterns in other rooms.
14. Use an Oversized Canvas or Art Panel for a Bold Statement
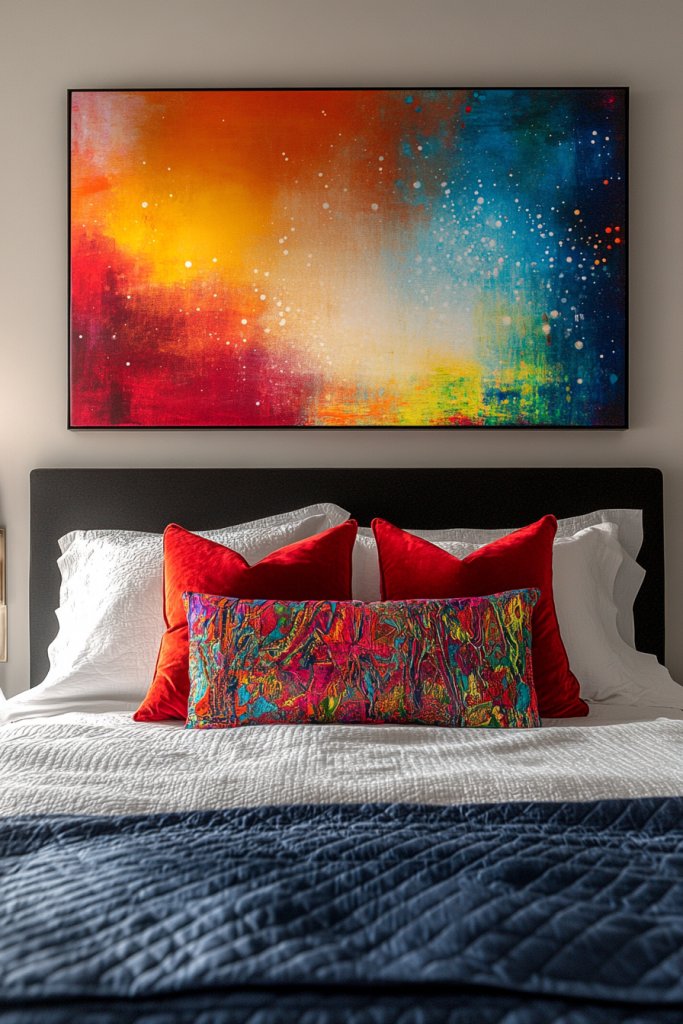
Craving a striking focal point that’s easy to update? An oversized canvas or art panel behind your bed creates a bold, artistic statement. It’s a stylish, affordable way to infuse personality and color into your space.
Recommended Products to replicate this idea
| # | Preview | Product | |
|---|---|---|---|
| 1 |

|
Large Framed Sage Green Abstract Landscape Wall Art for Living Room, 3 Piece Modern Canvas Prints... | Buy on Amazon |
| # | Preview | Product | |
|---|---|---|---|
| 1 |

|
MHARTK66 Large Size Wall Art for Living Room Modern Wall Decor for Bedroom Office Decor Abstract... | Buy on Amazon |
Envision a large, vibrant artwork spanning the width of your bed, instantly commanding attention. The colors and brushstrokes set the mood—calm, energetic, or romantic. The size makes the wall feel complete and balanced, transforming the room into a personal gallery. It’s the perfect centerpiece for a modern or eclectic bedroom.
Select prints that reflect your personality—abstract, landscape, or graphic designs. Opt for a single large canvas or a series of smaller panels arranged in a grid or asymmetrical pattern. Change the artwork seasonally or whenever you want a fresh look. Frame it in a sleek border or leave it unframed for a contemporary vibe.
Choose a high-quality print or canvas that fits your wall space. Mount it securely using appropriate hooks or adhesive strips—avoid nails if you want a renter-friendly option. Position it at eye level, centered behind your bed, for maximum impact. For extra stability, especially in high-traffic areas, consider anchoring the artwork to the wall with brackets or strips. Keep the surrounding decor minimal to let the art shine.
Customize your canvas with added textures—like gold leaf, textured gels, or mixed media. Incorporate your favorite colors or motifs to match your room’s theme. Use matching or contrasting frames to enhance visual appeal. Change or rotate your artwork periodically for variety and freshness.
A large, bold art piece elevates your space instantly and shows off your personal style. It’s a simple DIY or affordable purchase that makes a big impact. Completing this project will inspire you to explore more creative ways to decorate with art and color.
15. Attach a Row of Decorative Hooks or Pegs for a Practical Headboard
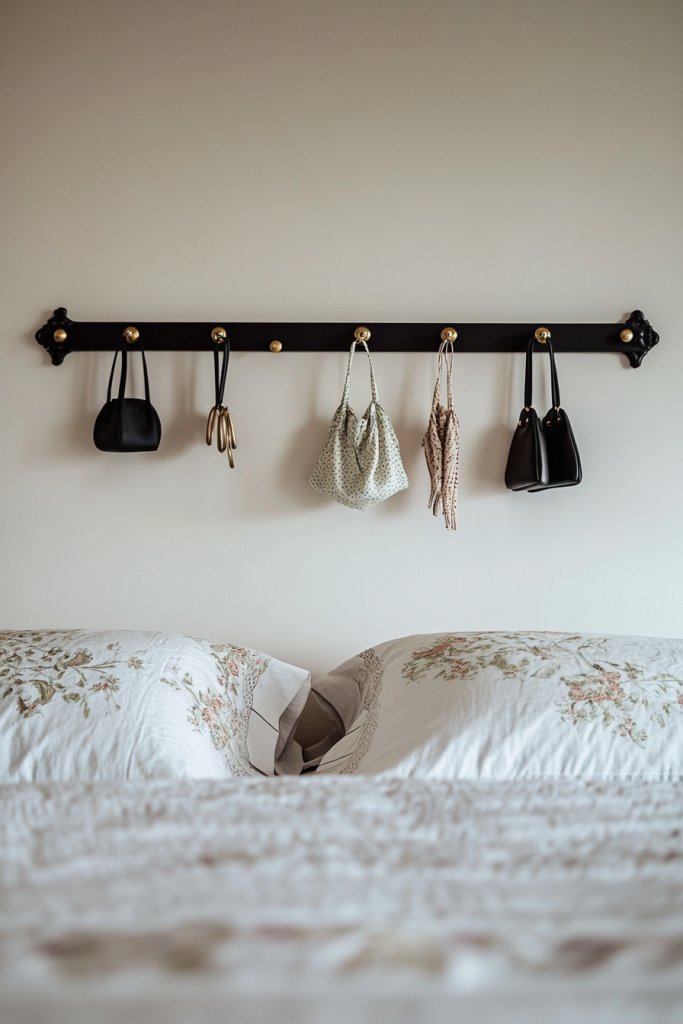
Looking for a functional yet stylish headboard? Installing a row of decorative hooks or pegs behind your bed adds storage and personality. It’s perfect for hanging accessories, lightweight decor, or even a few lights, making your space both practical and chic.
Recommended Products to replicate this idea
| # | Preview | Product | |
|---|---|---|---|
| 1 |

|
Optish Coat Rack Wall Mount, 16.5 Inches Wood Coat Hooks, Wall Hooks for Hanging, Hat Rack Bag... | Buy on Amazon |
| # | Preview | Product | |
|---|---|---|---|
| 1 |

|
10 Pieces Wooden Shaker Peg Screw-on Pegs 3.62 Inch Long Unfinished Wood Shaker Racks for Hanging... | Buy on Amazon |
Imagine a sleek line of hooks in matte black, brass, or colorful finishes, mounted directly behind your bed. They create a visual rhythm and can hold everything from hats and scarves to fairy lights. The hooks add depth and an element of surprise, especially when styled with items that reflect your personality.
Choose hooks in different shapes and finishes—industrial, vintage, or minimalist—to match your decor. Arrange them in a straight line or staggered for an eclectic look. Use the hooks for seasonal decor, like lightweight garlands or banners, or for everyday essentials. You can also add small decorative objects or lights to the hooks for extra flair.
Decide the length and number of hooks based on your space and needs. Mount them at a height that’s accessible but doesn’t interfere with your sleep zone. Secure each hook with appropriate anchors, ensuring they are evenly spaced and level. Arrange your hanging items thoughtfully, balancing colors and textures. Keep the setup simple for easy updates or changes.
Personalize with custom-painted hooks or decorative finials. Use the hooks for themed decorations or to display personal items like vintage jewelry or handcrafted accessories. Incorporate string lights or battery-operated LEDs around the hooks for ambient lighting. Regularly update the hanging items to keep your decor fresh and engaging.
Using hooks as a headboard is a clever, space-efficient idea that adds function and style. It’s a DIY-friendly project that encourages you to think creatively about storage and decor. Once in place, you’ll enjoy a bedroom that’s more organized and personalized, boosting your confidence in home styling.
16. Create a DIY Headboard with a Tension Rod and Curtains
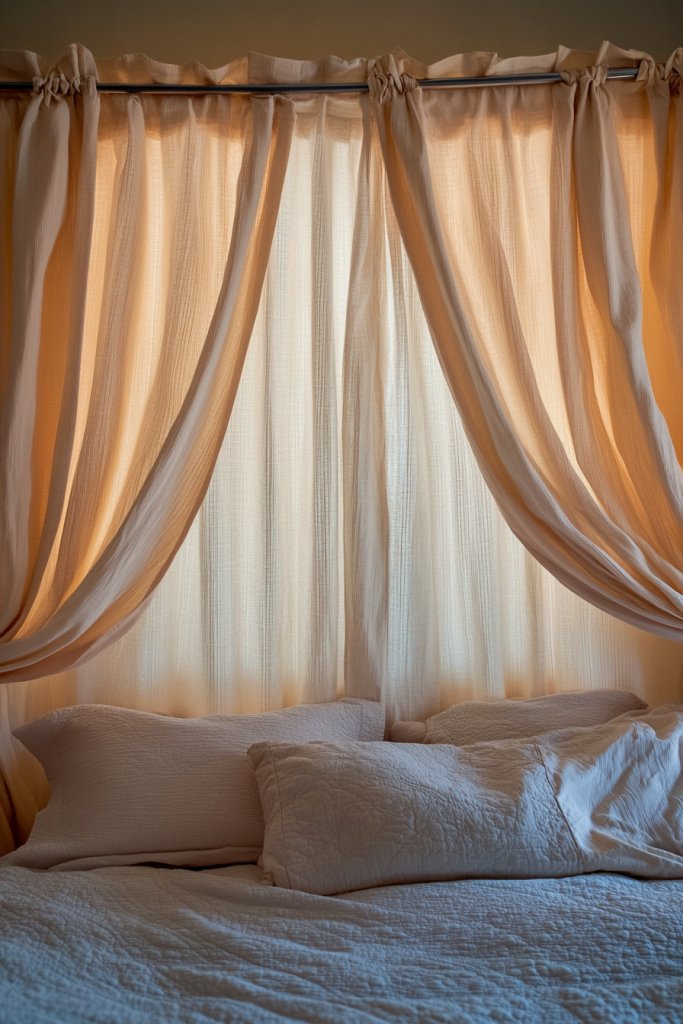
Want a versatile, easily changeable headboard? Using a tension rod and curtains allows you to instantly update your bedroom’s look without permanent fixtures. It’s a budget-friendly, flexible solution perfect for renters or anyone who loves swapping styles.
Recommended Products to replicate this idea
| # | Preview | Product | |
|---|---|---|---|
| 1 |

|
CorkLatta Black Shower Curtain Rod 31 to 80 Inch,1 Inch Diameter Adjustable Spring Tension Stainless... | Buy on Amazon |
| # | Preview | Product | |
|---|---|---|---|
| 1 |
|
NICETOWN Pitch Black Solid Thermal Insulated Grommet Blackout Curtains/Drapes for Bedroom Window (2... | Buy on Amazon |
Picture a lightweight curtain fabric hanging gracefully behind your bed, held in place by a sleek tension rod. The fabric creates a soft, flowing backdrop that adds color and texture. When pulled or changed seasonally, the look transforms—bright and airy for summer, cozy and plush for winter. It’s a simple way to add a personal, dynamic touch.
Choose curtains in different fabrics—sheer for lightness, velvet for richness, or patterned textiles for visual interest. Layer multiple curtains for a layered effect or use contrasting colors for drama. Change the curtains regularly to reflect your mood or decor theme. Mount the tension rod high or low, depending on your desired visual impact.
Install a sturdy tension rod across the wall behind your bed, ensuring it’s level and secure. Choose curtains that are long enough to drape elegantly or gather at the top for a pleated look. Attach the curtains with hooks, rings, or rod pockets for easy hanging. Adjust the fabric for fullness and flow, then style with tiebacks or decorative holdbacks. Keep the setup simple to swap out fabrics easily.
Add decorative trims, tassels, or tiebacks for a personalized look. Use fabrics that complement your bedding or wall colors. Incorporate seasonal or themed curtains for variety. Consider lining the curtains with blackout fabric for better sleep or thermal insulation, making the setup both beautiful and functional.
This DIY headboard is a fun, adaptable project that keeps your decor fresh and flexible. It encourages creativity and makes it easy to experiment with colors and textures. Once you see how simple it is to change your look, you’ll be inspired to keep updating your space regularly.
17. Incorporate a Layered Approach with Multiple Small Decor Pieces
Feeling overwhelmed by the idea of a giant statement headboard? A layered approach with small decor pieces offers a personalized, eclectic vibe without the fuss. It’s a versatile way to add depth, color, and personality to your bedroom wall.
Recommended Products to replicate this idea
| # | Preview | Product | |
|---|---|---|---|
| 1 |

|
Threehoney 6 Pcs Framed Botanical Wall Art Set Floral Wall Art Vintage Boho Plant Print Hanging... | Buy on Amazon |
| # | Preview | Product | |
|---|---|---|---|
| 1 |

|
CHOEZON Floating Shelves, Set of 2 Wall Shelves, 2-Tier Hanging Shelves, Wall Shelf Set of 2, Wall... | Buy on Amazon |
Imagine a collection of framed quotes, textiles, and small wall accents arranged artfully behind your bed. The mix of shapes, sizes, and textures creates a dynamic, curated look. Combining items like fabric swatches, decorative signs, and small shelves results in a rich tapestry of personal style. It’s a visual story that evolves with your tastes.
Mix and match different decor pieces—like framed art, textiles, or sculptural elements—for an eclectic look or keep it minimal for a more cohesive vibe. Rotate items seasonally or for special occasions to keep your decor fresh. Use a grid, salon-style, or freeform arrangement depending on your space and personality. Incorporate different textures—knits, prints, metals—for added interest.
Gather your favorite small decor items—frames, textiles, objects—and plan your layout before hanging. Use painter’s tape or a level to mark positions, ensuring a balanced composition. Secure each piece with appropriate hooks, nails, or adhesive strips, making sure they’re level and spaced well. Adjust and rearrange until you’re happy with the overall look. Keep the arrangement loose or grid-like as preferred.
Personalize with custom-framed photos, meaningful quotes, or textured textiles. Incorporate small decorative objects like vintage keys or lightweight sculptures. Layer items for depth—place some slightly overlapping or at different heights. Use lighting—like small clip-on lamps or fairy lights—to highlight your display.
A layered, mixed-media wall is a creative, approachable way to personalize your bedroom. It’s forgiving and flexible, allowing you to add or remove pieces easily. Seeing your personal collection come together boosts confidence and encourages ongoing decorating adventures.
Conclusion
With a diverse range of affordable headboard fixes showcased, there’s no reason to settle for a dull or outdated look. These ideas empower you to personalize your space and add a touch of your unique style at a fraction of the cost. Give these tips a try and turn your bedroom into a cozy, stylish retreat—your perfect headboard is just a DIY away!
Last update on 2026-03-01 / Affiliate links / Images from Amazon Product Advertising API