Imagine a dedicated space where your creativity can flourish—an art corner that transforms a simple nook into a personal sanctuary for expression. Art corner ideas are incredibly popular because they make art accessible, organized, and inspiring, turning everyday spaces into hubs of imagination.
In this article, you’ll uncover a variety of innovative and charming art corner ideas that cater to different styles and spaces. Whether you’re working with a small corner or a spacious room, these ideas will spark your creativity and help you craft a perfect spot for painting, drawing, or any artistic pursuit you love.
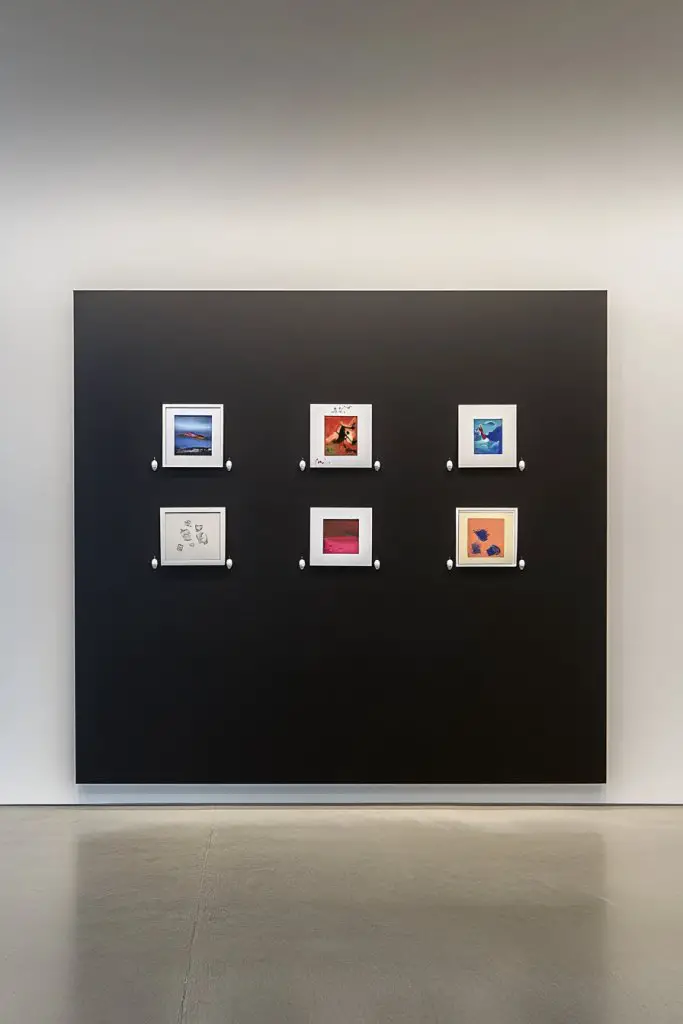
1. Boho-Chic Gallery Wall with DIY Framed Prints
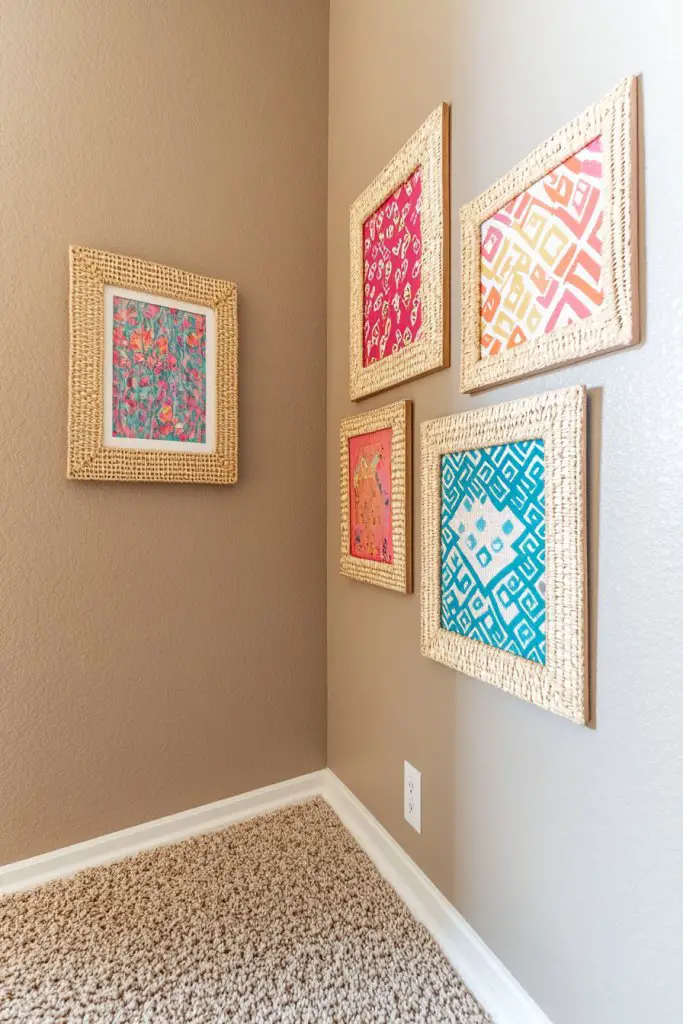
Ever feel like your space lacks personality and a splash of character? A bland corner can make even the most stylish rooms feel dull. Creating a vibrant gallery wall transforms a neglected spot into a focal point full of life. It’s the perfect way to showcase your personality without overwhelming the entire room. Plus, it’s surprisingly easy to do and adds a cozy, eclectic vibe.
Recommended Products to replicate this idea
| # | Preview | Product | |
|---|---|---|---|
| 1 |
|
Boho Wall Art Prints 11 x 3.5 x 0.2 Inch, Set of 4, Mid Century Positive Affirmations Wall Decor... | Buy on Amazon |
| # | Preview | Product | |
|---|---|---|---|
| 1 |

|
eletecpro 12x12 Picture Frames Set of 9 with Mat for 8x8 Photos or without Mat for 12x12, Square... | Buy on Amazon |
Imagine a wall filled with mismatched frames in boho patterns—think rattan, distressed wood, and metallic finishes. Inside, you feature your favorite prints, sketches, or even personal photographs, all arranged in a seemingly casual yet curated manner. The mix of patterns, textures, and colors creates visual interest that invites people to linger and explore. Soft textiles and layered decor add depth, making the whole display feel warm and inviting. It’s like a mini art exhibit right in your corner.
This look works with various styles—go for a more polished look with uniform frames for a modern boho vibe, or mix vintage thrifted pieces for a more eclectic feel. Adjust the scale of the frames according to your wall size; smaller frames work well in tight corners, while larger ones make a statement in bigger spaces. Seasonal swaps are easy—replace prints with holiday-themed artwork or inspiring quotes. You can even incorporate textile hangings or macramé for added texture.
Start by selecting a blank corner and measuring the space. Gather a variety of frames—DIY or thrifted—to keep costs low. Arrange your prints and photos on the floor first to find a layout you like, then replicate it on the wall. Use command hooks or picture-hanging strips to minimize wall damage. Mix in some decorative elements like woven textiles or small plants (if allowed) for a layered look. Keep the arrangement flexible until you’re happy with the overall composition. It’s all about balance and visual flow.
Add personal touches like handwritten quotes or drawings inside the frames. Incorporate different frame shapes and materials to enhance the boho charm. Use washi tape or decorative borders for a DIY feel. Layer some small decorative objects, like vintage keys or feathers, around the frames for extra personality. Change the prints seasonally or as your mood evolves to keep it fresh and engaging.
A boho gallery wall instantly elevates your space and boosts your creative confidence. It proves that you don’t need perfection—just personality. Your friends will ask for tips, and you’ll feel proud of turning a simple corner into a personal art space. Embrace your unique style and let your walls tell your story, one eclectic piece at a time.
2. Miniature Art Studio with Adjustable Easel and Supplies
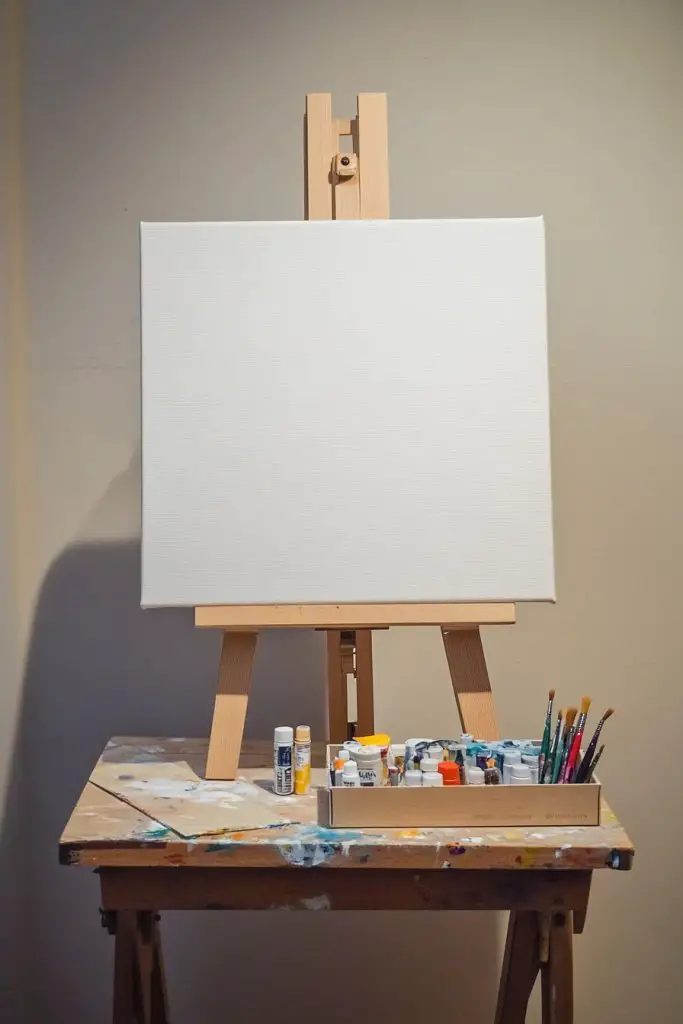
Ever wanted a dedicated space to unleash your inner artist but felt overwhelmed by the idea of a full-blown studio? A tiny corner can be transformed into a creative sanctuary where spontaneity thrives. It’s perfect for quick sketches, experimenting with new ideas, or just escaping into your art world. The best part? It doesn’t require a huge space or fancy equipment.
Recommended Products to replicate this idea
| # | Preview | Product | |
|---|---|---|---|
| 1 |
|
Art Easel Stand for Painting and Sign - RRFTOK Aluminum 66 Inch Metal Tripod Adjustable Portable... | Buy on Amazon |
| # | Preview | Product | |
|---|---|---|---|
| 1 |

|
ArtBin 6937AG Essentials Lift-Out Tray Box, Portable Art & Craft Organizer with Handle and Tray,... | Buy on Amazon |
Picture a compact setup with a foldable easel nestled in a cozy corner, surrounded by organized paints, brushes, and sketchbooks. Soft natural light filters in, illuminating your workspace. You might have a small shelf or container for supplies, kept within arm’s reach. The space feels inviting and inspiring, encouraging you to pick up your tools anytime creativity strikes. It’s like having a portable art room in a tiny package.
Customize your mini studio with different easel styles—tabletop, standing, or adjustable—depending on your preference. Use multi-tiered storage boxes or magnetic containers to keep supplies tidy. For seasonal variation, swap out your supplies for different mediums—watercolors in summer, pastels in winter. You can even add a foldable table that doubles as a workspace or storage shelf for art books and tools.
Begin by choosing a quiet corner or under-utilized space like behind a door or under a window. Select a lightweight, adjustable easel that fits your space and style. Organize your paints, brushes, and tools in small containers or bins that can be easily moved or stored. Use a portable tabletop surface that can fold or slide away when not in use. Keep essential supplies within easy reach, and consider adding a small corkboard or clip strip for inspiration or reference images. Regularly tidy up to keep the space inviting.
Personalize your mini studio with colorful storage bins or painted containers that match your aesthetic. Add a small decorative lamp or string lights for cozy evenings. Incorporate your favorite art tools or unique brushes as display pieces. Use washi tape or stickers to label storage areas or decorate your easel. Make it yours with little touches that motivate you to create every day.
Having a dedicated, even tiny, art corner boosts your confidence to experiment and improve. It’s a reminder that creativity doesn’t need a massive space—just passion and a little organization. Every time you set up or tidy your mini studio, you reinforce your commitment to your art journey. It’s your personal retreat, ready whenever inspiration hits, no matter how small the space.
3. Vintage Suitcase Art Caddy with Art Supplies and Inspiration Books
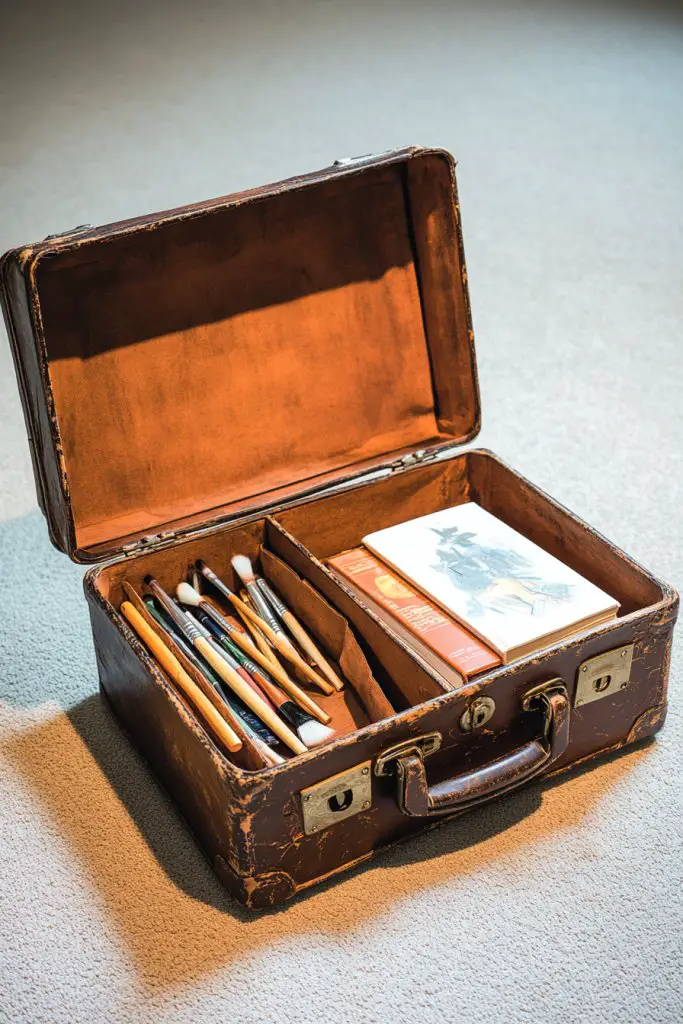
Feeling overwhelmed by cluttered art supplies and scattered inspiration? A vintage suitcase offers a stylish, portable solution that combines storage with decor. It adds nostalgia and charm while keeping your tools organized and accessible. Plus, it’s a fun way to inject personality into your creative space.
Recommended Products to replicate this idea
| # | Preview | Product | |
|---|---|---|---|
| 1 |

|
feilario Vintage Leather Storage Trunk Small Portable DecorativeLuggage Suitcase Movie Prop... | Buy on Amazon |
| # | Preview | Product | |
|---|---|---|---|
| 1 |
|
ArtBin 6937AG Essentials Lift-Out Tray Box, Portable Art & Craft Organizer with Handle and Tray,... | Buy on Amazon |
Picture an old, weathered suitcase with leather straps and brass fittings, sitting open in your corner. Inside, neatly arranged paints, brushes, and sketchbooks create a colorful, inviting scene. Surround it with a few vintage-inspired items—like an old camera or typewriter—and your favorite inspiration books stacked on top. The contrast of rustic materials and bright art supplies creates a cozy, artistic vibe. It’s like a treasure chest right in your home.
Choose suitcases with different sizes or styles—metal, leather, or fabric—to match your aesthetic. Use dividers or small containers inside for better organization. You can also stack multiple suitcases for layered storage or display. Seasonal changes might involve swapping out inspiration books or adding themed decorations. For small spaces, a compact suitcase works best, while larger ones serve as statement pieces.
Start by finding a vintage suitcase that speaks to you—thrift stores are treasure troves. Clean and, if needed, restore the exterior for a polished look. Organize your art supplies into small containers or zip pouches inside, making sure everything is easy to find. Place your inspiration books nearby and keep a few favorite tools ready to go. Consider adding labels or tags for quick access. Keep the setup flexible so you can add or remove items as needed.
Personalize your suitcase with decorative stickers, fabric lining, or painted details. Incorporate a small tray or cup inside for brushes or pens. Use a vintage key or charm as a handle accent. Place a cozy blanket or cushion nearby for comfort during creative sessions. Change the contents seasonally or based on your projects to keep it fresh and inspiring.
A vintage suitcase art caddy makes creativity portable and fun, turning everyday supplies into a charming display. It encourages spontaneous art sessions and showcases your personality. Every time you open it, you’re reminded of the stories and adventures that inspired your work. It’s a delightful way to keep your creative spirit alive and well-organized.
4. Corner Nook with a DIY Canvas Wall and Hanging Thread Art
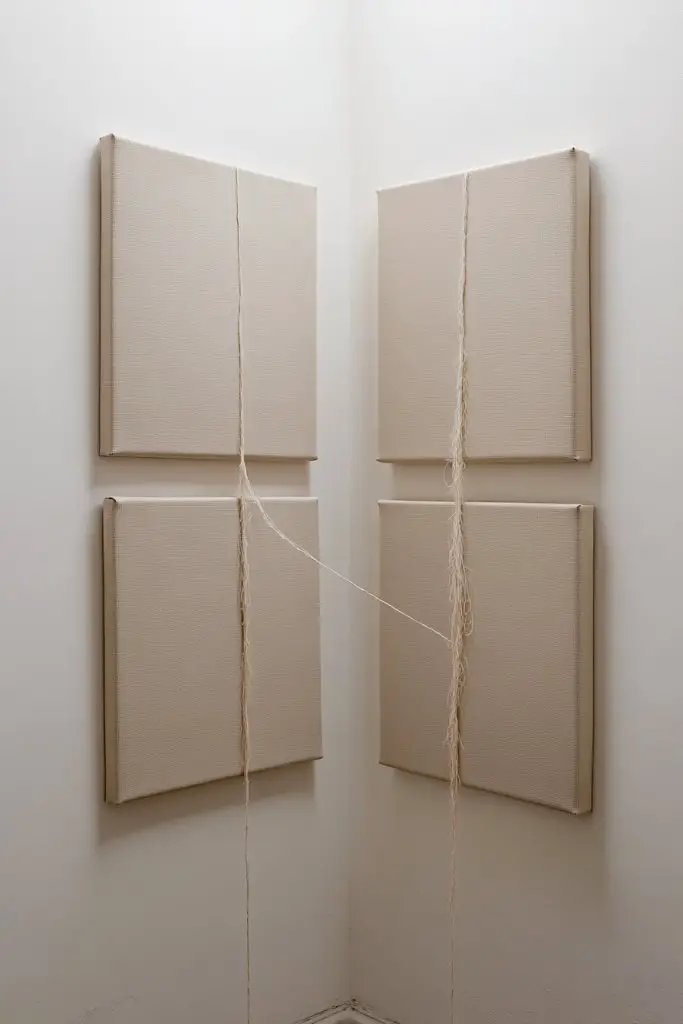
Cramped corners often get overlooked, but they hold huge potential for personalized creative spaces. Want to turn a dull nook into a textured, inspiring retreat? A DIY canvas wall combined with hanging thread art offers a tactile, artistic focal point that invites you to create. It’s perfect for adding depth and personality without taking up much space.
Recommended Products to replicate this idea
| # | Preview | Product | |
|---|---|---|---|
| 1 |

|
Stretched Canvas, 6x8, 8x10, 10x12, 12x16, 8 Set Artist Canvase Frame Board Panels, 100% Cotton... | Buy on Amazon |
| # | Preview | Product | |
|---|---|---|---|
| 1 |

|
FREEBLOSS DIY Macrame Leaf Wall Hanging Beginners Macrame Kit Leaf Woven Tapestry Feather Wall... | Buy on Amazon |
Visualize a large blank canvas mounted on your wall, serving as a backdrop for your art. In front, colorful threads or yarns are woven into intricate patterns, creating a textured tapestry that catches the light. The combination of the smooth canvas and textured thread adds visual contrast and tactile interest. Accent it with small decorative elements like fabric swatches or painted shapes. The result is a cozy, layered nook that sparks creativity.
Use different-sized canvases for varied effects—think large statement pieces or smaller panels. Thread art can be minimalist or elaborate, depending on your skill and style. Change the colors seasonally or as your mood shifts, incorporating metallic threads or eco-friendly fibers. Add a small shelf or ledge for displaying mini sculptures or books related to your craft. This setup is adaptable for wall color and existing decor.
Start by selecting a corner that gets good natural light or can be easily illuminated with task lighting. Mount a large canvas with simple hooks or a wire system. Create your thread art on a separate surface, then attach it to the canvas using nails or adhesive strips. Mix in textures or colors that inspire you. Optional: add a small table or stool nearby for working comfortably. Keep your supplies handy for spontaneous projects.
Personalize your wall with painted accents, stencils, or fabric borders. Incorporate your favorite color palettes or themes to match your style. Use metallic or glow-in-the-dark threads for extra flair. Add small LED lights or fairy lights for a magical effect. Rotate your thread patterns or canvas artwork to keep the space fresh and inspiring.
This textured nook transforms a simple corner into a tactile, engaging art retreat. It reminds you that creativity thrives in small, dedicated spaces. Every woven thread or painted canvas builds your confidence and skills. It’s a personal sanctuary that encourages spontaneous expression and growth, proving that even the tiniest corners can hold big inspiration.
5. Sculptural Art Corner with Clay or Papier-Mâché Creations
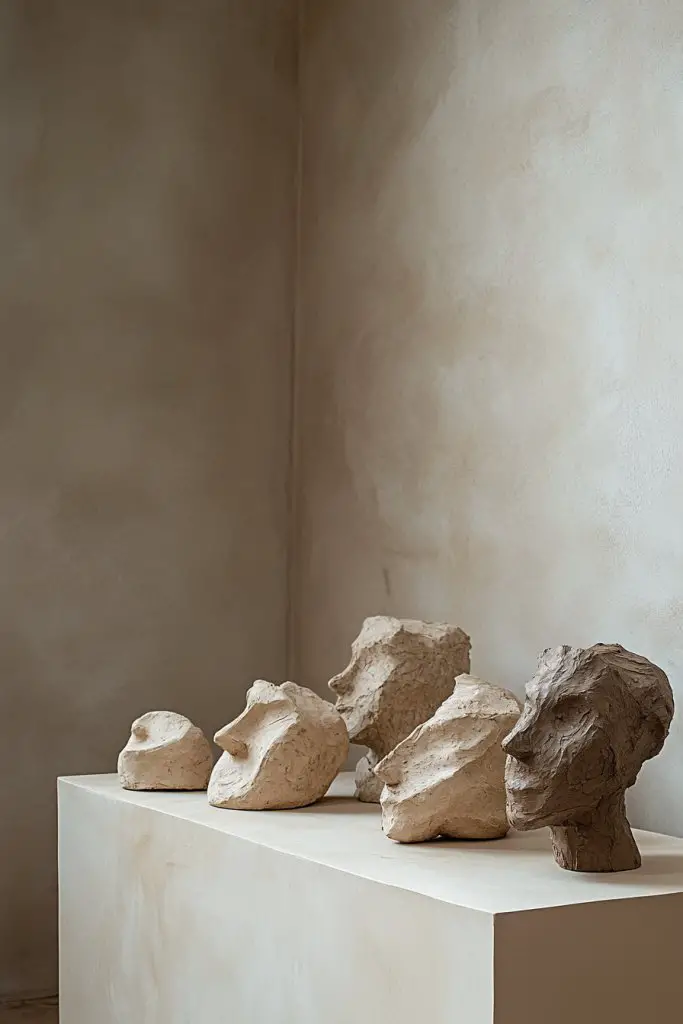
Feeling uninspired in your current space? Want a dedicated corner to experiment with 3D art? A sculptural art nook dedicated to clay or papier-mâché projects can be your new creative playground. It’s perfect for tactile artists who crave hands-on work and visual impact. Plus, it’s a fun way to add unique decor elements to your home.
Recommended Products to replicate this idea
| # | Preview | Product | |
|---|---|---|---|
| 1 |

|
Crayola Air Dry Clay (5lbs), Teacher Supplies, Natural White Modeling Clay for Kids, Sculpting... | Buy on Amazon |
| # | Preview | Product | |
|---|---|---|---|
| 1 |

|
Factory Direct Craft Handcrafted Paper Mache Book Shaped Box Set - 3 Premade Papier Mache Cardboard... | Buy on Amazon |
Picture a small table or shelf covered with your latest sculptures—quirky animals, abstract forms, or textured vessels. Nearby, organized tools like sculpting knives, sponges, and molds sit ready for your next project. The space exudes a creative, slightly messy vibe that’s full of personality. Finished pieces can be displayed on shelves or hung as wall art, adding a dynamic, three-dimensional element to your decor. The tactile surfaces invite touch and curiosity.
Create a dedicated work surface with a sturdy table or portable workstation. Use different materials—air-dry clay, polymer clay, or papier-mâché—based on your skill level and project type. Change themes seasonally or for specific projects—holiday ornaments, abstract sculptures, or functional ceramics. Incorporate storage containers for tools and drying racks for your creations. Consider a backdrop or wall-mounted grid to display finished pieces.
Start with a well-ventilated corner, ideally with access to water and power if needed. Gather the necessary supplies—clay, molds, tools, and protective coverings. Set up a sturdy table or workbench and organize your tools for easy access. Keep a drying or curing area nearby, and consider ventilation for dust or fumes. Keep your workspace tidy by cleaning tools immediately after use and storing supplies in labeled containers. Rotate projects to stay inspired.
Decorate the area with inspiring images, sketches, or color charts. Use colorful storage bins or custom labels to organize supplies. Incorporate fun elements like sculpting stencils or textured mats. Display finished pieces on shelves or hang them as wall-mounted art. Personalize your space with themed decor or a small accent rug to make it feel welcoming.
A sculptural corner encourages tactile exploration and boosts confidence in your creative abilities. Every new project adds to your skills and personal style. Seeing your finished pieces displayed motivates ongoing experimentation. It’s a dedicated space that celebrates your growth and passion for three-dimensional art, making your home uniquely yours.
6. Upcycled Pallet Wall for Artistic Inspiration and Storage
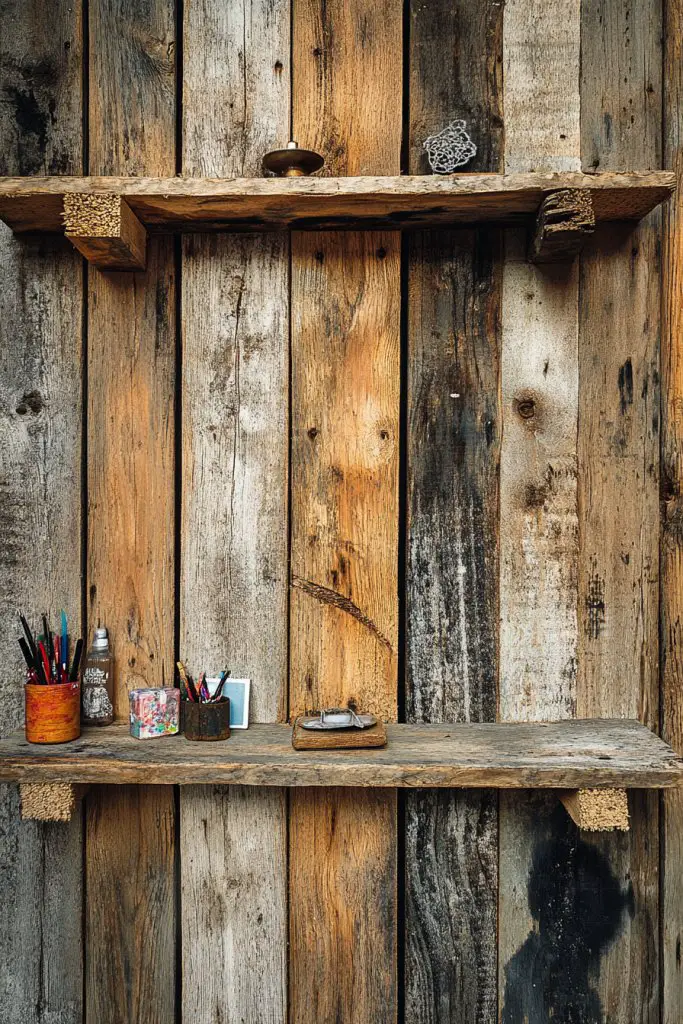
Struggling with bland, uninspiring walls that do nothing for your creative vibe? An upcycled pallet wall offers a rustic, eco-friendly way to fill that space with inspiration and practical storage. It’s perfect for DIY lovers who want to add character while organizing their supplies. Plus, it’s budget-friendly and endlessly customizable.
Recommended Products to replicate this idea
| # | Preview | Product | |
|---|---|---|---|
| 1 |

|
Holydecot Peel & Stick Real Wood Planks, Rustic Reclaimed Barn Wood Paneling, Brown Gray... | Buy on Amazon |
| # | Preview | Product | |
|---|---|---|---|
| 1 |

|
Besuerte Rustic Antique Mason Jar Organizer Hanging Wall Holder for Home Decor, Bathroom, Kitchen,... | Buy on Amazon |
Imagine a wall made from weathered wooden pallets—rough textures and natural tones—mounted securely for a layered, dimensional effect. You can attach small hooks, clips, or shelves to hold your art tools, inspiration cards, or small finished projects. The surface becomes a textured backdrop for pinning ideas, sketches, or small artworks. Decorate it further with vintage labels, string lights, or painted accents to enhance its charm.
Use different types of wood or paint the pallets in colors that match your decor. Create sections for different purposes—one for inspiration, another for ongoing projects, and a third for storage. Add small baskets or jars for organizing supplies. Change your display seasonally or theme it around holidays or projects. Incorporate hooks or pegs for hanging tools or small sculptures.
Start by sourcing weathered pallets from local stores or online. Sand and clean them thoroughly. Mount the pallets securely on your wall using heavy-duty anchors or brackets. Attach hooks, clips, or shelves at varying heights for visual interest. Use nails or screws for added stability, especially if hanging heavier items. Organize your supplies on or around the pallets, keeping frequently used tools within easy reach. Regularly update the display to keep inspired.
Paint or stain the pallets for a polished look or leave them natural for a rustic vibe. Incorporate decorative elements like stenciled quotes or patterns. Add small planters or decorative objects mounted onto the wood for visual richness. Change out inspiration cards or art snippets with the seasons or mood shifts. Use fabric or paper accents to soften the rustic wood and add color.
A pallet wall turns a humble material into a statement piece that fuels your creativity. It’s a reminder that DIY and upcycling can be both functional and beautiful. Each added element or new project completed reinforces your skill and style. It transforms your space into a personalized art haven that’s full of character and inspiration.
7. Magnetic Wall Panel for Dynamic Art and Notes
Want a versatile way to display your ideas, sketches, or small artworks without damaging walls? A magnetic wall panel offers a sleek, flexible solution that allows for quick updates and reconfigurations. It’s perfect for creative minds who love changing their displays often. Plus, it keeps everything neat and organized, avoiding clutter.
Recommended Products to replicate this idea
| # | Preview | Product | |
|---|---|---|---|
| 1 |

|
17.7" x 11.8" 2 Pack Metal Magnetic Board - Magnet Bulletin Board to Display Magnetic Letters... | Buy on Amazon |
| # | Preview | Product | |
|---|---|---|---|
| 1 |

|
LOVIMAG Strong Neodymium Disc Magnets, Rare Earth Magnet with Double-Sided Adhesive for Fridge, DIY,... | Buy on Amazon |
Picture a smooth, painted panel—perhaps in matte black or a bold color—mounted securely on your wall. Small magnets hold up your sketches, notes, or miniature art pieces, which can be moved or replaced effortlessly. The panel’s surface contrasts beautifully with metallic magnets, creating a modern, minimal aesthetic. You might add decorative labels or colored magnets for visual interest. It feels clean, organized, and infinitely adaptable.
Choose a size that fits your wall and needs—large for a main feature, or smaller panels for a subtle accent. Use a variety of magnets—decorative, magnetic clips, or custom shapes—to add personality. Change your display seasonally or based on projects—swap sketches, motivational quotes, or inspirational snippets. Incorporate a small ledge or tray for holding pens or other supplies nearby. The panel can also serve as a dry-erase surface for quick sketches.
Select a durable, magnet-compatible board or paint a wall with magnetic primer, then topcoat with your preferred color. Mount the panel securely using appropriate hardware. Organize your small artworks, notes, or samples with magnets of different shapes and colors. Keep supplies like pens or clips nearby for convenience. Regularly refresh the display for ongoing inspiration and motivation. Consider combining with other organizational tools for maximum efficiency.
Decorate the panel with themed magnets, stickers, or custom shapes that match your style. Use colored or patterned magnets to highlight special pieces. Add a small bulletin or cork section nearby for non-magnetic notes or pinned items. Rotate your artwork or notes often to keep the display lively. Personal touches like motivational quotes or your own designs add extra flair.
This magnetic wall makes it easy to showcase your progress and keep ideas flowing. It encourages ongoing experimentation by removing barriers to display changes. Every swap or update boosts your confidence and keeps your space vibrant. It’s a modern, functional centerpiece that celebrates your creative journey, inspiring you daily.
8. Hanging Wire Grid with Clips for Flexibly Changing Art
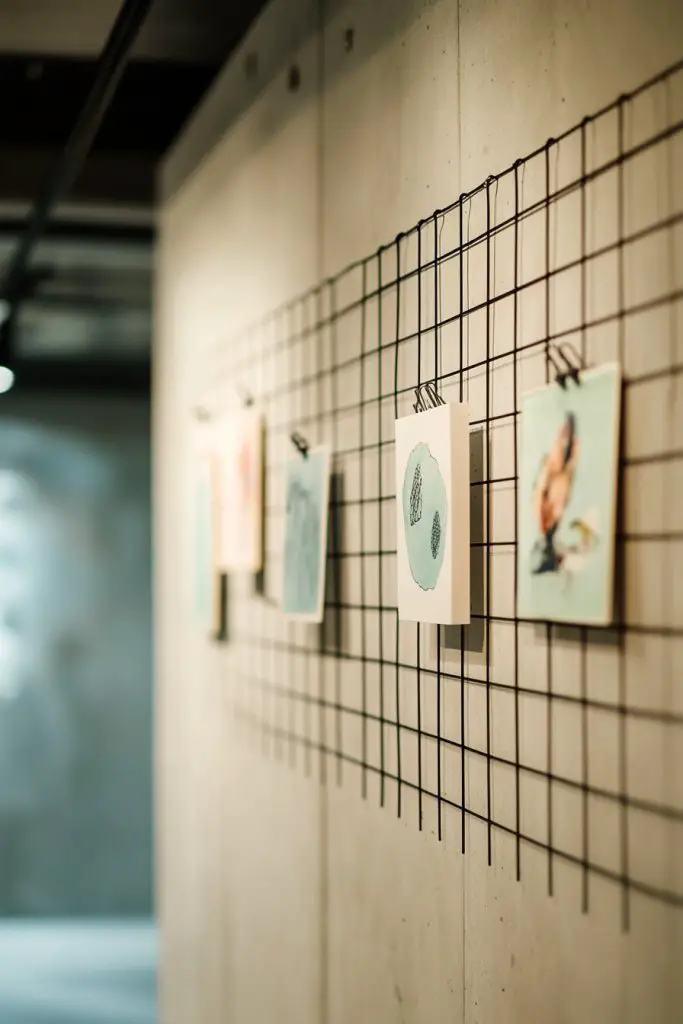
Feeling limited by static displays and want a more adaptable way to showcase your work? A hanging wire grid with clips offers a flexible, modern solution that makes swapping out art simple. It’s ideal for artists who want to keep their space fresh without constant re-hanging. Plus, it adds a cool, industrial touch to your creative corner.
Recommended Products to replicate this idea
| # | Preview | Product | |
|---|---|---|---|
| 1 |

|
2 Pack Wire Wall Grid Panel With Accessories | Includes Hanging Basket, Shelf & Hook Rack | Photo... | Buy on Amazon |
| # | Preview | Product | |
|---|---|---|---|
| 1 |

|
Mewutal 40 Pieces Offset Canvas Clips with Screws Black Metal Photo Frame Clips Mirror Clamps Heavy... | Buy on Amazon |
Envision a sturdy wire mesh or grid suspended from the ceiling or mounted on your wall, with colorful clips hanging from it. Your sketches, photos, or small artworks hang from these clips, ready to be swapped or rearranged. The grid’s open design creates a sense of space and allows light to flow freely. Small decorative objects or string lights can be woven around it for added texture. The overall look is sleek, functional, and urban-inspired.
Adjust the size of the grid or the spacing between clips based on your wall and number of pieces. Use different clip styles—metal, wooden, or colorful plastic—to enhance visual interest. Change your display seasonally or based on projects—swap out photos or sketches easily. Add small hooks or shelves for more display options. For a softer look, incorporate fabric or paper elements around the grid.
Choose a sturdy wire grid or mesh that fits your space. Mount it securely using hooks or anchors—consider ceiling mounting for a floating effect. Attach clips at varying heights for dynamic visual flow. Hang your artwork from the clips, making sure they are evenly spaced. Regularly update your display by simply unclipping and replacing pieces. Keep a small basket nearby with extra clips and notes for quick adjustments.
Decorate the wire with string lights, washi tape, or small decorative elements to match your style. Use different clip colors or shapes to categorize or highlight certain pieces. Add small framed photos or keepsakes on nearby shelves for more personal touches. Rotate your art and photos regularly to keep the display engaging. Personalize with themed clips or DIY decorations for extra flair.
This flexible display method keeps your creative energy flowing, making art swapping effortless. It encourages experimentation and continuous growth by removing display stress. Every change revitalizes your space and motivates you to create more. It’s a simple yet impactful way to showcase your evolving style and progress, inspiring confidence every day.
9. Tiered Art Ladder for a Vertical Showcase
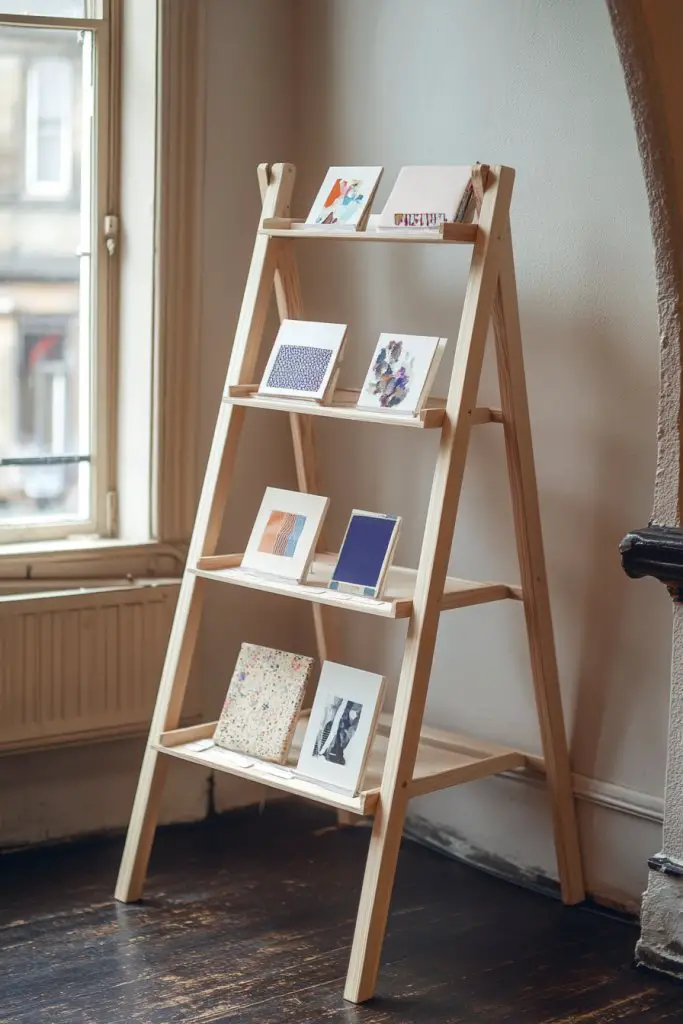
Struggling to find a stylish way to display multiple small artworks or fabric samples? A tiered art ladder offers a charming, space-saving solution that adds height and visual interest. It’s perfect for showcasing layered art pieces, textiles, or small framed works without cluttering surfaces. Plus, it’s easy to move and adapt as your collection grows.
Recommended Products to replicate this idea
| # | Preview | Product | |
|---|---|---|---|
| 1 |

|
Decorative Wooden Blanket Ladder for The Living Room and Bedroom, 5ft 8 inch, Pine Wood Quilt... | Buy on Amazon |
| # | Preview | Product | |
|---|---|---|---|
| 1 |

|
Ufine 4 Tier Wood Plant Stand Indoor Outdoor A Frame Plant Display Shelf for Multiple Plants Flower... | Buy on Amazon |
Imagine a leaning wooden or metal ladder placed against your wall, with artworks or fabric swatches draped over the rungs. Each tier showcases a different piece—think textured textiles, small paintings, or decorative samples—creating a layered, textured display. The natural or industrial finish of the ladder contrasts beautifully with colorful or neutral art. Small hooks or clips on the rungs can hold lightweight works securely. The overall effect is a relaxed, curated display with a touch of rustic charm.
Use different ladder styles—vintage wood, painted, or metallic—to match your decor. Adjust the angle and height for visual balance; lean it at a slight angle for a casual look. Change the display seasonally by swapping textiles or art pieces. You can also hang lightweight objects or decorative ribbons on the rungs for added dimension. In smaller spaces, choose a compact ladder; in larger rooms, a taller one makes a statement.
Select a sturdy ladder that fits your space and style. Position it against a blank wall or corner, leaning at an angle for stability. Use clips, hooks, or fabric ties to secure your artwork or textiles in place. Arrange your pieces in a visually pleasing manner, balancing colors and textures. Add decorative elements like fairy lights or small potted plants nearby to enhance the aesthetic. Regularly update the display by rotating or adding new pieces.
Personalize your ladder with painted accents, stenciled patterns, or decorative ribbons tied to the rungs. Incorporate your favorite fabric patterns or textures to match your decor. Use themed or seasonal pieces to keep the display fresh. Consider adding small shelves or hooks for extra storage or display options. It’s a flexible, charming way to make your art collection part of the decor.
A tiered art ladder transforms a simple corner into a dynamic showcase of your evolving style. It encourages you to experiment with layering and mixing media. Every new piece added boosts your confidence and sense of achievement. It’s a practical, attractive way to celebrate your artistic journey and keep your space lively and inspiring.
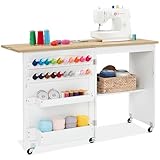
10. Compact Art Corner with Multi-Level Desk and Storage Bockets
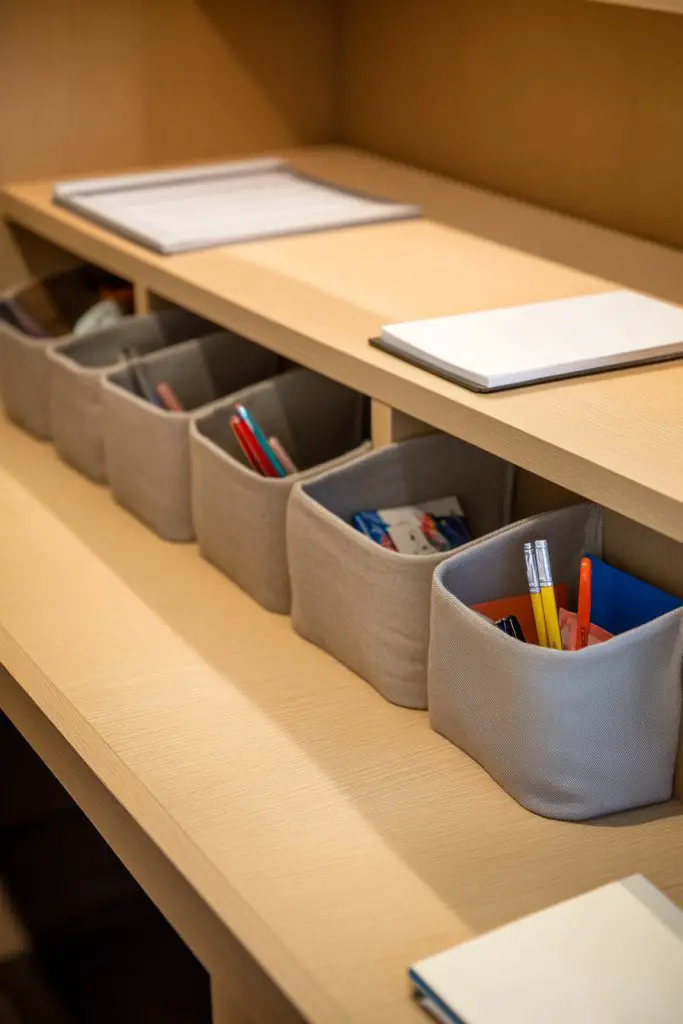
Limited space but still craving a dedicated area for your creative pursuits? A compact art corner with a multi-level desk and storage pockets maximizes every inch while keeping your supplies organized. It’s perfect for small apartments or tight nooks where functionality is key. Plus, it makes clean-up and setup quick and easy, so you can dive into your projects anytime.
Recommended Products to replicate this idea
| # | Preview | Product | |
|---|---|---|---|
| 1 |

|
Yaheetech Height Adjustable Drafting Table Drawing Table Artist Desk Tilting Tabletop Art Craft Desk... | Buy on Amazon |
| # | Preview | Product | |
|---|---|---|---|
| 1 |

|
Newraturner Closet Hanging Organizer with Mesh Pockets & Rotating Metal Hanger,Dual Sided Wall Shelf... | Buy on Amazon |
Envision a small corner featuring a multi-tiered desk—think a lower work surface with a raised shelf or compartments above. Store your paints, brushes, and sketchbooks in colorful pockets or bins attached underneath or on the sides. The space feels organized yet accessible, with everything within arm’s reach. Decorate with a small corkboard or magnetic strip nearby for quick reference or inspiration snippets. It’s a neat, efficient setup that feels inviting and inspiring.
Choose a desk with adjustable or foldable tiers to adapt to your needs. Use multi-colored or patterned storage pockets to add visual interest. Change the configuration seasonally—swap out supplies or add themed accessories. Incorporate small drawers or containers for tools, and add a fold-out or extendable surface for larger projects. For wall-limited spaces, mount the desk directly onto the wall for a floating effect.
Start by measuring your available corner and choosing a multi-level desk that fits comfortably. Install wall-mounted pockets or baskets underneath or on the sides for supplies. Keep your most-used tools in easily accessible containers or trays. Use hooks or magnetic strips for hanging tools or reference sheets. Organize your supplies by type or project to stay tidy and efficient. Regularly review your setup to optimize workflow.
Personalize your corner with colorful fabric or patterned drawer liners. Add small decorative elements like themed magnets or painted accents. Use labels or tags for quick identification of supplies. Incorporate a small task light or clip-on lamp for better illumination. Keep it fresh by changing storage arrangements or adding new accessories as your needs evolve.
This compact setup proves that even small spaces can be functional and inspiring. It encourages you to create regularly without hassle and boosts your confidence by making your supplies easily accessible. Every project completed in this corner adds to your skills and style. It’s a practical, stylish reminder that your creative journey can thrive anywhere, big or small.
11. Artistic Corner with a Chalkboard Wall and Colorful Murals
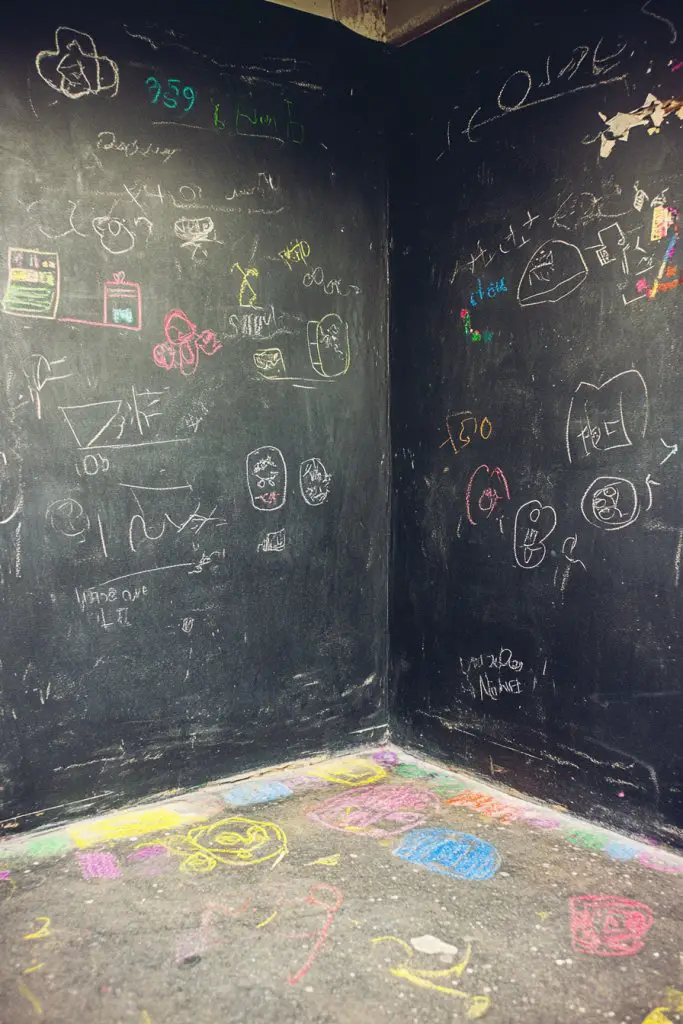
Want a space that’s both inspiring and functional for brainstorming, doodling, or just unleashing your inner artist? A chalkboard wall turns a plain corner into an interactive canvas that invites creativity. It’s perfect for jotting down ideas, sketching, or adding motivational quotes. Plus, it’s a dynamic feature that evolves with your mood and projects.
Recommended Products to replicate this idea
| # | Preview | Product | |
|---|---|---|---|
| 1 |

|
Rust-Oleum 206540 Chalkboard Brush-On Paint, 30 oz, Black | Buy on Amazon |
| # | Preview | Product | |
|---|---|---|---|
| 1 |

|
XUOIAYNB Colorful Abstract Shape Wall Stickers, Lovely Smile Clouds Rainbow Irregular Dots Vinyl... | Buy on Amazon |
Visualize a wall painted with chalkboard paint in a bold color—black, deep green, or navy—and filled with sketches, doodles, and colorful notes. Surround it with vibrant murals or patterns to enhance visual appeal. Use different chalk colors and styles to create contrast, and add decorative elements like string lights or small hanging objects nearby. The space feels lively, personal, and ever-changing, making it a perfect creative hub.
Mix chalkboard sections with painted murals or geometric patterns for a personalized look. Create zones for different activities—one for sketches, one for notes, and another for quotes. Change the theme or color palette seasonally—bright colors for summer, muted tones for winter. Add small shelves or ledges for chalk storage or decorative objects. This setup can extend to small areas or entire walls, depending on your space.
Select a wall that gets ample light and is free of obstructions. Prepare the surface by cleaning thoroughly and applying multiple coats of chalkboard paint if needed. Decorate the surrounding area with colorful borders, decals, or murals. Use a variety of chalks—chalk markers, pastel, metallic—to add richness and texture. Keep chalk and erasers handy in small containers or on nearby shelves. Regularly update your drawings or notes to keep the space fresh.
Personalize your chalkboard wall with themed murals, inspirational quotes, or your own artwork. Incorporate decorative frames, washi tape, or stickers to add visual interest. Use different chalk colors and styles to create contrast and depth. Add small LED lights or fairy lights for extra ambiance. Change the content regularly to reflect your current projects and mood.
A chalkboard wall turns your space into an evolving art and idea hub, inspiring ongoing creativity. It encourages experimentation and frees you from perfectionism—mistakes become part of the charm. Every new sketch or quote builds your confidence and makes your space uniquely yours. It’s a lively, inspiring corner that motivates you to keep creating and dreaming big.
12. Industrial Pipe Shelves with Artistic Accents and Tools
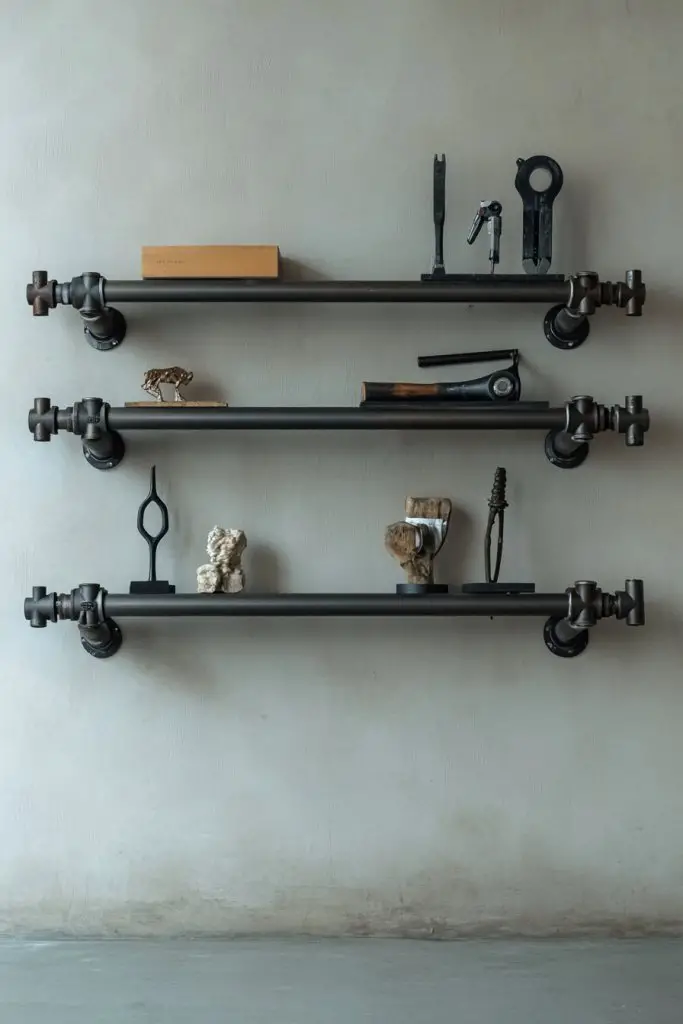
Feeling like your creative space lacks the edge and organization it deserves? Industrial pipe shelves combine functional storage with a trendy, modern aesthetic. They’re perfect for displaying art supplies, small sculptures, or decorative objects while adding a bold statement. Plus, they’re customizable and durable—built to last and impress.
Recommended Products to replicate this idea
| # | Preview | Product | |
|---|---|---|---|
| 1 |
|
Helsin 3 Tier Industrial Pipe Shelf Rustic Wood Floating Shelves,Wall Display Bookshelf,Storage Rack... | Buy on Amazon |
| # | Preview | Product | |
|---|---|---|---|
| 1 |

|
Premium Black Marble Display Base with Center Mount Hole – Polished Stone Pedestal Stand for... | Buy on Amazon |
Visualize sturdy black iron pipes forming a shelf system mounted on your wall, supporting wooden planks or metal trays. Art supplies or sculptural tools sit neatly organized, ready for your next project. The pipes add an urban, raw texture that contrasts beautifully with colorful artwork or textured decor. Small accents like vintage tools or decorative brackets heighten the industrial vibe. This setup feels robust, stylish, and highly functional.
Mix and match pipe lengths and configurations—single shelves, multiple tiers, or corner units—based on your space. Use reclaimed wood or metal for the shelves to reinforce the industrial aesthetic. Change the arrangement seasonally or for different projects—adding hooks or small baskets for extra storage. Decorate with vintage signage or metal accents for personal flair. Keep it flexible to suit evolving needs.
Start by planning your layout and measuring your wall space. Assemble the pipe fittings with appropriate tools, securing them firmly to support weight. Attach shelves using flange fittings, ensuring they’re level. Organize your art supplies, tools, or small sculptures on the shelves or hooks. Use anchors for heavier loads and double-check stability. Regularly clean and reconfigure your setup as your collection grows or changes.
Personalize with painted or stenciled accents on pipes or shelves. Add decorative elements like vintage signs, small sculptures, or LED lighting for ambiance. Use colorful storage containers or jars to brighten the industrial look. Incorporate your favorite tools or small artworks to create a curated display. Change the arrangement periodically to keep the space lively and inspiring.
Industrial pipe shelves turn utilitarian materials into a bold statement of creativity. They encourage a DIY mindset and show that functional storage can be stylish. Every project or upgrade boosts your confidence and sense of achievement. It’s a space that reflects your bold, creative spirit and makes your art corner stand out with confidence.
13. Fold-Down Art Table with Hidden Storage for Space Efficiency
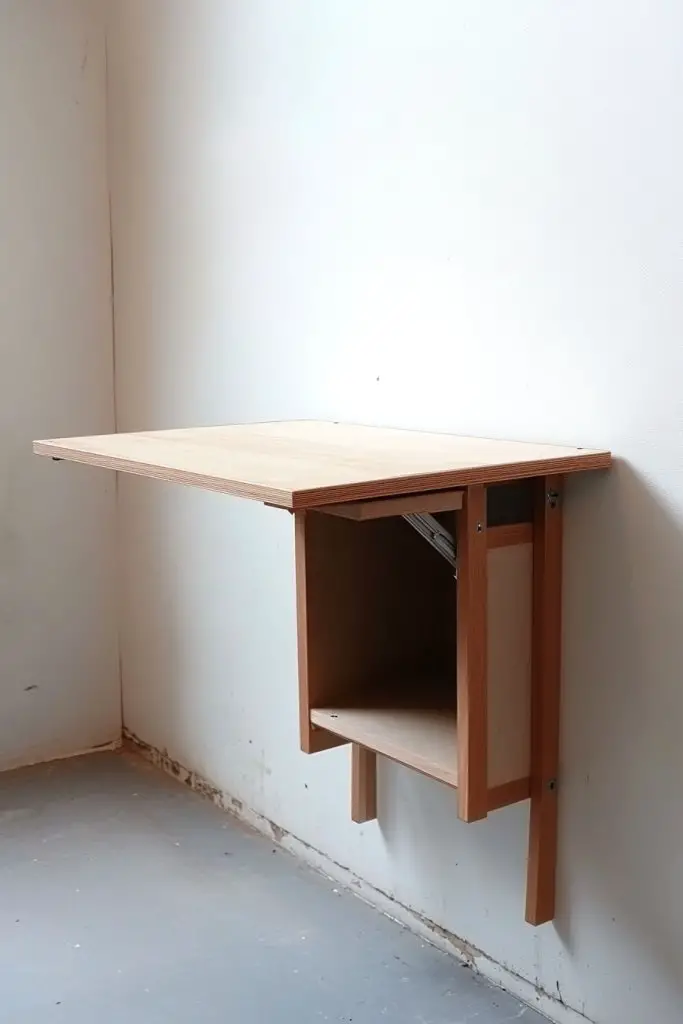
Limited space but craving a workspace that’s versatile and out of sight when not in use? A fold-down art table with hidden storage offers a clever solution that maximizes your room while keeping clutter at bay. It’s perfect for multi-use rooms or small apartments where every inch counts. Plus, it transforms from a sleek surface into a full workstation in seconds.
Recommended Products to replicate this idea
| # | Preview | Product | |
|---|---|---|---|
| 1 |

|
HOMCOM Foldable Convertible Writing Table, Wall Mounted Space-Saving Computer Desk with Chalkboard... | Buy on Amazon |
| # | Preview | Product | |
|---|---|---|---|
| 1 |
|
Best Choice Products Folding Sewing Table Multipurpose Craft Station & Side Desk with Compact... | Buy on Amazon |
Imagine a stylish wall-mounted table that folds down to reveal a smooth work surface, with compartments or drawers hidden within the structure. When folded up, it becomes a decorative panel or art piece, blending seamlessly into your decor. Simple brackets or hinges support the table, which can be tucked away when you need more space. The design is sleek, modern, and highly functional, making your space feel open and tidy.
Choose a minimalist design with clean lines for a contemporary look, or a rustic style with reclaimed wood for warmth. Incorporate multiple compartments or drawers for organizing tools and supplies. Adjust the size based on your typical projects—larger for canvases, smaller for detailed work. Use decorative hardware or paint to match your decor. It’s adaptable to any style and space.
Start by selecting a sturdy wall with enough clearance for folding down. Install the foldable table with appropriate brackets and hinges, ensuring stability. Organize your supplies in the hidden compartments or nearby storage bins. Keep your most-used tools accessible and store less frequent items away. When not in use, fold the table up, making sure it locks securely. Regularly check the hardware for wear.
Personalize the exterior with paint, stencils, or decorative hardware. Use colorful storage bins inside for supplies or add a small pegboard for hanging tools. Incorporate a cushion or pad for comfort if you plan to sit while working. Add a small wall lamp or clip-on light for better illumination. Make it your own with touches that motivate you to create.
A fold-down art table proves that space constraints don’t limit your creativity. It encourages spontaneous projects and organized workflows, making art more accessible. Every time you fold and unfold it, you reinforce your ability to adapt and optimize your environment. It’s a clever, practical solution that boosts your confidence and keeps your artistic spirit alive, no matter the size of your space.
14. Minimalist Desk Nook with Monochrome Art and Clean Lines
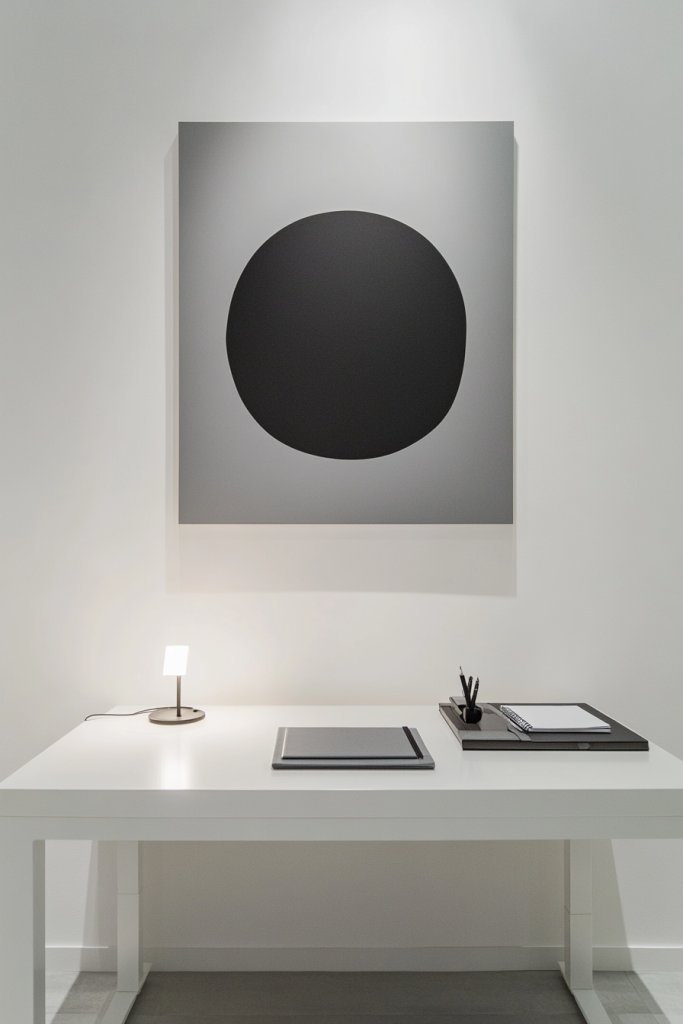
Feeling overwhelmed by cluttered workspaces and chaotic decor? A minimalist desk nook with monochrome art offers a calm, focused environment that boosts creativity and productivity. It’s perfect for those who prefer clean lines, simple color palettes, and a clutter-free mind. Plus, it creates a sophisticated aesthetic that’s easy to maintain.
Recommended Products to replicate this idea
| # | Preview | Product | |
|---|---|---|---|
| 1 |

|
Sweetcrispy Computer Small Desk, 32 Inch Office Writing Work Study Student Home Bedroom Table with... | Buy on Amazon |
| # | Preview | Product | |
|---|---|---|---|
| 1 |

|
Large Framed Black and White Abstract Wall Art for Living Room, 3 Piece Big Modern Canvas Prints... | Buy on Amazon |
Visualize a sleek, streamlined desk with a monochrome art piece hanging above—perhaps a bold black-and-white print or a subtle abstract design. The space is free of unnecessary objects, with only essential supplies stored neatly in drawers or on wall-mounted organizers. The color palette is consistent, with neutral tones and minimal decorative accents. This aesthetic feels peaceful, organized, and inspiring—like a modern art gallery in your own home.
Opt for different monochrome themes—black and white, shades of gray, or muted tones—based on your style. Use simple, geometric furniture with clean edges and minimal ornamentation. Change the art seasonally or for different projects—switch prints or add subtle textured wall coverings. Incorporate hidden storage or sleek containers to keep surfaces clear. This look works well in small or large spaces.
Choose a quiet corner with good lighting—preferably natural. Select a minimalist desk with clean lines and sufficient surface area. Hang a monochrome artwork or print above using simple hardware—avoid ornate frames. Organize supplies in sleek drawers or wall-mounted holders to keep clutter hidden. Use a monochromatic color scheme for all accessories to maintain harmony. Keep the space tidy and refreshed for ongoing inspiration.
Add subtle textures with fabric or paper in your chosen monochrome palette. Incorporate small decorative objects like geometric sculptures or textured ceramics for visual interest. Use a monochrome corkboard or magnetic board for notes and ideas. Change out artwork or accessories seasonally to keep the space inspiring. Keep it simple, functional, and true to your aesthetic.
A minimalist desk nook cultivates clarity and focus, making space for your best ideas. It reminds you that simplicity can be powerful and beautiful. Every project completed in this serene environment builds your confidence and discipline. It’s a stylish, calming retreat that elevates your creative routine and keeps your mind clear.
15. Art Corner with a Compact Tablet or Digital Drawing Station
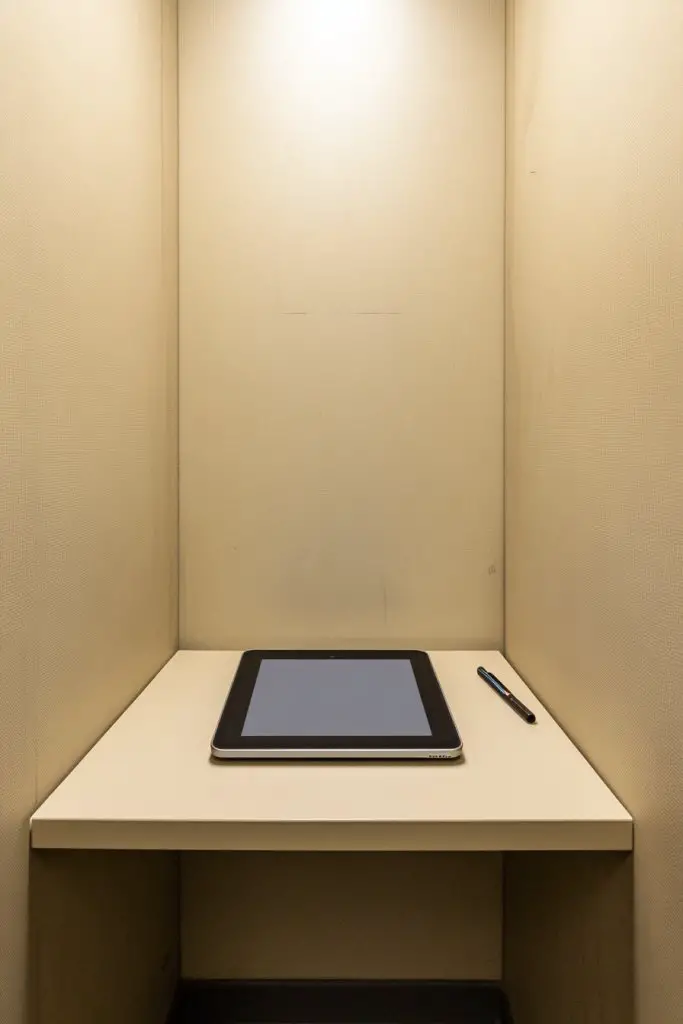
Want a modern, space-efficient way to create digital art without cluttering your room? A dedicated tablet or digital drawing station offers sleek, high-tech solutions that fit into small corners. It’s perfect for experimenting with digital mediums, practicing, or professional work. Plus, it keeps your creative tools organized and ready for spontaneous inspiration.
Recommended Products to replicate this idea
| # | Preview | Product | |
|---|---|---|---|
| 1 |

|
XPPen Magic Drawing Pad 12.2 Inch Standalone Drawing Tablet No Computer Needed with 16384 Pressure... | Buy on Amazon |
| # | Preview | Product | |
|---|---|---|---|
| 1 |

|
COOPER TabHolder, 7-10" Height Adjustable Tablet Stand, Premium iPad Stand for Desk, 270° Tilt... | Buy on Amazon |
Imagine a small desk with a high-resolution drawing tablet set up on a stand, accompanied by a stylus holder and organized tech accessories. Nearby, a clean workspace with a minimalist mouse and keyboard creates a streamlined environment. The area feels modern and tidy, with a focus on digital tools instead of traditional supplies. Soft lighting and a neutral backdrop keep the attention on your digital canvas, inspiring focus and productivity.
Choose a sleek, adjustable stand for your tablet to suit your preferred working angle. Incorporate a compact storage unit or cable organizer to prevent clutter. Change the environment with different backgrounds—wallpapers, decals, or lighting—to match your mood. Use additional peripherals like a drawing glove or ergonomic stand for comfort. The setup adapts well to different projects, from casual doodles to professional illustrations.
Select a corner with good lighting and minimal distractions. Mount or place your tablet on a stable surface, ensuring easy access to buttons and controls. Organize your tech accessories—chargers, stylus, and filters—in small containers or drawers. Keep the workspace clean and free of unnecessary clutter. Regularly update software and backup your work. Make sure your chair and desk height promote comfort during long sessions.
Personalize your station with themed wallpapers, custom backgrounds, or artwork on your tablet’s screen. Add small decorative elements like a soft mouse pad or textured desk mat. Use ambient lighting or LED strips to create a cozy or inspiring atmosphere. Incorporate a small plant or decorative object nearby for balance (if allowed). Rotate your digital projects or themes to keep the environment fresh.
A dedicated digital art setup boosts your confidence by providing a professional, organized workspace. It encourages regular practice and exploration of new techniques. Every digital piece you complete reinforces your skills and style. It’s a sleek, innovative space that makes art accessible anytime inspiration strikes, making your creative journey feel seamless and high-tech.
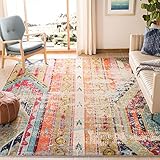
16. Artistic Corner with a Colorful Rug, Cushions, and Creative Lighting
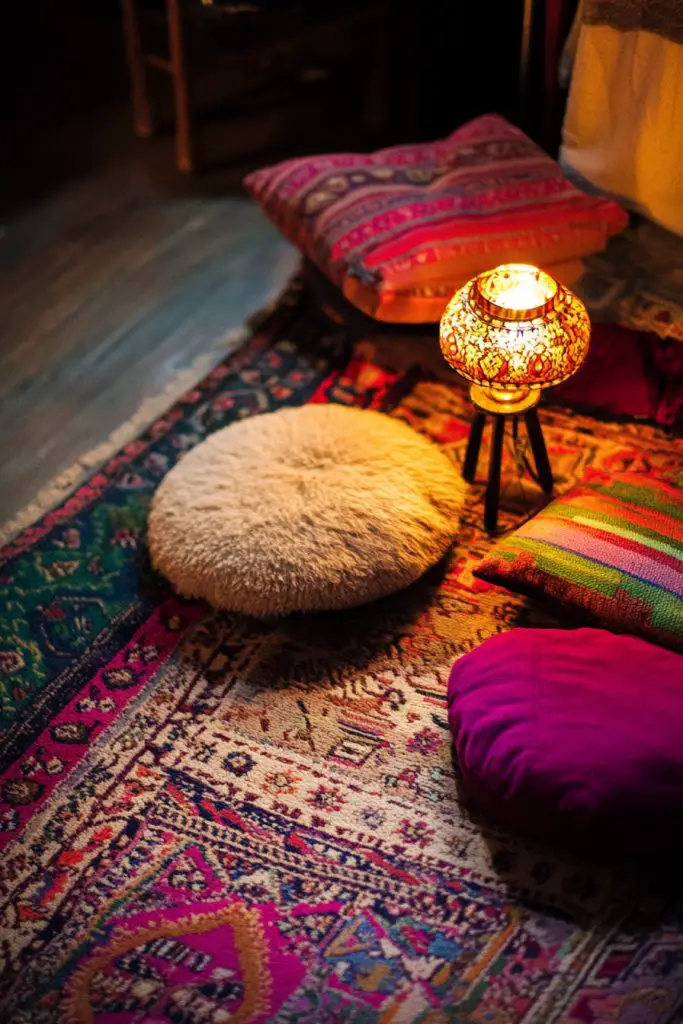
Looking to turn a simple corner into a cozy, inviting hideaway for spontaneous art sessions? A colorful rug, plush cushions, and creative lighting can transform a dull space into your personal creative sanctuary. It’s perfect for relaxing, brainstorming, or working on your latest project in comfort. Plus, it makes your space instantly more inspiring and Instagram-worthy.
Recommended Products to replicate this idea
| # | Preview | Product | |
|---|---|---|---|
| 1 |
|
SAFAVIEH Monaco Collection Area Rug - 8' x 10', Multi, Boho Chic Tribal Distressed Design,... | Buy on Amazon |
| # | Preview | Product | |
|---|---|---|---|
| 1 |

|
Rechargeable Floor Lamp for Indoor/Outdoor, Cordless Tall Standing Lamp with 3 Color Temps &... | Buy on Amazon |
Visualize a corner adorned with a vibrant, patterned rug that anchors the space. Plenty of cushions and floor pillows in different textures and colors invite you to sit or lounge comfortably. Soft, adjustable lighting—like fairy lights, lanterns, or LED lamps—creates a warm, inviting glow. Small side tables or floor lamps add functionality and ambiance. The overall feel is playful, relaxed, and full of personality, encouraging creative flow.
Choose rugs in bold patterns or bright colors to match your decor. Mix cushions with different fabrics—knits, velvets, or cotton—to add tactile richness. Change lighting based on mood—warm white for cozy evenings, cool for daytime focus. Add small decorative objects or art supplies in styled baskets or trays. Adapt the setup seasonally or for different projects—think cozy winter vibes or fresh summer themes.
Position your rug in a corner with good light. Arrange cushions and pillows for maximum comfort, layering for visual appeal. Use adjustable or string lights to add a creative glow—try twinkle lights or paper lanterns. Incorporate small tables or storage ottomans for your supplies. Keep the space tidy and inviting, adding personal touches like fabric accents or DIY decorations. Use it regularly for spontaneous or planned creative sessions.
Personalize with a theme—boho, tropical, or minimalist—through colors, textiles, and accessories. Add some DIY touches like painted cushions or handmade banners. Incorporate your favorite artworks or quotes on small hanging signs or fabric panels. Change out cushions or lighting seasonally to keep the vibe fresh. Make it a space that feels like a retreat from everyday stress, fueling your creativity.
This cozy corner transforms your space into a mood-boosting haven where inspiration flows freely. It encourages you to spend more time creating and relaxing simultaneously. Each element—colorful textiles, soft lighting—supports your artistic confidence. It’s a reminder that your environment can inspire joy and productivity, making your creative routine more joyful and frequent.
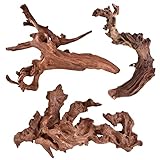
17. Nature-Inspired Art Corner with Driftwood, Stones, and Natural Elements
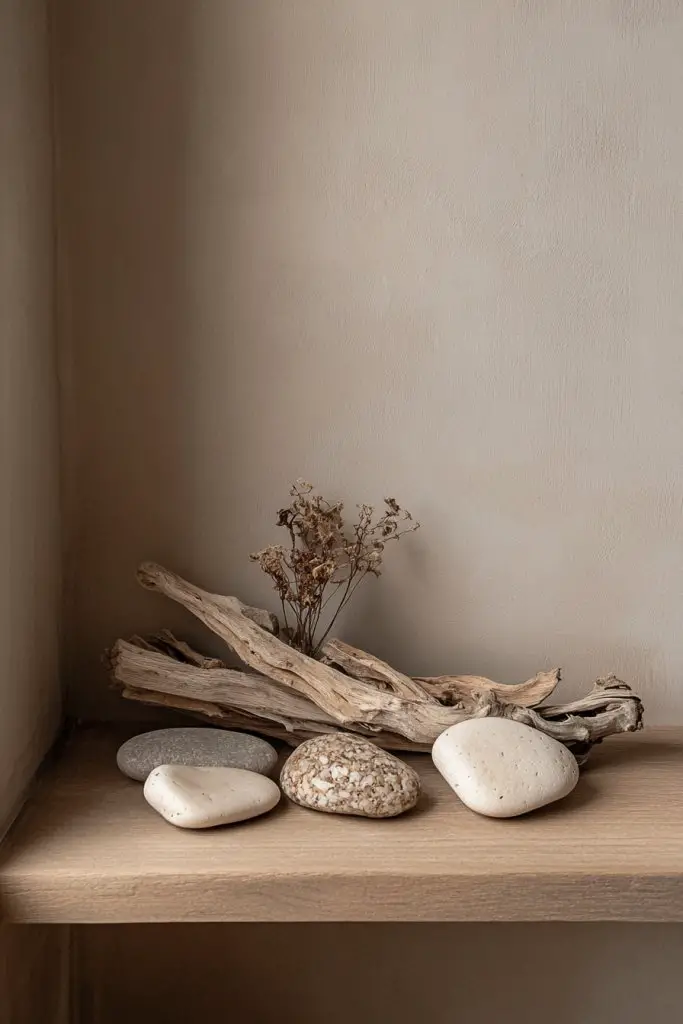
Craving a calming, organic environment that sparks creativity naturally? A nature-inspired art corner with driftwood, stones, and dried botanicals brings the outdoors inside, creating a soothing space for artistic expression. It’s perfect for those who find inspiration in textures and natural materials. Plus, it adds a tranquil vibe that helps you relax and focus.
Recommended Products to replicate this idea
| # | Preview | Product | |
|---|---|---|---|
| 1 |
|
majoywoo Natural Coral Driftwood for Aquarium Decor Fish Tank Decorations, Assorted Driftwood Branch... | Buy on Amazon |
| # | Preview | Product | |
|---|---|---|---|
| 1 |

|
30Pcs Dried Eucalyptus Stems, 17" Real Preserved Eucalyptus Plant for Shower, Fresh Natural Branches... | Buy on Amazon |
Picture a corner decorated with a collection of driftwood pieces, smooth stones, and dried botanicals arranged in bowls or on shelves. Incorporate textured fabrics or woven baskets to add warmth. Use natural light or warm LED bulbs to highlight earthy tones. Display your artwork alongside these elements—think nature sketches, leaf prints, or textured clay pieces—blending art and organic materials seamlessly. The space feels grounded, peaceful, and alive.
Mix different textures and materials—bark, feathers, shells—for a layered, tactile look. Change the arrangement seasonally—incorporate fresh flowers or seasonal botanicals. Integrate eco-friendly elements like recycled wood or biodegradable decor. Use natural color palettes—beiges, greens, browns—to create harmony. Add small plants if permitted, or decorative branches for vertical interest.
Set up a dedicated spot with enough space for your collection of natural elements. Use bowls, trays, or shelves made from reclaimed wood or woven materials. Incorporate your favorite art supplies nearby—clay, natural dyes, or textured paints—keeping everything accessible. Arrange your botanicals and stones in a way that feels balanced and calming. Regularly refresh the display with new finds or seasonal items. Keep the environment clean and organized for ongoing inspiration.
Personalize with hand-painted signs, engraved stones, or custom labels. Use natural fiber textiles or linen for a soft, organic feel. Incorporate DIY elements like painted driftwood or handcrafted mobiles. Add small sculptures or wall hangings made from natural materials. Rotate your botanical collection and display new finds to keep the space vibrant and inspiring.
A nature-inspired corner nurtures your creative soul and calms your mind. It encourages exploration and experimentation with textures and natural themes. Building this space deepens your connection to the outdoors and your artistic expression. Every new element or project reinforces your ability to craft beauty from simple, organic materials—making your artistic journey both relaxing and fulfilling.
Conclusion
Exploring these diverse art corner ideas reveals how a simple space can become a vibrant haven for creativity and self-expression. From functional setups to whimsical displays, there’s an idea to suit every style and space. Don’t hesitate to try out these ideas in your own home—your personalized art sanctuary awaits. Embrace your creativity and transform your space into a beautiful expression of your unique artistic journey!
Last update on 2026-02-12 / Affiliate links / Images from Amazon Product Advertising API