Imagine stepping into a kitchen where rustic charm meets functional elegance—this is exactly what a backsplash paired with a butcher block countertop can offer. The warm, natural tones of butcher block combined with creative backsplash designs create a cozy, inviting atmosphere that many homeowners find irresistible.
In this article, you’ll explore a variety of inspiring backsplash ideas that beautifully complement butcher block countertops, from classic subway tiles to intricate mosaic patterns. Whether you’re aiming for a rugged farmhouse look or a subtle country vibe, these ideas will help you craft a space that feels both timeless and uniquely yours.
1. Reclaimed Wood Plank Backsplash for Authentic Rustic Appeal
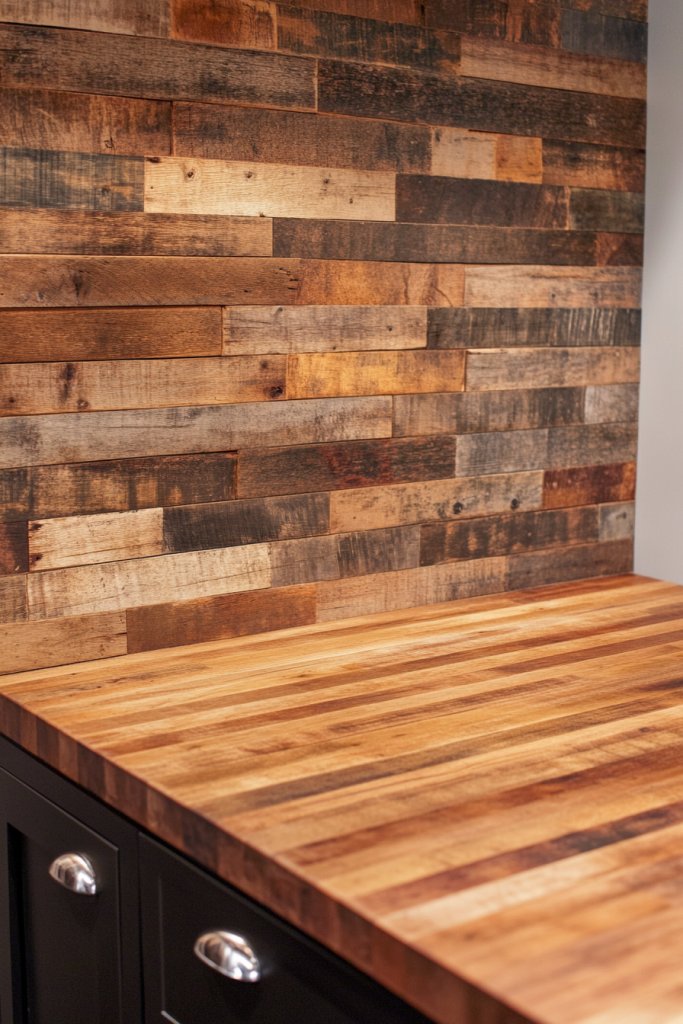
Ever wish your kitchen had that warm, authentic feel that makes everyone say, ‘Wow, this place is cozy!’? Sometimes, standard tiles just don’t cut it when you’re craving real character. A reclaimed wood plank backsplash instantly adds that rustic charm that turns a plain space into a storybook setting. It’s perfect if you want your kitchen to feel lived-in and full of personality.
Recommended Products to replicate this idea
| # | Preview | Product | |
|---|---|---|---|
| 1 |

|
Holydecot Peel & Stick Real Wood Planks, Rustic Reclaimed Barn Wood Paneling, Brown Gray... | Buy on Amazon |
| # | Preview | Product | |
|---|---|---|---|
| 1 |

|
StyloVue 100 Pieces Peel and Stick Backsplash for Kitchen, 3" x 6" PVC Subway Tile Upgraded... | Buy on Amazon |
Picture weathered wood planks with rich grain patterns, stained in soft natural tones that glow in warm light. The textures are rough yet inviting, with knots and imperfections adding charm. The planks run horizontally, creating a sense of width, while the aged finish offers a tactile experience. It looks like a piece of history layered into your walls, with a subtle matte sheen that invites touch.
You can choose lighter or darker reclaimed woods depending on your style—think pale oak for Scandinavian vibes or deep walnut for a more robust look. For a beach cottage feel, opt for driftwood hues, while darker, richer tones suit a farmhouse style. Seasonal accents like a cozy plaid towel or a vintage ceramic container can change the vibe without altering the wood itself. This look adapts beautifully to both small and large kitchens.
Start by sourcing reclaimed wood from local suppliers or salvage yards—bonus points for eco-friendly choices! Prepare your wall surface by ensuring it’s clean, flat, and primed. Use a high-quality wood adhesive and finish with galvanized nails or screws for extra durability. Seal the wood with a matte polyurethane to protect it from moisture and stains. Pattern the planks with a staggered or straight layout, depending on your preference. Regular maintenance involves gentle cleaning to preserve the rustic look.
Add personal touches like vintage metal brackets or hooks for hanging utensils or small decor. You can also integrate LED strip lighting behind the planks for a subtle glow that highlights their texture. Stain or paint some planks with a different hue for a custom, layered effect. Consider distressing the wood further with a wire brush for extra weathered charm. These tweaks make the space uniquely yours.
Reclaimed wood is more than just a trend—it’s a statement of character and sustainability. Once installed, you’ll feel a sense of pride knowing you curated a space that’s both stylish and eco-conscious. Plus, every scratch and mark tells a story, making your kitchen one-of-a-kind. Ready to embrace the rustic charm and create a kitchen that feels like home from day one?
2. Whitewashed Shiplap Backsplash for Bright, Airy Vibes
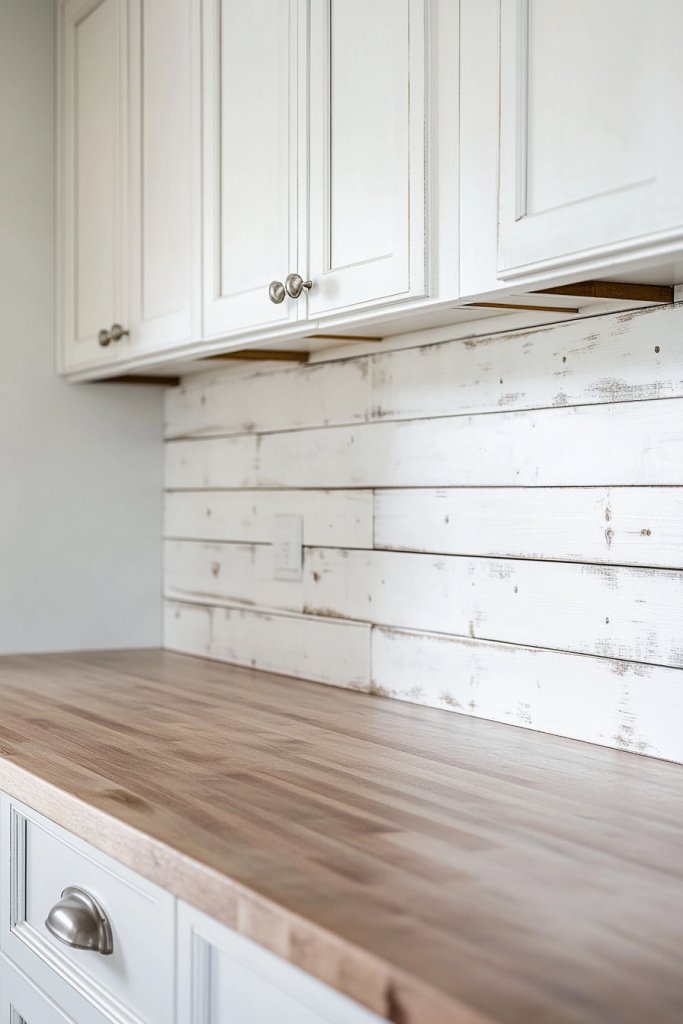
Looking to brighten up your kitchen while adding a touch of rustic charm? Whitewashed shiplap is your new best friend. It creates a clean, airy atmosphere that makes small spaces feel larger and more inviting. Plus, it pairs effortlessly with warm butcher block countertops, balancing rustic and fresh aesthetics.
Recommended Products to replicate this idea
| # | Preview | Product | |
|---|---|---|---|
| 1 |

|
Art3d Premade Board and Batten Paintable Wainscoting Kit, MDF Accent Wall Panel for Kitchen Bedroom... | Buy on Amazon |
| # | Preview | Product | |
|---|---|---|---|
| 1 |

|
Rust-Oleum 249087 Painter's Touch 2X Ultra Cover Spray Paint, 12 oz, Matte Clear | Buy on Amazon |
Imagine crisp white planks with subtle wood grain peeking through a soft, semi-transparent wash. The shiplap’s horizontal lines draw the eye across the space, adding visual interest without overwhelming. The finish is matte, with a slight distressed look that hints at vintage farmhouse charm. Soft natural light reflects off the white surface, amplifying the brightness and making the space feel open.
You can customize the level of whitewashing—from barely-there hints of color to nearly opaque coats—depending on whether you want a breezy coastal feel or a more vintage look. For a more modern twist, pair it with sleek black hardware or minimalistic fixtures. During different seasons, adding colorful accents like a bold dish towel or a vibrant utensil holder shifts the vibe. It adapts well from small apartment kitchens to large country-style farms.
Begin by choosing tongue-and-groove shiplap panels designed for wall installation. Lightly sand the wood to ensure a smooth surface, then apply a whitewash stain or diluted white paint. Use a brush or sponge to create an uneven, weathered effect, letting some wood grain show through. Attach the panels with nails or adhesive, making sure to stagger the joints for a seamless look. Finish with a clear matte sealer for durability and easy cleaning. Regular dusting keeps it looking fresh.
Incorporate decorative elements like vintage-inspired hooks or open shelving painted in coordinating colors for added character. For seasonal flair, hang a soft fabric curtain or add a fabric placemat that complements the whitewashed backdrop. Use textured textiles like a linen runner or a chunky knit potholder to introduce tactile contrast. These small touches make the space feel cozy and personalized.
Whitewashed shiplap offers a timeless appeal that works with almost any decor style. It’s an easy DIY project that transforms your kitchen into a bright, welcoming hub. Once installed, you’ll love how it reflects light and adds a sense of calm. Feel confident knowing this look is both stylish and versatile—perfect for future updates or complete makeovers.
3. Stacked Stone Accent Backsplash for Textural Contrast
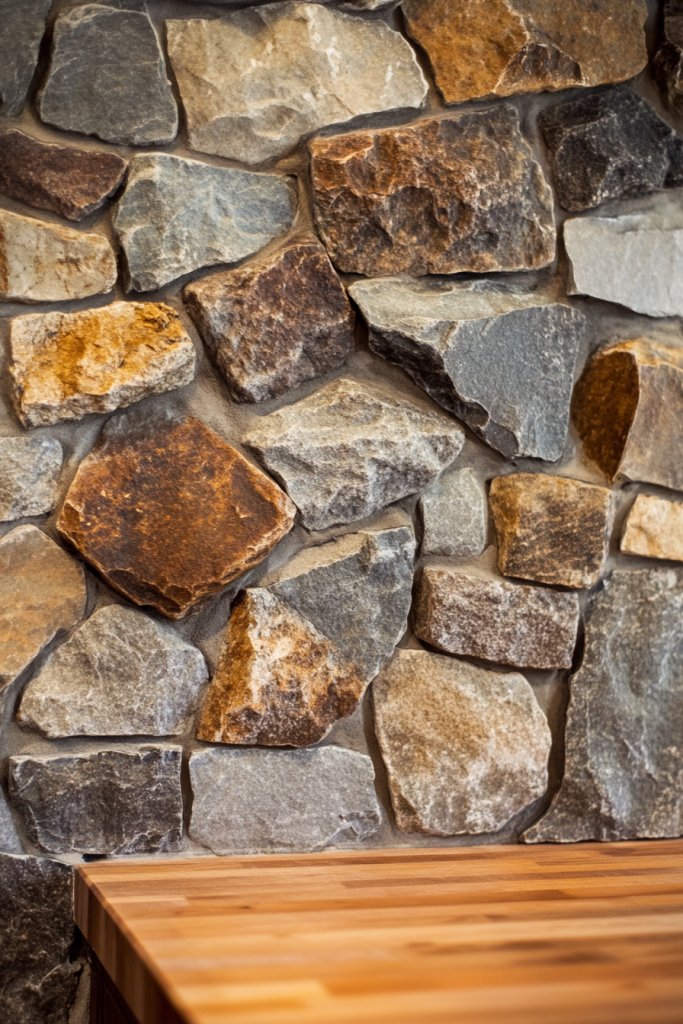
Craving a bold statement that screams rustic elegance? Stacked stone provides that undeniable texture and natural beauty your kitchen might be missing. It adds depth and character, creating a stunning focal point that complements the warmth of butcher block countertops. If you want your kitchen to feel like a cozy mountain retreat, this is your go-to.
Recommended Products to replicate this idea
| # | Preview | Product | |
|---|---|---|---|
| 1 |

|
20PCS 3D Wall Panels Peel and Stick 3D Brick Wallpaper Peel and Stick Faux Stone Wall Panel Foam... | Buy on Amazon |
| # | Preview | Product | |
|---|---|---|---|
| 1 |
|
Goldblatt 4 Pieces Tile Grout Masonry Mortar Bag Set, Includes 3 Pieces Tear Puncture Resistant... | Buy on Amazon |
Envision rough-hewn stone in shades of gray, beige, and brown, stacked meticulously to form a rugged yet refined surface. Each stone’s unique shape and texture catch the light differently, creating a dynamic visual effect. The stones extend from countertop to ceiling, emphasizing height and grandeur. Their natural variations evoke a sense of earthy authenticity, transforming the space into a rustic sanctuary.
Choose between natural stone, manufactured veneer, or stacked slate depending on your budget and style preference. For a more polished look, opt for smoother stones with subtle color variations; for a rugged vibe, go for irregular, rough-textured stones. Mixing with other natural materials like wood beams or wrought iron fixtures enhances the rustic look. Seasonal accents like a cozy woven rug or decorative wooden bowls can complement the stone.
Start by selecting a stone type that suits your style—either natural or faux. Prepare your wall with a sturdy backing, ensuring it’s flat and clean. Use a high-quality mortar or adhesive designed for stone installation, applying it with a notched trowel. Carefully press each stone into place, maintaining consistent spacing. Fill joints with grout or mortar, then clean excess from the surface. Seal the stones to prevent staining and ensure longevity. Regular maintenance involves gentle cleaning with water and a soft brush.
Add small decorative elements like vintage lanterns or wrought iron hooks for functionality and charm. Incorporate LED strip lighting beneath upper cabinets or along the top edge to highlight the texture. Personal touches like a handcrafted ceramic pitcher or a woven basket can soften the ruggedness. These details make the space both functional and deeply inviting.
Stacked stone elevates your kitchen from ordinary to extraordinary with minimal effort. It’s a durable choice that ages beautifully, gaining character over time. Once finished, you’ll feel empowered by your ability to create a naturally stunning space. This look embodies rustic sophistication and makes every meal feel special.
4. Vintage Tin Tiles for a Rustic Industrial Touch
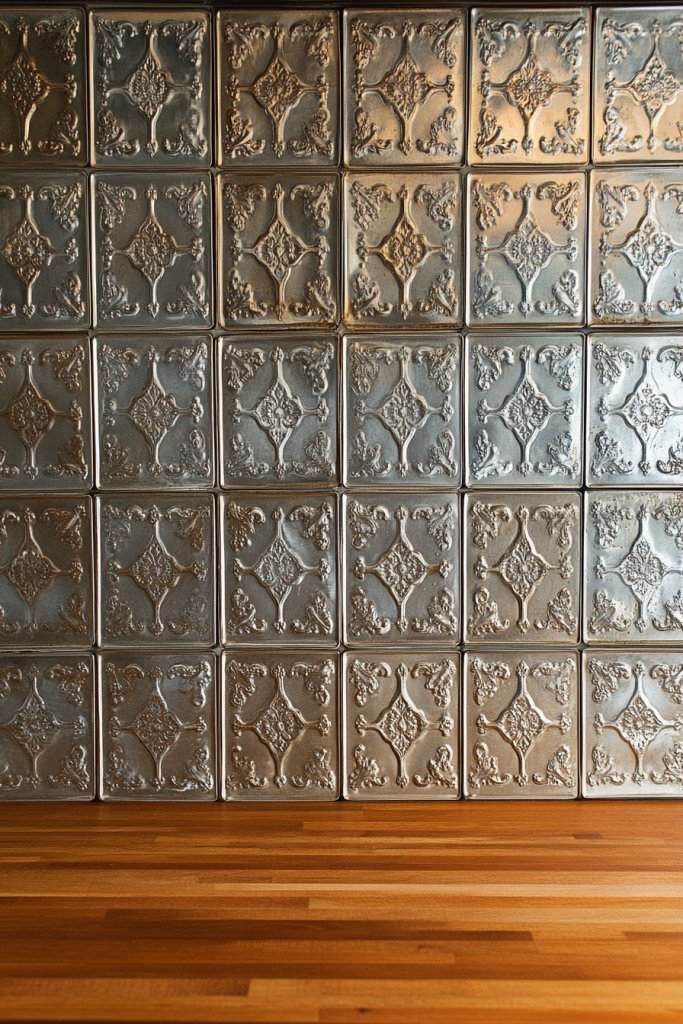
Want to inject some vintage industrial flair into your rustic kitchen? Vintage tin tiles offer a unique blend of old-world charm and rugged texture. They add visual interest and a pop of metallic shine that breaks up the wood tones. If you’re tired of plain backsplashes, these tiles could be your new obsession.
Recommended Products to replicate this idea
| # | Preview | Product | |
|---|---|---|---|
| 1 |

|
RoomMates TIL4624FLT StickTiles Silver Tin Peel and Stick Tile | Buy on Amazon |
| # | Preview | Product | |
|---|---|---|---|
| 1 |

|
S-MANTIS Vintage Wall Sculpture, Antique Pediment, Hallway Wall Art, Hand Painted Wall Decoration... | Buy on Amazon |
Imagine embossed metal tiles with intricate patterns, aged to perfection with a patina that hints at decades of history. Their reflective surface catches the light, creating a subtle shimmer that energizes the space. The tiles are arranged in a grid pattern, with some showing slight imperfections or rust spots, emphasizing their vintage appeal. This combination of rustic and industrial elements results in a truly striking backdrop.
Choose from a variety of patterns—floral, geometric, or plain metal—for different aesthetic effects. For a more cohesive look, coordinate with hardware or fixtures in brushed nickel or matte black. To keep it fresh, pair the tin tiles with warm wood accents and vintage-style fixtures. Seasonal variations could include adding a soft fabric curtain or a rustic wooden shelf for functionality.
Start by selecting authentic vintage tin tiles or high-quality replicas. Prepare a clean, flat wall surface, and mark your layout before installation. Use a strong adhesive suitable for metal, applying it with a notched trowel. Carefully place each tile, ensuring alignment and spacing. Secure with nails or screws if needed, then clean excess adhesive. Seal the tiles with a protective coating to prevent tarnishing. Regular dusting and gentle cleaning keep their vintage glow.
Incorporate small industrial-style accessories like vintage light fixtures or metal hooks. Use dimmable lighting to accentuate the metallic shimmer in the evening. Personalize further with handcrafted metal art or vintage signs mounted nearby. You can also add a distressed wood border to frame the tiles for a finished look. These touches make the space uniquely yours.
Vintage tin tiles offer a nostalgic yet modern appeal that elevates your kitchen’s style instantly. They’re durable, easy to clean, and age gracefully. Once installed, you’ll love how they add character and a touch of history. This look proves that rustic and industrial can coexist beautifully in your home.
5. Hand-Painted Ceramic Tiles with Rustic Patterns
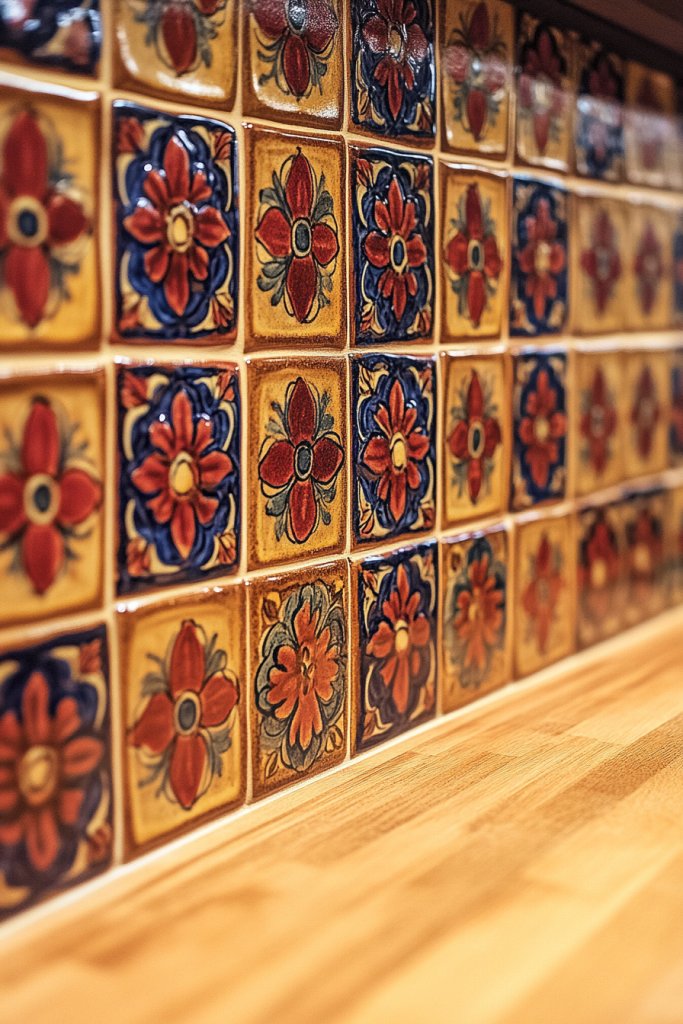
Looking for a way to add personality and artisanal charm to your kitchen? Hand-painted ceramic tiles with rustic patterns can do just that. They turn a simple backsplash into a piece of art, showcasing craftsmanship and detail. If you want a kitchen that feels personalized and warm, these tiles are a perfect choice.
Recommended Products to replicate this idea
| # | Preview | Product | |
|---|---|---|---|
| 1 |

|
Set of 9 Decorative Ceramic Tiles – Hand Painted Indoor & Outdoor – Spanish Artisan Top Kitchen... | Buy on Amazon |
| # | Preview | Product | |
|---|---|---|---|
| 1 |

|
Custom Building Products 4000 Acrylic Ceramic Tile Mastic, 1-Gallon | Buy on Amazon |
Visualize tiles decorated with hand-painted motifs—think floral, geometric, or nature-inspired designs—done in earthy tones like terracotta, deep reds, or muted greens. Each tile has slight variations, making every piece unique just like handcrafted pottery. The glossy glaze adds a subtle shine, emphasizing the intricate patterns. When arranged in a grid or a border, they create a lively, inviting pattern that immediately draws the eye.
Mix and match different patterns and colors for a bohemian or eclectic look. For a more subdued style, choose tiles with minimalist rustic motifs in neutral shades. These tiles work well with natural wood, open shelving, or vintage hardware to enhance the artisanal vibe. You can also introduce seasonal accents by swapping out certain tiles or adding decorative trims.
Start by selecting quality ceramic tiles that feature rustic, hand-painted designs. Prepare your surface by cleaning and smoothing the wall area. Use a high-quality tile adhesive and apply it evenly to the back of each tile. Place the tiles carefully, maintaining consistent grout lines, and press firmly. Once set, fill the joints with a matching grout, wiping away excess. Seal the tiles with a clear, non-yellowing sealer for protection. Regular gentle cleaning preserves the artwork.
Create a gallery wall effect by framing some tiles or grouping them in a central pattern. Incorporate a custom border or trim made from natural materials like wood or cork. Add small handcrafted ceramic accessories nearby, such as a pitcher or a bowl, to complement the tiles. Personal touches like initials or meaningful symbols can also be painted onto some tiles for a true one-of-a-kind feel.
Hand-painted ceramic tiles blend artistry with durability, making them ideal for a rustic kitchen upgrade. They showcase your personality and appreciation for craftsmanship. Once installed, they’ll become a conversation starter and a cherished feature. This approach proves that small details can transform your entire space into something special and meaningful.
6. Corrugated Metal Sheets for a Modern Rustic Fusion
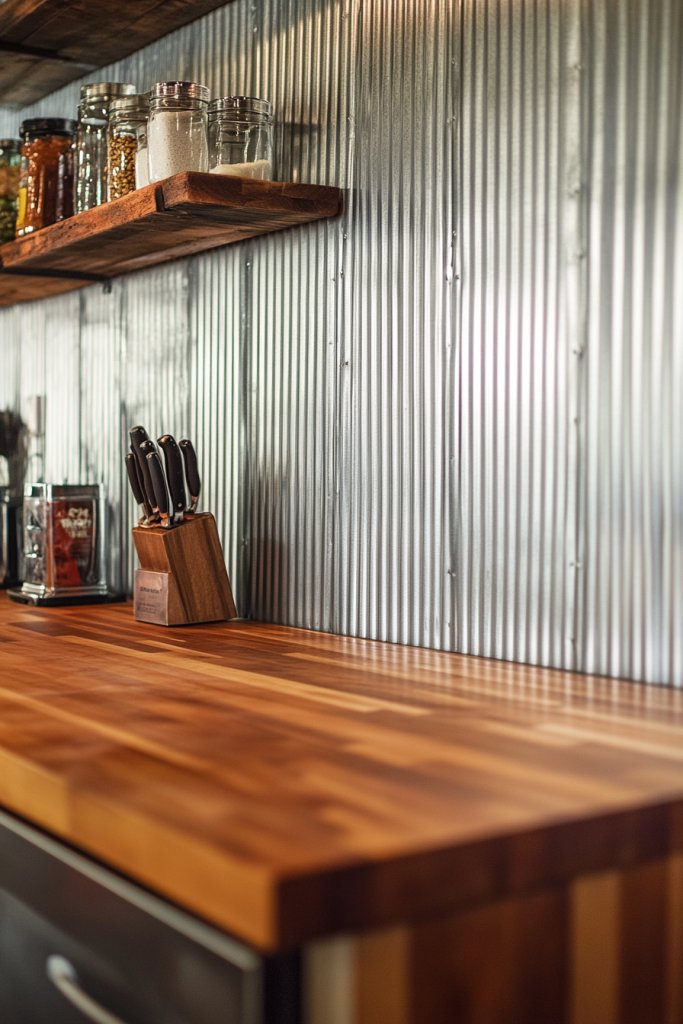
Craving a bold, contemporary twist on rustic charm? Corrugated metal sheets bring an edgy, industrial vibe that still feels warm and inviting. They create a striking contrast with the natural tones of butcher block countertops. If you want to make a statement while maintaining rustic roots, this is your go-to solution.
Recommended Products to replicate this idea
| # | Preview | Product | |
|---|---|---|---|
| 1 |

|
Brakki Metal Roofing Panels 10pcs 52.4 ft², Black Corrugated Galvanized Steel Roof Panels with... | Buy on Amazon |
| # | Preview | Product | |
|---|---|---|---|
| 1 |

|
Funyfa 20FT Metal Wall Trim,Peel and Stick Molding Trim Frame,Stainless Steel Trim,self Adhesive... | Buy on Amazon |
Imagine textured metal with deep ridges and a matte finish, weathered for a vintage appeal. The sheets are installed horizontally, emphasizing their linear pattern, with a slight sheen that catches ambient light. The variation in tones—ranging from silver to bronze—adds depth and character. Paired with warm wood accents, these sheets transform the space into a modern rustic haven with an industrial edge.
Opt for painted or raw metal sheets depending on your desired look—painted for a sleek, uniform appearance or raw for a more rugged feel. Pair with black or oil-rubbed bronze fixtures for coherence. For seasonal updates, consider adding textiles like a soft linen curtain or a woven placemat to soften the industrial edge. This look works well in open-plan kitchens or spaces with high ceilings.
Begin by measuring your wall area and selecting corrugated metal sheets designed for interior use. Prepare the wall by ensuring it’s flat and clean. Attach the sheets using screws with rubber washers to prevent moisture ingress. For a seamless look, butt the sheets tightly and conceal screws with matching paint or a decorative trim. Seal the surface with a clear protective coating to prevent rust or tarnish. Regular dusting and mild cleaning keep the metal looking fresh.
Add decorative elements like vintage signs, industrial-style hooks, or LED strip lighting underneath to highlight the texture. Incorporate textiles like a neutral-toned runner or cushions to balance the metal’s coolness. Personalize further with handcrafted metal art or custom painted panels nearby. These details help integrate the metal sheets into your overall design seamlessly.
Corrugated metal sheets provide a fresh, modern edge that elevates your rustic kitchen. They’re durable, easy to maintain, and age beautifully with a patina that adds character. Once installed, you’ll feel confident creating a space that’s both stylish and unique. This fusion of modern and rustic elements keeps your kitchen timeless and on-trend.
7. Brick Veneer for Classic Rustic Warmth
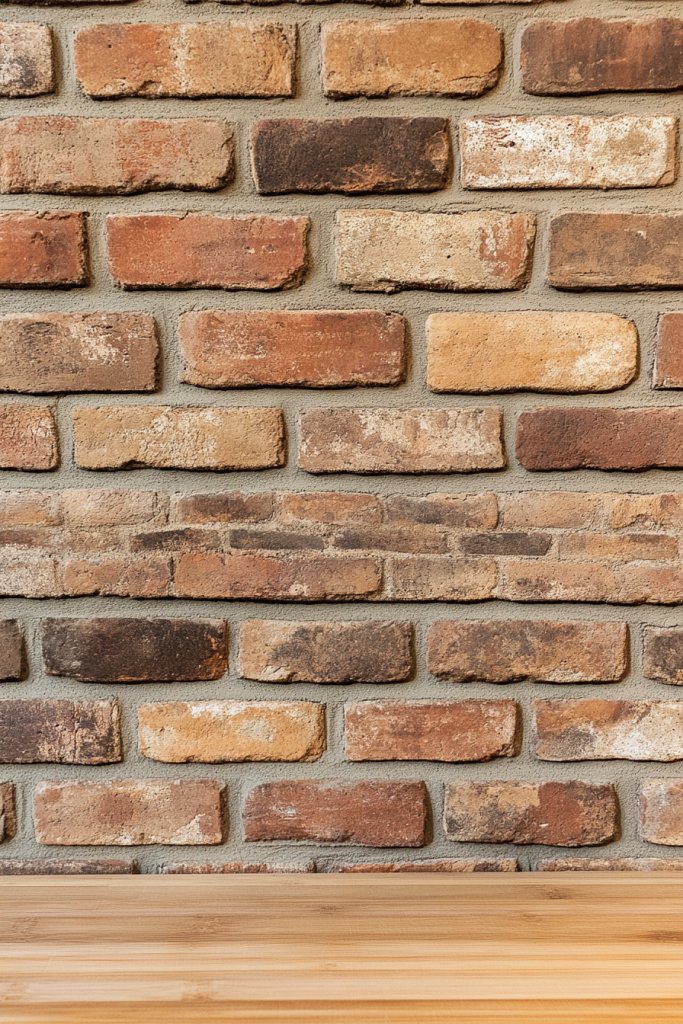
Ever wish your kitchen felt like a cozy farmhouse or rustic cottage? Brick veneer offers that classic warmth without the hefty weight of traditional brick. It instantly adds texture and depth, creating a welcoming atmosphere that pairs beautifully with butcher block countertops. Perfect for those who want a timeless, durable look.
Recommended Products to replicate this idea
| # | Preview | Product | |
|---|---|---|---|
| 1 |

|
TORURAL 100 Vintage Brown/Red Faux Brick Wall Tiles, 3D Thin Brick Veneers for Bedroom, Bathroom,... | Buy on Amazon |
| # | Preview | Product | |
|---|---|---|---|
| 1 |

|
1/4" Leveling Spacers Leave 6mm Jointing space for Paving spacer Mortar Grouting space Leveling tool... | Buy on Amazon |
Visualize a wall covered in tiny, perfectly uniform brick veneer in warm terracotta hues. The surface has a slightly rough texture, with mortar lines that add authenticity. The bricks are arranged in a running bond pattern, giving a traditional appearance. The warm tones reflect natural light softly, making the entire space feel snug and inviting. It’s like bringing a piece of the countryside into your home.
Choose between real brick veneer and high-quality faux options depending on your budget and structural needs. For a more rustic look, opt for bricks with slight irregularities and varied coloring. Pair with vintage accessories or distressed wood shelves for extra charm. Seasonal touches like a woven placemat or a rustic bowl can complement the warmth of the brick.
Start by preparing the wall surface, ensuring it’s clean, dry, and flat. Apply a scratch coat of mortar if installing real brick veneer, then set each piece with spacers for consistent joints. For faux brick panels, use adhesive specifically designed for interior walls. Press firmly and align carefully, then fill joints with matching mortar or grout. Seal the surface for extra protection against moisture. Regular cleaning with a soft brush keeps it looking fresh.
Enhance the rustic feel with open wooden shelving or vintage iron brackets. Incorporate seasonal textiles, like a plaid table runner or linen towels, to refresh the look. Add small decorative elements like a cast iron kettle or a hanging basket for herbs. These small details help deepen the cozy, rustic ambiance.
Brick veneer transforms your kitchen into a warm, inviting space that feels both durable and charming. It’s a classic look that ages gracefully, gaining character over time. Once installed, you’ll enjoy a sense of accomplishment and pride in creating a truly timeless feature. This approach proves that simple materials can make a big impact.
8. Pebble or River Rock Backsplash for Natural Serenity
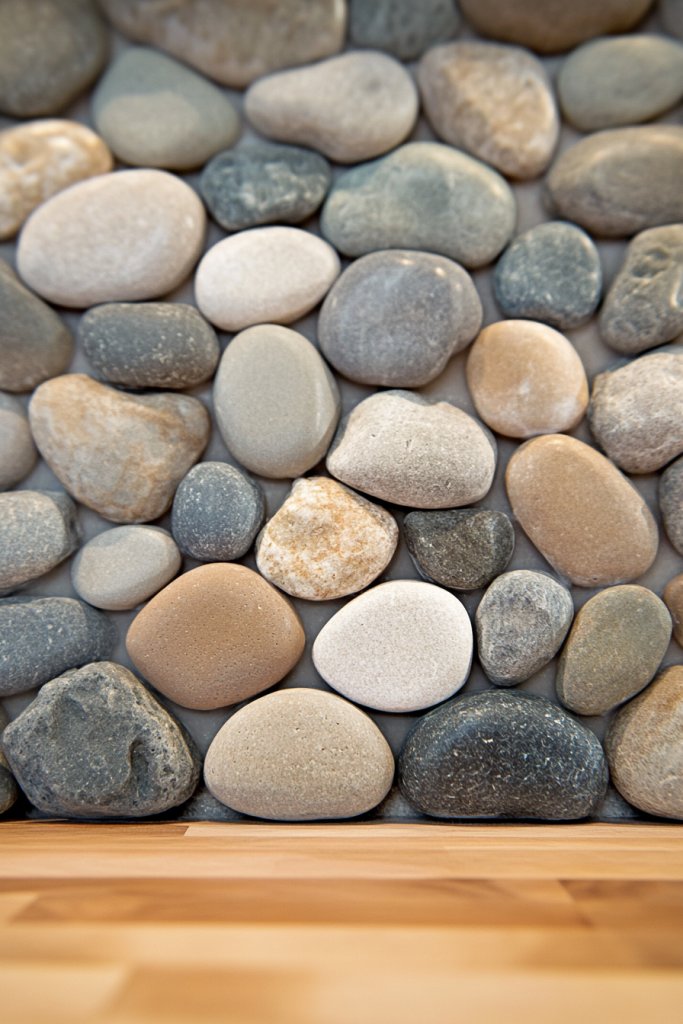
Craving a calming, organic vibe in your kitchen? Pebble or river rock accents provide that peaceful, natural atmosphere you’re after. They create a soothing backdrop that feels like a mini outdoor retreat. If you want your space to radiate tranquility, this is the perfect choice.
Recommended Products to replicate this idea
| # | Preview | Product | |
|---|---|---|---|
| 1 |

|
Parrotile Pebble Shower Floor Tile Bathroom Beige Wall Backsplash Mosaic Tiles (5 Sheets) | Buy on Amazon |
| # | Preview | Product | |
|---|---|---|---|
| 1 |

|
Lovdeco Pebble Tiles for Shower and Bathroom Floor, Tumbled Mix River Rock Pebble Stone Mosaic Tile... | Buy on Amazon |
Imagine small, smooth stones in shades of gray, tan, and muted blues arranged tightly together. The surface is textured, with some stones protruding slightly for a tactile feel. The natural variation in size and color adds visual interest, mimicking a riverbed or beach shoreline. The glossy or matte sealant enhances their natural beauty, making the whole wall feel like a calming landscape.
Use larger stones for a bold, statement look or smaller pebbles for subtle elegance. Pair with natural wood or bamboo accessories to enhance the organic theme. Seasonal accents like a soft woven rug or linen curtains can soften the space further. It’s adaptable for both small kitchens and larger open-plan areas, creating a seamless flow between indoors and nature.
Start by cleaning and preparing your wall surface, ensuring it’s flat and sturdy. Attach a waterproof adhesive suitable for stones, spreading it evenly with a notched trowel. Carefully press each pebble into place, maintaining tight joints. Fill gaps with grout or a flexible sealant, then clean off excess. Seal the entire surface with a clear, matte finish to protect against moisture and stains. Regular gentle cleaning preserves the natural look.
Add small decorative elements like driftwood accents or handcrafted ceramic bowls nearby. Incorporate soft textiles like linen towels or a jute rug to soften the space. Personalize further with natural elements like potted herbs or a small indoor fountain nearby, blending tranquility with function. These touches reinforce the peaceful, earthy vibe.
Pebble or river rock backsplashes bring the outdoors inside, creating a serene retreat in your kitchen. They are durable and easy to maintain, gaining character with age. Once installed, you’ll feel more connected to nature every time you cook. This look demonstrates that rustic charm can be both beautiful and calming.
9. Chipped Paint or Distressed Wood for a Weathered Charm
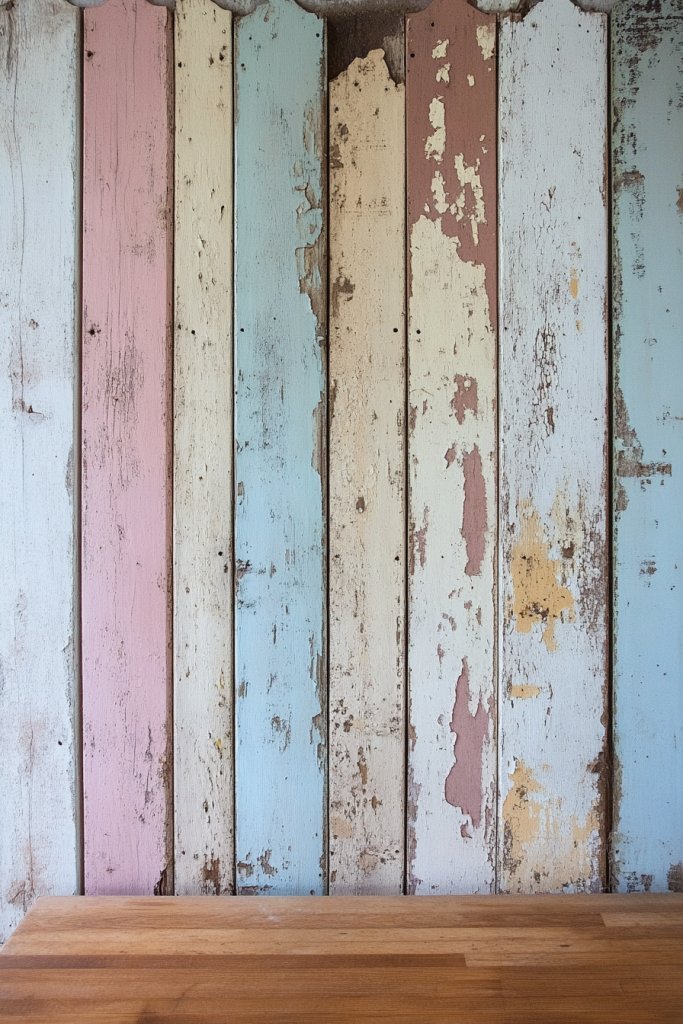
Ever want your kitchen to look like it’s been loved for generations? Chipped paint and distressed wood exude vintage charm and character. They give your space an authentic, well-worn feel that’s full of history. If you love the idea of a cozy, nostalgic vibe, this is your ideal choice.
Recommended Products to replicate this idea
| # | Preview | Product | |
|---|---|---|---|
| 1 |

|
Art3d Slat Wood Wall Paneling for Interior and Ceiling Decoration - Pack of 4pcs + 1pc End-Trim,... | Buy on Amazon |
| # | Preview | Product | |
|---|---|---|---|
| 1 |

|
JETLAND Traditional Antique Cabinet Hardware - 6 Pack, Antique Brass, 3" Hole Centers, Vintage Pulls... | Buy on Amazon |
Picture wooden panels with uneven paint in muted shades like soft teal, cream, or faded gray. The paint is deliberately chipped or sanded to reveal layers underneath, creating a layered, textured appearance. The surface has a tactile roughness that invites touch and adds depth. The distressed finish pairs beautifully with warm, natural wood counters, creating a harmonious rustic aesthetic.
Choose between a heavily distressed look or a more subtle, aged effect depending on your taste. Pair with vintage hardware or antique accessories for a truly nostalgic feel. Seasonal accents like a soft throw blanket or a ceramic mug in muted tones can enhance the vintage vibe. This technique suits both small cottages and large farmhouse kitchens.
Start by selecting wood panels or furniture pieces that can be distressed. Use a sander or wire brush to create chipped areas, then apply a base coat of paint in your chosen color. Once dry, sand or scrape areas to simulate natural wear. Seal with a protective matte finish to prevent further damage. Regular touch-ups and gentle cleaning keep the weathered look authentic. This DIY process is forgiving and highly customizable.
Add vintage-inspired fixtures like lantern-style lighting or antique hooks. Incorporate textiles such as a frayed linen curtain or a patchwork cushion to complement the weathered finish. Personalize further with hand-painted signs or stenciled motifs. These elements make your kitchen uniquely nostalgic and inviting.
Weathered and chipped finishes tell a story of timeless charm. They create a cozy, welcoming space that feels loved and lived-in. Once you master this technique, your home will radiate authenticity and warmth. It’s proof that imperfection can be the key to beauty.
10. Handcrafted Mosaic with Earth Tones
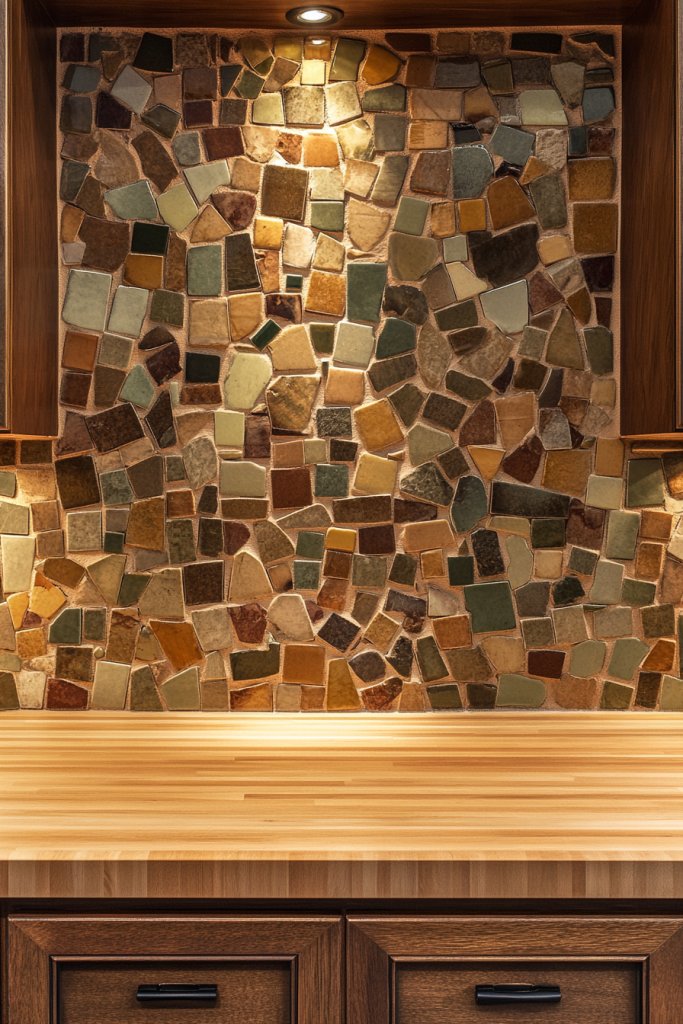
Want to turn your backsplash into a work of art that reflects your personality? Handcrafted mosaics with earthy hues create a personalized, artisanal focal point. They add intricate detail and color depth that elevate the entire space. If you love small, meaningful design details, mosaics are your answer.
Recommended Products to replicate this idea
| # | Preview | Product | |
|---|---|---|---|
| 1 |

|
BEACON Mosaic Glue - Non-Toxic & Water Resistant, Ideal for All Tiles & Surfaces, 2-Ounce | Buy on Amazon |
| # | Preview | Product | |
|---|---|---|---|
| 1 |

|
Red Devil 0422 Pre-Mixed Tile Grout - Professional Quality, Excellent Adhesion, Ideal for Wall &... | Buy on Amazon |
Visualize tiny ceramic or stone pieces arranged in a flowing pattern—think swirling earth tones like ochre, terracotta, and moss green. The mosaic tiles are slightly textured, with a matte or semi-gloss finish that catches light subtly. The pattern can be geometric, organic, or abstract, depending on your style. When installed, the mosaic becomes a vibrant, tactile feature that invites closer inspection.
Choose a pattern that complements your overall decor—spirals, waves, or earthy floral motifs. Incorporate metallic accents or glass pieces for added shimmer. Keep the surrounding decor simple to let the mosaic shine or pair it with natural materials like wood and linen. Seasonal additions like a woven basket or ceramic pitcher nearby can enhance the earthy vibe.
Begin by selecting a mosaic kit or custom design, then prepare your wall surface thoroughly. Use a flexible adhesive suited for small tiles and apply with a small trowel, working in sections. Carefully place each piece, maintaining consistent spacing. Once set, fill joints with matching grout, then clean excess with a damp sponge. Seal with a matte or semi-gloss protective coat for longevity. Regular gentle cleaning preserves the intricate details.
Frame sections of the mosaic with rustic wood or handmade ceramic tiles. Add complementary decorative elements like a handcrafted clay vase or woven textiles. Personalize further with a custom pattern or initials embedded into the design. These personal touches turn a simple mosaic into a heartfelt feature.
A handcrafted mosaic transforms your backsplash into a piece of wearable art, showcasing your creativity. It’s a durable choice that ages beautifully, gaining character over time. Once completed, your kitchen will feel uniquely yours, filled with artistry and warmth. This project proves that with patience, you can craft something truly special.
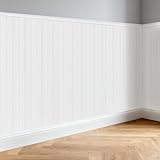
11. Beadboard Paneling for Classic Cottage Appeal
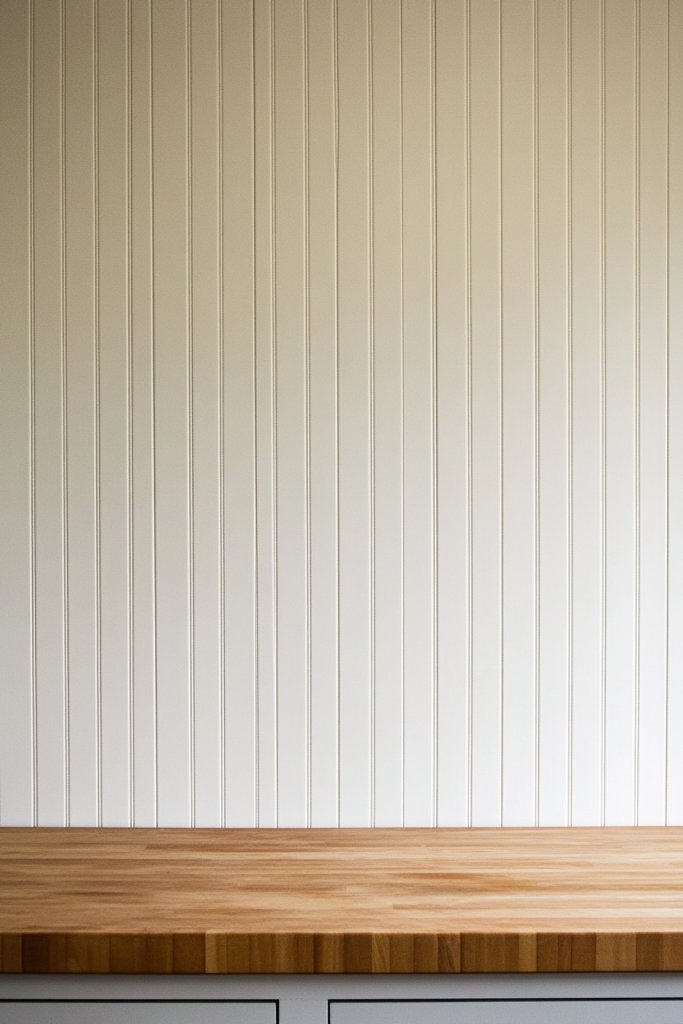
Dreaming of a cozy cottage or farmhouse kitchen? Beadboard paneling instantly evokes that classic, inviting vibe. It adds texture and charm while providing a practical, easy-to-clean surface. If you want your kitchen to feel warm, traditional, and timeless, beadboard is a perfect pick.
Recommended Products to replicate this idea
| # | Preview | Product | |
|---|---|---|---|
| 1 |
|
Pre-Cut Wainscoting Panels Kit, WPC Slats Accent Wall Panel for Home Decor Covers 39 x 79 in, Ready... | Buy on Amazon |
| # | Preview | Product | |
|---|---|---|---|
| 1 |
|
Art3d Premade Board and Batten Paintable Wainscoting Kit, MDF Accent Wall Panel for Kitchen Bedroom... | Buy on Amazon |
Imagine narrow, vertical wooden planks with rounded edges and bead detailing, painted in soft shades like white, cream, or pastel hues. The paneling runs from countertop to ceiling, emphasizing height and openness. The subtle bead detail creates shadows and highlights, adding depth and visual interest. It’s reminiscent of vintage kitchens and country retreats.
Choose from painted or stained finishes, depending on your preferred aesthetic. For a more rustic look, opt for distressed or weathered paint. Pair with vintage hardware, woven textiles, or open shelving for extra charm. During different seasons, simple accessories like a colorful apron or a cozy fabric cover can refresh the look. It’s versatile enough for both small and large kitchens.
Start by measuring your wall area and selecting tongue-and-groove beadboard panels. Prepare the wall with a primer or primer-sealer. Attach the panels with nails or adhesive, ensuring tight joints and a seamless appearance. Use a saw to cut panels to size, and fill any gaps or seams with caulk or wood filler. Finish with paint or stain, and add a protective topcoat if needed. Regular dusting and gentle cleaning maintain the fresh look.
Decorate with vintage hooks or small open shelves painted to match or contrast. Incorporate seasonal textiles like plaid or floral fabrics to update the cottage feel. Add handcrafted ceramic or wooden utensils in open holders for functional decor. These personalized touches enhance the cozy, inviting atmosphere.
Beadboard paneling is a timeless choice that adds charm and character effortlessly. It creates a warm, welcoming environment perfect for family gatherings or quiet mornings. Once installed, you’ll feel proud of your classic, handcrafted look. It’s a simple upgrade that makes a big statement, proving that tradition never goes out of style.
12. Log Cabin Style Backsplash with Rounded Logs
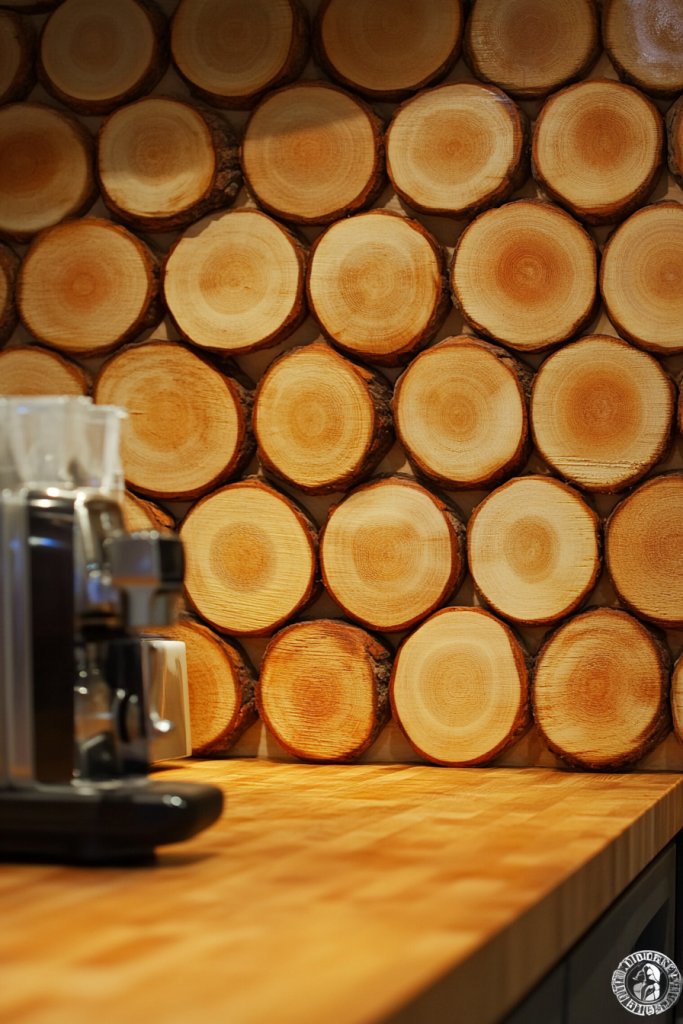
Ever dream of transforming a plain kitchen into a cozy retreat that feels like a mountain cabin? The rustic charm of rounded logs as a backsplash might just be your new secret weapon. It offers a warm, inviting vibe that makes cooking feel like an escape. If you crave a space that feels handcrafted and authentic, this idea hits the sweet spot.
Recommended Products to replicate this idea
| # | Preview | Product | |
|---|---|---|---|
| 1 |

|
Dundee Deco Brown Faux Logs PVC 3D Wall Panel, 3.2 ft X 1.6 ft (96 cm X 48cm), Interior Design Wall... | Buy on Amazon |
| # | Preview | Product | |
|---|---|---|---|
| 1 |

|
Varathane Premium Fast Dry Wood Stain | 1 Hour Dry Time | 1 Coat Color | Interior Wood Stain |... | Buy on Amazon |
Imagine a wall lined with smooth, rounded logs—each one carefully placed to create a pattern that’s both natural and artful. The rich, earthy tones of the wood contrast beautifully with the sleekness of your butcher block countertop. The texture of the logs adds depth, while their rounded edges soften the overall look. Light plays off the curved surfaces, creating subtle shadows that bring the entire wall to life.
This concept adapts well to various styles—think of a more refined, polished look with stained logs or a rugged, natural feel with rougher cuts. For small kitchens, a single accent wall might suffice, while larger spaces can have full log-paneled backsplashes. Seasonal tweaks could include adding cozy textiles or rustic metal accents that complement the logs. It’s all about balancing the organic feel with your personal taste.
Start by sourcing logs that are smooth and rounded, preferably kiln-dried for stability. Measure your wall carefully and plan the pattern—stacked horizontally or in a grid. Attach logs using heavy-duty adhesive and finishing nails, ensuring they’re flush against the wall. Sand and seal the logs to protect against moisture and staining. For a seamless look, consider using logs of similar diameter and color, or intentionally mix sizes for a more rustic appeal. Regular maintenance involves cleaning with a damp cloth and re-sealing annually.
Add a personal touch by staining logs in different shades or applying a clear matte finish to emphasize natural grain. Incorporate carved details or painted accents for a custom look. You might also integrate small, handcrafted wooden shelves or hooks between logs for functional decor. Complement this with rustic hardware or vintage-inspired fixtures to amplify the cozy cabin vibe.
This log cabin backsplash design proves that rustic charm can be both stunning and functional. It’s an investment in creating a space that feels warm, welcoming, and uniquely yours. With the right materials and a bit of patience, you can craft a feature wall that becomes the centerpiece of your kitchen. Imagine the compliments and envy when guests see your cozy, handcrafted retreat.
13. Natural Clay or Earthen Plaster for Textured Walls
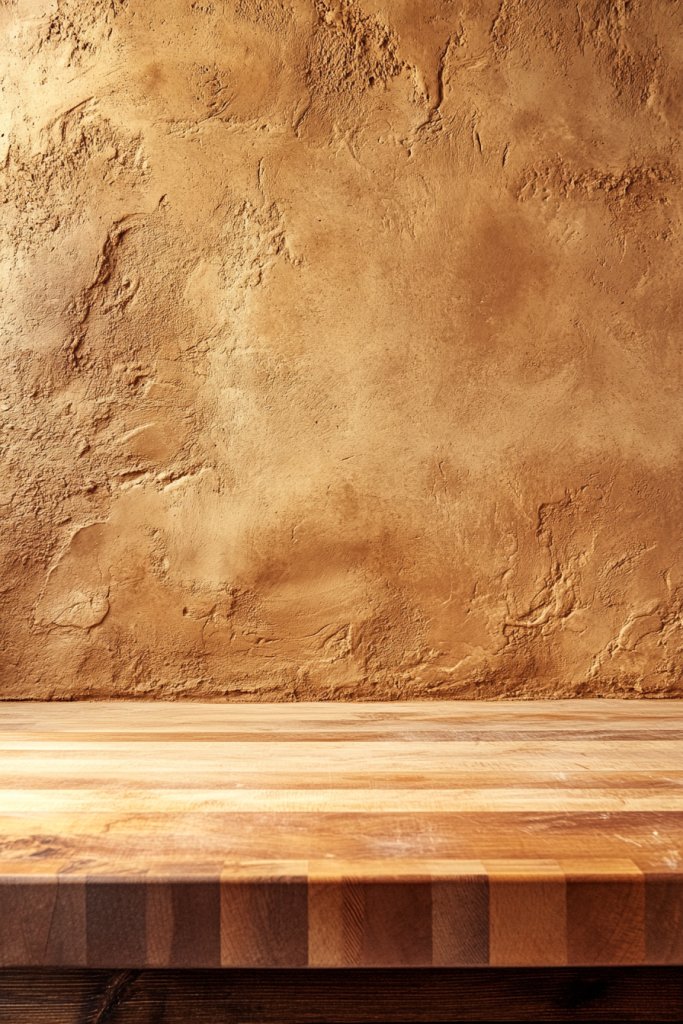
Tired of flat, boring walls that do nothing to inspire you? If you crave a textured, earthy backdrop that adds character and depth, natural clay or earthen plaster might be your answer. It offers a warm, organic feel that pairs beautifully with butcher block countertops. Plus, it’s eco-friendly and surprisingly easy to customize to your taste.
Recommended Products to replicate this idea
| # | Preview | Product | |
|---|---|---|---|
| 1 |
|
Falling in Art 1lb Plaster of Paris Powder - Hand Mold Casting Kit Powder, Gypsum Cement, Pottery &... | Buy on Amazon |
| # | Preview | Product | |
|---|---|---|---|
| 1 |

|
Garden Box Sealer | FDA Food Contact Safe Plant-Based Wood Sealant for Raised Bed, Planter & Pet... | Buy on Amazon |
Picture a wall with a subtle, mottled texture created by layers of natural clay. The surface feels slightly gritty yet smooth to the touch, reminiscent of a clay sculpture. Warm tones, from soft creams to rich terracottas, bring the space alive with a rustic glow. Light dances across the textured surface, highlighting its imperfections and unique character, making your kitchen feel like a handcrafted masterpiece.
You can opt for a polished, smooth finish for a more refined look or an intentionally rough, layered appearance for a raw, rustic vibe. Seasonal color shifts can be achieved by adding natural pigments or mineral oxides. This technique works well in open-plan kitchens or small nooks, providing an organic connection to nature. Pair it with textured wood accessories or handcrafted ceramics for an earthy theme.
Begin by preparing your wall surface—clean and prime if necessary. Mix clay or earthen plaster with water according to manufacturer instructions, adding natural pigments if desired. Apply the mixture with a trowel, creating a textured surface through swirling, stippling, or layering. Allow each layer to dry thoroughly before adding another for depth. Finish with a natural sealant to protect the surface from moisture and stains. This process is forgiving and allows for artistic freedom, making it suitable even for beginners.
Enhance the texture with subtle color variations or metallic mineral accents to add shimmer. Incorporate sculptural elements like embedded stones or small ceramic pieces for a bespoke touch. For added warmth, consider installing natural fiber textiles or woven mats nearby, complementing the earthen walls. Focus on creating a tactile experience that invites touch and admiration.
Using clay or earthen plaster transforms your kitchen into a natural sanctuary that celebrates craftsmanship. It’s a statement of sustainability and artistry, perfect for those who love organic aesthetics. With minimal tools and a bit of patience, you can achieve a stunning textured wall that’s both functional and beautiful. Your space will radiate warmth and timeless appeal, inspiring pride and creative confidence.
14. Salvaged Window Frames as Unique Backsplash Features
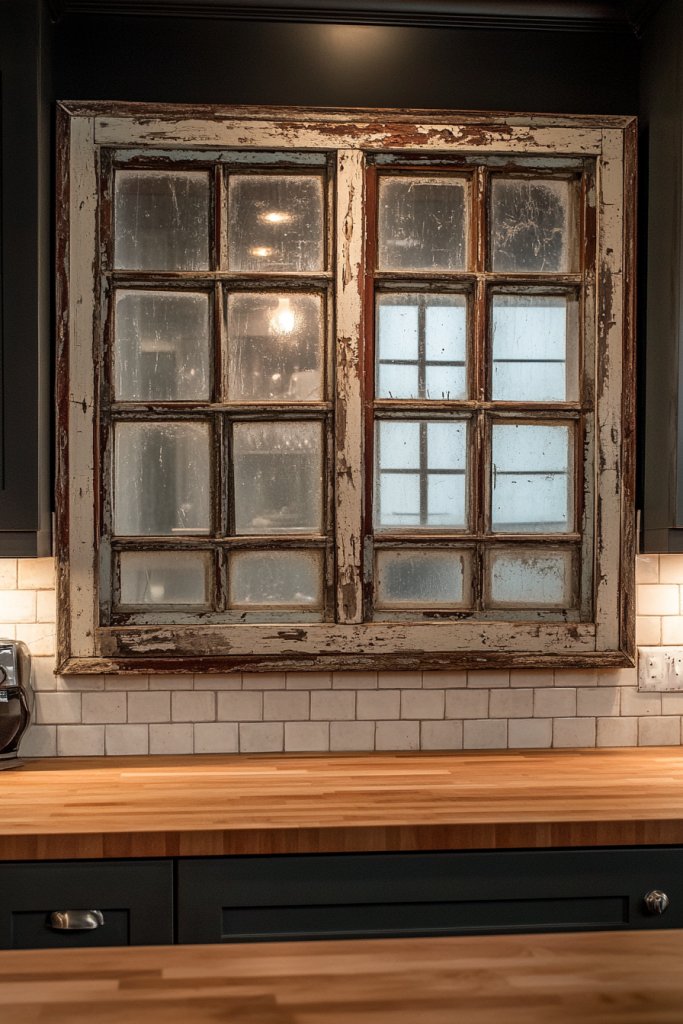
Looking for a backsplash idea that’s anything but ordinary? Salvaged window frames bring a charming, vintage vibe that adds instant character and history. They’re perfect for DIY enthusiasts who love repurposing and want a feature wall that tells a story. If you want to turn everyday items into art, this is your chance.
Recommended Products to replicate this idea
| # | Preview | Product | |
|---|---|---|---|
| 1 |

|
CALIFORNIA CADE ELECTRONIC Rustic Wall Decor-Home Decor Window Barnwood Frames -Room Decor for Home... | Buy on Amazon |
| # | Preview | Product | |
|---|---|---|---|
| 1 |

|
Tempered Glass Cutting Board – Long Lasting Clear Glass – Scratch Resistant, Heat Resistant,... | Buy on Amazon |
Imagine a wall decorated with weathered, painted window frames, each one slightly different in size and style. Some frames hold clear glass panes, reflecting the kitchen’s surroundings, while others are open, showing off the wall behind. The distressed paint and rustic wood give a layered, textured feel that enhances the warmth of your butcher block countertop. It’s like bringing a piece of an old cottage into your modern home.
You can leave some frames as they are for a raw, vintage look or repaint them in your favorite muted tones for a more cohesive aesthetic. Incorporate small shelves or hooks on the frames to hold utensils or decorative items, blending function with form. This approach works well in eclectic, shabby chic, or farmhouse styles. Adjust the number and size of frames to fit your wall space and design vision.
Start by sourcing authentic salvaged window frames from flea markets, salvage yards, or online marketplaces. Clean and sand the frames to remove loose paint and debris. Secure them to the wall using heavy-duty brackets or mounting hardware, ensuring stability. If desired, add glass panes or acrylic sheets for a reflective surface. Seal or repaint the frames for protection and a finished look. Layering multiple frames creates depth and visual interest, so plan your layout before mounting.
Personalize the frames by distressing paint further or adding decorative stencils. Use the open sections to display artwork, photos, or vintage kitchen tools—whatever fits your vibe. For a more polished look, add a clear protective coat or wax. Incorporate complementary rustic elements like reclaimed wood shelves or metal accents nearby to create a harmonious design.
This upcycled backsplash idea combines sustainability with style, proving that old things can become new treasures. It’s a conversation starter and a visual anchor in your kitchen. With a little patience and creativity, you’ll have a one-of-a-kind feature that reflects your personality and eco-conscious values. Get ready for compliments and admiration from friends and visitors alike.
15. Driftwood Art Panels for a Coastal Rustic Vibe
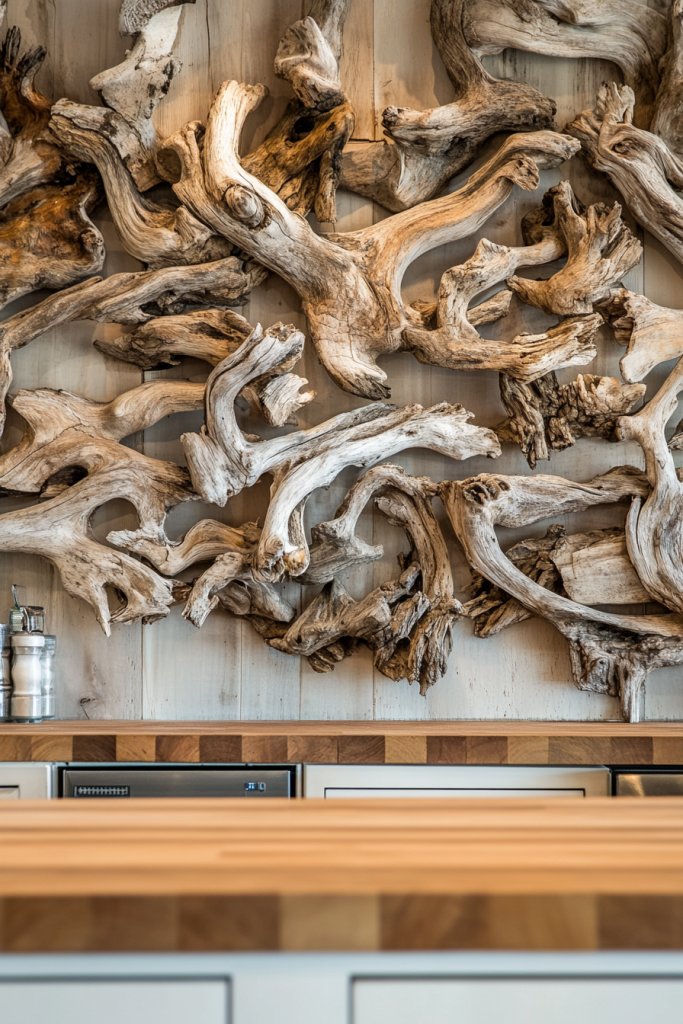
Ever wish your kitchen had a breezy, seaside feel without sacrificing rustic charm? Driftwood art panels offer a perfect blend of coastal and farmhouse aesthetics. They create a relaxed, natural atmosphere that’s both calming and visually captivating. If you love beachy vibes but want something more authentic than plastic shells or fake coral, this idea is for you.
Recommended Products to replicate this idea
| # | Preview | Product | |
|---|---|---|---|
| 1 |

|
BLACK FOREST DECOR Driftwood Tropical Leaf Wall Art - Set of 3 | Buy on Amazon |
| # | Preview | Product | |
|---|---|---|---|
| 1 |

|
JQAQJU Sea Glass Wooden Nautical Wall Decor, Coastal Starfish Bathroom Decor Sea Shells, Driftwood... | Buy on Amazon |
Picture a wall adorned with pieces of weathered driftwood, arranged in a deliberate pattern or abstract design. The natural textures and irregular shapes of each piece add depth, while their faded, sun-bleached tones evoke memories of peaceful shores. The contrast between rough wood and smooth, polished surfaces nearby makes the space feel layered and inviting. Soft natural light enhances the organic beauty of each driftwood element.
You can create a large, statement piece or a series of smaller panels for visual rhythm. Incorporate shells, stones, or recycled glass within the driftwood for added interest. For a more refined look, apply a clear matte sealant that preserves the weathered appearance. This concept suits coastal, bohemian, or rustic styles and adapts well to various wall sizes.
Collect driftwood of similar size and texture, cleaning and drying each piece thoroughly. Arrange them on a flat surface, experimenting with patterns or shapes until satisfied. Attach each piece to a sturdy backing using strong adhesive or small nails, ensuring secure mounting. Seal the entire panel with a protective matte finish to prevent deterioration. Hang the finished piece at eye level for maximum impact and ensure it’s firmly secured.
Add small accents like recycled glass pieces or painted details to individual driftwood segments. You might also incorporate LED strip lighting behind or around the panels for a soft glow. Use weathered, sea-inspired colors—light blues, sandy beiges, or muted whites—to enhance the coastal feel. Personalize by creating a custom-sized panel that fits your space perfectly.
This coastal-inspired feature instantly transports your kitchen to a seaside retreat, blending relaxation with rustic charm. It’s a highly visual project that celebrates nature’s artistry, perfect for DIY enthusiasts. With patience and a creative eye, you can craft a stunning focal point that elevates your entire space and sparks joy whenever you cook or relax nearby.
16. Hand-Stained Masonry Tiles for Subtle Elegance
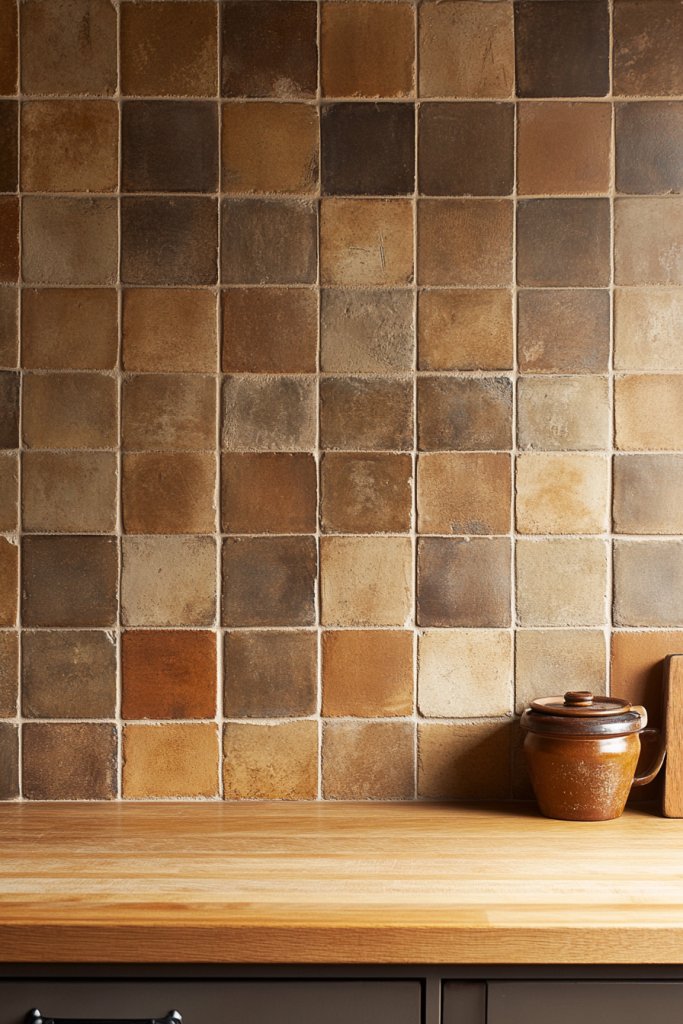
Looking for a backsplash that’s understated yet sophisticated? Hand-stained masonry tiles offer a refined way to add color and texture without overwhelming the space. They bring a subtle elegance that pairs beautifully with the warmth of butcher block countertops. If you prefer a look that’s timeless and customized, this idea deserves your attention.
Recommended Products to replicate this idea
| # | Preview | Product | |
|---|---|---|---|
| 1 |

|
Vamos Tile 100-Piece Glossy Dolomite White Peel and Stick Backsplash Tile,3''x6'' PVC Subway Tile... | Buy on Amazon |
| # | Preview | Product | |
|---|---|---|---|
| 1 |

|
Creative Hobbies 12 Pack of Glossy White Glazed Ceramic Tiles for Alcohol Ink Painting, Decorating,... | Buy on Amazon |
Imagine a wall covered in irregularly shaped, hand-stained tiles in muted earth tones—warm beiges, soft browns, or gentle grays. The natural variations in color and texture create a soft, tactile surface that catches the eye without dominating. Light reflects gently off the glazed or matte finishes, enhancing the understated beauty of each tile. The overall effect is a harmonious, artisanal backdrop that adds depth and character.
Opt for tiles in different shapes—hexagon, rectangular, or irregular forms—to create visual interest. Use subtle color gradients or multiple shades within a single tile for a layered effect. This style works well in both traditional and modern kitchens, especially when paired with simple cabinetry and minimal hardware. Seasonal accents can be added with decorative textiles or metal fixtures to update the look.
Choose high-quality masonry tiles that can be hand-stained or painted with heat-resistant, durable stains. Prepare your wall surface to be smooth and clean before applying thin-set mortar. Arrange the tiles in your desired pattern, leaving consistent grout lines. Hand-stain each tile with natural or mineral-based dyes, then seal them with a protective finish. Once installed, fill the gaps with grout that complements the tile tones. Regular cleaning with gentle solutions helps preserve the stain’s vibrancy.
Add custom touches by creating gradient effects or mixing shades for a layered look. Incorporate metallic or matte glazes for a unique finish. Personalize further with hand-painted motifs or initials for a truly bespoke backsplash. Keep the color palette neutral for versatility or go bold with contrasting shades for a statement piece.
These stained masonry tiles prove that subtle can be stunning. They elevate your kitchen’s style with artisanal craftsmanship and personal flair. With careful selection and a bit of patience, you’ll achieve a sophisticated, unique look that feels both timeless and entirely your own. Your kitchen will radiate understated elegance and creative confidence.
17. Exposed Wooden Beams and Natural Finishes for Seamless Integration
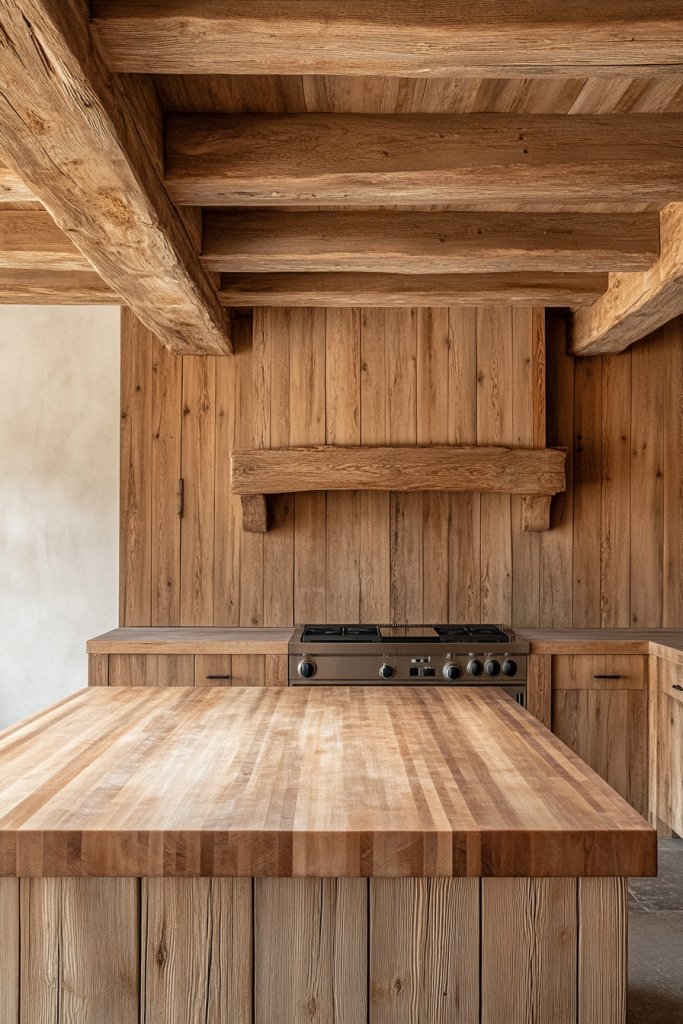
Craving a kitchen that feels warm, natural, and effortlessly stylish? Exposed wooden beams and natural finishes create a seamless, rustic ambiance that brings the outdoors inside. They add architectural interest while maintaining a cozy, inviting vibe. If you want a space that looks thoughtfully designed yet relaxed, this idea is your new best friend.
Recommended Products to replicate this idea
| # | Preview | Product | |
|---|---|---|---|
| 1 |

|
Ekena Millwork 3 1/2"W x 5 1/2"H x 96"L 3-Sided (U-Beam) MENA HeritageTimber Faux Wood Ceiling Beam,... | Buy on Amazon |
| # | Preview | Product | |
|---|---|---|---|
| 1 |

|
Tlence 4 Pack Overhead Garage Storage Hooks, 16.5" Heavy Duty Ceiling Mount Hangers, Double T-Bar... | Buy on Amazon |
Visualize timber beams running across the ceiling, their rough-hewn texture contrasting with smooth, polished surfaces below. The natural wood tones, from honey to deep chestnut, blend effortlessly with your butcher block countertops. The combination of exposed beams and natural wall finishes creates layers of texture and warmth, making the space feel authentic and lived-in. Soft lighting highlights the wood grain, emphasizing the craftsmanship.
Adjust the size and placement of beams to fit your ceiling height and room layout. Stain or leave the wood raw for a more rustic appearance, or paint the beams in neutral tones to match your decor. Combine with natural stone or brick accents for added texture. Seasonal updates could include adding decorative textiles or cozy throws nearby to enhance the warmth.
Select high-quality, reclaimed or sustainably sourced wood for beams, ensuring they’re properly dried and treated. Install beams securely into the ceiling joists using heavy-duty brackets and lag bolts. Finish with a natural oil or stain that enhances the wood’s grain, or opt for a clear sealant for a more authentic look. Coordinate the finish of your ceiling and wall surfaces to create a cohesive, natural aesthetic. Regular maintenance involves cleaning with a dry cloth and reapplying protective finishes as needed.
Personalize by adding decorative wood carvings or painted details on beams. Incorporate natural fiber textiles in curtains or cushions to complement the earthy tones. You could also install small wood shelves or beams with hooks for hanging utensils or towels. Keep the overall look simple and organic to preserve the rustic charm.
Exposed wooden beams elevate your space into a rustic retreat that’s both stylish and functional. Embracing natural finishes and structural elements creates a cohesive, timeless look. With some basic carpentry skills or professional help, you can design a kitchen that feels warm, authentic, and uniquely yours. It’s a bold choice that pays off in comfort and style, inspiring confidence in your design instincts.
Conclusion
With such a diverse range of backsplash ideas paired with butcher block countertops, there’s no limit to the rustic charm you can achieve in your kitchen. These creative combinations can transform your space into a warm, inviting retreat that reflects your personal style. Don’t hesitate to experiment and bring your rustic kitchen vision to life—your perfect culinary haven awaits!
Last update on 2026-02-15 / Affiliate links / Images from Amazon Product Advertising API