Looking to transform your bedroom into a personal sanctuary that truly reflects your unique personality? Bedroom inspirations for teenagers are more popular than ever, offering fresh, creative ideas that help teens express their individuality and style. Whether it’s through bold colors, themed decor, or clever space-saving solutions, these ideas make decorating exciting and fun, inspiring teens to craft a space they love.
In this article, you’ll discover a wide range of bedroom ideas perfect for growing personalities—whether you prefer vibrant, minimalist, cozy, or eclectic styles. Each concept is designed to spark your creativity and help you envision your dream space. Get ready to find inspiration that will make your bedroom a true reflection of who you are and what you love!
1. DIY String Light Canopy for Cozy Ambiance
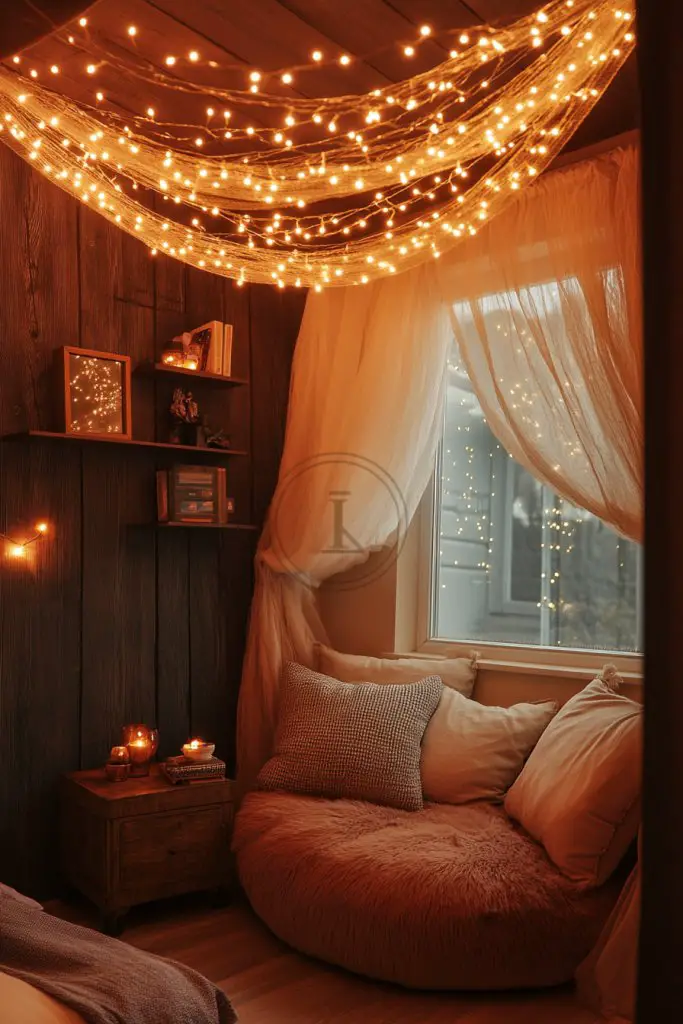
Ever wanted to create a dreamy, cozy vibe in your bedroom without spending a fortune? String lights instantly add warmth and charm but hanging them just right can be tricky. Instead of store-bought fixtures, why not craft your own DIY canopy for that magical, personalized glow?
Visualize a soft curtain of fairy lights draped over your bed or a cozy corner, casting a gentle, flickering glow. The lights cascade from a simple ceiling hook or wall-mounted frame, creating a starry-night effect. The warm light reflects off textured fabrics or plush pillows, making your space feel like a private retreat. It’s like having your own piece of the sky inside.
Use different string light styles—warm white for a subtle glow or multicolor for fun and vibrancy. Drape the lights in a crisscross pattern, or create a canopy by hanging from four points to form a tent-like structure. For smaller rooms, cluster the lights over a single corner, while larger spaces can handle a more elaborate setup. Seasonal themes can be added with themed clips or decorative elements.
Gather string lights with a safe, low-voltage power source. Attach a ceiling hook or wall-mounted frame securely. Drape the lights evenly, using hooks or clips to hold them in place. For a more structured look, create a frame with flexible piping or wooden dowels. Connect the lights to an extension cord if needed, and test the setup before finalizing. Add light diffusers like sheer fabric or lantern covers for a softer glow.
Enhance the canopy with fabric drapes or decorative ribbons to add texture and color. Incorporate small, lightweight ornaments or paper lanterns for additional flair. Use dimmer switches to control brightness and set the mood. Change up the look seasonally by swapping out fabrics or adding themed decorations. Personal touches make your cozy space uniquely yours.
Creating your own string light canopy is simple, affordable, and incredibly rewarding. It transforms your bedroom into a dreamy sanctuary, perfect for relaxing or unwinding after a long day. Plus, it’s a project you can customize endlessly, reflecting your personality. Ready to glow up your space? Let the lights guide your style!
2. Gallery Wall of Favorite Art and Photos
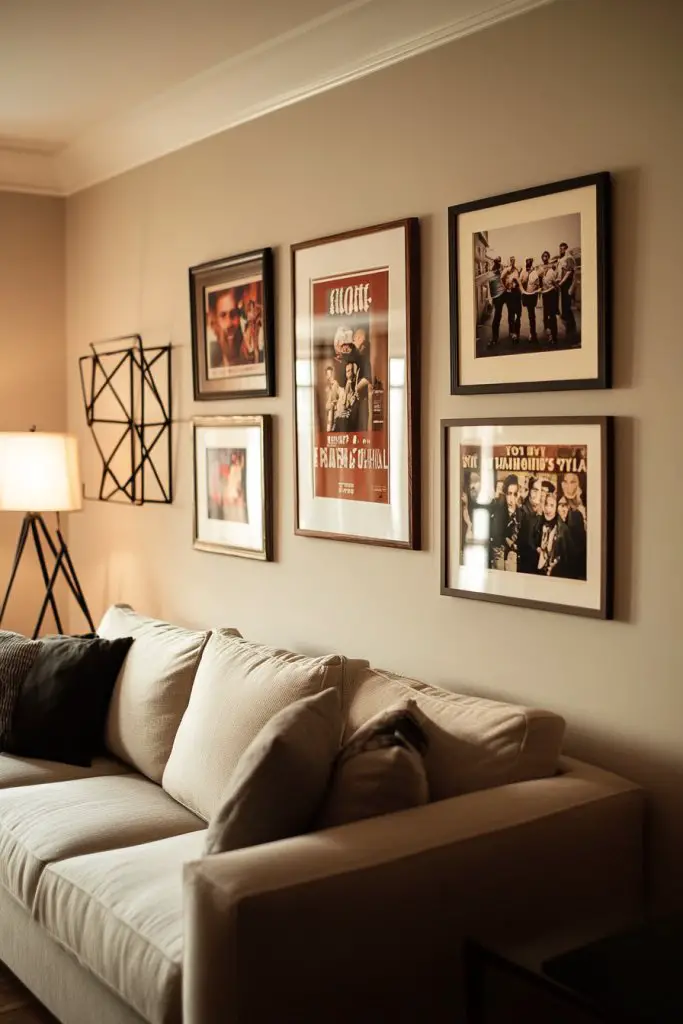
Want to make your bedroom feel more like you? A blank wall is just waiting for some personality. Creating a gallery wall of your favorite art, photos, or prints instantly turns a plain space into a gallery of your life and interests. It’s a simple way to showcase what inspires you.
Imagine a wall filled with framed photos of friends, travel snapshots, or posters of your favorite bands and movies. Mix in some geometric or vintage frames for added style, arranging them in a balanced, asymmetrical layout. The wall becomes a visual story of your memories and passions. Soft lighting highlights the display, making it a focal point in your room’s design.
Mix different frame sizes and styles for an eclectic look or keep it uniform for a sleek, modern vibe. You can incorporate a theme, like black-and-white photos or colorful prints that match your room’s palette. For seasonal updates, swap out or rearrange prints and photos to keep the display fresh. Smaller spaces benefit from a tightly grouped cluster, while larger walls can handle a sprawling, layered arrangement.
Start by selecting your favorite images and prints. Measure your wall and plan the layout on the floor first, using painter’s tape to visualize placement. Choose frames that complement your decor style and fit your budget—consider DIY painted frames for a personal touch. Use command hooks or picture-hanging strips to avoid wall damage. Arrange the frames following your plan, making adjustments as needed. Keep it balanced but dynamic.
Add decorative elements like string lights behind the frames or small sculptural pieces for dimension. Incorporate your favorite quotes or handwritten notes with washi tape or clipboards for a casual, personalized feel. Change out prints seasonally or for special occasions—birthdays, holidays, or milestones. Personal touches turn your gallery wall into a constantly evolving showcase.
A gallery wall is a powerful way to showcase your personality and memories. It boosts your confidence by celebrating what matters most to you. Plus, it’s a flexible project that can grow and change over time. Ready to turn your wall into a storybook of your life? Start creating today!
3. Customizable Corkboard or Pinboard for Inspiration
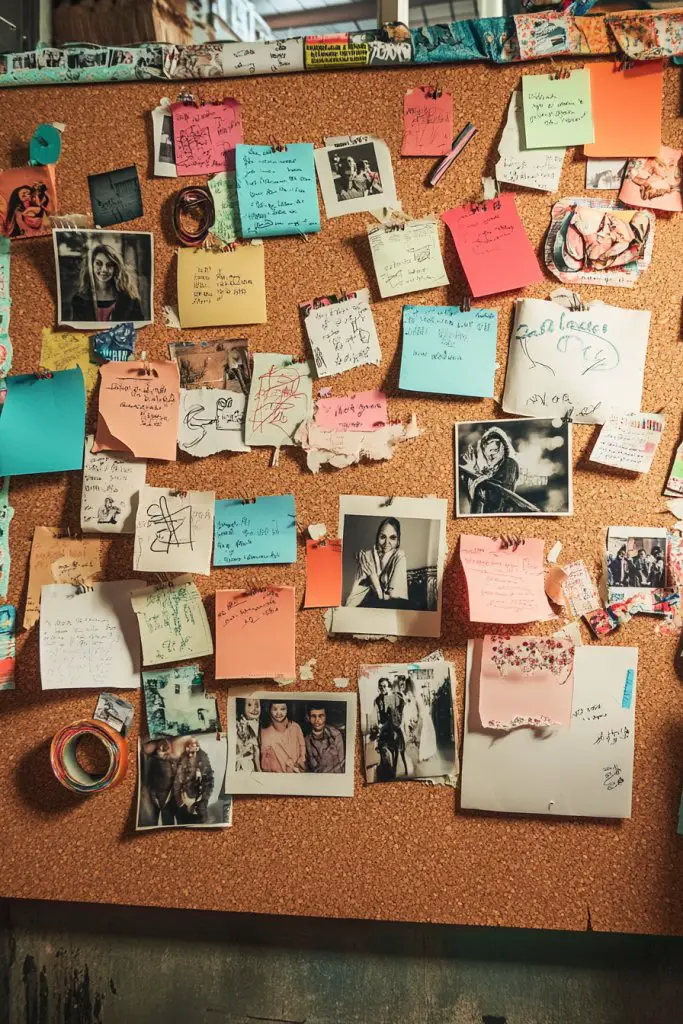
Struggling to stay organized or find inspiration in your cluttered space? A corkboard or pinboard can be your new best friend. It offers a dedicated spot for notes, reminders, or mood boards, keeping everything in sight and within reach. Plus, it’s a fun way to add a splash of personality.
Picture a large corkboard covered with colorful notes, sketches, and photos pinned neatly or in a playful chaos. Add decorative washi tape or fabric around the edges for a customized look. The board becomes a visual hub, full of inspiration, goals, and reminders—like a mini command center. It’s both functional and decorative, making your space feel more lively.
Choose a frame or border style that suits your decor—metal, wood, or fabric-covered. Use different pin types like clips, push pins, or decorative tacks to add variety. For seasonal updates, change out the inserts or rearrange the pins for a fresh look. Larger boards can be sectioned into zones for study, inspiration, and personal goals. Small rooms benefit from compact setups that maximize wall space.
Pick a sturdy backing material—wood panel, foam core, or magnetic board—and mount it securely to the wall. Decorate the frame or border to match your style. Use a variety of pins, clips, or magnets to hold your items securely. Organize your content into categories—quotes, photos, schedules—using color coding or labels. Regularly update the content for ongoing motivation and order.
Add motivational quotes, small decorative elements, or themed accessories like seasonal stickers. Incorporate a small ledge or shelf for displaying tiny collectibles or memorabilia. Use washi tape or painted borders to customize the frame. Make it a reflection of your personality and current goals, and it’ll keep you inspired daily.
A personalized corkboard keeps you focused and motivated, turning chaos into clarity. It’s a simple but powerful tool to visualize your plans and dreams. Plus, customizing it keeps the process fun and engaging. Ready to get organized and inspired? Your new pinboard awaits!
4. Chic Floating Shelves for Books and Collectibles
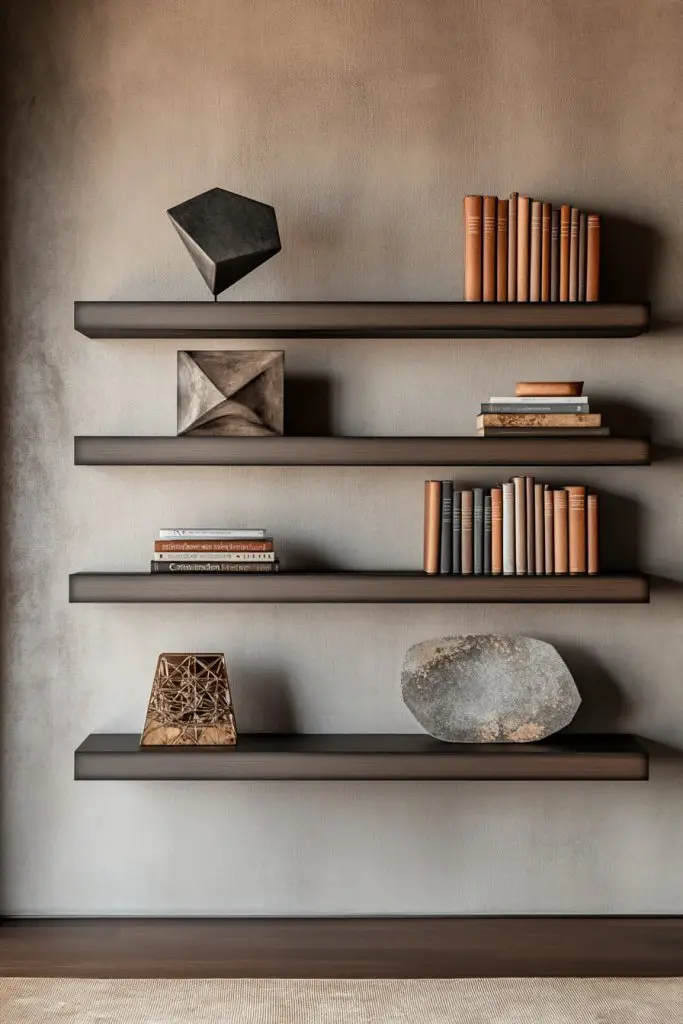
Tired of clutter taking over your desk and floor? Floating shelves are the perfect way to clear space while adding a stylish touch. They give you a designated spot for your favorite books, awards, or collectibles, making your room look organized and intentional. Who knew storage could be so chic?
Imagine sleek, minimalist shelves floating against a painted wall, showcasing a curated collection of your prized possessions. Mix in some decorative objects—like geometric sculptures or textured ceramics—to add interest. The shelves create a layered, gallery-style display that draws attention and sparks conversation. The combination of open storage and clean lines makes your room feel modern and curated.
Use different lengths and finishes—matte, gloss, or natural wood—to match your decor. Arrange shelves asymmetrically for a more dynamic look or keep them aligned for symmetry. For seasonal flair, swap out displayed items or add themed decor. Small spaces benefit from narrow shelves, while larger walls can hold longer or multiple tiered setups. Incorporate corner shelves for tricky spaces.
Measure the wall space carefully and select sturdy brackets or hidden mounts. Choose shelves that support your weight requirements—wood or metal are both durable options. Mount the brackets at even intervals, ensuring they’re level. Place your books and collectibles thoughtfully, balancing height and visual weight. Secure everything tightly, and add decorative objects for a personalized touch. Regularly dust and check stability.
Paint or stain the shelves to match your room’s palette. Incorporate small potted plants or decorative boxes (if plant content is avoided, opt for ceramic or sculptural objects). Use LED strip lighting underneath for a glowing effect. Change displayed items seasonally or for special occasions. Personalization makes your shelving both functional and a reflection of your style.
Floating shelves add both utility and style, transforming your room into a curated space of interests. They show off your personality while keeping clutter at bay. Plus, they’re an easy DIY project that boosts your confidence in home styling. Ready to elevate your decor with some sleek shelving? Start planning today!
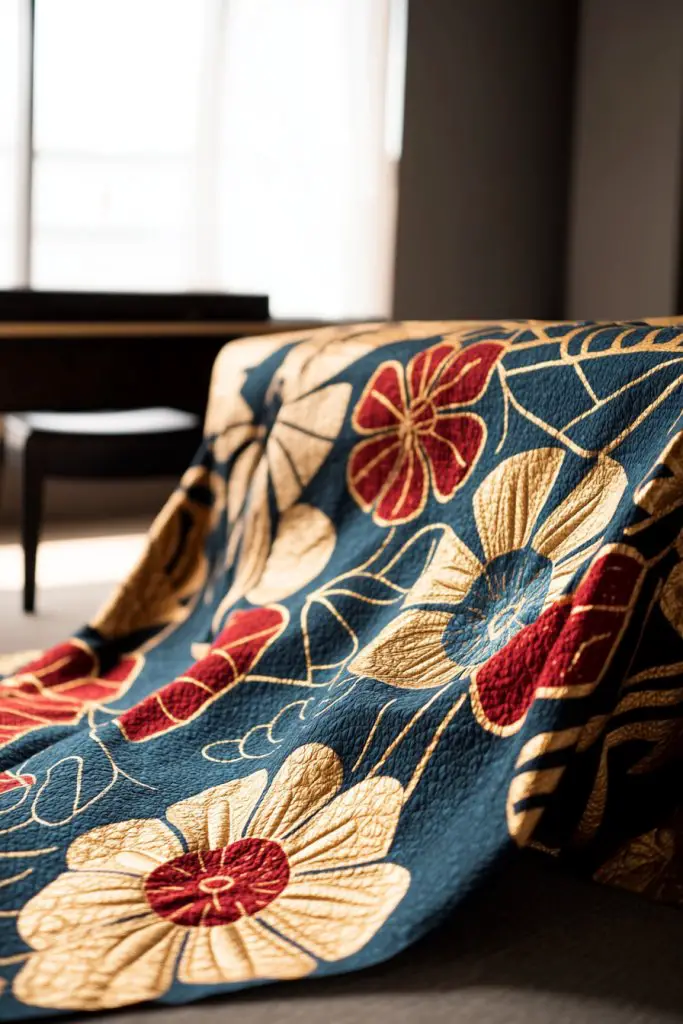
5. Themed Bedding with Fun Patterns and Textures
Feeling bored with your current bedding? Want your bed to reflect your personality and mood? Themed bedding with vibrant patterns and textures can make your sleep space fun and inviting. It’s an easy way to refresh your room and express your style.
Picture a bed dressed with a duvet cover featuring bold, playful prints—such as geometric shapes, florals, or cartoon characters. Layer with textured throws or pillows in contrasting fabrics like velvet, faux fur, or knitted textures. Bright colors or monochrome palettes can set different moods—cheerful, cozy, or sophisticated. The mix of patterns and textures creates a lively, tactile experience that invites you to relax.
Switch out bedding seasonally—think lighter fabrics like cotton or linen for summer, plush velvets for winter. Mix and match different patterns within a color scheme for a curated look. For smaller beds, keep bedding simple with a statement pillow or throw. Larger beds can handle layered bedding—comforters, quilts, and decorative pillows for a lush, inviting look. Personalize further with embroidery or custom prints.
Start by selecting bedding that matches your vibe—bright and bold, or subtle and textured. Wash and prepare the fabrics before dressing your bed. Use fitted sheets and pillowcases to keep everything tidy. Layer your comforter or duvet with decorative throws and pillows, mixing textures and patterns thoughtfully. Incorporate accent pillows or small cushions for added comfort. Clean and fluff regularly to keep it looking fresh.
Add personal touches like embroidered initials or custom patterns. Incorporate seasonal themes—pumpkins and warm tones for fall, icy blues for winter. Use textured throws or pillow covers to add tactile interest. You can also swap out pillowcases or duvet covers for special occasions or holidays—making your bed a constant reflection of your mood and style.
Themed bedding transforms your room into a personal sanctuary that’s full of life and personality. It’s a simple change that lifts your mood every time you enter. Plus, experimenting with textures and patterns builds your confidence in decorating. Ready to make your bed a statement piece? Dive into fun patterns today!
6. DIY Wall Art Using Canvas and Paints
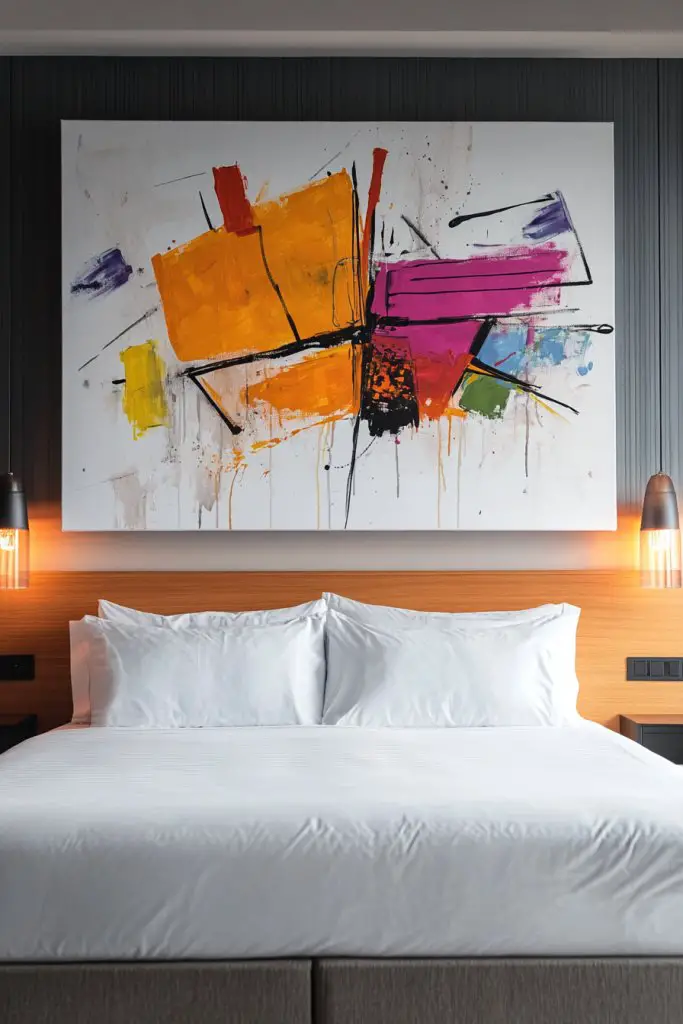
Bored of generic posters and prints cluttering your walls? Want a unique piece that truly reflects your personality? DIY canvas art is a fun, affordable way to create personalized wall decor. Plus, it’s a creative outlet that adds a special touch to your space.
Imagine a large canvas painted with bold, abstract strokes in your favorite colors, or a delicate watercolor of something meaningful to you. Play with textures using different brush techniques, stencils, or even palette knives. The finished piece hangs proudly above your bed or desk, serving as a focal point that sparks inspiration or calm. It’s a one-of-a-kind masterpiece, made by you.
Create a series of smaller canvases for a gallery wall effect, or stick to a single statement piece. Use different painting styles—minimalist line art, textured abstract, or detailed illustrations—matching your vibe. Seasonal or mood-based themes keep your art relevant and fresh. Experiment with metallic paints or gloss finishes for extra dimension.
Gather quality canvases, brushes, and paints—acrylics are beginner-friendly and quick-drying. Sketch your design lightly with a pencil before painting. Use painter’s tape for sharp edges or geometric shapes. Layer colors gradually, letting each dry before adding details. Seal your artwork with a clear varnish for longevity. Hang with command strips or picture hooks, making sure it’s securely mounted.
Add personal touches like handwritten quotes, small collages, or mixed media elements. Incorporate your favorite colors or motifs to match your room’s theme. Change your artwork periodically to keep the decor fresh and aligned with your evolving style. Use stencils or tape to create clean lines and professional-looking designs.
Making your own wall art boosts your confidence and sense of style. It’s a rewarding process that results in a piece you’ll love and cherish. Plus, it proves that decor can be both personal and budget-friendly. Ready to unleash your inner artist? Grab your brushes and start creating!
7. Statement Rug to Define Personal Space
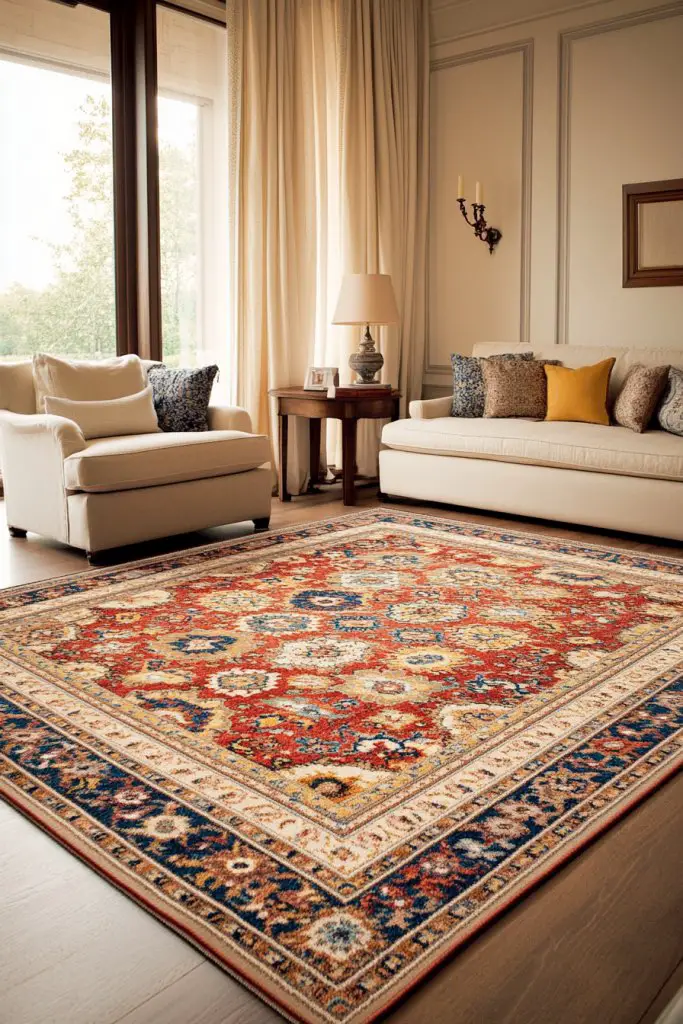
Does your room feel a bit disconnected or bland? A bold rug can anchor your space and add a splash of personality. It’s more than just a floor covering—it’s a statement piece that defines zones and ties your decor together. Plus, it adds comfort underfoot, making your room cozier.
Picture a large, patterned rug with vibrant colors or intricate designs placed in the center of your room. It contrasts beautifully with neutral furniture or complements a color scheme. The texture of plush or shaggy rugs invites you to kick off your shoes and relax. The rug visually divides your space into zones—sleeping, studying, lounging—making everything feel more organized.
Choose a rug that matches your mood—bright and playful for fun, muted and textured for calm. Smaller rugs work well in compact areas or as accents, while large area rugs anchor bigger rooms. Seasonal changes can be reflected by swapping rugs or layering different textures. Patterned rugs with geometric or abstract designs add modern flair, while traditional motifs lend a classic vibe.
Measure your space carefully to select the right size—aim for the rug to extend a few inches beyond furniture edges. Opt for durable materials like wool, nylon, or polyester, depending on your budget. Lay the rug flat, smoothing out wrinkles, and secure it with non-slip pads if needed. Layer it with your existing flooring or furniture for a cohesive look. Regular vacuuming and spot cleaning keep it looking fresh.
Coordinate the rug with your room’s color palette or add a contrasting border for extra visual interest. Use it to highlight a specific area, like your bed or desk. Mix textures by layering with smaller mats or throws. Personal touches like embroidered initials or painted patterns can further customize your rug.
A statement rug instantly elevates your room’s style and comfort. It shows off your eye for design and makes the space feel complete. Plus, it’s a practical way to add warmth and texture—your feet will thank you. Ready to redefine your space with a bold rug? Shop around and find your perfect match!
8. Functional Storage with Stylish Bins and Baskets
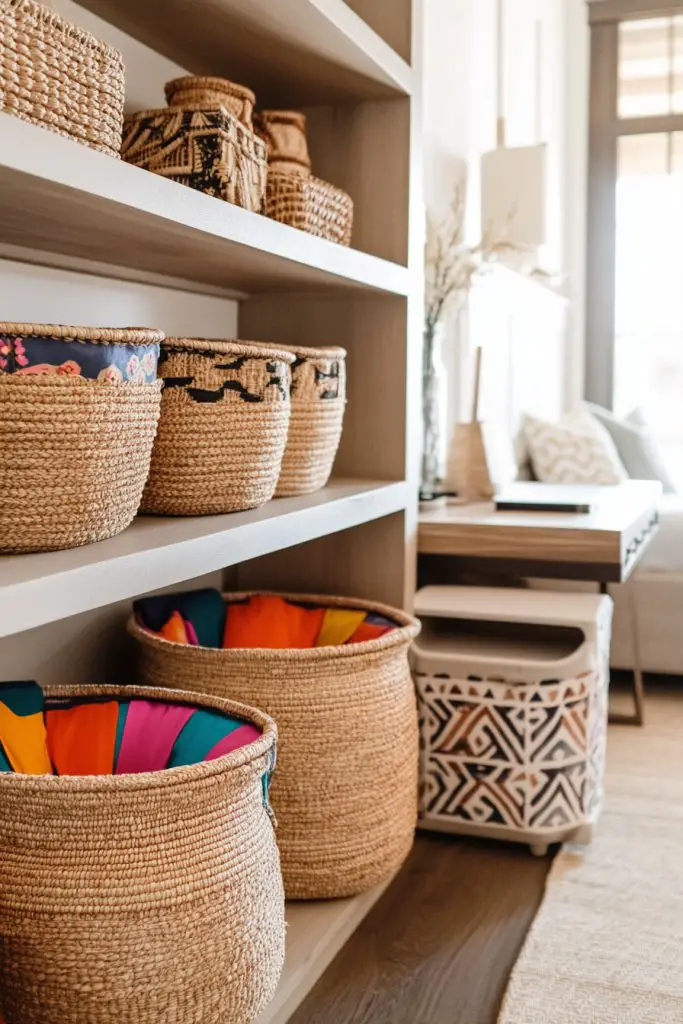
Clutter piling up and making your room feel chaotic? Stylish bins and baskets are your best bet for keeping things organized without sacrificing style. They hide away messy piles and add a decorative touch. Who says storage can’t be cute?
Imagine woven baskets with colorful fabric linings stacked neatly on shelves or under your desk. Open-top bins with geometric patterns or neutral textures store everything from school supplies to accessories. They add visual interest and texture, turning practical storage into a design feature. The room looks tidy, inviting, and thoughtfully curated.
Mix materials—rattan, fabric, plastic, or metal—for variety and texture. Use uniform bins for a clean, minimalist look or mix different styles for an eclectic vibe. Label your containers with tags or stickers for easy access. Seasonal swaps—like cozy fleece-lined baskets in winter—keep things fresh. Incorporate under-bed storage or corner baskets for tricky spaces.
Choose storage options based on your needs—small for accessories, larger for clothes or books. Measure your available space before purchasing. Opt for durable, lightweight materials for easy handling. Use stacking or modular designs to maximize vertical space. Keep frequently used items in easy-to-reach bins, and label everything clearly. Regularly declutter and reorganize to maintain order.
Decorate baskets with fabric wraps or painted designs. Use colorful or patterned liners to add pop. Incorporate seasonal themes—like holiday motifs or pastel colors—to match your decor. Personalize with tags featuring your name or icons. These small touches make storage both functional and fun.
Stylish storage solutions prove that organization can be aesthetically pleasing. They help create a peaceful, clutter-free environment that boosts your mood. Plus, they’re easy to update as your needs or style evolve. Ready to tidy up in style? Start choosing your favorite bins today!
9. Creative Desk Setup with Organizer and Mood Lighting

Does your study area feel uninspired or chaotic? A well-organized desk setup can boost productivity and make homework less of a chore. Adding mood lighting turns your space into a cozy, inviting zone where you actually want to sit down. It’s time to upgrade your workspace game.
Picture a sleek desk with a tidy array of stationery stored in colorful containers or drawer organizers. Adjustable LED strips or clip-on lights provide warm, adjustable illumination that reduces eye strain and creates a relaxed vibe. Decorate your desk with a few favorite items—like a sculptural pen holder or textured mouse pad—to add personality. The overall setup is both functional and visually appealing, making study sessions more enjoyable.
Choose minimalist organizers for a clean look or go for colorful, patterned containers to add fun. Incorporate a corkboard or magnetic strip for quick access to notes and reminders. Seasonal accents—like themed stationery or decorative clips—keep things fresh. For small rooms, vertical storage and wall-mounted lights save space. Larger desks can handle multiple zones—study, craft, or gaming.
Start with a good quality desk that fits your space and needs. Organize supplies using drawers, trays, or stacking containers—prioritize accessibility for frequently used items. Install adjustable LED strips or clip-on lamps with dimming features for mood control. Use cable clips or sleeves to hide wires and keep the surface clutter-free. Add a small plant or sculptural object if plant content is avoided—like a ceramic figure or decorative object. Regularly tidy and update your setup to stay motivated.
Customize your organizer with labels, colorful wraps, or stickers. Incorporate themed accessories that match your hobbies—music, art, or tech. Use a soft fabric or textured mat for comfort and style. Change lighting color or intensity to match your mood or time of day. Your personalized setup will make studying more inviting and less of a chore.
A creative desk setup shows you value your space and your productivity. It’s a reflection of your personality and a tool to boost confidence in your abilities. Plus, it makes daily routines more enjoyable. Ready to transform your workspace? Start organizing and lighting it up today!
10. Hanging Planters and Vertical Garden Alternatives

Want to add a touch of nature without cluttering your space? Hanging planters and vertical gardens are perfect for bringing in greenery or decorative elements while saving floor space. Even if you’re not a plant person, creative alternatives can give your room a fresh, lively vibe.
Envision sleek ceramic or woven hanging planters suspended from the ceiling or mounted on walls. If real plants aren’t your thing, try faux greenery or decorative wall-mounted panels with sculptural elements. These add visual interest and depth, creating a layered, textured look. The vertical garden becomes a living or artistic backdrop that energizes your space.
Use different sizes and shapes—small pots, elongated planters, or wall panels—to suit your style. For seasonal flair, swap out fake or real plants with themed decor—like autumn leaves or winter berries. In small rooms, vertical setups maximize space while still adding greenery. Larger walls can feature a full wall of mounted shelves or panels with layered decor.
Secure ceiling hooks or wall anchors for hanging planters, ensuring they can handle the weight. Choose durable, lightweight containers—ceramic, plastic, or woven materials. Arrange the planters at varying heights for visual interest. For faux greenery, select high-quality artificial plants that look realistic. Regularly dust or water (if real) and check stability to keep your garden looking fresh and secure.
Decorate the planters with painted designs, fabric wraps, or decorative stones. Incorporate themed elements—like seashells or mini sculptures—to match your style. Use lighting—like small spotlights or LED strips—to highlight your garden. Change the display seasonally or when you want a new look, making it a dynamic feature.
Vertical gardens show off your creativity and love for design. They prove that even small spaces can be lively and full of personality. Plus, they’re easy to update and maintain, making your room feel fresh and personalized. Ready to bring some green (or faux green) into your space? Start experimenting today!
11. Vintage or Upcycled Furniture for Unique Style
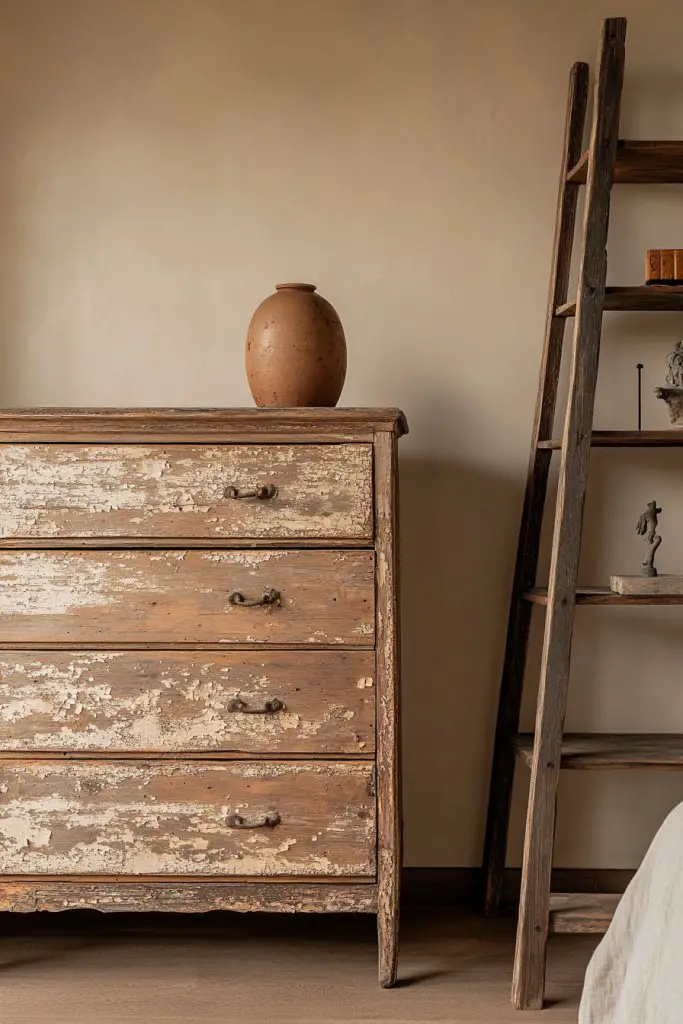
Looking for furniture that stands out and tells a story? Vintage and upcycled pieces add character and eco-friendly flair to your bedroom. They’re a great way to create a unique, personalized space that’s full of charm. Plus, they’re often more affordable than brand-new furniture.
Imagine a distressed wooden dresser with peeling paint or a repurposed ladder turned bookshelf. These pieces bring a rustic, nostalgic vibe, making your room feel more welcoming and intentional. Mixing vintage with modern decor creates an eclectic look that’s both stylish and sustainable. The textures and imperfections tell stories, adding depth to your design.
Choose furniture with a patina or shabby-chic finish for a cozy, worn-in look. Combine different eras and styles for an eclectic vibe—think mid-century chairs with Victorian dressers. To suit your space, opt for smaller vintage pieces or larger upcycled furniture as statement focal points. Seasonal accents can be added with textiles or decorative hardware.
Source vintage or upcycled furniture from thrift stores, flea markets, or online marketplaces. Inspect pieces for stability and repairs needed—repainting or reupholstering can be DIY projects. Mix and match different finishes and hardware for a layered, collected look. Incorporate new cushions or fabric to match your decor palette. Protect surfaces with sealants or paint for longevity.
Add decorative hardware, new paint, or distressed finishes for a custom look. Incorporate personal touches like hand-painted details or vintage accessories. Pair with modern decor elements for balance. Use seasonal textiles or decorative accents to keep your space lively and fresh.
Vintage and upcycled furniture showcase your style and eco-conscious values. They make your room truly one-of-a-kind and inspire others to think creatively about decor. Plus, they’re often more budget-friendly and sustainable. Ready to hunt for your next statement piece? Start exploring thrift shops today!
12. Accent Lighting with Color-Changing LEDs
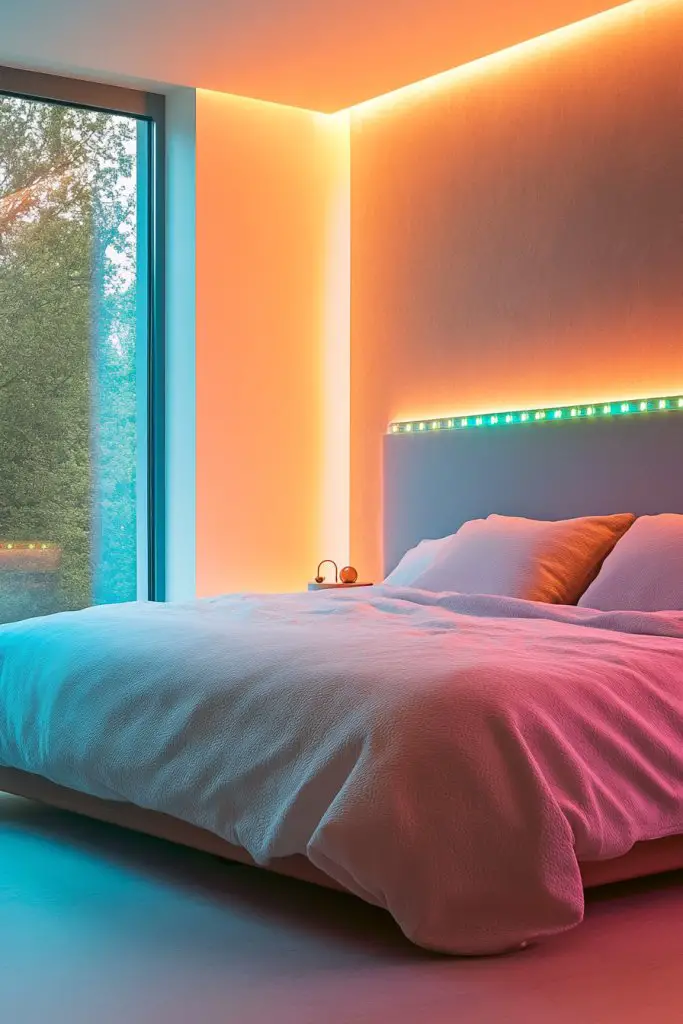
Want to set the perfect mood for studying, relaxing, or hanging out? Color-changing LED lights give you instant ambiance control. They’re versatile, fun, and can totally transform your space with a simple switch. Plus, they’re a fun tech upgrade you didn’t know you needed.
Picture soft, glowing lights that shift from cool blues to warm pinks or vibrant greens, casting different moods in your room. They can be installed behind beds, along shelves, or around windows for a subtle, ambient glow. The changing colors add depth and drama, making your room feel dynamic and alive. Whether for chilling out or energizing your space, these lights do it all.
Choose strip lights that are flexible and easy to install—clip or adhesive-backed options work best. Sync the lights with music or set timers for automatic changes. Use different colors for different occasions—calm tones for study nights, vibrant hues for parties. For smaller rooms, install lights behind headboards or along the ceiling edges for a seamless look.
Select LED strips with remote controls or smart home compatibility. Clean the surface before applying the adhesive for a secure fit. Connect the strips to the power supply, following the manufacturer’s instructions. Program your preferred color schemes or effects via remote or app. Hide wires with cable clips or run them along moldings for a tidy appearance. Test the setup and tweak for the perfect mood.
Create customized lighting scenes—bright for study, soft for sleeping, colorful for parties. Use color modes to match your mood or mood swings. Incorporate complementary decor like textured fabrics or decorative panels that reflect the color themes. Change colors seasonally or for special occasions to keep things fresh. It’s all about making your space uniquely yours.
Color-changing LEDs show that tech can be stylish and functional. They add personality and mood flexibility, making your room a reflection of your vibe. Plus, they’re easy to install and control, so you can experiment freely. Ready to light up your life? The mood is in your hands!
13. Personal Closet Organization with Statement Hooks
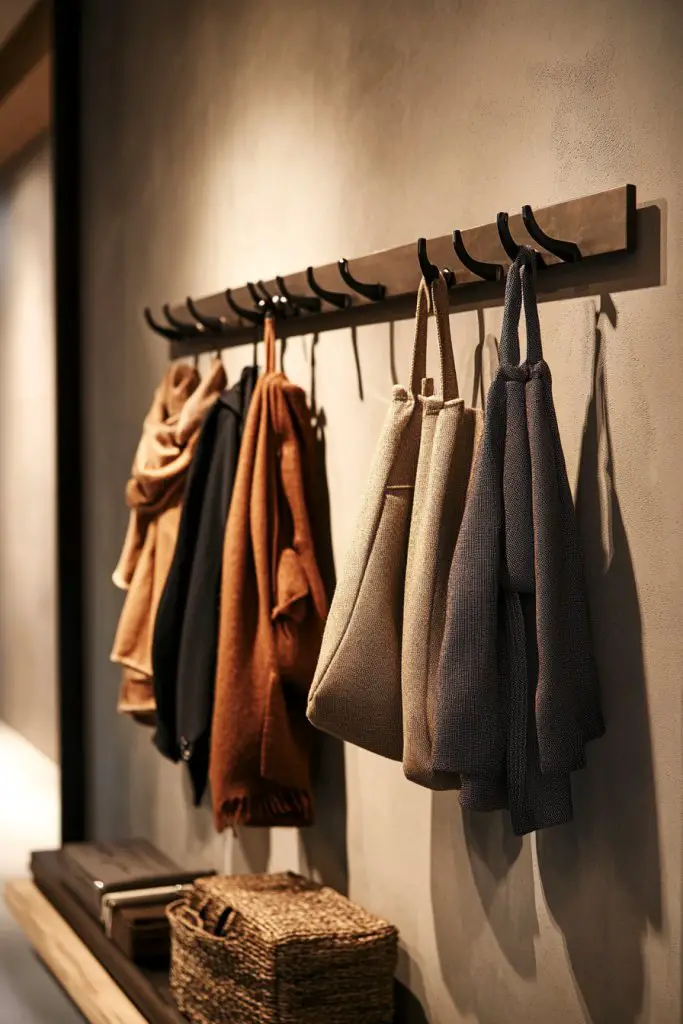
Is your closet a chaotic mess every time you need an outfit? A cluttered wardrobe can kill your vibe and waste precious time. Statement hooks are a simple way to organize your clothes and accessories while adding an edgy, stylish element to your room. It’s time to ditch the chaos.
Imagine a wall-mounted rack with sleek, metallic hooks holding your favorite jackets, scarves, or bags. The hooks serve as both storage and decorative accents, creating an industrial or modern vibe. The organized display makes getting dressed faster and more fun, turning your closet into a mini art installation. The open, accessible setup encourages you to keep things tidy.
Use statement hooks in bold metallic finishes for a contemporary look or rustic wood for a warm, vintage feel. Mix and match different hook styles or sizes for visual interest. Incorporate a small mirror or decorative wall art nearby for a complete styling zone. Seasonal updates can include adding decorative scarves or hats to keep things fresh.
Choose sturdy, stylish hooks that support your clothing weight—metal, wood, or acrylic. Mount them at different heights or in geometric patterns for a custom look. Use wall anchors and a level to ensure even placement. Organize your wardrobe by type or color for easy access. Regularly review and swap items to keep your closet looking intentional and neat.
Decorate the hooks with paint or decorative wraps for a personalized touch. Add small baskets or pouches for accessories underneath. Incorporate themed hooks—like star shapes or initials—to reflect your personality. Use the hooks to display statement pieces or favorite outfits for quick access. It’s a small change that makes a big difference.
Statement hooks turn closet organization into a stylish feature that boosts your confidence. They make dressing up quicker and more enjoyable. Plus, they show off your personal style right at the door. Ready to upgrade your closet? Start planning your hook wall today!
14. Artistic Wall Decals or Vinyl Stickers

Looking for a quick way to spice up your room without permanent changes? Artistic wall decals or vinyl stickers can transform boring walls into expressive canvases. They’re removable, customizable, and perfect for showing off your personality. It’s a fuss-free way to refresh your space anytime.
Visualize a wall decorated with colorful quotes, geometric patterns, or playful motifs—easily applied and removed without damage. The decals can feature anything from inspiring words to abstract designs, creating a dynamic backdrop. They add visual interest and depth, making your room feel more lively and intentional. Perfect for renters or those prone to changing tastes.
Mix different sizes and styles for a layered, artistic look or keep it minimal with a single statement decal. Use themed decals—like stars, moons, or motivational quotes—that align with your personality or current mood. Change your decals seasonally or for special events to keep your decor fresh. For a more cohesive look, coordinate the colors with your room’s palette.
Clean the wall thoroughly to remove dust and grease. Carefully peel the decal from its backing, avoiding tears. Position it on the wall, starting from the center and smoothing outward to eliminate bubbles. Use a credit card or squeegee to press out air pockets. For larger decals, enlist a friend or use a level to ensure perfect alignment. Remove or reposition easily without residue.
Customize decals with your own drawings or quotes using cut vinyl or printable sheets. Layer decals over painted backgrounds or textured walls for added effect. Combine decals with other decor elements—like fabric or lighting—for a personalized scene. Update or change decals regularly to reflect your evolving style.
Wall decals make decorating fun, simple, and reversible. They let you express your creativity and change your space easily without commitment. Plus, they’re a great way to add a personal touch that sparks confidence. Ready to turn your walls into a canvas? Start exploring designs today!
15. Cozy Reading Nook with Bean Bags and Pillows
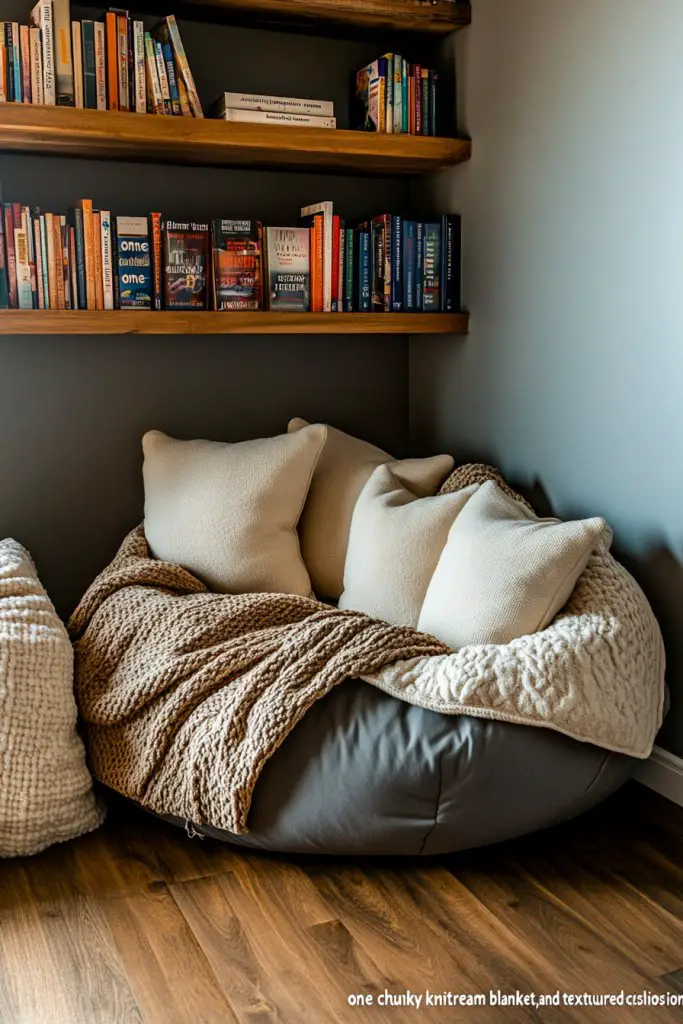
Ever find your teen’s bedroom turning into a chaos zone where relaxation feels impossible? Creating a cozy reading nook addresses that struggle, giving them a dedicated space to unwind and escape the daily grind. It’s about transforming a corner into a sanctuary of comfort, making reading or chilling out irresistible. Who wouldn’t want a little personal retreat right in their own room?
Picture a snug corner bathed in soft ambient light, with a plush bean bag that molds perfectly to your shape. Surround it with layered textiles—a chunky knit throw, a soft cream blanket, and textured cushions in muted tones. The scent of fresh fabric and the gentle sound of a nearby bookshelf filled with their favorite titles complete the scene. It’s an inviting, tactile haven that beckons them to settle in for hours.
Adjust the setup with seasonal textiles: cozy fleece blankets for winter or lightweight linen throws for summer. For smaller rooms, opt for a compact corner with a slim bookshelf and a small floor cushion or pouf. If space allows, add a small side table for snacks or a cup of tea. Personalize with their favorite colors, patterns, or themed decor to match their evolving style and interests.
Start by choosing a quiet corner away from noisy areas. Select a comfy bean bag or a cushioned armchair that’s easy to move and clean. Layer with soft textiles like throws and pillows—preferably washable for easy maintenance. Incorporate good lighting, such as a nearby wall sconce or a portable reading lamp, to avoid eye strain. Add a small shelf or basket nearby for books and accessories, keeping everything within reach. Keep the space clutter-free for maximum relaxation.
Inject their personality with themed pillows, custom embroidery, or DIY wall hangings made from textiles. Incorporate a small side table with their favorite mug or a scented candle (if safety permits). Use decorative baskets for organizing books or magazines for a clean look. Changing textiles seasonally keeps the space fresh and exciting, encouraging regular use.
A dedicated reading nook transforms a bedroom into a versatile retreat, boosting their love for quiet time and reading. It’s a simple yet powerful way to foster independence and personal growth. Plus, every time they settle in, they’ll feel proud of creating a space uniquely theirs. Ready to turn that corner into their new favorite spot?
16. DIY Jewelry and Accessory Organizer
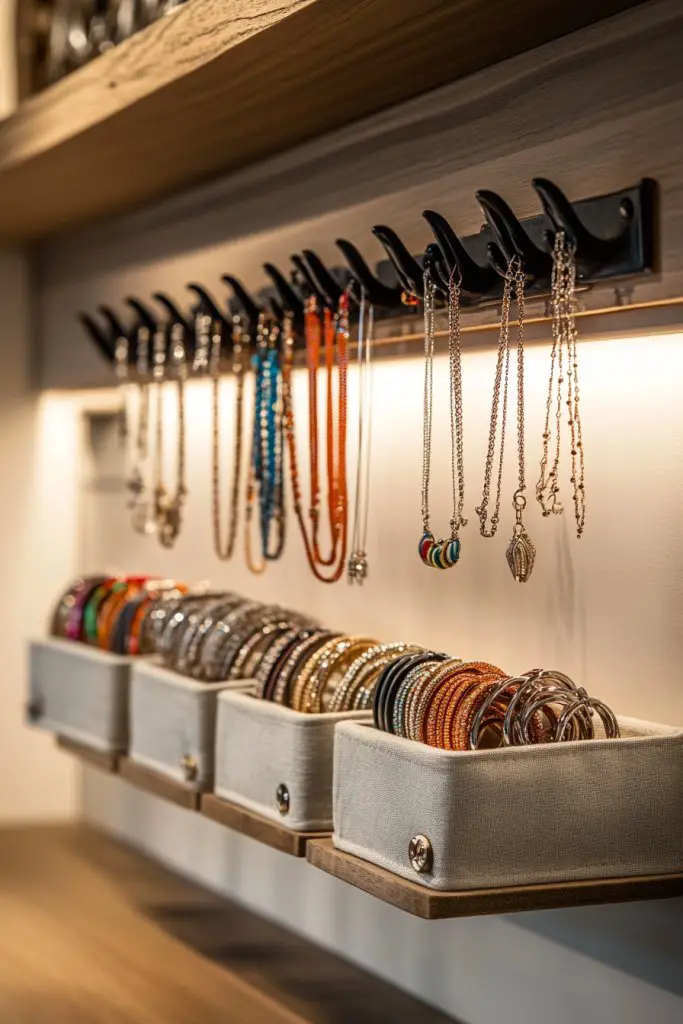
Does your teen spend ages rummaging through drawers or cluttered boxes just to find that one necklace? An organized jewelry stand or wall-mounted accessory display makes everything visible and accessible in seconds. It’s about cutting the frustration and adding a touch of style to their bedroom. Who knew organization could look this good?
Imagine a sleek, wall-mounted frame with multiple hooks and small fabric-lined compartments. Behind it, a row of colorful bangles and layered necklaces hang neatly, catching the light. Nearby, a vintage-inspired stand displays rings and earrings, adding an artistic vibe. The space feels curated yet functional, with everything in easy reach and beautifully displayed.
Use repurposed items like vintage picture frames or wooden pallets for a rustic look, or sleek acrylic panels for a modern vibe. For small spaces, opt for a compact jewelry box with multiple drawers. Create a rotating display with removable hooks or magnetic strips for flexibility. Personalize with themed decor, such as themed stickers or custom labels, to match their personality.
Begin by selecting a suitable wall or corner with enough space. Choose a frame or board that complements their room decor. Attach hooks, small shelves, or fabric pouches—easy to install with basic tools. Use adhesive-backed magnets or hooks for lightweight accessories, avoiding damage to walls or furniture. Organize items by type or color to simplify selection. Regularly update the display to keep it fresh and inspiring.
Add decorative elements like small LED fairy lights or themed stickers around the organizer. Use colorful or patterned fabric linings inside compartments to add visual interest. Incorporate a small mirror nearby to try on accessories quickly. Encourage customization with DIY labels or tags for a personal touch. This not only keeps their collection tidy but also turns it into a fun creative project.
A personalized jewelry organizer boosts confidence by making accessories feel special and easy to access. It encourages them to experiment with different styles and develop their fashion sense. Plus, it’s a practical way to teach responsibility and tidiness. Ready to make their bedroom both functional and fabulous?
17. Themed Corner for Hobbies or Passion Projects

Ever wish your teen’s bedroom reflected their passions and encouraged their creativity? Dedicating a themed corner for hobbies like music, art, or gaming transforms a cluttered space into an inspiring sanctuary. It’s about making their interests a focal point, boosting motivation and pride. Who wouldn’t love a space that celebrates their unique talents?
Visualize a cozy nook with a small worktable, colorful storage bins, and wall-mounted shelves filled with their tools and gear. Bright posters, custom decals, or themed fabric curtains set the tone—whether it’s a music zone, art studio, or gaming hub. A comfy chair or bean bag invites them to spend hours immersed in their passion. The overall vibe screams personal expression and enthusiasm.
Adjust the theme with removable decals or fabric drapes that can be swapped out as their interests evolve. Use storage solutions like stackable bins or wall-mounted trays for supplies. For small rooms, opt for foldable tables or vertical storage to save space. Personal touches like a custom name sign or themed decor make it unmistakably theirs.
Start by choosing a corner or wall that’s free of distractions. Install sturdy shelves or pegboards for easy access to tools or equipment. Use labeled containers or drawers to keep supplies organized. Incorporate a comfortable seating option suited for long sessions. Keep the area well-lit with task lighting to prevent eye strain. Regularly refresh the decor to keep it exciting and motivating.
Add personalized elements like a custom wall decal or their favorite quote in bold lettering. Incorporate a display area for their achievements, such as medals, trophies, or artwork. Use themed textiles or cushions to add comfort and style. Encourage them to decorate with their own DIY projects, making the space truly their own.
A dedicated hobby corner fuels passion and nurtures their talents. It shows that their interests are valued and supported, boosting confidence and independence. Plus, it’s a fantastic way for them to develop skills and find joy in their pursuits. Ready to turn a corner into their personal passion zone?
18. Minimalist Design with Clean Lines and Neutral Colors
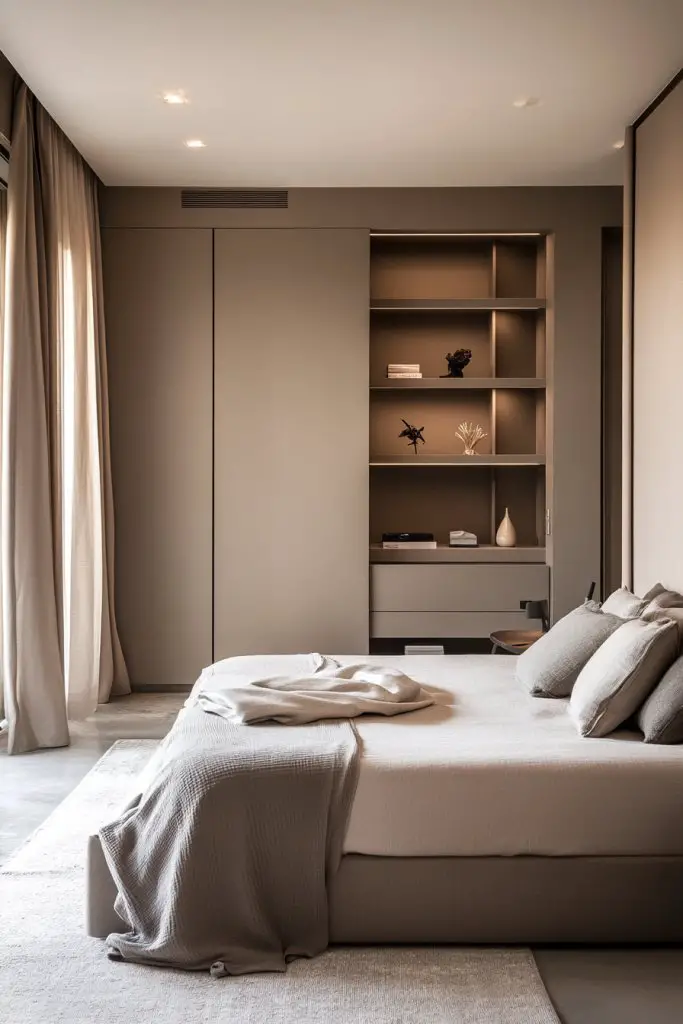
Does your teen’s bedroom feel cluttered and chaotic despite your best efforts? Embracing a minimalist design with clean lines and neutral tones creates a calming environment that promotes focus and peace. It’s about stripping away the unnecessary to highlight what truly matters. Who wouldn’t want a space that feels organized and serene?
Imagine a room painted in soft taupe or cool gray, with sleek furniture featuring smooth surfaces and simple shapes. The space feels open, with hidden storage solutions keeping clutter out of sight. Natural light floods the room, enhancing the soft, muted palette. The overall effect is a tranquil haven that invites relaxation and mental clarity.
Introduce subtle textures with woven baskets, linen textiles, or a soft rug in neutral shades. Keep decor minimal—think geometric shapes or simple framed quotes—avoiding overly busy patterns. For a seasonal update, swap textiles or add a few statement pieces like a sculptural object or architectural detail, all keeping with the minimalist theme. Adapt the layout to maximize openness.
Start by decluttering and choosing essential furniture pieces with clean lines. Opt for multi-purpose items like beds with built-in drawers or fold-away desks. Keep surfaces clear—use wall-mounted organizers or hidden compartments. Use soft, natural lighting such as indirect LED strips or sconces to enhance the calm aesthetic. Maintain a consistent color palette and regularly purge unnecessary items to uphold the minimalist vibe.
Add subtle decorative accents like monochrome artwork or textured cushions in neutral tones. Incorporate personal items in a tidy way, such as a single statement piece or a curated collection. Keep accessories minimal but meaningful—like a decorative bowl or a sculptural lamp. Focus on quality over quantity to create a cohesive, stylish look that’s easy to maintain.
A minimalist bedroom helps clear the mind and reduces stress, fostering better focus and sleep. It encourages disciplined habits and appreciation for simple beauty. Your teen will learn the value of quality and order, setting a foundation for lifelong organization. Ready to embrace calm and clarity?
19. Bold Wallpaper or Fabric Backdrops for Photos
Getting the perfect shot for social media can be a challenge when your teen’s background is cluttered or uninspiring. A bold wallpaper or fabric backdrop turns their bedroom into a professional-looking photo studio in seconds. It’s about making every selfie or TikTok pop with style and personality. Who knew bedroom decor could double as a photo set?
Visualize a vibrant, patterned backdrop, perhaps with geometric shapes or floral motifs, hanging behind their setup. The rich colors and textures add depth to any photo, making images instantly more engaging. Their room now doubles as a creative space where every shot feels curated. The backdrop complements their outfit and mood, elevating their social feed.
Choose removable wallpapers or fabric panels that are easy to install and switch out. For seasonal or themed shoots, swap backdrops to match holidays or trends. Use a simple, foldable stand or wall hooks for quick setup and takedown. Personalize with DIY elements like painted frames or decorative borders to match their aesthetic.
Select a wall or corner with enough space for the backdrop. Use removable adhesive strips or hooks to hang fabric or wallpaper smoothly. Make sure the backdrop is wrinkle-free and securely attached. Incorporate good lighting—either natural light or portable LED panels—to highlight features and eliminate shadows. Keep accessories minimal to keep focus on the backdrop. Regularly change the backdrop to keep content fresh and exciting.
Add themed elements like metallic accents or glitter for extra flair. Create a collection of different backdrops for various moods and occasions. Encourage your teen to design their own fabric or paper backdrops for a personal touch. Use color-coordinated props and outfits to complete the professional look.
A dedicated photo backdrop boosts confidence by making every shot look intentional and styled. It encourages creativity and helps them develop their personal brand or style. Plus, it’s a fun, inexpensive way to upgrade their content game. Ready to turn their room into a picture-perfect studio?
20. Personal Wall Calendar or Planner for Organization
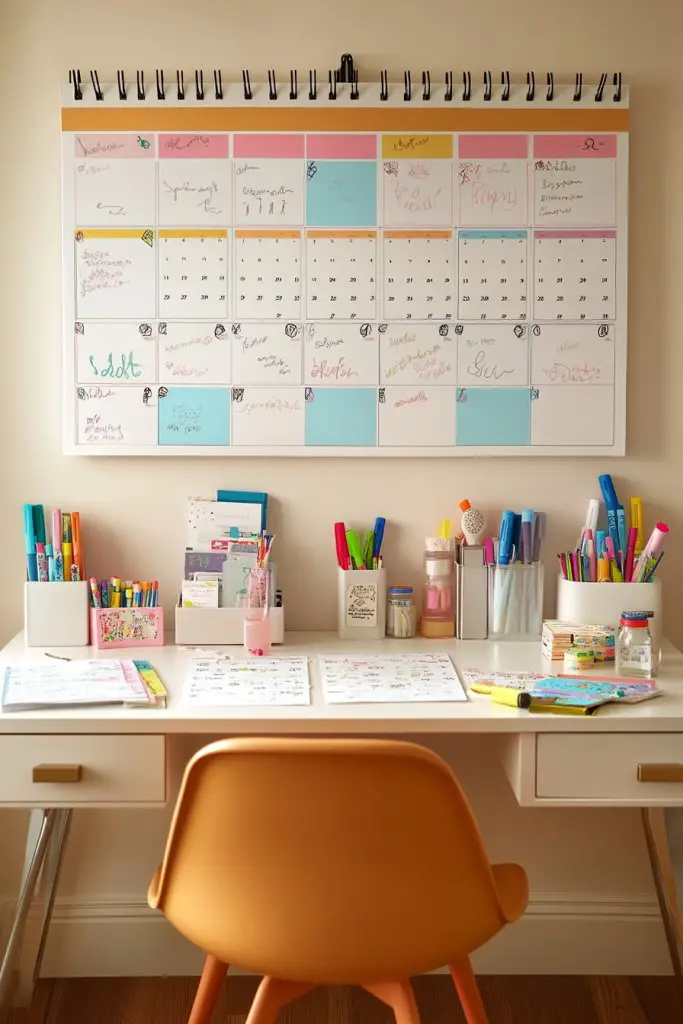
Teenagers often struggle with staying organized amidst their busy schedules filled with school, activities, and social plans. It’s easy to forget deadlines, appointments, or important events, which can cause stress. They want a simple yet effective way to keep everything in check without feeling overwhelmed. A personal wall calendar or planner helps them take control and feel more confident about managing their time.
Imagine a colorful, stylish calendar hanging above a clutter-free desk. Bright markers, washi tapes, and decorative stickers make planning fun and personalized. The calendar features large blocks for notes, with space for doodles or motivational quotes. As you glance at it, you see a well-organized month filled with deadlines, birthdays, and goals, giving a sense of accomplishment and clarity. It’s a cheerful, motivating focal point.
Teenagers can personalize their planners with themes fitting their style, like minimalist monochromes or playful patterns. For small rooms, compact or slim calendars save space, while larger wall-mounted versions work well in bigger bedrooms. Digital options can be combined with physical planners for tech-savvy teens. Seasonal colors or holiday-themed layouts add a festive touch during special times of the year.
Start by choosing a sturdy, visually appealing wall space. Pick a large, easy-to-read calendar or planner—either pre-made or DIY using chalkboards or peel-and-stick sheets. Use colorful markers, washi tapes, or decorative clips for easy updates and personalization. Mount it securely with adhesive strips or nails, ensuring it’s accessible. Encourage regular updates, making planning part of their daily routine. Incorporate sections for goals, reminders, and notes to keep everything organized.
Add personal touches like motivational quotes, photos, or doodles to make the calendar uniquely theirs. Incorporate themed stickers for special days or achievements. Use different colors for subjects, activities, or priorities to enhance clarity. Consider adding a small corkboard or dry erase section nearby for quick notes or inspiration. The goal is to turn it into a motivational hub that encourages consistency and creativity.
A personal wall calendar isn’t just about organization—it’s about building habits that boost independence. Seeing progress visually can motivate teens to stay on top of their responsibilities. Plus, it adds a pop of personality to their space, making it more inviting. Ready to turn chaos into clarity? Your new favorite organizational tool awaits!
21. DIY String Art or Wall Hangings
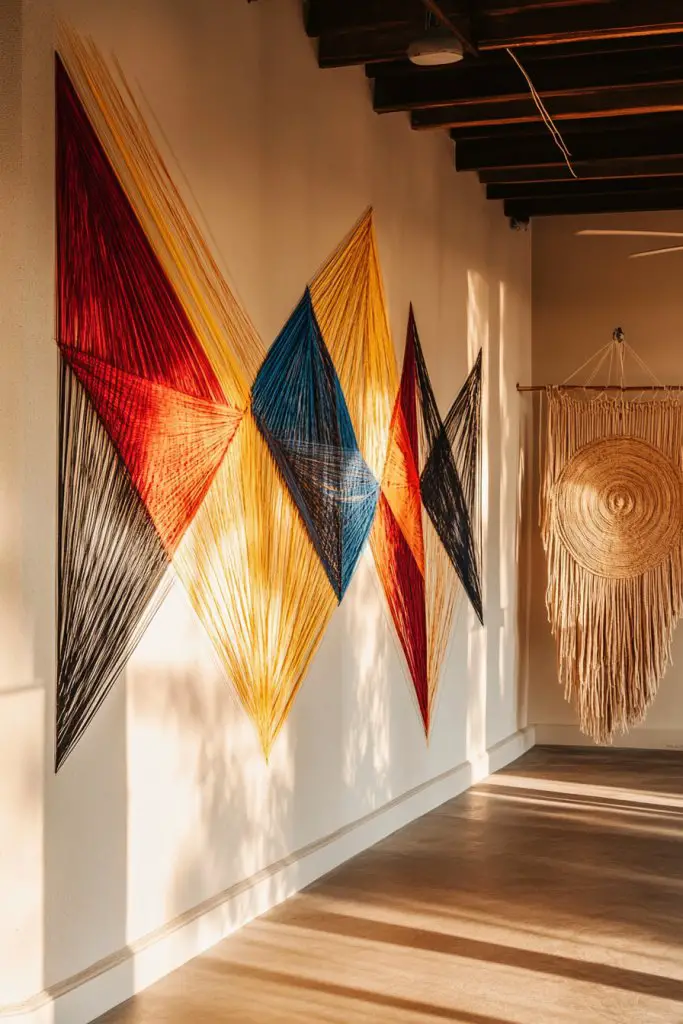
Teenagers love expressing their creativity, but sometimes they struggle to find unique decor that truly reflects their personality. Generic posters or prints don’t cut it anymore. They crave something handmade and meaningful—a piece they can craft themselves that adds character and a personal touch. DIY string art or wall hangings fill this gap perfectly, turning simple supplies into stunning art.
Picture a wall adorned with vibrant, geometric string art in bold colors, casting intricate shadows as sunlight hits it. The texture of the intertwined threads contrasts beautifully with smooth painted walls. Or imagine a boho-inspired wall hanging woven from natural fibers, adding warmth and texture to the room. These pieces serve as focal points, showcasing their personality with every knot and stitch, making their space uniquely theirs.
Teens can choose abstract shapes, heartfelt quotes, or favorite symbols for their string art. Bright neon threads create a lively vibe, while muted earth tones lend a calming atmosphere. They can hang woven wall hangings, macramé, or even fabric banners depending on their style. Small spaces benefit from compact designs, while large blank walls invite more elaborate projects. Seasonal themes or personal milestones can inspire new creations.
Gather supplies like wooden boards or canvas, colorful embroidery thread or yarn, and basic tools such as nails or push pins. Sketch a simple design or pattern on paper before transferring it onto the surface. Hammer in nails or pins according to the pattern, spacing them evenly. Then, weave or knot the string around the nails, following the design. Experiment with different colors and techniques to add depth and interest. Finishing touches include sealing the edges or framing the piece for added polish.
Encourage teens to incorporate their favorite colors, symbols, or words into their designs. They can add small embellishments like beads or charms for extra flair. Swap out strings or change patterns over time to keep the decor fresh. Create themed series, like celestial motifs or inspirational quotes, that evolve with their interests. This ongoing project becomes a creative outlet and a statement piece in their room.
Making their own art boosts confidence and inspires a sense of achievement. It proves they can create something beautiful without needing professional skills. Plus, it adds a cozy, artistic vibe that makes their room more inviting. Ready to knot your way to a personalized space? The possibilities are endless, and the satisfaction is priceless!
Conclusion
These diverse bedroom inspirations for teenagers showcase how to personalize your space in exciting and meaningful ways. From bold color schemes to clever organizational hacks, there’s something to suit every taste and personality. Don’t hesitate to try these ideas out and make your bedroom a vibrant, comfortable retreat that fuels your individuality. Remember, your room is your canvas—start creating your perfect space today!