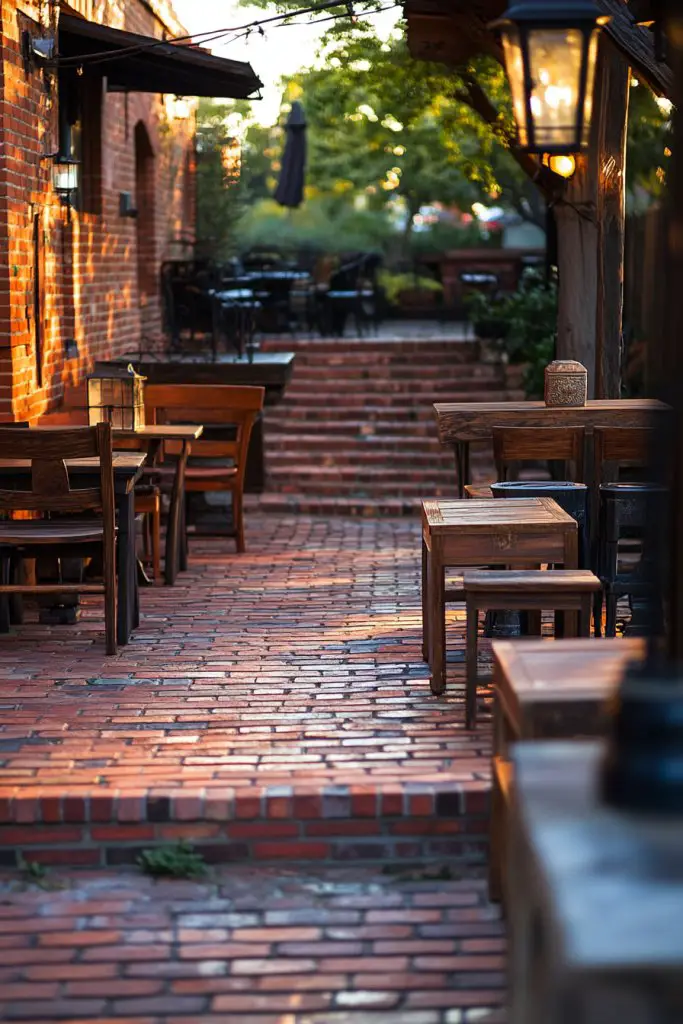
Imagine stepping into a backyard that instantly exudes charm and timeless appeal — that’s the magic a beautiful brick patio can bring. Known for their durability and classic look, brick patios have remained a favorite among homeowners seeking a warm, inviting outdoor space that ages gracefully.
In this article, you’ll explore a variety of inspiring brick patio ideas that cater to different styles and preferences. Whether you prefer a traditional pattern, a modern twist, or something uniquely personalized, these ideas will help you create an outdoor oasis that’s both functional and stunning.
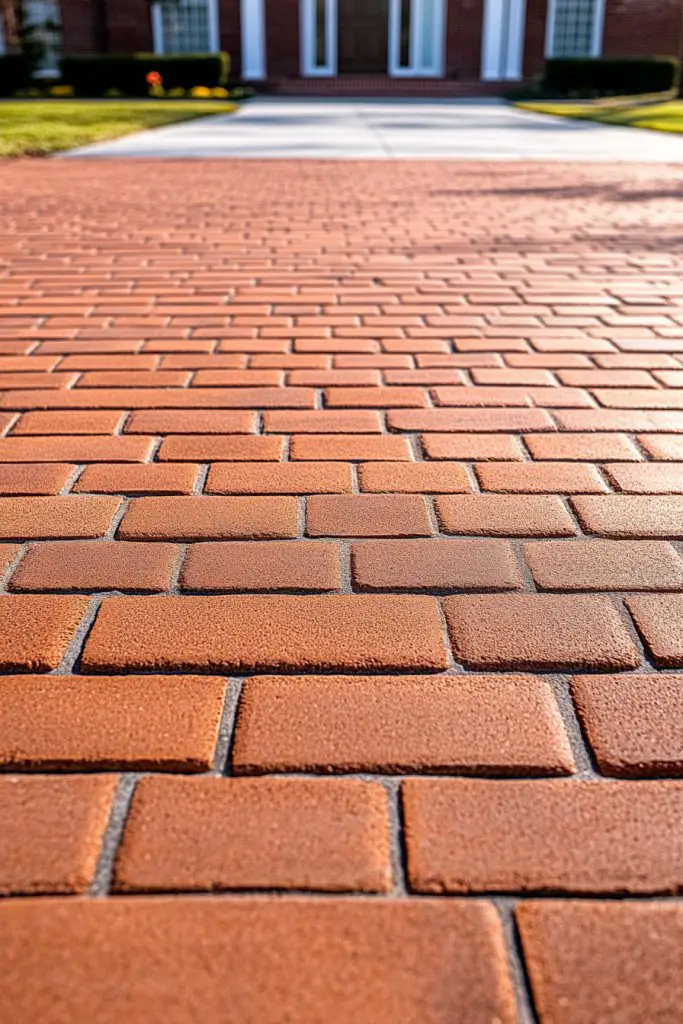
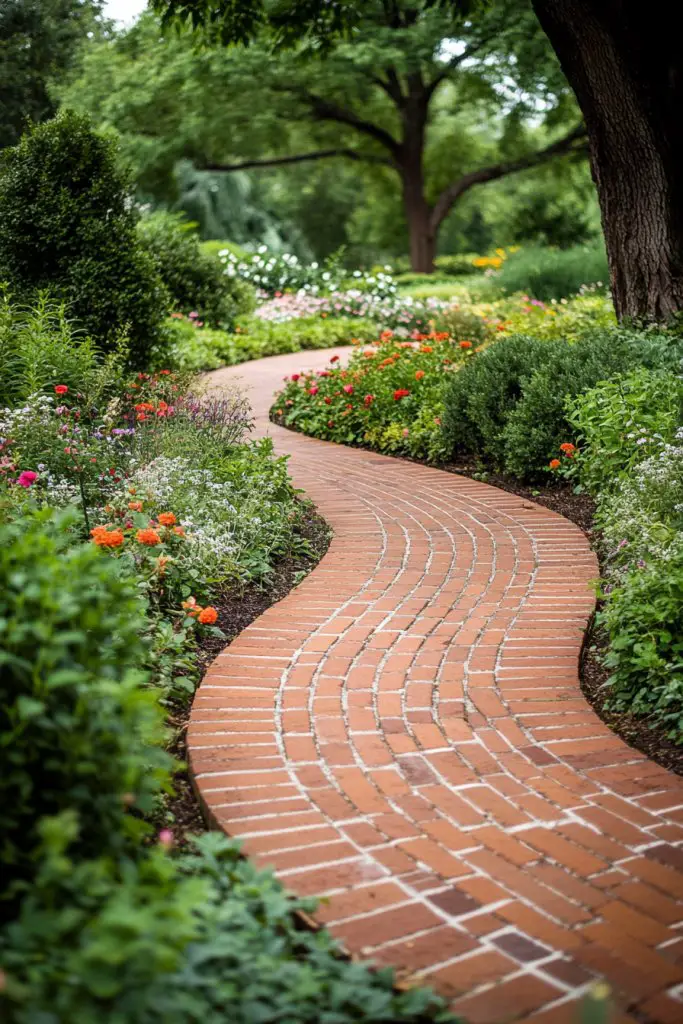
1. Classic Red Brick Pattern with Herringbone Design
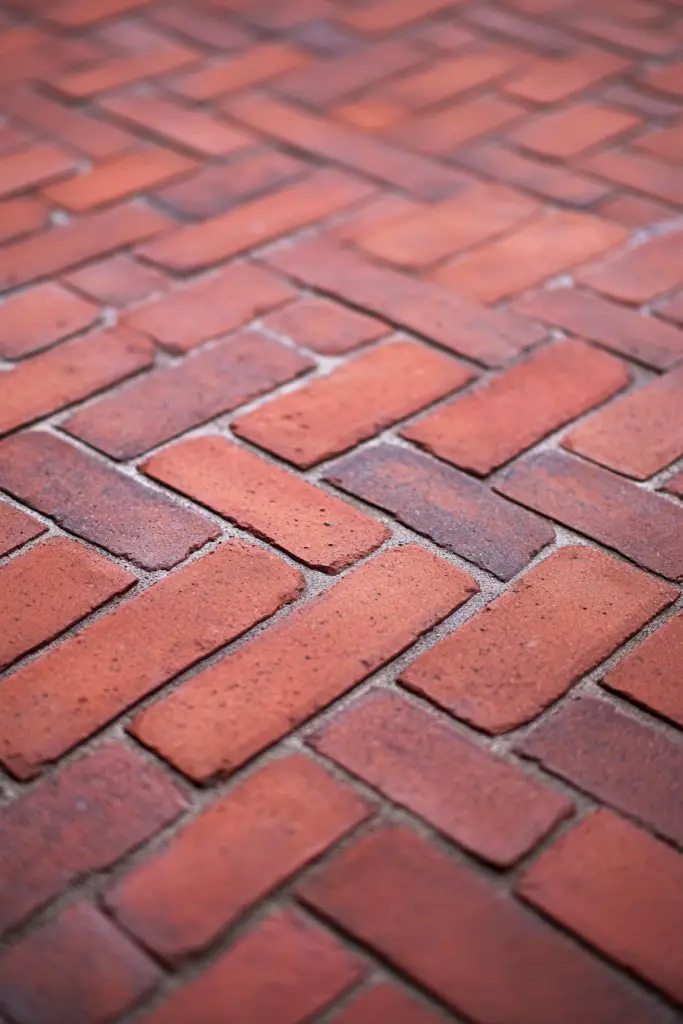
Ever dreamed of elevating your outdoor space with a touch of timeless elegance? The classic red brick herringbone pattern offers a sophisticated upgrade that never goes out of style. It’s perfect for homeowners craving a durable yet refined look that turns heads. Whether you’re hosting summer barbecues or enjoying quiet mornings, this design adds a layer of charm to your backyard.
Recommended Products to replicate this idea
| # | Preview | Product | |
|---|---|---|---|
| 1 |

|
Clay-X Red Clay Stain Remover – 1 Gallon | Removes Red Clay Stains & Rust from Concrete, Brick,... | Buy on Amazon |
| # | Preview | Product | |
|---|---|---|---|
| 1 |

|
Olde Town Herringbone Brick Concrete Stamp Single by Walttools | Classic Woven Paver Pattern, Sturdy... | Buy on Amazon |
Picture a sprawling patio where bricks are laid in a precise zigzag pattern, creating a dynamic visual flow. The deep, warm reds contrast beautifully with lush greenery or neutral outdoor furniture. The textured surface catches sunlight at different angles, giving your space a lively yet balanced aesthetic. Imagine walking barefoot across this intricate pattern, feeling the craftsmanship beneath your feet.
You can adapt this pattern to smaller spaces by using narrower bricks or mixing in darker shades for a modern twist. For a more rustic vibe, opt for slightly uneven bricks with weathered finishes. Seasonal accents like cozy throws or colorful cushions can complement the pattern without overpowering it. This design also works well with both traditional and contemporary furniture styles.
Start by selecting high-quality red bricks suitable for outdoor use, ensuring they resist weathering. Prepare a level base with gravel and sand, compacting it tightly. Lay the bricks at a 45-degree angle in a herringbone pattern, using spacers to maintain uniform gaps. Use a rubber mallet to set each brick firmly and fill joints with sand or fine gravel. Seal the surface if desired for added durability, and regularly clean to maintain its vibrancy.
Add personalized touches by integrating custom inlays or borders with contrasting bricks. Incorporate decorative edge patterns or set small lanterns along the perimeter for evening ambiance. You could also embed engraved stones or plaques into the pattern for a unique family signature. Bright outdoor cushions or a colorful outdoor rug can soften the overall look.
A herringbone brick patio is a classic that elevates any yard into a stylish retreat. Its timeless appeal and proven durability make it a favorite among DIY enthusiasts and pros alike. Imagine the compliments you’ll receive when friends see your craftsmanship—it’s a project worth tackling! Ready to turn your outdoor space into a masterpiece?
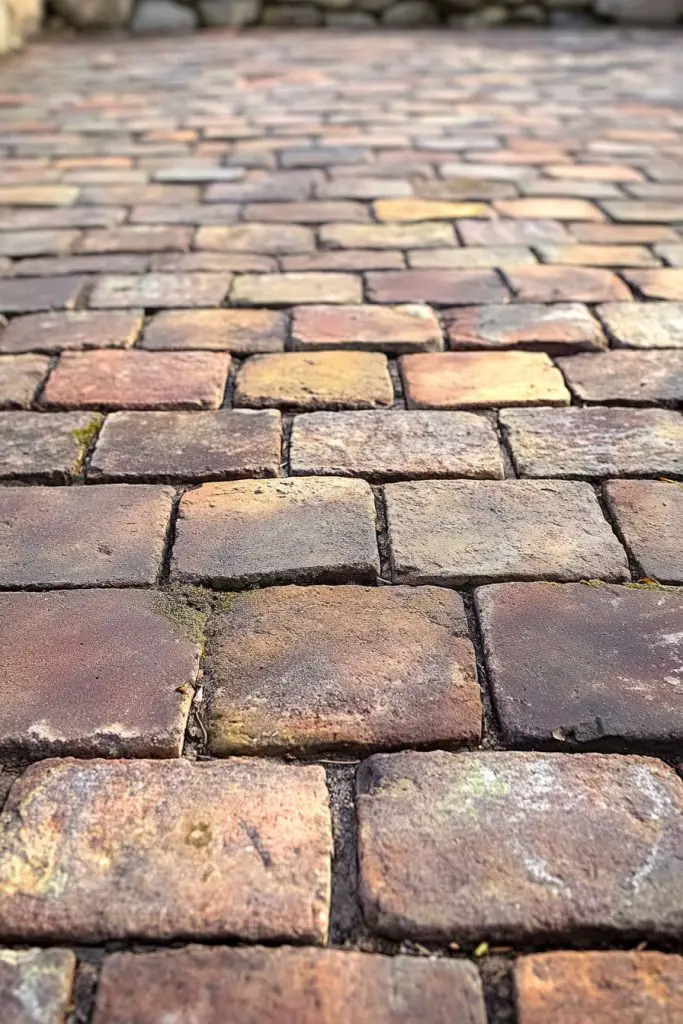
2. Rustic Cobblestone-Style Brick Layout
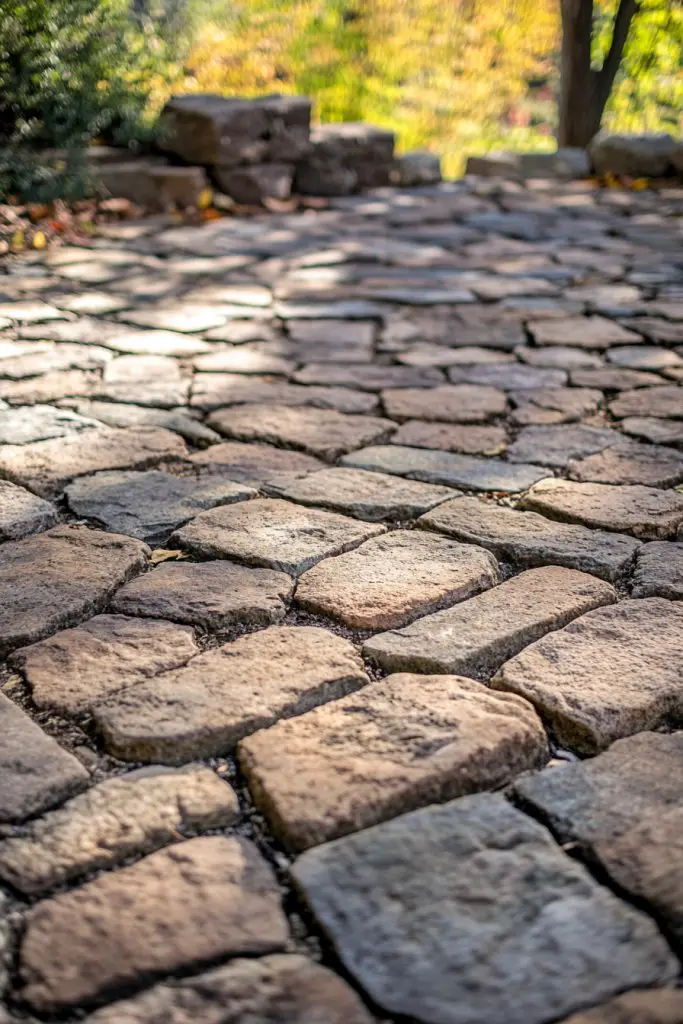
Craving that vintage, storybook charm for your garden or patio? The rustic cobblestone-style layout with uneven bricks offers genuine old-world appeal. It’s ideal if you want a space that feels both inviting and full of character. Plus, it’s a fantastic way to add texture and visual interest without a hefty price tag.
Recommended Products to replicate this idea
| # | Preview | Product | |
|---|---|---|---|
| 1 |

|
AUTUMN Arabelle Paver Stone Maker - DIY Stepping Stone Pavers, Concrete Walkway Molds | Buy on Amazon |
| # | Preview | Product | |
|---|---|---|---|
| 1 |

|
OFFSCH Concrete Paver Mold Reusable Pavement Mold 17.32X17.32X1.37In Antique Colored Brick for... | Buy on Amazon |
Envision a winding pathway or a cozy patio made of irregularly shaped bricks, each with a weathered finish. The uneven surface invites barefoot strolls, while the earthy tones blend seamlessly with natural surroundings. Moss and small plants often find a home in the crevices, enhancing that authentic, aged look. The overall effect feels like a quaint village street brought right into your backyard.
For a more curated look, combine different shades of browns, grays, and reds to mimic natural stones. You can also create a patchwork effect by mixing new bricks with reclaimed, weathered pieces. Seasonal touches like string lights or a vintage-style bench complete the scene. This layout works well with rustic furniture, wooden tables, and cozy textiles.
Begin by sourcing uneven bricks with textured surfaces, ideally reclaimed or weathered bricks for authenticity. Prepare a compacted gravel base, adding a layer of sand for leveling. Lay the bricks randomly or in a loosely organized pattern, pressing them into the sand to mimic natural stone placement. Fill gaps with fine gravel or soil, and let moss or grass grow naturally in the crevices for added charm. Regular maintenance involves removing weeds and occasional sand re-filling.
Personalize by creating small focal points with decorative sculptures, vintage lanterns, or weathered planters. You could also design a small mosaic or embedded stones for added artful detail. Use outdoor cushions on rustic benches or add a vintage wheelbarrow as a decorative feature. These touches amplify the rustic vibe while making the space uniquely yours.
Nothing beats the timeless appeal of a cobblestone-inspired layout—it’s like stepping back in history. Its natural irregularity hides minor imperfections and adds personality to your space. Plus, DIY installation is feasible with patience and a bit of creativity. Ready to craft your own vintage-inspired oasis?
3. Incorporating Brick Borders with Gravel or Mulch Infill
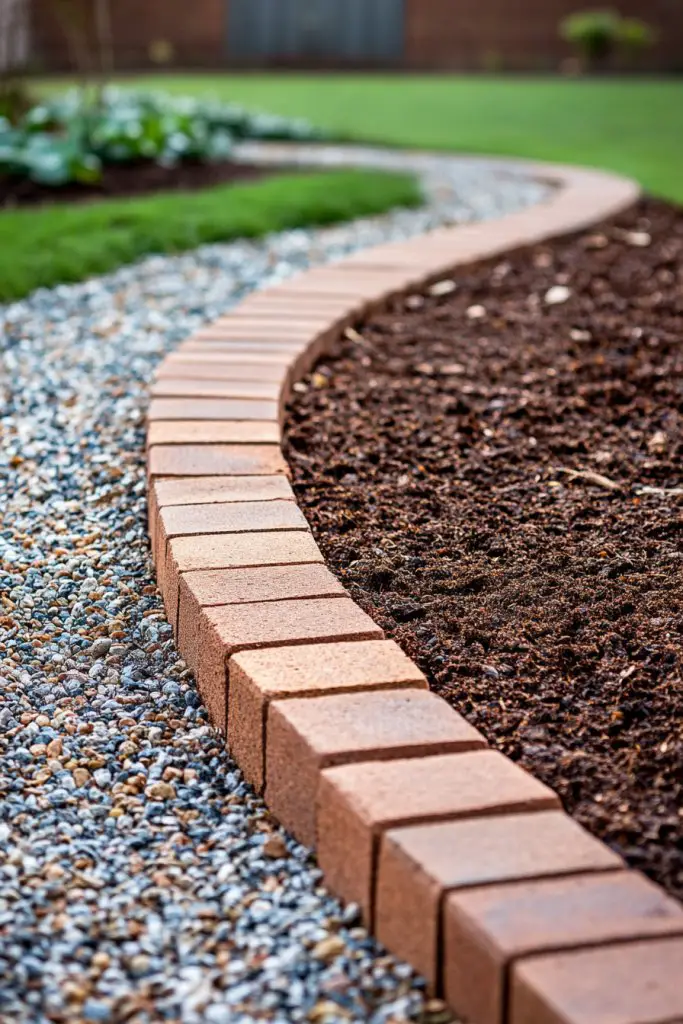
Looking for a way to define your outdoor space while keeping maintenance simple? Using brick borders combined with gravel or mulch infill offers a clean, organized look that’s easy to maintain. It’s perfect for creating distinct zones without complex paving techniques. Plus, it adds a polished, finished feel to your patio or garden beds.
Recommended Products to replicate this idea
| # | Preview | Product | |
|---|---|---|---|
| 1 |
|
EasyFlex No-Dig Landscape Edging with Anchoring Spikes, 2.7 in Tall Decorative Stone-Look Garden... | Buy on Amazon |
| # | Preview | Product | |
|---|---|---|---|
| 1 |

|
Generic All Purpose Pea Gravel 50 lb, brown | Buy on Amazon |
Imagine a sleek brick edge framing a gravel pathway or mulch-filled garden bed. The bricks serve as a visual boundary, highlighting different areas, while the loose gravel or mulch creates a soft, natural contrast. This combination offers a textured, layered appearance that feels both modern and inviting. The warm hues of the bricks complement the earthy tones of gravel or mulch, creating harmony in your landscape.
Choose bricks in various shades—reds, browns, or even weathered gray—to match your overall landscape style. For a contemporary look, go for larger, clean-lined bricks; for rustic charm, pick uneven or reclaimed bricks. Seasonal accents like colorful mulch or decorative stones can be added to enhance visual interest. This approach adapts well for walkways, garden beds, or patio edges.
Start by laying a mortarless or mortared brick border along your chosen area, ensuring they’re evenly spaced and level. Next, fill the interior with gravel or mulch, raking it smooth and compacting as needed. For a more permanent solution, secure bricks with mortar; for a flexible, DIY-friendly approach, skip mortar and rely on the weight and friction. Regularly replenish gravel or mulch to keep the edges looking fresh and neat. Weeding and raking maintain the overall aesthetic.
Add decorative stones or engraved bricks within the border for a personalized touch. Incorporate solar-powered landscape lights along the border for nighttime ambiance. Use colorful mulch or patterned gravel to add visual interest and coordinate with your existing decor. Small stepping stones or sculptures can create focal points along the border.
This border and infill technique offers a balance of style and practicality, perfect for DIY enthusiasts. It’s versatile enough to suit various garden styles, from modern to cottage. The low-maintenance nature means you spend less time upkeep and more time enjoying your outdoor space. Ready to create defined zones that look polished and inviting?
4. Circular Brick Patio with Central Fire Pit
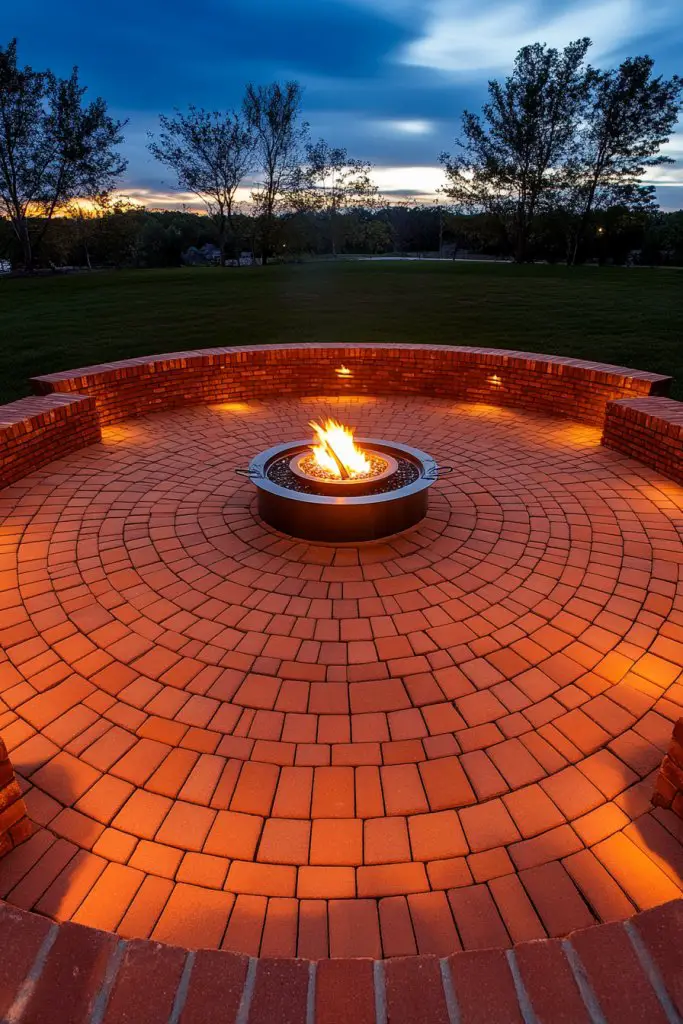
Ever wanted a cozy, inviting spot for gatherings that feels both functional and stylish? A circular brick patio centered around a fire pit hits that sweet spot. It creates a natural focal point and fosters a sense of community. Plus, it offers a perfect space for roasting marshmallows or sharing stories under the stars.
Recommended Products to replicate this idea
| # | Preview | Product | |
|---|---|---|---|
| 1 |

|
SoulMate Outdoor 40-Inch Outer/36-Inch Inner Fire Pit Ring Smokeless,Duty Solid Metal Steel Round... | Buy on Amazon |
| # | Preview | Product | |
|---|---|---|---|
| 1 |

|
Upgraded Paver Removal Tool, Sapele Hardwood Handle & Dual-Height Joint Scraper, Heavy-Duty Steel... | Buy on Amazon |
Picture a perfectly round brick surface, with a rustic fire pit at its center, surrounded by comfortable seating. The warm, reddish tones of the bricks contrast beautifully with the flickering flames and dark night sky. String lights or lanterns hung on nearby trees add a soft glow, enhancing the intimate atmosphere. The circular shape encourages conversation, making everyone feel included.
You can customize the size of the circle based on your space, from intimate nooks to spacious patios. Use bricks with a smooth or textured finish for different visual effects. Incorporate built-in seating walls or add plush outdoor cushions for comfort. For different seasons, layer on weather-resistant rugs or add removable covers for furniture.
Begin by marking out the circle’s dimensions and excavating the area. Lay a sturdy gravel base, then set the bricks in a circular pattern, ensuring each is level and tightly packed. Install the fire pit at the center, securing it to withstand heat and weather. Finish by filling gaps with sand or gravel, and seal the surface if desired. Add seating around the perimeter with matching bricks or outdoor furniture.
Personalize with engraved stones, decorative fire pit surrounds, or custom brick patterns. Incorporate built-in planters or side tables made from bricks for added functionality. Use weatherproof cushions or covers in your favorite colors to match your outdoor decor. Lighting options like solar sconces or string lights complete the ambiance.
A circular brick patio with a fire pit transforms your yard into a welcoming retreat. It’s easy to customize and adapt over time. You’ll find yourself hosting more gatherings, making memories around the fire. Ready to create your own outdoor haven?
5. Brick Patio with Built-In Seating Walls
Tired of bulky, unattractive outdoor furniture that eats up space? Built-in brick seating walls offer a sleek, seamless alternative. They maximize seating while blending effortlessly into your landscape. Plus, they add architectural interest and a polished look that elevates your entire outdoor area.
Recommended Products to replicate this idea
| # | Preview | Product | |
|---|---|---|---|
| 1 |
|
RadonSeal BrickTastic Brick & Paver Cleaner (1-Gal) - Industrial-Strength Cleaner & Degreaser for... | Buy on Amazon |
| # | Preview | Product | |
|---|---|---|---|
| 1 |

|
Kichler 20" Capanna 1-Light Extra-Large Wall Light with Clear Water Glass in Textured Black, for... | Buy on Amazon |
Imagine low brick walls lining your patio, topped with smooth, wide caps for comfortable sitting. The bricks’ rich, earthy tones complement surrounding greenery, creating a cohesive visual flow. The seating walls serve dual purposes—providing a place to relax and acting as a boundary for different zones. During sunset, the warm glow of the bricks enhances the inviting atmosphere.
Adjust the height and length of the walls to suit your needs, from casual perches to formal seating. Use bricks with a weathered finish for rustic charm or sleek, uniform bricks for modern design. Incorporate built-in planters or ledges for added greenery or decorative elements. These walls work well with various furniture styles, from minimalist to traditional.
Start by planning your seating layout and marking the wall positions. Excavate trenches and lay a gravel base for stability. Use mortar or dry-stack techniques to build the walls, ensuring each course is level. Cap the walls with wide bricks or slabs for comfortable seating. Finish by sealing the bricks or applying a weather-resistant coating. Regular cleaning and minor repairs keep the look sharp.
Add cushions or fabric covers that can be easily changed to suit seasons or moods. Integrate built-in tables or storage compartments within the walls for convenience. Use decorative ashlar stone caps or mosaic inlays for a personalized touch. Outdoor lighting fixtures can be embedded into the walls for nighttime ambiance.
Built-in seating walls create a sleek, integrated look that’s both functional and stylish. They add value and comfort, making your yard a true extension of your living space. It’s a project that pays off in both beauty and utility. Ready to redefine your outdoor seating?
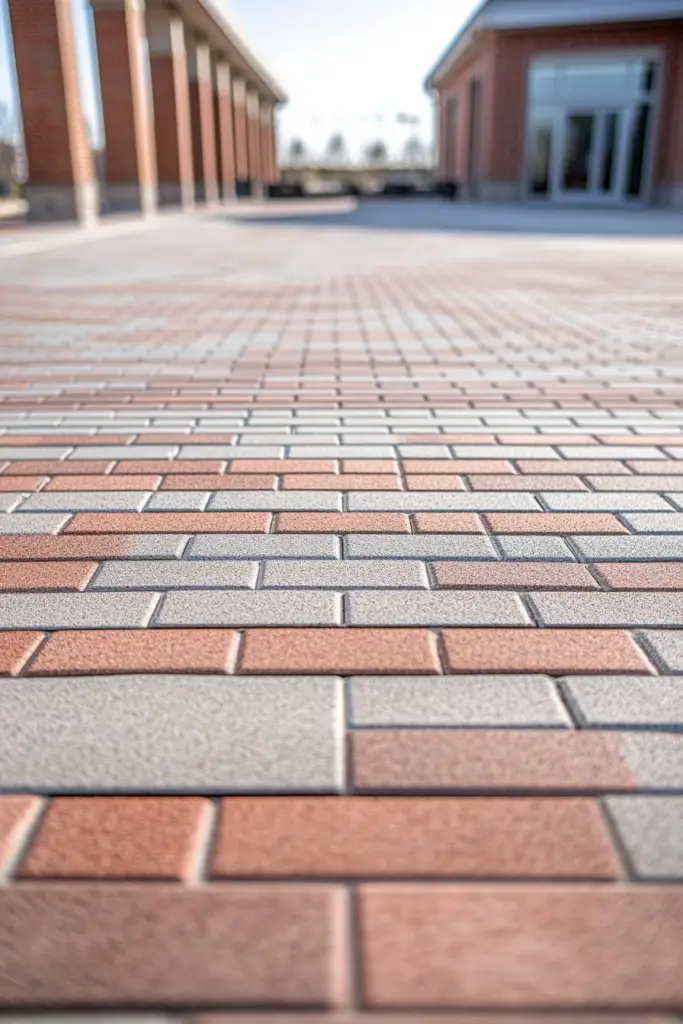
6. Mixing Brick Colors for a Patterned Effect
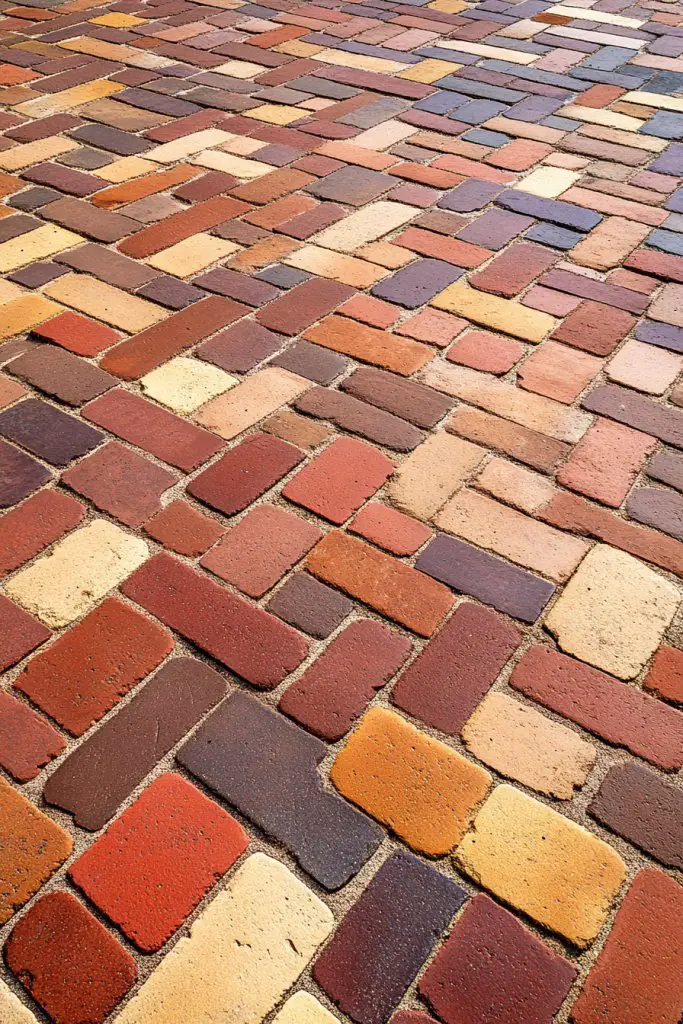
Want your patio to stand out with a unique, eye-catching look? Mixing brick colors creates stunning patterns that showcase your personal style. It’s an easy way to add visual interest without complex designs. Plus, it allows you to incorporate your favorite hues into a cohesive outdoor space.
Recommended Products to replicate this idea
| # | Preview | Product | |
|---|---|---|---|
| 1 |

|
MYCENSE Hexagon Paving Color Brick Reusable Sturdy Stepping Stone Paver Tool for Garden Patio... | Buy on Amazon |
| # | Preview | Product | |
|---|---|---|---|
| 1 |

|
4Pcs Brick Stencils for Painting Walls 17 x10 Inch, Reusable Brick Stencil for Concrete Floor Large... | Buy on Amazon |
Visualize a patchwork of reds, browns, and tans arranged in a mosaic or checkerboard pattern. The variety of shades adds depth and texture, making the surface lively and engaging. The contrasting colors can be used to define zones or highlight focal points, like a fire pit or seating area. The overall effect is vibrant and playful, turning your patio into a piece of outdoor art.
Experiment with different color combinations to match your landscape or outdoor furniture. Use darker bricks for a contemporary, sleek look or warm tones for a cozy vibe. Incorporate accent bricks with special finishes or textures for added dimension. Seasonal accessories like colorful cushions or umbrellas can tie the look together.
Select bricks in varying shades and textures, ensuring they’re compatible for laying. Plan your pattern carefully—whether checkerboard, herringbone, or mosaic—before starting. Lay the bricks in sections, alternating colors according to your design. Use a mortar bed or dry-stack method, pressing bricks firmly into place. Finish with joint filling and sealing to protect against weathering. Regular cleaning reveals the vibrant color mix over time.
Embed decorative stones or engraved bricks within the pattern for a personal touch. Create a border or central medallion with a special design or motif. Use colored joint filler to emphasize the pattern further. Incorporate lighting or small sculptures to add character and ambiance.
Mixing brick colors is a playful way to make your outdoor space truly your own. It’s an affordable project with a big visual payoff. Your patio will become a conversation starter, reflecting your creativity and style. Ready to make your outdoor area pop?
7. Vintage Brick Pavers with Weathered Finish
Dreaming of an outdoor space with a rich history and charm? Vintage brick pavers with a weathered finish give your yard an aged, authentic appeal. This look is perfect if you love a rustic, timeless vibe that feels both cozy and sophisticated. Plus, reclaimed bricks add an eco-friendly touch to your project.
Recommended Products to replicate this idea
| # | Preview | Product | |
|---|---|---|---|
| 1 |

|
MASTER MARK Dig-Free Landscape Paver, Bricks, Stone Edging, No-Dig Patio Flex Border, Plastic 60 ft.... | Buy on Amazon |
| # | Preview | Product | |
|---|---|---|---|
| 1 |

|
Color Enhancer Sealer for All-Natural Stone and Pavers. Marble, Travertine, Limestone, Granite,... | Buy on Amazon |
Imagine a pathway or patio made of bricks with chipped edges, uneven surfaces, and a soft patina that hints at decades of outdoor life. The muted, earthy tones blend seamlessly with mature trees and lush gardens. The irregularities tell a story, making each brick unique. The weathered surface invites barefoot strolls, evoking a sense of nostalgia.
Pair weathered bricks with modern furniture for a balanced mix of old and new. Use them as accents or main features in garden paths or patios. Incorporate vintage-inspired accessories like lanterns or wrought iron furniture. Seasonal elements like colorful blankets or rustic planters enhance the aged charm.
Source reclaimed or weathered bricks, ensuring they are clean and free of loose mortar. Prepare a stable base with gravel and sand, compacting thoroughly. Lay the bricks randomly or in a pattern that mimics natural stone, pressing them into the substrate. Fill joints with sand or soil, allowing moss or grass to grow naturally over time. Regular cleaning and minor repairs keep the weathered look authentic.
Create focal points with vintage sculptures, antique lanterns, or custom engraved bricks. Incorporate weather-resistant textiles or cushions with vintage patterns for seating. Use decorative edging or mosaic inserts for added detail. Lighting can be achieved with old-fashioned lanterns or solar-powered lamps for authentic ambiance.
Vintage weathered bricks bring history and personality to your outdoor space. They’re a sustainable choice that ages beautifully, gaining character over time. Your yard will exude charm and storytelling, inspiring admiration from friends and neighbors. Ready to embrace a classic, timeless look?
8. Brick-Overlay on Existing Concrete for Cost-Effective Upgrade
Got a dull concrete slab that’s cramping your style? Overlays with brick pavers can transform your plain surface into a stunning outdoor haven without breaking the bank. It’s a smart solution for upgrading existing patios while adding texture and visual appeal. Plus, it’s faster than ripping out and replacing.
Recommended Products to replicate this idea
| # | Preview | Product | |
|---|---|---|---|
| 1 |

|
CJGQ 20"x20"x1.8" Plus Size Walk Maker Reusable Concrete Path Maker Molds Stepping Stone Paver Lawn... | Buy on Amazon |
| # | Preview | Product | |
|---|---|---|---|
| 1 |

|
10 Pound Titanium Gray DOMINATOR Polymeric Sand with Revolutionary Ceramic Flex Technology for... | Buy on Amazon |
Visualize a smooth concrete slab covered with a meticulously laid brick overlay, creating a rich, textured surface. The bricks add warmth and character, instantly elevating the space. Imagine walking across the surface, feeling the slight give of the bricks underfoot. The contrast with the surrounding greenery makes the patio look more inviting and intentional.
Use different brick colors or finishes to match your outdoor decor. For a sleek, modern look, opt for uniform, smooth bricks; for rustic charm, choose weathered or reclaimed bricks. Incorporate border patterns or inset tiles for extra detail. Seasonal accents like outdoor rugs or lighting enhance the overall ambiance.
Start by cleaning and preparing the concrete surface thoroughly. Use a bonding agent to ensure adhesion between the concrete and the brick overlay. Lay the bricks in the desired pattern, starting from one corner, and use spacers for uniform gaps. Fill joints with sand or mortar, then seal the surface. Regular cleaning and resealing will prolong the life of the overlay.
Add decorative borders or inlays to customize the look. Incorporate outdoor furniture with colorful cushions to complement the brick tones. Use outdoor lighting to highlight the textured surface at night. Small planters or sculptures can further personalize your upgraded space.
This cost-effective upgrade dramatically improves your outdoor area’s appearance and value. It’s a quick project with impressive results, perfect for DIYers. Your neighbors might even ask for tips—are you ready to impress?
9. Incorporating Brick Steps for Multi-Level Patios
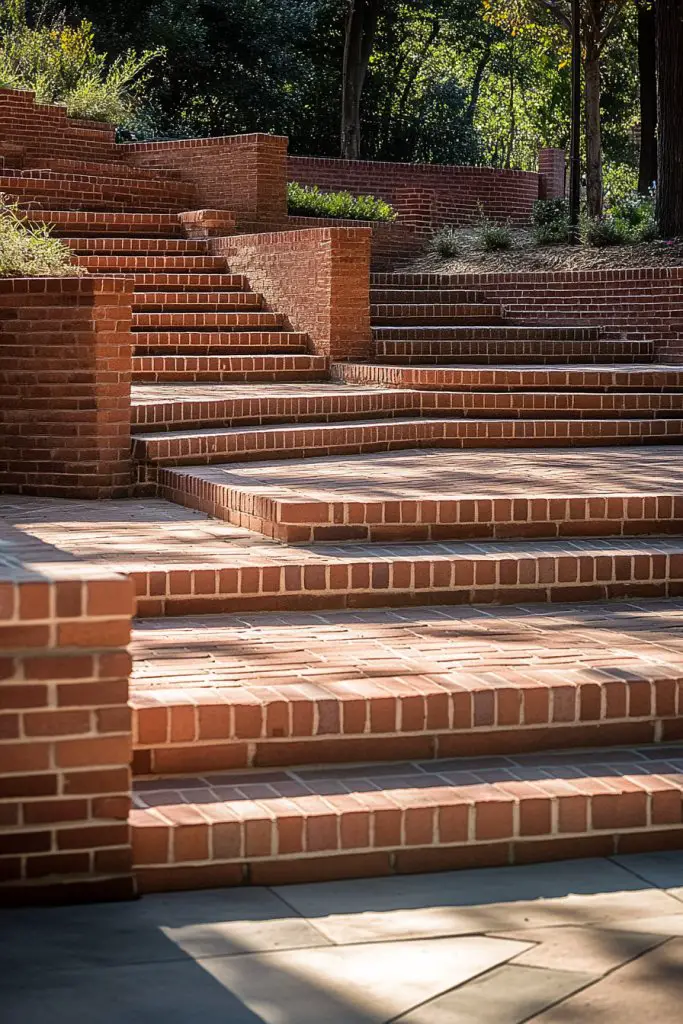
Does your yard have slopes or uneven terrain that makes outdoor living tricky? Adding brick steps can create multiple levels, turning a challenging landscape into a beautiful, functional space. It’s an easy way to add visual interest and better define different zones. Plus, it makes your yard safer and more accessible.
Recommended Products to replicate this idea
| # | Preview | Product | |
|---|---|---|---|
| 1 |
|
Ottomanson Outdoor Rubber Stair Treads – Scroll Classic Heavy-Duty Non-Slip Stair Mats – Best... | Buy on Amazon |
| # | Preview | Product | |
|---|---|---|---|
| 1 |
|
MASTER MARK Dig-Free Landscape Paver, Bricks, Stone Edging, No-Dig Patio Flex Border, Plastic 60 ft.... | Buy on Amazon |
Imagine a series of brick steps ascending gently through a lush garden, each step perfectly aligned and textured. The bricks’ warm tones contrast with greenery, highlighting the transition between levels. The steps invite you to explore different areas of your yard, encouraging outdoor activity and discovery. At sunset, the bricks glow softly, enhancing the overall ambiance.
Choose bricks with a weathered or smooth finish depending on your aesthetic. Vary the riser height to match your terrain, creating a natural look. Incorporate built-in seating or planters on landings for added utility. For a more formal look, align the steps symmetrically; for a relaxed vibe, stagger them slightly.
Begin by surveying your terrain and marking the desired path and heights of each step. Excavate and lay a stable gravel base for each landing and step. Set the bricks in mortar or dry-stack, ensuring each is level and secure. Use a tamper or rubber mallet to firmly set each brick. Finish by sealing joints and considering handrails or lighting for safety.
Decorate the landings with decorative tiles or engraved bricks. Add lighting along the steps for safety and ambiance. Plant small shrubs or flowers in the landings’ edges for added color. Use textured or patterned bricks for visual interest, tailoring the look to your style.
Multi-level brick steps turn uneven yards into inviting outdoor retreats. They add dimension and personality, making your landscape more dynamic. With careful planning, this project is achievable for DIYers and pros alike. Ready to elevate your yard?
10. Creating a Brick Pathway Through Garden Beds
Want to make your garden more accessible and inviting? A brick pathway weaving through flower beds and shrubs creates both functionality and charm. It guides visitors, prevents trampling delicate plants, and adds a handcrafted touch. Plus, it instantly boosts your yard’s curb appeal.
Recommended Products to replicate this idea
| # | Preview | Product | |
|---|---|---|---|
| 1 |

|
Sekcen 3 Pack Rubber Stepping Stones Outdoor Garden Rubber Pavers Pathway Walkway Paving Stones | Buy on Amazon |
| # | Preview | Product | |
|---|---|---|---|
| 1 |

|
VEVOR 4FTx300FT Premium Heavy Duty Weed Barrier Landscape Fabric, 3.2OZ Woven Geotextile Fabric... | Buy on Amazon |
Picture a winding brick pathway bordered by lush greenery, blooming flowers, and decorative mulch. The irregular pattern of bricks invites exploration, while the natural colors blend seamlessly with the landscape. At each bend, small focal points like sculptures or water features draw attention. The pathway’s textured surface encourages a tactile connection to nature.
Use bricks in warm earth tones for a classic look or darker shades for a modern vibe. Incorporate stepping stones or mosaic accents for visual interest. Vary the width and shape of the pathway to suit your garden’s layout. Seasonal decorations like lanterns or flower pots can enhance the experience.
Lay out the pathway’s route with stakes and string, then excavate the area to a depth of about 4 inches. Prepare a compacted gravel base, then lay the bricks in your chosen pattern, ensuring they’re level and snug. Fill gaps with sand or fine gravel, and tamp down to secure. Regularly check for levelness and adjust as needed. Finish by adding mulch or soil along the edges.
Embed decorative stones or engraved bricks at key points or intersections. Install solar path lights or small lanterns for nighttime strolling. Use colorful plants or seasonal flowers along the borders for added beauty. Personal touches like garden signs or custom stepping stones can make it uniquely yours.
A brick pathway transforms your garden into a charming, accessible oasis. It’s a project that combines practicality with artistic expression. You’ll love how it invites exploration and adds value to your landscape. Time to start laying those bricks?
11. Modern Minimalist Brick Patio with Clean Lines
Craving a sleek, contemporary outdoor space that feels uncluttered and fresh? A modern minimalist brick patio emphasizes clean lines and uniform textures, creating a stylish retreat. It’s perfect if you prefer understated elegance over ornate designs. Plus, it’s surprisingly easy to maintain and versatile.
Recommended Products to replicate this idea
| # | Preview | Product | |
|---|---|---|---|
| 1 |

|
BETONEX Concrete Grass Pavers Breeze Block Paving Bricks Mold ABS 4mm Parking - Plastic Mold for... | Buy on Amazon |
| # | Preview | Product | |
|---|---|---|---|
| 1 |

|
SUUNYN Lounge Chair Outdoor, Chaise Lounge Outdoor, HDPE 6-Position Lounge Chair for Outside, Patio... | Buy on Amazon |
Visualize a spacious patio with large, smooth bricks laid in a grid or linear pattern. The uniform color palette—beige, gray, or subtle earth tones—sets a calm, cohesive tone. Minimalist furniture with sleek metal or wood accents complements the clean layout. At night, subtle lighting highlights the precision of the design, transforming the space into a serene sanctuary.
Opt for monochromatic or tonal variations for a sophisticated look. Incorporate textured or patterned bricks sparingly for subtle visual interest. Use simple, geometric furniture and decor to reinforce the minimalist aesthetic. Seasonal accents like a soft cream throw blanket with chunky knit texture can add warmth without clutter.
Choose large, flat bricks with a smooth finish, ensuring they’re suited for outdoor use. Prepare a level base with compacted gravel and sand. Lay the bricks in a straight, grid, or linear pattern, using spacers for uniform joints. Secure with mortar or dry-stack, depending on your preference. Finish by sealing the surface for longevity. Maintain a tidy look by sweeping regularly.
Add sculptural planters, minimalist sculptures, or modern outdoor furniture in neutral tones. Incorporate subtle lighting fixtures like recessed LED strips or in-ground lights. Use monochrome cushions or textiles to soften the space without disrupting the sleek aesthetic. This approach ensures your patio remains stylish and functional.
A minimalist brick patio proves that less truly is more. Its timeless appeal and easy upkeep make it a favorite for modern homeowners. With thoughtful details, your outdoor space will radiate calm and sophistication. Ready to embrace clean lines?
12. Brick Patio with Embedded Decorative Stones or Tiles
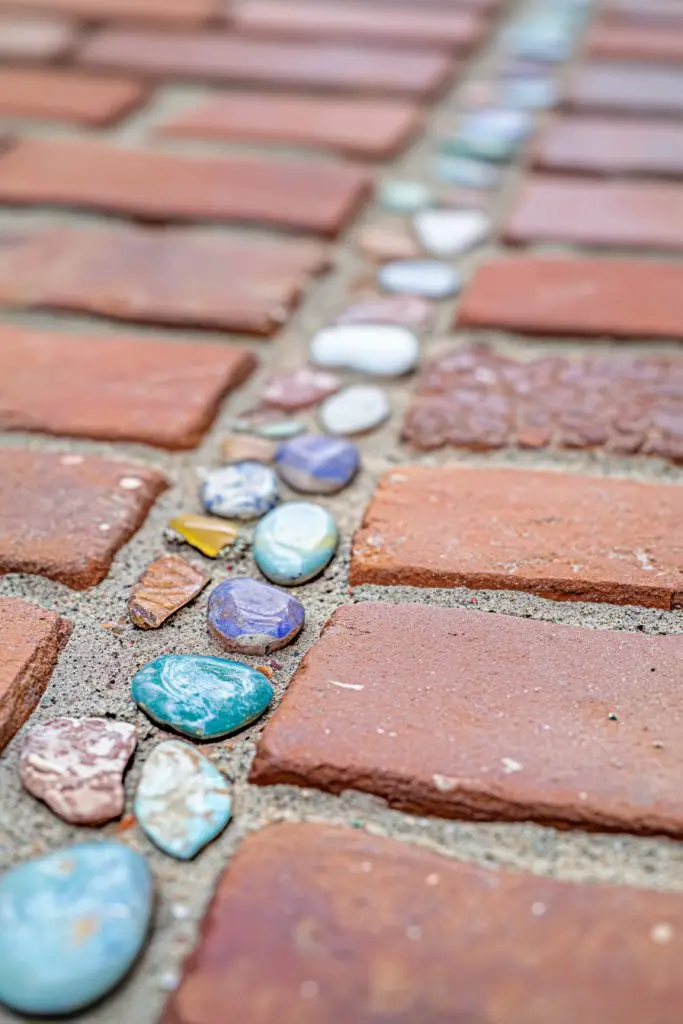
Looking to add a personal, artistic touch to your outdoor area? Embedding decorative stones or colorful tiles within your brick surface creates a unique focal point. It’s an easy way to elevate simple paving into a piece of outdoor art. Plus, it adds texture and visual intrigue that sets your space apart.
Recommended Products to replicate this idea
| # | Preview | Product | |
|---|---|---|---|
| 1 |

|
Lanyani Broken Ceramic Porcelain Tiles for Mosaic Crafts Glazed Irregular Blue and White China Plate... | Buy on Amazon |
| # | Preview | Product | |
|---|---|---|---|
| 1 |

|
OUPENG Pebbles Polished Gravel, Natural Polished Mixed Color Stones, Small Decorative River Rock... | Buy on Amazon |
Imagine a brick patio with a central mosaic or scattered embedded stones in vibrant colors. The contrast of textures and hues creates a lively, dynamic surface that draws the eye. Decorative tiles can feature patterns, motifs, or personal symbols, making the space truly yours. The tactile variation invites exploration and adds an element of surprise.
Use a variety of stones or tiles that match your style—sleek glass, natural stone, or glazed ceramics. Embedding them in the center or along pathways emphasizes focal points. Coordinate embedded elements with outdoor furniture or accessories for a cohesive look. Seasonal decor like colorful cushions or umbrellas complements the artistic details.
Lay your bricks following your chosen pattern, leaving space for the decorative elements. Secure the stones or tiles with adhesive or mortar, pressing them firmly into the surface. Use grout or joint filler around the embedded pieces to secure and level the surface. Seal the entire surface for weather resistance. Regular cleaning reveals the embedded details vividly.
Create themed mosaics or inlays with family initials, symbols, or favorite patterns. Incorporate small sculptures or decorative borders around the embedded stones. Use lighting to highlight the embedded elements at night, creating a magical effect. Personal touches like engraved stones or custom tiles add extra charm.
Embedding decorative stones or tiles makes your patio a one-of-a-kind space full of personality. It’s a project that combines craftsmanship with creativity, delivering impressive results. Your outdoor area becomes a reflection of your style and story. Ready to get artistic?
13. Incorporating Brick Planter Edges for Green Accents
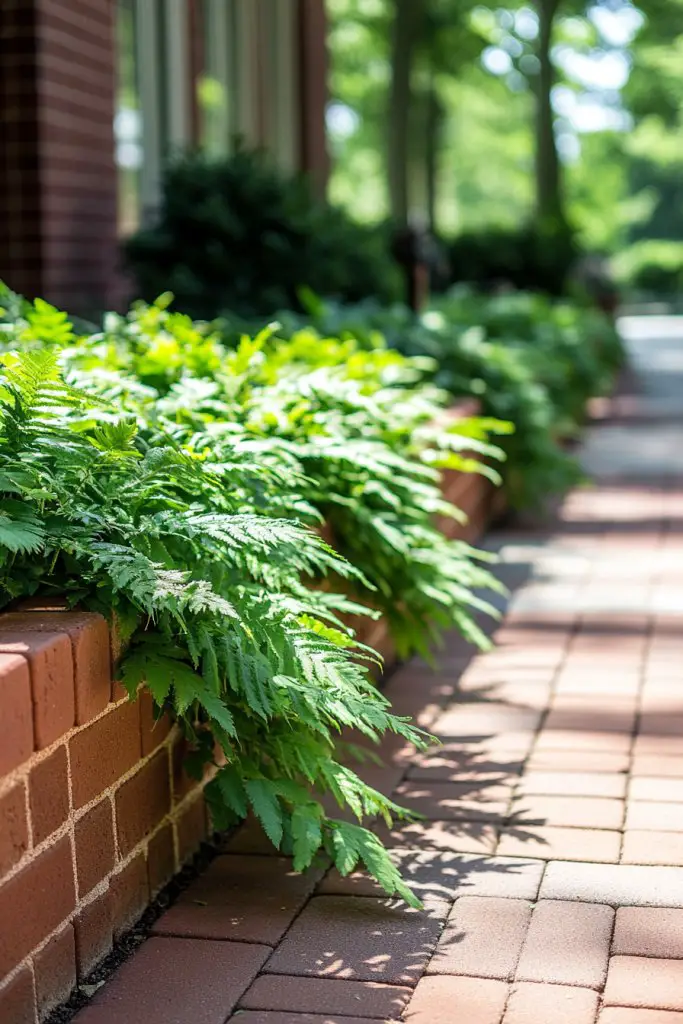
Want to seamlessly integrate greenery into your patio design? Brick planter edges or raised beds add lush, green accents that soften hardscape surfaces. They create a natural boundary for flower beds or shrubs while maintaining a cohesive look. It’s an instant upgrade that combines beauty with function.
Recommended Products to replicate this idea
| # | Preview | Product | |
|---|---|---|---|
| 1 |

|
Beuta Landscape Edging | Garden Edging Border | Faux Stone Bricks for Lawn edging, Flower beds,... | Buy on Amazon |
| # | Preview | Product | |
|---|---|---|---|
| 1 |

|
Land Guard Galvanized Raised Garden Bed Kit, Galvanized Planter Garden Boxes Outdoor, Oval Large... | Buy on Amazon |
Visualize low brick borders framing vibrant flower beds or lush shrubs, with the bricks’ warm tones complementing the plants’ colors. The clean lines of the edges provide structure and definition, making your garden look tidy yet inviting. The contrast between the earthy bricks and lively greens creates a balanced, harmonious scene. During blooming seasons, the pops of color make the space lively and cheerful.
Choose bricks that match or contrast with your patio, depending on your style. Use taller or wider bricks for raised beds or low borders for a subtle boundary. Incorporate decorative inlays or engraved bricks for a personalized touch. Seasonal planting ideas like colorful annuals or succulents can refresh the look annually.
Plan your plant bed layout and mark the edges with stakes and string. Excavate the area to a depth suitable for your plants and brick height. Lay the bricks in a straight or curved pattern, securing with mortar or dry-stack for a flexible approach. Fill the inside with soil and plant your favorites. Regular watering and weeding keep the beds vibrant.
Add decorative stones or engraved bricks within the borders for special details. Incorporate small garden statues or sculptures for personality. Use colorful mulch or gravel to accentuate the edges. Installing drip irrigation or lighting can make your green accents more functional and attractive.
Brick planter edges beautifully blend greenery into your outdoor design, elevating the space effortlessly. They’re practical, durable, and customizable, making your yard more inviting. Such features turn a plain patio into a lush, green retreat. Ready to create your own green oasis?
14. Brick Patio with Outdoor Dining Area and Pergola
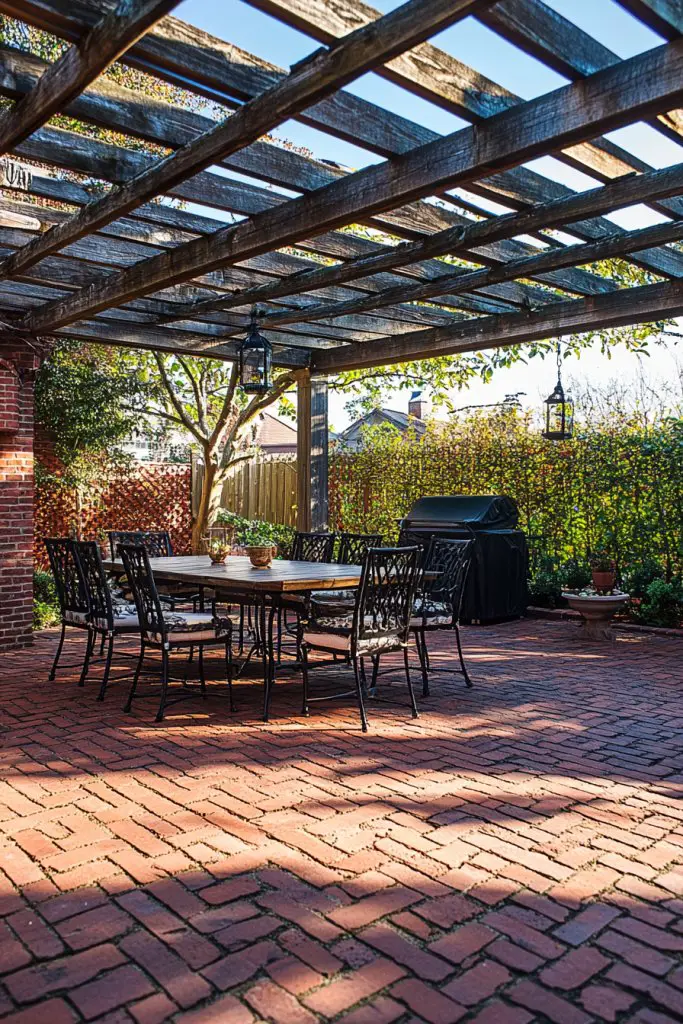
Dreaming of alfresco dinners under the stars? Combining a brick patio with an outdoor dining area and a pergola creates a stylish, functional space perfect for entertaining. It provides shade, defines the dining zone, and adds architectural interest. Plus, it encourages family meals and gatherings in your backyard.
Recommended Products to replicate this idea
| # | Preview | Product | |
|---|---|---|---|
| 1 |
|
Pergola Kit, Heavy Duty Pergola Brackets for 4"x 4" (Actual 3.5" X 3.5") Lumber,DIY Rust-Proof... | Buy on Amazon |
| # | Preview | Product | |
|---|---|---|---|
| 1 |

|
SERWALL Outdoor HDPE Dining Table Set, 7-Piece Outdoor Dining Table Sets with Umbrella Hole Cut-Out... | Buy on Amazon |
Visualize a spacious brick patio with a sturdy pergola overhead, draped with weather-resistant curtains or string lights. Underneath, a large dining table with comfortable chairs becomes the centerpiece. The brick surface grounds the space, while the pergola adds height and texture. Ambient lighting glows softly as you enjoy meals outdoors, rain or shine.
Select bricks in neutral or warm tones to match your outdoor furniture and aesthetic. The pergola can be made of wood, metal, or vinyl, depending on your style. Incorporate outdoor curtains or side panels for privacy and shade. Add a weatherproof outdoor rug or cushions for extra comfort.
Lay your brick patio first, following standard base preparation and laying techniques. Erect the pergola frame securely into the ground or attached to your house, ensuring stability. Attach the roofing material—vines, fabric, or slats—according to your climate needs. Anchor the structure properly, and seal the bricks for weather resistance. Arrange your dining set, and add accessories.
Decorate the space with personalized tableware, outdoor art, or seasonal accents. Use string lights, lanterns, or candles to create a cozy ambiance. Incorporate potted plants or small trees around the pergola for added greenery. Customize cushions and table linens to suit your style.
A brick patio with a dining area and pergola creates a backyard oasis perfect for entertaining. It combines style, function, and comfort, making every meal feel special. You’ll enjoy hosting friends and family more often. Ready to dine outdoors?
15. Using Brick Pavers for Curved or Organic Shapes
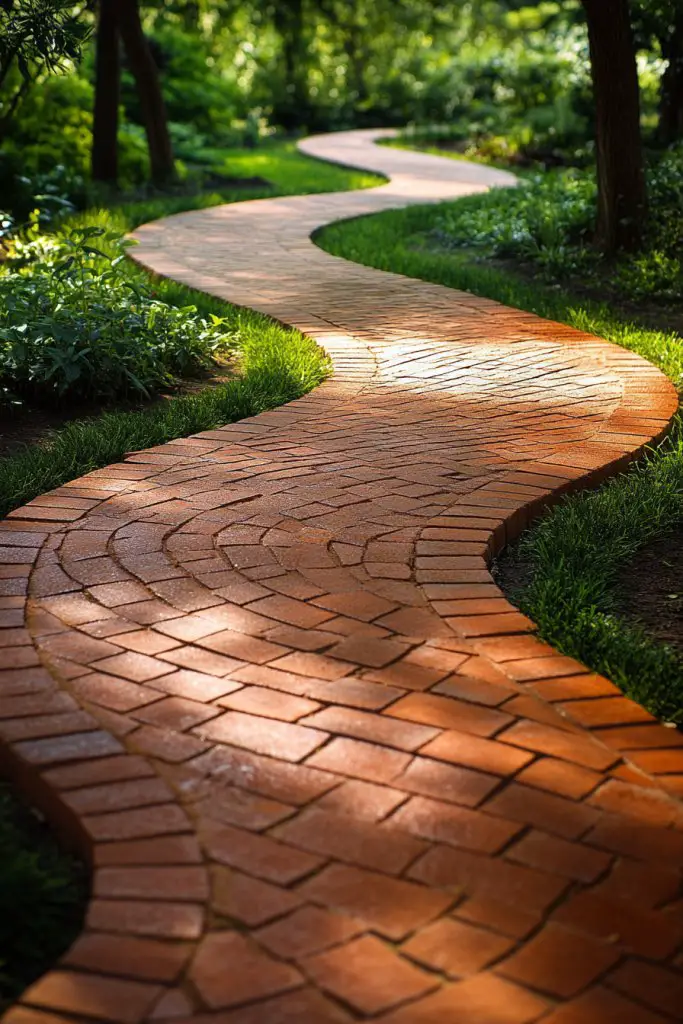
Want your yard to feel more natural and less rigid? Curved brick pavers break away from straight lines, mimicking organic landscapes. They soften the overall look and create flow that feels more inviting. It’s an excellent choice if you prefer a landscape that looks like it grew naturally.
Recommended Products to replicate this idea
| # | Preview | Product | |
|---|---|---|---|
| 1 |

|
Beuta Landscape Edging | Garden Edging Border | Faux Stone Bricks for Lawn edging, Flower beds,... | Buy on Amazon |
| # | Preview | Product | |
|---|---|---|---|
| 1 |

|
10 Pound Gray Beige DOMINATOR Polymeric Sand with Revolutionary Ceramic Flex Technology for... | Buy on Amazon |
Imagine a winding brick path that meanders through your garden, edged by plants and flowers. The gentle curves contrast with angular structures, adding visual interest. The textured bricks in warm tones blend into the landscape, inviting exploration. At dusk, soft lighting along the curves enhances their gentle flow.
Use bricks with rounded edges or special shapes to facilitate organic curves. Mix different shades for a more natural look or keep them uniform for a sleek style. Combine curves with straight sections for a balanced design. Seasonal accents like blooming plants or decorative stones can enhance the effect.
Mark your desired curved layout with stakes and string, then excavate accordingly. Prepare a stable base of gravel and sand, compacting thoroughly. Lay the bricks following the curves, cutting bricks as needed for tight bends. Use a rubber mallet to set each brick firmly, and fill joints with sand. Seal and maintain regularly to keep the curves smooth and attractive.
Add engraved or patterned bricks at key points to emphasize the curves. Incorporate small garden sculptures or water features nearby. Use lighting to follow the curves, highlighting their natural flow at night. Personal touches like custom inlays make your landscape uniquely yours.
Organic-shaped brick layouts bring a natural, flowing beauty to your yard. They mimic nature’s randomness, creating harmony and tranquility. With careful planning, even DIYers can craft stunning curved pathways. Ready to embrace a softer, more natural landscape?
16. Integrating Lighting Elements into Brick Joints
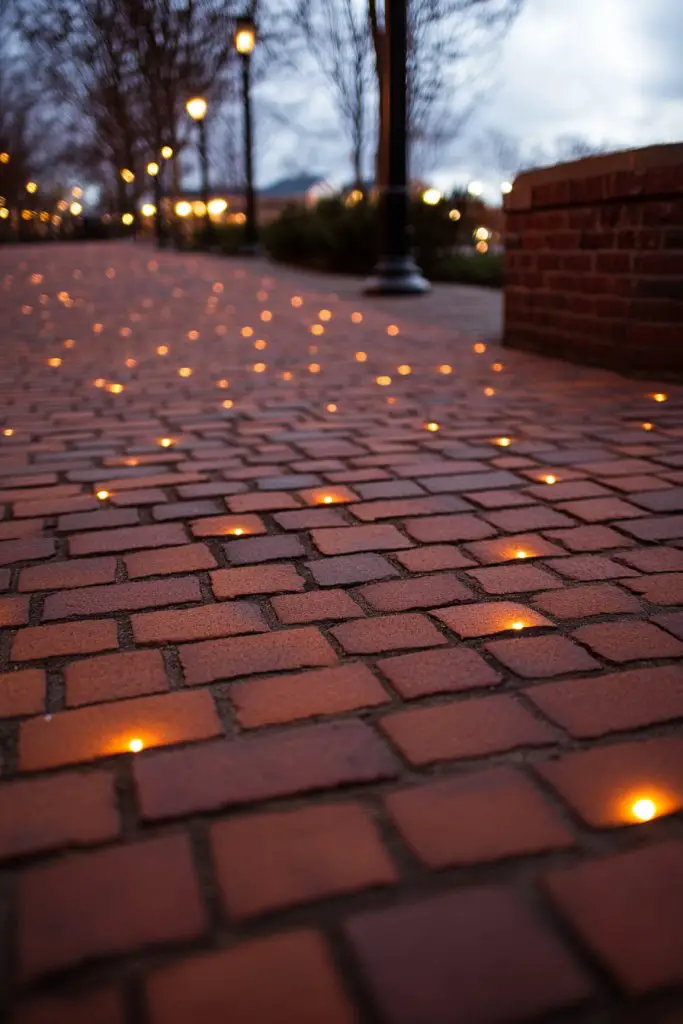
Want your outdoor space to shine after sunset? Integrating lighting into brick joints creates a stunning, functional glow that enhances safety and ambiance. It’s a subtle way to highlight your craftsmanship and add a magical touch. Plus, proper lighting extends your outdoor enjoyment into the night.
Recommended Products to replicate this idea
| # | Preview | Product | |
|---|---|---|---|
| 1 |
|
LEONLITE 8-Pack Premium Series RGB 7 Inch 3W LED Retaining Wall Lights Swivel, Color Changing... | Buy on Amazon |
| # | Preview | Product | |
|---|---|---|---|
| 1 |

|
SUNVIE All-in-One LED Low Voltage Landscape Lighting Kit, 12-Pack Landscape Lights with Transformer... | Buy on Amazon |
Picture a brick patio with tiny LED lights embedded in the joints, casting a gentle glow across the surface. The warm light accentuates the pattern and texture of the bricks, creating a captivating visual effect. Shadows dance softly on nearby walls or furniture, adding depth and mood. The illuminated space invites you to linger longer outdoors.
Choose low-voltage or solar-powered lights for energy efficiency. Use warm white for a cozy vibe or colored LEDs for fun accents. Embed the lights during the laying process or retrofit afterward for existing patios. Combine with landscape lighting to highlight plants or features nearby.
Plan your light placement before laying bricks, marking spots with tape or chalk. Use special fixtures designed for embedding in joints, ensuring they are waterproof and durable. Carefully cut or drill into the mortar joints to insert the lights, then secure and connect wiring. Seal around fixtures to prevent water ingress. Test the system before finalizing the surface.
Create light patterns or zones with dimmable fixtures, adjusting brightness to mood or occasion. Use colored or RGB lights to match seasonal themes or personal preferences. Incorporate timers or smart controls for convenience. This approach adds both safety and style effortlessly.
Lighting embedded in brick joints makes your patio a stunning nighttime retreat. It’s a practical upgrade that adds safety, ambiance, and wow factor. With minimal effort, you can turn your backyard into a magical space loved day and night. Ready to glow?
17. Combining Brick with Other Materials for Eclectic Charm
Looking to craft a unique, layered outdoor space that reflects your personality? Combining brick with materials like wood, metal, or concrete creates an eclectic, personalized look. It’s a way to break the mold and showcase your creativity. Plus, mixing textures adds depth and visual interest.
Recommended Products to replicate this idea
| # | Preview | Product | |
|---|---|---|---|
| 1 |

|
BETONEX Plastic Molds Concrete Set Patio Paving Mold 1 pcs - Big Beautiful Pathmaker Precast... | Buy on Amazon |
| # | Preview | Product | |
|---|---|---|---|
| 1 |

|
Best Choice Products 6x3x2ft Outdoor Metal Raised Garden Bed, Deep Root Box Planter for Vegetables,... | Buy on Amazon |
Imagine a patio with a brick base, accented by a reclaimed wood pergola and metal furniture. The warm brick tones contrast beautifully with the sleekness of metal or the rustic charm of wood. Textured concrete planters or sculptures add further dimension. This layered approach makes your outdoor space feel curated and full of character.
Mix different materials in a balanced way—use brick for the ground, wood for furniture, and metal or concrete for accents. Keep a consistent color palette for harmony or go bold with contrasting shades. Seasonal textiles, cushions, or coverings can further personalize the space. This versatility works for both modern and traditional styles.
Lay the brick surface first, ensuring a level base. Incorporate other materials as focal points or accents—like a wood pergola or metal fire pit. Use appropriate sealants or finishes to protect each material from weather. Careful planning ensures the materials complement rather than clash. Regular maintenance preserves the layered look.
Decorate with custom cushions, reclaimed furniture, or art pieces that reflect your taste. Use lighting to highlight different materials—spotlights on wood, uplights on brick. Incorporate personal touches like vintage signs or handcrafted sculptures. The goal is a space that feels curated and uniquely yours.
Blending materials offers endless possibilities for a distinctive outdoor space. It’s a reflection of your style, combining durability with artistry. Such eclectic designs impress guests and foster a sense of pride. Ready to mix and match?
Conclusion
With a diverse array of brick patio ideas showcased, you now have endless inspiration to transform your outdoor space into a charming retreat. Don’t hesitate to experiment with different patterns, colors, and layouts to make your patio uniquely yours. Take the leap and bring these timeless designs to life — your perfect outdoor sanctuary awaits!
Last update on 2026-02-11 / Affiliate links / Images from Amazon Product Advertising API