Dreaming of a beautiful backyard oasis without breaking the bank? Budget-friendly above ground pool deck ideas are gaining popularity because they offer a perfect blend of style, functionality, and affordability, making outdoor relaxation accessible to everyone.
In this article, you’ll find a variety of creative and cost-effective deck ideas that can transform your pool area into a welcoming retreat. From simple DIY solutions to clever design hacks, these ideas cater to different tastes and spaces, ensuring there’s something for every homeowner eager to enjoy summer fun without overspending.
1. DIY Pallet Decks for a Rustic, Cozy Look
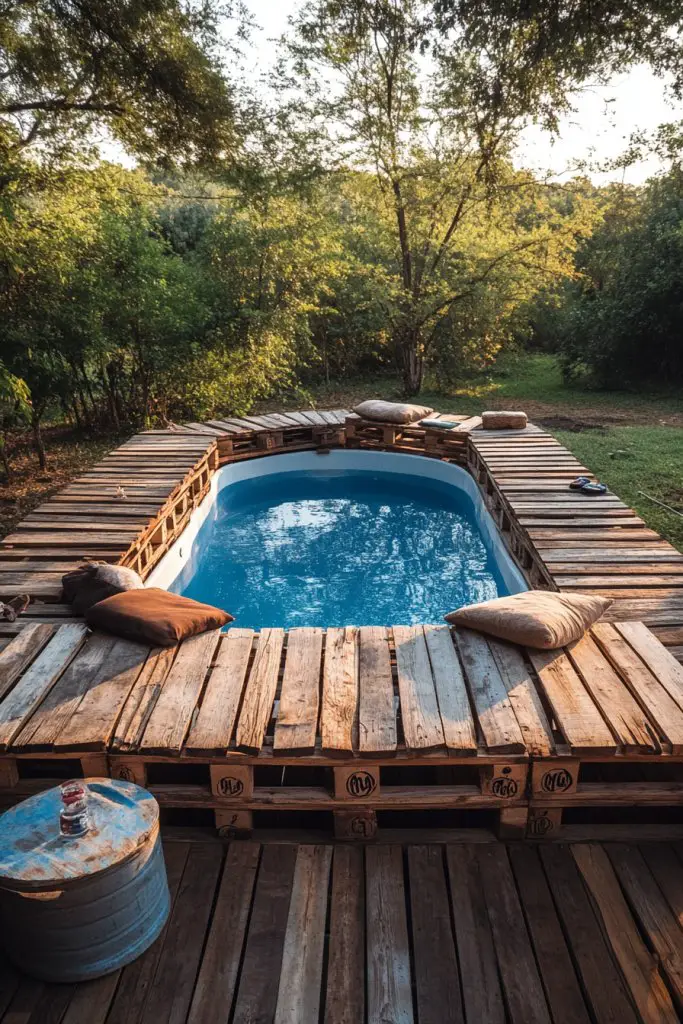
Ever dreamed of transforming your backyard into a charming retreat without breaking the bank? A DIY pallet deck offers that rustic, cozy vibe you crave, all while keeping costs minimal. If you’re tired of flimsy, overpriced decks that don’t match your style, this simple solution might be just what you need. Plus, it’s a fun project that adds a personal touch to your outdoor space.
Imagine walking barefoot onto a deck made from weathered wooden pallets, each one uniquely textured and stained in warm tones. The surface is slightly uneven, giving it that authentic rustic charm. Surround it with string lights hanging from nearby trees and a soft breeze ruffling lightweight curtains. The entire scene feels inviting, relaxed, and perfectly imperfect—like a cozy country cottage.
You can stain or paint the pallets in colors that match your outdoor decor, from classic white to vibrant blues. For a more polished look, add a simple railing or incorporate built-in benches using leftover wood. Seasonal touches like outdoor cushions or a fire pit can make it suitable for summer lounging or chilly evenings. This design adapts easily to small balconies or large yards alike.
Start by collecting enough pallets—look for sturdy, untreated wood. Clean and sand them to remove splinters, then stain or seal for weather resistance. Arrange the pallets in your desired layout, stacking or attaching them as needed. Use concrete blocks or wood spacers underneath for ventilation and leveling. Secure the pallets together with nails or screws if you want extra stability. Finish with outdoor furniture and accessories.
Add your personal touch with decorative elements like woven rugs, lanterns, or vintage lanterns. Incorporate built-in planters made from recycled materials for a splash of greenery without plants directly on the deck. Mix textures with soft outdoor cushions or chunky knit throws. You can also paint patterns or stencils on the pallets for a custom look.
A pallet deck proves that you don’t need to spend a fortune to create something beautiful and functional. It’s a project that encourages creativity and resourcefulness. Your friends will be amazed at how cozy and stylish your outdoor space looks, all thanks to a few pallets and some DIY spirit. Ready to build your rustic retreat?
2. Simple Concrete Paver Pathway with Reclaimed Wood Edging

Looking for a way to upgrade your pool area without draining your wallet? A simple concrete paver pathway offers durability and style in one affordable package. If your existing deck feels dull or uneven, this project can transform it into a welcoming, natural-looking space. Plus, it’s easy enough for DIY beginners who want a little outdoor upgrade.
Picture a winding pathway of uniform concrete pavers, their smooth surfaces contrasting beautifully with rustic reclaimed wood edging. The pathway guides your eye around the pool, inviting you to stroll barefoot along its firm surface. As the sun hits the pavers, they glow warmly, framed by weathered wood that adds a touch of organic charm. The whole scene feels balanced, natural, and inviting.
Mix different shades of concrete pavers for a more dynamic look, or create patterns like herringbone or basket weave. Reclaimed wood can be stained or left natural for a weathered appearance. Use wider borders or incorporate stepping stones to suit your yard’s size. Seasonal accents like potted plants or outdoor sculptures can personalize the space further.
Lay a gravel or compacted soil base to ensure stability, then install the concrete pavers in your chosen pattern. Use a rubber mallet to set them firmly in place. Frame the pathway edges with reclaimed wood, securing with nails or outdoor adhesive. Fill gaps with sand or small gravel for a finished look and to prevent shifting. Regularly sweep and reseal to maintain appearance.
Create visual interest by integrating lighting along the edges—solar-powered stake lights work well. Add a few decorative stones or small sculptures for character. Use different textures of reclaimed wood, like rough-hewn or smooth planks, for variety. Personal touches like customized engraved stones or painted patterns can make it uniquely yours.
This simple pathway elevates your pool area without complexity or high costs. It’s a project that combines practicality with aesthetic appeal, showing that small changes can make a big impact. Your backyard will feel more cohesive and inviting, encouraging more outdoor fun all season long.
3. Floating Deck Using Pressure-Treated Lumber
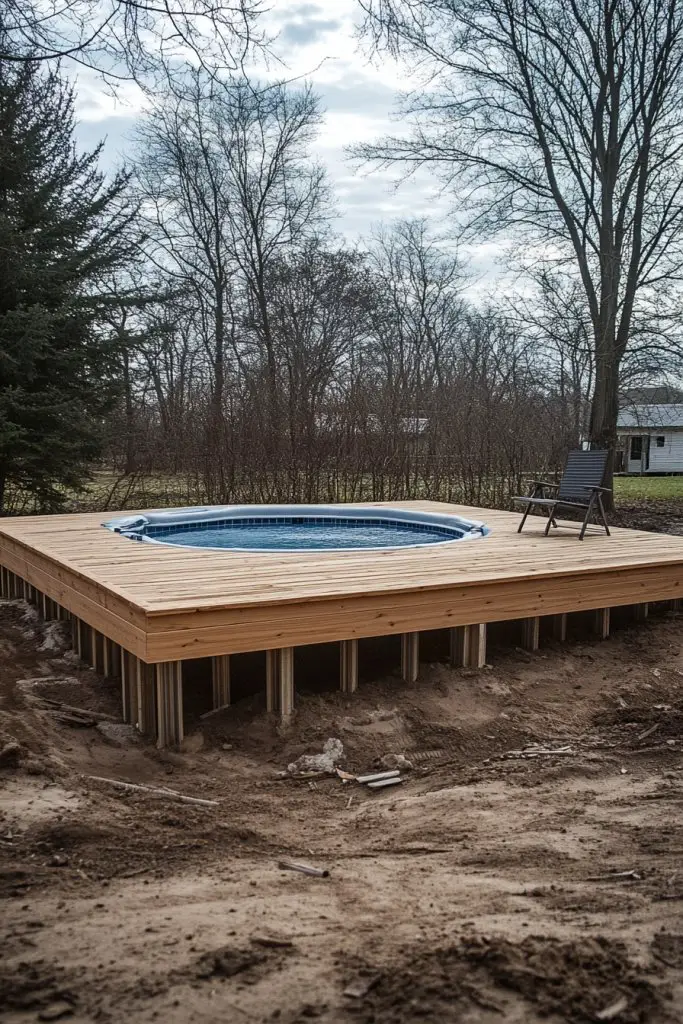
Fed up with uneven ground ruining your poolside vibe? A floating deck made from pressure-treated lumber offers a stable, stylish solution that’s easier than digging foundations. If you want a deck that feels like part of your yard but doesn’t require professional help, this DIY-friendly option is perfect. Plus, it adds a modern touch to your outdoor space.
Imagine a sleek, rectangular platform hovering just above the grass, made of uniform wooden planks stained in rich tones. It’s lightweight but sturdy, with clean lines that complement a contemporary yard. The deck’s surface invites you to kick back with a cold drink, while the open space underneath adds a breezy, airy feel. Soft outdoor lighting casts a warm glow in the evening.
Opt for different shapes or sizes to fit your space—square, rectangular, or even circular. Add built-in benches or attach planters made from reclaimed wood for a personalized touch. For seasonal versatility, layer with outdoor rugs or weather-resistant fabrics. You can also elevate sections for visual interest or create multiple levels for different zones.
Start by measuring your area and planning your deck’s footprint. Use pressure-treated lumber for durability, and assemble the frame on a flat surface. Elevate the frame using concrete blocks or adjustable pedestals to ensure levelness. Secure the planks with outdoor screws, leaving slight gaps for drainage. Finish with weatherproof stain or sealant for longevity. Make sure to anchor the deck securely to prevent shifting.
Incorporate built-in storage beneath the deck for pool accessories or outdoor gear. Decorate with textured cushions, or install string lights above for ambiance. Custom paint or stenciled patterns on the surface can add a playful or elegant touch. Use decorative stepping stones leading to the deck for a seamless transition.
A floating deck proves that you can achieve a polished look without complex construction. It’s a versatile project that adapts to various yard sizes and styles, boosting your outdoor living experience. Once finished, your pool area becomes the go-to spot for summer hangs and family fun.
4. Tiered Deck with Stained Wooden Planks
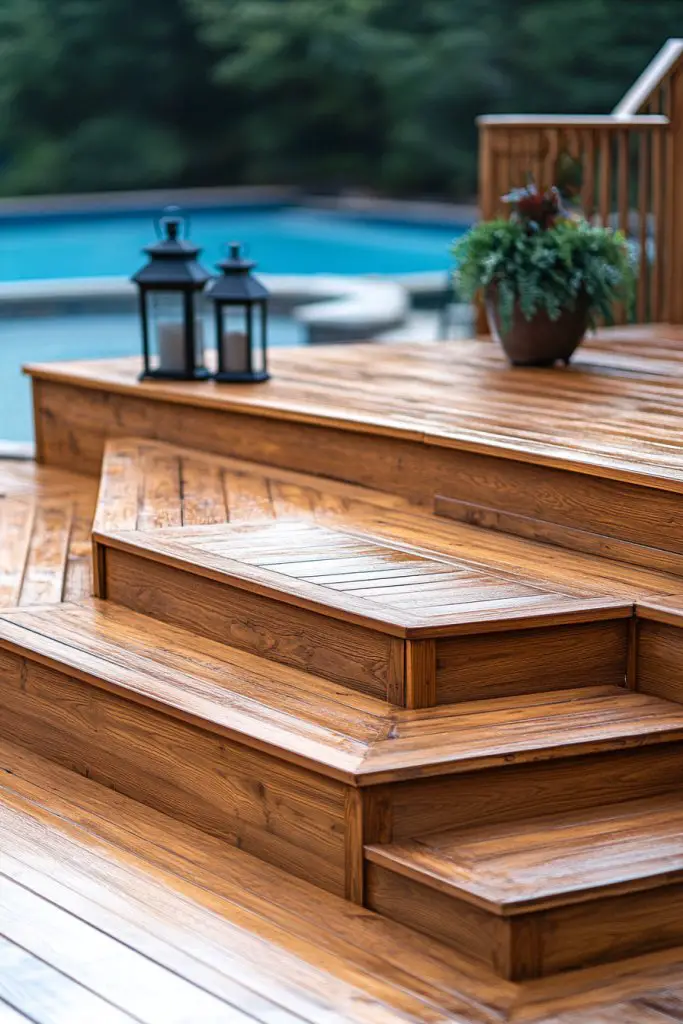
Ever wish your pool deck had more visual interest? A tiered wooden deck adds dimension and sophistication, making your backyard feel like a resort. If flat decks bore you or seem monotonous, this layered approach offers a dynamic alternative. It’s also great for sloped yards that need creative solutions.
Picture a multi-level deck with warm stained wooden planks, each level separated by simple risers. The different heights create functional zones— lounging on the upper tier, dining or sunbathing below. Sunlight plays across the various surfaces, highlighting the rich stain and wood grain. Decorative railings and steps connect the levels seamlessly, creating an elegant flow.
Use contrasting stains or paints on different levels for a colorful effect, or keep it uniform for a sleek look. Incorporate built-in seating or planters on each tier for a lush, inviting feel. Seasonal cushions or outdoor fabrics can soften the space, while lighting accents add mood. This design works well in small yards by maximizing vertical space.
Begin with careful measurement of your yard’s slope and plan your levels accordingly. Construct the frame using pressure-treated beams, anchoring each with concrete for stability. Attach the stained wooden planks, leaving gaps for drainage. Use risers or steps made from the same wood to connect the tiers, ensuring safety and accessibility. Seal all wood with weatherproof stain to resist the elements.
Add decorative elements like string lights, lanterns, or even a small water feature. Incorporate different textures of wood or paint accents to highlight each level. Use outdoor rugs or mats on each tier for comfort and style. Personal touches such as custom-built benches or unique balustrades can truly make it your own.
A tiered deck elevates your outdoor space into a multi-functional retreat. It maximizes visual interest and usability, especially in sloped yards. Your friends will wonder how you managed such a sophisticated upgrade on a budget. Ready to create a layered oasis?
5. Foldable Canvas Shade Canopy for Sun Protection
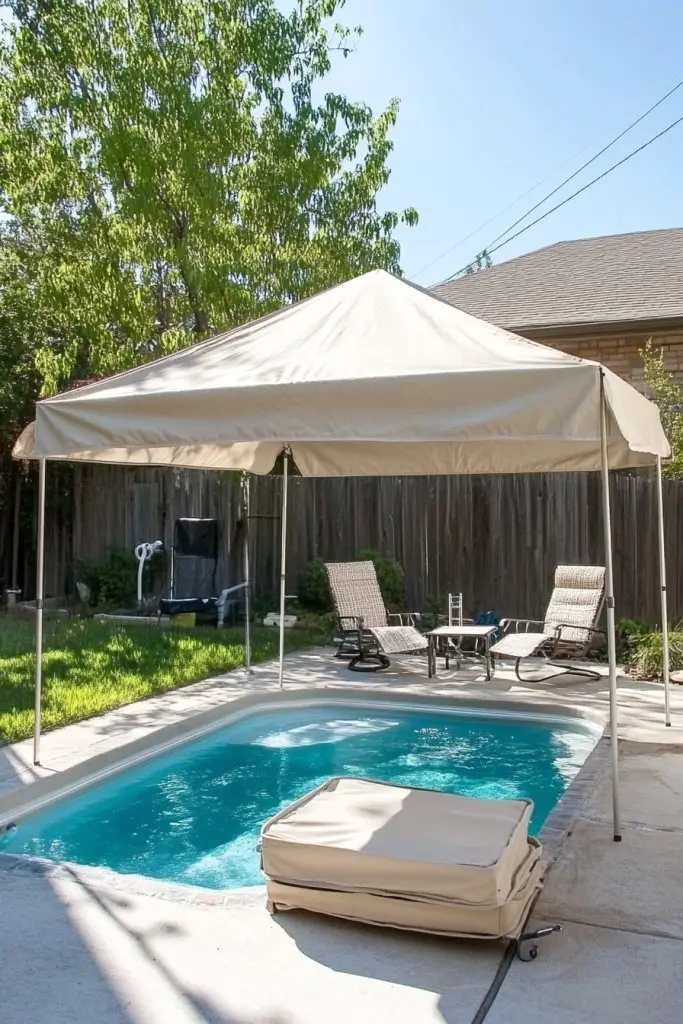
Tired of baking in the sun while relaxing by your pool? A foldable canvas shade canopy offers quick relief and adds a stylish touch. If permanent structures seem too costly or restrictive, this portable solution is perfect. It’s easy to set up, take down, and store when not in use.
Visualize a lightweight, foldable fabric canopy stretched over a simple frame, providing a shady sanctuary. The canvas material is breathable, preventing the stifling heat, while its neutral tone blends with outdoor surroundings. As breezes drift through, the fabric gently ripples, offering soothing relief. It’s a perfect spot for lounging, reading, or enjoying a meal outside.
Choose from various colors and patterns to match your outdoor decor—think sun-bleached stripes or solid earthy tones. The canopy can be anchored with weighted bases or attached to existing structures like trees or fences. For portability, consider collapsible frames or lightweight poles. Seasonal use might involve adding side panels or mesh screens for extra shade.
Select a durable, UV-resistant canvas fabric and sturdy, lightweight frames—aluminum or coated steel work well. Set up the frame in a flat, open space near your pool, ensuring it’s securely anchored. Attach the fabric with clips or grommets, making sure it’s taut to avoid flapping. When not in use, fold the canopy neatly and store it away. Regularly check for wear and tear.
Add decorative elements like outdoor curtains or hanging lanterns from the frame for extra style. Incorporate a small side table or a waterproof storage bag nearby for essentials. Use colorful fabric ties or ribbons for a playful look. Personalize with monogrammed patches or custom patterns on the canopy for a unique touch.
A foldable shade canopy is a game-changer for outdoor comfort, proving that sun protection can be stylish and practical. It transforms your poolside into a cool oasis on hot days. Now you can relax in confidence, knowing you’re protected from harsh rays without sacrificing style.
6. Compact Corner Deck with Non-Slip Decking Material
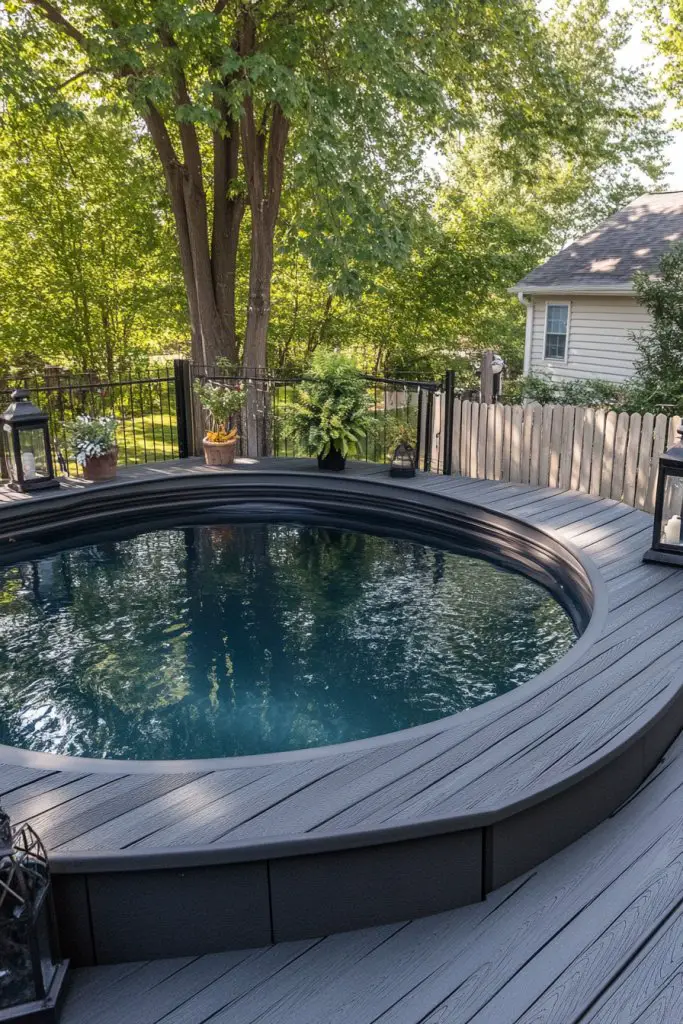
Struggling to make the most of a small yard or awkward corner? A compact corner deck with non-slip decking material maximizes space while ensuring safety. If slipping hazards or tight spots have kept you from enjoying your outdoor area, this idea offers a smart solution. It’s a small upgrade with a big impact.
Picture a neat, square corner deck fitted snugly into your yard’s niche, made from textured, non-slip composite boards. The surface feels secure underfoot, even when wet, and the subtle color complements your existing landscape. The deck’s edges are clean and simple, with a low-profile railing or none at all. It’s the perfect cozy spot for a couple of chairs or a small table.
Choose from different non-slip materials—composite decking, textured wood, or rubberized surfaces—based on your aesthetic and safety needs. Keep it monochrome for a sleek look or add colorful outdoor rugs for warmth. This small deck can be made multi-functional with foldable furniture or storage bins. It adapts well to tight spaces, balconies, or side yards.
Measure your corner precisely, considering clearance for furniture and movement. Prepare a level base by compacting soil or gravel. Cut your decking boards to fit the space, and secure them with corrosion-resistant screws. For added safety, install non-slip strips or textured coatings. Finish by sealing the surface with a weatherproof finish, and add trim or edging for a finished look.
Incorporate a small built-in bench or storage box to maximize utility. Add outdoor cushions or textured throws for comfort and style. You could also install a small, decorative fence or border to define the space further. Use weather-resistant paint or stains to match your yard’s color scheme.
Even the tiniest corner can become a charming retreat with the right materials and design. It’s a practical upgrade that boosts safety and style simultaneously. Your outdoor nook will become the go-to spot for morning coffee or evening chats, all on a budget.
7. Recycled Brick Patterned Surface for a Vintage Appeal
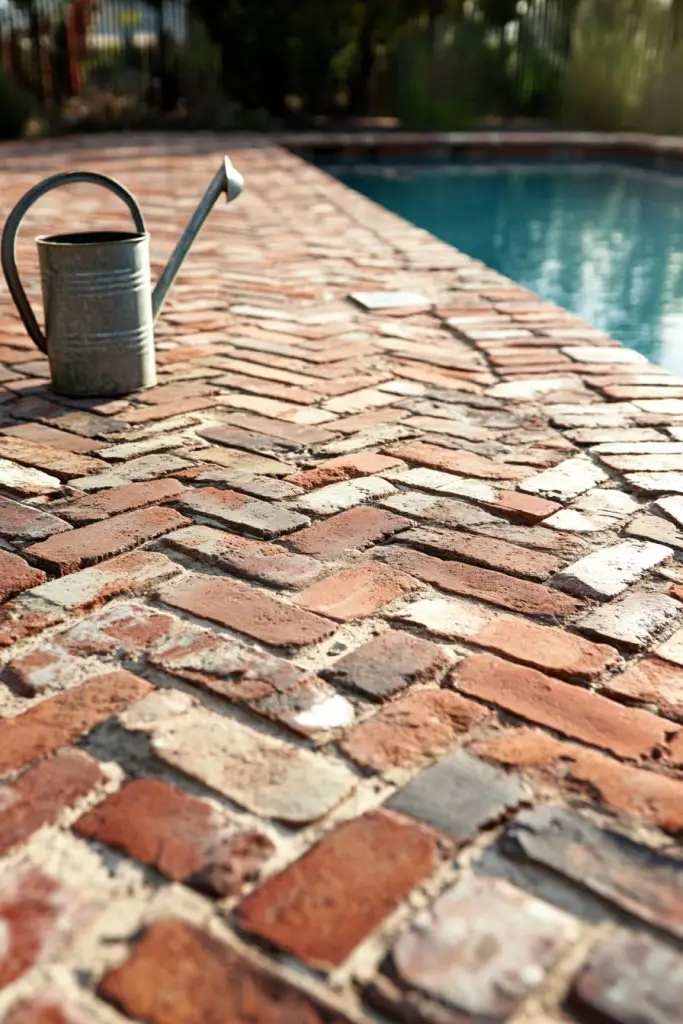
Want to add vintage charm to your poolside without splurging on fancy materials? A recycled brick patterned surface can do that while being eco-friendly and affordable. If your current deck looks tired or plain, this idea provides texture and character that’s hard to beat. Plus, it’s an excellent way to reuse old bricks.
Visualize a mosaic of weathered bricks laid out in a herringbone or basket weave pattern. The rich reds, browns, and earthy tones create a nostalgic vibe that instantly warms up the space. The textured surface feels solid underfoot, with a rustic charm that complements vintage or modern decor alike. Small gaps between bricks add a handcrafted feel, making the whole area inviting.
Use different shades or types of bricks for a more eclectic look, or keep it uniform for a classic feel. Incorporate a border of smooth stones or concrete accents for contrast. Seasonal accents like lanterns or string lights can enhance the vintage vibe. This pattern works in small patches or extends across your entire patio.
Start by sourcing reclaimed bricks from salvage yards or online marketplaces. Prepare a stable, level base of gravel or sand. Lay the bricks in your chosen pattern, tapping them into place with a rubber mallet. Fill gaps with sand or fine gravel, then sweep and compact thoroughly. Seal the surface with a waterproof sealant for durability. Regular maintenance involves sweeping and resealing every few years.
Add decorative elements like vintage lanterns, small sculptures, or engraved bricks. Use weather-resistant paint or stains to highlight certain bricks or create patterns. Incorporate a small water feature or a vintage bench nearby for added appeal. Personal touches like family initials or custom mosaics make it uniquely yours.
A recycled brick surface combines sustainability with style, proving that eco-friendly choices can be beautiful. It’s a durable, timeless upgrade that adds personality to your outdoor space. With a bit of effort, you’ll have a vintage-inspired oasis that feels both nostalgic and fresh.
8. Modular Interlocking Deck Tiles for Easy Installation
Looking for a quick, mess-free way to upgrade your pool area? Modular interlocking deck tiles are the perfect solution, offering instant style and easy installation. If you’re tired of complex DIY projects or waiting for contractors, these tiles allow you to transform your space in hours. Plus, they’re super versatile.
Picture a sleek grid of interlocking tiles, each one featuring textured, slip-resistant surfaces. The tiles come in various colors and finishes, from wood-look to stone-inspired options. When snapped together, they create a seamless, modern deck that feels sturdy and comfortable underfoot. The pattern is customizable, giving you control over the final look.
Mix and match different tile styles or colors to create patterns or zones. Use contrasting borders or accents to define spaces—like a lounging area versus a walkway. These tiles can be easily removed or replaced if damaged or to refresh the look. They work well in small patios, balconies, or large decks.
Prepare a flat, clean surface by sweeping away debris. Lay down a weed barrier or underlayment if desired. Snap the tiles together, ensuring each piece locks securely with its neighbors. For uneven surfaces, use shims or additional underlayment to level the tiles. No tools are required, making it accessible for most DIYers. For maintenance, simply lift and clean or replace individual tiles.
Create visual interest by adding outdoor rugs on top of tiles or incorporating decorative borders. Use LED lighting strips along the edges for nighttime ambiance. Personalize with engraved or painted designs on individual tiles. They also serve as a great base for outdoor furniture or planters.
Interlocking tiles demonstrate how simple upgrades can elevate your outdoor space instantly. They’re a practical, budget-friendly choice that combines style with functionality. Your backyard will look polished and modern, with minimal effort and maximum impact.
9. Minimalist Gravel and Wood Border for a Modern Edge

Want a sleek, low-maintenance upgrade to your poolside? A minimalist gravel bed with a clean wood border offers that modern edge you crave. If traditional decks seem too busy or high-maintenance, this simple design provides a contemporary look with minimal effort. It’s perfect for those who prefer clean lines and understated style.
Imagine a smooth gravel surface, dotted with smooth, rounded stones for texture. The gravel is edged with a slim wooden trim, stained or painted in a color that complements your yard. The contrast between the organic gravel and crisp wood creates a striking visual balance. Sunlight reflects softly off the gravel, adding a subtle shimmer that enhances the sleek aesthetic.
Use different gravel sizes and colors for variety—white, gray, or black—to match your overall landscape. The wooden border can be simple or detailed with decorative cuts. Seasonal touches like outdoor sculptures or minimalist planters (avoiding restricted plants) can personalize the space. This approach works well in modern or Scandinavian-inspired gardens.
Start by clearing and leveling the area. Lay a weed barrier or landscape fabric to prevent weed growth. Install the wooden border with stakes or anchors, ensuring it’s straight and secure. Fill the inside with gravel, raking it evenly and adding more for compaction. Maintain by raking occasionally and topping up the gravel as needed.
Add string lights or solar-powered stake lights for ambiance. Incorporate textured or patterned stones within the gravel for visual interest. Use sleek, modern outdoor furniture to match the minimalist theme. Personal touches like engraved wood signs or small sculptures can bring character.
This simple, modern design proves that less is often more. It’s a stylish way to create a defined outdoor zone without fuss or expense. Your poolside will feel fresh, open, and effortlessly elegant, encouraging more outdoor enjoyment.
10. Rope-Arm Bound Wooden Deck for Nautical Vibe
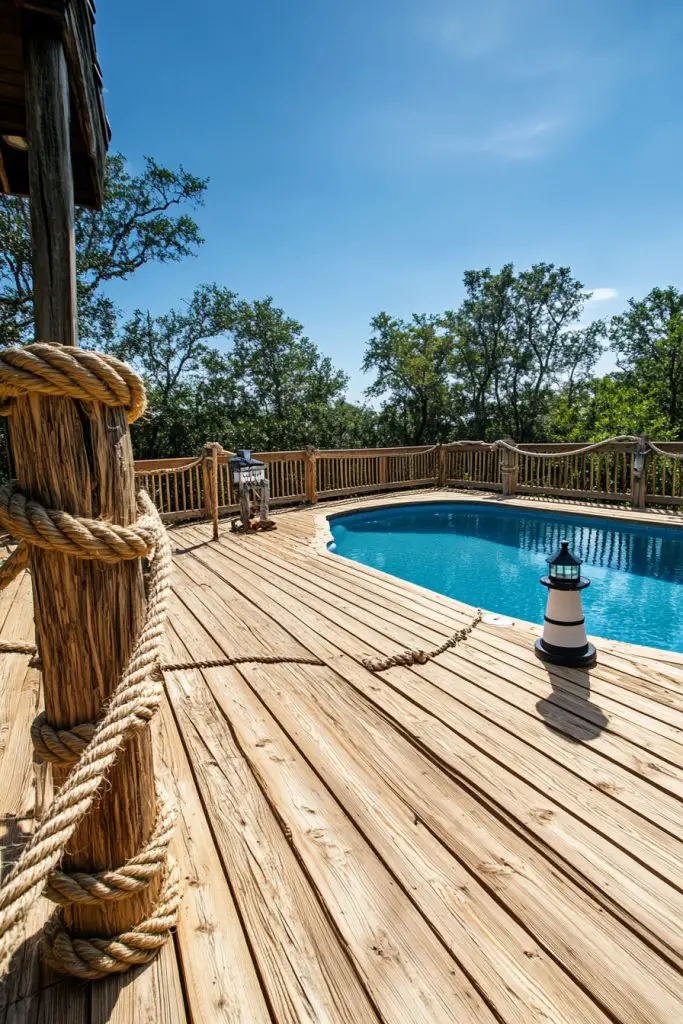
Dreaming of a beachy, nautical vibe for your pool area? A rope-arm bound wooden deck offers that relaxed, seaside charm you want without hefty costs. If traditional decks feel too formal or heavy, this breezy style adds personality and a sense of fun. Plus, it’s surprisingly simple to build.
Picture a wooden deck constructed with planks bound together by thick, braided ropes at the arms, resembling a ship’s railing. The natural wood finish and sturdy rope accents evoke a maritime feel. Soft cushions and striped throws complete the scene, inviting you to unwind and imagine ocean breezes. This deck feels both sturdy and playful, perfect for a relaxed summer vibe.
Use different rope thicknesses or colors—natural, navy, or white—for varied nautical effects. You can incorporate built-in seating or small tables wrapped in rope accents. Seasonal additions like weatherproof cushions or outdoor lanterns enhance the look. The design adapts well to small yards or large lakeside properties.
Construct a basic wooden platform using pressure-treated planks, securing them tightly with outdoor screws. Attach thick ropes at the arms of the deck, wrapping and knotting them securely around the frame. Make sure the ropes are tight and evenly spaced for safety. Seal the wood with a weatherproof stain to withstand the elements. Add accessories like nautical lanterns or a small anchor for authenticity.
Decorate with striped outdoor cushions, weatherproof throw blankets, or a small ship’s wheel mounted on a nearby post. Incorporate textured rope patterns or decorative knots on the deck edges. Use weather-resistant fabrics and accessories for durability. Personal touches make this nautical style truly yours.
A rope-arm bound wooden deck delivers a charming seaside feel on a budget. It’s a creative project that combines practicality with playful style. Your backyard will be a coastal escape, perfect for summer parties or quiet evenings under the stars.
11. Rope-Lighted Pergola for a Cozy, Inviting Space
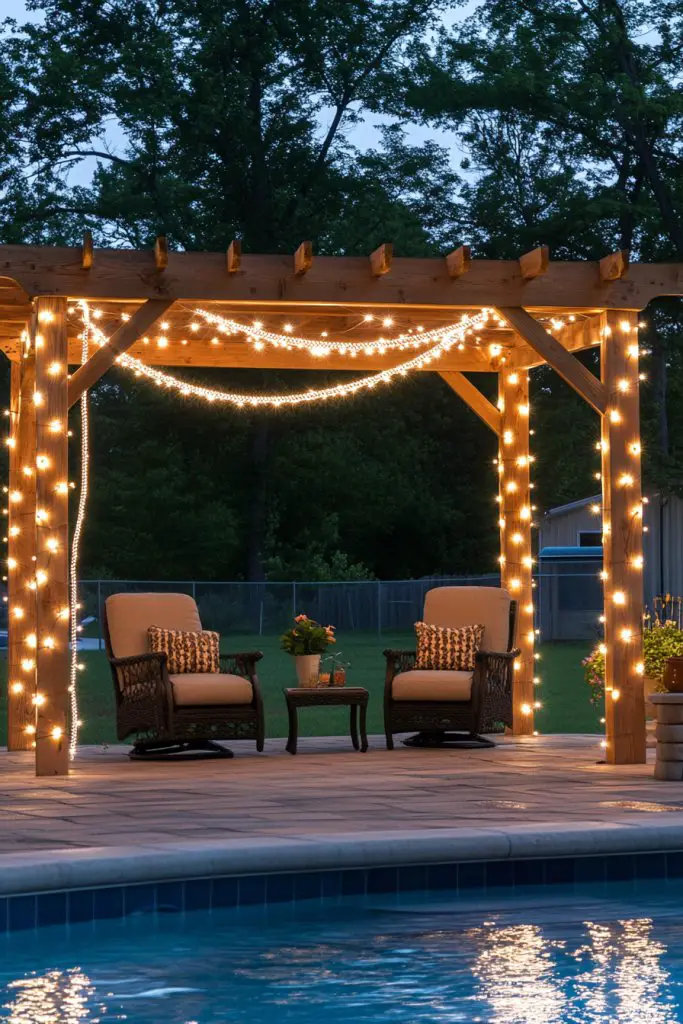
Want to extend your poolside fun into the night? A rope-lit pergola creates a cozy, inviting space for evening gatherings without spending a fortune. If traditional outdoor lighting feels too harsh or expensive, this DIY approach offers soft, ambient illumination. It’s a charming way to make your backyard feel magical.
Imagine a simple wooden pergola, draped with string lights that cast a warm, gentle glow. The lights are woven through the rafters, creating a canopy of sparkling points against the evening sky. Underneath, you might have a small table or lounge chairs wrapped in soft fabrics, all bathed in a romantic, inviting light. It’s perfect for intimate dinners or relaxing with friends.
Choose different styles of string lights—warm white, fairy lights, or even color-changing options. The pergola can be built from reclaimed wood or inexpensive lumber, with a straightforward design. Seasonal decor like fabric drapes or lanterns can enhance the cozy vibe. It adapts easily to various yard sizes and themes.
Construct the pergola frame using pressure-treated or reclaimed wood, anchoring posts securely into the ground. String the lights along the beams, ensuring they’re evenly spaced and safely attached. Use outdoor-rated string lights to withstand weather. Add additional elements like fabric curtains or wind chimes for extra charm. Regularly check the wiring and bulbs for safety.
Decorate the space with outdoor cushions, rugs, or small side tables for added comfort. Incorporate hanging lanterns or candles for extra ambiance. Use personalized touches like monogrammed cushions or DIY photo banners. Keep the setup simple but cozy, adding seasonal accents as desired.
A rope-lit pergola transforms your outdoor space into a fairy-tale setting, perfect for relaxing or entertaining. It shows that beautiful, functional lighting doesn’t have to be expensive or complex. Your backyard will become the ultimate evening retreat, all on a budget.
12. Upcycled Crate Seating and Table Area
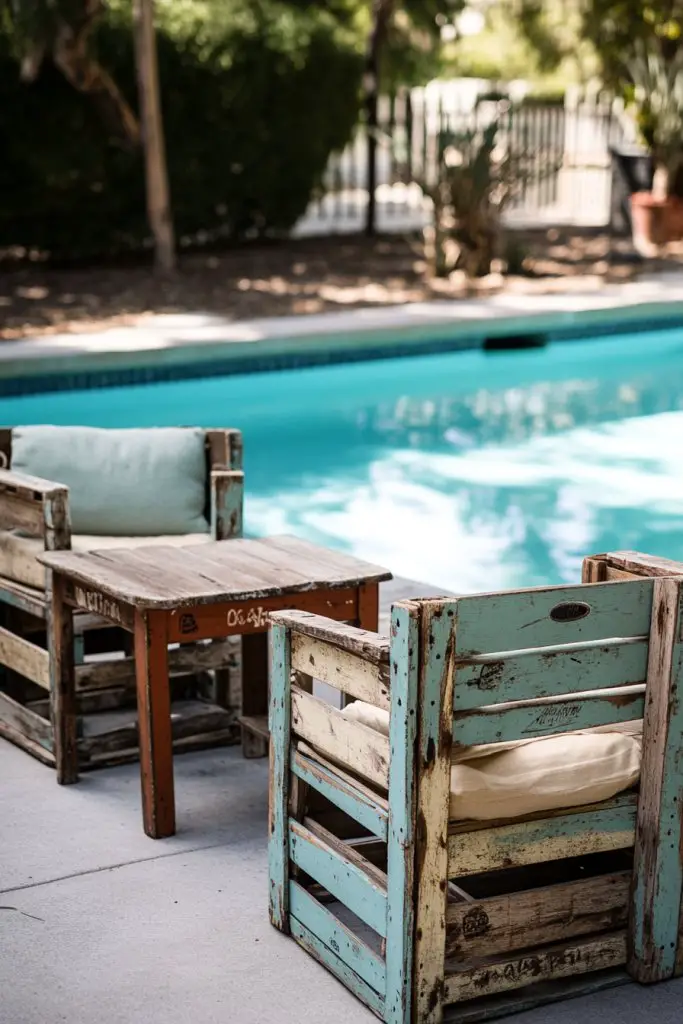
Ever wish you could add a cozy, casual vibe around your pool without breaking the bank? Upcycled crates are the perfect hack to create affordable seating and tables that look eclectic and inviting. Plus, they’re super easy to find or repurpose from old wooden boxes. Who knew that a few sturdy crates could turn your poolside into a relaxed hangout?
Imagine stacking weathered wooden crates to form a low, rustic table topped with a bright, colorful cushion. Nearby, crates serve as comfy seats with cushions or even small backrests. The rough texture of the wood contrasts beautifully with soft throws or pillows, making your space feel laid-back and inviting. You might add string lights overhead, but the crates themselves set the relaxed tone perfectly.
Paint or stain the crates to match your outdoor decor, or leave them raw for a more rustic look. Stack or arrange them in different configurations depending on your space—small or large. Use them as storage for pool toys or towels when not in use, or add wheels for easy mobility. During colder months, layer blankets or add faux fur pads for extra comfort and style.
Start by sourcing sturdy crates, either from thrift stores or online marketplaces. Sand rough edges and apply weatherproof sealant if you want durability against the elements. Stack or arrange crates in your preferred layout, securing them with brackets if needed. Top with cushions or foam pads for comfort, and accessorize with outdoor-friendly fabrics. For a more finished look, add decorative textiles or paint details. This DIY project requires minimal tools, mostly just some basic paint or sealant, plus cushions.
Customize your crates with bright colors, patterns, or even stenciled designs to match your personality. Mix and match different-sized crates for visual interest, or add removable cushions for versatility. Incorporate small side tables or ottomans by stacking crates and cushioning the top. You can also use them to create a green corner by adding planters or herbs on top, turning your pool area into a mini garden retreat.
Upcycled crates are a budget-friendly way to infuse personality into your pool space. They’re versatile, easy to move around, and endlessly customizable. Plus, you’ll impress friends with your eco-friendly, creative flair. Ready to ditch boring furniture and make your poolside uniquely yours? It’s simple, fun, and totally doable with a bit of DIY spirit.
13. Reclaimed Wooden Pallet Planter Edges for a Green Accent
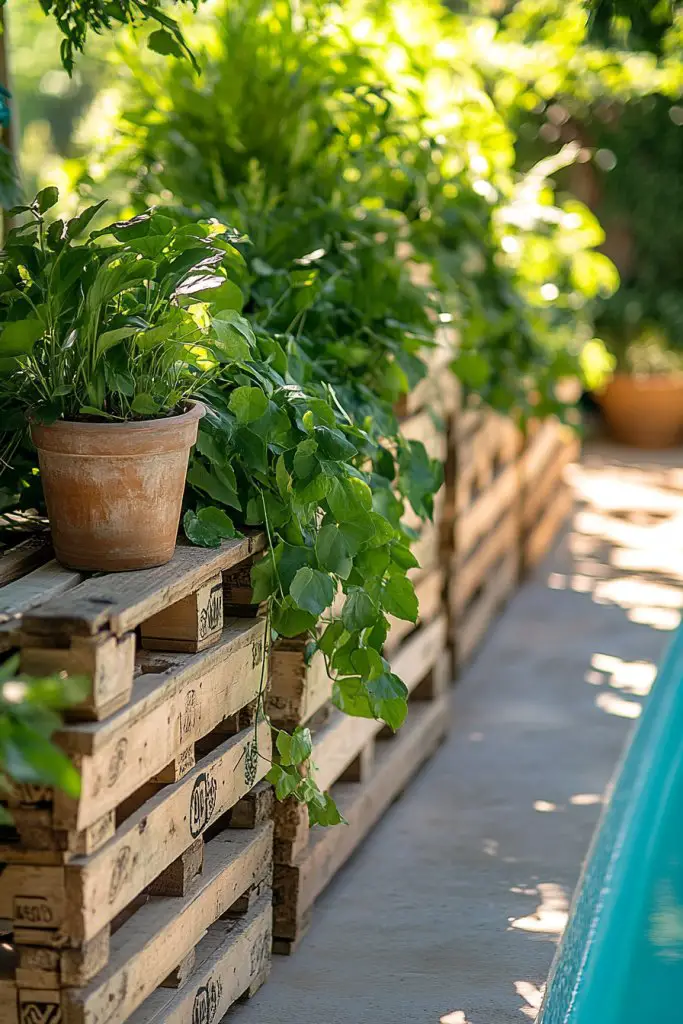
Looking to add a splash of nature to your pool area without spending a fortune? Reclaimed wooden pallets are your secret weapon for creating lush, green borders that don’t cost much. They bring a rustic charm and a splash of life, making your space feel more inviting and lively. Who knew that old pallets could become the backbone of your outdoor oasis?
Picture a low, wooden border made from stacked pallets, filled with vibrant greenery spilling over the edges. Along the perimeter, trailing vines and potted plants add texture and color, creating a natural barrier that feels like an extension of your yard. The weathered wood lends a vintage charm, especially when paired with bright flower pots or herbs nestled in between.
Paint or stain the pallets for a more polished look, or leave them natural for an authentic, rustic vibe. Stack them vertically or arrange them horizontally, depending on your space and style preference. Incorporate different plant types—succulents, herbs, or flowering plants—for seasonal variation. During winter, swap out plants for festive decorations or bare it down for a cleaner look.
Start by collecting reclaimed pallets, making sure they’re free of chemicals or pests. Sand rough edges and treat the wood with outdoor sealant to prolong lifespan. Assemble the pallets into a low border or raised beds by securing the planks together. Fill with soil and plant your chosen greenery—preferably hardy varieties that thrive outdoors. Position the edges around your pool area to create a seamless transition between yard and pool.
Add decorative touches such as painted patterns or stenciled designs on the pallets for extra flair. Incorporate small stepping stones or gravel paths between the pallet borders for easy access and a polished look. Use various heights or layered pallets to create a multi-dimensional green wall or tiered garden. Personalize with your favorite herbs, flowers, or even small vegetable plots, turning your poolside into a mini farm.
Using reclaimed pallets for plant borders combines eco-consciousness with style—who doesn’t love that? It’s affordable, customizable, and adds a fresh, natural vibe to your pool area. With a little effort, you can turn old wood into a stunning green backdrop that makes your space feel alive and welcoming. Dive into this project and enjoy a lush, eco-friendly oasis that’s uniquely yours.
14. Gravel Base with Wooden Plank Walkways for Easy Maintenance
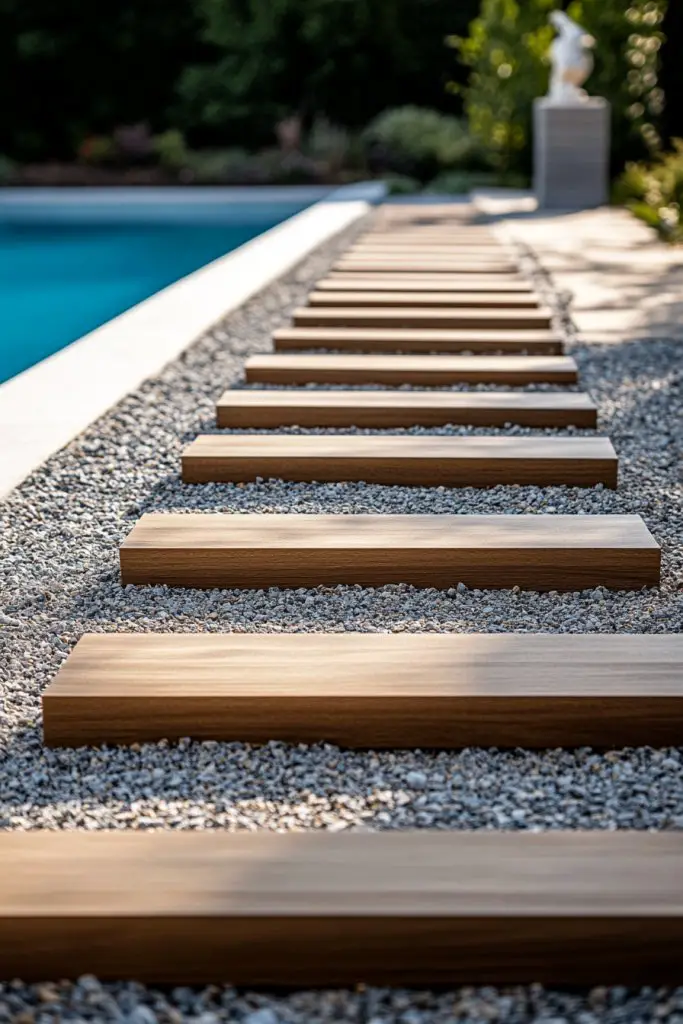
Tired of muddy footprints and constant weeding ruining your poolside? A gravel base combined with wooden plank walkways offers a clean, low-maintenance solution. It creates a neat, organized space that’s easy to walk on and looks great without much effort. Plus, it’s a budget-friendly alternative to expensive concrete or stone surfaces.
Imagine a smooth gravel foundation with narrow wooden planks laid out in a grid or pathway pattern. The gravel provides excellent drainage and a soft, textured look, while the wooden planks add warmth and structure. As you stroll, you hear the gentle crunch of gravel underfoot and see the contrasting colors—gray stones with warm, natural wood. It’s a simple yet effective way to define your pool area.
Use different types of wood—reclaimed, cedar, or pressure-treated—for the planks, depending on your style and budget. Lay the planks in straight lines for a classic look or create curves for a more organic feel. Add small gravel borders or edging for a tidy appearance and to prevent shifting. You can also incorporate stepping stones or larger wooden pads for seating spots or lounging areas.
Start by marking out your walkway routes and preparing a level gravel base—about 4-6 inches deep. Compact the gravel thoroughly for stability. Cut your wooden planks to size, then lay them across the gravel, spacing them evenly. Secure the planks with outdoor screws or nails, ensuring they’re flush with the gravel surface. For extra durability, treat the wood with a weatherproof sealant. Regular raking of gravel keeps the surface clean and functional.
Add decorative gravel in different shades or textures to create visual interest. Incorporate small garden beds or planters alongside the walkways for pops of color. Use different wood finishes or stains to match your outdoor decor. Consider adding solar-powered path lights along the wooden planks for a glowing effect at night, making your poolside both practical and enchanting.
This gravel and wood pathway combo keeps your pool area pristine with minimal effort. It’s an affordable way to create defined zones for lounging, walking, and entertaining. Plus, it’s easily expandable or adjustable as your needs change. With just a bit of planning, you’ll enjoy a tidy, stylish outdoor space that’s simple to maintain and forever adaptable.
15. Simple Rope Fence for Safety and Style
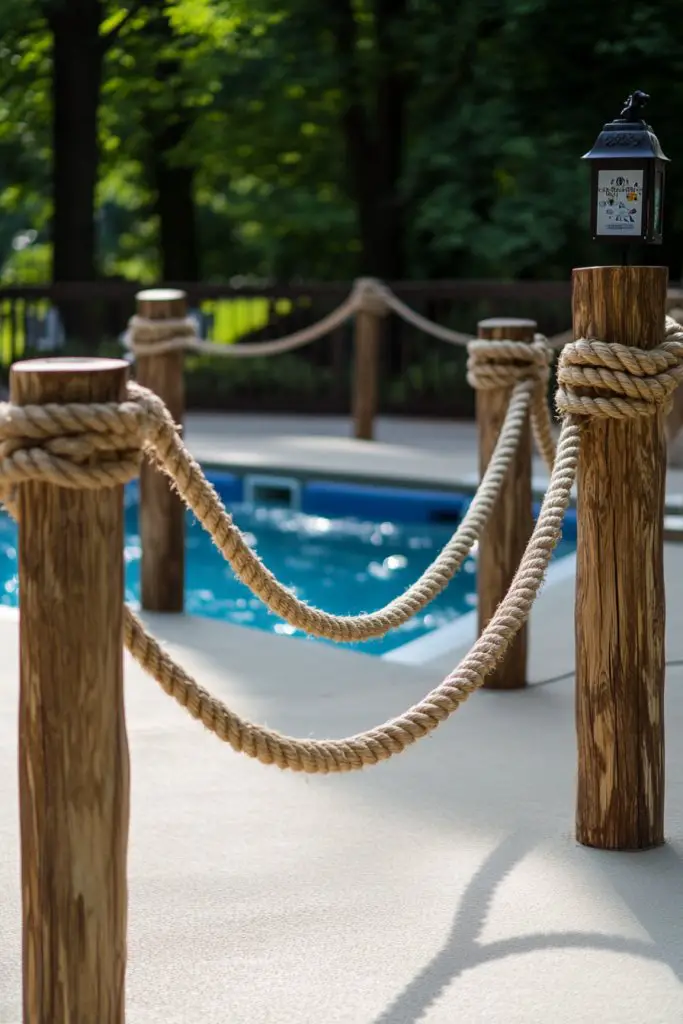
Ever worry about keeping little ones or pets safe around your pool without sacrificing style? A rope fence offers a chic, budget-friendly solution that’s easy to install and customize. It creates a clear boundary while maintaining an open, airy feel. Who says safety can’t be stylish?
Picture a series of sturdy wooden posts spaced evenly around your pool, connected by thick, knotted ropes. The ropes sway gently in the breeze, adding a playful, nautical vibe. This simple barrier doesn’t block views or sunlight, making your backyard feel open yet secure. It’s perfect for casual gatherings or family fun.
Choose different rope colors—classic white, navy, or even bright hues—to match your outdoor theme. Use thicker ropes for a more substantial look or thinner ones for a delicate, minimalist effect. Vary post heights for a dynamic appearance or add decorative caps to the posts. This fence can be easily extended or shortened, making it flexible for your space.
Start by installing the wooden posts securely into the ground, ensuring they’re level and evenly spaced. Attach the ropes using heavy-duty knots or eye bolts, tightening them to keep the barrier taut. For extra stability, add metal brackets at the base of each post. You can also add hooks or clips to easily remove or adjust the ropes. This project requires basic tools like a drill, level, and sturdy ropes.
Personalize your rope fence with decorative knots, bows, or even small signs for a whimsical touch. Incorporate LED lighting along the ropes for night-time safety and ambiance. Use different rope textures—jute, nylon, or hemp—to create visual interest. You can also add fabric banners or flags between posts for special occasions or holidays.
A rope fence is a simple, effective solution that keeps your pool safe without looking like a barrier. It’s easy to install, remove, or redesign as your needs evolve. Plus, it adds a charming nautical or rustic touch that enhances your backyard’s overall vibe. Ready to combine safety and style effortlessly? Give it a try!
16. Portable Step Stools with Painted Pallet Surfaces
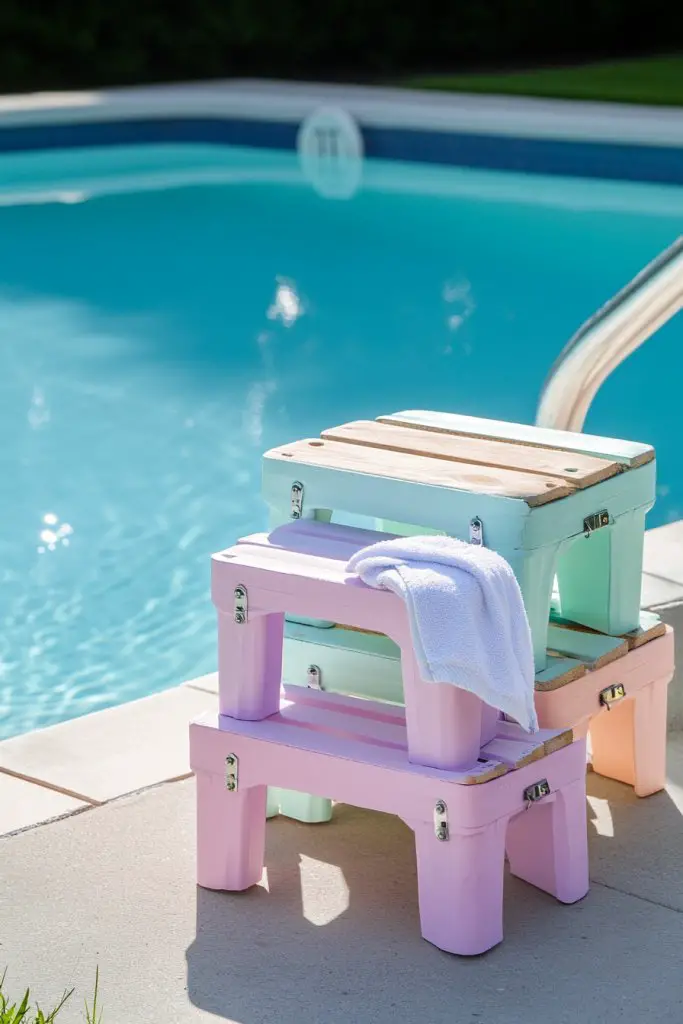
Getting in and out of your above ground pool can be a chore, especially without a proper step. Portable step stools made from repurposed pallets solve this problem with style and affordability. They’re lightweight, customizable, and can be moved wherever you need a boost. Who knew that an old pallet could boost your pool game?
Imagine a small, sturdy wooden pallet painted in cheerful colors like aqua or sunny yellow. It’s topped with a non-slip mat or textured paint for safety. You place it beside your pool, ready to help you climb in with ease. The bright color adds a fun pop to your poolside decor, and the simple design fits seamlessly into casual backyard settings.
Paint or stain the pallets to match your outdoor theme, or leave them natural for a rustic look. Add grip tape or textured paint on the top surface for safety. You can stack multiple pallets for higher steps or keep it simple with a single one. Consider adding small handles or hooks for easy mobility. Seasonal color changes or designs make this project fun and adaptable.
Source sturdy pallets, preferably treated for outdoor use. Sand rough edges thoroughly, then apply weatherproof paint or stain. Attach non-slip pads or textured paint on the top surface. Add handles or wheels if you want extra portability. Place the stool beside your pool, ensuring stability and ease of access. Regularly check for wear, and repaint or refinish as needed to keep it safe and attractive.
Decorate with stencils, patterns, or your favorite colors to personalize each step stool. Use waterproof markers or paint to add initials or fun designs. Match your stools with cushions or fabric wraps for extra comfort. For a cohesive look, coordinate the colors with your pool accessories or outdoor furniture. This DIY project keeps things playful and functional.
A custom-made pallet stool makes your pool experience safer and more fun. It’s a practical project that boosts confidence in DIY skills, plus it adds a cheerful touch to your backyard. With a little effort, you create a portable, stylish step that everyone will appreciate. Go ahead—step up your pool game!
17. DIY Sun Shelves Using Reclaimed Wood for Relaxation Nooks
Ever wish you had a dedicated spot to lounge, dry off, or keep your snacks close while enjoying your pool? DIY sun shelves from reclaimed wood are a clever, budget-friendly way to create cozy relaxation corners. They add functional beauty without the hefty price tag. Who wouldn’t want their own mini oasis right at the edge of the pool?
Visualize small, floating shelves made from weathered wood, attached just above water level or on the deck wall. You can place towels, sunscreens, or even a soft pillow on them, inviting you to lounge comfortably. The natural grain of reclaimed wood adds a rustic charm, blending seamlessly with outdoor surroundings. The shelves seem to hover, creating a laid-back, inviting vibe.
Customize the size and number of shelves to fit your needs—single or multiple, wide or narrow. Seal the wood with outdoor-grade preservative to prevent water damage. Attach them securely with brackets or waterproof adhesive, ensuring stability. Decorate with waterproof cushions or fabric covers for extra comfort. Seasonal accessories like lanterns or small plants can also be added, if restrictions permit.
Start by selecting reclaimed wood with water-resistant qualities. Sand and treat the wood to withstand outdoor elements. Mount brackets or adhesive strips on your deck or wall, then attach the shelves securely. Seal all surfaces with a waterproof finish to prolong lifespan. Arrange towels, sunscreen bottles, or small decor items on the shelves. Regularly check for wear or water damage, re-sealing as necessary.
Paint or stain the shelves in colors that complement your outdoor decor. Add hooks underneath for hanging items like sunglasses or keys. Incorporate waterproof cushions for lounging comfort. Use decorative elements like nautical rope accents or stenciled patterns to match your pool theme. These shelves become personalized, functional little retreats to unwind.
Creating your own floating or fixed sun shelves is a simple way to elevate your poolside experience. It’s a small project packed with potential for relaxation and style. Plus, it’s a chance to upcycle old wood and contribute to a greener planet. Dive into this easy DIY, and enjoy your own personal outdoor retreat.
Conclusion
Exploring these budget-friendly above ground pool deck ideas reveals a wide array of options to enhance your outdoor space without overspending. Whether you prefer a rustic wooden look, modern minimalism, or vibrant painted designs, there’s a project for you to try. Get inspired, gather your tools, and start creating your own stylish backyard haven—your perfect poolside retreat awaits!