Imagine walking into a kitchen where warmth, charm, and timeless appeal greet you at every turn—that’s the magic of butcher block countertops. Their natural beauty and versatile style make them a favorite among homeowners seeking a rustic, cozy vibe that also offers durability and practicality.
In this article, you’ll find a delightful array of ideas to incorporate butcher block countertops into your rustic-inspired spaces. Whether you’re dreaming of a classic farmhouse look or a more eclectic, creative style, these ideas will inspire you to transform your kitchen into a inviting retreat with character and charm.
1. Reclaimed Wood Butcher Block with Live Edge Finish
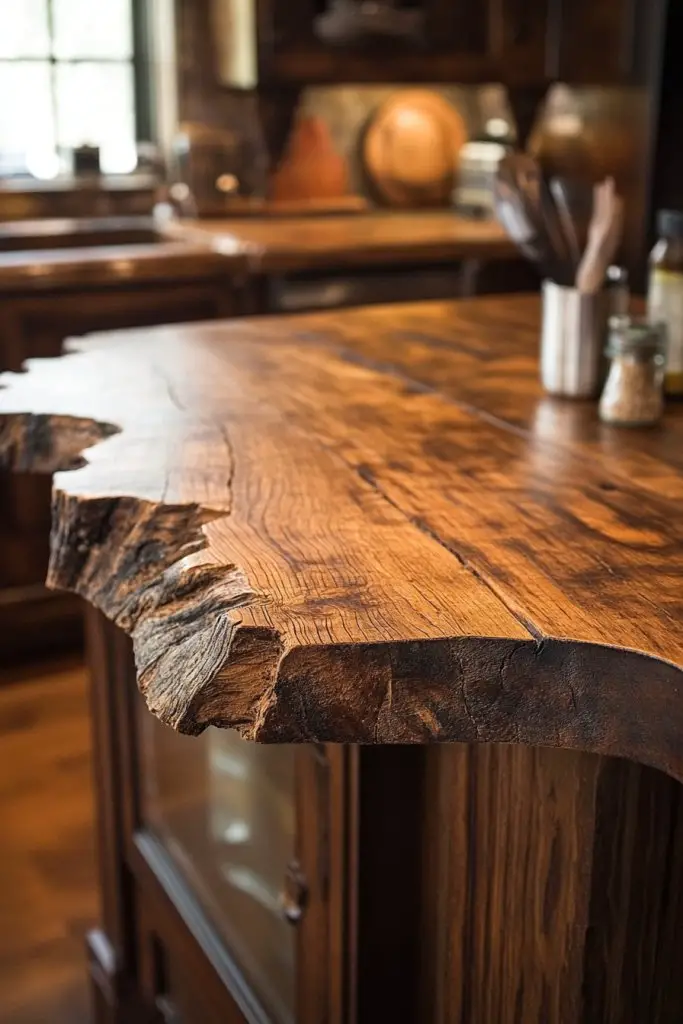
Ever wish your kitchen had a touch of authentic rustic charm without sacrificing durability? Reclaimed wood with a live edge finish gives your space that warm, weathered vibe many crave, especially if you love the idea of eco-friendly decorating. It’s not just about looks; it’s about creating a space that feels lived-in and genuine. But finding the right piece that balances beauty and function can be tricky.
Recommended Products to replicate this idea
| # | Preview | Product | |
|---|---|---|---|
| 1 |

|
HEIRLOUM Reclaimed Wood Table Top - Rustic Recycled Wooden Piece Perfect for Signs, Counters,... | Buy on Amazon |
| # | Preview | Product | |
|---|---|---|---|
| 1 |

|
Walnut Solid Wood Table Top – Live Edge Wood Slab for Desktop, Countertop, Laundry, Dining Table,... | Buy on Amazon |
Imagine a countertop where the natural edges of the wood follow the irregular contours of a mountain ridge, showcasing knots and grain patterns that tell stories of past lives. The warm honey tones contrast beautifully with modern appliances, adding character without overwhelming. The surface boasts a rich texture, with subtle ridges and valleys that invite touch and curiosity. Sunlight hits the uneven edges, casting shadows that emphasize its organic form.
This look works well in both traditional rustic kitchens and modern spaces aiming for a farmhouse feel. You can opt for darker stains or leave the wood raw for a more natural appearance. Seasonal accents like woven textiles or vintage pottery complement the reclaimed aesthetic. For small kitchens, pairing it with open shelving enhances the free-flowing, natural vibe, while larger spaces can feature it as a statement piece.
Start with sourcing reclaimed wood from local suppliers or salvage yards—look for slabs with minimal cracks or repairs. Sand the surface lightly to preserve the character but smooth enough for practical use. Seal it with food-safe mineral oil or beeswax to protect against spills and stains. To install, secure the slab onto sturdy base cabinets, ensuring level support along the live edges. Regular re-oiling keeps the wood looking fresh and prevents cracking.
Add personal touches by carving initials or meaningful symbols into the wood for a custom look. Incorporate metal accents or vintage hardware to enhance the rustic feel. You could also embed small LED strip lights underneath for subtle illumination at night. Using contrasting edging materials, like blackened steel or copper, creates a layered, industrial-rustic hybrid style. These small details make the piece uniquely yours.
Choosing reclaimed wood combines sustainability with style, making your kitchen both eco-conscious and beautiful. It’s a versatile look that ages gracefully and gains character over time. Once installed, it becomes a conversation starter and a treasured focal point. DIY or professional, this project elevates your space with authenticity and charm. Ready to embrace rustic elegance that’s truly one-of-a-kind?
2. Pallet Wood Butcher Block for a Budget-Friendly Rustic Look
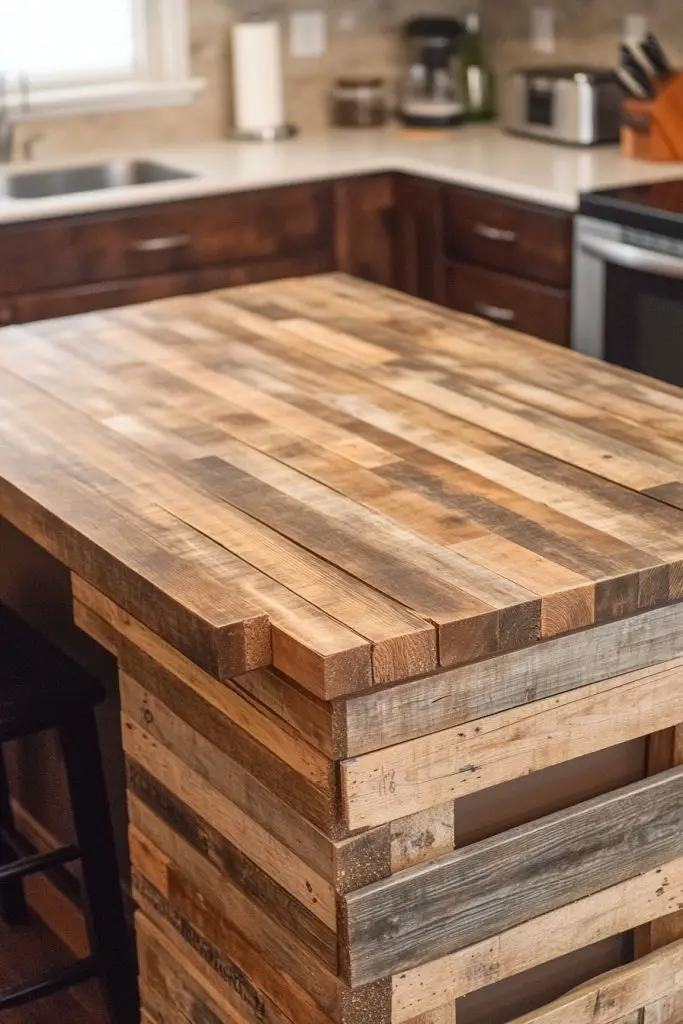
Looking to add rustic charm without breaking the bank? Pallet wood offers a surprisingly stylish solution for creating a warm, inviting countertop. It’s perfect if you’re into DIY projects or want a quick, affordable update that feels authentic. But can a bunch of discarded pallets really turn into a functional surface? Absolutely—if you know how to do it right.
Recommended Products to replicate this idea
| # | Preview | Product | |
|---|---|---|---|
| 1 |
|
Pallet Board Co. - 20 Sq. Ft. Bundle of Reclaimed Pallet Boards - Nail Up Application - Rustic... | Buy on Amazon |
| # | Preview | Product | |
|---|---|---|---|
| 1 |

|
Howard Products Butcher Block Conditioner and Food Grade Mineral Oil for Wood Cutting Boards, 12 Fl... | Buy on Amazon |
Picture a countertop composed of narrow, evenly cut planks arranged in a herringbone pattern, with the natural knots and grain showing through. The weathered gray and brown hues give a lived-in, casual vibe perfect for a farmhouse or cottage kitchen. The rough texture invites touch, while the subtle variations in color add depth and character. The entire surface feels like a piece of history, repurposed into a functional work of art.
This DIY approach adapts well to small or large kitchens, especially when paired with simple open shelves or vintage fixtures. You can stain the wood for a darker, richer tone or leave it raw for a more distressed look. Seasonal accents like linen runners or ceramic dishes enhance the rustic appeal. For a more refined finish, seal with a food-safe poly or mineral oil, ensuring durability without losing the charm.
Begin by collecting pallets from local sources, ensuring they’re untreated and safe for food contact. Disassemble and sand the planks thoroughly to remove splinters and rough patches. Arrange the planks in your desired pattern, then glue and clamp them together securely. Once dried, attach the assembled panel to your base cabinets with strong brackets or screws. Finish with multiple coats of sealer or oil to protect against moisture and wear.
Personalize your pallet countertop by adding a painted monogram or decorative stencil along the edge. Incorporate vintage hardware or reclaimed metal brackets for added rustic flair. You can also embed small ceramic tiles or decorative stones for visual interest. Using different stain shades on sections of the wood creates a patchwork effect that’s both playful and charming. Every detail adds personality.
A pallet wood butcher block proves that you don’t need to spend a fortune to achieve rustic beauty. It’s a project accessible to DIY beginners with patience and a few tools. Over time, it develops a beautiful patina that tells the story of your home. Embrace the imperfections—each one adds to its charm and authenticity. Your kitchen will feel warm, inviting, and uniquely yours.
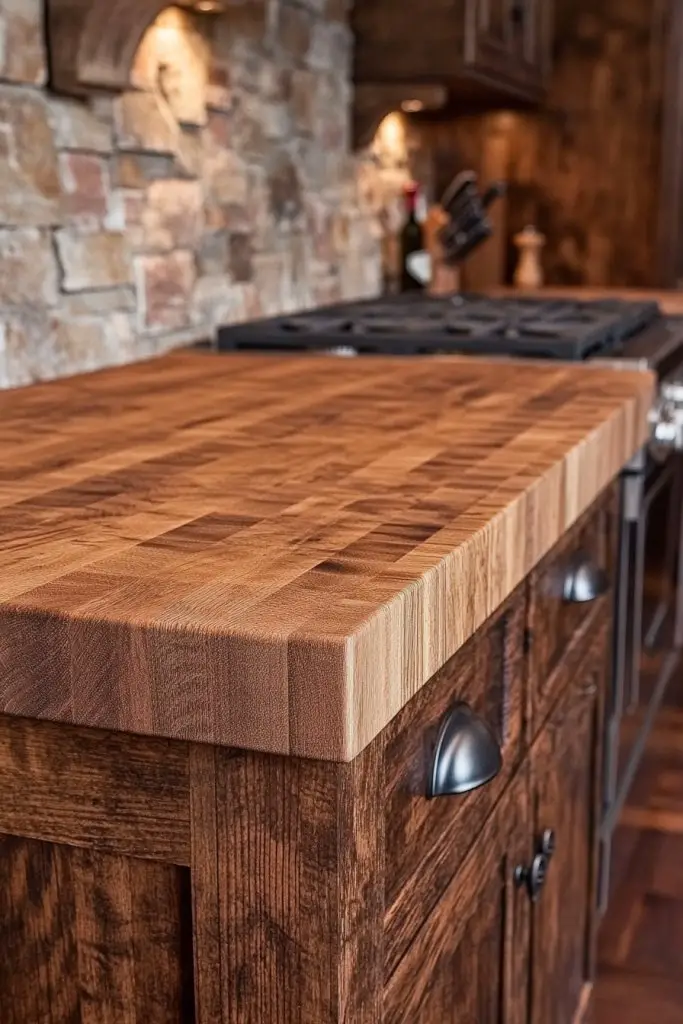
3. Wide Plank Maple Butcher Block with Natural Oil Finish
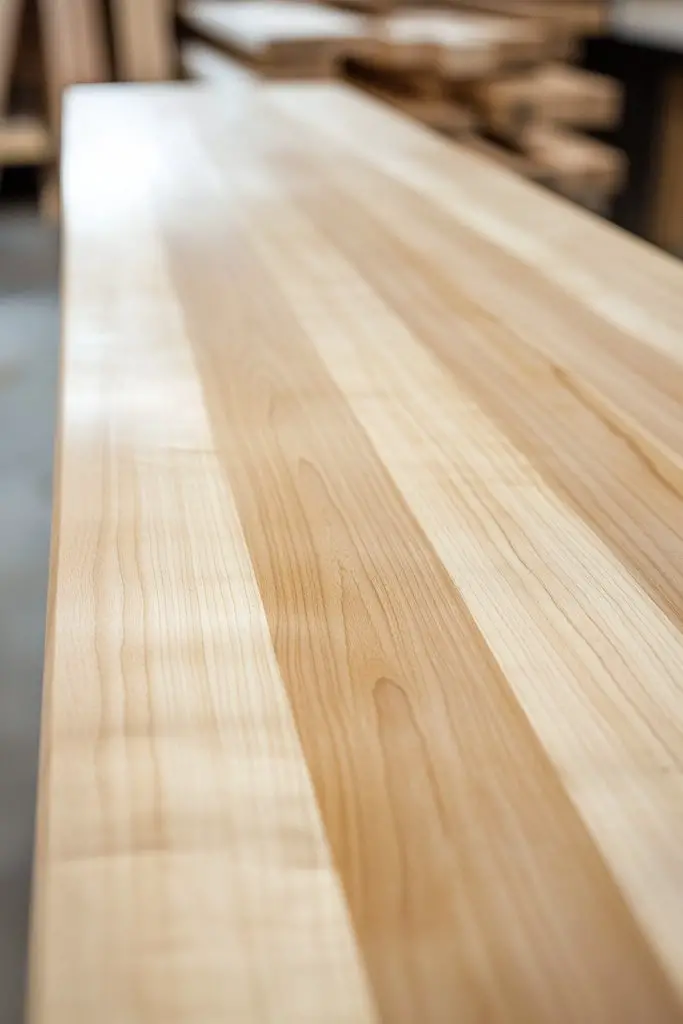
Craving a sleek yet rustic look that highlights natural beauty? Wide plank maple with an oil finish offers a clean, elegant surface that celebrates the wood’s grain. It’s perfect if you want a timeless, versatile countertop that fits both modern and traditional kitchens. But can you strike a balance between refinement and rustic charm? You definitely can.
Recommended Products to replicate this idea
| # | Preview | Product | |
|---|---|---|---|
| 1 |

|
CONSDAN Butcher Block Countertop, 48 x 25 Inches, USA Grown Solid Hard Maple Hardwood, for Kitchen... | Buy on Amazon |
| # | Preview | Product | |
|---|---|---|---|
| 1 |
|
Howard Products Food Grade Mineral Oil for Wood Cutting Board - 12 oz, Pack of 1 | Buy on Amazon |
Envision a smooth, expansive surface of wide maple planks, their pale, creamy color warmed by a natural oil finish. Subtle knots and delicate grain patterns add character without cluttering the eye. The finish enhances the wood’s softness and depth, inviting you to run your hand across it. The minimalist look is bright and airy, making the space feel open and inviting, yet rooted in natural simplicity.
This style suits minimalist, Scandinavian, or farmhouse interiors. You can enhance the natural look by pairing it with neutral-colored cabinets or textured textiles. For seasonal warmth, add a soft throw blanket or linen towels nearby. To adapt for different spaces, consider sealing with matte or satin finishes—each offers a slightly different look and feel while maintaining the wood’s natural charm.
Select high-quality, kiln-dried maple planks, ideally at least 1.5 inches thick for durability. Sand the surface thoroughly, then apply a food-safe oil like tung or mineral oil—reapply periodically for ongoing protection. Secure the planks together with dowels or wood glue, clamping tightly until set. Attach the assembled surface to your base cabinets, ensuring a smooth, level finish. Regular oiling maintains its luster and prevents drying out.
Personalize the look with subtle inlays or engraved initials at the edge. Use contrasting wood or inlay strips for a modern twist. Incorporate decorative metal accents or handles on nearby cabinets to complement the warm, natural tone. Seasonal decor like a soft fabric runner or a handcrafted trivet can add a cozy touch without cluttering the surface.
A wide plank maple butcher block offers a perfect mix of durability and elegance, elevating your kitchen’s style. Its natural finish ages gracefully and gains character over time. With proper maintenance, it remains a functional centerpiece for years. It’s a simple, classic choice that proves rustic and refined can coexist beautifully. Are you ready to embrace timeless beauty?
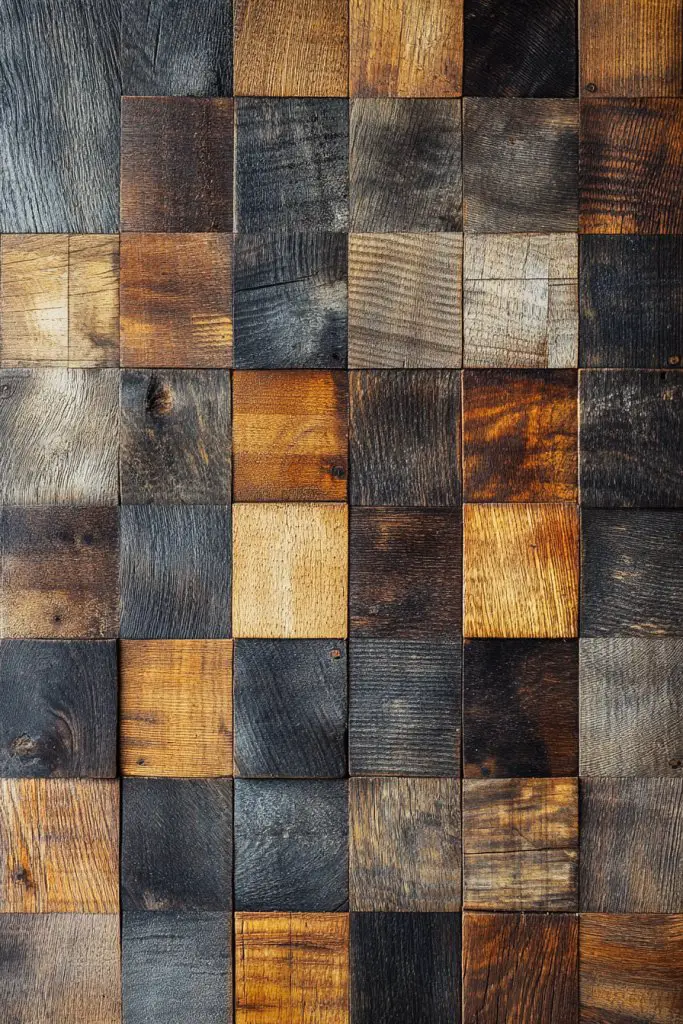
4. Mixed Wood Tones for a Vintage, Weathered Appearance
Want a statement piece that screams vintage charm? Mixing different wood tones creates an aged, weathered look that feels both authentic and full of character. It’s ideal if you love the idea of a rustic kitchen that looks like it’s been around forever, yet still functional. But how do you make mismatched tones work without looking chaotic? The secret is balance.
Recommended Products to replicate this idea
| # | Preview | Product | |
|---|---|---|---|
| 1 |

|
vidaXL Solid Reclaimed Wood Dining Table - Industrial Elegance 55.1" with Steel Cross Frame,... | Buy on Amazon |
| # | Preview | Product | |
|---|---|---|---|
| 1 |

|
Fixwal 15.8in Floating Shelves, Set of 6 Wood Shelves, Farmhouse Shelf Wall Decor for Bathroom,... | Buy on Amazon |
Picture a countertop patchwork of rich mahogany, faded oak, and soft pine, each with its own unique grain pattern and patina. The varied hues create a mosaic-like surface with depth and personality. The distressed finish adds to the vintage appeal, with subtle cracks and worn edges telling a story of time passing. The overall effect is warm, inviting, and full of nostalgia.
This look pairs beautifully with antique hardware, open shelving, and vintage-inspired accessories. You can stain sections differently or leave some wood raw for a more organic feel. For seasonal updates, add cozy textiles or handcrafted ceramics that complement the weathered tones. It’s versatile enough to suit both small cozy kitchens and larger, more eclectic spaces.
Gather a variety of wood scraps or disassemble old furniture to source different tones. Sand the surfaces to remove splinters and old finishes, then apply a light distressing technique—like scraping or wire brushing—to enhance aged effects. Use a combination of stains or whitewash to unify the tones subtly. Seal it with a matte, food-safe finish to protect the surface while maintaining the vintage look. Secure the assembled pieces onto a sturdy base, ensuring a level surface.
Create custom inlays or carved details to add a personal touch. Incorporate decorative metal accents or vintage-style knobs nearby. Use contrasting edging or painted details to further emphasize the patchwork effect. Adding a few well-chosen antique accessories nearby can enhance the overall vibe—think old jars, wrought iron hooks, or vintage signs.
Mixing wood tones allows you to craft a truly one-of-a-kind piece that ages beautifully. It’s a forgiving approach perfect for creative minds and budget-conscious DIYers. Over time, the variations will deepen, making it even more charming. This project proves that imperfectly perfect can be stunning, adding instant history to your space. Ready to embrace your inner vintage decorator?
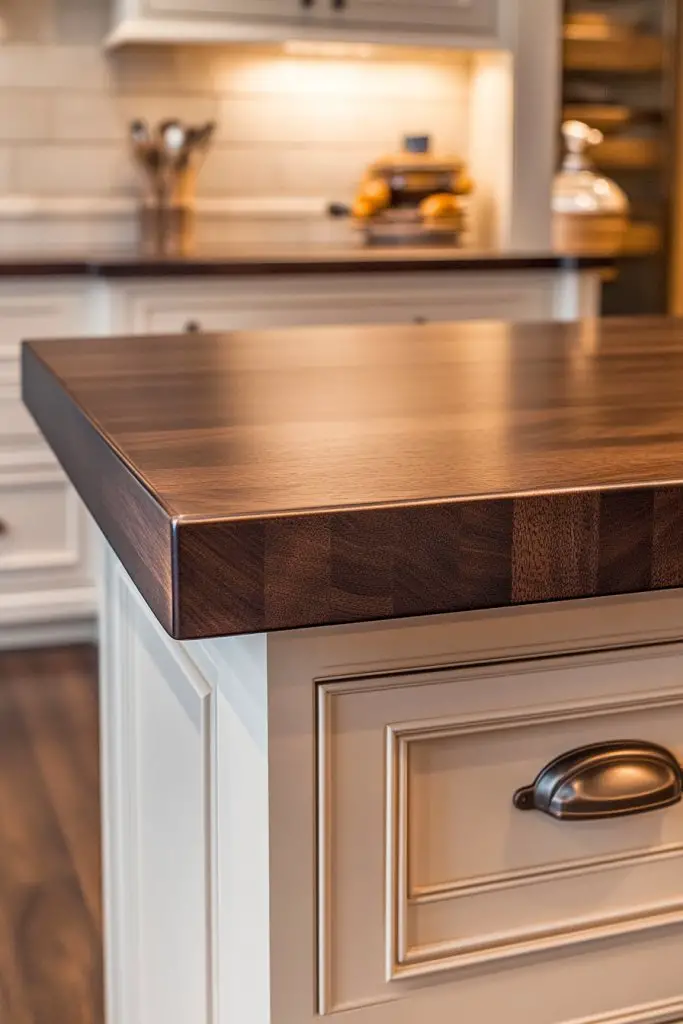
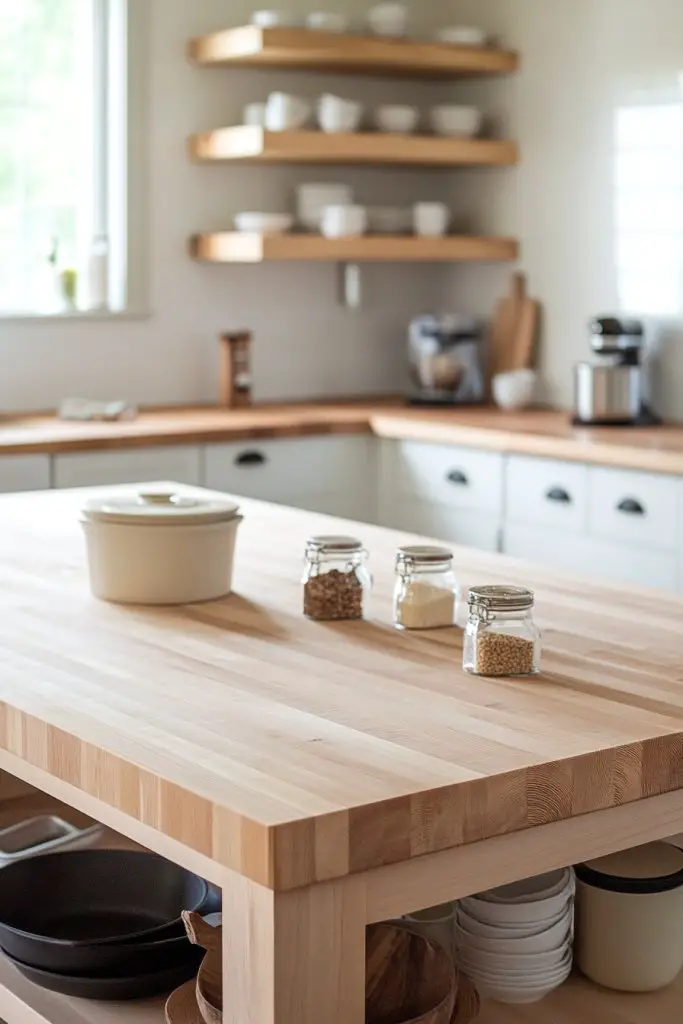
5. Dark Walnut Butcher Block with Matte Finish for Contrast
Craving a bold, sophisticated look that still feels rustic? Dark walnut with a matte finish offers a striking contrast to light cabinets and neutral walls, adding depth and richness. It’s perfect if you want to bring a touch of elegance into your farmhouse or industrial-style kitchen. But does dark mean high maintenance? Not necessarily, if you choose the right finish.
Recommended Products to replicate this idea
| # | Preview | Product | |
|---|---|---|---|
| 1 |

|
Howizz Walnut Butcher Block Countertop 60 x 25 x 1.5 Inches - Solid Wood Table Top for Desk Top,... | Buy on Amazon |
| # | Preview | Product | |
|---|---|---|---|
| 1 |

|
Minwax 222224444 Polycrylic Protective Wood Finish, Clear Matte, ½ Pint | Buy on Amazon |
Visualize a deep, velvety walnut surface with subtle grain patterns and a matte sheen that absorbs light rather than reflects it. The dark hue creates a dramatic backdrop for colorful cookware, textured textiles, or metallic accents. The surface feels velvety to the touch, with a soft, non-glossy finish that enhances its natural beauty. Shadows cast by overhead lighting emphasize the wood’s intricate grain, adding layers of visual interest.
This look pairs well with industrial metal fixtures, vintage hardware, or leather accents. For a softer vibe, add light-colored textiles or ceramic dishes nearby. Seasonal decor like woven placemats or cozy throws can warm up the space during colder months. To keep it versatile, consider sealing with a matte, food-safe oil that minimizes glare and maintains the subdued, elegant appearance.
Choose high-quality walnut slabs, ensuring they’re properly dried for stability. Sand thoroughly to a smooth finish, then apply a matte, food-safe sealer or oil. Multiple coats may be necessary for a durable, even surface. Secure the slab onto a sturdy base, making sure it’s level and well-supported. Regular maintenance with a soft cloth and oil touch-ups will keep the matte finish looking fresh and refined.
Add carved or stamped details along the edge for personalized flair. Incorporate decorative metal brackets or handles to complement the dark wood tone. You can also embed subtle inlays or accents for visual interest. Seasonal accessories like a soft fabric runner or handcrafted trivets enhance the rustic yet elegant vibe, making the space feel warm and inviting.
Dark walnut countertops make a statement that’s both bold and timeless, elevating your entire kitchen aesthetic. They develop a beautiful patina over time, adding character and depth. With proper care, they remain resilient and stunning for years. This choice proves that rustic can be refined, and sophistication isn’t out of reach. Are you ready to make a bold statement?
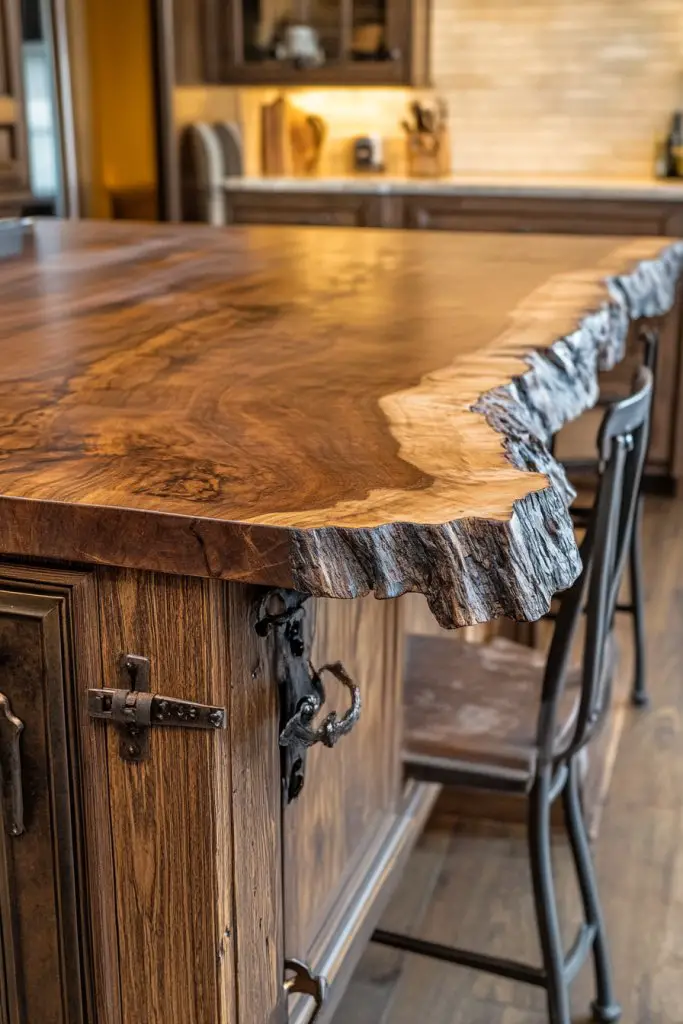
6. Handcrafted Live Edge Center Island with Rustic Hardware
Want to turn your kitchen into a showstopper? A handcrafted live edge island with rustic hardware creates a focal point that’s both functional and full of personality. It’s perfect if you love the idea of a piece that looks unique and tells a story. But how do you craft or choose the right piece without it feeling out of place?
Recommended Products to replicate this idea
| # | Preview | Product | |
|---|---|---|---|
| 1 |

|
rzoizwko Solid Wood Bar Height Table Rustic Live Edge Counter Height Dining Table Long Narrow Bistro... | Buy on Amazon |
| # | Preview | Product | |
|---|---|---|---|
| 1 |

|
CABDM 10 Pack Rustic Black Cabinet Pulls, Antique Hammered Kitchen Hardware, Vintage Drawer Pulls, 3... | Buy on Amazon |
Imagine a large, sturdy island with a natural, uneven edge that follows the contours of the tree it came from. The surface showcases the intricate grain, knots, and color variations, making each piece one-of-a-kind. Pair it with vintage-style hardware—wrought iron or distressed metal—to enhance its rustic charm. The combination of raw wood and antique accents creates a cozy, inviting atmosphere.
This approach works well in open-plan kitchens or as a standalone centerpiece. You can stain or seal the wood to match your décor, whether that’s a light Scandinavian style or a darker, more traditional vibe. Add open shelving or decorative hooks nearby for utensils or towels, emphasizing practicality and style. Seasonal textiles or handcrafted accessories can further personalize the space.
Start by sourcing a large slab of hardwood with a live edge—many suppliers specialize in custom cuts. Sand the surface carefully, preserving the natural edge, and apply a protective, food-safe finish. Attach rustic hardware like wrought iron handles or hooks to nearby cabinetry or the island itself. Ensure the base is sturdy and level, supporting the weight of the wood and frequent use. Regular sealing prevents cracks and maintains its beauty.
Personalize by engraving or burning meaningful symbols into the wood. Incorporate decorative metal accents or vintage hardware to reinforce the rustic feel. Use a mix of rough textures and smooth finishes around the island for visual contrast. Add seasonal touches such as fabric runners or handcrafted bowls to keep the look fresh and personal.
A handcrafted live edge island instantly elevates your kitchen’s personality, making it feel warm and authentic. Each one is a conversation starter, showcasing craftsmanship and natural beauty. Over time, it develops a charming patina that adds to its character. This project proves that a little effort delivers big style—your kitchen will thank you.
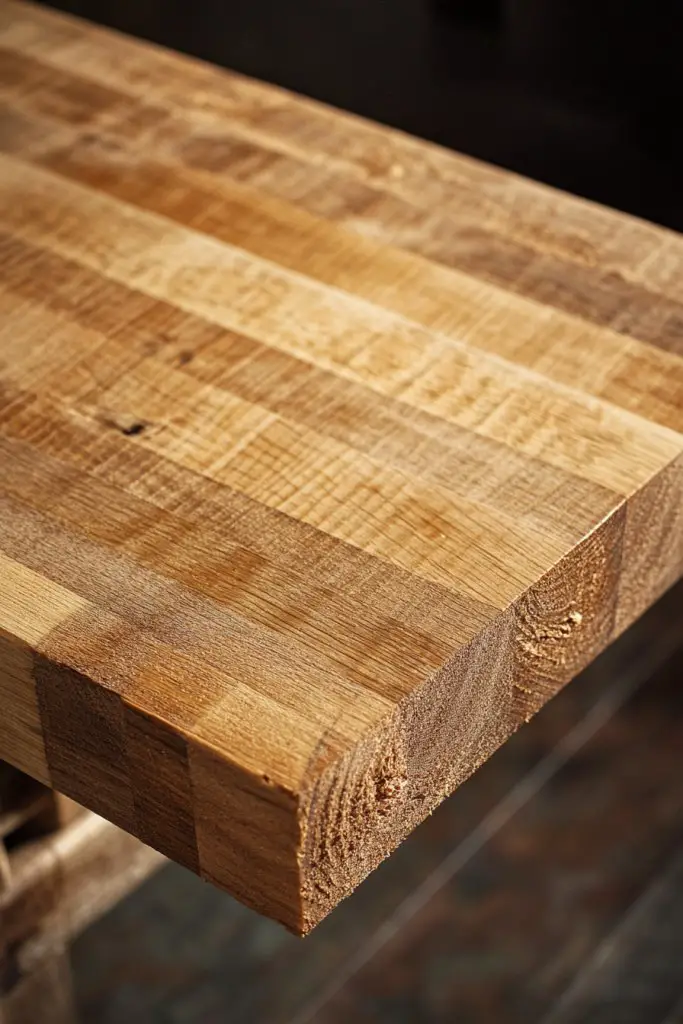
7. Narrow Strip Butcher Block for a Textured, Patterned Surface
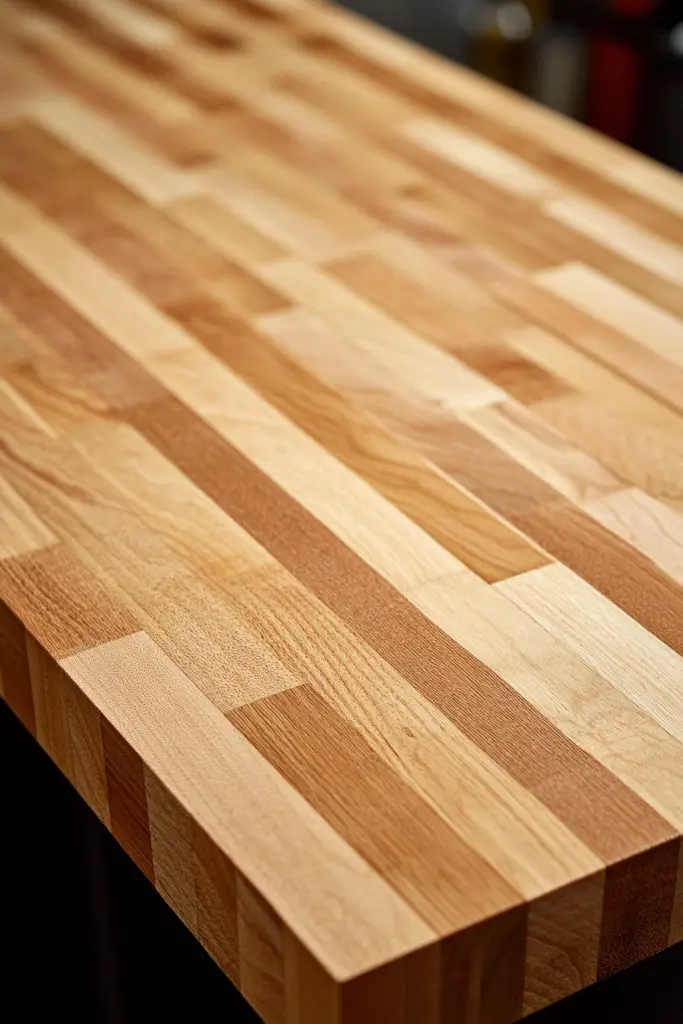
Ever want a surface that’s more than just plain wood? Narrow strip butcher blocks introduce texture and pattern, transforming your countertop into a visual masterpiece. It’s ideal if you love intricate details and want a rustic look with a modern twist. But how do you prevent it from feeling busy or overwhelming?
Recommended Products to replicate this idea
| # | Preview | Product | |
|---|---|---|---|
| 1 |

|
5FT Butcher Block Countertop Birch Solid Wood - 60" x 25" Table Top Butcher Block Cutting Board for... | Buy on Amazon |
| # | Preview | Product | |
|---|---|---|---|
| 1 |

|
Thirteen Chefs Mineral Oil - 8 oz Food Grade Conditioner for Wood Cutting Board, Countertop &... | Buy on Amazon |
Visualize a surface composed of tiny, uniform strips of wood laid out in a chevron or herringbone pattern. The alternating shades and grain directions create a dynamic, textured appearance that catches the eye. The narrow strips add a sense of craftsmanship and detail, with subtle variations in color and grain contributing to a layered, tactile experience. The overall effect is lively yet harmonious.
This pattern works well in kitchens with minimalist or eclectic styles. You can choose contrasting wood tones or keep it monochrome for a more subdued look. Pair it with simple cabinetry and open shelving to highlight the intricate surface. Seasonal accents like woven placemats or colorful textiles can further enhance its visual appeal.
Start by cutting uniform strips of wood, ensuring precise measurements for a seamless pattern. Sand each strip to smoothness, then arrange them in your preferred pattern on a flat surface. Glue and clamp the strips securely, allowing the adhesive to cure fully. Finish by sanding the entire surface for a uniform look, then seal with a food-safe oil or varnish. Attach the assembled top to a sturdy base, ensuring stability.
Enhance the pattern with inlays or painted accents along the edges. Use contrasting stains to emphasize the pattern even more. Incorporate decorative metal or leather details on nearby cabinetry or accessories. Seasonal touches like a soft fabric runner or handcrafted trivets can add warmth and personality without cluttering the detailed surface.
A narrow strip patterned butcher block offers a high-impact, artisanal look that showcases your craftsmanship. It’s a rewarding project that results in a truly unique feature. Over time, the intricate pattern develops a warm patina, enhancing its rustic beauty. This approach proves that detailed work can elevate both style and function—are you ready to craft your masterpiece?
8. Custom-Stamped or Carved Details for Unique Rustic Accents
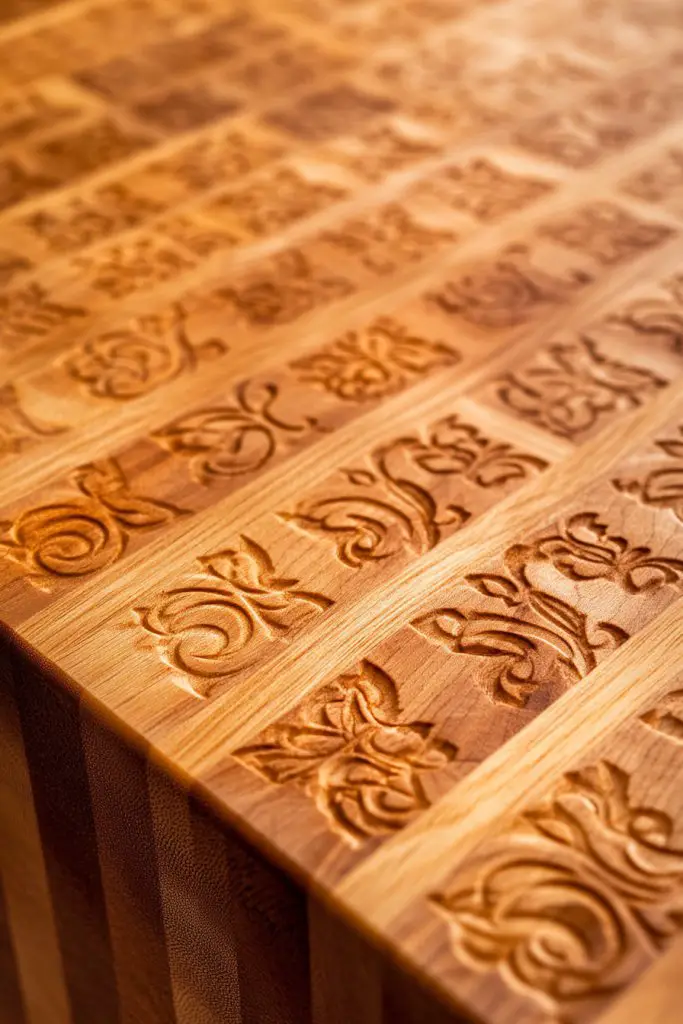
Want a countertop that stands out with personal charm? Custom-stamped or carved details turn a simple butcher block into a work of art. It’s perfect if you love adding personalized touches that tell a story or reflect your personality. But how do you incorporate intricate designs without sacrificing practicality?
Recommended Products to replicate this idea
| # | Preview | Product | |
|---|---|---|---|
| 1 |

|
Electric Branding Iron, Customize Wood Stamp Gift for Woodworker and Leather Craft Food Branding... | Buy on Amazon |
| # | Preview | Product | |
|---|---|---|---|
| 1 |

|
Wood Carving Kit Whittling Kit: Deluxe Wood Carving Tools Knife Set with Leather Case - Woodworking... | Buy on Amazon |
Imagine a wooden surface with delicate leaf or floral carvings, or stamped patterns that mimic vintage motifs. The carvings add depth and texture, inviting viewers to touch and explore. The designs are subtle yet detailed, appearing as if they’ve been part of the wood for decades. Light plays across the carved surfaces, emphasizing the craft and adding an element of surprise.
This technique suits rustic, shabby chic, or eclectic styles. You can choose motifs that hold personal significance or go for abstract patterns for a modern twist. Pair the carved surface with distressed hardware, antique accessories, or layered textiles for a cohesive look. Seasonal or thematic carvings—like leaves in fall or snowflakes in winter—can keep it feeling fresh.
Use a wood-burning tool or carving chisels to create your desired patterns. Practice on scrap wood first to refine your technique. Seal the surface with a food-safe finish to protect the carvings from wear. For stamped designs, use custom stamps or create your own with rubber or metal. Apply the stamp evenly and press firmly to ensure clear impressions. Finish with multiple coats of sealer to preserve the detail.
Add painted accents or colored stains within the carved areas for extra pop. Incorporate metal or leather embellishments around the design for mixed textures. Personalize with initials or symbols that hold meaning for you. These details turn your countertop into a truly bespoke piece, full of character and story.
Custom carvings and stamps transform a plain surface into a personalized masterpiece. It’s a project that celebrates craftsmanship and individuality. Over time, the carvings develop a beautiful patina, adding to the rustic charm. Go ahead—make your mark and create a piece that’s truly yours.
9. Distressed Finish to Enhance Vintage, Worn-In Feel
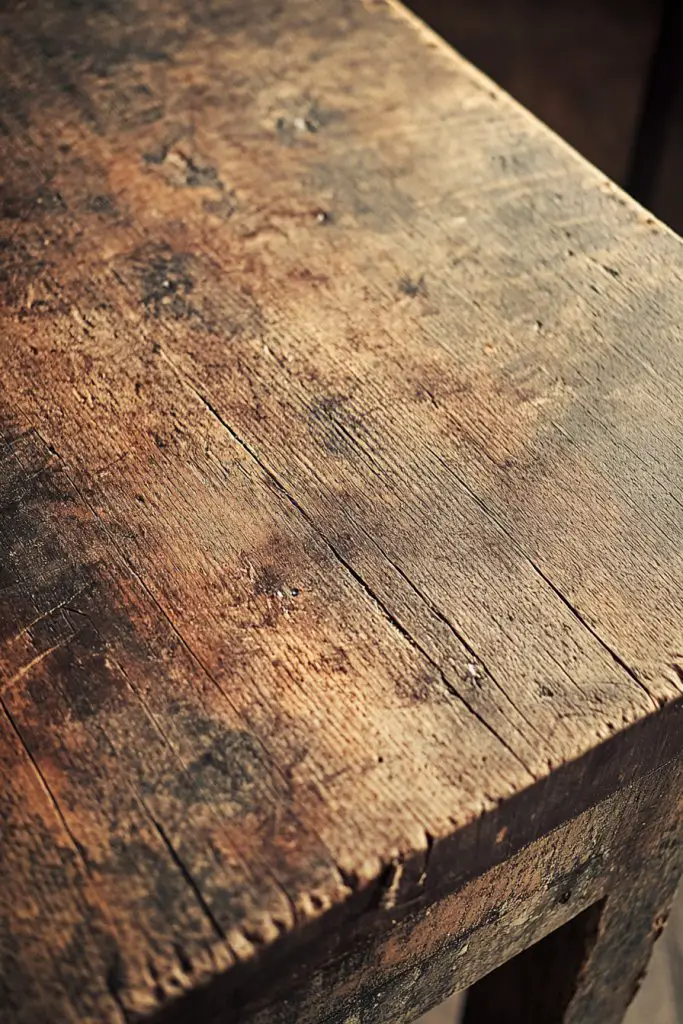
Craving a countertop that feels like it’s been part of your home forever? A distressed finish gives your butcher block a vintage, worn-in vibe that’s full of charm. It’s perfect if you love the idea of history and character in your space. But how do you achieve that aged look without making it look sloppy?
Recommended Products to replicate this idea
| # | Preview | Product | |
|---|---|---|---|
| 1 |
|
Howard Products Butcher Block Conditioner and Food Grade Mineral Oil for Wood Cutting Boards, 12 Fl... | Buy on Amazon |
| # | Preview | Product | |
|---|---|---|---|
| 1 |

|
GOXAWEE Mini Cordless Rotary Tool Kit with 105pcs Accessories, USB Charging 5-Speed 18000rpm... | Buy on Amazon |
Visualize a surface with uneven, subtle scratches, worn edges, and a slightly faded patina. The distressed finish reveals glimpses of the wood’s natural grain beneath layers of wax or stain. It’s as if the countertop has weathered decades of use, yet still remains sturdy and beautiful. The look is imperfectly perfect, inviting touch and nostalgia.
This finish pairs well with antique fixtures, vintage textiles, and layered accessories. You can distress by sanding, scraping, or applying a whitewash to highlight the grain. For seasonal decor, add cozy textiles or rustic pottery to enhance the aged feel. Seal with a matte, food-safe finish to preserve the distressed look while protecting against moisture.
Begin by sanding the surface to remove any gloss and create a rough texture. Use tools like wire brushes, chains, or even a hammer to add scratches and dents. Apply a stain or whitewash in layers, then sand lightly to reveal the distressed details. Finish with a matte sealer to lock in the aged appearance. Regular touch-ups with oil keep the surface looking authentic and protected.
Add carved or stamped motifs that look worn down over time. Incorporate decorative metal accents or vintage hardware to complement the distressed surface. You might also embed small relic-like details or faux rust to enhance the vintage vibe. These touches make the piece uniquely yours, full of history and personality.
A distressed finish turns a simple surface into a storybook of memories, each scratch and worn edge adding depth. It’s a forgiving process perfect for DIYers who love a bit of imperfection. Over time, the aged patina deepens, making your kitchen feel warm and well-loved. Embrace the charm of the worn-in look—you’ll love the character it adds.
10. Two-Tone Butcher Block with Contrasting Edges or Inlays
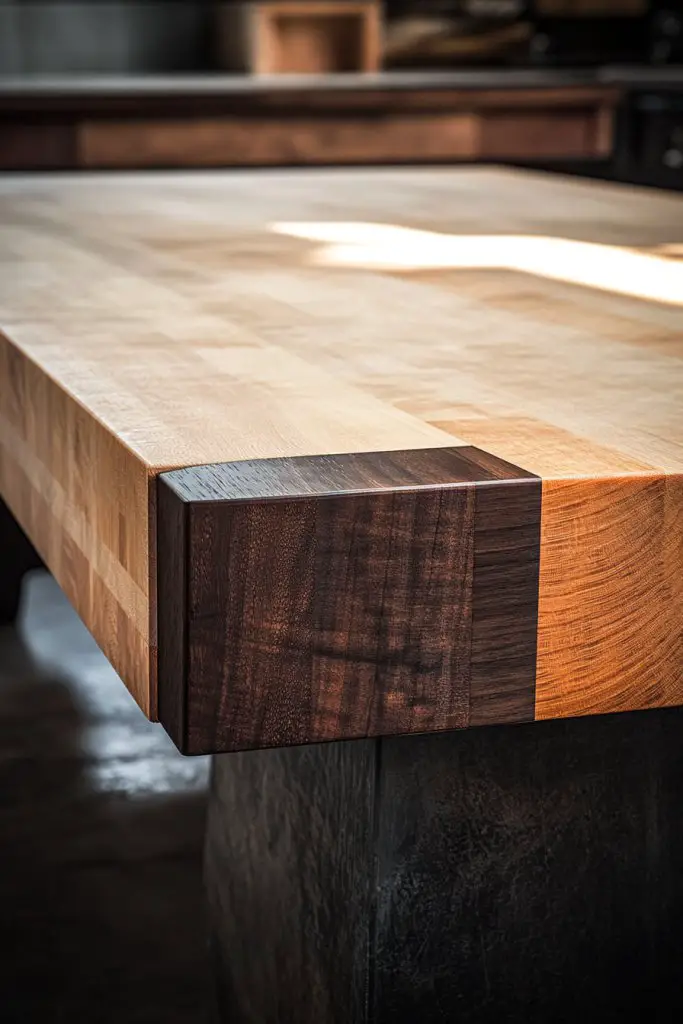
Want to add visual interest and depth to your countertop? A two-tone butcher block with contrasting edges or inlays creates a striking focal point. It’s perfect if you love bold design choices that still feel rustic. But how do you keep it looking cohesive and not overly busy?
Recommended Products to replicate this idea
| # | Preview | Product | |
|---|---|---|---|
| 1 |
|
5FT Butcher Block Countertop Birch Solid Wood - 60" x 25" Table Top Butcher Block Cutting Board for... | Buy on Amazon |
| # | Preview | Product | |
|---|---|---|---|
| 1 |

|
71333 Inlay Router Bit Bushing Set for 1/4 Templates High RPM Routing, Includes 1/8" Carbide Spiral... | Buy on Amazon |
Imagine a surface where the main area features warm, honey-colored wood, while the edges or inlays are a darker, richer hue. The contrast highlights craftsmanship and adds a layered effect that draws the eye. Small inlays or accents, like a strip of contrasting wood, break up the surface visually while adding elegance. The overall look balances rustic charm with modern sophistication.
This style suits contemporary, transitional, or rustic interiors. You can choose contrasting woods like cherry and walnut or oak and stained pine. For seasonal updates, add decorative textiles or colorful accessories nearby. Keep the design simple and let the contrasting tones do the talking for a balanced aesthetic.
Select complementary woods with similar grain qualities for a seamless look. Cut precise inlays or edge strips, then sand and finish each piece. Glue the contrasting pieces into the main surface, ensuring flushness and stability. Seal the entire surface with a food-safe, matte finish to protect against moisture and wear. Proper installation guarantees durability and visual harmony.
Add engraved or inlaid initials or motifs within the contrasting sections. Incorporate decorative metal strips or handles that echo the contrast theme. Seasonal accents like a vibrant cloth or decorative bowl nearby can complement the bold look. These details personalize the piece, making it a centerpiece.
A two-tone butcher block combines craftsmanship with striking visuals, elevating your kitchen’s style. It’s a versatile choice that ages beautifully and can be customized endlessly. With proper sealing and care, it remains a stunning feature for years. It’s proof that bold contrasts can create timeless rustic elegance—are you ready to make a statement?
11. Incorporating Reclaimed Barn Wood for Authentic Rustic Vibe

Dreaming of a genuine rustic look with a touch of history? Reclaimed barn wood brings authenticity and character that new wood can’t replicate. It’s perfect for creating a warm, cozy atmosphere full of stories. But sourcing and working with barn wood can seem daunting—how do you make it work?
Recommended Products to replicate this idea
| # | Preview | Product | |
|---|---|---|---|
| 1 |

|
Holydecot Peel & Stick Real Wood Planks, Rustic Reclaimed Barn Wood Paneling, Brown Gray... | Buy on Amazon |
| # | Preview | Product | |
|---|---|---|---|
| 1 |

|
FLYJOE Floating Shelves | 8" Deep Rustic Reclaimed Barnwood Wall Hanging Shelves with Invisible... | Buy on Amazon |
Visualize a countertop with wide, weathered planks displaying a mix of gray, brown, and faded hues. The wood’s rough texture, knots, and imperfections tell stories of years spent outdoors. The surface’s uneven edges add to its charm, making it feel like a slice of barnyard nostalgia. The aged patina warms the space and invites touch and curiosity.
Pair reclaimed barn wood with vintage fixtures, wrought iron accents, or antique hardware. You can leave it untreated for a raw look or apply a protective oil or finish to enhance durability. Seasonal accessories like woven baskets or soft textiles complement the rustic vibe. It adapts well to open layouts or cozy nooks, depending on your space.
Source reclaimed barn wood from reputable suppliers, ensuring it’s thoroughly cleaned and free of pests. Sand the surface lightly to remove splinters while preserving the aged look. Seal with a food-safe oil or matte finish to protect against moisture. Attach the wood to a sturdy base with heavy-duty brackets or screws, ensuring stability. Regular maintenance with oil or wax enhances longevity.
Engrave meaningful dates or initials into the wood for a personal touch. Incorporate decorative metal brackets or antique hardware for added rustic flair. Use distressed paint or stain to deepen color variations or highlight grain patterns. Small decorative elements like vintage signs or woven accents complement the reclaimed aesthetic.
Using reclaimed barn wood connects your space to history and craftsmanship, creating a truly authentic rustic vibe. It’s a sustainable choice that ages beautifully and gains character over time. Your kitchen will tell a story of tradition and durability—perfect for creating a warm, inviting environment. Ready to bring a piece of history home?
12. Floating Butcher Block with Open Shelving Below for Open Rustic Style

Want a kitchen that feels spacious and airy? A floating butcher block with open shelving underneath creates an open, inviting vibe while offering functional workspace. It’s ideal for small kitchens or those who love showcasing their rustic decor. But how do you ensure stability and style without losing the airy feel?
Recommended Products to replicate this idea
| # | Preview | Product | |
|---|---|---|---|
| 1 |

|
BenchPro Floating Shelf Wall Mounted Solid Butcherblock Shelf 12" Depth x 36" Length x 1" Thick... | Buy on Amazon |
| # | Preview | Product | |
|---|---|---|---|
| 1 |

|
Goovilla Shelf Bracket, Heavy Duty Floating Shelf Brackets 6 inch Long, 6 Pack Brackets for Shelves,... | Buy on Amazon |
Picture a sturdy wood countertop suspended by rustic brackets, with open shelves beneath displaying handcrafted pottery, baskets, or vintage tools. The floating design emphasizes clean lines and maximizes visual space. Natural wood grain and live edges bring a warm, organic touch, while the open space underneath keeps the room feeling open and uncluttered.
Choose reclaimed or distressed wood for a rustic look, paired with industrial brackets or wrought iron supports. Shelving can be customized with wood or metal for different textures. Decorate with practical storage baskets or colorful textiles to add warmth. For seasonal updates, swap out decorative items on the shelves for a fresh look.
Select a sturdy, moisture-resistant wood for the countertop—like reclaimed oak or pine. Attach it securely to wall-mounted brackets or supports, ensuring they’re level and capable of handling weight. Install open shelves beneath using matching brackets, spacing them according to your storage needs. Finish all surfaces with food-safe oil or sealer. Regular maintenance includes cleaning and occasional re-oiling.
Add decorative brackets with rustic or vintage-inspired designs. Personalize the shelves with handcrafted or painted accessories. Incorporate seasonal textiles or handcrafted storage baskets to keep the space fresh. Consider adding small hooks on the brackets for hanging utensils or towels, combining function with style.
A floating butcher block with open shelving combines rustic charm with modern functionality, making your kitchen feel more spacious and inviting. It’s a DIY-friendly project that can be customized endlessly. Over time, it develops a beautiful patina, adding to its charm. This design proves that open, airy spaces can be both practical and full of character—are you ready?
13. Rounded Edges and Beveled Corners for Soft Rustic Aesthetic
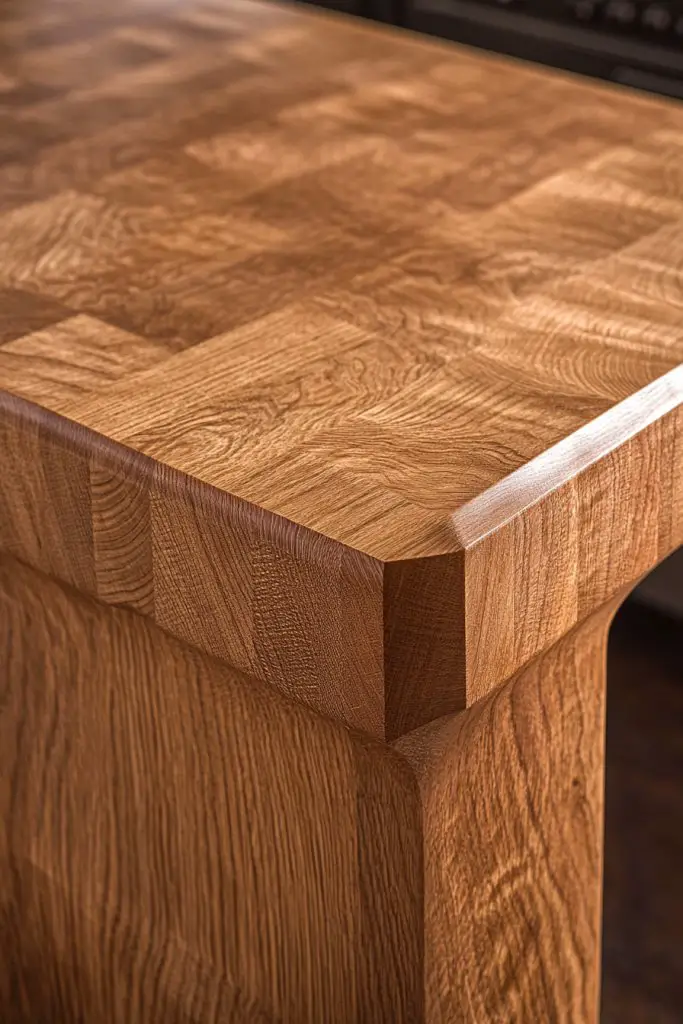
Craving a softer, more inviting rustic look? Rounded edges and beveled corners give your butcher block a handcrafted, gentle appearance that’s safe and cozy. It’s perfect if you want rustic charm without the harshness of sharp corners. But how do you achieve that perfectly smooth finish?
Recommended Products to replicate this idea
| # | Preview | Product | |
|---|---|---|---|
| 1 |

|
Ultra-Shear Finger Grip Groove Router Bit, 1/2 SH, 1-1/4" Boards, Template Pattern Bearing, Great... | Buy on Amazon |
| # | Preview | Product | |
|---|---|---|---|
| 1 |

|
DONSTRAW Wood Rasp File 4 Way Premium Grade High Carbon Hand File and Round Rasp, Half Round Flat &... | Buy on Amazon |
Imagine a countertop with smoothly curved edges that follow the natural flow of the wood. The beveled corners catch light differently, adding subtle shadows and depth. The rounded edges soften the overall look, making it approachable and family-friendly. The surface’s natural grain and knots remain visible, adding character without sharpness.
This detail pairs well with rustic, cottage, or farmhouse styles. You can accentuate the curves with contrasting paints or stains on the edges or leave them natural. Add soft textiles or rounded accessories nearby to enhance the gentle aesthetic. For a modern touch, combine with sleek hardware and minimal decor.
Use a router with a rounded-over or chamfer bit to carefully shape the edges and corners. Sand thoroughly to smooth out any roughness or splinters. Seal the surface with a food-safe oil or finish, paying special attention to the edges. Regular touch-ups maintain the smooth feel and protect against moisture. For beveled corners, smooth the angles gradually to avoid sharp edges.
Add carved or stamped details along the rounded edges for a personalized touch. Incorporate decorative metal or wood accents that follow the curved lines. Use soft textiles or cushions nearby for a cozy vibe. Seasonal decor like a soft fabric runner or handmade trivets complements the gentle aesthetic.
Rounded edges and beveled corners make your butcher block safer and more inviting, perfect for family kitchens. It’s a simple detail that elevates the craftsmanship and softness of the overall look. Over time, the smooth edges develop a natural patina, adding to their charm. This subtle touch makes your space both beautiful and practical—are you ready for softer style?
14. Incorporating Vintage Metal Hardware or Edging
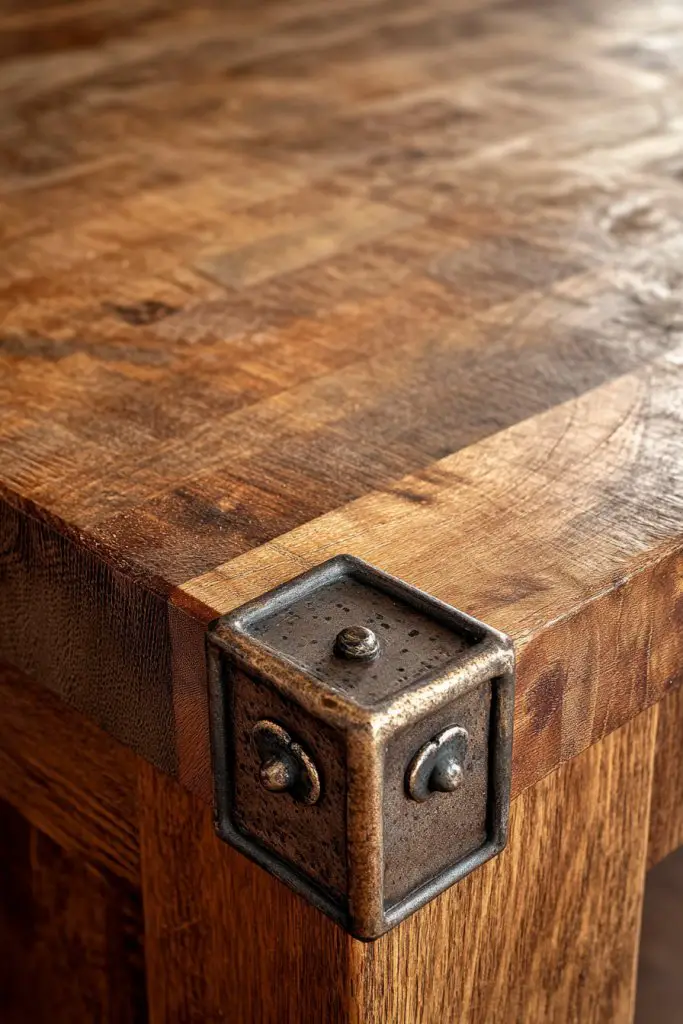
Looking to add a rustic, industrial touch to your butcher block? Vintage metal hardware or edging instantly elevates the aesthetic and adds a layer of authenticity. It’s perfect if you want a piece that feels both functional and full of history. But how do you choose the right hardware without overwhelming the wood?
Recommended Products to replicate this idea
| # | Preview | Product | |
|---|---|---|---|
| 1 |

|
Tiazza 4Pcs Antique Pure Brass Corner Protectors Braces Classical Furniture Tables and Chairs... | Buy on Amazon |
| # | Preview | Product | |
|---|---|---|---|
| 1 |

|
Coengwui Aluminum Corner Guards, Peel and Stick L-Shaped Molding Trim for Wall Table Door Frame... | Buy on Amazon |
Visualize aged iron or brass hardware framing the edges or serving as decorative accents. The metal’s patina complements the weathered or reclaimed wood, creating a layered, textured look. These details evoke a sense of craftsmanship and tradition, adding character and depth. The contrast between warm wood and cool metal creates a timeless, rustic harmony.
Pair vintage hardware with distressed or reclaimed wood for a cohesive rustic vibe. Modern or industrial finishes like blackened steel or brushed nickel can also work for a more contemporary rustic look. Decorate nearby with vintage-inspired accessories or antique containers to reinforce the theme. Seasonal accents like leather straps or decorative nails can add small, personalized touches.
Choose hardware with a finish that matches your overall decor—antique brass, wrought iron, or matte black are popular choices. Secure hardware using appropriate screws or nails, ensuring they’re flush and sturdy. For edging, consider metal strips or corner brackets that reinforce durability and style. Seal the wood to prevent corrosion or tarnishing of the metal over time. Regular cleaning and polishing maintain the aged look.
Engrave or emboss initials or meaningful symbols into the metal for added personalization. Use decorative metal accents along the edges or as hardware on nearby cabinetry. Combine with textured textiles or leather details to enhance the rustic-industrial vibe. Seasonal touches like a vintage sign or a leather strap handle can refresh the look.
Vintage metal hardware and edging add instant authenticity and charm, making your butcher block a true statement piece. It’s a simple upgrade that elevates the overall style while respecting rustic roots. Over time, the patina and wear tell a story of craftsmanship and history. Ready to give your space a rugged, timeless appeal?
15. Multi-Functional Butcher Block with Built-In Cutting Board or Sink
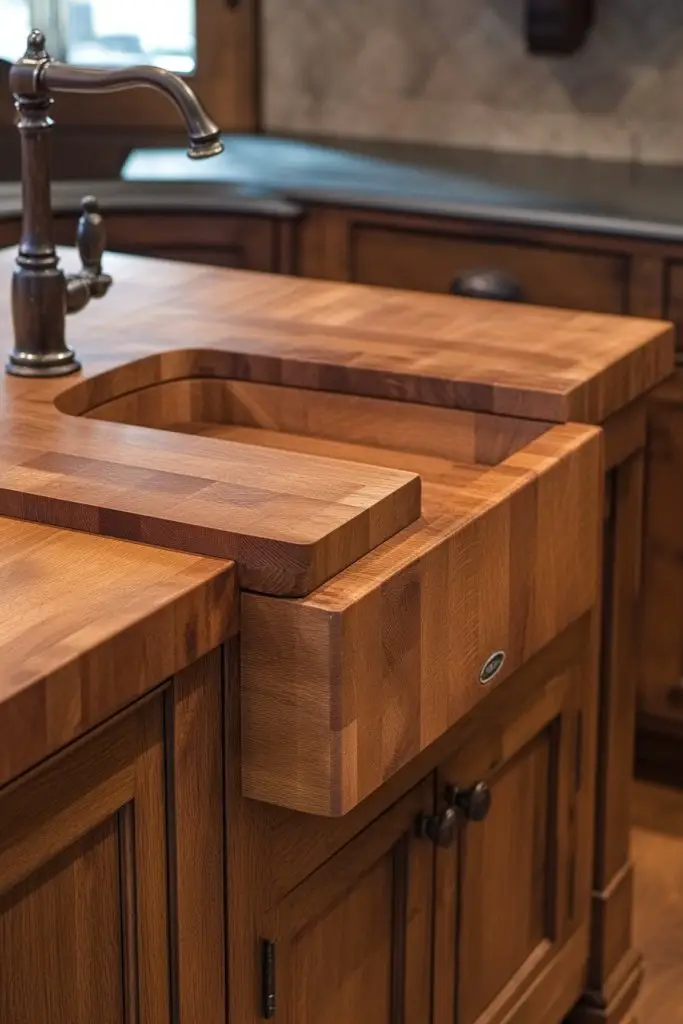
Ever felt like your kitchen counters are just not enough? You want a workspace that does more than just look good. When cooking gets intense, having everything at your fingertips makes life easier. A multi-functional butcher block can turn a simple countertop into a powerhouse of utility.
Recommended Products to replicate this idea
| # | Preview | Product | |
|---|---|---|---|
| 1 |

|
LITTLE TREE 55 Inches Kitchen Island with Storage, 3-Tier Farmhouse Wooden Stationary Island Table... | Buy on Amazon |
| # | Preview | Product | |
|---|---|---|---|
| 1 |

|
Orgneas Sink Protectors for Kitchen Sink, Single Bowl Sink Bottom Grid 12.5"x10.5"x1.25", 304... | Buy on Amazon |
Imagine a sturdy wooden surface with a seamless cut-out where a cutting board slides in smoothly. Next to it, a built-in sink made of copper or stainless steel adds practicality. The warm tones of the wood contrast with sleek metallic accents, creating a rustic yet modern vibe. The smell of fresh herbs and sizzling food fills the air as you work effortlessly.
You can customize these features based on your needs—opt for a larger cutting area, or add a fold-out shelf for extra prep space. For small kitchens, a compact design with a fold-down cutting board saves space. Seasonal touches like a warm, honey-colored finish or a distressed look can add charm. Even integrating small spice drawers keeps everything tidy and within reach.
Start with a solid butcher block surface made of maple, oak, or walnut for durability. Incorporate a groove or slot for the sliding cutting board—these are often available as kits or can be custom-made. Install a stainless steel sink with simple plumbing hookups that fit beneath the counter. Use food-safe finishes on the wood to prevent stains and moisture damage. Secure the sink and sliding board with precise measurements for a flush look.
Add personal touches like engraved initials or decorative hardware to the sliding panel. Consider a heat-resistant pad or a small integrated towel holder for convenience. To match your decor, choose finishes like matte black or brushed nickel for hardware. You can also incorporate a hidden compartment underneath for storing knives or utensils, keeping everything neat.
This multi-purpose setup turns your countertop into a chef’s dream, blending function with rustic charm. It makes cooking more enjoyable and less chaotic. Once installed, you’ll wonder how you ever managed without it. Ready to upgrade your kitchen game with a custom-built butcher block that does it all?
16. Use of Knotty or Whimsical Grain Patterns for Natural Charm
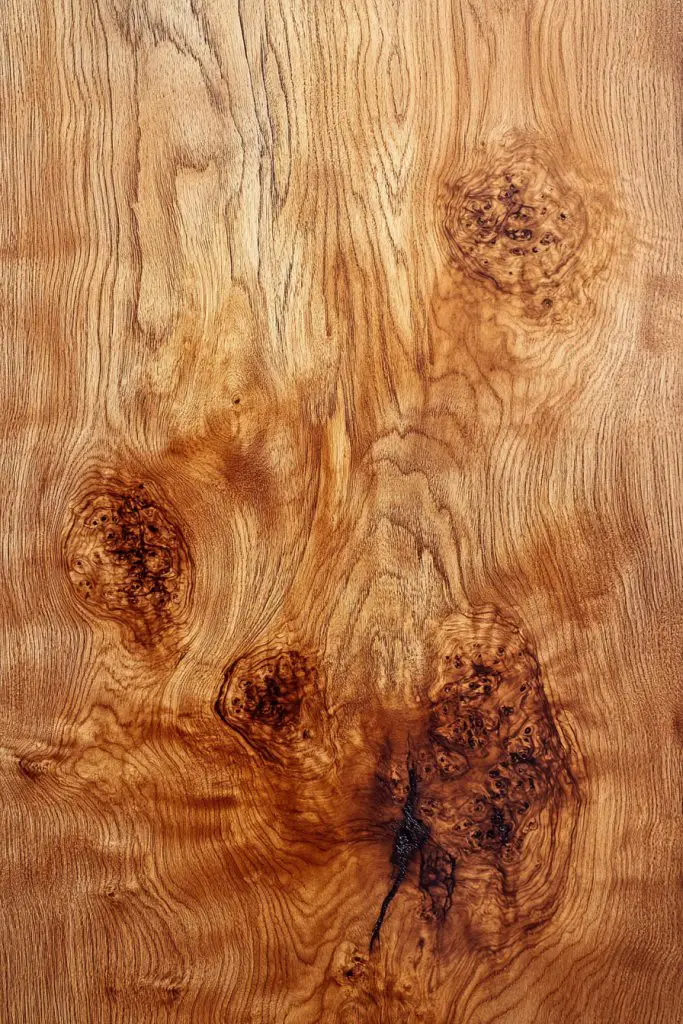
Ever stumble upon a plain butcher block that just feels… generic? You crave something with character—something that tells a story. Using wood with knots and wild grain patterns can turn your countertop into a statement piece. Why settle for bland when you can have a rustic masterpiece?
Recommended Products to replicate this idea
| # | Preview | Product | |
|---|---|---|---|
| 1 |
|
End Grain Wooden Cutting Board for Kitchen 15"x 11" - Walnut Hardwood Chopping Block with Non Slip... | Buy on Amazon |
| # | Preview | Product | |
|---|---|---|---|
| 1 |

|
Walnut Solid Wood Desk Top with Cable Grommets – Live Edge Wood Slab, Table Top for PC,... | Buy on Amazon |
Picture a warm, inviting surface sprinkled with prominent knots and swirling grain patterns. Each imperfection adds personality, as if the wood has a unique personality of its own. The natural variations highlight the craftsmanship and age of the wood. When sunlight hits, the complex grain dances with depth and warmth, making your kitchen feel alive.
Choose wood species like cherry, walnut, or reclaimed barn wood that naturally showcase dramatic knots. For a more whimsical look, combine different grains and knots in a mosaic or patchwork pattern. Incorporate natural edge finishes that leave the wood’s live edge exposed for extra rustic appeal. Seasonal styling can include adding soft textiles or leather accents to complement the organic texture.
Select wood with prominent knots and varied grain patterns—usually reclaimed or salvaged woods are ideal. Sand lightly to retain the character but smooth rough edges for safety. Seal with a food-safe oil that enhances the natural hues and grain. When installing, ensure the knots are stable and not prone to splitting over time. Regular maintenance involves re-oiling to keep the wood vibrant.
Personalize your surface by adding carved initials or a rustic inlay. Using contrasting wood tones can emphasize the knots and grain patterns even more. Incorporate decorative metal accents or leather straps along the edges for added flair. You can also stain or lightly color the wood to deepen the natural hues without masking the character.
Embracing the knots and wild grain elevates your butcher block from mere utility to genuine art. It’s like having a piece of history in your kitchen, full of stories and character. No two slabs are alike, making your countertop truly one-of-a-kind. Ready to celebrate the natural beauty of wood in your rustic space?
17. Large-Scale Checkerboard or Plank Pattern for Visual Interest
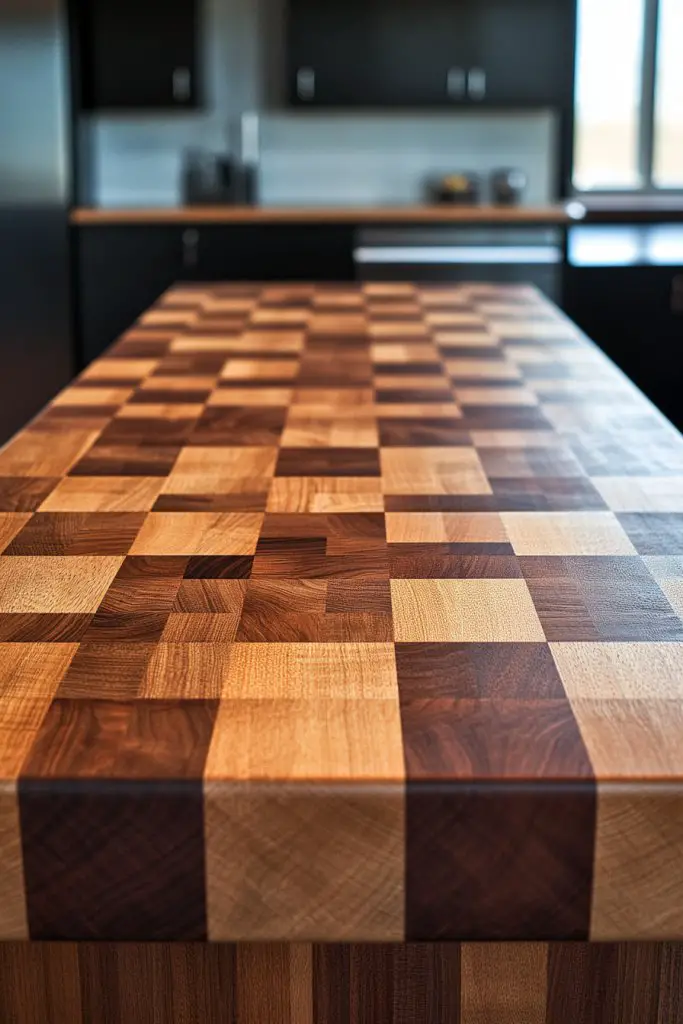
Bored of the same old plain countertops? Want something bold that grabs attention instantly? A checkerboard or large plank pattern can turn your kitchen into a visual feast. It’s a simple way to add personality and make your space stand out with minimal effort.
Recommended Products to replicate this idea
| # | Preview | Product | |
|---|---|---|---|
| 1 |

|
Nexus Self Adhesive 12-Inch Vinyl Floor Tiles, 20 Tiles - 12" x 12", Black/White Pattern - Peel &... | Buy on Amazon |
| # | Preview | Product | |
|---|---|---|---|
| 1 |
|
Art3d Peel and Stick Floor Tile Vinyl Wood Plank 36-Pack 54 Sq.Ft, Deep Gray, Rigid Surface Hard... | Buy on Amazon |
Imagine a checkerboard of contrasting woods—light oak paired with dark walnut—laid out in a classic pattern. The large planks create a striking geometric effect that draws the eye across the surface. The pattern adds depth and dimension, making the countertop the focal point of the room. The warm tones of the different woods create a cozy yet sophisticated vibe.
Opt for a traditional checkerboard for a retro look or a modern variation with asymmetrical planks for a contemporary edge. Use different wood stains or finishes to enhance contrast or unify the palette. For smaller kitchens, a border or inset pattern can add intrigue without overwhelming the space. Seasonal accents like colorful textiles or vintage hardware can complement the bold look.
Choose contrasting woods with similar hardness to prevent uneven wear. Cut large planks with precision, ensuring tight joints and seamless transitions. Arrange the pattern on a flat surface before gluing down to test the design. Use a high-quality adhesive suitable for wood, and clamp the pieces securely while drying. Finish with a durable, food-safe sealant to protect the pattern.
Add a carved or painted monogram at the center of the checkerboard for a personalized touch. Incorporate metal or leather accents around the edges to frame the pattern. Use contrasting stains or dyes to highlight the geometric design further. You could also add subtle inlays or decorative grooves to emphasize the pattern’s structure.
A checkerboard pattern instantly elevates a rustic space to a striking design statement. It shows confidence in your style and willingness to experiment. Plus, it’s a conversation starter for guests. Ready to take your countertop from average to extraordinary?
18. Weathered Gray Finish for a Coastal Rustic Look
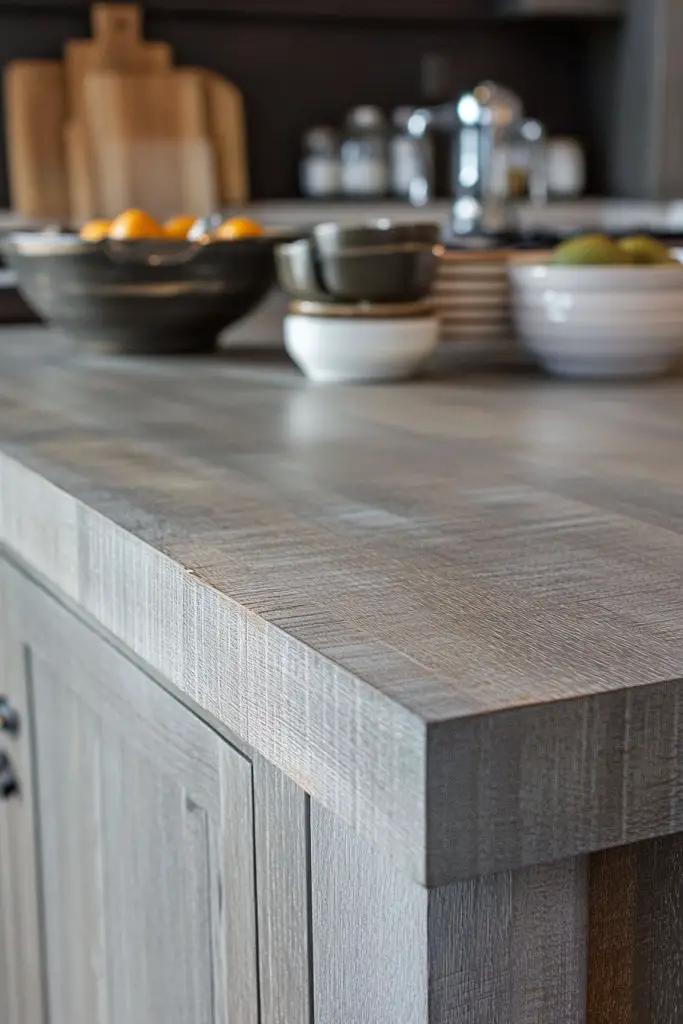
Looking for a way to bring a breezy, coastal vibe into your rustic kitchen? A weathered gray finish can do just that—giving your butcher block a soft, seaside charm. It’s perfect if you want a relaxed, lived-in look that pairs well with blues, whites, and sandy neutrals.
Recommended Products to replicate this idea
| # | Preview | Product | |
|---|---|---|---|
| 1 |
|
Varathane Premium Fast Dry Wood Stain | 1 Hour Dry Time | 1 Coat Color | Interior Wood Stain |... | Buy on Amazon |
| # | Preview | Product | |
|---|---|---|---|
| 1 |
|
Howard Products Butcher Block Conditioner and Food Grade Mineral Oil for Wood Cutting Boards, 12 Fl... | Buy on Amazon |
Picture a countertop with a soft, matte gray hue that mimics sand and driftwood. The finish has a gentle, worn-in appearance, as if it’s been through years of seaside storms and salt air. Subtle variations in tone and texture add depth, making it feel like a piece of coastal history. The overall effect is calming and effortlessly stylish.
Combine the gray finish with whitewashed cabinets, linen textiles, or distressed furniture. For a more dynamic look, add hints of light blue or aqua accents. This finish also pairs beautifully with open shelving and vintage brass hardware. Seasonal updates might include adding soft, plush textiles or nautical-inspired decor to complete the theme.
Start with a light gray wood stain or a custom-mixed gray wash. Apply multiple thin coats with a brush or rag, allowing each to dry thoroughly. Light sanding between coats enhances the weathered effect. Seal with a matte, food-safe topcoat to protect the finish while maintaining a soft appearance. Regular touch-ups keep the color consistent over time.
Add subtle white or off-white highlights to mimic sun-bleached wood. Incorporate textured or woven edge trims for extra coastal charm. Use nautical-inspired hardware or decorative corner brackets to reinforce the theme. Layer with soft textiles like linen or jute for warmth and texture.
A weathered gray butcher block instantly transports your kitchen to a seaside retreat. It’s a versatile choice that pairs well with many styles, from farmhouse to beach cottage. Feeling inspired? Your coastal rustic dream is just a finish away.
19. Combining Butcher Block with Stone or Brick Elements
Want to create a layered, textured look that screams rustic elegance? Pairing butcher block with stone or brick can instantly add depth and character. It’s perfect if you love a mix of natural materials that tell a story of craftsmanship.
Recommended Products to replicate this idea
| # | Preview | Product | |
|---|---|---|---|
| 1 |

|
Solid Wood Butcher Block Countertop - Unfinished Birch Slab Counter Top Wooden Table Top for DIY... | Buy on Amazon |
| # | Preview | Product | |
|---|---|---|---|
| 1 |

|
Art3d 20-Pack 105 Sq.Ft Faux Brick 3D Wall Panels Peel and Stick in Red Brown, Self Adhesive... | Buy on Amazon |
Imagine a warm wooden countertop sitting atop a rugged brick backsplash or a stone foundation. The contrast between the smooth, organic wood and the rough, textured stone highlights their individual beauty. The combination creates a cozy, timeless feel reminiscent of mountain cabins or old-world kitchens. The tactile experience makes the space inviting and grounded.
Use reclaimed brick or natural stone tiles for authenticity, or opt for manufactured options that mimic aged materials. Incorporate open shelving or rustic metal brackets to enhance the layered look. Seasonal styling could include woven baskets, vintage cookware, or textured textiles that complement the earthy vibe. For a cleaner look, keep the color palette neutral and let the textures do the talking.
Start with a sturdy butcher block surface finished with a protective oil or sealant. Install the stone or brick elements as a backsplash or flooring, ensuring proper adhesion and leveling. For brick, use a mortar mix suited for interior use, and for stone, secure with appropriate adhesive. Seal all surfaces with a protective coating to prevent staining and moisture damage. Focus on seamless transitions between materials for a cohesive aesthetic.
Decorate the joint with vintage metal hardware or decorative grout lines for extra rustic charm. Add textured textiles or woven rugs to soften the space. Incorporate vintage cookware, copper pots, or iron accents to deepen the old-world feel. Personal touches like custom engraved stones or reclaimed wood signs can make the space uniquely yours.
Blending wood with stone or brick creates a timeless, durable look that ages gracefully. It’s a style that’s both rustic and refined, perfect for making your kitchen stand out. Ready to layer textures for maximum impact?
20. Minimalist Rustic with Light, Pale Wood Tones and Simple Design
Craving a rustic look but worried it might feel too heavy or cluttered? A minimalist approach with light, pale wood tones can keep the charm without overwhelming your space. It’s the perfect balance between rustic warmth and modern simplicity.
Recommended Products to replicate this idea
| # | Preview | Product | |
|---|---|---|---|
| 1 |

|
Sorbus Floating Shelves for Wall, Bathroom Shelves Wall Mounted for Kitchen, Bedroom, Bathroom... | Buy on Amazon |
| # | Preview | Product | |
|---|---|---|---|
| 1 |

|
FABATO Lift Top Coffee Table, Wood Square Coffee Table with Storage, Farmhouse Coffee Tables with... | Buy on Amazon |
Envision a clean, airy countertop in soft, bleached wood or light oak. The subtle grain and pale finish reflect natural light, making the space feel open and fresh. Minimal hardware or hidden joints keep the look sleek and uncluttered. Small decorative touches like a soft cream throw blanket with chunky knit texture or simple ceramic bowls enhance the understated elegance.
Pair the pale wood finish with white or pastel cabinetry for a soft, airy feel. Incorporate simple, functional accessories—think matte black or brushed metal handles. Seasonal updates might include a soft linen runner or a few well-chosen textiles in neutral shades. The key is maintaining a clutter-free, streamlined aesthetic that emphasizes quality over quantity.
Choose light-colored woods like ash or whitewashed oak for the surface. Sand and finish with a clear, food-safe sealant to preserve the natural look. Keep hardware minimal—prefer recessed or hidden fixtures. The focus is on clean lines and simple forms, so avoid ornate detailing. Regular maintenance involves gentle cleaning and re-sealing every few years to sustain the light, fresh appearance.
Add subtle textural contrasts through textiles like linen or cotton in neutral shades. Use open shelving or hidden storage to maintain the minimalist vibe. Incorporate a few sculptural or geometric decor pieces in ceramics or wood to add interest without clutter. Personal touches like engraved wood tags or simple labels can enhance functionality.
This understated, light aesthetic offers a calming retreat from busy kitchens. It’s versatile enough to grow with your style, whether rustic or modern. Embrace simplicity for a timeless, elegant look that feels both fresh and cozy.
21. DIY Pallet Wood Sealed with Food-Safe Oil for Personal Touch
Thinking about adding a personal, rustic touch to your kitchen without breaking the bank? Making your own butcher block from reclaimed pallets is a fun, rewarding project. It’s a great way to showcase sustainability while creating something totally unique. Plus, DIY projects always feel more special.
Recommended Products to replicate this idea
| # | Preview | Product | |
|---|---|---|---|
| 1 |
|
Howard Products Food Grade Mineral Oil for Wood Cutting Board - 12 oz, Pack of 1 | Buy on Amazon |
| # | Preview | Product | |
|---|---|---|---|
| 1 |
|
Pallet Board Co. - 20 Sq. Ft. Bundle of Reclaimed Pallet Boards - Nail Up Application - Rustic... | Buy on Amazon |
Picture a rugged, handmade butcher block with visible pallet slats and a weathered finish. The surface is sealed with a clear, food-safe oil that enhances the wood’s natural grain and knots. Every mark and scar tells a story of its journey, adding authentic charm. The warm, natural hues of the reclaimed wood radiate rustic authenticity, making it the centerpiece of your kitchen.
You can customize your pallet wood by sanding rough edges or adding a protective top coat. For a more polished look, stain the wood lightly or add decorative corner trims. Incorporate small handles or leather straps for portability or aesthetic flair. Seasonal styling includes adding woven textiles or vintage metal accents that complement the rustic theme.
Start by disassembling pallets and selecting the most attractive slats. Sand thoroughly to smooth rough areas while preserving character. Arrange the boards in your preferred pattern—linear, herringbone, or checkerboard—before gluing and clamping. Finish with a food-safe oil or beeswax, applying multiple coats for durability. Seal all surfaces well to prevent moisture absorption and staining. Regular re-oiling maintains the finish and enhances the wood’s natural beauty.
Add engraved initials, decorative nails, or painted accents for a personalized touch. Use contrasting stains or dyes to highlight different wood grains. Incorporate a built-in groove for draining or a small inset for knives or utensils. Display your handmade creation proudly, knowing it’s a true labor of love.
Creating your own butcher block from pallets is not only eco-friendly but also deeply satisfying. It adds genuine rustic character and can be tailored to your exact taste. Ready to roll up your sleeves and craft a piece that’s uniquely yours?
Conclusion
With these diverse butcher block countertop ideas, you have the tools to create a stunning rustic space that reflects your personal style. From bold accents to subtle details, each idea offers a pathway to infuse warmth and authenticity into your home. Don’t hesitate—embrace these concepts and start transforming your kitchen into a cozy, rustic haven today!
Last update on 2026-02-26 / Affiliate links / Images from Amazon Product Advertising API