Imagine stepping into a kitchen where rustic charm meets everyday practicality — that’s the magic of a butcher block island. These versatile surfaces are loved not only for their natural beauty but also for their durability and warm, inviting feel that transforms any space into a cozy gathering spot.
In this article, you’ll explore a variety of creative butcher block island ideas that combine functionality with rustic elegance. Whether you prefer a classic, vintage look or a modern twist on traditional design, there’s inspiration here to suit every style and space. Get ready to discover how these ideas can elevate your kitchen’s aesthetic and efficiency!
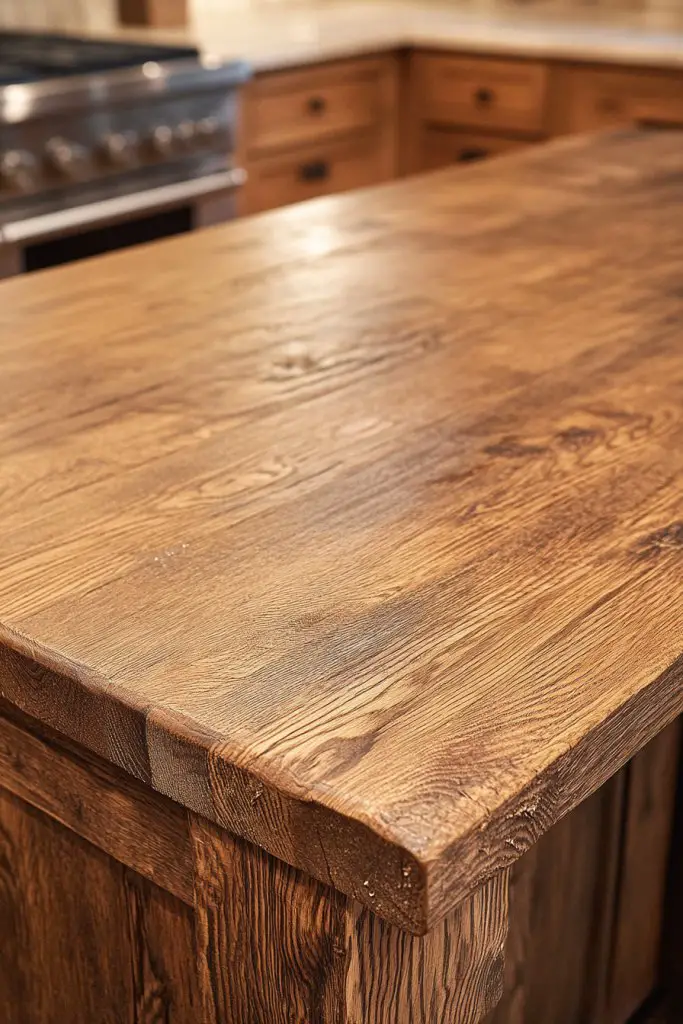
1. Reclaimed Wood Top with Live Edge Edges for Authentic Rustic Charm

Ever dream of a kitchen island that feels like it’s been part of your family for generations? A piece that radiates warmth, history, and a touch of nature? Many homeowners crave that authentic rustic charm but struggle to find a surface that genuinely looks aged and unique. Standard countertops often lack character and can feel sterile. This idea taps into the desire for a centerpiece that tells a story.
Recommended Products to replicate this idea
| # | Preview | Product | |
|---|---|---|---|
| 1 |

|
Walnut Solid Wood Table Top – Live Edge Wood Slab for Desktop, Countertop, Laundry, Dining Table,... | Buy on Amazon |
| # | Preview | Product | |
|---|---|---|---|
| 1 |

|
HSH 72" Rustic Kitchen Island with Storage, Mobile Farmhouse Kitchen Island Cart with Cabinet,... | Buy on Amazon |
Picture a thick slab of reclaimed wood with rugged, uneven live edges, showcasing natural knots and grain patterns. The wood’s warm, rich tones contrast beautifully with matte metal hardware and neutral cabinetry. Imagine running your hand along the textured surface, feeling the history embedded in every imperfection. The rustic charm is amplified by subtle cracks and natural color variations, giving it a truly authentic vibe. It’s like bringing a piece of the forest into your kitchen.
You can customize this look with different wood species—oak, pine, or cedar—depending on your style preference. For a more refined rustic feel, opt for a lightly whitewashed finish, while a darker stain enhances a more dramatic, aged appearance. Seasonal accents like woven baskets or cozy textiles can complement the natural aesthetic. Small kitchen spaces might benefit from a narrower slab, while larger islands can handle more dramatic live edges for impact.
Start by sourcing reclaimed wood from local suppliers or salvage yards—look for pieces with minimal warping or rot. Sand the surface gently to highlight the natural grain, but avoid over-smoothing to preserve character. Seal the wood with a food-safe, matte finish to protect against spills and moisture. Mount the slab securely on a sturdy frame or base, ensuring it can handle daily use. Consider adding a slight overhang for seating or extra workspace.
Add personal touches with engraved initials or meaningful symbols etched into the wood. Incorporate decorative metal brackets or accents that age naturally over time. You could also add a protective oil finish that deepens the wood’s color and enhances luster. For a more eclectic look, pair the reclaimed top with mismatched stools or vintage accessories. The goal is to create a centerpiece that reflects your personal story.
This reclaimed wood top with live edges transforms your space into a warm, inviting haven. It’s perfect for entertaining or family dinners, adding rustic authenticity to every meal. Plus, sourcing reclaimed materials supports sustainability and reduces waste. Ready to craft a kitchen centerpiece that’s full of character and charm? Embrace the beauty of natural imperfections and let your space tell its story.
2. Incorporate Industrial Metal Accents for a Modern Rustic Fusion
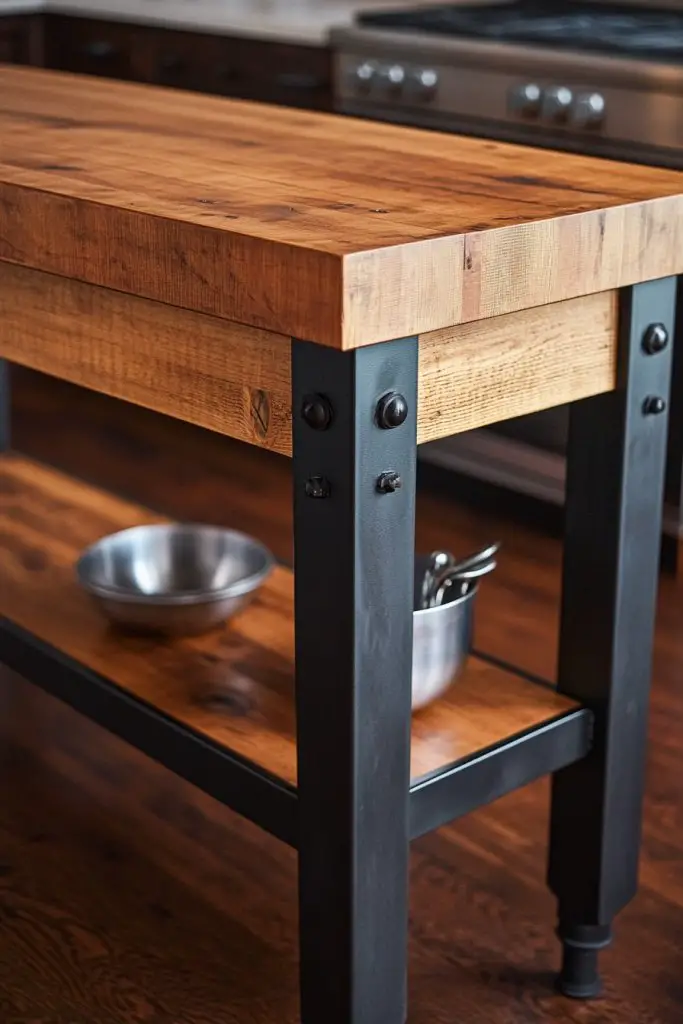
Looking to add a little edge to your rustic kitchen? Sometimes the perfect island balances warmth with a touch of industrial cool. The challenge is blending these two styles without making the space feel disjointed. If you love the rustic charm but crave a contemporary twist, integrating metal accents can be the perfect solution. It creates a dynamic, modern-rustic vibe that’s both trendy and timeless.
Recommended Products to replicate this idea
| # | Preview | Product | |
|---|---|---|---|
| 1 |

|
Yaheetech 30 Inch Metal Bar Stools Set of 4, Bar Height Backless Bartools, Industrial Stackable Bar... | Buy on Amazon |
| # | Preview | Product | |
|---|---|---|---|
| 1 |

|
Sheetea 2-Pack Farmhouse Pendant Lights Kitchen Island, Black Pendant Light Fixtures Hanging Lamp... | Buy on Amazon |
Imagine a wooden island topped with a matte finish, accented by black steel brackets and pipe fittings. Steel legs or support beams add a sturdy, industrial feel, contrasting with the organic texture of the wood. The combination of dark metals with the warm wood creates a striking visual balance. This style often features exposed bolts, rivets, or metal mesh elements that add a rugged, raw character. The result is an eye-catching piece that feels both functional and artistic.
You can soften the look with brushed or antique-finished metals for a vintage touch, or go for sleek, polished steel for a more modern aesthetic. Mixing metal finishes—like copper or bronze—adds depth and visual interest. For smaller spaces, opt for subtle metal accents, such as drawer pulls or corner brackets. Larger islands can incorporate metal frame supports or gridwork, giving an industrial edge while maintaining rustic warmth.
Begin by selecting durable metal elements—think powder-coated steel or wrought iron—that won’t rust or degrade over time. Attach metal brackets or supports with heavy-duty screws, ensuring stability. Use a drill to secure metal legs or frame components firmly to the wooden surface. To enhance the industrial look, consider adding metal mesh shelving or open metal grids for storage or display. Seal the wood and metal with appropriate protective finishes to prevent corrosion and wear.
Customize with personalized metal tags, vintage-inspired hardware, or hand-painted accents. Incorporate reclaimed steel pipes or fittings for an authentic vintage feel. You can also add decorative rivets or bolts to emphasize the industrial style. For a softer touch, include textiles like leather or canvas for seating or accents that complement the metal details. The key is balancing the rustic warmth with sleek, industrial elements.
Blending rustic wood with industrial metals creates a standout focal point that’s both stylish and sturdy. It’s perfect for a modern farmhouse or loft-style kitchen. Plus, these accents age beautifully, gaining character over time. Ready to fuse the best of both worlds? Your space will feel fresh, functional, and full of personality, making every meal an experience.
3. Add Open Shelving Made from Reclaimed Pallets for Easy Access and Display
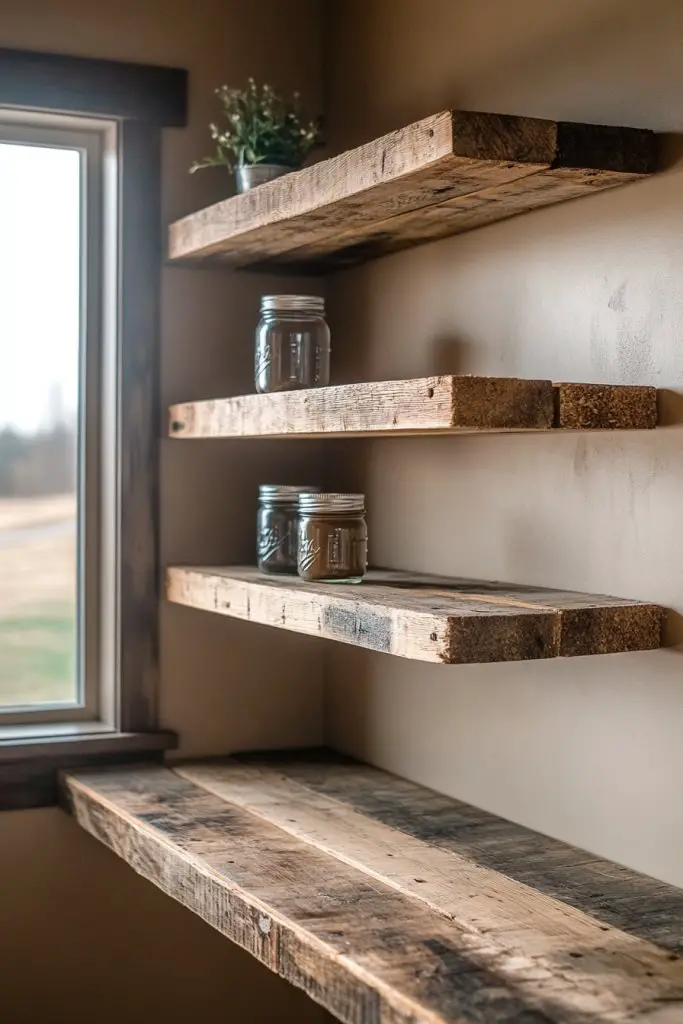
Ever wish your kitchen was more accessible and visually interesting? Open shelving offers a way to keep essentials within arm’s reach while adding a rustic charm. The dilemma is finding storage that doesn’t clutter or look too industrial. If you love the idea of showcasing your favorite dishes or quirky decor, reclaimed pallet shelves are a fantastic choice. They marry function with a laid-back aesthetic.
Recommended Products to replicate this idea
| # | Preview | Product | |
|---|---|---|---|
| 1 |

|
FLYJOE Floating Shelves, 8 Inch Deep Rustic Solid Reclaimed Wood Wall Shelves for Storage, Wall... | Buy on Amazon |
| # | Preview | Product | |
|---|---|---|---|
| 1 |

|
Rustic Floating Shelf Bracket 8 Inch, Cast Iron Shelf Brackets for Wall Shelving, Heavy Duty Shelf... | Buy on Amazon |
Picture sturdy planks of weathered wood mounted on the wall, supported by simple brackets or directly fixed into studs. The rough-hewn texture of reclaimed pallets adds character, with visible nail holes and uneven edges. Display colorful dishes, vintage mugs, or handcrafted ceramics—items that tell their own story. The open design creates a feeling of spaciousness, while the natural wood tones warm up the space. It’s like bringing a slice of a rustic barn into your kitchen.
Choose pallets with a balanced mix of weathered and intact boards for a neater look or embrace full rustic chaos for maximum character. You can stain or paint the shelves to match your color scheme or leave them in their natural state. Adjust the spacing between shelves based on what you want to display—wide gaps for larger items or close together for smaller ones. Incorporate decorative brackets or keep it minimalist with hidden fasteners for a cleaner appearance.
Start by sourcing reclaimed pallets from local salvage yards or online suppliers. Disassemble pallets carefully, removing nails and splinters. Sand the wood lightly to smooth rough edges but retain the rustic texture. Mount heavy-duty brackets or directly screw into wall studs for stability. Seal the wood with a clear matte finish to protect against moisture and wear. Arrange your favorite items on the shelves, ensuring weight is evenly distributed.
Personalize the shelves by adding small decorative items like vintage jars or handcrafted signs. Incorporate hooks underneath for hanging utensils or towels. Use different stains or paint techniques to match seasonal decor or personal mood. You could also add LED strip lighting underneath for a soft glow during evening hours. The goal is to make the shelves both functional and a reflection of your personality.
Open pallet shelving brings a relaxed, approachable vibe that invites casual gatherings and daily life. It’s a simple DIY project that adds both storage and visual interest. Plus, repurposing pallets supports eco-friendly practices and adds a unique story element. Ready to make your kitchen more accessible and charming? Your space will feel warmer and more inviting, perfect for entertaining or everyday use.
4. Install Under-Counter Storage Drawers with Vintage Hardware
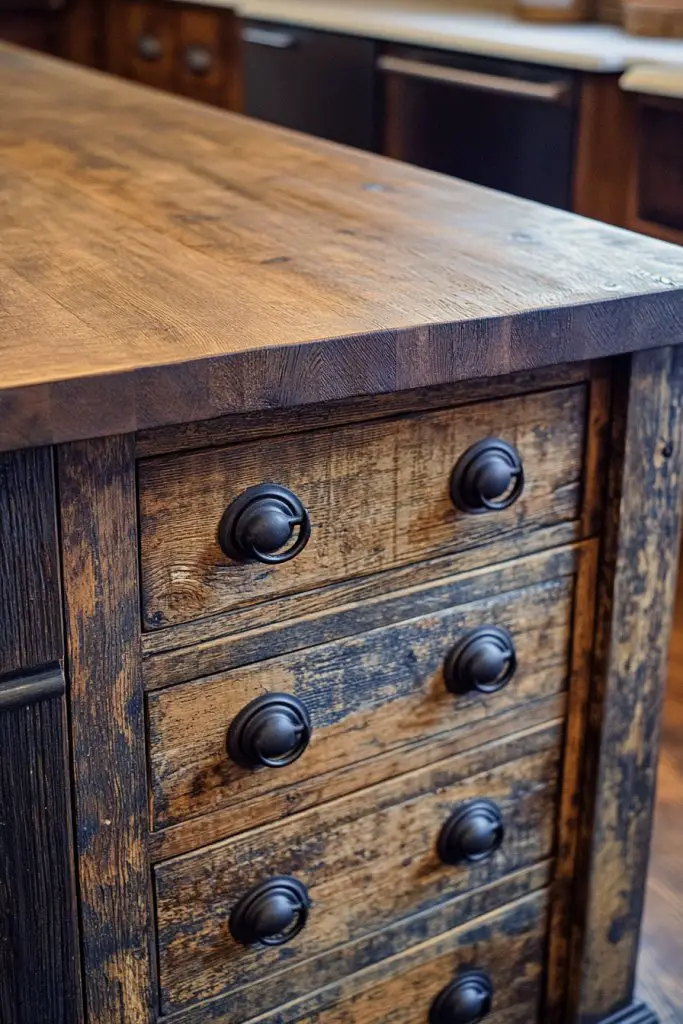
Tired of cluttered counters and lost utensils? Under-counter storage drawers keep your essentials hidden yet easily accessible. The challenge is achieving a vintage look that doesn’t sacrifice modern functionality. If you love the charm of old-world hardware but want the convenience of drawers, this is your perfect solution. It’s a clever way to maximize space while adding nostalgic flair.
Recommended Products to replicate this idea
| # | Preview | Product | |
|---|---|---|---|
| 1 |

|
Pull out Cabinet Organizer, 15"W X 21"D, Heavy Duty Smooth Sliding Under Cabinet Shelves for Pots... | Buy on Amazon |
| # | Preview | Product | |
|---|---|---|---|
| 1 |

|
Yanxia Set of 12 -Sleek Round Antique Brass Cabinet Knobs - Retro and Minimalist Hardware for... | Buy on Amazon |
Visualize drawers with distressed wood fronts, accented by antique brass or wrought iron handles. The hardware’s aged patina complements the rustic theme, creating a cohesive look. Inside, organize utensils, linens, or small kitchen gadgets in dividers or baskets. The drawers slide smoothly on metal tracks, offering a seamless blend of form and function. This setup provides a charming focal point that feels both functional and timeless.
Choose hardware finishes that match your style—oil-rubbed bronze, matte black, or aged nickel. For a more eclectic vibe, mix and match different vintage pulls. You can also customize drawer fronts with stenciled patterns or painted details. If space is tight, opt for shallow drawers or slim profiles that still hold plenty of essentials. Larger islands can incorporate multiple drawers for different categories.
Start by selecting a sturdy base cabinet or build a custom frame for your drawers. Use reclaimed or repurposed wood for the drawer fronts to enhance the vintage appeal. Install high-quality drawer slides rated for daily use, aligning them precisely for smooth operation. Attach vintage hardware securely, ensuring they can withstand frequent use. Inside, organize with small baskets or dividers for efficiency. Seal the wood with a protective finish suitable for kitchen environments.
Add decorative touches like engraved initials or painted accents on drawer fronts. Incorporate small label holders or tags for easy identification. Consider lining drawers with patterned or textured liners that add a subtle touch of personality. You can also install soft-close mechanisms for a quieter, more refined feel. Keep the vintage theme alive with accessories like old-fashioned jars or antique spoons displayed nearby.
Vintage hardware on drawers instantly adds charm and character, making your kitchen uniquely yours. It’s a functional upgrade that offers both practicality and nostalgia. This project can be DIY-friendly with a little patience, and the result is totally worth it. Embrace the timeless appeal of vintage accents and enjoy a kitchen that feels warm, lived-in, and beautifully functional.
5. Use Matte Black Faucet and Hardware to Enhance the Rustic Aesthetic
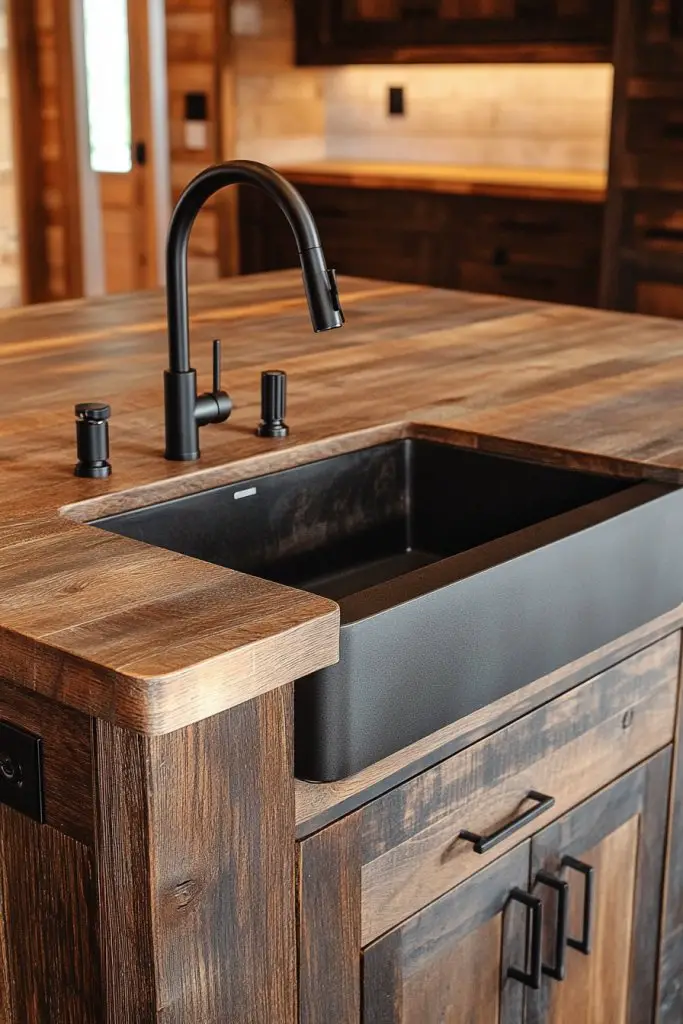
Looking to add a bold yet understated touch to your rustic island? Matte black fixtures are the perfect way to create contrast and modern flair without overpowering the natural textures. The challenge is integrating these dark accents seamlessly into a warm, rustic setting. If you love the idea of sleek hardware that’s both functional and stylish, matte black is your best bet. It elevates the space while keeping things grounded.
Recommended Products to replicate this idea
| # | Preview | Product | |
|---|---|---|---|
| 1 |

|
FORIOUS Black Kitchen Faucet with Pull Down Sprayer, High Arc Single Handle Classic Stainless Steel... | Buy on Amazon |
| # | Preview | Product | |
|---|---|---|---|
| 1 |
|
Ravinte 30 Pack | 5 Inch Cabinet Pulls Matte Black Stainless Steel Kitchen Drawer Pulls Cabinet... | Buy on Amazon |
Envision a farmhouse sink with a matte black faucet, complemented by matching cabinet handles. The dark finish pops against the lighter wood or distressed paint, drawing the eye without overwhelming. The matte texture reduces glare, adding a sense of depth and sophistication. The hardware’s subtle sheen pairs beautifully with aged metals or natural stone accents. Overall, it creates a balanced, contemporary-rustic vibe that feels both fresh and timeless.
Choose hardware with simple, clean lines for a minimalist look, or go for ornate vintage-inspired pieces to add character. Mixing matte black with brushed brass or antique metals can create a layered, eclectic style. For smaller islands, use black knobs or pulls on drawers and cabinet doors. Larger islands benefit from bold black fixtures that serve as focal points, anchoring the overall design.
Select high-quality matte black fixtures designed for durability and ease of cleaning. Install the faucet with proper sealing to prevent leaks, ensuring it can withstand daily use. Attach matching hardware to drawers and doors using the provided screws, tightening securely. For a cohesive look, consider replacing existing fixtures with matte black options, or spray-paint hardware with a specialized matte finish. Regular cleaning with gentle products maintains the matte appearance.
Add a pop of color or texture by pairing black fixtures with colorful or textured textiles nearby. Customize your hardware with engraved or embossed details for a personal touch. Consider installing matching black hooks or racks for towels and utensils. To keep things consistent, choose matte black accessories like soap dispensers or utensil holders. This cohesive approach makes your rustic island feel thoughtfully designed.
Matte black fixtures bring a modern edge to rustic charm, making your kitchen feel both fresh and timeless. They’re versatile enough to evolve with changing styles and preferences. Plus, they hide fingerprints and water spots better than shiny finishes, making maintenance a breeze. Ready to add that bold, sleek detail? Your space will look polished and effortlessly stylish, perfect for everyday life or entertaining.
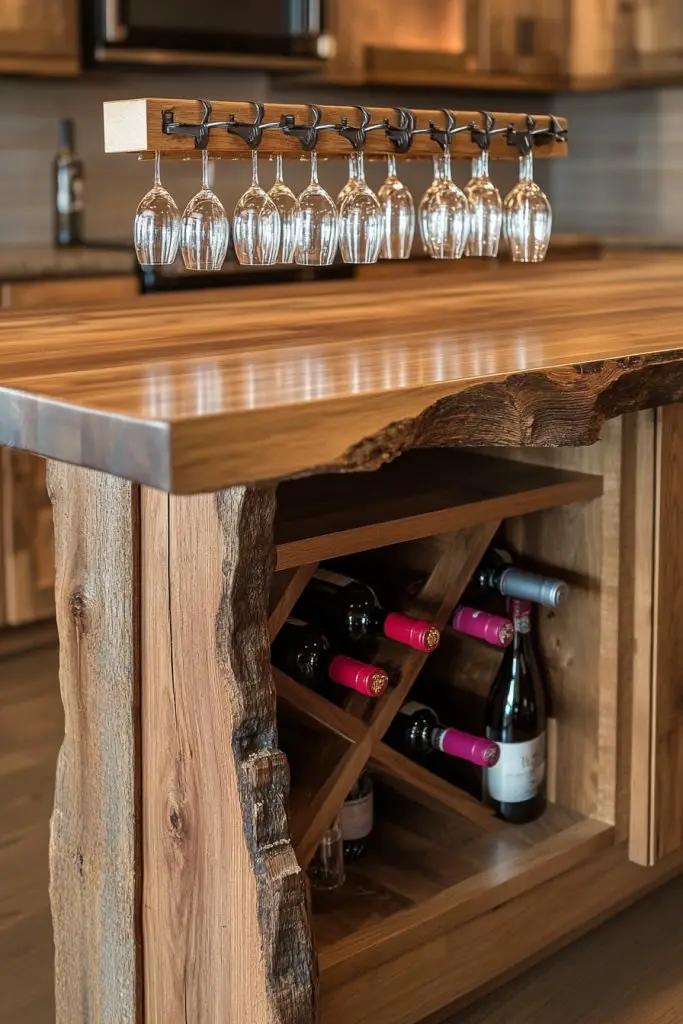
6. Integrate Built-In Wine Racks or Glass Holders for Convenient Entertaining
Ever wanted your kitchen island to do more than just look pretty? Incorporating a built-in wine rack or glass holder transforms it into a functional entertainment hub. The challenge is blending these features seamlessly into rustic decor without losing charm. If you love hosting and want everything within reach, these built-ins make a statement while adding practicality. They’re a subtle luxury that elevates your space.
Recommended Products to replicate this idea
| # | Preview | Product | |
|---|---|---|---|
| 1 |

|
GeLive 10 Inch Under Cabinet Wine Glass Rack Stemware Holder Glass Storage Hanger Organizer for... | Buy on Amazon |
| # | Preview | Product | |
|---|---|---|---|
| 1 |

|
28-Bottle Trimmable Wine Rack Lattice Panel Inserts in Unfinished Solid North American Hard Maple | Buy on Amazon |
Imagine a narrow, vertical wine rack built into the side of your island, crafted from reclaimed wood or blackened steel. It holds bottles securely, with space for a few favorite vintages. Nearby, hanging glass holders with etched or vintage-style glassware add visual interest. The combination of wood and metal creates a warm, inviting feel. When you entertain, these features become a focal point that’s both functional and decorative.
Choose a minimal rack for a clean look or a more elaborate design with decorative brackets and framing. For smaller spaces, a compact, wall-mounted rack works well. You can also incorporate a built-in wine fridge or cooler into larger islands for added convenience. Glass holders can be customized with different finishes to match your hardware—antique brass, matte black, or distressed iron.
Start by planning the exact location—either within the island or as a side attachment. Use reclaimed or weathered wood for the rack to keep the rustic vibe. Securely attach metal brackets or supports, ensuring stability for bottles and glasses. Install the rack at a comfortable height for serving or display. Seal your wood with a protective finish suitable for humid environments. Incorporate lighting if desired for added ambiance.
Personalize by engraving initials or dates on the wood or metal components. Display special bottles or vintage glassware that reflect your taste. Add decorative touches like cork accents or rustic tags. You can also incorporate a small chalkboard or signage nearby for wine labels or serving suggestions. These details make your entertaining space unique and welcoming.
Built-in wine racks and glass holders turn your kitchen island into a stylish, practical entertaining station. They’re perfect for casual gatherings or special celebrations, adding a personal touch. This upgrade shows guests your attention to detail and love of hosting. Ready to impress with a functional, charming centerpiece? Your space will be both beautiful and highly usable.
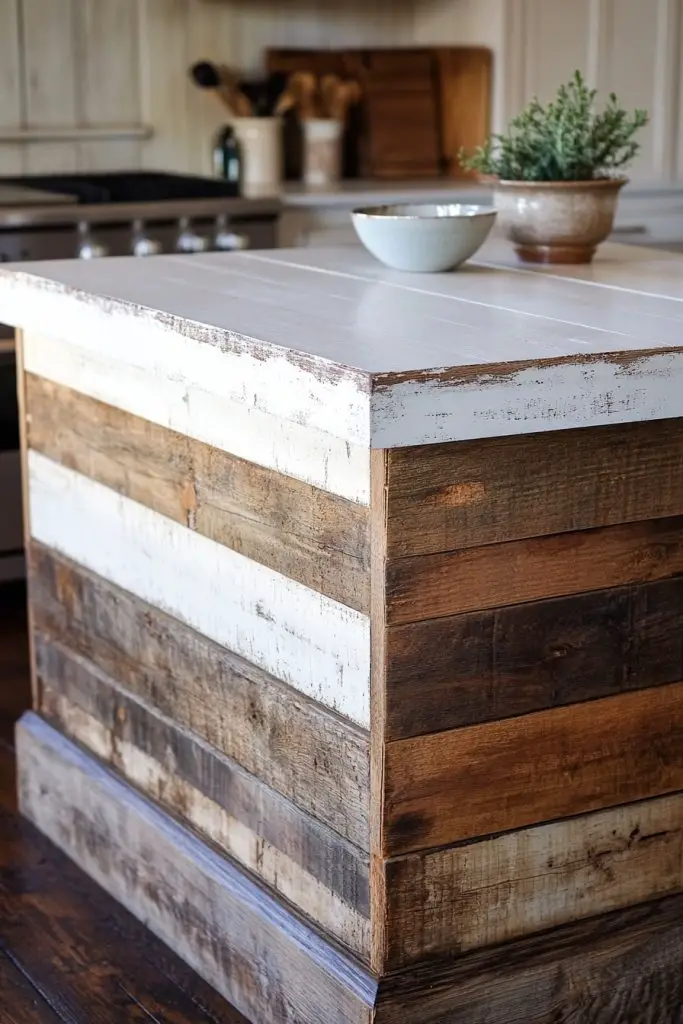
7. Create a Two-Tone Finish with Whitewashed and Natural Wood for Visual Depth
Ever feel like your rustic island could use a little more visual interest? A two-tone finish adds depth and dimension, making your piece stand out without overwhelming the space. The challenge is balancing contrasting shades so they complement each other naturally. If you love a layered, textured look, combining whitewashed and natural wood is a stylish way to achieve it. It’s perfect for adding subtle sophistication to rustic decor.
Recommended Products to replicate this idea
| # | Preview | Product | |
|---|---|---|---|
| 1 |

|
Varathane 355305 Whitewash Wood Enhancer, Half Pint, White | Buy on Amazon |
| # | Preview | Product | |
|---|---|---|---|
| 1 |
|
Minwax 622224444 Polycrylic Protective Wood Finish, Clear Matte, 1 Quart | Buy on Amazon |
Picture a wooden island with the base painted in a soft, matte whitewash, revealing hints of the natural wood grain beneath. The top remains in its original, warm wood tone, creating a striking contrast. The whitewashed finish softens the rustic look while adding brightness and a touch of shabby chic charm. The combination plays with light and shadow, giving the entire piece a layered, textured appearance that invites closer inspection. It feels fresh yet cozy.
Experiment with different shades of whitewash—from pure white to slightly gray or cream tones—to match your decor. For a more distressed look, sand or lightly chip the paint to reveal the wood underneath. Apply different stains or finishes on the top for added contrast or uniformity. This technique adapts well to both small and large islands, allowing flexibility in style and scale.
Start by choosing a high-quality wood base, then apply a diluted whitewash or liming wax with a brush or rag, focusing on the grain for a natural look. Seal the whitewashed sections with a matte, protective finish to prevent chipping. For the top, sand and stain or seal as desired, maintaining the natural wood warmth. Consider using painter’s tape to keep clean lines between the two finishes. Allow each layer to dry thoroughly before handling.
Add personal touches like stenciled patterns, painted borders, or decorative corner accents. Incorporate textiles like a soft throw or cushions in neutral or pastel shades to complement the layered look. Use contrasting hardware for drawers and cabinets—black, brushed nickel, or antique brass—to further enhance the two-tone effect. This style works beautifully with vintage, farmhouse, or Scandinavian decor themes.
A two-tone finish elevates your rustic island from simple to sophisticated, adding visual interest without complexity. It’s a subtle way to introduce modern flair into a traditional setting. Plus, experimenting with finishes is a fun DIY project with impressive results. Ready to add depth and elegance? Your space will feel more dynamic, inviting, and uniquely yours.
8. Add Woven Baskets or Burlap Liners for Extra Storage and Rustic Texture
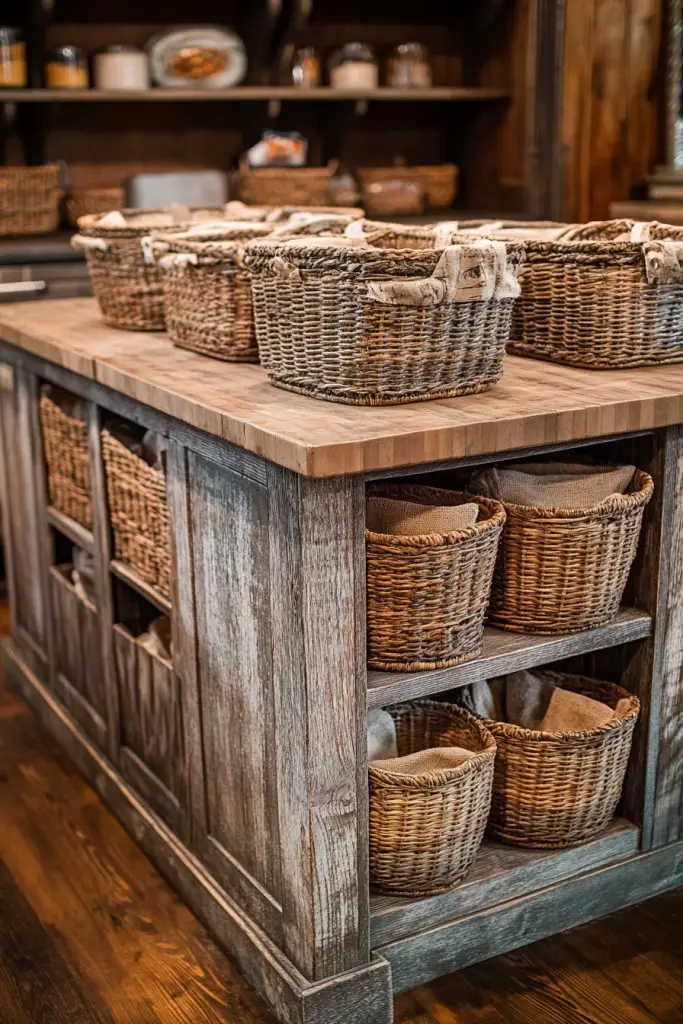
Do you find yourself overwhelmed by clutter on your rustic island? Woven baskets and burlap liners offer a simple solution for stylish, functional storage. The challenge is maintaining that cozy, rustic vibe while keeping things organized. If you love natural textures and want an easy way to hide messes, this idea strikes the perfect balance. It’s like adding a layer of texture that’s both practical and pleasing.
Recommended Products to replicate this idea
| # | Preview | Product | |
|---|---|---|---|
| 1 |

|
Yilobi 5 Pack Woven Storage Baskets for Shelves, Decorative Basket Organizer Storage Bins for Toys,... | Buy on Amazon |
| # | Preview | Product | |
|---|---|---|---|
| 1 |

|
BestNest Panacea Round Burlap Hanging Basket Liners, 14 in Diameter, Pack of 4 – Formed Basket... | Buy on Amazon |
Imagine open wire or woven seagrass baskets sitting on shelves or inside cabinets, filled with fresh produce, linens, or utensils. Burlap-lined bins add a touch of countryside charm, with their rough texture contrasting beautifully with smooth wood or distressed finishes. These containers look handcrafted and imperfect, emphasizing rustic authenticity. When you open a drawer or cabinet, the woven elements peek out, adding visual warmth and texture.
Choose baskets in natural fibers such as seagrass, rattan, or wicker, depending on your preferred texture. Burlap liners can be customized with decorative trims or painted patterns for a personalized touch. For a cohesive look, stick to neutral tones or muted colors that blend with your overall palette. Use smaller baskets for organizing cutlery or spices, and larger ones for bulkier items like towels or cleaning supplies.
Select baskets that fit your storage areas, ensuring they’re sturdy enough for daily use. Line open shelves or inside cabinets for a tidy appearance. Secure larger baskets with hooks or brackets if needed, especially in high-traffic areas. To clean, simply wipe down with a damp cloth; burlap liners may need gentle hand washing. Mix and match textures and sizes to create an inviting, organized space that feels effortless.
Personalize baskets with painted initials, decorative tags, or fabric liners in patterns that suit your decor. Incorporate small decorative accents like dried flowers or wooden tags for a handmade feel. You could also add a few vintage-inspired pieces nearby to reinforce the rustic aesthetic. Changing liners seasonally adds freshness and keeps the look dynamic. These simple touches turn storage into a design statement.
Woven baskets and burlap liners make storage charming and approachable, perfect for everyday life. Their natural textures add warmth and tactile interest, making your space feel cozy and lived-in. Plus, they’re easy to swap out or update as your style evolves. Ready to organize with style? Your kitchen will look inviting, relaxed, and effortlessly put together.
9. Incorporate Mason Jar Pendant Lights Above the Island for Warm Lighting
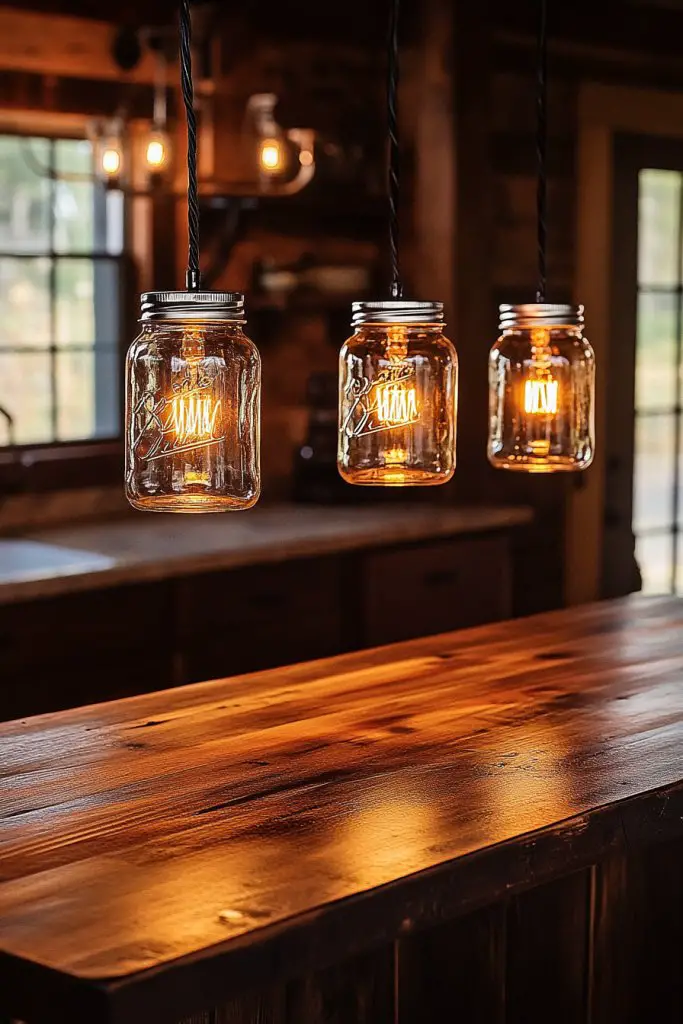
Ever wish your kitchen had a warm, inviting glow that feels both vintage and functional? Pendant lighting is the perfect way to create ambiance while highlighting your rustic island. The challenge is finding fixtures that blend seamlessly into a rustic or farmhouse aesthetic without looking out of place. If you love the idea of soft, warm lighting that also serves as decor, mason jar pendant lights are an adorable solution.
Recommended Products to replicate this idea
| # | Preview | Product | |
|---|---|---|---|
| 1 |

|
JWLUYN Mason Jar Light Fixtures, Farmhouse Pendant Light, Farmhouse Kitchen Island Lighting,... | Buy on Amazon |
| # | Preview | Product | |
|---|---|---|---|
| 1 |
|
Sheetea 2-Pack Farmhouse Pendant Lights Kitchen Island, Black Pendant Light Fixtures Hanging Lamp... | Buy on Amazon |
Picture a row of clear or tinted mason jars hanging from blackened metal or distressed wood beams, each fitted with a vintage-style filament bulb. The jars emit a soft, diffused glow that bathes the island in warm light. The textured glass adds an element of handcrafted charm, while the exposed wiring and simple hooks enhance the rustic feel. During the evening, this setup provides cozy, inviting illumination that’s both functional and decorative.
Use jars in different sizes or colors for an eclectic look, or keep them uniform for a cleaner aesthetic. Hang the jars at varying heights for visual interest or keep them aligned for a symmetrical effect. You can also incorporate decorative elements like twine, leather straps, or small charms for added personality. For more modern spaces, opt for sleek, matte black fittings; for vintage charm, choose distressed or copper fixtures.
Select sturdy mason jars with smooth rims for easy fitting. Fit each jar with a vintage-style filament bulb, making sure the wiring is safe and concealed. Attach the jars to a wooden beam or ceiling plate using hooks or custom brackets. Use dimmable switches to adjust the mood, especially during dinner parties or cozy nights. Seal any exposed wiring with weatherproof or decorative covers to keep everything tidy.
Add decorative touches like painted or etched designs on the jars, or fill them with seasonal accents like dried herbs or flowers. Swap out bulbs for different colors or brightness levels to change the ambiance. Incorporate small tags or ribbons for a personalized touch. This lighting setup isn’t just functional; it’s a statement piece that combines rustic charm with a touch of whimsy.
Mason jar pendant lights infuse your space with warmth and nostalgia, perfect for creating a cozy, inviting atmosphere. They’re easy to install, inexpensive, and highly customizable. Plus, they look fantastic in both small and large kitchens, adding a handcrafted touch that elevates your entire decor. Ready to light up your rustic haven? Your space will glow with charm and character, making every meal special.
10. Use Distressed Paint Techniques on the Island Base for a Weathered Look
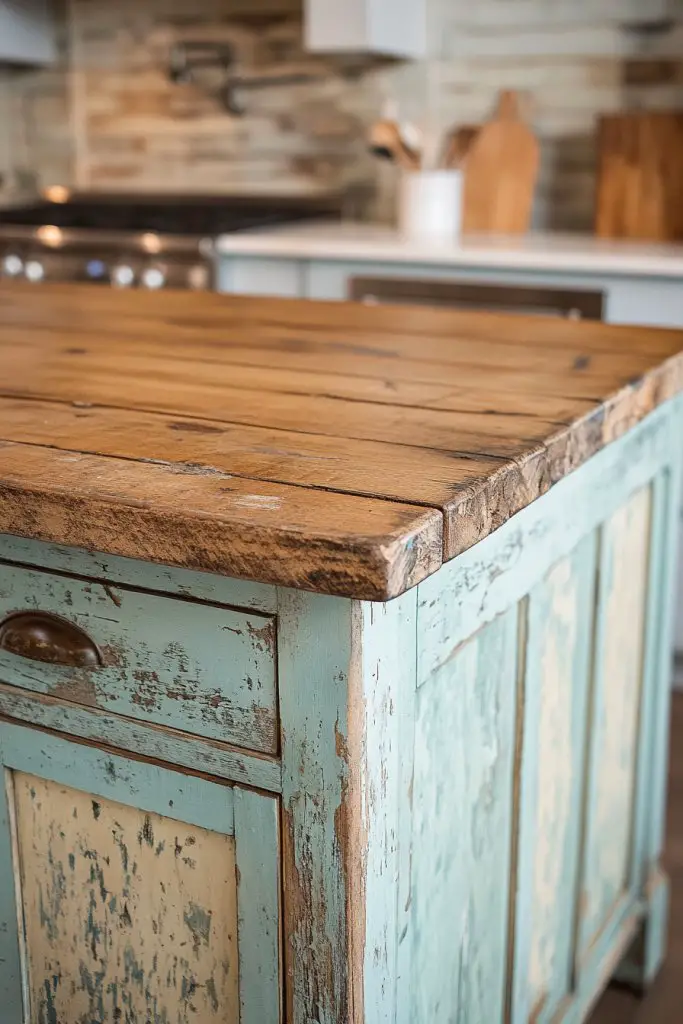
Want your kitchen island to look like it’s been around for decades? A weathered, distressed finish adds instant history and charm, making your space feel warm and lived-in. The problem is that new furniture often looks too pristine and sterile. If you love the idea of a piece that feels perfectly imperfect, distressed paint techniques are your secret weapon. They create a vintage aura that’s both stylish and comforting.
Recommended Products to replicate this idea
| # | Preview | Product | |
|---|---|---|---|
| 1 |

|
Rust-Oleum Linen White Chalked All-in-One Ultra Matte Paint | One Coat Coverage | No Primer,... | Buy on Amazon |
| # | Preview | Product | |
|---|---|---|---|
| 1 |

|
4 Pack Hand Sanding Sponge Set -120 220 320 400 Grit- Coarse Medium Fine Grit Sanding Block, Sander... | Buy on Amazon |
Imagine a base painted in a soft, muted color—think pale blue, gray, or cream—then gently sanded or chipped to reveal layers underneath. The distressed areas show hints of wood or previous paint layers, adding depth and texture. The rough edges and uneven finishes mimic years of wear, giving the island an authentic aged appearance. The overall effect is charming, rustic, and full of character. It’s like giving your furniture a story to tell.
Use different colors or techniques—such as crackling or glazing—to achieve various weathered effects. For a more subtle look, focus on the edges and corners; for a more dramatic finish, distress larger areas. Combine with waxes or sealants to enhance the aged look and protect the finish. This technique works well on painted surfaces, whether on cabinets, furniture, or the island base itself.
Start by applying a base coat of paint, then add a contrasting or similar color for the top layer. Once dry, use sandpaper or a wire brush to gently remove paint from edges, corners, and raised details. To add more authenticity, rub in a dark wax or stain into the distressed areas, then wipe excess. Seal everything with a matte or satin protective finish. Practice on scrap wood first to perfect your technique.
Add decorative touches like stenciled patterns or vintage decals to reinforce the aged look. Incorporate hardware with a distressed or antiqued finish to match the weathered aesthetic. Use contrasting paint colors for different sections to create visual interest. Personalize with hand-painted motifs or subtle patterns that reflect your style—these details make the piece truly one-of-a-kind.
A distressed finish breathes new life into your island, making it a focal point full of character. It’s a simple DIY project that offers high impact with minimal investment. Plus, each scratch or chip adds to the story, making your space uniquely yours. Ready to embrace the imperfect beauty of weathered charm? Your rustic kitchen will radiate warmth, history, and personality.
11. Include a Fold-Out or Drop-Leaves Section for Flexible Space Usage

Ever wished your kitchen island could adapt to different needs? Whether you’re hosting a dinner party or need extra workspace, a fold-out or drop-leaf section offers versatile solutions. The challenge is designing a feature that’s both functional and seamlessly integrated into rustic style. If flexibility is your goal, this clever addition transforms your space without sacrificing charm. It’s like having a multi-tool built into your kitchen.
Recommended Products to replicate this idea
| # | Preview | Product | |
|---|---|---|---|
| 1 |
|
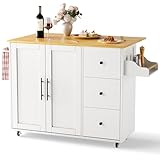
GRUSIGN Kitchen Island on Wheels with Storage-Multifunctional Kitchen Island Cart with Drop Leaf,... | Buy on Amazon |
| # | Preview | Product | |
|---|---|---|---|
| 1 |

|
Folding Shelf Bracket 18 inch 2PC Wall Mounted Collapsible Shelves Brackets Heavy Duty Foldable... | Buy on Amazon |
Visualize an island with a sturdy, reclaimed wood surface that extends when needed, supported by hinges or brackets. When not in use, the leaf folds down neatly, maintaining a clean, rustic appearance. The extension can be a matching wood panel or a contrasting stained piece for visual interest. When open, it creates extra space for preparing, eating, or serving—perfect for entertaining. The design blends rustic craftsmanship with modern practicality.
Choose hinges and supports that match your hardware—antique brass, matte black, or wrought iron—to keep with your theme. The leaf can be fixed or removable, depending on your needs. For smaller spaces, a compact fold-down adds functionality without clutter. Larger islands can incorporate multiple fold-out sections for maximum flexibility. Consider adding locking mechanisms to keep the extension stable during use.
Start by planning the size and location of the fold-out section, ensuring structural support underneath. Use reclaimed or distressed wood to match the island base, attaching hinges securely with rust-resistant screws. Reinforce support brackets inside the frame to bear weight. When in use, lift and lock into position; when not needed, fold down and store. Seal all surfaces with a protective finish for durability.
Add decorative details like carved edges or painted accents to the fold-out section. Use contrasting stains or finishes to highlight the extension. Incorporate hooks or small shelves nearby for utensils or condiments. For a personalized touch, engrave a special date or motif on the support brackets or the fold-out surface. This feature turns your island into a multi-functional centerpiece.
A fold-out or drop-leaf adds a level of adaptability that makes your kitchen more versatile and user-friendly. It’s a smart upgrade for small spaces or busy households. Plus, it’s a fun DIY project that showcases craftsmanship and ingenuity. Ready to make your island more flexible? You’ll love how easily it adapts to your ever-changing needs.
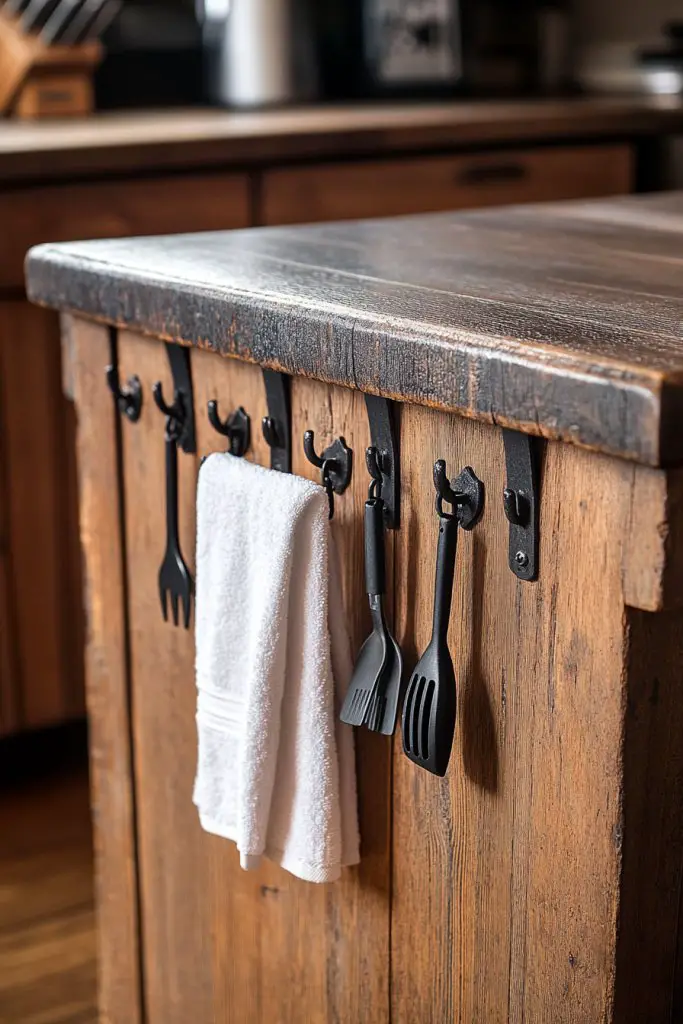
12. Attach Hooks or Pegs for Hanging Utensils, Towels, or Cookbooks
Tired of digging through drawers for utensils or towels? Hooks and pegs provide instant access and keep your workspace tidy. The challenge is choosing fixtures that blend seamlessly into rustic decor without looking cluttered. If you love a practical yet charming solution, adding hooks turns your island into a functional art piece. It’s all about smart storage with style.
Recommended Products to replicate this idea
| # | Preview | Product | |
|---|---|---|---|
| 1 |

|
Homode Wall Hooks with Shelf, Wood Coat Rack with Shelf Wall-Mounted, Entryway Hanging Shelves with... | Buy on Amazon |
| # | Preview | Product | |
|---|---|---|---|
| 1 |

|
Railroad Spike Cast Iron Hooks (10 Pack) Handmade Blacksmith, Wall Mounted Farmhouse Decorative... | Buy on Amazon |
Imagine a row of wrought iron hooks or wooden pegs mounted underneath the overhang or on the side of your island. They hold everything from spatulas and ladles to tea towels and even hanging cookbooks in vintage covers. The natural or distressed finish of the hooks complements weathered wood or painted surfaces. When you’re cooking or cleaning, everything is within arm’s reach, making your workflow smooth and efficient.
Choose hooks in different finishes—black, antique brass, or galvanized steel—to match your hardware. For a cohesive look, use hooks with decorative elements like leaves, stars, or rustic motifs. Space them evenly for a clean appearance or cluster for a more eclectic vibe. You can also incorporate small shelves or magnetic strips nearby for additional storage or organization.
Determine the best mounting points—under the overhang or on the side panels—then mark and drill holes carefully. Use rust-resistant screws or brackets to secure the hooks or pegs firmly. Ensure they’re at a comfortable height for hanging and retrieval. For added durability, seal the hooks with a protective coating or paint. Regularly check and tighten fittings to prevent sagging or loosening.
Decorate with personalized tags or engraved initials on the hooks for a custom touch. Incorporate vintage or handcrafted hooks for extra character. Use colorful or patterned textiles for towels to add visual interest. You could also add small baskets or containers nearby for other essentials, turning hooks into a decorative and practical feature.
Hooks and pegs are one of the simplest, most effective ways to add function and rustic charm. They keep your workspace organized and invite a casual, welcoming vibe. Perfect for everyday use or entertaining guests, they show off your thoughtful design. Ready to hang your way to a more organized, charming kitchen? Your space will feel warmer and more practical.
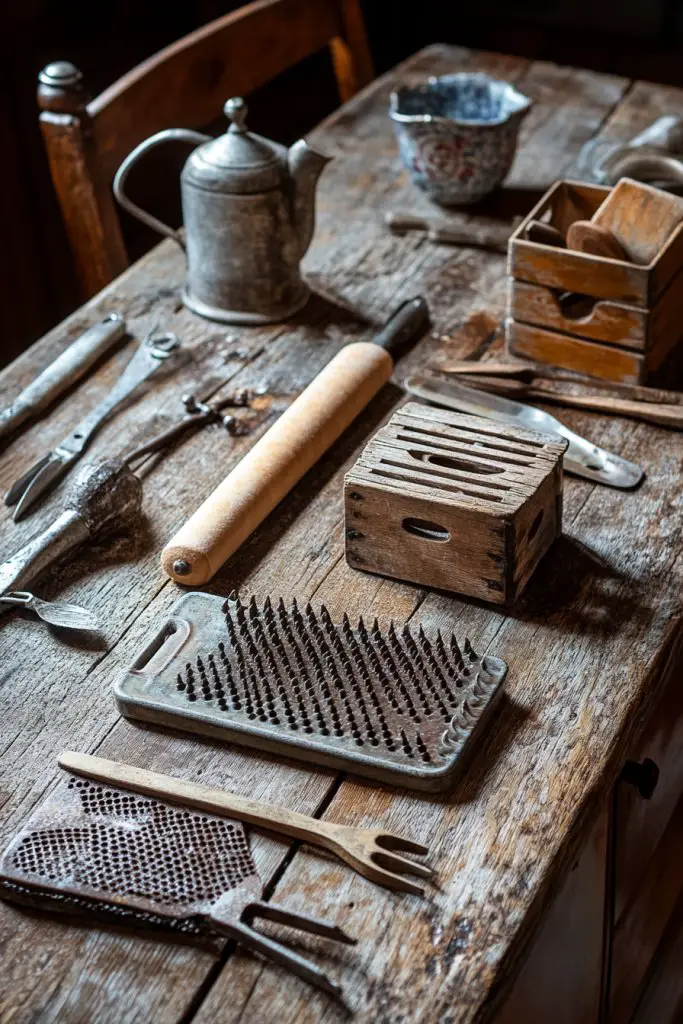
13. Decorate with Antique Kitchen Tools and Rustic Decor Accents
Want to give your rustic island a truly authentic feel? Antique kitchen tools and rustic accents add character and history, making your space stand out. The challenge is sourcing genuine vintage pieces that look charming without cluttering. If you love collecting or simply want your kitchen to tell a story, this approach is perfect. It’s about blending functionality with nostalgic beauty.
Recommended Products to replicate this idea
| # | Preview | Product | |
|---|---|---|---|
| 1 |

|
jogreful Utensil Holder, Cast Iron Kitchen Utensil Crock for Countertop, Extra Large Utensil... | Buy on Amazon |
| # | Preview | Product | |
|---|---|---|---|
| 1 |

|
Moucuny 4 Pcs Farmhouse Wooden Tabletop Decor Farmhouse Tiered Tray Decor Rustic Eucalyptus Leaves... | Buy on Amazon |
Visualize a set of vintage rolling pins, copper molds, or cast iron skillets hanging on a reclaimed wood wall or displayed on open shelves. Rustic signs, wooden crates, and woven textiles complement these items, creating a cozy, lived-in atmosphere. The aged patina of antique tools adds depth and authenticity, while their varied shapes and sizes make the space lively and interesting. Every piece contributes to a timeless, inviting aesthetic.
Mix different materials—copper, cast iron, and distressed wood—for visual richness. Group items by theme or color for a curated look, or scatter eclectic pieces for a more casual vibe. Incorporate vintage containers or jars for storage or display. You can also add small decorative items like old-timey signs or framed black-and-white photos for extra personality. The key is balancing nostalgia with practicality.
Begin by sourcing authentic or reproduction vintage tools from antique shops, flea markets, or online marketplaces. Clean and restore items as needed, applying gentle polish or oil for preservation. Mount tools on a wooden board or hooks, ensuring they’re securely fastened. Use reclaimed wood or distressed metal fixtures for hanging. Arrange your collection thoughtfully, mixing large and small pieces for visual interest. Regularly update or rotate items for variety.
Personalize your display by adding engraved tags or painted accents. Incorporate family heirlooms or meaningful collectibles to make the space truly yours. Use rustic frames or chalkboards nearby to label or describe each item. Complement with textured textiles like burlap or linen for a layered look. These details turn your kitchen into a charming, storytelling space.
Decorating with antique tools creates a warm, nostalgic atmosphere that feels authentic and welcoming. It’s a great conversation starter and a chance to showcase your personality. These pieces age beautifully, gaining character over time. Ready to turn your kitchen into a vintage-inspired haven? You’ll love the charm and history it brings to everyday life.
14. Integrate a Built-In Cutting Board Section for Food Prep Convenience

Ever wish your kitchen island had a dedicated space for prep work that’s both functional and seamless? A built-in cutting board section offers quick, easy access while maintaining rustic charm. The challenge is designing a space that looks integrated and doesn’t disrupt the overall aesthetic. If you love efficient workflows and tidy surfaces, this addition makes food prep smoother and more stylish.
Recommended Products to replicate this idea
| # | Preview | Product | |
|---|---|---|---|
| 1 |

|
Cooler Kitchen Wooden Cutting Boards for Kitchen with 6 Flexible Plastic Mats - Meal Prep and... | Buy on Amazon |
| # | Preview | Product | |
|---|---|---|---|
| 1 |

|
JS Gourmet Bamboo Chopping Board with Non Stick Pullout Stainless Steel Tray, Elevate you Kitchen... | Buy on Amazon |
Picture a thick, wooden inset panel on the side of your island, crafted from the same reclaimed wood or distressed finish as the rest of the piece. A sliding or removable cutting board fits snugly into this space, blending perfectly with the rustic design. When in use, it provides a sturdy surface for chopping vegetables or kneading dough. When not needed, it hides away, keeping the look clean and uncluttered. It’s functional art.
Choose wood types that match or complement your island—oak, cherry, or pine—depending on your style. You can opt for a fixed inset or a sliding, fold-away design for versatility. Personalize the area with engraved initials or decorative edges. For small spaces, a compact, integrated board offers maximum utility, while larger islands can feature multiple sections for different tasks.
Start by measuring the desired inset area, then cut a hole in your island surface using precise tools. Fit a custom or pre-made cutting board made from butcher block or reclaimed wood. Secure it with hidden supports or a sliding track for easy removal. Seal the wood with food-safe oil or finish to prevent staining. Make sure the inset is flush with the surface for a sleek look. Keep it clean and well-maintained for longevity.
Add engraved monograms or decorative borders along the edge of the inset for a personalized touch. Incorporate small grooves or drainage channels for cleaning. Use contrasting stains or finishes to highlight the built-in feature. Nearby, hang a vintage knife rack or utensil holder to complete the prep area. This setup combines practicality with rustic elegance.
A built-in cutting board elevates your food prep game while adding a custom, handcrafted element to your island. It’s a simple upgrade that makes everyday cooking more enjoyable. Plus, it keeps your workspace tidy and organized. Ready to streamline your kitchen’s functionality? Your space will be more efficient, charming, and ready for any culinary challenge.
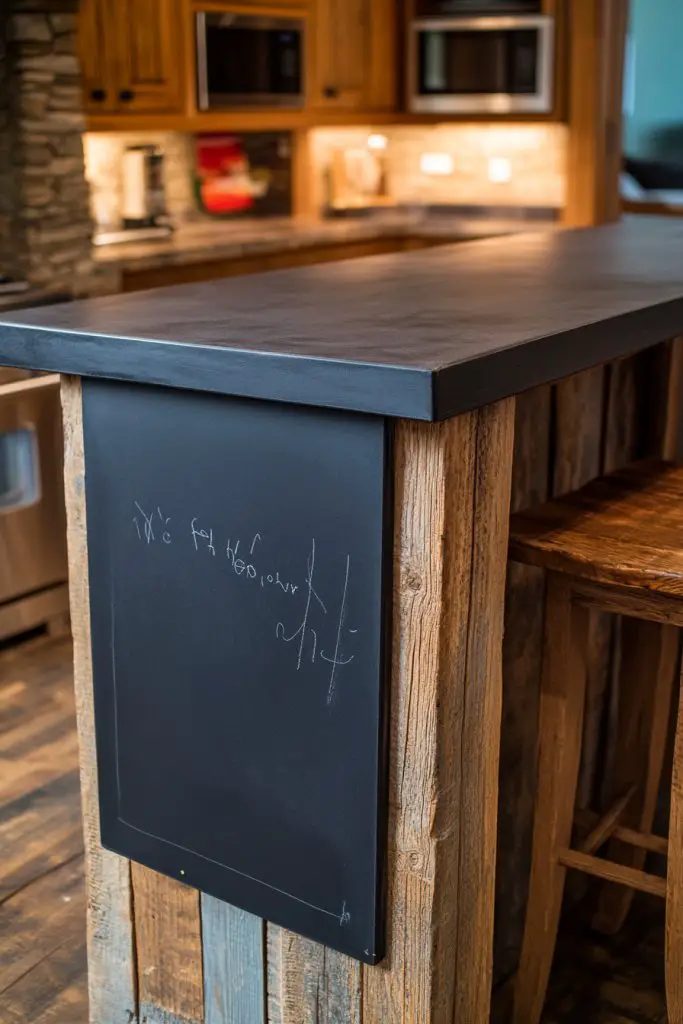
15. Add a Chalkboard Panel on the Side for Notes and Recipes
Ever forget your grocery list or want to jot down quick recipes? A chalkboard panel on your rustic island offers a charming, practical solution. The challenge is integrating it without breaking the rustic aesthetic. If you love DIY projects and personal touches, this feature is both fun and functional. It transforms your island into a creative hub for notes, menus, and inspiration.
Recommended Products to replicate this idea
| # | Preview | Product | |
|---|---|---|---|
| 1 |

|
Rust-Oleum 206540 Chalkboard Brush-On Paint, 30 oz, Black | Buy on Amazon |
| # | Preview | Product | |
|---|---|---|---|
| 1 |

|
MyGift 3 Panel Wall Mounted Entryway Bulletin Board Combo Set with Rustic Burnt Solid Wood Frame... | Buy on Amazon |
Imagine a weathered wooden side panel painted with chalkboard paint, framed with reclaimed wood or distressed trim. You can write your shopping list, recipe ideas, or daily affirmations with colorful chalks. The surface adds a rustic, handcrafted vibe, especially when paired with vintage signage or handwritten fonts. During gatherings, it becomes a focal point for sharing menus or special messages, adding personality and warmth.
Use different frame styles—simple wood, decorative molding, or painted accents—to match your decor. You can create sections for notes, recipes, or even a calendar. For a more playful look, incorporate colorful chalks or add small ledges for holding chalk and erasers. This feature works well on side panels, doors, or even the front of your island.
Prepare the surface by cleaning and sanding to ensure adhesion. Apply a high-quality chalkboard paint or adhesive film, then seal with a protective topcoat if needed. Frame the panel with reclaimed or distressed wood for a finished look. Attach securely to your island, making sure edges are flush and stable. Keep chalk and cleaning supplies nearby for easy updates.
Decorate the frame with painted patterns, stenciled designs, or rustic hardware. Personalize it with handwritten quotes or family names. Incorporate small decorative elements like vintage signs or metal accents to enhance the rustic feel. Change the message or artwork seasonally to keep the space lively and engaging.
A chalkboard panel adds a personal, interactive touch to your rustic island, making it more than just a workspace. It encourages creativity and keeps your family organized in a charming, informal way. Plus, it’s easy to update and customize over time. Ready to turn your kitchen into a functional, artistic space? It’s perfect for sharing ideas, notes, and memories.
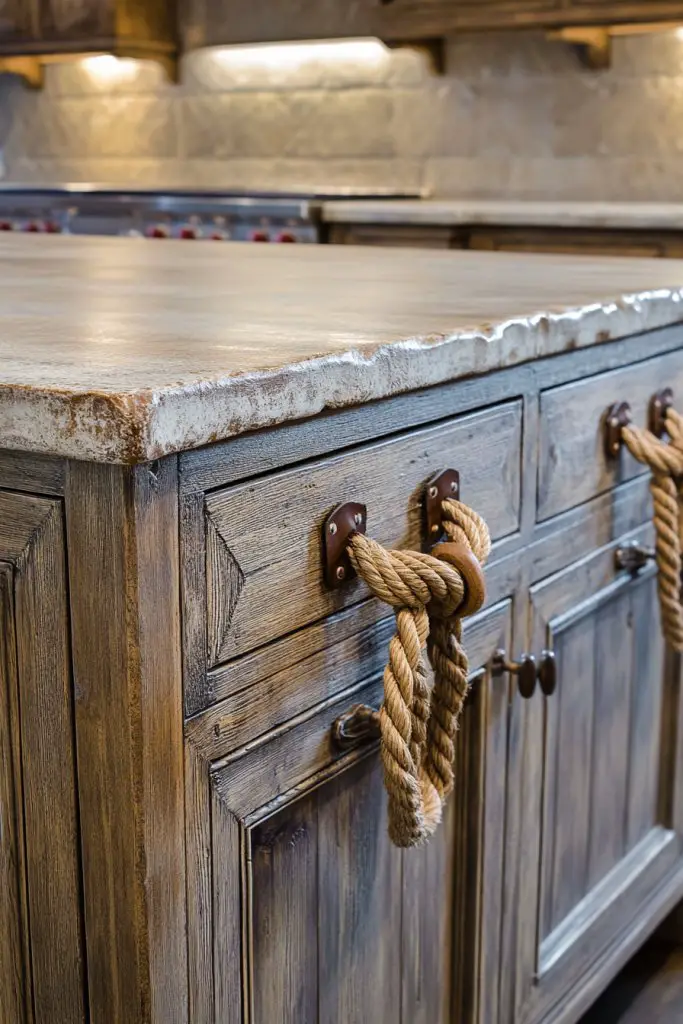
16. Use Rope or Leather Straps as Decorative Handles for a Natural Touch
Looking to add a handcrafted, natural element to your rustic island? Rope or leather straps as handles provide an organic, tactile feel that enhances the overall aesthetic. The challenge is choosing materials that are durable yet complement the rustic vibe. If you love the look of simple, earthy details, these handles are both practical and charming. They make everyday use feel special.
Recommended Products to replicate this idea
| # | Preview | Product | |
|---|---|---|---|
| 1 |

|
ESreake 4 Pack Soft Genuine Leather Drawer Pulls Handle,Wardrobe Cabinets Kitchen Closet Knobs Door... | Buy on Amazon |
| # | Preview | Product | |
|---|---|---|---|
| 1 |

|
QNNEFF 6PCS Nautical Twisted Jute Rope Drawer Pulls Brushed Brass Dresser Knobs Rustic Hemp Rope... | Buy on Amazon |
Visualize leather straps with brass rivets or thick, twisted rope knotted through reclaimed wood drawers and cabinet doors. The natural fibers and warm tones contrast beautifully with distressed or whitewashed finishes. When you open a drawer, the textured handles invite a sense of craftsmanship and authenticity. They add a subtle layer of detail that makes your furniture feel like a piece of art.
Select leather or rope in neutral, earthy shades—tan, brown, or charcoal—to match your decor. Knot or loop the straps for a rustic, handcrafted look, or use sleek, wrapped techniques for a more refined appearance. For smaller drawers, thin leather strips work well; larger handles can feature thick, braided rope. Incorporate metal accents or decorative rivets for added visual interest.
Measure and cut straps to the desired length, then attach them securely with sturdy screws, hooks, or eyelets. For leather, use a punch tool to create holes for rivets or fasteners. Wrap or knot the straps tightly around the handles, ensuring they’re comfortable to hold and won’t slip. Seal or treat the leather for longevity, especially in humid kitchens. Adjust tension periodically for continued durability.
Personalize with stamped initials, painted motifs, or decorative beads on the straps. Combine different textures or colors for a layered effect. Add small charms or metal accents for a personalized touch. You could also incorporate fabric or braided details for a more eclectic look. These handles become a signature feature that reflects your style.
Rope and leather handles bring a handcrafted, earthy vibe that elevates your rustic design. They’re simple to install and maintain, adding warmth and personality with every use. Perfect for a cozy, welcoming kitchen, these details make your furniture feel more inviting and unique. Ready to add that natural touch? Your space will radiate charm and craftsmanship, making every detail count.
17. Incorporate Shelves with Crate-Style Storage for Baskets and Kitchen Essentials
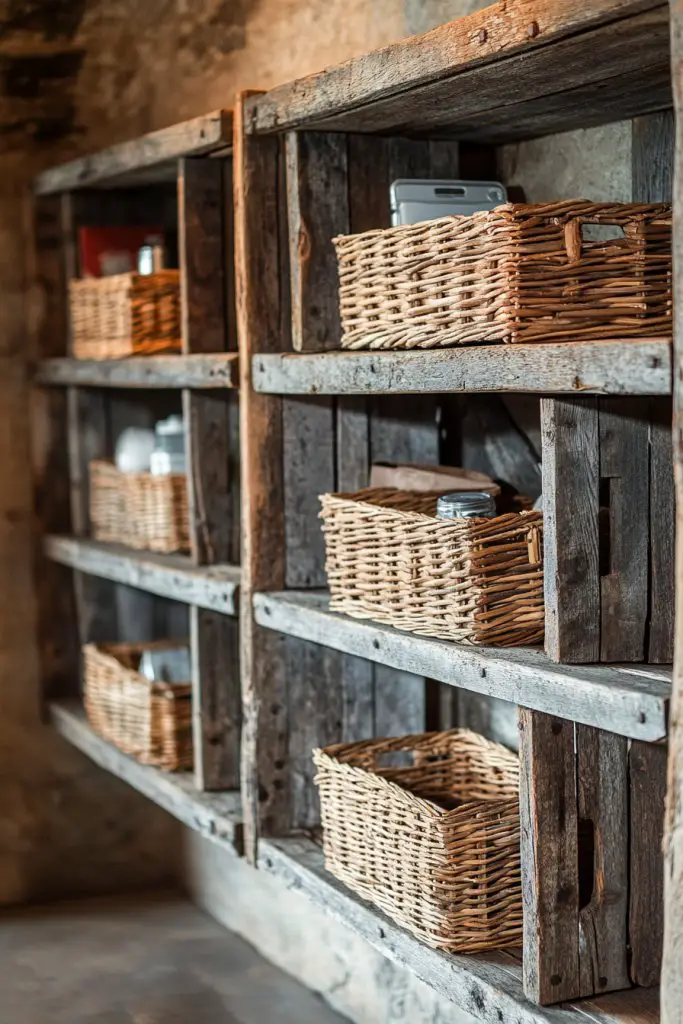
Craving a storage solution that’s both functional and full of rustic charm? Crate-style shelves offer open, accessible storage that’s perfect for baskets and essentials. The challenge is creating a design that looks cohesive and doesn’t feel cluttered. If you love the look of vintage crates and want a practical way to organize, this idea is a game-changer. It adds character while boosting storage.
Recommended Products to replicate this idea
| # | Preview | Product | |
|---|---|---|---|
| 1 |

|
Menkxi 4 Pcs Stackable Wood Storage Cube for Shelves Closet Wooden Bins Box Wood Crates Storage... | Buy on Amazon |
| # | Preview | Product | |
|---|---|---|---|
| 1 |

|
BLUEWEST Water Hyacinth Storage Baskets (Set of 6) – Woven Hyacinth Organizer with Carrying... | Buy on Amazon |
Imagine open wooden crates mounted on a reclaimed wood or distressed-painted wall, filled with woven baskets, pots, or utensils. The weathered, slatted design evokes a barn or farmhouse vibe. Display your favorite kitchenware or decorative items, letting their textures and colors add layers of visual interest. The open design keeps everything within reach, making your space feel warm and inviting.
Use different wood tones and finishes—weathered gray, stained, or painted—to match your decor. Mix sizes and shapes for a varied, eclectic look, or keep uniform crates for a more streamlined appearance. Incorporate decorative hardware like vintage labels or metal corner brackets. For smaller spaces, mount crates vertically or stack them for maximum efficiency.
Source or build crates from reclaimed or distressed wood, ensuring they’re sturdy enough for daily use. Mount them securely on the wall using heavy-duty brackets or anchors, spaced to allow easy access. Arrange the crates in a pattern that’s both functional and visually appealing. Fill them with baskets or containers that suit your storage needs. Seal the wood to protect against moisture and wear.
Label baskets or crates with handwritten tags or stenciled words to organize contents. Add decorative elements like vintage signs or painted motifs to enhance the rustic appeal. Incorporate small plant holders or decorative accents in or around the crates. Use seasonal or themed baskets to keep the look fresh and personalized.
Crate-style shelves transform your kitchen into a farmhouse or vintage paradise. They’re practical, customizable, and full of charm. Plus, they give you a chance to showcase your collection of baskets, pottery, or vintage finds. Ready to craft a storage display that’s both functional and fabulous? Your space will look cozy, organized, and full of personality.
18. Finish with a Clear Matte Sealant to Protect the Wood’s Rustic Appearance
Want your rustic island to stay beautiful and durable over the years? A clear matte sealant protects the wood from stains, moisture, and wear without sacrificing that soft, natural look. The challenge is choosing a finish that preserves the rustic charm while offering protection. If you love the raw, weathered aesthetic but want it to last, this step is essential. It’s the secret to keeping your piece looking authentic and fresh.
Recommended Products to replicate this idea
| # | Preview | Product | |
|---|---|---|---|
| 1 |

|
Aleene's Spray Finish 6oz Acrylic Sealer, 6 Ounce (Pack of 1), Clear-Matte | Buy on Amazon |
| # | Preview | Product | |
|---|---|---|---|
| 1 |
|
Minwax 233334444 Polycrylic Protective Wood Finish, Clear Satin, ½ Pint | Buy on Amazon |
Imagine a soft, matte finish that subtly enhances the wood’s natural grain and texture, giving it a gentle, velvety appearance. The finish is invisible to the eye but works tirelessly to prevent water rings, scratches, and stains. When you run your hand over the surface, it feels smooth yet retains the rustic, matte quality. This finish ensures your island maintains its authentic character over time, even in a busy kitchen.
Select a matte sealant suitable for food contact if your island surface is used for food prep. For a more antique or vintage look, opt for wax-based or natural finishes that deepen the wood’s color. Test the sealant on a scrap piece first to ensure it doesn’t alter the appearance or texture. Reapply periodically to maintain protection, especially after cleaning or heavy use. The key is choosing a product that enhances durability without gloss or shine.
Prepare the surface by sanding it smooth and removing dust. Apply the sealant with a brush or cloth, working in thin, even coats. Allow each coat to dry completely before applying the next, usually 2-4 hours depending on the product. Lightly buff or sand between coats for a smoother finish. Finish with a final coat for maximum protection. Regular maintenance involves gentle cleaning and re-sealing as needed.
Add subtle hints of color or tone by blending sealants with tinting agents if desired. Use a brush or sponge to create textured or layered effects for a more aged look. Incorporate decorative edges or carved details that can be highlighted with a contrasting finish. The goal is a protected surface that still looks rustic and authentic, with a soft matte touch.
A quality matte sealant preserves your rustic island’s character and longevity, making it a wise investment. It’s the finishing touch that keeps your piece looking beautiful without gloss or shine. Plus, maintaining the finish is simple—just gentle cleaning and occasional reapplication. Ready to protect your beautiful, weathered surface? Your island will stay charming and functional for years to come.
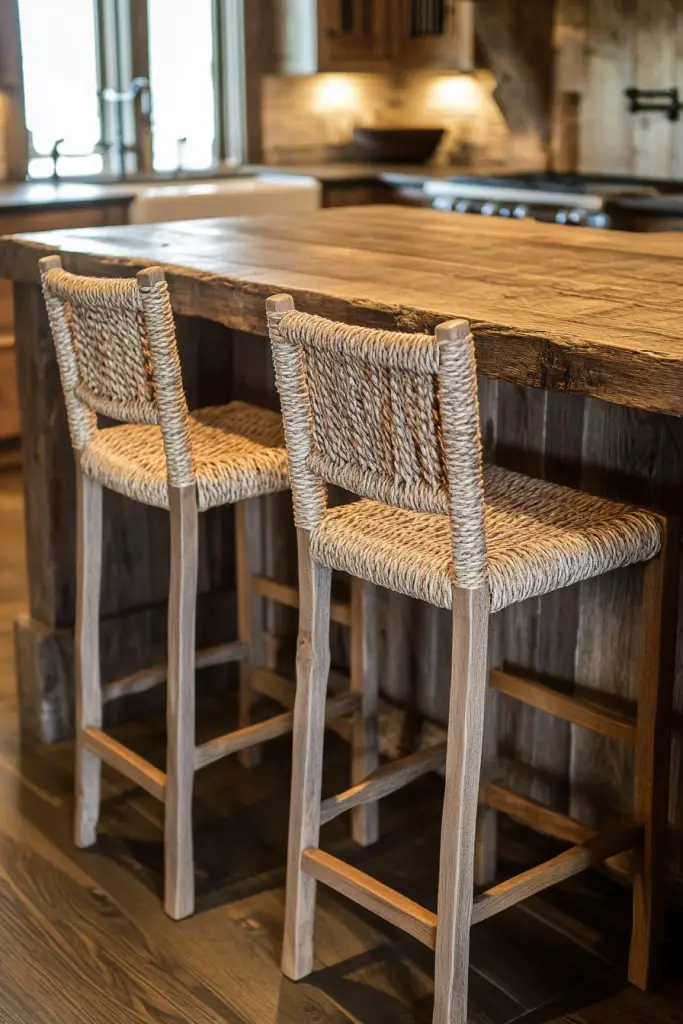
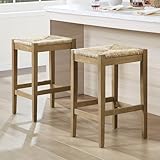
19. Pair with Cozy, Woven Barstools for Comfortable Seating and Complete the Look
Looking to make your rustic island a welcoming gathering spot? Cozy, woven barstools add comfort and style, inviting family and friends to linger. The challenge is selecting seating that complements rustic decor without feeling bulky or out of place. If you love the idea of casual, comfortable seating with a natural touch, woven stools are the perfect finishing detail. They complete the look and elevate the vibe.
Recommended Products to replicate this idea
| # | Preview | Product | |
|---|---|---|---|
| 1 |

|
DUHOME Rattan Bar Stools Set of 4, 24'' Bohemian Counter Height Stool with Woven Seagrass Seat and... | Buy on Amazon |
| # | Preview | Product | |
|---|---|---|---|
| 1 |
|
DUHOME 26-Inch Backless Seagrass Counter Stools Set of 2,Handwoven with Natural Fibers&Solid Natural... | Buy on Amazon |
Imagine a set of hand-woven rattan or seagrass stools with soft cushions, tucked neatly under your island’s overhang. Their textured surfaces contrast beautifully with distressed or whitewashed wood. The natural fibers add warmth and tactile interest, making the space feel cozy and inviting. When guests sit down, the combination of rustic charm and comfort creates a relaxed, convivial atmosphere. It’s like sitting in a seaside cottage or mountain retreat.
Choose stools with different heights or woven patterns to add visual variety. For a more refined look, opt for darker finishes or leather accents. Incorporate cushions in neutral tones or seasonal fabrics to change the mood easily. For smaller spaces, stackable or backless stools provide flexibility. Larger islands can accommodate multiple seating options for a lively, communal feel.
Select sturdy, weather-resistant woven stools that can handle daily use. Add cushions or pillows for extra comfort and easy cleaning—use removable covers for practicality. Arrange the seating around your island, ensuring enough space for movement and comfort. Consider anchoring the stools with a simple frame or support if needed for stability. Regularly check for wear and reupholster or replace cushions as necessary.
Personalize with embroidered or painted accents on cushions, or add small decorative elements like tassels or braided trims. Mix and match different woven styles for a boho or eclectic look. Incorporate personal touches like vintage fabrics or locally made textiles. These details make your seating both functional and a reflection of your style.
Woven barstools bring a warm, tactile element that invites lingering and conversation. They’re comfortable, stylish, and adaptable to various decor themes. Plus, they add a relaxed, inviting vibe that makes your space perfect for everyday life or entertaining. Ready to complete your rustic look with cozy seating? Your space will be both functional and irresistibly welcoming.
Conclusion
From sleek modern takes to charming vintage-inspired designs, these butcher block island ideas showcase the endless possibilities for adding rustic functionality to your home. Don’t hesitate to try out these creative concepts and make them your own — the perfect kitchen oasis is within reach. Embrace the warmth and practicality of a butcher block island and let your space tell a story of style and comfort!
Last update on 2026-02-28 / Affiliate links / Images from Amazon Product Advertising API