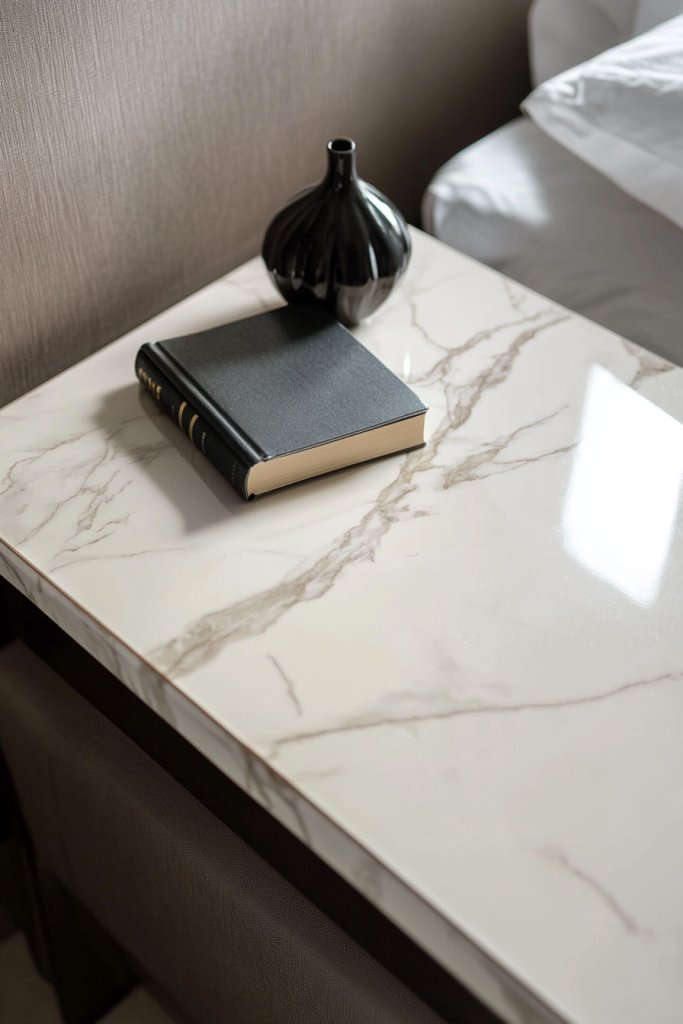
Ever looked at your bedside table and wished for a fresh, stylish update without breaking the bank? Cheap bedside table makeovers are gaining popularity because they offer a fun and affordable way to personalize your space and reflect your unique style.
In this article, you’ll find a variety of creative ideas to transform ordinary bedside tables into eye-catching pieces. From paint tricks to creative repurposing, these ideas will inspire you to get crafty and give your bedroom a fresh new look—all on a budget!
1. Repainted Vintage Dresser Turned Chic Nightstand
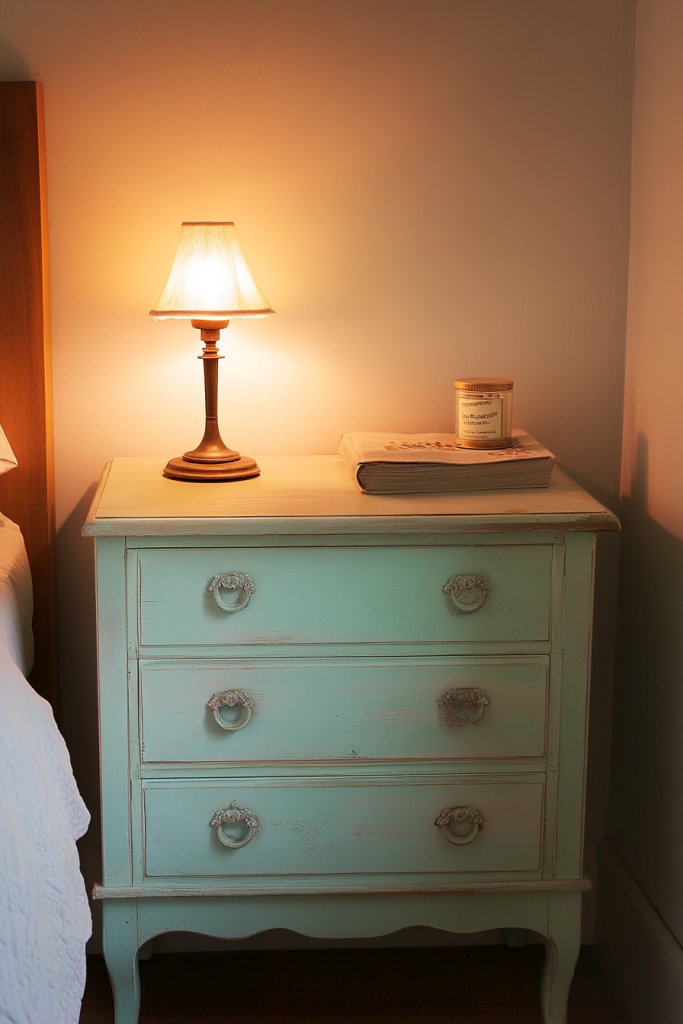
Ever feel like your bedside table is just a boring, forgotten piece that adds no personality to your space? Or maybe you’re tired of the same old furniture that doesn’t reflect your style? A vintage dresser can be transformed into a stunning nightstand that instantly upgrades your bedroom’s vibe. It’s a budget-friendly way to bring character and charm without buying new furniture. Plus, who doesn’t love a good before-and-after?
Recommended Products to replicate this idea
| # | Preview | Product | |
|---|---|---|---|
| 1 |
|
Magicfly 15 Pcs Chalk Furniture Paint Set, 9 Colors Ultra Matte Finish Acrylic Craft Paint Set (60... | Buy on Amazon |
| # | Preview | Product | |
|---|---|---|---|
| 1 |

|
Furnulem Retro Night Stand with 3 Drawers and 2-Tier Shelf, Small Nightstand Side Table, Vintage... | Buy on Amazon |
Imagine a chunky, vintage dresser painted in a bold, trendy color like deep teal or soft blush. The distressed finish adds a touch of shabby chic, while new hardware or knobs give it a modern twist. The surface is sleek but shows subtle signs of wear that tell a story. It stands proudly next to a cozy bed, with a plush throw blanket draped over the side, ready to hold your essentials. The contrast of old meets new makes it a statement piece.
You can customize the color to match your decor, from muted pastels to vibrant hues. For smaller rooms, opt for a slimmer, more streamlined vintage piece, or go for a larger, more ornate dresser for a dramatic focal point. Seasonal touches, like a cozy fabric runner or metallic hardware, can refresh the look. If you prefer a minimalist style, keep the paint neutral and add sleek new knobs. This idea adapts easily to different styles, from rustic to modern.
Start by selecting a vintage dresser with good bones—solid wood and sturdy drawers. Sand down rough patches and clean thoroughly before painting. Use high-quality, durable paint designed for furniture, applying multiple thin coats for a smooth finish. Replace or update the hardware for a fresh look. Seal with a clear topcoat to protect your work from everyday wear and tear. This project takes a few hours but makes a huge impact. No fancy tools needed—just patience and creativity.
Add personalized touches like stenciled patterns or a pop of metallic paint on the edges. You can also attach decorative knobs or vintage-inspired drawer pulls for extra charm. For a more functional twist, install small baskets or trays on top for organization. A soft, patterned fabric underneath the tabletop can add a layer of texture. This way, your nightstand becomes uniquely yours, reflecting your personality.
Transforming an old dresser into a chic nightstand proves that you don’t need to spend a fortune to upgrade your space. It’s a rewarding project that boosts your confidence and personal style. Plus, every time you see it, you’ll be reminded that creativity and a little effort can work wonders. Ready to give your bedroom a fresh, stylish new look? Let that vintage piece tell its story in a whole new way.
2. Upcycled Crate as a Stylish Bedside Cubby
Tired of cluttered, cluttered nightstands that don’t hold enough? Or maybe you want a rustic, budget-friendly way to add storage without sacrificing style? Wooden crates are an easy, affordable solution that can be repurposed into charming bedside storage. They’re versatile, portable, and instantly add a layer of texture to your decor. Plus, no one will guess how simple it was to create.
Recommended Products to replicate this idea
| # | Preview | Product | |
|---|---|---|---|
| 1 |

|
LYDWOO8D Nested Wooden Storage Crates Set of 3 (L,M,S),Farmhouse Decorative Boxes with Handles for... | Buy on Amazon |
| # | Preview | Product | |
|---|---|---|---|
| 1 |

|
HOOBRO Dog Crate Furniture, Wooden Dog House, Decorative Dog Kennel with Drawer, Indoor Pet Crate... | Buy on Amazon |
Picture a set of sturdy wooden crates stacked or arranged side by side next to your bed. The natural wood finish has a raw, rustic charm, enhanced with a light stain or paint for a personalized touch. Inside, you can store books, chargers, or cozy throws. The open design invites you to see everything at a glance, while the sturdy top doubles as a surface for a lamp or a small plant. It’s a perfect blend of function and style.
You can leave the crates in their natural state for a rustic look, or paint them in bold colors to match your decor. For a more refined style, add decorative paper or fabric liners inside. To adapt to small spaces, stack crates vertically to save floor space or line them up along a wall. Seasonal accents like fairy lights or fabric covers can transform the look for different times of the year. The possibilities are endless.
Start with sturdy wooden crates, preferably with smooth edges and solid construction. Sand rough spots and clean thoroughly. Decide whether you want to stain, paint, or leave them natural. For a pop of color, use chalk paint or spray paint, applying multiple thin coats. Secure the crates together if stacking, using brackets or screws for safety. Top with a sturdy, flat surface—either the crate lid or a piece of reclaimed wood—to create a stable tabletop. Fill with your essentials and enjoy your DIY storage solution.
Add decorative touches like stenciled patterns or personalized labels to each crate. Use fabric or paper liners inside to hide clutter and add a splash of color. For a more curated look, incorporate small baskets or decorative boxes on top. Attach hooks or small hanging organizers underneath for added storage. The key is making it functional yet reflective of your personal style.
Upcycled crates show how creative solutions can turn everyday items into stylish furniture. They’re perfect for renters or anyone looking to add character without breaking the bank. Every crate-stacked setup becomes a conversation starter and a reflection of your ingenuity. Ready to craft your own rustic bedside cubby? Get stacking and enjoy the charm of upcycled design!
3. DIY Decoupage with Patterned Tissue Paper
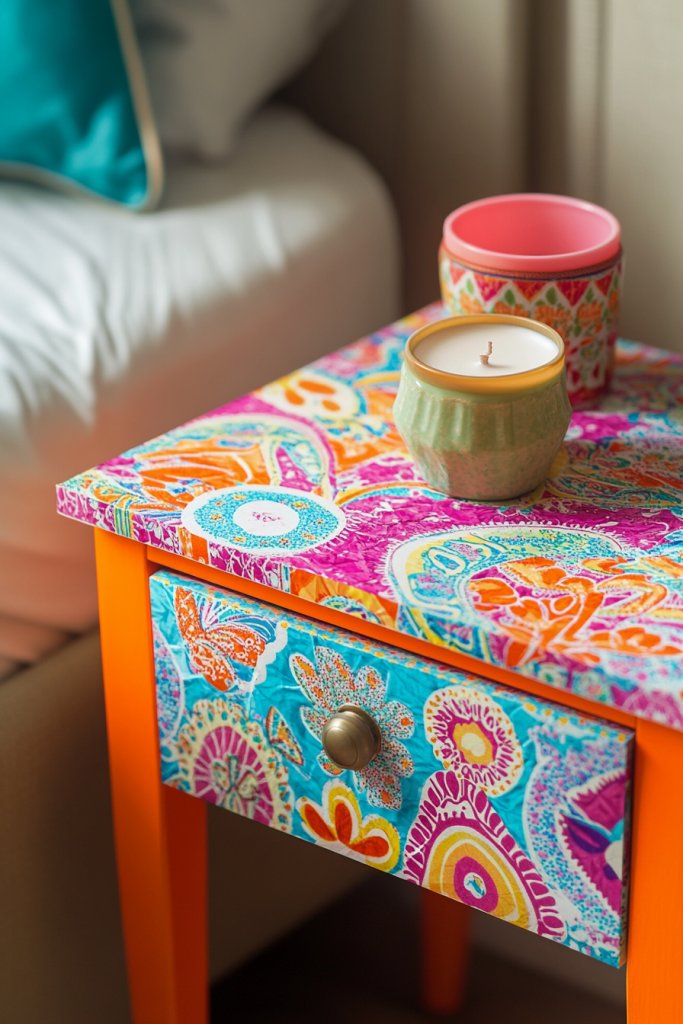
Ever feel like your furniture is missing personality or a splash of color? Or maybe you want to add a custom touch without the cost of new decor? Decoupage is an affordable, creative way to breathe new life into an old table or nightstand. With just tissue paper and a few supplies, you can craft a one-of-a-kind piece that’s full of personality. It’s a fun project for anyone who loves DIY.
Recommended Products to replicate this idea
| # | Preview | Product | |
|---|---|---|---|
| 1 |

|
Vintage Tan Almond Flower Pattern Tissue Paper 30 Sheets 20 x 14 In, Decorative Floral Gift Wrapping... | Buy on Amazon |
| # | Preview | Product | |
|---|---|---|---|
| 1 |

|
Mod Podge Gloss Sealer, Glue & Finish: All-in-One Craft Solution- Quick Dry, Easy Clean, for Wood,... | Buy on Amazon |
Imagine a plain wooden nightstand transformed with vibrant, patterned tissue paper. The paper features bold florals, geometric shapes, or abstract designs, layered carefully over the surface. The edges are sealed with a glossy finish, adding a subtle sheen that makes the colors pop. The texture is smooth to the touch, yet visually dynamic. It sits next to your bed, radiating personality and charm, like a little piece of art.
Choose tissue papers that reflect your personal style—bright and playful or muted and sophisticated. You can decoupage entire surfaces or create specific patterns or borders. For seasonal updates, swap out tissue papers for festive or themed designs. This technique works well on small furniture pieces, drawer fronts, or even on the sides of larger pieces. It’s perfect for adding a pop of color in any room.
Start by cleaning and lightly sanding the furniture surface. Cut tissue paper into your desired shapes and patterns. Use a decoupage medium or Mod Podge, applying a thin layer to the surface. Place the tissue paper carefully, smoothing out bubbles with a sponge or brush. Overlap pieces for layered effects. Once covered, seal with multiple coats of a clear gloss or matte finish, allowing each layer to dry thoroughly. This process takes patience but yields stunning results.
Add metallic accents or glitter to certain areas for extra flair. Use stencils or stamps to add borders or details. Incorporate custom labels or monograms with paint or stickers for a personalized touch. Finish with a protective topcoat to keep your design looking fresh. This is your chance to turn a simple piece into a reflection of your personality.
Decoupage is a playful, budget-friendly way to customize your furniture. It encourages creativity and experimentation, so don’t be afraid to try bold colors or patterns. Your DIY project can become a treasured piece that sparks conversations. Ready to turn plain into extraordinary? Grab your tissue paper and start creating your own masterpiece!
4. Spray-Painted Metal Side Table with Bright Colors
Is your metal side table looking dull and uninspired? Or maybe you want a quick way to inject some personality into your space without splurging? Spray paint is your best friend for transforming tired furniture into a vibrant statement piece. It’s quick, affordable, and surprisingly easy to do, even for newbies. Why settle for boring when you can have bold?
Recommended Products to replicate this idea
| # | Preview | Product | |
|---|---|---|---|
| 1 |
|
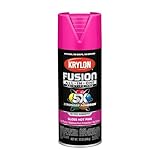
Krylon Fusion All-In-One Adhesive Spray Paint for Indoor/Outdoor Use, 12 oz, Hot Pink | Buy on Amazon |
| # | Preview | Product | |
|---|---|---|---|
| 1 |

|
EKNITEY 2 Tier End Table - Metal Side Table Waterproof Small Sofa Coffee Side Tables Bedroom Indoor... | Buy on Amazon |
Picture a sleek metal table painted in a vivid coral or electric blue. The glossy finish makes it catch the light, adding a pop of color to your room. The smooth surface is free of rust or chips, thanks to a fresh coat of spray paint. It sits confidently beside your bed, with a soft throw or a stack of books on top, ready to serve as both a functional and decorative element. The contrast between shiny metal and colorful paint adds modern flair.
Choose bright colors that complement your existing decor—think bold reds, sunny yellows, or pastel shades for a softer look. For an eclectic vibe, mix and match different painted pieces. Seasonal color updates are easy—just spray a new hue for summer or winter themes. If you prefer a more subtle approach, opt for metallic or matte finishes. The paint can be applied to various metal furniture, from stools to larger tables, making it a versatile solution.
Start by cleaning the metal thoroughly to remove dirt, grease, and rust. Lightly sand or use a primer designed for metal surfaces for better adhesion. Shake your spray paint well, and apply in thin, even coats, holding the can about 12 inches from the surface. Multiple coats may be necessary for vibrancy. Allow each layer to dry completely before applying the next. Finish with a clear topcoat for durability, especially if the table will be exposed to moisture or frequent use. Safety tip: spray in a well-ventilated area or outdoors.
Add stenciled patterns or metallic accents to make the piece even more unique. Consider taping off sections for a geometric design or applying a matte topcoat for a softer look. Attach decorative grips or knobs if the table has drawers, giving it a custom feel. You can also pair it with coordinating painted furniture pieces for a cohesive look. This simple update turns a tired metal table into a lively focal point.
A brightly spray-painted metal table proves that a little paint goes a long way. It’s a fantastic way to refresh your space without breaking the bank. Plus, it’s a fun project that boosts your DIY confidence. Don’t be afraid to experiment with colors and finishes—your home will thank you for the splash of personality. Brighten up your decor and enjoy the bold new vibe!
5. Chalk Paint Finish for a Shabby Chic Look
Feeling like your furniture lacks charm or personality? Or maybe you want that perfect vintage vibe without hunting for expensive antique pieces? Chalk paint is the secret weapon for creating a beautifully distressed, shabby chic look. It’s perfect for transforming plain or worn furniture into something with character and history. Plus, it’s super forgiving for beginners.
Recommended Products to replicate this idea
| # | Preview | Product | |
|---|---|---|---|
| 1 |
|
Magicfly 15 Pcs Chalk Furniture Paint Set, 9 Colors Ultra Matte Finish Acrylic Craft Paint Set (60... | Buy on Amazon |
| # | Preview | Product | |
|---|---|---|---|
| 1 |
|
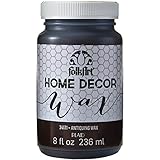
FolkArt Home Decor Chalk Furniture & Craft Acrylic Paint in Assorted Colors, 8 ounce, Antique Wax | Buy on Amazon |
Visualize a little bedside table with a soft, matte finish in a muted pastel or off-white shade. The paint’s chalky texture gives it an aged appearance, with subtle cracks and chips that add authenticity. You might distress the edges with sandpaper to reveal glimpses of the wood underneath. The overall effect is cozy, inviting, and full of nostalgic charm. It pairs well with vintage textiles and soft lighting.
Choose colors that match your decor, from creamy whites to dusty blues or pale grays. You can distress the paint in specific areas for a more rustic look or keep it smooth for a cleaner aesthetic. This technique works on different furniture types, from nightstands to dressers or even small shelves. Seasonal updates can be achieved by changing the paint color or adding decorative decals. It’s a versatile style that suits various tastes.
Start by lightly sanding the furniture to remove any glossy finish. Apply a coat of chalk paint with a brush or roller, working in smooth, even strokes. Let it dry completely—this usually takes about 30 minutes to an hour. For a distressed look, gently sand the edges or areas you want to highlight, revealing the underlying wood or previous paint layers. Seal the surface with a clear wax or matte topcoat for durability. Distressing and sealing are key steps for that authentic shabby chic appearance.
Use contrasting colors for a layered, textured effect or add decorative stencils for extra detail. Incorporate vintage-inspired hardware or new knobs painted in metallic shades. You can also apply a light glaze over the paint to enhance the aged look. Personal touches like fabric liners or decorative trims can make the piece even more unique. The goal is to create a piece that looks both timeless and personalized.
Chalk painting is a cost-effective way to add charm and personality to any furniture piece. It encourages creativity and patience, rewarding you with a vintage-inspired masterpiece. Your space will feel more inviting, and your DIY skills will grow with each project. Ready to embrace the shabby chic trend? Grab your chalk paint and start transforming your furniture today!
6. Wallpapered Surface for a Patterned Accent

Is your plain bedside table crying out for a splash of personality? Or maybe you want to introduce a bold pattern without committing to wallpapering an entire wall? Wallpapered surfaces are a quick, inexpensive way to add visual interest and style. It’s perfect for those who love patterns but don’t want a permanent change. Plus, it’s an easy refresh for any furniture piece.
Recommended Products to replicate this idea
| # | Preview | Product | |
|---|---|---|---|
| 1 |
|
Art3d Smoothing Tool Kit for Applying Peel and Stick Wallpaper, Vinyl Backsplash Tile | Buy on Amazon |
| # | Preview | Product | |
|---|---|---|---|
| 1 |

|
Frisco Craft Transparent Self Adhesive Laminating Roll - Self Laminating Sheets for Decals, Sticker,... | Buy on Amazon |
Picture a simple table with its top covered in peel-and-stick wallpaper featuring a vibrant floral or geometric design. The pattern adds depth and character, transforming a plain surface into a focal point. The edges are trimmed neatly, and the surface is sealed with a clear, matte topcoat to prevent peeling. It’s a lively, modern twist on traditional furniture, bringing personality to your space with minimal effort.
Choose wallpapers that complement your color scheme—think bold and bright or subtle and muted. You can cover the entire surface or create a framed border for a more refined look. Seasonal or thematic patterns can be swapped out easily, keeping your decor fresh. For small surfaces, try a single accent panel or border. It’s a flexible idea that can be tailored to any style.
Start with a clean, smooth surface—lightly sand and wipe away dust. Measure and cut your wallpaper to fit, leaving a slight margin for trimming. Use a wallpaper adhesive or peel-and-stick backing for easy application. Smooth out air bubbles with a squeegee or credit card, working from the center outward. Trim excess with a craft knife or scissors. Seal the edges with a clear topcoat for durability. This project takes under an hour and makes a big impact.
Layer additional details like metallic accents or painted borders for a custom look. Use stencils or decals to add further personalization. Incorporate decorative drawer pulls or knobs that match your wallpaper’s theme. You can also add a fabric or ribbon trim around the edges for extra flair. Personalizing the surface makes it uniquely yours while keeping the look fresh and fun.
Wallpapering furniture is a fantastic way to experiment with patterns and textures without a long-term commitment. It’s budget-friendly and easily reversible, making it perfect for renters or those who like change. Your creative space will feel more vibrant and personalized, boosting your confidence in DIY projects. Ready to turn simple surfaces into patterned works of art? Dive in and start wallpapering!
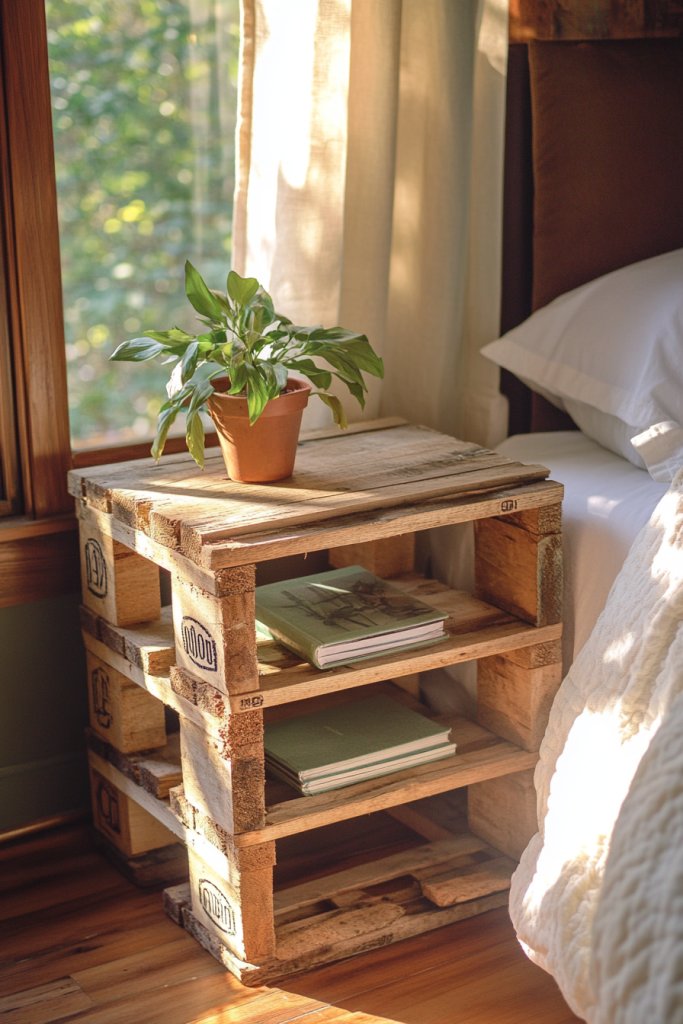
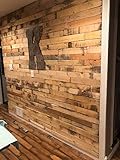
7. Reclaimed Wood Pallet Nightstand
Looking for a rustic, eco-friendly way to upgrade your bedroom? Or maybe you’re tired of the mass-produced look and crave something with character? Reclaimed wood pallets are a treasure trove of DIY potential. They’re inexpensive, sustainable, and perfect for creating a unique nightstand that tells a story. Plus, it’s a satisfying project that adds warmth to any space.
Recommended Products to replicate this idea
| # | Preview | Product | |
|---|---|---|---|
| 1 |
|
Pallet Board Co. - 20 Sq. Ft. Bundle of Reclaimed Pallet Boards - Nail Up Application - Rustic... | Buy on Amazon |
| # | Preview | Product | |
|---|---|---|---|
| 1 |

|
SMARTSTANDARD 16" Hairpin Furniture Legs, Metal Home DIY Projects for Nightstand, Coffee Table,... | Buy on Amazon |
Visualize a simple pallet with its slats sanded smooth and stained in a warm honey or dark walnut tone. The natural imperfections and weathered look lend authenticity and charm. It’s topped with a reclaimed wood board for a flat surface, perfect for holding a lamp, books, or a glass of water. The open slats underneath provide space for storage or decorative baskets. The overall effect is cozy, inviting, and full of rustic appeal.
You can customize the finish—go for a distressed look, a sleek stain, or even paint for a different vibe. Stack multiple pallets for extra height or add casters for mobility. For a more polished look, seal the wood with a protective finish or wax. Seasonal accessories like cozy throws or decorative baskets can change the look throughout the year. It’s a versatile project that suits various decor styles, from farmhouse to industrial.
Begin by sourcing reclaimed pallets—look for sturdy, clean wood without rot or pests. Disassemble if necessary, then sand down rough edges and surfaces. Stain or paint your wood, applying multiple thin coats. Attach the top board securely with screws or brackets, ensuring stability. You can add small casters or furniture glides for easier movement. Finish with a protective sealant for longevity. Outfit your new pallet nightstand with your essentials, and enjoy the rustic charm.
Add decorative hardware or painted accents for a customized look. Incorporate small hooks or baskets underneath for extra storage. Personalize with a fabric or leather cushion on top for a softer touch. Using contrasting stains or colors can create visual interest. The raw, reclaimed look pairs well with modern accents or vintage finds, making your space truly one of a kind.
A reclaimed wood pallet nightstand shows how sustainability and creativity can go hand-in-hand. It’s a statement piece that’s both functional and eco-conscious. Once finished, you’ll feel proud of your craftsmanship and environmental impact. Plus, it’s a great way to add warmth and texture to your bedroom. Ready to build something with history and heart? Grab your pallets and start crafting!
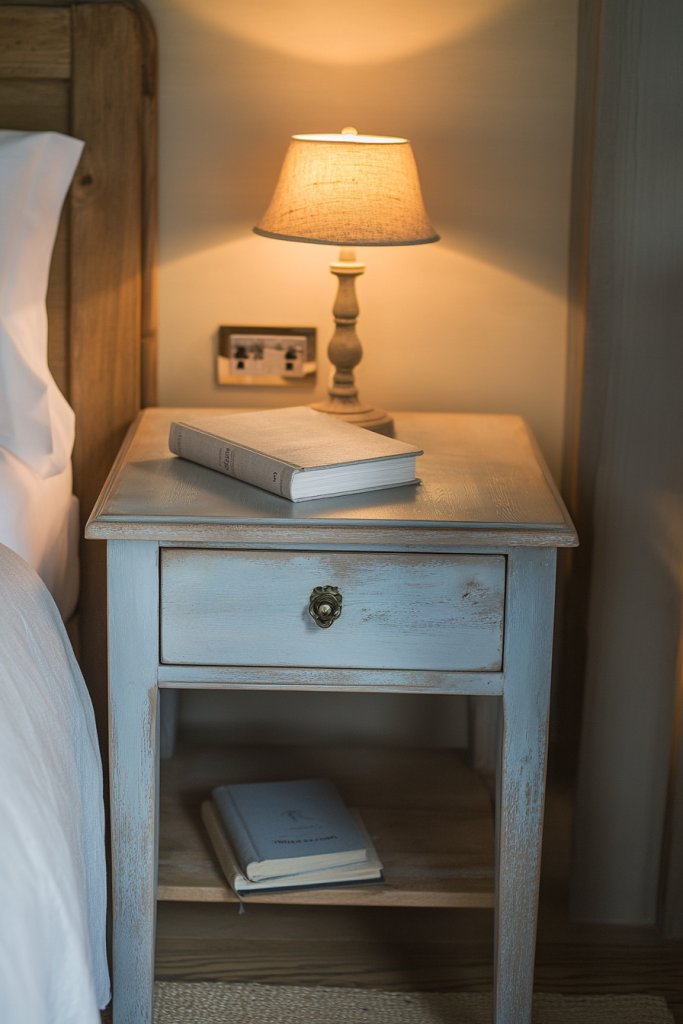
8. Fabric-Covered Top for Soft Textural Appeal
Do you find your bedside table too hard or cold-looking? Or maybe you want a cozy, inviting touch that adds softness to your room? Covering the top with fabric is a simple yet effective way to introduce warmth and texture. It’s budget-friendly, customizable, and adds a layer of comfort that’s perfect for resting your hands or placing a glass. Who says furniture can’t feel soft?
Recommended Products to replicate this idea
| # | Preview | Product | |
|---|---|---|---|
| 1 |
|
Linen Fabric Repair Tape 4.7x63 Inch, Self Adhesive Couch Patch Repair Fabric Tape for Furniture,... | Buy on Amazon |
| # | Preview | Product | |
|---|---|---|---|
| 1 |

|
Dahlia Star Centerpiece Pattern-36”, Table Runner Pattern, Table Topper Pattern(Pattern only) | Buy on Amazon |
Imagine a sleek wooden or MDF surface wrapped in a plush, textured fabric like velvet, faux fur, or chunky knit. The fabric is neatly tucked and stapled underneath for a clean finish, with decorative trim or piping added for a polished look. The surface invites touch, offering a tactile experience that contrasts beautifully with the rest of your furniture. It pairs well with soft bedding and layered textiles, creating a cozy corner.
Choose fabrics that match your decor—think neutral linen for a minimalist look or bold patterns for a playful vibe. You can also layer textiles, like adding a soft throw over the top for extra comfort. For seasonal updates, switch out the fabric for different textures or colors. This idea works on existing tables or makes a perfect top addition for DIY projects. It’s a simple way to add personality and comfort.
Start with a clean, smooth surface. Cut your fabric slightly larger than the top, leaving extra to wrap underneath. Use a strong adhesive spray or a staple gun to attach the fabric securely, smoothing out wrinkles as you go. For a more refined look, add decorative trim or piping around the edges. Make sure the fabric is taut and secured on all sides. This quick project can be completed in under an hour and instantly upgrades your furniture.
Add embroidery, patches, or painted motifs to make it even more personalized. Use contrasting piping or a decorative border to frame the fabric. For a layered look, place a small cushion or decorative pillow on top. Incorporate fabrics with different textures—like boucle or velvet—to create visual interest. Your fabric-covered top becomes a cozy, tactile feature that complements your room’s style.
A fabric-covered surface demonstrates how simple touches can make a big difference. It’s a quick and inexpensive way to add softness and personality to your space. Plus, it’s a project anyone can do, even with limited DIY experience. Enjoy the cozy, inviting feel it brings and feel proud of your creative upgrade. Ready to wrap your furniture in comfort? Let’s get sewing!
9. Stenciled Geometric Designs for a Modern Touch
Does your furniture lack a wow factor? Or perhaps you want a quick way to add a modern, artistic touch without a complete overhaul? Stenciling geometric patterns is an easy, budget-friendly way to elevate your bedside table’s style. It’s perfect for adding visual interest and a contemporary vibe. Plus, it’s surprisingly straightforward—no artist skills required.
Recommended Products to replicate this idea
| # | Preview | Product | |
|---|---|---|---|
| 1 |

|
12 Pieces Geometric Stencils Template Set for Kids Children Simple Drawing Stencils Colorful Art... | Buy on Amazon |
| # | Preview | Product | |
|---|---|---|---|
| 1 |
|
Magicfly 15 Pcs Chalk Furniture Paint Set, 9 Colors Ultra Matte Finish Acrylic Craft Paint Set (60... | Buy on Amazon |
Envision a sleek table with bold, black geometric shapes or intricate patterns painted on the surface. The crisp lines contrast against a neutral background, creating a striking visual effect. You might choose triangles, chevrons, or hexagons, depending on your style. The pattern is clean and sharp, giving the piece a fresh, modern look. It pairs well with minimalist decor and metallic accents, making your furniture stand out.
Select stencil designs that suit your taste—simple lines for subtle sophistication or complex patterns for a statement piece. Use contrasting colors for a bold effect or keep it monochrome for a more understated look. You can stencil only a section or cover the entire surface for maximum impact. Seasonal color schemes can be easily incorporated by changing your paint choices. This technique adapts to small or large furniture pieces alike.
Start with a clean, smooth surface—light sanding may be necessary. Secure your stencil with painter’s tape and use a stiff brush or sponge to apply paint in a dabbing motion. Keep your strokes light to avoid bleeding under the stencil. Remove the stencil carefully while the paint is still wet to prevent smudging. Repeat for each section or pattern element. Finish with a clear sealer for protection. This method takes about an hour and yields a professional-looking design.
Add metallic or neon accents to certain shapes for extra pop. Experiment with layered stenciling or combining different patterns for a custom look. Use painter’s tape to create borders or framing around your design. Incorporate small painted details or dots for added texture. Your geometric masterpiece will instantly refresh your space and showcase your modern aesthetic.
Stenciling geometric designs is a fun way to add trendy flair without a hefty price tag. It shows that you can create artful furniture with just a little patience and some supplies. Your space will feel more curated and intentional, boosting your confidence in DIY decor. Ready to get geometric? Grab your stencil kit and start transforming your furniture today!
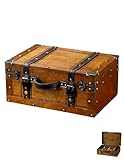
10. Repurposed Suitcase as a Unique Bedside Table
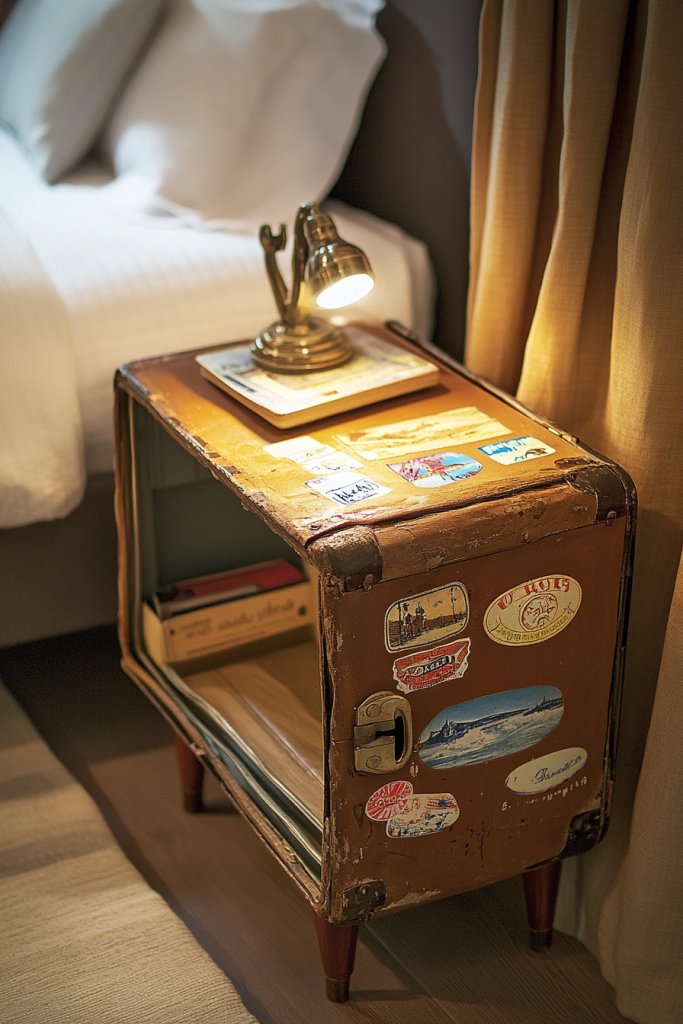
Looking for a quirky, vintage-inspired nightstand that’s both functional and full of character? Or maybe you want a piece that sparks conversation and adds a touch of nostalgia? Repurposing an old suitcase is an affordable, creative way to achieve this. It’s a fun project that combines style with practicality, perfect for adding personality to your bedroom.
Recommended Products to replicate this idea
| # | Preview | Product | |
|---|---|---|---|
| 1 |

|
DECOR4SEASON Wooden Vintage Suitcases Set - 2 Sizes, Antique Decorative Storage Chests with Lids,... | Buy on Amazon |
| # | Preview | Product | |
|---|---|---|---|
| 1 |
|
SMARTSTANDARD 16" Hairpin Furniture Legs, Metal Home DIY Projects for Nightstand, Coffee Table,... | Buy on Amazon |
Imagine a vintage suitcase, cleaned and possibly painted in a bright color or distressed finish, sitting next to your bed. Its lid is propped open or removed to reveal storage inside, perfect for books, pajamas, or other small essentials. The suitcase is elevated on hairpin or wooden legs, giving it a modern twist. Decorated with vintage hardware or decorative straps, it exudes charm and character. The unexpected combination of retro and modern creates a unique focal point.
Choose suitcases in different sizes and styles—hard-shell, soft-sided, or vintage trunks. Paint or distress the exterior to match your decor, or leave it natural for a more authentic look. Attach legs or casters for height and mobility. Decorate with vintage stickers, decals, or hardware to personalize further. Seasonal accessories like a throw blanket or decorative pillows can soften or jazz up the look. It’s adaptable to any aesthetic, from boho to industrial.
Start with a clean, sturdy suitcase—repair any broken hinges or straps. Sand lightly if you plan to paint or distress. Attach legs or casters to the bottom, securing with screws. For a sleeker look, paint the exterior with chalk or spray paint, choosing colors that complement your room. Inside, organize with baskets or fabric-lined compartments. Add a cushion on top for extra coziness or a decorative tray for essentials. This project is quick and highly customizable.
Decorate the exterior with vintage stickers, fabric, or paint patterns. Add a custom label or monogram for a personalized touch. Use inside compartments to organize small items or add a fabric liner for softness. Attach decorative hardware or a painted stripe for visual interest. You can also layer with other vintage or modern accents for a curated look. The suitcase’s history adds warmth and storytelling to your decor.
Turning a suitcase into a nightstand proves that you don’t need to buy new furniture to be stylish. It’s a project full of personality and history, perfect for showcasing your creativity. Plus, it’s a practical storage solution with a nostalgic twist. This piece becomes a centerpiece that reflects your individual style and resourcefulness. Ready to give your bedroom a vintage upgrade? Grab an old suitcase and start transforming!
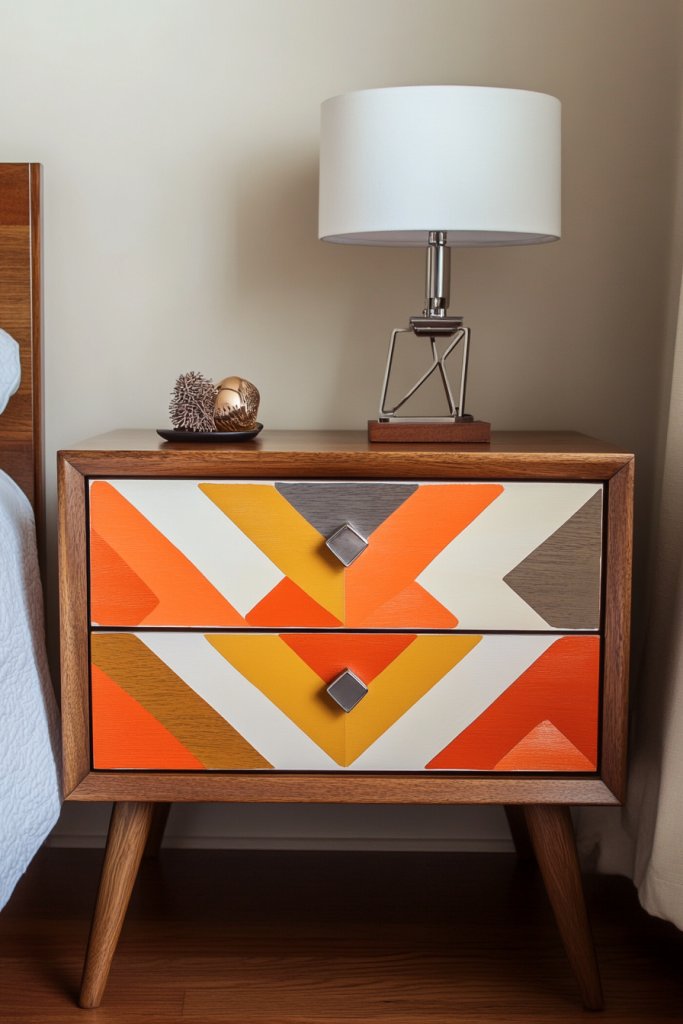
11. Painted and Stenciled Drawer Fronts for Visual Interest
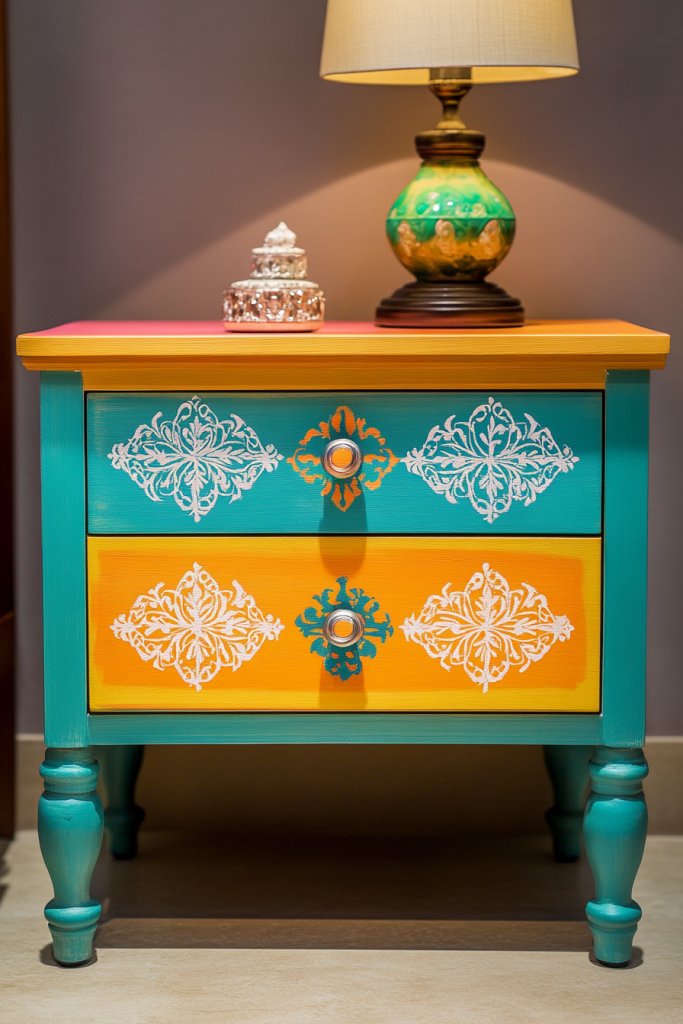
Bored with plain, boring furniture that doesn’t catch the eye? Or maybe you want to add a splash of color and pattern without replacing entire pieces? Painting and stenciling drawer fronts is a simple, cost-effective way to bring new life and personality to your furniture. It’s a DIY trick that can turn a tired piece into a showstopper.
Recommended Products to replicate this idea
| # | Preview | Product | |
|---|---|---|---|
| 1 |
|
6-Piece Wildflower Stencil for Painting - Large Reusable Floral Design for DIY Furniture Decor |... | Buy on Amazon |
| # | Preview | Product | |
|---|---|---|---|
| 1 |

|
Rust-Oleum Linen White Chalked All-in-One Ultra Matte Paint | One Coat Coverage | No Primer,... | Buy on Amazon |
Picture a dresser or nightstand with its drawer fronts transformed into a canvas. Bright, contrasting colors or intricate stencils create a layered, textured effect. The patterns may include florals, chevrons, or geometric shapes—whatever suits your style. The result is a dynamic piece that draws attention and adds visual depth. Paired with minimalist hardware, it becomes a modern or vintage statement depending on your design choices.
Choose color schemes that match or contrast with your decor—think bold jewel tones or soft pastels. Use stencils to create repeating patterns or focal points. For a more subtle look, paint only the edges or corners, leaving the center plain. Seasonal themes or custom motifs can be incorporated for variety. This technique works on a variety of furniture, from small nightstands to large dressers.
Begin by thoroughly cleaning and lightly sanding the drawer fronts. Use painter’s tape to mask off areas you want to keep unpainted. Apply a primer if necessary, then paint your base color in thin, even coats. Once dry, position your stencil and use a small brush or sponge to apply contrasting paint. Carefully remove the stencil and fix any smudges. Seal the design with a clear topcoat for durability. This process takes a few hours but yields a dramatic change.
Add decorative hardware or painted accents to enhance the design. Mix and match colors for a playful or sophisticated look. Incorporate custom motifs or initials for a personal touch. Use metallic or glitter paints sparingly to highlight details. Your customized drawer fronts will instantly elevate your furniture and make your space uniquely yours.
Painting and stenciling drawer fronts is a fantastic way to showcase your creativity. It’s a small project with a big impact, proving that you can update furniture without spending a fortune. Your space will feel more curated and stylish, and your DIY skills will grow with each project. Ready to make your furniture a work of art? Grab your paints and stencils and start creating!
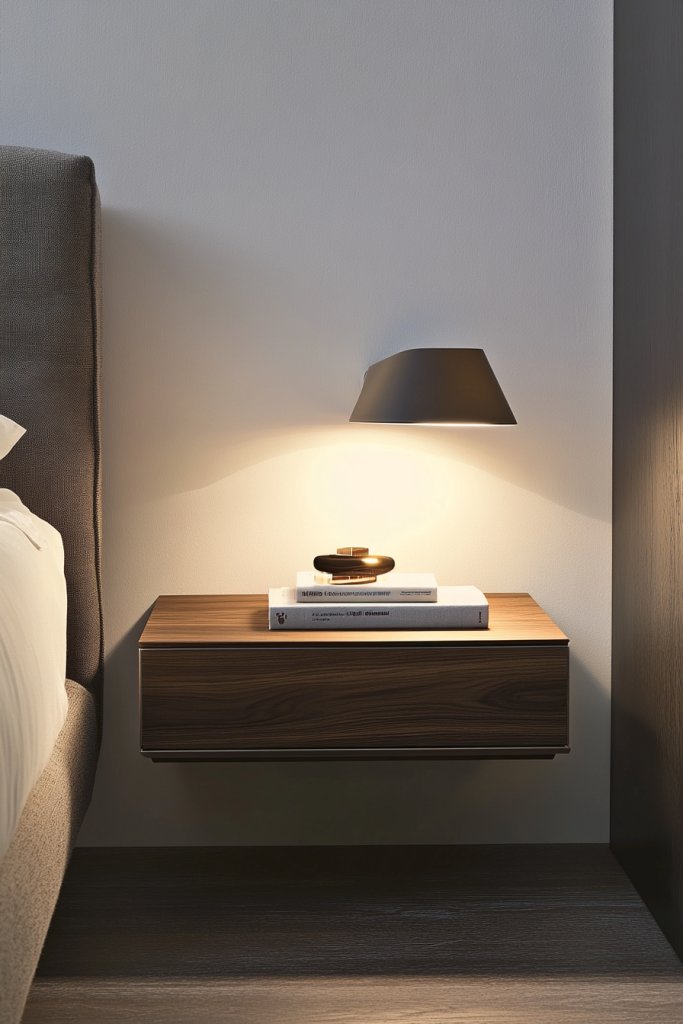
12. Minimalist Floating Nightstand Made from Recycled Materials
Want a sleek, clutter-free look in your bedroom but don’t want bulky furniture taking up space? Or maybe you’re short on square footage and need a minimalist solution? A floating nightstand is perfect for creating an airy, modern vibe while maximizing space. Plus, building one from recycled materials adds an eco-friendly touch. It’s a win-win for style and sustainability.
Recommended Products to replicate this idea
| # | Preview | Product | |
|---|---|---|---|
| 1 |

|
WDSHIYI Floating Nightstand, Wall Mounted Bedside Shelf, Handmade Bedroom Furniture,Pine Wood... | Buy on Amazon |
| # | Preview | Product | |
|---|---|---|---|
| 1 |

|
MY VINTAGE FINDS Reclaimed Wood Floating Shelves Real Solid Thick Wood Rustic Shelf Handmade | Buy on Amazon |
Picture a simple, clean-lined wooden shelf mounted directly onto the wall with hidden brackets. The floating design makes the room feel larger and more open. It holds a few essentials like a book or a small lamp, with open space underneath for a tidy look. The natural or painted finish complements modern decor, and the absence of bulky legs or hardware keeps the look light and uncluttered. It’s a minimalist’s dream.
Choose recycled wood, MDF, or even repurposed pallets for the shelf. Paint or stain the material to match your decor, from sleek black to light natural wood. Size and depth can vary based on your needs—go for a narrow ledge or a wider platform. Add a small lip or edge for safety or to keep items from falling. Seasonal decor can be swapped easily with minimal effort.
Start by sourcing reclaimed or recycled materials—look for sturdy, flat pieces. Mount the brackets securely into studs or wall anchors for safety. Cut your shelf to size, sand smooth, and finish with paint or stain. Attach the shelf to the brackets, making sure it’s level and stable. Keep the installation simple and avoid overloading. Decorate with essentials like a clock or a small plant, but keep the area uncluttered.
Add a coat of paint in your favorite color or a natural stain for a warm look. Incorporate decorative elements like a small sculpture or a textured wall panel underneath. Use different materials—metal brackets or a glass shelf—for a contemporary touch. You can even install LED strip lighting underneath for a subtle glow. Personal touches will make your floating nightstand stand out.
A floating nightstand shows that minimalism is not boring—it’s sophisticated and intentional. It’s a practical, space-saving solution that elevates your decor. Plus, it’s a project that can be completed in a few hours, boosting your DIY confidence. Ready to declutter and modernize? Start designing your sleek floating nightstand today!
13. Mosaic Tile Top for a Colorful, Textured Surface
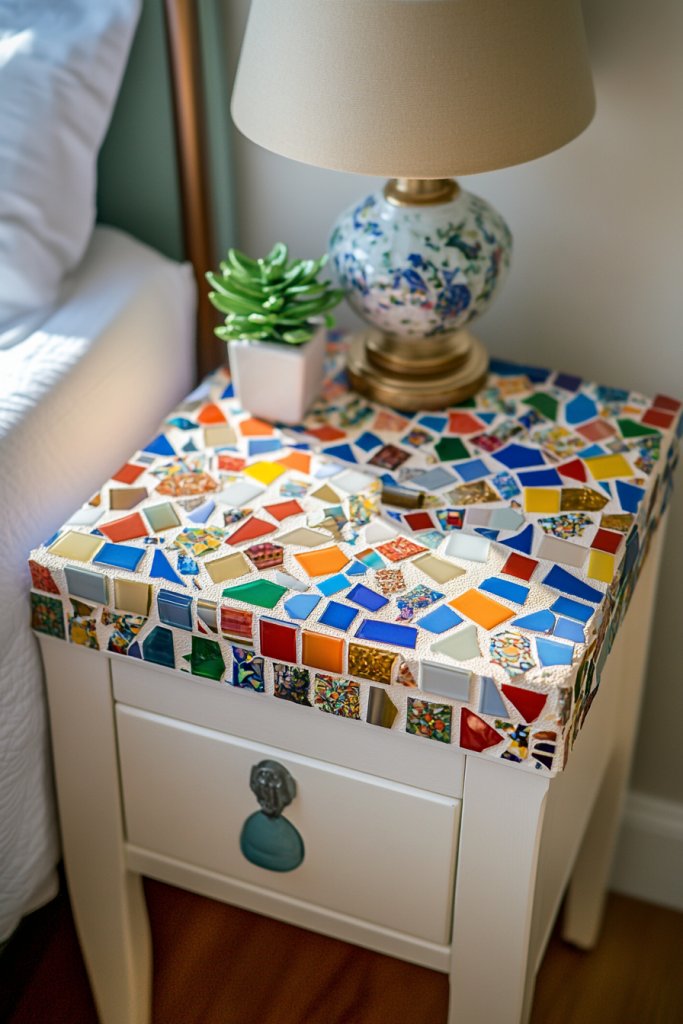
Looking to add a bold statement to your bedroom without buying new furniture? Or maybe you want a surface that’s both functional and artistic? A mosaic tile top can turn a plain nightstand into a vibrant, textured focal point. It’s a creative way to incorporate color and personality while keeping costs low. Who says furniture can’t be a piece of art?
Recommended Products to replicate this idea
| # | Preview | Product | |
|---|---|---|---|
| 1 |

|
BEACON Mosaic Glue - Non-Toxic & Water Resistant, Ideal for All Tiles & Surfaces, 2-Ounce | Buy on Amazon |
| # | Preview | Product | |
|---|---|---|---|
| 1 |

|
ZippySolve Tile Grout, Repair Kit, Restore & Renew Tile Joints Line, Fast Drying Tile Grout Paint... | Buy on Amazon |
Imagine a small table with a top covered in colorful mosaic tiles or broken china pieces. The vibrant pattern creates a textured, tactile surface that invites touch. The edges are sealed with grout or a clear resin for a smooth finish. The mosaic is a kaleidoscope of colors—blues, reds, golds—that brighten up the space. It’s a handcrafted masterpiece sitting confidently next to your bed, radiating personality.
Choose tiles that match your color palette or create a contrasting pattern for visual interest. Use glass, ceramic, or broken china for different textures and effects. The mosaic can cover the entire surface or create a border around a painted or stained center. Seasonal or thematic designs can be incorporated by changing the tile arrangement. It’s a versatile project that adapts to various decor styles.
Start with a sturdy, flat surface—preferably wood or MDF. Plan your tile layout before gluing, and cut tiles as needed. Use a strong adhesive suitable for mosaics, applying it with a spatula or trowel. Press tiles into the adhesive, leaving space for grout. Once set, fill gaps with grout, wipe excess, and let cure. Seal with a clear resin or protective topcoat to prevent staining. This process can be labor-intensive but results in a stunning, colorful surface.
Add metallic or glitter accents to the grout for extra sparkle. Incorporate personal mementos or themed tiles to tell a story. Use contrasting grout colors for different patterns or effects. Finish with a glossy sealant for a polished look. Your mosaic top becomes a unique, handcrafted feature that elevates your entire bedroom.
A mosaic tile top shows that DIY can be both artistic and functional. It’s a colorful, bold transformation that demonstrates your creative potential. Once completed, you’ll feel proud of crafting a piece that’s both beautiful and durable. Ready to turn your furniture into a work of art? Get creative with mosaics and start designing!
14. Chalkboard Paint for Customizable Nightstand
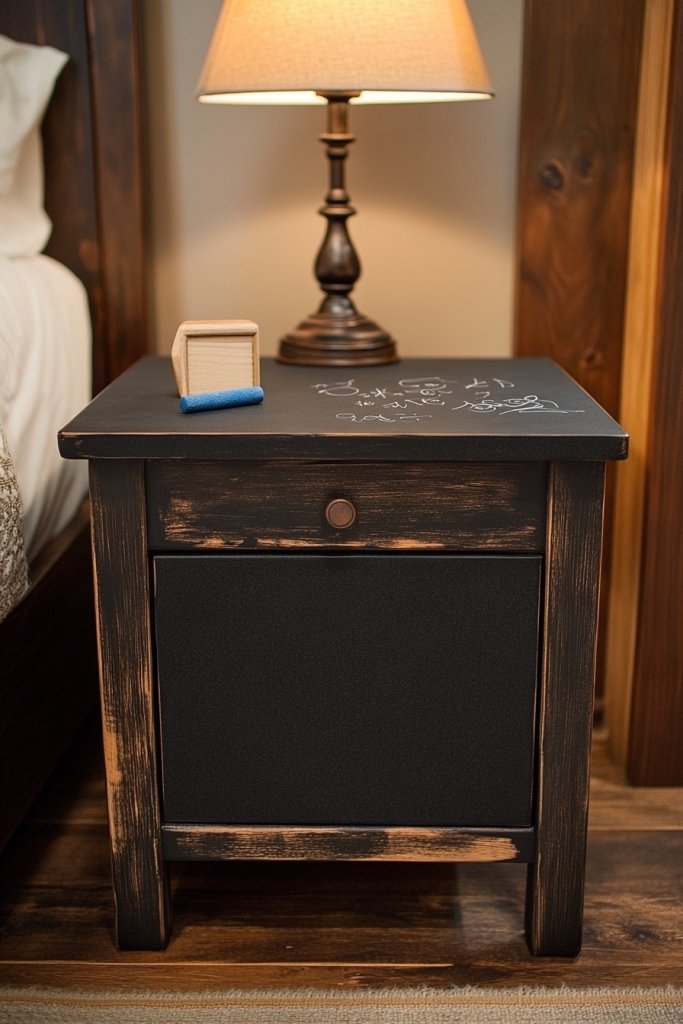
Ever wish your nightstand could serve a dual purpose—both functional and fun? Or maybe you want an easy way to jot down reminders, doodles, or love notes? Applying chalkboard paint turns any surface into a writable canvas. It’s a playful, inexpensive upgrade that adds personality and practicality. Who knew a coat of paint could do so much?
Recommended Products to replicate this idea
| # | Preview | Product | |
|---|---|---|---|
| 1 |

|
Rust-Oleum 206540 Chalkboard Brush-On Paint, 30 oz, Black | Buy on Amazon |
| # | Preview | Product | |
|---|---|---|---|
| 1 |

|
Bandle B. Chalk Markers - 8 Vibrant, Erasable, Non-Toxic, Water-Based, Reversible Tips. For Glass or... | Buy on Amazon |
Picture a sleek nightstand with a matte black or chalky finish, ready to be written on. You can leave messages, draw doodles, or organize your thoughts right on the surface. The chalkboard area contrasts beautifully with metallic or wooden hardware, creating a modern yet personal touch. It invites interaction and adds a layer of functionality to your decor. It’s like having a giant notepad at your bedside.
Choose a large section or just a small area for your chalkboard surface—whichever suits your style. Use it for daily reminders, inspirational quotes, or playful sketches. Change the look by erasing and rewriting as often as you like. Pair with colorful chalks or pastel chalk for a softer vibe. This idea easily adapts to various furniture sizes and styles, from vintage to modern.
Start by cleaning the furniture thoroughly, sanding lightly if needed. Apply a primer suitable for your surface, then paint with chalkboard paint in thin, even coats. Multiple coats may be necessary for a rich, dark finish. Once dry, condition the surface with chalk by rubbing the entire area and wiping it clean. Your nightstand is now ready for notes and doodles. Regular reconditioning keeps the surface easy to write on.
Decorate the border with washi tape or paint for a framed effect. Use colorful chalks to add flair or seasonal designs. Incorporate small magnetic or clip-on accessories for added functionality. Personalize with labels or hand-lettered quotes to match your decor theme. It’s a fun, interactive piece that evolves with you.
A chalkboard nightstand combines practicality with creativity, making your space more engaging. It’s a project that’s quick to do and endlessly customizable. Plus, it encourages a playful, relaxed approach to home decor. Ready to write your own story? Grab your chalk and start transforming your furniture today!
15. Faux Marble Finish with Contact Paper
Craving a luxurious marble look but don’t want to spend a fortune? Or maybe you want a quick update that looks high-end without the hassle? Faux marble contact paper is your answer. It’s inexpensive, easy to apply, and instantly elevates any furniture piece. Who knew a roll of contact paper could turn a plain surface into a marble masterpiece?
Recommended Products to replicate this idea
| # | Preview | Product | |
|---|---|---|---|
| 1 |

|
practicalWs Glossy Marble Contact Paper Granite White/Grey Kitchen Countertop Cabinets Furniture... | Buy on Amazon |
| # | Preview | Product | |
|---|---|---|---|
| 1 |
|
Art3d Smoothing Tool Kit for Applying Peel and Stick Wallpaper, Vinyl Backsplash Tile | Buy on Amazon |
Imagine a bedside table transformed with a glossy, veined marble contact paper in shades of white, gray, or black. The pattern mimics real marble, complete with intricate veins and natural variations. The contact paper’s smooth finish gives a sleek, polished look, making the furniture appear more expensive. It’s a simple update that adds sophistication and a touch of elegance to your space.
Choose contact paper that matches your decor—classic white marble, dark Carrara, or even colorful faux options. Apply to entire surfaces or create a border for a subtle effect. Seasonal or style updates are easy—just peel and replace the contact paper. It works on various furniture, from small tables to larger dressers, making it highly adaptable.
Start with a clean, smooth surface—lightly sand if necessary. Measure and cut the contact paper to fit your piece, leaving a small margin. Peel off the backing and carefully apply, smoothing out air bubbles with a squeegee or credit card. Trim excess around edges with a craft knife. Seal with a clear protective spray if desired, especially for surfaces exposed to moisture. The entire process takes about an hour but delivers a stunning, high-end look.
Add metallic or gold accents around the edges for extra luxe appeal. Use contrasting contact paper for decorative borders or insets. Incorporate small hardware updates, like new knobs or pulls, to complement the marble look. Layer with other textures, like soft textiles or matte finishes, to balance the high shine. Your faux marble piece becomes a statement of style.
Faux marble contact paper proves that DIY upgrades can rival expensive designer finds. It’s a simple, budget-friendly way to add elegance and character. Your furniture instantly looks more polished and refined. Once you see the transformation, you’ll be confident tackling more home projects. Ready to add a touch of luxury? Grab your contact paper and get started!
16. Distressed Paint with Metallic Accents

Do you love the vintage, industrial, or shabby chic look but think it’s hard to achieve? Or maybe your furniture looks too new and needs a touch of personality? Combining distressed paint with metallic accents creates a layered, textured vibe that’s both trendy and timeless. It’s a chic way to add depth and sophistication without a full renovation. Who says furniture can’t have character?
Recommended Products to replicate this idea
| # | Preview | Product | |
|---|---|---|---|
| 1 |

|
FolkArt Home Décor Chalk Finish Acrylic Paint, 8oz, 8 ounce, Milk Jug | Buy on Amazon |
| # | Preview | Product | |
|---|---|---|---|
| 1 |

|
Viva Decor Inka Gold Gilding Wax2.3 oz (Old Gold) - Easily Applicable Wax-Based Metallic Polishing... | Buy on Amazon |
Visualize a nightstand with a muted base color, lightly distressed along the edges and corners. Metallic details like gold or bronze hardware catch the light, adding an elegant contrast. The distressed paint reveals hints of underlying wood or previous layers, giving it a well-loved, vintage feel. The metallic accents enhance the overall look, making the piece pop in a subtle yet striking way. It’s a perfect blend of rustic charm and industrial elegance.
Choose base colors that complement your decor—muted blues, grays, or creams work well. Distress the paint lightly or heavily, depending on your style preference. Metallic accents can be applied through hardware, trim, or painted details. For seasonal updates, switch hardware or add decorative trims. This technique works on various furniture types and can be tailored for a subtle or bold statement.
Start with a clean, lightly sanded surface. Apply a base coat of paint, then distress the edges with fine-grit sandpaper or a damp cloth. Use metallic paint or leafing products on selected areas or hardware for accents. Seal the paint with a clear matte or semi-gloss topcoat to protect the finish. Attach new hardware or embellishments for extra flair. The process is forgiving and allows for creative experimentation.
Mix metallic paints for custom shades—think rose gold, copper, or antique bronze. Add decorative trims or appliqués for more texture. Incorporate custom hardware or knobs with metallic finishes. Use contrasting colors or layered distressing for added depth. Your piece will radiate both vintage and contemporary vibes, making it uniquely yours.
Combining distressed paint with metallic accents elevates your furniture’s style effortlessly. It shows that a little paint and patience can create high-end looks on a budget. Once finished, you’ll feel inspired to tackle more furniture updates with confidence. Your space will feel more curated, warm, and inviting. Ready to add a touch of glam? Get distressed and metallic!
17. Painted Patterned Legs with Solid Top
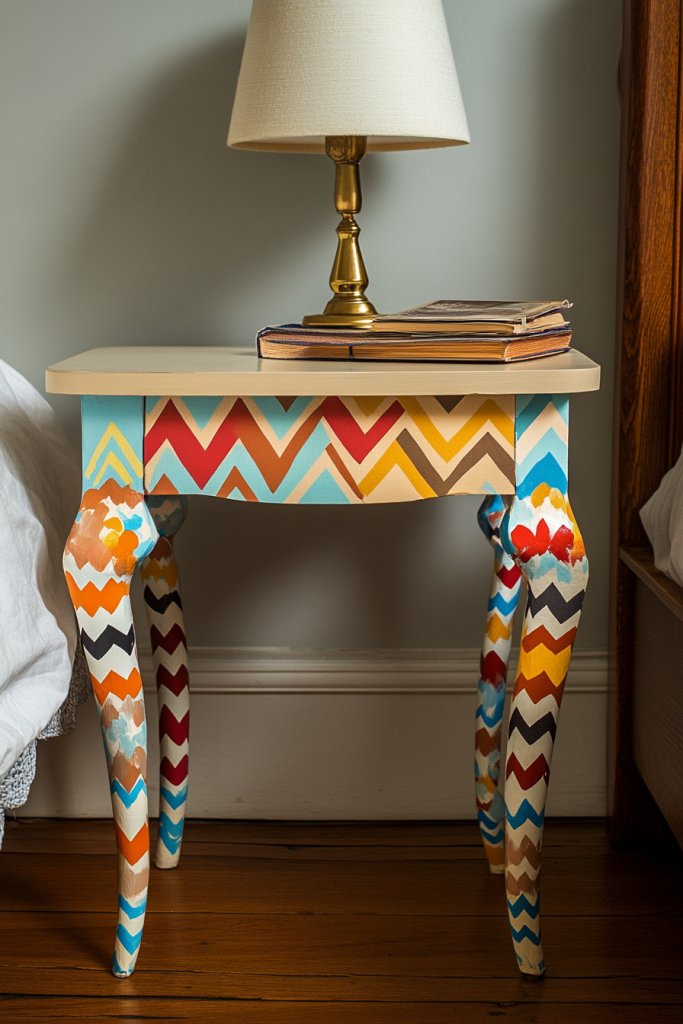
Want to add a playful or modern twist to your furniture but keep the overall simple look? Or maybe your plain top is crying out for some flair? Painting patterns on the legs while keeping the top solid is a creative way to introduce visual interest without overwhelming. It’s a subtle, fun upgrade that transforms your nightstand into a statement piece. Who says furniture can’t be a little whimsical?
Recommended Products to replicate this idea
| # | Preview | Product | |
|---|---|---|---|
| 1 |

|
DIY Decorative Stencil Template for Scrapbooking Painting on Wall Furniture Crafts,Set of 6 (Damask) | Buy on Amazon |
| # | Preview | Product | |
|---|---|---|---|
| 1 |
|
Rust-Oleum Linen White Chalked All-in-One Ultra Matte Paint | One Coat Coverage | No Primer,... | Buy on Amazon |
Imagine a sleek nightstand with its legs painted in bold stripes, polka dots, or chevrons in contrasting colors. The top remains a neutral or matching solid hue, grounding the piece. The patterned legs draw the eye downward, adding a touch of personality and movement. It’s a playful yet sophisticated look that balances fun with elegance. Paired with minimalist decor, it creates a fresh, contemporary vibe.
Choose patterns that match or contrast with your room’s color palette—think black and white or bright primary colors. You can paint all four legs or highlight only two for an asymmetrical look. This idea works well on various furniture styles, from mid-century to eclectic. Seasonal changes can be made by switching up the leg patterns or colors. It’s a simple yet impactful way to refresh your furniture.
Start by cleaning and lightly sanding the legs for better paint adhesion. Use painter’s tape to mask off the top and other areas. Apply a primer if needed, then paint the legs with your chosen pattern using stencils or freehand techniques. Multiple thin coats will give a smooth, vibrant finish. Allow drying time between coats. Seal with a clear topcoat for longevity. This project takes a couple of hours but offers big visual payoff.
Add metallic or glitter accents to the painted patterns for extra sparkle. Use different colors or shapes for a personalized touch. Incorporate matching or contrasting hardware to complete the look. You can also experiment with different patterns on each leg for a truly eclectic vibe. The key is balancing fun with style, making it uniquely yours.
Painting patterned legs shows that small details can make a big impact. It’s a creative way to express your personality and refresh your furniture without a full redo. Once finished, you’ll feel confident tackling other DIY projects. Your space will feel more lively, fresh, and curated. Ready to add some pattern to your life? Grab your paints and get creative!
18. Vintage Suitcase Turned Bedside Table with Legs

Are you obsessed with vintage finds but hate the idea of cluttering your space? Or maybe you want a unique, portable nightstand that doubles as storage and decor? Turning a vintage suitcase into a bedside table is a creative, budget-friendly solution. It combines nostalgia with functionality, giving your room a charming, retro vibe. Who says furniture can’t have a story?
Recommended Products to replicate this idea
| # | Preview | Product | |
|---|---|---|---|
| 1 |
|
EALRIDV Vintage Suitcase, Distressed Wood Bridal Trunk with Finger Lift Latches Stackable Mini... | Buy on Amazon |
| # | Preview | Product | |
|---|---|---|---|
| 1 |
|
SMARTSTANDARD 16" Hairpin Furniture Legs, Metal Home DIY Projects for Nightstand, Coffee Table,... | Buy on Amazon |
Picture a well-loved vintage suitcase, painted or distressed for added character, sitting beside your bed. Its lid is propped open or removed to reveal space for books, chargers, or small essentials. The suitcase is elevated on sleek hairpin or wooden legs, giving it a modern lift. Decorated with vintage hardware or decals, it exudes personality and charm. It’s a perfect blend of old-world charm and contemporary style.
Choose suitcases in different sizes, colors, or patterns to suit your decor. You can paint or distress the exterior for a more rustic look or leave it natural for authenticity. Attach custom legs or casters for height and mobility. Decorate with vintage stickers, hardware, or fabric strips for added personality. Change accessories seasonally to keep the look fresh. It’s a highly adaptable project that suits various aesthetic themes.
Start with a sturdy, clean suitcase—repair any broken hinges or straps. Sand lightly if planning to paint or distress. Attach legs or casters securely using screws or brackets. Paint the exterior with chalk or spray paint, choosing colors that complement your decor, or leave it distressed for a vintage feel. Inside, organize with small baskets or fabric liners. Add a cushion on top for comfort or a decorative tray for essentials. It’s an easy, customizable project with big visual impact.
Decorate the exterior with vintage stickers, fabric, or painted patterns. Add a monogram or personal label for a custom touch. Inside, organize with fabric-lined compartments or small baskets. Attach decorative hardware or painted accents to the exterior. Layer with textiles or small decor items to elevate the look further. Your vintage suitcase becomes a conversation piece and a functional bedside table.
Transforming a vintage suitcase into furniture proves that you don’t need new to be stylish. It’s a nostalgic project that sparks creativity and resourcefulness. The finished piece adds warmth, charm, and a story to your space. Plus, it’s a fun way to upcycle and personalize your decor. Ready to bring vintage charm into your bedroom? Grab your suitcase and start transforming!
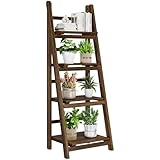
19. Upcycled Ladder as a Multi-Tier Nightstand
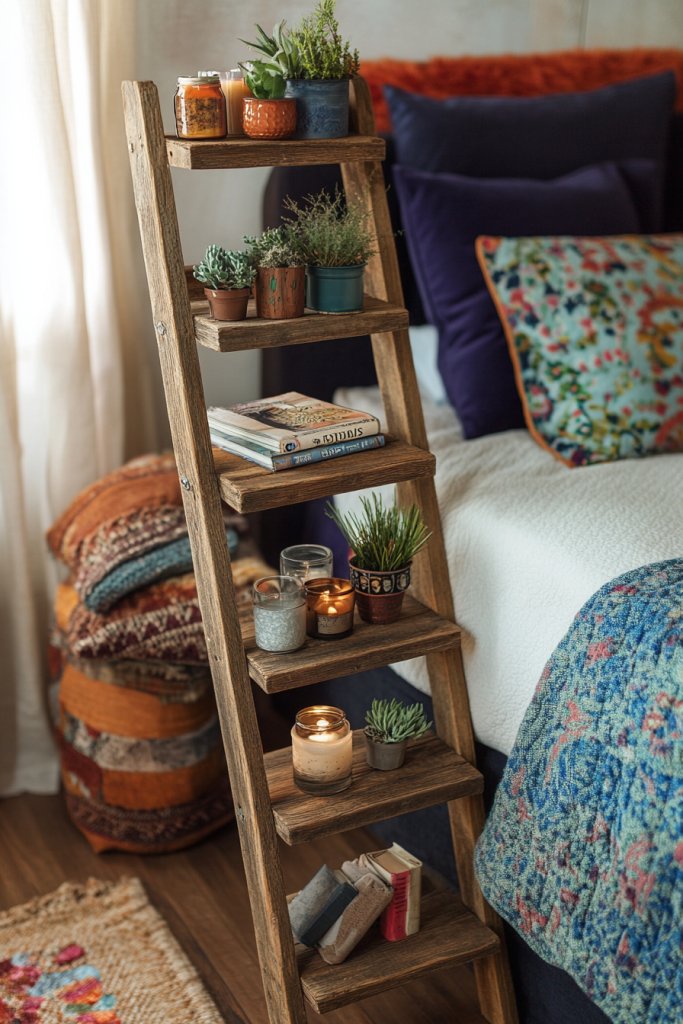
Want a unique, multi-functional piece that adds height and storage to your bedroom? Or maybe your space needs a quirky, statement-making upgrade? An upcycled ladder is a creative solution that combines vintage charm with modern practicality. It’s perfect for small rooms or those who love layered, eclectic decor. Who knew a simple ladder could turn into a stylish nightstand?
Recommended Products to replicate this idea
| # | Preview | Product | |
|---|---|---|---|
| 1 |

|
Decorative Wooden Blanket Ladder for The Living Room and Bedroom, 5ft 8 inch, Pine Wood Quilt... | Buy on Amazon |
| # | Preview | Product | |
|---|---|---|---|
| 1 |
|
Mugovelo Ladder Shelves - Folding Wooden Ladder Bookshelf, 4-Tier Retro Plant Stand Storage Shelves... | Buy on Amazon |
Picture an old wooden ladder, sanded and painted in a fresh hue, leaning against your wall. Flat surfaces or attached planks serve as shelves or platforms for your essentials. Decorated with textiles, books, or small plants, it creates a layered, textured look. The open rungs provide space for hanging items or accessories. It’s a functional art piece that adds height and visual interest to your bedroom.
Paint or stain the ladder in colors that match or contrast your decor—think pastel shades or bold hues. Attach additional shelves or platforms for more storage. Use baskets or fabric bins on the rungs for organization. For a boho vibe, add hanging textiles or fairy lights. It’s adaptable for different spaces, from tight corners to open walls, and can be styled for vintage, industrial, or modern looks.
Start with a sturdy, clean ladder—repair any loose rungs or cracks. Sand and paint or stain as desired. Attach flat planks or shelves to the rungs with screws or brackets, ensuring stability. Decorate with textiles or small accessories to suit your style. Secure the ladder to the wall if needed for extra safety. Use the tiers for books, decor, or personal items, creating a multi-layered nightstand that’s both functional and fun.
Add decorative touches like painted patterns, metallic accents, or hanging curtains. Use baskets or fabric liners on the shelves for hidden storage. Personalize with small framed photos, vintage finds, or themed decor. Incorporate lighting like battery-operated fairy lights or sconces for ambiance. Your ladder becomes a personalized, multi-tier statement piece.
Repurposing an old ladder shows your creativity and resourcefulness. It’s a versatile, eye-catching addition that makes your space more dynamic. DIY projects like this boost your confidence and prove that stylish furniture doesn’t have to be expensive. Ready to elevate your bedroom decor? Grab an old ladder and start building your multi-tier masterpiece!
20. Colored Wash Finish for a Soft, Subtle Look
Does your furniture look too stark or plain? Or maybe you want a gentle, weathered appearance that adds warmth without heavy distressing? A colored wash finish is an easy way to achieve a soft, subtle look that’s both stylish and understated. It’s perfect for creating a cozy, inviting atmosphere with minimal effort. Who says furniture can’t be softly transformed?
Recommended Products to replicate this idea
| # | Preview | Product | |
|---|---|---|---|
| 1 |
|
All-in-One White Paint Wood Refinishing Kit– 2-Pack Easy Paint Brush with No Drip Design,... | Buy on Amazon |
| # | Preview | Product | |
|---|---|---|---|
| 1 |

|
General Finishes Water Based Wood Stain, 1 Pint, Whitewash | Buy on Amazon |
Imagine a wood surface coated in a diluted, tinted stain or paint wash. The transparent layer enhances the natural grain while adding a hint of color—think soft cream, muted gray, or gentle blue. The finish allows the underlying texture to shine through, creating a layered, lived-in look. It’s a versatile technique that complements various decor styles, from farmhouse to coastal. The result is a piece that feels warm, relaxed, and harmonious.
Choose a color wash that enhances your decor—light tans, soft pastels, or subdued neutrals work well. Apply the wash with a damp cloth or brush, then wipe away excess for a more transparent effect. Layer multiple coats for depth or keep it light for a delicate touch. This finish suits furniture that you want to look gently aged or naturally faded. It’s easy to adapt for different furniture sizes and styles.
Start with a clean, sanded surface. Mix your paint or stain with water or a medium for transparency. Apply with a brush, sponge, or cloth, working in the direction of the wood grain. Wipe away excess before it dries to control the intensity of the color. Let it dry thoroughly, then add additional layers if needed for depth. Seal with a matte or semi-gloss topcoat to protect the finish. This technique is quick and provides a soft, harmonious look.
Incorporate subtle metallic or pearl accents for a hint of shimmer. Use contrasting or complementary colors for a layered effect. Add decorative trims or hardware in finishes that match your wash tone. Use this technique on furniture, walls, or decorative accessories for a cohesive look. It’s a subtle way to add depth and personality to your space.
A colored wash finish emphasizes natural textures and adds warmth effortlessly. It’s a versatile, budget-friendly technique that can be applied to many surfaces. Once completed, you’ll feel confident experimenting with colors and layering techniques. Your furniture will radiate a soft, inviting charm that makes your home more welcoming. Ready for a gentle transformation? Try a wash finish today!
21. DIY Pallet Shelf with Drawer for Extra Storage
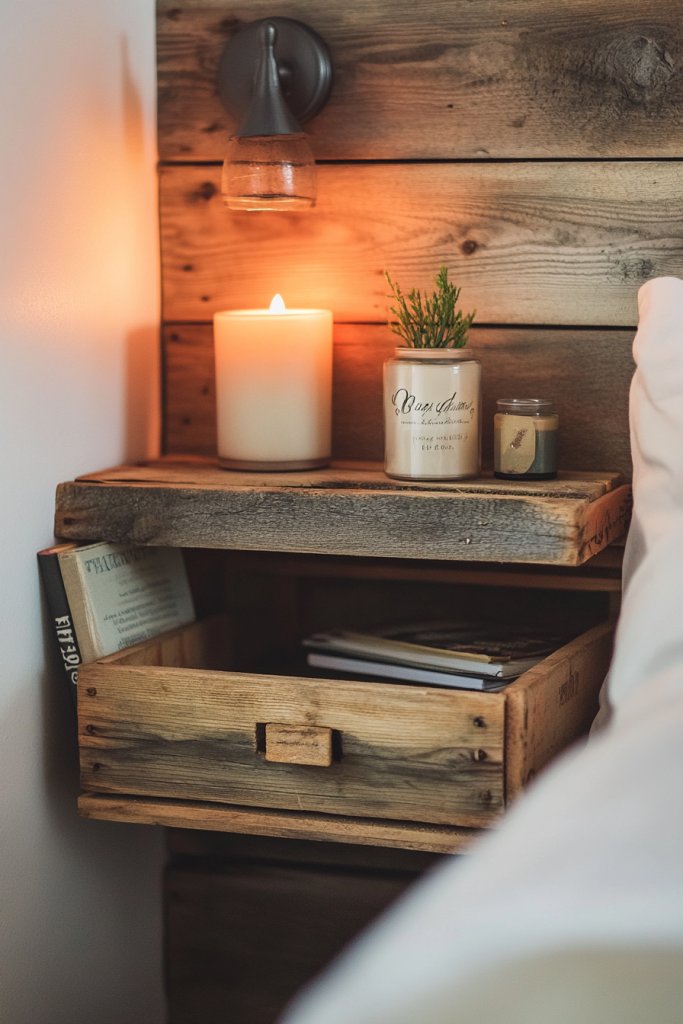
Want to add extra storage without sacrificing style? Or maybe your bedroom needs a bit more organization but you’re on a tight budget? A DIY pallet shelf with a drawer combines rustic charm with practical storage in one project. It’s a fun, affordable way to make your space more functional and cozy. Who knew pallets could do so much?
Recommended Products to replicate this idea
| # | Preview | Product | |
|---|---|---|---|
| 1 |

|
FLYJOE Floating Shelves | 8" Deep Rustic Reclaimed Barnwood Wall Hanging Shelves with Invisible... | Buy on Amazon |
| # | Preview | Product | |
|---|---|---|---|
| 1 |

|
Maitys 4 Pcs Wooden Drawer Slides Bottom Mount Classic Center Guide Track with Metal Slide Glides... | Buy on Amazon |
Picture a sturdy wooden pallet mounted on the wall with a clean, painted finish. Attached underneath is a small drawer or box, perfect for storing bedside essentials. The shelf holds books, a clock, or decorative items, while the drawer keeps clutter out of sight. The combination of open and hidden storage creates a balanced, inviting look. It’s a practical piece that also adds texture and warmth to your decor.
Paint or stain the pallet in neutral or bold colors to match your decor. Use a pre-made drawer or build one from reclaimed wood for a custom touch. Decorate the shelf with small plants, photos, or decorative objects. For a more refined look, add decorative hardware or paint the drawer in a contrasting color. It’s adaptable for various room sizes and styles, from bohemian to farmhouse.
Start by sourcing a sturdy pallet—clean and sand it thoroughly. Assemble or repurpose a small drawer or box, attaching it securely underneath the pallet. Paint or stain the pallet and drawer for a finished look. Mount the entire unit on the wall using appropriate anchors or brackets, ensuring stability. Organize your bedside essentials inside the drawer and decorate the shelf with personal items. It’s a practical, customizable project with a big impact.
Decorate the drawer front with stenciled patterns or contrasting colors. Add decorative hardware or handles to personalize the drawer. Incorporate small baskets or fabric liners inside for additional organization. Use themed or seasonal decor on the shelf to keep the look fresh. Your pallet shelf with drawer becomes a functional yet charming focal point.
Building a pallet shelf with a drawer shows your DIY skills and creativity. It’s a practical upgrade that adds storage and style simultaneously. Once finished, you’ll feel proud of creating something unique and tailored to your needs. Your bedroom will look more organized and inviting. Ready to craft your own rustic storage solution? Grab your pallets and start building!
Conclusion
With these diverse and affordable bedside table makeover ideas, you’re equipped to turn any plain table into a stunning focal point. Whether you choose a bold paint job, creative decoupage, or simple hardware swaps, these transformations are easy to try and highly rewarding. Dive into your project today and create a bedroom that truly reflects your personality—your perfect space is just a makeover away!
Last update on 2026-03-01 / Affiliate links / Images from Amazon Product Advertising API