Imagine transforming your outdoor space into a stunning oasis without breaking the bank! Cheap landscaping ideas have gained popularity because they allow homeowners to enhance their gardens and yards with creativity and budget-friendly solutions.
In this article, you’ll discover a variety of clever, affordable landscaping ideas that can turn any outdoor area into a functional and stylish retreat. From DIY projects to simple plant arrangements, these ideas are perfect for garden enthusiasts of all skill levels eager to make a big impact on a small budget.
1. Create a DIY Gravel Path with Recycled Materials
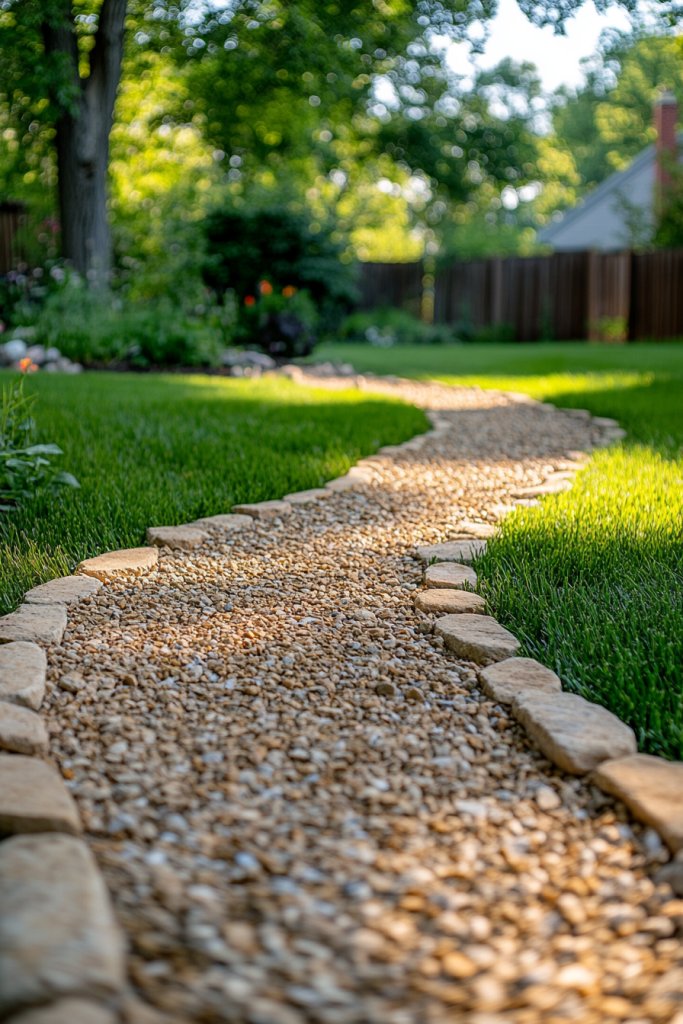
Ever wanted to add charm and function to your yard without draining your wallet? A simple gravel path can transform a dull lawn into an inviting walkway, but fancy pavers often come with a hefty price tag. If you’re tired of bland, over-priced solutions, creating your own recycled material pathway might just be the answer. Plus, it’s surprisingly easy to do and adds a rustic touch.
Recommended Products to replicate this idea
| # | Preview | Product | |
|---|---|---|---|
| 1 |

|
40 LBS Grey Pea Gravel - Landscape Rocks - Drainage Rock - Gardening - Average Size 3/8 inch - 1/4... | Buy on Amazon |
| # | Preview | Product | |
|---|---|---|---|
| 1 |

|
Happybuy 6x300ft Premium Weed Barrier Landscape Fabric Heavy Duty 2.4OZ, Woven Weed Control Fabric,... | Buy on Amazon |
Imagine winding your garden with a textured, uneven path made from crushed stone, old bricks, and broken concrete. The mix of earthy tones contrasts beautifully with lush greenery, creating a natural feel. The gravel crunch underfoot makes a satisfying sound, and the varied materials give a handcrafted, vintage look. It’s a backyard scene straight out of a cozy countryside retreat.
You can customize the look by choosing finer gravel for a sleek appearance or larger stones for a more rugged vibe. For a more formal garden, align bricks neatly along the edges. During different seasons, consider adding seasonal décor like potted plants or fairy lights along the path. Whether you prefer a whimsical or structured style, this DIY approach can be adapted easily.
Gather inexpensive gravel, crushed stone, old bricks, or broken concrete from salvage yards or your own pile. Outline the path with stakes and string, then excavate the area to a depth of about 4-6 inches. Lay down a landscape fabric to prevent weeds, then fill with your chosen materials. Rake it smooth and compact it with a tamper or the back of a shovel. For added stability, edge the path with leftover bricks or wood planks.
Use different colored stones or bricks to create patterns or borders that reflect your personality. Incorporate small sculptures, garden ornaments, or solar lanterns for a personalized touch. You could also add stepping stones made from extra materials for visual interest. Experimenting with textures and colors allows you to craft a unique pathway that feels truly yours.
Building your own gravel path is a satisfying project that boosts your confidence in DIY home upgrades. It’s budget-friendly and eco-conscious, especially if repurposing old materials. Your yard will look more inviting, and you’ll enjoy every step along your new walkway. Ready to add charm without breaking the bank?
2. Install Pallet Garden Beds for Vegetables and Herbs
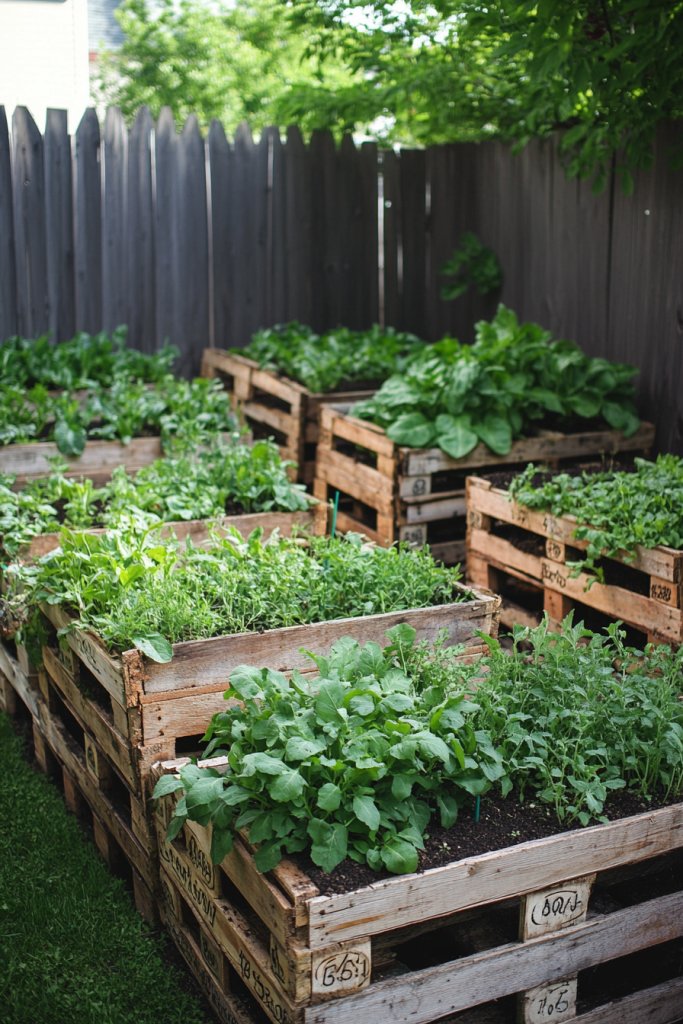
Dreaming of fresh herbs and vegetables but lack the space or funds for traditional garden beds? If your backyard feels cramped or your budget is tight, converting old pallets into garden beds is a game-changer. It’s a clever way to grow your own food without the hefty price tag or taking up tons of space. Plus, it’s a fun project anyone can do.
Recommended Products to replicate this idea
| # | Preview | Product | |
|---|---|---|---|
| 1 |

|
Yaheetech 43.5″ L×16″ W×14″ H Wooden Raised Garden Bed, Horticulture Wood Rectangular Garden... | Buy on Amazon |
| # | Preview | Product | |
|---|---|---|---|
| 1 |

|
VEVOR 4FTx300FT Premium Heavy Duty Weed Barrier Landscape Fabric, 3.2OZ Woven Geotextile Fabric... | Buy on Amazon |
Picture a vertical wall of wooden pallets filled with vibrant greens—basil, lettuce, cherry tomatoes—bursting with life. The rustic wood adds charm, and the compact design makes it perfect for small yards or patios. The pallets stand upright or lay flat, creating a layered, textured garden. Morning dew glistens on fresh leaves, and the scent of herbs fills the air.
Pallet gardens can be tailored to your space—lean them against fences, stack vertically, or lay flat as raised beds. For a more polished look, paint or stain the pallets in colors matching your decor. During different seasons, swap out plants or add decorative elements like small lights or weatherproof fabric covers. They work well in sunny spots or shaded patios.
Start with sturdy, untreated pallets—preferably ones marked ‘HT’ for heat-treated. Remove any nails or splinters and line the inside with landscape fabric to hold soil and prevent weeds. Fill with quality compost and plant your chosen herbs or vegetables. For vertical setups, attach additional slats or shelves for extra plant space. Secure the pallets upright with stakes or brackets for stability.
Add personal touches by painting the pallets with bright colors or chalkboard paint for labels. Incorporate small decorative stones or pebbles in the soil for a finishing touch. You can also attach small planters or watering systems for convenience. Creating a mini garden with personal flair makes it more rewarding.
Transforming old pallets into productive garden beds is a rewarding, eco-friendly project. It proves that you don’t need a big budget to grow your own food and beautify your space. Plus, it’s a flexible method that adapts to any yard size. Ready to turn recycled wood into your green oasis?
3. Use Painted Cinder Blocks as Plant Stands and Edging
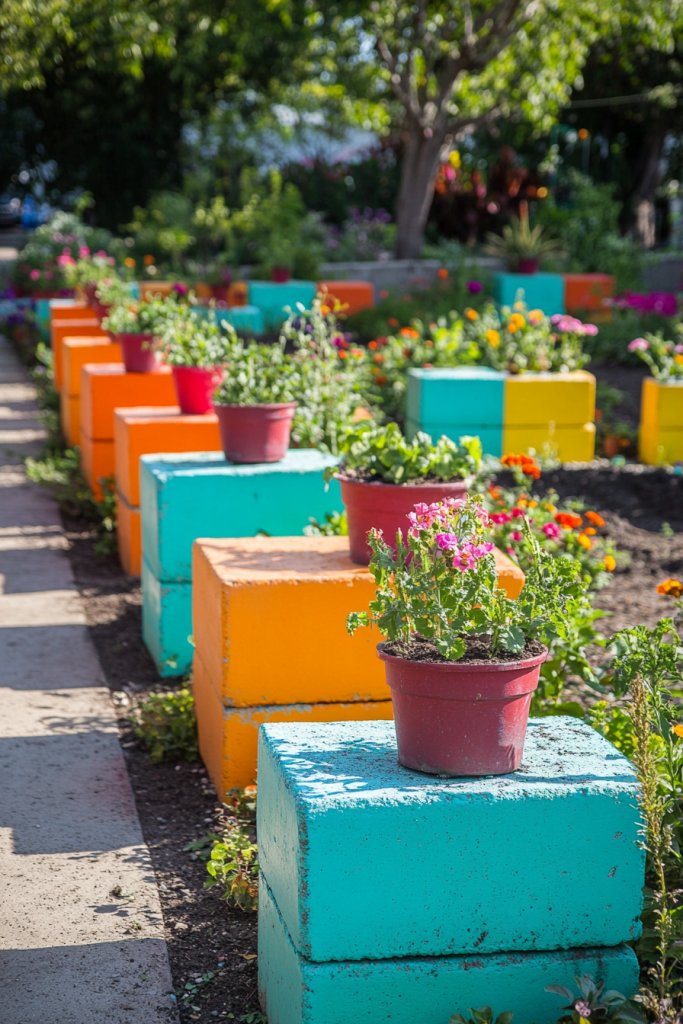
Tired of dull garden borders and flimsy plant stands? Cinder blocks are often seen as basic construction materials, but with a splash of color and some creativity, they become stylish and functional garden accessories. They’re affordable, sturdy, and surprisingly versatile—perfect for sprucing up your outdoor space on a budget.
Recommended Products to replicate this idea
| # | Preview | Product | |
|---|---|---|---|
| 1 |

|
INSL-X WaterBlock Acrylic Masonry Waterproofer Paint, White, 1 Gallon | Buy on Amazon |
| # | Preview | Product | |
|---|---|---|---|
| 1 |

|
47th & Main Mid-Century Modern Wooden Plant Stand with Cement Planter for Succulents Flowers and... | Buy on Amazon |
Imagine bright, bold cinder blocks arranged neatly along a garden bed, each topped with potted plants or used as a low wall. The vibrant colors pop against lush green foliage, creating a playful yet organized look. Some blocks serve as stepping stones, while others act as stands for herbs or flowers. The textured surface adds an industrial-chic vibe.
Paint the blocks in various colors or patterns to suit your decor style—think pastel shades for a soft look or bold primaries for a modern touch. Stack them to create tiered plant stands or arrange them in geometric patterns for edging. During different seasons, swap out plants or change the colors for a fresh look. They can also double as small seating options.
Start by cleaning and sanding the cinder blocks to prepare for painting. Use outdoor, weather-resistant spray paint or brush-on paint for durability. Arrange them in your desired configuration—either in straight lines or creative patterns. For edging, dig a shallow trench and embed the blocks securely with soil or gravel. For stands, stack or place individual blocks as needed, ensuring stability.
Personalize your cinder blocks by painting them with patterns, quotes, or symbols. Add decorative stones or gravel around the bases for a finished look. You could also attach hooks or small shelves to hold garden tools or ornaments. Mixing colors and shapes allows you to craft a unique, lively garden feature.
Transforming simple cinder blocks into colorful garden accents is a budget-friendly way to elevate your landscape. It’s a project that combines practicality with a pop of personality. Your garden will stand out with a playful, modern edge, all while keeping costs low. Ready to paint your way to a more vibrant yard?
4. Incorporate Simple Mulch and Stone Features for Texture

Does your garden lack visual interest and feel flat or unfinished? Using mulch and stones is an easy, affordable way to add texture and depth to your landscape. It also helps with weed control and moisture retention, making your garden both prettier and easier to care for. Who knew that simple materials could make such a difference?
Recommended Products to replicate this idea
| # | Preview | Product | |
|---|---|---|---|
| 1 |

|
100% Natural Cedar Shavings | Mulch | Great for Outdoors or Indoor Potted Plants | Dog Bedding (4... | Buy on Amazon |
| # | Preview | Product | |
|---|---|---|---|
| 1 |

|
GASPRO 15lb Natural River Rocks Decorative Rocks for Plants and Garden Landscaping, Polished River... | Buy on Amazon |
Picture a garden bed edged with dark, rich mulch that contrasts beautifully with the vibrant green plants. Natural stones, from small pebbles to larger flagstones, create pathways and focal points that catch the eye. The rough textures and earthy tones add a tactile dimension, making your garden inviting to both sight and touch.
Choose mulch like shredded bark or straw for a softer look, or opt for gravel or crushed stone for a more modern, sleek aesthetic. For pathways, use larger flat stones or pavers to create clean, defined routes. During different seasons, you can switch mulch colors or add decorative stones to refresh the look. It’s an easy way to adapt your garden’s visual style.
Start by clearing the area and removing weeds. Lay down landscape fabric to prevent future weed growth. Spread mulch evenly around plants, aiming for a layer about 2-3 inches thick. For stone features, dig out a shallow trench and level the stones, using sand or gravel as a base for stability. Rake and compact to ensure a smooth, durable surface. Regularly replenish mulch to maintain its appearance.
Mix different types and colors of mulch to create patterns or highlight specific areas. Incorporate decorative stones or pebbles in contrasting hues to add visual interest. Use larger stones as artistic focal points or to form borders. Adding sculptures, small statues, or decorative gravel can further personalize your landscape.
Simple mulch and stones are a low-cost way to upgrade any garden’s look and feel. They give your yard a polished, finished appearance and help with garden health. You’ll feel proud every time you see how these straightforward enhancements make a big impact. Time to get your hands dirty?
5. Design a Reclaimed Wood Bench for Seating
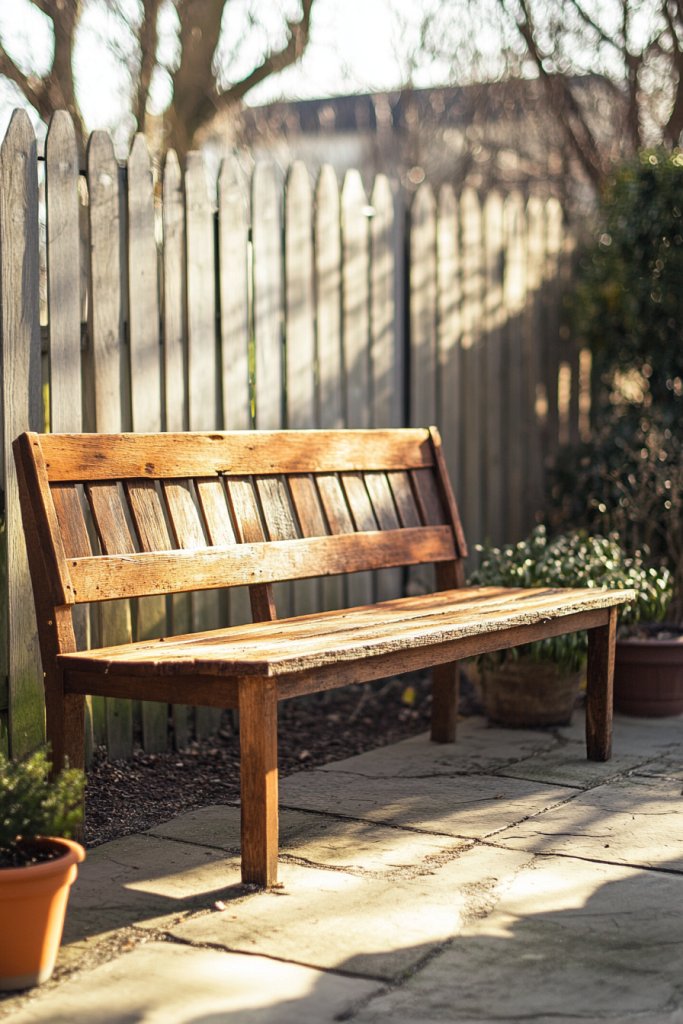
Looking for a cozy spot to sit and enjoy your garden but don’t want to splurge on pricey outdoor furniture? A reclaimed wood bench offers charm, comfort, and sustainability all in one package. Plus, it’s a rewarding project that adds a rustic touch to your yard without costing a fortune. Who doesn’t love a DIY that doubles as furniture?
Recommended Products to replicate this idea
| # | Preview | Product | |
|---|---|---|---|
| 1 |

|
Artissance Handmade Wooden Entryway Bench, Vintage Noodle Bench for Living Room, Bedroom, or... | Buy on Amazon |
| # | Preview | Product | |
|---|---|---|---|
| 1 |

|
Olympic WaterGuard 11 oz. Clear Exterior Waterproofing Wood Sealer Spray | Buy on Amazon |
Imagine a weathered, beautifully aged wooden bench nestled among vibrant flowering plants. The rough-hewn planks have knots and grains that tell stories of their past life. A simple, sturdy frame supports the seat, inviting you to sit and relax. The natural textures and imperfect finish blend seamlessly into a natural or farmhouse-inspired landscape.
You can customize the size and shape of your bench, from long, communal seats to smaller, intimate ones. Stain or seal the wood for weather resistance or leave it natural for an authentic look. During different seasons, add cushions or throws made from durable fabrics to enhance comfort and style. It pairs well with other rustic or minimalist garden elements.
Source reclaimed wood from pallets, old furniture, or demolition sites. Sand down rough edges and check for splinters. Construct a simple frame using scrap or inexpensive lumber, ensuring stability with proper joinery. Attach the wooden slats securely with weatherproof screws or nails. Finish with a protective sealant or stain to prolong lifespan. Place the bench in a shaded spot or under a tree for maximum comfort.
Decorate your bench with painted patterns or carved initials to add a personal touch. Incorporate small planters or lanterns on nearby posts for ambiance. You could also attach hooks for hanging garden tools or decorative items. Let your creativity run wild with stains, paints, or added cushions—whatever makes your space feel like home.
Building a reclaimed wood bench is a simple, eco-friendly way to add functional charm to your yard. It’s a project that boosts your DIY confidence and helps you contribute to sustainability. Plus, it’s a conversation starter and a perfect spot for relaxation. Ready to craft your own piece of outdoor art?
6. Build a Basic Raised Garden Bed with DIY Wooden Frames

Tired of bending over in your garden or dealing with soil erosion? Raised beds are the perfect solution—elevate your planting game without spending a lot. They make gardening easier, cleaner, and more organized. Plus, building your own wooden frame is a budget-friendly project that pays off.
Recommended Products to replicate this idea
| # | Preview | Product | |
|---|---|---|---|
| 1 |

|
Infinite Cedar Deep Root Cedar Raised Bed Garden Kit | Buy on Amazon |
| # | Preview | Product | |
|---|---|---|---|
| 1 |

|
20 Pcs Corner Brace for Wood Small Angle Brackets Versatile L Brackets with Reinforing... | Buy on Amazon |
Visualize a rectangular wooden box filled with rich soil and sprouting seedlings. The frame is made from simple, untreated lumber, giving a natural look that blends well with your yard. The height keeps weeds at bay and reduces back strain. Surrounding the bed, a neat border of gravel or mulch keeps everything tidy and inviting.
Adjust the size of your raised bed based on available space—small for patios or large for vegetable gardens. Use recycled or salvaged wood for a more eco-conscious touch. During different planting seasons, change out crops or add trellises for climbing plants. You can paint or stain the wood for added durability or aesthetic appeal.
Measure and cut your lumber to size, then assemble with screws or nails, ensuring corners are secure. Level the frame on a flat surface and dig a shallow trench if needed to stabilize it. Fill with a mix of compost, soil, and organic matter. For extra stability, embed the frame into the ground or secure it with stakes. Water thoroughly after planting.
Decorate the edges with painted patterns or add small signs for different plant sections. Incorporate drip irrigation lines or simple watering cans for easy maintenance. You could also add a trellis or cage for vertical crops. The key is creating a functional, attractive space that encourages gardening success.
Constructing a raised garden bed is a straightforward project that can transform your outdoor space. It boosts your confidence in DIY gardening and helps produce fresh, healthy food. Plus, it makes your yard look more organized and inviting. Ready to elevate your gardening routine?
7. Use Upcycled Containers for Unique Plant Pots
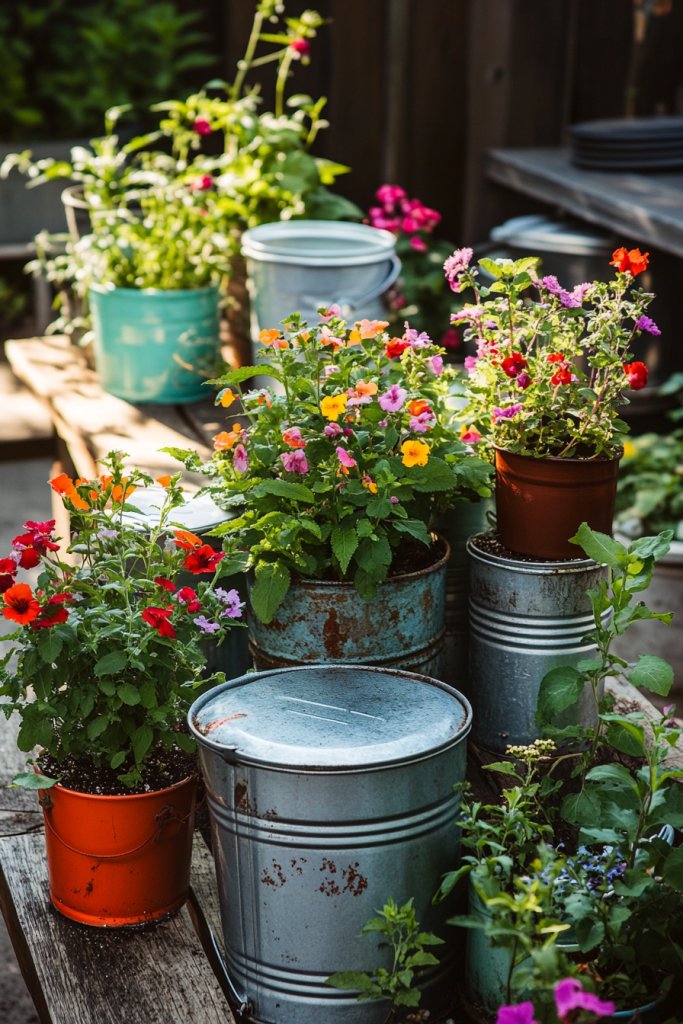
Looking to add a splash of personality to your garden without buying new pots? Upcycled containers are a clever and eco-friendly way to bring color and charm into your outdoor space. Old tins, buckets, or even teacups can be transformed into quirky planters that tell a story. Who knew trash could be turned into treasure?
Recommended Products to replicate this idea
| # | Preview | Product | |
|---|---|---|---|
| 1 |
|
vensovo Galvanized Metal Oval Planter Buckets with Handles – Set of 3 Rustic Farmhouse Flower Tubs... | Buy on Amazon |
| # | Preview | Product | |
|---|---|---|---|
| 1 |

|
hadaaya 7.5” Round Ceramic Teacup Planter with Saucer – Purple Polka Dot Design Pot for... | Buy on Amazon |
Picture a row of mismatched vintage containers filled with lush herbs and flowers. The eclectic mix of colors and shapes gives your garden a whimsical, inviting feel. Some containers sit on rustic wooden shelves, while others hang from hooks or sit on the ground. The variety creates a lively, artistic display that sparks joy.
Choose containers that suit your aesthetic, from shabby-chic to industrial. Paint or decorate the outside for a customized look or leave them weathered for a vintage charm. Mix and match sizes and styles to create a playful, layered effect. During different seasons, swap out plants or add decorative elements like stones or moss.
Clean and drill drainage holes in your containers to prevent waterlogging. Fill them with potting soil and select plants suited to their size and light needs. Secure hanging containers with sturdy hooks or attach them to fences or walls. Elevate smaller containers on stands or bricks for added visual interest. Water regularly and fertilize as needed.
Label your containers with chalkboard tags or painted signs for a personalized touch. Decorate with ribbons, fabric, or decals to match your garden theme. Arrange the containers in clusters or along pathways for a dynamic look. Repaint or refinish over time to keep the display fresh.
Using upcycled containers is a budget-smart way to make your garden unique and vibrant. It’s a fun project that sparks creativity and helps reduce waste. Plus, it’s a conversation starter and a great way to showcase your personality. Ready to give your plants a charming new home?
8. Create a Simple Vegetable or Herb Patch

Ever wanted fresh herbs and veggies at your fingertips but felt overwhelmed by the idea of a full garden? A small, dedicated patch is a budget-friendly way to grow your own food without the hassle of large beds. It’s straightforward, accessible, and perfect for beginners or busy folks. Plus, it adds a fresh flavor to your meals.
Recommended Products to replicate this idea
| # | Preview | Product | |
|---|---|---|---|
| 1 |

|
Land Guard Galvanized Raised Garden Bed Kit, Galvanized Planter Garden Boxes Outdoor, Oval Large... | Buy on Amazon |
| # | Preview | Product | |
|---|---|---|---|
| 1 |

|
Seed Needs Herb Seeds Variety Pack Culinary Herb Collection (12 Individual Packets for Planting... | Buy on Amazon |
Imagine a cozy corner of your yard with a neat rectangular patch of soil, lined with simple wooden or wire fencing. Rows of sprouting herbs like basil, cilantro, and parsley mingle with small vegetable plants. The scent of fresh herbs fills the air as bees and butterflies flit nearby. It’s a mini paradise that’s easy to maintain and full of life.
Designate a section of your yard or balcony for quick access and easy maintenance. Use inexpensive fencing or edging to organize and contain your plants. During different seasons, rotate crops or plant seasonal varieties for variety and freshness. Incorporate decorative touches like painted borders or small garden markers to personalize your patch.
Choose a sunny, well-drained spot for your vegetable or herb patch. Clear and level the area, then add compost or organic soil to improve fertility. Use inexpensive fencing or edging to define the space. Plant seeds or seedlings according to each crop’s requirements, spacing them properly. Water consistently and mulch to retain moisture and suppress weeds.
Label different sections with painted stakes or small signs for easy identification. Add small decorative elements like stones or figurines around the border. During the growing season, harvest regularly and encourage regrowth for continuous yield. You can also extend the patch with vertical planters or hanging baskets.
Starting a small vegetable or herb patch makes gardening accessible and rewarding. It’s a simple step toward healthier eating and self-sufficiency. You’ll gain confidence in your green thumb with each harvest, and your meals will taste better than ever. Ready to plant your own fresh corner?
9. Plant Fast-Growing Ground Cover for Low Maintenance

Struggling with weeds and patchy grass that take too much work? Fast-growing ground covers are the perfect low-maintenance solution to fill in gaps and reduce yard work. They create a lush, uniform look without the need for constant mowing or weed pulling. Who doesn’t want a beautiful yard with less effort?
Recommended Products to replicate this idea
| # | Preview | Product | |
|---|---|---|---|
| 1 |
|
PLANTMEW 20000+pcs Creeping Thyme Seeds for Planting – Non-GMO Ground Cover Flowers –10g Edible... | Buy on Amazon |
| # | Preview | Product | |
|---|---|---|---|
| 1 |

|
Pennington Smart Seed Clover and Grass Mix 7 lb | Buy on Amazon |
Picture a yard carpeted with creeping thyme or clover, soft underfoot and bursting with tiny blooms. The dense greenery suppresses weeds naturally, creating a neat, inviting space. The plants spread quickly, covering bare patches and adding a fresh, verdant vibe to your outdoor area. Bees and butterflies love it too.
Select ground covers suited to your climate and soil—clover for low water needs, creeping thyme for a fragrant touch, or sedum for rocky areas. During different seasons, these plants change subtly, providing year-round interest. They work well in shady corners or sunny patches, making them versatile for any yard.
Clear weeds and loosen the soil before planting. Spread the ground cover seeds or plant starter patches, spacing them according to the variety’s growth habits. Water thoroughly until established. Mulch lightly around new plants to retain moisture. Maintenance involves occasional trimming to encourage dense growth and prevent overgrowth.
Add decorative stones or small stepping stones to create pathways through the ground cover. Incorporate small garden accents or border plants to break up the green. During flowering seasons, harvest or prune for a tidy appearance. It’s a simple, beautiful way to create a low-effort landscape.
Choosing fast-growing ground covers reduces yard work and keeps your outdoor space looking lush. It’s a smart, eco-friendly choice that adds vibrancy and life. With minimal effort, your yard can look professionally maintained and inviting. Ready to cover those bare patches?
10. Incorporate DIY Wind Chimes or Garden Ornaments from Recycled Items
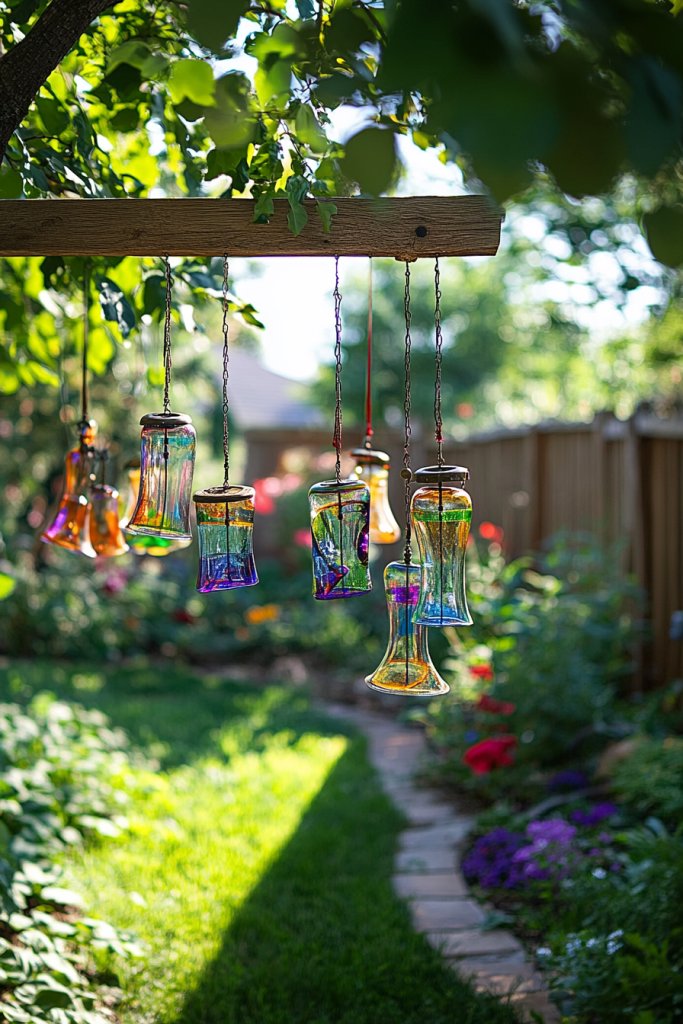
Want to add personality and movement to your garden without spending a fortune? DIY wind chimes and ornaments crafted from recycled materials can bring charm and a personal touch. They create gentle sounds and visual interest, making your outdoor space feel lively and welcoming. Plus, it’s a fun project to showcase your creativity.
Recommended Products to replicate this idea
| # | Preview | Product | |
|---|---|---|---|
| 1 |

|
4M Make A Wind Chime Kit - Arts & Crafts Construct & Paint A Wind Powered Musical Chime DIY Gift for... | Buy on Amazon |
| # | Preview | Product | |
|---|---|---|---|
| 1 |

|
Metal Flower Garden Stakes, 6 Pc. Set, Large Colorful Decorative Landscape and Gardening Outdoor... | Buy on Amazon |
Imagine hanging wind chimes made from old silverware, glass bottles, or metal scraps that catch the sunlight and sway softly in the breeze. The chimes produce soothing sounds that enhance the garden ambiance. Nearby, colorful ornaments crafted from scrap wood or metal add a playful, eclectic vibe. It’s a creative patchwork of recycled art that feels uniquely yours.
Use different materials for a layered, textured look—think metal, glass, or wood. Hang them from tree branches, pergolas, or fence posts. During different seasons, add elements like fabric ribbons or seasonal decorations to keep it fresh. They work well in both modern and rustic gardens, depending on your style.
Collect old utensils, keys, bottle caps, or scrap wood from around your home or yard. Drill small holes for hanging, and assemble the pieces with twine, wire, or string. Hang your creations at varying heights for visual interest. Securely attach the hangers to sturdy branches, hooks, or fences. Regularly clean and repair to keep them looking their best.
Paint or decorate the ornaments with bright colors or patterns that match your garden’s theme. Incorporate small bells or beads for extra sound effects. Personalize with engraved messages or symbols. Group different pieces together for a whimsical, artistic display.
Creating recycled wind chimes and ornaments is an inexpensive way to add charm and personality to your yard. It’s a project that encourages recycling and individual expression. Your garden will have a lively, musical atmosphere that’s both soothing and fun. Ready to craft some eco-friendly decor?
11. Install a Basic Drip Irrigation System Using Reused Tubing
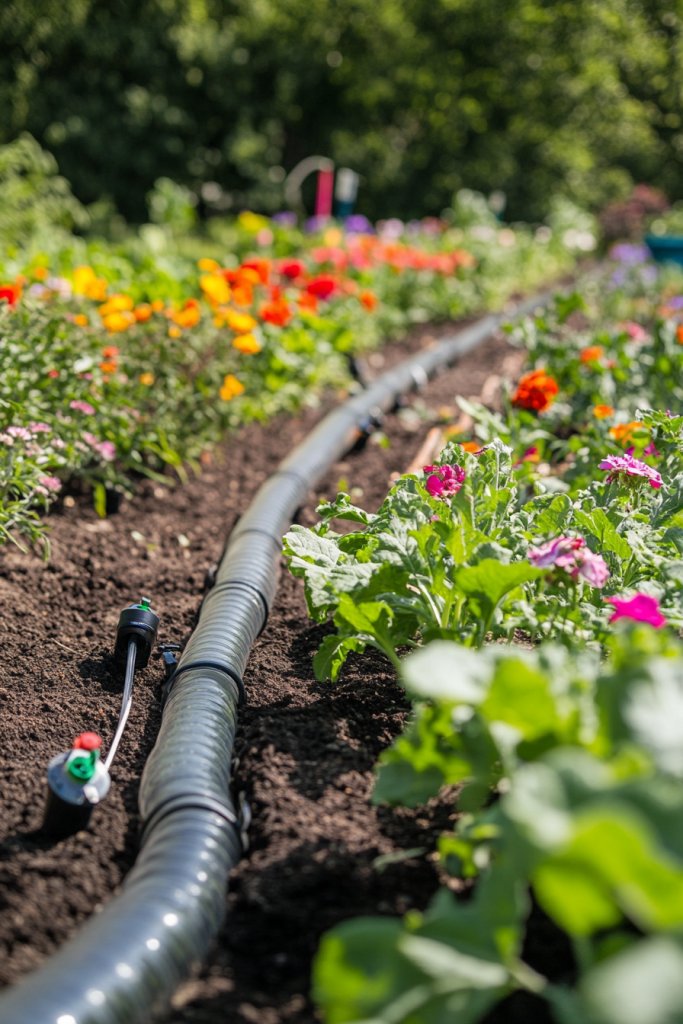
Fed up with dragging hoses around or overwatering your plants? A simple drip irrigation system can make watering more efficient and less time-consuming. Using reused tubing and hoses keeps costs down and your eco-consciousness up. It’s a practical upgrade that saves water and your energy.
Recommended Products to replicate this idea
| # | Preview | Product | |
|---|---|---|---|
| 1 |

|
Rain Bird DRIPKITBAG Drip Irrigation Repair and Expansion Kit | Buy on Amazon |
| # | Preview | Product | |
|---|---|---|---|
| 1 |

|
Garden Hose Repair Kits, 3 Sets Aluminum Alloy Water Hose Connector, Fit 3/4" and 5/8" Garden Hose,... | Buy on Amazon |
Imagine a neat network of thin tubing snaking through your garden beds, delivering water directly to roots. Each plant gets just the right amount, minimizing waste. The system quietly hums in the background, ensuring your plants stay healthy. It’s a low-profile, tidy setup that blends seamlessly with your landscape.
Customize your system with adjustable emitters or timers for automated watering. Use recycled hoses or tubing from old irrigation setups or hardware stores. During different seasons, modify the flow or coverage to match changing needs. It’s flexible enough for flower beds, vegetable patches, or container gardens.
Lay out your layout by planning where each emitter will go, based on plant placement. Cut reused tubing to length and connect using connectors or clamps—many are compatible with salvaged parts. Attach the tubing to a water source, and test for even flow. Secure the tubing with stakes or clips to prevent movement. Consider adding a timer for hands-free operation.
Label different zones with weatherproof tags, or add decorative stones along the tubing for visual appeal. Use drip emitters with adjustable flow rates for customization. During dry spells, increase watering duration or add supplementary spray nozzles for larger areas. Keep the system clean to prevent clogging.
Installing a DIY drip irrigation system is a smart way to nurture your garden with less hassle and water waste. It boosts your confidence in creating efficient, eco-friendly landscapes. Your plants will thank you with healthy growth, and you’ll enjoy less manual labor. Ready to automate your watering?
12. Create a Low-Cost Privacy Screen with Fast-Growing Shrubs or Bamboo
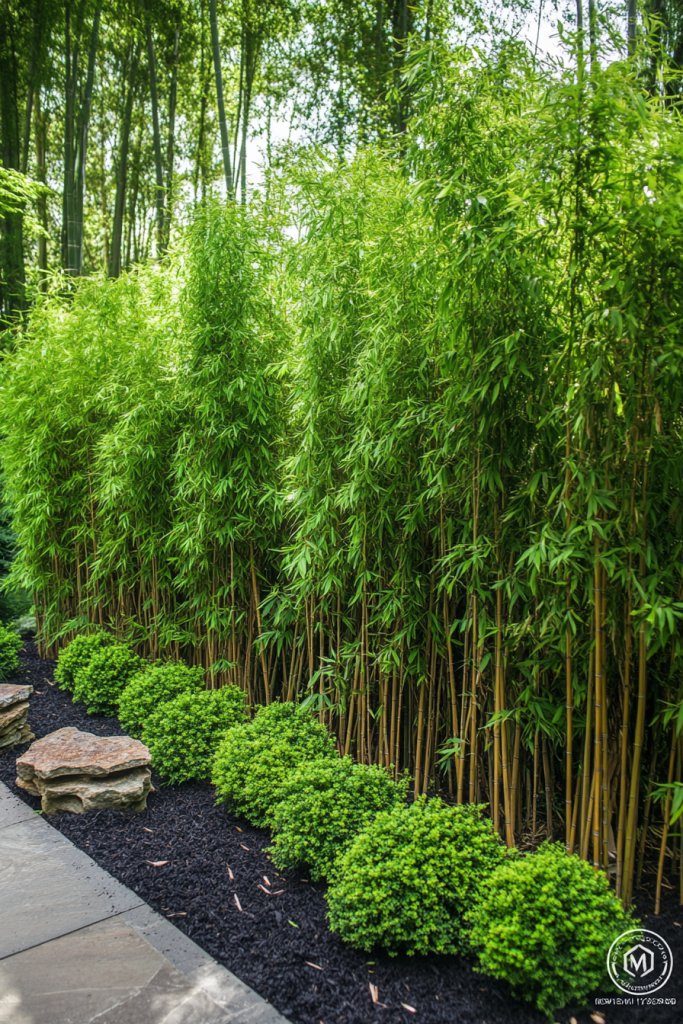
Feeling exposed in your yard or patio? Privacy is a must for relaxing outdoors without feeling like you’re on display. Fast-growing shrubs or bamboo provide an affordable, natural barrier that quickly shields your space from prying eyes. It’s an eco-friendly, stylish solution that doesn’t require a big investment.
Recommended Products to replicate this idea
| # | Preview | Product | |
|---|---|---|---|
| 1 |

|
300+ PCS Purple Black Bamboo Seeds for Planting Exotic Bamboo Seed Fast Growing Giant Bamboos... | Buy on Amazon |
| # | Preview | Product | |
|---|---|---|---|
| 1 |

|
Hybrid Willow Tree Plants for Growing | Fast Privacy Hedge Row, Wind Block, Shade | Fast Growing -... | Buy on Amazon |
Visualize a thick wall of tall bamboo or lush evergreen shrubs forming a natural curtain around your patio. The greenery sways gently in the breeze, creating a calming, secluded atmosphere. Small gaps or spaces can be filled with decorative rocks or mulch, blending privacy with aesthetics. It turns your yard into a private oasis.
Choose native or drought-tolerant plants for easier maintenance. Bamboo can be planted in clusters or containers for a more controlled look. During different seasons, prune or shape the plants for a tidy appearance. Incorporate decorative fencing or trellises with climbing plants for added style and privacy.
Prepare the planting area by clearing weeds and loosening soil. Dig holes twice as wide as the root balls and space the plants according to their mature size. Water thoroughly after planting and mulch around the base. Regularly trim to encourage dense growth and remove any dead or overgrown parts. Consider planting in staggered rows for a natural, layered effect.
Add decorative stones or bark mulch around the plants for a finished look. Attach string lights or hanging ornaments to nearby fences or trellises for ambiance. During different seasons, you can add fabric screens or lightweight curtains for extra privacy and style. Personal touches make the space uniquely yours.
Using fast-growing plants for privacy is a budget-smart, quick fix that transforms your yard into a private retreat. It’s an easy project that boosts confidence in your landscape skills while enhancing your outdoor experience. Your friends will wonder how you achieved such privacy on a budget. Ready to plant your peaceful barrier?
13. Use Painted Rocks to Mark Garden Sections or Pathways
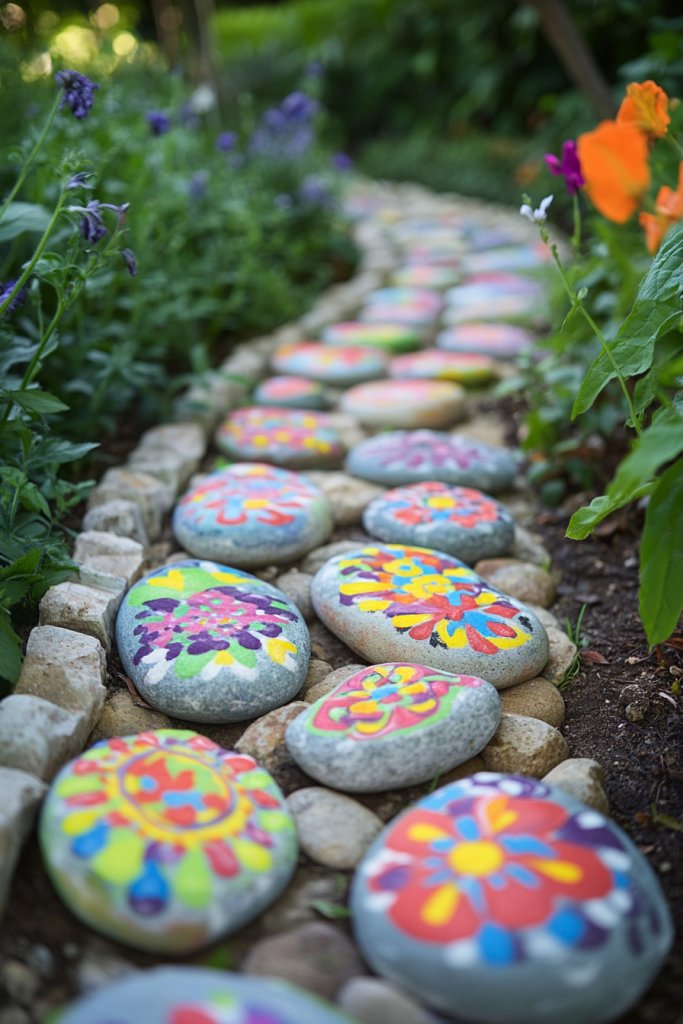
Want a creative way to organize your garden and add a splash of color? Painted rocks are inexpensive, versatile, and fun to make. They can mark different sections, guide pathways, or serve as decorative accents. It’s a simple project that brings personality and order to your outdoor space.
Recommended Products to replicate this idea
| # | Preview | Product | |
|---|---|---|---|
| 1 |

|
Shuttle Art Outdoor Acrylic Paint Set, 12 Colors Waterproof Paint, 8.45oz/250ml Large Bottles, Rich... | Buy on Amazon |
| # | Preview | Product | |
|---|---|---|---|
| 1 |

|
ROCART 100 Large 2.05-3.15" Flat Rocks for Painting, Smooth River Rocks Painting Supplies for... | Buy on Amazon |
Visualize a winding garden path lined with smooth, painted stones in bright colors or intricate patterns. Each rock serves as a visual cue—indicating plant zones or directions. The stones add texture and color, creating a playful, inviting environment. Some are decorated with symbols or quotes that reflect your personality.
Use a variety of colors and designs to match your garden theme—pastel for a soft, romantic look or bold for a modern vibe. Group larger stones as focal points or scatter smaller ones for subtle guidance. During different seasons, refresh the paint or add seasonal motifs. They work well in formal and informal gardens alike.
Gather smooth stones from your yard or buy them inexpensively. Clean and dry them thoroughly. Use outdoor acrylic paint and seal with clear weatherproof spray for durability. Decorate with patterns, numbers, or symbols. Place the stones along pathways or within garden beds, pressing them slightly into the soil for stability. Repaint as needed.
Create themed sets—like ocean, floral, or abstract designs—and store extras for future use. Use the stones as plant markers or decorative accents on plant pots. Incorporate small engraved or painted messages for a personal touch. Grouping stones into artful arrangements enhances visual appeal.
Decorating with painted rocks is an affordable, creative way to organize and beautify your garden. It’s a relaxing activity that offers a big payoff in visual charm. Your yard will look more organized, colorful, and personalized. Ready to paint your way to a more vibrant landscape?
14. Build a Simple Compost Bin from Recycled Pallets or Bins
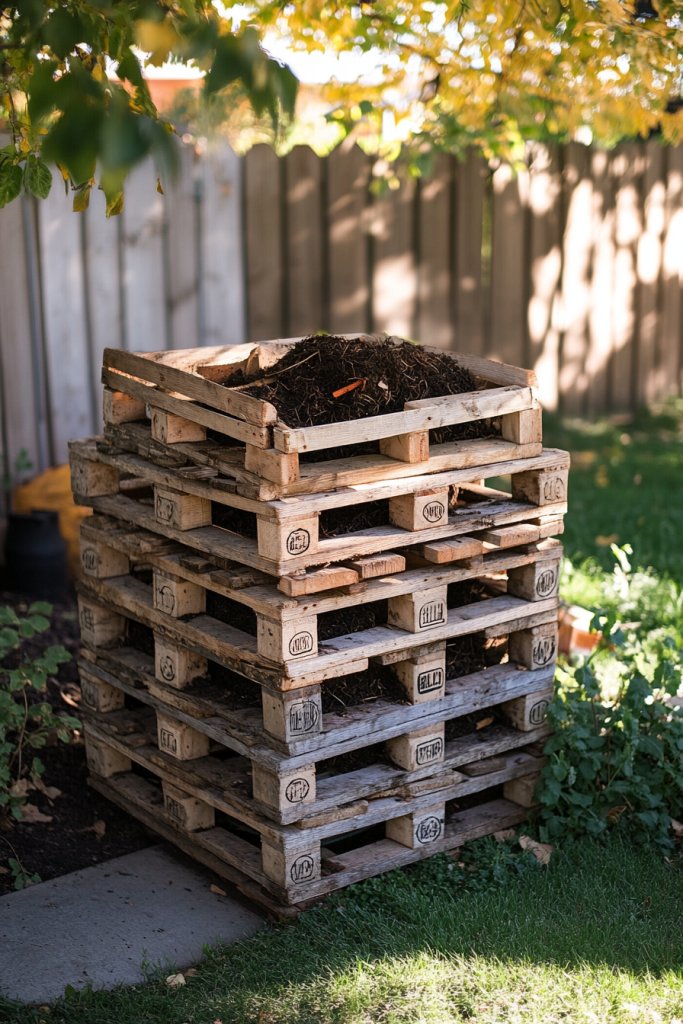
Want to reduce waste and improve your garden’s soil naturally? A compost bin made from recycled pallets or bins is an easy, inexpensive way to turn kitchen scraps and yard waste into rich compost. It’s eco-friendly, budget-friendly, and gives your garden a boost of natural nutrients. Who doesn’t want healthier plants for less?
Recommended Products to replicate this idea
| # | Preview | Product | |
|---|---|---|---|
| 1 |

|
EPICA Countertop Compost Bin Kitchen | 1.3 Gallon | Odorless Composting Bin with Carbon Filters |... | Buy on Amazon |
| # | Preview | Product | |
|---|---|---|---|
| 1 |

|
SOCOME 115 Gallon Solid Wood Composter, Outdoor Compost Bin with Pull-Out Door and Flip-Top Lid,... | Buy on Amazon |
Picture a sturdy, open-sided bin constructed from weathered pallets, filled with rotting organic matter. The smell of composting leaves and food scraps is earthy and satisfying. Over time, dark, crumbly compost forms, ready to nourish your plants. The simple structure blends into your yard, a testament to sustainable living.
Choose between open or covered designs, depending on your climate and preference. Add a lid or tarp for moisture control and pests. Incorporate a bin with multiple sections for easier turning and harvesting. During different seasons, adjust the location for optimal heat and airflow. It’s adaptable to your space and needs.
Source pallets from local stores or reuse bins you already have. Assemble the sides using nails or screws, ensuring stability and airflow. Place your bin on a well-drained, accessible spot—near the garden but out of the way. Fill it with a mix of kitchen scraps, grass clippings, and leaves, turning it regularly for even decomposition. Keep it moist but not soggy.
Label your compost bin with painted or stenciled signs. Add a small thermometer or moisture indicator for better management. Incorporate a compost turning tool or a simple pitchfork for aeration. Personal touches like decorative paint or a small planter on top make the bin an integrated part of your yard.
Building a compost bin from recycled materials is a straightforward, eco-conscious project that enhances your garden’s health. It reduces waste and saves money on fertilizers. Plus, you’ll feel good knowing you’re doing your part for the environment. Ready to start composting?
15. Design a Minimalist Gravel or Pebble Area for Low-Maintenance Style

Ever wish your yard looked sleek without spending hours on upkeep? A minimalist gravel or pebble area offers a clean, modern look that’s practically maintenance-free. It’s perfect for those who want style without the constant fuss of mowing or weeding. Plus, it instantly elevates your outdoor space with minimal effort.
Recommended Products to replicate this idea
| # | Preview | Product | |
|---|---|---|---|
| 1 |

|
Virekm River Rocks, Decorative Ornamental Pebbles,Garden Landscaping Stones,Gravel Filler for Home... | Buy on Amazon |
| # | Preview | Product | |
|---|---|---|---|
| 1 |
|
VEVOR 4FTx300FT Premium Heavy Duty Weed Barrier Landscape Fabric, 3.2OZ Woven Geotextile Fabric... | Buy on Amazon |
Picture a smooth expanse of uniform, light-colored pebbles nestled around a simple seating area. The gravel creates a crisp border between flower beds and pathways, reflecting sunlight and adding brightness. The subtle texture contrasts beautifully with sleek furniture or sculptural planters, giving your yard a contemporary vibe. It’s like a Zen garden but easier to maintain.
You can opt for darker stones for a dramatic look or mix different sizes for texture. Seasonal accents like a few colorful succulents or drought-tolerant plants can soften the edges without cluttering the space. This style works well in small urban patios or large backyard retreats, adapting easily to different climates and aesthetics.
Start by clearing the area and laying down a weed barrier fabric. Spread a layer of crushed gravel or pebbles to your desired depth, usually 2-3 inches. Use a rake to level the surface, then compact it with a tamper. For a cleaner look, install metal or plastic edging to contain the stones. Add stepping stones or small seating elements to create functional zones.
Incorporate decorative elements like angular rocks or polished stones for visual interest. Use textured or patterned gravel to add a unique touch. You can also add small solar-powered lights or minimalist sculptures to create ambiance at night. The key is simplicity—let the stones speak for themselves and keep accessories minimal.
A gravel or pebble area offers a stylish, low-maintenance solution that fits any budget. It’s a modern twist on traditional landscaping, showing that simplicity can be stunning. Once installed, it requires little upkeep, freeing you to enjoy your outdoor space more. Ready for a sleek upgrade that lasts?
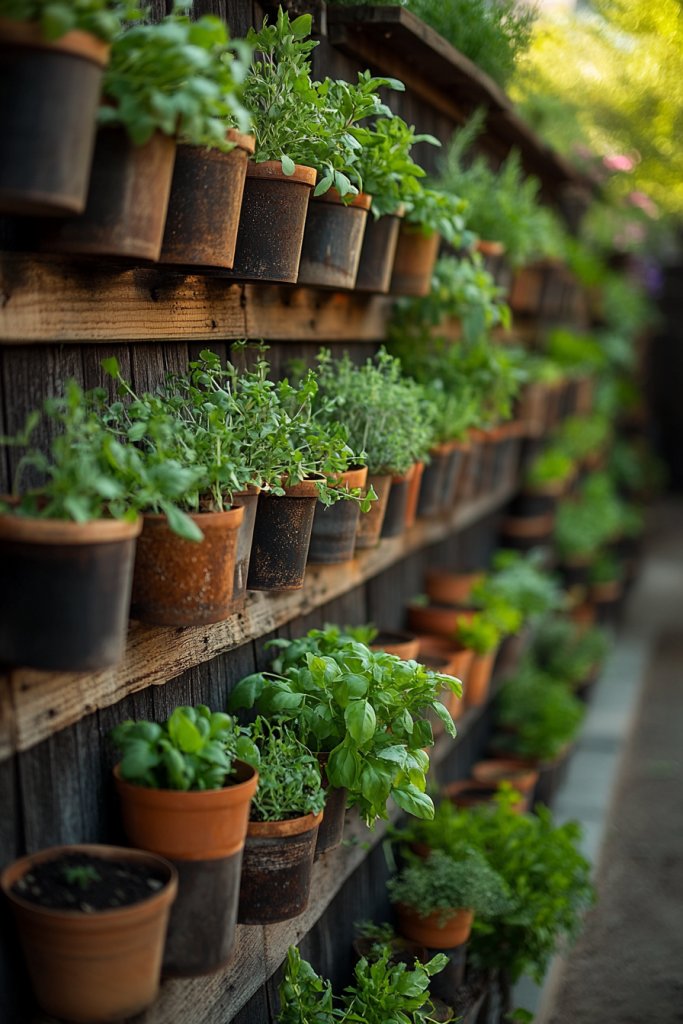
16. Hang DIY Vertical Planters from Reclaimed Wood or Metal Frames
Struggling to find enough space for your gardening hobby? Vertical planters unlock new dimensions for green thumbs with limited square footage. They transform bland walls or fences into lush, living art. Plus, they keep your plants off the ground and out of harm’s way, making maintenance easier.
Recommended Products to replicate this idea
| # | Preview | Product | |
|---|---|---|---|
| 1 |

|
Maxona Vertical Wall Planter for Indoor Plant-Walls Mounted Pot with 2 Drainage Tray 8 Pack, 13 inch... | Buy on Amazon |
| # | Preview | Product | |
|---|---|---|---|
| 1 |

|
Charmy Crafts 18″ Wooden Jharokha Wall Shelf with Base – Hand‑Carved Reclaimed Wood Decorative... | Buy on Amazon |
Imagine a weathered wooden pallet mounted on a fence, filled with colorful herbs or small flowers. Or picture a series of metal gutters repurposed into tiered planters on a patio wall. The textures contrast—rough wood, shiny metal, and vibrant greenery—creating a dynamic visual display. It’s like turning your vertical surfaces into botanical murals.
Use reclaimed wood for a rustic look or sleek metal frames for a modern vibe. Customize sizes and shapes to fit your space, from small wall-mounted boxes to large hanging gardens. This idea works well indoors too, like in a kitchen or stairwell, for year-round greenery regardless of season.
Begin by selecting sturdy reclaimed wood or metal frames suited to your design. Attach hooks, brackets, or mounting hardware securely to your wall or fence. Fill the planters with your chosen soil and plants—consider lightweight options like succulents or herbs. Ensure proper drainage to prevent water buildup and root rot. Regular watering and occasional pruning keep the display fresh.
Decorate the frames with painted patterns or stenciled designs for extra flair. Incorporate small storage hooks or shelves nearby for gardening tools or pots. Use colorful pots or liners to add contrast, or string fairy lights for a cozy glow at night. The goal is a personalized, functional art piece.
Vertical planters turn blank walls into vibrant focal points, making your space feel alive and inviting. They’re easy to customize and expand over time, ensuring your garden grows along with your skills. It’s a simple project that delivers big visual impact—get planting!
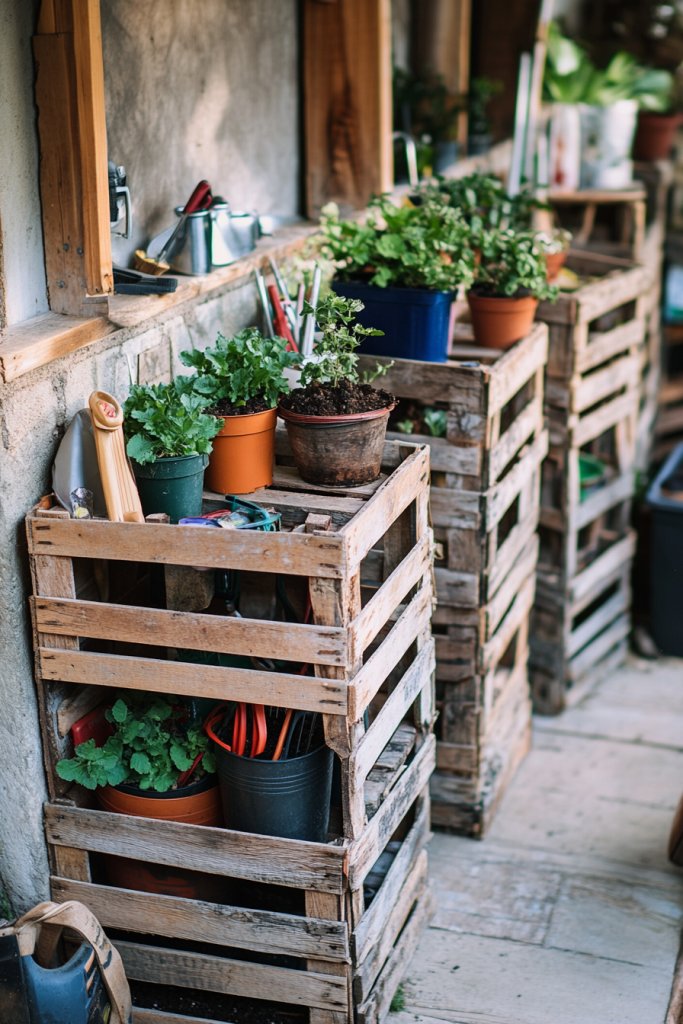
17. Use Reclaimed Wooden Crates as Storage or Plant Stands
Clutter and disorganized tools or supplies can ruin the vibe of your outdoor space. Reclaimed wooden crates offer a charming, budget-friendly way to organize while adding rustic style. They’re versatile enough to serve as storage, plant stands, or even side tables. Who knew repurposed wood could be so functional?
Recommended Products to replicate this idea
| # | Preview | Product | |
|---|---|---|---|
| 1 |

|
TIMRIS Set of 2 Rustic Wooden Countertop Baskets, Farmhouse Distressed Nesting Boxes, Small... | Buy on Amazon |
| # | Preview | Product | |
|---|---|---|---|
| 1 |

|
TOPZEA Set of 2 Mini Wooden Stool Display Stand, Wood Riser for Bonsai, Flower Pot, Small Potted... | Buy on Amazon |
Picture a row of vintage crates stacked in a corner, filled with gardening supplies or potted plants. The distressed wood adds character, while the open slats give a relaxed, airy feel. Arranged neatly or casually, they create a cozy, lived-in atmosphere that’s both practical and inviting. It’s like bringing a piece of a farmyard into your backyard.
Paint or stain the crates to match your decor, from weathered gray to bright colors. Stack them vertically for height or line them up on the ground for easy access. Use them indoors for a boho vibe or outdoors for a garden shed look. Incorporate wheels for mobility or add cushions on top for seating.
Start by sourcing reclaimed crates from flea markets, thrift stores, or online marketplaces. Clean and treat the wood with weatherproof sealant if used outdoors. Use them to store tools, hoses, or decorative items. For plants, line crates with landscape fabric, fill with soil, and plant your favorites. Secure stacks with brackets if needed for stability. Regularly check for signs of rot or pests.
Add personal touches with stenciled labels or painted patterns. Incorporate small hooks or holders for garden gloves or tools. Place a soft cushion on top of some crates to create a rustic seat. Combine with other vintage items like watering cans or lanterns for a curated look.
Using reclaimed crates proves that affordable, eco-friendly solutions can be stylish and functional. They make organizing outdoors effortless while adding charm. Plus, customizing them is a fun DIY project that boosts your confidence in creative reuse. Ready to get crafty?
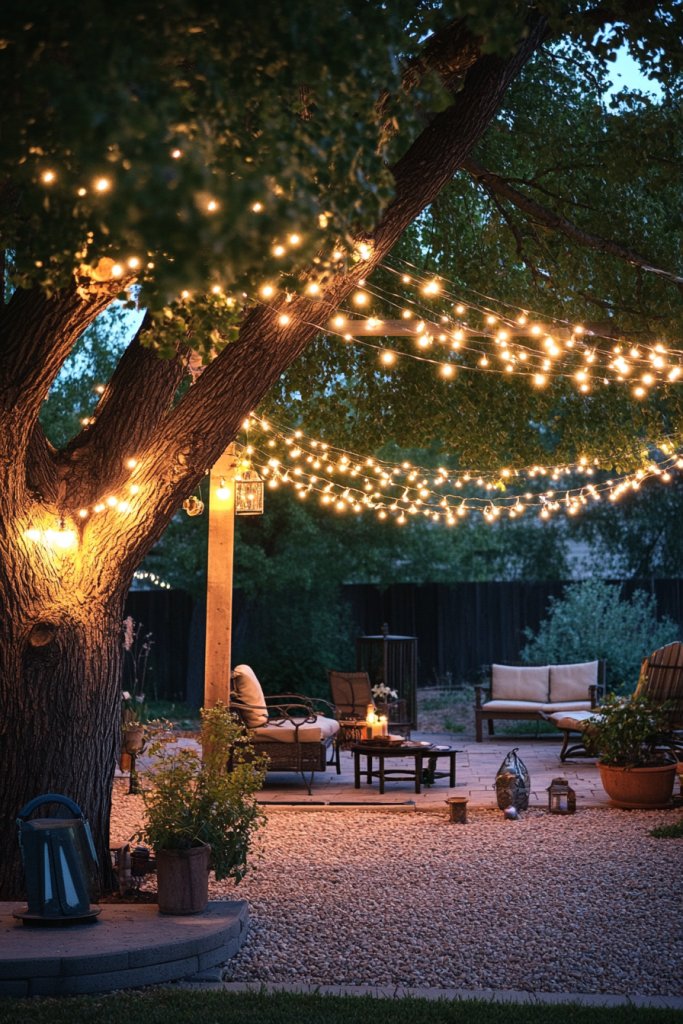
18. Install DIY Fairy Lights with Cost-Effective String Lights
Want to enjoy your backyard well into the evening without breaking the bank? Fairy lights are a simple, inexpensive way to add magic and ambiance. They turn ordinary outdoor spaces into cozy retreats, perfect for unwinding or entertaining. Plus, they’re easy to install and remove.
Recommended Products to replicate this idea
| # | Preview | Product | |
|---|---|---|---|
| 1 |
|
Brightever LED Outdoor String Lights 100FT Patio Lights with 52 Shatterproof ST38 Vintage Edison... | Buy on Amazon |
| # | Preview | Product | |
|---|---|---|---|
| 1 |

|
Solar Lights Outdoor(4 Pack,32 LEDs), ASMAD Solar Garden Lights, Outdoor Decorations, Firefly Light... | Buy on Amazon |
Imagine strings of warm LED lights draped along fences, pergolas, or trees, casting a gentle glow over your space. The tiny bulbs twinkle like stars, creating a whimsical atmosphere. The soft light reflects off textured surfaces and casts playful shadows, making everything feel enchanted. It’s like transforming your yard into an outdoor fairy tale.
Use solar-powered or battery-operated string lights for easy installation without wiring. Choose different bulb shapes or colors to match your style—classic warm white, colorful, or vintage-inspired Edison bulbs. Wrap lights around structural elements or hang them in zigzag patterns for a whimsical effect. Seasonal variations include adding lanterns or paper lanterns for special occasions.
Measure your space and plan the layout. Attach hooks or nails to secure the string lights at intervals, ensuring they are taut but not stretched. Use zip ties or clips for extra hold. Position solar panels or batteries in sheltered spots for reliable power. Test the lights before final installation to avoid surprises. For larger areas, connect multiple strands for a seamless glow.
Create focal points by hanging lights around a seating area or framing a garden feature. Mix in DIY lanterns or paper shades for added texture. Use colored bulbs for themed parties or cozy evenings. Incorporate timers or dimmers to control brightness and save energy. The goal is an inviting, personalized glow that’s easy to adjust.
Fairy lights are a budget-friendly way to upgrade your outdoor space instantly. They’re simple DIY projects that deliver big visual impact. Brighten your nights and create a relaxing atmosphere to enjoy with friends or alone. Who knew tiny bulbs could make such a difference?
19. Create a Simple Lawn Area Using Affordable Turf or Grass Seed
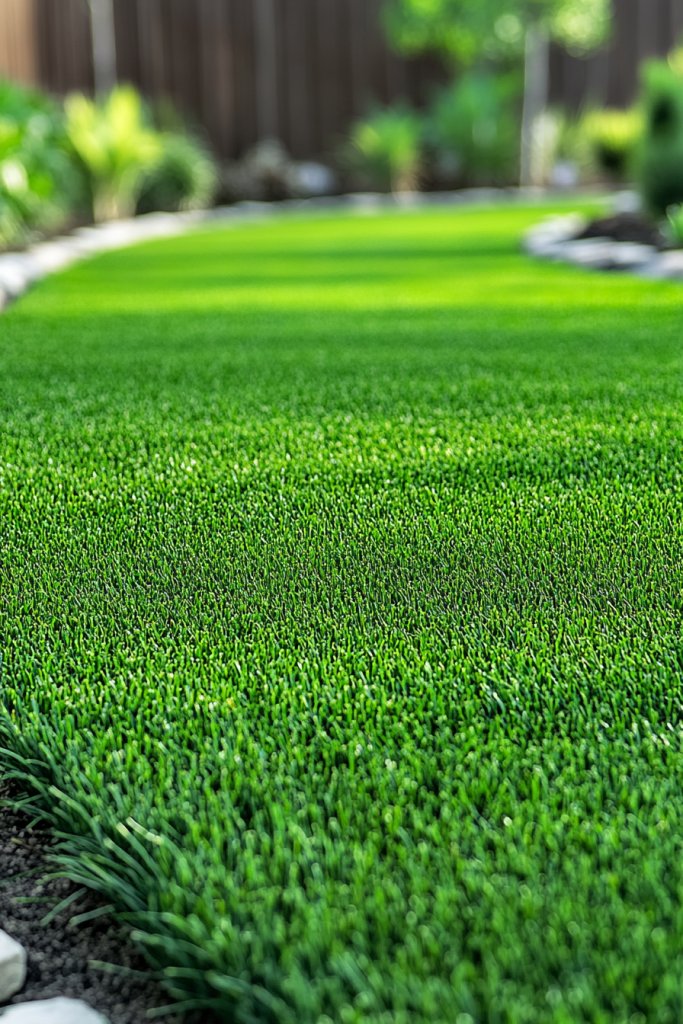
Dreaming of a lush, green lawn but worried about costs and maintenance? Establishing a simple, healthy lawn is easier than you think with affordable turf or seed. It’s a practical way to turn a patch of dirt into a beautiful space for play, relaxation, or gatherings.
Recommended Products to replicate this idea
| # | Preview | Product | |
|---|---|---|---|
| 1 |

|
Scotts Turf Builder Grass Seed Sun & Shade Mix with Fertilizer and Soil Improver, Thrives in Many... | Buy on Amazon |
| # | Preview | Product | |
|---|---|---|---|
| 1 |

|
GRASS EXPRESS Artificial Grass Turf, 10ft x 10ft 0.4" Pile Height, Indoor Outdoor Fake Astroturf Rug... | Buy on Amazon |
Visualize a freshly laid patch of bright green turf, evenly cut and inviting. Alternatively, imagine a newly seeded area with a light mist of water and tiny shoots emerging. The vibrancy of the grass contrasts with surrounding hardscapes or flower beds, providing a perfect backdrop. It transforms your yard into a soft, welcoming haven.
Choose between instant turf for quick results or grass seed for a more budget-friendly approach. Select drought-tolerant or native varieties suited to your climate. For small patches, spot seeding works well; larger areas benefit from rolled turf. Seasonal planting ensures you get the best growth and durability.
Prepare the soil by removing weeds and tilling it to loosen. Level the ground and add a thin layer of compost if needed. Lay turf sheets or spread seed evenly, then water thoroughly. Keep the area moist until the grass establishes, typically a few weeks. Use a lawn roller to ensure good soil contact for turf. Regular watering and mowing will keep it healthy.
Add a border or edging to define the lawn, using inexpensive materials like bricks or wood. Incorporate stepping stones or small pathways for easy access and visual interest. Use inexpensive lawn paint for temporary color accents or patterns. Maintain a consistent mowing and watering schedule to keep your lawn lush.
A simple lawn adds instant curb appeal and creates a versatile space for all kinds of outdoor fun. It’s a cost-effective way to boost your home’s value and your outdoor enjoyment. With just a little effort, you’ll have a vibrant green space you can be proud of.
20. Add Cheap, Colorful Outdoor Rugs or Mats
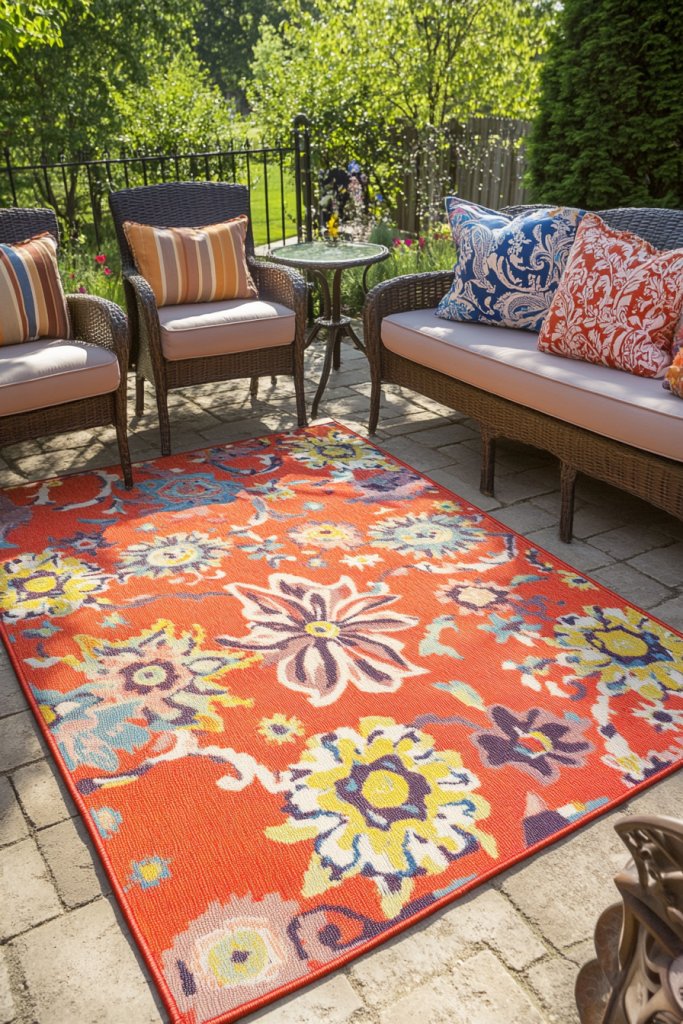
Wish your outdoor space felt more inviting and cozy? Cheap outdoor rugs and mats are an easy fix to define seating zones and add a splash of color. They instantly make patios or decks feel like extensions of your indoor style, without a hefty price tag. Plus, they’re practical and easy to swap out.
Recommended Products to replicate this idea
| # | Preview | Product | |
|---|---|---|---|
| 1 |
|
SAND MINE Waterproof Outdoor Rug 5x8 ft, Plastic Reversible Rug, Modern Area Rug, Large Floor Mat... | Buy on Amazon |
| # | Preview | Product | |
|---|---|---|---|
| 1 |
|
SAND MINE Reversible Mats, Plastic Straw Rug, Modern Area Rug, Large Floor Mat and Rug for Outdoors,... | Buy on Amazon |
Envision a vibrant, patterned rug laid beneath a weather-resistant table and chairs. The bright colors contrast with neutral paving stones or decking, energizing the space. Textured mats add tactile appeal and soften hard surfaces. When the sun sets, string lights or lanterns cast a warm glow, making your outdoor area feel warm and welcoming.
Pick bold, colorful patterns for a lively vibe or subtle tones for a minimalist look. Layer rugs for added depth or use different sizes to define distinct zones like dining or lounging areas. Seasonal changes are easy—swap out rugs for different colors or patterns to match holidays or moods.
Choose rugs made from weather-resistant materials like polypropylene or acrylic. Lay them flat on clean, dry surfaces, ensuring they’re secured with outdoor tape or weights if needed. For larger spaces, use multiple rugs to create an inviting layout. Regularly shake out or hose down to keep them clean and fresh.
Add decorative cushions or poufs that coordinate with your rugs for extra comfort. Incorporate small side tables or lanterns nearby to enhance the ambiance. Use outdoor rugs as a base for DIY projects, such as painted designs or stitched embellishments. The goal is a colorful, cozy zone that feels personal.
Affordable outdoor rugs are a quick way to elevate your space and boost your decorating confidence. They’re versatile, stylish, and simple to change as your tastes evolve. Enjoy your new cozy corner—who says outdoor lounging can’t be chic?
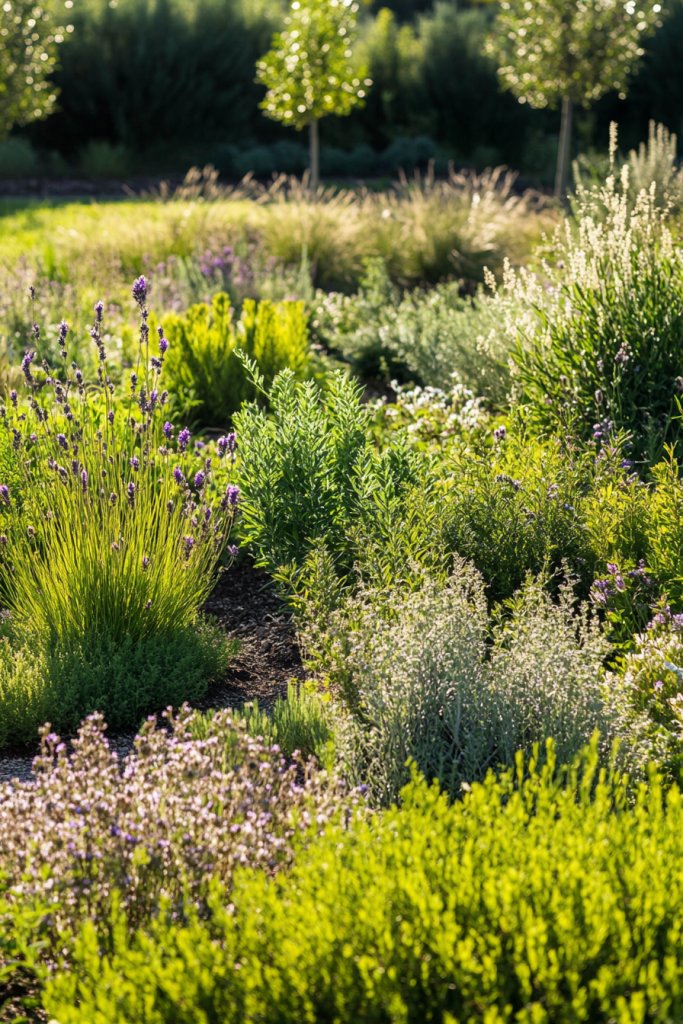
21. Incorporate Native Plants for Low-Cost, Eco-Friendly Landscaping
Tired of high water bills and constant yard work? Native plants offer a sustainable, budget-friendly solution that thrives with minimal care. They’re adapted to your local climate, so watering and maintenance are drastically reduced. Plus, they boost local biodiversity and support native wildlife.
Recommended Products to replicate this idea
| # | Preview | Product | |
|---|---|---|---|
| 1 |

|
California Wildflower Mixture - Bulk 1 Ounce Packet - Over 7,000 Native Seeds - Open Pollinated and... | Buy on Amazon |
| # | Preview | Product | |
|---|---|---|---|
| 1 |

|
20000pcs Purple Creeping Thyme Seed for Planting Flowers Seeds Perennial Ground Cover Plants, Lawn... | Buy on Amazon |
Imagine a garden bed filled with drought-tolerant wildflowers and grasses, naturally thriving without fuss. The plants’ varied textures and shades of green create a relaxed, natural look. Birds, bees, and butterflies flutter around, adding lively movement and sound. It’s a vibrant, eco-friendly landscape that blends seamlessly into the environment.
Select native species suited to your soil and sun exposure, choosing from flowering perennials, grasses, or shrubs. Mix different heights and textures for visual interest. Incorporate mulch or rocks to reduce weeds and moisture loss. You can design formal or informal native gardens, depending on your style.
Research native plants suitable for your area through local extension offices or native plant societies. Prepare your soil by removing invasive species and amending it minimally. Plant in early spring or fall for best establishment. Use native mulch and water sparingly until plants settle in. Over time, native plants require little intervention.
Create personalized pathways using local stones or recycled materials. Add decorative features like driftwood or sculptural elements made from eco-friendly materials. Incorporate functional elements like rain gardens or bioswales to manage runoff. Your landscape becomes a true reflection of local ecology and your personal style.
Incorporating native plants demonstrates your commitment to sustainability and regional beauty. They are a testament to eco-awareness that doesn’t sacrifice style. Over time, your garden becomes a thriving, low-maintenance haven that’s good for the planet and your wallet.
Conclusion
With a diverse array of budget-friendly landscaping ideas, you now have the tools to elevate your outdoor space without overspending. Whether you opt for DIY plant displays, repurposed decor, or creative layout tweaks, each idea brings your vision closer to reality. Get inspired, take action, and watch your yard transform into a beautiful, functional haven you can enjoy every day.
Last update on 2026-02-11 / Affiliate links / Images from Amazon Product Advertising API