Are you dreaming of a craft room that sparks creativity without breaking the bank? Crafting is a beloved hobby for many, and having a dedicated space can boost your inspiration—plus, creating one on a budget makes it even more satisfying! Budget-friendly craft rooms are trending because they prove that you don’t need expensive furniture or fancy decor to make a space functional and inspiring.
In this article, you’ll find a variety of clever ideas to transform your craft space into a haven of creativity without overspending. From DIY storage solutions to charming decor tips, these ideas are perfect for crafters of all levels looking to personalize their space and save money at the same time.
1. Repurposed Vintage Suitcases as Stylish Storage Solutions
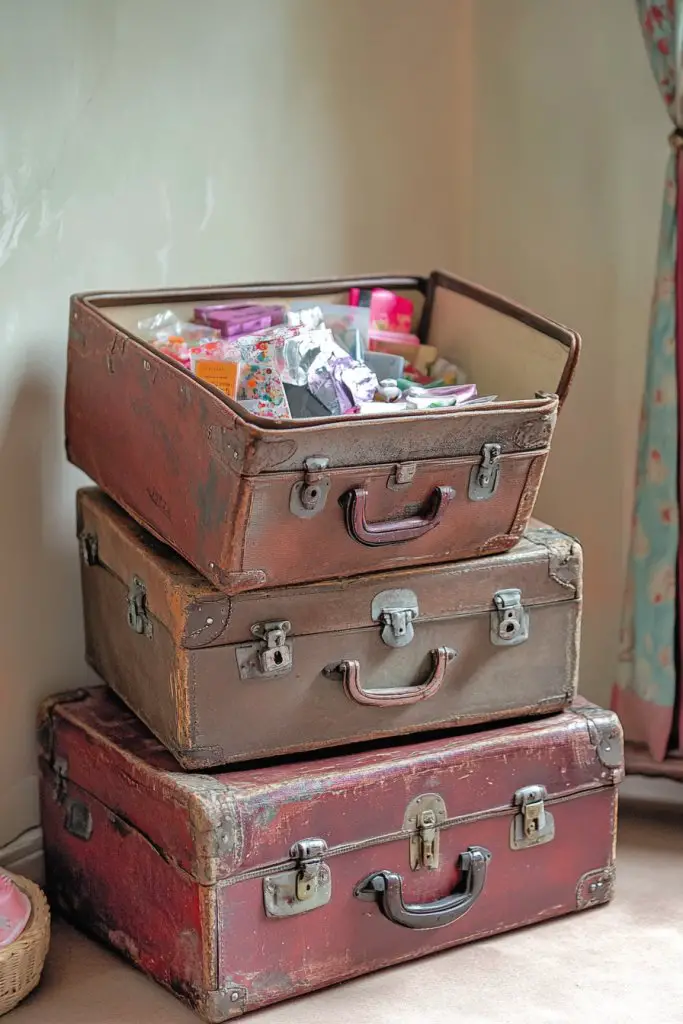
Ever feel overwhelmed by clutter but hate the look of typical storage bins? Vintage suitcases are perfect for adding charm and character while hiding your crafty mess. They turn functional storage into a statement piece. Who said storage has to be boring or purely utilitarian?
Imagine stacking a collection of old suitcases in soft pastel shades or distressed leather, creating a whimsical display. You open one to reveal neatly folded fabrics or organized craft tools inside. Their curved edges and vintage hardware add a nostalgic touch, making your space both practical and pretty. They sit perfectly on shelves or tucked under tables, blending form and function.
Choose suitcases with different sizes for a layered look, or keep them uniform for a cleaner aesthetic. For a more rustic vibe, opt for distressed finishes or natural leather. You can also decorate the exterior with fabric liners or custom paint. Seasonal tweaks, like adding holiday-themed tags or ribbons, give it a personalized touch. Suitcases work well in vintage, shabby chic, or eclectic styles.
Start by sourcing old suitcases from thrift stores, flea markets, or online marketplaces—look for sturdy handles and hinges. Clean and disinfect thoroughly before repurposing. Decide whether to line the interior with fabric for a softer look or leave it raw for a rugged vibe. Secure multiple suitcases with vintage-style straps or stacking supports for stability. Use them as storage on shelves, under desks, or as decorative side tables.
Add custom labels, vintage stickers, or fabric liners to match your decor theme. Incorporate small decorative knobs or tassels for a playful touch. Personalize with monograms or painted designs on the exterior. You can also add a small cushion on top to turn a suitcase into a cozy seat or footrest. Mix and match with other vintage finds for a curated look.
Vintage suitcases are a stylish way to keep your craft space organized without sacrificing charm. They turn storage into an art form and boost your creative vibe. Ready to give your room a nostalgic upgrade while staying practical? Your cluttered corner just became a vintage-inspired masterpiece!
2. DIY Pegboard Wall Organizer with Painted Frames
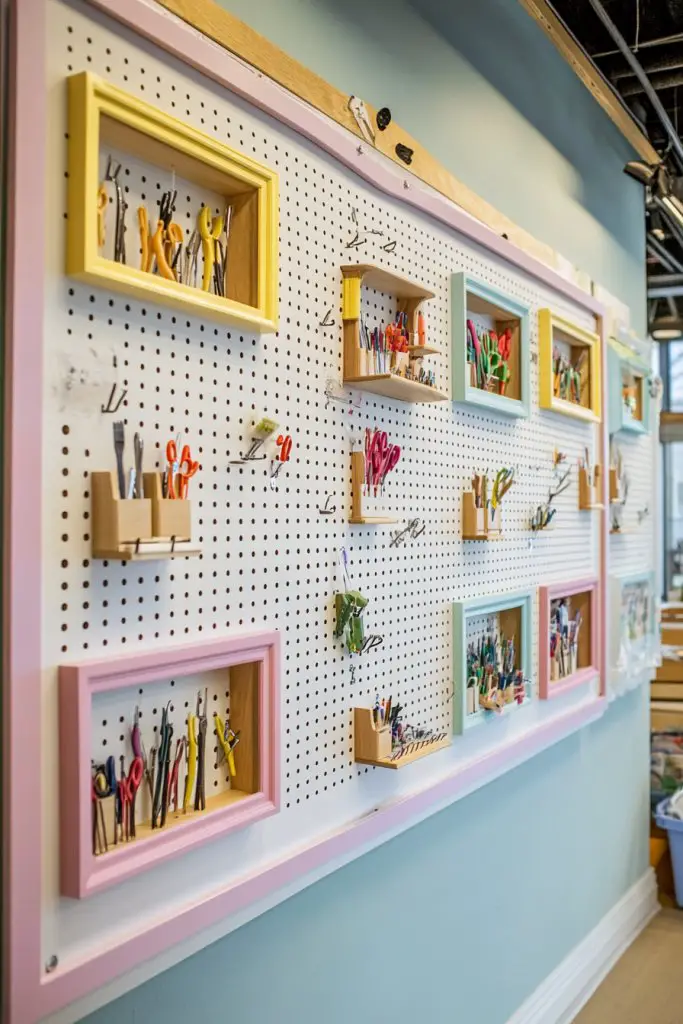
Messy craft supplies scattered everywhere? A cluttered workspace kills creativity faster than a bad coffee. Installing a pegboard offers a simple fix that keeps everything within reach. But plain pegboards can look dull—why not give it a splash of personality?
Picture a vibrant pegboard painted in bold colors or geometric patterns, hung above your workspace. Ribbons, scissors, and small tools hang neatly from hooks, creating a visual feast of organized chaos. Framed with inexpensive picture frames painted to match your decor, it instantly elevates your workspace from functional to fashionable. The colors pop against a neutral wall, inspiring you to craft more.
You can customize the frames to suit your style—vintage, modern, or boho. Use contrasting colors or metallic paints for a sleek look. Mix different frame sizes or shapes for visual interest. Seasonal color schemes or metallic accents can refresh the look throughout the year. This adaptable system works equally well in small corners or large walls.
Start by purchasing a basic pegboard from any hardware store, then paint it with your chosen colors or patterns. Use painter’s tape for clean lines or stencils for designs. Secure the painted pegboard to the wall with sturdy hooks or brackets. Attach hooks, shelves, or bins to hold your supplies, adjusting placement as needed. Decorate the edges with painted or decoupage frames for a polished, personalized look.
Add small decorative elements like washi tape borders or chalkboard labels for easy identification. Use different colored hooks or clips for categories—think color-coding for quick access. Incorporate small shelves within the frames for storing tiny items or displaying miniatures. Switch up the paint or add decals seasonally to keep the space fresh and inspiring.
A DIY painted frame pegboard transforms your messy supplies into a curated display. It’s a practical yet stylish upgrade that makes organization fun. Once you see how it boosts your productivity and style, you’ll wonder why you didn’t do it sooner. Get ready to craft with confidence in a workspace that truly reflects your personality.
3. Upcycled Wooden Crates as Modular Shelving
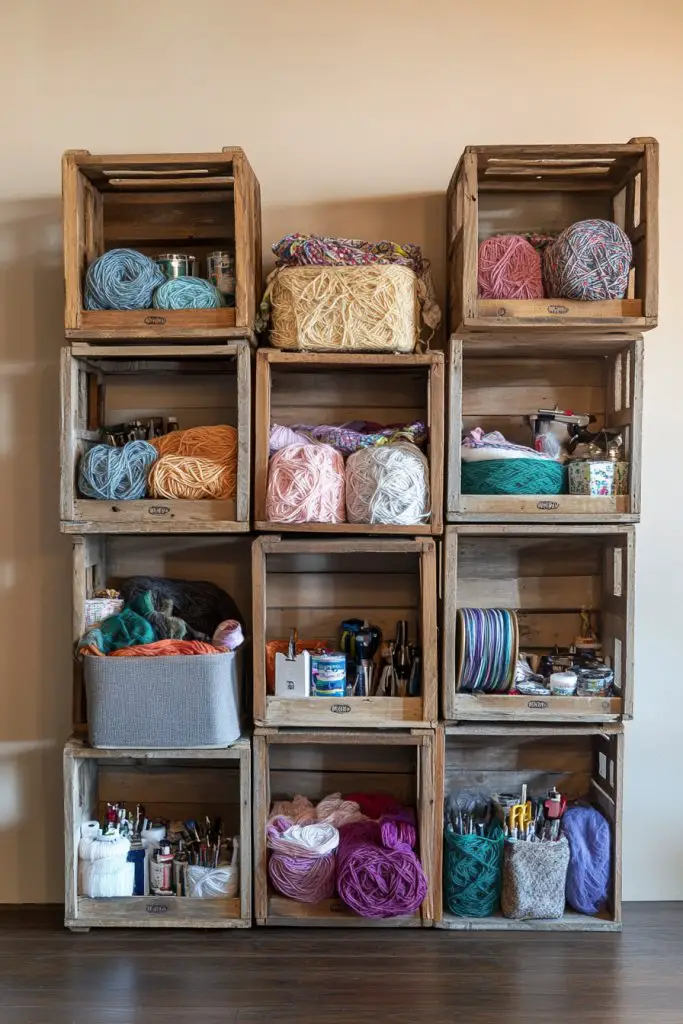
Tired of cluttered tables and overflowing drawers? Wooden crates offer a versatile, budget-friendly solution to create extra storage without sacrificing style. Plus, they add a rustic charm that instantly warms up any space. Who knew recycling could look this good?
Imagine stacking weathered wooden crates in a staggered formation against a wall, filled with colorful fabric rolls or neatly organized craft supplies. The natural grain and imperfections give a handcrafted, vintage vibe. You can leave them raw or paint and distress for a more polished look. The open design invites easy access, while the varied heights add visual interest. They become both storage and decor, blending seamlessly into a cozy, creative corner.
Arrange crates in different configurations—stacked vertically, side-by-side, or in a zig-zag pattern—for maximum flexibility. Paint or stain them to match your room’s palette or leave them natural for a rustic feel. Add casters for mobility or attach hooks for hanging tools. Use smaller crates for jewelry or bead storage, and larger ones for fabric or paper stacks. This modular approach adapts easily to any space or style.
Source reclaimed wooden crates from thrift stores, flea markets, or online marketplaces. Clean and sand the surfaces to remove splinters and dust. Decide whether to stain, paint, or leave them natural—consider your overall decor. Secure the crates with brackets, or stack them using heavy-duty straps or brackets for stability. Install on the wall with appropriate anchors or use on the floor as standalone units. Experiment with different heights and arrangements until it feels right.
Personalize with custom labels, stenciled patterns, or decorative hardware. Incorporate fabric liners or baskets inside larger crates for smaller supplies. Use decorative tags or small signs to identify sections. To add a bit of whimsy, attach fairy lights or string lights around the crates for ambiance. This DIY project offers endless ways to make the storage uniquely yours.
Upcycled crates are a proof that good design and sustainability go hand in hand. They make your craft space functional and charming without breaking the bank. Once you see how these crates organize your clutter, you’ll wonder why you didn’t do it sooner. It’s a simple step toward a more inspiring and practical workspace.
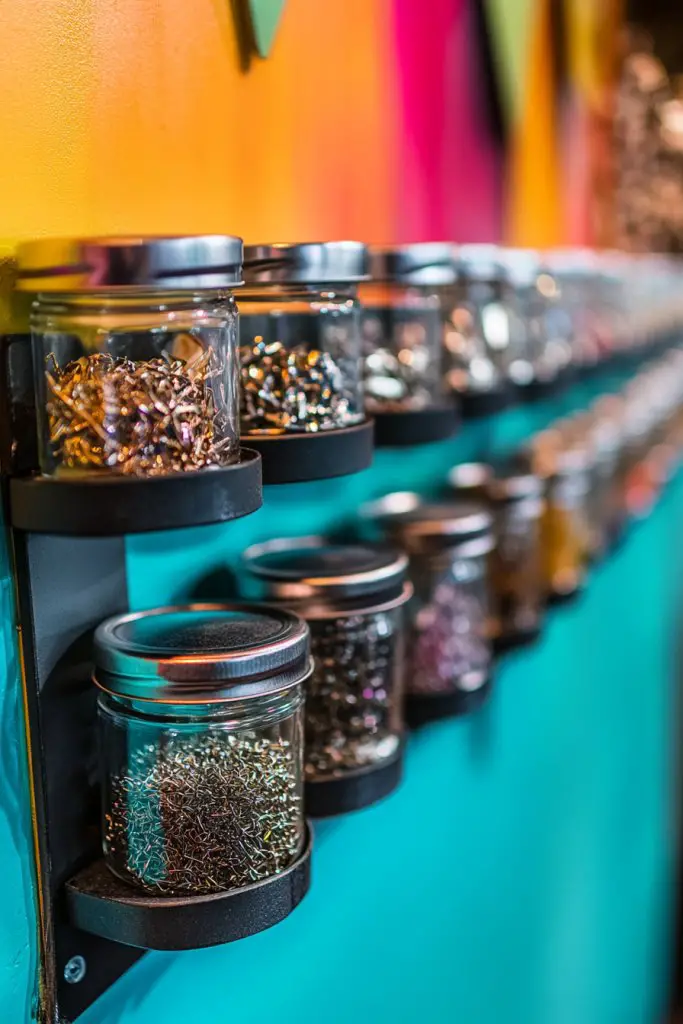
4. Mason Jar Desk Organizers for Small Supplies
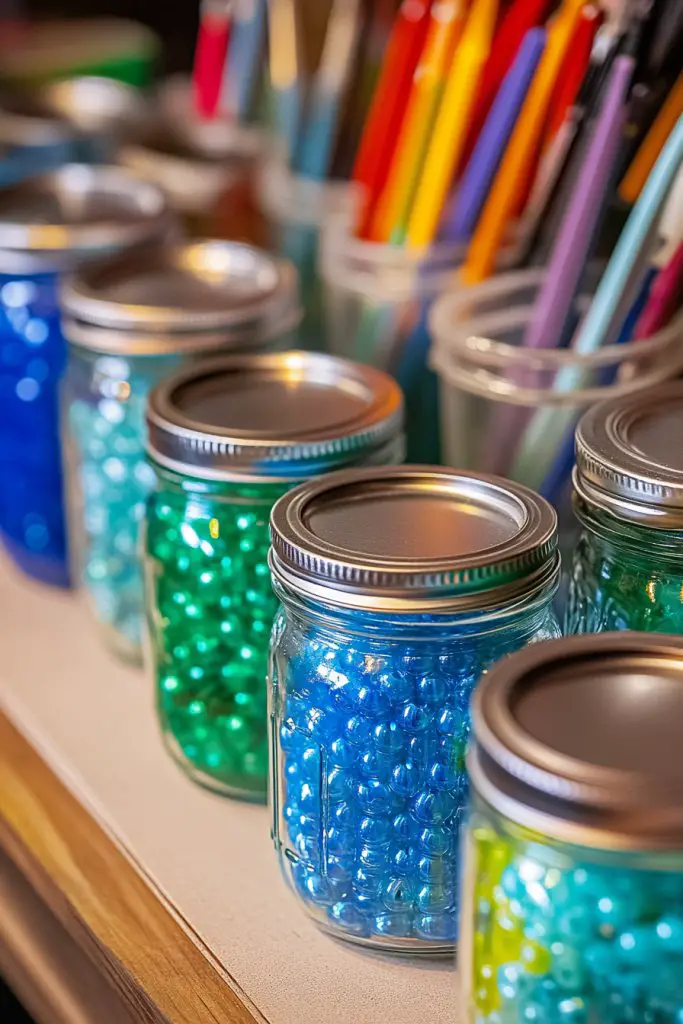
Small craft supplies like beads, brushes, and pens can quickly turn your workspace into a cluttered nightmare. Mason jars offer a cute, inexpensive way to corral tiny items. They keep your essentials accessible while adding a rustic or vintage touch. Who says organization can’t be adorable?
Picture a row of clear glass mason jars lined up on a wooden shelf or tray. Each jar holds different supplies—colorful buttons, paintbrushes, or glitter. Their transparency allows you to see everything at a glance, reducing search time. Add metal or wooden lids for variety, or tie a piece of twine around the neck for extra charm. It’s a simple solution that turns chaos into order with style.
Use different sizes and shapes of mason jars to create visual interest. Decorate the lids with paint, fabric, or washi tape to match your room’s theme. Group jars by color or purpose for quick identification. Incorporate small labels or tags for added organization. You can also suspend jars from a hanging rack or attach them to a magnetic strip for space-saving options.
Gather a variety of mason jars from thrift stores or your pantry. Clean thoroughly and decorate the lids if desired. Arrange jars on a shelf, tray, or inside a storage box, grouping similar items together. For added stability, secure jars with adhesive or mounting brackets if you want them on a wall or vertical surface. Use a funnel or small scoop to fill jars without mess. This setup makes cleanup quick and easy.
Add personalized labels or chalkboard tags for each jar. Incorporate decorative elements like ribbon, twine, or stickers to match your decor. Switch out contents seasonally or for special projects. Mix in small vintage finds like keys or charms inside jars for a personal touch. This method keeps your supplies organized and visually appealing.
Mason jar organizers are a charming, practical way to keep your craft supplies tidy. They make your workspace look inviting and inspire creativity every time you sit down. Once you see how much easier it is to find what you need, you’ll wonder why you didn’t start sooner. Embrace the simplicity and style of this classic organization hack.
5. Fabric-Covered Cardboard Bins for Hidden Storage
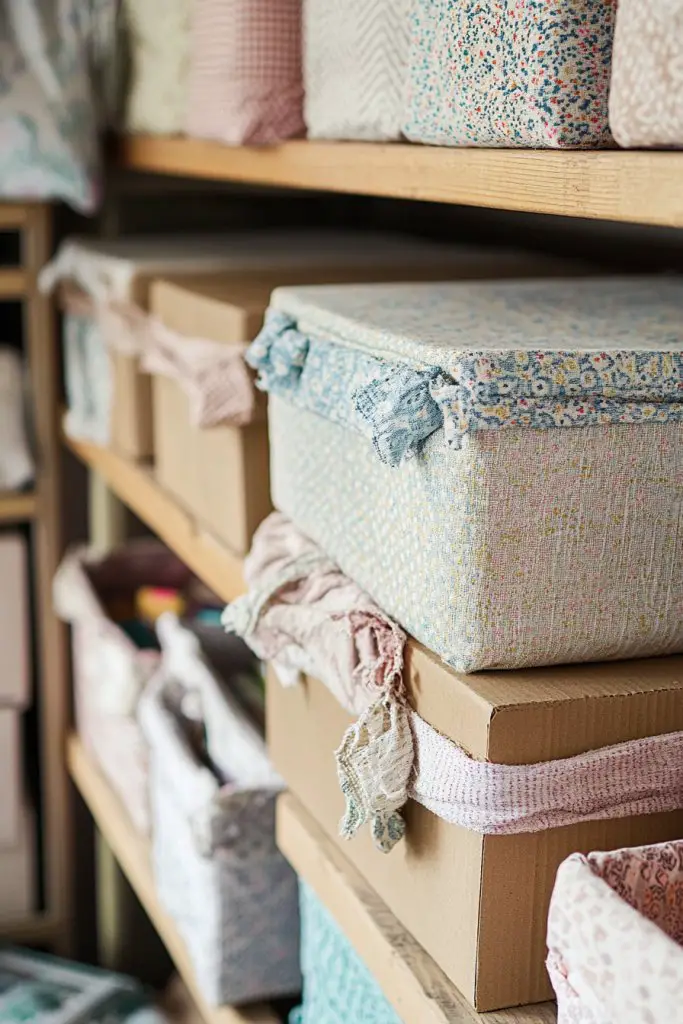
Ever wish you could hide your craft clutter while keeping it easily accessible? Cardboard boxes are cheap and plentiful, but they look dull and unfinished. Covering them with fabric transforms them into attractive storage bins. Plus, it’s a quick fix that adds a cozy, personalized touch.
Imagine a row of colorful fabric-covered boxes stacked neatly on a shelf or tucked under your worktable. The fabric patterns—florals, geometrics, or solids—coordinate with your decor. The soft texture contrasts beautifully with the cardboard’s rough surface, creating a warm, inviting vibe. These bins hide supplies like paper, yarn, or tools, yet look stylish enough to leave out in the open.
Choose fabrics that reflect your style—bright prints for fun, neutrals for a minimalist look. Add decorative trim or ribbon to edges for a polished finish. Use different sizes for versatility, and label each with tags or fabric paint. For seasonal flair, swap out fabrics for holidays or themes. These bins work well in craft rooms, closets, or playrooms.
Start with sturdy cardboard boxes or storage bins, ensuring they are clean and dry. Cut fabric slightly larger than the box openings. Use a hot glue gun or fabric adhesive to attach the fabric smoothly, folding and trimming excess for a clean look. Reinforce corners with extra glue or double layers if needed. Label the front with fabric paint or adhesive labels. Place inside shelves or under tables for discreet storage.
Add decorative touches like bows, buttons, or appliqué for extra charm. Personalize with hand-painted labels or stenciled words. Mix fabrics for a patchwork effect or coordinate with room decor for a cohesive look. You can also add small handles or pulls for easier access. These fabric-covered bins turn plain storage into a crafty statement piece.
Transforming simple cardboard boxes into stylish storage shows that creativity and thriftiness go hand in hand. They keep your space tidy and add warmth to your room. Seeing your customized bins makes organizing less of a chore and more of a fun project. Ready to hide clutter with style? Let your imagination run wild!
6. Repurposed Ladder as a Vertical Craft Tool Rack
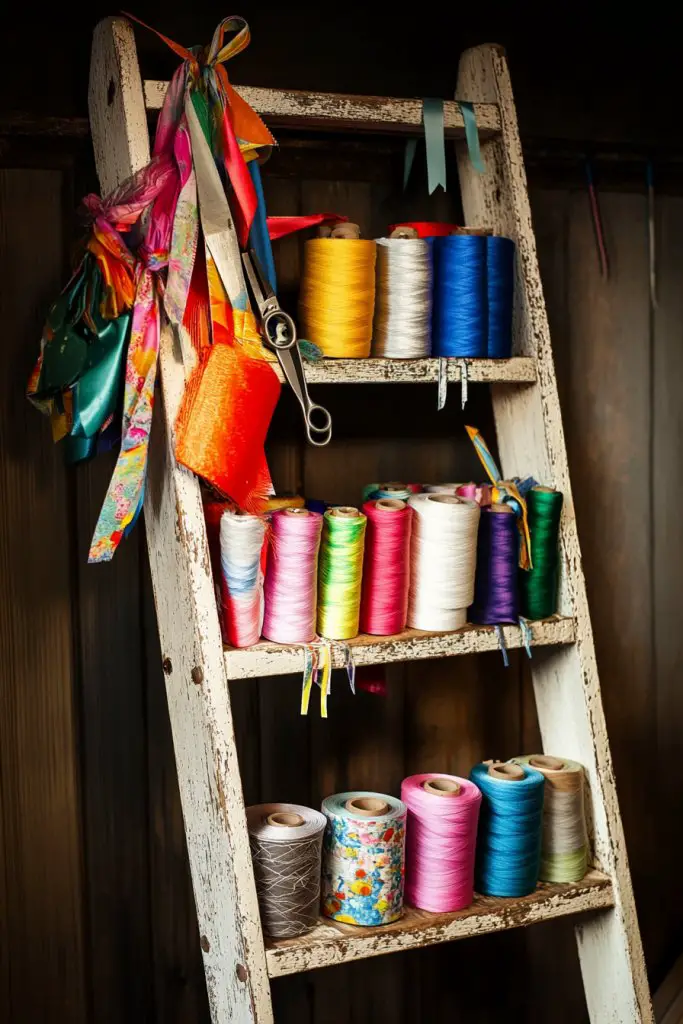
Craft rooms can quickly become a jumble of tools, ribbons, and fabric rolls. Finding a dedicated, accessible storage solution is key. An old ladder, often discarded, can be repurposed into a vertical rack that’s both functional and decorative. Who knew that leaning a ladder could be a game-changer?
Visualize a rustic wooden ladder propped against a wall, with hooks holding scissors, rulers, and spools of ribbon. Fabric rolls hang from the rungs, easily accessible for quick projects. The natural wood adds texture and warmth, giving your space a vintage farmhouse feel. It’s a clever way to organize while adding a charming focal point. The open design invites creativity and keeps supplies within arm’s reach.
Paint or stain the ladder to match your decor—bright colors for a playful vibe, or distressed finishes for vintage charm. Attach S-hooks or clips for flexible storage of tools and supplies. Add baskets or fabric pouches to the rungs for smaller items. Use different ladder sizes or styles—stepladders or steampunk-inspired designs—to suit your space and taste. It’s perfect for small craft rooms or even garages.
Source an old ladder from thrift stores, yard sales, or online marketplaces. Clean and sand the surface to remove splinters. Paint or stain as desired, then secure hooks or S-clips onto rungs. Hang fabric rolls, ribbons, or tools, adjusting placements for optimal access. Mount the ladder securely against the wall with appropriate anchors to prevent tipping. Use it to free up drawer or shelf space and keep everything visible.
Add decorative elements like painted patterns, stencils, or decals to the ladder for extra character. Personalize hooks with labels to identify supplies. Incorporate small shelves or baskets for items like glue, beads, or brushes. For seasonal updates, swap out ribbons or add themed decorations. This DIY ladder rack is both practical and a stylish statement piece.
Turning a repurposed ladder into a craft tool rack is a budget-friendly way to boost organization and style. It’s a unique focal point that sparks inspiration and keeps your supplies tidy. Once you see how much easier it is to access everything, you’ll wonder why you didn’t try this sooner. Get ready to elevate your craft space with a simple, creative hack!
7. DIY Wall-Mounted Ribbon and Thread Holders
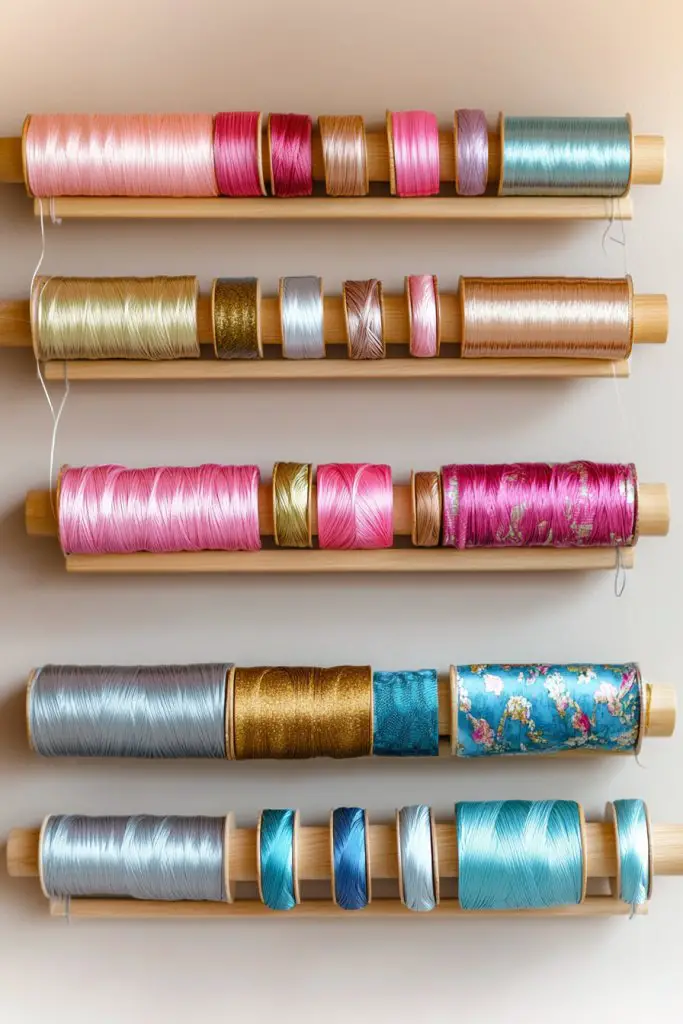
Dealing with tangled ribbons and stray threads can kill your creative flow. A dedicated holder keeps everything neat and accessible, saving you time and frustration. But store-bought organizers can be pricey or bulky. Why not craft your own wall-mounted solution that’s both functional and personalized?
Imagine a sleek, minimalist wall with evenly spaced dowels or hooks holding colorful ribbons and threads. The materials—wood, metal, or sturdy plastic—are mounted flush against the wall, creating a tidy ribbon runway. Small labels or clips keep each type separated and easy to find. The visual appeal is clean and organized, inspiring you to craft more efficiently. It’s a smart, space-saving upgrade that looks good too.
Choose different materials—wood for warmth, metal for industrial chic, or acrylic for modern minimalism. Arrange hooks or dowels in straight lines or creative patterns to suit your space. Incorporate small shelves or containers for scissors, pins, and tape. Adjust the height and spacing based on ribbon length and thread spool size. This system adapts easily to your specific supply collection and room dimensions.
Purchase sturdy dowels, hooks, or rods from hardware stores. Cut and sand wood dowels if needed, or use pre-made hooks. Mount them securely on the wall at various heights, ensuring stability. Use labels or color-coded clips to separate types of ribbons and threads. Organize by length or color to streamline your workflow. Regularly update or reorganize as your collection grows.
Decorate the mountings with paint, stencils, or washi tape for a fun touch. Personalize with labels, tags, or color-coding for easy identification. Add small decorative elements like charms or appliqués that match your style. Incorporate a small mirror or memo board nearby for quick notes or inspiration. This DIY holder keeps your supplies tidy and visually inspiring.
A wall-mounted ribbon and thread holder makes your space look professional and inviting. It’s a simple upgrade that adds order and style, encouraging longer, more focused crafting sessions. Seeing your organized supplies at a glance boosts confidence and sparks creativity. Ready to tidy up and get inspired? Your perfect craft corner awaits!
8. Thrifted Picture Frames as Creative Display Boards
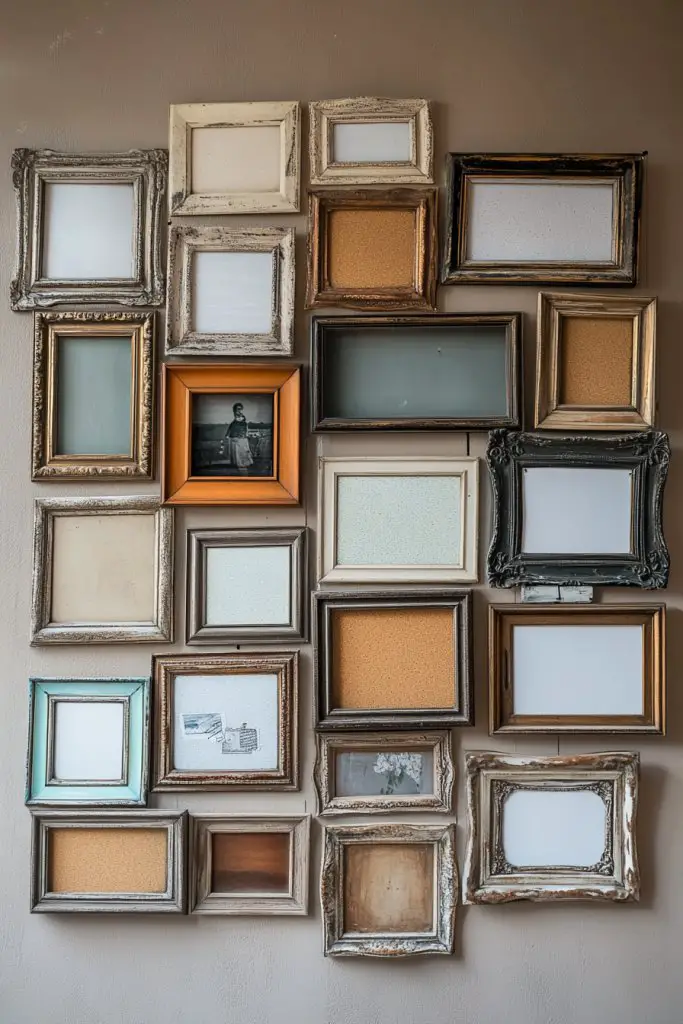
A cluttered corkboard or plain wall can kill your creative vibe. Thrifted picture frames are a budget-friendly way to create personalized display boards that double as wall art. Why settle for boring when you can craft something unique and inspiring?
Picture a collection of vintage frames painted in coordinating colors or distressed for a shabby chic look. Inside, you can insert cork panels, magnet sheets, or fabric-covered boards. Pin inspiration snippets, sketches, or notes to the frames, turning each into a mini gallery. The mix of textures and frames adds visual interest and personality. It’s a creative way to keep ideas front and center.
Mix and match different frame styles—ornate, simple, or distressed—to suit your decor. Paint or decorate the frames for a cohesive look or an eclectic vibe. Use cork, magnet, or chalkboard inserts depending on your needs. Hang them in symmetrical or asymmetrical arrangements for visual impact. Swap out inserts seasonally or as your inspiration evolves.
Source thrifted frames from yard sales, flea markets, or thrift stores. Remove any glass or backing, then paint or decorate the frames as desired. Insert cork boards, magnet sheets, or fabric-covered panels. Mount the frames securely on the wall with appropriate anchors. Use small nails, picture hangers, or Command strips depending on weight. Decorate with your favorite inspiration or motivational quotes.
Add decorative touches like washi tape borders or painted accents. Personalize with hand-lettered labels or stickers. Incorporate small hooks or clips inside the frames for displaying jewelry, tags, or small tools. Change out content regularly to keep your workspace fresh and motivating. These display boards turn functional organization into a creative statement.
Transforming thrifted frames into display boards is a creative, budget-friendly way to organize and inspire. They reflect your personal style while keeping important ideas visible. Once you see how much more inspired you feel, you’ll want to make more. Your craft space becomes a gallery of your creativity!
9. Paint Chips and Scrap Paper Art for Inspirational Decor
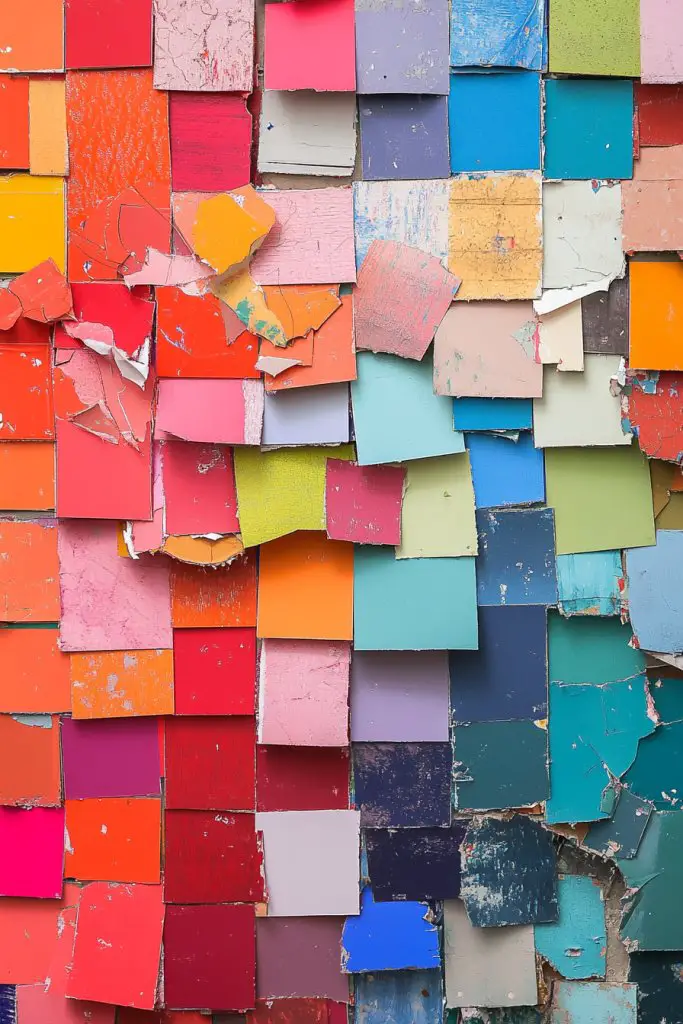
Looking for inexpensive ways to add color and motivation to your craft room? Paint chips and scrap paper are budget-friendly materials that can turn your walls into a vibrant gallery. Plus, they’re easy to update and personalize. Who needs expensive art when you have a stack of colorful scraps?
Visualize a wall decorated with a rainbow of paint chips arranged in a chevron pattern or layered like a collage. Complement with scrap paper cutouts—like paper flowers, geometric shapes, or motivational words—fused into a cheerful banner. The textures and colors create a lively, inspiring atmosphere that sparks your creativity. It’s a playful, DIY way to brighten your workspace.
Create themed banners or murals by grouping colors or shapes. Use washi tape or glue dots to assemble a collage on a canvas or directly on the wall. Switch out pieces seasonally or as your projects evolve. Keep the design simple for a modern look, or go eclectic with mismatched shapes. This flexible decor can grow with your style.
Collect paint chips from hardware stores or paint samples from your walls. Cut scrap paper into various shapes or sizes, and arrange them into a pattern or freeform collage. Secure with low-tack glue, washi tape, or double-sided tape directly on the wall or on a backing board. Frame or mount your artwork for a finished look, or keep it as a removable collage. Refresh as needed to keep inspired.
Add handwritten motivational quotes or project goals using markers or paint pens. Incorporate your favorite color palettes or themes to match your decor. Use printed images or magazine cutouts for added interest. Combine with fabric elements or decorative borders for extra flair. This DIY art is a cost-effective way to make your space uniquely yours.
Colorful paint chips and scrap paper art turn simple materials into a source of daily inspiration. They boost your mood and motivate you to start new projects. Once you see how easy and fun it is to create, you’ll want to keep adding new pieces. Your craft room will be a vibrant reflection of your creative energy!
10. Repurposed Tin Cans as Paintbrush or Tool Holders
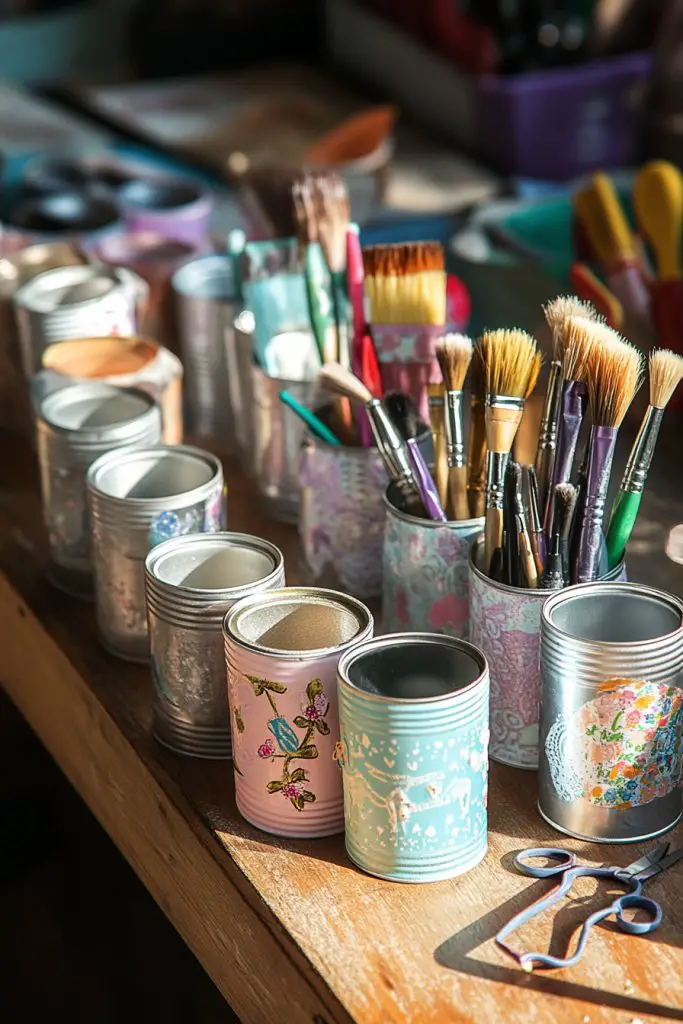
A cluttered workspace with scattered brushes and small tools can slow you down. Repurposing tin cans offers a cheap, eco-friendly solution that keeps everything tidy and within arm’s reach. Plus, it adds a touch of charm and character to your craft area. Who knew recycling could be so stylish?
Imagine a row of painted or decorated tin cans lined up on your work surface or mounted on a wall. Each can holds a different type of brush, pen, or small tool—organized, accessible, and visible. The metallic sheen or colorful designs brighten your space and add a rustic or industrial vibe. They’re perfect for quick cleanups and easy sorting.
Paint cans in bright colors, metallic finishes, or patterns to match your decor. Use adhesive labels or hand-painted tags to identify contents. Attach cans to a wooden board or wall-mounted rack for a space-saving setup. For a vintage look, leave cans with a distressed finish or add decorative hardware. They work well in craft rooms, garages, or even outdoor workshops.
Clean and dry empty cans thoroughly. Decorate the exterior with spray paint, stencils, or wrapping paper. Attach cans to a wooden plank or frame with screws or strong adhesive for wall mounting. Fill each with brushes, pens, or small tools, then organize by type or size. Consider adding a drip tray or catch basin underneath for messy supplies. Regularly refill and clean to keep the setup functional.
Personalize with decorative washi tape, stickers, or custom labels. Mix and match can finishes—some painted, some left metallic. Incorporate small decorative charms or tags for a whimsical touch. Change out contents seasonally or for specific projects to keep things fresh. This DIY can be as simple or fancy as you like, depending on your style.
Using repurposed cans turns everyday items into practical storage solutions that add personality to your space. They help keep your tools organized and your workspace clutter-free. Seeing everything in its place makes your creative process smoother and more enjoyable. Ready to recycle your way to a more organized craft room? Let’s get started!
11. DIY Canvas Art with Stencils and Acrylics
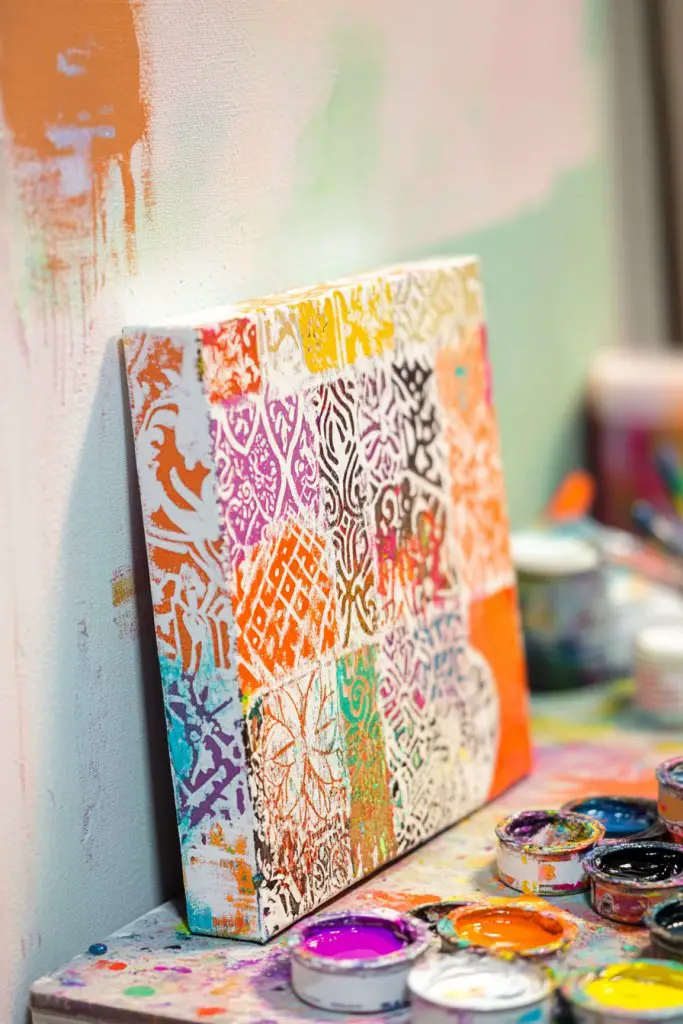
Decorating your craft room with personalized art shouldn’t break the bank. Canvas art using stencils and acrylic paints is an affordable way to add style and inspiration to your space. Plus, it’s a fun project that boosts your creativity while customizing your environment.
Picture a large canvas hanging above your workspace featuring bold, geometric patterns or inspiring words. Stencils in contrasting colors create crisp, professional-looking designs with minimal effort. The texture of thick acrylic paints adds depth, making the artwork pop. Your walls transform into a gallery of motivational pieces that energize your creative flow.
Choose stencils that match your style—florals, quotes, or abstract shapes. Mix and match colors for a vibrant or monochrome palette. Use different brush sizes or sponges for varied textures. Create a series of smaller canvases or a single large piece for impact. Seasonal or themed designs keep your decor fresh and relevant.
Purchase blank canvases from craft stores or repurpose old ones. Secure stencils with painter’s tape and apply acrylic paint using brushes, sponges, or rollers. Remove stencils carefully for crisp edges. Layer colors or add details with fine brushes. Seal your artwork with a clear varnish for durability. Hang your creations with nails or adhesive hooks in your favorite spots.
Add hand lettering, doodles, or decorative borders to make each piece unique. Incorporate metallic or glitter paints for extra sparkle. Personalize with your name, favorite quotes, or project goals. Display your art in creative arrangements—clustered or asymmetrical. It’s a simple way to make your space truly yours.
Creating your own canvas art is empowering and endlessly customizable. It’s a budget-friendly way to fill your walls with motivation and personality. Seeing your own work displayed fuels your confidence and inspires continuous creativity. Ready to turn blank canvases into inspiring masterpieces? Grab your paints and stencils!
12. Floating Shelves from Reclaimed Wood for Display and Storage
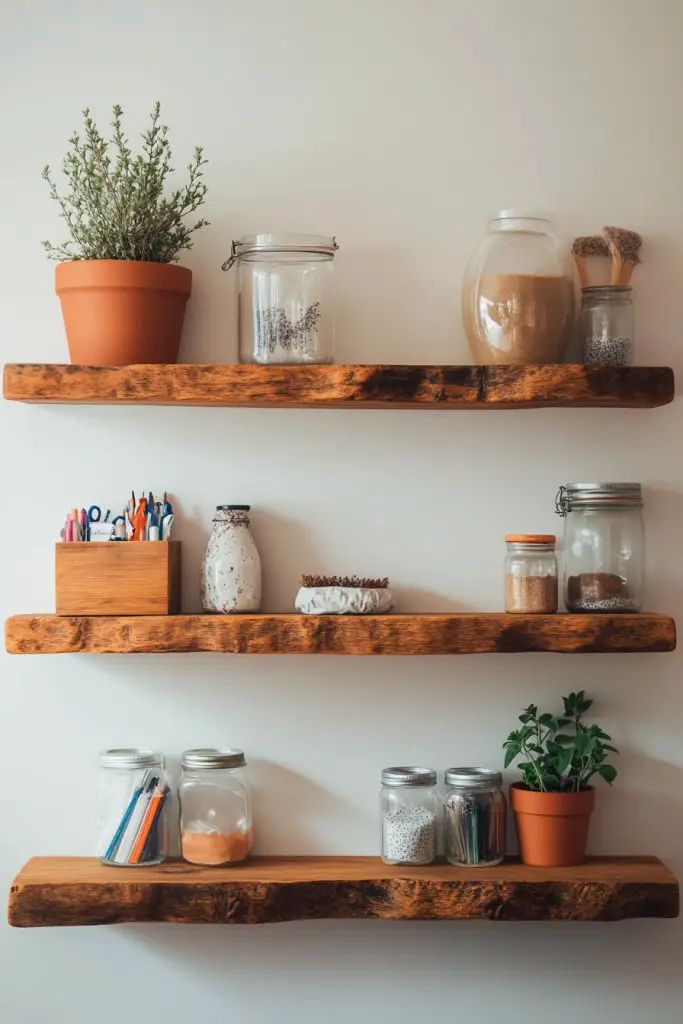
Cluttered surfaces and overflowing cabinets make your craft space feel chaotic. Floating shelves made from reclaimed wood offer a sleek, affordable fix that adds both storage and style. Best of all, they free up valuable workspace and give your room a rustic charm. Who knew saving your space could look so good?
Visualize a set of sturdy, weathered wood planks mounted flush against the wall, holding jars, small baskets, or decorative items. The natural imperfections and grain add character, making your room feel warm and inviting. Arranged symmetrically or asymmetrically, these shelves become a focal point that showcases your favorite supplies or decor pieces. They’re functional art that elevates your entire workspace.
Paint or stain the wood to match your decor—light, dark, or distressed finishes work well. Use brackets or hidden mounts for a clean, floating effect. Mix in different widths or lengths for visual interest. Install at varying heights to maximize storage and accessibility. Combine with decorative baskets or small hooks for added utility.
Source reclaimed wood from salvage yards or repurpose old pallets. Cut and sand the wood for a smooth finish. Attach mounting brackets or concealed hardware to the back of each shelf, then secure to the wall with suitable anchors. Arrange your craft supplies or decorative objects on the shelves, making sure to balance weight and aesthetics. Regularly check stability and re-secure as needed.
Decorate the edges with painted patterns or stenciled designs. Personalize with handwritten labels or small decorative elements. Incorporate small hooks underneath for hanging tools or accessories. Change up the display seasonally or for different projects. These shelves are a versatile way to showcase your creativity while keeping clutter at bay.
Reclaimed wood shelves combine sustainability with style, making your craft room both eco-friendly and inviting. They create a gallery-like display of your supplies and projects. Seeing your organized space inspire you to create more often. Ready to give your room a rustic upgrade? Let’s build some floating shelves!
13. Magnetic Spice Jars for Small Metallic Supplies
Tiny metal embellishments and paper clips can clutter your workspace and slow you down. Magnetic spice jars offer a clever, space-saving way to keep these supplies organized and visible. Plus, they add a touch of novelty to your craft area. Who knew spice jars could be so multifunctional?
Imagine a metal strip or magnetic board mounted on a wall, with small jars attached magnetically. Each jar holds different metallic supplies—pins, clips, or tiny embellishments—organized by type or color. The transparent jars make it easy to see contents at a glance, while the sleek metal look adds a modern industrial vibe. It’s a simple, stylish upgrade that keeps your supplies handy.
Opt for clear glass or colored jars to match your decor. Decorate the lids with paint or stickers for a personalized touch. Arrange jars in a grid or irregular pattern for visual interest. Use magnetic strips for a more flexible setup, allowing you to rearrange jars easily. Incorporate labels or color codes for quick identification. This system is highly adaptable to your space and collection.
Purchase magnetic spice jars and a sturdy metal or magnetic board from kitchen or hardware stores. Clean jars thoroughly and decorate lids if desired. Mount the board securely on the wall using screws or adhesive strips. Fill jars with metallic supplies, then attach them magnetically. Organize by project, color, or size to streamline your workflow. Regularly check and refill to keep everything tidy and accessible.
Add decorative elements like washi tape around jars or custom labels. Use color-coding to quickly identify supplies. Incorporate small decorative charms or stickers for a personalized touch. Change the arrangement seasonally or for different projects to keep the display fresh. This DIY setup is both practical and a visual delight.
Magnetic spice jars are an innovative way to keep small metallic supplies organized and visible. They make your workspace more efficient and stylish, inspiring you to craft more confidently. Once you experience the ease of access, you’ll wonder how you ever worked without them. Ready to upgrade your organization game?
14. Upcycled Drawer Dividers for Better Organization
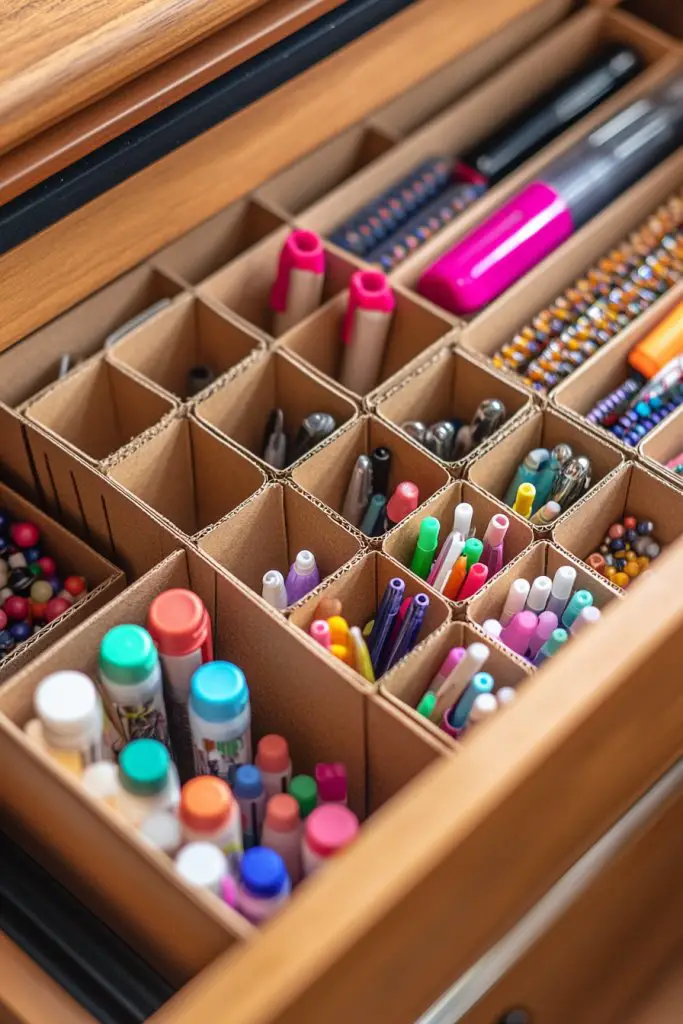
Ever open a drawer and feel like everything is just a jumbled mess? Custom drawer dividers can turn chaos into order, making your craft supplies easy to find. Plus, upcycling old materials saves money and adds a personal touch. Who knew organization could be so eco-friendly?
Picture a cluttered drawer suddenly transformed by neatly inserted dividers, creating separate sections for beads, scissors, and brushes. Using repurposed cardboard, foam board, or old plastic containers, you can customize the compartments to fit your needs. The result is a tidy, accessible space that invites you to create without hunting through clutter. It’s a simple fix with a big impact.
Create dividers in different sizes for various drawers—long, shallow, or deep. Decorate with paint, fabric, or decorative tape to match your room’s theme. Use adjustable or removable dividers for flexibility. Combine multiple materials—cardboard, plastic, or wood—for durability and style. This DIY project adapts easily to different storage needs and aesthetic preferences.
Measure your drawer dimensions and cut your chosen material accordingly. Reinforce with paint or fabric for a finished look. Slot the dividers into your drawer, ensuring they stay upright and secure. Organize your supplies into each section, customizing as your collection grows. For added stability, glue or tape the dividers in place if desired. Regularly clean and adjust to maintain order.
Label each section with handwritten tags or printed labels for quick reference. Decorate with washi tape, stickers, or paint to coordinate with your decor. Use different textures or colors to distinguish categories visually. Reconfigure the dividers seasonally or for new projects. This flexible system keeps your space organized and inspiring.
Upcycled drawer dividers prove that organization can be simple, affordable, and eco-friendly. They make your craft space more functional and inviting, encouraging longer creative sessions. Seeing your supplies neatly separated boosts confidence and motivation. Ready to tidy up and reclaim your drawers? Let’s get started!
15. Crochet or Fabric Baskets for Soft Storage Options
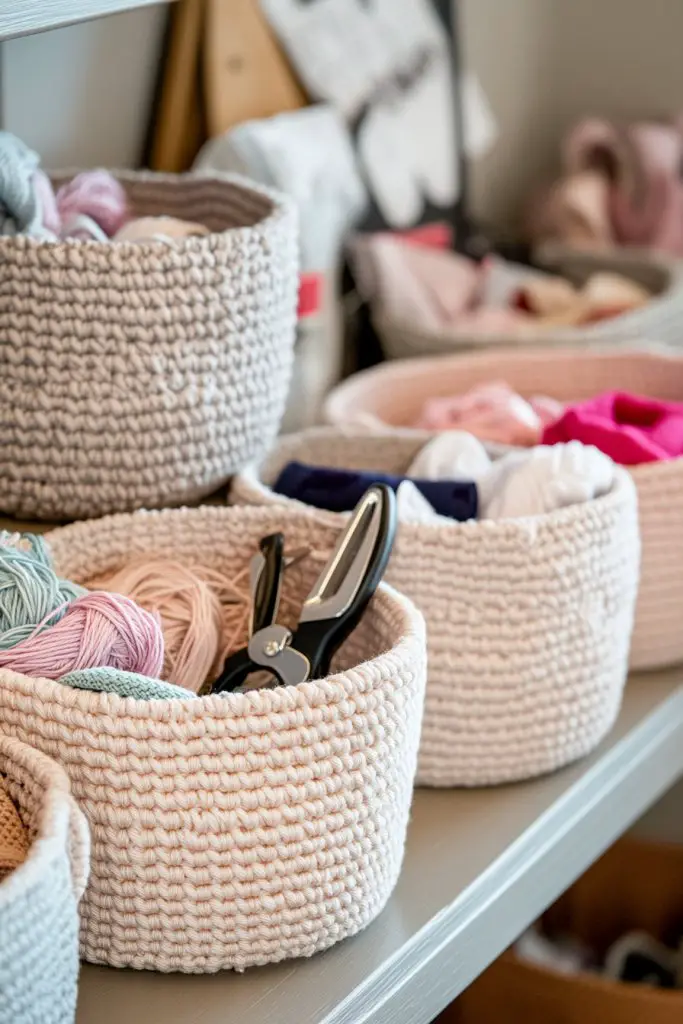
Larger supplies like yarn, fabric scraps, or sewing tools can quickly clutter your workspace. Crochet or fabric baskets provide soft, flexible storage that’s easy on the eyes. They add texture and warmth, making your craft area feel cozy. Who said organization can’t be tactile and inviting?
Envision a collection of hand-crocheted baskets in earthy tones or vibrant colors, sitting on shelves or under tables. The soft edges and textured surfaces create a welcoming vibe. Some baskets feature decorative handles or trims, adding a personalized touch. They hold everything from yarn balls to fabric pieces, making your supplies look intentionally curated rather than chaotic. It’s both functional and decorative.
Create baskets in various sizes for different needs—small for notions, large for yarn or fabric. Use different yarns or fabrics to match your decor style—boho, rustic, or modern. Add decorative trim, pom-poms, or tassels for extra flair. Incorporate labels or tags for quick identification. These baskets are versatile, fitting into shelves, corners, or under tables.
If crocheting, choose soft, durable yarns in your favorite colors and follow a simple pattern or customize your size. For fabric baskets, cut sturdy fabric or repurpose old textiles, sewing or gluing edges for stability. Add handles or decorative elements as desired. Fill with your supplies and place where needed. Regularly wash or air out for freshness. This DIY adds warmth and personality to your storage.
Personalize with embroidered initials, decorative buttons, or patches. Mix different textures or colors to create visual interest. Use fabric paint or markers for custom designs. Incorporate seasonal or project-themed decorations. These baskets turn organizing into a craft project itself and reflect your personal style.
Crochet or fabric baskets combine practicality with handmade charm. They encourage a clutter-free, warm environment that fuels creativity. Seeing your supplies neatly stored boosts confidence and makes your workspace more inviting. Ready to craft your own soft storage? Let’s get sewing or crocheting!
16. Using Washi Tape for Colorful, Temporary Decor
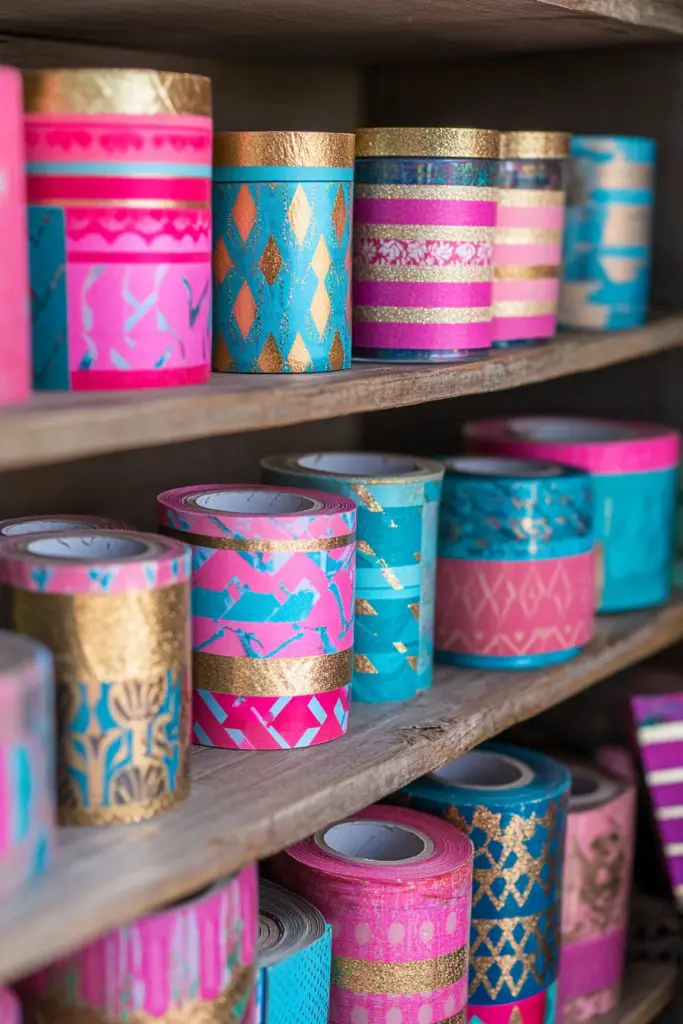
Bored of plain shelves and dull storage containers? Washi tape offers a quick, inexpensive way to add color and personality. It’s perfect for temporary or seasonal decor that’s easy to change. Who said decorating has to be permanent and expensive?
Visualize a neutral-colored storage bin decorated with bright, patterned washi tape borders. Or a plain wall transformed with geometric shapes and stripes. The tape adheres smoothly without damaging surfaces, allowing you to experiment freely. It’s an instant upgrade that can be removed or swapped out whenever inspiration strikes. The playful patterns and vibrant hues instantly lift the room’s mood.
Create borders, chevrons, or polka dots on containers, shelves, or even furniture. Mix and match patterns for a lively, eclectic look. Use it to label or color-code sections for quick identification. Change designs seasonally or for special projects, keeping your space fresh. Combine with other inexpensive decor elements like stickers or paint for layered effects.
Select washi tapes in colors and patterns that match your decor. Clean surfaces before application. Use straight lines, curves, or layered patterns—your choice. Secure the tape firmly with a smoothing tool or credit card to avoid bubbles. For curved or textured surfaces, apply carefully and re-adjust as needed. Remove or reposition easily without residue, allowing for endless customization.
Create themed designs—holidays, seasons, or favorite colors. Use tape to outline frames, labels, or decorative motifs. Combine with hand-lettered signs or stickers for extra flair. Incorporate tape accents into gift wrapping or project tags. It’s a simple way to bring fun and color into your workspace.
Washi tape makes decorating accessible and adaptable, turning ordinary into extraordinary. It encourages experimentation and adds a personal touch that’s always removable. Seeing your space glow with color motivates you to craft more often. Ready to tape your way to a happier workspace? Let’s get decorating!
17. Reclaimed Window Frames as Unique Craft Wall Art
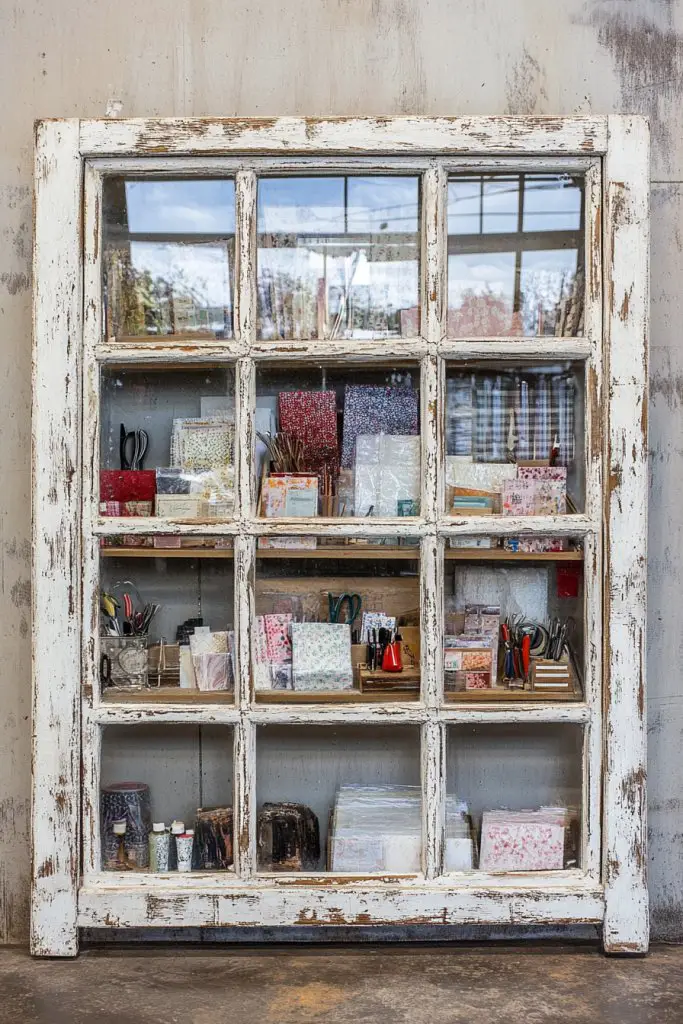
Plain walls and uninspired decor can make your craft space feel dull. Reclaimed window frames are a creative, budget-friendly way to add vintage charm and visual interest. They turn a simple wall into a focal point that fuels your creativity. Who knew old windows could become art?
Picture an old, distressed window frame hung on the wall, with the panes replaced by corkboard, wire mesh, or fabric. It displays your favorite photos, notes, or inspirational quotes in a charming, rustic setting. The frame’s weathered paint and unique shape add character and history. It’s a functional piece of art that sparks conversation and inspiration.
Choose frames with different styles—shabby chic, industrial, or vintage—to match your decor. Paint or distress the frames for a cohesive look or leave their natural patina. Use different sizes and shapes for variety. Fill the panes with cork, chicken wire, or fabric to create customizable display areas. Hang multiple frames in a gallery style for maximum impact.
Source reclaimed window frames from salvage yards or online marketplaces. Clean and repair as needed. Decide whether to paint or strip for a distressed look. Attach wire, cork, or fabric to create display surfaces. Mount securely on the wall using appropriate hooks or anchors. Use small nails or picture hangers to avoid damage. Decorate with your favorite art, photos, or notes.
Add decorative elements like stenciled borders or painted accents. Personalize with hand-lettered quotes or small embellishments. Incorporate string lights or mini led strips behind the frame for subtle illumination. Use themed decorations for holidays or special occasions. This DIY transforms old windows into artful storytelling pieces that reflect your style.
Reclaimed window frames are a statement of creativity and sustainability. They make your space unique and inviting, inspiring you to craft more often. Seeing your projects displayed in a vintage frame adds pride and motivation. Ready to breathe new life into old windows? Let’s start crafting!
18. DIY Desk Lamp from Recycled Materials
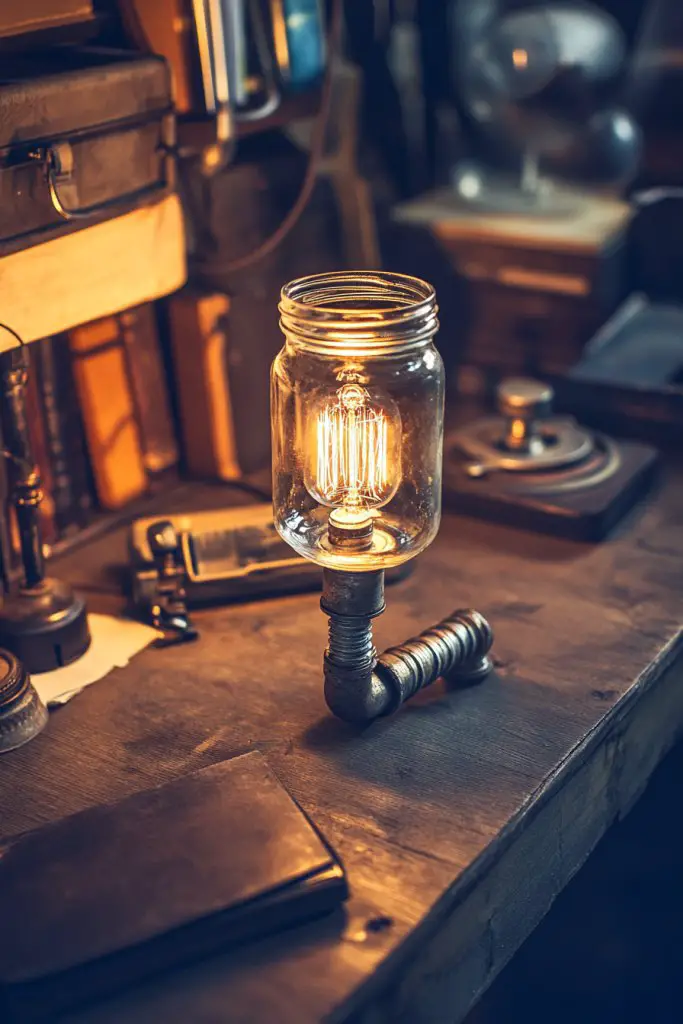
A well-lit workspace is essential for focus, but store-bought lamps can be pricey or uninspired. DIY desk lamps from recycled materials are a budget-friendly, creative alternative. Plus, they add a personal, quirky touch to your craft room. Who said sustainability can’t be stylish?
Envision a unique lamp made from a glass jar filled with fairy lights or a vintage teapot repurposed as a lampshade. The base could be reclaimed wood, a stack of books, or a sturdy ceramic mug. The light casts a warm glow, creating an inviting atmosphere. These DIY lamps combine function with personality, making your workspace cozy and inspiring.
Use different recycled items—mason jars, teapots, or tin cans—as the lampshade. Add LED string lights, battery-operated candles, or small bulbs for illumination. Decorate bases with paint, fabric, or decorative tape to match your style. Opt for adjustable or portable designs to suit your needs. This approach suits any space, big or small.
Gather recycled containers and choose your light source—string lights or small LED bulbs. Secure the light source inside the container with hot glue or wire. Attach the container to a sturdy base or stand, ensuring stability. Add a switch or power cord for convenience. Position your new lamp on your desk or shelf, and enjoy the warm, personalized glow. Regularly replace batteries or bulbs to keep it functional.
Decorate the container with paint, fabric, or decals for added flair. Personalize with labels, stickers, or hand-lettered tags. Incorporate seasonal themes or color schemes to match your decor. This DIY not only provides light but also sparks conversation and compliments. It’s a fun project that makes your workspace uniquely yours.
A recycled materials lamp is a testament to your creativity and eco-conscious mindset. It’s a functional piece that brightens your space and inspires ongoing projects. Seeing your own design glow encourages confidence and pride. Ready to light up your craft room with a handmade touch? Let’s get crafting!
19. Inexpensive DIY Rug from Painted or Upcycled Fabrics
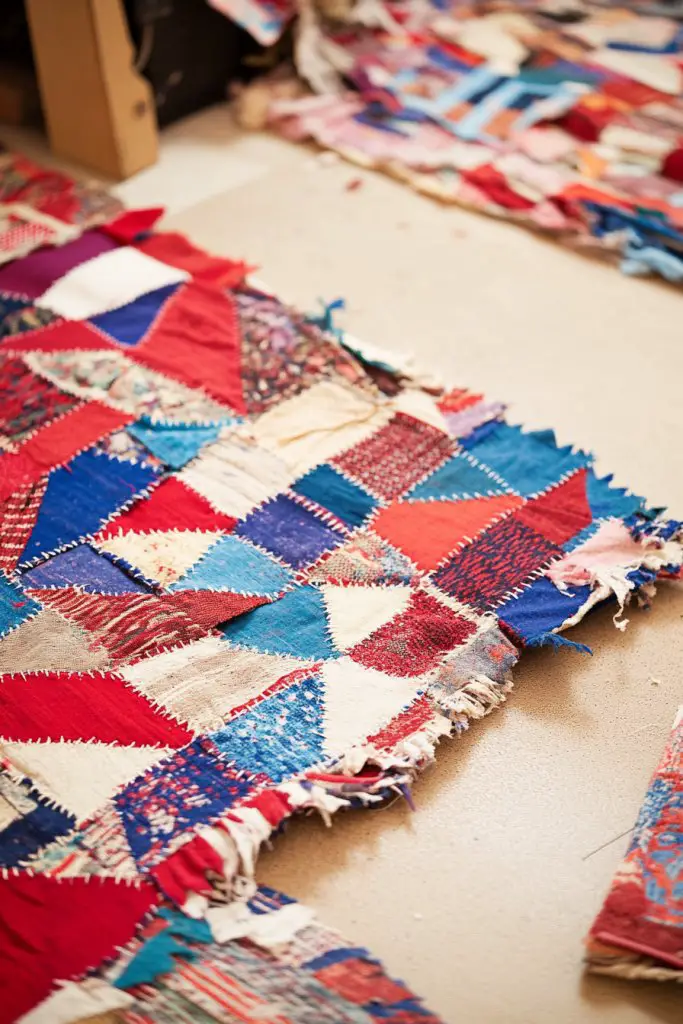
A dull, cold floor can make your craft space less inviting. An inexpensive DIY rug crafted from painted or upcycled fabrics adds warmth and personality without breaking the bank. Plus, it’s a fun project that transforms your floor into a cozy retreat. Who said comfort can’t be stylish?
Picture a patchwork of colorful fabric scraps arranged in a vibrant mosaic on your floor. Some pieces painted with geometric patterns or abstract designs, others left plain or distressed. The textures and colors create a lively foundation that energizes your entire workspace. It’s a handcrafted statement piece that invites you to sit down and create.
Use fabric scraps from old clothes, sheets, or thrifted textiles. Paint some pieces with stencils or freehand designs to add visual interest. Sew or glue the pieces together for a patchwork effect, or lay them flat for a layered look. Incorporate different textures—soft cotton, burlap, or felt—to enhance tactile appeal. Adjust size and shape to fit your space.
Cut fabric into manageable strips or shapes, then arrange them on the floor in your preferred pattern. Sew or glue the pieces together, reinforcing edges for durability. Use fabric paint or stencils to add designs and personalize your rug. Seal with fabric protectant if needed. Place the finished piece where you need it most—under your work table or in front of your storage area. Regular cleaning keeps it fresh.
Add decorative details like painted borders, motifs, or monograms. Incorporate theme-based fabrics—seasonal, favorite colors, or patterns. Use embellishments like pom-poms or tassels along the edges for extra charm. Change out sections or repaint areas to refresh the look. This DIY rug is both practical and expressive of your personal style.
A painted or upcycled fabric rug shows that DIY can be both beautiful and functional. It makes your workspace more inviting and encourages you to spend more time creating. Seeing your own handiwork on the floor boosts confidence and pride. Ready to craft your cozy new foundation? Let’s get started!
20. Organized Craft Supply Wall with DIY Pockets and Pouches
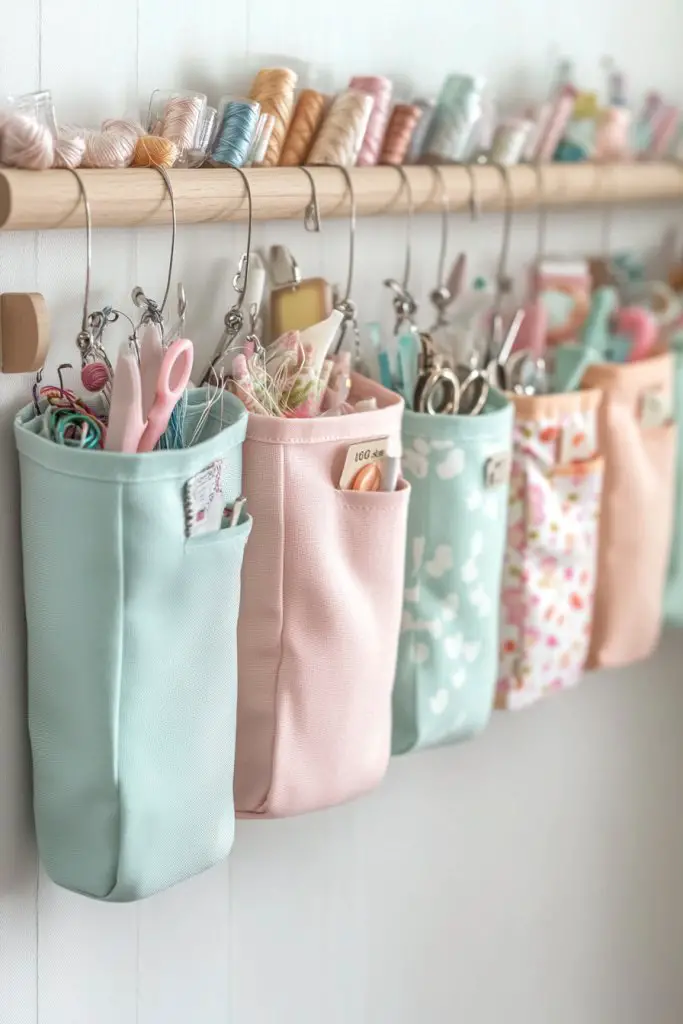
A cluttered tabletop or overflowing drawers can crush your creative spirit. A wall-mounted system of pockets and pouches keeps supplies organized and within reach. Plus, it frees up your workspace for more hands-on crafting. Who said organization has to be complicated?
Imagine a wall with colorful fabric or plastic pockets hung in rows or clusters. Each pouch holds different tools or supplies—scissors, glue sticks, or ribbons—visible and accessible. The vibrant colors and varied sizes create a lively, functional art installation. It’s a practical way to keep your essentials front and center, inspiring spontaneous creativity.
Use repurposed fabric or plastic to create pockets in different shapes and sizes. Attach them with sewing, glue, or safety pins to a sturdy backing like corkboard, wood, or canvas. Customize with decorative stitches, trims, or labels for easy identification. Vary the arrangement—grid, cluster, or freeform—to suit your space and style. This DIY system adapts to any room or project.
Cut fabric or plastic into pockets, then reinforce edges with sewing or heat sealing. Attach the pockets securely to a backing board or wall with nails, staples, or adhesive strips. Organize supplies into each pocket, considering frequency of use. For added fun, label each pouch with fabric paint or printable tags. Regularly update the contents to keep your system functional and inspiring.
Decorate the backing with paint, stencils, or decals for a cohesive look. Add decorative trims or appliqués to the pockets. Personalize with labels, icons, or color coding for quick access. Incorporate seasonal themes or project-specific designs. This wall system makes your supplies as inspiring as your projects.
A DIY organized wall with pockets turns chaos into a colorful, functional display. It simplifies your workflow and sparks motivation every time you glance at your supplies. Seeing everything in its place encourages longer, more focused craft sessions. Ready to transform your wall into an organized masterpiece? Let’s hang those pockets!
Conclusion
With a diverse range of budget-friendly craft room ideas, you now have the tools to turn your space into a creative paradise without overspending. Whether you opt for repurposed furniture, clever storage hacks, or charming decor accents, these ideas are easy to implement and highly inspiring. Get started today and watch your craft room become a vibrant, organized sanctuary that fuels your creativity. Your perfect craft space is just a few smart DIYs away!