Ever feel overwhelmed by clutter but want quick results? Decluttering your home fast has become a popular goal because it offers instant satisfaction and a more peaceful living environment. Whether you’re preparing for guests or just craving a fresh start, speedy decluttering can transform your space in no time.
In this article, you’ll discover a variety of effective ideas to help you clear out clutter swiftly and efficiently. From simple tricks to strategic methods, these tips will motivate you to tackle every corner of your house and create an organized, stress-free home you love to live in.
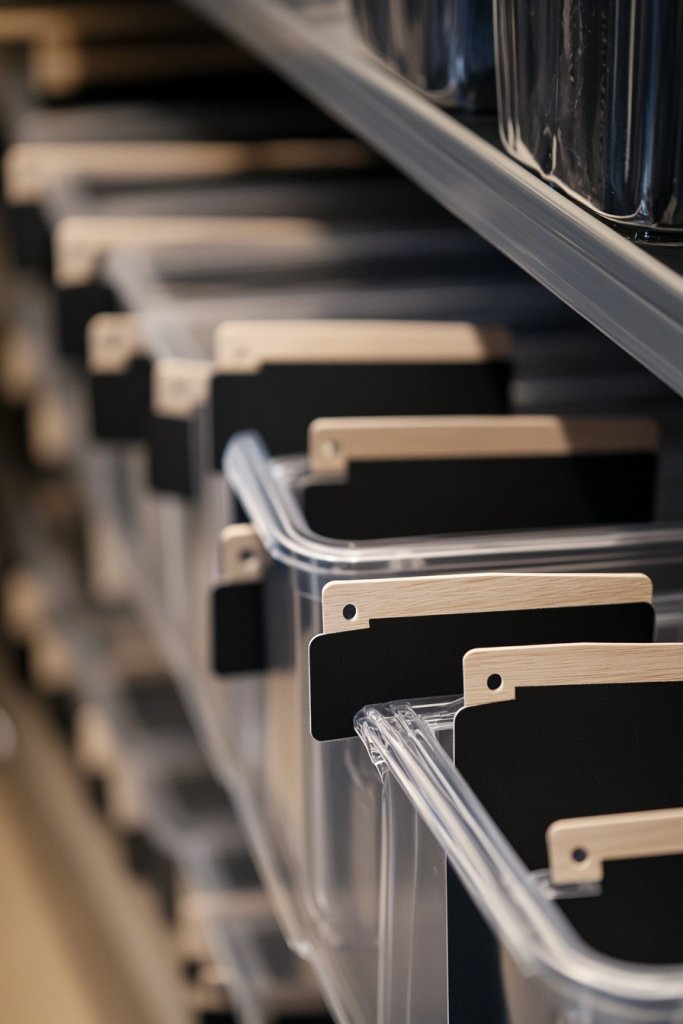
1. Use Clear Storage Bins for Quick Visual Organization
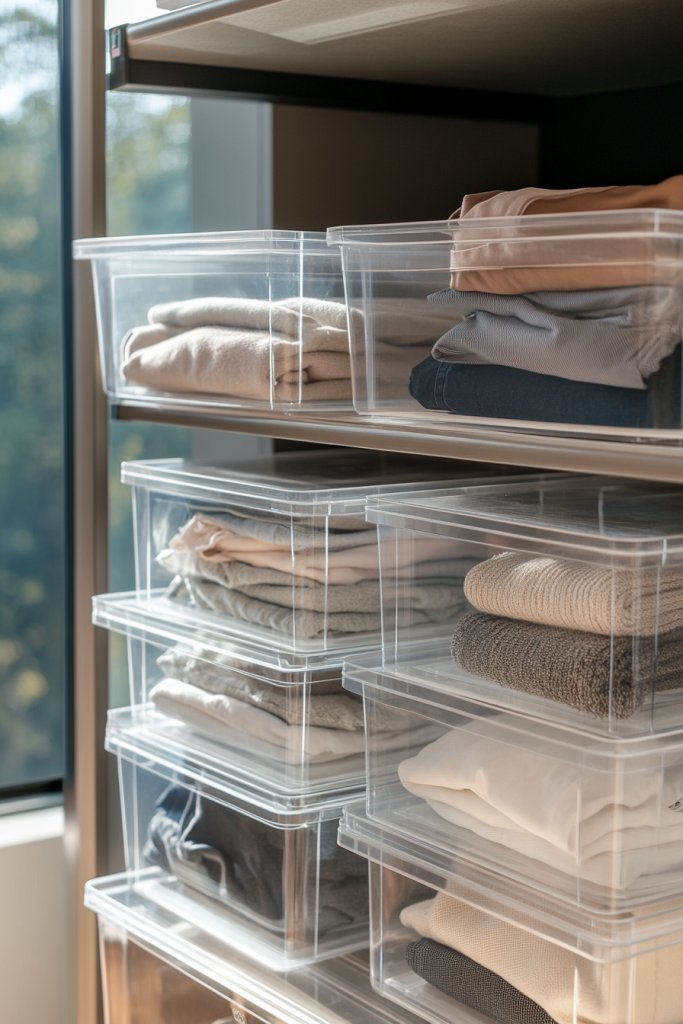
Ever looked around your space and felt overwhelmed by the chaos? Sometimes, the biggest hurdle isn’t lack of storage but not knowing what’s where. Clear storage bins promise instant clarity, turning a cluttered mess into a manageable system. They make it so easy to find what you need without rummaging through piles.
Imagine a set of transparent containers stacked neatly on a shelf, each one revealing its contents at a glance. Brightly colored labels peek through, making organization both functional and cheerful. The smooth plastic reflects light, giving your shelves a clean, modern look. When clutter is stored this way, your space feels lighter and more inviting.
Opt for neutral-toned containers for a minimalist vibe or go for vibrant hues to add energy. Use different sizes for various items—small for jewelry or craft supplies, large for bedding or seasonal clothing. Stackable bins work great in closets, while open-front boxes suit shelves in living rooms. Seasonal inserts or decorative lids can switch up the look for holidays.
Start by decluttering your space and sorting items into categories. Choose clear bins with lids or open fronts depending on use. Label each container with a waterproof marker or adhesive labels for quick identification. Place frequently used items at eye level, less-used ones higher or lower. Use bins with handles for easy access and transport. Regularly reassess and swap out contents as needed to keep everything current.
Add personalized labels with fun fonts or icons to make organization more engaging. Incorporate colored bins to designate specific zones, like blue for bathroom supplies or red for craft materials. Use decorative duct tape on lids for a pop of pattern. You can also insert small dividers inside larger bins for compartmentalizing tiny items.
Clear storage bins turn chaos into calm, boosting your confidence as a home organizer. They prove that simple solutions can make a big difference. Once you see your space transform, you’ll feel motivated to tackle other clutter spots with the same straightforward approach.
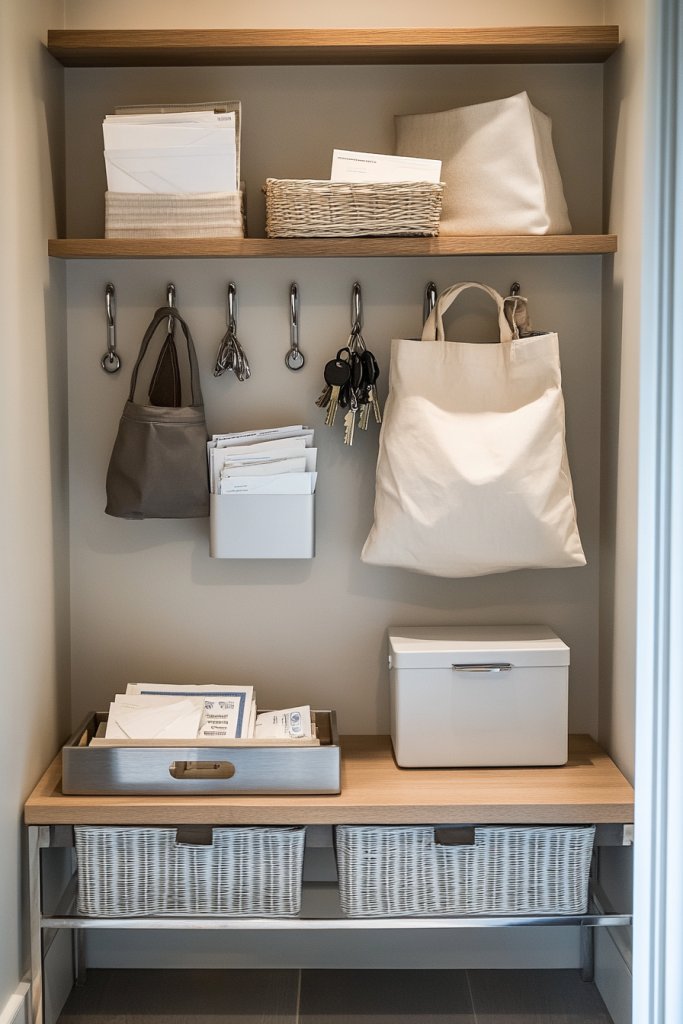
2. Create a Command Center with Labels and Hooks
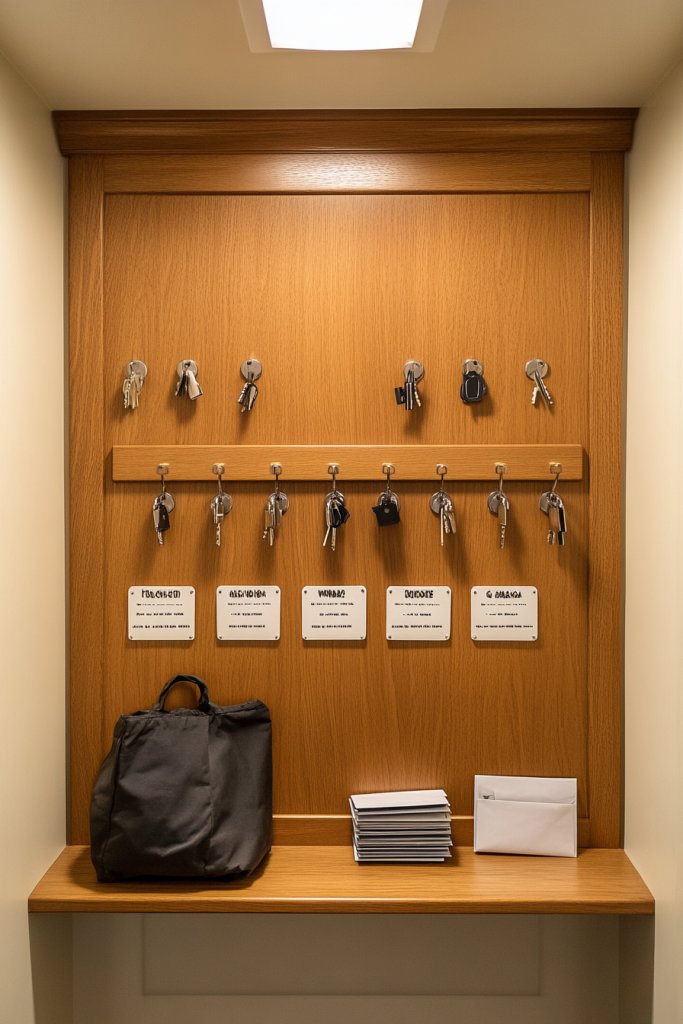
Ever forget where you left your keys or pile mail on every flat surface? A cluttered entryway can set a chaotic tone for the entire day. Creating a dedicated command center helps contain daily chaos, making life feel more manageable. It’s the perfect way to keep essentials in one accessible spot.
Picture a sleek wall with a row of labeled hooks holding keys, bags, and jackets. Beneath, a tray or small basket collects incoming mail and notes. Brightly colored or textured labels add personality, while the hooks themselves can be decorative metallic or rustic wood. This setup keeps everything within arm’s reach, yet orderly and stylish.
Choose hooks and trays that match your decor—industrial metal, vintage wood, or minimalist plastic. For small spaces, wall-mounted organizers save precious surface area. If you prefer a cozy vibe, opt for woven baskets and soft-label tags. Seasonal themes can be incorporated with removable labels or decorative accents.
Identify the main entry point and clear the area. Mount sturdy hooks at different heights for keys, umbrellas, and bags. Attach a labeled tray or pocket chart for mail. Use decorative labels to clearly mark zones, like ‘Mail’, ‘Keys’, ‘Bags’. Incorporate a small mirror or calendar nearby for added function. Keep everything in sight to encourage daily use and maintenance.
Personalize with custom labels—think monograms or playful fonts. Incorporate small decorative elements like a vintage clock or a plant shelf (avoiding restricted art decor). Use different hook styles for variety, or color-code items for family members. Add a small bench or shoe rack beneath for extra convenience.
A well-organized command center reduces morning stress and boosts your sense of control. It’s a simple yet powerful upgrade that pays off daily. Seeing everything in its place encourages consistent tidiness and transforms your entryway into a welcoming, functional space.
3. Repurpose Decorative Bolders as Functional Storage
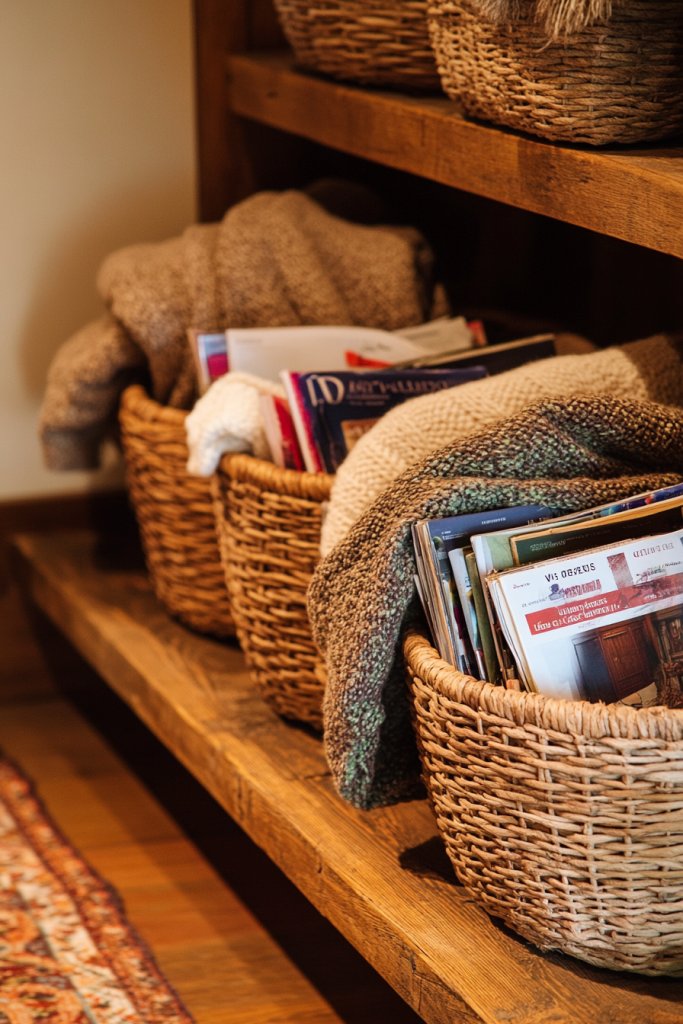
Clutter often takes over your beautiful space because you lack stylish storage options. Why settle for boring plastic bins when you can use decorative baskets or woven containers? These stylish pieces hide clutter while adding texture and warmth to your decor.
Imagine a cozy living room with a chunky knit basket filled with plush blankets or a sleek woven bin tucked beside an armchair holding magazines. The natural fibers and neutral tones blend seamlessly into the room’s aesthetic. These containers can be placed on shelves, under tables, or in corners, adding visual interest and practical storage.
Choose baskets with lids for hidden storage or open baskets for easy access. Mix textures like rattan, seagrass, or fabric-lined options for variety. Use them in different rooms—bathroom baskets for towels, entryway bins for shoes, or living room baskets for kids’ toys. Coordinate colors and materials with your existing decor for a cohesive look.
Identify clutter hotspots that could benefit from stylish concealment. Select baskets or bins that fit the space and style. Place them strategically—near seating areas or under tables—and label if needed for specific items. Use the baskets to group similar items and reduce visual clutter. Regularly go through contents to keep things fresh and tidy.
Add a personal touch by customizing baskets with fabric liners or painted accents. Incorporate seasonal elements—like festive ribbons or holiday-themed covers. Use different shapes and sizes to suit various items, creating a layered, curated look. Pair with decorative trays or small stands for added dimension.
Using decorative baskets elevates your storage game from purely functional to stylish. It proves that you don’t have to sacrifice beauty for organization. Once you see how easily clutter hides in these chic containers, you’ll be inspired to decorate and organize simultaneously.
4. Implement a “One In, One Out” Decluttering Rule
Over time, clutter sneaks back into your home despite your best efforts. The “one in, one out” rule offers a simple way to keep possessions in check. It encourages mindfulness about new items, preventing accumulation and promoting a minimalist lifestyle.
Visualize walking into a closet where every new shirt or pair of shoes is balanced by removing an old one. The shelves stay neat, with just enough space for what you wear regularly. This balance creates a visual calm, making it easier to maintain an organized environment.
Apply this rule to clothing, kitchenware, or office supplies. For example, every time you buy a new book, donate or sell an old one. Use a dedicated bin or rack to collect items to discard or donate. This system works well for small spaces or those trying to reduce possessions gradually.
Start by setting clear criteria—what qualifies for removal? Make it a habit to evaluate items when bringing in new ones. Keep a donation box in the closet or under the bed to make the process easy. Regularly commit to emptying the box to prevent backlog. Enforce the rule consistently for lasting results. It’s all about forming a mindful, ongoing habit.
Make it fun by setting challenges or tracking progress with stickers or charts. Personalize your decluttering process by rewarding yourself for meeting goals. Use stylish bins or baskets to collect items to go, making the process feel less like a chore. Involve family members to create a team effort.
This rule helps you maintain a clutter-free home effortlessly. It also cultivates a mindset of intentional consumption. Over time, you’ll notice how much easier it is to stay organized and how much less stuff you accumulate—making your home feel calmer and more manageable.
5. Tackle Clutter in Small Zones with Timer-Driven Decluttering Sessions
Feeling overwhelmed by the thought of decluttering an entire room? Break it down into manageable chunks using timers. Short, focused sessions make decluttering less daunting and more effective, especially if your motivation wanes quickly. It’s a great way to make progress without feeling drained.
Imagine setting a timer for 15 minutes and attacking one corner of your kitchen or closet. You work swiftly, sorting items into keep, toss, or donate piles. As the timer buzzes, you step back to admire your tidy space, feeling accomplished. The room transforms gradually, one small zone at a time, with clear visual progress.
Adjust the timer based on the space—shorter for quick tasks, longer for more involved areas. Use different colored timers or apps to add a playful element. Focus on high-traffic areas like entryways or countertops. Rotate zones weekly or bi-weekly to prevent stagnation and keep your home fresh.
Choose a small zone, like a drawer or shelf. Set a timer for 10-15 minutes. Gather necessary supplies—boxes, labels, trash bags. Work quickly, sorting items and clearing clutter. When time’s up, reset and move to another zone. Keep a schedule or checklist to track your decluttering goals. Regular sessions build momentum and reduce clutter accumulation.
Make it fun with themed sessions—spring cleaning, back-to-school, holiday prep. Use motivating playlists or podcasts. Celebrate small wins with treats or new organizational tools. Record your progress visually with before-and-after photos for extra motivation. The key is consistency and making it feel rewarding.
Timer-driven decluttering turns a massive task into bite-sized victories. It helps you develop a habit of regular tidying and prevents clutter from piling up. Over time, your home will be a calmer, more functional space you love spending time in.
6. Use Over-the-Door Organizers for Shoes and Accessories
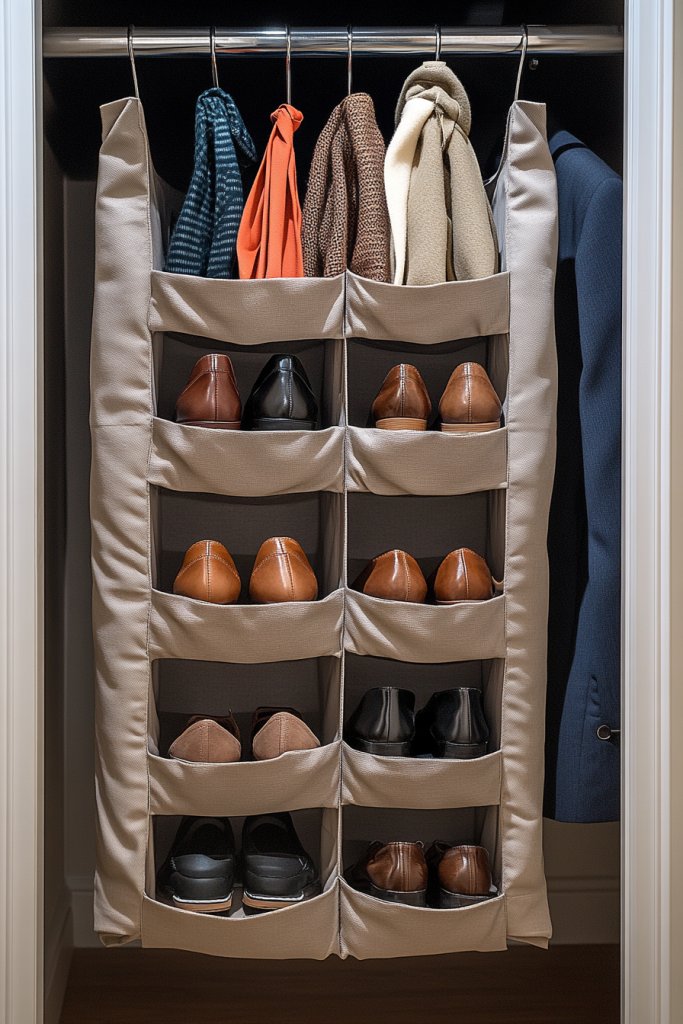
Cluttered entryways or closets can make even the neatest homes feel chaotic. Over-the-door organizers provide a quick fix by utilizing vertical space efficiently. They’re perfect for keeping shoes, accessories, or cleaning supplies off the floor and out of sight. Plus, they’re easy to install and reconfigure.
Picture a sturdy fabric or clear plastic pocket organizer hanging behind a door. Shoes are neatly tucked into individual pockets, while scarves or small accessories hang in the same system. The space looks tidy and inviting, with everything visible and accessible at a glance. This setup instantly declutters the floor and streamlines your daily routine.
Choose between fabric, clear vinyl, or mesh designs based on your aesthetic preferences. Use them in bedrooms, bathrooms, or mudrooms. For small spaces, opt for slim profiles that don’t protrude too much. Label pockets for family members or different item categories to stay organized. Seasonal swaps or removable labels make it adaptable.
Measure your door’s height and width to select the right organizer. Install hooks or adhesive strips if necessary, following product instructions. Sort your items—shoes, accessories, cleaning tools—and assign each to a pocket or compartment. Regularly review and remove items that no longer belong. Keep frequently used items at the top or front for convenience.
Add decorative touches with colorful fabric or patterned trims. Use themed labels like “Summer Shoes” or “Holiday Scarf Collection.” Incorporate small hooks for keys or umbrellas. Rotate items seasonally to keep the system fresh and functional. Personalize with stickers or initials to involve the whole family.
Over-the-door organizers turn clutter hot spots into functional storage. They make daily routines smoother and space more inviting. Once you see how much extra room you gain, you’ll be motivated to tackle other clutter areas with similar creative solutions.
7. Store Frequently Used Items in Accessible, Stylish Caddies
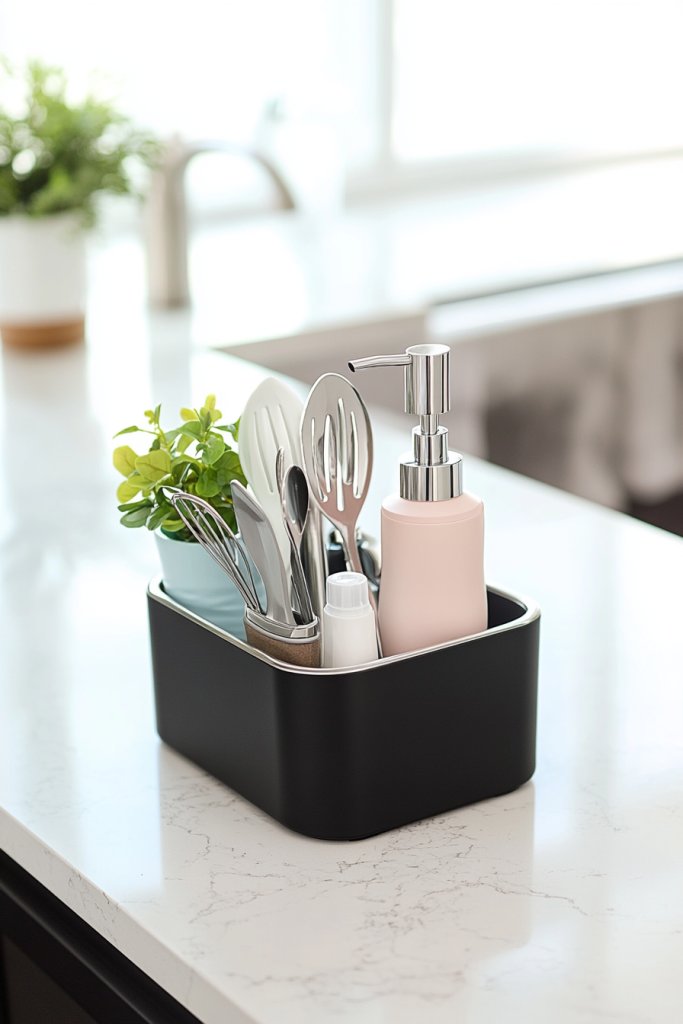
Ever hunted through drawers or cabinets for your daily essentials? It’s frustrating and wastes precious time. Stylish caddies offer a simple solution by keeping everyday items within arm’s reach. They’re perfect for busy kitchens, bathrooms, or even home offices.
Imagine a sleek, portable caddy sitting on your countertop, filled with soap, brushes, or notepads. The handle makes it easy to carry to where you need it. The caddy’s design complements your decor—maybe a matte black finish or a bright, playful color. Everything is organized, visible, and instantly grab-and-go.
Choose materials like plastic, metal, or bamboo depending on your style. Use compartments or dividers to separate small items. For seasonal needs, swap out contents or add themed accessories. In bathrooms, a waterproof caddy prevents water damage; in kitchens, a sturdy one holds utensils or spices. Keep a few in different spots for maximum efficiency.
Identify high-use items and gather or purchase suitable caddies. Organize items into compartments—think toothbrushes, skincare, cooking utensils. Place the caddy where you use these items most often. Regularly clean and refill as needed. For shared spaces, assign different colors or labels to each family member for clarity. Use stackable or multi-tiered designs for more storage.
Add custom labels or stickers to personalize each caddy. Incorporate decorative elements like patterned tape or fabric wraps. Use matching sets for kitchen tools or toiletries to create a cohesive look. You can even attach small hooks or clips inside for extra storage. Seasonal updates keep the caddies feeling fresh.
Using stylish caddies simplifies your daily routines and keeps clutter contained. It’s a small change that yields big results in organization and aesthetics. Once you see how much easier it is to find what you need, you’ll be motivated to keep other areas tidy too.
8. Declutter by Sorting Items into Keep, Donate, and Discard Piles

Clutter piles up because we’re unsure what to do with items we no longer need. Sorting everything into keep, donate, and discard piles provides clarity and makes decluttering more manageable. It’s a straightforward way to reduce clutter while helping others and recycling responsibly.
Visualize a large table or corner with three designated zones. As you go through your belongings, you place items into each zone—clothes that still fit and suit your style, items you no longer love or use, and things to toss or recycle. The act of sorting brings immediate relief and a sense of control, transforming chaos into order.
Use clear bins or boxes for each pile to easily see contents. Label zones with simple tags or color-coded stickers. For seasonal decluttering, create separate stacks for winter and summer gear. In small spaces, keep donation and discard piles near your main decluttering area to streamline the process. Incorporate a dedicated bin for items to sell or gift.
Set aside dedicated time—perhaps an afternoon or weekend—to go through items systematically. Handle each item once, deciding its fate immediately. Use boxes or bags for donations and trash, and keep them accessible. Be honest about what you actually use or love. Regularly revisit these piles to prevent re-accumulation of clutter. Keep a log or checklist for tracking donations.
Make it fun by rewarding yourself after each session. Personalize your sorting stations with inspiring quotes or photos. Use attractive labels or decorative tape to mark donation and discard bins. Consider involving family or friends for accountability and motivation. Celebrate decluttering wins with small treats or new organizational tools.
This method not only clears space but also redefines your relationship with your belongings. It’s empowering to see tangible results and know you’re making a positive impact. Regular sorting keeps your home manageable and your mind clear, turning decluttering into a satisfying, ongoing routine.
9. Install Floating Shelves to Display and Organize Small Items

Countertops and surfaces quickly become cluttered with small items, making spaces look messy and uninviting. Floating shelves provide a sleek way to organize and display essentials while freeing up surface area. They add visual interest and can turn functional storage into decorative accents.
Imagine a set of minimalist white shelves mounted on a wall, holding neatly arranged jars, candles, or decorative boxes. The shelves create a layered effect, adding depth and dimension. The items on display are organized by size or color, creating a curated, gallery-like vibe. This setup makes your space feel open, airy, and stylish.
Select different sizes and shapes of shelves to fit your decor—long, thin lines for modern looks or chunky wood for rustic charm. Use the shelves in kitchens, bathrooms, or living rooms. Incorporate decorative storage boxes or baskets on the shelves for hidden clutter. Change displays seasonally or for special occasions to keep the look fresh.
Decide on the wall area that needs decluttering and measure available space. Choose floating shelves that match your style—metal, wood, or glass. Install brackets or anchors for stability, following manufacturer instructions. Arrange small items logically—group similar objects or color-code for visual harmony. Keep frequently used items within easy reach to enhance functionality.
Paint or stain shelves to match your decor palette. Add decorative labels or small signs for a personalized touch. Incorporate framed photos or miniature sculptures to elevate the style. Use LED strip lighting underneath for a warm glow and extra visual appeal. Regularly update the contents to reflect your changing tastes.
Floating shelves turn clutter into curated displays, making your home look thoughtfully designed. They boost your confidence in decorating and organizing simultaneously. Achieving a balanced, styled look motivates you to keep other areas polished and organized, turning decluttering into a creative outlet.
10. Use Under-Bed Storage Bins for Seasonal or Less-Used Items
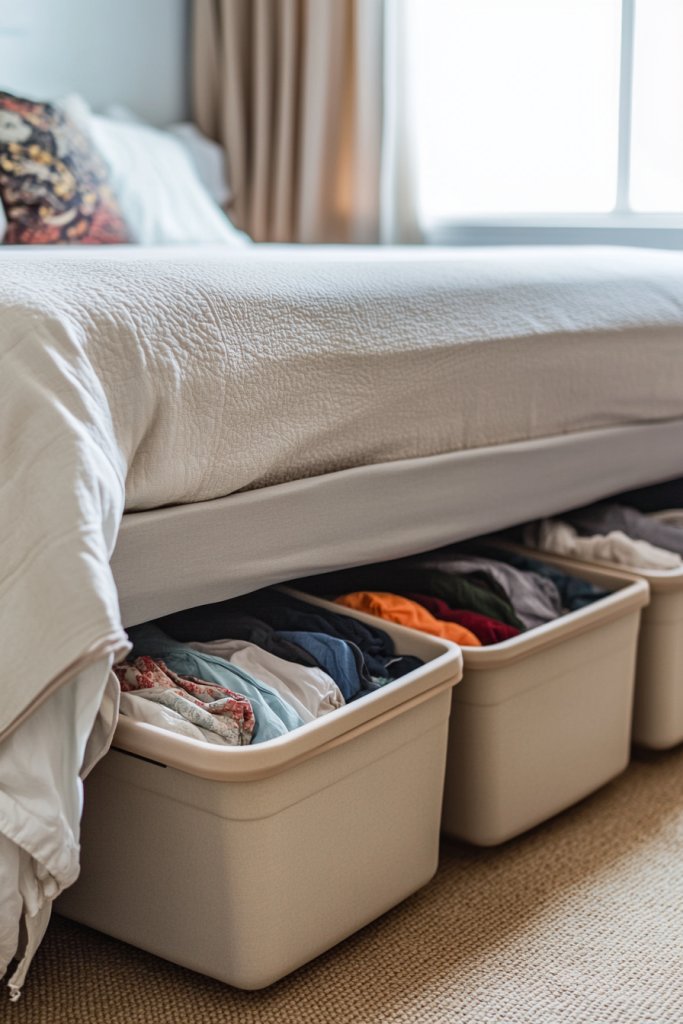
Clutter in closets and bedrooms often spills over, making spaces feel cramped and chaotic. Under-bed storage offers a hidden, out-of-sight solution for stashing seasonal clothes, extra bedding, or rarely used items. It’s a smart way to maximize space without sacrificing style.
Picture flat, labeled storage bins neatly slid under your bed frame. They’re made of fabric, plastic, or even woven materials, blending seamlessly into your room. When needed, you simply pull out the bin, access your stored items, and slide it back. The space stays tidy, and your room feels more open.
Use soft fabric bins for a cozy look or clear plastic for easy viewing. Color-code bins for different seasons—winter clothes, summer gear, holiday decorations. For low-profile beds, choose slim, flat containers that slide easily. Label each bin with large, clear tags for quick identification. Store bulky items or lightweight things, depending on your needs.
Measure the clearance space under your bed to select appropriately sized bins. Opt for durable, easy-to-clean materials. Organize items by frequency of use—keep seasonal or seldom-used items at the back or bottom. Regularly review contents to donate or discard outdated or unused items. Use labels or color-coding to streamline your retrieval process. Consider stacking bins if space allows.
Decorate labels with stickers or handwriting for a personal touch. Use decorative fabric covers or patterned bins to add style. Incorporate small dividers inside bins for better organization of small items. Rotate contents seasonally to keep everything relevant and accessible. Pair with a matching bed skirt or throw blanket for a cohesive vibe.
Under-bed storage is a hidden hero in home organization, turning wasted space into treasure. It keeps your room looking neat and clutter-free with minimal effort. Seeing your space instantly more spacious motivates ongoing decluttering and smarter storage habits.
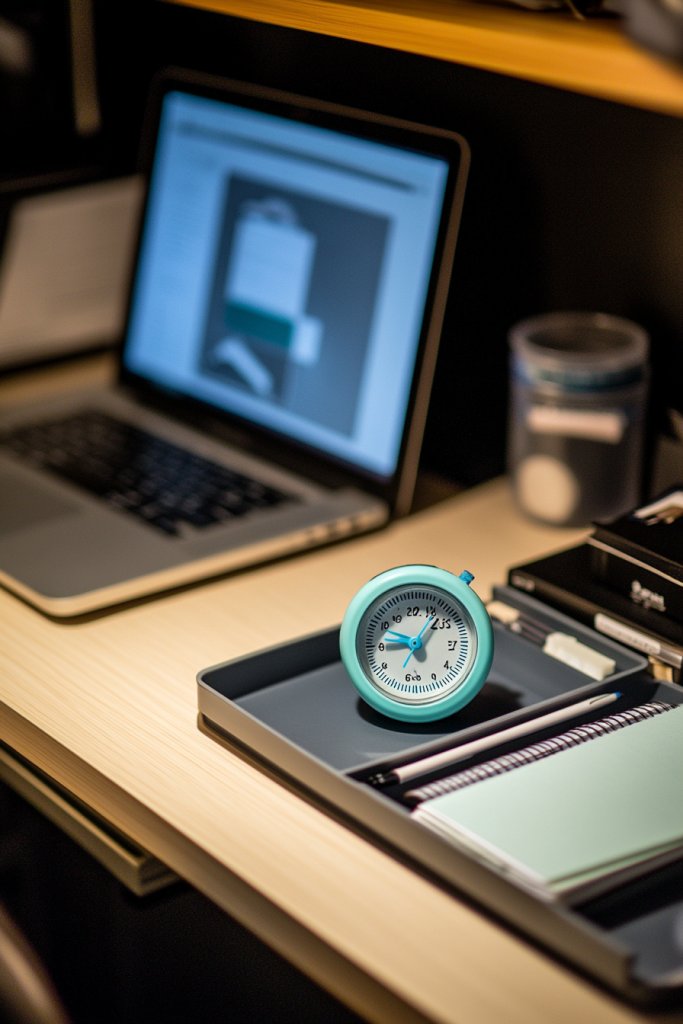
11. Designate a Drop Zone for Incoming Items at Entry Points
Messy entryways can make your entire home feel chaotic before you even step inside. Designating a drop zone helps contain clutter like keys, mail, or bags, preventing it from spreading everywhere. It’s an easy fix that instantly tidies your space and sets a welcoming tone.
Visualize a stylish tray or basket placed on a console or wall-mounted shelf near the door. Keys hang on a small hook, while mail and sunglasses sit neatly in the tray. A decorative element like a small plant or photo frame adds personality. Everything looks curated yet functional, making tidying up part of your routine.
Choose a tray or basket that matches your decor—metal, wood, woven, or acrylic. Add hooks or small shelves for keys and scarves. Use labels or tags to organize different items—e.g., ‘Mail’, ‘Keys’, ‘Bags’. For small spaces, opt for wall-mounted options to save surface area. Incorporate seasonal accessories or decorative accents to keep it fresh.
Identify your main entry point and clear the area. Select a container or tray that fits your available space and style. Assign specific spots for keys, mail, and small accessories. Keep the drop zone tidy by regularly sorting through items—discard old mail, organize keys. Use decorative elements to make it inviting and easy to maintain. Encourage everyone in the household to use it daily.
Personalize with labels, stickers, or customized tags. Incorporate decorative elements like a small vintage clock or a framed quote. Use seasonal decor to make the space inviting year-round. Consider adding a small bench or shoe rack nearby for convenience. The goal is to create a designated, attractive area that encourages clutter containment.
A dedicated drop zone reduces stress by keeping clutter contained at the door. It transforms a chaotic entry into a calm, organized space. Maintaining it becomes part of your daily routine, reinforcing good habits and making your home more welcoming.
12. Incorporate Multi-Functional Furniture with Built-In Storage
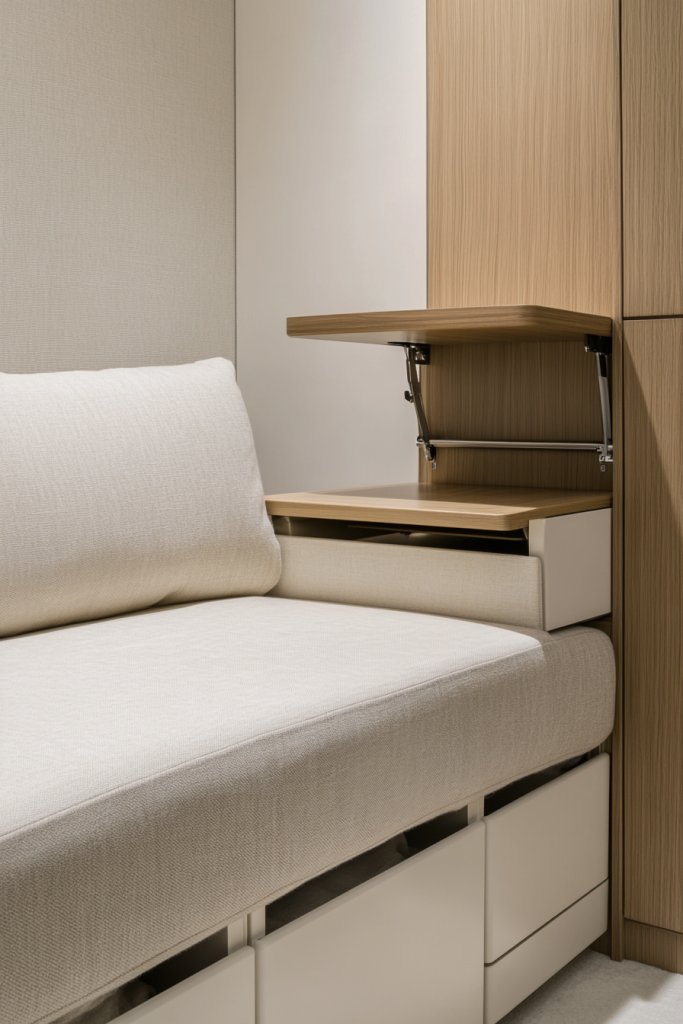
Limited space often forces us to choose between style and storage. Multi-functional furniture with built-in storage solves this dilemma by combining comfort and practicality. It’s a smart way to maximize every inch of your home without sacrificing design. Who says furniture can’t be both beautiful and functional?
Imagine a plush ottoman with a hidden compartment filled with blankets or magazines. Or a sleek storage bed with drawers underneath, perfect for seasonal clothing or extra bedding. The furniture’s clean lines blend seamlessly into your decor, while its hidden storage keeps clutter out of sight. It’s like having a secret storage closet in plain sight.
Choose furniture that matches your style—modern, rustic, or eclectic. Opt for pieces with drawers, lift-up lids, or hidden compartments. Use in bedrooms, living rooms, or even entryways to hide shoes, toys, or linens. Combine with decorative cushions or throws to enhance style. Adjust the storage capacity based on your needs and space.
Identify your storage needs and measure available space. Select furniture with built-in compartments that match your aesthetic. For beds, consider those with drawers or lift-up mechanisms. In living rooms, look for coffee tables or sofas with hidden storage. Assemble or place furniture carefully, ensuring stability and easy access. Regularly declutter stored items to maintain order.
Customize with decorative cushions or slipcovers that reflect your style. Use labels or small baskets inside storage compartments for small items. Incorporate decorative elements like patterned fabrics or textured finishes. Mix and match different pieces to create a cohesive look. Keep the interior organized with small dividers or trays.
Multi-functional furniture transforms your space into a stylish, clutter-free zone. It makes organization effortless and encourages ongoing tidiness. Once you experience the convenience, you’ll be inspired to upgrade other furniture pieces and keep clutter at bay.
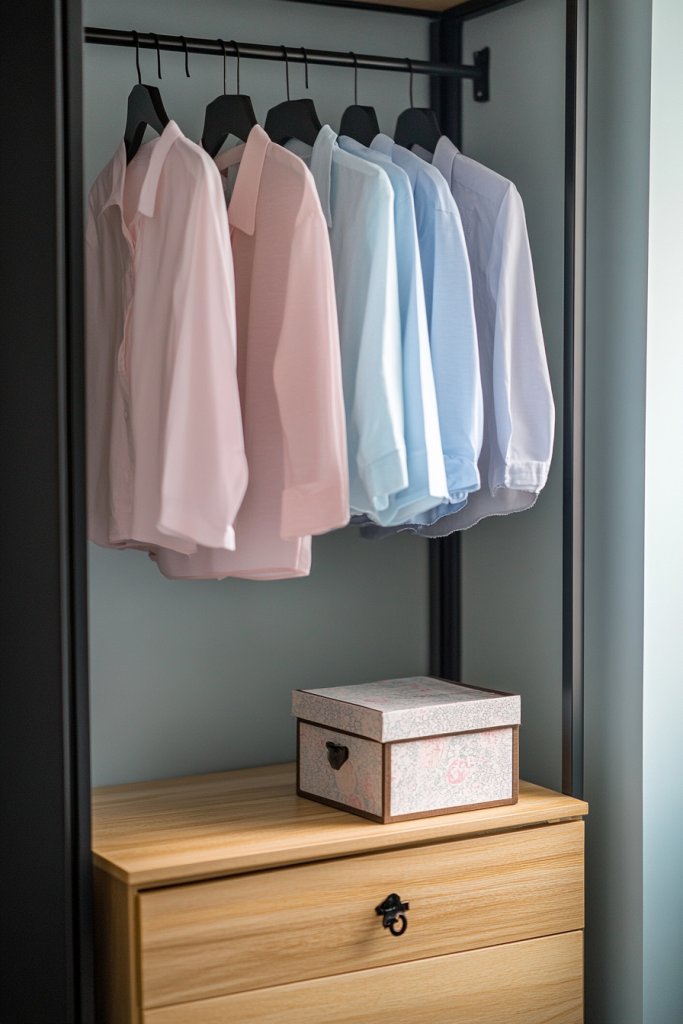
13. Create a Minimalist Closet with Fold-and-Stack Techniques

Cluttered closets can turn mornings into chaos. Creating a minimalist closet with smart folding and stacking techniques simplifies outfit choices and maximizes space. It’s a game-changer for anyone tired of digging through piles of clothes. Minimalism isn’t just trendy; it’s practical.
Visualize uniform, tightly folded stacks of t-shirts, jeans, and sweaters arranged neatly on shelves. Use matching hangers for a clean look and reduce visual clutter. Color-coordinated sections make it easy to find and put away clothes. The space looks serene, organized, and inviting, encouraging better habits.
Employ folding techniques like KonMari or rolling to save space. Use uniform hangers for a streamlined appearance. Incorporate drawer dividers or small baskets for accessories. Adapt the system for different seasons—lighter clothes in summer, heavier layers in winter. Keep frequently worn items at eye level for quick access.
Empty your closet and sort clothes into categories. Fold items with consistent techniques to maintain uniformity. Use shelf dividers or small boxes to separate categories. Hang essential items and fold everything else into neat stacks. Regularly declutter and donate unused clothes to maintain the minimalist aesthetic. Invest in slim, space-saving hangers for efficiency.
Add labels to drawers or baskets for easy identification. Incorporate decorative storage boxes or fabric bins for seasonal accessories. Use a small mirror or decorative hooks for added utility. Personal touches like a colorful scarf or patterned storage add personality. Keep the system flexible for future wardrobe updates.
A minimalist closet reduces decision fatigue and streamlines your mornings. It visually calms your space and mind, making you feel more in control. Maintaining this system encourages ongoing organization and reinforces good habits, transforming your wardrobe into a source of pride.
14. Use Stackable Bins and Trays in Pantries and Cabinets
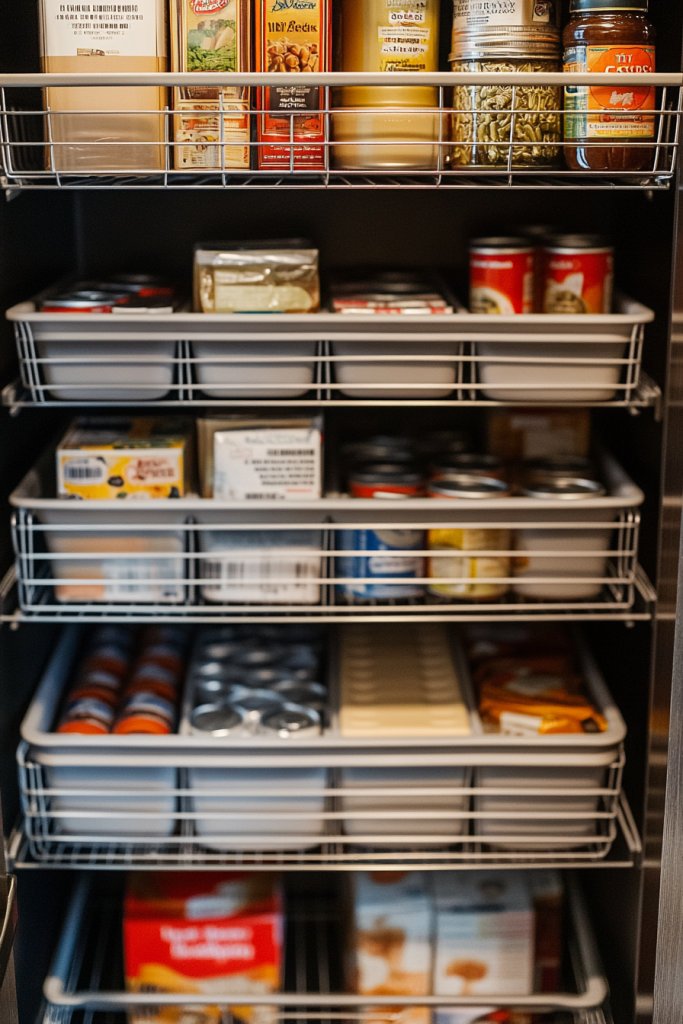
Pantries and cabinets often turn into black holes where cans and boxes go to hide forever. Stackable bins and trays create order by keeping similar items grouped and easily accessible. They turn cluttered chaos into a tidy, functional space that saves time and reduces stress.
Picture clear or opaque nesting containers filled with spices, snacks, or canned goods, all sorted by category. Labels on each bin or tray help you identify contents at a glance. Items are neatly stacked, with space-saving design that makes full use of vertical room. The result feels organized and inviting, encouraging healthier eating habits.
Choose stackable containers in different sizes for flexibility. Use airtight seals for perishable goods or open trays for bulk items. Incorporate labels or color coding for quick sorting. Adapt to your space—small containers for spice jars, larger bins for bulk snacks or baking supplies. Consider drawer inserts or shelf risers for even more efficiency.
Empty your pantry or cabinet and group similar items together. Select stackable bins and trays that fit your space and needs. Label each container with durable labels or stickers. Stack items logically—heavy at the bottom, frequently used at the front. Regularly purge expired or unused products to keep everything fresh. Use vertical space for maximum capacity.
Decorate labels with fun fonts or colors matching your decor. Add small decorative touches like patterned liners or matching lids. Use clear containers to see contents without opening. Incorporate seasonal or themed storage for holidays and special occasions. Keep your system flexible to adapt as your needs change.
Stackable bins turn cluttered pantries into showcase-worthy storage. They boost your confidence in the kitchen and promote healthier habits. Once organized, maintaining order becomes second nature, making meal prep and grocery shopping easier and more enjoyable.
15. Implement a Daily 5-Minute Reset Routine for High-Traffic Areas

High-traffic areas like the kitchen or entryway tend to accumulate clutter fast. A quick daily reset routine prevents messes from becoming overwhelming. Just five minutes a day can keep your home looking tidy and feeling calm, saving you hours of deep cleaning later. Small habits yield big results.
Visualize setting a timer for five minutes each evening. You quickly gather stray objects—empty cups, mail, shoes—and put them in their designated spots. Surfaces like countertops or tables are cleared, leaving a clean, inviting space. The space feels fresh and organized, ready for the next day’s activities.
Choose specific spots for quick tidying—countertops, tables, or entryway shelves. Use baskets or trays to contain loose items. Incorporate a checklist or a visual guide to stay on track. Adjust the routine based on your household size or daily schedule. For busy families, assign roles or rotate responsibilities.
Set a daily alarm or reminder to do your quick reset. Gather a small set of organizing tools—clothes baskets, cleaning cloths, or labels. Tackle one high-traffic zone, focusing on surface clearing and item organization. Make it part of your evening ritual, such as after dinner or before bed. Consistency is key to turning this into a habit.
Create a fun or motivating environment—play your favorite music or set a reward. Use colorful containers or stickers to make the routine engaging. Celebrate your progress with small treats or new organizational accents. Over time, this routine becomes second nature, drastically reducing clutter.
A daily five-minute reset is a powerful tool for maintaining a tidy home effortlessly. It fosters discipline and makes clutter less intimidating. Seeing your spaces stay clean boosts your confidence and encourages you to extend tidiness habits to other parts of your home.
16. Label Everything with Stylish Tags for Quick Sorting
Searching for items in cluttered cabinets or drawers is frustrating and time-consuming. Stylish labels turn chaos into clarity by clearly indicating what’s inside. They make it easy for everyone in the household to put things back where they belong, reducing the cycle of mess.
Imagine clear, beautifully designed tags attached to baskets, jars, or drawers—each with elegant fonts or icons. The labels instantly communicate their contents, whether it’s spices, craft supplies, or socks. They add a polished look and help organize items by category, color, or frequency of use. The result is a space that looks both functional and stylish.
Choose from materials like chalkboard, adhesive paper, or engraved wood for different aesthetics. Use matching tags for a uniform look or mix textures for visual interest. Apply labels to containers in your pantry, linen closet, or craft area. Seasonal themes can be added with removable tags for holidays or special occasions.
Start by gathering your containers, jars, and bins. Decide on a labeling style and create labels with a label maker, printer, or handwrite with a fine marker. Attach labels securely to each container, ensuring they’re easy to read. Group similar items together and label each group. Regularly update labels as contents change to maintain clarity.
Personalize labels with decorative fonts, icons, or colors to match your decor. Use chalkboard labels for versatility and easy updates. Add small decorative touches like washi tape borders or embossing for an elegant look. Incorporate labels into your overall design scheme to tie everything together.
Labeling transforms your storage into a professional, organized system. It promotes consistency and reduces clutter-related stress. When everything has a designated label, putting items away becomes effortless, making your entire home feel more orderly and inviting.
17. Clear Off Surfaces with Decorative Trays and Baskets
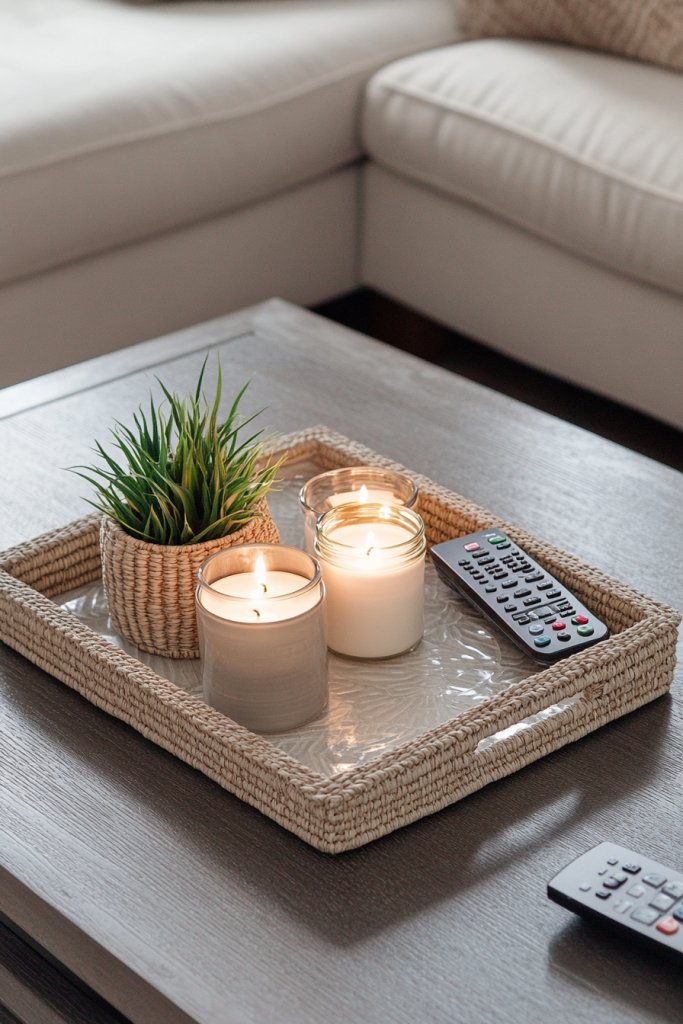
Countertops, coffee tables, and desks often become catch-alls for random clutter, making spaces look untidy. Decorative trays and baskets offer a stylish way to gather and contain small items. They instantly tidy surfaces and add a layer of design to your home.
Picture a elegant tray on your coffee table holding remote controls, coasters, and a candle. On a kitchen counter, a woven basket keeps mail, keys, and sunglasses organized. The containers’ textures and colors complement your decor, transforming clutter into curated displays. This approach keeps your space looking intentional and inviting.
Choose trays and baskets in materials like wood, metal, or woven fibers to match your style. Use decorative options on surfaces that are frequently used, such as entry tables or nightstands. Incorporate small organizational dividers inside baskets for tiny items. Rotate contents seasonally or for holidays to keep displays fresh.
Identify the surfaces prone to clutter buildup. Select trays or baskets that fit the space and aesthetic. Gather items to be contained—keys, chargers, pens, or cosmetics—and place them inside. Regularly review and refresh contents, discarding or relocating items that no longer belong. Use attractive containers to encourage consistent use.
Decorate trays with paint, fabric, or decorative handles. Use labels or tags for specific items or zones. Incorporate seasonal decor—like pinecones or flowers—to enhance visual appeal. Match containers across rooms for a cohesive look. Keep things simple but stylish for a clutter-free, welcoming space.
Using decorative trays and baskets elevates everyday clutter into stylish decor. It helps you maintain a tidy home effortlessly and makes organizing feel like an art. Once you see how a few attractive containers can transform your space, you’ll be motivated to keep other areas just as polished.
18. Declutter Digital Clutter by Organizing Files and Photos

Digital clutter can be just as overwhelming as physical messes. Files, emails, and photos pile up, slowing down devices and creating stress. Organizing digital content simplifies your life and frees up space. It’s time to treat your digital world like your physical one—clean and streamlined.
Picture creating a well-structured folder system on your computer, with clearly labeled directories for work, personal, photos, and receipts. Inside each folder, files are named consistently and sorted chronologically. Photos are organized into albums or tagged by event or date, making retrieval quick and painless. The space looks tidy and efficient, reducing frustration.
Use color-coded folders or tags for different categories. Adopt naming conventions that make sense to you—date, event, project. Regularly delete duplicates or unnecessary files. Consider cloud storage for backups and sharing. Use apps or tools to automate sorting or remove duplicates to streamline your process.
Start by backing up important data. Create a main folder structure that reflects your needs. Move files into their appropriate folders, deleting duplicates and old versions. Tag or label especially important photos or documents for easy searching. Schedule weekly or monthly reviews to keep the system current. Use search functions and metadata to locate files quickly.
Customize folder icons or colors for quick visual identification. Use digital filing systems that match your workflow—tags, keywords, or smart folders. Create a visual dashboard or desktop organizer for quick access to frequently used files. Regularly archive or delete outdated content to keep your digital space lean.
An organized digital space boosts productivity and reduces stress. It helps you find what you need in seconds and prevents files from becoming digital clutter. Maintaining this system makes your device faster and your mind clearer, turning digital organization into a satisfying habit.
19. Use Drawer Dividers and Small Containers for Easy Sorting
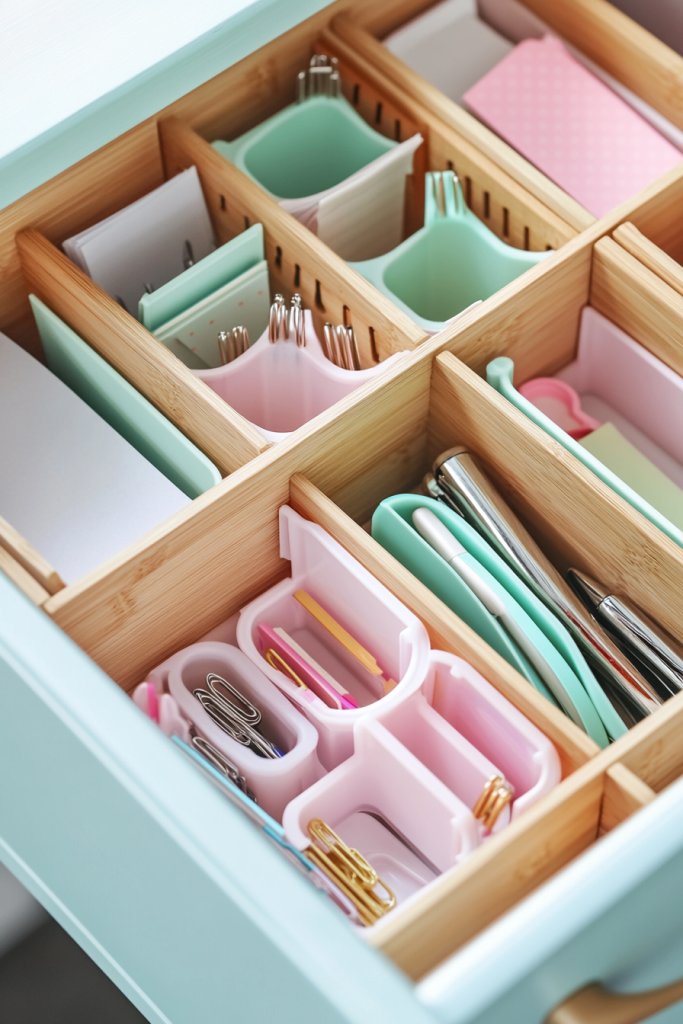
Messy drawers turn mornings into chaos. Small items like utensils, office supplies, or beauty products get lost or jumbled. Drawer dividers and small containers create order and make everything accessible. They turn clutter into a neatly organized space where you can find what you need in seconds.
Imagine a kitchen drawer with neatly separated sections for knives, spoons, and measuring spoons. An office drawer holds pens, paper clips, and sticky notes in labeled containers. The visual effect is clean and organized, reducing frustration and clutter. Everything has its place, and chaos is replaced by calm.
Choose adjustable dividers for versatility or small boxes for specific items. Use color-coded containers for different categories—office supplies, cosmetics, jewelry. Incorporate foam or silicone inserts for delicate items. Adapt the system for each drawer’s size and purpose, ensuring accessibility and neatness.
Empty your drawers and sort items into categories. Measure drawer dimensions and select suitable dividers or containers. Place items into designated spaces, grouping similar objects together. Label containers if needed for clarity. Regularly review and declutter to prevent buildup. Keep frequently used items at the front or top.
Customize with colorful or patterned containers for fun. Use clear materials for quick identification. Incorporate small decorative touches like stickers or washi tape. Rotate or update contents seasonally or as needs change. Keep the system flexible to adapt to new items.
Using drawer dividers makes organization effortless and keeps your space looking polished. It reduces morning stress and boosts your confidence in your tidiness skills. Maintaining this system encourages ongoing neatness and turns clutter management into a simple daily habit.
20. Hang Hooks and Pegboards for Tools and Accessories
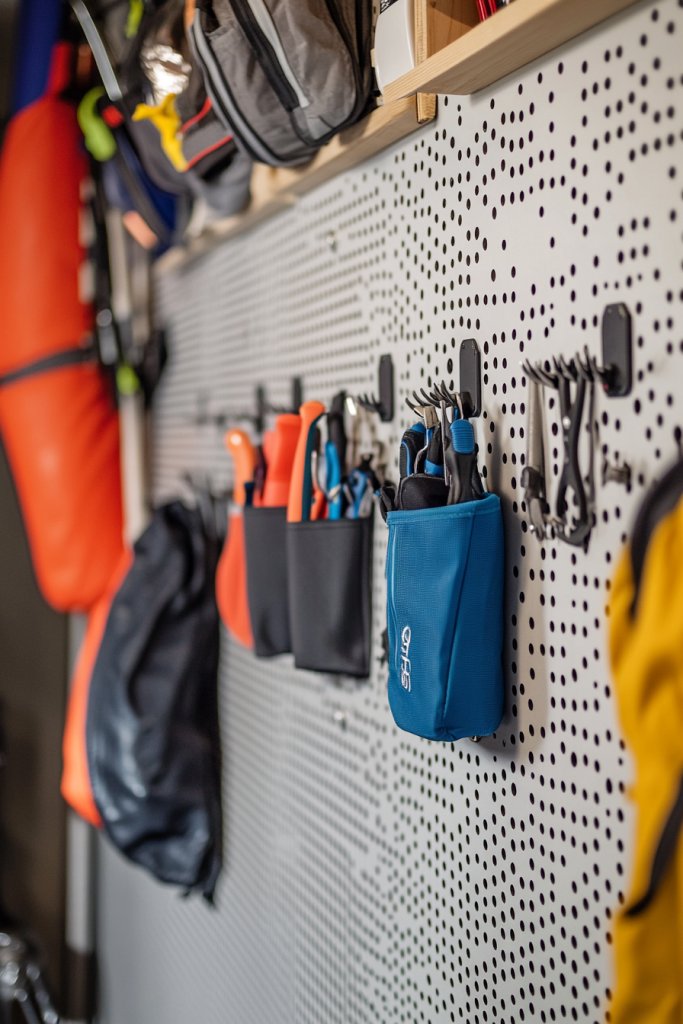
Tools, bags, or accessories scattered across counters create visual chaos and slow down your routines. Wall-mounted hooks and pegboards turn clutter into a functional display that keeps essentials at your fingertips. They’re perfect for workshops, kitchens, or craft rooms, making organization both practical and appealing.
Picture a sturdy pegboard mounted on a wall, with hooks holding tools, aprons, or jewelry. Baskets or small shelves attached to the board store related items, creating a cohesive look. The arrangement is colorful and organized, transforming a plain wall into a visual workspace. Everything is accessible and neatly stored, reducing clutter.
Choose metal, wood, or plastic hooks and pegboards to suit your decor. Use different hook sizes for varied tools or accessories. Incorporate baskets or small shelves for additional storage. Adapt the setup for specific needs—garage tools, craft supplies, or kitchen utensils. Arrange items by frequency of use for efficiency.
Identify cluttered areas where tools or accessories accumulate. Install robust hooks or pegboards securely into studs or wall anchors. Group similar items—gardening tools, baking utensils, or craft supplies—and hang them accordingly. Label sections or hooks to streamline usage. Regularly reassess and tidy to prevent buildup.
Decorate with colorful hooks or themed pegboard designs. Use labels, tags, or small signs to identify sections. Incorporate decorative elements—like patterned baskets or painted hooks—to add style. Keep frequently used items within easy reach. Change out or rearrange as your needs evolve.
Hooks and pegboards make organizing tools and accessories straightforward and attractive. They foster a clutter-free environment and inspire you to keep other areas tidy. Seeing everything displayed neatly encourages ongoing organization habits and makes your space more functional and welcoming.
21. Regularly Schedule 10-Minute Maintenance Checks
Clutter tends to creep back in over time, undoing your hard work. Regular short maintenance sessions prevent accumulation and keep your home looking fresh. Just ten minutes a day is enough to nip clutter in the bud and maintain an organized, peaceful space.
Imagine setting a timer each evening or morning, quickly scanning your main spaces. You put away stray items, straighten cushions, and wipe surfaces. The space looks neat and inviting, and the routine becomes second nature. It’s a small habit with a big impact, ensuring clutter doesn’t get a foothold.
Choose specific days or times for maintenance—before bed or after breakfast. Focus on high-traffic areas, such as the kitchen, living room, or entryway. Use a checklist or quick mental cue to stay on track. Adapt the duration or scope based on your household size and needs. Consistency is key.
Set recurring reminders in your calendar or phone. Dedicate a specific spot for cleaning supplies—sprays, cloths, organizers. During each check, put away items, straighten or fold, and wipe surfaces. Involve family members to share responsibilities. Celebrate your progress to motivate ongoing commitment.
Make it enjoyable by playing music or rewarding yourself after completing routines. Use cheerful, colorful cleaning tools or labels to motivate participation. Track your streaks or milestones visually. Over time, this quick routine becomes automatic and essential for maintaining order.
Routine maintenance keeps your home consistently tidy and stress-free. It builds discipline and prevents clutter from piling up. With just a few minutes each day, you sustain a calm, organized environment that benefits your mental and physical well-being.
Conclusion
With these diverse decluttering ideas, you now have a toolkit to quickly transform your home into a tidy sanctuary. Don’t hesitate to try out different strategies and see what works best for your space and lifestyle. Take action today—your organized, clutter-free home is just a few steps away, and you’ll enjoy the peace and joy that come with it!