Dreaming of a bathroom refresh but unsure where to start? DIY bathroom remodel ideas are incredibly popular because they allow homeowners to personalize their space without breaking the bank, all while adding a sense of accomplishment to the process. Whether you’re aiming for a spa-like retreat or a modern update, tackling a remodel yourself can be both fun and rewarding.
In this article, you’ll find a variety of creative and practical ideas to transform your bathroom. From simple paint jobs to clever storage solutions and stylish DIY upgrades, there’s something for every skill level and style preference. Get ready to be inspired and discover how easy it can be to create a fresh, updated bathroom that truly reflects your personality!
1. Install a Modern Beadboard Wainscoting for Classic Charm
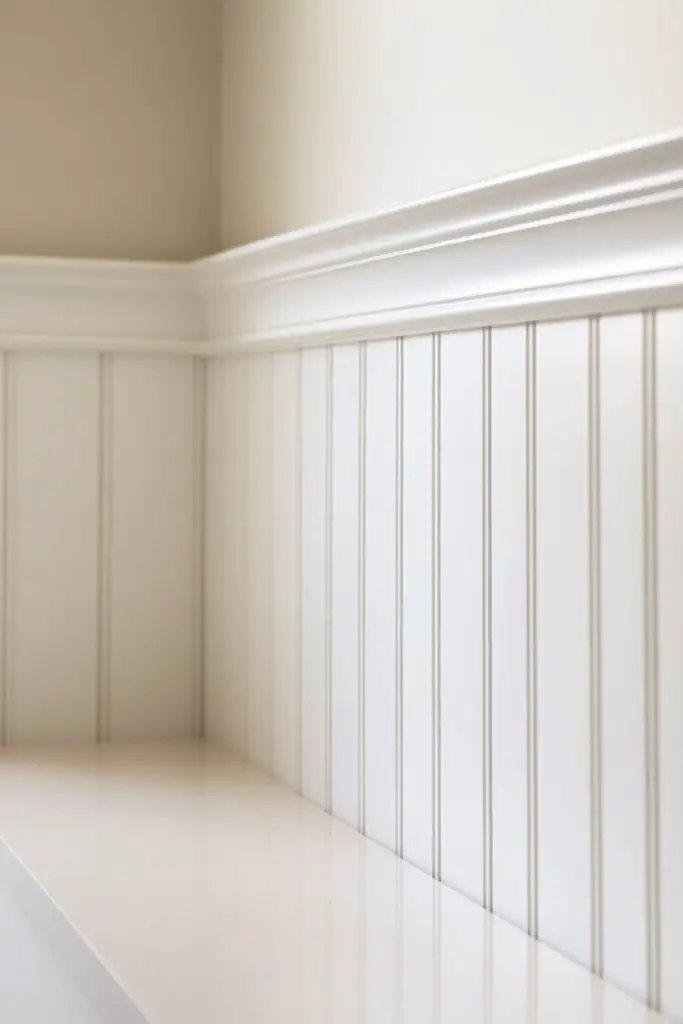
Ever wish your bathroom walls looked a little more polished without spending a fortune? Beadboard wainscoting offers an easy way to add instant charm and character. It’s perfect if you’re craving a classic, timeless look that elevates your space with minimal effort. Plus, it hides any wall imperfections and adds a cozy vibe.
Picture smooth, creamy beadboard panels running halfway up your wall, painted in soft neutrals or crisp whites. The vertical grooves create a subtle texture that catches the light, making the room feel taller. Pair it with brass or matte black fixtures for a modern twist. The contrast between the paneling and your existing decor makes the space feel fresh yet cozy.
You can customize beadboard in many ways—paint it bold colors for a modern look or go for a distressed finish for rustic charm. It works well in small powder rooms or larger bathrooms, adapting to different styles like farmhouse or coastal. For a seasonal change, switch from bright whites to deeper navy or muted greens.
Start by measuring your wall area and selecting tongue-and-groove beadboard panels or pre-made sheets. Use a level to mark a straight line at your desired height, then attach the panels with adhesive and nails. Sand the edges for a seamless look, then paint or finish as desired. You can do this yourself with basic tools or hire a pro for a flawless finish. Consider adding quarter-round molding at the top for a polished appearance.
Add decorative trim or molding to frame the beadboard for extra dimension. Incorporate a contrasting paint color on the upper wall or ceiling for a layered effect. You could also install beadboard on just one wall as an accent, creating a focal point. DIY stencil patterns or decals can add a personalized touch without cluttering the look.
Installing beadboard is a straightforward upgrade that transforms your bathroom’s style. It’s a DIY project that even beginners can tackle, giving you a sense of accomplishment. With its timeless appeal, beadboard remains a popular choice for a reason—classic, versatile, and budget-friendly.
2. Create a Statement Wall with Peel-and-Stick Wallpaper
Tired of boring, plain walls that do nothing to excite you? Peel-and-stick wallpaper offers a quick, damage-free way to inject personality into your bathroom. It’s perfect if you want a bold look without the hassle of traditional wallpaper or messy adhesives. Plus, it’s easily removable if your style changes.
Imagine a single wall covered in geometric patterns, textured designs, or vibrant colors—adding instant drama. The wallpaper clings smoothly, creating clean lines and crisp edges. Visualize it paired with minimalist fixtures or vintage accents for a balanced aesthetic. The pattern adds depth and visual interest, making the bathroom feel lively without overwhelming the space.
Choose from a variety of prints—from subtle metallic accents to bold floral or abstract patterns. For smaller bathrooms, opt for light colors or small-scale designs to avoid cluttered feel. In larger spaces, go for oversized prints or darker shades for drama. Seasonal options like tropical motifs or cozy textures are also popular choices.
Start by cleaning and drying your wall thoroughly. Measure and cut the wallpaper strips slightly longer than the wall height for easier alignment. Peel off the backing gradually, smoothing the paper with a squeegee or credit card to avoid bubbles. Overlap or trim excess with a craft knife. No glue or paste is needed, making this a beginner-friendly project. Use painter’s tape to protect edges and corners during application.
Combine different patterns or textures for a custom mural-like effect. Use coordinating paint or decals on adjacent walls to enhance the statement. Add a decorative mirror or metallic accents to amplify the look. For extra flair, use peel-and-stick borders or trim to frame the wallpaper edges.
This DIY wallpaper trick turns a plain wall into a showstopper with minimal effort. It’s a budget-friendly upgrade that instantly boosts style and confidence. Whether for a quick refresh or a bold design statement, peel-and-stick wallpaper is your best friend for creating a personalized bathroom vibe.
3. Upgrade Your Vanity with a DIY Reclaimed Wood Countertop
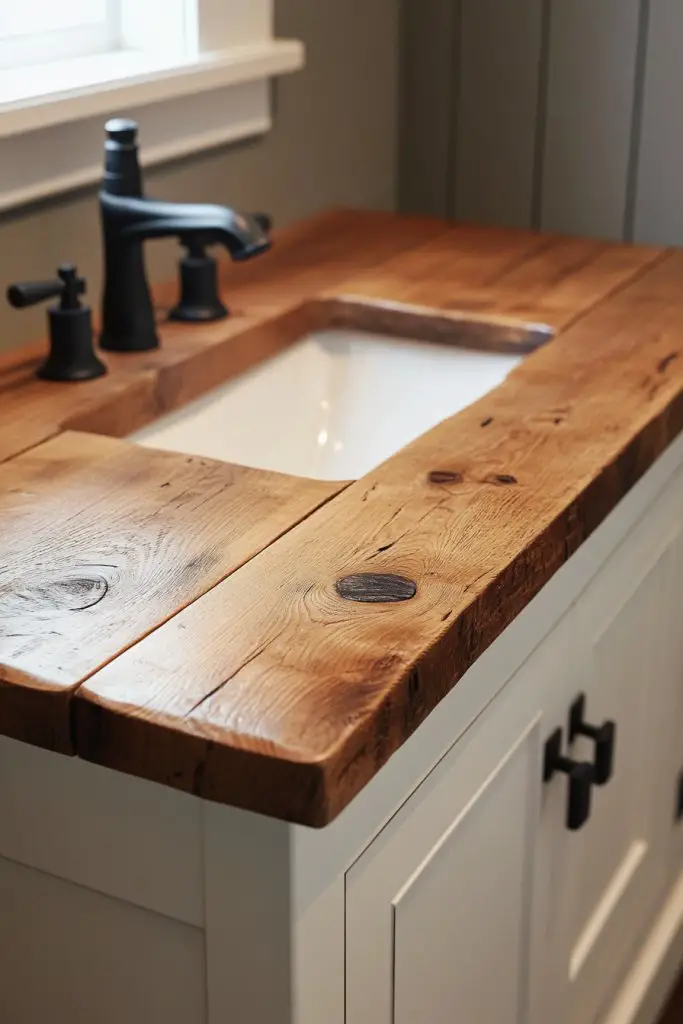
Feeling like your bathroom vanity needs a facelift but not ready for a full remodel? Reclaimed wood countertops offer a warm, rustic touch that can dramatically change the vibe. It’s a budget-friendly way to add character and sustainability to your space. Plus, it’s surprisingly easy to DIY if you’re handy with a saw and sander.
Visualize a rugged wood slab with natural knots and grains, sealed to withstand moisture. The warm tones contrast beautifully with sleek modern fixtures or vintage-inspired hardware. Imagine the textured surface catching the light, adding depth to the vanity area. The earthy, natural finish creates a cozy, inviting atmosphere in your bathroom.
Choose different wood types—pine, cedar, or reclaimed barn wood—for distinct looks. For a sleek modern twist, opt for a smooth, stained finish; for rustic charm, leave it raw or lightly distressed. Sizes can be customized to fit your vanity, from small countertops to large, statement pieces. Seasonally, you could stain it darker for a cozy winter feel or go lighter for summer freshness.
Start by sourcing reclaimed wood from local suppliers or salvage yards. Cut the wood to your vanity’s dimensions, then sand thoroughly to remove splinters. Seal the surface with a waterproof, food-grade polyurethane or epoxy resin to prevent water damage. Attach the wood to your existing vanity base with brackets or adhesive, ensuring it’s level and secure. Finish with a few coats of sealant, then wait 24 hours before use.
Add decorative metal or leather handles for a personalized touch. Incorporate subtle inlays or painted designs for a custom look. Pair it with vintage fixtures or modern hardware depending on your style. Protect the wood regularly with oil or sealant to maintain its beauty and durability.
A reclaimed wood countertop can turn a standard vanity into a focal point. It’s a DIY project that combines sustainability with style, giving you confidence in your craftsmanship. With a little effort, you create a unique piece that adds warmth and personality to your bathroom for years to come.
4. Add Open Shelving with Stylish Baskets for Practical Storage
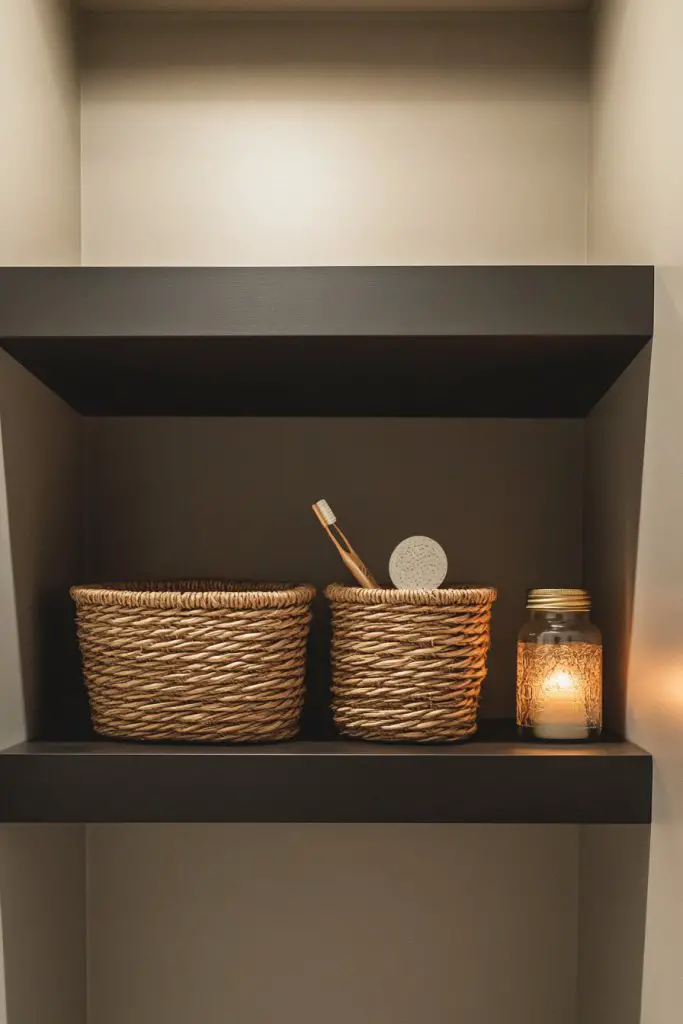
Cluttered countertops and cramped cabinets making your bathroom feel chaotic? Open shelving offers an accessible, stylish solution that keeps essentials within reach. It’s perfect for adding storage without closing off the space or making it feel smaller. Plus, it’s a chance to display your favorite organizational finds.
Imagine sleek floating shelves mounted above your vanity or toilet, lined with woven baskets or decorative boxes. The open design allows you to see everything at a glance, reducing chaos. Fill baskets with neatly folded towels, toiletries, or decorative accents like candles—creating a balanced, curated look. The natural textures of baskets add warmth and visual interest against sleek tile or painted walls.
Use different shelf styles—industrial metal, minimalist wood, or ornate carved designs—to match your decor. Incorporate baskets of various sizes to optimize space and organization. For a cohesive look, choose baskets in matching colors or textures. In small bathrooms, opt for slim, wall-mounted shelves; larger spaces can handle deeper or multiple tiers.
Mount floating shelves using appropriate wall anchors and screws for your wall type. Space them at different heights for visual interest or align them for a clean, modern look. Organize items in decorative baskets or boxes that fit the shelves. Keep heavier items on lower shelves for safety and stability. Regularly clean and reorganize to maintain a fresh appearance. You can DIY the brackets or buy ready-made floating shelf kits for simplicity.
Paint the baskets or decorative boxes to match your color scheme. Add labels for easy identification or personal monograms. Incorporate small decorative items like vintage jars or sculptural pieces to elevate the look. Rotate items seasonally to keep the display fresh and engaging.
Open shelving with baskets transforms your bathroom into an organized oasis. It’s a simple DIY upgrade that feels both functional and fashionable. When everything has a place, your mornings become smoother—and honestly, who doesn’t need that boost of confidence in their space?
5. Refresh Your Shower Area with a DIY Tile Decal Border
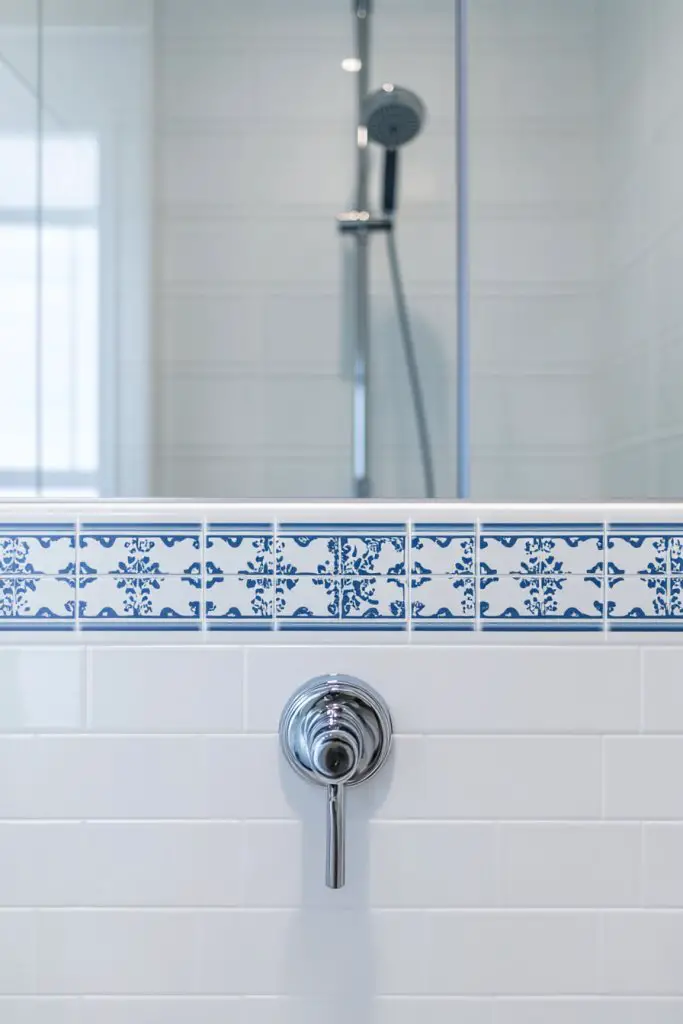
Does your shower look dull or outdated? A quick fix like a DIY tile decal border can instantly elevate the entire look. It’s an affordable way to add a splash of style without the mess or expense of retiling. Plus, it’s perfect for renters or anyone wanting a temporary update.
Imagine a sleek shower surround with a custom border of geometric or textured decals. These decals mimic real tiles with realistic grout lines and patterns, creating depth and interest. Visualize crisp, clean edges contrasting with plain tiles, adding a modern or vintage vibe. The decals are water-resistant and adhere smoothly, giving a seamless, professional look.
Choose decals in metallics for a luxe feel, or go for matte or matte-embossed patterns for a more subdued, modern look. Match the decal border to your towel hooks, soap dishes, or hardware for cohesion. Change the pattern seasonally: floral decals in spring or bold geometrics for a contemporary twist. Use accent decals to highlight corners or niches for added customization.
Clean the shower surface thoroughly to ensure adhesion. Measure and mark where the decal border will sit, using painter’s tape as a guide. Peel back the backing gradually, smoothing the decal onto the surface with a squeegee or credit card. Work slowly to avoid bubbles or wrinkles. Trim excess with scissors or a craft knife for a perfect fit. Seal the edges with clear silicone if needed for extra water resistance.
Pair the decals with matching accessories—like a textured shower curtain or stylish soap dispenser. Mix and match decal patterns to create a customized mosaic effect. For a more layered look, combine decals with removable wall decals or stencils for added texture. Change out the border every few years to refresh the space.
This simple project can completely transform your shower, making it feel brand new. It’s a low-cost, low-effort way to boost your confidence in DIY projects. With a little patience, you’ll have a stunning, personalized shower area that impresses everyone who visits.
6. Install a New, Space-Saving Over-the-Toilet Shelf Unit
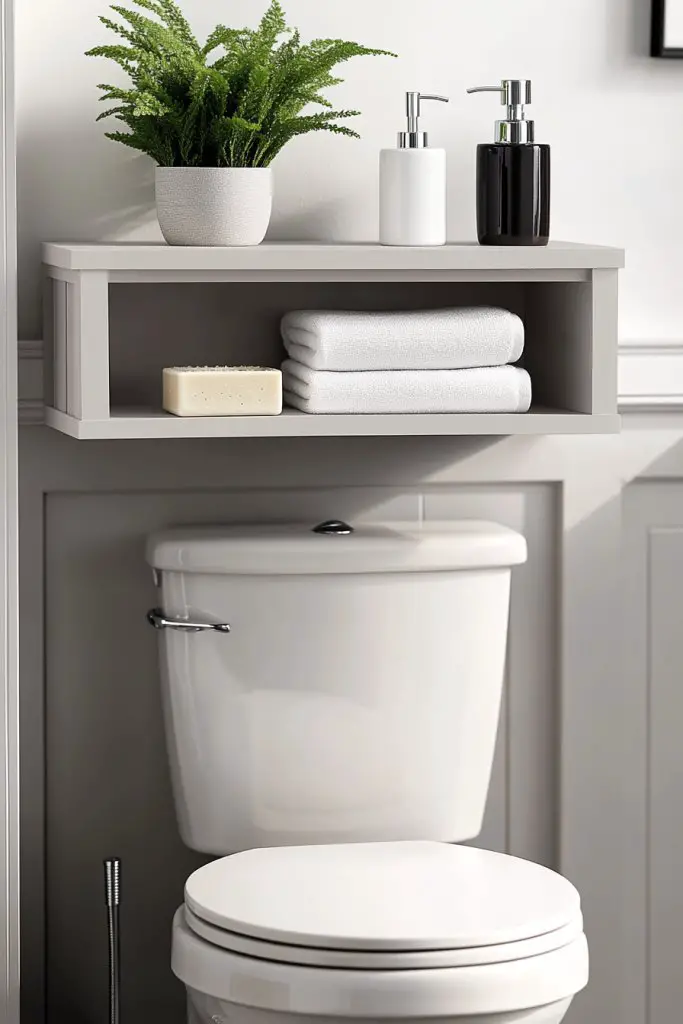
Is your bathroom short on storage and feeling cluttered? An over-the-toilet shelf unit offers a practical solution that adds extra space without taking up precious floor area. It’s perfect for holding toiletries, extra towels, or decorative items. Plus, it instantly upgrades your bathroom’s organization and style.
Picture a sleek, multi-tiered shelf above your toilet, made from wood, metal, or even acrylic. It holds neatly folded towels, baskets, or decorative jars, making the most of vertical space. The unit blends seamlessly with your decor, whether modern, rustic, or vintage. The open design keeps everything accessible and visually balanced, preventing the space from feeling cramped.
Choose units with adjustable shelves to cater to your storage needs. For a minimalist look, opt for painted or lacquered designs; for rustic charm, go for distressed wood or metal finishes. Some units include hooks or towel bars for added functionality. In small bathrooms, slim profiles work best; larger spaces can support wider or taller units.
Secure the shelf unit to the wall using appropriate anchors and screws, ensuring it’s level. Arrange your items on the shelves, balancing weight and visual weight for aesthetic harmony. Use baskets or small containers to organize smaller items. Regularly clean the shelves and check for stability, especially if you’re storing heavier items. DIY options include building your own or repurposing sturdy crates and brackets.
Paint or stain the shelf to match your bathroom palette. Add decorative handles or corner brackets for a custom look. Incorporate small decorative elements like vintage jars or textured containers to elevate style. You can also add a small plant or a decorative tray to hold daily essentials.
A space-saving over-the-toilet shelf is a game-changer for small bathrooms. It’s a straightforward DIY upgrade that makes your space seem larger and more organized. Once installed, you’ll feel more confident tackling other projects to personalize your bathroom further.
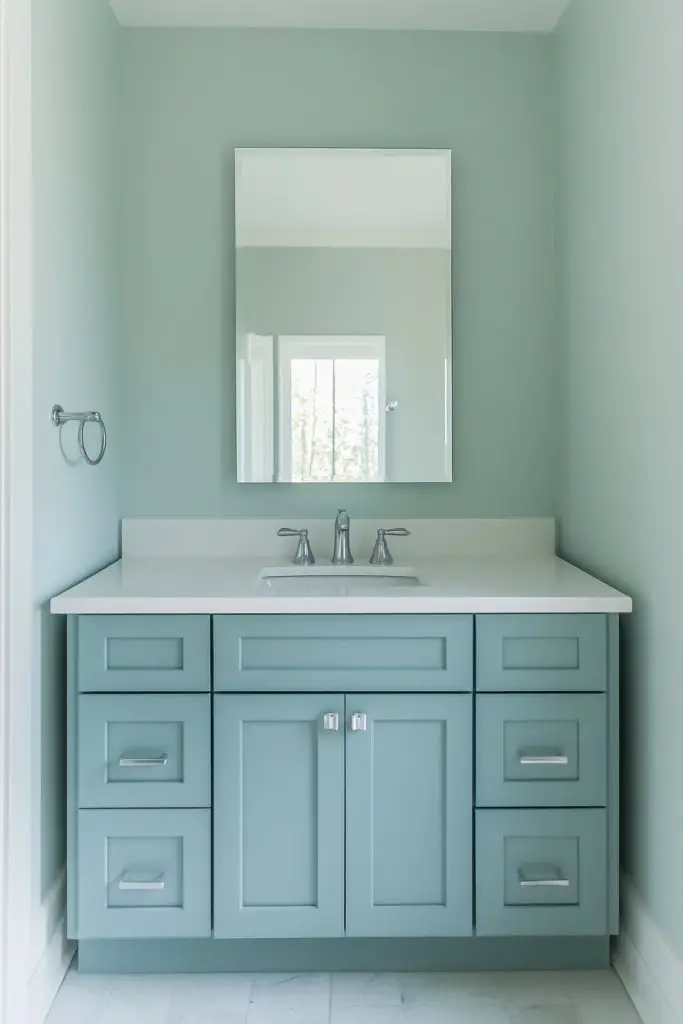
7. Paint Cabinets in Trending Matte Finishes for a Modern Touch

Old, worn-out cabinets dragging down your bathroom’s look? A fresh coat of matte paint can instantly modernize and brighten the space. It’s an affordable alternative to replacing cabinets and offers a sleek, contemporary vibe. Plus, it’s surprisingly simple to do yourself—no heavy lifting required.
Imagine your cabinets transformed into smooth, velvety surfaces in deep navy, soft blush, or earthy sage. The matte finish absorbs light softly, reducing glare and creating a sophisticated look. Pair it with brushed nickel or matte black hardware for a trendy contrast. The overall effect is clean, minimal, and effortlessly chic.
Choose bold, dark matte colors for a dramatic statement or muted tones for subtle elegance. For a vintage feel, go for pastel matte shades; for a high-end look, consider rich jewel tones. Matte paint works well on wood, MDF, or laminate surfaces—just prep thoroughly before painting. Seasonal accents, like metallic or gloss trims, can add a fun twist.
Start by cleaning and lightly sanding the cabinet surfaces to ensure good paint adhesion. Use a primer designed for matte finishes if needed. Apply at least two coats of high-quality matte paint with a brush or roller, allowing proper drying time between coats. Replace or update the hardware for a complete refresh. Protect the finish with a matte clear sealer if desired, especially in high-moisture areas.
Add decorative knobs or pulls in contrasting metals or colors for extra flair. Incorporate decals or stenciled patterns for a personalized touch. For a cohesive look, paint the hardware or add a decorative trim along the cabinet edges. Use drawer liners or shelf paper inside cabinets to add visual interest.
Updating your cabinets with matte paint is a DIY win that instantly boosts your bathroom’s style. It’s a cost-effective way to stay on trend and express your personal taste. Once finished, you’ll enjoy a space that feels fresh, modern, and uniquely yours.
8. Craft a Unique Mirror Frame Using Reclaimed Wood or Metal
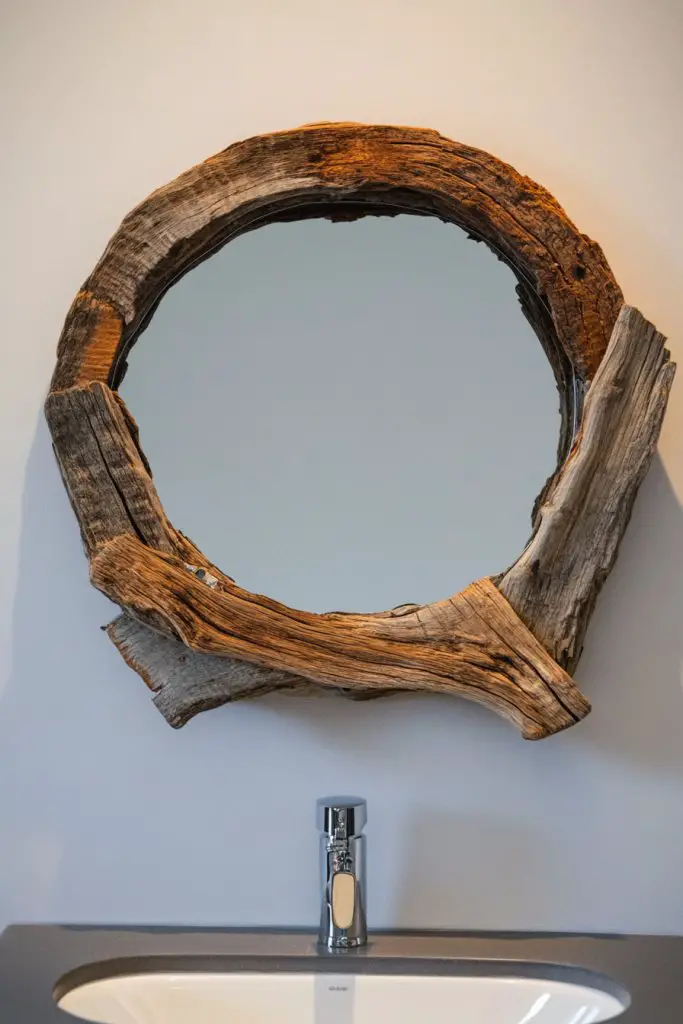
Tired of generic mirrors that blend into the background? Crafting a custom frame from reclaimed wood or metal adds a personal, artistic touch. It’s an easy DIY project that results in a stunning focal point. Plus, it allows you to match your existing decor and style with a one-of-a-kind piece.
Visualize a mirror surrounded by a rustic wooden frame with a rough-hewn finish or a sleek metal border with geometric accents. The raw textures and finishes add depth and interest, elevating even a simple mirror into a statement. The contrast between the mirror and its frame draws the eye, making it a centerpiece. Ambient lighting or candles nearby enhances its visual impact.
Opt for natural, weathered wood for a farmhouse or coastal look, or go for painted, glossy, or brushed metal for a modern or industrial vibe. Size and shape can be customized to fit your space—oval, rectangular, or round. Add decorative elements like carved motifs or metal accents for extra personality. Seasonal finishes like whitewash or metallic paints provide additional options.
Start by selecting the right reclaimed wood or metal strips. Cut the pieces to size with a saw or metal cutter, then sand or clean thoroughly. Assemble the frame using nails, screws, or adhesive, ensuring the corners are tight and square. Attach the frame to the mirror with strong adhesive or brackets. Finish with a protective sealant or paint as desired. Hang securely on the wall using appropriate hardware.
Stain or paint the frame in your chosen color to match your decor. Add decorative hardware or embellishments for extra flair. Incorporate engraved or carved details for a handcrafted look. You can also attach small hooks or shelves for functional or decorative purposes—like hanging jewelry or small accessories.
A DIY reclaimed frame transforms a plain mirror into a bespoke piece that reflects your style. It’s an inexpensive way to add texture and depth, boosting your confidence as a maker. With a little effort, you’ll have a stunning, personalized mirror that anchors your bathroom’s aesthetic.
9. Add a DIY Floating Vanity with Open Storage for Minimalist Appeal
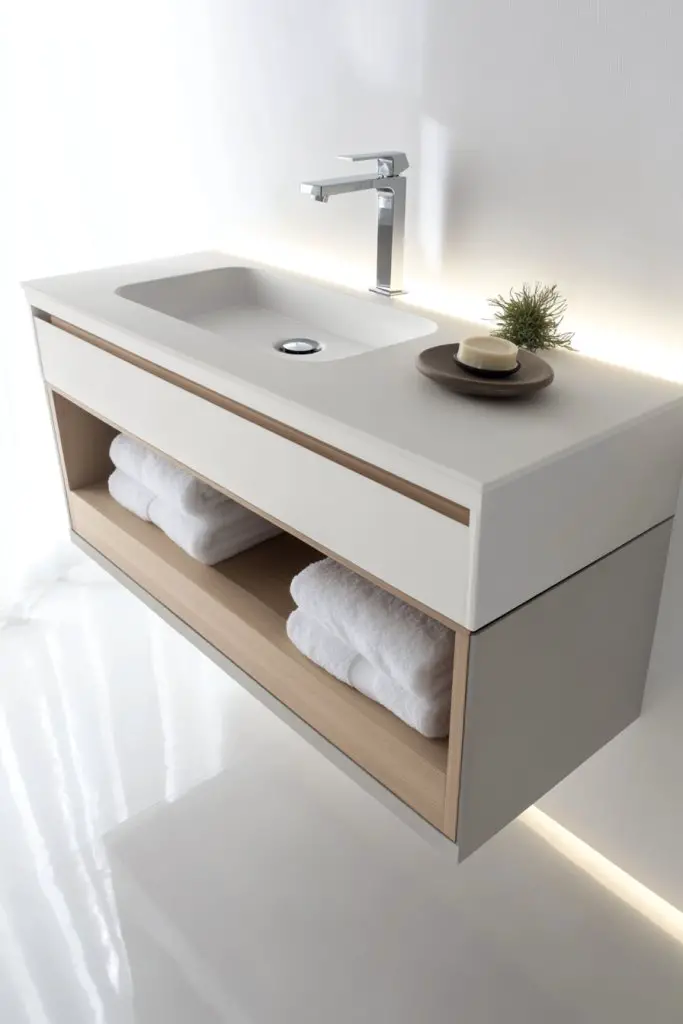
Cluttered countertops and bulky vanities can make your bathroom feel cramped. A floating vanity with open storage offers a sleek, minimalist alternative that creates the illusion of more space. It’s perfect for modern homes and those who love clean lines. Plus, it’s a satisfying DIY project that adds a custom touch.
Imagine a slim, wall-mounted unit with open shelves or cubbies, painted in a neutral tone or stained wood. The open design reveals neatly organized baskets, towels, or toiletries—keeping everything accessible. The floating look exposes more floor space, making the bathroom appear larger and more airy. Soft lighting underneath or nearby adds a warm glow, completing the aesthetic.
Use different materials—natural wood, painted MDF, or composite—for various styles. Incorporate a small countertop for daily essentials or leave it completely open for a minimalist vibe. Adjust the height to suit your needs; higher for a vanity, lower for a dressing table. Seasonal accents like colorful baskets or decorative trays can add personality.
Build or buy a sturdy wall frame to support the vanity top, then attach it securely with anchors and screws. Choose open shelving units or construct your own with plywood and brackets. Install the unit at a comfortable height, ensuring it’s level. Organize with baskets or containers, making sure everything is within reach. Finish by sealing or painting to protect against moisture.
Paint or stain the wood to match your decor. Add decorative hardware or labels to organize essentials. Incorporate LED strip lighting or small sconces for added ambiance. Use decorative containers or textured baskets for a personalized touch. Mix functional with decorative to create a balanced look.
A floating vanity elevates your bathroom’s style while keeping things simple and functional. It’s a DIY project that rewards your effort with a sleek, personalized piece. Once installed, you’ll enjoy a more open, clutter-free space that feels as good as it looks.
10. Incorporate a Stylish, DIY Soap Dispenser and Accessories
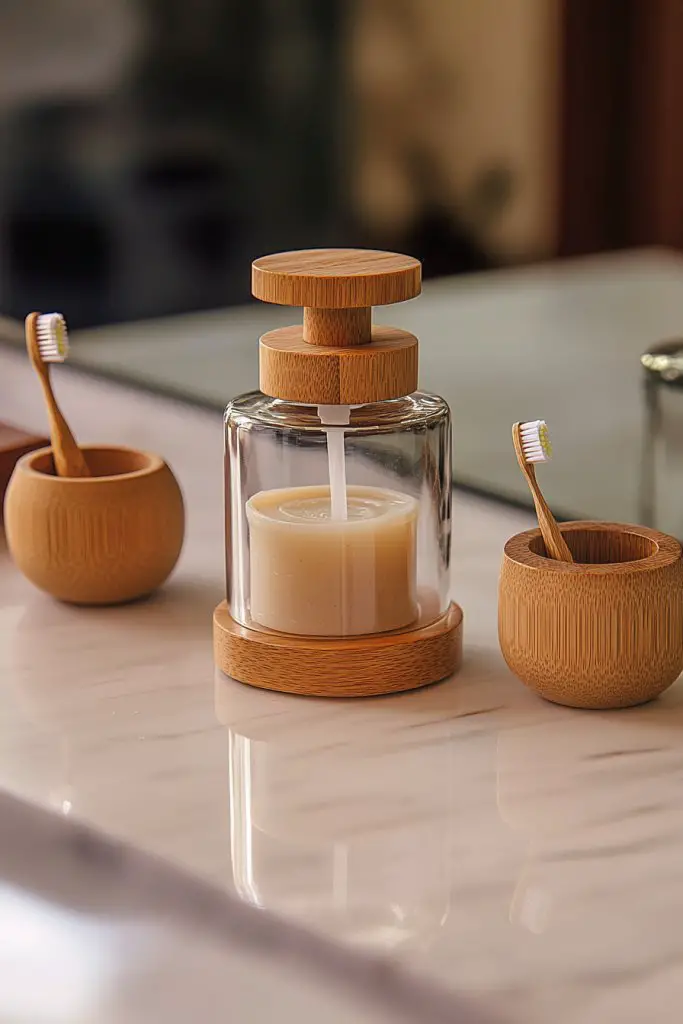
Generic soap dispensers and accessories can make your bathroom feel dull. Creating your own DIY versions allows you to personalize and elevate the look. It’s a small detail that makes a big impact on overall style. Plus, it’s an easy project that lets you experiment with materials and design.
Imagine a sleek ceramic or glass soap dispenser with a matte pump, sitting alongside matching toothbrush holders or cups. The accessories reflect your style—whether modern, vintage, or boho. Coordinated textures and finishes bring harmony and sophistication. These small touches create a curated, intentional space that feels thoughtful and unique.
Use upcycled containers like vintage jars, repurposed bottles, or painted tins for a creative twist. Incorporate natural elements like wood, cork, or concrete for a textured, earthy vibe. Mix materials—metal, ceramic, and glass—for visual interest. Seasonal or color-themed accessories keep your decor fresh and fun.
Select or craft containers in your preferred style. For DIY soap dispensers, modify bottles with drilled pumps or attach pump mechanisms to jars using silicone sealant. Decorate with paint, decoupage, or adhesive labels for a personalized look. Arrange your accessories on a tray or small shelf for a tidy display. Secure pump parts and test for leaks before use.
Add decorative touches with metallic accents, labels, or textured wraps. Switch out accessories seasonally or for special occasions. Incorporate matching baskets or holders to unify the look. Personal touches like engraved initials or custom patterns can make your accessories truly unique.
Custom DIY accessories add a polished, cohesive feel to your bathroom. They’re simple projects that boost your confidence and style IQ. With a few creative touches, your space feels more curated and personalized, making every routine a little more special.
11. Upgrade Lighting with DIY Pendant or Sconce Fixtures
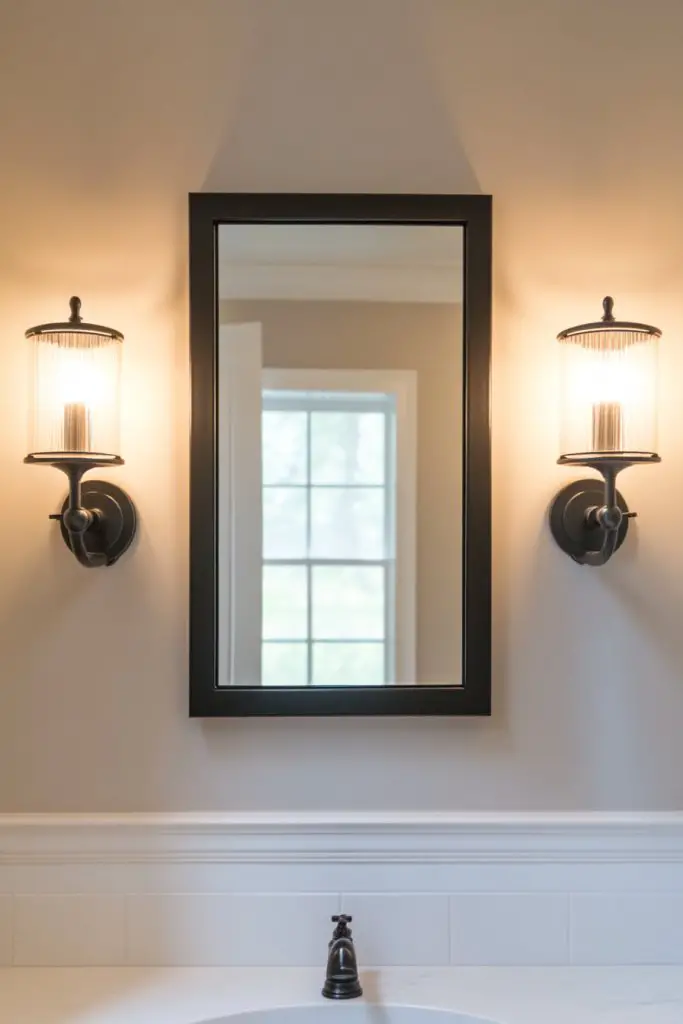
Bad lighting can make your bathroom feel gloomy and uninviting. Upgrading to DIY pendant or sconce fixtures instantly boosts ambiance and functionality. It’s a chance to add style and personality without hiring an electrician. Plus, well-chosen lighting transforms the entire mood of your space.
Picture a pair of vintage-inspired sconces flanking your mirror or a modern pendant hanging from a decorative chain. The warm glow highlights your features and creates a cozy atmosphere. Textured glass or matte metal fixtures add visual interest and complement your decor. The layered lighting makes the bathroom feel more welcoming and thoughtfully designed.
Choose fixtures that match your style—industrial, farmhouse, minimalist, or glam. For small bathrooms, opt for wall-mounted sconces; larger spaces can handle statement pendants or clustered fixtures. Use dimmable bulbs to control ambiance. Seasonal or themed fixtures, like metallic finishes or colorful cords, keep things fresh.
Select fixtures compatible with your electrical setup. Mount sconces at eye level or slightly above for optimal lighting. For pendants, hang at a height that provides task lighting without obstruction. Wire the fixtures safely, following local code or hiring a licensed electrician if needed. Install bulbs and test for even, flicker-free light.
Paint or decorate pendant cords or fixture surrounds to match your decor. Use decorative bulbs—filament, Edison, or colored—to add a touch of whimsy or sophistication. Add dimmer switches for adjustable mood lighting. Incorporate decorative shades or fabric wraps for a softer glow.
Upgrading your bathroom lighting is an accessible DIY that instantly elevates style and function. It’s a project that pays off visually and emotionally, making your space more inviting. With a bit of effort, you create a warm, personalized atmosphere that feels professional and polished.
12. Install a Cork or Vinyl Flooring for Water-Resistant Durability
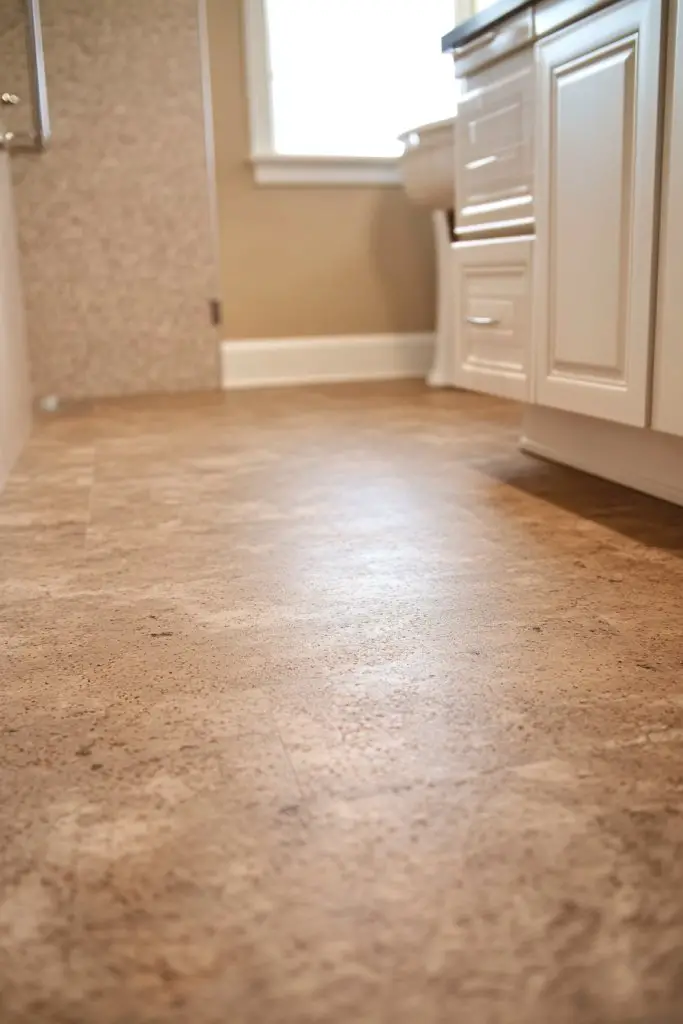
Tired of slippery, worn-out bathroom floors? Cork and vinyl flooring offer durable, water-resistant options that are easy to install and maintain. They’re perfect for DIYers looking to upgrade their space with minimal fuss. Plus, they add comfort and warmth underfoot compared to cold tiles.
Imagine cork tiles with their natural, textured look, or vinyl planks mimicking wood or stone. The earthy tones or sleek finishes instantly modernize your bathroom. The planks or tiles click together easily, creating a seamless surface. The textured materials offer slip resistance and a cozy feel, even in high-moisture zones.
Choose from a variety of patterns—herringbone, plank, or tile-like layouts—to suit your style. Light-colored cork adds brightness; darker vinyl creates contrast. Seasonal accents like rugs or decorative borders can enhance the look. These floors work well in small or large bathrooms, adapting to your aesthetic preference.
Prepare the subfloor by cleaning and leveling it. Lay down a moisture barrier if needed. Install the cork or vinyl flooring following manufacturer instructions—usually clicking or gluing pieces in place. Use spacers to maintain expansion gaps around the edges. Finish with baseboards or molding to hide the edges and give a polished look. DIY installation takes a few hours and basic tools.
Choose flooring with embedded patterns or textures for added visual interest. Coordinate the floor color with wall paint or accessories. Use decorative transition strips to blend different flooring types or zones. Add textured rugs or mats for extra comfort and style.
A water-resistant floor upgrade is a practical DIY that transforms your bathroom’s look and feel. It boosts confidence in your ability to handle home projects, while creating a space that’s both beautiful and functional. Enjoy your new, slip-resistant surface for years to come.
13. Add a Pop of Color with Bright, DIY Wall Stenciling
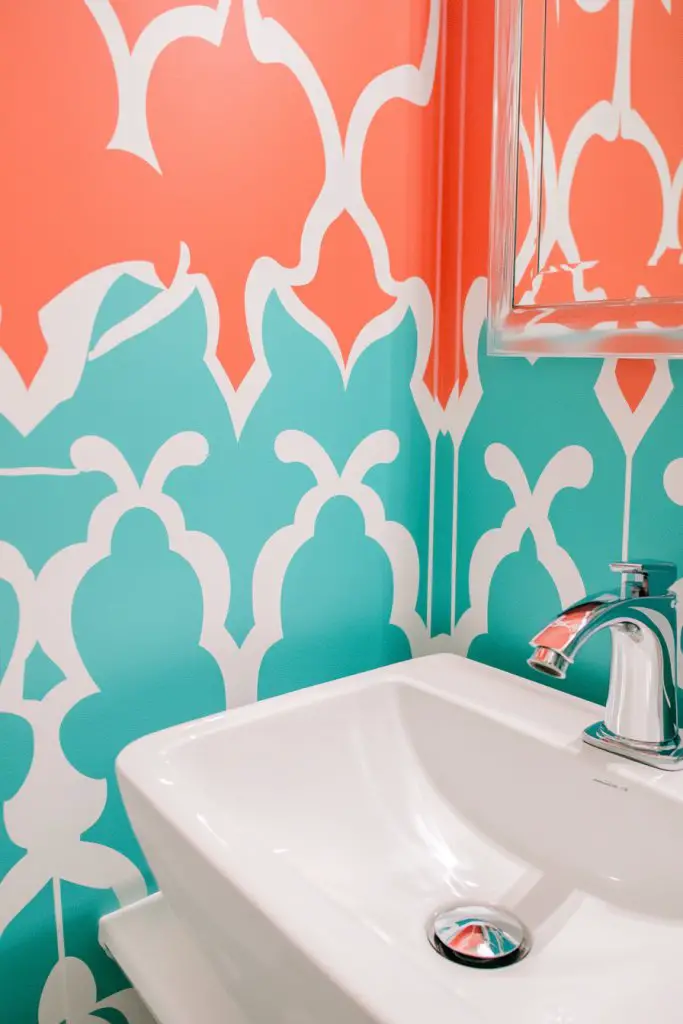
Feeling like your bathroom walls are playing it safe? Bright, DIY wall stenciling introduces a splash of personality and energy. It’s an inexpensive way to add a bold statement or subtle pattern without the commitment of wallpaper. Plus, it’s a fun project that gives your space a fresh vibe.
Imagine a wall adorned with geometric shapes or botanical motifs in vibrant hues—red, turquoise, or mustard. The stenciled pattern creates visual rhythm and depth, elevating the plainest wall. The textured paint adds dimension, making the space feel lively and inviting. Accentuate with simple fixtures or minimalist decor to let the pattern shine.
Opt for bold, contrasting colors for a dramatic effect or softer shades for a subtle upgrade. Use modern geometric patterns or vintage-inspired designs depending on your style. Create a feature wall or stencil borders around the room for a more understated look. Seasonal color swaps keep the room feeling fresh.
Choose a stencil pattern and tape it securely to the wall. Mix your paint colors and load a stencil brush or roller. Apply paint with a dabbing motion to avoid bleeding under the stencil. Carefully lift the stencil to reveal your design, then repeat for even coverage. Seal the pattern with a clear matte or satin finish for longevity. Practice on cardboard first to perfect your technique.
Incorporate metallic or glitter paints for a touch of glamour. Combine multiple patterns or colors for a layered look. Add hand-painted accents or small details to personalize the design further. Use complementary decor like towels or accessories in the stenciled hues to create a cohesive theme.
Stenciling is an enjoyable DIY that instantly energizes your bathroom. It’s an affordable way to showcase your creativity and style. With a little practice, you can design a truly unique wall that boosts your confidence and makes the space feel vibrant and welcoming.
14. Design a DIY Window Treatment with Water-Resistant Fabrics
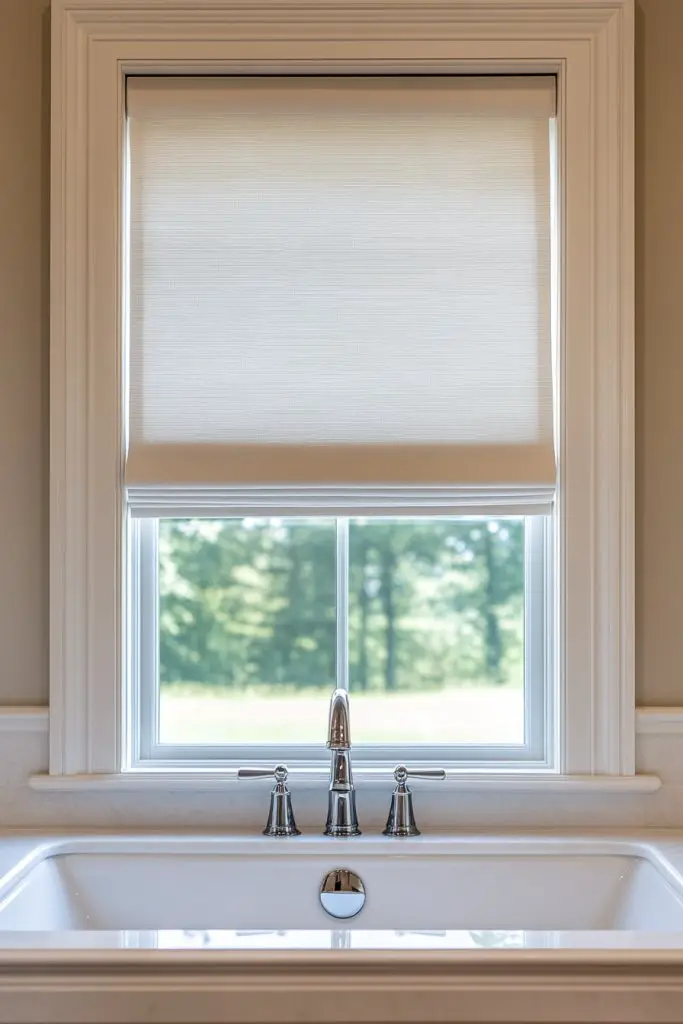
Are your current window coverings letting in drafts or moisture? A DIY water-resistant fabric treatment offers privacy and style without the hassle of store-bought blinds. It’s a practical upgrade that adds softness and color to your bathroom decor. Plus, it’s a simple project anyone can tackle.
Imagine a soft, textured Roman shade or curtain in waterproof fabric, gently framing your window. The fabric filters light softly, creating a calming ambiance. Choose playful patterns or solid colors to complement your decor. The fabric’s water-resistant quality ensures it stays looking fresh despite humidity and splashes.
Use waterproof vinyl, polyester, or treated canvas for durability. Create simple roller shades, pleated curtains, or layered valances depending on your style. Seasonal fabrics or removable covers can change the look throughout the year. For a more luxe feel, add decorative trims or tiebacks.
Measure your window carefully, adding seam allowances. Cut your fabric, then hem edges with waterproof tape or sewing. For shades, attach a dowel or tension rod at the top, and use grommets or clips for hanging. Install hooks or brackets to hold the fabric in place. Ensure the fabric hangs smoothly without wrinkles or sagging.
Add decorative elements such as painted patterns, fabric bows, or custom trims. Coordinate with towels or accessories to unify your bathroom’s color scheme. Use different fabrics for different seasons to keep the look fresh. Consider blackout or dimming linings for more privacy or light control.
A DIY water-resistant window treatment combines practicality with personality. It’s a quick project that enhances privacy and style simultaneously. Once finished, you’ll enjoy a space that feels cozy, functional, and uniquely yours—no more boring, plain windows!
15. Install a DIY Wall-Mounted Towel Rack or Hooks in Unique Shapes
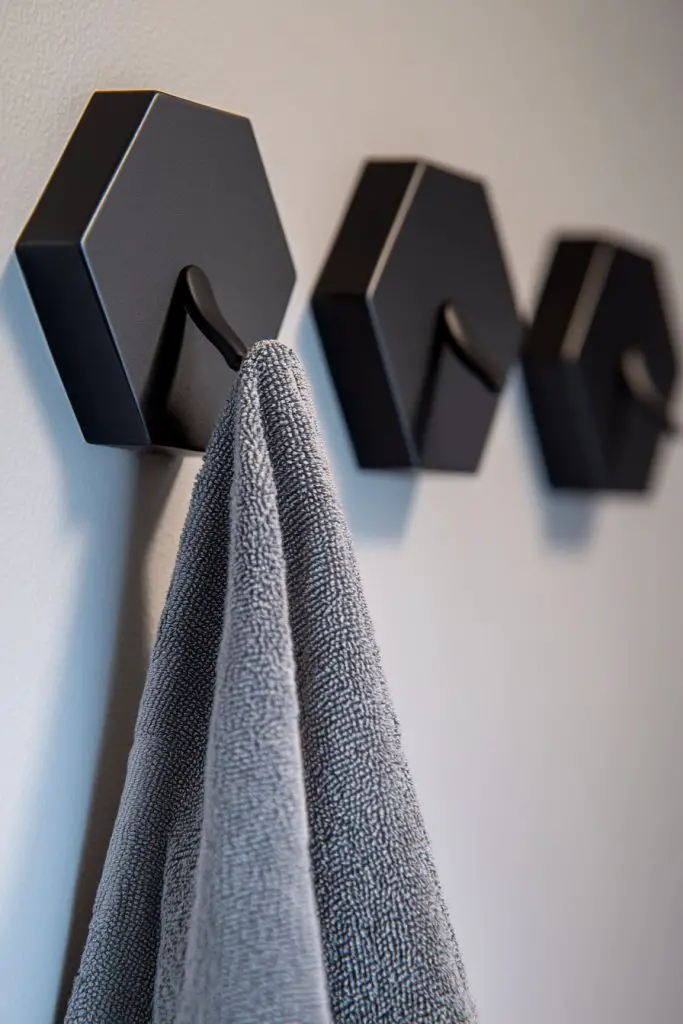
Standard towel hooks can be boring and forgettable. Creating your own wall-mounted towel racks or hooks in fun, unique shapes elevates your bathroom decor. It’s a chance to add personality and function in one DIY package. Plus, it’s a simple upgrade that can make your space more playful.
Picture hooks shaped like abstract geometric forms, vintage-inspired motifs, or even whimsical animal shapes. They hold your towels and robes while serving as small art pieces. The unusual shapes create visual interest and break up the wall space. When paired with complementary hardware, they add a curated, designer feel.
Use materials like wood, metal, or resin for different looks—rustic, modern, or eclectic. Paint or decorate the hooks in bright colors, metallic finishes, or patterns. Install multiple hooks in a cluster or spread them out for visual balance. Combine functional hooks with decorative wall art for a personalized touch.
Select hooks or craft your own with wood or metal cutouts. Attach them securely to the wall using anchors and screws, ensuring they can handle the weight of towels. Position them at different heights to accommodate various items. Seal or paint the hooks for durability and style. Regularly check for stability and touch up the finish if needed.
Customize hooks with stencils, decals, or metallic leafing. Add small decorative elements like charms or beads for a playful effect. Mix shapes and sizes for a dynamic display. Coordinate with other hardware or accessories to create a unified look.
Unique DIY hooks turn a mundane feature into a design statement. They’re easy to make and install, giving you confidence in your crafting skills. With personalized shapes, your bathroom gains a fun, imaginative element that reflects your personality.
16. Refresh Your Bathroom with a DIY Paint Job in Trendy Colors
Feeling bored with your bathroom’s color scheme? A fresh coat of trendy paint can breathe new life into the space. It’s one of the most cost-effective ways to upgrade your decor without a full remodel. Plus, it’s a straightforward DIY project that anyone can tackle.
Imagine walls in deep navy, soft blush, or calming sage—colors that set the tone for relaxation or sophistication. The smooth, freshly painted surface reflects light beautifully, making the room feel brighter. The color choice can dramatically change the mood, from energetic to serene. Pair painted walls with matching accessories for a cohesive look.
Use moisture-resistant paint designed for bathrooms to prevent mold and mildew. Matte finishes hide imperfections, while satin or semi-gloss reflect more light and are easier to clean. Experiment with accent walls or bold stripes to add visual interest. Seasonal or mood-based color swaps keep the space feeling fresh.
Start by cleaning and sanding the walls to remove any peeling paint or rough spots. Apply a primer suitable for high-moisture areas. Use high-quality brushes or rollers for a smooth finish, and apply at least two coats, allowing proper drying time. Cover fixtures and floors with painter’s tape and drop cloths. Ventilate well during and after painting.
Incorporate stenciled patterns or geometric designs for added flair. Use accent colors on trims, window frames, or door edges for contrast. Add decorative decals or wall decals for extra personality. Replace old fixtures with new modern hardware that complements your new color scheme.
A new paint job is a quick, satisfying DIY that can completely transform your bathroom. It’s a confidence booster, showing how a simple change can make a big impact. Once done, you’ll enjoy a space that feels fresh, stylish, and truly personalized—ready for your next project!
17. Add Functional Yet Stylish Baskets or Hampers for Laundry and Storage
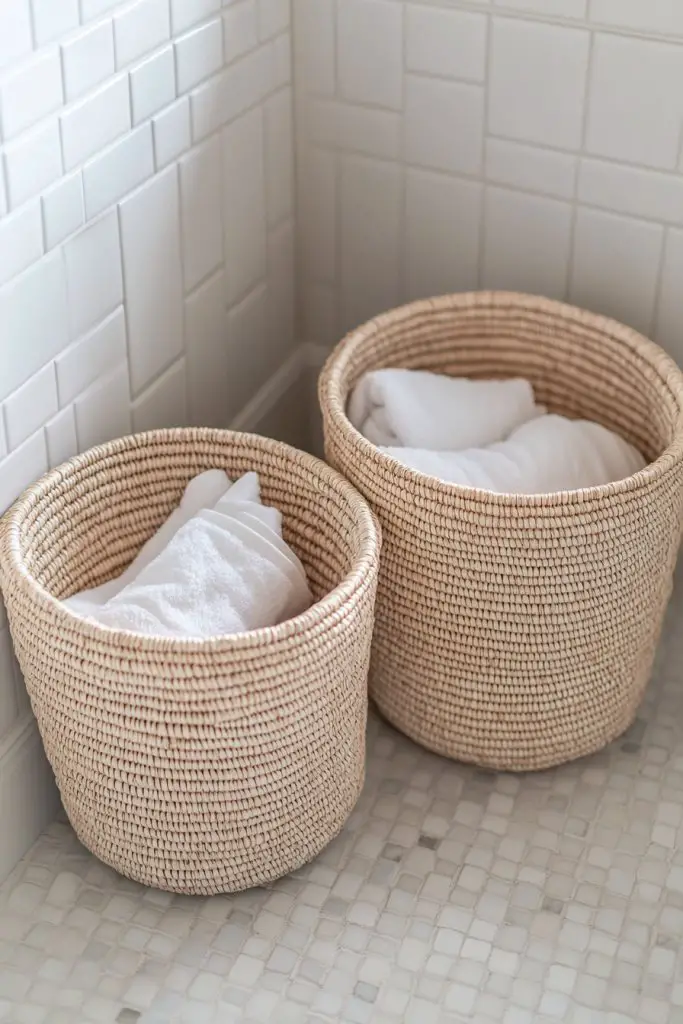
Cluttered laundry hampers and disorganized storage can make your bathroom feel chaotic. Stylish baskets and hampers solve this problem while adding texture and warmth. They’re practical, attractive, and can be tailored to your decor style. Plus, it’s a simple way to hide clutter and keep your space tidy.
Picture woven or fabric baskets in natural fibers, placed near your shower or vanity. They hold dirty clothes or extra towels, keeping everything within arm’s reach. The textures, whether rattan, seagrass, or canvas, add visual interest and complement your decor. A neatly arranged set of baskets creates a curated, inviting vibe.
Choose baskets in neutral tones for a minimalist look or bright colors for a playful touch. Stackable or nested baskets maximize space, especially in small bathrooms. Use decorative labels or tags for easy organization. For seasonal flair, swap out fabrics or add decorative trims.
Select sturdy, moisture-resistant baskets or hampers that fit your space. Position them where they’re most accessible but out of the way—near the shower, vanity, or in a corner. Use matching or contrasting styles to create visual harmony. Regularly empty and clean to maintain freshness and prevent odors.
Paint or decorate baskets with stencils or fabric paint for a custom look. Add decorative trims, pom-poms, or tassels for extra charm. Label baskets for specific uses—like ‘Laundry,’ ‘Towels,’ or ‘Toiletries’—for quick access. Coordinate with your overall color palette for a cohesive feel.
Stylish baskets make everyday routines more enjoyable and organized. They’re a simple DIY project that elevates your entire bathroom aesthetic. With a few thoughtful touches, your space becomes both functional and beautiful—boosting your confidence in your home decor skills.
18. Incorporate Small Greenery or Faux Plants for a Fresh Feel
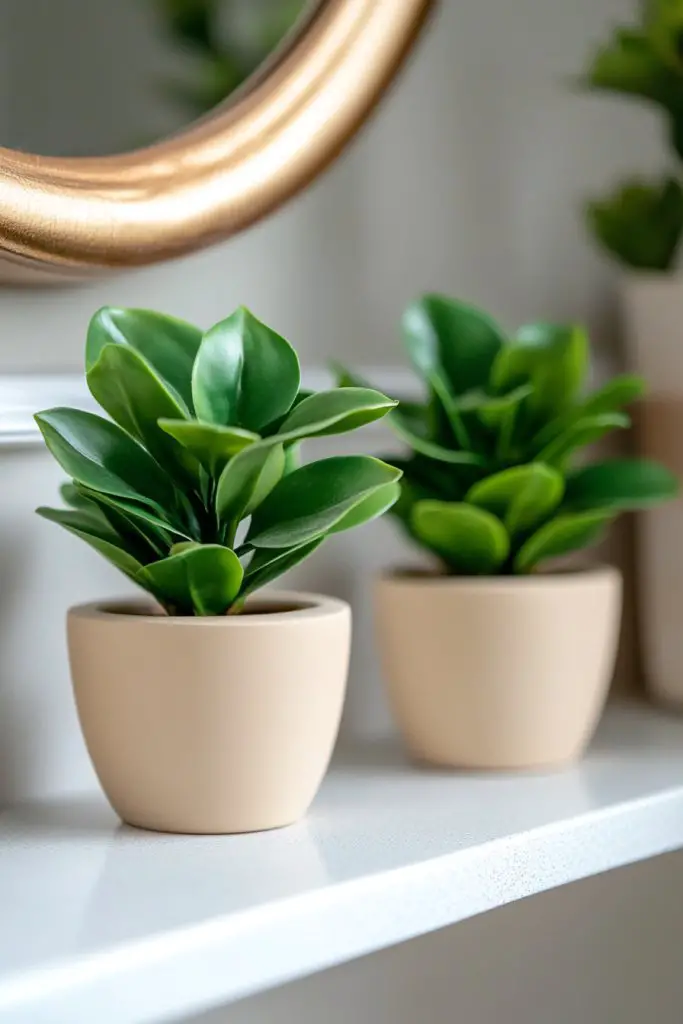
Want to add a touch of nature to your bathroom but hate the hassle of real plants? Faux greenery offers a maintenance-free way to bring life and freshness into your space. It’s perfect for humid environments where real plants might struggle. Plus, it adds a pop of color and texture that elevates your decor.
Visualize a sleek, modern pot with a faux succulent or lush fern placed on a shelf or countertop. The vibrant green foliage contrasts beautifully with neutral tiles or painted walls. The realistic textures and colors make it hard to tell it’s fake—yet you don’t need to water or prune. It’s a simple, elegant way to brighten the room.
Use different plant types—succulents, ferns, or trailing vines—in various containers to match your decor. Place them on open shelves, window sills, or in decorative baskets. Seasonal or themed planters can add variety throughout the year. Faux plants are especially useful in shady or low-light areas where real ones might wither.
Select high-quality, realistic faux plants and containers that suit your style. Arrange them thoughtfully to create a balanced, natural look. Clean them periodically to remove dust and maintain their fresh appearance. Position plants at eye level or in spots that get good visibility. Mix different heights and textures for a layered, natural effect.
Add decorative stones, moss, or fairy lights inside the containers for extra charm. Combine faux greenery with decorative objects like candles or sculptures for a curated display. Rotate or update your faux plants seasonally—adding flowers or seasonal accents. Use matching or contrasting planters to tie the look together.
Faux plants are an easy, stylish way to add life and color without the upkeep. They give your bathroom a fresh, inviting atmosphere and show off your eye for detail. With minimal effort, you create a space that feels lively, vibrant, and undeniably yours—no green thumb required.
Conclusion
With a diverse range of DIY bathroom remodel ideas, you now have plenty of inspiration to start transforming your space. Whether you choose small updates or more involved projects, each idea offers a chance to make your bathroom uniquely yours. Don’t hesitate—take the first step today and bring your vision to life. Your dream bathroom is just a DIY away!