A beautiful headboard can completely transform the vibe of your bedroom, and the best part? You can create one yourself! DIY headboard ideas are incredibly popular because they allow for personalized touches, affordability, and a satisfying sense of accomplishment.
In this article, you’ll find a variety of creative headboard ideas that cater to different styles and skill levels. Whether you love rustic charm, modern chic, or boho vibes, these inspiring projects will help you craft a headboard that’s uniquely yours and adds that perfect finishing touch to your space.
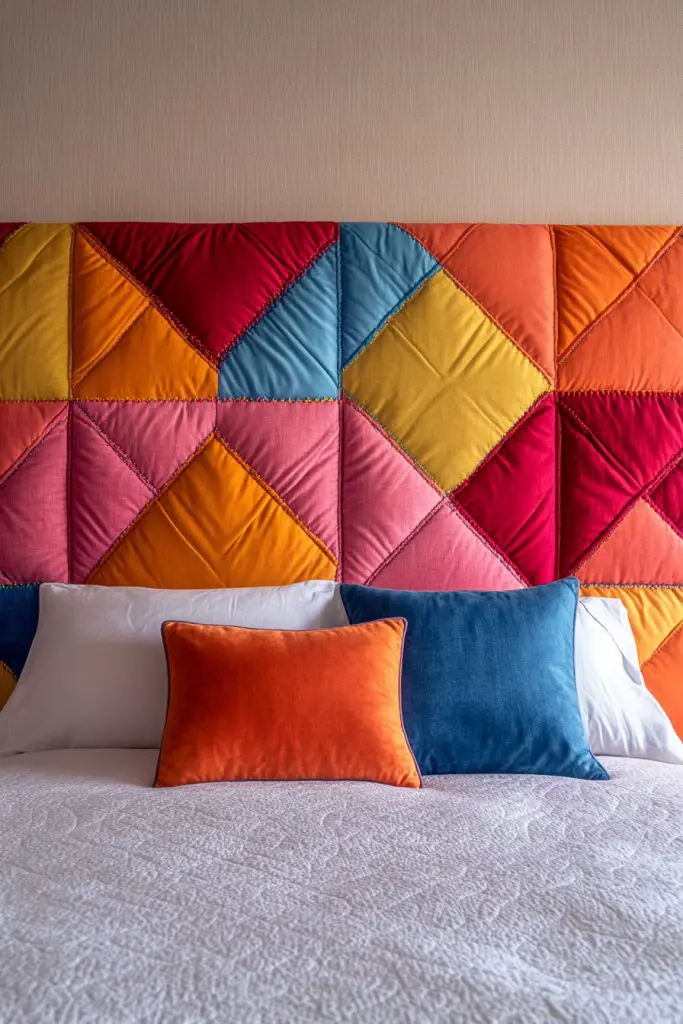
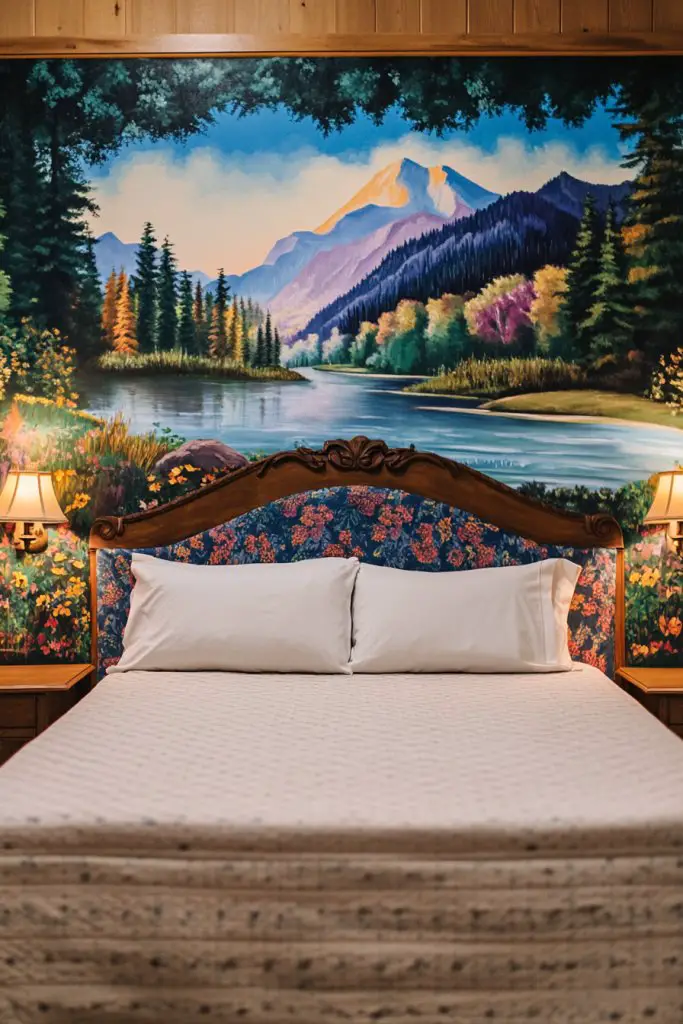
1. Upholstered Fabric Panel Headboard with Colorful Quilted Patterns
Ever feel like your bed is missing that cozy, personalized touch? A plain headboard can leave your space feeling cold and uninspired. If you crave a soft, inviting spot to rest your back and eyes, then upgrading with an upholstered fabric panel might be just what you need. It’s a simple way to add warmth and personality without breaking the bank.
Imagine a plush headboard covered in vibrant, patterned quilting that catches the light softly. The textured fabric feels smooth under your fingertips, while the quilted design adds depth and dimension. Bright colors like coral, teal, or mustard pop against neutral walls, creating a lively focal point. This piece feels like a handcrafted hug, filling your space with comfort.
You can customize this idea to match your style—go for bold geometric quilting or subtle pastel patterns. For smaller rooms, opt for a slimmer panel to avoid overwhelming the space. Seasonal changes are easy: swap out fabrics for winter textures like velvet or faux fur, or keep it light with linen during summer. Mix and match colors to reflect your mood or decor theme.
Start by measuring your bed’s width and decide on the height for your headboard. Cut foam padding to fit the panel, then cover it with your chosen fabric—preferably a durable, washable type. Attach the fabric securely with a staple gun to a wooden frame or directly to a wall if you prefer a floating look. Add quilting stitches with a sewing machine or hand for extra texture. Hang or mount the panel securely, ensuring it’s stable.
Personalize further with decorative stitching, contrasting piping, or even small fabric tassels along the edges. Incorporate your favorite colors or patterns to make it uniquely yours. Consider adding removable covers for seasonal updates or easy cleaning. You can also attach small fabric pockets or loops for storing bedtime essentials.
This DIY fabric headboard allows you to create a cozy sanctuary tailored to your style. It’s a no-fuss project that results in a striking, personalized feature. Your bedroom will feel instantly warmer and more inviting—perfect for lazy mornings or peaceful nights. Ready to craft your own plush retreat?
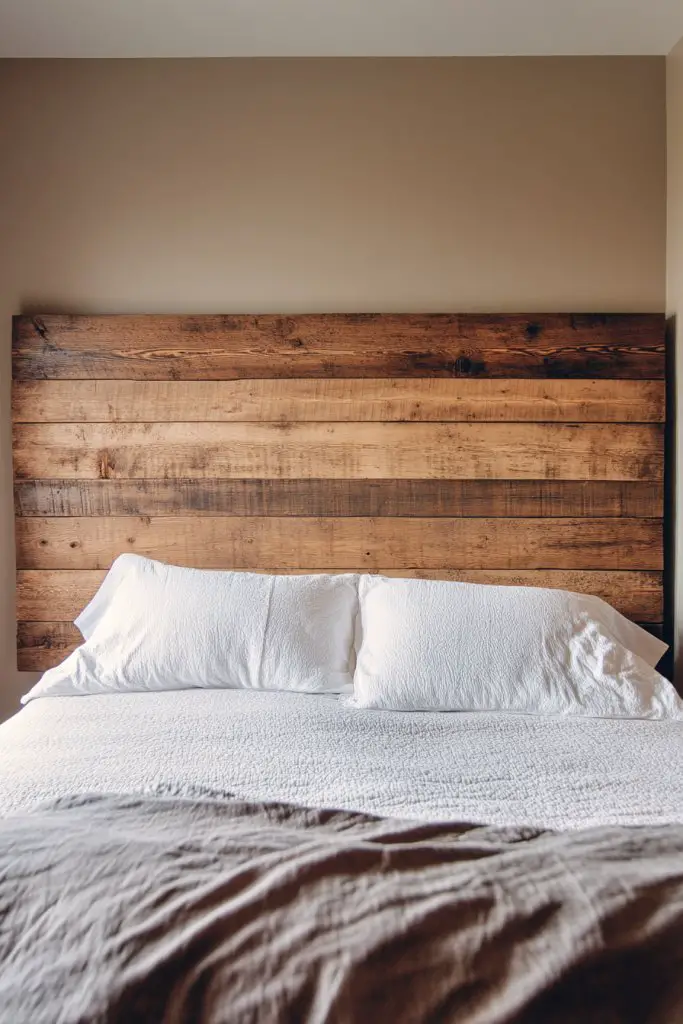
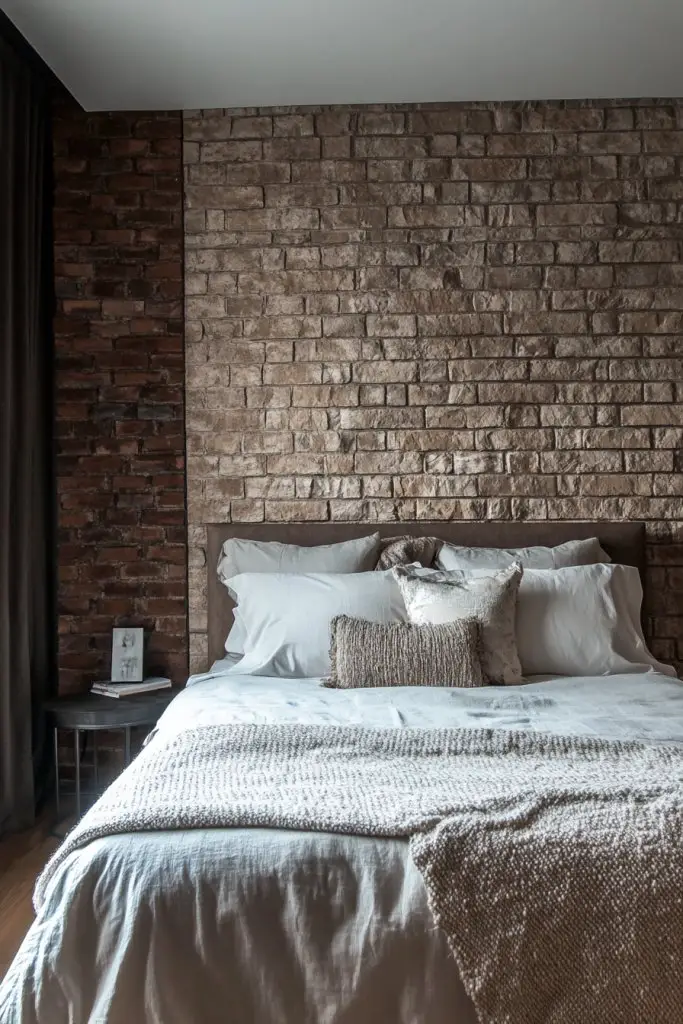
2. Reclaimed Wood Plank Headboard with Natural Finish
Looking for a headboard that oozes rustic charm and eco-conscious vibes? A reclaimed wood headboard offers a natural, authentic look that adds warmth and character to any bedroom. It’s perfect if you love the idea of repurposing and want a statement piece that’s both stylish and sustainable.
Picture weathered wooden planks arranged horizontally or vertically behind your bed, each with its own history and texture. The natural grain and imperfections tell stories of past life, adding depth to your decor. Imagine soft sunlight highlighting the aged patina, creating a cozy, earthy glow. It’s like bringing a piece of nature indoors—raw, real, and inviting.
Adjust the finish to suit your space—go for a clear sealant to preserve the weathered look or paint them in muted tones for a more polished vibe. For smaller rooms, a single row of planks can suffice, while larger spaces might benefit from a full panel. Incorporate metal accents or vintage hardware for added interest. Seasonal decor can be achieved by layering textiles or adding cozy throws.
Start by sourcing reclaimed wood from salvage yards or online marketplaces. Clean and sand the planks to remove splinters while maintaining their rustic charm. Arrange them on a wall or frame them together as a single panel. Use heavy-duty brackets or mounting strips to secure the headboard firmly. Finish with a protective sealant if you want longevity, or leave it natural for that weathered look.
Add a personal touch by stenciling meaningful quotes, symbols, or patterns onto the wood. Incorporate decorative nails or metal brackets for an industrial edge. Use LED strip lights behind the headboard for a subtle glow, avoiding the need for lamps or pendants. An eco-friendly choice that’s as functional as it is stylish.
Reclaimed wood headboards are a sustainable yet chic way to elevate your bedroom decor. They blend effortlessly with modern, farmhouse, or eclectic styles. Plus, every piece is unique—no two are exactly alike—making your bedroom a true reflection of your personality. Time to embrace rustic elegance?
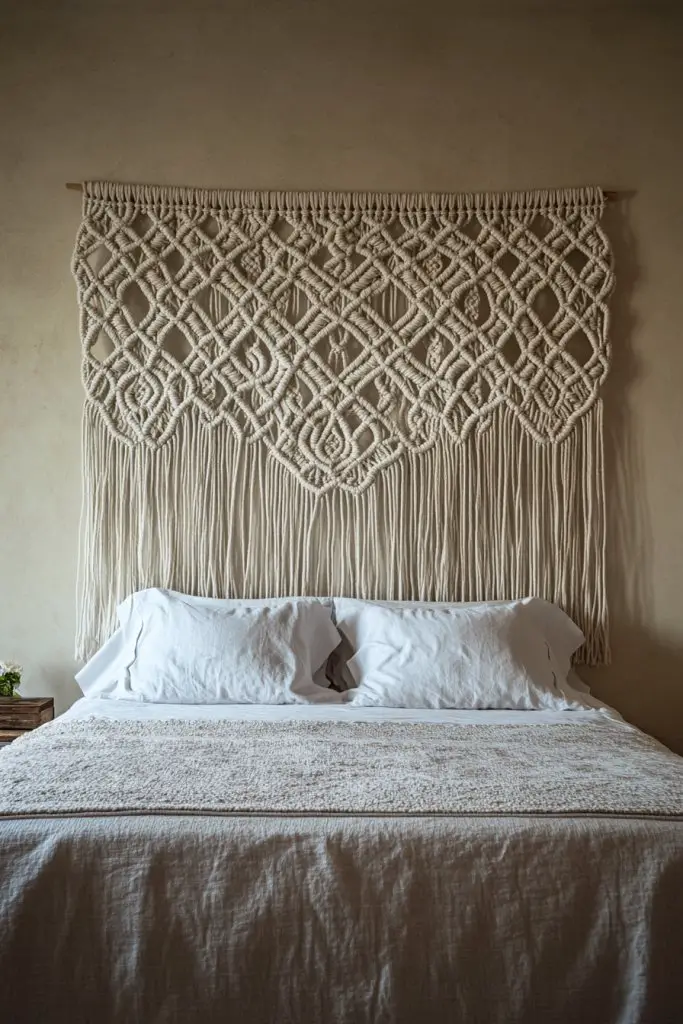
3. Macramé Wall Hanging Headboard for Boho Charm
Ever wish your bedroom had that laid-back, artsy vibe that screams boho chic? A macramé wall hanging can instantly add texture and visual interest behind your bed. It’s a DIY-friendly way to inject personality into your space without committing to permanent fixtures. Plus, it’s a cozy backdrop for lazy mornings.
Picture a large, intricate macramé tapestry with knotted patterns and fringe details. The natural cotton cords create a soft, tactile surface that catches the light beautifully. Imagine the subtle movement of the tassels in a gentle breeze, adding a calming rhythm. The neutral tones blend seamlessly with earthy decor, making your room feel relaxed and inviting.
Choose from minimalist designs with clean geometric knots or more elaborate, layered patterns for a boho maximalist look. Color can be added via dyed cords or layered with fabric accents. Hang it alone for a simple statement or combine multiple pieces for a gallery wall effect. Seasonal swaps include adding fairy lights or draping fabric for a different mood.
Begin by selecting a large piece of sturdy dowel or wooden rod as your base. Follow a tutorial to knot your macramé cords into various patterns—there are plenty of beginner-friendly guides online. Attach the completed tapestry securely to the wall behind your bed, ensuring it’s centered and taut. Use hooks or nails that won’t damage the wall, and consider adding a thin rod for extra support.
Add beads, shells, or fabric accents to customize your macramé. Incorporate small LED fairy lights around the piece for a warm glow. You can also dye or paint sections of the cords for a pop of color. Personal touches like initials or meaningful symbols make it even more special.
A macramé headboard is a statement of creativity and laid-back style. It’s easy to change out or update as your taste evolves, making it a flexible choice. Plus, mastering basic knots boosts your DIY confidence—who knew you could create art with just cords and knots?
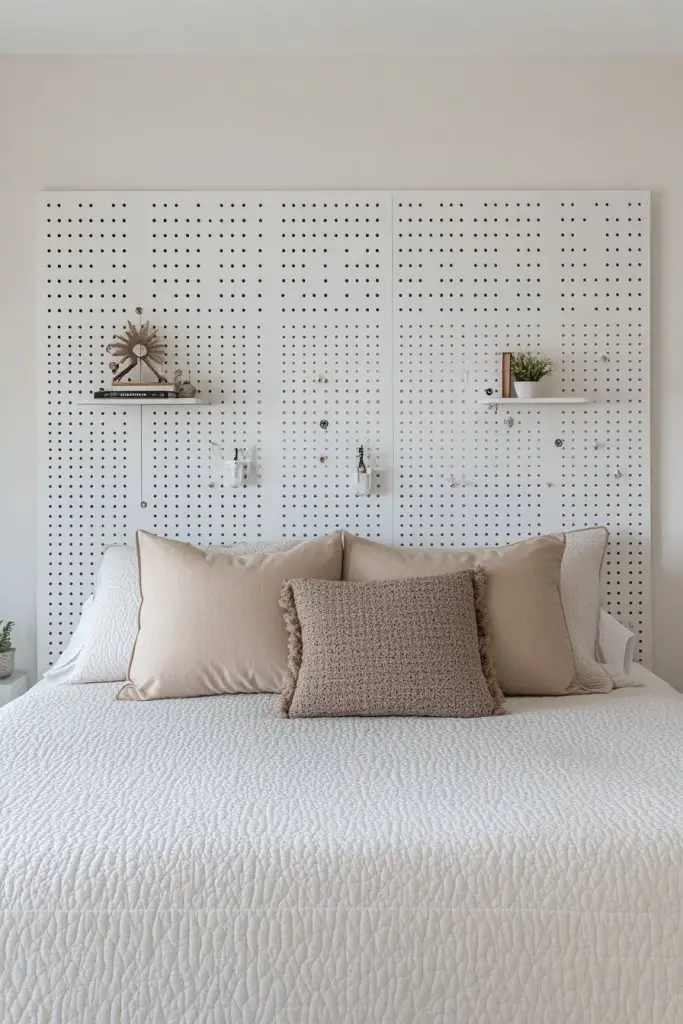
4. DIY Pegboard Headboard with Functional Storage
Tired of clutter cluttering your nightstand? Want a headboard that’s both stylish and practical? A pegboard headboard offers a clever solution, turning your bedroom wall into an organizer and decor piece. It’s perfect for those who love to keep essentials close at hand without sacrificing style.
Imagine a sleek painted pegboard mounted behind your bed, filled with hanging shelves, hooks, and baskets. The open grid design adds a modern industrial edge, while your curated items—books, small plants, or decor—bring personality. Soft lighting from clip-on lamps or fairy lights highlights your display. It’s a functional art piece that adapts to your needs.
Choose paint colors that match your room’s palette or opt for raw metal for an industrial look. You can fully customize by attaching small shelves, hooks, or even small baskets for accessories. Seasonal updates include swapping out items or adding cozy textiles like throws and cushions nearby. The pegboard can also serve as a display for your favorite keepsakes.
Start by measuring your bed width to determine the pegboard size. Mount it securely on the wall using heavy-duty anchors. Use hooks and brackets to attach shelves, organizers, or hanging accessories. You can paint the pegboard beforehand or leave it raw for a rugged look. Organize your essentials in a way that balances function and aesthetics.
Personalize with labels, wall decals, or painted patterns on the pegboard. Use decorative hooks or miniature shelves to hold small decorative items or essential accessories. Add a strip of LED lighting or clip-on lamps for better visibility. Keep it functional yet visually appealing—your space, your rules.
A pegboard headboard combines utility with style, perfect for small or cluttered rooms. It’s a DIY project that’s easy to update and adapt over time. You’ll love how it keeps your essentials organized while adding a modern touch—functional decor that’s fun to create.
5. Pallet Wood Headboard with Stenciled Designs
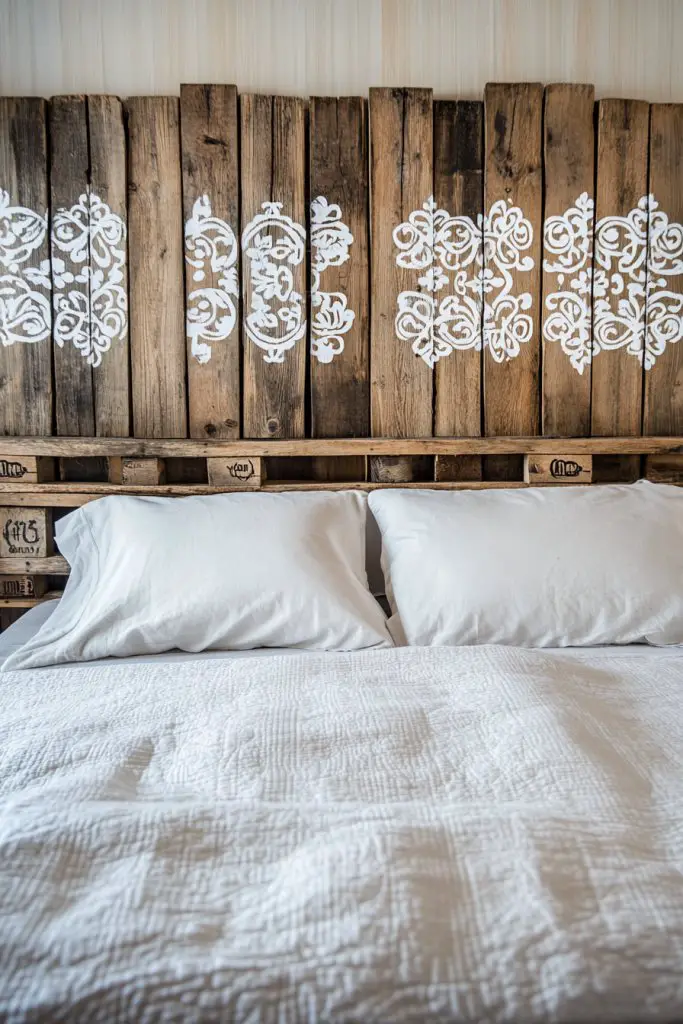
Want a budget-friendly, rustic headboard that’s full of character? Repurposing old pallets into a headboard not only saves money but also adds a DIY charm to your bedroom. It’s a perfect project if you love the idea of creating something unique from reclaimed materials. Plus, it’s eco-friendly!
Imagine a set of weathered wooden pallets painted with stenciled patterns, quotes, or designs. The natural imperfections and rough texture give it a vintage, shabby-chic vibe. Soft lighting enhances the grain and distressed paint, making it feel warm and inviting. It’s like having a piece of art that’s also functional decor.
You can personalize it with your favorite words, symbols, or patterns using stencils and contrasting paint. For a more polished look, seal the surface with a matte finish to preserve the design. For a boho twist, add fabric or macramé accents along the edges. Seasonal decor might include string lights or cozy textiles layered nearby.
Source pallets from local stores, online marketplaces, or recycling centers. Sand down rough edges but keep some weathered texture for authenticity. Arrange the pallets vertically or horizontally, then secure them together using nails or screws. To mount, attach the assembled panels directly to the wall with heavy-duty anchors. Use stencils to paint designs, then seal with a clear topcoat.
Add personal touches like painted initials, favorite quotes, or decorative patterns. Incorporate metallic accents or hardware to enhance the rustic appeal. Layer with soft bedding and textured throws to soften the look. You can also add small shelves or hooks for extra storage or display.
A pallet wood headboard is a budget-friendly way to craft a statement piece that’s full of charm. It’s a project anyone can personalize, making your bedroom truly yours. The rustic look pairs well with many decor styles and adds a warm, lived-in feel—perfect for cozy mornings.
6. Fabric-Covered Foam Board Headboard with Decorative Pins
Craving a sleek, modern headboard that’s simple yet stylish? Covering foam boards with fabric offers a quick DIY solution for a polished look. It’s perfect if you want a minimalist vibe without spending a fortune. Plus, it’s easy to change when your style evolves.
Visualize a clean, rectangular foam core wrapped in a soft, textured fabric like linen or velvet. Use decorative pins or nailhead trim along the edges for an extra touch of elegance. The fabric’s subtle sheen or matte finish provides a refined backdrop. Placed against a neutral wall, it creates a calm, sophisticated atmosphere.
Choose fabrics that match your decor—light neutrals for a calm retreat or bold prints for a statement. For a softer look, add a padded layer underneath the fabric. You can also layer multiple foam boards for a multi-dimensional headboard. Seasonal updates include swapping fabric covers or adding decorative pins in different colors.
Cut foam boards to your desired size, then cover with fabric, pulling tight and stapling or tacking at the back. Decorate the edges with decorative pins or nailhead trim, spacing evenly. Attach the boards to the wall with mounting strips or brackets, ensuring they’re level and secure. For extra durability, reinforce the fabric with spray adhesive before pinning.
Add embellishments like embroidered initials, contrasting piping, or layered fabrics. Incorporate decorative pins with shapes or colors that reflect your personality. Use LED strip lighting behind the boards for ambient glow. For a playful touch, pin on small fabric tassels or charms.
This headboard is a sleek, customizable project that elevates your bedroom’s look. Its clean lines and fabric options make it adaptable to any decor style. Once complete, you’ll feel proud of creating a modern, stylish focal point that’s easy to update whenever you want a fresh look.
7. Floating Shelf Headboard with Built-In Reading Lights
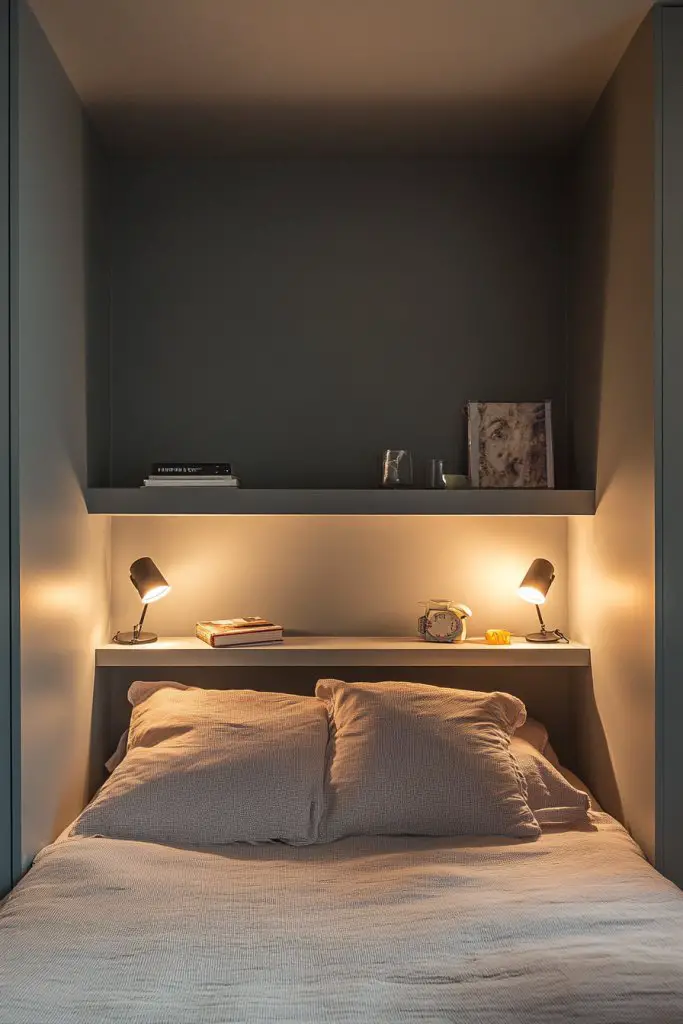
Dreaming of a functional yet stylish headboard that also doubles as a bedside storage? A floating shelf headboard combines sleek design with practicality. It’s perfect for small bedrooms where every inch counts, offering a place for essentials without clutter. Plus, it adds a modern touch to your space.
Imagine a simple wooden or MDF shelf mounted just above your mattress, with clean lines and a minimalist finish. Small built-in LED lights or flexible reading lamps are attached to the shelf, illuminating your bedtime routine. Decorate the shelf with books, small plants, or decorative objects—keeping the look tidy and chic. The floating design creates an illusion of space and height.
Paint or stain the shelf to match your room’s color scheme. Adjust the length based on your bed size—from twin to king. Incorporate hidden compartments or drawers underneath for additional storage. Seasonal styling might include adding cozy textiles or decorative objects like candles or sculptures.
Choose a sturdy shelf material and measure its length to fit your bed. Mount securely to the wall using anchors and brackets, ensuring it can handle weight. Install LED strip lights or clip-on reading lamps for functional lighting. Decorate the shelf with your favorite items, but keep it organized to avoid clutter. Consider adding a protective finish to the wood for durability.
Add personal touches with custom-painted designs or decorative brackets. Incorporate a mix of functional and decorative items—like a small clock or framed photo—without overcrowding. Use warm lighting to create a cozy atmosphere. You can also add fabric or textured wall panels underneath for extra style.
A floating shelf headboard transforms your bedroom into a sleek, functional space. It’s a DIY project that combines form and function effortlessly. Once installed, it’s easy to update with new decor, making your bedroom a constantly evolving sanctuary.
8. Woven Rattan or Cane Headboard for Textural Depth
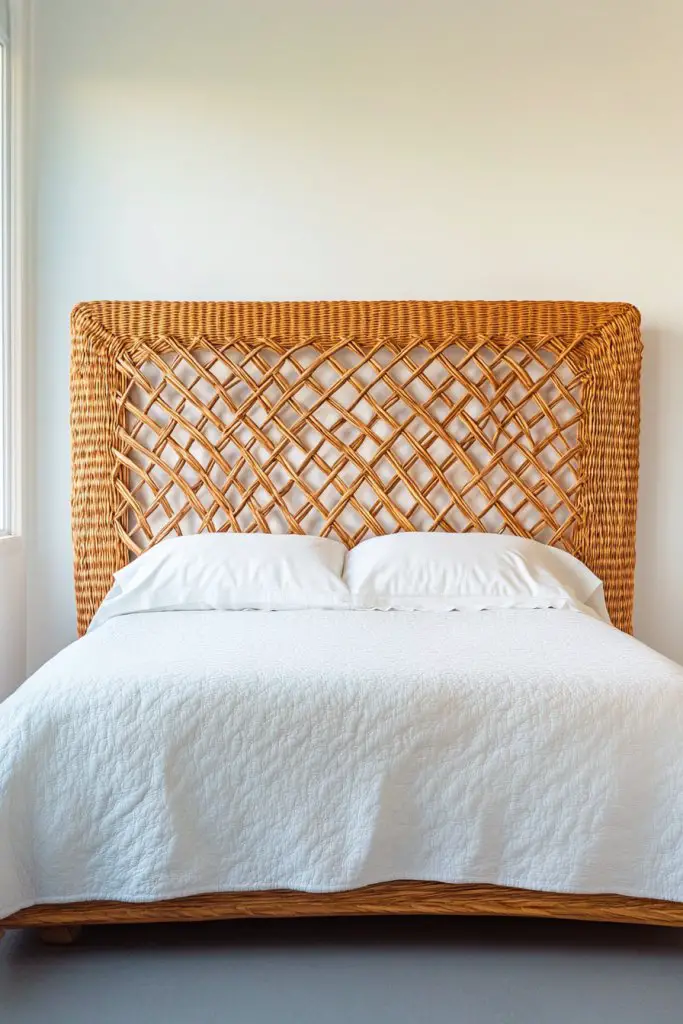
Craving a headboard that adds natural texture and a breezy, tropical vibe? Woven rattan or cane headboards bring a touch of the outdoors inside, creating a relaxed, inviting atmosphere. They’re a perfect choice for those who want to add depth without overwhelming their decor.
Picture a headboard made of intricately woven rattan or cane panels, with a light, airy appearance. The natural fibers create a subtle pattern that catches the light in unique ways. Imagine the soft sound of weaving and the warm glow of sunlight filtering through the woven surface. It’s like a piece of beachside retreat in your own bedroom.
Choose from natural finishes or add a coat of paint for a contemporary twist. Pair with light, neutral bedding and textured throws for a layered look. For a more eclectic style, mix woven panels with wooden or metal accents. Seasonal decor could include adding fabric cushions or layered textiles for warmth.
Select a woven rattan or cane panel that fits your bed’s width. Secure it to a sturdy wooden frame or directly to the wall with brackets. Ensure the weaving is tight and stable, especially if you’re DIY-ing the weaving process. Finish with a protective sealant if desired. Mount the headboard at a height that complements your bedding and room proportions.
Decorate the frame with painted or stained borders, or add decorative trim for a polished look. Incorporate textiles such as throw pillows and blankets that match the natural vibe. Consider adding small shelves or hooks to hold lightweight accessories. Keep the look simple and organic for maximum calming effect.
A woven rattan or cane headboard offers a timeless, relaxed aesthetic that enhances any decor style. It’s a DIY project that combines craftsmanship with natural beauty. Once finished, it turns your bedroom into a serene, resort-like escape—your personal slice of paradise.
9. Painted Mural Headboard with Abstract or Scenic Designs
Want to turn your headboard into a piece of art? A painted mural offers a bold, creative way to personalize your space. Whether you prefer abstract patterns or scenic views, it’s a stunning focal point that reflects your personality. Plus, it’s a fun project that transforms a plain wall into a masterpiece.
Visualize a large, colorful mural painted directly onto the wall behind your bed. Abstract swirls, bold geometric shapes, or tranquil landscapes create a captivating backdrop. The colors and designs bleed softly into the room, adding depth and energy. Imagine the texture of brushstrokes and the vibrancy of your choice of hues.
Choose themes that resonate with your style—modern, boho, or minimalist. Seasonal updates can include changing the color palette or adding temporary elements like decals or overlays. Use stencils or freehand techniques depending on your skill level. Incorporate lighting around the mural for dramatic effects.
Start with a high-quality wall primer and choose durable, washable paint. Sketch your design lightly with a pencil or chalk to plan proportions. Use stencils or freehand paint, layering colors for depth. Seal the mural with a clear protective coat to ensure longevity. Make sure your workspace is well-ventilated and protected.
Add metallic or iridescent paints for extra shimmer, or incorporate personal symbols and motifs. Frame parts of the mural with decorative tape or borders for a finished look. Complement the artwork with matching textiles or accessories that echo the colors or theme. It’s a chance to showcase your artistic side.
A painted mural headboard is a bold statement that shows off your creativity. It’s a project that turns your bedroom into a personal gallery. Once complete, you’ll enjoy a sense of pride and a unique decor piece that’s truly one-of-a-kind—your personal masterpiece.
10. Layered Canvas Art Headboard for Artistic Flair
Craving a headboard that feels like a curated art gallery? Layered canvas art offers a creative, customizable way to add visual interest. It’s perfect if you love changing your decor often or want a flexible, artistic statement piece. Plus, it’s easier than painting a mural!
Imagine multiple framed or stretched canvases arranged in a grid or collage behind your bed. Each piece features different artwork—abstract, landscapes, or personal photos—creating a dynamic, layered effect. The textures and colors draw the eye and bring energy into the room. The layered setup adds depth and dimension, making your space feel thoughtfully curated.
Mix and match different sizes, frame styles, or art genres for a personalized look. Seasonal updates are simple—swap out artwork or change the arrangement. Use themed collections for harmony or eclectic combos for vibrancy. Incorporate textured fabrics or decorative trims around the canvases for added flair.
Select canvases or framed art pieces that fit your wall space and style. Arrange them on the floor first for optimal layout. Mount each piece securely with hooks or wall brackets, ensuring even spacing. You can also layer smaller pieces over larger ones for a collage effect. For a clean look, use identical frames or matching mats.
Create your own artwork to make it even more personal—try printmaking, mixed media, or photography. Add decorative details like metallic accents or textured mats. Incorporate LED backlighting behind the canvases for a subtle glow. Change artwork seasonally to keep the visual interest fresh.
Layered canvas art headboards turn your bedroom into a personal art exhibit, showcasing your taste and creativity. It’s a versatile project that can evolve with your style. Once finished, you’ll have a stunning, ever-changing focal point that sparks joy and inspiration daily.
11. Vintage Door or Window Frame Headboard for Eclectic Style
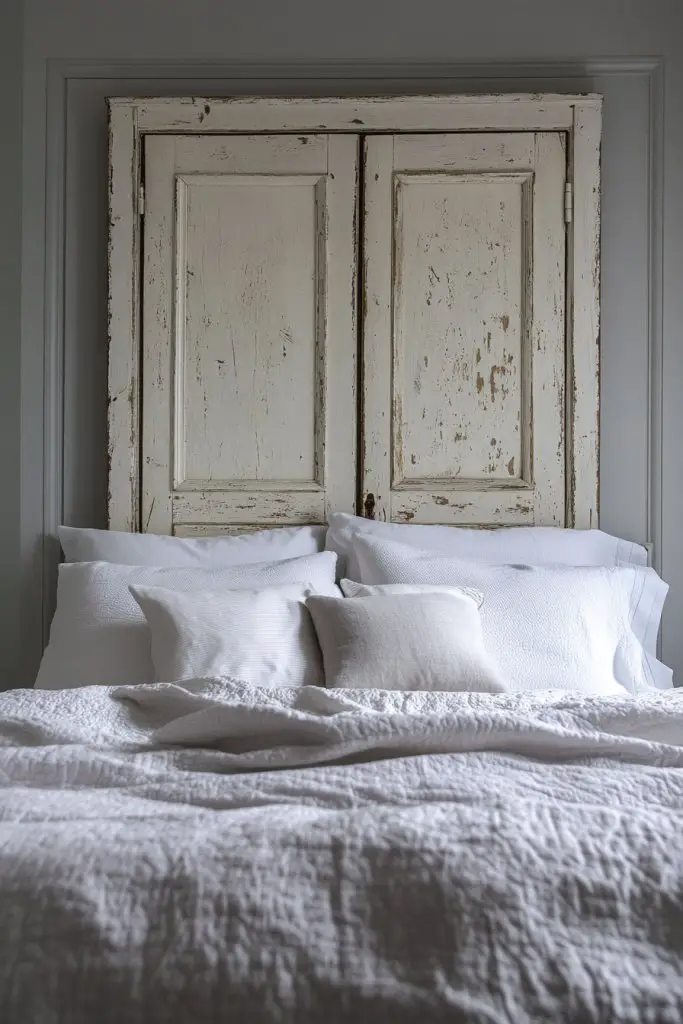
Looking to add a charming, eclectic touch to your bedroom? Vintage doors or window frames offer a unique way to repurpose old architecture into functional decor. They bring personality, history, and a touch of whimsy that standard headboards can’t match. Perfect for lovers of vintage or shabby chic styles.
Imagine a distressed, painted door or window frame mounted behind your bed, with peeling paint and weathered hardware. The frame’s character adds layers of history and texture, making your bed feel like a cozy retreat in an old cottage. Soft light filtering through the frame’s openings or glass panels enhances the nostalgic vibe. It’s a piece that feels both timeless and inviting.
Paint or distress the frame further to match your decor, or leave it raw for maximum rustic charm. Incorporate curtains, fabric panels, or string lights for seasonal or stylistic updates. Pair with vintage or modern bedding depending on your overall aesthetic. For a more eclectic look, combine different types of old doors or frames.
Source old doors or window frames from salvage yards, flea markets, or online auctions. Clean and repair any damage, then paint or distress as desired. Mount the frame securely on the wall using appropriate hardware, ensuring it’s level and stable. For additional stability, reinforce the mounting points with brackets or anchors. Decorate around it with complementary textiles or accessories.
Add decorative hardware, vintage knobs, or painted motifs for extra character. Incorporate seasonal textiles or layered throws for comfort. Personalize by attaching small hooks for jewelry or accessories. Keep the look cohesive with matching vintage accessories or art pieces nearby.
A vintage door or window frame headboard adds charm and storytelling to your space. It’s a DIY project that celebrates history and craftsmanship. Once you see it in place, you’ll feel a sense of pride creating a truly one-of-a-kind bedroom focal point.
12. Fabric Tapestry Headboard with Fringed Edges
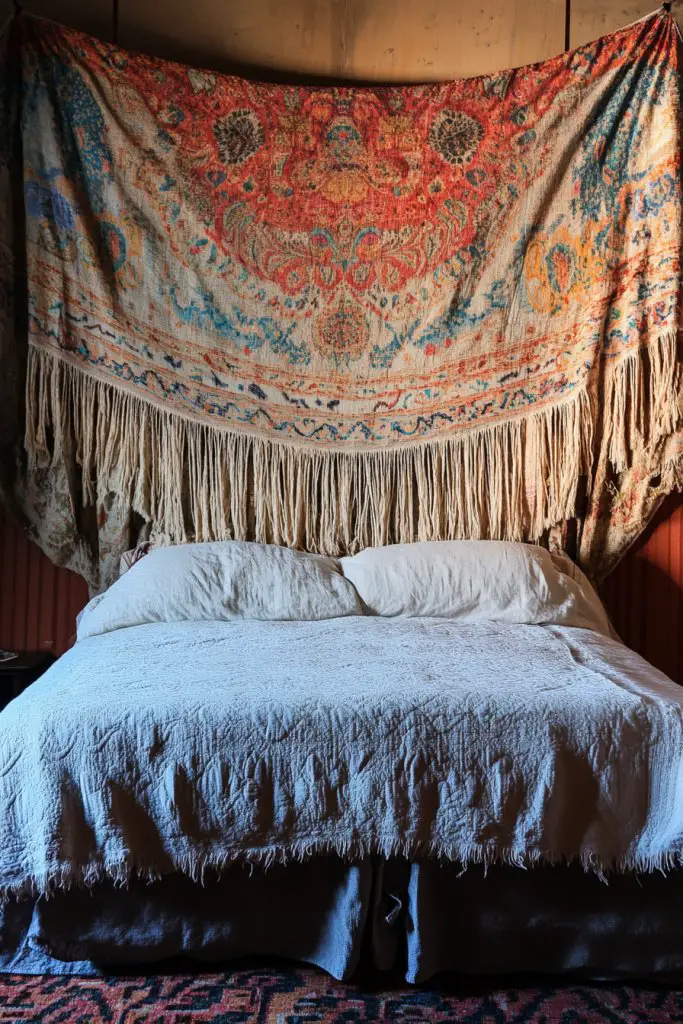
Want a headboard that’s soft, stylish, and easy to update? A fabric tapestry with fringed edges offers a versatile, boho-inspired solution. It’s perfect if you love textile art and want a cozy, layered look behind your bed. Plus, it’s lightweight and simple to install.
Picture a large, textured textile hanging behind your bed, with fringed edges waving gently in the breeze. The intricate patterns—be it embroidered, woven, or printed—add visual interest and depth. The soft fabric creates a warm, inviting backdrop that feels like a personal hug. Earthy tones or vibrant colors can set different moods.
Select fabrics with patterns or textures that match your decor—think tasseled throws, embroidered textiles, or layered quilts. Change the look seasonally by swapping fabrics or adding decorative elements like tassels or beads. Layer it over a headboard for extra dimension or hang it directly on the wall. Mix materials for a rich, textured vibe.
Choose a large textile or tapestry with the size that fits your wall. Attach it to a lightweight rod or directly to the wall using hooks, nails, or adhesive strips. For added stability, sew or glue a backing or insert a rod pocket. Ensure the fabric is taut and centered. Decorate with fringe or additional embellishments as desired.
Add personal touches like embroidered initials, painted motifs, or layered trims. Incorporate complementary textiles—such as pillows or throws—near the bed. Use decorative fringe or tassels to frame the piece. Personalize further by adding charms or small accessories to the fabric.
A fabric tapestry headboard is an easy, charming way to add texture and personality. It’s a DIY project that invites creativity and experimentation. Once hung, it instantly transforms your bedroom into a cozy, artsy space—your personal textile gallery.
13. DIY Metal Pipe Frame Headboard with Industrial Vibe
Craving an edgy, industrial look that’s both sturdy and stylish? A metal pipe frame headboard is the perfect DIY project for those who love raw materials and modern design. It adds an industrial edge to your bedroom without the hefty price tag of store-bought pieces. Plus, it’s surprisingly easy to assemble.
Visualize thick black metal pipes connected with fittings, forming a minimalist rectangular frame behind your bed. The matte finish and visible joints create a rugged, utilitarian aesthetic. You can add wooden planks or reclaimed wood accents across the frame for warmth. The result: a bold, architectural focal point that complements a range of decor styles.
Paint or leave the pipes raw for a more industrial look. Add a wooden panel or slats within the frame for contrast. Incorporate LED strip lighting along the edges for a modern glow. For a softer touch, layer textiles like chunky knit throws or faux fur cushions nearby—no vases or artwork needed.
Gather metal pipes, elbows, tees, and flanges from hardware stores or online. Measure your bed width and cut pipes accordingly. Assemble the frame on the floor first, then mount it to the wall using heavy-duty anchors. Secure all fittings tightly to ensure stability. Optionally, attach a wood panel to the frame for additional texture. Finish with a protective coating if desired.
Paint the pipes in different colors or finishes to match your decor. Attach hooks or small shelves for storage or display. Incorporate LED lighting for ambiance, avoiding traditional lamps or vases. Add decorative metal accents or geometric patterns for extra flair.
A metal pipe headboard is a statement of modern industrial style that’s customizable and durable. It’s a project that combines technical skills with creative design. Once completed, you’ll have a headboard that’s both functional and visually striking—an instant upgrade to your space.
14. Cork Board Headboard for Personalization and Organization
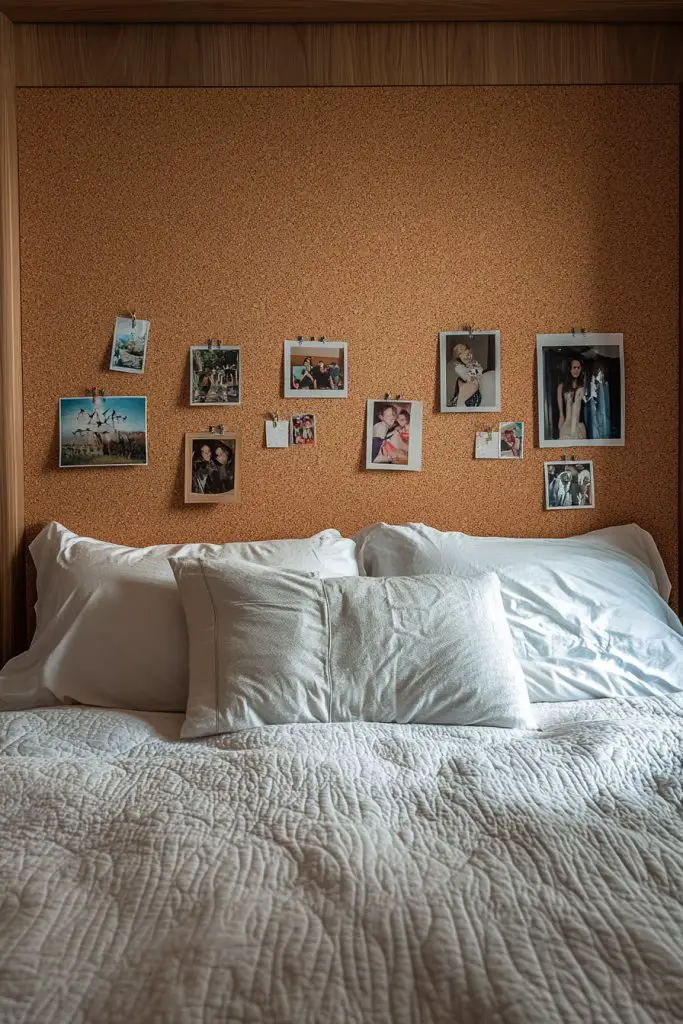
Looking for a headboard that’s both functional and fun? A cork board headboard turns your bedroom wall into a personal notice board, perfect for pinning photos, notes, or inspirational quotes. It’s ideal for those who love to keep their memories and ideas close, all while adding a creative touch to the space.
Imagine a large corkboard mounted behind your bed, covered in colorful photos, handwritten notes, and decorative pins. The textured surface invites touch and interaction, making your space feel lively. Surround it with a frame or fabric border to match your decor. It’s a customizable collage that showcases your personality.
Cover the cork with fabric or paint it to match your room’s palette. Use different colored pins or decorative tacks to organize and embellish. Layer photos and notes for a dynamic, ever-changing display. Seasonal updates include adding holiday-themed pins or new photos. You can also add small shelves or clips for extra organization.
Select a large corkboard that fits your wall space. Cover it with fabric or paint it for a finished look. Mount it securely with hooks or brackets, making sure it’s level. Decorate with your favorite images, notes, or small decorative items pinned in place. Keep it organized by grouping related items or color-coding.
Add decorative borders or trim around the corkboard for a polished appearance. Incorporate themed pins or decorative pushpins for special occasions. Personalize your display with quotes or artwork on paper pinned temporarily. Keep the display fresh by rotating items seasonally or for special events.
A cork board headboard makes your space interactive and personal. It’s a DIY project that reflects your interests and memories. Once in place, it creates a lively, functional focal point that encourages creativity and organization—your bedroom, your personal gallery.
15. Geometric Wooden Block Headboard with Paint Accents
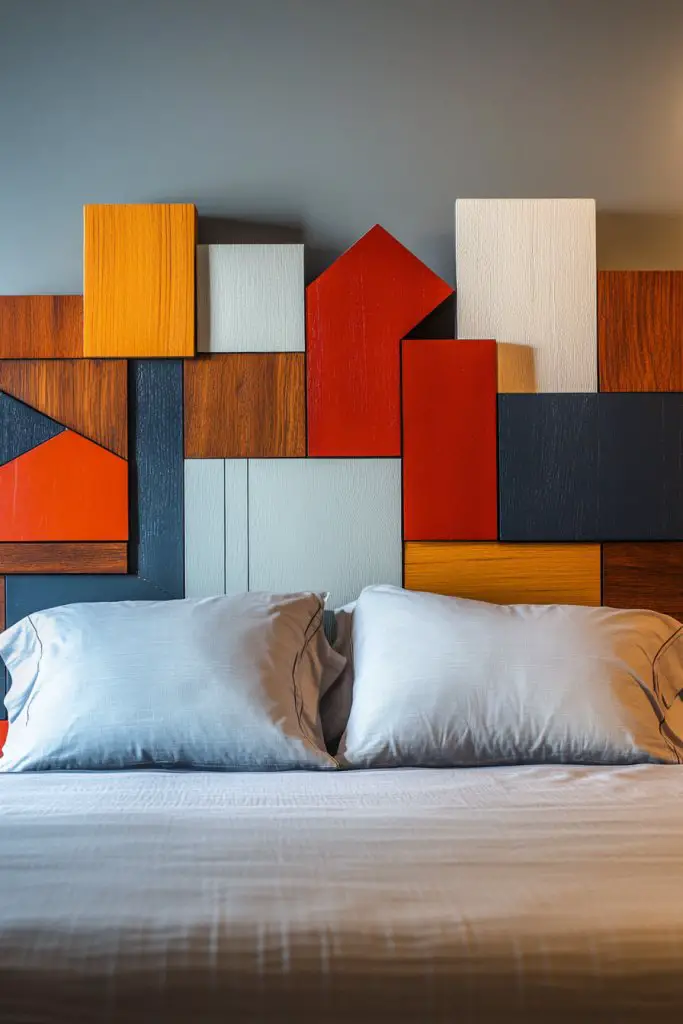
Want a headboard with a modern, artsy vibe that’s also easy to customize? Geometric wooden blocks painted in bold or muted tones can bring a fresh, contemporary touch to your bedroom. It’s a simple DIY project that transforms basic shapes into a statement piece. Plus, it’s a fun way to add color and texture.
Visualize a series of wooden blocks arranged in a pattern—either aligned or staggered—across the wall behind your bed. Paint each block in contrasting colors or shades of the same color family for a cohesive look. The geometric shapes create visual rhythm, adding depth and dimension. The natural wood grain peeks through some blocks, balancing the painted surfaces.
Mix painted and natural wood blocks for an eclectic feel. Use different sizes for visual interest or keep all blocks uniform for a sleek look. Incorporate metallic or matte paint finishes depending on your decor style. Seasonal updates include switching colors or adding decorative motifs.
Cut or buy pre-cut wooden blocks to your desired size. Sand edges for safety and smoothness. Paint or stain the blocks with your chosen colors, allowing plenty of drying time. Arrange them on the wall in a pattern you like, then attach each with strong adhesive or mounting hardware. Ensure they’re level and evenly spaced for a clean finish.
Add painted patterns, initials, or symbols to individual blocks for a personal touch. Incorporate metallic accents or glitter for extra sparkle. Layer textiles or cushions in colors that complement the blocks. You can also create a 3D effect by stacking some blocks or attaching different depths.
A geometric wooden block headboard is a bold, artistic choice that’s easy to adapt to any decor. It’s a project that sparks creativity and results in a unique focal point. Once finished, it’s a testament to your DIY skills and eye for design—ready to impress everyone who visits.
16. Rope or Twine Woven Headboard for Nautical or Rustic Appeal
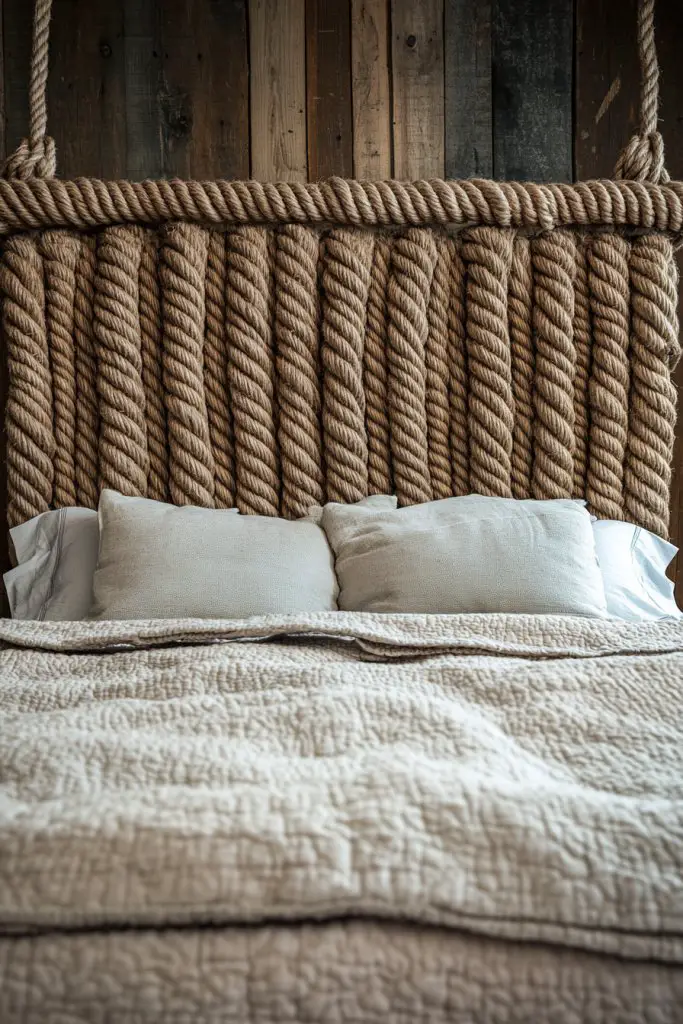
Dreaming of a headboard that exudes rustic charm or nautical flair? Woven rope or twine headboards are a perfect DIY option to bring those cozy, natural textures into your bedroom. They’re easy to make and add a tactile, warm feel that invites relaxation. Who knew simple cords could make such a statement?
Picture a thick, woven pattern of natural jute or hemp rope stretched across a frame behind your bed. The rough texture and chunky knots create a coastal or rustic vibe, especially when paired with linen or cotton bedding. The natural fibers catch light subtly, adding depth and warmth. It’s like bringing a seaside cottage or mountain cabin into your room.
Use different rope thicknesses, colors, or weaving patterns for variation. For a nautical look, incorporate navy, white, or striped ropes; for rustic, stick to natural tones. Add decorative knots or embellishments like shells or charms for extra flair. Seasonal updates include layering with textiles or adding fairy lights.
Create a sturdy rectangular frame from wood or metal. Attach the rope at one end, then weave or knot it across the frame, securing tightly at each point. Use a pattern that suits your style—herringbone, basket weave, or simple crisscross. Secure the ends with hooks or staples, and make sure the tension is even. Mount the finished piece behind your bed at the desired height.
Incorporate decorative knots or colored accents for personality. Add small charms, shells, or fabric strips to the weaving for a personalized touch. Layer textiles or throws over the foot of the bed for extra texture. Keep the look casual yet intentional to match your decor.
A rope or twine woven headboard offers a handcrafted, cozy vibe that’s both rustic and nautical. It’s an easy project that rewards your effort with a warm, natural focal point. Once in place, you’ll enjoy a bedroom that feels inviting and thoughtfully designed—your personal retreat.
17. Faux Brick or Stone Panel Headboard for Urban Charm
Want an urban, industrial look without the mess of real bricks? Faux brick or stone panels are a quick and stylish way to add texture and depth to your bedroom wall. They create a modern, edgy vibe that’s perfect for city apartments or loft-inspired decor. It’s a bold upgrade that’s surprisingly easy to install.
Imagine a wall behind your bed covered in realistic faux brick or stone panels in shades of gray, white, or warm earth tones. The textured surface adds dimension and visual interest, making your bed feel like a feature in a trendy urban loft. Soft lighting highlights the rough texture, creating a dramatic, cozy ambiance. The panels elevate your decor instantly.
Choose panels in different shades or textures for a layered look. Pair with sleek metal or wooden furniture to enhance the industrial vibe. For a softer touch, add textiles like chunky throws or layered bedding. Seasonal decor can include string lights or fabric drapes to warm up the space.
Select faux brick or stone panels suitable for interior use, and measure your wall space. Clean the wall surface thoroughly before installation. Attach panels with adhesive or mounting strips, ensuring a tight fit and alignment. Seal seams with caulk or paint for a seamless look. Finish by adding lighting or accessories to complement the panels.
Decorate with metallic accents or industrial-style fixtures. Layer textiles like cozy blankets or textured pillows to soften the look. Integrate small decor items on nearby shelves or ledges—no vases or wall art needed. Keep the look sleek and minimal for maximum impact.
Faux brick or stone panel headboards are a quick way to add urban sophistication. They’re a DIY-friendly upgrade that makes a big statement. Once installed, your bedroom gains a modern, industrial charm that’s both stylish and functional—perfect for city living.
18. DIY Velvet Curtain Headboard with Tiebacks for Elegant Privacy
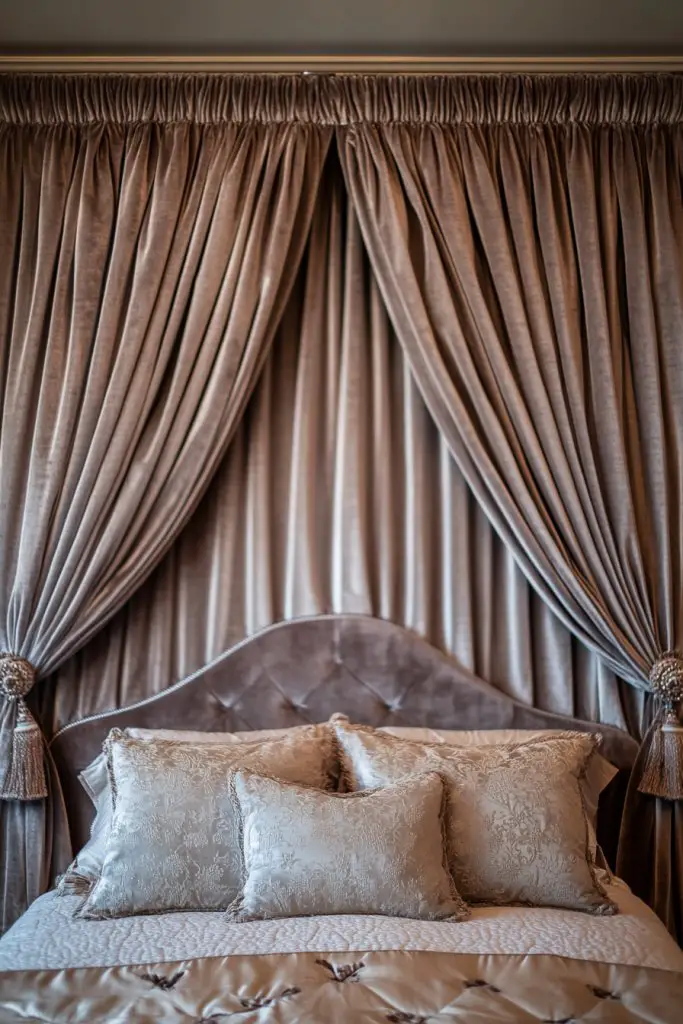
Looking for a luxurious yet flexible headboard option? A velvet curtain with decorative tiebacks can instantly elevate your bedroom’s style while offering privacy and softness. It’s a simple DIY project that transforms your space into a chic retreat. Plus, it’s versatile enough to open and close as needed.
Picture a plush velvet curtain in deep jewel tones or classic neutrals hanging gracefully behind your bed. The fabric’s rich texture catches light beautifully, adding depth and warmth. Tiebacks with decorative tassels or metallic accents keep the curtain open during the day, revealing your personalized space. When closed, it creates a cocoon of comfort and elegance.
Choose fabrics like velvet, silk, or heavy linen depending on your style. Use decorative tiebacks to add personality—think tassels, metallic cords, or fabric rings. Seasonal changes include swapping curtains for lighter fabrics or adding layered textures for winter. Match the curtain color with your bedding or wall decor for a cohesive look.
Install a sturdy curtain rod or track behind your bed, ensuring it’s securely anchored. Hang your fabric curtain, adjusting the length for a dramatic or subtle effect. Attach decorative tiebacks to the sides, using hooks or fabric loops. Use a variety of fabrics and tieback styles to create a look that reflects your personality. Consider adding blackout linings or lining fabric for extra privacy.
Add embellishments like embroidery, beaded trim, or metallic accents to the curtain for a refined look. Use layered curtains or drapes for a more luxurious feel. Incorporate decorative tassels or charms into the tiebacks. Think about matching your curtain fabric with other textiles or decor accessories in your room.
A velvet curtain headboard combines elegance with practicality, offering flexibility for different moods or seasons. It’s a DIY project that adds a bespoke touch to your bedroom. Once finished, you’ll love how it turns your space into a luxurious, private sanctuary—perfect for unwinding in style.
Conclusion
From upholstered designs to reclaimed wood masterpieces, this collection of DIY headboard ideas showcases the endless creativity you can bring into your bedroom. Don’t hesitate to try these ideas and make your space truly your own. Get inspired, gather your materials, and start turning your bedroom into a stylish sanctuary today!