A well-organized food storage room can transform chaos into convenience, making mealtime prep easier and more enjoyable. As home chefs and homemakers seek smarter ways to keep their kitchens tidy, innovative food storage ideas are gaining popularity for their practicality and style.
In this article, you’ll discover a variety of creative solutions to optimize your food storage space. From clever shelving hacks to space-saving containers, these ideas will inspire you to create a functional and visually appealing food storage area tailored to your needs.
1. Custom Wall-Mounted Shelving Units for Maximum Space

Ever feel like your food storage is more of a cluttered mess than an organized haven? Sometimes, the biggest challenge isn’t finding space but making the most of what you have. Installing custom wall-mounted shelves can free up precious floor space while keeping everything within arm’s reach. It’s a simple fix that makes your entire storage area look cleaner and more functional.
Recommended Products to replicate this idea
| # | Preview | Product | |
|---|---|---|---|
| 1 |

|
Delta Heavy Duty Lumber Storage Rack Cycle, Holds Up to 800 lbs - Easy to Install Wood Storage Rack... | Buy on Amazon |
| # | Preview | Product | |
|---|---|---|---|
| 1 |

|
12 Pack L12 x H 8" Black Heavy Duty Shelf Brackets with Screws Metal Shelf Brackets Shelf Support... | Buy on Amazon |
Imagine sleek, open shelves stretching across a well-lit wall, filled with neatly stacked cans, jars, and boxes. The shelves are made of warm wood or matte metal, giving a modern yet cozy vibe. Items are arranged in a way that’s both accessible and visually appealing, with labels facing outward for quick identification. The space feels airy, organized, and inviting, almost like a boutique pantry.
You can customize these shelves to match your style—industrial pipes for a rugged look, or painted wood for a softer touch. Adjust the height of each shelf based on what you store, from tall bottles to small spice jars. For seasonal flair, swap out accessories or add decorative brackets. Even in small spaces, these can be extended or combined to fit different room sizes or tastes.
Start by measuring your wall and planning your shelf layout, considering the height of your tallest items. Choose durable materials like hardwood, metal, or high-quality MDF, and pick stylish brackets that support weight and add visual interest. Use a level and drill for precise installation, ensuring each bracket is securely anchored into studs or wall anchors. Organize your items by category or frequency of use, placing popular items at eye level for convenience. Regularly check and tighten brackets to keep everything safe and sturdy.
Add small baskets or decorative containers to group similar items, and consider painting the brackets or shelves in your favorite color. You could also incorporate under-shelf lighting or adhesive LED strips for better visibility. Personalize with labels made from chalkboard material or printed tags for a cohesive look. Changing the arrangement seasonally or as your collection grows keeps the space fresh and functional.
Custom wall-mounted shelves turn a cluttered room into a showcase of order and style. They prove that smart storage solutions can dramatically improve your daily routine. Once installed, you’ll wonder why you didn’t do this sooner—plus, your friends will be impressed by how organized and chic your space looks.
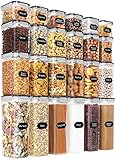
2. Clear Labelled Plastic Bins for Categorized Storage

Ever spend ages digging through a mountain of cans and boxes just to find that one bag of rice? The frustration of cluttered, unorganized food storage can really kill the vibe. Clear, labeled plastic bins offer a simple way to categorize everything, making your pantry or storage room instantly more manageable. It’s like having a personal assistant for your food stash.
Recommended Products to replicate this idea
| # | Preview | Product | |
|---|---|---|---|
| 1 |

|
Vtopmart 6 Pack Clear Stackable Storage Bins with Lids, Large Plastic Containers with Handle for... | Buy on Amazon |
| # | Preview | Product | |
|---|---|---|---|
| 1 |
|
Kuocodall 288 Pantry Labels for Food Containers, Preprinted Minimalist Waterproof Stickers for... | Buy on Amazon |
Picture uniform transparent bins stacked neatly on shelves, each with bright, easy-to-read labels like ‘Grains,’ ‘Snacks,’ or ‘Canned Goods.’ The clear plastic allows you to see what’s inside without opening each container, saving time and hassle. The labels are colorful and appealing, adding a pop of order amidst the chaos. Everything looks tidy, inviting, and just plain logical.
You can choose different bin sizes depending on your space and storage needs—small for spices, large for flour or rice. Label styles range from minimal chalkboard tags to vibrant printed stickers, matching your decor vibe. For a rustic look, opt for woven baskets with fabric liners, while sleek kitchens might favor minimalist clear containers with black or white labels. Seasonal labels or themed stickers can spice things up or help with holiday prep.
Select sturdy, stackable plastic bins that are food-safe and BPA-free. Use a label maker or printable sticker paper for clear, durable tags, and affix them prominently on each container front. Group similar items together—like all breakfast cereals in one bin and baking supplies in another. Stack bins to maximize vertical space, and consider adding door-mounted racks for even more organization. Regularly purge expired items to keep everything fresh and functional.
Personalize by color-coding labels based on food groups or expiration dates. Use decorative label holders or chalkboard paint to write custom labels that can be erased and rewritten. Incorporate a label zone on your shelves or inside cabinet doors for quick reference. To make it more fun, add themed stickers or icons representing each category to help everyone in the house find what they need.
Labeled containers give you immediate control over your food storage, transforming chaos into calm. They make restocking and cleaning easier, which keeps your space neat longer. Plus, they add a professional touch that boosts your confidence in your organization skills. Once you see how much easier life becomes, you’ll wonder why you didn’t start sooner.
3. Industrial Pipe Shelving for a Modern, Durable Look

Are your current shelves sagging or looking tired? If you want something sturdy, stylish, and capable of holding heavy items, industrial pipe shelving might be your new best friend. It combines raw metal with rustic wood, creating a look that’s both modern and rugged. Plus, it’s incredibly durable and customizable, perfect for a high-traffic food storage area.
Recommended Products to replicate this idea
| # | Preview | Product | |
|---|---|---|---|
| 1 |

|
Janyang Industrial Pipe Shelf Brackets for 8 10 12 14 inches Board, Iron L Pipe Floating Shelves,... | Buy on Amazon |
| # | Preview | Product | |
|---|---|---|---|
| 1 |

|
Rustic Reclaimed Wood Planks for Crafts – 10 Pack (5" W x 48" L) – Unfinished Barnwood Boards... | Buy on Amazon |
Envision thick black metal pipes supporting reclaimed wood planks filled with jars, cans, and boxes. The pipes are exposed, crossing the wall in geometric patterns, giving an edgy yet functional vibe. The wood shelves are finished with a matte sealant, highlighting their natural grain. This setup turns your storage into a statement piece that’s both practical and eye-catching.
You can customize pipe shelving to suit your space—go for a single long shelf or a network of smaller ones. The pipe finishes vary from matte black to brushed nickel, matching different decor styles. For a softer look, add wooden brackets or paint the pipes in a different color. Incorporate hooks underneath for hanging utensils or tools, making it multifunctional.
Start by measuring your wall space and sketching your desired layout. Purchase industrial pipe fittings, flanges, and wooden planks from a hardware store or online. Assemble the pipes using a pipe wrench, attaching them securely to the wall with heavy-duty anchors. Cut the wood to size, sand smooth, and finish with a protective coat. Install the shelves, then organize your pantry items by category for easy access.
Add small decorative elements like vintage tin signs or labels attached with metal clips. Use different wood stains or paint the pipes in bold colors for a customized look. Incorporate hooks or baskets for extra storage, and consider adding LED strip lighting underneath for an illuminated display. These touches turn industrial shelving into a true focal point.
Industrial pipe shelving offers a tough, timeless look that ages beautifully and supports your food storage needs. It’s a project that pays off visually and practically, elevating your entire room. Once installed, you’ll have a sturdy, stylish setup that lasts for years and impresses anyone who visits.
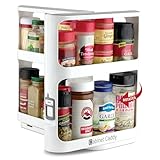
4. Pull-Out Drawer Systems for Hidden Organization

Tired of digging through piles of canned goods or baking supplies? Hidden pull-out drawer systems turn clutter into concealment, offering a sleek way to hide small items and keep everything in reach. They’re perfect for maximizing storage in tight spaces and maintaining a clean look. Who doesn’t want a secret compartment for their snacks?
Recommended Products to replicate this idea
| # | Preview | Product | |
|---|---|---|---|
| 1 |

|
Seinloes 2Pack Expandable Pull Out Cabinet Organizer 21"Deep With Raising Pad for Framed Cabinets,... | Buy on Amazon |
| # | Preview | Product | |
|---|---|---|---|
| 1 |

|
LYNK PROFESSIONAL® Pull Out Cabinet Organizer, 14" x 21" Slide Out Drawers for Kitchen Cabinets -... | Buy on Amazon |
Imagine deep drawers tucked into your cabinetry, smoothly sliding out to reveal neatly organized rows of jars, boxes, or spice tins. The drawer fronts are flush with your cabinets, giving a seamless appearance. Inside, dividers and small containers keep everything separated and easy to find. When closed, they’re invisible, maintaining a tidy, minimalist aesthetic.
Choose between full-extension drawers for easy access or soft-close mechanisms for a quieter experience. You can install these in existing cabinets or as part of a custom-built pantry. Use different internal organizers—like stackable trays or adjustable dividers—to suit your storage needs. For a modern look, opt for matte finishes or sleek handleless designs.
Begin by measuring your cabinet or space to determine drawer dimensions. Purchase high-quality drawer slides that support the weight of your items. For DIY installation, remove existing shelves, then attach the slides according to the manufacturer’s instructions. Insert the drawers, and organize your food items with small containers or dividers. Regularly clean and reorganize to keep things fresh and accessible.
Add labels or color-coded dividers for quick identification. Incorporate soft-close features or child-proof locks for safety. Use decorative drawer fronts or paint to match your kitchen decor. You can also add a pull-out spice rack or small tray inserts for even better organization. Personal touches like these make the system uniquely yours.
Pull-out drawers hide clutter and make everything easy to access with minimal effort. They turn a cluttered pantry into an elegant storage solution, boosting your confidence in organizing. Once installed, you’ll enjoy a cleaner, more efficient space that feels like a luxury upgrade. It’s a small change with a big impact.
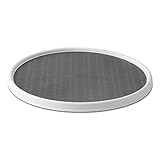
5. Rotating Pantry Racks for Easy Access

Ever get tired of crawling on your hands and knees just to reach that jar at the back of the shelf? Rotating pantry racks, like lazy Susans, make accessing items effortless. They’re perfect for small spaces or deep cabinets where reaching the back is a chore. Plus, they keep everything in view and within arm’s reach.
Recommended Products to replicate this idea
| # | Preview | Product | |
|---|---|---|---|
| 1 |
|
Copco 18-Inch Lazy Susan Turntable Organizer, Non-Skid Pantry or Cabinet Spinner for Spices,... | Buy on Amazon |
| # | Preview | Product | |
|---|---|---|---|
| 1 |
|
Cabinet Caddy Spice Rack Organizer for Cabinet - Slide & Rotate Kitchen Organizers and Storage - 2... | Buy on Amazon |
Visualize a sturdy turntable filled with spice jars, canned goods, or bottles, spinning smoothly on a well-organized shelf. The rack rotates 360 degrees, allowing you to see every item at a glance. It’s made of durable plastic or metal, with raised edges to prevent items from falling off. Everything looks orderly, with labels facing outward for quick identification.
Choose different sizes depending on your space—small for spice racks or large for full-sized cans. Some racks are adjustable or stackable, fitting into various cabinet depths. You can also opt for corner-mounted versions to maximize tricky spaces. Decorate the outside with labels or color codes to further improve organization.
Select a sturdy turntable that fits your cabinet or shelf space. Secure it with screws or adhesive if necessary. Organize your items by frequency of use—everyday essentials at the front, rarely used items at the back. Regularly rotate to ensure everything stays fresh, and clean the surfaces to prevent dust buildup. For added convenience, label each segment for quick reference.
Customize with decorative labels or color schemes to match your decor. Add small baskets or dividers inside the rack for better separation of different food types. Consider stacking multiple tiers for larger collections. For a more refined look, choose sleek metallic finishes or vintage-inspired designs.
Rotating racks turn a cluttered, hard-to-reach space into a model of efficiency. They save time, reduce frustration, and help you keep your pantry organized long-term. Implementing this simple solution boosts your confidence in managing your food storage and inspires continuous improvement.
6. Overhead Ceiling Storage for Seasonal Items

Struggling for space in your pantry for those bulky, seasonal items? Overhead ceiling storage offers a surprisingly clever solution. It’s perfect for storing large pots, holiday treats, or rarely used appliances out of sight but still within reach. Free up lower shelves for everyday essentials and declutter your space.
Recommended Products to replicate this idea
| # | Preview | Product | |
|---|---|---|---|
| 1 |

|
FLEXIMOUNTS 4x8 Overhead Garage Storage Rack, Adjustable Organization System, Heavy-Duty Metal... | Buy on Amazon |
| # | Preview | Product | |
|---|---|---|---|
| 1 |
|
FLEXIMOUNTS 4x8 Overhead Garage Storage Rack, Adjustable Organization System, Heavy-Duty Metal... | Buy on Amazon |
Picture sturdy ceiling-mounted racks or hooks suspended above your workspace, holding oversized bins or boxes. Large, heavy-duty hooks secure items like seasonal decorations or large cookware. The space below remains open and accessible, with everything neatly organized overhead. The entire setup looks like a professional storage area, maximizing vertical space.
Choose between open racks, covered bins, or custom cabinetry with ceiling lifts. For seasonal storage, use labeled bins or decorative baskets that can be easily swapped out. Add hooks or pegboards for hanging larger items like brooms or ladders. This approach adapts well to garages, basements, or large walk-in pantries.
Install heavy-duty ceiling hooks or tracks, ensuring proper anchoring into joists or beams. Use sturdy storage containers or baskets with handles for easy removal. Organize items by season or frequency of use, labeling each container. Regularly rotate and check for damage or pests. Keep the area clean and free of dust for long-lasting function.
Decorate storage containers with colorful labels or custom stickers. Add a step stool or ladder nearby for easy access. Incorporate lighting underneath for visibility in dark corners. Personalize with themed labels or seasonal motifs to make the space fun and practical.
Ceiling storage transforms unused vertical space into a valuable resource. It helps you keep seasonal clutter out of sight but still within easy reach. Once organized, you’ll feel more in control of your entire storage system, inspiring more efficient habits and making your home feel larger.
7. Stackable Baskets for Flexible, Tiered Storage

Is your pantry overflowing with mismatched boxes and baskets? Stacking baskets introduce flexibility and order into your storage. They’re great for maximizing vertical space and creating a tiered system that adapts to your changing needs. Plus, they make grabbing an item a breeze.
Recommended Products to replicate this idea
| # | Preview | Product | |
|---|---|---|---|
| 1 |

|
PUPPYCUTE Stackable Wire Storage Baskets for Kitchen Closet Pantry, Hanging Closet Organizers... | Buy on Amazon |
| # | Preview | Product | |
|---|---|---|---|
| 1 |

|
X-cosrack 3-Tier Stackable Fruit Basket for Kitchen Counter, Fruit and Vegetable Storage Basket-... | Buy on Amazon |
Imagine a series of woven or plastic baskets stacked neatly on top of each other, each labeled for different food groups. The baskets come in various sizes, fitting into tight corners or deep shelves. Their textures add visual interest, from smooth plastic to rustic wicker, creating a cozy, organized vibe. Everything looks accessible and inviting.
Choose baskets with lids or open tops depending on your preference. Use fabric liners or decorative tags for a polished look. Stack them horizontally or vertically, adjusting to your space constraints. Mix materials—metal, wicker, or plastic—for a layered aesthetic that matches your decor style.
Start by measuring your shelf or cabinet height to determine basket sizes. Organize items into categories—like snacks, baking supplies, or grains—and assign each to a basket. Stack baskets securely, ensuring they won’t topple over. Label each basket with tags or stickers, and periodically reassess to keep everything current. Use handle openings for easy removal.
Personalize by choosing colors or patterns that complement your kitchen decor. Add decorative ribbons or tags for a customized touch. Create a consistent labeling system for quick identification. Consider nesting smaller baskets inside larger ones for extra organization. Rotate contents seasonally or as your collection evolves.
Stackable baskets turn chaos into a tidy, flexible system that grows with you. They make it simple to access and rearrange items, boosting your confidence in maintaining order. Once set up, your pantry will look inviting, and finding what you need becomes effortless, saving you time and stress.
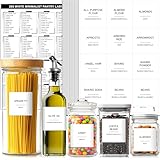
8. Elegant Glass Jars for Bulk Items and Dry Goods

Tired of rummaging through opaque bags or mismatched containers? Glass jars offer a timeless, elegant solution for storing bulk items and dry goods. They keep your ingredients fresh, visible, and organized, elevating your food storage game. Who says practicality can’t be pretty?
Recommended Products to replicate this idea
| # | Preview | Product | |
|---|---|---|---|
| 1 |

|
NETANY 6-pack 16 oz Overnight Oats Containers with Lids, Glass jars with Airtight Lids, Wide mouth... | Buy on Amazon |
| # | Preview | Product | |
|---|---|---|---|
| 1 |

|
Salzesfalls Glass Storage Containers,Clear Glass Jar with Lid, for Pantry - Flour, Coffee bean,... | Buy on Amazon |
Visualize uniformly sized glass jars lined up on open shelves or inside cabinets, filled with rice, pasta, or spices. The transparency allows you to see at a glance what’s inside, while the uniformity creates a sleek, cohesive look. Metal or wooden lids add a touch of sophistication, and labels or tags add personality.
Choose from various shapes—square, round, or rectangular—to fit your space. Use chalkboard lids or printable labels for easy updates. For a rustic look, opt for mason jars with wire handles, or select sleek modern designs for a minimalist aesthetic. Incorporate stacking options or tiered racks for maximum efficiency.
Start by selecting high-quality glass jars with airtight seals to preserve freshness. Clean and dry them thoroughly before filling. Organize your bulk ingredients by type, filling each jar with a funnel to avoid spills. Label each jar with clear, waterproof tags or stickers. Arrange the jars in a way that’s both accessible and visually appealing, and regularly check for expired contents.
Personalize your jars with custom labels, decals, or chalkboard tags. Mix and match jar sizes for different ingredients, creating a dynamic display. Add decorative touches like twine or fabric covers for lids. Use tiered racks or open shelving for display, turning your pantry into a chic feature.
Glass jars combine function and beauty, making your kitchen look polished and inviting. They help you keep track of your ingredients, reducing waste and saving money. Once you see your organized, attractive storage, you’ll feel inspired to keep your entire space tidy and stylish.
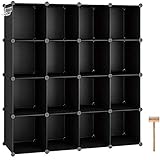
9. Modular Cube Storage for Customizable Organization

Do traditional shelves feel inflexible or cluttered? Modular cube storage offers a customizable solution for your food organization needs. They allow you to create tailored compartments that grow or shrink as your collection changes. Plus, they add a modern, tidy aesthetic to any storage room.
Recommended Products to replicate this idea
| # | Preview | Product | |
|---|---|---|---|
| 1 |
|
C&AHOME Cube Storage Organizer, 16-Cube Shelves Units, Plastic Storage Cubes, DIY Closet Organizer,... | Buy on Amazon |
| # | Preview | Product | |
|---|---|---|---|
| 1 |

|
YIHONG 6 Pack Clear Pantry Organizer Bins, Plastic Containers with Handle for... | Buy on Amazon |
Picture a grid of fabric-lined or wooden cubes stacked and arranged to fit your space perfectly. Each cube holds a specific category—snacks, spices, canned goods—and can be swapped or reconfigured easily. The varied textures and clean lines give a Scandinavian or contemporary vibe, making your storage both functional and stylish.
Use fabric bins or wooden drawers inside the cubes for added privacy or style. Arrange cubes in different configurations—vertical towers, L-shapes, or flat grids—depending on your space. Mix materials for a layered look, and incorporate labels or tags for quick identification. Adapt the size of each cube to fit your storage needs.
Start by measuring your available space and selecting cube units accordingly. Assemble the cubes using manufacturer instructions, ensuring stability. Fill each cube with appropriate containers or items—like small baskets or jars—and label as needed. Stack or arrange the cubes to maximize space and accessibility. Regularly reassess and adjust the configuration as your needs evolve.
Decorate the exterior of cubes with paint or contact paper matching your decor. Personalize with fabric liners or themed labels for a cohesive look. Incorporate additional accessories like small hooks or magnetic strips inside the cubes for extra utility. Rotate and update contents seasonally to keep the system fresh.
Modular cube storage empowers you to craft a personalized, flexible organization system. It’s easy to expand or reconfigure as your collection grows. Achieving this level of tailored order boosts your confidence and makes food management a breeze. Your space will look sleek, organized, and totally Pinterest-worthy.
10. Corner Shelving Units to Maximize Every Inch

Corners are often wasted space that could be making your food storage more efficient. Corner shelving units turn awkward, unused areas into valuable storage spots. They’re perfect for fitting in spices, small jars, or even canned goods without sacrificing style or accessibility. Why leave space empty when it could be functional?
Recommended Products to replicate this idea
| # | Preview | Product | |
|---|---|---|---|
| 1 |

|
SUNMORY 5 Tier Corner Shelf Stand,Industrial 65" Corner Shelves Display Shelf for Living Room... | Buy on Amazon |
| # | Preview | Product | |
|---|---|---|---|
| 1 |

|
HOOBRO 5-Tier Corner Shelf Stand, Corner Shelf with LED Light, 56.3" Tall Corner Bookshelf, Display... | Buy on Amazon |
Visualize a sleek, triangular or L-shaped shelf snug in the corner of your pantry, filled with neatly organized jars and cans. The shelves are made of wood, metal, or plastic, depending on your style, and are supported with brackets or mounted directly to the wall. The arrangement makes the most of every corner, creating a tidy, purposeful look that complements your overall decor.
Choose adjustable or fixed shelves based on your needs. Use baskets or small containers inside the corner unit for extra organization. For a more rustic vibe, opt for open wooden shelves with distressed finishes. For modern spaces, sleek glass or matte-finished shelves work well. You can also add hooks underneath for hanging utensils or tools.
Measure your corner space carefully and select a shelving unit that fits snugly. Mount the unit securely into wall studs or use strong anchors for free-standing options. Organize your items by category, placing frequently used items at the front. Keep the shelves clean and dust-free, and periodically reassess your storage to optimize space.
Add decorative touches like matching containers or labels to enhance visual appeal. Use matching baskets or themed accessories to create a cohesive look. Incorporate small LED lights underneath for better visibility. Rotate items seasonally or as your collection changes to keep the space fresh.
Corner shelving maximizes every inch of your storage area, making your entire pantry more efficient. It’s a smart move that transforms dead space into a well-organized zone. Once you see how much easier it is to find your essentials, your confidence in organizing will soar, inspiring more improvements across your home.
11. Magnetic Strip Storage for Metal Tools and Small Items

Small utensils, spice tins, or metal tools often end up cluttered in drawers or forgotten in cabinets. A magnetic strip offers a sleek, space-saving solution to keep these items visible and within easy reach. It’s a game-changer for maintaining order and reducing clutter.
Recommended Products to replicate this idea
| # | Preview | Product | |
|---|---|---|---|
| 1 |

|
Modern Innovations 18 Inch Stainless Steel Magnetic Knife Bar - Use as Knife Holder, Rack, Strip,... | Buy on Amazon |
| # | Preview | Product | |
|---|---|---|---|
| 1 |

|
Talented Kitchen Magnetic Spice Jars for Refrigerator - 3 oz, Stainless Steel, Set of 12 - Spice... | Buy on Amazon |
Imagine a sturdy magnetic strip mounted on a wall or inside a cabinet door, holding metal measuring spoons, spice tins, or small utensils. The items stick firmly yet are easy to remove when needed. The strip itself is minimalist, blending seamlessly into your storage space, while the organized display adds a modern, functional touch.
Choose a magnetic strip with a finish that matches your decor—stainless steel, painted, or powder-coated. Use multiple strips for different item categories or to cover larger wall sections. Combine with small baskets or hooks for additional storage options. This setup works well in kitchens, workshops, or utility rooms.
Decide on the optimal location for your magnetic strip, ensuring it’s accessible but out of the way. Mount the strip securely into wall studs or anchors, following the manufacturer’s instructions. Organize your metal items on the strip, grouping similar items together. Regularly clean the strip to ensure magnetic strength remains optimal, and replace or reposition as needed.
Personalize by adding labels or color-coding your items. Use decorative washi tape or paint accents around the strip to match your decor theme. Combine with small containers or clip-on holders for extra organization. Keep frequently used items at the front for quick access.
Magnetic strips keep your small metal tools visible and accessible, boosting efficiency. They help you maintain a clutter-free workspace and foster a sense of control over your storage. Once you adopt this system, you’ll wonder how you ever managed without it.
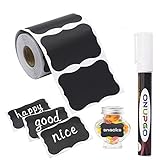
12. Chalkboard Labels for Fun and Functional Organization

Changing labels or keeping track of what’s inside containers can be a hassle. Chalkboard labels offer a fun, reusable way to keep your food organization flexible and stylish. They’re perfect for updating your storage as your collection evolves or seasons change. Who doesn’t love a bit of DIY charm?
Recommended Products to replicate this idea
| # | Preview | Product | |
|---|---|---|---|
| 1 |
|
ONUPGO Chalkboard Labels-180pcs Waterproof Reusable Blackboard Stickers with 1 Liquid Chalk Marker... | Buy on Amazon |
| # | Preview | Product | |
|---|---|---|---|
| 1 |

|
Liquid Chalk Marker Pen - White Dry Erase Marker - Chalkboard Signs, Windows, Blackboard, Glass (6... | Buy on Amazon |
Visualize black chalkboard labels adhered to jars, bins, or shelves, with handwritten descriptions like ‘Pasta’ or ‘Baking Supplies.’ The chalkboard surface makes it easy to update or rewrite labels as needed. The handwritten look adds a rustic, farmhouse feel, blending practicality with personality. It’s a charming detail that elevates your storage game.
Choose pre-cut labels or create your own with chalkboard paint on adhesive paper. Use colorful chalk or chalk markers for a personalized touch. Incorporate labels into a consistent style—framed or plain—to match your decor. You can also add decorative borders or icons for quick visual cues.
Clean the surface of your containers thoroughly before applying labels. Write clearly with chalk or chalk markers, allowing ink to dry before handling. Use a damp cloth to erase and update labels easily. For a polished look, frame the labels with washi tape or decorative borders. Regularly review and refresh labels for accuracy and aesthetics.
Create a label station with different chalk colors for various categories or priorities. Add decorative elements like small stickers or drawings. Use contrasting colors for better visibility or to match your room’s theme. Personalize by numbering or coding labels for inventory management.
Chalkboard labels make your organization adaptable and charming. They encourage creativity and give you confidence in maintaining a fresh look. Updating your labels becomes a fun, satisfying task that keeps your storage system lively and functional.
13. Under-Shelf Baskets for Extra Layered Storage

Is vertical space wasted in your pantry? Under-shelf baskets provide an extra layer of storage, turning unused space beneath shelves into a practical spot for small items. They’re perfect for snacks, baking supplies, or small packaged foods. It’s a smart way to boost capacity without adding more shelves.
Recommended Products to replicate this idea
| # | Preview | Product | |
|---|---|---|---|
| 1 |

|
Simple Houseware Under Shelf Basket, White – 2-Pack Space-Saving Storage Organizer for Kitchen,... | Buy on Amazon |
| # | Preview | Product | |
|---|---|---|---|
| 1 |

|
Tebery 4 Pack Black Under Shelf Wire Basket, Hanging Storage Baskets Under Cabinet Add-on Storage... | Buy on Amazon |
Imagine wire or plastic baskets hanging beneath your existing shelves, filled with colorful snack packs or spice packets. They slide in easily and stay put, creating a layered look that’s both organized and accessible. The baskets are lightweight but sturdy, with handles or hooks for quick removal. Everything is within easy reach, yet neatly tucked away.
Choose baskets that match your decor—metal for an industrial vibe, or woven for a rustic feel. Use different sizes to accommodate various items, and label each basket with tags or stickers for quick identification. Incorporate hooks or clips for hanging utensils or small tools inside the baskets. Adjust placement based on your storage needs.
Install the baskets by hooking or sliding them onto the underside of the shelf supports. Ensure they are securely attached and can handle the weight of your items. Organize contents into categories—baking supplies, snacks, or tea bags—and label accordingly. Regularly check for clutter or expired items, and clean the baskets for hygiene.
Decorate baskets with colorful tape or patterned fabric liners to match your decor. Add labels or icons to distinguish contents easily. Use stacking or nesting baskets for more storage options. Seasonal reorganization or rotating contents keeps the system fresh and functional.
Under-shelf baskets add valuable storage without cluttering your space. They make small items easy to find and keep everything organized. Once you see how efficiently they utilize space, your confidence in managing your pantry will grow, inspiring smarter storage solutions.
14. Sliding Barn Doors for a Stylish, Space-Saving Entrance

Traditional swinging doors can take up precious space and disrupt your room’s flow. Sliding barn doors are a stylish alternative that save space and add rustic charm. They create a seamless entryway to your food storage room, making the entire space look more intentional and inviting. Who knew doors could be so cool?
Recommended Products to replicate this idea
| # | Preview | Product | |
|---|---|---|---|
| 1 |

|
SMARTSTANDARD 6.8 FT Heavy Duty Sturdy Sliding Barn Door Hardware Kit, Black, (Whole Set Includes 1x... | Buy on Amazon |
| # | Preview | Product | |
|---|---|---|---|
| 1 |

|
S&Z TOPHAND 36 in. x 84 in. Unfinished British Brace Knotty Barn Door with 6.6FT Sliding Door... | Buy on Amazon |
Picture a barn door sliding smoothly on a track, revealing a neatly organized pantry behind it. The door’s rustic wood finish complements industrial or farmhouse decor, adding character to the room. When open, it reveals a tidy storage zone, while closed, it adds a dramatic, charming element to your decor scheme. It’s both functional and decorative.
Choose from reclaimed wood, painted finishes, or metal accents depending on your style. Install a sturdy track system with rollers that glide smoothly. For small spaces, opt for pocket doors that fold into the wall. Decorate the door with hardware or paint to match your overall aesthetic. Add handles or pulls that blend seamlessly into your design.
Measure the opening carefully and select a sliding door kit that fits your space. Mount the track securely into wall studs or ceiling joists, ensuring smooth operation. Hang the door, then align it properly to prevent sticking or wobbling. Finish by sealing edges or painting for a polished look. Organize your storage behind the door for maximum efficiency.
Decorate the door with stencils, decals, or distressing techniques to add personality. Add a decorative handle or vintage hardware for extra flair. Consider integrating a small window or glass panel for a peek inside. Personal touches like custom paint or distressing enhance the rustic appeal and make it uniquely yours.
Sliding barn doors combine style and function, transforming your storage into a focal point. They maximize space and add a warm, charming vibe that elevates your entire room. Once installed, you’ll feel confident in your DIY skills and inspired to incorporate more creative design elements into your home.
15. Color-Coordinated Storage for Aesthetic Appeal

Does your pantry look like a rainbow exploded? Color-coordinated storage creates a harmonious, calming environment that’s pleasing to the eye. It’s a simple trick to turn chaos into calm and make finding items a breeze. Plus, it’s a fun way to add personality to your food space.
Recommended Products to replicate this idea
| # | Preview | Product | |
|---|---|---|---|
| 1 |
|
PRAKI Airtight Food Storage Containers Set with Lids - 24 PCS, BPA Free Kitchen and Pantry... | Buy on Amazon |
| # | Preview | Product | |
|---|---|---|---|
| 1 |

|
Smart Labels QR Code Stickers Pack of 48 (Neon) Made in USA - QR Code Labels for Storage & Inventory... | Buy on Amazon |
Imagine containers and bins arranged by hue—reds, blues, yellows—creating a gradient or block pattern. The uniformity in shape and color makes the space look intentional and stylish. Labels or accents in matching shades further unify the look. The overall effect is a visually soothing, Instagram-worthy storage area.
Use colored containers, bins, or labels to group similar foods—like all grains in beige, snacks in bold reds. For a minimalist vibe, stick to monochrome tones with subtle variations. For a more eclectic feel, mix different textures and finishes but keep colors consistent. Seasonal swaps or updates keep the look fresh and aligned with your decor.
Start by sorting your items into color groups, then sourcing containers or labels in matching shades. Use paint or contact paper to recolor existing containers if needed. Arrange items by color on open shelves or inside cabinets for a clean visual flow. Label everything clearly, and periodically reorganize as your collection grows or changes.
Add decorative touches like color-coordinated tags or decorative tapes. Incorporate matching storage bins or baskets for a cohesive look. Personalize further with themed labels or icons for each color zone. Seasonal decorations or motifs can also enhance the aesthetic appeal.
Color-coordinated storage makes your space look chic and effortless. It boosts your confidence in maintaining a tidy, beautiful environment. Once you see how harmonious everything looks, you’ll be motivated to keep your entire home styled with this simple but impactful technique.
16. Built-In Drawer Pantry for Seamless Integration

Cluttered shelves and mismatched containers can make food storage feel chaotic. A built-in drawer pantry offers a sleek, seamless solution that integrates perfectly into your kitchen design. It provides hidden, organized storage that’s both functional and stylish. Who wouldn’t want a hidden treasure chest of goodies?
Recommended Products to replicate this idea
| # | Preview | Product | |
|---|---|---|---|
| 1 |

|
PAKETA 4 Pack Expandable Pull Out Cabinet Organizer, 21'' Deep Pull Out Drawers for Cabinets,Upgrade... | Buy on Amazon |
| # | Preview | Product | |
|---|---|---|---|
| 1 |

|
Suneerplay Spice Drawer Organizer 4 Tier, Acrylic Seasoning Organizer Rack, Clear Spice Rack Tray,... | Buy on Amazon |
Envision a custom cabinet with multiple pull-out drawers, flush with your cabinetry for a clean, uninterrupted look. Inside, dividers and small containers keep everything tidy—spices, snacks, or baking supplies. The drawers glide smoothly, revealing a well-organized, clutter-free space that makes every item easy to find. The overall effect is a high-end, streamlined aesthetic.
Use different drawer depths and sizes depending on your storage needs. Choose finishes that match your cabinets—painted, stained, or laminate. Incorporate soft-close mechanisms for quiet operation, and add labels or internal dividers for added organization. This system can be designed to fit into existing cabinetry or as part of a new build.
Work with a carpenter or custom cabinet maker to plan your drawer layout. Measure your space carefully, considering the height and depth of drawers. Install high-quality slides and dividers, and organize contents into categories. Regularly maintain and adjust the layout as your collection evolves. Keep the drawer interiors clean for hygiene and longevity.
Decorate the drawer fronts with paint or veneer to match your decor. Add labels or engraved tags for quick identification. Incorporate soft-close or child-proof features for safety. Use interior organizers like small baskets or dividers for better separation. Seasonal reorganization helps keep everything fresh and accessible.
A built-in drawer pantry elevates your kitchen’s style and efficiency, making food storage feel luxurious and effortless. It’s a long-term investment that boosts your confidence in home organization. Once you experience the seamless access and tidy appearance, you’ll be inspired to refine other areas of your home too.
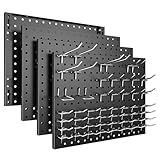
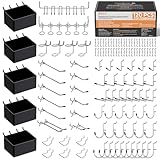
17. Pegboard Wall for Customizable Tool and Accessory Storage

Cluttered countertops and jammed drawers make kitchen organization a nightmare. A pegboard wall transforms an empty space into a versatile, customizable storage area. It’s perfect for hanging utensils, measuring cups, or lightweight containers, keeping everything visible and accessible. Why settle for chaos when you can have a flexible system?
Recommended Products to replicate this idea
| # | Preview | Product | |
|---|---|---|---|
| 1 |
|
Spampur Peg Board, 4 Pack Metal Pegboard Panels with 50 Hooks, Black Pegboards Wall Organizer, Heavy... | Buy on Amazon |
| # | Preview | Product | |
|---|---|---|---|
| 1 |
|
INCLY 120PCS Pegboard Accessories Organizer Kit, Peg Board Hooks Assortment with Bins for Organizing... | Buy on Amazon |
Imagine a large pegboard mounted on an empty wall, with hooks holding spatulas, measuring spoons, or small baskets. The setup is adaptable—add or move hooks as your needs change. The holes in the board create a geometric pattern that’s both functional and decorative. Everything hangs in a tidy, organized grid, making your workspace more efficient.
Choose between wood, metal, or plastic pegboards to match your decor style. Use a combination of hooks, shelves, and baskets to hold different items. Customize with painted or decorative elements on the board itself for a personalized touch. Adjust the layout as your collection of tools or accessories grows.
Mount the pegboard securely into studs or wall anchors, ensuring it can support the weight of your tools. Arrange hooks and accessories in a pattern that keeps frequently used items at eye level. Keep the board clean and free of dust, and periodically reassess your setup for efficiency. Add labels or small containers for smaller pieces.
Decorate the pegboard with paint, stencils, or themed accessories that match your room’s aesthetic. Use color-coded hooks or labels for quick identification. Incorporate small shelves or bins for lightweight items like spice packets or snack bars. Keep your system flexible by rearranging as your collection expands.
A pegboard wall offers a highly customizable, efficient way to organize small tools and accessories. It transforms cluttered chaos into a visual masterpiece, boosting your confidence in your organizational skills. Once set up, you’ll enjoy a workspace that’s both stylish and super functional.
Conclusion
With a diverse range of food storage room ideas covered, you’re equipped to transform your space into an efficient and attractive hub for your culinary essentials. Implement these creative solutions and enjoy the benefits of a more organized kitchen environment. Take action today and turn your food storage into a showcase of smart design and functionality!
Last update on 2026-02-26 / Affiliate links / Images from Amazon Product Advertising API