Imagine a kitchen that feels open, inviting, and perfectly tailored to your lifestyle—without the need for a bulky island in the center. Kitchen ideas without an island have gained popularity because they maximize space, create easier flow, and offer a sleek, uncluttered look that’s both functional and stylish.
In this article, you’ll uncover a variety of innovative design ideas that cater to different tastes and space constraints. Whether you prefer a cozy, minimalist setup or a more organized, multi-functional layout, these ideas will inspire you to rethink your kitchen’s potential and make the most of your available space.
1. Incorporate a Breakfast Nook with Built-In Seating for Cozy Dining
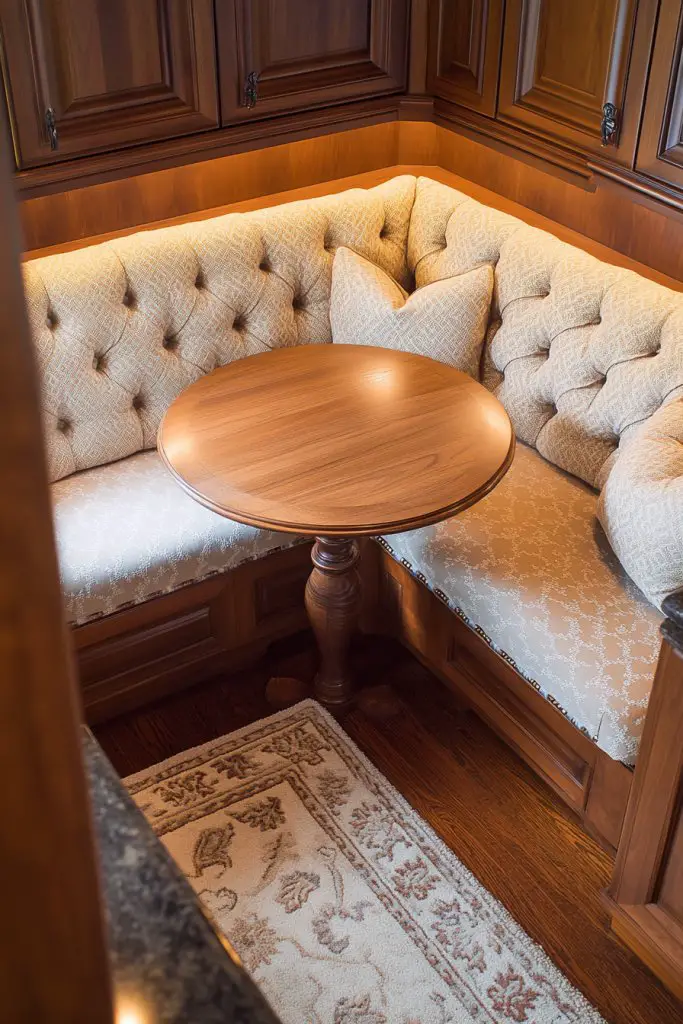
Ever wished your kitchen could feel more inviting and less like a staging area? A cozy breakfast nook transforms an ordinary corner into a warm, personal space for casual dining. It’s perfect for lazy weekend mornings or quick weekday breakfasts without the fuss of a formal table. Plus, it makes the most of small spaces by adding charm and function.
Imagine a charming corner tucked into a sunny spot with built-in benches upholstered in soft, durable fabric. A small, round wooden table sits in the middle, perfect for two or three people. The space is accented with colorful cushions and textured throws that invite you to sit and relax. Bright cushions and a cheerful rug ground the area, making it feel like a little sanctuary within your kitchen.
This idea adapts easily to various styles—think rustic wood with vintage accents or sleek, modern fabrics and clean lines. In winter, add a faux fur throw for extra coziness. During summer, swap cushions for lighter fabrics or incorporate a small potted plant nearby. For tiny kitchens, corner benches maximize seating without sacrificing walking space, while larger spaces can incorporate a built-in window seat with storage.
Start by identifying a corner that gets good natural light. Measure the space carefully to ensure comfortable seating and table placement. Use plywood or pre-made bench kits for quick assembly, then upholster with foam and fabric of your choice. The table can be a simple round top with a sturdy base or even a repurposed vintage find. Secure the benches and table to prevent wobbling, especially if kids will be climbing or sitting regularly.
Personalize your nook with decorative cushions, themed textiles, or a small gallery of framed photos and artwork nearby. Consider using a fabric with a pattern that complements your overall kitchen decor. Adding a small, portable speaker nearby allows for background music during breakfast. You might also include a small shelf or hooks for coffee mugs or utensils—functional and charming.
A breakfast nook adds warmth and personality, turning your kitchen into a cozy gathering spot. It’s an affordable upgrade that creates a welcoming atmosphere. Once set up, you’ll love the ease of grabbing a quick bite or enjoying a leisurely brunch with friends. This simple transformation boosts your space’s usability and your daily mood. You’re just a few cushions and a table away from a new favorite spot!
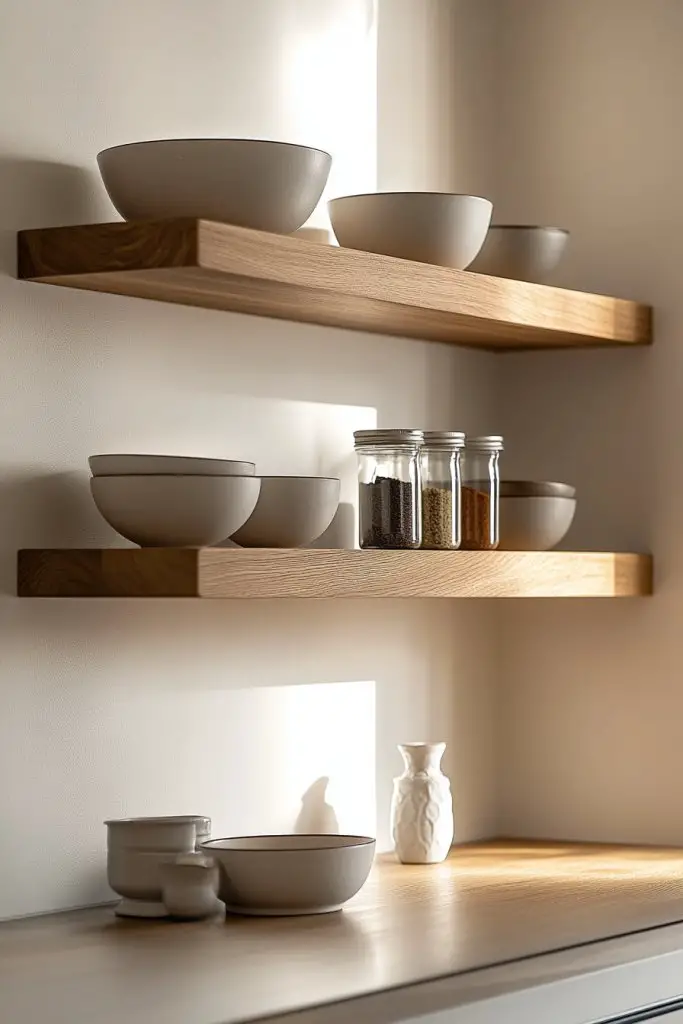
2. Use Open Shelving for Easy Access and Stylish Display
Tired of digging through cabinets for that one pan or spice jar? Open shelving offers a practical solution that also adds a dash of style. It keeps essentials within reach and turns your kitchen into a visual feast. Plus, it’s a quick fix for small spaces that need to feel more open and inviting.
Picture sleek, floating wood shelves mounted against a neutral wall. The shelves are styled with a curated mix of colorful dishware, neatly arranged pots, and decorative jars. The open design allows light to flow freely, making the space appear larger. The textures of the shelves contrast beautifully with the glossy backsplash, creating an engaging visual rhythm. The easy access makes cooking and entertaining more effortless.
Open shelving can be styled in many ways—minimalist with monochrome dishware or boho with layered textiles and vintage finds. For a seasonal twist, swap out decor items or incorporate themed accessories, like holiday-themed mugs or summer-colored bowls. In small kitchens, narrow shelves maximize storage without cluttering the space, while larger kitchens can include a mix of open and closed storage for balance.
Begin by choosing durable, moisture-resistant materials such as hardwood or sealed MDF. Install brackets or wall mounts at regular intervals for stability. Group items by function or color for a cohesive look, and leave some empty space to prevent visual clutter. Use labels or decorative jars for dry ingredients to keep things tidy. Regularly dust and organize to maintain the aesthetic and functionality.
Add personality by incorporating unique dishware, vintage teacups, or handcrafted ceramics. Use decorative trays or risers to create visual interest and height variation. Consider installing LED strip lighting underneath the shelves for ambient illumination without adding bulky fixtures. Incorporate small accent pieces like woven baskets or framed quotes to reflect your style.
Open shelving elevates your kitchen’s style while increasing functionality. It encourages organization and displays your personality through curated collections. With a little effort, you can transform plain walls into eye-catching focal points. It’s a simple upgrade that makes your kitchen feel more approachable and alive, inspiring you to cook and entertain more often.
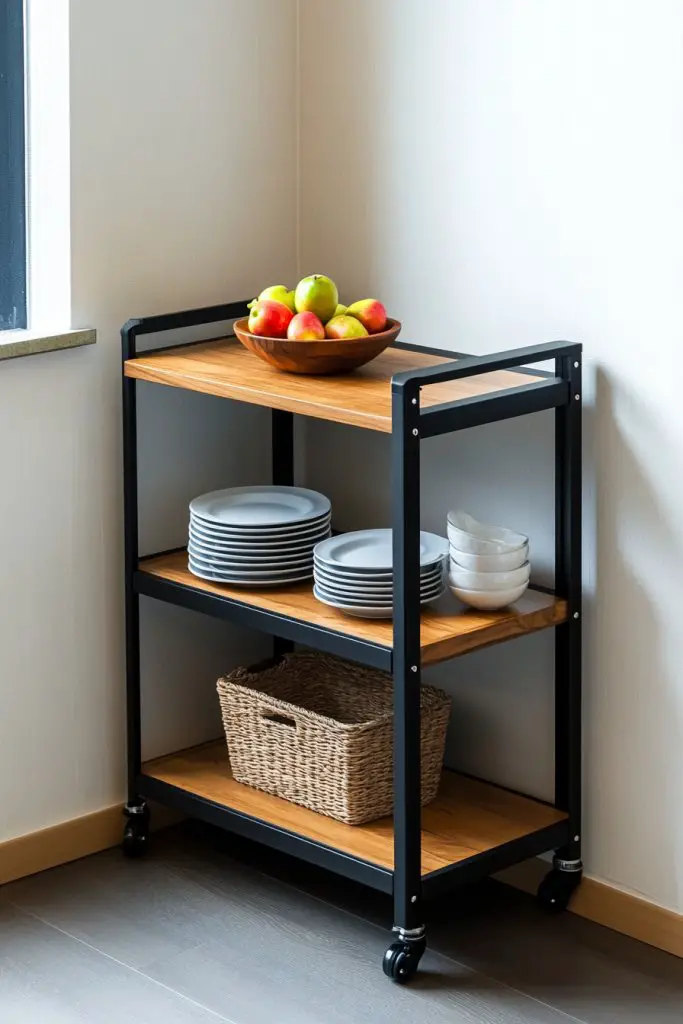
3. Install a Rolling Cart for Flexible Storage and Prep Space
Ever wish you had extra counter space when cooking but hate the permanent fixtures? A rolling cart offers a versatile solution that can be moved and adapted as needed. It adds storage, prep area, or serving space without cluttering your kitchen. Plus, it’s perfect for small apartments or open-plan layouts where flexibility is key.
Imagine a sleek metal cart with wooden shelves parked next to your stove, ready for chopping and prep. When not in use, it can be rolled away into a corner or stored against a wall. During gatherings, it becomes a serving station with dishes and glasses. The cart’s wheels make it a dynamic piece, easily repositioned for maximum convenience. Its minimalist design complements various decor styles, from industrial to farmhouse.
Choose carts with different shelf configurations—some with drawers, hooks, or wine racks—to suit your needs. For seasonal use, swap the top surface for a butcher block or marble slab for a more upscale look. Use a colorful or patterned cover to add a pop of personality when stored away. It’s also perfect for outdoor kitchens, picnic setups, or as a mobile bar cart for parties.
Select a sturdy, lightweight material that suits your environment—metal or wood are common options. Assemble according to instructions or customize with additional hooks or baskets. Position the cart close to your main work zone for efficiency, but don’t forget to lock the wheels if it has that feature. Use it to hold frequently used utensils, small appliances, or ingredients to streamline your workflow.
Decorate the cart with colorful storage bins, chalkboard labels, or themed accessories for special occasions. Customize the shelves with liners that match your kitchen decor, like patterned fabric or silicone mats. For a modern look, add sleek metallic handles or replace the wheels with stylish casters. Personal touches make it truly yours while boosting functionality.
A rolling cart is a flexible workhorse that adapts to your cooking and entertaining style. It’s a smart investment that boosts your kitchen’s efficiency without permanent changes. Once you see how much easier meal prep becomes, you’ll wonder why you didn’t get one sooner. Flexibility and style, all in one simple solution!
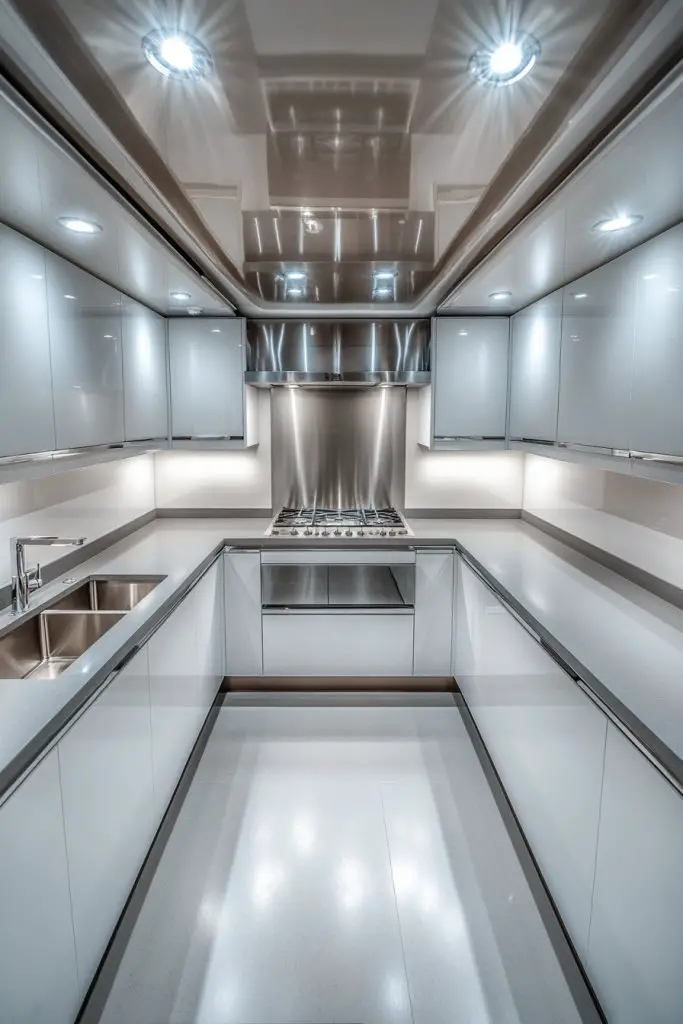
4. Design a U-Shaped Layout for Efficient Workflow
Struggling with a cluttered, inefficient kitchen? A U-shaped layout can dramatically improve your workflow by creating dedicated zones for prep, cooking, and cleaning. It’s a classic design that maximizes space while keeping everything within arm’s reach. Perfect for those who love to cook or entertain at home.
Visualize a U-shaped kitchen with cabinets and appliances lining three walls, forming an open, inviting space. The central area offers a generous countertop for chopping, mixing, or plating. The sink and dishwasher are conveniently located nearby, streamlining cleanup. The open ends of the U provide room for a small breakfast bar or extra seating, blending function and social space seamlessly.
You can customize the U-shape with open shelving or glass-front cabinets for display. For small kitchens, narrow U layouts work well, while larger spaces can incorporate an island or extended counters. Seasonal accessories like cozy textiles or colorful cookware can add warmth or vibrancy. For a more modern vibe, incorporate sleek finishes and integrated lighting.
Start by measuring your space carefully and sketching out your layout. Choose durable cabinetry with soft-close hinges and efficient storage solutions like pull-out trays and lazy Susans. Place appliances strategically to reduce steps—ideally, the fridge near prep areas and the stove close to the sink. Use under-cabinet lighting to brighten work zones. Consider professional help for precise installation and to optimize your space.
Add personality with colorful backsplash tiles, decorative hardware, or textured cabinetry. Incorporate organizational tools like drawer dividers and spice racks to keep everything tidy. For a cozy touch, include a soft rug or cushioned mats in high-use areas. Small decorative accents, like a vintage timer or a sleek utensil holder, can tie the look together.
A well-designed U-shaped kitchen streamlines your cooking process and makes entertaining a breeze. It’s a proven layout that increases efficiency and comfort. Once you see how smoothly your kitchen functions, you’ll feel more confident tackling ambitious recipes and hosting gatherings. It’s a timeless design that boosts both form and function.
5. Create a Multi-Function Peninsula with Storage and Seating
Ever felt your kitchen lacks enough prep space or seating for guests? A multi-function peninsula solves both problems by extending your counter area while adding storage and casual seating. It creates a natural gathering spot without closing off the room. Perfect for open-concept homes or small kitchens where space is at a premium.
Picture a sleek, elongated counter jutting out from the main cabinetry, topped with a durable surface like quartz or butcher block. Bar stools line the outer edge, inviting friends or family to sit and chat while you cook. Beneath, cabinets or open shelves store cookware, utensils, or extra dishes. Pendant lighting hangs overhead, creating a cozy, inviting glow. The entire setup encourages social interaction and efficient cooking.
Choose materials and finishes that match your style—matte black cabinetry with warm wood accents for industrial chic, or light-colored surfaces for a Scandinavian look. Incorporate a small overhang for extra seating or a fold-down extension for occasional use. Seasonal accessories like colorful placemats or a decorative bowl for fruit can add a fresh touch. For a more professional look, integrate built-in appliances or wine storage.
Start with precise measurements to ensure enough space for chairs and movement. Select a sturdy, easy-to-clean surface and durable cabinets or open shelving below. Install the counter securely to the existing cabinetry, then add comfortable, stylish stools. Use task lighting or pendant fixtures to enhance the ambiance and functionality. Keep frequently used items within arm’s reach in cabinets or drawers under the peninsula.
Decorate with a colorful runner or textured placemats to make the space inviting. Consider adding a small herb garden or decorative bowls for nuts or candies. Swap out stools seasonally or for special occasions. You can also personalize the cabinetry with contrasting hardware or paint to match your decor theme. This area becomes a focal point for both cooking and socializing.
A multi-function peninsula turns your kitchen into an interactive space that balances style and practicality. It encourages family and friends to gather around while you prepare meals. Once set up, it elevates your entertaining game and increases your kitchen’s versatility. You’ll love how it transforms everyday cooking into a social event.
6. Opt for a Wall-Mounted Fold-Down Table for Small Spaces
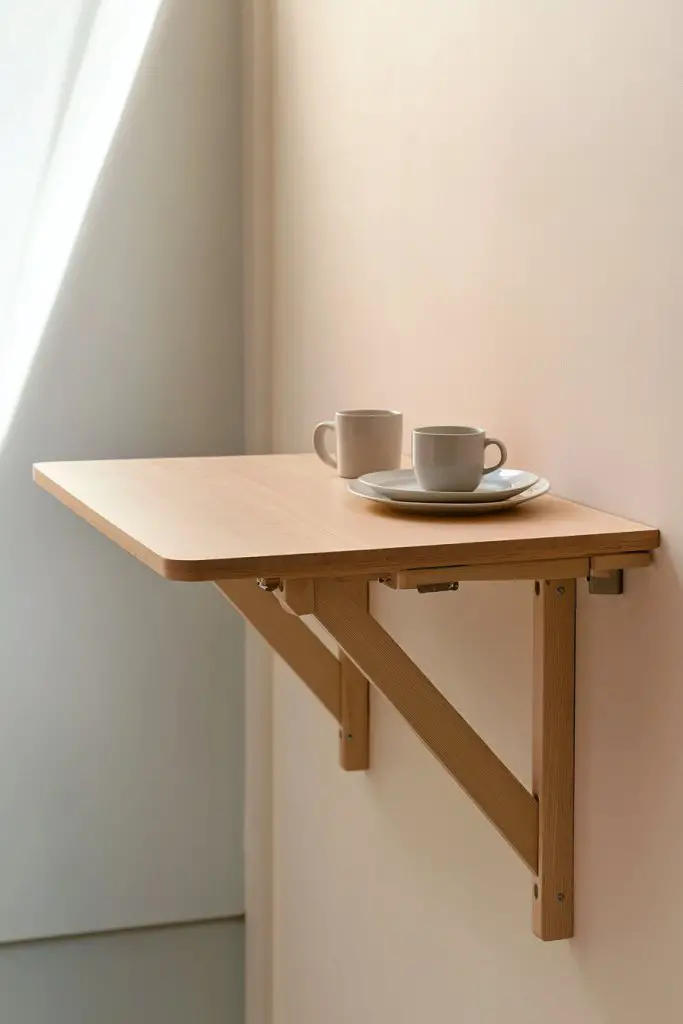
Limited space in your kitchen making it hard to have a dedicated dining area? A wall-mounted fold-down table offers a clever solution that folds away when not in use. It’s perfect for small apartments or studio setups where every inch counts. Plus, it adds a functional surface without sacrificing style.
Imagine a sleek, minimalist table mounted against a wall, with a simple latch or hinge mechanism. When folded down, it becomes a compact work surface or prep station. When needed, you simply lower it, revealing a sturdy surface finished in wood, laminate, or even metal. Folded, it blends seamlessly into the wall, with only a slim profile visible. It’s a space-saving hero that looks clean and modern.
Choose a table finish that complements your kitchen’s aesthetic—warm wood for cozy vibes or sleek laminate for contemporary spaces. Add a decorative backsplash or wall art around the fold-down to make it a feature. For extra versatility, incorporate magnetic or pegboard panels on the wall nearby for tools or accessories. In larger kitchens, this can double as a breakfast bar or additional prep space.
Start by locating a wall with enough clearance for the table to fold down fully. Use sturdy hinges and brackets rated for the weight of your chosen surface. Install a latch or locking mechanism to keep the table secure when folded up. When deploying, make sure to clear the area underneath for chairs or stools. Consider a durable, easy-to-clean surface for food prep or quick meals.
Decorate the wall around the fold-down with removable organizers, hooks, or decorative tiles. Customize the table surface with paint, stencils, or decals for a personalized touch. Use foldable or stackable chairs that tuck away easily when not in use. This approach allows you to maximize utility without sacrificing aesthetic appeal.
This space-saving trick makes even the tiniest kitchens functional and stylish. It’s a smart way to add dining or prep space without permanent fixtures. Once you experience how much easier meal prep and quick bites become, you’ll wonder why you didn’t do it sooner. It’s a small change with a big impact on your daily life.
7. Maximize Corner Spaces with Lazy Susan or Corner Cabinets
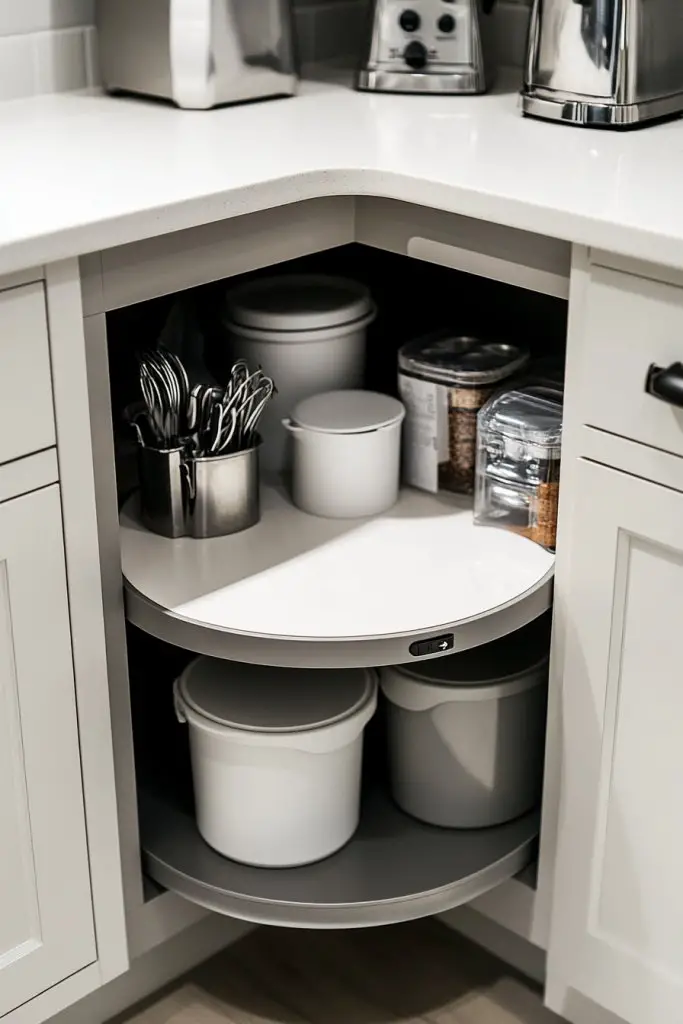
Corner cabinets often turn into dead zones that waste valuable space. A Lazy Susan or specially designed corner cabinets can turn these awkward spots into highly functional storage areas. It’s a smart move for keeping everything accessible and organized without cluttering your counters. Who knew corner spaces could be so useful?
Visualize a corner cabinet with a revolving shelf, filled with neatly arranged spices, canned goods, or small appliances. The Lazy Susan spins smoothly, giving you instant access to items stored deep inside. Alternatively, a corner cabinet with pull-out trays or angled shelves allows for easy reach and visibility. The sleek hardware and well-organized interior make your kitchen look tidy and efficient.
Choose between round Lazy Susans for a classic look or custom-built corner drawers for a seamless appearance. Incorporate clear containers or labeled jars for quick identification. For a more decorative touch, install a contrasting trim or paint the interior a different color. Adapt this idea for small kitchens by reducing clutter and grouping similar items for maximum efficiency.
Start by assessing your existing corner space and measure dimensions carefully. Select a Lazy Susan turntable or custom cabinet insert compatible with your cabinet size. Remove existing hardware, then install the new system according to manufacturer instructions. Organize items by frequency of use, placing the most-used at the front or on the top shelves. Regularly declutter and reorganize for optimal access.
Decorate the interior with colorful containers or add labels that match your kitchen theme. Consider integrating lighting inside the cabinet for better visibility. Use uniform, attractive storage jars for spices and ingredients, turning storage into a display element. Personal touches like themed labels or decorative hardware can elevate the look.
Maximizing corner spaces with Lazy Susans or specialized cabinets makes your kitchen smarter and tidier. It’s a simple upgrade that pays off with easier meal prep and less frustration. Once you see how accessible everything becomes, you’ll be motivated to reorganize other storage areas. It’s a straightforward change that enhances both function and style.
8. Incorporate a Butler’s Pantry for Additional Storage and Prep Area
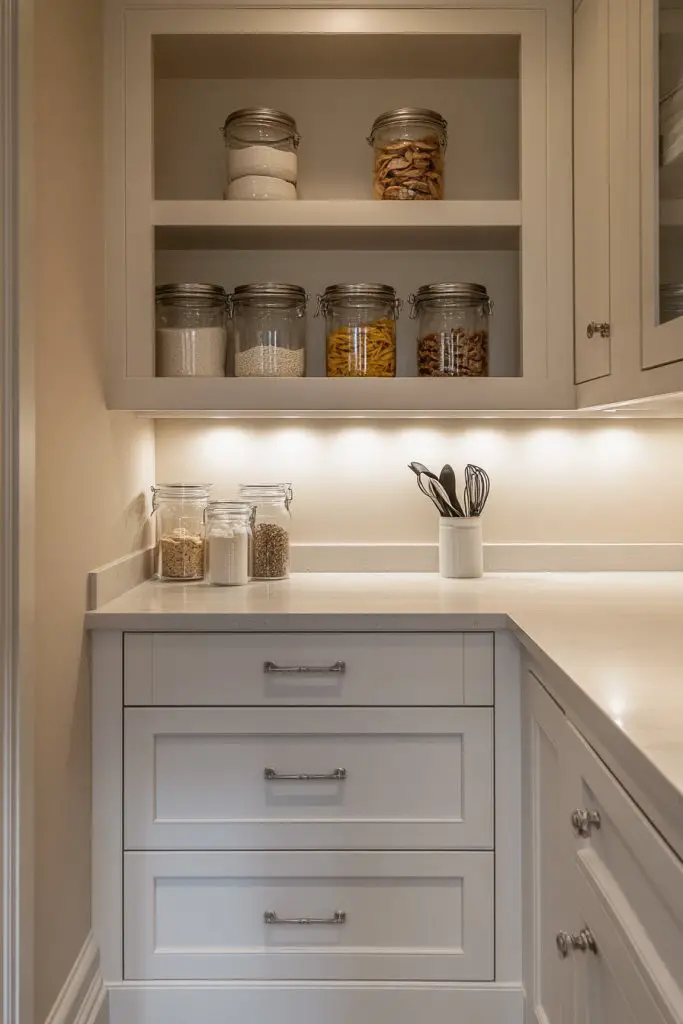
Feeling cramped in your main kitchen? A butler’s pantry offers a dedicated space for prep, storage, and organization, freeing up your primary area. It’s like having a secret weapon for hosting and cooking without cluttering your main counters. Plus, it adds an element of luxury and efficiency to your home.
Imagine a separate small room or closet-like space behind the main kitchen, fitted with shelves, cabinets, and countertop surfaces. It’s organized with labeled bins, spice racks, and small appliances tucked away neatly. The space feels airy and functional, making it easy to prep meals or store seasonal items. A small door or open archway connects it seamlessly to your main kitchen, creating a flow that feels both practical and elegant.
Design a butler’s pantry with open shelving for quick access or closed cabinets for a sleek look. Use decorative hardware or paint colors that complement your kitchen decor. Incorporate a small sink or additional lighting for convenience. For smaller homes, convert a closet or unused corner into a mini pantry, while larger homes can dedicate a full room.
Identify an available space near your kitchen, such as an extra closet or small room. Install sturdy shelving, cabinetry, and a countertop surface. Use organizational tools like baskets, spice racks, and hooks to keep things tidy. Ensure good ventilation and lighting, possibly adding a window or under-cabinet lights. Regularly declutter and update your storage system to keep it functional.
Decorate with stylish containers, labeled jars, or framed quotes to personalize the space. Integrate small appliances like a coffee maker or toaster for easy access. Use decorative backsplashes or paint to match your aesthetic. This dedicated area can also serve as a coffee or beverage station, adding more utility.
A butler’s pantry transforms your kitchen into a highly organized, efficient space that impresses guests. It’s a luxurious upgrade that simplifies daily routines and special entertaining. Once you see how much easier it is to keep things tidy, you’ll wonder how you ever managed without it. It’s a smart investment in your home’s functionality and style.
9. Use a Kitchen Cart with Built-In Appliances for a Mobile Cooking Station
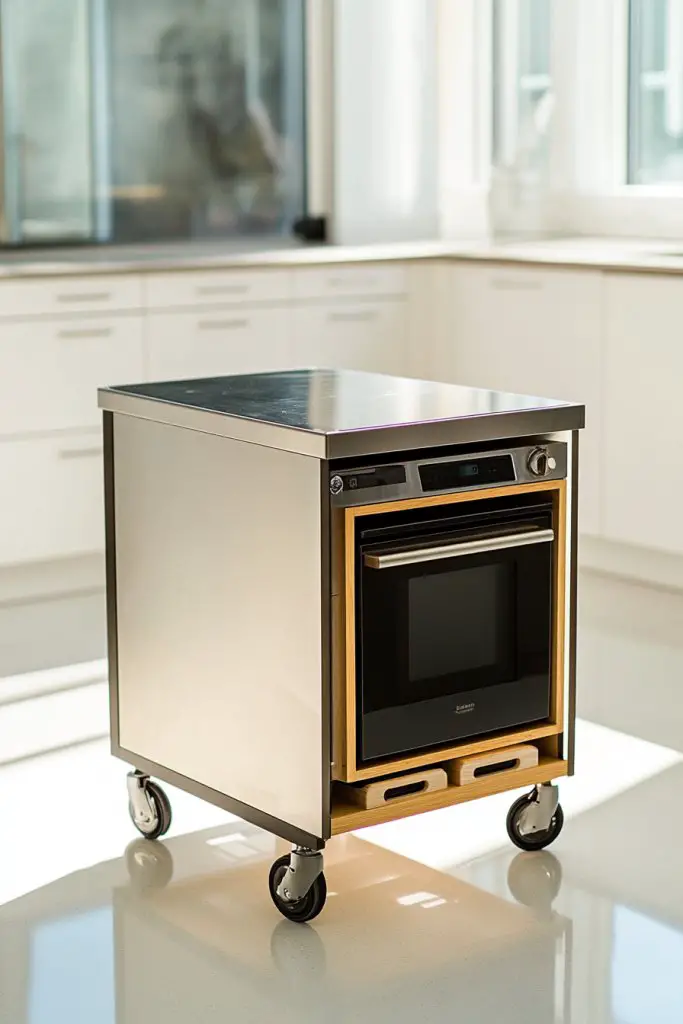
Wish you had more counter space but hate the permanence of built-ins? A kitchen cart with integrated appliances offers a flexible, mobile solution. It provides extra prep and storage areas that can be moved out of the way when not needed. Ideal for small kitchens, it adds functionality without sacrificing style.
Picture a stylish metal and wood cart with a built-in microwave and wine cooler underneath. The top is large enough for chopping and assembling ingredients. Small wheels make it easy to reposition or tuck away. During parties, it transforms into a mini bar or serving station. Its modern, sleek design complements any decor style, from industrial to farmhouse.
Choose carts with different configurations—some with drawers, open shelving, or wine racks. Opt for finishes that match your kitchen, like matte black, stainless steel, or natural wood. Decorate with colorful bowls, a chic tray for utensils, or a small herb planter nearby. In larger kitchens, combine multiple carts for maximum flexibility.
Select a sturdy, easy-clean cart that fits your space and needs. Install built-in appliances securely, ensuring proper ventilation and electrical connections. Use the storage drawers and shelves for utensils, cookware, or ingredients. Keep wheels locked when stationary, and regularly clean the surfaces. Position the cart near your main workspace for maximum efficiency.
Add decorative elements like a patterned cloth cover or a tray on top for serving. Use color-coordinated containers or utensils to keep it organized and stylish. Swap out accessories seasonally or for special occasions. You could also add hooks or magnetic strips for knives and tools, turning it into a mini-command center.
A kitchen cart with built-in appliances makes your space more versatile and fun. It helps you stay organized and prepares you for spontaneous gatherings. Once you see how much easier it is to move food prep and serving out of the way, you’ll wonder why you didn’t get one sooner. It’s a simple upgrade with big benefits.
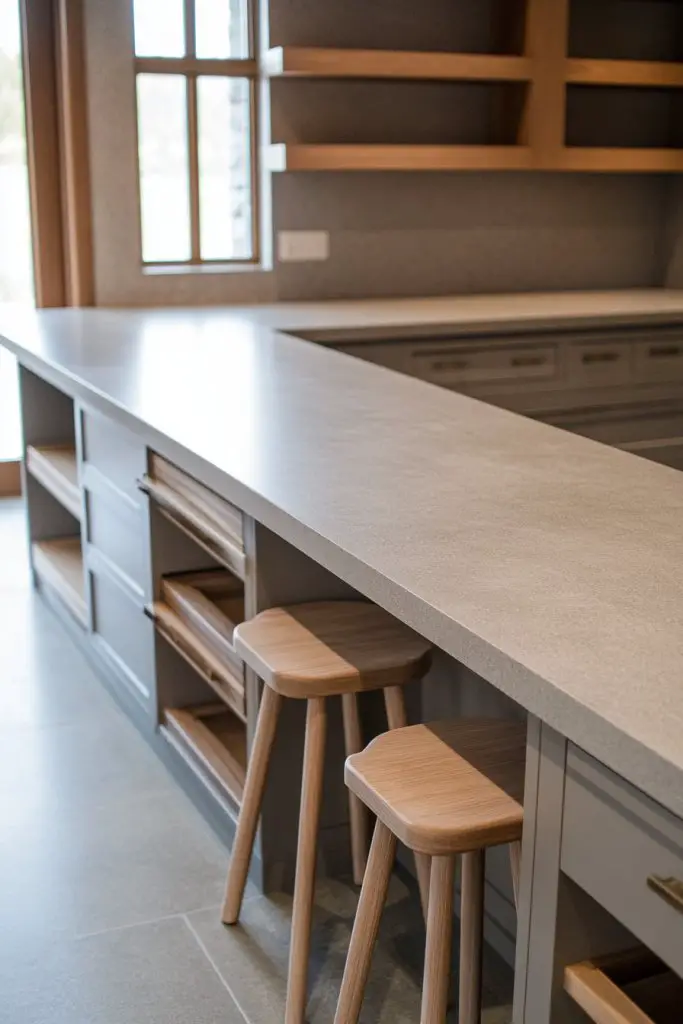
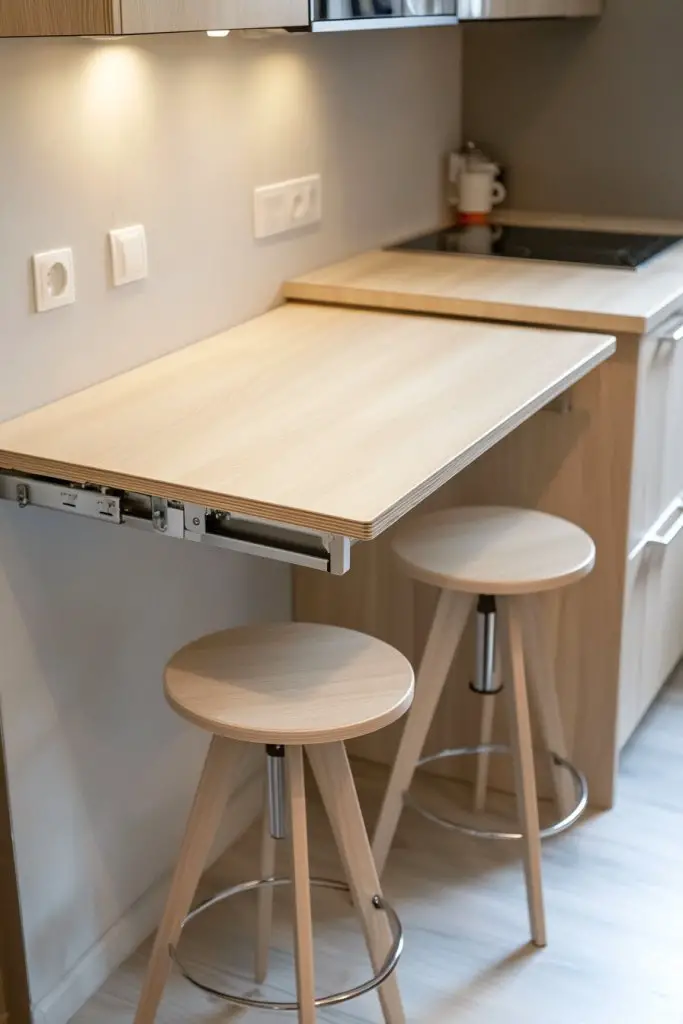
10. Implement a Drop-Down Counter or Pull-Out Surface for Extra Workspace
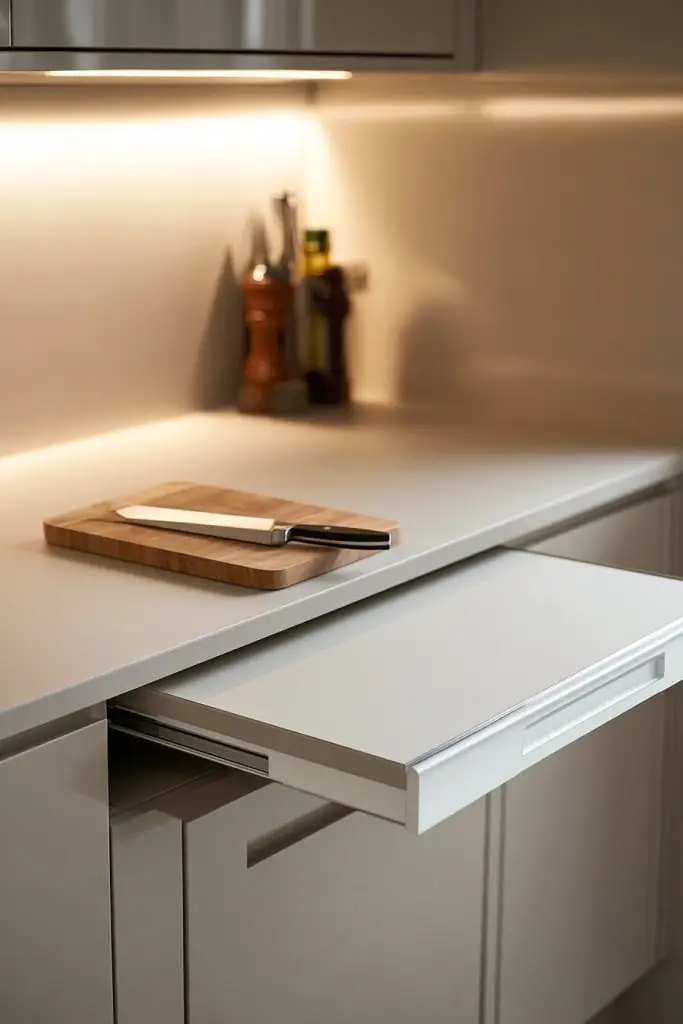
Running out of counter space when cooking? A drop-down or pull-out surface provides instant extra workspace without permanently taking up room. It’s a genius solution for small kitchens or multi-use spaces, giving you more prep area on demand. No more juggling ingredients on a tiny countertop.
Imagine a sleek cabinet with a hidden pull-out or fold-down countertop. When needed, you release a latch, and a sturdy surface unfolds or slides out, revealing extra room for chopping, mixing, or plating. When finished, it folds away neatly, leaving your kitchen uncluttered. Its minimalist design blends seamlessly into your cabinetry, maintaining a clean look.
Choose different materials for the surface—wood, laminate, or quartz—for durability and style. Incorporate a fold-down table with decorative trim or paint that matches your cabinets. For added flair, install a small backsplash or decorative hardware around the mechanism. Use this space for quick prep or as an overflow station during parties.
Start by selecting a cabinet or wall space suitable for a pull-out or fold-down surface. Install sturdy hinges or slides rated for the surface weight. Make sure to reinforce the cabinet structure if necessary. When deploying, ensure the surface is level and secure. Use quick-release latches or magnetic catches to keep it in place when folded up.
Decorate the edges with decorative molding or paint for a personalized touch. Add non-slip pads or liners to prevent items from sliding during use. Keep it clean and clutter-free by storing frequently used tools nearby. You can even add a small fold-down shelf or hooks for utensils or towels.
A fold-down or pull-out surface adds instant functionality and keeps your kitchen looking sleek. It’s a practical upgrade that makes cooking more efficient and enjoyable. Once you experience the extra space, you’ll wonder how you ever managed without it. It’s a small tweak with a major impact.
11. Create a Wall of Cabinets with Vertical Storage Solutions
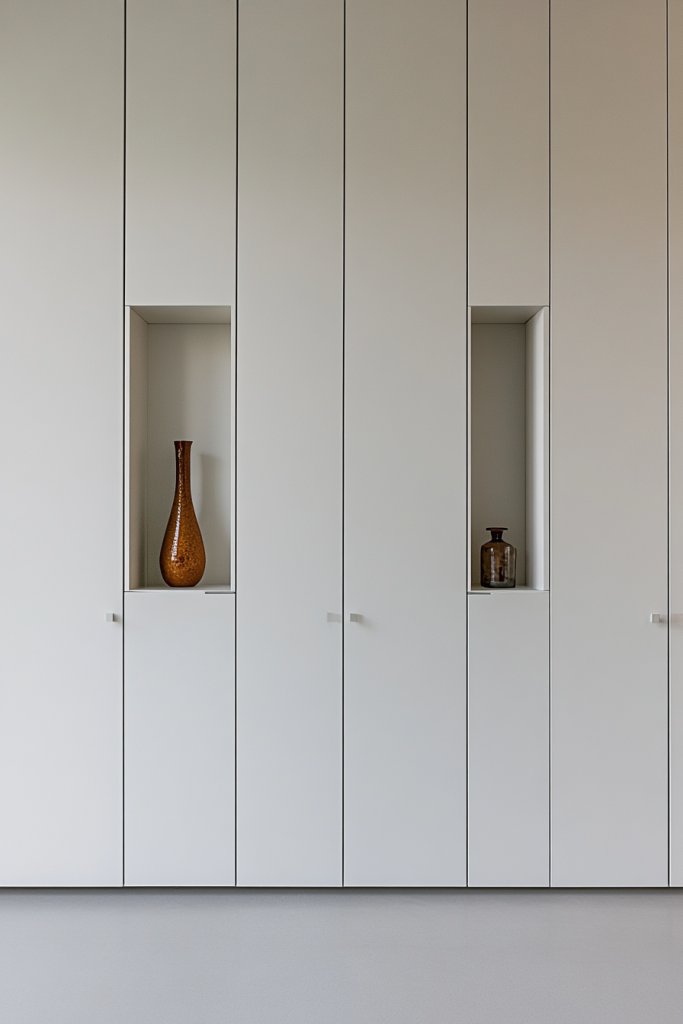
Cluttered countertops and limited storage can make any kitchen feel cramped. Building a wall of tall cabinets creates abundant vertical storage, keeping your essentials organized and out of sight. It’s a smart way to free up counter space and give your kitchen a sleek, streamlined look. Plus, it maximizes every inch of available wall height.
Visualize a wall lined with floor-to-ceiling cabinets, finished in a high-gloss or matte paint that complements your decor. The cabinets feature a mix of closed doors and open shelving for display. The tall units hide away appliances, bulk pantry items, and cleaning supplies. The vertical lines draw the eye upward, making the room appear taller and more spacious.
Select cabinet doors with modern hardware or minimal handles for a clean look. Incorporate glass-front doors on upper cabinets to display beautiful dishware or glassware. For a personalized touch, paint the interior a contrasting color or add decorative wallpaper behind open shelves. Use this design in large kitchens or open-plan spaces for a dramatic impact.
Start by measuring your wall space and selecting cabinet styles that suit your aesthetic. Install sturdy mounting hardware to support the weight of tall cabinets. Use a level and spacers for precise alignment. Organize the interior with adjustable shelves, baskets, or pull-out trays for maximum efficiency. Seal or paint the cabinets to match your overall decor.
Decorate the interior with colorful or patterned liners, or add lighting inside the cabinets for visibility. Incorporate a mix of closed and open storage to display curated collections or decorative items. Use decorative hardware or paint accents to elevate the look. Regularly reorganize to keep everything accessible and attractive.
A wall of cabinets transforms your kitchen into a stylish, highly functional space. It offers ample storage while maintaining a clean aesthetic. Once you’re organized, cooking and cleaning become more streamlined and enjoyable. It’s a visual upgrade that boosts your confidence and inspires better kitchen habits.
12. Utilize a Portable Island Alternative: A Trolley or Bar Cart
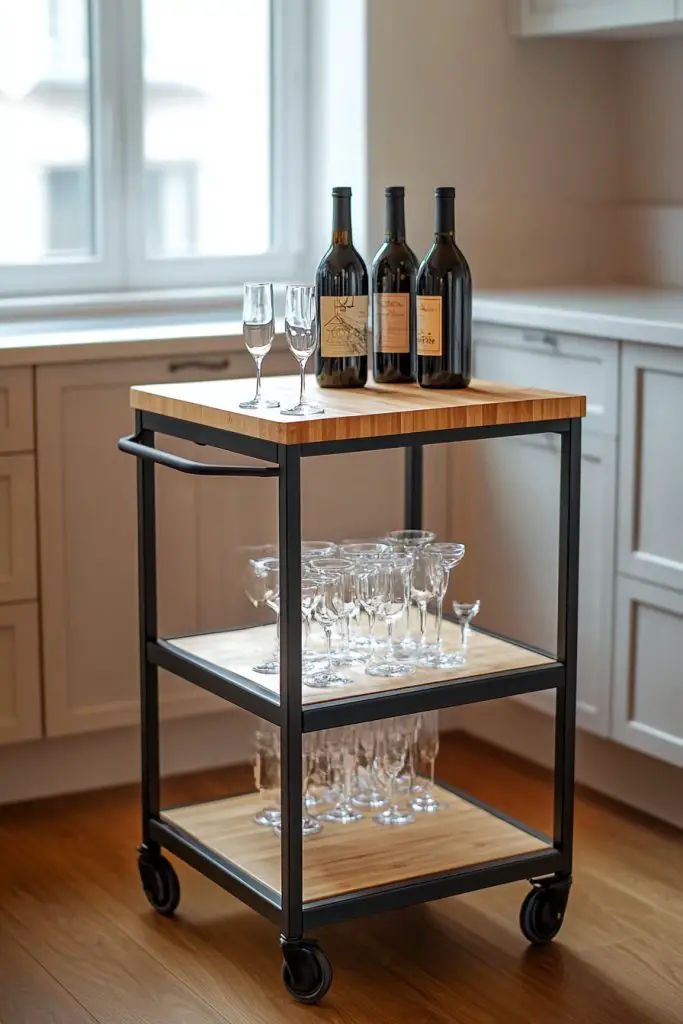
Longing for the versatility of an island but don’t have the space? A trolley or bar cart offers a lightweight, movable alternative that adds counter and storage space when needed. It’s perfect for small kitchens, open floors plans, or even outdoor setups. Plus, it’s easy to store away when not in use, making your space more adaptable.
Imagine a sleek trolley with a butcher block top, stocked with utensils, bowls, and a small wine cooler underneath. It rolls smoothly on casters, allowing you to reposition it as needed. During dinner parties, it becomes a serving station, holding drinks and snacks. When not in use, you tuck it into a corner or behind a door, keeping your space open and uncluttered. Its design complements various styles, from rustic to modern.
Choose a trolley with multiple shelves, drawers, or hooks for maximum flexibility. Decorate the top with a colorful cloth, or add a tray for serving. For outdoor spaces, select weather-resistant materials like metal or sealed wood. Use it as a coffee station, dessert cart, or even a plant display if you want to get creative.
Start by selecting a sturdy, lightweight model suitable for your needs. Assemble following the manufacturer instructions, ensuring all wheels are securely attached. Organize utensils, small appliances, or beverages on the shelves or in drawers. Position it conveniently near your main cooking or entertaining area. Regular cleaning and organization keep it looking fresh and functional.
Decorate with themed accessories, colorful containers, or decorative handles. Use removable liners or baskets inside for easy organization. Customize with stickers, paint, or hardware to match your decor style. Add a small chalkboard or label holder for fun and functional notes or shopping lists.
A portable cart boosts your kitchen’s versatility and makes entertaining effortless. It’s a flexible piece that adapts to your lifestyle, whether for everyday use or special occasions. Once you see how much easier meal prep, serving, and cleanup become, you’ll wonder how you managed before. It’s a simple upgrade with big benefits.
13. Design a Galley Kitchen with Parallel Work Zones
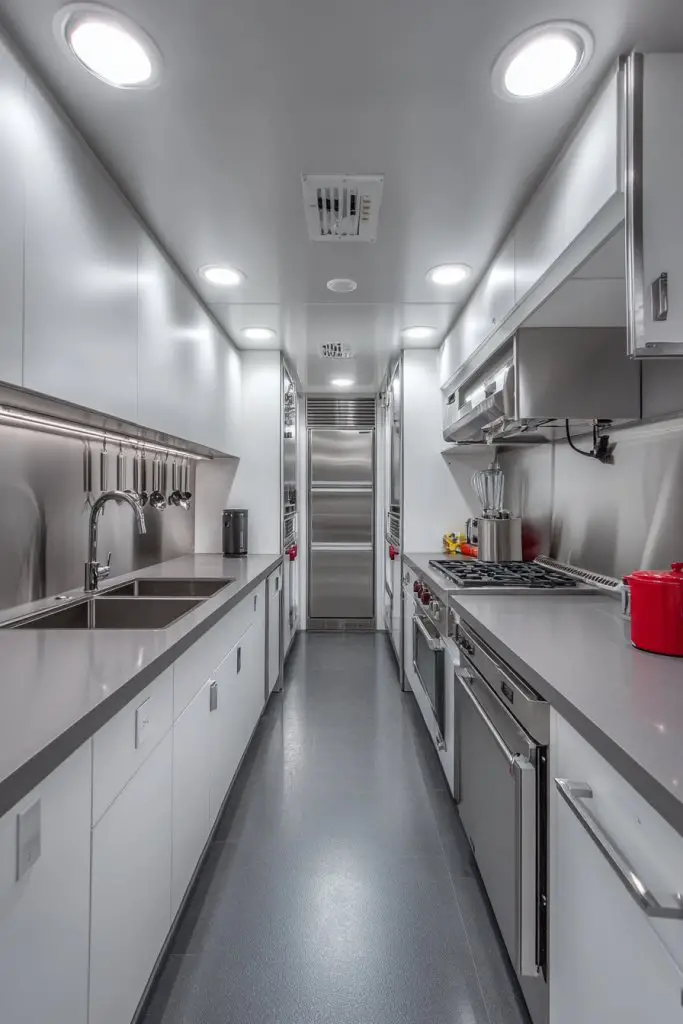
Feeling like your kitchen is a maze? A galley layout creates an efficient, streamlined workspace by organizing appliances and storage along two parallel walls. It reduces unnecessary steps, making cooking and cleaning quicker. Ideal for narrow spaces, it transforms your kitchen into a functional corridor that feels open and organized.
Imagine two parallel rows of cabinetry, with a wide walkway in between. The stove and sink are aligned on opposite walls, with ample countertop space for chopping and prep. Overhead, sleek cabinets hide away essentials, while open shelves provide easy access to frequently used items. Under-cabinet lighting brightens the entire corridor, making it feel spacious and inviting. This setup is all about efficiency and flow.
Opt for modern, handle-less cabinets or mix open shelving with closed storage for a personalized look. Use contrasting colors or finishes to add visual interest. Incorporate a small breakfast nook or fold-away table at one end for casual dining. For larger spaces, extend the galley into a double-sided layout or add a small island for extra workspace.
Begin by measuring your space carefully and planning the placement of major appliances. Use slim, high-quality cabinets with smart storage solutions like pull-out trays and corner units. Install task lighting underneath cabinets for better visibility. Keep frequently used tools within easy reach, and consider adding a fold-down table or wall-mounted rack for extra convenience. Professional installation ensures everything fits and functions smoothly.
Decorate with a colorful backsplash or patterned tiles to add personality. Use stylish hardware and accessories that match your overall decor theme. Incorporate small organizational tools—like spice racks or utensil holders—to keep the workspace tidy. Add a personal touch with framed recipe cards or decorative jars on open shelves.
A galley kitchen maximizes efficiency and minimizes clutter, making everyday cooking a breeze. It’s a timeless layout that adapts well to various styles and sizes. Once you experience how smoothly everything works, your confidence in tackling meals and hosting will soar. It’s a practical, stylish solution that elevates your entire cooking experience.
14. Incorporate a Hidden Work Surface with a Drop-Leaf Table
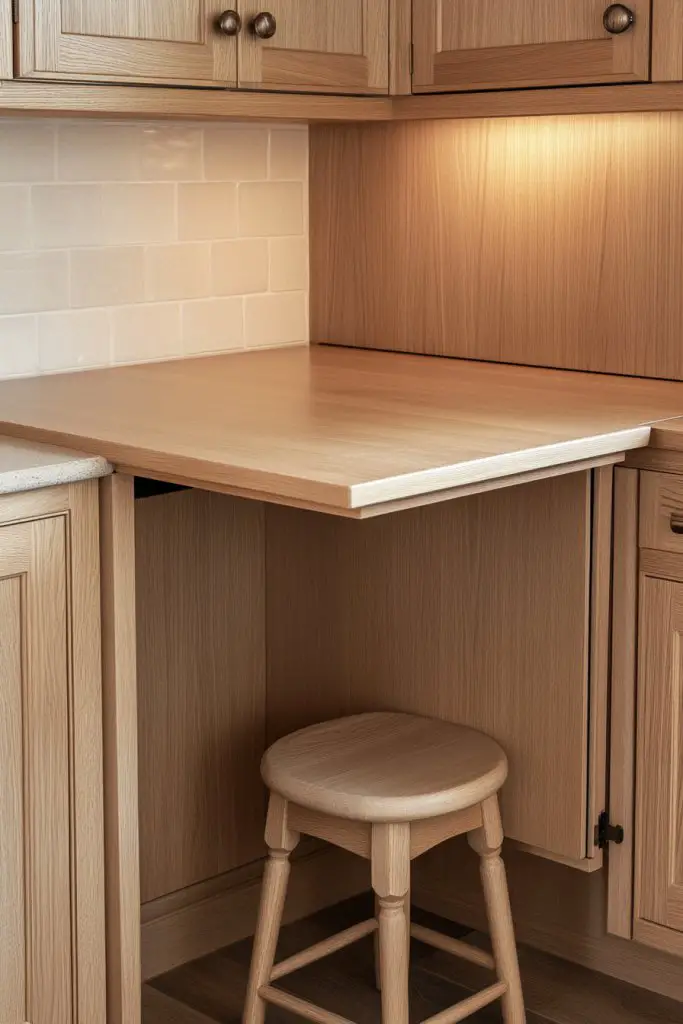
Limited space making it hard to have a dedicated prep or dining area? A hidden work surface with a drop-leaf table offers a clever way to increase functionality without sacrificing space. It’s perfect for compact kitchens or multi-purpose rooms where every square inch matters. Now, you can prep or dine without clutter taking over.
Imagine a sleek cabinet with a fold-down leaf that doubles as a small table. When folded up, it blends seamlessly with the cabinetry, maintaining a clean, streamlined look. When lowered, it reveals a sturdy surface ideal for chopping ingredients or serving snacks. The edges are finished with decorative molding or paint that matches your decor, making it a subtle yet practical feature.
Choose a finish that complements your cabinetry—think painted, stained, or laminated surfaces. Incorporate decorative hardware or trim for added character. Use a fold-down surface as a breakfast bar with stylish stools that tuck underneath. For larger kitchens, extend the leaf for more seating or workspace, matching the material for a cohesive look.
Start by selecting a cabinet or wall space suitable for a fold-down surface. Reinforce the structure with sturdy hinges and supports rated for the weight. Install a latch or magnetic catch to keep the surface securely in place when folded up. When in use, make sure the area underneath is cleared for chairs or stools, and add a non-slip mat if necessary. Regularly check hinges and supports for wear.
Decorate the edges with decorative molding or paint accents. Use colorful or patterned liners to brighten the surface. Personalize the space with small accessories like a decorative tray or a set of stylish utensils stored nearby. Incorporate a small corkboard or chalkboard on the cabinet door for notes or recipes.
A hidden fold-down surface adds instant versatility to your kitchen while maintaining a sleek appearance. It’s a smart, space-saving solution that can double as a breakfast spot or extra prep area. Once you see how it simplifies your cooking routines, you’ll wonder how you managed without it. It’s a small upgrade with a big payoff.
15. Use a Multi-Level Counter Design for Visual Interest and Functionality
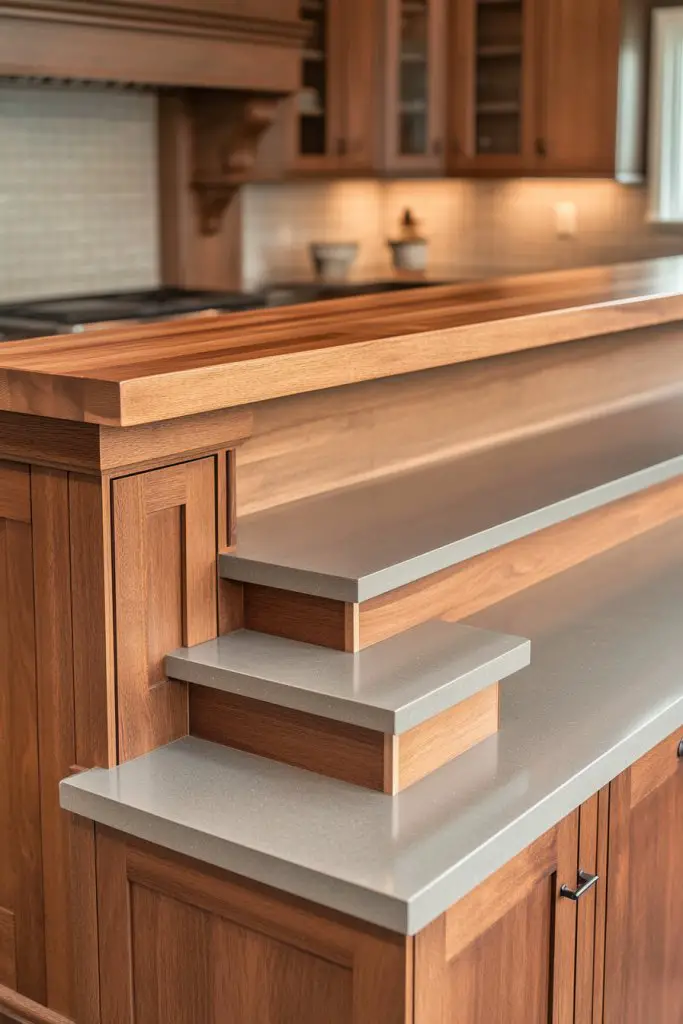
Feeling like your kitchen lacks visual and functional variety? A multi-level counter design adds depth and interest while creating distinct zones for prep, cooking, and dining. It breaks up the monotony of flat surfaces and helps organize tasks more efficiently. Plus, it injects style into your space with varying textures and heights.
Picture countertops with different heights—perhaps a lower section for prep and a raised bar for casual dining. Use materials like wood, stone, or concrete to define each level, adding texture and warmth. The contrasting heights create visual interest and make the space feel layered and dynamic. Incorporate bar stools or seating to make the higher section functional for quick meals.
Choose a high level for a breakfast bar or workspace, and keep the lower level for prep or appliance placement. Use different finishes or colors on each level to emphasize the separation. Incorporate decorative elements like textured wallpaper or backsplash tiles to enhance the visual appeal. Adapt the height differences to suit your needs, from a few inches to a full countertop height.
Begin by planning the counter heights based on ergonomics and intended use. Use sturdy framing and support brackets for the elevated sections. Select durable surfaces that withstand spills and heat. Install the different levels smoothly, ensuring seamless transitions. Add bar stools or seating for the raised area, and keep the lower section organized with storage or prep tools.
Decorate each level with coordinated textiles, colorful trims, or decorative edge banding. Use lighting to highlight different heights or zones—think under-cabinet LEDs or pendant fixtures. Incorporate functional elements like built-in cutting boards or utensil holders on the lower level. Personal touches like themed decor or textured finishes make it uniquely yours.
Multi-level counters create a visually engaging and practical kitchen environment. They help organize different tasks while adding a designer touch. Once you see your space transformed into a layered, functional masterpiece, your confidence in your design choices will soar. It’s a smart way to combine style with everyday practicality.
16. Add a Built-In Dish Drying Area with a Fold-Down Countertop
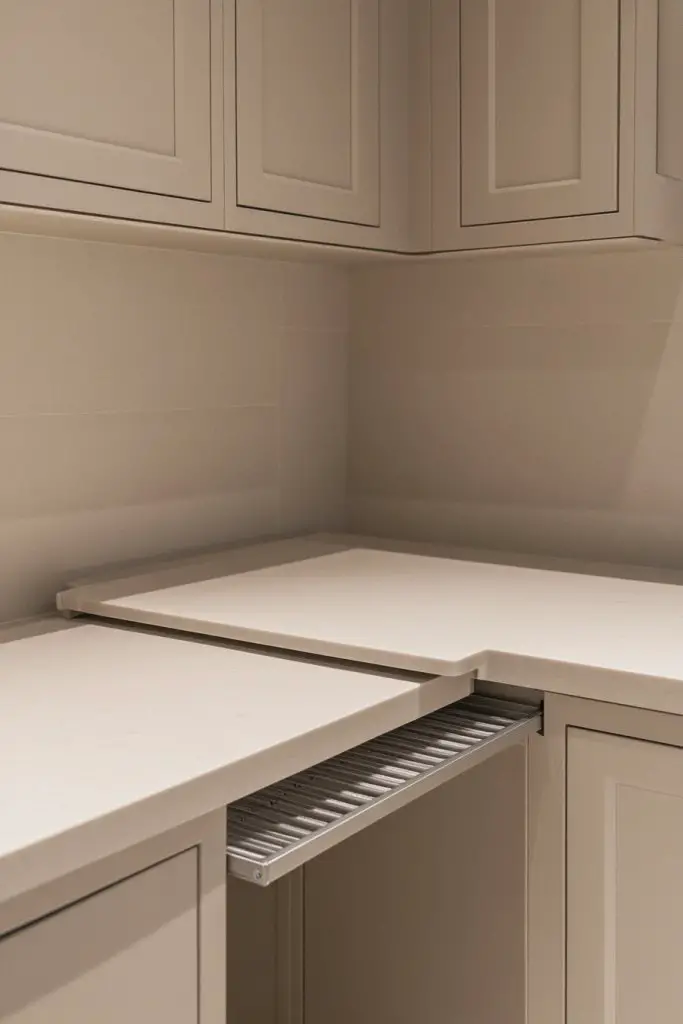
Cluttering your counters with drying dishes? A built-in drying area with a fold-down countertop offers a tidy, efficient solution. It keeps your dishware organized and accessible while maintaining a sleek look. Perfect for small kitchens or when you want a dedicated space for clean dishes that doesn’t take up permanent space.
Imagine a cabinet with a fold-down surface that reveals a drainage tray or drying mat once lowered. The surrounding cabinetry is finished to match your kitchen’s style, and the area is well lit for convenience. When not in use, the rack folds away neatly, leaving your counters clear. It’s a subtle but functional feature that blends seamlessly into your design.
Choose materials like stainless steel, wood, or composite for the fold-down surface, depending on your aesthetic. Incorporate a small backsplash or splash guard above the drying area to protect cabinetry. Use decorative handles or trims that match your hardware. Adapt this idea for a compact or large kitchen, adding multiple drying zones if needed.
Start by selecting a cabinet space near your sink. Reinforce the interior with waterproof or sealed materials. Install sturdy hinges and supports rated for the weight of the countertop. Include a drainage tray or rack that catches water and directs it into the sink or a small drain pipe. Regularly clean and dry the area to prevent mold or water damage.
Decorate with matching or contrasting cabinetry hardware. Use labeled containers or hooks for utensils, sponges, or cleaning supplies nearby. Consider adding a small, decorative light fixture or LED strip for better visibility. Personalize with a color scheme or textured finishes that suit your overall kitchen decor.
A built-in dish drying area keeps your kitchen organized and efficient. It’s a simple upgrade that makes daily chores easier and more pleasant. Seeing your dishes dry quickly and neatly stored boosts your confidence in your kitchen management skills. It’s a practical, stylish addition that pays off in convenience.
17. Install a Compact Breakfast Bar Along a Wall or Peninsula
Craving a quick, casual dining spot without sacrificing valuable space? A compact breakfast bar along a wall or extendable peninsula provides a cozy, functional spot for meals or coffee chats. It’s a space-efficient way to add seating and style to your kitchen, perfect for busy mornings or informal gatherings.
Imagine a slim, sturdy ledge with a durable surface, lined with a few stylish bar stools. The bar is positioned along a wall or extends from your existing counter, creating an inviting nook. The area is accented with pendant lighting or a decorative backsplash, making it a focal point. It’s a perfect blend of practicality and style, encouraging conversation over quick bites.
Use materials like wood, quartz, or laminate that match or contrast with your main countertops. Decorate with cushions or colorful stools to add personality. Incorporate open shelving or decorative tiles behind the bar for visual interest. For smaller spaces, opt for a narrow ledge that fits seamlessly into the existing layout.
Measure available space carefully to ensure comfortable seating and movement. Install a sturdy, water-resistant surface with secure brackets or supports. Select stylish, comfortable stools that tuck away when not in use. Add lighting fixtures above for ambiance and task illumination. Keep essential items within arm’s reach for convenience.
Decorate with themed cushions, colorful placemats, or decorative lighting. Use a variety of stool styles or colors for a playful look. Personalize the space with a small menu board or decorative hooks for utensils or towels nearby. Regularly update accessories to match seasons or moods.
A compact breakfast bar elevates your kitchen from functional to inviting. It’s a simple addition that makes everyday meals and quick chats more enjoyable. Once you see how much easier it is to eat and entertain in a small space, your confidence in your design skills will grow. It’s a small change with big social benefits.
18. Opt for a Minimalist, Open-Plan Layout with Defined Zones
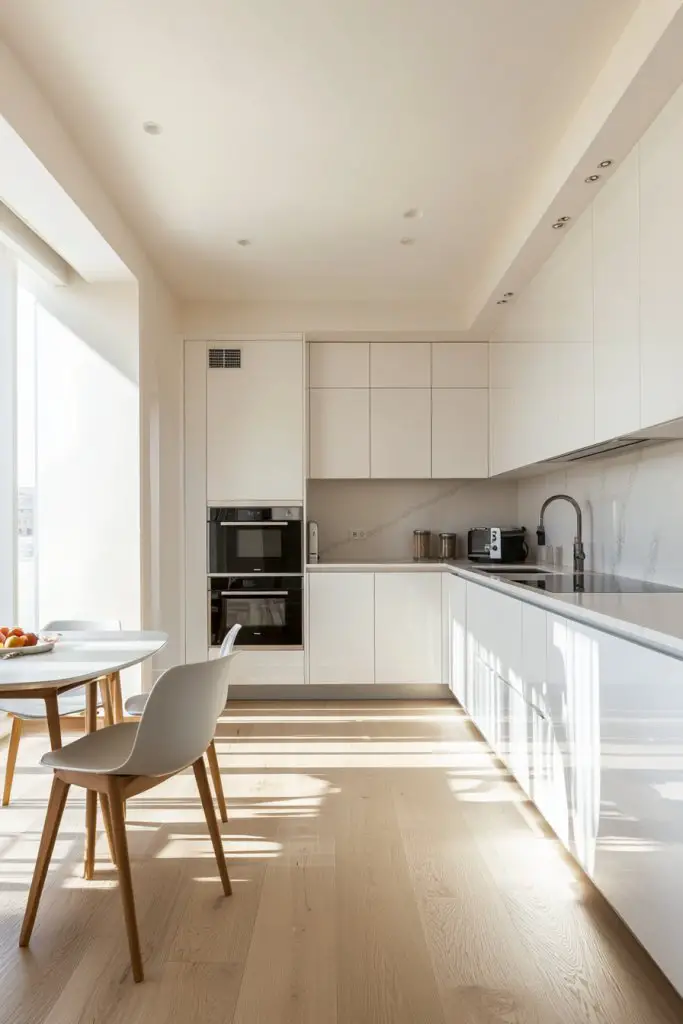
Feeling overwhelmed by cluttered, cramped kitchens? An open-plan minimalist layout clarifies your space by defining zones for cooking, prep, and dining, all while maintaining an airy feel. It’s perfect for entertaining and makes everyday routines more enjoyable. The key is to keep it simple, functional, and clutter-free.
Visualize a spacious kitchen with unobstructed sightlines, sleek cabinetry, and integrated appliances. Clear, open countertops with minimal decor create a clean look. Use subtle variations in flooring or lighting to delineate zones—like a different tile pattern or pendant lights hanging over the prep area. This design emphasizes openness and ease of movement, making the entire space feel larger.
Choose a neutral color palette with natural textures like wood or stone. Incorporate hidden or integrated storage solutions to reduce visual clutter. Use slim, handleless cabinets and appliances that blend into the cabinetry for a seamless look. Add a statement light fixture or a textured wall for focal interest, keeping the overall aesthetic minimal.
Start by removing unnecessary upper cabinets or bulky furniture. Choose sleek, handleless cabinetry with push-to-open mechanisms for a clean look. Use concealed storage to hide away clutter. Install lighting that highlights each zone without overpowering the space. Keep essential tools and appliances in designated areas to maintain the minimalist aesthetic.
Add subtle decorative touches like textured rugs or cushions in seating areas. Use open shelving sparingly for decorative objects or everyday essentials. Incorporate natural elements like a small indoor herb garden or a bowl of seasonal fruit. These small personal touches keep the space feeling inviting without disrupting the minimalist vibe.
An open-plan, minimalist kitchen offers a calm, organized environment that boosts your daily efficiency. It’s a design that ages well and adapts to changing needs. Once you embrace simplicity, you’ll enjoy a more peaceful, functional space that encourages better habits and confidence in your home’s style. Less truly is more.
19. Use Under-Cabinet Lighting and Glossy Finishes to Enhance Small Spaces
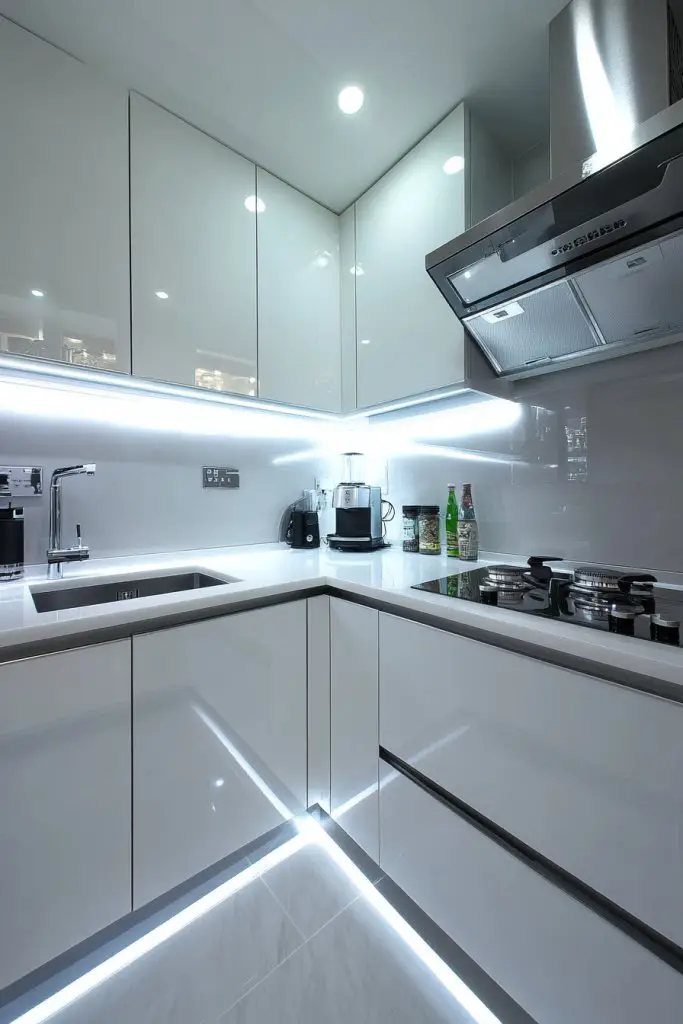
Small kitchens often feel dark and cramped, making it hard to see what you’re doing. Under-cabinet lighting brightens up the workspace, while glossy finishes reflect light to make the room appear larger. Together, these elements transform your kitchen into a bright, airy haven that feels more spacious and inviting.
Picture sleek LED strips installed beneath upper cabinets, casting a warm, even glow across countertops. Glossy backsplash tiles or polished surfaces bounce light around the room, amplifying the effect. The reflective surfaces and strategic lighting eliminate shadows, creating a sense of depth. The overall feel is contemporary and clean, with a bright, welcoming atmosphere.
Choose from various lighting options—warm or cool tones, dimmable LEDs, or color-changing strips—to suit your mood. Pair glossy cabinets with high-gloss tiles or acrylic panels for maximum reflectivity. For a softer look, incorporate textured or matte finishes with strategic lighting accents. Match the hardware and fixtures to enhance the overall style.
Install under-cabinet lighting using low-voltage LED strips or puck lights, ensuring proper wiring and placement. Use reflective surfaces on backsplashes or cabinetry to bounce light and increase brightness. Keep electrical connections hidden for a clean, uncluttered look. Regularly clean surfaces to maintain their reflective quality and prevent dust buildup on lights.
Add dimmer switches to control light intensity, creating different moods for cooking or relaxing. Incorporate decorative light fixtures or accent lighting for visual interest. Use colorful or patterned backsplashes behind glossy surfaces for a customized touch. Keep the space organized to maximize the light’s effect and overall brightness.
Bright, reflective kitchens feel larger and more welcoming, boosting your joy in cooking and entertaining. Proper lighting and finishes are simple upgrades that make a big difference in small spaces. Once you see how much more spacious and vibrant your kitchen becomes, you’ll gain confidence in your design choices. Brighten your space, brighten your day!
20. Incorporate a Wall-Integrated Coffee Station or Beverage Area
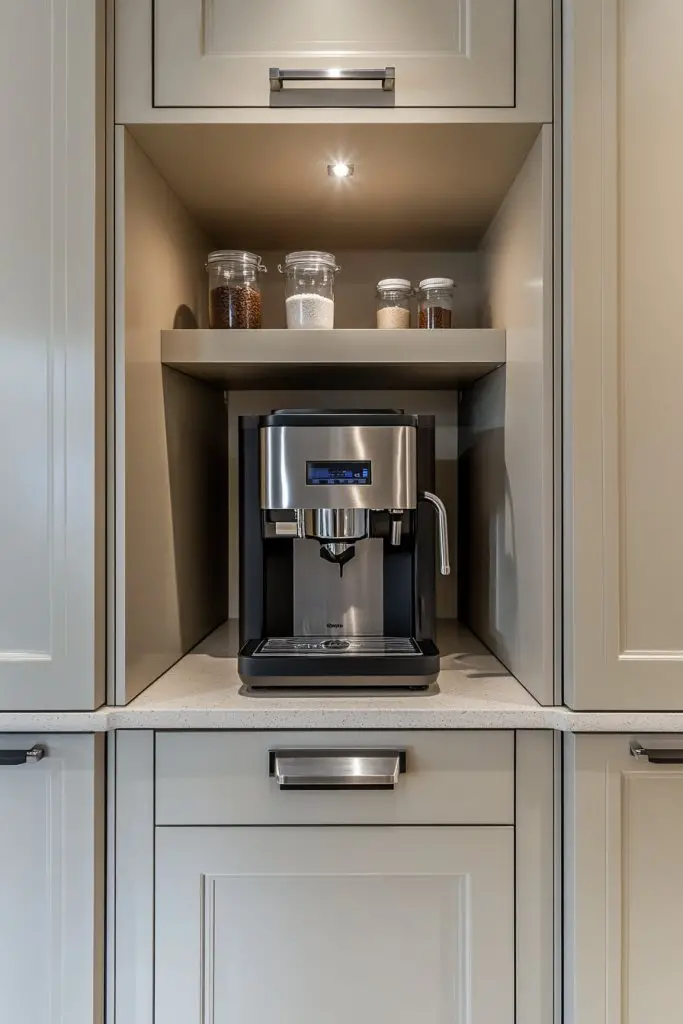
Love starting your day with coffee or need a dedicated area for drinks? A wall-integrated beverage station keeps everything in one place and saves countertop space. It’s perfect for coffee lovers, entertaining guests, or keeping your kitchen tidy. Plus, it adds a touch of sophistication and practicality.
Imagine a sleek wall-mounted shelf with built-in compartments for a coffee machine, mugs, and supplies. A small countertop or pull-out tray provides space for prep or serving. Behind the scene, decorative tiles or a textured wall add visual interest. The setup is clean, organized, and stylish, creating a functional focal point in your kitchen.
Choose minimalist or decorative shelving depending on your aesthetic. Incorporate hidden compartments for storage or add hooks for mugs or utensils. Use a mix of open shelves and closed cabinets for a balanced look. For a seasonal touch, swap accessories or change the backsplash for a fresh vibe. Adapt it for outdoor spaces or small kitchens with compact setups.
Start by selecting a wall near your sink or main prep area. Install sturdy shelving or cabinetry that can support small appliances. Use adjustable brackets or modular components for flexibility. Organize items by frequency of use, placing daily essentials at eye level. Add electrical outlets if needed for machines, and keep cords hidden for a tidy appearance.
Decorate with stylish jars, labeled containers, or decorative cups that match your decor. Use colorful or patterned tiles behind the station for visual pop. Incorporate small LED lights or under-shelf lighting for ambiance. Personalize with accessories like a vintage coffee grinder or a decorative tray to enhance the space.
A dedicated beverage area elevates your kitchen’s style and functionality. It simplifies your morning routine and impresses guests. Once you see how organized and attractive it is, you’ll be motivated to incorporate similar setups in other areas of your home. It’s a small feature with a big impact on daily enjoyment.
21. Create a Functional Entryway with Storage Bench and Hooks
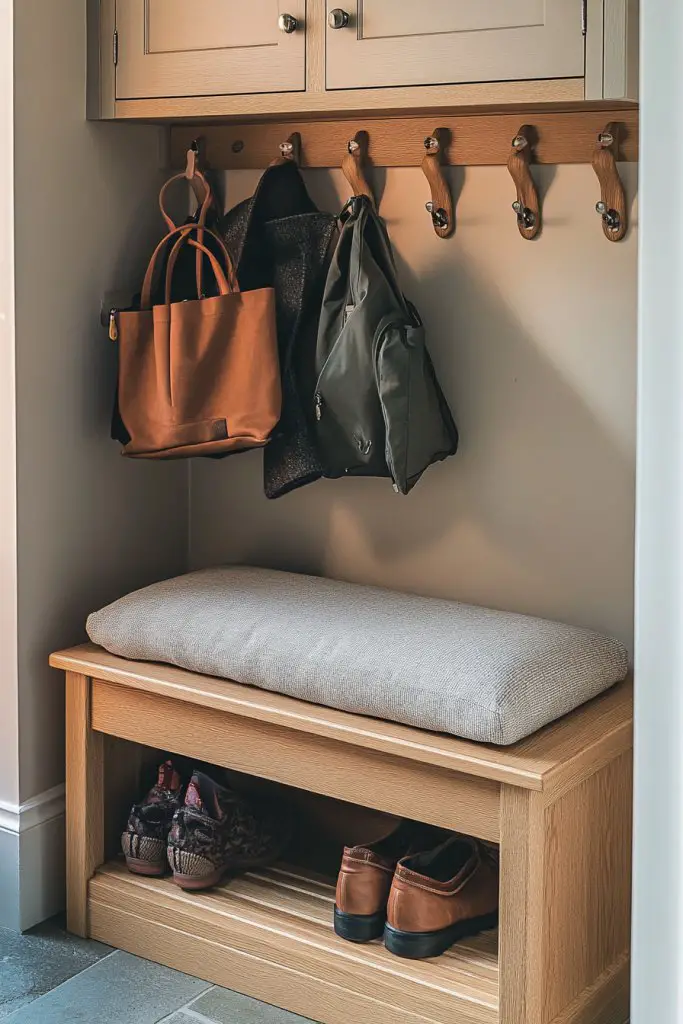
Cluttered entryways can make your entire home feel chaotic. A combination of a storage bench and hooks creates a practical landing zone for coats, bags, and shoes. It keeps your kitchen and living areas tidy and ready for guests. Plus, it adds a welcoming touch and makes daily routines smoother.
Visualize a sleek, wooden storage bench against the wall, topped with a cushioned seat for comfort. Above, a row of hooks holds jackets, hats, and bags. Beneath, cubbies or baskets organize shoes and accessories. The space is decorated with a mirror or artwork, making it both functional and attractive. It’s the perfect blend of style and utility, turning an often neglected space into a feature.
Choose a bench with built-in compartments or cubbies for extra storage. Decorate with cushions or throws that match your decor theme. Incorporate a shoe rack or small coat closet nearby for additional organization. Adapt the size and style to your space—compact for small foyers or grander for larger entryways. Seasonal accents like wreaths or decorative pillows add a personal touch.
Start by measuring your entryway to select a suitable bench. Secure the hooks at a height that’s easy to reach for all family members. Use sturdy hardware to support coats and bags. Organize shoes and accessories in baskets or bins underneath. Add a mirror or decorative panel to enhance the visual appeal. Regularly declutter to keep the area functional.
Decorate with themed cushions or seasonal decor to keep the space fresh. Use labeled storage bins or baskets to organize smaller items. Incorporate a small tray or bowl for keys or sunglasses. Add decorative elements like a small plant or artwork to make the area inviting. Personal touches make it a space you enjoy every day.
A well-organized entryway sets a positive tone for your entire home. It makes daily routines easier and helps keep clutter out of your kitchen and living spaces. Once you see how smoothly everything flows, your confidence in your organizational skills will grow. Transforming this small space can make a big difference in your home’s overall feel and function.
Conclusion
Exploring these diverse kitchen ideas without an island showcases how you can achieve a beautiful, efficient, and welcoming space without sacrificing style. From open shelving to clever storage solutions, there’s a design approach for every home. Give these ideas a try and transform your kitchen into a functional haven that reflects your personality and needs. Your perfect kitchen is just an inspired idea away!