Imagine stepping into a kitchen where everything has its place and chaos is a thing of the past—that’s the magic of a well-organized space! Kitchen organization ideas are incredibly popular because they not only make cooking and cleaning more efficient but also turn your kitchen into a beautiful, inviting environment.
In this article, you’ll discover a variety of clever and practical ideas to transform your kitchen into a functional haven. From space-saving solutions to stylish storage tricks, these tips cater to every need and style, helping you create a more organized and enjoyable cooking experience.
1. Utilize Clear Stackable Storage Containers for Pantry Items
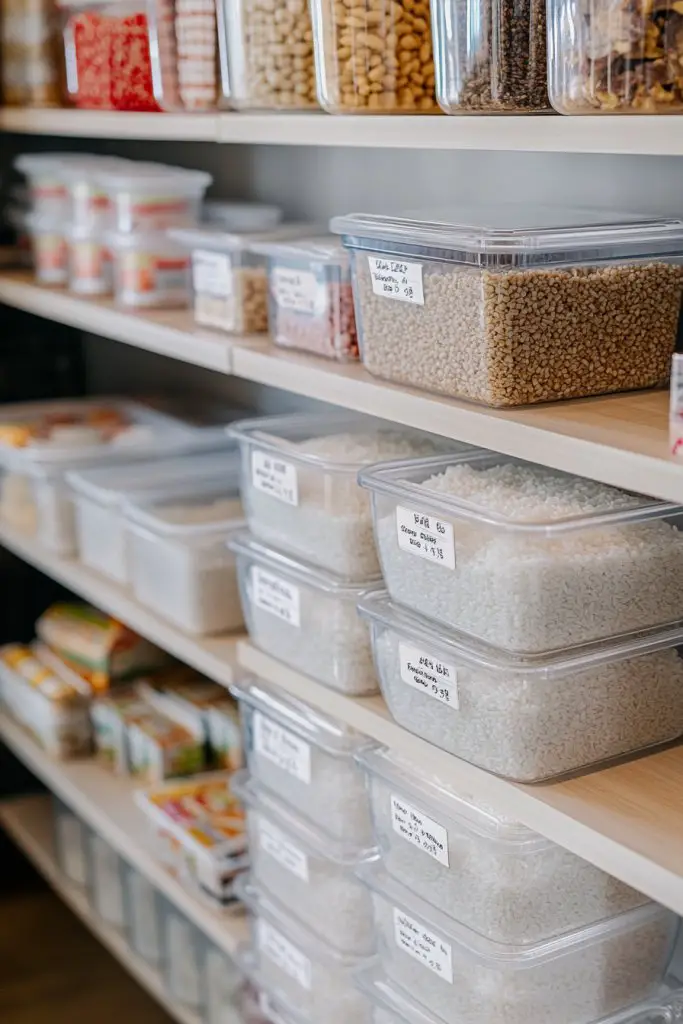
Ever struggled to find that bag of rice or box of cereal amidst a chaotic pantry? It feels like an obstacle course just to grab a snack. Cluttered shelves make it hard to see what you have, leading to waste and frustration. The fix? Clear, stackable containers that keep everything visible and accessible.
Imagine uniform glass jars with airtight seals lined up neatly on a shelf, their contents vividly visible. The labels facing outward make it easy to spot your favorite snacks or grains at a glance. The transparent surfaces reflect natural light, creating an inviting, organized look. Stacked high, these containers maximize vertical space while adding a clean, modern aesthetic.
Choose different sizes to suit your pantry’s needs, from small spice jars to large flour containers. For a rustic vibe, opt for wooden lids or silicone seals, while sleek plastic or glass models suit contemporary kitchens. Seasonal changes—like holiday baking supplies—can be stored in color-coded containers for easy access. You can also stack containers in a modular fashion to fit odd-shaped spaces.
Start by clearing your pantry and sorting items into categories. Purchase uniform containers with airtight lids, preferably BPA-free and dishwasher-safe. Label each container with a clear, durable label or use a label maker for consistency. Arrange the containers by frequency of use or size, stacking them efficiently. Keep heavier items at the bottom and lighter ones on top for stability. Regularly check seals and replace worn-out containers.
Add decorative touches like chalkboard labels for easy updates or color-coded lids for quick identification. Incorporate small risers or tiered trays inside larger containers for extra organization. Use different textures—like matte or glossy finishes—to match your kitchen decor. Personalize with themed labels for special occasions or dietary preferences, making your pantry both functional and fun.
With clear stackable containers, your pantry transforms into a sleek storage haven. No more digging through clutter—just grab and go! This simple upgrade boosts your kitchen’s efficiency and adds a touch of modern style. Ready to impress guests or just make your daily routine smoother? Start stacking and see the magic happen.
2. Install Pull-Out Drawers in Lower Cabinets for Easy Access
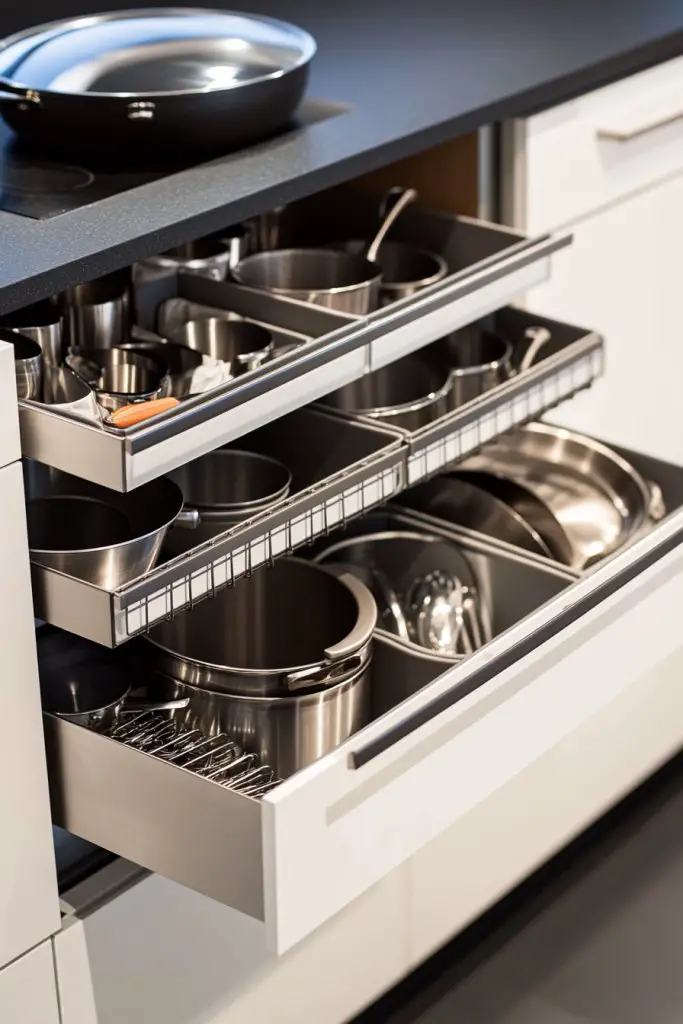
Bending down, rummaging behind stacks of pots and pans, only to find what you need at the bottom—sound familiar? Traditional cabinets turn into black holes that waste your time and patience. Installing pull-out drawers can turn these dark caves into organized, accessible storage spaces.
Picture sliding wooden or metal drawers that smoothly glide out, revealing neatly arranged pots, pans, or small appliances. The drawers are deep enough to hold bulky items and are fitted with dividers for utensils. When opened, you see everything at eye level, eliminating that frustrating crouch-and-search routine. Bright LED lighting inside these drawers makes items pop, even in dim corners.
Choose different finishes—stainless steel, painted wood, or matte black—to match your cabinetry. For small kitchens, narrow drawers maximize space, while wider options suit larger areas. Incorporate soft-close mechanisms for a quiet, gentle glide. Seasonal adjustments might include dedicated drawers for baking supplies or grilling tools. You can also customize drawer heights based on item sizes.
Remove your existing cabinet doors and measure the interior dimensions carefully. Purchase high-quality pull-out drawer kits compatible with your cabinet style—consider a kit with soft-close features. Install the runners securely, ensuring smooth operation. Sort your items into categories and place them into the drawers for easy retrieval. Reinforce the structure if needed, especially in older cabinets. Regular maintenance involves checking for smooth gliding and tightening hardware.
Add labels or color-coded inserts to keep things ultra-organized. Consider customizing drawer liners with patterns or textures that match your decor. For frequently used items, assign specific drawers for quick access. Use small baskets inside drawers for smaller utensils or spice jars. Personal touches like decorative trims or handles can elevate the look.
Transform your kitchen into a model of efficiency with these sliding drawers. No more crawling or digging—just a simple slide and you’re there. It’s a smart upgrade that makes your space feel larger and more functional. Once installed, you’ll wonder how you ever managed without them. Get ready to enjoy cooking with everything at your fingertips.
3. Add Over-the-Door Racks for Spices and Utensils
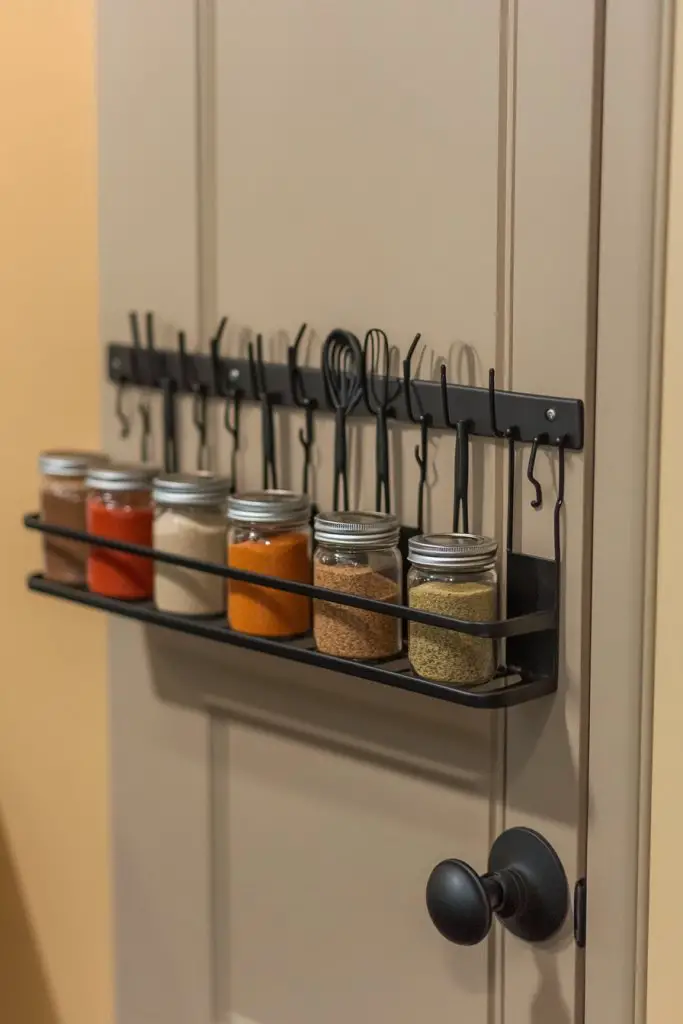
Cluttering countertops and overflowing cabinets make cooking feel chaotic. Ever wish you had more space to keep those frequently used spices or utensils within arm’s reach? Over-the-door racks are a perfect solution to reclaim that lost space and streamline your prep area.
Imagine a sleek metal or durable plastic rack hanging over your cabinet door, filled with glass spice jars or hanging utensils. The hooks hold whisks, spatulas, and ladles, all visible at a glance. The rack adds a layer of organization that balances practicality with a tidy look. Its placement keeps your workspace clear while keeping essentials accessible.
Choose from various styles—stainless steel, painted wood, or minimalist matte finishes—to match your kitchen aesthetic. For smaller spaces, compact racks fit over pantry doors or inside cabinet doors. Seasonal tweaks might involve swapping out spice jars for holiday-themed labels or adding decorative hooks for special utensils. Use color coding to quickly identify spice types or cooking tools.
Select a sturdy over-the-door rack that fits your door dimensions. Clean and dry the surface before installation, then hang the rack securely using hooks or screws if needed. Fill the spice jars with your favorite blends, label them clearly, and arrange them for easy visibility. Hang your most-used utensils on hooks, adjusting their positions for convenience. Regularly check for loose hooks or wear, especially in high-use areas. Keep the rack clean with routine wiping.
Decorate the rack with personalized labels or color schemes that match your kitchen decor. Use decorative jars or sleek containers to elevate the look. Incorporate small baskets for additional storage of loose items like tea bags or measuring spoons. Consider adding a small chalkboard to jot down shopping lists or spice ideas for extra flair.
Over-the-door racks turn wasted space into functional storage, making your kitchen feel more organized instantly. They’re a simple, affordable upgrade that adds convenience and style. Soon, you’ll wonder how you managed without these handy hooks. Get ready to cook more efficiently and impress everyone with your neat setup.
4. Incorporate Magnetic Knife Strips for Safe, Space-Saving Knife Storage
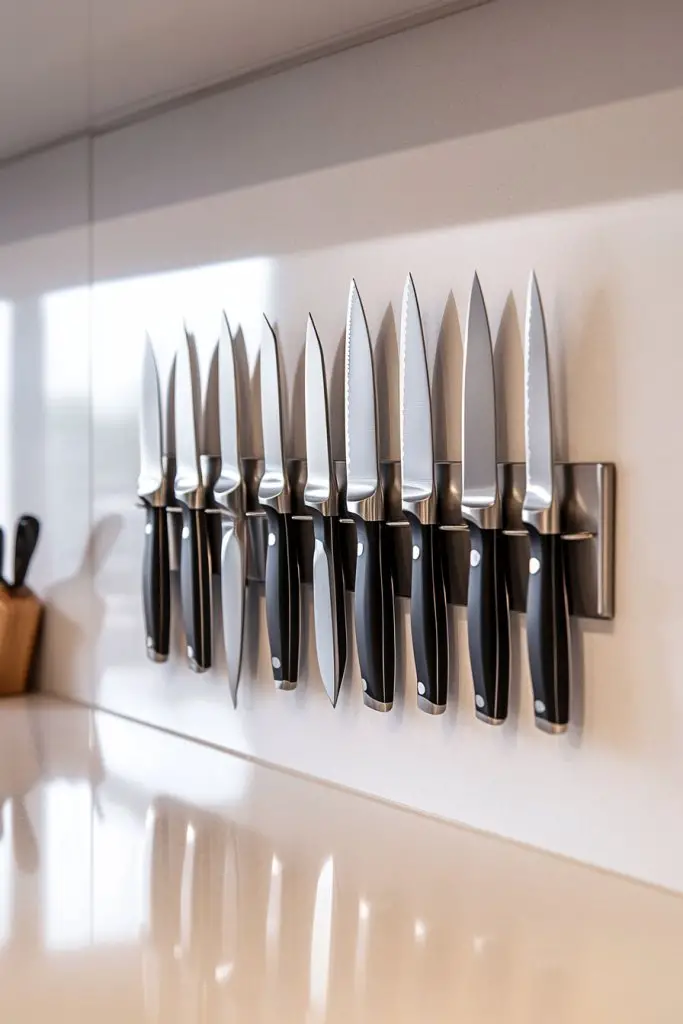
Loose knives in a drawer or jumbled on a countertop are not only unsafe but make cooking less enjoyable. Ever worry about dulling blades or accidental cuts? A magnetic knife strip offers a safe, space-efficient way to store your knives while keeping them within easy reach.
Visualize a sleek metal strip mounted on the wall, with knives securely held by magnets. The blades hang vertically, creating a clean, modern look. The strip keeps knives organized and accessible, while also freeing up drawer space. The magnetic hold ensures blades stay in place, and you avoid the risk of dulling or damaging delicate edges.
Choose from stainless steel, wood, or magnetic strips with decorative finishes to match your kitchen style. For small spaces, mounts can be placed inside a cabinet door or on a backsplash. Seasonal adjustments include swapping out or rearranging knives for special occasions. You can also add a few utensil holders nearby for a coordinated tool station.
Select a magnetic strip of appropriate length and strength, ensuring it can hold the weight of your heaviest knives. Mount it securely on a clean, dry wall surface using screws or strong adhesive, depending on your wall material. Arrange your knives by size or frequency of use for quick access. Regularly wipe the strip to prevent dust and maintain magnetic strength. Check mounting hardware periodically for safety.
Personalize your knife station with engraved or color-coded handles. Add decorative elements like a wooden backing or paint the wall area for a custom look. Use additional magnetic containers or clips for small tools like scissors or bottle openers. Keep your knife collection sharp and organized for safe, efficient cooking.
A magnetic knife strip elevates your kitchen’s safety and style, making meal prep faster and safer. It transforms cluttered drawers into sleek display zones. Once you experience the convenience, you’ll wonder why you waited so long to make the switch. Get ready to cook smarter and safer every day.
5. Use Tiered Shelf Organizers for Fruits, Vegetables, and Baking Supplies
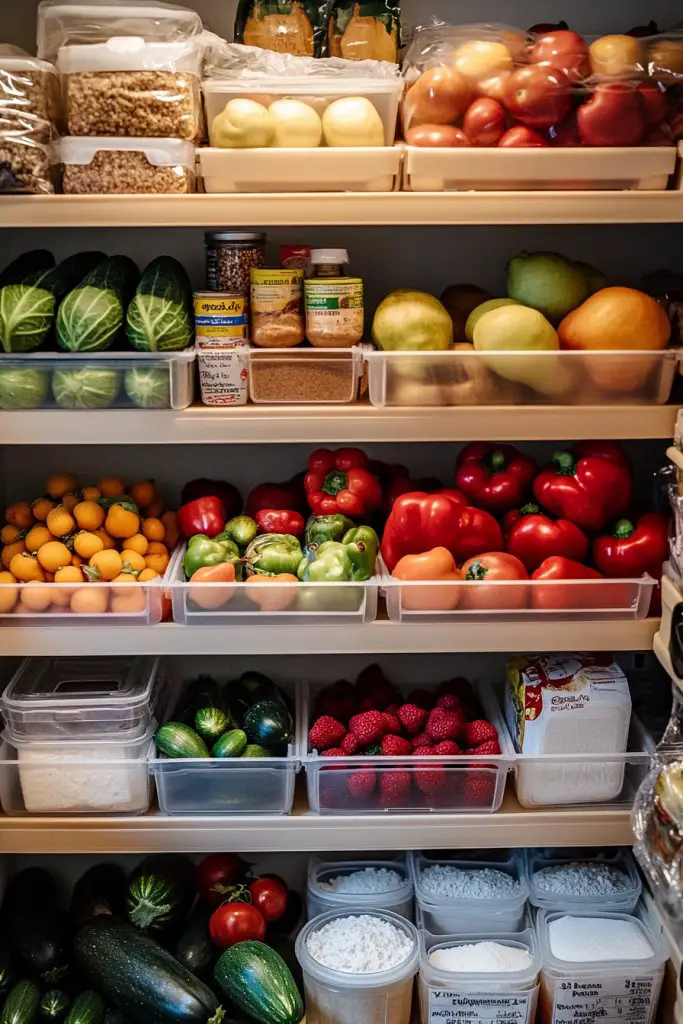
Is your countertop or pantry looking like a fruit basket explosion? It’s tough to keep produce fresh and accessible when everything is piled up. Tiered shelf organizers help create order, making it easy to see and reach your fruits, veggies, and baking essentials.
Picture a clear, multi-level plastic or wire stand sitting on your countertop or inside a cabinet. Bright produce like apples, oranges, and tomatoes are displayed neatly on each tier. Baking supplies such as flour, sugar, and sprinkles are organized in baskets or jars on different levels. The layers allow you to utilize vertical space efficiently, giving your kitchen a tidy, airy vibe.
Select adjustable or stackable tiers to customize height and capacity. For seasonal decor, use colorful baskets or liners that match your kitchen theme. In smaller spaces, wall-mounted tiered racks save counter space, while large kitchens can use multiple stands for different categories. Incorporate non-slip pads or decorative trays to add stability and style.
Determine the items you want to organize—fruits, vegetables, baking supplies—and choose a tiered shelf that fits your space. Place the organizer on your countertop or inside a cabinet door, ensuring stability. Arrange produce in open baskets or on flat tiers, and group baking supplies in labeled jars or boxes. Regularly rotate items to prevent spoilage and keep everything fresh. Clean the tiers periodically to prevent dust buildup.
Add decorative liners, colorful labels, or themed baskets to match your decor. Use small chalkboards to note expiration dates or favorite recipes. Incorporate a few decorative elements like a ceramic bowl or a textured tray to elevate the look. Personal touches make the organization system both functional and charming.
Tiered shelves turn chaos into clarity, giving you quick access to fresh ingredients. They make your kitchen look more inviting and organized, encouraging healthier eating habits. Once you see how much easier it is to find what you need, you’ll want to upgrade other storage areas too. Get ready for a more efficient, stress-free cooking experience.
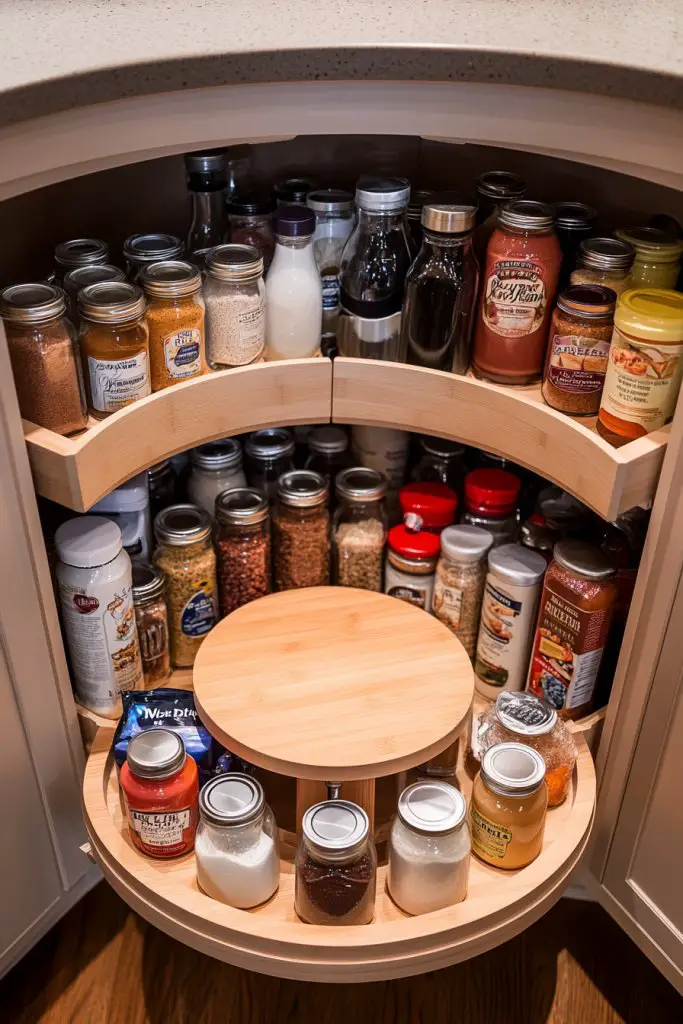
6. Implement a Lazy Susan for Corner Cabinets
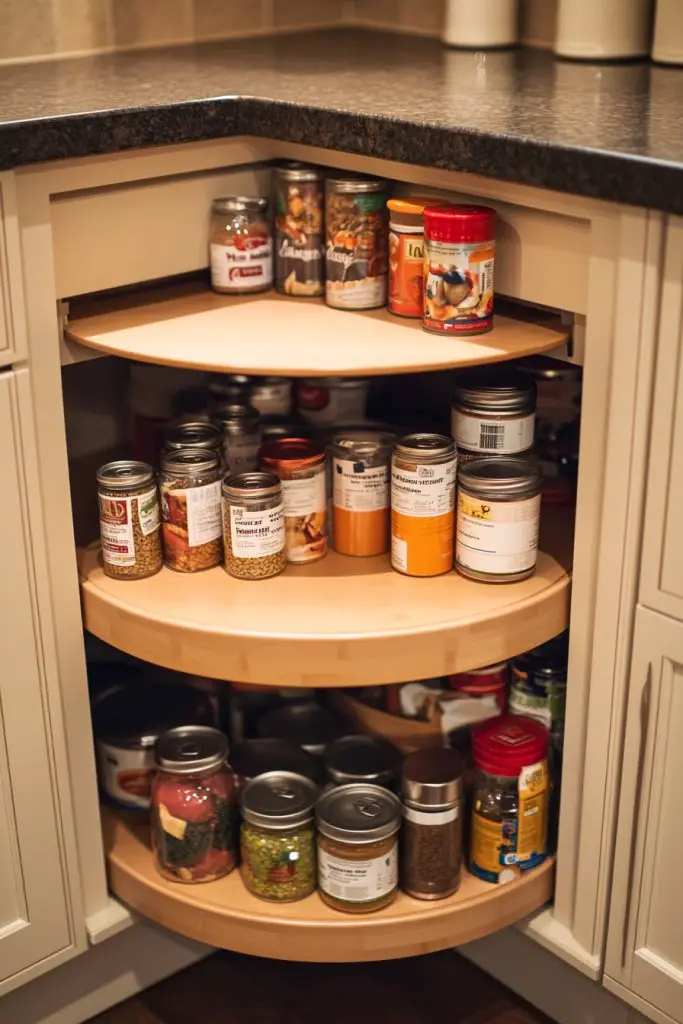
Corner cabinets are notorious for becoming dead zones filled with hard-to-reach items. Do you find yourself knocking over stacked cans or digging through jars? A Lazy Susan is your ticket to transforming those forgotten corners into practical, organized storage.
Imagine a smooth-rotating tray filled with spices, oils, or canned goods, all easily accessible with a simple spin. The circular design allows you to utilize every inch of the corner space, eliminating the need to reach or move other items. The sturdy surface reflects light, making everything on it easy to spot and grab.
Choose from different sizes and materials—wood, acrylic, or metal—to match your cabinet interiors. For small spaces, compact rotating trays work best, while larger cabinets may benefit from multi-tiered turntables. Incorporate adjustable dividers or small baskets for better organization. You can also add a lip or edge to contain spills or prevent items from falling off during rotation.
Remove the existing shelf in your corner cabinet if possible, then install the Lazy Susan base securely. Place the tray on the base, ensuring it spins smoothly. Sort your items into categories—spices, baking supplies, or canned goods—and place them on the turntable. Regularly rotate and tidy up to avoid clutter buildup. Check for stability and clean the surface to maintain smooth operation.
Personalize with labels, decorative trims, or themed containers that fit your style. Use small baskets or risers to create multi-level storage on the turntable. Add a non-slip mat underneath for extra grip. Consider color coding or matching with your existing kitchen palette for a seamless look.
A Lazy Susan makes your corner cabinets accessible and efficient, turning a storage black hole into a showcase of organization. It reduces clutter and saves time, making cooking less frustrating. Once installed, you’ll appreciate how much easier it is to find your favorite ingredients or tools. It’s a small change with a big impact.
7. Hang Pots, Pans, and Lids on a Wall-Mounted Rack
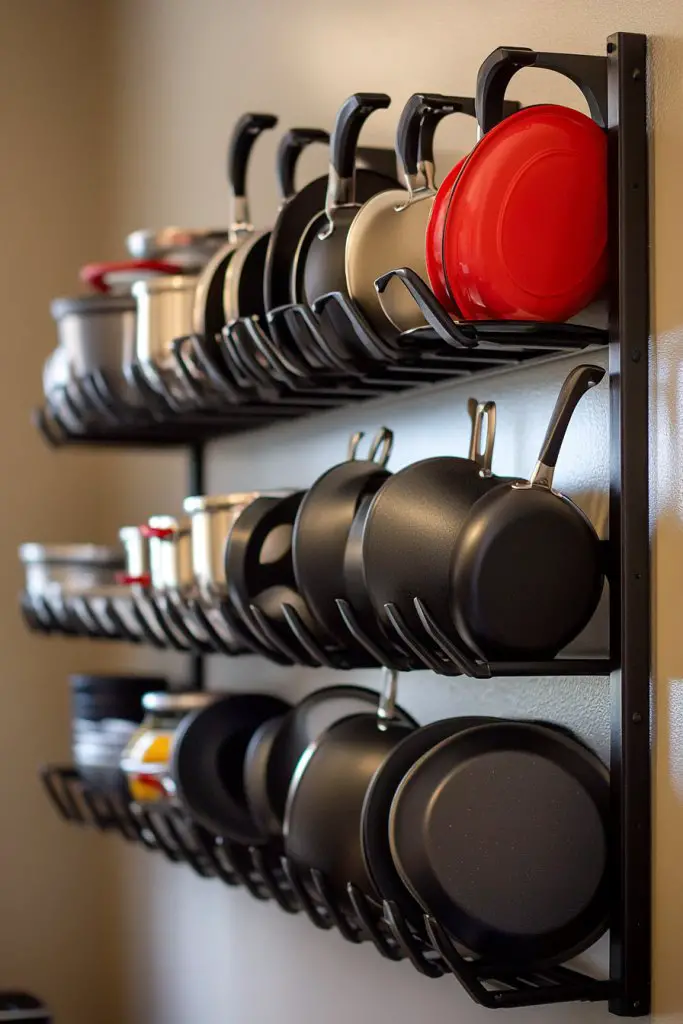
Are your pots and pans taking up precious cabinet space, and lids cluttering your countertop? It’s time to ditch the chaos and make your cookware a feature rather than a frustration. Wall-mounted racks turn your tools into art, freeing up cabinet room and adding a stylish touch.
Picture a sleek metal or wooden rack installed above your stove or along a blank wall, with hooks holding pots, pans, and their matching lids. The cookware hangs in a cascading display, showing off your favorite pieces. The open arrangement creates a professional, restaurant-inspired vibe, while keeping everything within arm’s reach.
Opt for minimalist stainless steel, rustic wood, or colorful powder-coated finishes to complement your decor. For small kitchens, install a compact rack or a magnetic strip combined with hooks for versatility. Seasonal updates might include swapping out certain pots for specialty cookware or decorative accents like engraved handles. Adjustable hooks accommodate different sizes and types.
Identify a sturdy wall area near your cooking zone, clean it thoroughly, and mount the rack securely with anchors and screws. Arrange your pots and pans by size or frequency of use for efficient workflow. Hang lids on the side or beneath the rack if space allows. Regularly wipe down the rack and check for loose hooks or hardware. Consider adding decorative elements like a magnetic strip or utensil hooks nearby.
Decorate the rack with personalized handles or labels. Use colorful silicone grips or fabric covers on handles to add personality. Add a few decorative kitchen tools or a small chalkboard for notes. Mix and match different materials and colors for a vibrant, personalized display that makes your kitchen feel warm and inviting.
Wall-mounted pots and pans not only optimize space but also elevate your kitchen’s style quotient. It’s a visual upgrade that impresses guests and makes cooking more enjoyable. Once you see your cookware organized this way, you’ll never want to go back to cramped cabinets. Get ready to cook with confidence and style.
8. Incorporate Drawer Dividers for Flatware and Utensils
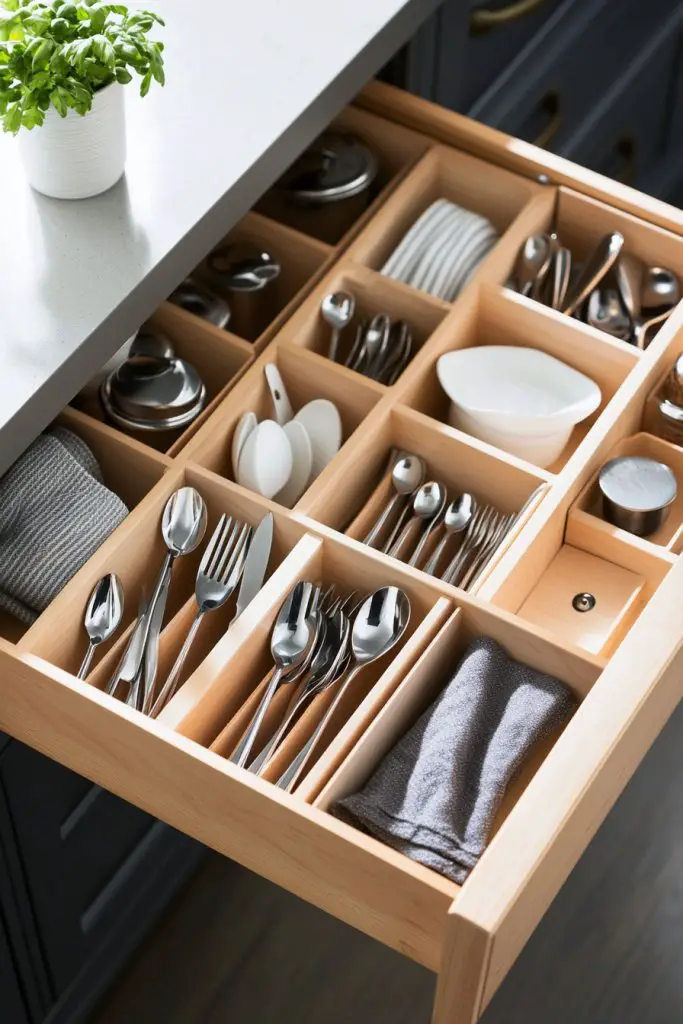
Messy drawers full of tangled spoons, forks, and spatulas make finding what you need a chore. It’s frustrating to dig through a jumbled mess every time you set the table or cook. Drawer dividers promise to bring order and efficiency, so you spend less time searching and more time enjoying.
Visualize a clean, organized drawer with neatly separated compartments for flatware, serving utensils, and small gadgets. The dividers are adjustable, fitting snugly to customize space for each item. Everything is visible at a glance, and the clutter-free setup creates a calming effect. The textured dividers prevent items from sliding around, maintaining order during busy mornings.
Choose from wood, plastic, or silicone dividers to match your kitchen style. For larger families, opt for multiple sections to accommodate more utensils. Seasonal or special occasion sets—like barbecue tools or baking accessories—can have dedicated compartments. In small drawers, stackable or collapsible dividers save space when not in use.
Remove and empty your current flatware drawer, then measure its dimensions. Purchase adjustable or pre-sized dividers that fit your needs. Install the dividers in your drawer, adjusting their positions for optimal separation. Organize your utensils by type or frequency of use, placing them into their designated sections. Regularly declutter and clean the dividers to keep the system functioning smoothly.
Add decorative labels or color-coding for quick identification. Use patterned or textured dividers to add visual interest. Incorporate small trays for tiny items like clips or peelers. Personal touches like engraved handles or themed accessories can make your drawer both functional and fun.
Drawer dividers turn chaos into calm, making your kitchen more functional and less stressful. They encourage better organization habits and make cleaning easier. Once you experience the difference, you’ll wonder why you ever tolerated a cluttered drawer. It’s a small upgrade with a big payoff in daily convenience.
9. Use Under-Shelf Baskets to Maximize Vertical Space in Cabinets

Are your cabinets overflowing with small items or hard-to-reach dishes? Under-shelf baskets help maximize vertical space, giving you extra room for dish towels, snacks, or cleaning supplies. They’re a simple way to lift clutter off the shelves and create organized zones.
Imagine a wire or plastic basket hanging just beneath a shelf, holding spare dishcloths or small pantry items. The basket’s open design allows for visibility and airflow, preventing stuff from getting lost or stale. Items are neatly stacked, and the extra storage feels like a breath of fresh air inside your cabinet.
Select baskets in different sizes and materials—metal, plastic, or woven—to suit your needs. For larger, deeper cabinets, multiple baskets can be stacked or hung side by side. Use colorful or coordinating liners to match your decor, or opt for neutral tones for a sleek look. Seasonal or themed baskets can add a playful touch.
Measure the space beneath your existing shelves, then purchase baskets with hooks or clips that fit. Install the baskets by hooking them onto the underside of your shelf or securing them with clips or adhesive strips. Fill the baskets with items like dish sponges, snack packs, or small cleaning bottles. Regularly tidy and rotate contents to keep everything fresh and accessible.
Add labels or color codes to categorize contents—e.g., red for cleaning supplies, blue for snacks. Use decorative liners or fabric covers for a softer look. Incorporate small trays or dividers within baskets for even better organization. Personal touches like themed labels or fun colors can make storage practical yet stylish.
Under-shelf baskets turn wasted space into extra storage, making your cabinets more efficient. They help keep small items in check and free up shelf space for larger dishes or appliances. Once you see everything in its place, maintaining order becomes effortless. It’s a simple tweak that delivers big results.
10. Install a Magnetic Spice Jar Rack on the Fridge or Wall
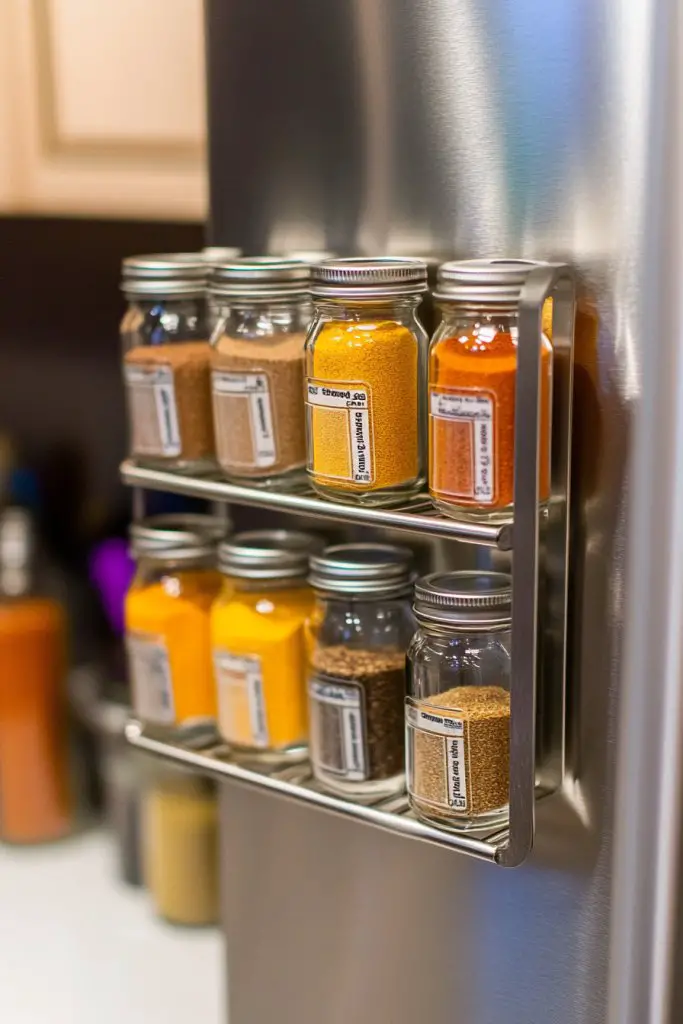
Spice jars clutter your countertop or get hidden in cluttered cabinets, making cooking more frustrating. Ever wish your favorite seasonings were more accessible? A magnetic spice rack keeps everything within reach, adds a modern look, and declutters your space.
Visualize a sleek magnetic strip mounted on the side of your fridge or a wall, holding small glass jars filled with colorful spices. The transparent jars make it easy to see contents at a glance, and the magnets keep them securely in place. The display turns your spices into a decorative element that’s both functional and stylish.
Choose from minimalist stainless steel, colorful magnetic strips, or custom-cut wood options. For seasonal flair, swap out labels or switch to themed jars. Mount the rack near your cooking zone for maximum convenience. You can also add a small magnetic chalkboard or labels for quick identification. For tighter spaces, combine with vertical wall panels or inside cabinet doors.
Clean the mounting surface thoroughly, then attach the magnetic strip with screws or strong adhesive. Fill the small jars with your spices, label them clearly, and arrange them on the strip based on frequency of use or flavor profile. Periodically check the magnets for strength and replace any jars that lose their grip. Keep the area clean and free of dust for best adhesion.
Decorate jars with personalized labels, colorful caps, or patterned wraps. Add a small chalkboard label for custom spice blends or notes. Incorporate complementary tools like a spice scoop or mini funnel for easy refilling. Match the rack’s style with your kitchen decor—industrial, rustic, or modern.
A magnetic spice rack turns a cluttered problem into a sleek feature, making cooking more enjoyable. It’s a quick upgrade that saves space and adds a pop of color. Once you see your spices organized this way, you’ll wonder why you didn’t do it sooner. Get ready to spice up your kitchen with style and ease.
11. Designate a Dedicated Charging Station for Small Appliances
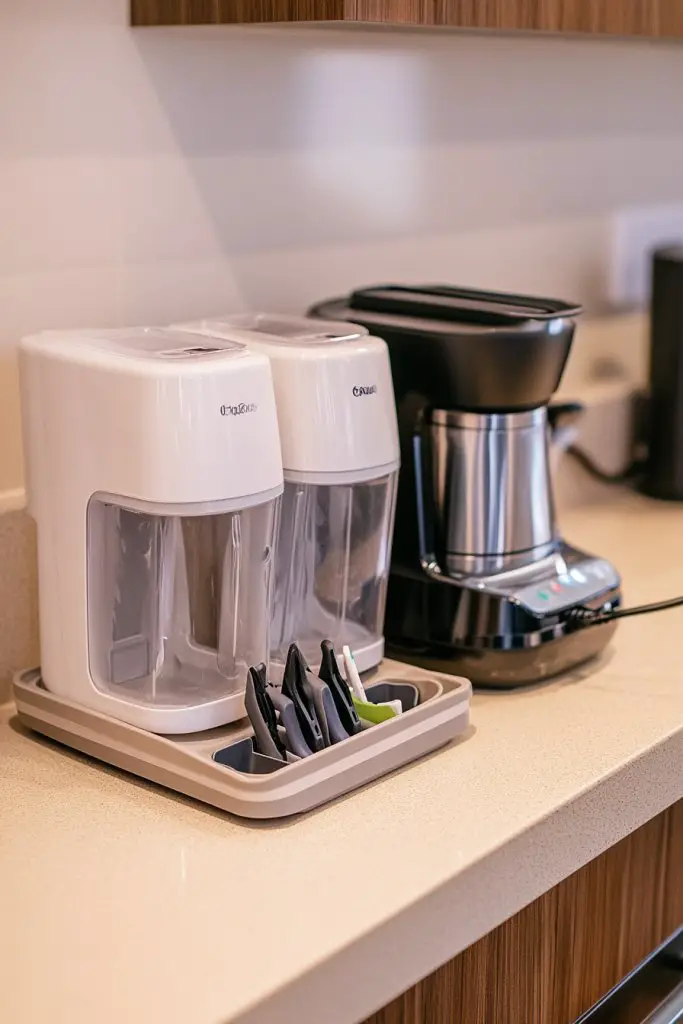
Counter clutter from chargers and small appliances can turn your kitchen into a tangled mess. Ever find yourself hunting for the right cord or struggling with a jumble of plugs? Creating a dedicated charging station declutters your counters and makes your gadgets easy to find.
Imagine a sleek, organized station with a power strip tucked neatly inside a drawer or mounted behind a panel. Small appliances like blenders, toasters, and chargers sit in designated spots, with cords tucked away in cable organizers. The area looks tidy and functional, with everything you need in one place.
Choose a compact tray, box, or shallow drawer with compartments to hold cords and devices. For a seamless look, install a power strip inside a cabinet or under a countertop with accessible outlets. Seasonal updates might include adding decorative elements like labels or color-coded cords. For small kitchens, a wall-mounted docking station or pegboard can work well.
Select a quiet, surge-protected power strip or outlet, and install it in a hidden yet accessible spot. Gather your small appliances and cords, then organize the cords with velcro straps or cable clips. Place each device in its designated space, ensuring cords are long enough to reach outlets without tension. Label cords or use color coding for quick identification. Periodically review and tidy the station to prevent clutter buildup.
Decorate the station with themed labels or fun stickers. Use decorative containers or fabric-lined trays for a softer look. Incorporate a small chalkboard or writable surface for notes or reminders. Personal touches like matching accessories or a small plant (if allowed) can make the station both functional and inviting.
A dedicated charging spot declutters your counters and simplifies daily routines. It keeps your appliances organized and ready to use, saving time and reducing frustration. Once set up, you’ll enjoy a cleaner, more streamlined kitchen that’s both practical and stylish. It’s a small change with a big impact on your everyday life.
12. Use Clear Labelled Baskets for Recycling and Trash Sorting
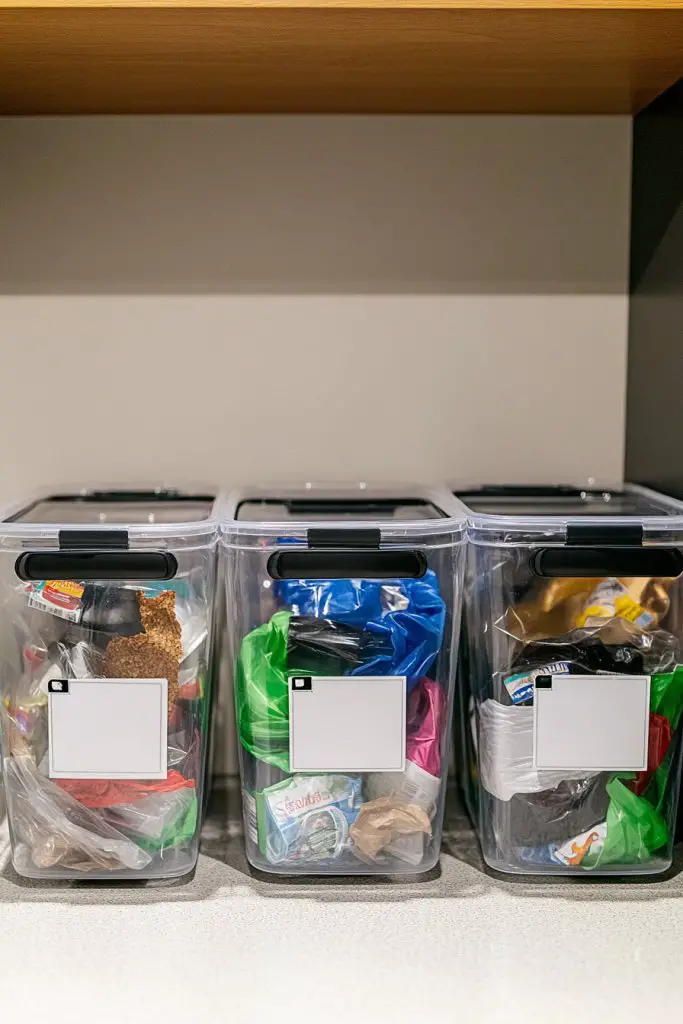
Waste sorting often becomes a messy guessing game, leading to overflowing bins and confusion. Ever wished for a simple way to keep recycling and waste separate and tidy? Clear, labeled baskets make waste management straightforward and visually appealing.
Picture a set of stylish, transparent baskets or bins with bold labels like ‘Recycling,’ ‘Compost,’ and ‘Trash.’ They sit neatly in a designated corner or under the sink, with the labels facing outward. The clear design lets you see contents at a glance, encouraging proper disposal without searching or second-guessing.
Choose durable, washable baskets in neutral or bright colors to match your decor. For small spaces, stackable or wall-mounted versions save floor space. Seasonal or themed labels can add personality, while color coding helps family members quickly identify which bin to use. Incorporate lids or covers for a cleaner look and odor control.
Select baskets that fit your space and labeling needs. Attach clear labels with waterproof labels or print custom stickers for clarity. Position the bins near your main waste area, ensuring easy access. Train household members to use the correct bin, and set a schedule for regular emptying and cleaning. Periodically review labels and contents to prevent contamination.
Decorate baskets with themed labels, stickers, or fabric covers. Use icons or color schemes to reinforce sorting habits. Add small caddies for sorting smaller recyclable items like plastic caps or paper scraps. Personal touches like a framed sign or a fun mascot can make waste sorting more engaging.
Proper waste separation reduces landfill waste and promotes eco-friendly habits. These clear, labeled baskets simplify the process, making it easy for everyone to participate. Once set up, you’ll feel good about keeping your kitchen clean and green. It’s a small step toward a more sustainable lifestyle.
13. Mount a Pegboard for Kitchen Tools and Accessories
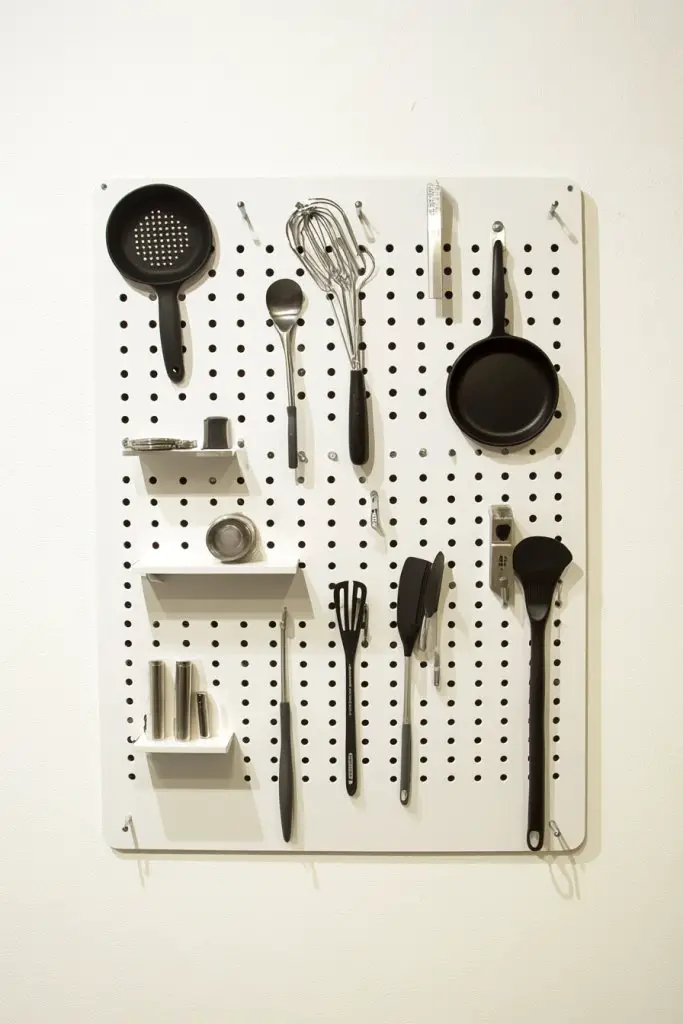
Counter clutter and drawer chaos make cooking more stressful than it needs to be. Ever wish you had a dedicated spot for your utensils and accessories that’s both organized and stylish? A pegboard transforms a blank wall into a versatile storage solution.
Visualize a sleek, painted pegboard with hooks holding spatulas, ladles, oven mitts, and measuring spoons. The tools are displayed in an accessible grid, making it easy to grab what you need. The open design adds an industrial or modern touch to your kitchen, turning functional tools into decor.
Choose from various materials—wood, metal, or painted MDF—to match your decor. For small spaces, mount the pegboard inside cabinet doors or as part of a vertical wall. Seasonal or themed hooks can be swapped out easily, while color-coded pegs help organize by function or family member. Incorporate small shelves or baskets for additional storage.
Mount the pegboard securely on a stud or wall anchor, making sure it’s level. Arrange hooks and accessories based on your daily routines, grouping similar items together. Hang your most-used utensils at eye level and keep less-used tools higher or lower. Regularly clean and reorganize to maintain a tidy appearance. Use different hook sizes for various tools to keep everything stable.
Add labels or painted icons to identify tool categories. Personalize with decorative paint, stencils, or themed accessories that match your style. Incorporate small shelves or baskets for spices, oils, or small gadgets. Use colorful or patterned hooks to inject personality into your organization system.
A pegboard makes your tools visible and accessible, reducing clutter and streamlining cooking prep. It’s a flexible solution that grows with your needs and style. Once you experience the ease of grabbing utensils from a dedicated display, you’ll wonder why you didn’t do this sooner. Get ready for a tidier, more efficient kitchen.
14. Incorporate a Pull-Out Trash and Recycling Bin System
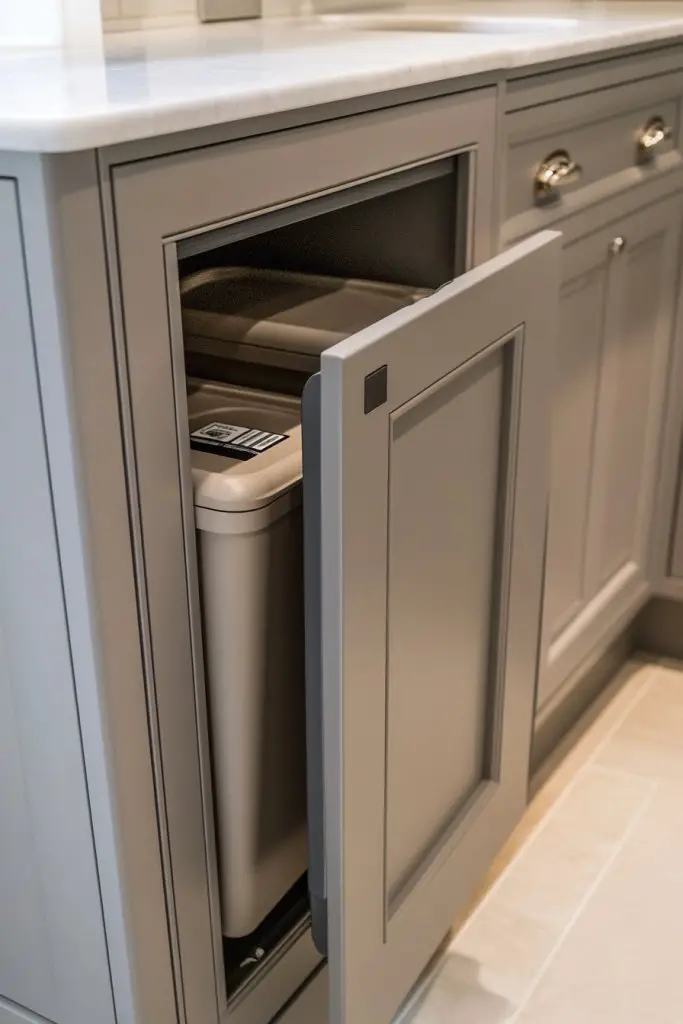
Trash cans and recycling bins often stand out like sore thumbs, cluttering your kitchen and taking away from the sleek look. Ever wish you could hide waste away while still making it easy to dispose of? A pull-out system keeps your waste out of sight and your kitchen looking tidy.
Imagine a slim cabinet with a hidden pull-out drawer containing two bins—one for trash, one for recyclables. When closed, it’s seamlessly integrated into your cabinetry, maintaining a clean aesthetic. When opened, the bins slide out smoothly, ready for use. The design keeps odors contained and minimizes messes.
Select from various sizes, materials, and configurations—dual bins, triple compartments, or even composting units. For small kitchens, compact models fit neatly into narrow spaces. For larger households, dual or multiple systems help manage waste efficiently. You can match the cabinet finish to your decor or opt for a contrasting color for a statement.
Remove the existing cabinet door or modify the cabinet for installation. Fit the pull-out mechanism with sturdy slides or rollers, ensuring smooth operation. Place the bins inside, securing them to prevent tipping. Label each bin clearly for waste or recyclables. Regularly clean the bins and check the sliding hardware for wear. Incorporate odor filters or deodorizer packs for freshness.
Decorate the cabinet face with a custom paint job or decorative hardware. Use color-coded bins to differentiate waste types or add custom labels. Incorporate a small compartment for trash bags or cleaning supplies nearby. Personal touches like a chalkboard label or themed hardware can elevate the look.
A pull-out trash system declutters your kitchen and improves hygiene. It creates a streamlined look and simplifies waste disposal. Once installed, you’ll love how effortless and clean your kitchen stays. It’s a practical upgrade that makes your home more organized and eco-friendly.
15. Add Hooks Under Cabinets for Mugs, Towels, and Small Items
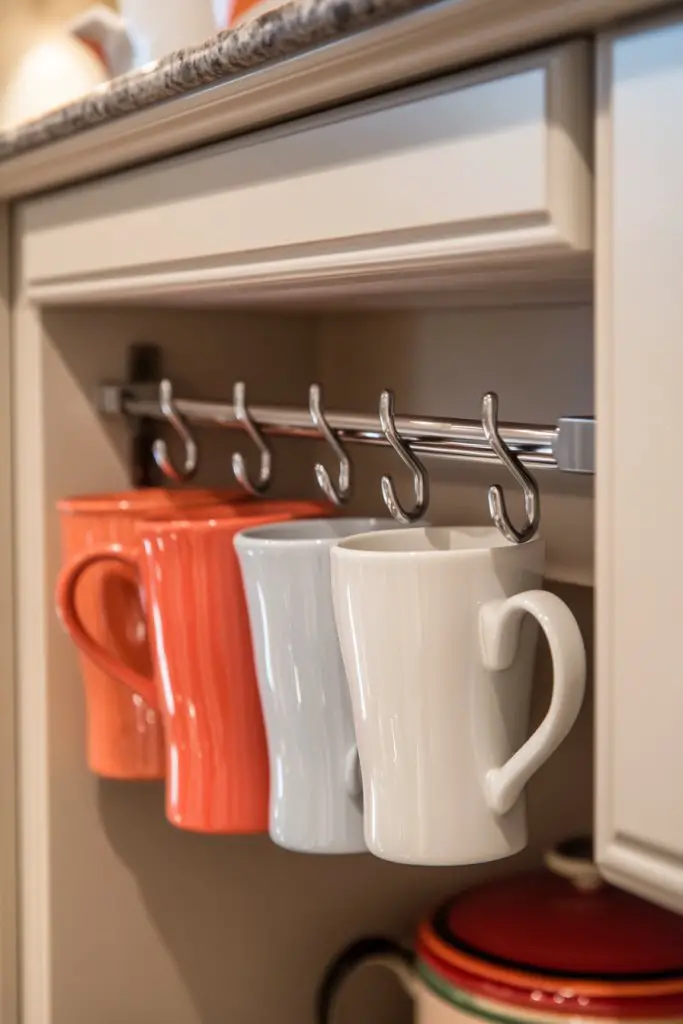
Counter space is precious, and cluttered surfaces make cooking and cleaning less enjoyable. Ever wished you had a dedicated spot for mugs, towels, or small tools that keeps everything tidy and within reach? Hooks under cabinets provide a smart storage solution that keeps your essentials off the counter.
Visualize sturdy hooks installed beneath upper cabinets, holding your favorite coffee mugs or vibrant dish towels. The hooks are discreet yet functional, creating a visual display that adds character to your kitchen. Items hang neatly, making cleanup and access quick and effortless. The setup transforms a blank space into a practical decor feature.
Choose from different hook styles—metal, plastic, decorative shapes—to suit your decor. For small kitchens, install hooks along the length of the cabinet or inside doors. Seasonal swaps might include themed towels or mug designs. Group similar items together for a cohesive look, and vary heights to accommodate different sizes.
Measure the space beneath your cabinets and select sturdy hooks that can support weight. Mount them securely with screws or adhesive, depending on your cabinet material. Hang mugs by their handles or cups by their rims, ensuring they are balanced. Use hooks for towels, oven mitts, or small utensils for added versatility. Regularly check for stability and clean dust or grease buildup.
Add decorative elements like colorful hooks or painted finishes to match your theme. Use themed or patterned towels and mugs to inject personality. Incorporate small decorative accents like a miniature chalkboard for notes or labels. Personal touches make functional items feel more integrated into your decor.
Hooks under cabinets turn unused space into functional storage, decluttering counters and drawers. They make your kitchen more organized and aesthetically pleasing. Once you see your everyday items neatly hanging, you’ll wonder how you ever managed without them. It’s a simple upgrade that boosts convenience and style.
16. Use Stackable Shelves for Small Appliances and Cookbooks
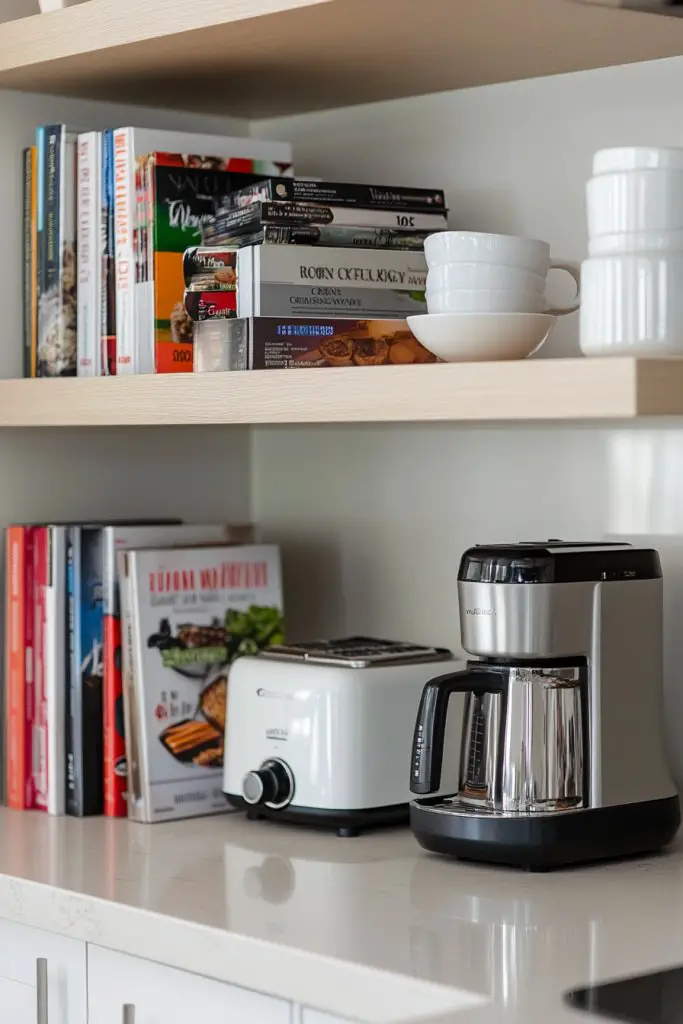
Counter clutter from small appliances and cookbooks can make your kitchen look chaotic and reduce workspace. Ever wish you could keep these essentials accessible but out of the way? Stackable shelves create vertical storage that keeps your counters free and your collection organized.
Imagine a set of sleek, modular shelves stacking on top of each other, holding blenders, toasters, and a row of cookbooks. The layered setup adds height and depth to your countertop, making everything easy to reach. The open design allows you to display your favorite cookbooks while keeping appliances ready for action.
Choose from various materials—wood, metal, or acrylic—to match your decor. For small spaces, wall-mounted stacks save counter space, while larger kitchens can benefit from multiple tiers. Seasonal changes might include swapping out cookbooks or adding decorative accents like jars or bowls. Incorporate labels or color schemes for quick identification.
Arrange the shelves securely on your countertop or wall, ensuring stability. Organize appliances based on usage frequency, keeping the most-used items at the top or front. Stack cookbooks with the spines facing outward for easy browsing. Regularly clear off clutter and wipe down surfaces to maintain cleanliness. Use risers or small brackets for added height or stability.
Decorate the shelves with themed accessories, decorative jars, or matching storage containers. Use bookends or decorative clips to keep cookbooks upright. Incorporate small planters or textured trays to add visual interest without plants or artwork. Personal touches like labels or custom risers make your organization both functional and stylish.
Stackable shelves turn clutter into order, freeing up valuable counter space. They make your kitchen look more intentional and inviting. Once you organize this way, cooking and baking become more enjoyable and less stressful. Get ready to love your space even more.
17. Install a Fold-Down Table or Counter Extension for Extra Workspace
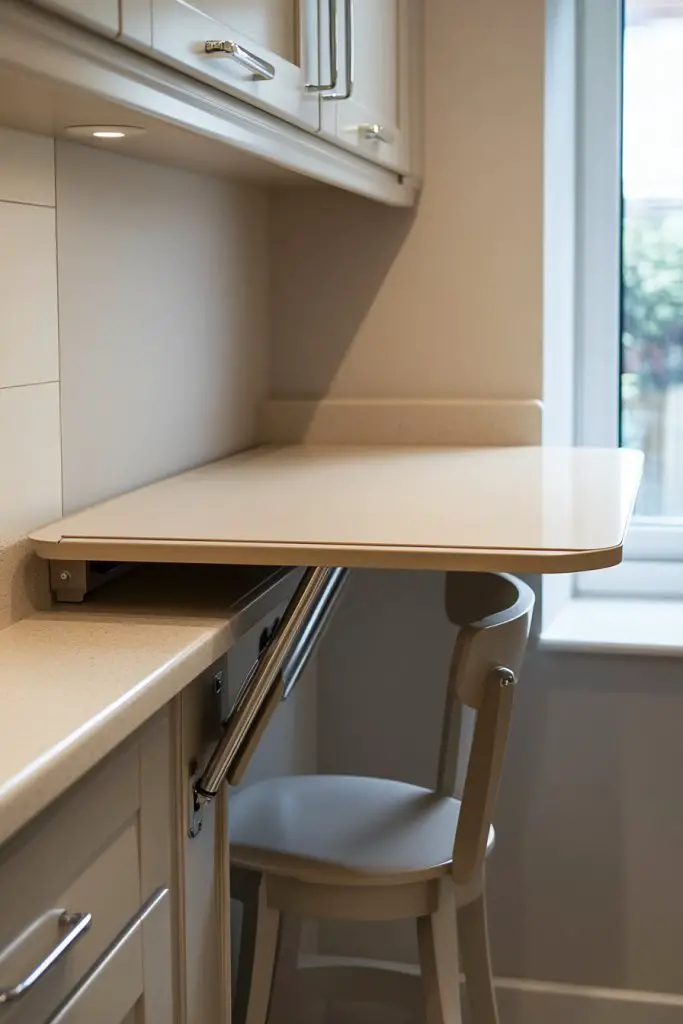
Limited counter space hampers meal prep and makes entertaining awkward. Ever wish you had a little extra surface area for chopping or serving? A fold-down table or counter extension provides instant extra workspace that disappears when not in use.
Visualize a sleek countertop with a hidden fold-away extension that swings down when needed. It’s supported by sturdy hinges and brackets, blending seamlessly into your kitchen. When folded, it’s flush with the existing surface; when lowered, it offers a generous area for prep or casual dining. The design is minimalist and space-saving.
Choose from materials like wood, laminate, or composite to match your decor. For small kitchens, install a pull-out or fold-down extension inside a cabinet or along a wall. Seasonal or occasional use may involve a simple wall-mounted fold-down surface, while everyday needs can be met with a more durable setup. Incorporate locking mechanisms for stability.
Measure your available space and select a fold-down table or extension that fits. Install hinges and supports securely into wall studs or cabinet sides. Test the mechanism for smooth operation and load capacity. When in use, lock the extension in place for stability. Use clips or magnets to hold it in the folded position when not needed. Regularly check for loose hardware.
Decorate the fold-down surface with a contrasting paint or textured finish. Add a small rail or edge to contain spills. Personalize with custom hardware or handles that complement your decor. Use a matching chair or stool that tucks neatly underneath when the extension is folded down.
A fold-down table offers flexible space that adapts to your lifestyle, whether for extra prep, dining, or crafts. It brings a sense of innovation and practicality to your kitchen. Once installed, you’ll wonder how you ever managed without this space-saving feature. It’s a game-changer for small kitchens or multi-use areas.
18. Incorporate a Lazy Susan or Turntable for Baking Supplies and Condiments
Searching for baking supplies or condiments buried at the back of cabinets feels like a scavenger hunt. Do you find yourself knocking over jars or wasting time hunting for that elusive vanilla extract? A Lazy Susan or turntable simplifies access and keeps everything in view.
Picture a rotating tray inside your cabinet or on your countertop, filled with baking powders, sprinkles, or condiments. The smooth turn allows you to spin and select items easily, preventing clutter and spills. The circular design fits neatly into corners or small spaces, making your ingredients both accessible and visually appealing.
Choose materials like wood, acrylic, or metal to match your decor. For countertops, a sturdy, non-slip turntable works well, while inside cabinets, a compact, flush-mounted version maximizes space. Use labels or color coding for quick identification. Seasonal or themed setups can involve decorative liners or coordinated containers.
Place the turntable on your countertop or inside a cabinet, ensuring it spins freely without obstruction. Fill with frequently used baking ingredients or condiments, then organize by size or type. Regularly clean the surface to prevent residue buildup. For inside cabinets, secure the turntable to prevent movement during opening. Rotate periodically to keep things accessible.
Decorate the edges with decorative trim or painted patterns. Use themed containers or labeled jars to add personality. Incorporate small accessories like mini scoops or decorative spoons to enhance functionality. Match the color scheme to your kitchen decor for a cohesive look.
A Lazy Susan or turntable makes ingredient access effortless, transforming cluttered cabinets into organized treasures. It streamlines cooking and baking, making your kitchen more efficient. Once you try this setup, you’ll wonder how you managed without it. It’s a simple upgrade with a big impact on your culinary experience.
19. Use Stylish Baskets and Trays for Decorative yet Functional Organization
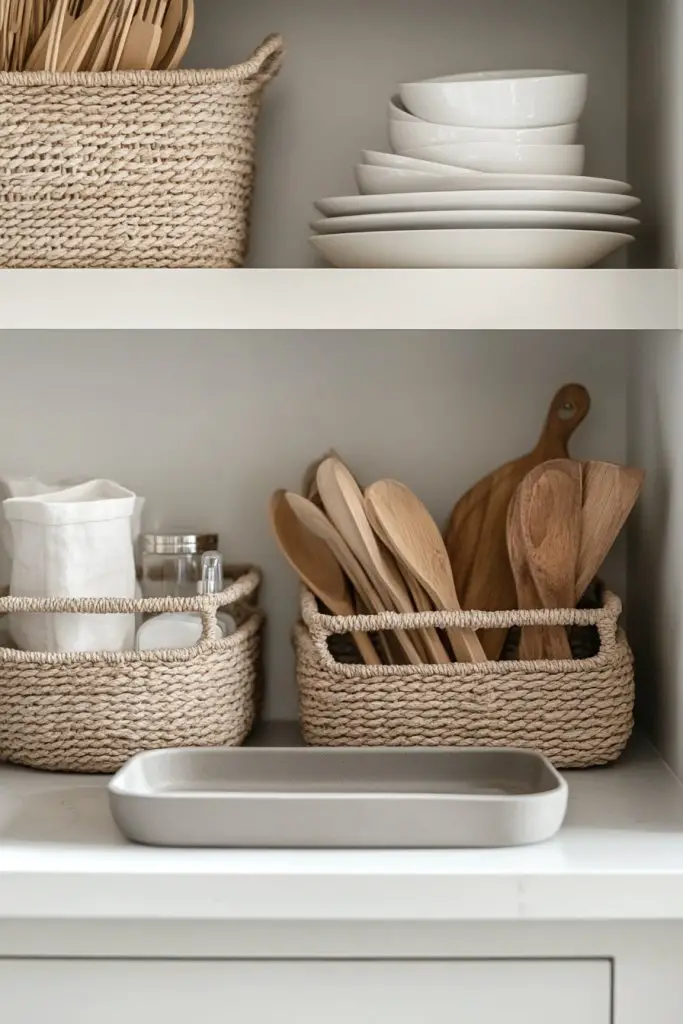
Cluttered countertops and open shelves can look messy, even if everything is technically in its place. Want to add both style and function to your kitchen? Stylish baskets and trays make organizing essentials easy while elevating your decor.
Visualize a collection of woven or ceramic baskets holding snacks, napkins, or utensils, arranged neatly on open shelves or countertops. Decorative trays display your everyday items in a curated, intentional way. The mix of textures and materials creates visual interest, making your kitchen feel warm and welcoming.
Choose baskets and trays in materials like wicker, wood, or metal to match your decor style—rustic, modern, or boho. For seasonal updates, swap out plain baskets for themed or patterned ones. Use trays to corral small items or to serve as a catch-all for miscellaneous essentials. Incorporate decorative elements like faux greenery (if allowed) or textured fabrics.
Arrange baskets and trays on open shelves, countertops, or inside cabinets for a layered look. Fill them with everyday essentials—utensils, napkins, or snacks—that you use often. Label each basket or tray for quick identification, especially if sharing your space. Regularly declutter and refresh the contents for a tidy appearance. Use stacking or nested arrangements to maximize space.
Add decorative touches like custom labels, fabric liners, or themed accessories. Mix different textures and colors to create contrast and visual interest. Incorporate personal items like vintage tins or unique containers for a curated vibe. Use these organization tools to reflect your personality and style.
Stylish baskets and trays turn everyday storage into a design feature, making your kitchen more inviting. They help keep clutter contained and your space looking intentional. Once you see how good it feels to have everything in its place, you’ll be motivated to upgrade other areas too. Style meets function—what’s not to love?
Conclusion
Exploring these diverse kitchen organization ideas can inspire you to reimagine your space and boost your daily efficiency. Whether you prefer minimalist setups or creative storage hacks, there’s something here to suit your style. Don’t hesitate to try these ideas—your dream kitchen is just an organized step away. Take action today and make your kitchen a masterpiece of both form and function!