There’s something truly satisfying about seeing a kitchen transformation that takes a space from ordinary to extraordinary. Before and after kitchen redo ideas are incredibly popular because they showcase the incredible potential hidden in your own home, inspiring you to dream big and get creative.
In this article, you’ll find a variety of dramatic updates that can completely change the look and feel of your kitchen. Whether you’re into modern minimalism, rustic charm, or bold color statements, these ideas will spark your imagination and help you plan your perfect kitchen makeover.
1. Installing a Bold Backsplash for Instant Visual Impact
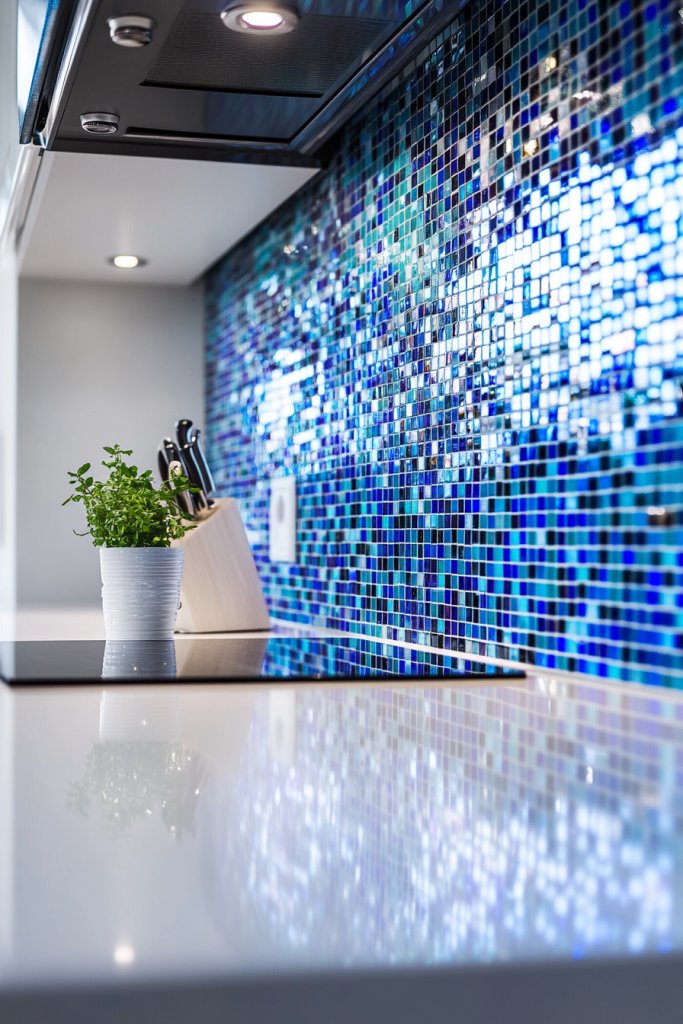
Ever looked at your plain kitchen walls and wondered if something more vibrant could lift the space? A bold backsplash can transform an ordinary kitchen into a showstopper almost instantly. It’s the easiest way to inject personality and color without a full overhaul. If you crave a space that feels fresh and lively, this is the upgrade you need.
Recommended Products to replicate this idea
| # | Preview | Product | |
|---|---|---|---|
| 1 |

|
Art3d 102-Piece Peel and Stick Wall Tile for Kitchen Backsplash, Bathroom, Fireplace, 3in. × 6in.... | Buy on Amazon |
| # | Preview | Product | |
|---|---|---|---|
| 1 |

|
VARIART Tiffany Stained Glass and Mixed Colors Rainbow Mosaic Glass Tiles Colorful Cathedral Art... | Buy on Amazon |
Imagine vibrant patterned tiles with intricate designs or textured surfaces that catch the light just right. Think about a splash of deep emerald green or fiery red that creates contrast against neutral cabinets. The texture varies from glossy ceramic to matte stone, adding depth to the wall. Visualize how this feature draws your eye as soon as you step into the room, making every meal feel special.
Choose from a myriad of styles—geometric, floral, or abstract—to match your aesthetic. For smaller kitchens, vertical or narrow subway tiles can make the space appear taller. In larger kitchens, oversized patterned tiles create a dramatic focal point. Seasonal trends like metallic or matte finishes can refresh the look yearly, keeping your kitchen trendy.
Start by selecting durable, heat-resistant tiles suitable for cooking splatters. Prepare your wall by cleaning and smoothing the surface. Use spacers to ensure even gaps and a level layout. Adhesives vary based on tile type—select the appropriate mortar or glue. Grout in a color that complements or contrasts for added effect. Consider hiring a professional if tiling isn’t your forte; it can get tricky with intricate patterns.
Add a personal touch by mixing different tile patterns or incorporating a border. Use metallic or glass tiles as accents to elevate the design. Framing the backsplash with a sleek metal or wood trim can create a polished look. Incorporate subtle details like beveled edges or textured finishes to make it uniquely yours.
A bold backsplash instantly elevates your kitchen’s style and makes you feel proud of your space. It’s a statement piece that reflects your personality and taste. Don’t be afraid to experiment with colors and textures—your perfect kitchen awaits!
2. Replacing Cabinet Doors with Open Shelving for a Modern Touch
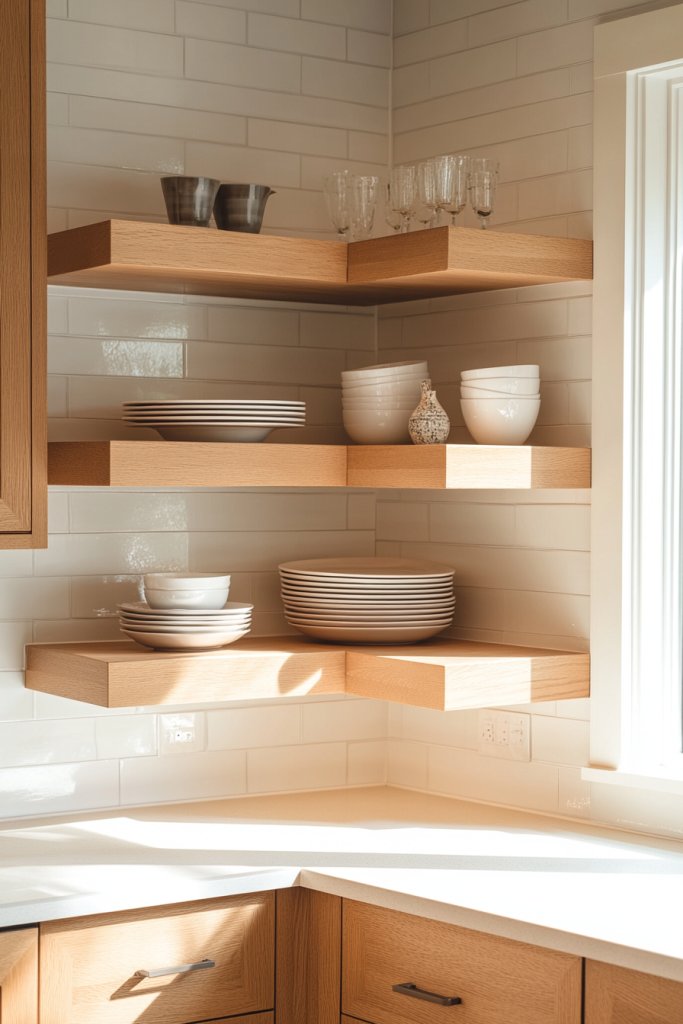
Does your kitchen feel cramped and cluttered? Traditional closed cabinets hide your dishware and make the space look smaller. Replacing some cabinet doors with open shelves instantly creates an airy, modern vibe. It’s the perfect way to showcase your favorite dishes and add a personal touch.
Recommended Products to replicate this idea
| # | Preview | Product | |
|---|---|---|---|
| 1 |

|
QEEIG Floating Shelves for Wall Bathroom Shelf Bedroom Kitchen Living Room Hanging Book Shelves... | Buy on Amazon |
| # | Preview | Product | |
|---|---|---|---|
| 1 |

|
HENABLE 6PCS 3 Size Black Iron Plate Stands for Display - 4, 6, 8 Inch Decorative Metal Plate... | Buy on Amazon |
Picture sleek wooden or painted shelves against a backdrop of textured walls. Imagine neatly arranged bowls, cups, and decorative jars that add color and character. The open display allows natural light to bounce around, making the room feel brighter. Visualize how this simple change transforms your kitchen into a stylish yet functional space.
Use open shelving for only upper cabinets or on a feature wall. Mix materials—wood, metal, or glass—to match your decor style. For small kitchens, floating shelves save space and add a minimalist feel. Seasonal accessories like cozy mugs or colorful containers can keep the look fresh and inviting.
Remove existing cabinet doors carefully, keeping hinges for future use or repurpose. Install sturdy brackets or floating shelf supports at even intervals. Select shelves that are deep enough to hold your dishware without overcrowding. Arrange items thoughtfully with a mix of practical and decorative pieces. Seal or treat wooden shelves to prevent damage from moisture or stains.
Add decorative elements like vintage jars, patterned dishcloths, or unique cookware to personalize your open shelves. Incorporate under-shelf lighting or small spotlights to highlight your display. Use matching baskets or boxes underneath for hidden storage. Play with symmetry or asymmetry for a balanced, curated look.
Open shelving can make your kitchen look more inviting and personalized. It’s a simple swap that adds both style and functionality. With a little planning, your space will feel more open and showcase your personality effortlessly!
3. Painting Cabinets in a Fresh, Trendy Color for a Quick Makeover
Are your kitchen cabinets stuck in the past? A fresh coat of paint in a trendy color can completely change the vibe without a costly renovation. It’s an affordable way to update your space and reflect your evolving style. Why settle for outdated when you can be bold?
Recommended Products to replicate this idea
| # | Preview | Product | |
|---|---|---|---|
| 1 |

|
Nuvo Titanium Infusion Cabinet Makeover Kit - Easy DIY 7-Piece Set, Brilliant White, Long-Lasting... | Buy on Amazon |
| # | Preview | Product | |
|---|---|---|---|
| 1 |

|
BEROSSA 10 Pack Brushed Nickel Cabinet Pulls 3 Inch Satin Nickel Cabinet Handles Nickel Hardware for... | Buy on Amazon |
Visualize cabinets in a soft matte blush pink or deep navy blue that contrast beautifully with neutral countertops. The new color adds warmth or sophistication, depending on your choice. Imagine how a fresh hue brightens the entire room, making it feel more modern and inviting. Textured or matte finishes add depth, while high-gloss paints create a sleek, polished look.
Choose colors that complement your wall paint, countertops, and flooring. For a subtle update, go for pastel shades or muted tones. For a statement, bold colors like emerald or charcoal work well. Seasonal color swaps—like warm terracotta in fall—can keep your kitchen feeling fresh throughout the year.
Start by cleaning and lightly sanding the cabinets for better paint adhesion. Use a high-quality primer suited for cabinetry. Apply at least two coats of your chosen color with a brush or roller, ensuring even coverage. Use painter’s tape to protect hardware and edges. Finish with a clear sealant or topcoat for durability. Allow adequate drying time between coats.
Add decorative touches like new hardware or contrasting trim to enhance the fresh look. Consider painting the inside of glass-front cabinets for an extra pop of color. Incorporate contrasting painted accents on the drawers or panels for visual interest. Personalize with custom stenciling or patterns for a unique touch.
A simple color change can make your entire kitchen feel renewed and more aligned with your personality. It’s a DIY-friendly project that empowers you to take control of your decor. Go ahead—pick that bold hue and enjoy your stylish new space!
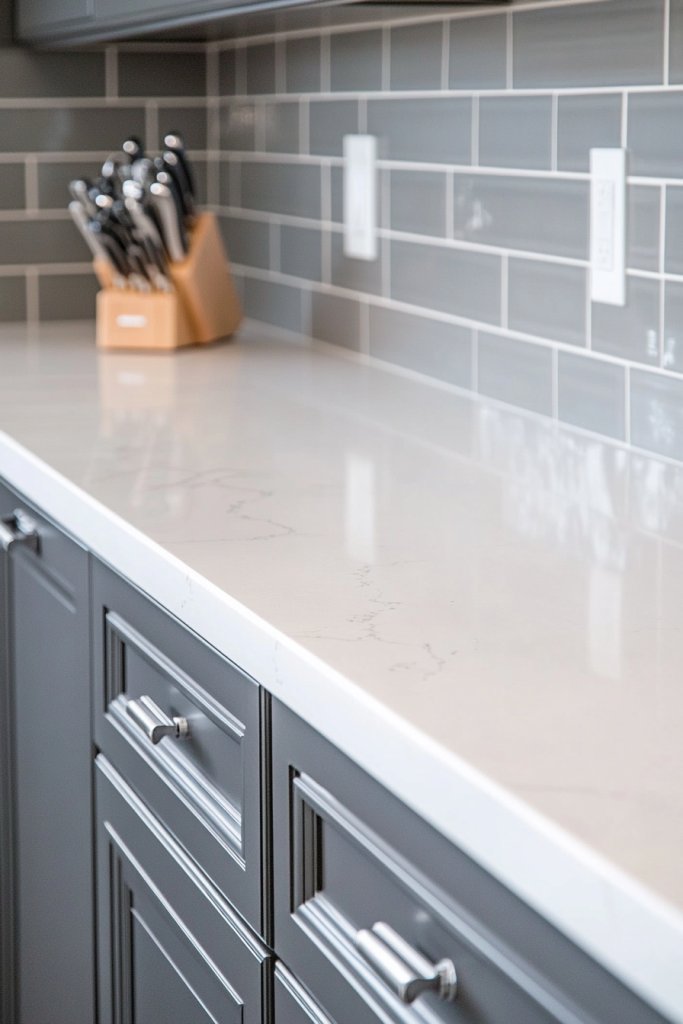
4. Upgrading Countertops to Quartz or Marble for a Luxurious Feel
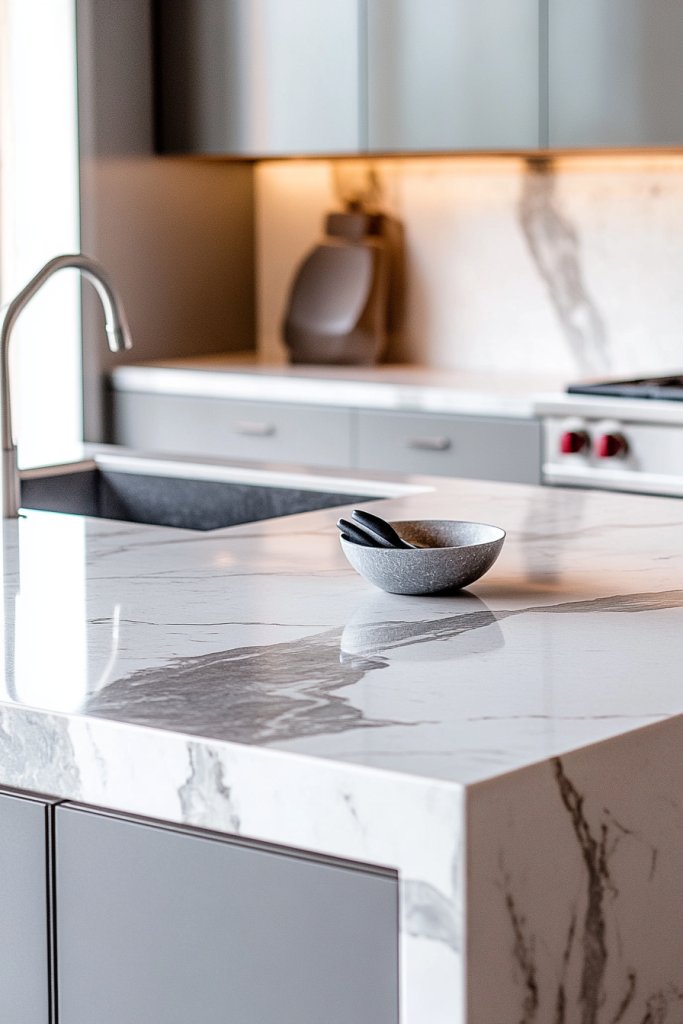
Are your countertops looking worn or outdated? Upgrading to quartz or marble instantly elevates your kitchen’s luxury factor. It’s a game-changer for creating a sophisticated, high-end vibe without redoing the entire space. Who doesn’t want a countertop that screams elegance?
Recommended Products to replicate this idea
| # | Preview | Product | |
|---|---|---|---|
| 1 |

|
Quartz Countertop Repair Kit, Marble Repair Kit, Strong Bond, Seamless Finish for Granite Repair,... | Buy on Amazon |
| # | Preview | Product | |
|---|---|---|---|
| 1 |
|
Marble Peel and Stick Wallpaper Granite Wall Paper for Old Furniture Self Adhesive and Removable... | Buy on Amazon |
Picture sleek, polished quartz in shades of grey or bold patterns that mimic natural stone. Or imagine a pure white marble with subtle veining that adds a sense of timeless beauty. The reflective surface amplifies light, making your kitchen feel brighter and more spacious. Visualize how these surfaces add texture and depth, elevating the overall design.
Choose a finish that suits your lifestyle—polished for a glossy, luxurious look or honed for a softer matte appearance. Integrate contrasting materials like wood or metal accents to add warmth. For smaller kitchens, lighter shades help open up the space, while darker tones create drama in larger areas.
Begin by measuring your current countertops and selecting a durable, heat-resistant material. Hire a professional for precise cutting and installation—these surfaces are heavy and require specialized tools. Seal the edges properly to prevent water infiltration. Consider adding a protective sealant or ongoing maintenance routine to keep the surface looking pristine. Choose a reputable supplier for quality slabs.
Add a custom edge profile—beveled, bullnose, or ogee—to enhance style. Incorporate inlays or contrasting colors in the countertop for a bespoke look. Use decorative backsplashes or trim to frame your new surface. Personal touches like engraved initials or unique inlays can make the countertop uniquely yours.
Upgrading your countertops is an investment that pays off in style and function. It creates a sleek, polished look that impresses guests and boosts your pride. With the right choice, your kitchen becomes a luxurious retreat you’ll love showing off.
5. Adding Under-Cabinet Lighting to Brighten and Modernize
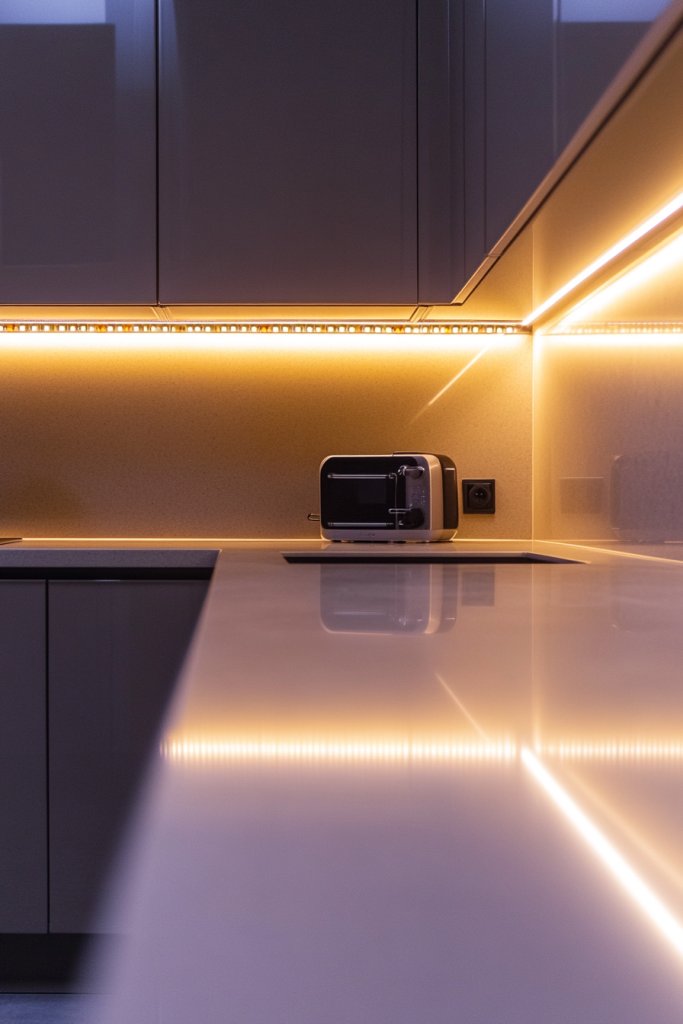
Ever feel like your kitchen is a bit dim or shadowy? Under-cabinet lighting can brighten your workspace and add a sleek, modern touch. It’s a simple upgrade that makes a big difference in both functionality and ambiance. Plus, it’s the kind of detail that makes your kitchen feel thoughtfully designed.
Recommended Products to replicate this idea
| # | Preview | Product | |
|---|---|---|---|
| 1 |
|
JUSJUBR Plug-in Under Cabinet Lighting, 2pcs 12 Inch Dimmable Closet Light, Cold White 6000K... | Buy on Amazon |
| # | Preview | Product | |
|---|---|---|---|
| 1 |

|
Electight Upgraded Motion Sensor Light, 8 LEDs, 3 Pack Rechargeable, 120 Detection, 3 Modes -... | Buy on Amazon |
Imagine warm LED strips casting a gentle glow beneath your cabinets, illuminating countertops evenly. Think about how this lighting highlights your backsplash and adds depth to the room. Visualize the subtle shimmer of light reflecting off polished surfaces, creating a cozy yet contemporary vibe. It’s like turning on a soft spotlight on your culinary zone.
Choose from tape, puck, or strip lights depending on your space and style preference. Warm white or daylight tones set different moods—warm for cozy, daylight for bright clarity. Install dimmers for adjustable ambiance. For a minimalist look, hide wiring behind trim or molding, or choose wireless options for easy setup.
Start by measuring your cabinet lengths and selecting the right lighting type. Clean the underside of cabinets thoroughly before attaching. Use connectors and power supplies compatible with your chosen lights, following manufacturer instructions. Secure the strip with adhesive backing or mounting clips. Connect to your power source, and test thoroughly before finalizing installation. Ensure wiring is hidden for a clean look.
Integrate color-changing LEDs or smart systems that sync with your home automation. Add a timer or motion sensors for convenience. Use light diffusers or frosted covers for a softer glow. Personalize with dimming controls to match different moods and occasions.
Adding under-cabinet lighting transforms your kitchen into a well-lit, inviting space. It’s an upgrade that combines style with daily practicality. With a bit of DIY effort, you’ll enjoy a brighter, more functional kitchen every day.
6. Replacing Old Hardware with Stylish Handles and Knobs
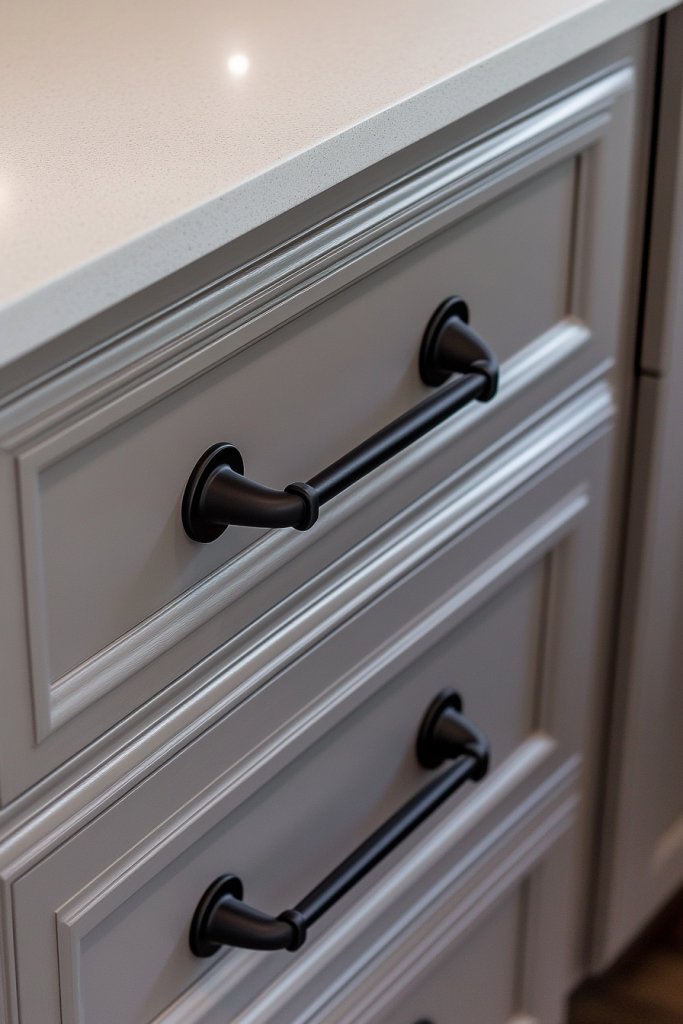
Are your cabinet handles looking tired or mismatched? Swapping them out with stylish new handles and knobs is an easy way to refresh your entire kitchen. It’s a small change that packs a punch in updating your decor and improving usability. Who knew tiny hardware could make such a big impact?
Recommended Products to replicate this idea
| # | Preview | Product | |
|---|---|---|---|
| 1 |

|
Ravinte 30 Pack 5'' Cabinet Pulls Brushed Nickel Stainless Steel Kitchen Drawer Pulls Cabinet... | Buy on Amazon |
| # | Preview | Product | |
|---|---|---|---|
| 1 |
|
Ravinte 30 Pack 1-1/4 inch Matte Black Zinc Euro-Style Cabinet Knobs, Drawer Pulls & Door Handles | Buy on Amazon |
Picture sleek matte black pulls or vintage brass knobs against painted cabinets. Visualize how shiny, textured handles catch the light and add a layer of sophistication. The new hardware can contrast or complement your existing fixtures, creating a cohesive look. It’s like jewelry for your cabinets—subtle but essential.
Mix and match hardware styles for a curated, eclectic vibe or stick to uniform designs for a streamlined look. Choose finishes that match your faucet, light fixtures, or other accents. For a rustic feel, opt for antique or distressed finishes. Changing hardware seasonally or for special occasions keeps your kitchen feeling fresh.
Remove existing handles carefully, saving screws if possible. Measure and drill new holes if needed, ensuring they align perfectly. Use a level or template for symmetry. Install the new handles securely, tightening all screws. Clean off any leftover adhesive or fingerprints for a polished finish. Double-check that handles open and close smoothly.
Add decorative accents like leather straps or colorful rubber grips for a personalized touch. Incorporate theme-based handles—nautical, vintage, modern—for a cohesive style. Use contrasting colors for an unexpected pop—think black handles on white cabinets. Keep spare hardware for quick swaps and seasonal updates.
Upgrading hardware is a quick DIY project that instantly modernizes your kitchen. It’s a small investment with a high visual return. Once done, you’ll enjoy improved functionality and a fresh look every time you open your cabinets.
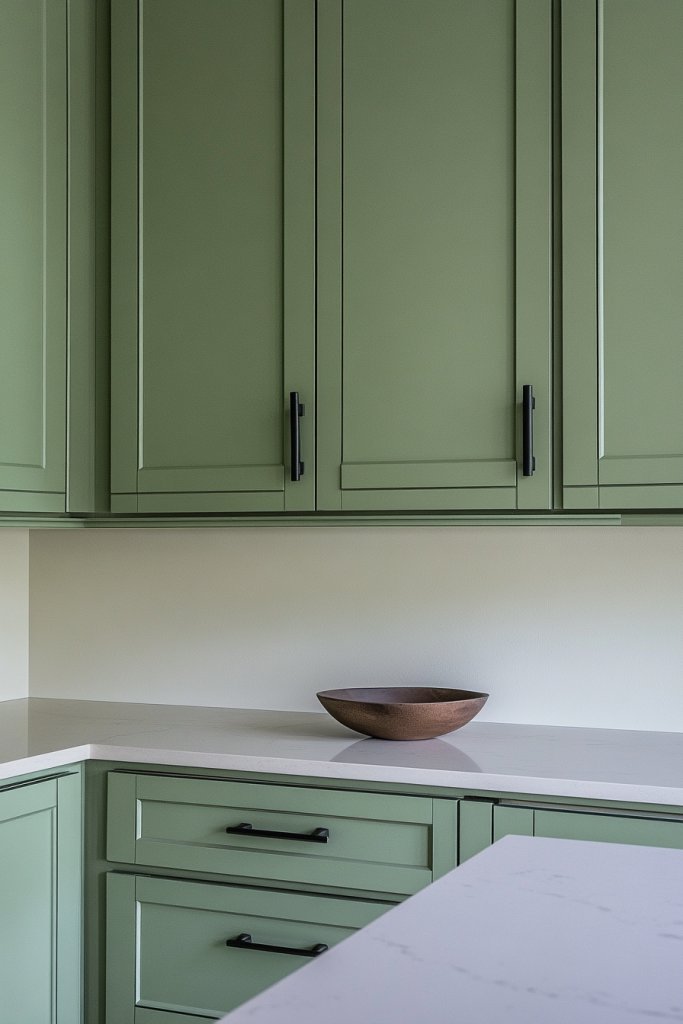
7. Incorporating a Two-Tone Cabinet Color Scheme for Visual Contrast
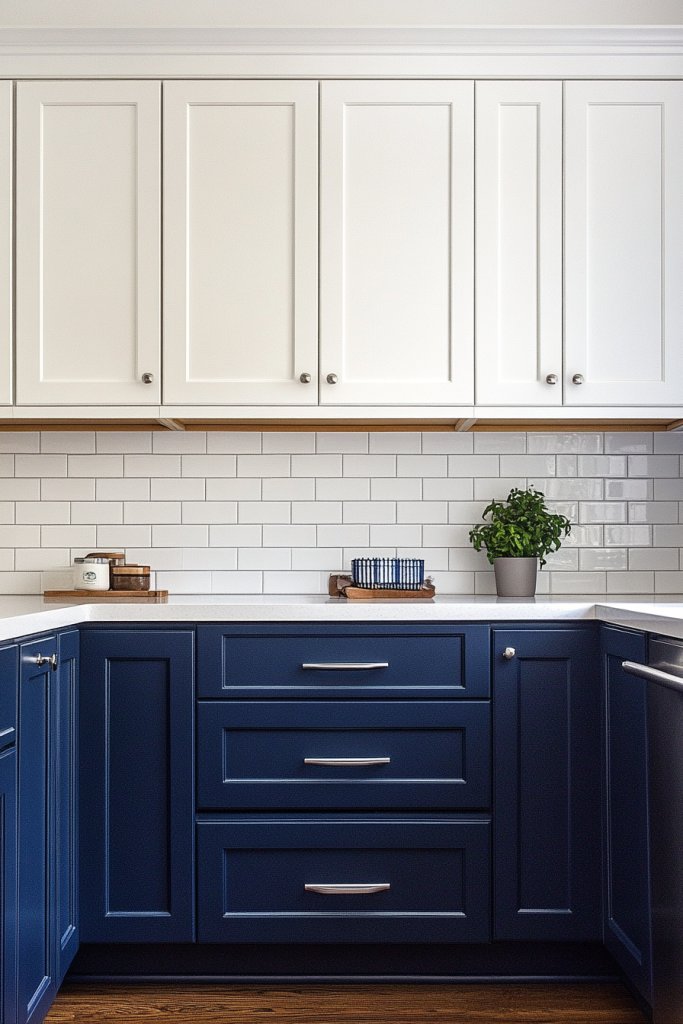
Feeling like your kitchen needs a bit more depth and character? A two-tone cabinet scheme is an easy way to add visual interest and break up monotony. It’s perfect for creating a layered, sophisticated look that feels both modern and inviting. Ready to ditch the sameness?
Recommended Products to replicate this idea
| # | Preview | Product | |
|---|---|---|---|
| 1 |

|
Heroad Peel and Stick Wallpaper Wood Contact Paper Wood Wallpaper White Wood Grain Contact Paper... | Buy on Amazon |
| # | Preview | Product | |
|---|---|---|---|
| 1 |

|
Haliwu 10 Pack Black and Gold Cabient Handles 2 Tone Cabinet Hardware Black and Brushed Gold Cabinet... | Buy on Amazon |
Imagine upper cabinets painted a soft dove grey while the lower cabinets pop in bold navy or deep green. The contrast draws your eye around the space and highlights different architectural features. Visualize how this layering creates a sense of dimension and richness. The interplay of colors adds personality and depth to an otherwise plain setup.
Opt for complementary hues that match your overall palette—neutral with bold accents or pastel with darker shades. For small kitchens, lighter upper cabinets can keep the space airy, while darker lower cabinets ground the room. Seasonal tweaks like warm tones or cool shades can refresh the vibe throughout the year.
Start by choosing two harmonious colors, testing samples in your kitchen’s lighting. Paint or veneer the upper and lower cabinets separately, using painter’s tape for clean lines. Prepare surfaces by cleaning and sanding. Apply primer if needed, then paint with quality brushes or rollers. Seal with a clear topcoat for durability. Be patient—allow ample drying time between coats.
Add contrasting hardware or decorative trims to reinforce the color separation. Incorporate different finishes—matte, satin, or gloss—to emphasize contrast. Use decorative moldings or panels to further define each section. Personalize by adding a pop of color inside glass-front cabinets or on the interior edges.
A two-tone kitchen feels designer-made and personalized. It’s an easy way to elevate your space without a full renovation. Embrace bold choices and enjoy a kitchen that looks fresh, vibrant, and truly yours.
8. Installing a Statement Pendant Light Over the Kitchen Island

Is your kitchen island missing that wow factor? A statement pendant light can instantly elevate the space from ordinary to extraordinary. It’s the perfect centerpiece that combines style and function. Want your kitchen to look professionally designed? This is your move.
Recommended Products to replicate this idea
| # | Preview | Product | |
|---|---|---|---|
| 1 |

|
KLSS Brushed Nickel Pendant Lights Kitchen Island - Clear Glass Pendant Light Fixture Multiple Stems... | Buy on Amazon |
| # | Preview | Product | |
|---|---|---|---|
| 1 |

|
Lingkai 15.7" Black Modern Pendant Light Fixtures, Kitchen Lighting Fixtures Ceiling Hanging Light... | Buy on Amazon |
Picture a large, sculptural pendant with a matte black finish or a colorful glass globe hanging above your island. Visualize how the light fixture becomes a focal point, drawing attention and anchoring the room’s design. The glow from the pendant highlights the countertop and creates a cozy, inviting atmosphere. It’s like jewelry for your kitchen.
Choose a fixture that matches your overall style—industrial, modern, boho, or farmhouse. Scale is key: larger fixtures work best over big islands, while smaller pendants suit more delicate spaces. Mix materials—metal, glass, or woven fibers—for texture. Change out shades seasonally for a fresh look.
Measure the island’s dimensions to select an appropriately sized fixture. Ensure the fixture hangs at a height that provides ample task lighting without obstructing views or conversation. Attach the mount securely to the ceiling, ensuring electrical wiring is properly connected. Use a dimmer switch for adjustable ambiance. Confirm all connections are tight and tested before finalizing.
Add decorative bulbs or vintage filament styles for a warm glow. Incorporate matching wall sconces or accent lighting to create layers of light. Personalize with unique shapes or colors that reflect your personality. Keep the design balanced and proportional to the island size.
A statement pendant turns a functional element into a design feature. It’s a simple upgrade with a big aesthetic payoff. Enjoy your kitchen’s new centerpiece and bask in the compliments from visitors!
9. Refreshing Flooring with Durable, Modern Materials
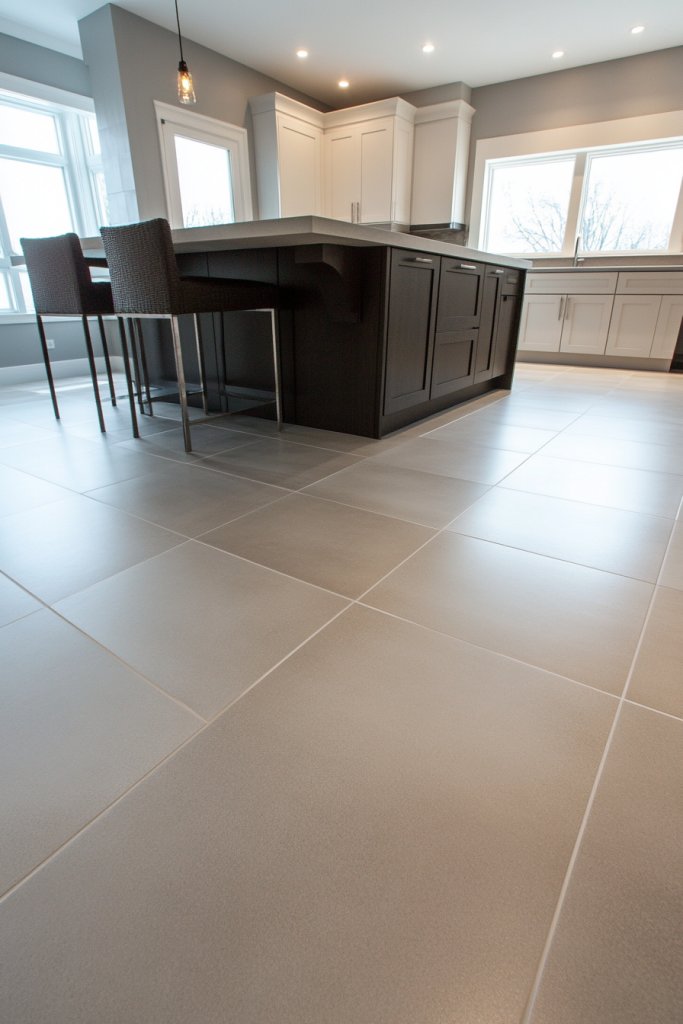
Does your kitchen floor look tired or outdated? Swapping old flooring for modern, durable materials can breathe new life into the space. It’s a practical upgrade that boosts style and functionality simultaneously. Ready for a fresh foundation?
Recommended Products to replicate this idea
| # | Preview | Product | |
|---|---|---|---|
| 1 |

|
REXBETI Laminate Wood Flooring Installation Kit, LVP Installation Kit, Vinyl Flooring Tools -... | Buy on Amazon |
| # | Preview | Product | |
|---|---|---|---|
| 1 |

|
FloorPops x Chris Loves Julia 12-in by 12-in Bonneville Grey & White Marble Peel & Stick Floor... | Buy on Amazon |
Think of warm-toned hardwood planks that add richness and texture, or sleek large-format tiles in geometric patterns for a contemporary look. Patterned vinyl or patterned cement tiles can add personality without breaking the bank. Visualize how new flooring instantly brightens and grounds the entire kitchen.
Match flooring choices to your lifestyle—luxury vinyl for resilience, hardwood for elegance, or tile for heat resistance. Lighter shades can make small kitchens appear larger, while darker tones add drama. Seasonal accents like rugs or mats can soften the look and add comfort.
Remove existing flooring carefully, ensuring the subfloor is even and clean. Measure and cut new materials precisely, following manufacturer instructions. Use appropriate adhesive, nails, or click-lock systems based on your material. Seal or grout as needed to protect against moisture and stains. Consider professional installation for complex patterns or large areas.
Layer with rugs or runners that complement your decor style. Choose textured or patterned options for visual interest. Incorporate heating mats under tiles or vinyl for added comfort. Personalize with decorative borders or inlays to create a custom look.
A new floor anchors your entire kitchen makeover. It’s a practical upgrade that adds significant value and style. Once installed, you’ll enjoy a durable, beautiful surface for years to come.
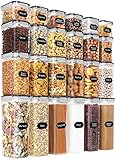
10. Creating a Functional Pantry with Custom Shelving
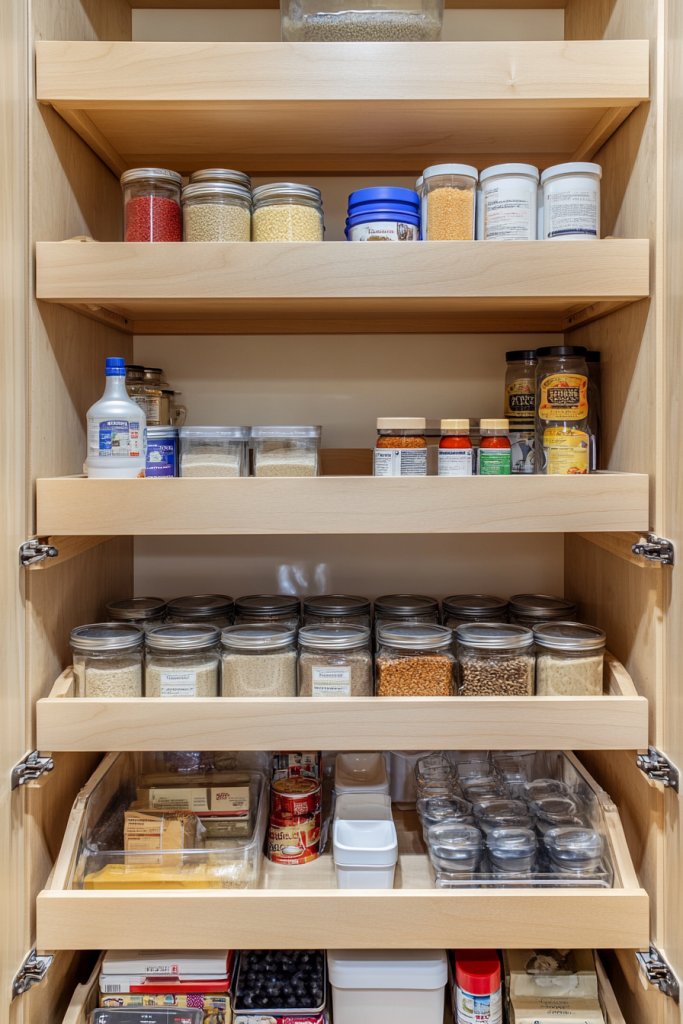
Is your pantry a chaotic maze of half-empty boxes and forgotten cans? Creating a dedicated, organized pantry can simplify your life and reduce stress. Custom shelving turns clutter into order, making everything accessible at a glance. Plus, it looks pretty impressive when guests open the door.
Recommended Products to replicate this idea
| # | Preview | Product | |
|---|---|---|---|
| 1 |

|
Amazon Basics 5-Shelf Adjustable Storage Shelving Unit for Garage, Steel Wire Rack, 200 Pound... | Buy on Amazon |
| # | Preview | Product | |
|---|---|---|---|
| 1 |
|
PRAKI Airtight Food Storage Containers Set with Lids - 24 PCS, BPA Free Kitchen and Pantry... | Buy on Amazon |
Visualize sturdy wooden or metal shelves lined with labeled jars, baskets, and neatly stacked cans. Imagine a pull-out drawer system for spices or a clear bin for snacks. The shelves are adjustable, fitting your needs perfectly. Bright lighting and uniform containers create a sleek, professional look. It’s like having a mini grocery store in your kitchen.
Use open shelving for easy access or enclosed cabinets for a cleaner look. Incorporate baskets or decorative boxes for miscellaneous items. Adjustable racks can accommodate different container heights. Seasonal or themed labels can keep things fun and functional.
Start by decluttering and measuring your space. Choose shelving systems that are sturdy and easy to install—wall-mounted or free-standing. Use a level and drill to secure shelves at your desired height. Organize items by category and frequency of use for efficiency. Add labels or color coding for extra organization. Regular maintenance keeps your pantry looking sharp.
Add decorative touches like vintage jars or unique handles. Personalize with chalkboard labels or custom signage. Incorporate pull-out trays or lazy Susans to maximize space. Use color themes or patterns to make it visually appealing.
An organized pantry simplifies meal prep and shopping. It makes your kitchen more functional and enjoyable. Plus, it’s a satisfying project that boosts your confidence in DIY organization.
11. Adding a Chalkboard or Magnetic Wall for Practicality and Charm
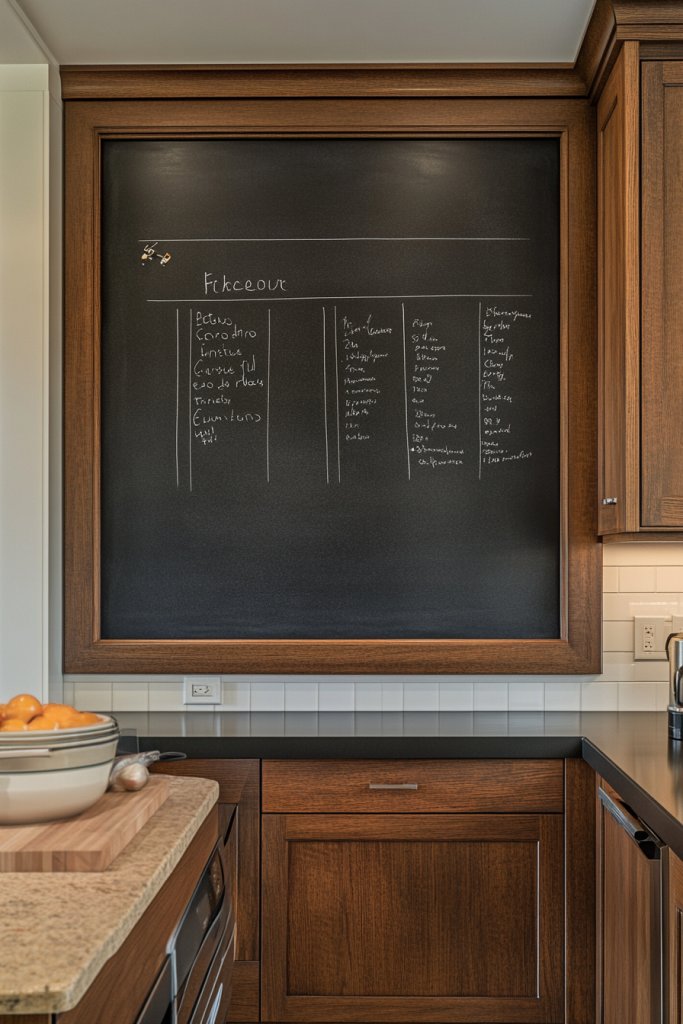
Ever wish you had a dedicated spot for grocery lists, meal plans, or family messages? A chalkboard or magnetic wall combines practicality with a dash of charm. It’s a versatile feature that keeps everyone on the same page and adds a personalized touch. No more sticky notes cluttering your fridge.
Recommended Products to replicate this idea
| # | Preview | Product | |
|---|---|---|---|
| 1 |

|
YOUNGJQ Magnetic Whiteboard Contact Paper 39" x 18" Adhesive Magnetic Dry Erase White Board Sticker... | Buy on Amazon |
| # | Preview | Product | |
|---|---|---|---|
| 1 |

|
Extra Large Chalkboard Peel and Stick Paper 9 Feet roll (108 inches) + (5) Color Chalk Included - by... | Buy on Amazon |
Imagine a large chalkboard painted on a blank wall or a magnetic panel with colorful magnets and notes. Picture handwritten reminders, grocery lists, or even kids’ artwork displayed proudly. The surface adds a rustic or modern vibe, depending on your choice of frame and finish. It’s both functional and decorative, making your kitchen more interactive.
Choose a chalkboard with a wood or metal frame to match your style. For a cleaner look, go frameless or use peel-and-stick options. Incorporate magnetic paint beneath a decorative wallcovering for a seamless look. Change the message or layout seasonally for freshness.
Prepare the wall by cleaning and sanding as needed. Apply chalkboard paint or magnetic primer following manufacturer instructions. Use painter’s tape for clean edges. Once dry, add a decorative frame if desired. Use chalk or magnets to write messages and organize notes. Regularly clean and update the surface to keep it inviting.
Add colorful chalk or themed magnets to match your decor. Incorporate small shelves or hooks nearby for markers and erasers. Personalize with quotes, recipes, or family goals written on the board. Use different colors to categorize or highlight key info.
A chalkboard or magnetic wall transforms your kitchen into a hub of activity and communication. It’s a fun, interactive feature that keeps your family organized. Plus, it adds a charming, lived-in feel that everyone loves!
12. Incorporating a Breakfast Nook with Built-In Seating
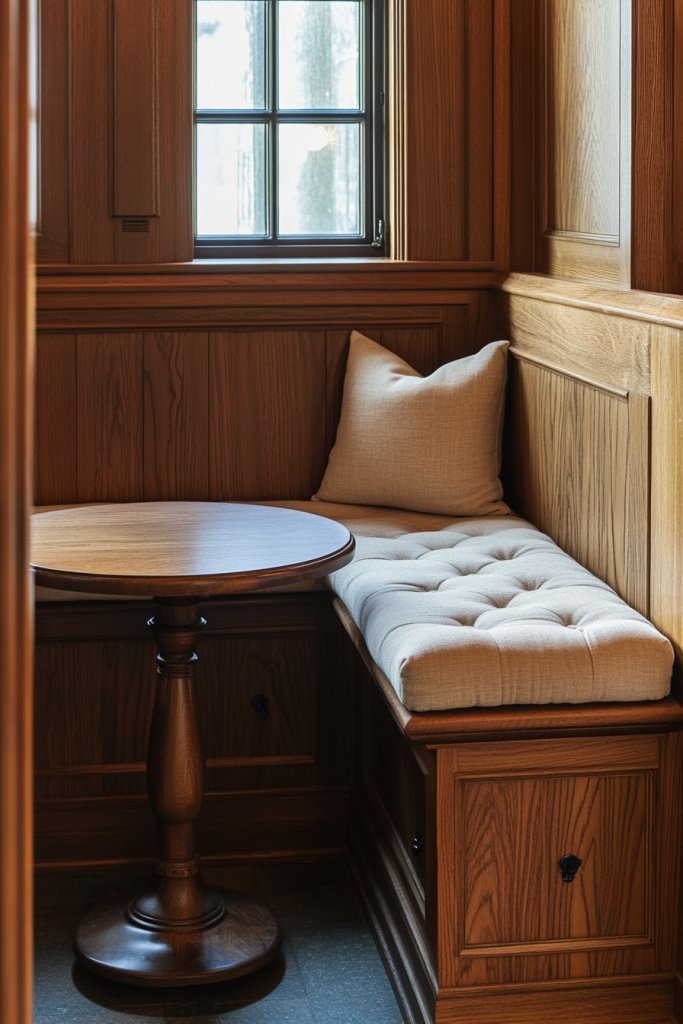
Craving a cozy spot for casual meals or morning coffee? A built-in breakfast nook creates a welcoming, intimate corner that makes everyday dining special. It’s perfect for small kitchens or open-plan spaces where every inch counts. Who says eating can’t be stylish?
Recommended Products to replicate this idea
| # | Preview | Product | |
|---|---|---|---|
| 1 |

|
BALAPET Breakfast Nook Cushions Set 4 Piece Cushion Pad Set for Kitchen Breakfast Dining... | Buy on Amazon |
| # | Preview | Product | |
|---|---|---|---|
| 1 |

|
Murphy Folding Table, Fold Fown Dining Table Wall-Mounted Drop-Leaf Table, Wall Mounted... | Buy on Amazon |
Imagine a snug corner with a cushioned bench, surrounded by windows that flood the space with natural light. Add a small table with a colorful tablecloth or a sleek wooden surface. Visualize plush pillows and a soft throw blanket for comfort. The space becomes a charming retreat for mornings and casual gatherings.
Use custom-built benches or repurpose existing nooks. Incorporate storage underneath the seating for extra functionality. Choose fabrics and colors that match your overall decor—think cozy textiles or sleek leather. Adapt the size and shape based on your space, from L-shaped to corner setups.
Measure the space carefully, considering doorways and traffic flow. Build or buy a custom bench that fits perfectly, with hidden storage if desired. Choose a durable tabletop material—wood, laminate, or stone. Add cushions and pillows for comfort. Finish with paint or stain that complements your kitchen’s palette. Keep it simple or add decorative trim for flair.
Add decorative pillows or a throw for extra coziness. Incorporate a small shelf or hooks above for mugs or accessories. Personalize the space with your favorite colors or patterns. Use themed textiles for seasons or holidays to keep the nook fresh.
A breakfast nook turns everyday meals into a special occasion. It creates a warm, inviting atmosphere that encourages lingering and conversation. It’s an easy project that adds charm and functionality to your kitchen.
13. Replacing a Cluttered Sink Area with a Stylish Farmhouse or Undermount Sink

Is your sink area a magnet for mess and clutter? Upgrading to a stylish farmhouse or undermount sink can transform this functional zone into a sleek, organized space. It’s a small change with a big impact on both aesthetics and usability. Why settle for dull when you can have stunning?
Recommended Products to replicate this idea
| # | Preview | Product | |
|---|---|---|---|
| 1 |

|
Miuara Farmhouse Sink 33 Inch - Apron Front Kitchen Sink Reversible 33"x18"x10", Undermount... | Buy on Amazon |
| # | Preview | Product | |
|---|---|---|---|
| 1 |

|
Kitchen Sink 30x18 Inch Undermount Sink Stainless Steel 16 Gauge Single Bowl Kitchen Sinks Set (5... | Buy on Amazon |
Picture a deep, white farmhouse sink with a vintage-inspired finish or a seamless undermount model that blends into your countertop. Surround it with a tidy arrangement of soap dispensers, scrub brushes, and a cutting board. Visualize the clean lines and open space that make the area feel more spacious and inviting. It’s both practical and charming.
Choose between rustic or modern styles depending on your decor. Pair with a decorative faucet that matches your theme—brushed nickel, matte black, or brass. Incorporate a matching soap dispenser or a small tray for essentials. Use open shelving or a minimalist backsplash for added style.
Remove the old sink carefully, disconnecting plumbing safely. Measure your countertop opening precisely for the new sink. Seal the edges with appropriate caulking to prevent leaks. Connect plumbing and test for leaks before finalizing. Consider professional help for complex installations or custom cuts. Keep the workspace clean and organized.
Add a decorative faucet or vintage handles for extra charm. Use a stylish soap dispenser or a small plant nearby to soften the look—remember, restricted items like plants are not necessary here unless essential. Incorporate a sleek dish rack or organizer that fits your style.
Upgrading your sink area creates a fresh, inviting workspace. It boosts your kitchen’s overall look and makes daily chores more enjoyable. It’s a simple project with long-lasting benefits, turning a functional zone into a design feature.
14. Implementing a Two-Tone or Two-Texture Countertop Backsplash Combo
Are your kitchen surfaces feeling flat and uninspired? Combining two materials or textures for your countertops and backsplash can add visual interest and depth. It’s an innovative way to elevate your space without a full remodel. Ready to break the monotony?
Recommended Products to replicate this idea
| # | Preview | Product | |
|---|---|---|---|
| 1 |
|
Art3d 102-Piece Peel and Stick Wall Tile for Kitchen Backsplash, Bathroom, Fireplace, 3in. × 6in.... | Buy on Amazon |
| # | Preview | Product | |
|---|---|---|---|
| 1 |
|
Quartz Countertop Repair Kit, Marble Repair Kit, Strong Bond, Seamless Finish for Granite Repair,... | Buy on Amazon |
Imagine a butcher block countertop paired with a sleek glass tile backsplash or a stone countertop with a textured ceramic tile. Visualize how the interplay of textures creates a layered, dynamic look. Think of warm wood tones contrasting with cool stone or glossy tiles with matte finishes. This combo adds personality and sophistication.
Mix materials based on function—resistant stone or quartz for high-traffic areas, decorative tiles for accents. Use different textures—smooth, matte, or textured—for contrast. Incorporate colors that complement your overall palette, from neutral to bold. Seasonal or trend-driven combinations keep your kitchen current.
Plan your layout carefully, deciding which surfaces get each material. Prepare surfaces by cleaning and leveling. Install the primary material first, then carefully add the secondary layer—whether it’s a backsplash or countertop edge. Use appropriate adhesives, sealants, or grout. Pay attention to seams and transitions for a seamless look. Professional help can ensure precision.
Add decorative trim or contrasting edges along your counters. Incorporate inlays or accent tiles in the backsplash for extra flair. Personalize with custom shapes or colors that reflect your style. Keep maintenance in mind—select easy-to-clean materials for longevity.
A layered, textured surface scheme makes your kitchen look thoughtfully curated and unique. It’s an easy way to enhance visual interest without a complete overhaul. Embrace the creative freedom to mix and match for a truly personalized space.
15. Adding a Statement Rug or Mat for Color and Comfort

Does your kitchen floor feel cold and uninspiring? A vibrant statement rug or mat can add warmth, color, and personality. It’s an easy, budget-friendly way to refresh your space and make it more inviting. Who says your kitchen can’t be cozy and stylish?
Recommended Products to replicate this idea
| # | Preview | Product | |
|---|---|---|---|
| 1 |

|
2x6 Hallway Washable Runner Rug : Vintage Soft Kitchen Laundry Runner with Non Slip Backing... | Buy on Amazon |
| # | Preview | Product | |
|---|---|---|---|
| 1 |

|
StepRite Kitchen Mats, 2PCS Kitchen Rugs, Cushioned Anti Fatigue Kitchen Mats for Floor, Non-Slip... | Buy on Amazon |
Imagine a bold patterned rug with geometric shapes or floral motifs that pop against neutral floors. Visualize soft textures like plush or woven fabrics that invite you to stand and linger. The rug becomes a focal point, tying together your decor elements and anchoring the space.
Choose rugs that complement your color palette—bold for a statement or neutral for subtlety. Layer multiple rugs for a boho look or keep it simple with one large piece. Seasonal swaps—like a bright spring pattern or a cozy winter design—keep the vibe fresh. Make sure it’s non-slip for safety.
Measure your space to select the right size—large enough to define the area without overpowering it. Choose durable, easy-to-clean materials suitable for high traffic. Lay the rug flat and secure with non-slip pads. Clean your floors before placing for a neat, polished look. Regular vacuuming keeps it looking fresh.
Add decorative elements like fringes, tassels, or custom embroidery. Coordinate the rug with your curtains or towels for a cohesive look. Use seasonal accessories—like holiday-themed motifs—to keep the decor playful. Personal touches make your space uniquely yours.
A statement rug transforms the kitchen into a warm, welcoming space. It’s a simple update with a big visual impact. Enjoy a more comfortable standing surface and a pop of personality every day!
16. Incorporating Modern Storage Solutions Like Pull-Out Drawers and Lazy Susans
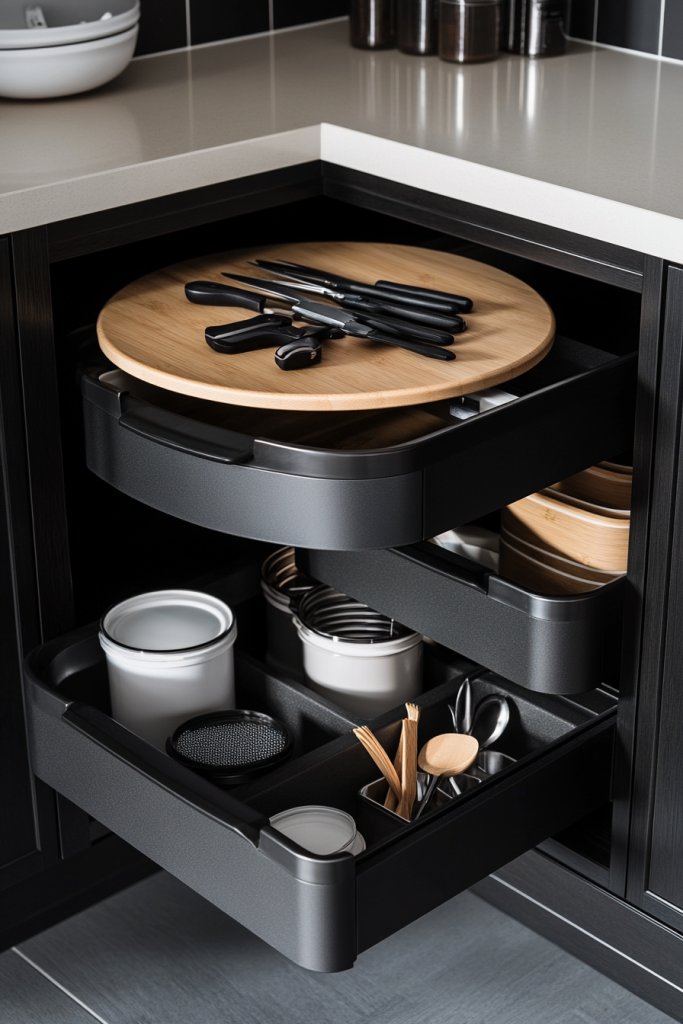
Tired of digging through cluttered cabinets? Modern storage solutions like pull-out drawers and lazy Susans make organization effortless. They maximize space and accessibility, turning chaos into calm. It’s time to upgrade your kitchen’s efficiency and style.
Recommended Products to replicate this idea
| # | Preview | Product | |
|---|---|---|---|
| 1 |

|
REALINN Under Sink Organizer, Pull Out Cabinet Organizer 2 Tier Slide Out Sink Shelf Cabinet Storage... | Buy on Amazon |
| # | Preview | Product | |
|---|---|---|---|
| 1 |
|
Set of 4, 10 Inch Non-Skid Lazy Susan Organizers - Turntable Rack for Cabinet, Pantry Organization... | Buy on Amazon |
Visualize smooth-gliding pull-out trays filled with neatly arranged spices or canned goods. Picture a Lazy Susan spinning effortlessly to reveal hidden corners of deep cabinets. The sleek metal or wood finishes blend seamlessly with your decor, providing both function and flair. It’s a design upgrade you’ll love every day.
Choose adjustable or modular systems to customize your storage. Incorporate clear bins or labeled containers for easy identification. Use corner units or tiered trays to utilize every inch. Match finishes—matte, gloss, or metallic—to your overall style scheme.
Empty existing cabinets and measure interior dimensions. Select storage hardware that fits your needs. Install sliding tracks or hardware securely, following manufacturer instructions. Organize items logically—heavy on the bottom, frequently used at the front. Test for smooth operation and adjust if needed. Keep the workspace clean during installation.
Label containers for quick identification or add decorative accents. Incorporate color-coded systems for different food groups. Use decorative trim or handles to match your aesthetic. Regularly purge and reorganize for ongoing efficiency.
Modern storage solutions make your kitchen more functional and less stressful. They help keep everything visible and within reach. Once installed, you’ll wonder how you ever managed without them!
17. Painting or Refinishing Old Wooden Floors for a Rustic Charm

Is your wooden floor looking worn, dull, or full of scratches? A fresh coat of paint or refinishing can restore its rustic charm and breathe new life into your kitchen. It’s a cost-effective way to add warmth and character without replacing the entire floor. Ready for a transformation?
Recommended Products to replicate this idea
| # | Preview | Product | |
|---|---|---|---|
| 1 |
|
Furniture Repair Kit Wood Markers - Set of 13 - Markers and Wax Sticks with Sharpener Kit, for... | Buy on Amazon |
| # | Preview | Product | |
|---|---|---|---|
| 1 |

|
Zep High Traffic Floor Polish - 1 Gal (Case of 2) ECZUHTFF1282- Scuff-Resistant Durable Finish for... | Buy on Amazon |
Imagine distressed wood painted in soft, muted tones—like whitewash or pastel shades—that add a vintage vibe. Or see a natural finish highlighting grain patterns and knots for an authentic rustic look. The surface gleams subtly under warm lighting, inviting you to linger. It’s like bringing history back to life with a modern twist.
Choose between staining, painting, or distressing to achieve your desired effect. Weathered finishes work well in farmhouse or shabby chic styles. For a more polished look, opt for sealing with a clear topcoat that enhances the wood’s natural beauty. Incorporate rugs or runners for added texture and comfort.
Sand the existing surface thoroughly, removing old finishes and smoothing rough patches. Apply a primer if painting, or stain with a brush or roller for even coverage. For painted floors, use durable, floor-specific paint and seal with a protective topcoat. Refinish in sections to ensure no area is missed. Allow adequate drying time before use.
Add decorative stencils or patterns for a unique look. Layer rugs or mats that complement your decor style. Incorporate reclaimed or vintage accessories nearby to enhance the rustic charm. Regular maintenance preserves the finish and keeps your floors looking great.
Refinished wooden floors add warmth and personality, making your kitchen feel cozy and inviting. It’s a DIY project that pays off in style and long-term value. Enjoy the beauty of your restored floors for years to come.
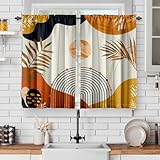
18. Updating Window Treatments with Stylish Shades or Curtains
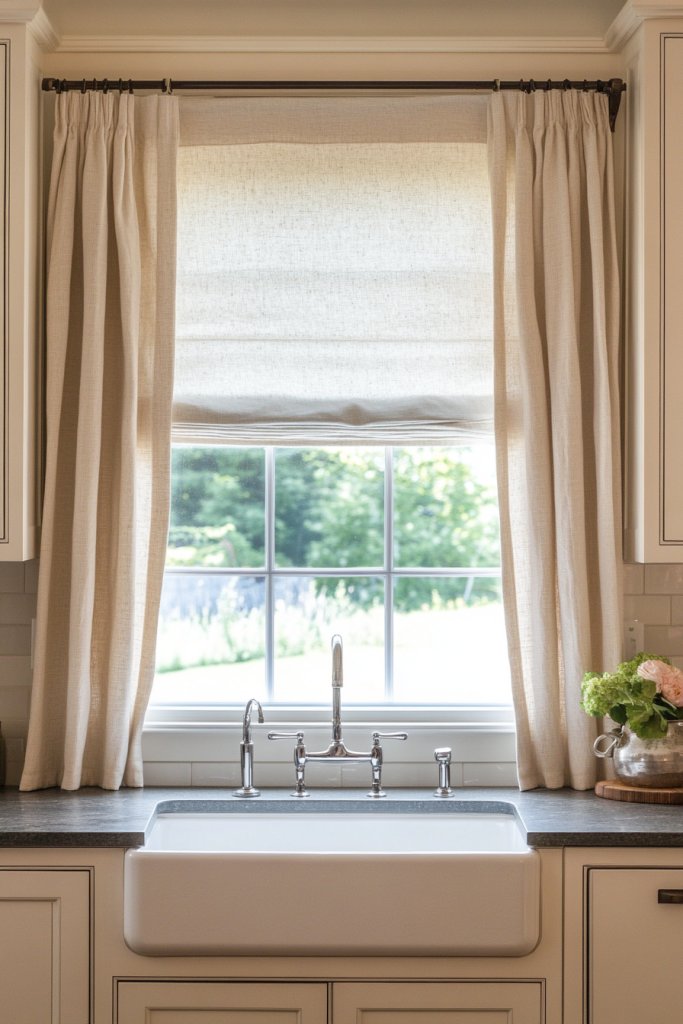
Are your window coverings dull or outdated? Stylish shades or curtains can frame your kitchen windows beautifully and add a finishing touch to your decor. It’s an easy way to control light, add privacy, and inject personality. Why settle for boring blinds?
Recommended Products to replicate this idea
| # | Preview | Product | |
|---|---|---|---|
| 1 |

|
jinchan Tie Up Curtain Double Layer Linen Roman Shades Valance Curtain Floral for Bathroom Window... | Buy on Amazon |
| # | Preview | Product | |
|---|---|---|---|
| 1 |
|
GOLDLAWN Orange Boho Curtains 39 Inch Mid Century Cafe Drapes for Small Windows Abstract Leaves... | Buy on Amazon |
Picture flowing linen curtains in soft neutral tones that soften the room’s edges. Or imagine sleek roller shades in bold colors or patterns that make a statement. The fabric or material adds texture and color, transforming the overall look. Visualize how natural light filters softly through, creating a warm, inviting atmosphere.
Choose from blackout, sheer, or layered options depending on your needs. Coordinate curtain fabrics with your upholstery or accessories for a cohesive look. Use decorative rods, tiebacks, or valances to add flair. Seasonal covers—like lightweight fabrics for summer or heavier drapes for winter—keep your decor fresh.
Measure your window accurately for proper fit. Select hardware that complements your style—metal, wood, or painted options. Install brackets securely, ensuring level placement. Hang your shades or curtains and adjust for proper length and fullness. Add tiebacks or decorative finials for extra style. Clean and iron fabrics before hanging for a polished finish.
Mix and match fabrics or patterns for an eclectic look. Incorporate decorative trims, tassels, or embroidery for a custom feel. Use contrasting colors or textures to make windows pop. Change out seasonal treatments to keep your decor lively and aligned with your mood.
Updated window treatments frame your view and add style to your kitchen. It’s a simple project that instantly boosts curb appeal and comfort. Enjoy the privacy and personality they bring, making your space truly yours.
19. Decluttering and Styling with Practical, Attractive Organization Bans

Does your kitchen feel more like a storage war zone than a cooking haven? Decluttering and organizing with practical, attractive solutions can restore order and calm. It’s about making your space functional and visually appealing at the same time. Ready to tame the chaos?
Recommended Products to replicate this idea
| # | Preview | Product | |
|---|---|---|---|
| 1 |
|
PRAKI Airtight Food Storage Containers Set with Lids - 24 PCS, BPA Free Kitchen and Pantry... | Buy on Amazon |
| # | Preview | Product | |
|---|---|---|---|
| 1 |

|
Kitstorack Under Sink Organizer, 2 Tier Under the Sink Storage, Slide out Pull out Cabinet Organizer... | Buy on Amazon |
Visualize baskets, jars, and trays neatly arranged on countertops and shelves. Clear containers with labels keep ingredients visible and accessible. Use uniform storage options—like glass jars or woven baskets—to create harmony. The space looks tidy, inviting, and even a little fancy. It’s like a curated magazine spread.
Incorporate open shelving, closed cabinets, or a mix based on your needs. Use matching containers and labels for consistency. Seasonal or themed storage—like holiday cookie jars or summer drink pitchers—adds fun. Maximize vertical space with hooks or hanging racks for utensils or pots.
Start by emptying your cabinets and drawers, sorting items into keep, donate, or discard. Clean all surfaces thoroughly. Invest in stylish containers, trays, and drawer organizers. Group similar items together—spices, baking supplies, utensils—for quick access. Label everything clearly for ongoing tidiness. Regular maintenance keeps clutter at bay.
Add decorative touches like vintage jars or colorful containers. Customize with labels or chalkboard tags for a personal touch. Incorporate a color scheme or theme that matches your decor. Use attractive storage solutions that double as decor elements, like woven baskets or metal tins.
A decluttered, well-organized kitchen boosts your efficiency and mood. It transforms daily routines into enjoyable tasks. Once you see how beautiful and functional your space can be, you’ll wonder why you waited so long.
Conclusion
From sleek modern renovations to cozy rustic updates, these before and after kitchen redo ideas demonstrate the endless possibilities for transforming your space. Don’t be afraid to try new styles and techniques—your dream kitchen is within reach. Take the leap and turn your vision into reality, creating a kitchen that truly reflects your personality and lifestyle.
Last update on 2026-03-01 / Affiliate links / Images from Amazon Product Advertising API