Your kitchen is more than just a place to cook—it’s the heart of your home where personality and creativity shine. Kitchen wall decor ideas are incredibly popular because they allow you to showcase your style, add warmth, and make the space uniquely yours.
In this article, you’ll find a diverse array of decor ideas that can transform your kitchen walls from plain to captivating. Whether you love vintage accents, modern art, or cozy textiles, there’s something here to inspire your next kitchen update and bring new life to your culinary space.
1. Magnetic Chalkboard Wall for Meal Planning and Doodles
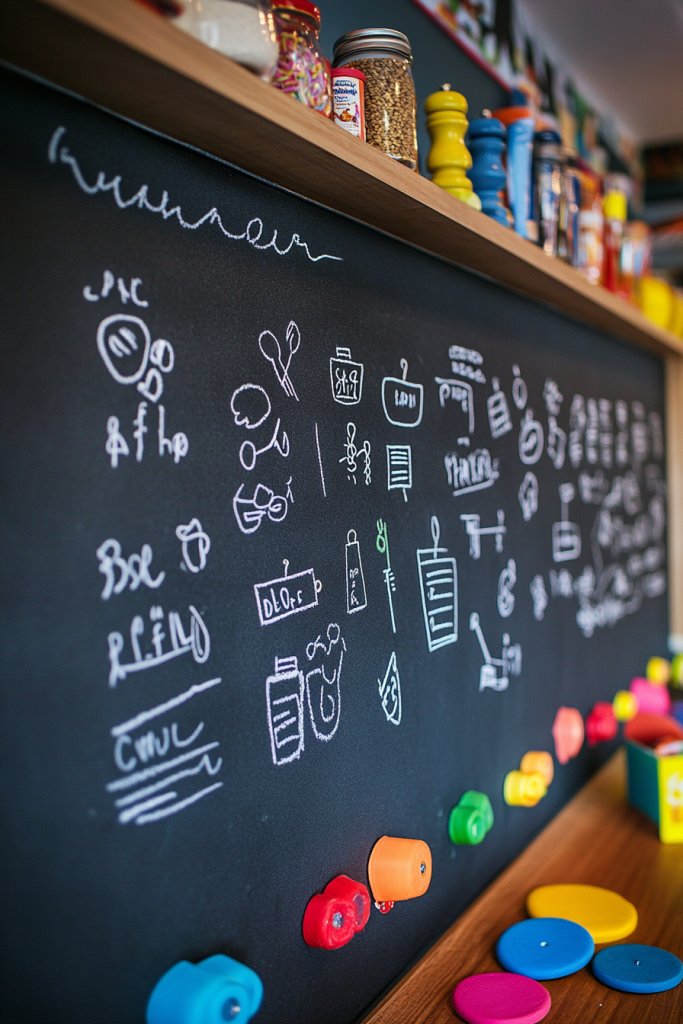
Ever tried juggling a shopping list, family schedule, and a quick doodle all on your fridge door? It’s chaos, and you probably end up forgetting important stuff or scribbling on post-its that disappear. A magnetic chalkboard wall offers a simple solution that keeps everything in one spot, reducing clutter and stress. Plus, it adds a playful yet functional vibe to your kitchen.
Recommended Products to replicate this idea
| # | Preview | Product | |
|---|---|---|---|
| 1 |

|
HeatPomelo Arch Magnetic Wall Decal - 40" x 18" Matte Finish Chalkboard Sticker for Wall - Magnetic... | Buy on Amazon |
| # | Preview | Product | |
|---|---|---|---|
| 1 |

|
Loddie Doddie Chalk Markers - Pack of 24, 6mm Reversible Tips - Liquid Chalk Pens for Glass &... | Buy on Amazon |
Picture a large, matte black panel stretching across a section of your wall, dotted with colorful magnets holding notes, recipes, and artwork. Chalk dust lightly coats the edges as you jot down tomorrow’s dinner plans or sketch a quick family doodle. The surface invites interaction, with a few decorative magnets adding pops of color against the sleek background. It becomes a lively hub of activity and creativity.
You can customize the size and shape of your chalkboard wall to suit your space, from a small framed section to an entire wall. For a rustic look, opt for a distressed wood frame around the chalkboard. Seasonal themes can be reflected through magnetic decorations—pumpkins in fall, snowflakes in winter—making it versatile and fun year-round. Even chalk colors can change with your mood or decor style.
Start by choosing a wall section that’s easy to access and won’t interfere with daily activities. Purchase a magnetic chalkboard paint or a pre-made panel, depending on your DIY skill level. Prepare the surface by cleaning thoroughly; then, apply the paint in multiple thin coats if needed. Once dry, you can add a decorative frame or leave it as-is for a minimalist look. Use magnets to hold notes and a chalk marker for a cleaner writing experience.
Add personalized magnet sets with family photos, favorite quotes, or custom illustrations. Incorporate a color-coded system for different categories—grocery lists, reminders, or fun doodles—making organization stylish. You could even create a weekly rotation of inspiring messages or motivational quotes to boost your mood during busy mornings. The key is to make it uniquely yours.
A magnetic chalkboard wall transforms your kitchen into a lively, organized space that encourages creativity and practicality. It’s an easy upgrade that makes daily routines more fun and less stressful. With a bit of customization, it becomes a focal point that reflects your personality and keeps everyone on the same page. Ready to turn blank wall space into your new favorite feature?
2. Vintage Wooden Pegboard for Storage and Display
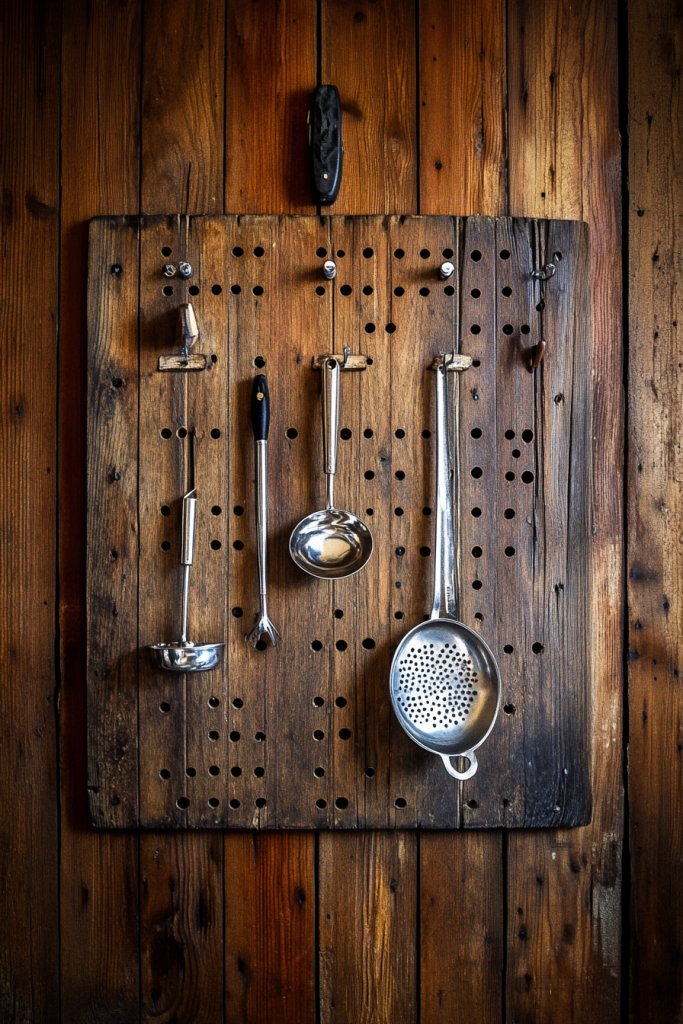
Is your kitchen counter cluttered with utensils, pots, and random gadgets? It’s like a never-ending game of hide-and-seek trying to find that one spatula. A vintage wooden pegboard offers a stylish way to organize essentials while adding nostalgic charm. It keeps tools within reach and frees up precious counter space.
Recommended Products to replicate this idea
| # | Preview | Product | |
|---|---|---|---|
| 1 |
|
AMSXNOO Wood Pegboard Wall Organizer Panels, Wooden Pegboard Combination Wall Organizer Kit, Display... | Buy on Amazon |
| # | Preview | Product | |
|---|---|---|---|
| 1 |
|
INCLY 120PCS Pegboard Accessories Organizer Kit, Peg Board Hooks Assortment with Bins for Organizing... | Buy on Amazon |
Imagine a warm, rustic wooden panel mounted on the wall, with hooks holding colorful utensils, small pots, and decorative items. The grain of the wood adds texture and warmth, contrasting beautifully with sleek modern appliances. Light filters in, highlighting the farmhouse vibe. It’s both functional and eye-catching, turning everyday items into curated decor.
Choose different wood finishes—weathered, stained, or painted—to match your style. For a more eclectic look, mix vintage tools and decorative accents like hanging herbs or small framed quotes. You can also incorporate shelves or baskets beneath the pegboard for additional storage. Seasonal swaps are easy—swap out hooks or add festive decorations without much effort.
Start by selecting a sturdy wooden panel, preferably reclaimed or distressed for that vintage feel. Mount it securely at eye level using wall anchors and screws. Arrange hooks and accessories in a pattern that balances practicality with aesthetics. You can customize the layout by grouping similar items or creating a visual flow. To keep it tidy, regularly rotate or swap items to refresh the look.
Personalize your pegboard with painted labels, vintage signs, or small decorative knobs. Incorporate small potted herbs or miniature framed photos in between functional items for a layered effect. Use different colored hooks or baskets to designate zones—such as baking tools, cooking utensils, or coffee accessories. This not only enhances the look but also improves efficiency.
A vintage pegboard transforms clutter into curated decor, proving that organization can be charming. It’s a versatile solution that adapts to your evolving needs and style preferences. With a little creativity, your kitchen becomes a space that’s both practical and nostalgic, inspiring you to keep things tidy and stylish every day.
3. Floating Shelves with Colorful Dishware
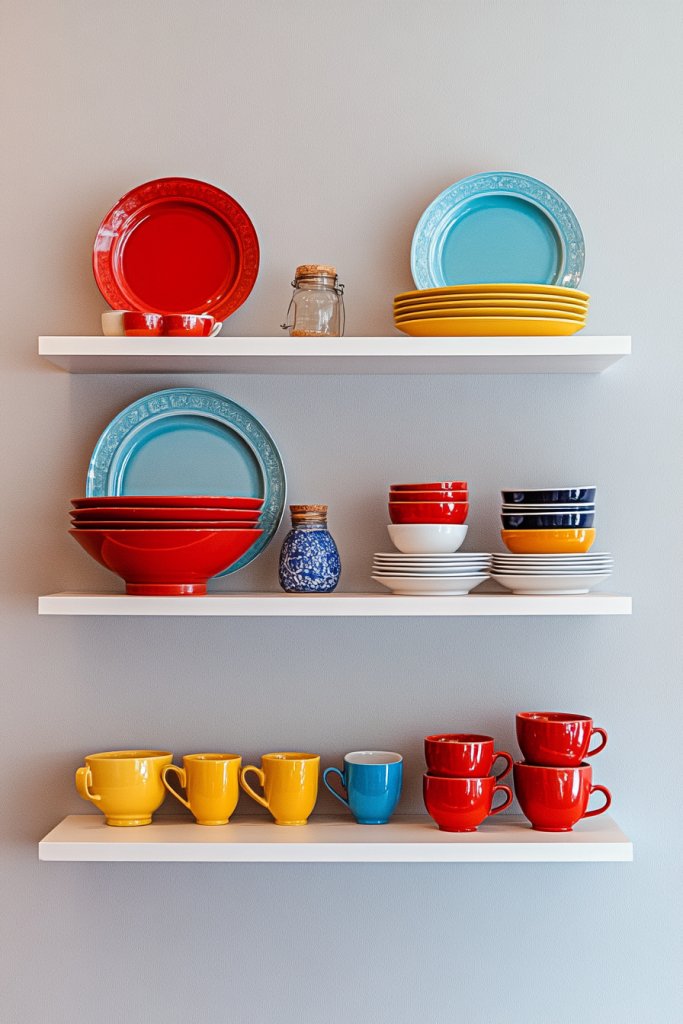
Tired of digging through cluttered cabinets every time you need a plate or mug? A simple yet effective solution is floating shelves that display your favorite dishware. It turns everyday essentials into decorative elements, making your kitchen feel more inviting and organized at the same time. Plus, it’s a quick upgrade with a big visual impact.
Recommended Products to replicate this idea
| # | Preview | Product | |
|---|---|---|---|
| 1 |
|
BAYKA Floating Shelves for Wall, Wall Mounted Rustic Wood Shelves for Bathroom, Bedroom, Living... | Buy on Amazon |
| # | Preview | Product | |
|---|---|---|---|
| 1 |

|
vancasso Bonita Dinnerware Sets, 24 Pieces Multicolor Stoneware Dinner Set for 6, Handpainted... | Buy on Amazon |
Visualize sleek, minimalistic floating shelves stretching across the wall, holding a vibrant array of plates, bowls, and mugs. Bright colors and varied patterns add personality while creating a lively focal point. The open display allows light to reflect off the dishware, brightening the space. Small decorative items like jars or candles can be nestled between for added interest.
Mix and match dishware styles—modern, vintage, or handcrafted—to reflect your personality. For seasonal charm, swap out items for themed dishware, like pastel tones for spring or deep hues for fall. Use different shelf lengths or stagger the heights for a dynamic look. Consider adding under-shelf lighting for a cozy glow or highlighting specific pieces.
Begin by selecting sturdy, wall-mountable floating shelves that match your decor style. Measure and mark their placement for even spacing and balance. Mount the shelves securely using appropriate anchors and screws, ensuring they can support the weight of your dishware. Arrange the items in a layered style, with taller pieces at the back and smaller ones in front. Feel free to add decorative accents or small plants (if you ignore restrictions) for a lively vibe.
Personalize the display with custom labels, painted patterns, or unique dishware from travels and gifts. Group similar colors or styles for a cohesive look or mix for an eclectic feel. Rotate the display periodically to showcase new favorites or seasonal pieces. Using matching or contrasting dishware can also influence the overall mood of the space.
Floating shelves turn your dishware into art, making your kitchen feel more curated and lively. They’re a flexible way to showcase your personality while keeping essentials within arm’s reach. This simple update can make everyday meals more enjoyable and visually inspiring, proving that organization and style go hand in hand.
4. Stenciled Geometric Wall Patterns for Modern Flair
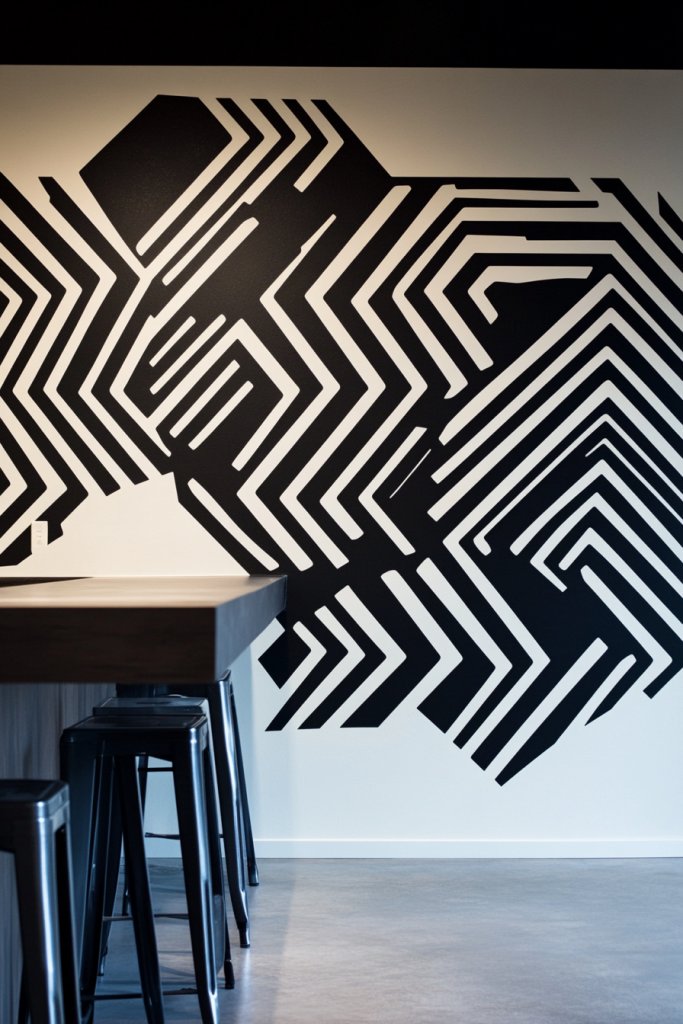
Is your plain wall crying out for a facelift? Maybe you want to add a touch of modern sophistication without a costly renovation. Stenciled geometric patterns provide a chic, DIY-friendly way to elevate your kitchen walls. They add visual interest and a contemporary edge, making your space feel fresh and intentional.
Recommended Products to replicate this idea
| # | Preview | Product | |
|---|---|---|---|
| 1 |

|
Geometric Stencils for Painting, 16PCS 6" Plastic Stencils for Crafts Reusable, Modern Geometric... | Buy on Amazon |
| # | Preview | Product | |
|---|---|---|---|
| 1 |

|
Zinsser 02774 PERMA-WHITE Mold & Mildew Proof Interior Paint, Quart, Eggshell White | Buy on Amazon |
Imagine bold triangles, chevrons, or diamond shapes in crisp contrasting colors creating a dynamic pattern across your wall. The precise lines and angles give a sense of movement and energy. Textured paints or matte finishes can add depth, while the repetitive shapes create a hypnotic visual rhythm. It’s like artwork you made yourself—personal and striking.
Choose geometric patterns that align with your style—minimalist monochrome, colorful and playful, or subtle metallic accents. You can stencil an entire wall or create a border or focal section. Seasonal color changes or paint touch-ups keep the pattern feeling fresh. For small kitchens, subtle patterns can add depth without overwhelming the space.
Select a stencil design that suits your taste and buy or make your own. Prepare the wall by cleaning and priming it for smooth application. Use painter’s tape to mark the boundary and masking tape for clean edges. Apply paint with a stencil brush or sponge, following the pattern’s instructions carefully. Seal with a clear matte or gloss finish to protect your work.
Incorporate metallic or holographic paints for a modern twist, or add small decals within the pattern for extra flair. Play with color combinations—black and white for a classic look or bold hues for a statement. Pair the geometric wall with minimalist furnishings and lighting to amplify the modern vibe. It’s all about making the pattern uniquely yours.
A geometric wall pattern instantly upgrades your space, making it feel designer and intentional. It’s a fun project that yields a high-impact result without needing professional help. Once finished, your kitchen will radiate a fresh, modern confidence that’s hard to ignore. Ready to stencil your way to style?
5. Hanging Rope and Clip Display for Recipes or Art
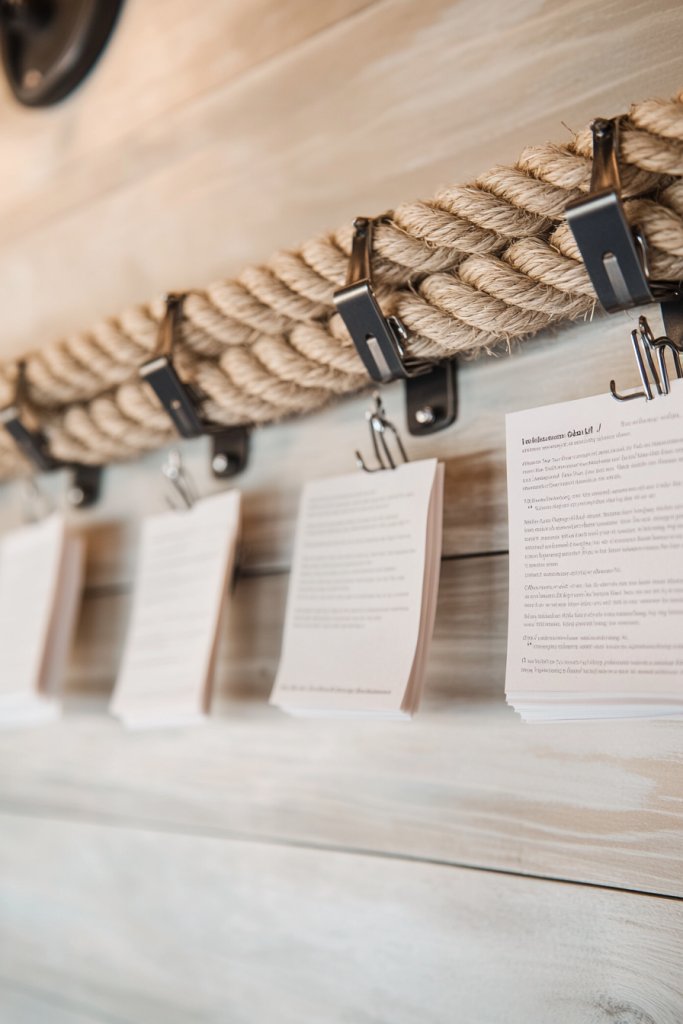
Ever wanted a simple way to display your favorite recipes, inspirational quotes, or even light artwork without cluttering surfaces? A hanging rope and clip system offers a minimalist, functional solution that keeps things organized and easy to update. Plus, it adds a casual, artsy touch to your kitchen decor.
Recommended Products to replicate this idea
| # | Preview | Product | |
|---|---|---|---|
| 1 |

|
Photo Hanging Display with 50 Photo Clips, String Hanging Pictures Decor Wall Display, Clip Photo... | Buy on Amazon |
| # | Preview | Product | |
|---|---|---|---|
| 1 |
|
DECORA Sturdy 1 Inch Mini Wooden Craft Clothespins 100pcs | Buy on Amazon |
Picture a sturdy jute or cotton rope stretched horizontally across a wall, with metal clips holding printed recipes, photos, or sketches. The texture of the rope adds warmth, while the clips keep items easily changeable. It’s like a gallery wall, but flexible and playful. Light catches on the clips, making the display lively and inviting.
Choose different rope thicknesses, colors, or materials to match your decor—natural fibers for rustic charm or sleek synthetic for modern minimalism. Vary clip styles—wooden, metal, or colorful—to add personality. You can also layer multiple ropes or add decorative elements like fairy lights or small fabric banners for special occasions.
Start by selecting a sturdy wall anchor point and measuring the length needed for your display. Attach hooks or anchors securely into the wall, then stretch the rope taut between them. Attach clips at intervals, ensuring they are evenly spaced. Use high-quality clips that won’t damage paper or fabric. It’s a simple project that can be completed in minutes.
Personalize the display with themed clips—holiday motifs, vintage clips, or custom-painted ones. Rotate recipes or artwork seasonally or whenever inspiration strikes. Add small decorative touches like fabric swatches or tassels hanging from the rope’s ends. This makes the display a dynamic feature that reflects your personality.
A hanging rope and clip system makes your kitchen feel more curated and personalized. It’s a flexible way to keep favorite recipes or art in sight, encouraging creativity and organization. Plus, it’s incredibly easy to update, so your decor stays fresh and reflective of your mood.
6. DIY Tile Stickers for a Faux Backsplash
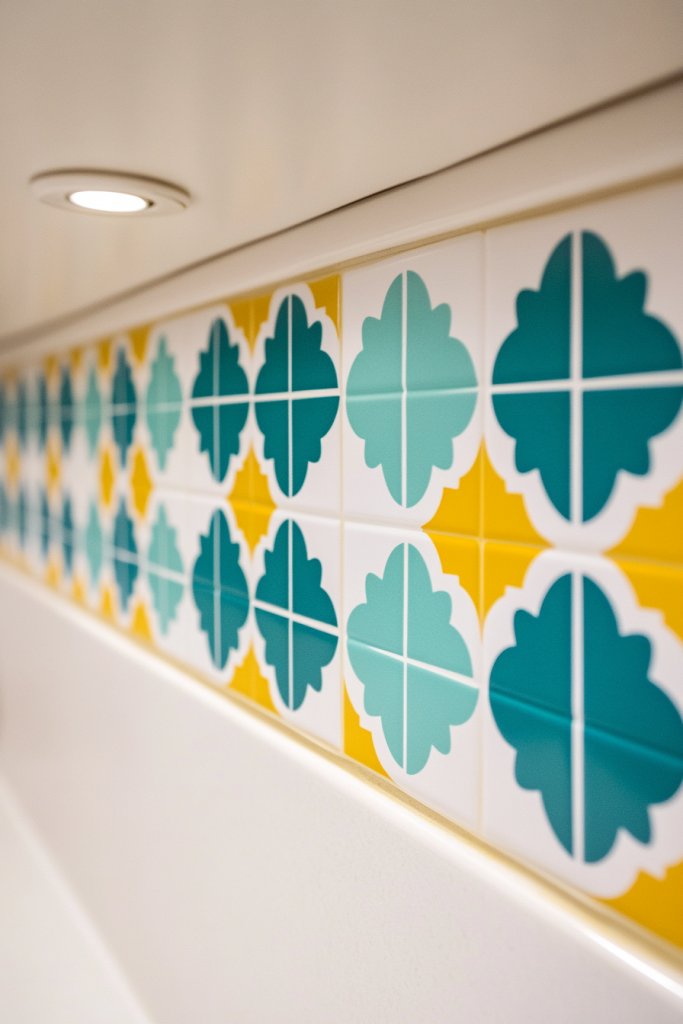
Are you tired of your outdated or boring backsplash but hesitant to rip out tiles or spend a fortune? DIY tile stickers provide an affordable, temporary solution that can transform your kitchen’s look instantly. They mimic real tiles, adding texture and pattern without the mess or cost of renovation.
Recommended Products to replicate this idea
| # | Preview | Product | |
|---|---|---|---|
| 1 |

|
Art3d 102-Piece Peel and Stick Wall Tile for Kitchen Backsplash, Bathroom, Fireplace, 3in. × 6in.... | Buy on Amazon |
| # | Preview | Product | |
|---|---|---|---|
| 1 |
|
Art3d Peel and Stick Backsplash for Kitchen White Subway (10 Tiles, Thicker Design) | Buy on Amazon |
Imagine a wall covered with glossy, patterned vinyl stickers that resemble classic subway tiles or colorful mosaics. The stickers sit flush against the wall, reflecting light and creating a sleek, modern effect. The pattern adds visual depth and interest, making your kitchen appear more polished and put-together.
Choose from a variety of tile patterns, colors, and finishes to match your style—classic white subway, bold geometric, or rustic terracotta. Mix and match for a unique look or keep it uniform for simplicity. Seasonal or themed stickers can add a fun update for holidays or parties. They’re easy to remove or replace as your tastes evolve.
Start by thoroughly cleaning and priming the wall surface. Measure and plan your layout, then carefully peel and stick the tiles, starting from one corner and working outward. Use a level or straight edge to ensure alignment. Smooth out air bubbles with a squeegee or credit card. For edges, cut stickers to fit gaps precisely. Finish with a clear sealant if needed for extra durability.
Create a pattern with contrasting colors or combine different styles for a custom look. Incorporate metallic or textured decals for added dimension. Personalize by adding small decorative accents around the tile area, such as vintage signs or small shelving units. Keep the design flexible—easily swap out stickers when you want a new look.
DIY tile stickers give you the power to upgrade your kitchen without a hefty investment or mess. It’s a project that feels impactful yet manageable, perfect for DIY novices. Once finished, your kitchen will look more modern and styled, boosting your confidence in tackling other decor projects. Why not give it a try and wow your guests?
7. Wire Grid Panel for Utensil and Accessory Organization
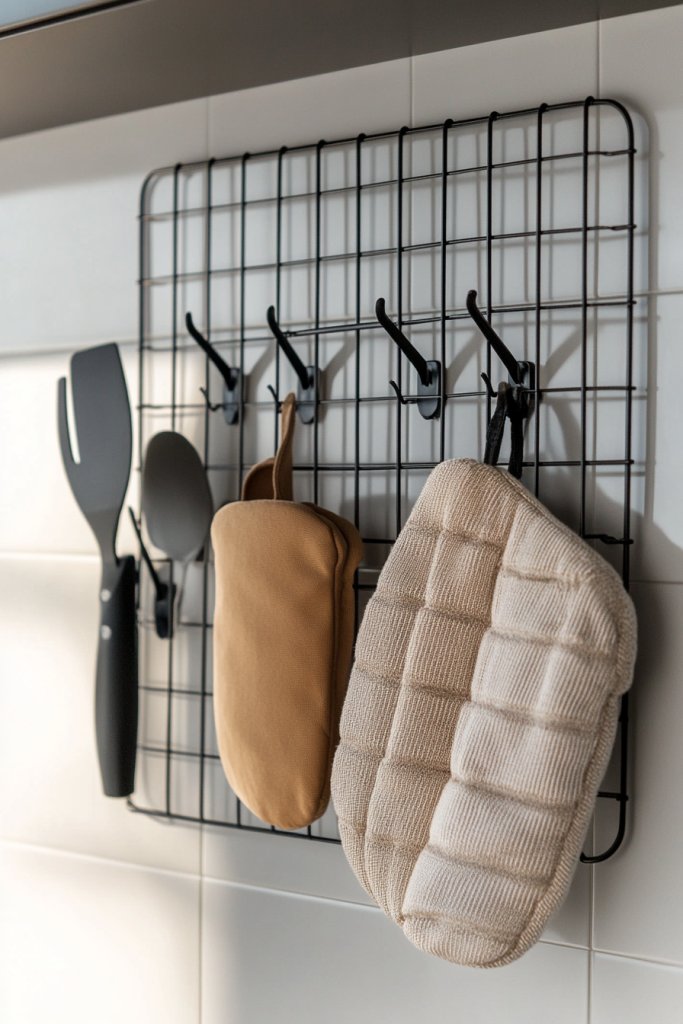
Cluttered countertops and drawers make cooking more stressful than it needs to be. A wire grid panel offers a chic, industrial-inspired solution to organize utensils, oven mitts, or small accessories visibly and accessibly. It’s a perfect way to combine function with style, especially if you’re into modern or loft-inspired decor. No more digging through drawers!
Recommended Products to replicate this idea
| # | Preview | Product | |
|---|---|---|---|
| 1 |

|
C&AHOME Photo Wall Display Set of 2, Grid Panel with Hooks, Clips, Hemp Cord, Hammer - 15.7" x... | Buy on Amazon |
| # | Preview | Product | |
|---|---|---|---|
| 1 |

|
100 Pack Small Curtain Clips Curtain Hooks Stainless Steel Light Clips S Hooks Clip Set for Hanging... | Buy on Amazon |
Visualize a large metal grid mounted on the wall, with hooks and baskets holding spatulas, tongs, or decorative accents. The open design makes everything easy to see and grab, while the metallic finish adds a sleek, contemporary touch. Small pouches or clips can hold recipe cards, notes, or even decorative items like fairy lights for a cozy glow. It’s an organized chaos that works.
Mix and match different sizes of baskets and hooks to suit your needs—some for utensils, others for small kitchen tools or decorative items. Paint or powder-coat the grid in colors that match your decor, from matte black to metallic brass. For a softer look, incorporate textile pouches or add decorative labels. Use it in a small nook or as a large focal point.
Measure and mark the wall for proper placement. Mount the grid securely using heavy-duty anchors, especially if holding heavier items. Arrange hooks and baskets in a pattern that balances accessibility and visual appeal. Start with essential tools and gradually add decorative or less-used items. Keep frequently used utensils within easy reach. Regularly clean and reorganize to maintain its fresh look.
Personalize with custom labels, painted accents, or decorative elements like small ceramic or fabric pouches. Incorporate seasonal or themed hooks to keep the display lively. Use color-coordinated utensils or accessories for a harmonious look. You can also add small framed quotes or photos nearby to make it more inviting.
A wire grid panel transforms clutter into curated decor, making your kitchen more functional and stylish. It encourages a tidy, accessible space where everything has a place. Once installed, it’s a visual reminder that organization can be attractive and easy. Your cooking routine will feel smoother, more efficient, and more inspired.
8. Artistic Metal Wall Art for a Modern Edge

Looking to add some sophistication and modern flair to your kitchen? Artistic metal wall art can instantly elevate plain walls with sleek designs, abstract shapes, or intricate cutouts. It brings texture, shine, and a contemporary vibe that complements minimalist or industrial decor. Why settle for blank walls when you can make a bold statement?
Recommended Products to replicate this idea
| # | Preview | Product | |
|---|---|---|---|
| 1 |

|
Rajukit Modern Geometric Abstract Metal Wall Art – Black Wall Decor – Large Metal Wall Sculpture... | Buy on Amazon |
| # | Preview | Product | |
|---|---|---|---|
| 1 |

|
Abstract Black Metal Wall Art for Living Room, 4 Pack Large Wall Sculptures Minimalist Modern 3D... | Buy on Amazon |
Imagine large, sculptural metal pieces with geometric patterns or fluid curves catching the light and casting shadows across your wall. The cool metallic tones contrast beautifully with warm wall colors or neutral palettes. The art’s three-dimensional quality creates depth, making your space feel more dynamic and layered. It’s a piece that invites admiration and curiosity.
Select from sleek, abstract designs, nature-inspired motifs, or modern cutouts that echo your personal style. Mix different sizes and finishes—brushed, polished, or matte—for visual interest. Hang multiple pieces in a gallery style or go for a single large statement piece. Incorporate LED accent lighting to highlight the art and create ambiance.
Choose durable, rust-resistant metal pieces suited for kitchen humidity. Mount securely using appropriate anchors to support the weight. Position the art at eye level or above eye height for maximum impact. Use spacers or frames for a polished look. Clean regularly with a soft cloth to maintain shine and prevent dust buildup. Consider installing subtle lighting to emphasize the textures.
Customize with painted accents, added LED backlights, or mixed media elements like wood or glass. Pair with minimalist furnishings to keep the focus on the artwork. Create a themed collection—like abstract, industrial, or organic shapes—that ties your decor together. Rotate or add new pieces over time for a fresh look.
Metal wall art lends a high-end, artistic feel that transforms your kitchen into a gallery. It’s a statement piece that combines craftsmanship with modern design. Once installed, it boosts your confidence in creating a space that’s both functional and visually stunning. Ready to add some metal magic?
9. Brightly Colored Tape or Washi Tape Wall Accents
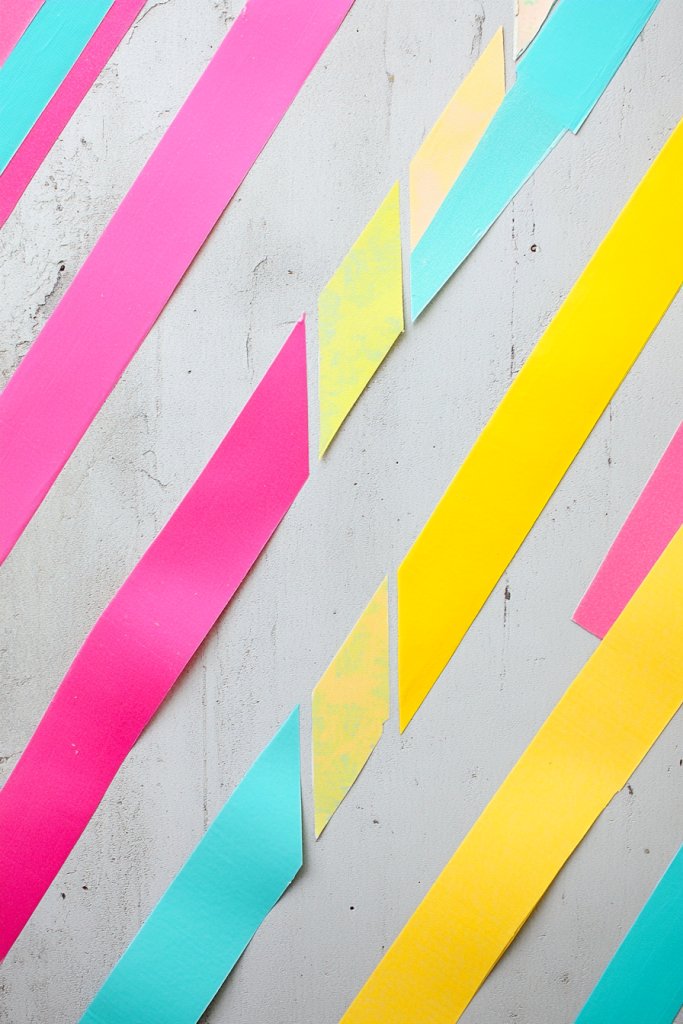
Bored with plain, boring walls? Looking for a quick, inexpensive way to add personality and color? Brightly colored tape or washi tape offers a versatile, playful solution that can transform your kitchen instantly. It’s perfect for renters or anyone hesitant to commit to permanent decor changes.
Recommended Products to replicate this idea
| # | Preview | Product | |
|---|---|---|---|
| 1 |

|
55 Rolls Holiday Washi Tape Set - Decorative Tape Seasonal Bohemian Colored Tape, Cute Washi Tapes... | Buy on Amazon |
| # | Preview | Product | |
|---|---|---|---|
| 1 |

|
Guirnd 12PCS Colored Masking Tape, Kids Art Supplies, DIY Craft Tape, Colored Tape Rolls, Colored... | Buy on Amazon |
Imagine walls adorned with bold stripes, geometric patterns, or playful shapes created with vibrant tape. The tape’s matte or glossy finish catches the light, adding a subtle shine or texture. You can layer different colors or create intricate designs—think chevrons, polka dots, or abstract art—making your walls a canvas of fun and personality.
Choose from a wide range of colors, patterns, and widths to match your mood or decor theme. For seasonal updates, swap out colors or designs—pastels for spring, deep tones for fall. You can create temporary murals, borders, or accents around shelves or appliances. It’s an easy way to experiment without long-term commitment.
Start by planning your design on paper or using painter’s tape for a dry run. Clean the wall surface thoroughly, then apply the tape carefully using a level or ruler for straight lines. Press firmly to ensure adhesion and smooth out any air bubbles. When finished, seal with a clear matte spray or leave as-is for a flexible, removable design. Remove or adjust anytime without damage.
Combine different tape patterns or add small stickers and decals for extra flair. Use tape to frame a photo collage or highlight a specific area. Coordinate the colors with your existing decor or create contrast for a more dynamic look. It’s a creative way to express your style without breaking the bank.
Brightly colored tape transforms your wall into a playful, personalized masterpiece, making your space more lively and inviting. It encourages creative experimentation with minimal risk and effort. Once done, you’ll be surprised at how much personality a simple strip of tape can add to your everyday environment.
10. Repurposed Plate or Spoon Wall Art
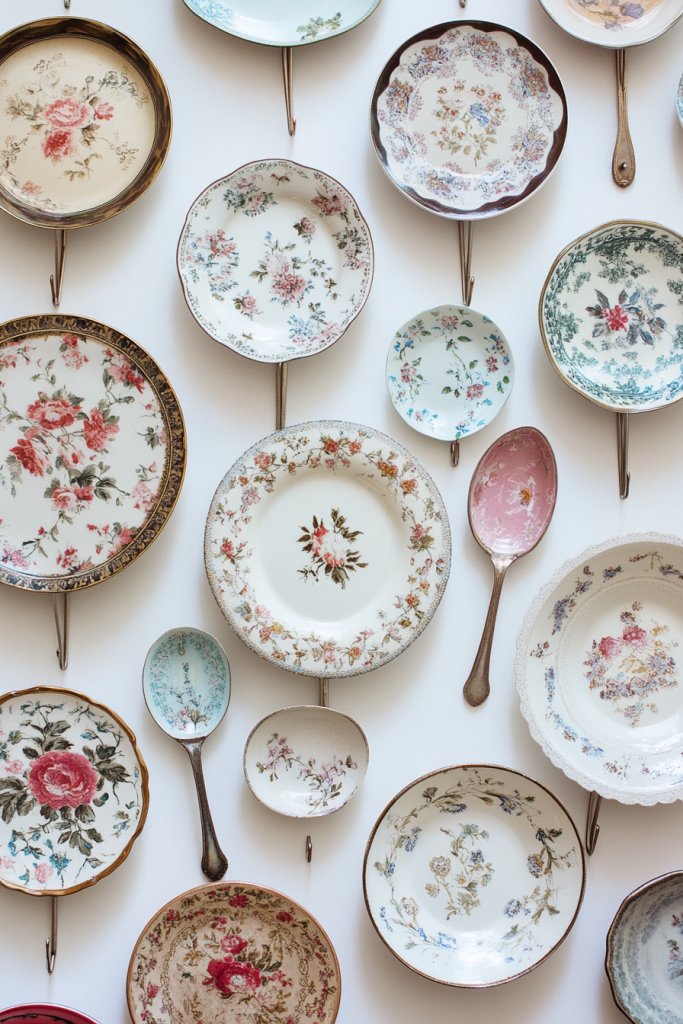
Want to add a vintage or eclectic touch to your kitchen without buying new decor? Repurposing plates or spoons into wall art is a clever way to showcase your personality and history. It turns everyday items into eye-catching focal points that tell a story. Plus, it’s a budget-friendly project that’s surprisingly easy.
Recommended Products to replicate this idea
| # | Preview | Product | |
|---|---|---|---|
| 1 |

|
Rocky Mountain Goods Plate Hanger for Wall and Mounting Hardware - Fits Decorative Plates and... | Buy on Amazon |
| # | Preview | Product | |
|---|---|---|---|
| 1 |

|
Kodrily 6Pcs Vintage Coffee Spoons, Retro Small Dessert Spoons and Fork with Carved Decorative... | Buy on Amazon |
Visualize a collection of colorful, decorative plates arranged in a symmetrical or eclectic pattern on the wall. Or imagine a series of vintage spoons with ornate handles mounted in a grid or artistic cluster. The mix of patterns, textures, and finishes adds depth and character, making your wall a conversation starter. The shine of glazed ceramics or the patina of aged silver adds richness.
Group similar items for a clean, cohesive look or mix different styles for a more bohemian vibe. Use plate stands or hooks to display decorative ceramics or vintage dishes. For spoons, arrange them in a frame or directly mount with their handles visible for a sculptural effect. Incorporate other repurposed kitchen tools or small frames for variety.
Select the plates or spoons you want to display, ensuring they are clean and undamaged. Use appropriate wall anchors or adhesive hooks for heavier ceramics. Plan your layout on the floor beforehand, then mark the wall for mounting. Hang with hooks or mounting brackets that won’t damage the items. Adjust spacing to create balance and symmetry.
Add a personal touch by incorporating hand-painted or custom-decorated plates. Mix in family heirlooms or travel souvenirs for sentimental value. Play with symmetry or asymmetry based on your style—either way, it creates visual interest. You can also include small framed photos or labels to tell the story behind each piece.
Repurposed plate or spoon art adds charm and character, making your kitchen uniquely yours. It’s an affordable, creative way to showcase your collection or heritage. Once displayed, it elevates your space from ordinary to memorable, inspiring others to think outside the box with everyday objects.
11. Minimalist Line Art Prints in Simple Frames
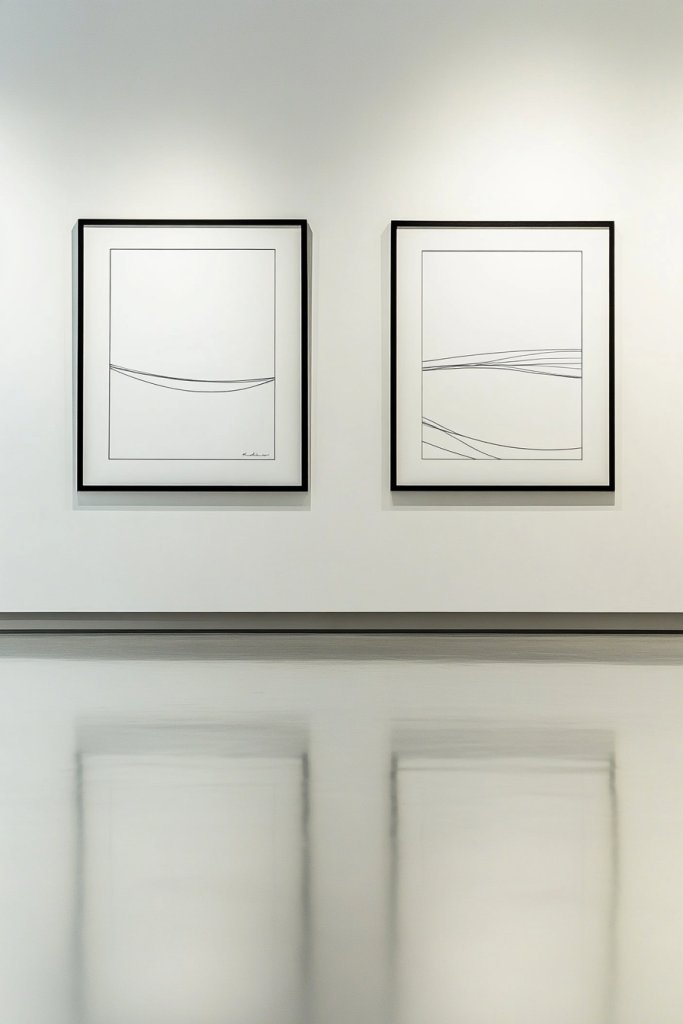
Feeling overwhelmed by busy, cluttered walls? Minimalist line art prints offer a sleek, calming aesthetic that brings sophistication without chaos. They add a modern touch to your kitchen while maintaining a clean, uncluttered look. It’s a subtle upgrade that makes a big impact.
Recommended Products to replicate this idea
| # | Preview | Product | |
|---|---|---|---|
| 1 |

|
Minimalist Line Art Prints Wall Decor Abstract Flower Line Art Modern Black and White Artwork Women... | Buy on Amazon |
| # | Preview | Product | |
|---|---|---|---|
| 1 |

|
upsimples 8x10 Picture Frame, Display Pictures 5x7 with Mat or 8x10 Without Mat, Wall Hanging Photo... | Buy on Amazon |
Picture simple black or color-line drawings with flowing, effortless lines arranged in a grid or gallery style. The artwork might depict abstract shapes, stylized kitchen scenes, or minimalist figures. Framed in slim, understated frames, these prints create a cohesive, elegant display. The negative space around the art enhances the sense of calm and clarity.
Choose monochrome or soft pastel line art to match your decor palette. Mix different styles—geometric, botanical, or abstract—for variety. Use matching frames for a uniform look or mix metallic and wood for contrast. Rotate or replace prints seasonally for fresh inspiration. Keep the arrangement simple for maximum impact.
Select high-quality prints on matte paper, then frame them in slim, simple frames—metal, wood, or acrylic. Hang at eye level using a level and appropriate wall anchors. Arrange the frames with consistent spacing for a polished look. You can also create a dynamic layout by varying sizes or orientation. Regularly dust and update as desired.
Create your own designs or commission local artists for unique pieces. Incorporate personal motifs or meaningful symbols within the minimalist style. Use color accents sparingly to highlight certain prints. Matched with contemporary furniture and lighting, these prints add a refined, personal touch.
Minimalist line art in simple frames elevates your decor with understated elegance. It shows that less truly is more and boosts your confidence in creating a sophisticated, harmonious space. Once hung, they serve as both art and a reminder to keep things simple and stylish.
12. Open Shelves with Potted Herbs and Kitchen Essentials
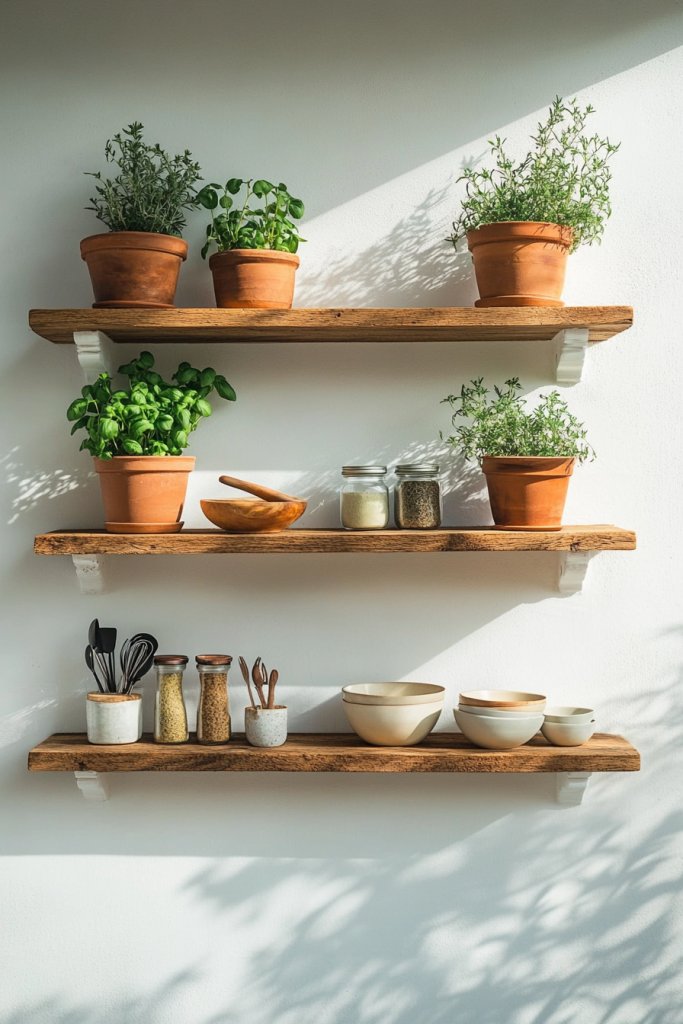
Are your countertops cluttered and hard to keep organized? Open shelves filled with potted herbs and essential tools turn practicality into decor. They bring freshness, color, and a touch of nature into your kitchen, making daily cooking more enjoyable. Plus, they save space and keep everything within arm’s reach.
Recommended Products to replicate this idea
| # | Preview | Product | |
|---|---|---|---|
| 1 |
|
BAYKA Floating Shelves for Wall, Wall Mounted Rustic Wood Shelves for Bathroom, Bedroom, Living... | Buy on Amazon |
| # | Preview | Product | |
|---|---|---|---|
| 1 |

|
PERFNIQUE Indoor Herb Garden, Herb Planter Set with Tray, Farmhouse Indoor Plant Pots, Windowsill... | Buy on Amazon |
Visualize a row of open wooden or metal shelves, displaying small potted herbs like basil, thyme, and mint alongside colorful utensils, jars, or bowls. The greenery adds life and aroma, creating a vibrant, inviting atmosphere. The arrangement is casual yet curated, with a mix of functional and decorative elements that make your kitchen feel warm and lively.
Use different shelf lengths, materials, or finishes—rustic wood for farmhouse, sleek metal for industrial. Incorporate decorative containers or vintage jars for storage. Seasonal herbs or colorful utensils can be rotated to keep the display fresh. Add hooks underneath for utensils or small tools to maximize space.
Securely mount shelves at a comfortable height, ensuring they can support the weight of plants and kitchenware. Arrange herbs in matching or contrasting pots, and position them for optimal sunlight exposure. Layer items for visual depth, and balance functional tools with decorative accents. Regular watering, cleaning, and reorganization keep the display appealing.
Personalize with custom labels, painted pots, or decorative stones. Incorporate favorite kitchen gadgets or vintage items for a nostalgic touch. Use color-coordinated herbs or containers to match your decor palette. Rotate herbs seasonally or add new plant varieties for ongoing freshness.
Open shelves with herbs and essentials make your kitchen more lively and functional. They inspire healthier eating and a closer connection to nature. Once styled, your kitchen exudes a fresh, personal vibe that encourages you to cook more confidently and enjoy the space every day.
13. Textured Wall Panels for Subtle Elegance
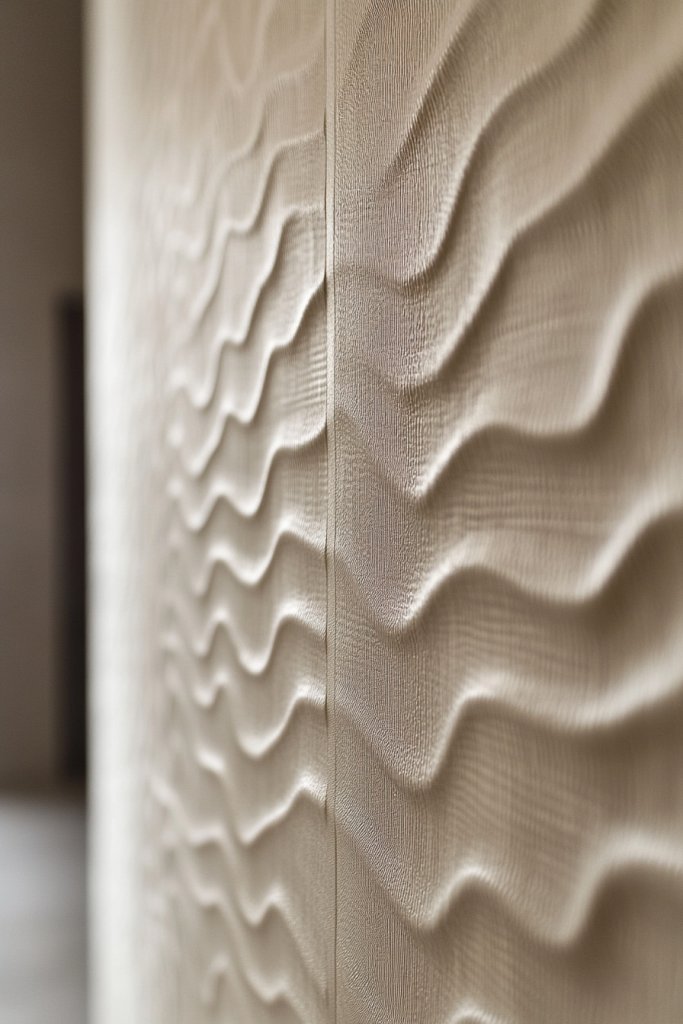
Plain walls can make a kitchen feel flat and uninspired. Textured wall panels introduce subtle elegance and depth, transforming a boring space into a sophisticated retreat. They add visual interest without overwhelming your decor, perfect for those who love refined, understated style.
Recommended Products to replicate this idea
| # | Preview | Product | |
|---|---|---|---|
| 1 |
|
Art3dwallpanels 33 Pack 3D Wall Panel Diamond for Interior Wall Décor, PVC Flower Textured Wall... | Buy on Amazon |
| # | Preview | Product | |
|---|---|---|---|
| 1 |
|
Art3d 102-Piece Peel and Stick Wall Tile for Kitchen Backsplash, Bathroom, Fireplace, 3in. × 6in.... | Buy on Amazon |
Imagine panels with shiplap, beadboard, or 3D geometric patterns creating a tactile surface that catches light and shadows beautifully. The textured finishes add dimension and warmth, making your walls feel alive. The subtle variations in pattern and material can complement both modern and traditional aesthetics, adding a layer of luxury.
Choose from a variety of materials—wood, PVC, or foam—for different budgets and installation ease. Install vertical or horizontal panels to influence the room’s perceived dimensions. Paint in neutral tones for a classic look, or go bold with deep hues or metallic finishes for contemporary flair. Combine with other textured elements for a layered, curated look.
Prepare the wall surface by cleaning and leveling it. Measure and cut the panels to fit, then attach using adhesive, nails, or clips depending on the material. Seal joints with caulk or trim for a seamless appearance. Use a level during installation to ensure straight lines. Finish with paint or a protective coating if desired. Regular cleaning maintains the texture’s appeal.
Enhance with contrasting paint colors or metallic accents to highlight patterns. Incorporate indirect lighting like LED strips or sconces to accentuate the textured surface. Use decorative molding or trim to add a finished look. Combine with minimalist furniture and accessories for a balanced, elegant space.
Textured wall panels subtly elevate your decor, creating an atmosphere of understated luxury. They demonstrate that a little effort yields a big visual payoff, inspiring you to explore more design ideas. Once installed, they make your kitchen feel curated and timeless, boosting your confidence in DIY upgrades.
14. DIY Rope or Fabric Wall Hangings for Soft Textures
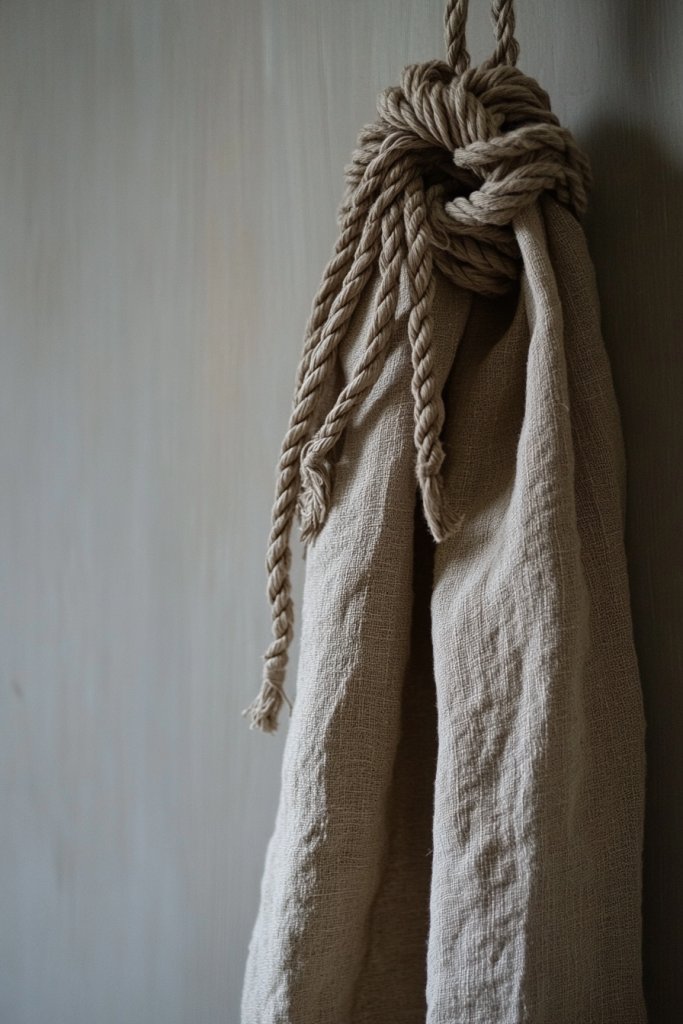
Looking to add a cozy, tactile element to your kitchen but without heavy or bulky decor? DIY rope or fabric wall hangings bring softness and warmth, making your space more inviting. They’re also a fun project that lets you showcase your creativity and personal style. Who says walls have to be hard and cold?
Recommended Products to replicate this idea
| # | Preview | Product | |
|---|---|---|---|
| 1 |

|
NOANTA Natural Macrame Cord 3mm x 109Yards, Beige Macrame Rope, Cotton Cord for Wall Hanging, Plant... | Buy on Amazon |
| # | Preview | Product | |
|---|---|---|---|
| 1 |
|
HOPELF 25PCS Wooden Dowel Rods - 1/4 x 12 Inch Bamboo Sticks - for Crafts, Cake Dowels and DIY... | Buy on Amazon |
Imagine a cascade of natural fiber ropes or flowing fabrics in neutral or vibrant colors, hanging from a wooden dowel or branch. The textures catch light and add movement, creating a relaxed, boho vibe. Tassels, knots, or decorative beads can enhance the look, turning simple materials into art. It’s like a wearable art piece for your wall.
Use different fabrics—linen, cotton, burlap—or natural fibers like jute for a rustic look. Mix textures and lengths for visual interest, or keep it uniform for a sleek appearance. Incorporate decorative elements like shells, feathers, or metallic accents. Change the hanging method or add small hooks for versatility.
Cut fabrics or ropes to desired lengths, then tie or knot them around a sturdy dowel or branch. Use a combination of knots or braids for variety. Mount the dowel securely on the wall at a height that suits your space. Adjust the hangings for fullness and balance. Keep the fibers clean and free of dust for longevity.
Personalize with painted or embroidered details, or incorporate meaningful charms or beads. Use colors that match your decor or seasonally switch to reflect your mood. Add lighting or small decorative objects nearby to create a layered, cozy corner. It’s a simple way to infuse personality and softness.
DIY fabric or rope hangings bring warmth and texture, transforming your space into a cozy haven. They’re easy to make and customize, giving you confidence to experiment with other textile projects. Once hung, they create a relaxed, inviting atmosphere that feels uniquely yours.
Conclusion
Exploring these varied kitchen wall decor ideas can help you craft a space that reflects your personality and elevates your daily routine. From bold art installations to charming shelves, the options are endless. Don’t hesitate to try out these ideas and turn your kitchen into a vibrant, inviting haven—your perfect wall transformation awaits!
Last update on 2026-03-01 / Affiliate links / Images from Amazon Product Advertising API