Imagine turning your blank wall into a stunning focal point that combines style and function—media walls are the perfect way to do just that! These innovative setups are gaining popularity because they effortlessly blend entertainment, storage, and decor, transforming any room into a personalized haven.
In this article, you’ll discover a variety of media wall ideas that cater to different tastes and spaces. From sleek minimalistic designs to bold, eclectic displays, there’s something here to spark your creativity and help you craft a media wall that truly reflects your personality and lifestyle.
1. Floating Shelves with Hidden Storage for Media Devices
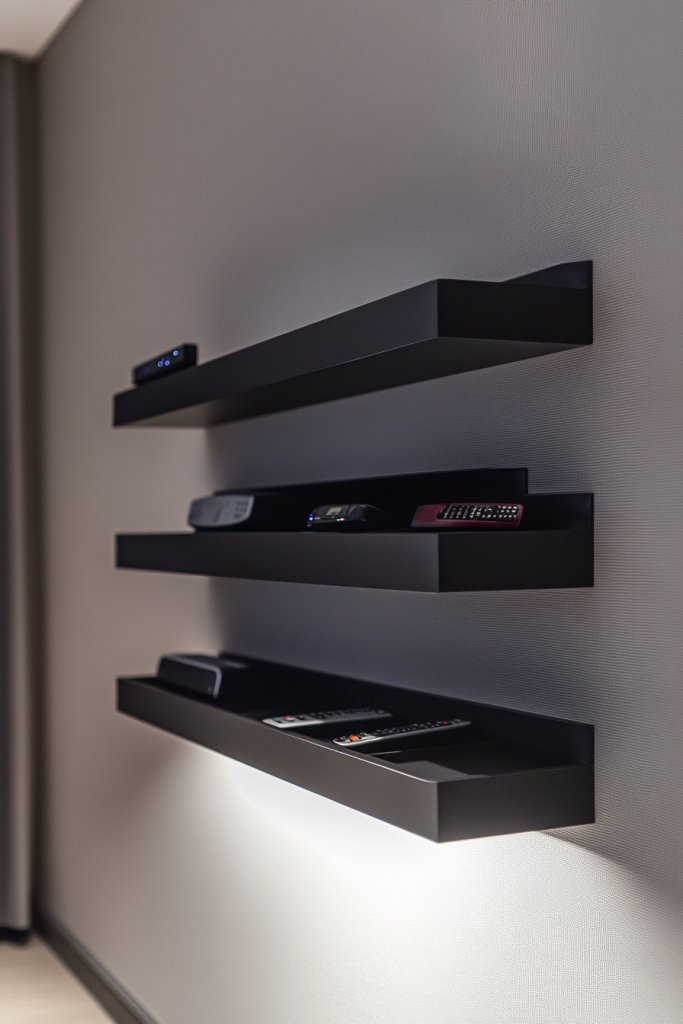
Ever struggled with cluttered media setups where remotes, cables, and gadgets take over your space? It’s frustrating when everything looks chaotic but you know there’s a smarter way. A sleek, organized media wall can transform your living room from a cable jumble to a stylish sanctuary. Who doesn’t want a clutter-free zone that’s both functional and good-looking?
Imagine floating shelves stretching across your wall, their minimalist design blending seamlessly with your decor. Concealed compartments hide away remotes, chargers, and accessories, keeping surfaces clean. The shelves’ smooth matte finish contrasts nicely with textured wall paint or wallpaper, adding depth to your space. Soft LED lighting underneath can highlight your organized treasures, creating a cozy ambiance.
You can choose floating shelves in wood for a warm, rustic vibe or sleek lacquered finishes for a modern look. Adjust the depth of the shelves based on your device size—deeper for soundbars, shallower for media players. For small spaces, vertical stacking saves floor area, while wider setups work great in larger rooms. Seasonal decor, like cozy throws or decorative boxes, can be added for changeable aesthetics.
Start by measuring your wall and choosing sturdy floating shelf brackets. Pick durable materials—wood, MDF, or metal—based on your style and budget. Concealed storage requires simple cabinetry or hidden compartments built into the shelf design. Secure the shelves into wall studs for stability, especially if holding heavier devices. Organize cables with clips or sleeves that run behind or underneath the shelves to keep everything tidy. Finish with a smooth paint or stain for a polished look.
Add custom labels or color-coded bins inside hidden compartments for quick access. Incorporate decorative elements like textured fabric baskets or sculptural accents on top of the shelves. Paint or stain the shelves in colors that complement your wall and furniture for a cohesive look. For tech enthusiasts, integrate wireless charging pads directly into the shelves for convenience.
A floating shelf setup with hidden storage elevates your space and makes you look like a design pro. It’s a simple DIY project or a quick professional install that instantly boosts your room’s style. And guess what? You’ll actually enjoy your media area instead of dreading the mess. Ready to ditch the chaos and embrace sleek organization?
2. Modular Cubic Wall Units for Customizable Storage
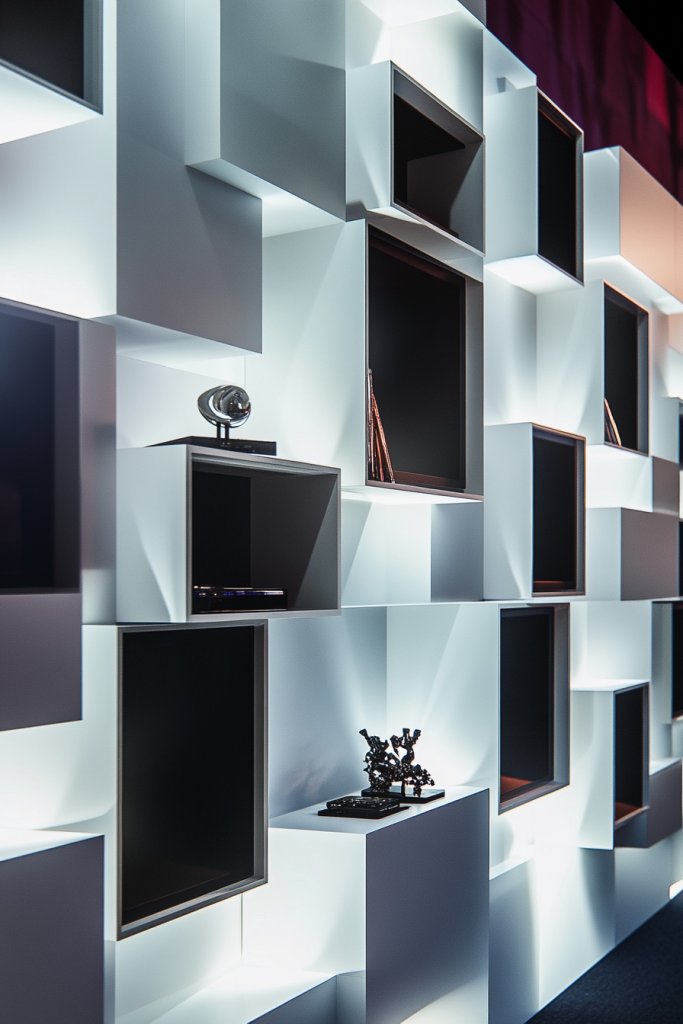
Tired of fixed media setups that don’t fit your evolving needs? Modular cubic units offer a flexible solution that adapts as your collection or preferences change. They let you create a bespoke wall that can grow or shrink over time. Say goodbye to one-size-fits-all furniture and hello to personalized storage that actually works.
Picture a grid of cube shelves painted in contrasting colors, arranged asymmetrically for a playful look. Inside, you store DVDs, gaming consoles, or decorative objects, all neatly organized. The open design allows for easy access, while the uniform cubes give your wall a clean, geometric aesthetic. The varied sizes and configurations create visual interest and balance.
Choose lightweight materials like MDF or acrylic for easy rearrangement, or sturdy wood for durability. Mix open cubes with closed cabinets to hide clutter or delicate items. In small rooms, stacking cubes vertically maximizes space, while in large areas, sprawling configurations make a bold statement. You can also paint or wallpaper the backs for a pop of color or pattern.
Start by designing your layout on paper or using design software. Purchase pre-made cubes or build custom ones with simple tools. Secure the units into wall studs using brackets or anchors, ensuring stability. Use spacers to create clean gaps between cubes for a cohesive look. For added flexibility, connect modules with brackets or clips, allowing for easy expansion or reconfiguration. Finish with a protective coat or paint for a polished appearance.
Integrate LED strip lighting inside or behind the cubes for a subtle glow. Customize each cube with removable labels or decals for easy identification. Incorporate a mix of textures—like fabric bins or metallic accents—to add depth. Change the color scheme seasonally or for special occasions to keep the display fresh.
Modular cube units turn your blank wall into a dynamic, customizable gallery. They’re perfect for renters or anyone who loves to change their decor often. Plus, you can start small and expand as your collection grows. It’s a smart, stylish investment in your home’s personality.
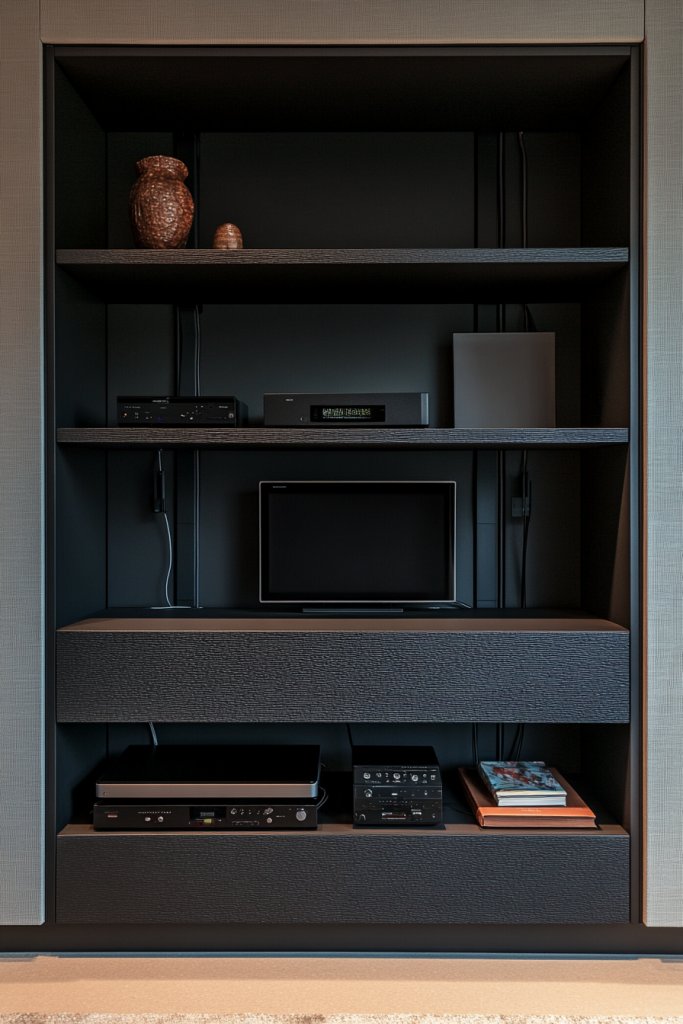
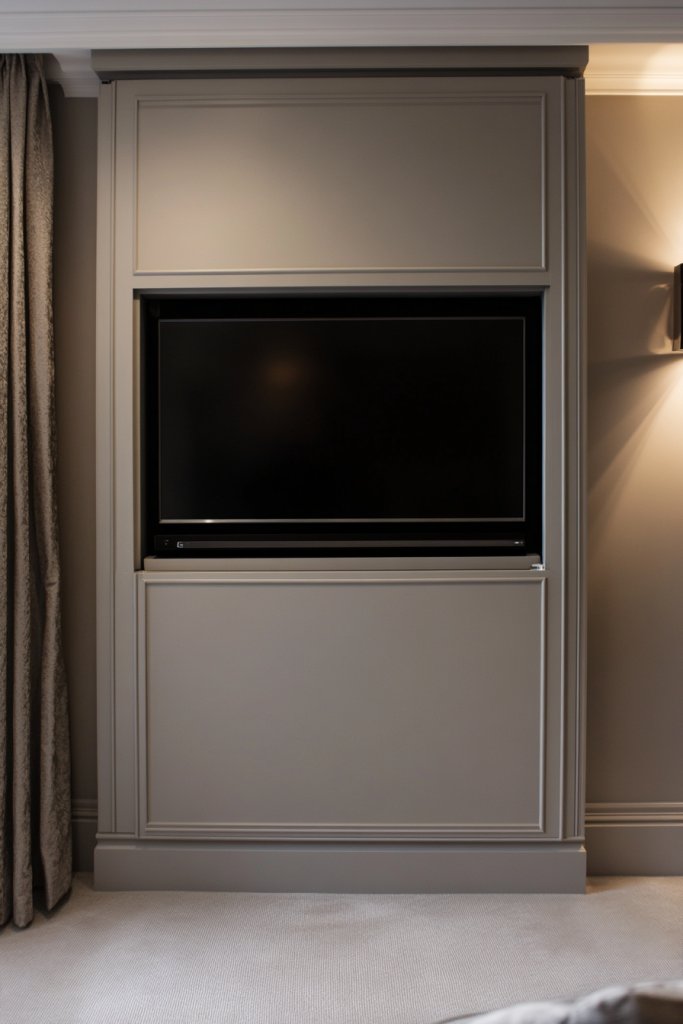
3. Built-in Wall Niche with Multimedia Integration

Ever wish your TV and media equipment could disappear into the wall itself? Built-in wall niches offer a sleek, seamless look that keeps everything integrated and hidden when not in use. It’s perfect for creating a clutter-free aesthetic that feels like a custom-designed space. Who wouldn’t want their media setup to look built-in and elegant?
Visualize a recessed wall cutout framed with crisp molding, perfectly fitted around your flat-screen TV. Shelves inside hold media players, sound systems, or decorative objects that won’t interfere with viewing. Cable management is hidden behind the wall, with outlets and conduits concealed for a flawless appearance. Warm lighting accents the niche, adding a cozy, inviting vibe.
Choose from various materials—drywall with paint, wood paneling, or stone—for the interior of the niche. Adjust the depth to accommodate different equipment sizes, or add adjustable shelves for flexibility. For a minimalist look, keep surfaces smooth and monochromatic; for a rustic style, incorporate reclaimed wood or textured finishes. This setup works well in living rooms, bedrooms, or even home theaters.
Design your wall niche on paper, considering the size of your TV and devices. Frame the opening with molding or drywall, and install proper electrical wiring and outlets inside the cavity. Use a level and stud finder for precise placement. Insulate or soundproof as needed to enhance acoustics. Finish with paint or stain that matches your decor. Professional help might be advisable for complex wiring or structural modifications.
Incorporate ambient lighting—such as LED strips or spotlights—to highlight your media space. Add decorative elements like textured wall panels or architectural molding for extra style. Keep accessories minimal inside to prevent clutter. You can also add a fold-down or sliding panel to conceal the TV when it’s not in use, maintaining a clean look.
A built-in wall niche elevates your media setup to a true design feature. It offers a premium, custom feel without the hefty price tag of professional installation. Plus, it simplifies your space and makes everything more accessible. Ready to give your room that high-end, integrated vibe?
4. Slim Wall-Mounted Cabinets with Open Display Shelves
Struggling with storage that doesn’t look bulky or out of place? Slim wall-mounted cabinets combined with open shelves strike the perfect balance. They hide your essentials while showcasing select items, creating a tidy yet personalized space. Who says functional storage can’t be stylish?
Envision narrow cabinets in matte black or sleek white, mounted just above eye level. Open shelves sit below, displaying curated collections like vintage cameras, decorative ceramics, or even a few well-chosen books. The contrast between closed and open storage adds visual interest, making your media wall feel curated and intentional. The clean lines and minimal hardware keep everything looking modern.
Choose materials that complement your decor—wood veneer for warmth, glass for a luxe feel, or high-gloss finishes for ultra-modern style. For small spaces, keep the cabinets shallow and narrow, while larger rooms can handle deeper units for extra storage. Mix and match open shelves with closed cabinets for flexibility and aesthetic balance. Seasonal or thematic decor can be displayed on shelves for freshness.
Start by measuring your wall space and selecting cabinets that fit your needs. Mount the cabinets securely into wall studs, ensuring they can hold your media devices and accessories. Use wall anchors or brackets for added stability. Install open shelves beneath or beside the cabinets, keeping alignment precise with a level. Organize your media devices inside the cabinets, with cables routed behind for a clean look. Finish by adding decorative touches or labels.
Personalize with decorative baskets or boxes inside cabinets for hidden storage. Decorate open shelves with small sculptural pieces, textiles, or lighting accents (like LED strips). Change shelf contents seasonally for a fresh vibe. Use hardware or handles that reflect your style, from vintage brass to modern chrome.
Slim cabinets with open shelving are a versatile, stylish way to organize your media space. They work well in both small and large rooms and can be customized endlessly. It’s a DIY-friendly project that can dramatically upgrade your room’s vibe. Get ready to impress your friends with your sleek, functional design!
5. Multi-Functional Wall Panel with Integrated Charging Station
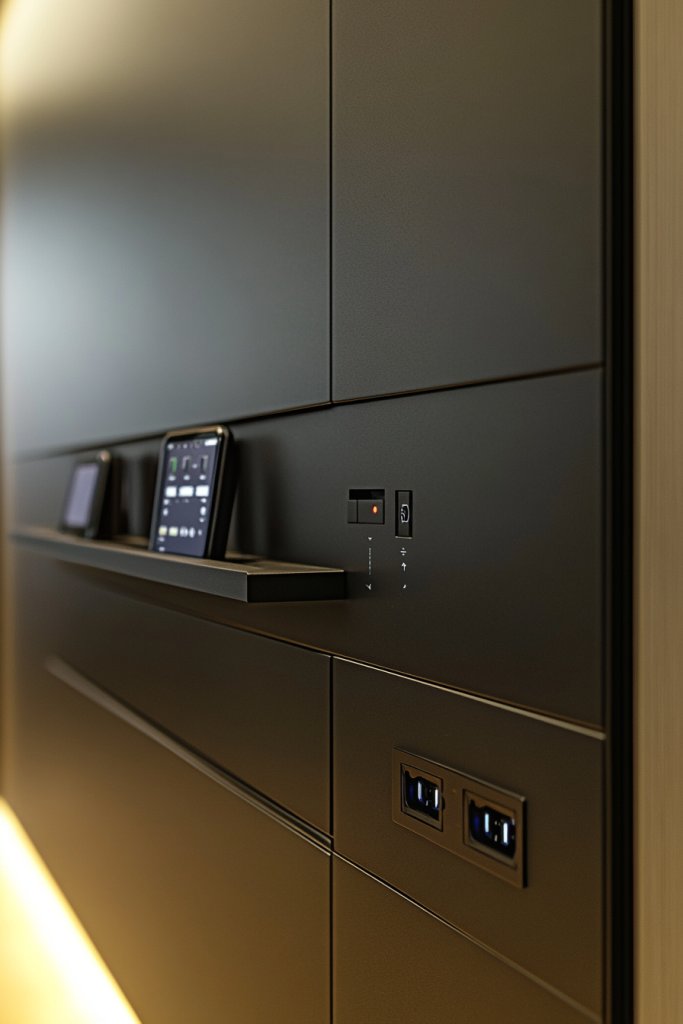
Ever wish your media wall could do more than just hold devices? A multi-functional wall panel with built-in charging ports turns your space into a tech hub. It keeps all your gadgets powered and organized in one spot, reducing clutter and frustration. Who wouldn’t want a dedicated station for all things tech?
Picture a sleek, wall-mounted panel with a textured surface, housing USB ports, power outlets, and even wireless charging pads. The panel doubles as a decorative feature—perhaps with geometric patterns or textured finishes—adding visual interest. Surround it with floating shelves or hooks for accessories, cables, or headphones, making everything accessible yet tidy. Soft lighting highlights the panel’s modern design.
Choose panels with different textures, such as wood grain, metallic finishes, or high-gloss plastics, to match your decor style. Incorporate additional features like magnetic strips for holding small gadgets or hooks for cords. Adjust the size based on your space—smaller panels work in compact setups, larger ones in open-plan rooms. You can also integrate a small shelf or drawer for extra storage.
Select a wall panel with enough outlets and ports for your needs. Mount it at a convenient height for easy access, ensuring it’s secured into wall studs. Run power cables behind the wall for a clean look, or use surface-mount wiring if necessary. Connect your devices and test charging speeds. Add optional accessories like cable clips or sleeves to keep cords tidy. Finish with wall paint or wallpaper that complements the panel.
Decorate around the panel with complementary textures or colors—think fabric-covered pinboards or sculptural wall features. Label the ports or add icons indicating device types for quick recognition. Use decorative cable organizers or sleeving for a sleek appearance. Keep your tech accessories in matching cases or containers for a cohesive look.
A multi-functional wall panel with charging stations is a smart upgrade that keeps your space organized and ready for any tech need. It’s perfect for modern homes, offices, or entertainment zones. Installing one is straightforward, and the benefits are huge—you’ll wonder how you ever managed without it. Time to get plugged in!
6. Industrial Pipe Shelving for a Rustic Media Wall
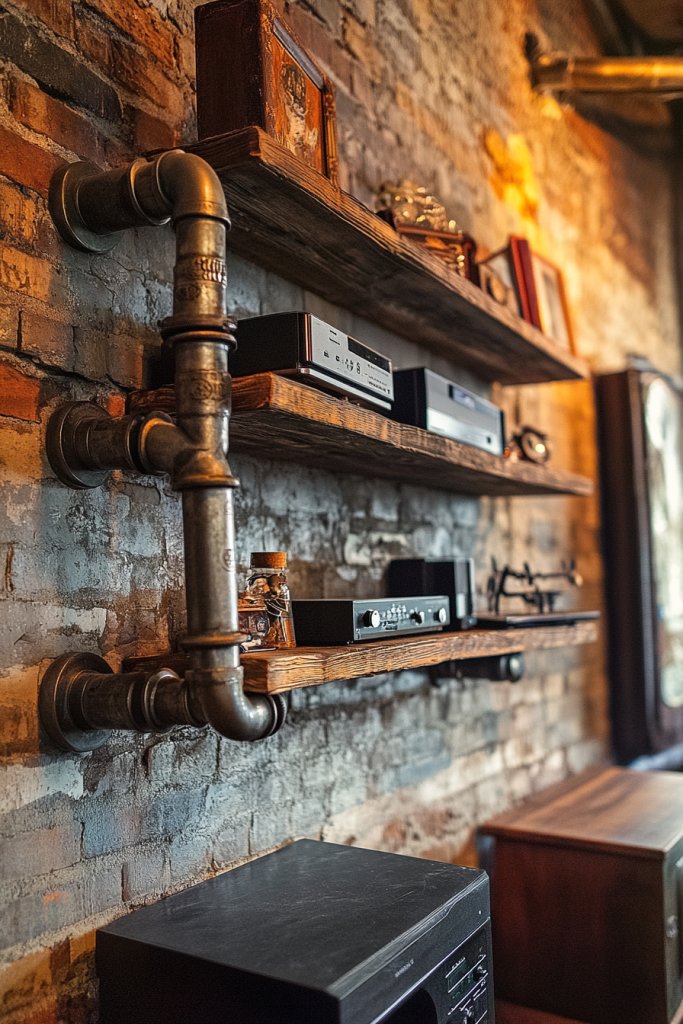
Looking to add some edge and character to your media space? Industrial pipe shelving brings a raw, rugged vibe that transforms a plain wall into a statement piece. It’s perfect for creating a rustic yet modern look that’s both functional and stylish. Who says media walls have to be boring?
Imagine black metal pipes forming sturdy frames, supporting reclaimed wood shelves with a distressed finish. The open design allows easy access to media devices, with cables neatly routed behind. The contrast of metallic pipes and warm wood adds texture and depth. Ambient lighting installed underneath the shelves emphasizes the industrial aesthetic while providing practical illumination.
Opt for different pipe finishes—matte black, brushed nickel, or antique bronze—to match your decor. Use thick, live-edge wood planks for a natural look or sleek, stained boards for a refined feel. Adjust shelf depth based on your equipment, and add brackets or pipe elbows for an architectural flair. This setup works well in lofts, man caves, or rustic cabins.
Start by designing your pipe system on paper, calculating pipe lengths and placement. Purchase industrial piping and reclaimed wood in sizes suitable for your equipment and wall space. Secure pipes into wall studs with heavy-duty anchors, then assemble the shelves using pipe fittings. Route cables behind shelves or through drilled holes for a clean setup. Finish by sealing or staining the wood for longevity.
Decorate shelves with vintage tech accessories, small sculptures, or textured baskets for storage. Incorporate LED strip lighting along the pipes or underneath shelves for a dramatic glow. Customize pipe finishes or add decorative caps to enhance the rustic look. Change the arrangement or add new shelves over time for a dynamic display.
Industrial pipe shelving offers a bold, durable look that stands out. It’s a DIY-friendly project with big visual payoff, making your media wall a true conversation starter. Plus, it ages beautifully and can be customized endlessly. Ready to bring some industrial charm into your home?
7. Magnetic Wall Boards for Interactive Media Organization
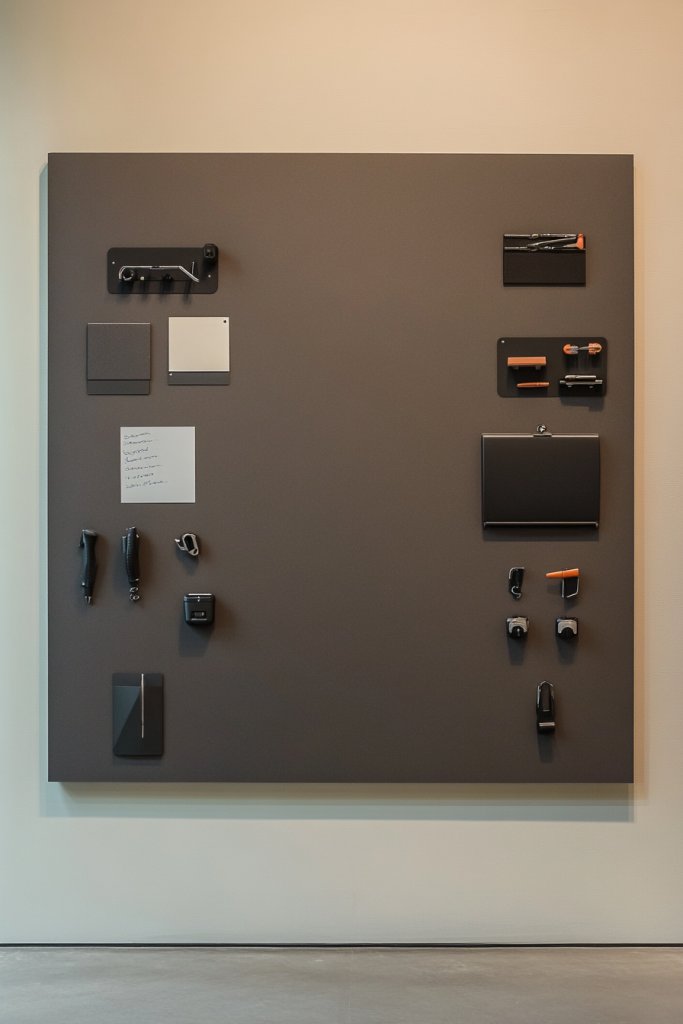
Ever wish organizing your media accessories could be fun and interactive? Magnetic wall boards turn a boring wall into a playful, functional space. They allow you to attach notes, gadgets, and tools easily, making media management a breeze. Who knew organization could be so engaging?
Visualize a sleek metal board mounted on your wall, dotted with magnets holding remotes, chargers, or even small tools. Use color-coded magnets to categorize items or attach small containers for batteries and cables. The reflective surface adds a modern touch, while the magnets themselves can be decorative, adding a pop of color or metallic shine. This setup makes your media area feel dynamic and interactive.
Choose magnetic boards in different finishes—matte, glossy, or textured—to match your decor. Incorporate magnetic strips or hooks for hanging larger accessories. For more organization, add small magnetic containers or clipboards for notes or manuals. Adapt the size of the board to your wall space—small for apartments or large for open-plan rooms. You can also combine with pegboards for extra versatility.
Mount the magnetic board at a comfortable height using anchors or screws into wall studs. Attach accessories like magnetic containers or hooks, ensuring they’re tightly secured. Use magnets to hold remotes, controllers, or small tools—test different sizes and strengths for stability. Keep frequently used items within easy reach, and rotate accessories seasonally or as needed. Clean the surface regularly to maintain magnetic strength.
Decorate the board with themed magnets or custom labels. Incorporate small decorative elements like metallic stickers or patterned magnets for added flair. Use the board to display motivational quotes, reminders, or even artwork made from magnetic materials. Keep the organization flexible by periodically changing magnet arrangements or accessories.
Magnetic wall boards make organizing your tech fun and interactive. They’re perfect for tech lovers and busy households wanting a flexible, visual system. Plus, installation is simple, and the system can evolve with your needs. Time to turn your wall into a command center!
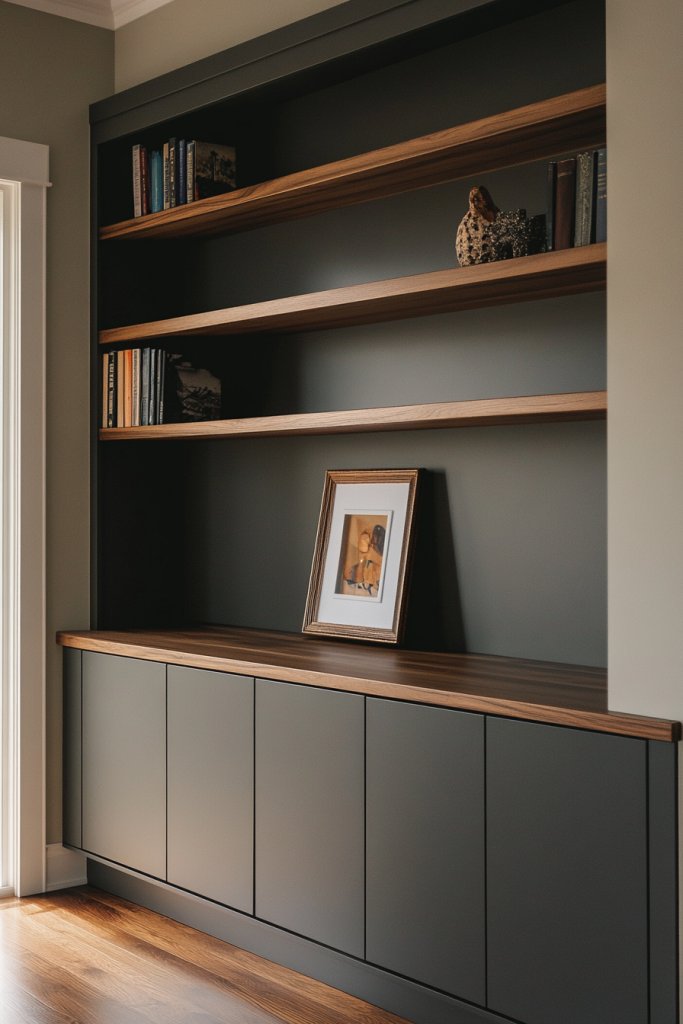
8. Vertical Wall-Mounted Bookcase with Media Storage
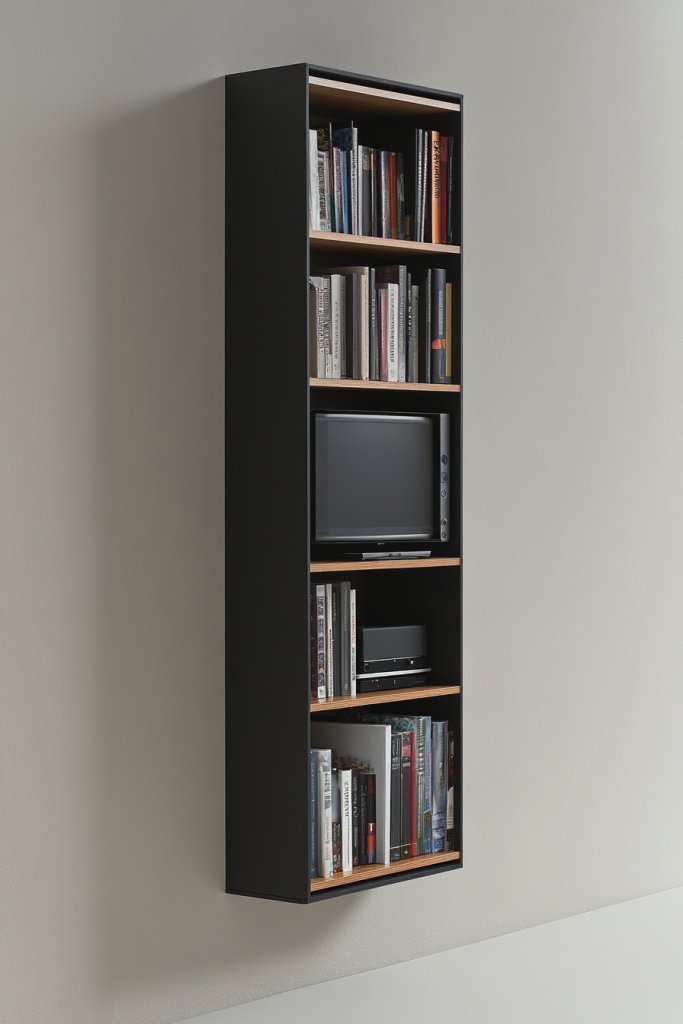
Need a way to combine reading and media storage without cluttering your space? A vertical wall-mounted bookcase offers a stylish solution that fits both needs perfectly. It keeps your favorite books, magazines, and media devices in one accessible, streamlined unit. Who says you can’t have a little of everything?
Picture a tall, narrow bookcase stretching from floor to ceiling, with open shelves in a sleek finish. The shelves hold a curated mix of books, tablets, or small media devices, while the top can display decorative objects or plants (if you dare). The vertical design saves floor space and creates a visual focal point, especially when paired with contrasting wall colors or textured wallpapers. It’s both functional and eye-catching.
Choose materials like light-colored wood, painted MDF, or metal for a contemporary look. Incorporate adjustable shelves to accommodate different item sizes. For a more eclectic vibe, mix open shelves with small cabinets or drawers. In smaller rooms, opt for a slim profile; in larger spaces, extend the unit with additional modules or incorporate a reading nook at the base.
Start by measuring the wall space and selecting a sturdy mounting system—preferably into wall studs. Install the shelves level and secure, ensuring they can hold the weight of books and media devices. Organize the shelves to maximize space, placing frequently used items at eye level. Use cable management clips or sleeves to route cords behind the unit discreetly. Finish with a coat of paint or stain that complements your decor.
Add decorative bookends, textured baskets, or small sculptural pieces to enhance visual interest. Incorporate LED lighting underneath shelves for a subtle glow. Personalize the look with themed accessories—like vintage cameras or travel souvenirs—placed among the books. Change the arrangement periodically to keep the display fresh and engaging.
A vertical bookcase with media storage is a clever way to blend two functions into one stylish feature. It encourages reading while keeping your tech within arm’s reach. It’s a project anyone can DIY or have built by a professional. Get ready to enjoy a more organized, charming space.
9. Bright Color-Blocked Media Wall for Visual Impact
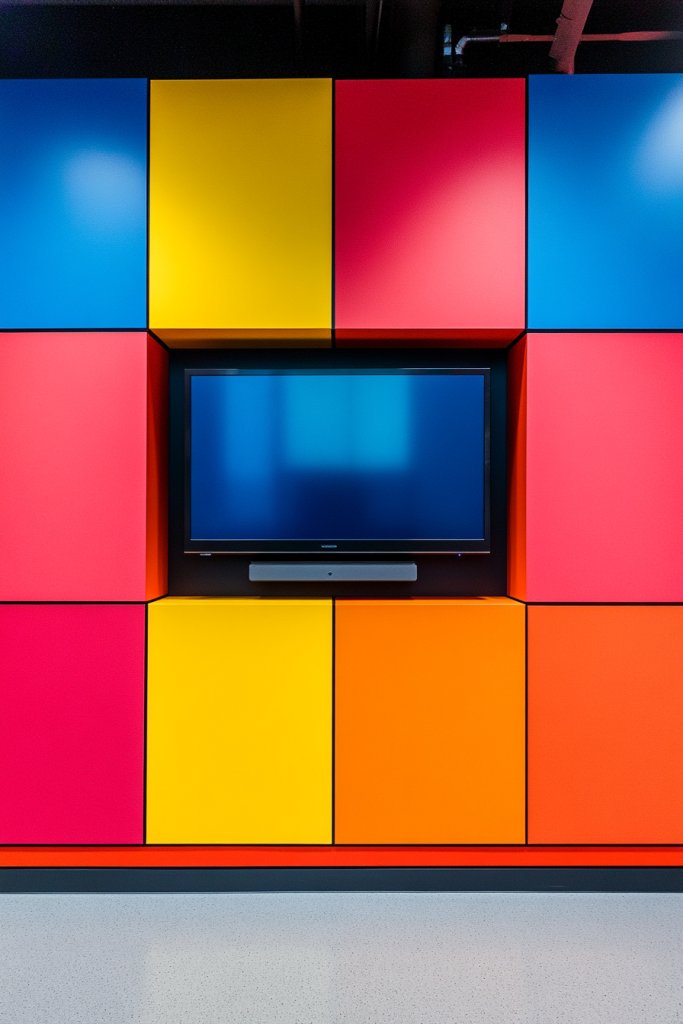
Bored with dull, monotone walls? A bright color-blocked media wall injects energy and personality into your space instantly. It’s a bold way to frame your TV and create a focal point that’s both playful and sophisticated. Who says your media area can’t be a piece of art?
Visualize sections of your wall painted in vibrant hues—think fiery reds, sunny yellows, or cool blues—creating geometric shapes or abstract patterns. The bold colors frame the TV and media console, drawing attention and adding depth. Matte or satin finishes give a modern touch, while textured paints or stenciled designs add extra dimension. The contrast makes your setup pop, even in a neutral room.
Use painter’s tape to create clean, crisp lines or opt for freeform shapes for a more organic feel. Mix and match colors based on your decor palette, or go monochrome with different shades of one hue for subtle sophistication. Consider accent walls or partial color blocking to keep it balanced. Seasonal or thematic color swaps are easy with removable paint or peel-and-stick options.
Plan your design on paper or with digital tools, then tape out your shapes on the wall. Use quality painter’s tape and multiple coats of paint for sharp edges. Protect your floors and furniture with drop cloths. Once dry, remove tape carefully to reveal your design. Mount your media components in the framed sections, ensuring cables are routed behind the wall or through conduit. Finish with a clear sealant for durability.
Add metallic or glossy accents in certain sections for visual contrast. Incorporate removable wall decals or stencils for added detail. Use coordinated decor accessories—like pillows or throws—that pick up on your color palette. Keep the overall look dynamic by changing out accent colors seasonally or for special occasions.
A color-blocked media wall turns your entire room into a vibrant, modern statement. It shows off your personality and can be tailored easily to your style. Plus, it’s a fun DIY project with a stunning payoff. Ready to make your walls a canvas?
10. Open-Back Shelving with Cord Management for Minimalist Look
Feeling overwhelmed by cable chaos behind your media setup? Open-back shelving with smart cord management offers a sleek, clutter-free solution. It keeps your devices accessible and your space looking clean and modern. Who wouldn’t want a minimalist vibe that actually works?
Imagine floating open shelves in a matte finish, with cables neatly routed behind or through holes in the back panel. Devices sit on the shelves, with minimal visible wiring, creating a sense of openness. The open design makes your media area feel airy and spacious, especially when paired with neutral wall colors or textured finishes. LED strip lighting underneath adds a subtle glow without clutter.
Select materials like wood, metal, or composite for a contemporary look. Use cable clips, sleeves, or channels to hide wires effectively. Adjust shelf depth based on your equipment—shallow for slim devices or deeper for larger components. Combine open shelves with closed cabinets for a balanced aesthetic or keep everything open for a modern, airy feel.
Mount the shelves securely into wall studs, ensuring weight limits are respected. Drill holes or channels in the back panels for cables to pass through discreetly. Organize cables with clips or sleeves that run behind the shelves, keeping everything out of sight. Connect your devices, then tidy up excess cables with Velcro straps or cable ties. Use wall paint or wallpaper to complement the overall minimalist design.
Add decorative elements like textured textiles or sculptural objects on the shelves to personalize the space. Use color-coordinated or patterned cables for a cohesive look. Incorporate smart home controls or hidden charging stations for added convenience. Change shelf contents seasonally to keep the space feeling fresh.
Open-back shelving with effective cord management turns a chaotic setup into a sleek, modern showcase. It’s an easy upgrade that makes your media space look intentional and stylish. Plus, it’s a project accessible to DIYers of all skill levels. Get ready to enjoy a clutter-free, beautiful room.
11. Corner Media Wall with Corner Shelves and Cabinets
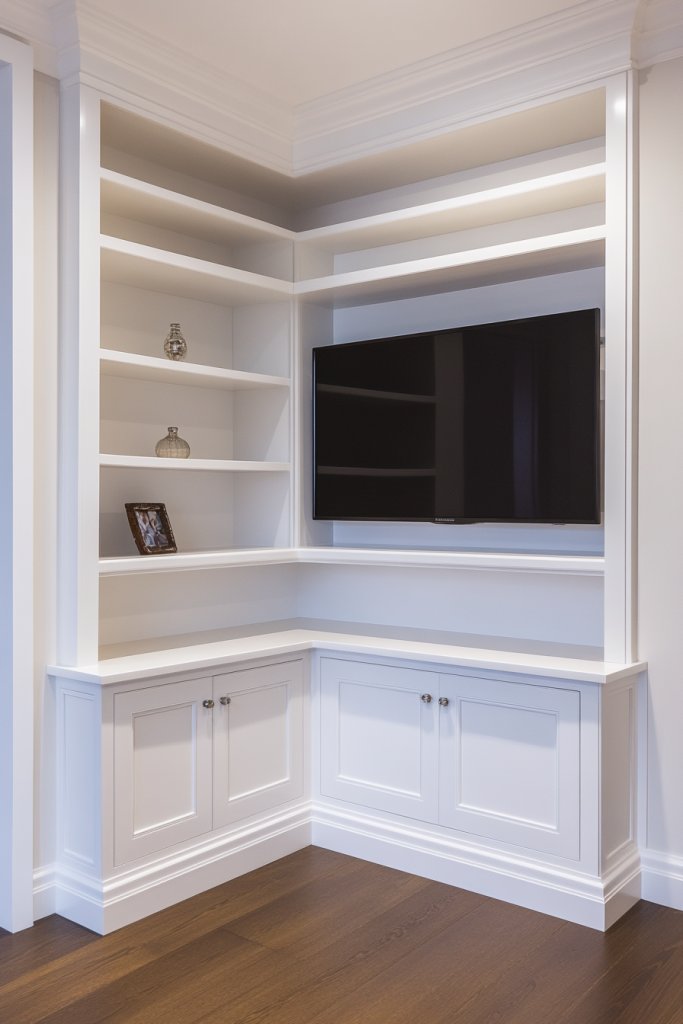
Struggling to utilize awkward corner spaces effectively? A corner media wall with shelves and cabinets turns underused angles into functional zones. It maximizes storage without sacrificing style, making your room feel more spacious and organized. Who knew corners could be so clever?
Visualize a custom-built corner unit with open shelves above and closed cabinets below, all fitted snugly into the corner. The shelves display media accessories, decorative objects, or even small plants—if you dare. The cabinets hide wires, extra equipment, or less attractive items. The design emphasizes clean lines and seamless integration, creating a cohesive look in your room’s nook.
Use materials like laminate, wood veneer, or painted MDF to match your decor. Incorporate adjustable shelves or pull-out drawers for versatility. For a more rustic look, opt for reclaimed wood and industrial hardware. In small rooms, a compact corner unit frees up valuable floor space; in larger rooms, extend the design to include a media center or seating area nearby.
Start by measuring your corner space carefully. Build or buy a unit designed for corners—either pre-made or custom-built. Secure the unit into wall studs to handle weight. Organize media gear inside the cabinets, routing cables neatly behind the unit. Mount shelves at varying heights for visual interest, and add soft-close hinges or sliders for ease of use. Finish with paint or stain to suit your style.
Decorate the shelves with textured baskets, small sculptures, or framed photos. Add LED lighting inside or underneath for a warm glow. Use hardware or handles that complement your decor theme—vintage brass or sleek matte black. Keep accessories organized with labeled bins or containers.
A corner media wall makes smart use of space and adds architectural interest. It’s a practical solution with high style, perfect for maximizing every inch. DIY or professional, it’s a project that transforms your room into a cohesive, functional haven. Ready to turn that awkward corner into your favorite spot?
12. Wall-Mounted Media Console with Built-In LED Lighting

Ever tried to watch a movie in a room where the lighting feels off or the setup looks cluttered? A good media wall should be functional yet stylish, but often the lighting or hidden cables ruin the vibe. Plus, having everything in plain sight makes your space look chaotic rather than sleek. The solution? A wall-mounted media console that combines modern tech with clean design.
Imagine a slim, matte-finished console attached to your wall, with soft LED strips running along its edges. The glow highlights your media devices without overwhelming the space, creating a cozy ambiance. The sleek surface holds your equipment, while hidden compartments keep cables out of view. The subtle lighting casts a warm, inviting hue that transforms your room into a cinematic haven.
Choose from minimalist monochrome styles for a contemporary look or go for textured wood finishes for a cozy, rustic feel. You can opt for adjustable LED colors to match seasonal moods or party themes. Larger rooms might incorporate a dual-section console, while smaller spaces benefit from narrow, space-saving designs. Mounting height can be tailored to eye level for optimal viewing comfort.
Start by measuring your wall space carefully to select a suitable console size. Look for units with built-in LED strips or plan to add flexible LED tape lighting yourself. Use a level and strong wall anchors to secure the console firmly. Conceal cables behind wall channels or within the unit’s internal compartments for a tidy look. Ensure your power outlets are accessible or consider installing additional sockets for seamless wiring. Some units come with pre-installed lighting kits, simplifying setup. Regularly dust and check connections to maintain a sleek appearance.
Add customized touches like a textured back panel or decorative trim that complements your room’s decor. You can install smart controls for the LED lighting to change colors via app or voice commands. Incorporate sound-absorbing panels behind the console for better acoustics or add small shelves for decorative objects. Personalize your media wall by choosing lighting modes that match your activities—bright for gaming, soft for movie nights.
This setup not only elevates your entertainment space but also boosts your confidence in DIY tech projects. It’s a practical upgrade that makes your room look professionally designed. Whether hosting friends or enjoying a quiet night, your media wall will impress and inspire. Ready to create a sleek, high-tech focal point that combines style with functionality?
13. DIY Pallet Wood Panel with Hooks and Shelves

Tired of generic media walls that all look the same? Want something with personality that also serves a purpose? A DIY pallet wood panel offers a rustic, charming vibe that’s easy to customize. Plus, it’s a budget-friendly way to add warmth and character to your space without sacrificing function.
Picture a reclaimed wood plank backdrop, with natural knots and textures that scream cozy. Attached hooks and small shelves break up the surface, providing spots for gadgets, remotes, or decorative items. The contrast of rough wood against sleek media devices creates a balanced, inviting aesthetic. Soft lighting or candles nearby enhance the rustic charm, making your entertainment zone feel like a cottage retreat.
Choose lighter or darker wood stains based on your decor palette. Incorporate metal brackets or industrial hardware for a more modern twist. You can add hooks for headphones, bags, or decorative scarves, or install small shelves for mini plants or art pieces—if greenery is allowed! Adapt the size of the panel to fit your wall and media setup, from narrow strips to full wall features. Seasonal accessories like festive garlands or cozy textiles can easily be swapped in.
Start by sourcing reclaimed wood or pallets from local suppliers or hardware stores. Sand down rough edges and treat the wood with a sealant for durability. Attach hooks and shelves using screws, ensuring they are sturdy enough for everyday use. Mount the panel to the wall using heavy-duty anchors, making sure it’s level. For added stability, reinforce the back with a frame or cross-bracing. This project requires basic carpentry skills but is totally doable with a cordless drill and some patience.
Paint or stain the wood in colors that match your room’s theme—think dark espresso or natural weathered gray. Add personalized hooks with engraved initials or symbols. Incorporate small lighting elements like battery-operated fairy lights for a whimsical touch. Use decorative baskets or fabric bins on shelves for organizing accessories or small gadgets, keeping the look tidy yet homey.
This project proves that you don’t need a professional to create a stunning feature wall. It’s both functional and full of personality, perfect for adding a personal touch to your space. Every time you glance at it, you’ll feel a sense of accomplishment and style. Ready to give your media wall a rustic, handcrafted makeover?
14. Geometric Wall Paneling with Integrated Shelving

Looking for a statement piece that elevates your entire room? Geometric wall paneling offers a modern, artistic vibe that also keeps your media essentials organized. It’s a clever way to combine visual interest with practical storage, all without cluttering the space. Who says functional can’t be fabulous?
Envision bold, three-dimensional panels arranged in a pattern of triangles or hexagons, painted in contrasting shades for dramatic effect. Embedded within some shapes are sleek shelves, perfect for small gadgets or decorative objects. The interplay of light and shadow adds depth and dimension, transforming a plain wall into an eye-catching focal point. It’s like living inside a modern art piece, but one that’s also useful.
Opt for monochrome tones for a minimalist look or vibrant colors for a playful edge. Mix materials—matte paint, glossy panels, or even textured finishes—to add variety. The size and complexity of the pattern can be scaled to suit small or large walls. Integrate hidden compartments behind panels or use open shelving for easy access. Seasonal color schemes or metallic accents can update the look effortlessly.
Begin by sketching your design or using stencil templates for precision. Choose durable MDF or plywood panels and cut them into geometric shapes, then paint or veneer as desired. Mount the panels securely with wall anchors, ensuring they are level and evenly spaced. Incorporate built-in shelves by attaching small planks within the panel design, using brackets or hidden supports. Seal the edges for a clean finish. This project may take some planning but results in a striking, customized feature.
Customize by adding metallic or mirrored accents for a luxe feel. Use LED strip lighting behind panels to create a backlit effect that enhances geometric shapes. Incorporate your favorite small collectibles or tech gadgets on the shelves. Change up color schemes seasonally or with trends to keep the wall fresh and inspiring.
A geometric wall paneling with integrated shelving transforms your room into a gallery of your personality and style. It’s a bold statement that shows off your design savvy. With a bit of effort, you create a masterpiece that’s both artistic and functional. Ready to turn your wall into a modern sculpture?
15. Multi-Level Wall Mounts for Different Media Zones
Ever feel like your media setup is a tangled mess of wires and devices? Or maybe you want a way to organize multiple zones like gaming, streaming, and audio without clutter? Multi-level wall mounts give each zone its own dedicated space, making everything accessible and neat. It’s a game-changer for tech lovers with diverse gadgets.
Imagine multiple mounts arranged at different heights along the wall, each holding a specific device—streaming box, gaming console, soundbar, or controllers. The varying levels create visual interest and clearly define zones. Clean cables run through channels or behind the wall for a clutter-free look. The result? An organized, sleek setup that looks as good as it functions, perfect for any tech enthusiast.
Adjust the heights based on device size or user accessibility. Use different mounting brackets for heavier equipment or decorative framing for a more polished appearance. For small rooms, stagger mounts vertically to maximize space. Seasonal adjustments might involve swapping devices or changing the color of mounted accents. You can also add lighting to highlight each zone for evening use.
Start by mapping out your zones and measuring device dimensions. Install sturdy wall anchors at different heights, ensuring each mount can handle the weight. Use cable management systems or conduits to hide wiring. For a cleaner look, consider installing a power strip behind the wall or within the mounts. Test each device’s placement before finalizing. Labeling or color-coding zones can help in daily use and troubleshooting. It’s an organized, tech-savvy solution that keeps your space tidy.
Personalize each zone with custom brackets or decorative back panels. Incorporate small shelves or hooks for controllers or headphones. Use colored LED lighting to differentiate zones or set a mood. Regularly update the arrangement as your gadget collection grows or changes, keeping the space fresh and functional.
Organizing your media zones with multi-level mounts boosts both style and efficiency. It shows off your tech collection proudly while reducing clutter. Once set up, you’ll feel more in control and ready to entertain or relax. Are you prepared to elevate your media game?
16. Scandinavian-Inspired Light Wood and White Media Wall
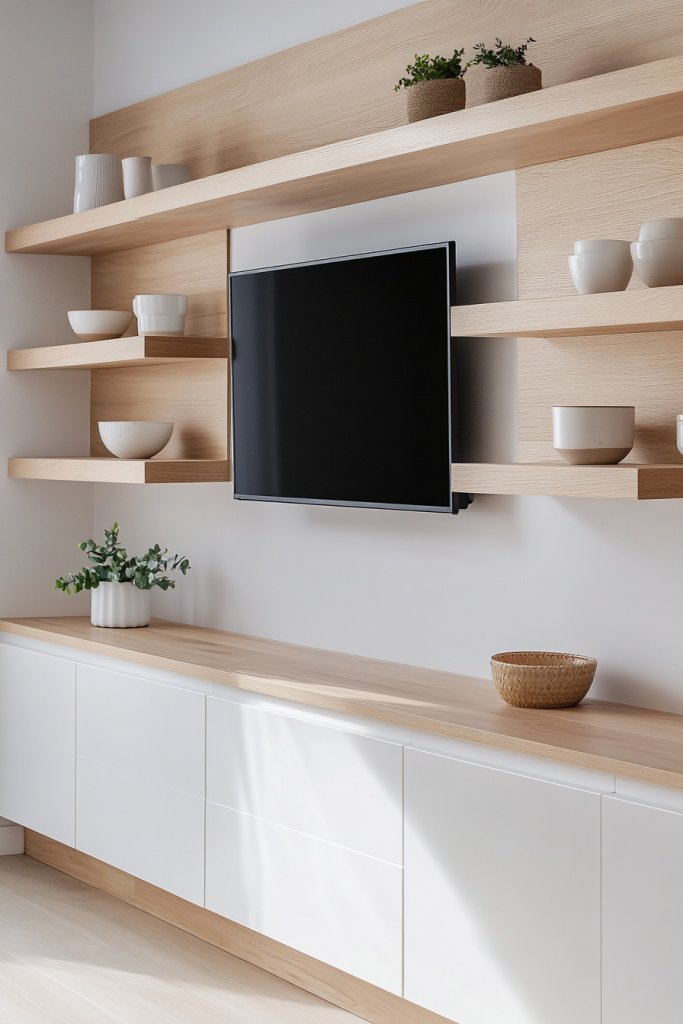
Ever wish your entertainment space looked brighter and more inviting? Scandinavian style offers a clean, airy aesthetic that’s perfect for creating a calming atmosphere. Combining light wood tones with crisp white cabinetry results in a fresh, minimalist look that makes your media area feel larger and more organized. It’s simplicity with a touch of elegance.
Picture sleek white cabinets with smooth, handleless fronts paired with natural light wood open shelves. Soft, neutral tones dominate, accented by subtle textures like a woven throw or plush cushions nearby. The open shelving displays neatly arranged media devices and decorative items, avoiding clutter. The overall effect is a serene, uncluttered space that invites relaxation and casual browsing.
Adjust the balance between open shelving and closed cabinets based on your storage needs. Incorporate natural elements like rattan baskets or linen-covered boxes for a harmonious look. Seasonal decor updates can include cozy textiles or monochrome art pieces. For smaller rooms, opt for compact, modular units that still follow the light wood and white palette. You can also add a touch of greenery here, but only if it’s minimal and non-intrusive.
Start by selecting modular components with a Scandinavian aesthetic—think clean lines and light finishes. Measure your wall carefully to ensure proportional balance. Assemble the units following manufacturer instructions, then mount the cabinets and shelves securely. Use wall anchors and level tools to keep everything straight. Keep cables hidden behind the cabinetry or within routed channels to maintain the minimalist feel. Finish with soft lighting underneath shelves or inside cabinets to enhance the airy vibe.
Personalize by adding textured textiles like a cozy rug or a knitted pouf to complement the look. Incorporate subtle decorative touches like ceramic or wooden figures. Change shelf contents seasonally with minimal accessories to keep it fresh. Consider installing a smart TV with a thin bezel to preserve the sleek, modern aesthetic.
This style proves that simplicity and function can coexist beautifully. It creates a peaceful space that promotes relaxation and focus. With a little effort, you can achieve a high-end Scandinavian look that’s both timeless and versatile. Ready to refresh your media wall with this charming, effortless vibe?
17. Hidden TV Lift Enclosed in a Decorative Wall Panel
Tired of your TV dominating the room or cluttering your decor? A hidden TV lift offers a sleek solution that vanishes your television when not in use. It combines modern technology with stylish design, creating a clutter-free aesthetic. Plus, it adds an element of surprise and sophistication to your space.
Imagine a decorative wall panel with intricate patterns or textured finishes that conceals a motorized TV lift. With the press of a button, the panel smoothly raises or lowers the TV, revealing or hiding the screen effortlessly. When hidden, the panel becomes a piece of art, blending seamlessly with your decor. The effect is both high-tech and elegant, elevating your entire room’s look.
Choose from various decorative panels—wood veneer, painted MDF, or textured laminates—to match your style. The lift can be integrated into a full wall or a smaller accent piece. You can add lighting or decorative trims to enhance the panel’s visual appeal. Adjust the panel size based on your TV dimensions and room scale, ensuring smooth operation and aesthetic harmony.
Select a motorized lift kit compatible with your TV size and weight. Install the panel securely on the wall using heavy-duty anchors, ensuring it’s level and flush. Connect the lift to a power source, preferably with a built-in or hidden outlet. Program the lift’s controls for smooth operation, and test multiple times. Finish by adding decorative elements around the panel to make it a focal point rather than a hidden feature. Professional installation might be advisable for seamless results.
Personalize the panel with custom finishes, LED accents, or artwork that complements your decor. Use remote control or smartphone app to operate the lift easily. Keep the surrounding area clutter-free to emphasize the sleek, hidden effect. For added flair, consider integrating speakers or soundbars into the panel’s design.
This innovative setup turns a typical media wall into a conversation piece, showcasing your tech-savvy side. It’s a functional upgrade that maintains minimalist aesthetics while providing maximum convenience. Ready to add a touch of high-end luxury and futuristic flair to your home?
Conclusion
With the diverse media wall ideas explored here, you’re equipped to create a functional and visually appealing centerpiece in your home. Don’t be afraid to experiment with different styles, arrangements, and accessories to make the space uniquely yours. Embrace the opportunity to elevate your living area and enjoy a stylish, organized, and inviting environment—your perfect media wall is just a step away!