Imagine stepping into a bedroom that feels like your personal concert hall—full of rhythm, style, and personality. Music-themed bedrooms are incredibly popular because they allow you to express your passions and create a space that energizes and inspires you every day. Whether you’re a musician, a music lover, or just someone who adores the vibe of musical decor, these ideas help turn your room into a sanctuary of sound and style.
In this article, you’ll discover a variety of creative and stylish music bedroom ideas that cater to different tastes and spaces. From bold wall art and vintage record displays to cozy listening nooks and instrument-inspired furniture, there’s something for everyone. Get ready to transform your bedroom into a personalized musical haven that truly rocks your world!
1. Create a Vinyl Record Wall Display as a Focal Point

Ever wanted your bedroom to scream personality and showcase your musical soul? A vinyl record wall display offers an eye-catching way to turn your favorite albums into art. It’s perfect for music lovers who want to add a vintage touch and make a statement. Plus, it turns an ordinary wall into a conversation starter.
Recommended Products to replicate this idea
| # | Preview | Product | |
|---|---|---|---|
| 1 |

|
Gotega 8 Pack Vinyl Record Shelf Wall Mount, 12 inch Album Record Holder Display, Clear Acrylic... | Buy on Amazon |
| # | Preview | Product | |
|---|---|---|---|
| 1 |

|
MCS Double Matte Record Album Frame, 16.5x25 Record Frame, Black for LP Vinyl Record & Jacket... | Buy on Amazon |
Imagine a wall lined with colorful album covers arranged in a neat grid or eclectic pattern. The glossy surfaces reflect ambient light, creating a vibrant mosaic of your music taste. Surround these with subtle LED backlighting or warm wall sconces for a cozy glow. It feels like walking into a personal museum of your musical journey.
You can organize the records by genre, era, or color scheme to match your style. For a modern look, opt for sleek, black frames or minimalist arrangements. If you’re more artsy, create a random collage or asymmetrical layout. Seasonal updates are easy—swap out albums to keep the wall fresh or match your mood.
Start by selecting your favorite albums or those with special meaning. Use wall-mounted display racks or floating shelves to hold the records securely. Measure your space and decide whether you want a symmetrical grid or a freeform layout. Use painter’s tape to mark the design before hammering nails or installing mounting hardware. For a polished look, consider framing the albums or using adhesive-friendly backing.
Add small personalized touches like handwritten labels or stickers with song lyrics. Incorporate decorative elements like vintage record sleeves or concert tickets nearby for context. You can also turn some albums into wall art by removing the vinyl and framing the covers for a different texture. Mix in some small LED strips behind the display for a subtle glow.
This vinyl wall display can transform your space and reflect your unique music taste. It’s an affordable way to add personality without clutter. Trust me, it’s a DIY project that impresses guests and makes your bedroom truly yours. Ready to curate your own musical gallery?
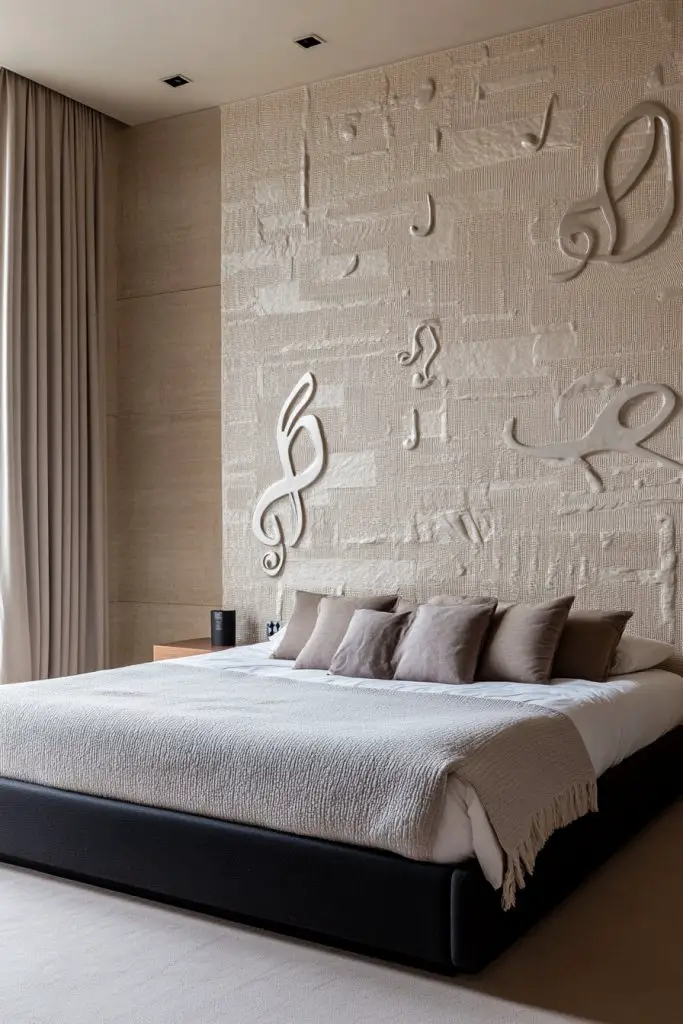
2. Incorporate a Music-Themed Headboard
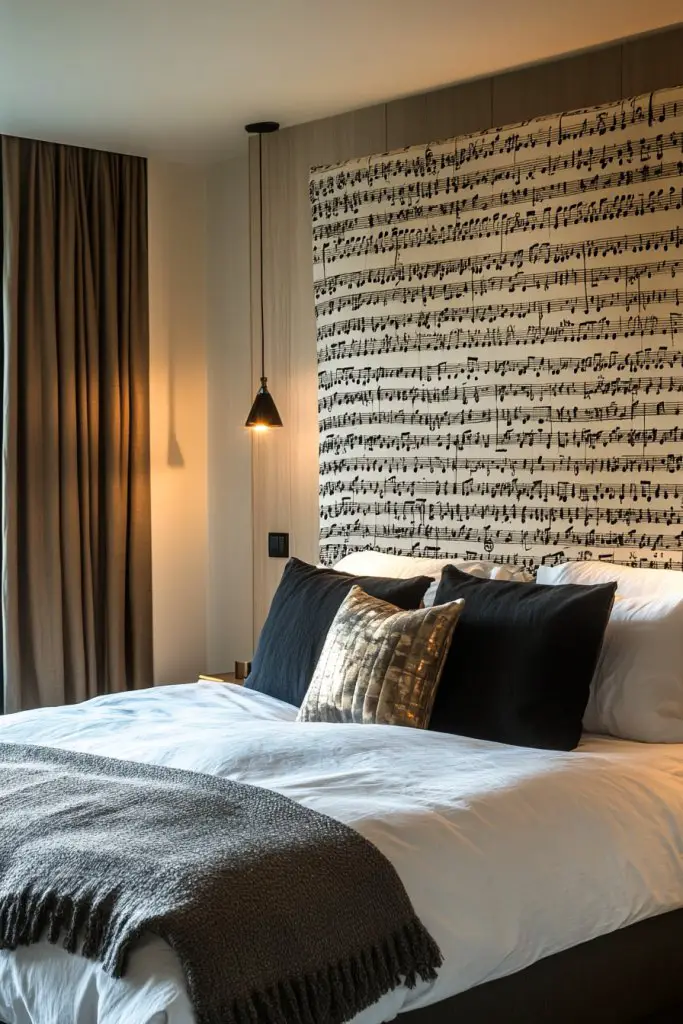
Tired of boring, generic headboards that lack personality? A music-themed headboard instantly elevates your bedroom decor and reflects your passion for tunes. It’s a bold statement piece that combines function with artistic flair. Plus, it’s a fun project for any music lover looking to customize their space.
Recommended Products to replicate this idea
| # | Preview | Product | |
|---|---|---|---|
| 1 |
|
Merronix Twin Bed Frames for Kids with Guitar-Shaped Headboard, Modern Twin Size Bed Frames for Boys... | Buy on Amazon |
| # | Preview | Product | |
|---|---|---|---|
| 1 |

|
VinylShopUS - Lot of 12" Vinyl Records for Crafts & Decoration Artwork for Party Decor Artist Studio... | Buy on Amazon |
Picture a headboard crafted from vintage guitars, or printed fabric featuring musical notes and symbols. The texture of a repurposed instrument adds a tactile dimension, while printed fabric offers colorful, intricate patterns. Soft lighting highlights the headboard’s unique features, making it the room’s focal point. It creates a vibe that’s both edgy and creative.
You can choose from actual musical instruments, like a guitar or keyboard, mounted directly on the wall. Alternatively, opt for upholstered fabric with musical motifs for a softer look. For a modern aesthetic, go for sleek, monochrome designs; for vintage charm, choose distressed finishes or retro prints. Adjust the height and width to suit your bed size and room proportions.
Decide whether you want to mount actual instruments or use printed fabrics. For instrument headboards, secure brackets or wall anchors are essential—use heavy-duty hooks or mounting hardware. If you prefer fabric, stretch it tightly over a wooden frame or attach it directly to a wall panel using adhesive or staple guns. For printed options, consider custom printing services for high-resolution designs. Add padding behind fabric for comfort and sound absorption if desired.
Personalize further by adding LED strip lighting behind the headboard for a subtle glow. Incorporate small decorative elements like vintage concert posters or band patches on fabric sections. You could also add a row of small shelves or hooks for hanging headphones or jewelry. Experiment with different textures and finishes to match your overall room style.
A music-themed headboard not only personalizes your space but also inspires your daily routines. It’s a conversation starter and a reflection of your musical journey. Trust your creativity—this DIY project can be as simple or elaborate as you want. Get ready to wake up to your favorite tunes every morning!
3. Install Floating Shelves for Your Favorite Music Collectibles
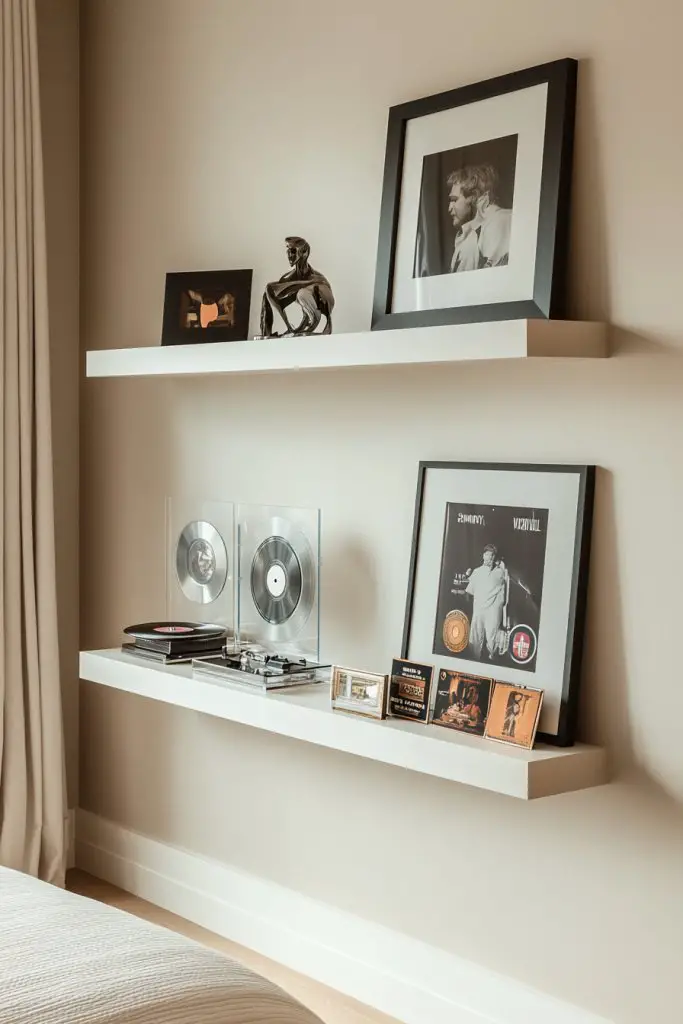
Storing your music collection can be a mess, turning your room into clutter central. Floating shelves offer a clean, modern solution to display records, CDs, or memorabilia without bulky furniture. They keep your treasures accessible and add a sleek aesthetic to your space. It’s a win-win for organization and style.
Recommended Products to replicate this idea
| # | Preview | Product | |
|---|---|---|---|
| 1 |

|
upsimples Floating Shelves for Wall, Wall Shelves for Decor Storage Set of 6, Wall Mounted Wood... | Buy on Amazon |
| # | Preview | Product | |
|---|---|---|---|
| 1 |

|
Laurensory Vinyl Record Shelf Wall Mount, 12 inch Clear Acrylic Album Record Holder Display,... | Buy on Amazon |
Visualize a set of slim, sturdy floating shelves mounted on a wall, holding your favorite albums and collectibles. The minimalist design makes the items pop, especially when arranged by color or size. Brightly colored vinyls or vintage music posters displayed nearby enhance the visual impact. The open shelving creates a sense of space and allows your collection to breathe.
Arrange the shelves in a staggered or linear pattern depending on your room’s layout. Use different lengths and depths for visual interest. For a more eclectic vibe, mix in small decorative objects like retro microphones or musical figurines (no plants, I swear!). You can also incorporate hidden LED lighting underneath for a subtle glow.
Choose quality floating shelf units that are rated to hold your collection weight. Measure wall space carefully and plan your layout before installation. Use a level and pencil to mark shelf positions, then drill and secure brackets into studs or use wall anchors for drywall. Place your records or collectibles neatly, balancing weight and visual harmony. Regularly check hardware tightness to avoid accidents.
Personalize with custom-painted back panels or decorative backing boards behind the shelves. Add framed band photos, concert tickets, or small sculptures among your collection. Change the arrangement seasonally or whenever you acquire new pieces. Use different shelf finishes—matte, gloss, or wood grain—to match your room’s theme.
Floating shelves turn your music collection into art, making your space uniquely yours. They’re practical and stylish, showing off your musical tastes proudly. With a little planning and effort, you’ll create a display that’s both functional and inspiring. Your room will be the envy of every music fan!
4. Use Musical Note Wall Decals for a Playful Touch

Looking to add some personality to your bedroom walls without the commitment of paint or wallpaper? Musical note wall decals are an easy way to inject fun and whimsy into your space. They’re perfect for music enthusiasts who want a playful, non-permanent decor element. Plus, they’re super easy to install and remove.
Recommended Products to replicate this idea
| # | Preview | Product | |
|---|---|---|---|
| 1 |

|
Musical Note Wall Decals, Creative Music Notes Notation Removable Vinyl Wall Stickers for Classroom... | Buy on Amazon |
| # | Preview | Product | |
|---|---|---|---|
| 1 |

|
Ctosree 9 Pcs Vinyl Wall Stickers Inspirational Saying Wall Decals Motivational Saying Murals Large... | Buy on Amazon |
Picture a white wall decorated with black, silver, or colorful musical notes scattered in a lively pattern. The decals come in various sizes, allowing you to create a dynamic, rhythmic design. When illuminated by soft ambient light, they seem to dance and sway, adding energy to the room. It feels like the music is literally spilling onto your walls.
Mix and match different shapes like treble clefs, bass clefs, and notes for a custom look. Use a single color for a minimalist vibe or multiple shades for a playful, vibrant feel. Place decals asymmetrically for a casual feel or in a structured pattern for a more organized appearance. Seasonal or mood changes are simple—just peel and reposition.
Clean the wall thoroughly before application to ensure good adhesion. Peel off the backing and carefully position the decals, using a ruler or level for straight lines if needed. Smooth out air bubbles with a squeegee or credit card. Remove or reposition decals easily without damaging the wall—perfect for renters or those who love to change decor often. For best results, apply decals at room temperature.
Create custom decals featuring your favorite song titles or band logos for a personal touch. Layer decals with other wall elements like fabric hangings or string lights (avoiding the restricted content, of course). You can also add small LED fairy lights intertwined with decals for a whimsical glow. Change the arrangement over time to keep the look fresh.
Musical note decals are a simple yet effective way to add personality and a sense of rhythm to your room. They’re budget-friendly and easily customizable, making your space uniquely yours. Trust your design instincts—play around with placement and colors. Soon, your bedroom will be a lively tribute to your love of music!
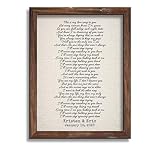
5. Design a Custom Playlist Wall with Framed Lyric Prints

Music is more than just sound; it’s a source of inspiration and emotion. Want to keep your favorite lyrics front and center? A playlist wall with framed lyric prints turns words into art and creates a personal, motivating atmosphere. It’s perfect for music fans who love to showcase their favorite lines and song memories.
Recommended Products to replicate this idea
| # | Preview | Product | |
|---|---|---|---|
| 1 |
|
clicked craft Custom Song Lyrics Canvas - Personalized Cotton Sheet Wall Art with Wooden Frame,... | Buy on Amazon |
| # | Preview | Product | |
|---|---|---|---|
| 1 |

|
Americanflat Set of 10 Picture Frames with Shatter-Resistant Glass - Gallery Wall Frame Set with Two... | Buy on Amazon |
Imagine a grid of framed prints arranged symmetrically or in a creative pattern on your wall. The lyrics are printed in bold fonts, with some elements highlighted in color or decorative typography. Surround the frames with subtle decorative elements like small musical symbols or abstract shapes. The result is a visually striking display that celebrates your musical favorites.
Use different frame styles—vintage wood, sleek black, or metallic—to match your decor theme. Mix in different sizes and orientations for visual interest. For a personal touch, include handwritten lyrics or notes in some frames. Change out the lyrics seasonally or for special occasions to keep your wall fresh and meaningful.
Select your favorite songs or quotes, then print them in high quality. Frame each lyric in a simple or ornate frame depending on your style. Arrange the frames on the wall using painter’s tape first to experiment with placement. Secure each frame with appropriate hooks or mounting hardware, ensuring they’re level. Consider adding a background wall color or textured wallpaper behind the frames for extra depth.
Add small decorative elements like vintage microphones or musical notes around the frames. Personalize further with small LED spotlights or picture lights to illuminate the lyrics at night. Incorporate personal photos or memorabilia among the lyric prints to tell your musical story visually. Rotate the lyric prints periodically to reflect your evolving taste.
A playlist wall transforms your favorite songs into a visual journey that motivates and inspires. It’s a long-lasting decor piece that’s as meaningful as it is stylish. Trust your choices and let your wall tell your musical story every day. Your space will become a source of daily inspiration.
6. Incorporate a Retro Radio or Vintage Music Player
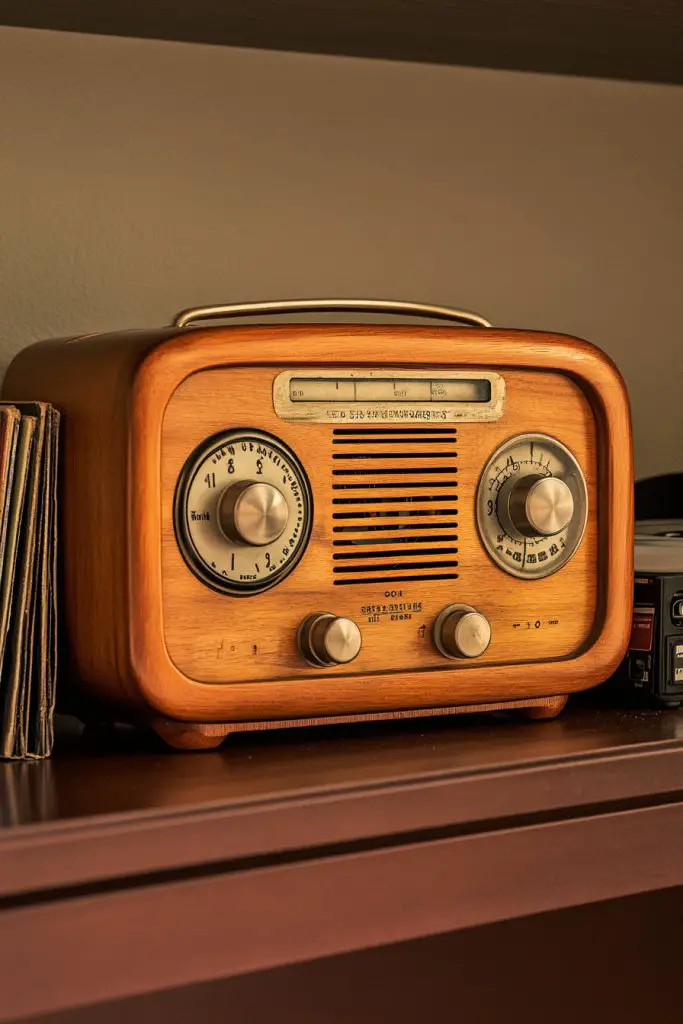
Looking for a nostalgic touch that combines style and function? A vintage radio or music player adds retro charm and a sense of history to your bedroom. It’s a functional decor piece that also sparks conversations and reminisces. Perfect for music fans who love a bit of old-school flair.
Recommended Products to replicate this idea
| # | Preview | Product | |
|---|---|---|---|
| 1 |
|
Victrola Willow – Retro Wood Bluetooth Radio with Built-in Speakers: Elegant & Vintage Design,... | Buy on Amazon |
| # | Preview | Product | |
|---|---|---|---|
| 1 |
|
Victrola Journey Bluetooth Portable Suitcase Record Player – with Built-in Speakers, 3 Speed Vinyl... | Buy on Amazon |
Envision a classic wooden or chrome radio sitting on a shelf or bedside table, emitting a warm glow. The design’s retro curves and dials instantly evoke a bygone era. When turned on, it fills the room with soft crackles and nostalgic tunes, creating a cozy, vintage atmosphere. It combines visual appeal with auditory nostalgia.
Choose from different styles—art deco, mid-century modern, or rustic—to match your decor. Pair with other vintage items like old posters, gramophones, or record stacks. Place the radio on a dedicated shelf, a stack of books, or integrate it into a gallery wall. It can serve as both a functional radio and a decorative object.
Select a reliable vintage or reproduction radio with good sound quality. Position it where it’s easily accessible but also visually prominent. Consider adding a power strip with a switch for convenience. Ensure the placement complements other decor elements without overcrowding. If you’re into DIY, refurbishing an old radio can be a rewarding project. Keep the area clean and dust-free for longevity.
Personalize with vintage-inspired accessories like retro records or mini speakers. Use it as a backdrop for other decor items like framed black-and-white photos or musical memorabilia. Occasionally, swap out old radios for different models to keep the look fresh. Add a small decorative tray or stand for a modern twist.
A retro radio is a charming conversation piece that also pays homage to musical history. It adds warmth and personality, making your room feel timeless. Trust your taste—whether you go for authentic or reproduction models, it’s a stylish and functional addition. Your bedroom will radiate vintage coolness.
7. Personalize with a Custom Headphone Hook or Holder
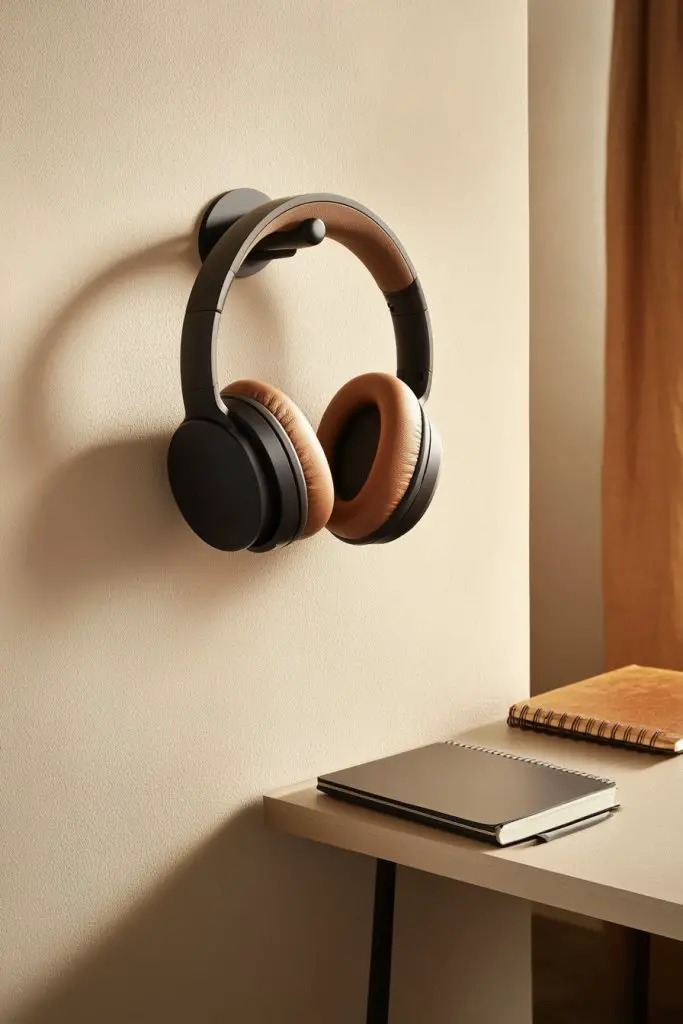
Earbuds and headphones can quickly clutter your space, making your room look messy. Want a dedicated spot that’s both functional and themed? A custom headphone hook or holder keeps your accessories organized and adds a subtle musical touch. It’s a small detail with a big impact.
Recommended Products to replicate this idea
| # | Preview | Product | |
|---|---|---|---|
| 1 |
|
Lamicall Headphone Stand, Sticky Headset Hanger - Adhesive Headphone Holder Hook Mount, Headset... | Buy on Amazon |
| # | Preview | Product | |
|---|---|---|---|
| 1 |

|
Bliocefo Headphone Holder Stand for Desk, Wood and Metal Headset Hanger Mount Hook Gaming Holder... | Buy on Amazon |
Visualize a sleek, wall-mounted hook shaped like a headphone or musical note, holding your favorite headset. The hook’s design can blend seamlessly into your decor or stand out as a statement piece. It keeps your headphones within reach while adding a modern, artistic element to your wall. It’s both practical and stylish.
Choose from minimalist metal hooks, colorful silicone holders, or decorative designs shaped like instruments or notes. Mount multiple hooks in a row for different sets or accessories. Use colors that match your room’s palette or go for metallic finishes for an industrial vibe. Combine with other musical wall decals or prints for a cohesive look.
Decide on the location—near your desk, bed, or door for easy access. Use appropriate anchors and hardware to secure the hook firmly to the wall. Hang your headphones by the headband or ear cups, avoiding stretching or damage. Keep the area clean and dust-free to maintain the look. Regularly check hardware for stability.
Add a small plaque or label with your name or a favorite lyric for a personalized touch. Incorporate LED strip lighting around the hook for a subtle glow. Mix in decorative elements like tiny musical charms or stickers nearby. Change the placement or style seasonally to keep your decor lively.
A custom headphone hook is a simple upgrade that reflects your musical personality. It keeps your space tidy and inspires daily use of your favorite gear. Trust your style—this small detail can make your room feel more curated and functional. Enjoy your organized, musical sanctuary!
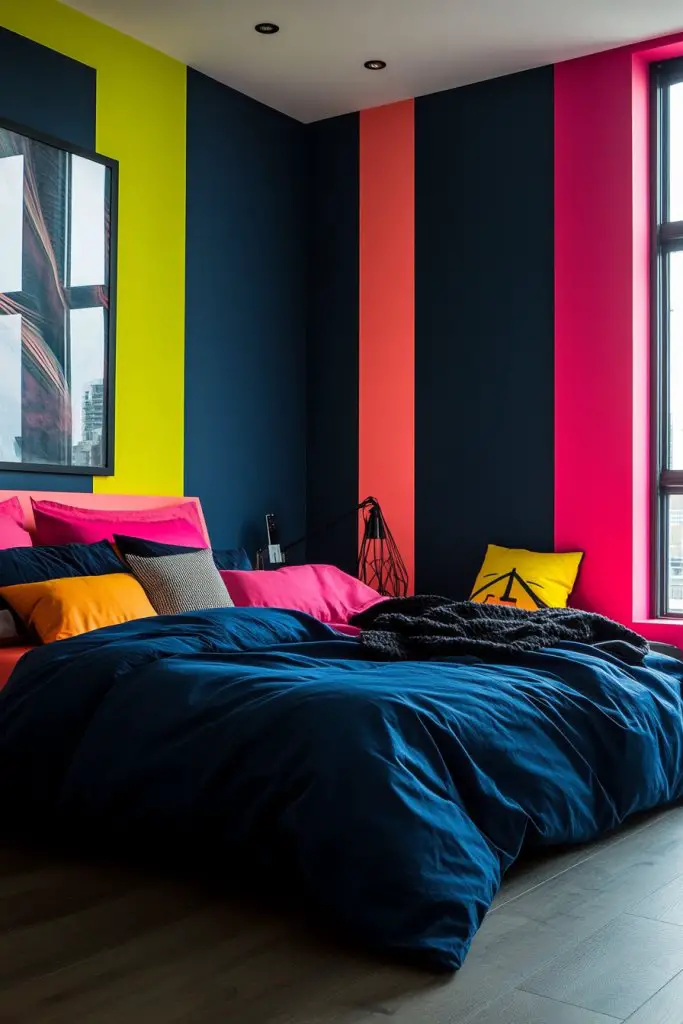
8. Incorporate a Music-themed Bedding or Throw Pillows

Bedding is the easiest way to instantly boost your room’s personality. Want to wake up in a space that celebrates your musical passion every day? Music-themed bedding or throw pillows add color, comfort, and a personal touch. It’s a simple, impactful decor upgrade.
Recommended Products to replicate this idea
| # | Preview | Product | |
|---|---|---|---|
| 1 |

|
Musical Note Bedding Set Staff Pattern Comforter Cover for Kids Adult Classic Music Themed Duvet... | Buy on Amazon |
| # | Preview | Product | |
|---|---|---|---|
| 1 |

|
CCOCND Set of 4 Throw Pillow Covers Electric Guitar Music Sound Speaks Musician Where Words Fail... | Buy on Amazon |
Picture a soft duvet cover adorned with musical notes, band logos, or colorful instruments. Complement it with pillows featuring lyrics, album art, or iconic symbols. The textures—like embroidered notes or printed graphics—make the bed a focal point. When you enter, you’re greeted by a vibrant, music-inspired oasis.
Choose bedding in bold, contrasting colors or more subdued tones for a minimalist look. Mix and match different pillow styles—bolsters, shams, or decorative cushions—with musical motifs. Change the bedding seasonally to reflect your mood or update your decor theme. Add a textured throw blanket with a chunky knit or fringed edges for extra coziness.
Select high-quality, machine-washable fabrics with designs that resonate with your style. Layer your bedding with complementary sheets or blankets in solid or patterned styles. Arrange pillows symmetrically or asymmetrically based on your aesthetic. Keep the bedding clean and fresh, and rotate designs periodically for variety. Consider custom printing for unique graphics.
Add personalized embroidery or patches featuring your favorite lyrics or symbols. Use decorative trims or piping in metallic or contrasting colors for added flair. Incorporate small decorative accents like musical charms or mini instruments on pillowcases. Change the look for different seasons or special occasions.
Music-themed bedding transforms your space into a personal concert hall and sanctuary. It’s a cozy, stylish way to express your musical identity. Trust your taste—whether classic rock, jazz, or pop—your bedding can reflect your musical journey every morning and night.
9. Hang a String of Fairy Lights with Music Notes
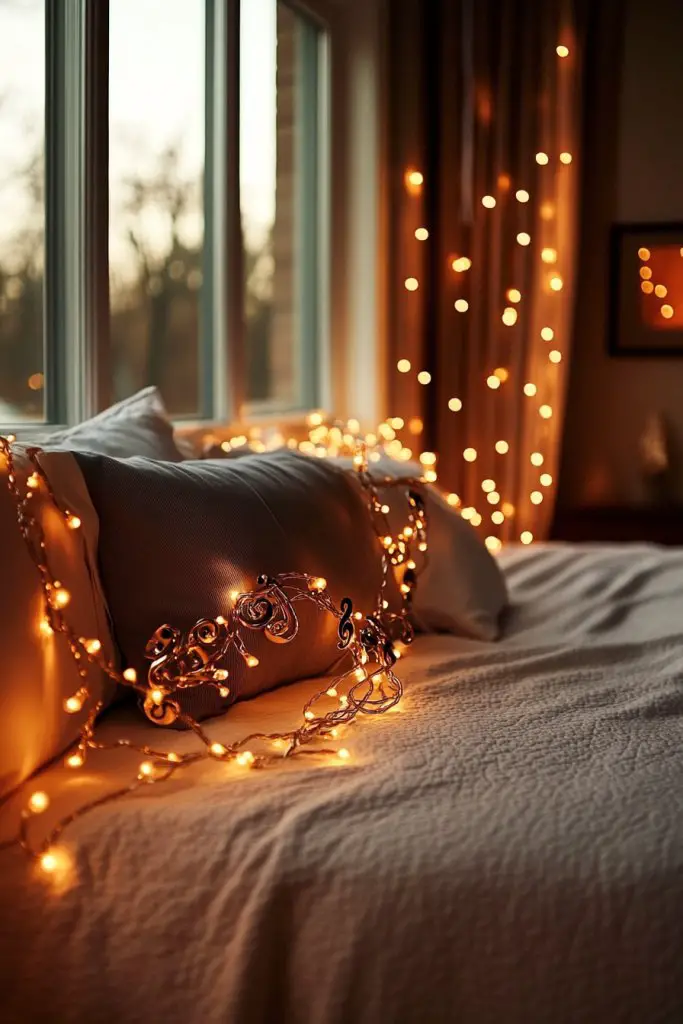
Want to add a magical glow to your bedroom without complicated wiring or expensive fixtures? Fairy lights are a simple, enchanting way to elevate your space. When decorated with tiny music note or instrument-shaped pendants, they turn your room into a whimsical musical haven. Perfect for creating ambiance and personality.
Recommended Products to replicate this idea
| # | Preview | Product | |
|---|---|---|---|
| 1 |

|
GUOCHENG 16FT 50LEDs Music Note String Lights, Music Stave Fairy Light 3AA Batteries Operated... | Buy on Amazon |
| # | Preview | Product | |
|---|---|---|---|
| 1 |

|
Feiss P1348PAGB/DWZ Baskin Glass Pendant Lighting, Brass, 1-Light (10"Dia x 10"H) 60watts | Buy on Amazon |
Imagine a string of warm white or colored fairy lights draped across your ceiling or around your bed frame. Small, metallic or translucent music note or instrument pendants hang down, catching the light. As the lights twinkle, they cast playful shadows and add depth to your decor. It’s like having a mini concert stage right in your room.
Arrange the string lights in a zigzag pattern, drape them behind your headboard, or frame your window. Use different colors or warm tones to match your mood. Mix with other soft textiles like curtains or throws for a layered, cozy effect. Replace or add new pendants seasonally for ongoing freshness.
Secure the lights using hooks, clips, or adhesive strips, ensuring they’re firmly attached without damaging the wall or ceiling. Space the pendants evenly along the string for a balanced look. Use battery-operated or plug-in lights depending on your preference—battery options allow for more flexible placement. Turn on and enjoy the soft, atmospheric glow. Regularly check connections and replace batteries as needed.
Create custom pendants with your favorite song lyrics or symbols by DIY printing on transparent sheets. Add tiny decorative elements like stars or musical notes for extra charm. Layer the fairy lights with other decor like wall decals or posters for a cohesive look. Use different light intensities or colors to match seasons or occasions.
Fairy lights with musical accents bring instant warmth and personality to your room. They’re a cost-effective way to create a dreamy, inspiring environment. Trust your creative instincts—play around with placement and colors. Your space will glow with your love for music and make every night special.
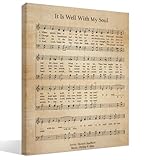
10. Use a Music Sheet Canvas Art as a Statement Piece
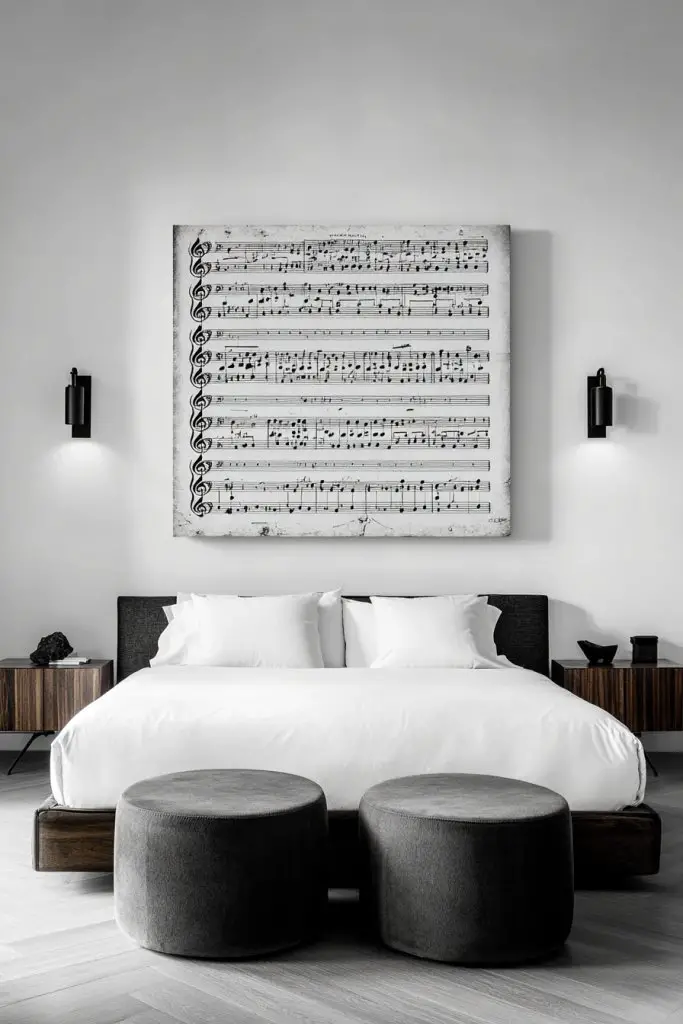
Looking for a bold, artistic focal point that’s both meaningful and stylish? A large canvas print of sheet music or a favorite song’s lyrics can transform your bedroom wall into a visual symphony. It’s perfect for music enthusiasts craving a statement piece that celebrates their passion.
Recommended Products to replicate this idea
| # | Preview | Product | |
|---|---|---|---|
| 1 |
|
BIWSHA Vintage Christian Music Wall Art Decor, It Is Well With My Soul Religious Bible Verse Church... | Buy on Amazon |
| # | Preview | Product | |
|---|---|---|---|
| 1 |
|
clicked craft Custom Song Lyrics Canvas - Personalized Cotton Sheet Wall Art with Wooden Frame,... | Buy on Amazon |
Picture a massive, high-quality print of a famous sheet, framed simply or stretched on a gallery-style canvas. The black-and-white notation or vibrant lyric typography draws immediate attention. When paired with subtle lighting, it becomes an eye-catching centerpiece that invites admiration and reflection. It’s a blend of art and music that’s both elegant and personal.
Select classic sheet music, modern lyric art, or custom designs featuring your favorite song. Use monochrome for a sophisticated look or vibrant colors for a lively vibe. Hang it above your bed or on a major wall for maximum impact. Combine with other musical decor like framed records or instruments for a curated gallery feel.
Order a high-resolution print from a professional printer or DIY with quality art paper. Choose a durable frame or opt for canvas stretching for a sleek look. Measure your wall and mark the ideal placement. Use appropriate hanging hardware to ensure stability. Keep the art dust-free and avoid direct sunlight to prevent fading.
Add small decorative elements around the art, like vintage microphone figurines or tiny musical symbols. Personalize further by including a plaque with a special date or quote. Rotate or update the print periodically to reflect your evolving music taste. Incorporate lighting effects for extra drama.
A sheet music canvas art anchors your decor with sophistication and passion. It’s a conversation starter and a reflection of your musical soul. Trust your artistic choices—this piece will inspire you daily and make your room uniquely yours. Let your walls sing!
11. Install a Mini Stage or Performance Corner
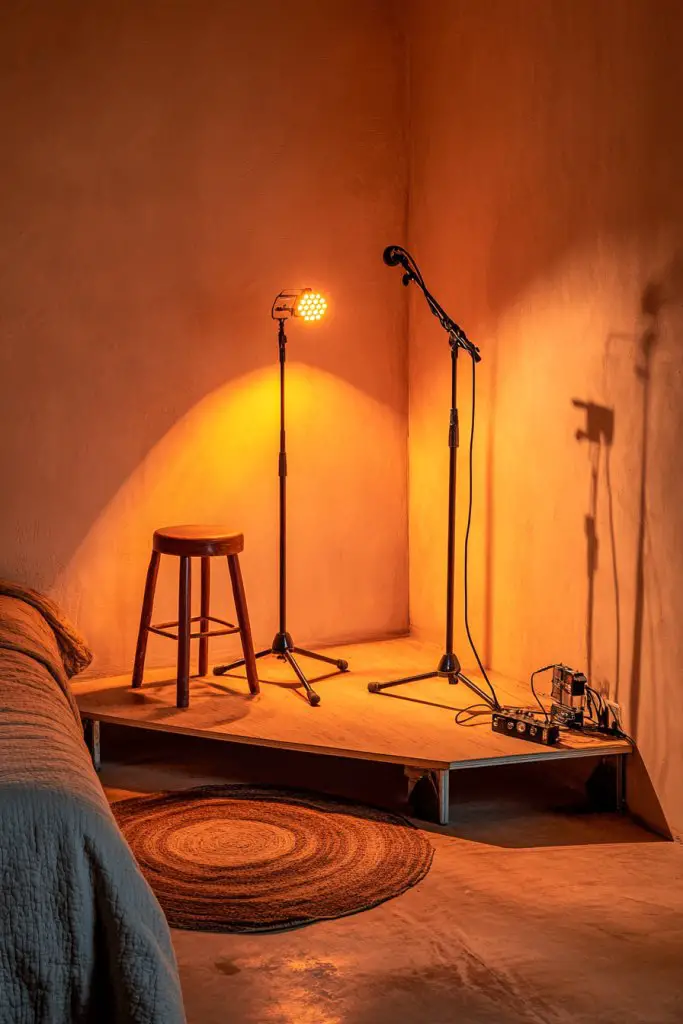
Ever dreamed of having a space dedicated to your musical talents? A mini stage or performance corner turns your bedroom into a personal concert venue. It’s perfect for practicing, recording, or just showing off your skills. Plus, it adds a fun, dramatic flair to your space.
Recommended Products to replicate this idea
| # | Preview | Product | |
|---|---|---|---|
| 1 |

|
Tandefio Portable Stage with Height Adjustable Riser (24" -40") Platform Modular System Stage Easy... | Buy on Amazon |
| # | Preview | Product | |
|---|---|---|---|
| 1 |

|
InnoGear Microphone Stand, Tripod Boom Arm Floor Mic Stand Height Adjustable Heavy Duty with... | Buy on Amazon |
Visualize a small elevated platform with a microphone stand, a stool, and theatrical lighting. The area is framed with colorful curtains or textured wall panels, creating a stage-like atmosphere. When you perform or practice here, it feels like a real show. Even when not in use, it’s an inspiring focal point.
Use a portable platform or build a custom stage from wood pallets or modular units. Incorporate adjustable lighting, like spotlights or colored LEDs, to set the mood. Decorate the backdrop with banners, posters, or textured panels (no plants, I swear!). Keep equipment organized with small shelves for instruments or accessories.
Choose a safe, stable platform that can support your weight. Set it against a wall that provides enough space for movement. Install adjustable lighting or portable lamps to highlight your performance area. Keep cords tidy with clips or cable organizers. Practice safety by securing all equipment and ensuring stability. Regularly inspect for wear or damage.
Personalize with themed backdrops, custom banners, or LED light strips that change colors with your mood. Add a mirror nearby to improve your performance and self-assessment. Use your mini stage for recording sessions or live streams to share your talent. Refresh the decor seasonally for new inspiration.
A dedicated performance corner boosts your confidence and fuels your passion. It makes practicing more fun and inspiring daily improvement. Trust your creativity—your room can be the perfect stage for your musical journey. Get ready to impress yourself and others!
12. Use Music-themed Wallpaper or Wall Panels
Bored of plain walls but hesitant to commit to bold paint or art? Music-themed wallpaper or textured wall panels create an instant statement. They add depth, drama, and personality without cluttering your space. It’s a bold move that pays off in style.
Recommended Products to replicate this idea
| # | Preview | Product | |
|---|---|---|---|
| 1 |

|
Peel and Stick Wallpaper Self Adhesive Wall Mural music notes treble clef seamless Abstract outline... | Buy on Amazon |
| # | Preview | Product | |
|---|---|---|---|
| 1 |
|
Art3dwallpanels 33 Pack 3D Wall Panel Diamond for Interior Wall Décor, PVC Flower Textured Wall... | Buy on Amazon |
Picture a wall covered in wallpaper featuring musical notes, instruments, or abstract sound waves. The pattern can be subtle or loud, depending on your taste. When paired with minimalist furniture, it becomes a striking backdrop that energizes the room. Textured panels resembling sound waves or sheet music add tactile interest and sophistication.
Choose from peel-and-stick wallpaper for an easy update or textured panels for a more permanent solution. Use a single wall as a feature or cover the entire room. Match the design’s color palette with your overall decor to maintain harmony. Change the panels or wallpaper seasonally for a fresh look.
Prepare your wall by cleaning and smoothing surfaces. Measure carefully and order enough wallpaper or panels to cover your desired space. For wallpaper, use a level and smoothing tool during application to avoid bubbles. For panels, follow manufacturer instructions for mounting—adhesive, screws, or clips. Finish with trim or molding for a clean edge. Regular maintenance keeps it looking pristine.
Add small decorative elements like mini posters or decals that complement the theme. Use LED backlighting or indirect lighting to highlight the textured surface at night. Coordinate with your room’s color scheme for a cohesive aesthetic. Rotate wallpaper or panels to reflect new music interests or seasons.
A musical wall creates a bold, immersive environment that celebrates your passion. It’s a design investment that transforms your space into a personal concert hall. Trust your style and choose a design that resonates—your room’s vibe will be truly one-of-a-kind. Let your walls sing!
13. Incorporate a DIY Drumstick or Microphone Decor
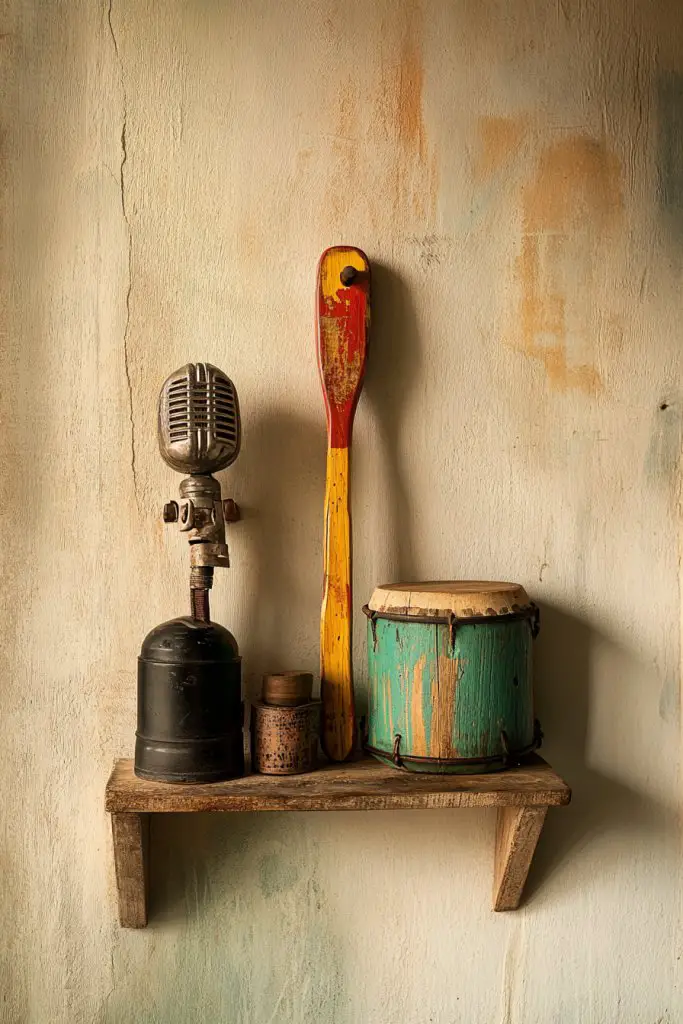
Looking for a subtle yet impactful way to show your love for performance? DIY drumstick or microphone decorations bring a touch of stage magic to your room. They’re affordable, customizable, and perfect for adding a personal, musical flair. Who says you need a stage to feel like a star?
Recommended Products to replicate this idea
| # | Preview | Product | |
|---|---|---|---|
| 1 |

|
Facmogu Acrylic Drum Stick Holder, Drumsticks Wall Display Stand for 8 Pair of Sticks, Drum Stick... | Buy on Amazon |
| # | Preview | Product | |
|---|---|---|---|
| 1 |

|
OnStage On-Stage DS7100B Desktop Microphone Stand, Black | Buy on Amazon |
Picture a wall with a pair of faux drumsticks crossed like a crest or a vintage microphone mounted as a piece of wall art. The textures and shapes instantly evoke a musical vibe, without overwhelming the space. These decor pieces are both playful and stylish, blending into your room’s theme seamlessly.
Use craft materials like painted wood, foam, or metallic finishes to create your own drumsticks or microphones. Mount them on walls with simple brackets or glue for a more casual look. Arrange multiple items in a pattern or cluster for visual interest. Keep the design consistent with your overall decor style.
Gather supplies: wood or foam sticks, paint, glue, and mounting hardware. Create or customize the drumsticks/microphones to your liking—paint, decals, or fabric covers add personality. Mount securely using wall anchors or adhesive strips. Position them at eye level or above other decor elements for maximum impact. Regularly check for stability.
Add small plaques or engraved tags with your favorite band names or song lyrics. Incorporate LED strip lighting around the decor for a spotlight effect. Mix with other musical decor like posters or vinyl for a curated look. Change out pieces when you want a fresh stage vibe.
DIY drumstick and microphone decor add a fun, creative punch to your space, celebrating your love for performing. It’s a conversation starter and a reflection of your personality. Trust your craftsmanship—your room will feel like your personal backstage arena. Get ready to shine!
14. Display a Collection of Vintage Concert Tickets or Posters
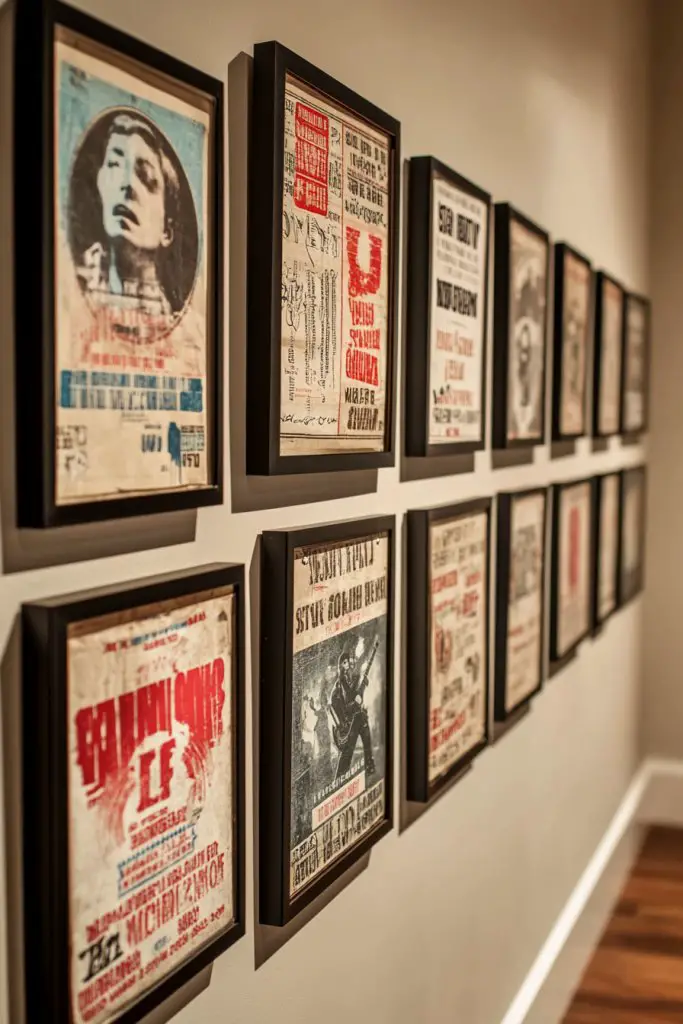
Memorabilia like concert tickets and posters capture special moments and memories. Want to showcase your musical adventures? Framing and displaying vintage concert tickets or posters turn them into art, adding nostalgia and personality to your room. It’s a creative way to relive your favorite gigs.
Recommended Products to replicate this idea
| # | Preview | Product | |
|---|---|---|---|
| 1 |

|
Acrylic Ticket Stub Holder with Base 4x9 Inch Clear Ticket Stub Display Ticket Stub Organizer... | Buy on Amazon |
| # | Preview | Product | |
|---|---|---|---|
| 1 |

|
10 Pack Vintage Picture Frames for Wall or Tabletop Display Ornate Vintage Picture Frames Vintage... | Buy on Amazon |
Imagine a gallery wall filled with framed tickets and posters from memorable concerts, arranged in a grid or eclectic pattern. The mix of colors, fonts, and images creates a vibrant narrative of your musical journey. When lit properly, it becomes a lively, nostalgic focal point that sparks conversations.
Use different frame styles—vintage wood, sleek black, or metallic—to match your decor theme. Mix in other memorabilia like band photos, album covers, or music magazines. Rotate or add new pieces over time to keep the display fresh. For a more polished look, group similar items together.
Source high-quality frames that protect your memorabilia. Arrange the tickets and posters on the floor first to experiment with layout. Use measuring tape and level to hang them evenly. Secure each frame with wall hooks or nails, ensuring stability. Keep the display dust-free and avoid direct sunlight to prevent fading. Regularly update with new finds.
Add small plaques with dates or personal stories behind each ticket or poster. Incorporate string lights or small LED strips around the display for nighttime glow. Place memorabilia in shadow boxes or layered frames for depth. Mix with other decor elements like musical ornaments or vintage accessories.
Your collection of vintage concert memorabilia tells your personal story and celebrates your musical tastes. It makes your space uniquely yours and sparks nostalgic joy. Trust your curation skills—every piece adds character and warmth. Your room becomes a living memory lane of your musical adventures.
15. Hang a String of Miniature Instrument Ornaments
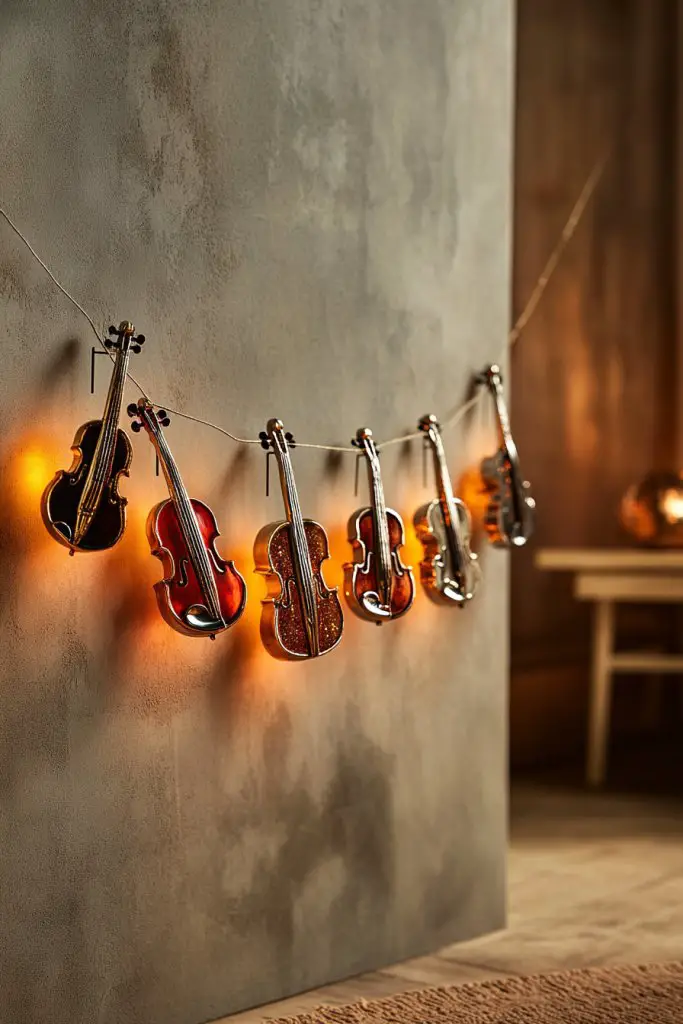
Want a subtle nod to your favorite instruments without overwhelming your decor? Stringing small instrument-shaped ornaments adds a delicate, musical touch. It’s a playful yet refined way to personalize your space. Perfect for those who love detail and want to keep things lightweight.
Recommended Products to replicate this idea
| # | Preview | Product | |
|---|---|---|---|
| 1 |

|
Dollhouse Musical Instruments, Miniature Violin Guitar Piano Drum Trumpet Mini Figurine Ornament for... | Buy on Amazon |
| # | Preview | Product | |
|---|---|---|---|
| 1 |

|
Jansun 32.8 Feet Dollhouse Fake Lights String, Miniatures Dollhouse Christmas Lights String... | Buy on Amazon |
Envision a thin string or wire hanging across a wall or ceiling corner, with tiny, detailed instrument charms—guitars, drums, pianos—dangled at intervals. The ornaments catch light and sway gently, creating a lively, dynamic effect. It’s like a mobile of musical dreams that adds movement and charm.
Use different materials—metal, wood, or acrylic—for a variety of textures. Mix small ornaments with decorative beads or charms for a layered look. Hang the string at different heights or create a cascading effect for visual interest. Coordinate colors with your room’s palette or go metallic for a modern vibe.
Attach small hooks or clips along the string or wire, then hang ornaments securely. Use adhesive hooks or eyelets on the wall for fixed points. Ensure the string is taut for a clean look, or allow gentle sway for a playful effect. Space ornaments evenly for balance. Regularly check for wear or tangles.
Personalize with engraved or painted details on each ornament. Add tiny LED lights along the string for a soft glow. Incorporate small decorative elements like musical notes or stars nearby. Switch out ornaments for different seasons or themes, keeping your decor fresh.
A string of miniature instrument ornaments subtly celebrates your musical interests. It adds movement, lightness, and personality without clutter. Trust your eye for detail—this delicate decor makes your room feel lively and curated. Your space will feel creatively inspired and uniquely yours.
16. Create a Musical Instrument Display Shelf
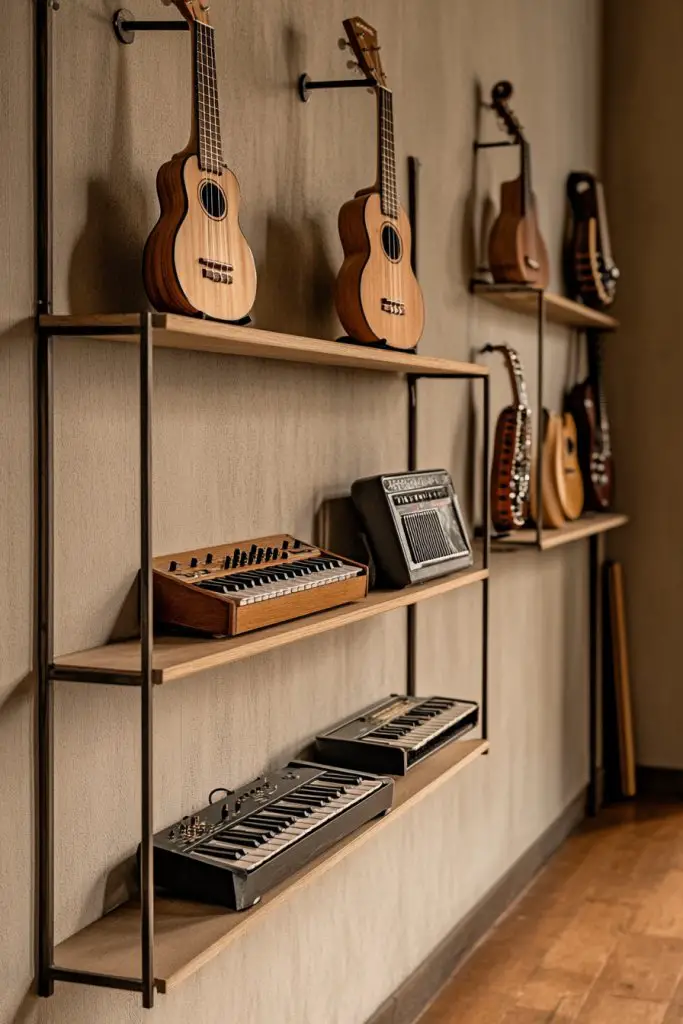
Hoarding your favorite instruments or collectibles but running out of space? A dedicated display shelf turns your musical gear into art. It keeps your instruments safe, organized, and proudly showcased. Ideal for music lovers who want to celebrate their collection without clutter.
Recommended Products to replicate this idea
| # | Preview | Product | |
|---|---|---|---|
| 1 |
![Keebofly 2-Pack Guitar Wall Mount Hanger with Shelf & Pick Holder - Wood Wall Hook for Acoustic, Electric, Bass Guitars, Ukulele (Screw-Mounted, Brown) [Patented]](https://m.media-amazon.com/images/I/51qQLBrA6fL._SL160_.jpg)
|
Keebofly 2-Pack Guitar Wall Mount Hanger with Shelf & Pick Holder - Wood Wall Hook for Acoustic,... | Buy on Amazon |
| # | Preview | Product | |
|---|---|---|---|
| 1 |
|
Onmiwod Guitar Wall Mount, Black Walnut Wood Guitar Hanger, U-Shaped Guitar Wall Hanger Mount,... | Buy on Amazon |
Picture a sleek, wall-mounted shelf with a few carefully arranged guitars, ukuleles, or percussion instruments. The display combines function with aesthetics, turning your room into a mini gallery. The varied shapes and colors of instruments add visual interest, making your space lively and personalized.
Use open shelves or cubbies to display different instruments or collectibles. Mix in small decorative elements like vintage microphones or music books for a layered look. Arrange items by size, color, or theme to create harmony. For a dynamic look, rotate the items periodically.
Securely mount the shelf at a height that’s both functional and aesthetic. Use sturdy brackets and anchors suitable for your wall type. Arrange your instruments carefully, ensuring they’re stable and protected from damage. Add padding or soft cloths underneath delicate pieces. Regularly check hardware and clean the shelf for dust.
Personalize with small labels or plaques describing each instrument’s story. Add LED strip lighting behind or underneath for a dramatic effect. Incorporate framed photos or posters of your musical milestones nearby. Change the display seasonally or as your collection evolves.
A musical instrument display shelf transforms your collection into a piece of art. It’s a source of pride and inspiration, reminding you of your musical journey. Trust your eye for design—this curated setup will bring joy and personality to your room. Showcase your passion with style!
17. Use Color Schemes Inspired by Album Covers
Tired of mismatched decor and dull walls? Using color schemes inspired by iconic album covers creates a cohesive and vibrant aesthetic. It’s a subtle way to celebrate your musical favorites while elevating your room’s style. Plus, it’s easier than you think to pull off.
Recommended Products to replicate this idea
| # | Preview | Product | |
|---|---|---|---|
| 1 |

|
Leptetek 6 PCS Vinyl Records Decorations 12 Inch with Markers, Double Side Tape and Vinyl Center... | Buy on Amazon |
| # | Preview | Product | |
|---|---|---|---|
| 1 |

|
Nicpro 14 Colors Large Bulk Acrylic Paint Set (16.9 oz,500 ml) Rich Art Painting Supplies, Non Toxic... | Buy on Amazon |
Imagine walls painted or accented with colors directly drawn from your favorite album art—bright reds, bold blacks, or pastel gradients. Incorporate decor items like pillows, curtains, or rugs that mirror these palettes. The room feels harmonious, yet full of personality, echoing the energy of your musical icons.
Choose a dominant color palette based on a single album or create a rainbow-inspired scheme. Use complementary or analogous colors for balance. Update the scheme seasonally or whenever you discover new favorite covers. Use paint, textiles, and accessories to reinforce the theme without overwhelming the space.
Start with a mood board or color palette inspired by album covers. Paint accent walls or add colorful accessories that reflect your chosen scheme. Keep the rest of the decor minimal to let the colors pop. Use fabric swatches or sample paints before committing. Regularly refresh accessories to keep the aesthetic lively.
Create custom art or decals that mimic album cover styles. Incorporate framed vinyl records or posters with matching color themes. Use colored lighting to enhance mood and highlight specific areas. Change the decor elements to match new favorite albums or moods.
A cohesive color scheme inspired by albums makes your room feel curated and vibrant. It reflects your musical taste visually and emotionally. Trust your instincts—this approach creates a space that’s as energetic or relaxed as your playlist. Your room will sing in harmony!
18. Add a Personalized Music Quote Wall Art

Looking for a way to motivate yourself daily? A wall art featuring your favorite music quote or lyric can inspire, uplift, and personalize your space. It turns meaningful words into a visual focal point that resonates with your inner musician. Bonus: it’s easy to update or change anytime.
Recommended Products to replicate this idea
| # | Preview | Product | |
|---|---|---|---|
| 1 |

|
Personalized Music Metal Wall Art, Custom Treble Clef Notes Decor, Song Lyric Wall Sculpture for... | Buy on Amazon |
| # | Preview | Product | |
|---|---|---|---|
| 1 |
|
clicked craft Custom Song Lyrics Canvas - Personalized Cotton Sheet Wall Art with Wooden Frame,... | Buy on Amazon |
Picture a large, bold quote printed or painted on a canvas or poster, hung prominently above your bed or desk. The typography can be playful, elegant, or gritty, depending on your style. Surround it with subtle decor elements like musical symbols or small lights to draw attention. Every time you see it, you’re reminded of your passion.
Use different fonts, colors, or materials—metal, wood, or canvas—to match your decor style. Incorporate multiple quotes or lyrics for a gallery wall effect. Change the quotes seasonally or for special milestones. Add decorative borders or backgrounds for more impact.
Choose a quote that motivates or resonates deeply with you, then print or paint it on a quality material. Use stencils, decals, or professional printing services for clean results. Hang at eye level using hooks or adhesive strips. Consider adding LED backlights or spotlights to emphasize the quote. Keep the area clean and free of clutter.
Personalize further with small decorative elements like miniature instruments or musical notes around the quote. Rotate quotes periodically to reflect your evolving taste or mood. Use framing or mounting techniques that match your overall decor aesthetic. Incorporate it into a larger gallery for a curated vibe.
A music quote wall art constantly reminds you why you love music and keeps your motivation high. It’s a personal, impactful decor piece that can inspire you daily. Trust your choice of words—this visual motivator will make your space uniquely yours. Let your walls speak!
19. Incorporate a Space for Practicing with Acoustic Panels
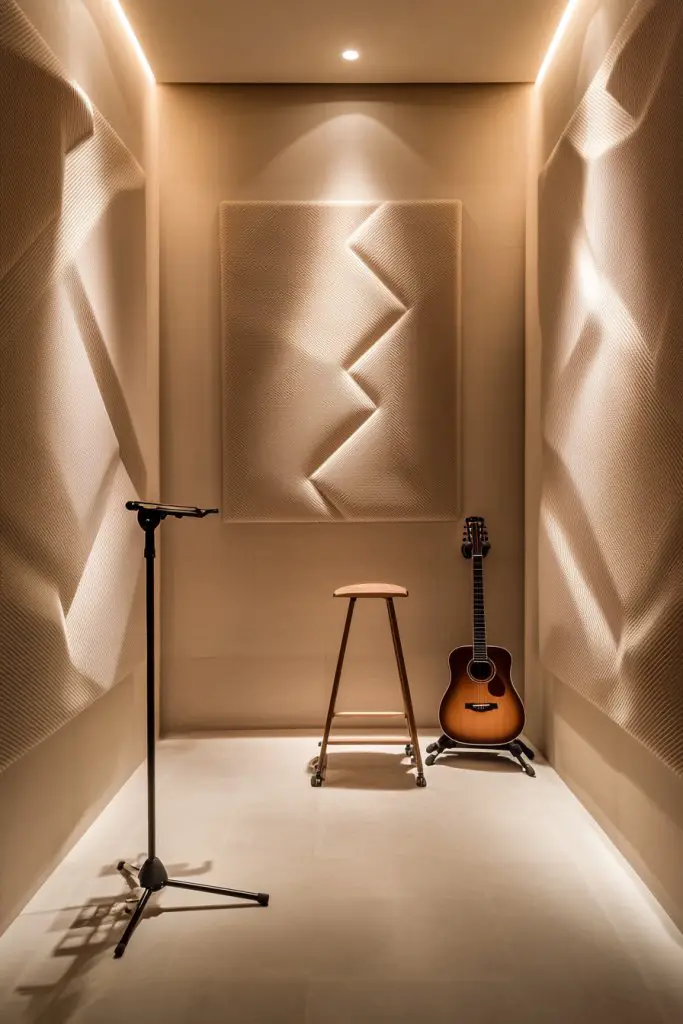
Practicing your instrument can be noisy and disruptive, especially in a shared space. Want to improve your acoustics while keeping your room stylish? Stylish acoustic panels create a dedicated practice zone that looks good and sounds even better. It’s a win for your talent and your peace of mind.
Recommended Products to replicate this idea
| # | Preview | Product | |
|---|---|---|---|
| 1 |

|
JBER 6 Pack Art Acoustic Panels, 72×48Inches Soundproof Wall Panels, Large Self-Adhesive Wall... | Buy on Amazon |
| # | Preview | Product | |
|---|---|---|---|
| 1 |
|
TroyStudio Thick Acoustic Foam Panels, 12 X 12 X 2 Inch 36 Pcs Broadband Sound Absorbing Foam, Dense... | Buy on Amazon |
Visualize geometric or textured panels arranged on a wall behind your practice area. They can be in bold colors, neutral tones, or patterned fabrics, matching your decor. The panels absorb sound and reduce echo, making practicing more enjoyable. When lit with ambient lighting, they also serve as a modern design feature. It’s a functional art installation that boosts your musical focus.
Choose panels in different shapes—hexagons, squares, or triangles—for a dynamic look. Cover them with fabric, textured material, or paint for customization. Arrange them in a pattern or scattered for a more organic feel. Match or contrast their colors with your room’s palette. Incorporate a small shelf or hook for your instrument or accessories nearby.
Select acoustic panels suited for your sound needs—foam, fabric-covered, or wooden slats. Mount them securely using brackets or adhesive strips, following manufacturer instructions. Arrange them strategically around your practice area to maximize sound absorption. Ensure wires and cords are managed safely. Regularly dust and inspect for wear.
Add decorative covers or custom prints on the panels reflecting your musical taste. Incorporate LED strip lighting for a dramatic, modern look. Use color-changing lights to match your mood or performance vibe. Pair the panels with other decor like posters or musical symbols for a cohesive space.
Acoustic panels turn a functional necessity into a stylish feature, inspiring your musical growth. They help you focus and improve without sacrificing interior style. Trust your space—this practical addition boosts both your sound quality and your confidence as a musician. Your room will be your perfect practice sanctuary.
Conclusion
These diverse music bedroom ideas showcase how you can infuse your space with your favorite sounds and styles, making it uniquely yours. Whether you opt for subtle musical accents or a full-blown studio vibe, these ideas are easy to adapt and customize. Don’t hesitate—try out these inspiring concepts and turn your bedroom into a lively expression of your musical spirit. Your dream space is just a creative step away!
Last update on 2026-02-12 / Affiliate links / Images from Amazon Product Advertising API