Imagine walking into a bedroom that instantly feels warm, personal, and full of cherished memories—there’s nothing quite like a stunning photo wall to achieve that! Photo walls in bedrooms have become a favorite decor trend because they beautifully blend style with sentimentality, transforming blank walls into heartfelt displays of family moments, travels, and milestones. They’re an easy, customizable way to infuse your space with personality and create a cozy, inviting atmosphere that tells your unique story.
In this article, you’ll discover a variety of creative ideas to craft your perfect photo wall, from sleek grid arrangements to eclectic gallery styles, and even themed displays that showcase your family’s adventures. Whether you prefer minimalist designs or vibrant, eye-catching displays, these ideas will inspire you to turn your bedroom into a visual celebration of your loved ones. Get ready to transform your space and keep those precious memories front and center!
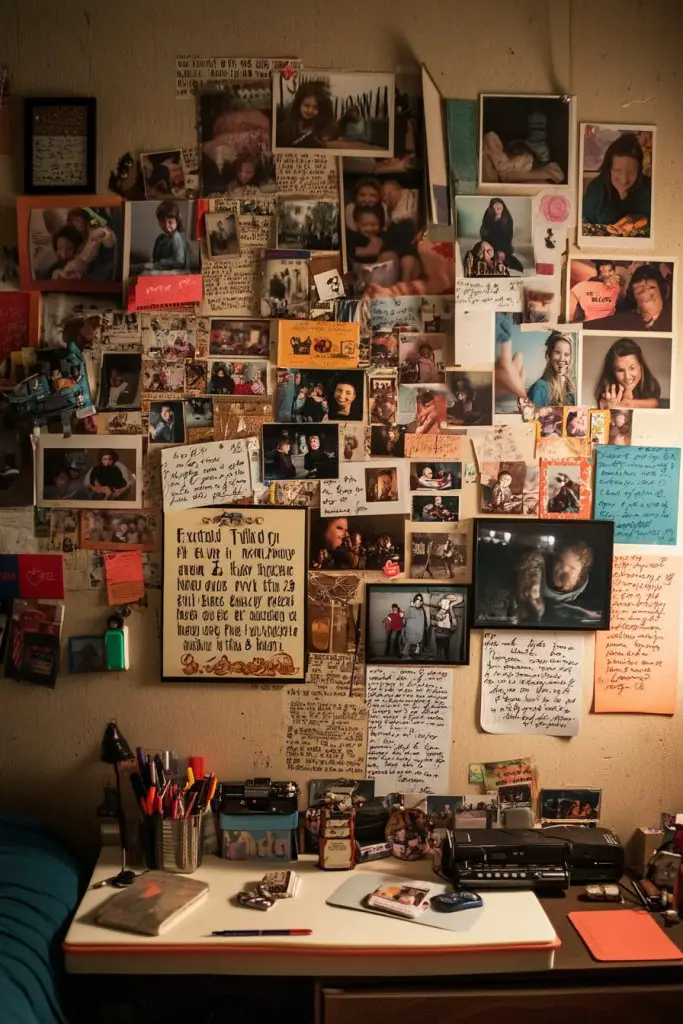
1. Gallery Wall with Mixed Frame Sizes and Colors for a Dynamic Look
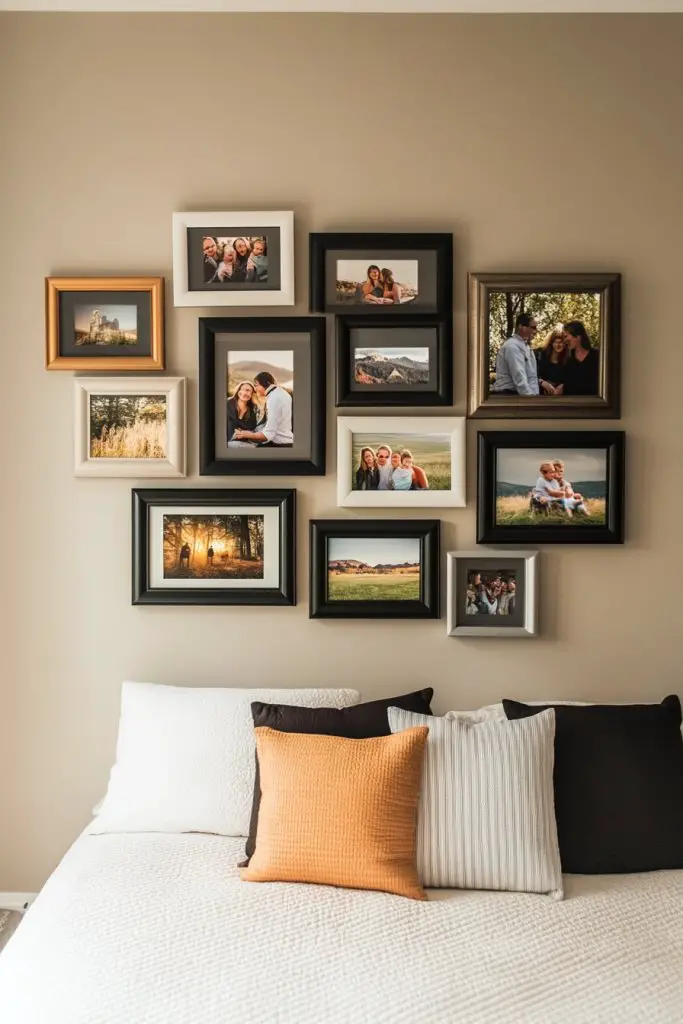
Ever feel like your bedroom walls need a serious upgrade to reflect your personality? A bland, uniform photo display can make your space feel dull and uninspired. You want a wall that bursts with character, showcasing your favorite family moments in a lively way. The solution? A gallery wall that captures your vibe and keeps the room feeling fresh.
Imagine a wall filled with photos in frames of various sizes, colors, and styles arranged in a seemingly spontaneous yet curated manner. The frames might be a mix of shiny metallic, matte black, and rustic wood, creating a vibrant mosaic. Photos of smiling faces, candid moments, and milestones pop against this eclectic backdrop. The visual energy sparks conversations and invites family and friends to linger.
You can customize this look to match your decor—go bold with bright, contrasting frames or keep it subtle with pastel tones. For seasonal touches, swap out some photos or switch frame colors. Smaller spaces benefit from a tighter cluster, while larger rooms can host expansive arrangements. The key is balancing chaos with cohesion to suit your style.
Start by selecting a variety of frames in different sizes and finishes. Lay them out on the floor first to plan your composition, then hang them with painter’s tape on the wall. Use a level to keep things straight and measure spacing carefully. Mix in some vertical and horizontal orientations for visual interest. Keep some spare frames around for adjustments or future updates. Tools like a hammer, level, and adhesive hooks will make installation smoother.
Add personal touches like decorative corner accents or custom matting to elevate the look. Incorporate seasonal themed frames or add small memorabilia inside some frames to deepen the story. You could also include small shelves or ledges for decorative objects that complement your photos. The goal is to make the wall an evolving tribute to your family moments.
A mixed-frame gallery wall transforms a simple space into a vibrant storytelling canvas. It’s a bold way to display your memories and showcase your personality. Don’t be afraid to experiment—your wall will reflect your unique style and make your bedroom truly yours. Ready to get creative and turn your walls into a visual celebration?
2. Symmetrical Photo Grid with Matching Frames for a Clean, Modern Feel
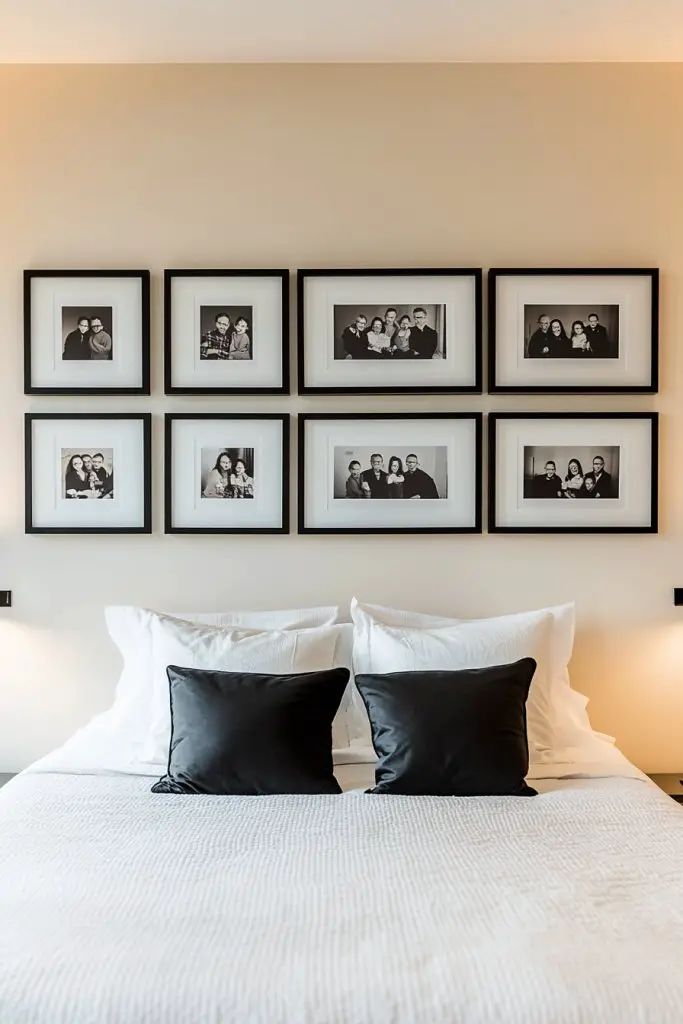
Tired of cluttered, chaotic photo displays that make your room look more busy than beautiful? A symmetrical grid of matching frames offers a sleek, organized vibe that instantly elevates your space. It’s perfect if you crave a modern, polished look that keeps the focus on your cherished memories without visual noise. Who said order can’t be stylish?
Picture a wall of identical black frames arranged in perfect rows and columns, each holding a crisp, clear family photo. The uniformity creates a sense of harmony and balance, drawing your eye evenly across the display. The photos are the stars, each given equal importance, creating a calming, cohesive scene that looks professionally curated. The symmetry emphasizes the timeless beauty of your family moments.
This approach works well in minimalist, contemporary, or Scandinavian-inspired rooms. You can adapt the grid for different room sizes—compact for small bedrooms or expansive for larger walls. For a softer look, choose light-colored or matte frames; for a bolder impact, go metallic or high-gloss. You can also vary the grid’s shape—square, rectangular, or even asymmetric for a modern twist.
Begin by selecting matching frames—preferably in the same size and color palette. Use a measuring tape and level to mark out your layout on the wall, ensuring perfect alignment. Hang the frames with appropriate hooks or adhesive strips, starting from the center and working outward for symmetry. Double-check spacing and alignment as you go. For a more professional finish, consider using a template or spacer to keep consistent gaps.
Personalize by adding subtle mat borders in contrasting colors for depth or including small captions underneath each photo for context. You can also incorporate a few accent pieces like a decorative clock or small wall-mounted shelves below for added style. Keep the overall look clean and uncluttered—less is more here. This setup is perfect for showcasing a curated collection of family milestones.
A symmetrical photo grid radiates sophistication and calm, making your bedroom feel like a boutique hotel. It’s a straightforward, timeless choice that impresses without overwhelming. Once you master the setup, you’ll feel confident creating similar displays throughout your home. Your photos will shine in this flawless, modern arrangement.
3. Rustic Wooden Frame Collage for Cozy, Farmhouse Charm
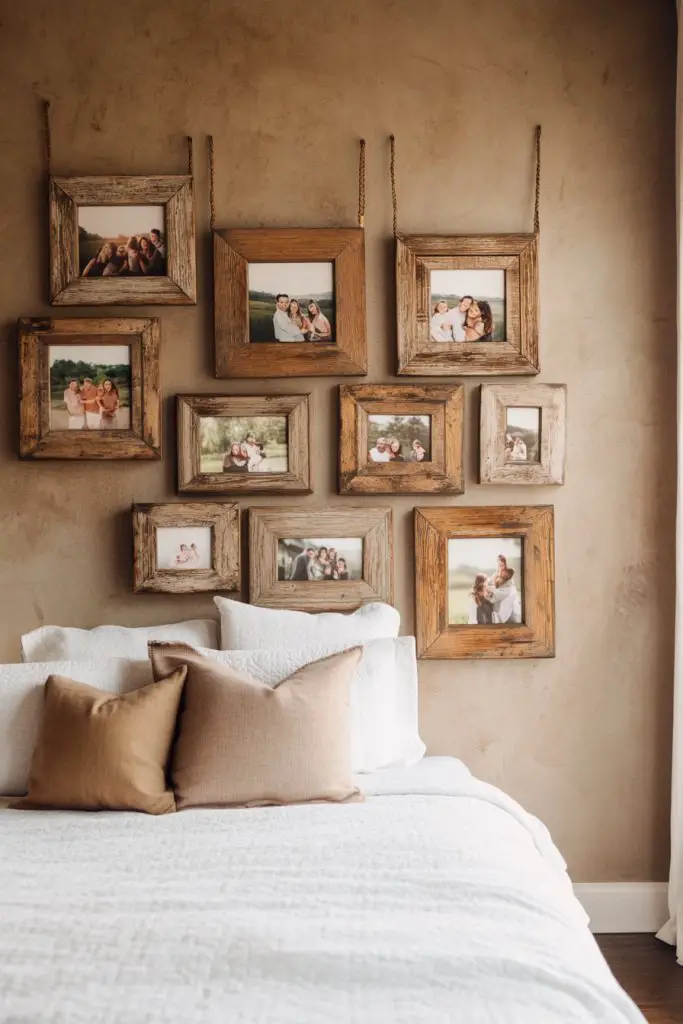
Looking to add warmth and a touch of nostalgia to your bedroom? A rustic wooden frame collage can instantly create that cozy, farmhouse vibe you’re after. It’s perfect if you want your space to feel inviting and personal, like a warm hug from family memories. Ready to transform your walls into a charming storybook?
Visualize a collection of mismatched wooden frames—some weathered, others stained, all arranged in a loose, organic layout. Inside each frame are candid shots, vintage prints, or black-and-white family portraits that evoke a sense of history. The warm tones of the wood complement the sepia filters or monochrome photos, enhancing the nostalgic feel. The overall effect is a textured, layered wall that radiates comfort.
Mix different types of wood—think reclaimed barn wood with distressed metal accents—for a truly rustic look. You can also incorporate elements like burlap mats or twine strings to hang some photos, adding a handmade touch. For seasonal updates, swap in new photos or add decorative objects like small wooden signs or metal accents. This style works beautifully in larger spaces or cozy corners.
Start by sourcing a variety of rustic frames—thrift stores and flea markets are goldmines. Arrange the frames on the floor first, experimenting with different layouts before hanging. Use picture hooks or nails to secure the frames, leaning toward a looser, asymmetrical arrangement for authenticity. Mix in some vintage-inspired props or small wooden shelves to break up the collage. Keep the wall paint neutral or in soft earth tones to let the frames stand out.
Add personal touches with handwritten labels or quotes on small wooden plaques. Incorporate family heirlooms or small vintage objects within some frames for a layered look. For a more dynamic display, consider rotating photos seasonally or adding seasonal decor like faux greenery or fairy lights (if you’re okay with indirect lighting). The goal is to keep it warm and inviting.
A rustic collage instantly makes your bedroom feel like a countryside retreat. It’s a heartfelt display that celebrates family history and craftsmanship. Don’t be afraid to get creative with mismatched styles—imperfect is perfect here. Your space will radiate genuine warmth and personality that’s hard to achieve with sterile, uniform displays.
4. Floating Shelves with Leaning Photos for a Casual, Layered Effect
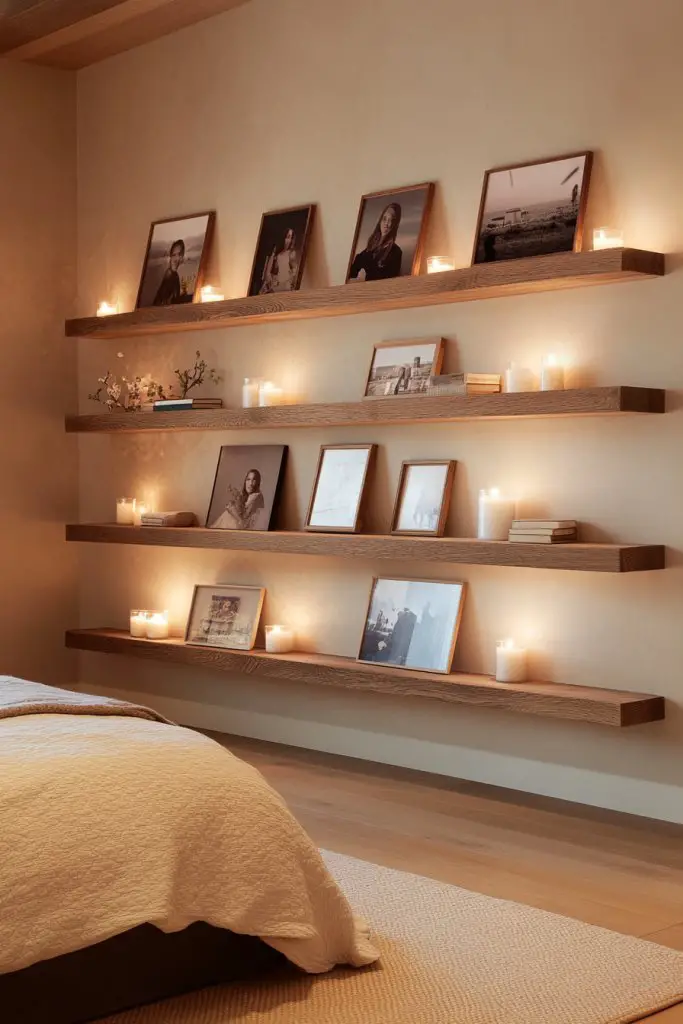
Ever wish your photo display could feel more relaxed and less rigid? Floating shelves that hold leaning photos offer a casual, layered look that’s easy to update and refresh. It’s perfect if you want your bedroom to feel lived-in without sacrificing style. Who said displays need to be perfectly framed and symmetrical?
Imagine sleek, narrow floating shelves installed at varying heights along your wall, each holding a collection of framed photos leaning casually. The frames are a mix of materials—metal, wood, or acrylic—adding texture and interest. The photos are a mix of candid family shots and favorite memories, arranged in a way that looks effortlessly curated. Soft lighting from nearby sconces or string lights enhances the cozy, layered effect.
Adjust shelf heights and spacing to suit your room size and style—more spaced out for a breezy look or tightly grouped for intimacy. Swap out photos or add small decorative objects like sculptures or books to keep the arrangement fresh. You can also incorporate seasonal decor or themed accessories to reflect holidays or celebrations. This style adapts well to both small bedrooms and larger spaces.
Install floating shelves using a level and appropriate anchors for your wall type. Arrange your photos on a flat surface beforehand, mixing sizes and orientations for visual interest. Lean the frames securely against the wall, and use small rubber pads or felt stickers on the shelf edges to prevent slipping or scratching. For an extra touch, add LED strip lighting underneath the shelves to highlight the display. Regularly update by swapping out photos or changing their orientation for a fresh look.
Personalize by including small mementos or souvenirs alongside your photos, creating a layered narrative. Use decorative clips or clamps to attach photos for an easy swap without re-hanging frames. Incorporate textiles like fabric backdrops or small rugs on the shelves for added warmth. Keep the display dynamic, changing it with your evolving family stories.
Floating shelves with leaning photos foster a relaxed, inviting atmosphere that feels authentic and personal. It’s an easy way to showcase your memories without the fuss of perfect framing. Once you get the hang of the arrangement, you’ll find it super easy to refresh and personalize as your family grows. Your bedroom will feel effortlessly stylish and full of life.
5. Heart-Shaped Photo Arrangement for a Romantic, Sentimental Touch
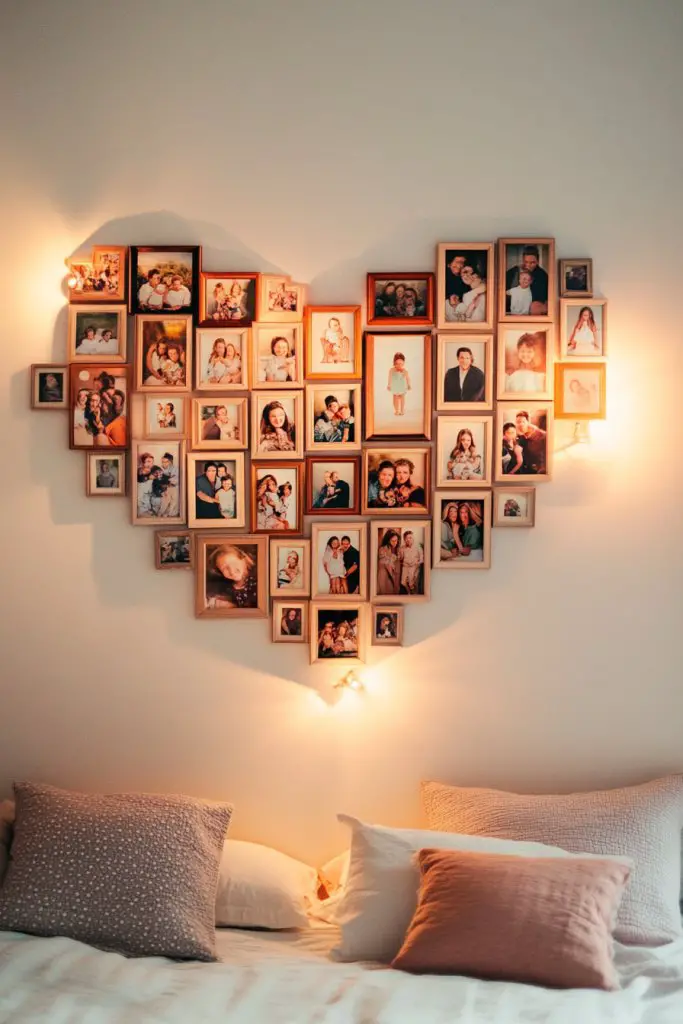
Want to add a touch of romance and sentimentality to your bedroom? A heart-shaped photo arrangement instantly creates a warm, loving atmosphere. It’s perfect for celebrating family bonds or special moments you cherish most. Who doesn’t want their walls to radiate love and connection?
Visualize a large, carefully arranged heart composed of small family photos, each one representing a meaningful memory. The photos could be a mix of candid shots, portraits, and milestone images—arranged with precision to form a perfect heart shape. The wall becomes a focal point, radiating love and nostalgia. Soft lighting or fairy lights around the shape enhances the intimate, sentimental vibe.
For a more modern look, use monochrome or sepia-toned photos in matching frames arranged into a heart shape. You can also create a playful, casual version with Polaroids pinned directly to the wall with decorative clips or washi tape. Adjust the size of the heart to fit your wall space—smaller for a subtle touch or large for a dramatic effect. You could even make a double heart for a more intricate display.
Start by selecting your favorite photos and printing them in uniform sizes or with a consistent filter. Use painter’s tape or masking tape to outline the heart shape on the wall; then arrange the photos within this shape. Secure each photo with small adhesive strips or removable hooks, ensuring they stay in position. Keep the edges aligned and symmetrical for a polished look. Consider adding a subtle border or decorative elements around the heart for extra emphasis.
Add handwritten captions or small quotes inside some frames to deepen the emotional impact. Incorporate decorative elements like fabric or paper flowers around the heart shape for added texture. Periodically update the photos to include new memories or special occasions, making the display a living tribute. Personal touches make the arrangement uniquely yours.
A heart-shaped photo display beautifully captures your love story and family bonds. It creates a cozy, intimate space that feels both personal and decorative. Once you see it come together, you’ll feel inspired to craft other themed shapes or displays. It’s a heartfelt way to turn your walls into a celebration of love.
6. String Lights and Clothespins for a Charming, DIY Photo Display
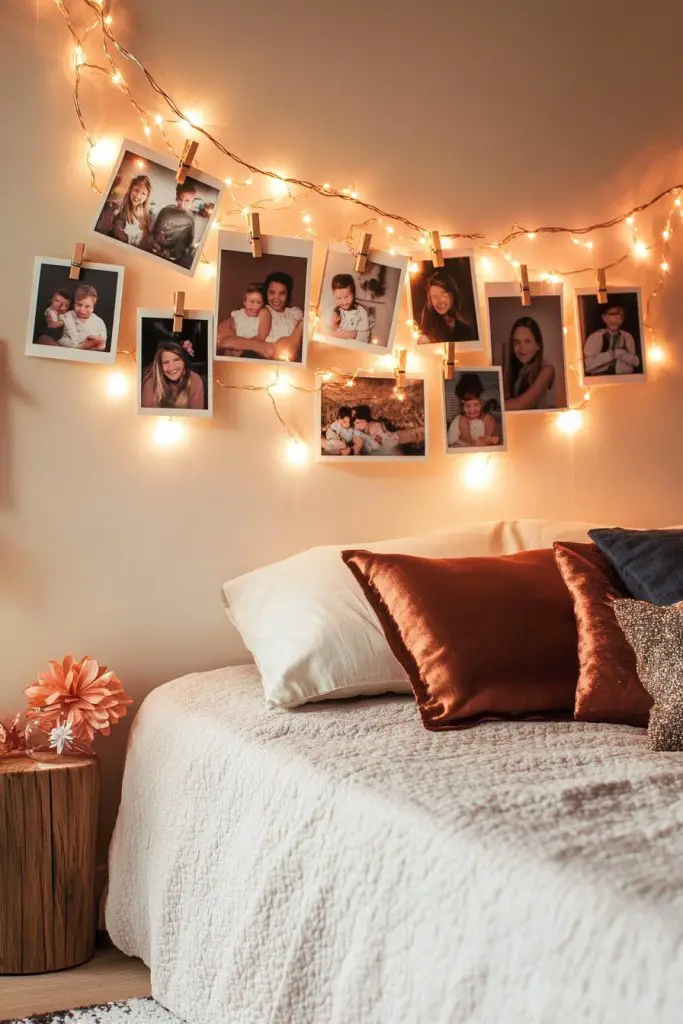
Looking for an easy, budget-friendly way to showcase your family moments? String lights combined with clothespins create a charming, whimsical display that’s simple to set up. It’s perfect for adding a cozy, personalized touch without the fuss of frames and nails. Who knew decorating could be this fun?
Picture a soft glow illuminating your wall as a string of delicate fairy lights or Edison bulbs crisscrosses above. Clothespins hold your favorite photos—whether candid snapshots, holiday memories, or milestone shots—in a casual, uneven pattern. The gentle light makes the photos pop, giving your space a warm, inviting feel. The display feels spontaneous, like a snapshot of your life in motion.
You can customize this look by choosing different light styles—colorful bulbs, vintage filament, or warm white LEDs. Change the arrangement of photos seasonally or for special occasions. Use themed clothespins—metal, wood, or decorative shapes—to match your decor. Add fabric or paper backdrops for a more layered, textured effect. This flexible setup works well in small or large bedrooms.
String the lights across your desired wall area, securing the ends with hooks or adhesive strips. Attach clothespins at regular intervals, spacing them unevenly for a playful vibe. Hang your photos by clipping them onto the clothespins, adjusting for balance and visual interest. For extra charm, add small decorative elements like paper lanterns or banners. Keep the lights plugged in and enjoy the warm glow as your photos shine.
Switch out photos regularly to keep the display fresh and engaging. Add small notes, quotes, or doodles on the back of the photos for an extra personal touch. Incorporate themed decor like mini pennant banners or seasonal ornaments. You could also swap the clothespins for clips with decorative edges or painted finishes. The goal is to make it uniquely yours and easy to update.
This DIY photo display adds charm and personality to any bedroom, making it feel warm and lived-in. It’s a playful way to celebrate your family and create a cozy focal point. Once you see how simple and customizable it is, you’ll be eager to experiment with new themes and layouts. Your wall will become a lively, heartfelt gallery everyone will admire.
7. Monochrome Photo Wall for a Sophisticated, Timeless Look
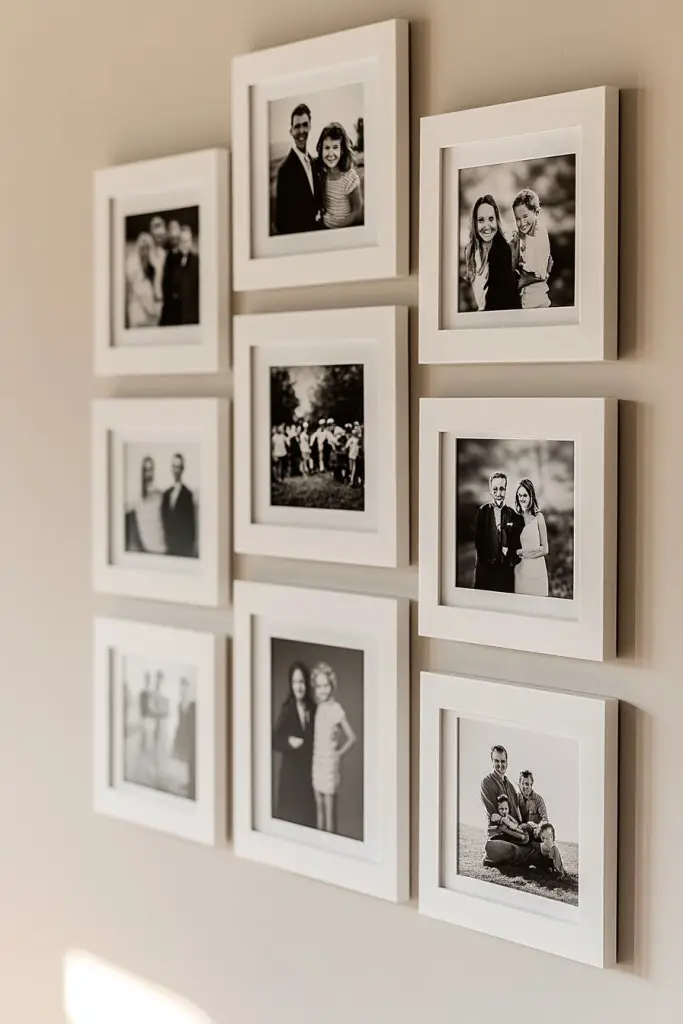
Looking for a way to create an elegant, timeless vibe in your bedroom? A monochrome photo wall offers sophistication and cohesion that elevates any space. It’s perfect if you prefer a clean, minimalist aesthetic that still showcases your family’s most treasured moments. Ready to add a touch of class?
Envision a wall filled with black-and-white or sepia-toned photos arranged in a grid or a stylish cluster. The uniform color palette ties everything together, highlighting expressions, textures, and details that might get lost in color. The lack of color draws focus to the emotion and narrative behind each image. Soft lighting enhances the subtle contrast, making the display look polished and refined.
Stick to classic black frames for a sleek look or opt for matte white for a softer, modern touch. Use matching mats or no mats at all for a more seamless appearance. This style works well in contemporary, Scandinavian, or vintage-inspired rooms. Adjust the size and grouping based on your wall space—symmetric for a formal vibe or eclectic for a more relaxed feel.
Select high-quality black-and-white or sepia photos, printing them uniformly. Measure your wall and plan your layout—use painter’s tape to outline the arrangement. Hang the photos with level precision, using the same type of hooks or adhesive strips for consistency. Keep consistent spacing to maintain harmony. Incorporate subtle lighting options like picture lights or wall sconces to enhance the monochrome effect.
Add small captions or dates in elegant fonts underneath some photos to provide context. Incorporate metallic or matte-finish frames for a luxurious feel. To keep the display fresh, rotate in new monochrome images from recent or upcoming family events. This approach emphasizes elegance and creates a gallery that feels both personal and refined.
A monochrome photo wall exudes sophistication and can transform your bedroom into a chic retreat. It’s a versatile style that complements nearly any decor and remains timeless. Once you master this look, you’ll feel confident experimenting with other classic display techniques—your walls will always impress.
8. Vertical Photo Ladder Using a Freestanding or Wall-Mounted Ladder
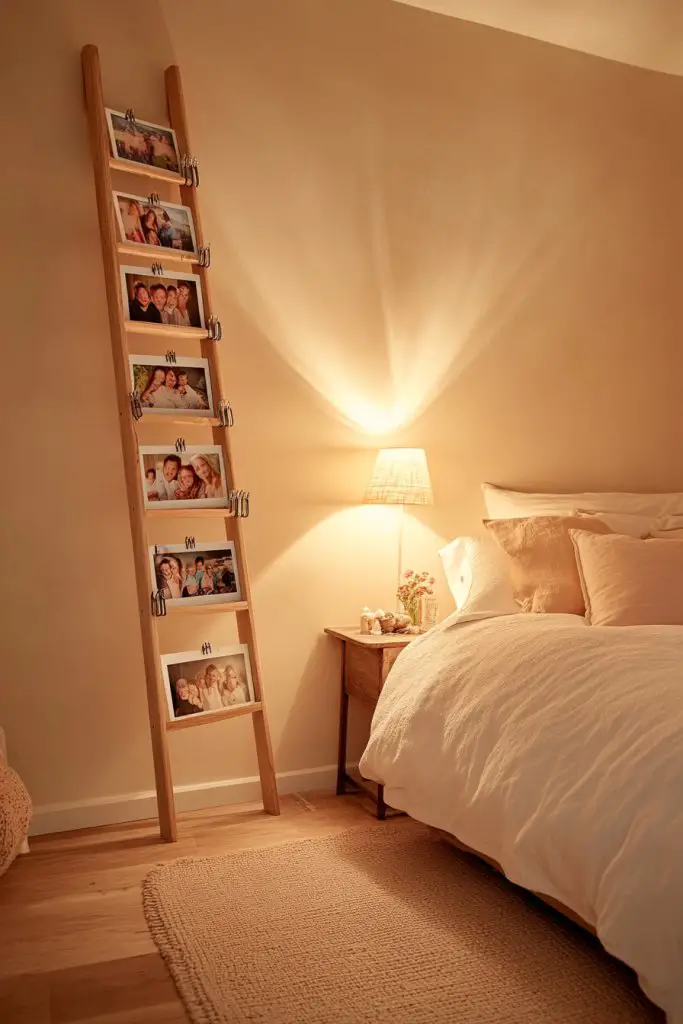
Looking for a unique way to display photos that’s both stylish and space-efficient? A vertical ladder offers a trendy, functional solution that adds height and visual interest to your bedroom. It’s perfect if you want a display that’s easy to update and doesn’t require drilling into every frame. Ready to elevate your decor?
Picture a sleek wooden or metal ladder leaning against your wall, with photos clipped or hung along the rungs. The images cascade vertically, creating a dynamic, eye-catching feature. The rungs can hold a mix of family portraits, travel snaps, or milestone pictures, arranged in a casual yet intentional way. The open structure adds airiness, making the room feel taller and more spacious.
Choose a ladder in a finish that complements your decor—natural wood, matte black, or painted in bold colors. You can position it directly on the floor or mount it securely to the wall for a more permanent look. Mix in decorative elements like small potted plants, fairy lights, or fabric ribbons if your wall and space allow. Adjust the number of rungs and spacing based on your photo collection.
Select a sturdy ladder that fits your space—free-standing or mounted. Attach clips, hooks, or string to hold your photos securely. Use a level to ensure the ladder leans at a pleasing angle if free-standing. Securely fasten mounted ladders with appropriate anchors. Arrange your photos along the rungs, balancing sizes and orientations for visual interest. Regularly swap out or add new images to keep the display fresh.
Incorporate decorative elements such as small charms, fabric wraps, or LED fairy lights to add personality. Use different photo sizes and orientations for a playful effect. Add small shelves or hooks for additional decor, like mini frames or keepsakes. Personalize the ladder with painted or stenciled titles or quotes for extra flair. It’s an adaptable, fun way to celebrate your family stories.
A vertical ladder display stands out as a modern, artistic feature that combines functionality with style. It’s easy to maintain and customize, making it perfect for evolving family memories. Once you master this look, you’ll be eager to experiment with other creative display methods. Your bedroom will look fresh, dynamic, and full of personality.
9. Multimedia Wall with Photos, Quotes, and Personal Mementos
Looking to add depth and personality to your bedroom decor? A multimedia wall combining photos, quotes, and personal mementos creates a layered, meaningful display. It’s perfect if you want your space to reflect your personality, values, and memories all in one place. Ready to craft a truly personal wall?
Envision a wall filled with framed photos interwoven with handwritten quotes, small souvenirs, and heirlooms. The mix of different media creates a rich tapestry of your life story—images capturing moments, quotes inspiring you daily, and keepsakes reminding you of special times. The arrangement is eclectic but balanced, with visual flow guiding the eye across the wall. Warm lighting can enhance the layered effect, making every element stand out.
Use a variety of frame styles and sizes, mixing modern sleek designs with vintage-inspired pieces. Incorporate different types of memorabilia—like fabric swatches, medals, or handwritten notes—to deepen the storytelling. Arrange elements in clusters or a freeform layout for a creative, relaxed vibe. You can also add small shelves for three-dimensional objects or decorative items that complement your theme.
Start by gathering your photos, quotes, and memorabilia. Map out your layout on the wall with painter’s tape, balancing visual weight. Hang photos with hooks or adhesive strips, then arrange quotes and mementos around them, using clips, washi tape, or small shelves. Incorporate lighting options like picture lights, clip-on lamps, or string lights to highlight key pieces. Keep some spare space for future additions or updates.
Write your own quotes or favorite sayings to add a personal touch. Use decorative fonts or calligraphy to make quotes stand out. Rotate photos and mementos seasonally or as new memories are made. Pair the display with complementary decor like textiles or candles to enhance the cozy, layered feel. The goal is a curated, evolving showcase of your life.
A multimedia wall turns your bedroom into a visual diary filled with meaning. It’s a creative, heartfelt way to celebrate your family and personal journey. Once you see how much character this layered approach adds, you’ll be motivated to keep updating and customizing. Your walls will tell your story in a vibrant, inspiring way.
10. Shadow Box Frames with 3D Family Keepsakes and Photos
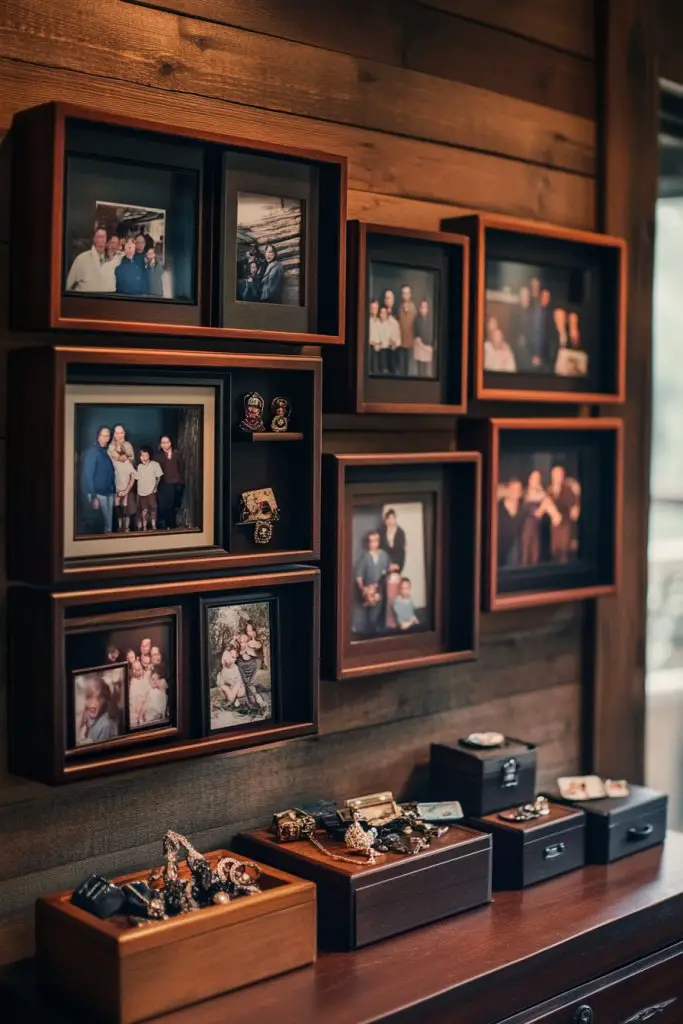
Want a display that adds texture and depth to your family memories? Shadow box frames allow you to showcase photos alongside small keepsakes in a way that feels personal and artistic. It’s perfect if you love the idea of combining memorabilia with images for a richer story. Ready to add dimension to your wall?
Picture a shadow box with a layered composition—photos of your family, tiny medals, vintage jewelry, or small souvenirs arranged carefully inside. The depth of the box creates a mini diorama, inviting viewers to explore each element closely. The combination of flat images and three-dimensional objects produces a dynamic, tactile display that sparks curiosity and nostalgia. Soft lighting from inside the box enhances the details.
Choose shadow boxes in different sizes and finishes—black, white, or natural wood—to match your decor. Mix flat photos with small objects like shells, miniature toys, or fabric pieces for variety. Hang multiple shadow boxes in a grid or staggered pattern for visual interest. You can also layer items within each box for a more complex, layered effect. Seasonal or theme-based displays keep it fresh.
Collect your photos and keepsakes, then arrange them inside the shadow boxes before mounting. Use small hooks, glue dots, or museum putty to secure items in place. Hang the shadow boxes using appropriate wall anchors, ensuring they are level. Consider adding LED strip lights or small spotlights inside or around the boxes to highlight the details. Maintain a balance between photos and memorabilia for a harmonious display.
Add handwritten labels, dates, or anecdotes inside or beside each shadow box for context. Incorporate seasonal themes by swapping objects or photos. Personalize each box with your family’s unique stories—medals from sports, tiny heirlooms, or travel tokens. Keep the display evolving as your family grows or memories deepen, creating a rich narrative.
Shadow box displays offer a textured, meaningful way to celebrate family history. They transform simple memorabilia into art, making your space feel warm and authentic. Once you see how beautifully layered and personal they can be, you’ll be inspired to create more curated collections. Your bedroom will become a gallery of your family’s story, full of depth and personality.
11. Vertical String or Cable System with Clips for an Ever-Changeable Display
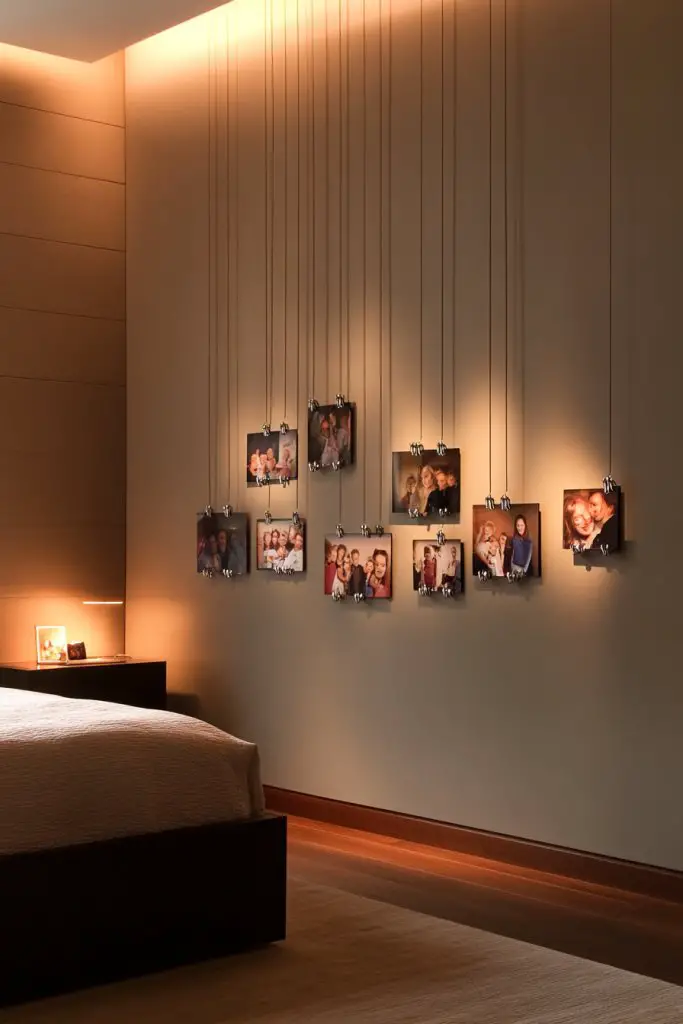
Want a display that’s simple to update and adds a modern touch? A vertical string or cable system with clips gives you a sleek, minimalistic way to showcase your latest family memories. It’s perfect if you love changing things up or want an organized way to keep your photos fresh. Who said wall art has to be permanent?
Visualize a slim, vertical cable or wire mounted along your wall, with small clips holding photos, notes, or mementos. The line runs from ceiling to floor, creating a clean, contemporary look that emphasizes height and space. Photos hang at varying heights, giving a dynamic, layered appearance. The clips make swapping images quick and effortless, encouraging regular updates and new stories.
Choose different cable styles—metal, nylon-coated wire, or sleek stainless steel—to match your decor. Use colorful or metallic clips for extra flair. You can add small shelves or decorative elements along the wire for variety. This system adapts well to small bedrooms or larger walls, and you can add multiple lines for different themes or family branches.
Mount the cable securely at the top and bottom using wall anchors or hooks. Attach clips at intervals, spacing them based on photo sizes. Hang your photos by clipping their corners or edges, adjusting for visual balance. Keep some spare clips and photos handy for quick updates. For an extra touch, add fairy lights or decorative ribbons along the wire for added charm. Ensure everything is level and securely fastened.
Personalize by using clips in different colors or shapes to match your theme. Incorporate small notes, tags, or quotes clipped alongside photos. Change the display seasonally or whenever new memories arrive. You can also add small decorative charms or mini frames for variety. This system keeps your wall lively and always relevant.
A cable and clip display is a sleek, modern solution that celebrates your evolving family story. It’s easy to update and maintain, making your space feel fresh and personal. Once you see how flexible and stylish it is, you’ll be motivated to incorporate similar innovative display ideas throughout your home. Your walls will always be a reflection of your current memories.
Conclusion
From classic grid layouts to whimsical, mixed-media displays, this collection of photo wall ideas offers something for every style and personality. These creative touches can elevate your bedroom decor while keeping your family memories beautifully showcased. Don’t hesitate—start experimenting with these ideas and make your space a heartfelt reflection of your life’s special moments. Remember, your bedroom is the perfect place to showcase what matters most—your family!