Imagine transforming your outdoor space into a serene oasis that exudes natural beauty — that’s the magic of river rock landscaping. Known for its durability and timeless appeal, river rock adds a touch of elegance and tranquility to gardens, walkways, and water features alike.
Its versatility makes it a favorite among homeowners looking to create a low-maintenance yet stunning landscape. In this article, you’ll discover a variety of creative ideas to incorporate river rocks into your landscape design. From chic pathways to eye-catching borders and Zen-inspired gardens, these ideas will inspire you to elevate your outdoor space with natural charm and sophistication.
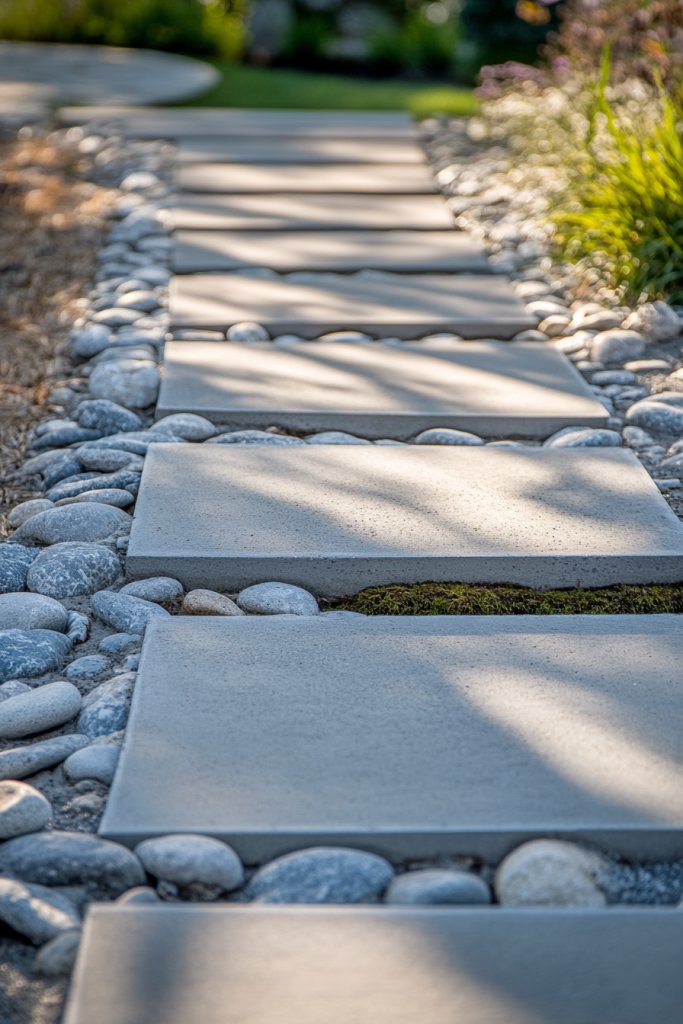
1. Creating a Serene River Rock Pathway for Garden Flow
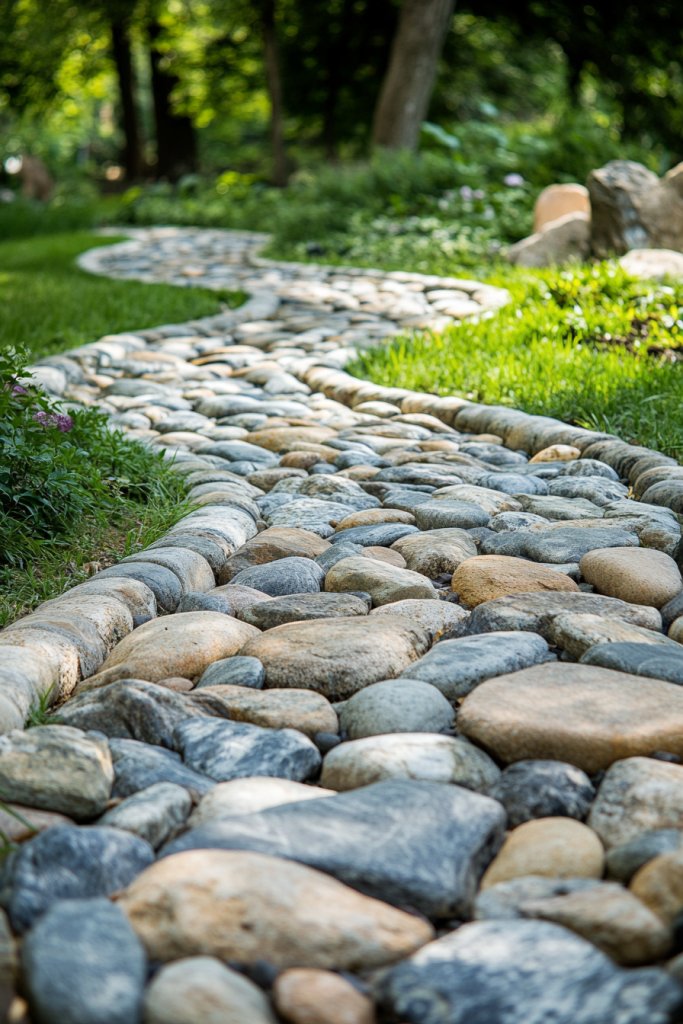
Ever feel like your garden’s missing that peaceful, natural vibe? A winding river rock pathway can transform a dull yard into a calming retreat. It’s about creating a space that invites you to walk barefoot and unwind.
Recommended Products to replicate this idea
| # | Preview | Product | |
|---|---|---|---|
| 1 |
|
Pulovin 20 lbs River Rocks for Aquarium, 3-4 Inch Fish Tank Rocks, Natural Decorative Garden Rocks... | Buy on Amazon |
| # | Preview | Product | |
|---|---|---|---|
| 1 |
|
LGJIAOJIAO 3ftx50ft Weed Barrier Landscape Fabric Heavy Duty,Weed Block Gardening Ground Cover... | Buy on Amazon |
Plus, it adds a touch of elegance without breaking the bank. Imagine a gently curving trail made of smooth, rounded river stones that snake through lush greenery.
The stones vary in shades of gray, tan, and rust, blending seamlessly with the environment. Soft moss and delicate grasses grow between the rocks, softening the edges.
As you stroll, the sound of crunching gravel and the scent of fresh earth fill the air, creating an immersive experience. You can customize the path’s width and shape to suit your space, from narrow winding routes to broad, inviting walkways.
Seasonal touches like placing colorful leaves or tiny fairy lights can change the mood. In small gardens, a simple single-file path works well, while sprawling yards can feature multiple branching trails.
Use different rock sizes or add stepping stones for variety. Start by mapping out your desired route and removing grass or soil in that area.
Lay down a landscape fabric to prevent weeds and stabilize the foundation. Spread a layer of gravel for drainage, then carefully place the river rocks, ensuring they’re level and snug.
Use a rubber mallet to tap stones into place and fill gaps with smaller pebbles or sand. Regular maintenance involves clearing debris and replacing displaced stones.
Add decorative elements along the path, like small sculptures, lanterns, or ceramic accents. Incorporate textured materials such as smooth stones or jagged edges for contrast.
You can also create focal points like a small pond or a seating nook nearby. Choose stones that complement your home’s exterior colors for a cohesive look.
Personal touches make the pathway uniquely yours. A river rock pathway isn’t just functional; it’s a statement of natural elegance.
It encourages outdoor activities and invites peaceful reflection. With a little effort, you can craft a feature that elevates your entire landscape. Ready to turn your yard into a serene escape? Just start laying stones and enjoy the process!
2. Designing a Low-Maintenance River Rock Mulch Bed
Tired of battling weeds and constant yard work? A river rock mulch bed offers a sleek, durable alternative to traditional mulch that cuts down on maintenance. It’s perfect for those who want a tidy, modern look without the hassle.
Recommended Products to replicate this idea
| # | Preview | Product | |
|---|---|---|---|
| 1 |

|
Black River Rocks - Large Polished Black Pebbles for Plants & Garden Decorative Stones, 1-2 Inch, 15... | Buy on Amazon |
| # | Preview | Product | |
|---|---|---|---|
| 1 |

|
Garden Edging,40ft Landscape Edging with 40 Spikes for Lawn 2 Inch Tall(Black, 40FT) | Buy on Amazon |
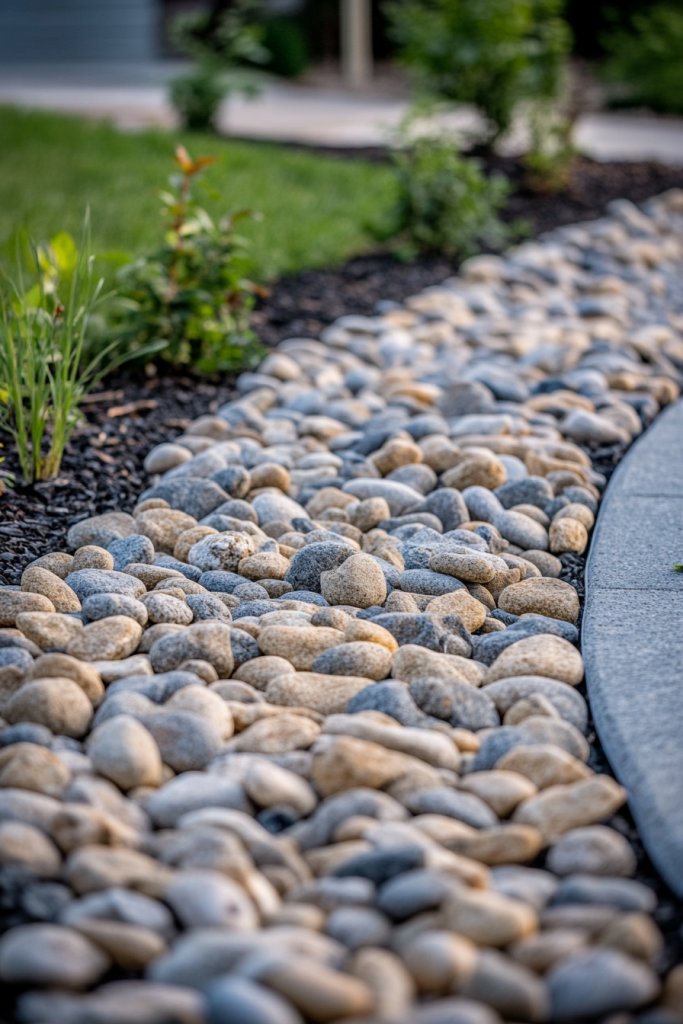
Plus, it helps keep soil moist and prevents erosion. Picture a bed of smooth, rounded river stones covering the base of trees and shrubs.
The stones reflect sunlight in shades of gray, brown, and cream, creating a natural, textured surface. Around the plants, the rocks form a clean, crisp border that contrasts with the green foliage.
It’s a minimalist masterpiece that stays fresh year-round, no matter the weather. Use different sizes or colors of river rocks to match your landscape style, from rustic to contemporary.
For a uniform look, pick a single color, or mix shades for a more natural vibe. You can also layer smaller stones over larger ones for visual interest or add edging to define the bed’s boundary.
This approach works well in flower beds, around bushes, or as a base for succulents. Clear the area of weeds and old mulch, then level the soil surface.
Lay down a weed barrier fabric to prevent future growth. Spread a layer of river rocks, about two to four inches deep, ensuring even coverage.
To keep stones in place, you can install a plastic or metal edging along the perimeter. Periodic raking or adding new stones keeps the bed looking fresh.
Avoid using crushed stone or gravel, which can shift and cause uneven surfaces. Incorporate decorative elements like small sculptures, solar lights, or driftwood accents to add personality.
To soften the look, place a few drought-resistant plants or ornamental grasses at the edges, using contrasting textures. Consider painting some stones or adding a few with embedded designs for a custom touch.
This approach keeps your landscape low-maintenance but visually appealing. A river rock mulch bed provides a polished, tidy appearance with minimal effort.
It reduces watering needs and eliminates the need for constant weed control. Once established, it requires very little upkeep, freeing up your weekends. Ready to ditch the mulch and embrace a more modern, durable solution? It’s easier than you think—just lay the stones and enjoy the clean look!
3. Building a Rustic River Rock Garden Border

Do your garden edges look sloppy or overgrown? A rustic river rock border can add charm and structure, making your yard look neat without feeling too formal. It’s perfect for creating a cozy, natural vibe that’s both functional and decorative.
Recommended Products to replicate this idea
| # | Preview | Product | |
|---|---|---|---|
| 1 |

|
Pulovin 15 lbs River Rocks for Plants, 1-1/2 inch Decorative Garden Rocks Outdoor Landscaping, Large... | Buy on Amazon |
| # | Preview | Product | |
|---|---|---|---|
| 1 |

|
VEVOR 4FTx300FT Premium Heavy Duty Weed Barrier Landscape Fabric, 3.2OZ Woven Geotextile Fabric... | Buy on Amazon |
Plus, it’s surprisingly easy to install. Visualize uneven, irregularly shaped river stones stacked along the edge of your flower beds.
The stones vary in size and color, giving a handcrafted, organic feel. The border gently curves around the garden, blending seamlessly into the lawn.
As the grass meets the rocks, tiny wildflowers and grasses peek through, enhancing the rustic charm. Use larger stones for a more pronounced, substantial border or smaller ones for a delicate edge.
Mix different colors and shapes to achieve a natural look, or keep it uniform for a more structured appearance. For a seasonal twist, layer in some evergreen branches or dried foliage.
You can also adapt the border height, making it low for a subtle look or taller for more definition. Begin by outlining your border with garden stakes and string.
Collect river stones from creek beds, or buy them from landscaping suppliers. Arrange the stones along the line, adjusting for size and shape.
Secure them in place by stacking and slightly embedding each stone into the soil or mulch base. Fill gaps with smaller stones or gravel for stability.
Regularly check the border for shifting and adjust as needed, adding more stones over time for a fuller look. Add decorative elements such as antique garden tools, small lanterns, or vintage signage to enhance the rustic vibe.
Incorporate native plants or wildflowers along the border to emphasize the natural theme. Use moss or lichen to give stones an aged, weathered appearance.
Personal touches like painted stones or engraved names make the border uniquely yours. A rustic river rock border effortlessly combines beauty and practicality, defining your garden’s edges with style.
It’s a DIY project that adds character and helps contain mulch or soil, preventing spillover. With patience and a bit of creativity, you can craft a charming, durable border that ages beautifully. Ready to add rustic charm to your landscape? Just gather stones and start stacking!
4. Installing a Zen-inspired River Rock Meditation Area
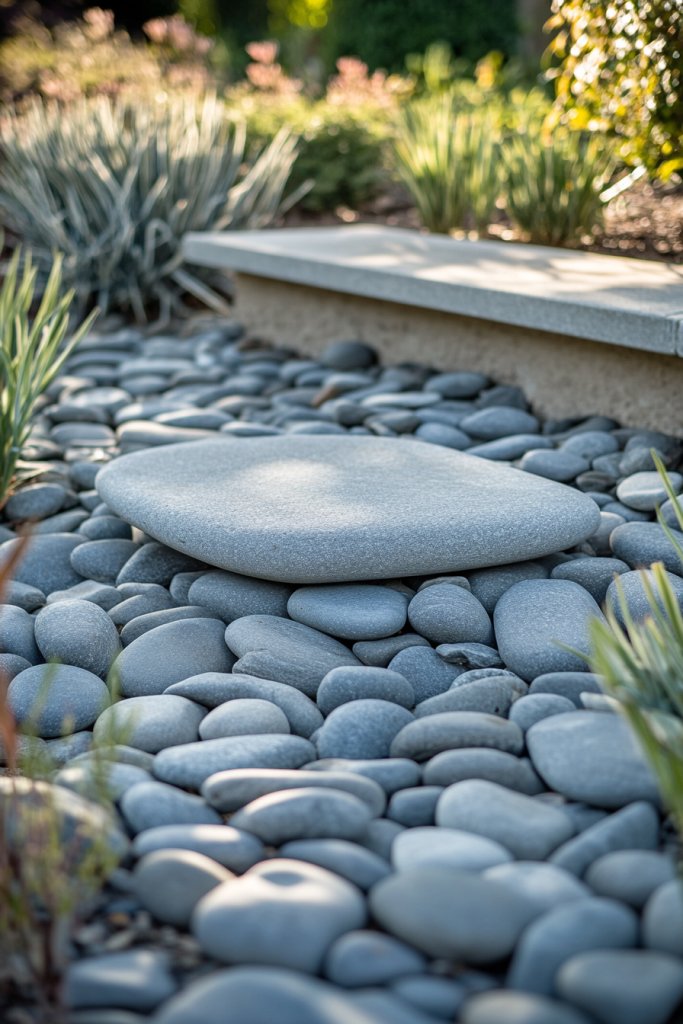
Craving a peaceful corner to unwind and meditate? A Zen-inspired river rock area offers a natural sanctuary right in your backyard. It’s about creating a space that invites calm, mindfulness, and quiet contemplation.
Recommended Products to replicate this idea
| # | Preview | Product | |
|---|---|---|---|
| 1 |
|
Pulovin 20 lbs River Rocks for Aquarium, 3-4 Inch Fish Tank Rocks, Natural Decorative Garden Rocks... | Buy on Amazon |
| # | Preview | Product | |
|---|---|---|---|
| 1 |
|
90 GPH Mini Submersible Pump, Small Fountain Pump (5W 350L/H) for water feature, Aquariums, Fish... | Buy on Amazon |
No fancy gadgets needed—just simple, natural elements. Picture a flat, smooth expanse of large river stones arranged in a small, secluded nook.
The stones are cool to the touch, with gentle curves and soft textures that encourage barefoot walking. Surrounding the area are bamboo fencing or low wooden screens, enhancing privacy.
The scent of fresh earth and the gentle sound of small water features complete the tranquil scene. You can shape the space into a circle, square, or irregular form depending on your preference.
Use larger, flat stones for sitting or walking, and smaller stones to fill gaps. Seasonal accents like dried flowers or candles can add ambiance.
For a more modern twist, incorporate sculptural elements or lighting that mimics moonlight for nighttime meditation. Choose a flat, well-draining spot with some shade or shelter.
Clear the area of debris and level the ground. Lay out large river stones in your desired pattern, ensuring stability.
Fill gaps with smaller stones or sand, tamping them down firmly. To keep the area tidy, add a border of larger stones or edged wood.
Consider installing a gentle water feature or wind chimes nearby to enhance sensory relaxation. Personalize your meditation space with textured fabrics like a soft throw blanket or cushion for sitting.
Use incense, essential oils, or natural sounds to deepen relaxation. Add a small, sculptural element like a stone lantern or a carved wooden piece.
Keep the area clutter-free and simple, allowing your mind to truly unwind. This Zen-inspired space offers a retreat from daily stress, encouraging mindfulness and balance.
It’s a simple yet powerful way to connect with nature and yourself. Once set up, it becomes an ongoing source of calm and clarity. Ready to create your own peaceful haven? Start with stones and let your imagination guide you.
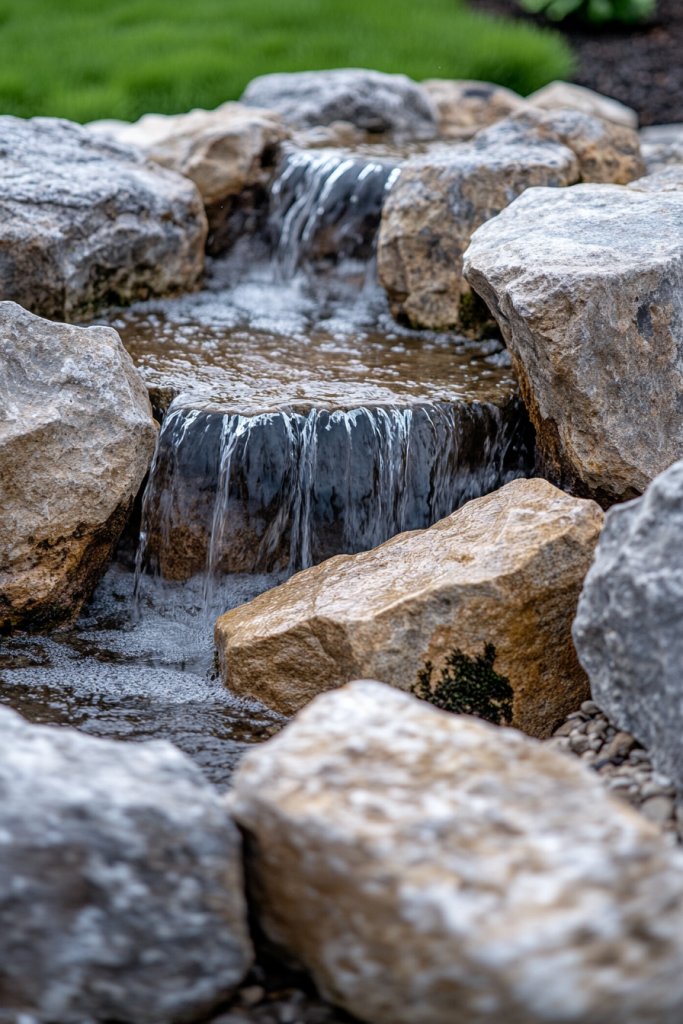
5. Crafting a Water Feature with River Rock Accents

Looking to add a calming focal point to your yard? A water feature with river rock accents can turn a dull corner into a soothing retreat. It’s an easy way to introduce the gentle sights and sounds of flowing water, elevating your landscape’s ambiance.
Recommended Products to replicate this idea
| # | Preview | Product | |
|---|---|---|---|
| 1 |

|
PULACO 400GPH Submersible Pump with 5 ft Tubing, (1500L/H 25W) durable fountain water pump for Pond... | Buy on Amazon |
| # | Preview | Product | |
|---|---|---|---|
| 1 |
|
OUPENG Pebbles Polished Gravel, Natural Polished Mixed Color Stones, Small Decorative River Rock... | Buy on Amazon |
Envision a small pond or fountain with a natural, uneven base made of river stones. Water gently cascades over the stones, creating a soothing, rhythmic sound.
Surrounding the feature are larger rocks and boulders, blending seamlessly into the landscape. The combination of water, stones, and subtle plantings creates a harmonious, organic look.
Choose from pondless waterfalls, bubbling rocks, or traditional fountains, depending on space and preference. Use different sizes and shapes of river stones for a layered, textured appearance.
Seasonal touches like floating candles or flower petals can enhance visual appeal. Incorporate LED lighting for nighttime magic or add a small stream for movement.
Start by selecting a suitable location with proper drainage. Dig a shallow basin for a pond or install a basin for a fountain pump.
Line the basin with pond liner and arrange river rocks along the edges and inside the basin, securing them with adhesive if needed. Install the pump and plumbing, then fill with water.
Finish by adding decorative stones on the surface and testing the flow. Decorate the edges with natural elements like driftwood or crafted sculptures.
Use colored lighting or underwater LEDs for night effects. Consider adding small aquatic plants in containers to keep water clean.
Personalize with ornaments or themed accents that reflect your style. A water feature creates a tranquil atmosphere that invites relaxation and mindfulness.
It’s a rewarding project that can be scaled to fit your yard’s size and style. Once installed, it requires minimal upkeep while providing maximum serenity. Ready to dip your toes into the world of water features? Just gather stones and start flowing!
6. Arranging a Rock Garden with Succulents and Cacti
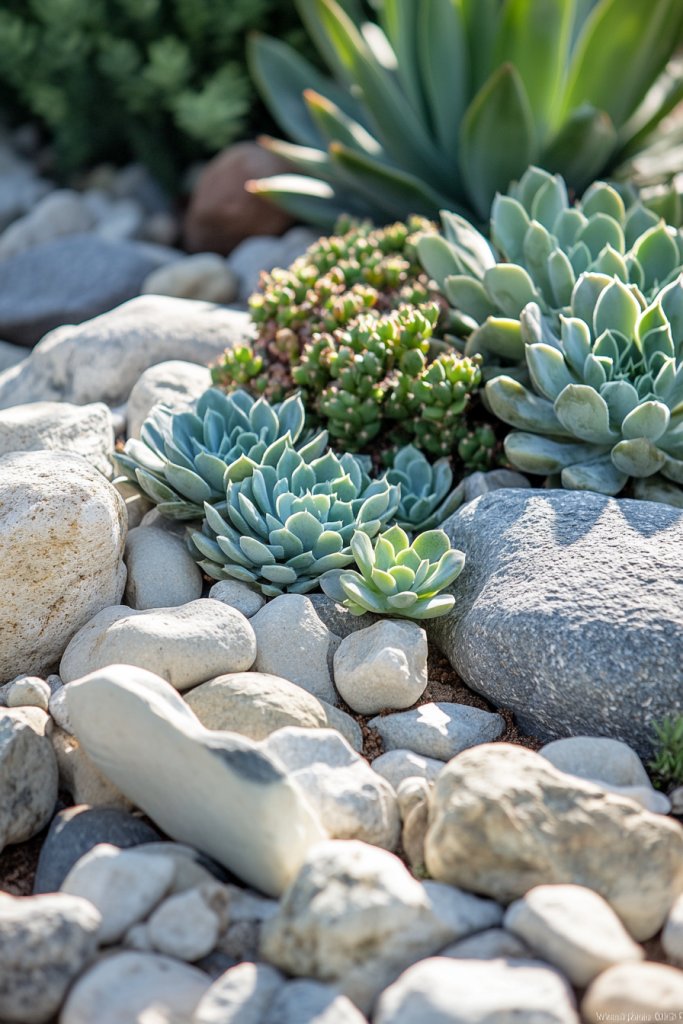
Want a striking garden that’s easy to care for? A rock garden with succulents and cacti offers bold textures and colors with minimal effort. It’s perfect for busy or drought-prone areas, combining beauty and resilience in one package.
Recommended Products to replicate this idea
| # | Preview | Product | |
|---|---|---|---|
| 1 |
|
LamDawn Cute Ceramic Succulent Garden Pots, Planter with Drainage and Attached Saucer, Set of 5... | Buy on Amazon |
| # | Preview | Product | |
|---|---|---|---|
| 1 |

|
FANTIAN 20 lbs Natural River Rocks Mexican Beach Pebbles, 2-3 Inch Decorative River Rocks for... | Buy on Amazon |
Visualize a bed of large river stones as a backdrop for colorful succulents and spiky cacti. The stones provide a natural, textured surface, while the plants add pops of red, purple, and green.
The arrangement feels wild yet deliberate, with plants spaced to mimic natural growth. The sun reflects off the stones, creating a vibrant, lively scene.
Mix different types of succulents and cacti for variety—think rosette-shaped echeverias or tall, columnar agaves. Use contrasting colors and shapes to create visual interest.
You can also incorporate small decorative stones or gravel for added texture. Seasonal accents like tiny fairy statuettes or painted stones can add playful touches.
Select a sunny, well-draining spot. Clear the area of weeds and loosen the soil.
Lay a base layer of river rocks, then add a layer of coarse sand or gravel. Plant succulents and cacti in the gaps, ensuring proper spacing for growth.
Water sparingly, about once a week, and avoid overwatering. Use gloves and tools suitable for prickly plants.
Create focal points with unique sculptures or decorative stones. Use colorful pots or containers to add height and dimension if desired.
Personalize with plant varieties that reflect your style or local environment. Incorporate small LED lights or reflective elements to enhance nighttime visual appeal.
A succulent and cactus rock garden is a low-maintenance, high-impact addition to any landscape. It’s a statement of natural beauty and toughness.
With just a few simple steps, you can craft a garden that’s both artistic and practical. Ready to embrace drought-tolerant elegance? Start stacking stones and planting!
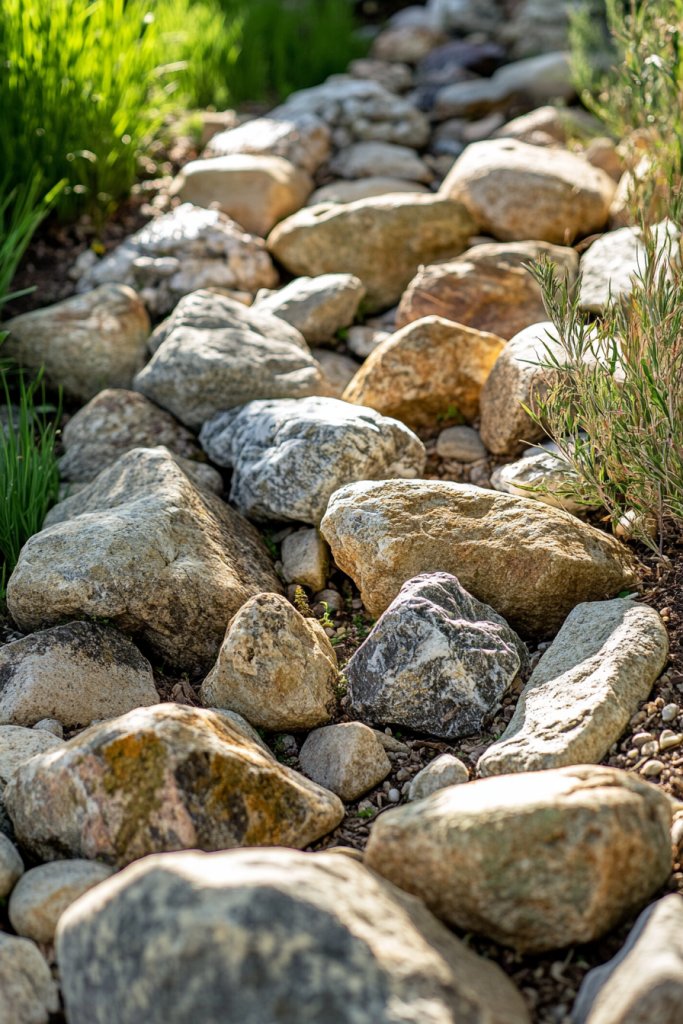
7. Building a Dry Creek Bed for Erosion Control and Aesthetic Appeal
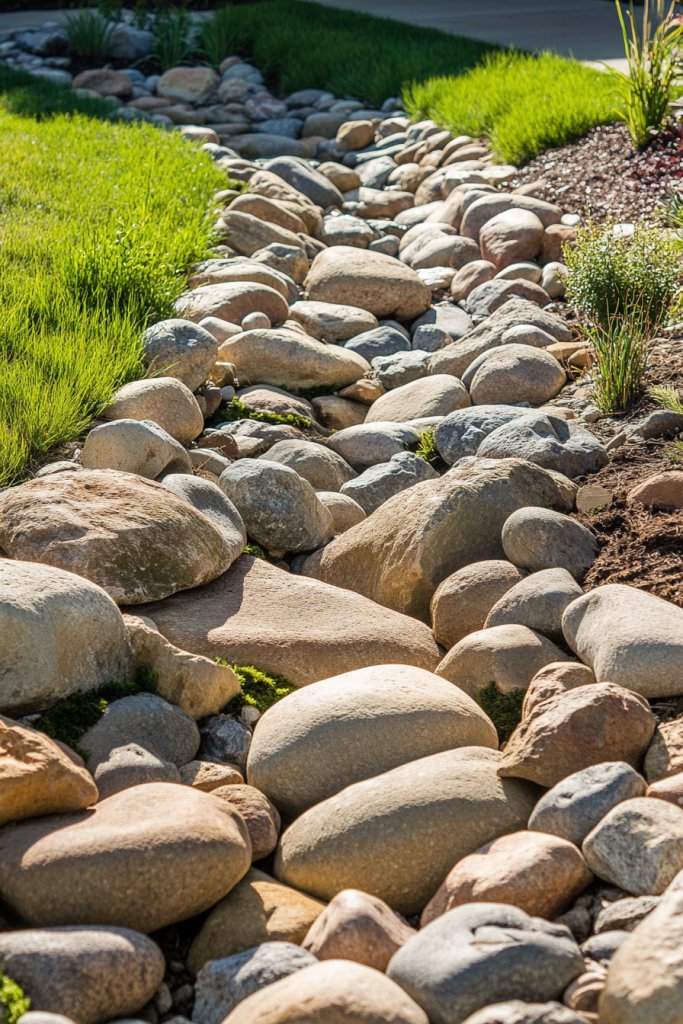
Dealing with soil erosion or want a natural-looking yard? A dry creek bed made of river rocks offers both functional erosion control and visual interest. It mimics a real creek without the hassle of water, adding movement and charm to your landscape.
Recommended Products to replicate this idea
| # | Preview | Product | |
|---|---|---|---|
| 1 |

|
Virekm River Rocks, Decorative Ornamental Pebbles,Garden Landscaping Stones,Gravel Filler for Home... | Buy on Amazon |
| # | Preview | Product | |
|---|---|---|---|
| 1 |

|
Happybuy 6x300ft Premium Weed Barrier Landscape Fabric Heavy Duty 2.4OZ, Woven Weed Control Fabric,... | Buy on Amazon |
Imagine a meandering line of river stones flowing through your yard, edged with grasses and wildflowers. The stones range from small gravel to larger boulders, creating a layered, textured appearance.
During rain, water flows over the dry bed, creating a mini river effect. In dry seasons, it’s a striking feature that adds depth and movement.
Adjust the width and curvature to suit your space, from narrow accents to broad features. Incorporate native plants or ornamental grasses along the sides to soften the edges.
Use different sizes or colors of stones for a more natural, irregular look. Seasonal touches like dried leaves or small ornaments can personalize your creek.
Plan the pathway of your dry creek, marking it with stakes and string. Excavate the area, removing topsoil and weeds.
Lay down a landscape fabric to prevent weed growth and stabilize the base. Fill the trench with river rocks, starting with the largest stones at the edges and filling in with smaller ones.
Compact the stones and add additional layers as needed. Regularly check for shifting and replenish with stones over time.
Decorate the creek with small sculptures, driftwood, or solar lanterns along the edges. Plant native grasses or wildflowers to create a lush border.
Use different shades of stones to mimic natural creek variations. Personal touches like engraved stones or painted accents can make it uniquely yours.
A dry creek bed is a beautiful, practical feature that enhances your landscape’s natural appeal. It controls erosion and adds visual flow, making your yard look lively.
With minimal maintenance, it remains a stunning focal point year-round. Ready to create a natural waterless river? Just gather stones and shape your creek!
8. Creating a Elevated Rock Seating Area
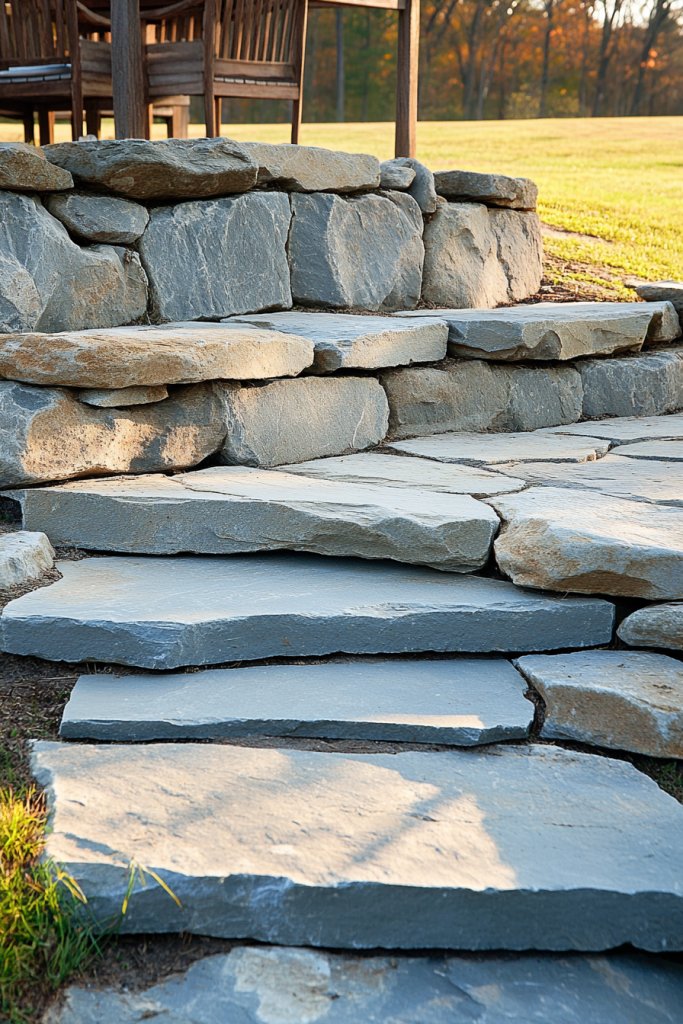
Looking for a cozy outdoor spot to gather or relax? An elevated rock seating area offers rustic charm and durability. It provides a natural-looking vantage point for enjoying your yard while adding a unique focal point.
Recommended Products to replicate this idea
| # | Preview | Product | |
|---|---|---|---|
| 1 |

|
DMT D8X Diamond Dia-Sharp Bench Stone, Knife Sharpener - Extra Coarse (220) Flat Sharpening, Made in... | Buy on Amazon |
| # | Preview | Product | |
|---|---|---|---|
| 1 |

|
addlon 54FT(48+6) Solar String Lights Outdoor Waterproof with USB Charging & Remote Control -... | Buy on Amazon |
Plus, it’s surprisingly simple to build. Picture a semi-circle of large river rocks stacked into a sturdy bench, nestled into a hillside or corner of your yard.
The stones have rough textures and warm hues, blending into the landscape. Sitting on the rocks, you feel the cool surface beneath you, with views of the garden or sunset beyond.
You’re surrounded by natural materials that invite lingering. Use different sizes and shapes of river stones for a more natural, uneven look or create a smooth, uniform bench for modern appeal.
Elevate the seating with layered stones or add backrests for comfort. Incorporate built-in tables or footrests with flat stones.
Seasonal cushions or throws can add comfort without compromising the rustic aesthetic. Choose a stable, level spot with good drainage.
Gather large, flat river stones and arrange them in a semi-circle or other shape. Secure the stones by partially embedding them into the ground or stacking for stability.
Fill gaps with smaller stones or gravel. For extra durability, consider anchoring the stones with mortar or concrete in the stacking process.
Finish with a smooth top layer for seating comfort. Decorate the seating with textured textiles like a soft blanket or weather-resistant cushions.
Add nearby small tables made from flat stones or reclaimed wood. Incorporate subtle lighting like solar-powered lanterns or string lights overhead.
Personal touches like engraved stones or painted symbols make it uniquely yours. An elevated rock seating area combines practicality with aesthetic appeal, creating a perfect outdoor lounge.
It’s a durable solution that ages beautifully and requires minimal upkeep. Once built, it becomes a favorite gathering spot for friends and family. Ready to sit back and relax? Start stacking stones today!
9. Framing Your Garden with Natural River Rock Retaining Walls
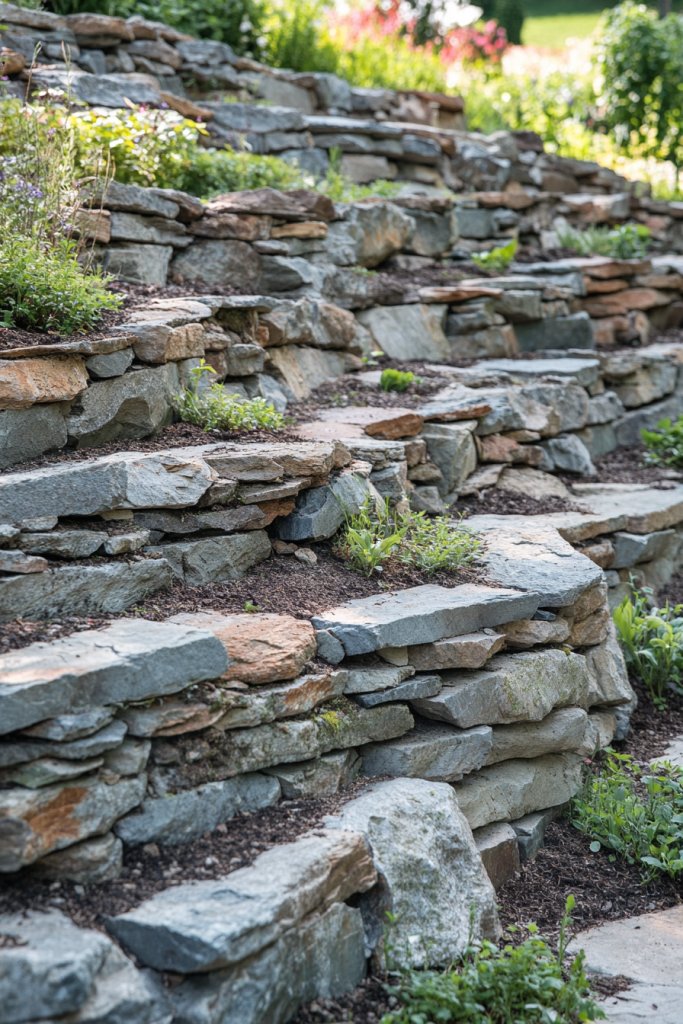
Is your garden terrain uneven or slopes out of control? A river rock retaining wall can tame the landscape while adding a natural, textured feature. It’s a smart way to create level planting areas and improve drainage—all with a rustic aesthetic.
Recommended Products to replicate this idea
| # | Preview | Product | |
|---|---|---|---|
| 1 |

|
Handpicked Mexican Beach Pebbles | Unpolished Natural Stones for Landscaping, Garden, Pathways |... | Buy on Amazon |
| # | Preview | Product | |
|---|---|---|---|
| 1 |

|
DIY Retaining Wall - Block Walls: Helping you with all steps of planning and building your own... | Buy on Amazon |
Visualize a wall of irregularly shaped river stones stacked tightly together, rising just a few feet high. The stones vary in size and color, from grays to warm earth tones, giving a rugged, organic look.
Behind the wall, tiered garden beds overflow with colorful flowers and greenery. The wall blends seamlessly into the landscape, almost as if it’s part of the natural terrain.
Use larger stones for a more substantial, durable wall or smaller ones for a delicate, decorative border. Curved walls add softness, while straight lines suit modern gardens.
Incorporate wooden or metal accents for contrast. Varying the height creates visual interest, and planting ground cover or small shrubs on top softens the edges.
Start by marking your desired wall location with stakes and string. Dig a trench, then lay a stable foundation of gravel or crushed stone.
Stack river rocks in a dry-fit pattern, ensuring stability and slight inward leaning for strength. Fill gaps with smaller stones or mortar if desired.
Reinforce the structure with geogrid or wire mesh for taller walls. Finish by sealing the top and planting appropriate ground cover or decorative plants.
Add decorative features like embedded fossils or painted stones within the wall. Use lighting fixtures or lanterns to highlight the structure at night.
Incorporate planters or small sculptures on top for extra flair. Personalize with engraved stones or colorful mortar joints.
A river rock retaining wall is both functional and beautiful, transforming uneven terrain into a polished landscape feature. It offers stability, prevents erosion, and provides a natural backdrop for your plants.
With patience and some planning, you can build a stunning, long-lasting structure. Ready to elevate your landscape? Gather rocks and get stacking!
10. Designing a Decorative River Rock Fire Pit Surround
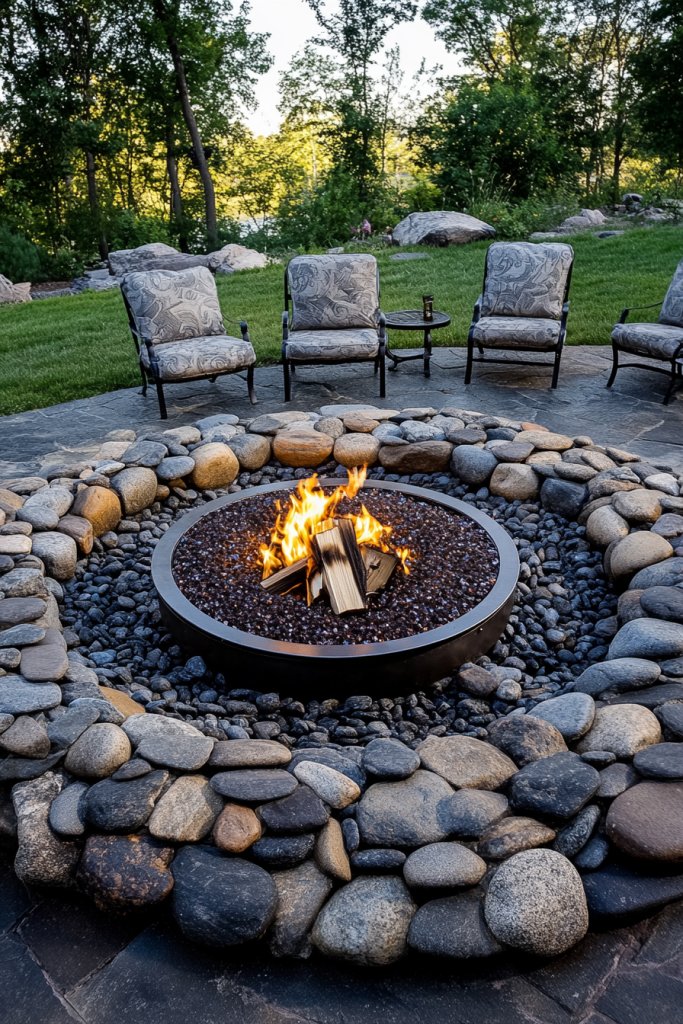
Dreaming of cozy nights around the fire? A river rock fire pit surround combines natural beauty with functional warmth. It creates a focal point for gatherings and adds a rustic touch to your outdoor space.
Recommended Products to replicate this idea
| # | Preview | Product | |
|---|---|---|---|
| 1 |

|
Sunnydaze Outdoor Fire Pit Bowl Replacement Insert for DIY Ring or Existing Stand - Wood-Burning... | Buy on Amazon |
| # | Preview | Product | |
|---|---|---|---|
| 1 |
|
Virekm River Rocks, Decorative Ornamental Pebbles,Garden Landscaping Stones,Gravel Filler for Home... | Buy on Amazon |
Plus, it’s easier to build than you might think. Imagine a circular fire pit surrounded by a ring of smooth river stones, varying in shades of gray and brown.
The stones are carefully stacked, creating a sturdy, natural-looking barrier. Inside, a metal bowl or fire pit sits ready for crackling logs.
Comfortable seating, like stone benches or rustic chairs, completes the scene, inviting friends to gather. Create a simple ring with uniform stones for a clean look or mix sizes and colors for a more organic appearance.
You can also extend the surround into a larger patio area or add built-in seating. For a modern twist, incorporate metal or concrete elements alongside the stones.
Seasonal decorations like lanterns or lanterns can add ambiance. Choose a flat, non-flammable surface for safety.
Mark the fire pit area with stakes and string. Excavate a shallow trench to set a stable base.
Lay down a gravel layer for drainage, then stack river stones in a circle, ensuring they’re snug and level. Use mortar or adhesive for added stability if desired.
Install the fire bowl or insert the fire pit unit, and finish by placing decorative stones around. Add personalized touches like engraved stones or decorative metal accents.
Incorporate weather-resistant cushions or blankets nearby for comfort. Use solar or string lighting to enhance nighttime appeal.
Personal touches make your fire pit a true outdoor retreat. A river rock fire pit isn’t just functional; it’s a natural gathering spot that elevates your outdoor living.
It’s durable, easy to maintain, and visually appealing. Once installed, it becomes the heart of your backyard. Ready to spark some outdoor fun? Just gather rocks and start building!
11. Incorporating River Rock Planters for a Modern Touch
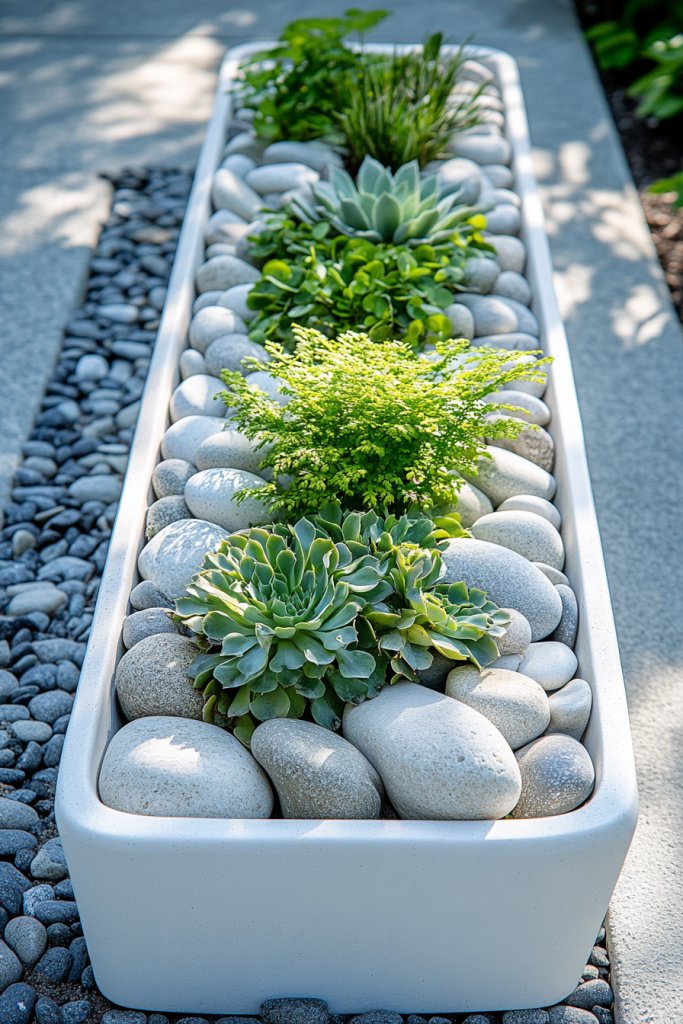
Looking for a sleek, contemporary way to display plants? River rock planters combine minimalist style with natural textures. They’re a versatile addition that can brighten patios, decks, or entryways.
Recommended Products to replicate this idea
| # | Preview | Product | |
|---|---|---|---|
| 1 |

|
ARTKETTY Succulent Pots - 10 Inch Ceramic Bonsai Pots with Drainage Stand, Large Shallow Planters... | Buy on Amazon |
| # | Preview | Product | |
|---|---|---|---|
| 1 |

|
DenicMic Solar Lights Outdoor 10 Pack Waterproof 6000K Cold White LED Stainless Steel Stake Outside... | Buy on Amazon |
Plus, they’re surprisingly easy to create and customize. Picture a shallow, wide container filled with a layer of small river stones, topped with drought-resistant plants or colorful succulents.
The stones spill over the edges, giving a layered, textured look. The combination of smooth, rounded rocks and vibrant greenery creates a modern, artistic vibe.
Light reflects softly off the stones, adding a subtle shimmer. Use large, shallow bowls or rectangular containers for a clean, geometric look.
Mix different stone sizes or add decorative elements like polished pebbles or embedded fossils. For seasonal interest, swap out plants or add decorative stones with painted patterns.
You can also incorporate multi-tiered arrangements for visual depth. Select durable, weather-resistant containers suitable for your climate.
Fill the bottom with a drainage layer of gravel or small stones. Add a layer of river rocks, then plant your chosen drought-tolerant plants or succulents.
Ensure proper watering and drainage—overwatering can cause root rot. Regularly refresh the stones for a vibrant appearance.
Replace or rearrange plants seasonally for variety. Add decorative metal or wooden accents to the containers.
Use painted or engraved stones for a personalized touch. Incorporate lighting elements like solar-powered spotlights or LED strips inside the containers.
Mix in other textures, like woven baskets or textured fabrics nearby, to enhance the modern aesthetic. River rock planters bring a sleek, natural element to any space, blending modern design with organic textures.
They’re low-maintenance and highly customizable, making them a smart choice for busy gardeners or trendsetters. Ready to elevate your plant game? Start with sturdy containers and a handful of stones!
12. Creating a Multi-Level Rock Terrace for Visual Depth
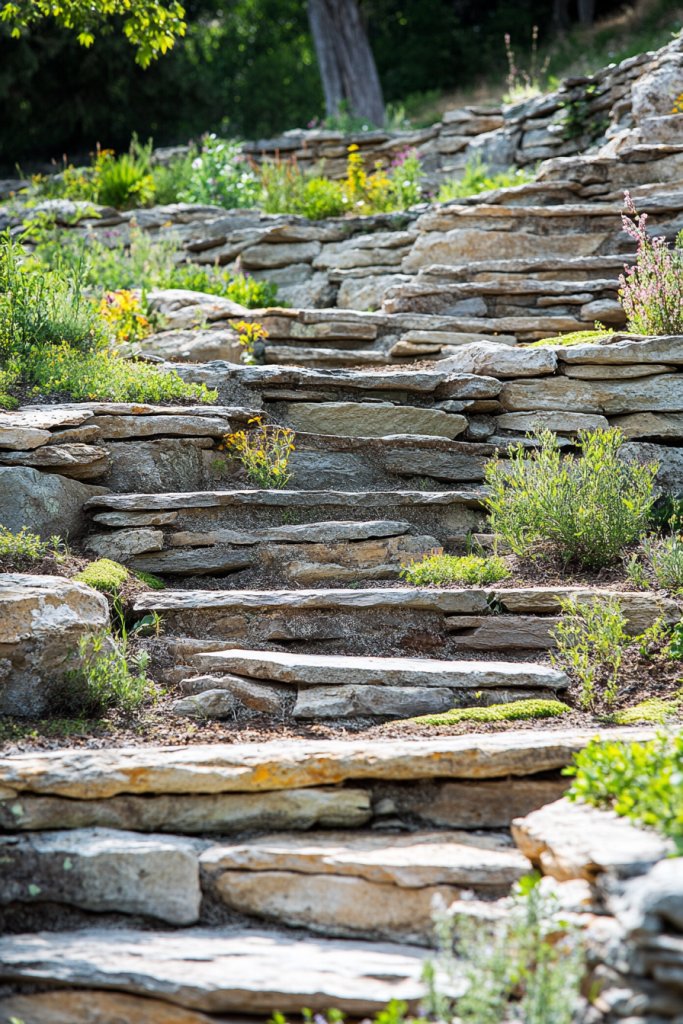
Want to add dimension and interest to a flat yard? A multi-level rock terrace creates visual layers, making your landscape feel more dynamic and inviting. It’s perfect for hillside gardens or creating separate zones for lounging and planting.
Recommended Products to replicate this idea
| # | Preview | Product | |
|---|---|---|---|
| 1 |
|
Pulovin 20 lbs River Rocks for Aquarium, 3-4 Inch Fish Tank Rocks, Natural Decorative Garden Rocks... | Buy on Amazon |
| # | Preview | Product | |
|---|---|---|---|
| 1 |
|
DIY Retaining Wall - Block Walls: Helping you with all steps of planning and building your own... | Buy on Amazon |
Plus, it’s a great way to showcase your creativity. Imagine a series of terraced platforms built from stacked river rocks, each level slightly higher than the last.
The rocks vary in size and color, adding texture and contrast. Between levels, tiered planting beds or seating areas are framed by natural stone walls.
The entire setup resembles a miniature mountain range, seamlessly blending into the landscape. Adjust the height and number of terraces based on your space and needs.
Use larger stones for the base and fill in gaps with smaller ones. Incorporate steps or pathways made from flat river stones to connect levels.
Seasonal planting options or decorative gravel can add color and texture. For a more natural look, avoid perfect symmetry and embrace irregular shapes.
Begin by planning the layout with stakes and string, defining each level’s boundary. Excavate the terraces to a stable base, then build retaining walls with interlocked river stones, stacking them securely.
Backfill each level with soil, adding drainage material behind the walls. Finish with topsoil and plant your chosen greenery.
Regular inspection ensures stability, especially after heavy rain. Decorate each level with sculptures, ornamental stones, or small water features.
Use different stone colors or textures to differentiate zones. Incorporate lighting along pathways or under overhanging rocks for night-time ambiance.
Add personal touches like engraved stones or seasonal decorations to each terrace. A multi-level rock terrace boosts visual interest and functional space, transforming flat yards into layered landscapes.
It’s a project that pays off with years of beauty and usability. With patience and planning, you can craft a stunning, natural-looking feature that elevates your entire landscape. Ready to build your layered paradise? Start stacking and shaping!
13. Lining Garden Edges with River Stones for a Clean Finish
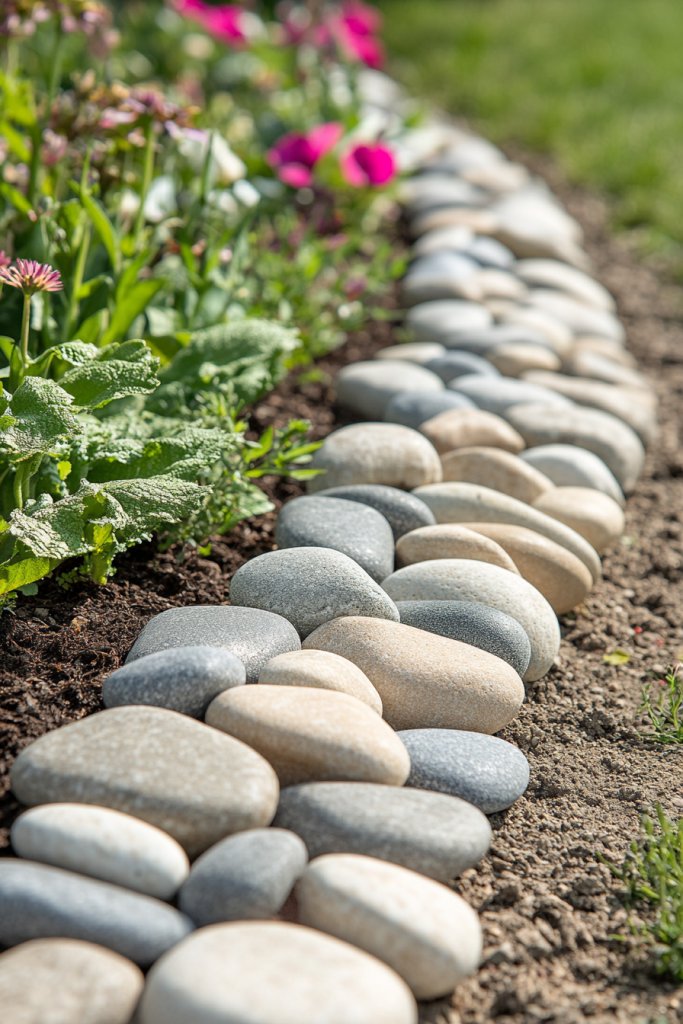
Wish your garden looked more polished and tidy? Lining edges with river stones instantly elevates the appearance of flower beds and borders. It creates a clean, defined boundary that keeps soil and mulch in place.
Recommended Products to replicate this idea
| # | Preview | Product | |
|---|---|---|---|
| 1 |

|
River Rocks for Painting 25 Pcs Large 2-3 Inch Flat Smooth Painting Stones Craft Rock to Paint for... | Buy on Amazon |
| # | Preview | Product | |
|---|---|---|---|
| 1 |

|
30 PCS Brown Landscape Edging Garden Stakes, 10 Inch Landscaping Anchoring Spikes Heavy Duty Plastic... | Buy on Amazon |
Plus, it adds a natural, decorative touch without much effort. Visualize a crisp, curved border of smooth river stones hugging a lush flower bed.
The stones are carefully placed, varying in size but maintaining a consistent flow. The contrast of the stones’ earthy tones against bright blooms makes the border pop.
The overall effect is neat, natural, and effortlessly elegant. Use uniform stones for a sleek, contemporary look or mix sizes for a more organic feel.
Create curves or straight lines depending on your garden shape. Incorporate contrasting colors or add a layer of mulch behind the stones for added depth.
Seasonal accents like small pinecones or decorative gravel can further personalize the border. Mark the edge with stakes and string to maintain a clean line.
Remove existing mulch or soil along the boundary. Lay the river stones along the marked line, pressing them slightly into the soil to secure.
Fill any gaps with smaller stones or gravel for stability. Regularly check and reposition stones as needed to maintain the clean finish.
Decorate the border with small sculptures or engraved stones for a personal touch. Add subtle lighting along the edge for night viewing.
Incorporate seasonal decorations like dried flowers or ornaments for variation. Use textured or patterned stones to complement your overall landscape design.
A well-defined border with river stones creates a polished, professional look with minimal effort. It’s a simple upgrade that makes your entire landscape look more organized and inviting.
Once done, it requires little maintenance and lasts for years. Ready for a clean, natural finish? Start lining your garden today!
14. Arranging a Colorful River Rock Mosaic for Artistic Flair
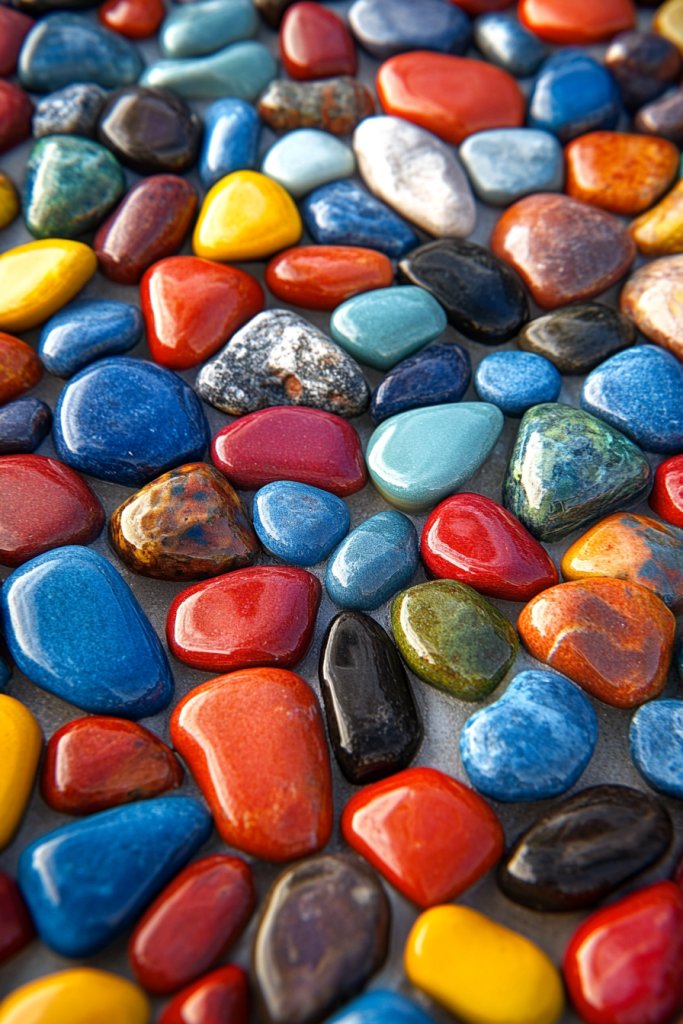
Looking to add a splash of color and artistry to your yard? A river rock mosaic turns ordinary stones into a vibrant, eye-catching feature. It’s an artistic project that adds personality and can be tailored to match your style.
Recommended Products to replicate this idea
| # | Preview | Product | |
|---|---|---|---|
| 1 |

|
Lanyani 800 Pieces Mosaic Tiles Stained Glass - Assorted Colors for Art Craft and Home Decorations -... | Buy on Amazon |
| # | Preview | Product | |
|---|---|---|---|
| 1 |

|
BEACON Mosaic Glue - Non-Toxic & Water Resistant, Ideal for All Tiles & Surfaces, 2-Ounce | Buy on Amazon |
Plus, it’s surprisingly simple to get started. Picture a large, flat surface decorated with a mosaic of multicolored river stones arranged in intricate patterns or motifs.
Bright reds, blues, greens, and yellows create a lively, dynamic scene. The stones are carefully placed to form a picture, a geometric pattern, or abstract art.
The mosaic catches the sunlight, creating a shimmering, textured surface that invites closer inspection. Design your mosaic to match your personal style, from bold geometric shapes to delicate floral patterns.
Use different sizes and shapes of stones to add depth and texture. Incorporate contrasting colors for visual impact and consider a theme that reflects your personality or local environment.
This can be a focal point on a pathway, tabletop, or decorative wall. Start by sketching your design on paper or directly onto the surface.
Arrange the stones in sections, adjusting for color balance and pattern flow. Use a strong adhesive suitable for outdoor use, and press stones firmly into place.
Fill gaps with grout or fine sand to secure stones and smooth out the surface. Seal the mosaic with a weatherproof sealant for durability.
Maintenance involves gentle cleaning and occasional touch-ups. Add embedded symbols, initials, or motifs to personalize your mosaic.
Incorporate glow-in-the-dark or reflective stones for nighttime sparkle. Frame the mosaic with decorative borders or surround it with plants or lighting.
Personal touches like painted accents or small sculptures nearby can enhance its artistic flair. A colorful river rock mosaic transforms a plain surface into a piece of outdoor art.
It’s an engaging project that offers a sense of accomplishment and a truly unique feature. With patience and creativity, you can craft a stunning centerpiece that celebrates your personal style. Ready to create your own mosaic masterpiece? Gather stones and start designing!
15. Enhancing Pathways with Layered River Rock Borders

Want to make your garden pathways stand out? Layered river rock borders add contrast and texture, making your paths more attractive and defined. They also prevent gravel or concrete from spilling over, keeping everything neat.
Recommended Products to replicate this idea
| # | Preview | Product | |
|---|---|---|---|
| 1 |

|
MIXC Garden Edging Border, 100FT 2 Inch Tall Plastic Landscape Edging with 150 Stakes, Flexible... | Buy on Amazon |
| # | Preview | Product | |
|---|---|---|---|
| 1 |

|
Mancra Solar Pathway Lights, 8 Pack LED Solar Lights Outdoor Waterproof, Glass Metal Garden Lighting... | Buy on Amazon |
It’s a simple upgrade that makes a big difference. Visualize a concrete or gravel pathway edged by a double layer of river stones.
The outer layer features larger, rounded rocks in shades of gray and brown, while the inner layer uses smaller, smoother stones for a polished look. The layered effect creates depth and visual interest, inviting you to walk along and explore.
Use stones of varying sizes and colors for a more natural appearance, or stick to a uniform palette for modern simplicity. Stack stones in a neat, overlapping manner or keep them loosely layered for a more casual feel.
Seasonal additions like dried leaves or small ornaments can personalize the borders. Adjust the thickness of each layer for different visual effects.
Mark your pathway edges with stakes and string. Remove any grass or existing edging material.
Dig a narrow trench along the line, then lay down a landscape fabric to suppress weeds. Place the larger stones first, anchoring them securely, then fill between with smaller stones.
Use a tamper to compact the stones, and top with a layer of fine gravel or sand for stability. Regularly check and adjust for shifts.
Decorate the layered border with small sculptures, engraved stones, or seasonal accents like pinecones or shells. Incorporate lighting, such as solar-powered path lights, to highlight the borders at night.
Use contrasting colors or textures to emphasize different sections. Personal touches create a more inviting, curated look.
Layered river rock borders give pathways a polished, professional vibe with minimal effort. They improve durability and visual appeal, making your landscape look thoughtfully designed.
With simple tools and a bit of patience, you can craft a feature that lasts for years. Ready to upgrade your pathways? Start layering stones today!
16. Designing a Naturalistic Rock Fountain for Soothing Soundscapes
Craving the calming sound of flowing water in your yard? A naturalistic rock fountain not only looks beautiful but also provides a peaceful ambiance. It’s an easy way to introduce soothing sights and sounds without the complexity of a full pond.
Recommended Products to replicate this idea
| # | Preview | Product | |
|---|---|---|---|
| 1 |
|
DoubleFill 1 Pack Fountain Basin, Water Feature Basin Kit Suitable for Vases, Statues or Bubbling... | Buy on Amazon |
| # | Preview | Product | |
|---|---|---|---|
| 1 |

|
VIVOSUN 800GPH Submersible Pump(3000L/H, 24W), Ultra Quiet Water Fountain Pump with 10ft. High Lift... | Buy on Amazon |
Plus, it’s a project that adds instant tranquility. Imagine a simple fountain composed of a collection of river stones stacked irregularly, with water cascading gently over the surfaces.
The stones are smooth and weathered, with hues blending into the landscape. Water flows over the rocks into a small basin, creating a gentle, rhythmic sound.
Surrounding greenery and subtle lighting complete the scene, offering a calming retreat. Opt for a small, bubbling rock feature or a larger, tiered cascade depending on space and preference.
Use a mix of sizes and shapes to mimic natural waterfalls. Seasonal accents like floating candles or flower petals can enhance visual appeal.
Incorporate LED lights or solar-powered pumps for nighttime enjoyment. Select a stable, level location with access to electricity or solar power.
Dig a shallow basin for the water reservoir. Arrange river stones in a natural, layered formation, securing them with adhesive or mortar if needed.
Install a submersible pump, connect the plumbing, and test the flow. Cover exposed pipes with stones, and keep the basin topped up for continuous operation.
Regular cleaning prevents algae buildup. Decorate the fountain with small sculptures, engraved stones, or textured minerals.
Use colored lighting or underwater LEDs to create night effects. Incorporate natural elements like driftwood or shells for added texture.
Personal touches like engraved stones or custom sculptures make it uniquely yours. A naturalistic rock fountain offers a tranquil escape that enhances your outdoor space.
It’s a manageable project that delivers long-term serenity and aesthetic value. Once installed, it requires minimal maintenance and provides endless calming moments. Ready to make your yard a peaceful haven? Start stacking stones and setting the flow!
17. Incorporating River Rocks in Planter Drainage Systems
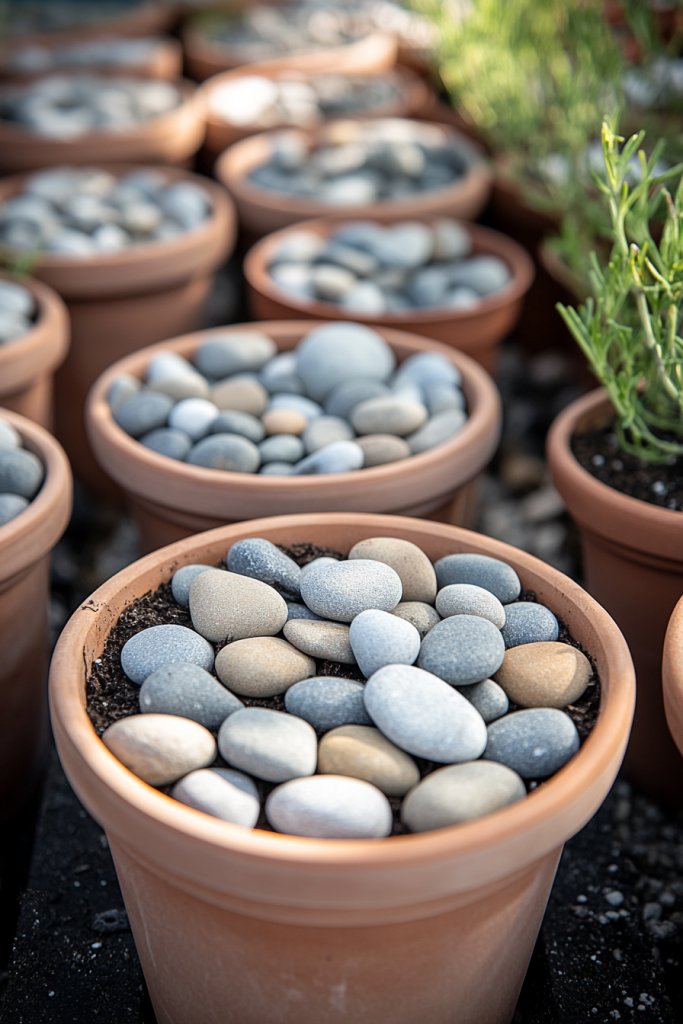
Are your potted plants constantly suffering from overwatering or poor drainage? Incorporating river rocks into your containers can dramatically improve drainage and root health. It’s an easy, affordable fix that keeps your plants happy and thriving.
Recommended Products to replicate this idea
| # | Preview | Product | |
|---|---|---|---|
| 1 |

|
ROCART 100 Large 2.05-3.15" Flat Rocks for Painting, Smooth River Rocks Painting Supplies for... | Buy on Amazon |
| # | Preview | Product | |
|---|---|---|---|
| 1 |
|
Happybuy 6x300ft Premium Weed Barrier Landscape Fabric Heavy Duty 2.4OZ, Woven Weed Control Fabric,... | Buy on Amazon |
Plus, it adds a decorative touch. Picture a large ceramic or plastic planter filled with a layer of colorful river stones at the bottom.
Above, soil and drought-resistant plants sit atop the stones, with roots breathing freely. The stones peek through the soil surface, giving a vibrant, textured look.
Water flows easily through the stones, preventing soggy roots and promoting healthy growth. Use different sizes or colors of stones for a decorative effect.
Layer stones in a pattern or keep them mixed for a natural look. For larger containers, add a mesh screen to prevent soil from slipping into the stones.
Adjust the depth of the stones based on plant needs or container size. Start by placing a layer of large river stones at the bottom of your container.
Cover with a fine mesh or landscape fabric to keep soil from mixing with stones. Add your potting soil on top, then plant your chosen plants.
Water thoroughly, ensuring excess water flows freely through the stones. Periodically check and replace stones if they become clogged or compacted.
Decorate the tops with decorative gravel, small sculptures, or painted stones. Mix in native or drought-tolerant plant varieties for a personalized touch.
Use colorful or textured stones to match your overall landscape theme. Keep the container tidy by removing debris and replacing stones as needed.
Incorporating river rocks into your planter drainage is a simple way to promote healthier plants and a cleaner look. It reduces root rot risks and adds visual interest.
With a few supplies and some patience, you can keep your plants thriving for years to come. Ready to upgrade your containers? Start layering stones today!
18. Using River Rock Accents in Stepping Stone Designs
Want stepping stones that look natural and blend seamlessly into your landscape? River rock accents can elevate simple concrete slabs into artful pathways. It’s a smart way to add texture and visual interest while keeping your garden walking-friendly.
Recommended Products to replicate this idea
| # | Preview | Product | |
|---|---|---|---|
| 1 |

|
My Garden Steping Stone Making kit | Buy on Amazon |
| # | Preview | Product | |
|---|---|---|---|
| 1 |
|
OUPENG Pebbles Polished Gravel, Natural Polished Mixed Color Stones, Small Decorative River Rock... | Buy on Amazon |
Plus, it’s a project you can tackle in a weekend. Imagine concrete stepping stones embedded with or surrounded by small river stones.
The stones vary in size, shape, and color, creating a mosaic-like appearance. They form a meandering path through your garden, guiding visitors and adding charm.
The contrast between the smooth concrete and textured stones invites touch and exploration. Embed larger river stones into the surface of concrete slabs for a mosaic effect or place smaller stones along the edges.
Use contrasting colors for a bold look or keep it monochrome for subtle elegance. Create curves or straight lines depending on your design preference.
Personalize with engraved stones or decorative inlays. Pour and level concrete slabs or use pre-made stepping stones.
Before the concrete sets, embed river stones into the surface or arrange stones along the edges. For embedded stones, press them gently into the wet concrete, ensuring they are flush or slightly raised.
For laid stones, set the slabs on a stable, compacted base and secure with gravel or sand. Seal the surface for weather resistance.
Regularly clean and check for shifting. Add decorative touches like painted stones or engraved initials.
Incorporate lighting along the edges for nighttime visibility. Use contrasting textures or colors to highlight the pathway.
Personalize with themed stones or add small sculptures nearby. Using river rocks in stepping stone design creates a natural, cohesive look that’s both functional and artistic.
It’s a DIY-friendly project that enhances your landscape’s flow. Once complete, your garden will feel more inviting and thoughtfully curated. Ready to step up your landscape game? Start embedding stones today!
19. Creating a Wildlife-Friendly Habitat with River Rock Hideouts
Interested in attracting beneficial insects, birds, or small wildlife? River rocks can provide essential shelter and hiding spots that support local ecosystems. It’s a natural, low-cost way to make your yard more inviting for creatures that help your garden thrive.
Recommended Products to replicate this idea
| # | Preview | Product | |
|---|---|---|---|
| 1 |
|
Pulovin 20 lbs River Rocks for Aquarium, 3-4 Inch Fish Tank Rocks, Natural Decorative Garden Rocks... | Buy on Amazon |
| # | Preview | Product | |
|---|---|---|---|
| 1 |

|
PINVNBY Parakeet Nesting Box Bird House Wood Breeding Box Parrots Mating Box for Lovebirds Budgie... | Buy on Amazon |
Visualize large river rocks stacked or partially buried to create small caves and hideouts. These structures blend into the landscape, offering refuge for insects, lizards, or birds.
Surrounding plants and native grasses enhance the habitat, while the rocks provide cool, shaded spots during hot days. It’s a mini wild sanctuary right outside your door.
Use larger, irregular-shaped stones for natural hideouts or create layered arrangements for more complexity. Integrate with native plants and grasses for a thriving ecosystem.
Place rocks near water sources or food attractants for maximum benefit. Seasonal decorations like dried leaves or moss can increase cover.
Select a quiet corner or shaded area for your habitat. Partially bury larger stones to stabilize them and create caves or tunnels.
Arrange smaller stones or gravel nearby to expand shelter options. Avoid disturbing existing wildlife; keep the area free of chemicals.
Regularly check and rearrange stones to maintain shelter and increase diversity. Add small nesting boxes or insect hotels nearby for specific species.
Incorporate natural materials like wood or hollow stems to attract different wildlife. Use engraved stones with nature motifs or messages.
Keep the habitat tidy but undisturbed to promote natural behaviors. A river rock habitat supports local biodiversity and enriches your outdoor experience.
It’s a simple, eco-friendly project that pays off with a lively, balanced yard. Once established, it requires little maintenance but offers endless benefits. Ready to welcome nature into your yard? Start stacking stones and creating safe havens!
20. Designing a Naturalistic Rock Garden with Native Plants

Want a landscape that’s eco-friendly and low-maintenance? A naturalistic rock garden featuring native plants blends seamlessly with the environment. It reduces water use, attracts local wildlife, and creates a stunning, authentic look.
Recommended Products to replicate this idea
| # | Preview | Product | |
|---|---|---|---|
| 1 |

|
HOME GROWN Premium Wildflower Seeds 89,000+ Count - 23 Non-GMO Native Varieties for Bees,... | Buy on Amazon |
| # | Preview | Product | |
|---|---|---|---|
| 1 |

|
GASPRO 15lb Natural River Rocks Decorative Rocks for Plants and Garden Landscaping, Polished River... | Buy on Amazon |
Plus, it’s a project that rewards patience and appreciation for native flora. Imagine a sprawling bed of river stones interspersed with native grasses, wildflowers, and small shrubs.
The stones vary in size and shape, mimicking natural terrain. The plants grow in clusters, their colors and textures adding vibrancy to the rocky landscape.
During different seasons, the scene shifts, showcasing blooms, seed heads, or lush greenery. Use larger stones to create natural slopes or flat areas for planting.
Mix in smaller gravel or pebbles for variety. Select native plants suited to your climate, emphasizing drought-tolerance and resilience.
Incorporate seasonal accents like dried seed heads or native grasses for year-round interest. Personal touches include engraved stones or natural ornaments.
Clear the area of debris and invasive plants. Arrange larger stones first, creating natural contours and focal points.
Place native plants in naturalistic groupings, ensuring good drainage and appropriate soil conditions. Use mulch or smaller stones around plants to suppress weeds.
Water sparingly at first, then rely on native drought-tolerant species for ongoing care. Regularly weed and replace plants as needed.
Add handcrafted signs, engraved stones, or sculptures to highlight specific plantings or themes. Incorporate natural materials like hollow logs or driftwood for added texture.
Use seasonal flowers or grasses to keep the garden lively year-round. Personal touches like painted stones or themed ornaments can reflect your style.
A native plant rock garden provides a beautiful, sustainable landscape that supports local ecosystems. It’s a low-maintenance, eco-conscious choice that grows more charming over time.
Once established, it requires minimal intervention and offers ongoing visual rewards. Ready to embrace natural beauty? Start arranging stones and planting native flora!
21. Adding Artistic River Rock Accents to Garden Decor
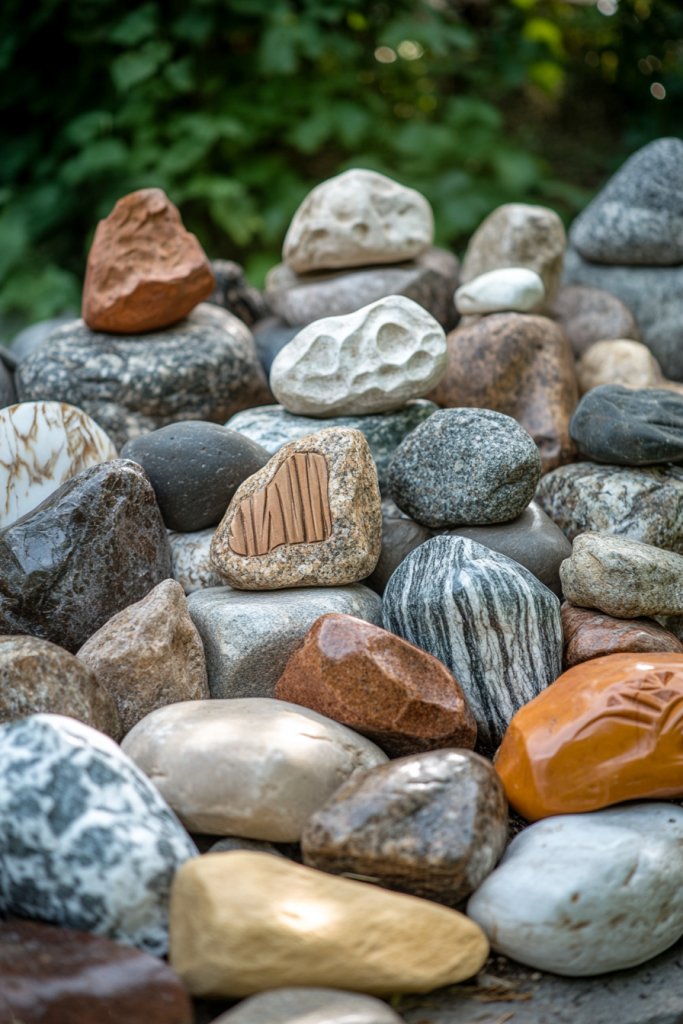
Looking for a way to personalize your garden decor? Artistic river rock accents can turn ordinary stones into custom art pieces that reflect your personality. From sculptures to borders, these accents add texture, color, and a sense of originality.
Recommended Products to replicate this idea
| # | Preview | Product | |
|---|---|---|---|
| 1 |

|
LOYIM 24 Pcs Stepping Stone Kit Includes Concrete Mold, Mosaic Tiles and Carving Tools, DIY Craft... | Buy on Amazon |
| # | Preview | Product | |
|---|---|---|---|
| 1 |

|
DecoArt Patio Outdoor Paint Set – 24 Starter Colors (2 fl oz Bottles) – Outdoor Weatherproof... | Buy on Amazon |
It’s an easy way to elevate your landscape with a creative flair. Picture polished river stones integrated into sculptures, borders, or decorative features.
Some stones are carved or painted, forming unique shapes or symbols. Others are embedded into concrete to create murals or textured panels.
The variety of colors and textures makes each piece stand out, giving your yard a bespoke, artistic touch. Create small sculptures or accents from river stones using carving tools, or paint them with weatherproof colors for a bold statement.
Incorporate stones into garden borders or stepping stones for a subtle artistic effect. Use engraved stones as markers or signs.
Mix natural stones with metal or wood for a balanced, eclectic look. Select stones suitable for carving or painting.
For sculptures, arrange stones in molds or wireframes, securing with adhesive or mortar. For painted accents, clean and prime stones before applying weatherproof paints or engravings.
Embed stones into concrete or mortar for borders or decorative panels. Seal with outdoor-grade sealant for longevity.
Regular maintenance involves cleaning and touch-ups. Add personalized messages, family initials, or symbols to your stones.
Incorporate reflective or glow-in-the-dark elements for nighttime impact. Use themed stones for holidays or special occasions.
Personal touches like engraved or painted stones make your decor truly one-of-a-kind. Artistic river rock accents bring a creative, personal touch that sets your garden apart.
They’re a fun project that results in meaningful, durable decor. With a little effort, you can craft pieces that reflect your style and personality. Ready to get artistic? Start collecting stones and let your imagination run wild!
Conclusion
Exploring these diverse river rock landscaping ideas opens up endless possibilities to enhance your outdoor sanctuary. Whether you opt for a sleek modern look or a more rustic vibe, these ideas are easy to adapt and implement. Don’t hesitate to experiment and make your outdoor space uniquely yours — embrace the beauty of natural elements and transform your yard into a haven of elegance and peace.
Last update on 2026-03-01 / Affiliate links / Images from Amazon Product Advertising API