Imagine stepping into a bathroom that exudes warmth, charm, and a cozy rustic vibe—shiplap walls can make that dream a reality! Their timeless, textured appearance has skyrocketed in popularity, adding character and visual interest to any space. Perfect for creating a welcoming retreat, shiplap instantly elevates your bathroom’s style while providing a versatile backdrop for various design elements.
In this article, you’ll discover a delightful array of shiplap bathroom ideas that range from classic to contemporary, showcasing how this charming material can be adapted to suit different tastes. Whether you prefer a subtle touch or a bold statement, these ideas will inspire you to transform your bathroom into a rustic haven full of personality and charm.
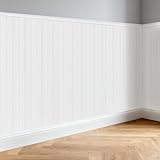
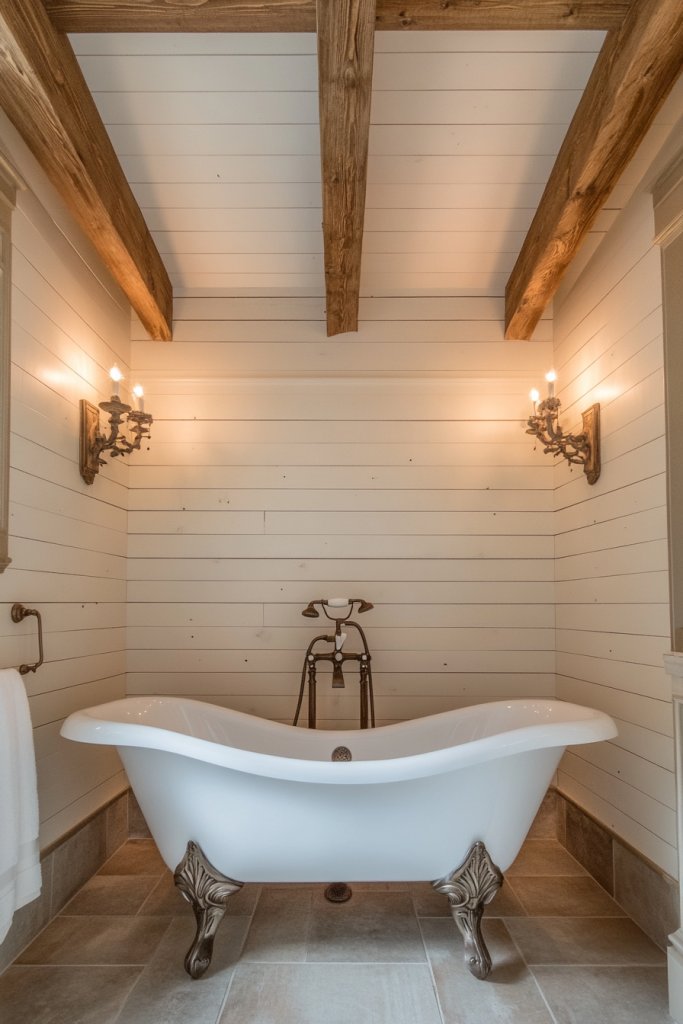
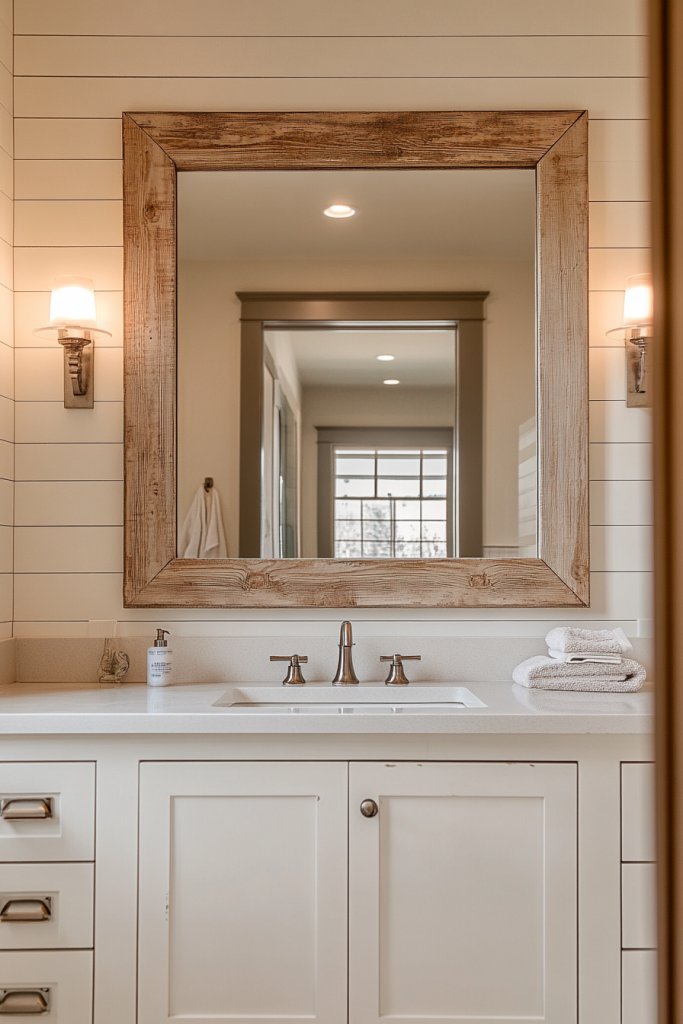
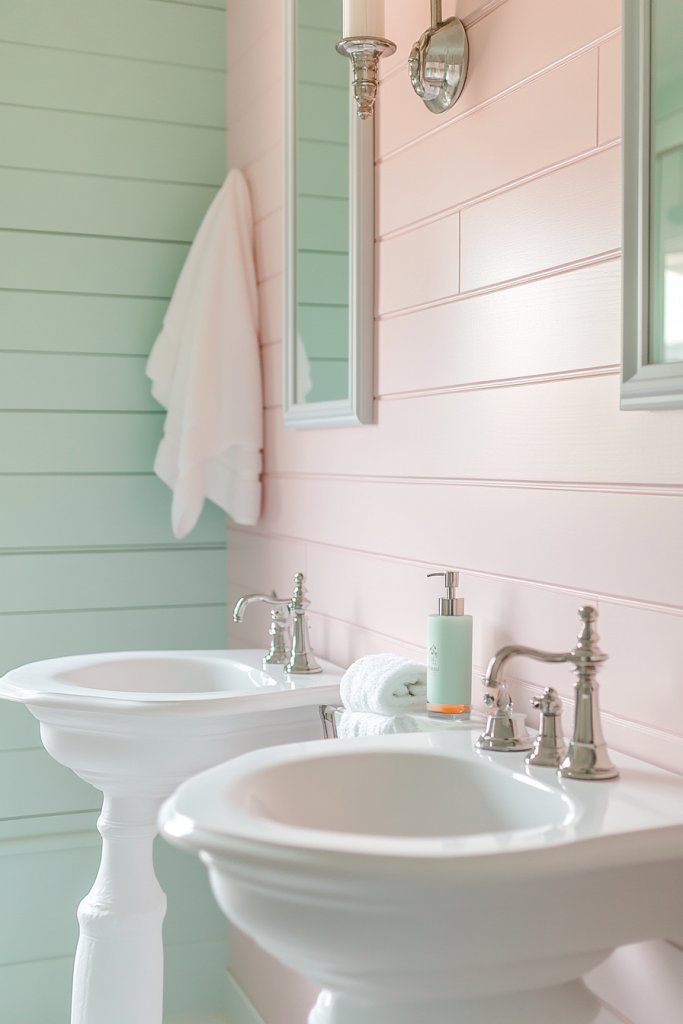
1. Classic White Shiplap Wall with Vintage Hardware Accents
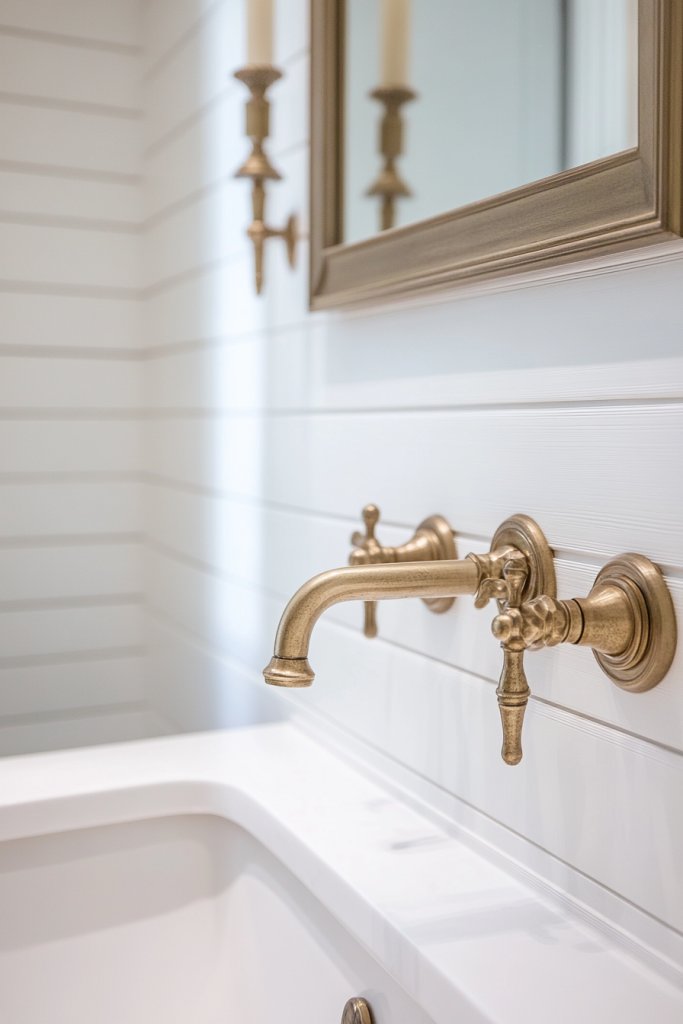
Ever wish your bathroom could evoke timeless charm without feeling outdated? The desire for a space that combines rustic appeal with classic elegance is common. Sometimes, all it takes is a simple touch of white shiplap paired with vintage hardware to transform the vibe entirely. If your current bathroom feels flat or uninspired, this idea could be your game-changer.
Recommended Products to replicate this idea
| # | Preview | Product | |
|---|---|---|---|
| 1 |

|
Luxdecor Real Wood Wall Planks - White Shiplap Boards 5" Peel and Stick - 10 Pieces, 12.5 Sq Ft | Buy on Amazon |
| # | Preview | Product | |
|---|---|---|---|
| 1 |
|
Otoolling 4 Pcs Antique Brass Gold Bathroom Accessories Set Wall-Mounted Towel Rack & Towel Ring &... | Buy on Amazon |
Imagine a crisp white shiplap wall stretching across your bathroom. The surface has a subtle texture, catching light and adding depth. Paired with antique bronze fixtures—think vintage-style faucet handles and drawer pulls—this setup screams old-world charm. The contrast between the matte white and the warm metallic accents creates a cozy, inviting atmosphere. It’s like stepping into a rustic cottage that’s been polished for modern living.
You can tweak this look by choosing different hardware finishes, such as brushed nickel or oil-rubbed bronze, to match your overall decor. For a more feminine touch, add soft textiles like a plush, neutral-toned rug or a linen shower curtain. In smaller bathrooms, consider extending the shiplap halfway up the wall to avoid overwhelming the space. Seasonal updates could include swapping hardware for darker or brighter metals to shift the mood.
Start with high-quality white shiplap boards, ensuring they’re treated for moisture resistance. Use a pneumatic nail gun to attach the planks evenly, leaving small gaps for a consistent look. Pick vintage-inspired hardware from local antique shops or online sources to keep the aesthetic authentic. Make sure to seal the wood to prevent water damage, especially in humid environments. Finish by installing your fixtures, matching their finishes to the hardware for seamless style.
Introduce personalized touches like engraved vintage-style handles or decorative hooks for robes and towels. Incorporate textured textiles, such as a soft cream throw blanket with chunky knit texture, to add warmth. Decorative metal accents, like a small sculptural piece or a rustic soap dish, can reinforce the vintage vibe. Play with color accents—perhaps a pop of teal or deep green—to make the space uniquely yours.
This classic white shiplap with vintage hardware creates a charming, timeless look that won’t go out of style. It’s simple enough for DIY enthusiasts yet sophisticated enough to impress guests. With a bit of effort, you can craft a bathroom that feels both cozy and luxurious, blending rustic charm with modern function. Ready to bring vintage elegance into your everyday routine?
2. Weathered Gray Shiplap for a Cozy, Worn-In Feel
Are you craving a bathroom that feels warm, inviting, and full of character? Sometimes, new finishes can seem too pristine, lacking that lived-in charm. Weathered gray shiplap offers a perfect balance—bringing rustic authenticity with a cozy, worn-in vibe. If your space needs a little more personality, this idea might be just what you need.
Recommended Products to replicate this idea
| # | Preview | Product | |
|---|---|---|---|
| 1 |

|
BARNWOODUSA Real Reclaimed Wood Planks - Easy Nail-Up Shiplap Panels for Rustic Wood Wall Paneling... | Buy on Amazon |
| # | Preview | Product | |
|---|---|---|---|
| 1 |

|
Luxdecor Real Wood Planks for Wall- White Shiplap Boards 5" Peel and Stick Shiplap Boards 10 Pieces... | Buy on Amazon |
Picture distressed gray shiplap with a matte finish, featuring subtle knots and imperfections that mimic aged barnwood. The weathered surface creates a textured backdrop that’s perfect for layering with plush towels and soft textiles. The muted tone pairs beautifully with matte black fixtures, giving your bathroom a moody yet welcoming glow. Natural light reflects softly off the surface, enhancing its rustic appeal. It feels like a space that has stories to tell.
You can embrace different shades of gray—from light ash to deep charcoal—to match your mood. In colder months, add cozy elements like a thick, knit shower curtain or a faux fur rug. For warmer seasons, brighten the space with crisp white accessories or metallic accents. Smaller bathrooms can feature this paneling on the lower half of the wall, paired with a light-colored upper wall for contrast. It’s flexible enough to blend with both modern and traditional decor styles.
Select weathered gray shiplap boards with a textured surface, ensuring they’re treated for moisture. Use a brad nailer for secure attachment, spacing the planks evenly. To enhance the aged look, lightly sand certain areas after installation to reveal the wood beneath. Opt for matte black or antique bronze fixtures to complement the rustic finish. Seal the surface with a matte polyurethane to protect against humidity and water splashes. Incorporate the shiplap on walls or ceiling for added visual interest.
Customize by adding vintage-inspired hooks or shelving brackets in matte black or dark bronze. Incorporate plush towels in warm hues like deep rust or creamy beige to contrast with the gray background. Use reclaimed wood accents for storage or decorative elements to reinforce the rustic theme. Small LED candles can add a warm glow, enhancing the cozy vibe without cluttering the space.
Weathered gray shiplap transforms your bathroom into a charming retreat with a storybook feel. It’s perfect for those who love rustic aesthetics but want a modern twist. With minimal effort, you create a space that feels warm, comforting, and full of texture. Ready to embrace the charm of aged wood in your daily routine?
3. Vertical Shiplap Paneling to Enhance Ceiling Height
Does your bathroom feel cramped or boxy? Sometimes, the problem is simply how the walls are oriented. Installing shiplap vertically can give the illusion of higher ceilings and more spaciousness. If you’re dreaming of a bathroom that feels open and airy, vertical paneling might be your secret weapon.
Recommended Products to replicate this idea
| # | Preview | Product | |
|---|---|---|---|
| 1 |

|
PVC Wall Panels - 3 Foot Accent Wall Panels Reversible for Interior Wall Decor, Easy to Install... | Buy on Amazon |
| # | Preview | Product | |
|---|---|---|---|
| 1 |
|
Pre-Cut Wainscoting Panels Kit, WPC Slats Accent Wall Panel for Home Decor Covers 39 x 79 in, Ready... | Buy on Amazon |
Imagine tall, narrow planks running from floor to ceiling, emphasizing the vertical lines of the room. The natural grain and texture of the shiplap add warmth and depth, while the upward direction draws your eye upward, creating a sense of height. Paired with soft, ambient lighting fixtures placed strategically, the space feels dramatically larger and more inviting. This technique transforms a standard bathroom into a lofty, cathedral-like retreat.
You can choose between wide or narrow planks depending on the look you prefer—narrower planks tend to look more traditional, while wider ones evoke a modern vibe. For a softer aesthetic, paint the shiplap in light shades like cream or pale gray. For a more dramatic effect, go bold with darker colors or even a contrasting ceiling color. This approach works well in both small and large bathrooms, especially those with high ceilings that need accentuation.
Begin by measuring wall height to determine plank length. Install a ledger board at the top to keep planks straight and level. Use a nail gun to attach each plank, ensuring consistent spacing. If painting, do so before installation for cleaner edges. Consider adding crown molding at the top for a finished look. For a seamless appearance, hide nails with wood filler or trim to cover gaps. This DIY upgrade requires patience but yields a stunning transformation.
Add subtle decorative elements like a textured towel rack or a sculptural shelf that runs vertically along the wall. Use contrasting colors on the ceiling to further emphasize height—perhaps a darker hue or a glossy finish. Incorporate LED strip lighting behind crown molding to cast a glow upward. Personal touches like vintage sconces or modern minimalist fixtures can complete the aesthetic.
Vertical shiplap paneling can dramatically alter the perception of your bathroom’s size, making it feel taller and more expansive. It’s a simple yet effective way to add architectural interest without knocking down walls. Once finished, you’ll enjoy a space that feels both grand and cozy. Why not give your bathroom a lofty upgrade today?
4. Reclaimed Wood Shiplap for Sustainable Rustic Charm
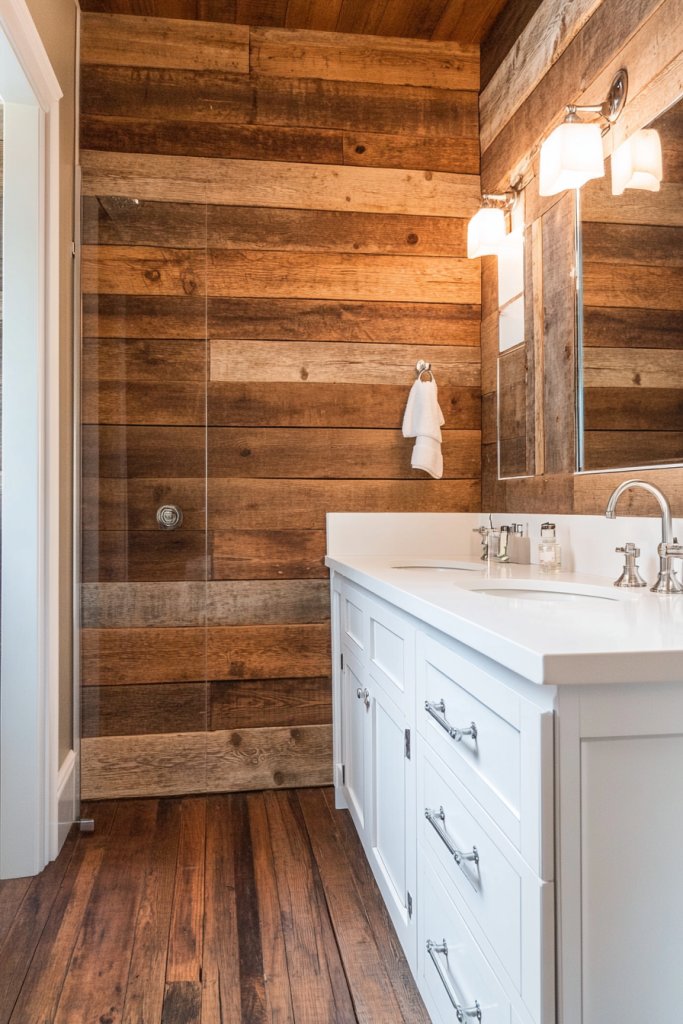
Looking for a way to add authentic rustic charm while being eco-conscious? Reclaimed wood shiplap combines sustainability with stunning aesthetics. It’s perfect for anyone wanting a unique, textured backdrop that tells a story. If your goal is to create a warm, inviting space with a conscience, this idea hits the mark.
Recommended Products to replicate this idea
| # | Preview | Product | |
|---|---|---|---|
| 1 |
|
BARNWOODUSA Real Reclaimed Wood Planks - Easy Nail-Up Shiplap Panels for Rustic Wood Wall Paneling... | Buy on Amazon |
| # | Preview | Product | |
|---|---|---|---|
| 1 |

|
Art3d Premade Board and Batten Paintable Wainscoting Kit, MDF Accent Wall Panel for Kitchen Bedroom... | Buy on Amazon |
Envision aged, weathered planks with a spectrum of natural hues—deep browns, faded grays, and hints of moss green. The rough texture and varied grain patterns add depth and character to the bathroom walls. When installed, the reclaimed wood lends a sense of history and authenticity. Accentuate the look with vintage-inspired fixtures and accessories that echo the rustic, eco-friendly vibe. It’s like giving your bathroom a piece of history.
Choose wood with a range of finishes—some raw and rough, others slightly sanded for comfort. You can stain the reclaimed planks in a uniform color or leave them natural for a more eclectic look. Pair with metal or matte black fixtures for contrast, or incorporate woven baskets and textiles for a cozy feel. This style works well in both small spaces and larger master baths.
Source reclaimed wood from reputable suppliers or salvage yards, ensuring it’s properly treated for moisture. Use a combination of nails and adhesives for secure installation—consider a staggered pattern for visual interest. Seal the wood with a matte, non-glossy finish to protect against humidity without losing its rustic charm. Attach the planks to a solid backing like plywood or drywall, leaving slight gaps for a handcrafted look. Regular maintenance involves cleaning with gentle solutions to preserve the patina.
Add personal touches by installing vintage hooks or shelves made from mismatched reclaimed wood pieces. Incorporate textiles like burlap or linen towels to enhance the rustic feel. Small sculptures or carved accents in wood can serve as focal points. Keep the overall decor simple to let the reclaimed wood shine and tell its story.
Reclaimed wood shiplap offers a sustainable way to craft a unique, textured bathroom backdrop. It’s a statement of eco-conscious living combined with timeless style. With patience and care, you’ll create a space that feels authentic, warm, and full of character. Why not give your bathroom a history-rich makeover?
5. Shiplap Accent Wall Behind the Vanity for Focus
Ever wish your bathroom had a focal point that draws attention and adds personality? An accent wall behind the vanity can do just that—creating a striking visual centerpiece. If your bathroom feels dull or lacks character, this idea instantly elevates the space with rustic charm. It’s a simple upgrade with big impact.
Recommended Products to replicate this idea
| # | Preview | Product | |
|---|---|---|---|
| 1 |
|
Luxdecor Real Wood Wall Planks - White Shiplap Boards 5" Peel and Stick - 10 Pieces, 12.5 Sq Ft | Buy on Amazon |
| # | Preview | Product | |
|---|---|---|---|
| 1 |
|
Pre-Cut Wainscoting Panels Kit, WPC Slats Accent Wall Panel for Home Decor Covers 39 x 79 in, Ready... | Buy on Amazon |
Visualize a beautifully textured shiplap wall painted in a warm, inviting color—think soft beige, muted sage, or deep navy. Positioned directly behind the vanity, it acts as a backdrop that highlights your fixtures and accessories. The textured surface catches the light differently throughout the day, adding depth and interest. Framing the mirror or vanity area with complementary trim enhances the focus, making it a true statement feature.
Choose a color that contrasts or complements your existing palette. For a modern rustic look, pair natural wood tones with matte black fixtures. For a softer aesthetic, use pastel or neutral tones. You can also experiment with different plank widths or finishes—distressed, smooth, or stained—to match your style. This feature works well in both small powder rooms and expansive master bathrooms.
Start by selecting shiplap with a texture or finish that suits your decor—pre-painted or natural wood. Install the planks horizontally, vertically, or diagonally depending on the desired effect. Use a level and spacers to ensure even spacing and alignment. Secure the planks with nails or adhesive, then finish with caulk or trim for a polished look. Seal or paint the surface to protect against moisture. Finally, add your fixtures and accessories to complete the focal point.
Add decorative elements such as vintage-inspired hardware or sculptural wall sconces flanking the mirror. Incorporate textured textiles like a woven rug or plush towels to soften the rustic surface. Customize with a framed mirror or artwork in complementing tones. Personal touches like your favorite scent candles or small decorative objects can enhance the ambiance.
An accent wall behind the vanity is an easy way to create a wow factor that’s both practical and stylish. It highlights your chosen fixtures and adds layers of texture to your bathroom decor. With a little effort, you can turn a simple space into a focal point that reflects your personality. Go ahead—make your bathroom a design masterpiece.
6. Combining White Shiplap with Natural Stone Elements
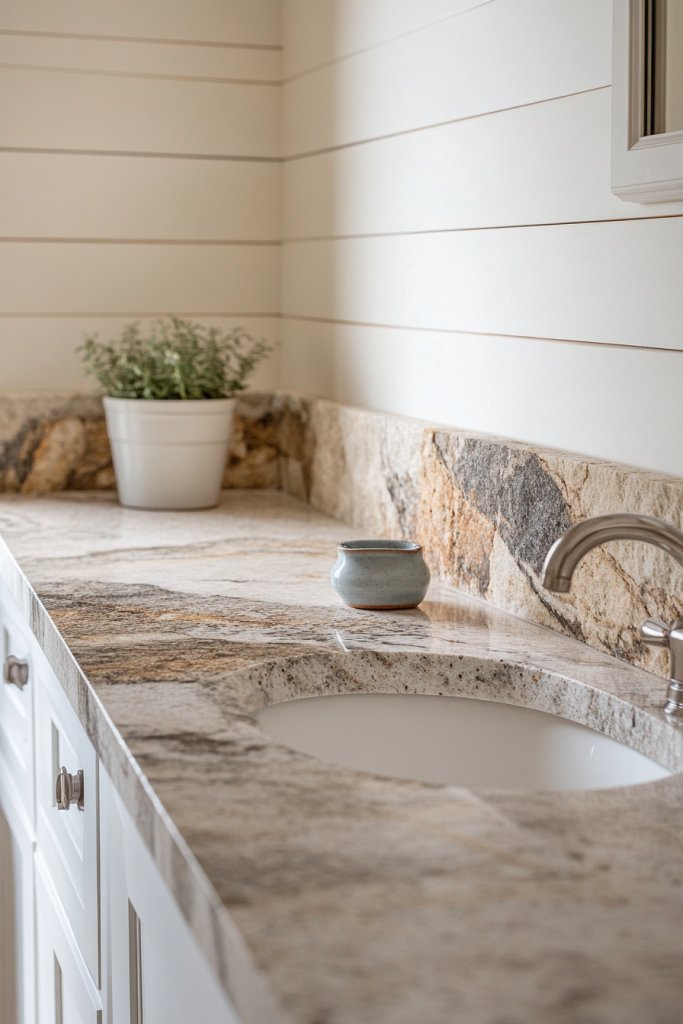
Craving a bathroom that feels both fresh and grounded? Combining white shiplap with natural stone creates a balanced aesthetic that’s bright yet earthy. If your space needs a refresh, this pairing offers a versatile and timeless solution. It’s perfect for those who want rustic charm with a modern twist.
Recommended Products to replicate this idea
| # | Preview | Product | |
|---|---|---|---|
| 1 |
|
Luxdecor Real Wood Wall Planks - White Shiplap Boards 5" Peel and Stick - 10 Pieces, 12.5 Sq Ft | Buy on Amazon |
| # | Preview | Product | |
|---|---|---|---|
| 1 |
![Parrotile Yellowstone Matte Pebbles Mosaic Tile for Shower Floor Bathroom Floor Tiles Non Slip [5 Sheets]](https://m.media-amazon.com/images/I/51nsHTU1ZjL._SL160_.jpg)
|
Parrotile Yellowstone Matte Pebbles Mosaic Tile for Shower Floor Bathroom Floor Tiles Non Slip [5... | Buy on Amazon |
Visualize bright white shiplap walls paired with rugged natural stone floors or accents—perhaps a stone countertop or shower surround. The smooth, clean surface of the shiplap contrasts beautifully with the textured, organic look of stone. This blend creates visual interest and connects indoor comfort with outdoor elements. Soft lighting highlights the textures, making everything feel warm and inviting. It’s like bringing a bit of nature inside.
You can opt for polished or rough-hewn stone depending on your vibe—sleek marble for elegance or tumbled stone for rustic authenticity. Keep the shiplap painted white or in a light neutral to maintain brightness. Incorporate metal accents—brushed nickel or matte black—to add contemporary touches. This combination works well in various styles, from farmhouse to contemporary chic.
Begin with durable, water-resistant white shiplap boards, carefully installing them to ensure a seamless look. For stone, choose slabs or tiles suitable for wet environments, and plan your layout to maximize visual flow. Secure stone elements with appropriate adhesives and sealants to prevent water infiltration. Seal the wood and stone surfaces to protect against humidity and splashes. Finish by installing fixtures that complement both materials, like matte black or brushed nickel.
Introduce textured textiles—think a plush bath mat or woven baskets—to add softness. Use minimal decor, focusing instead on the natural beauty of the materials. Add a wooden or metal-framed mirror to echo the rustic theme. Incorporate subtle color accents through towels or accessories to personalize the space further.
Pairing white shiplap with natural stone creates a versatile, stylish space that’s both calming and sophisticated. It’s a look that can evolve with your taste, from rustic farmhouse to sleek modern. With careful selection of materials and finishes, your bathroom will become a personal oasis blending nature and comfort.
7. Shiplap Ceiling for a Cozy, Barn-Inspired Atmosphere
Ever feel like your bathroom lacks that cozy, inviting vibe? Adding shiplap to the ceiling instantly warms up the space and creates a barn-inspired charm. If your bathroom feels too flat or clinical, this simple upgrade turns it into a rustic retreat. It’s like wrapping your bathroom in a warm blanket.
Recommended Products to replicate this idea
| # | Preview | Product | |
|---|---|---|---|
| 1 |

|
Inter-Wood Weathered Whitewash Shiplap Wall Planks – Real Wood, Distressed Finish, DIY Accent Wall... | Buy on Amazon |
| # | Preview | Product | |
|---|---|---|---|
| 1 |

|
Ekena Millwork 3 1/2"W x 3 1/2"H x 120"L 3-Sided (U-Beam) Salvaged Timber HeritageTimber Faux Wood... | Buy on Amazon |
Imagine a ceiling covered in white or weathered gray shiplap planks, running parallel to the floor. The textured surface adds visual interest and depth, especially when paired with warm lighting fixtures—think wrought iron or vintage-inspired sconces. The wood’s grain and imperfections add authenticity, making the space feel more intimate. When the light hits the surface, it creates a soft glow that enhances the rustic ambiance.
Choose a finish that suits your style—painted white for a bright, airy feel, or stained in darker tones for more drama. In larger bathrooms, extend the shiplap across the entire ceiling for maximum impact. Smaller spaces benefit from just a partial application or painted faux shiplap for the look without the weight. Pair with exposed beams or vintage light fixtures for extra charm.
Start by measuring your ceiling height and selecting planks that fit the space. Attach a ledger board along the perimeter to keep the planks level. Secure each plank with nails or screws, ensuring tight fit and minimal gaps. For painted finishes, prime and paint the planks before installation. Seal the wood with a matte or satin finish for moisture resistance. Finish with decorative trim where the ceiling meets the walls for a polished look.
Add small decorative touches like vintage lantern sconces or wrought iron hooks to reinforce the barn vibe. Incorporate textured textiles—such as a woven shower curtain or plush towels—to add contrast. Use warm-colored lighting to enhance the cozy atmosphere. Personal accents like antique scales or rustic soap dishes can complete the look.
A shiplap ceiling is a surprisingly simple way to add warmth and character to your bathroom. It transforms a plain room into a rustic haven that feels both charming and inviting. With minimal effort, you’ll enjoy a space that exudes comfort and timeless style.
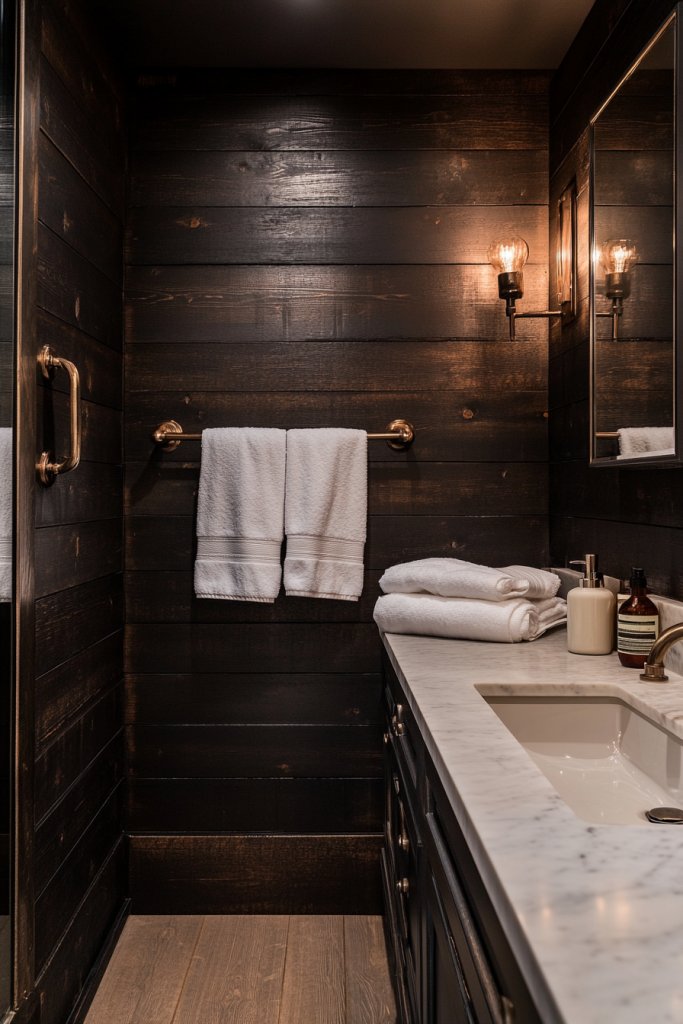
8. Painted Black Shiplap for a Bold, Modern Rustic Contrast
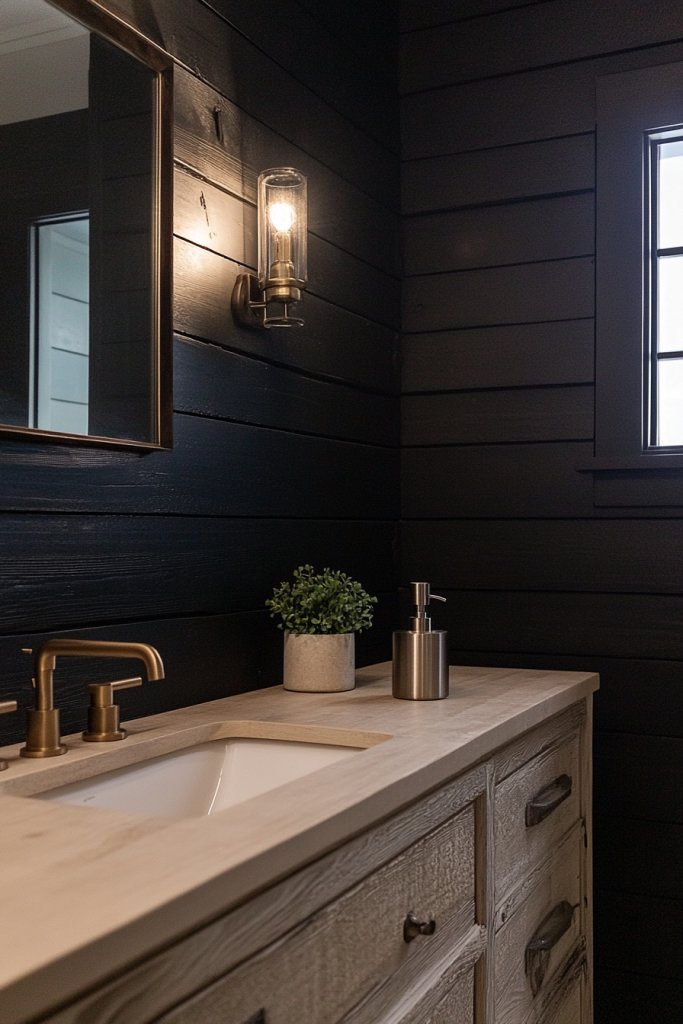
Thinking of making a bold statement in your bathroom? Black shiplap offers a striking contrast that combines rustic texture with modern sophistication. If your current decor feels flat or predictable, this dramatic color can turn your space into a stylish focal point. It’s perfect for those who love a little edge with their rustic charm.
Recommended Products to replicate this idea
| # | Preview | Product | |
|---|---|---|---|
| 1 |

|
Edge 1 in. x 6 in. x 6 ft. Timeless Smooth Nickel Gap Shiplap (Midnight Black) (6-Pack) | Buy on Amazon |
| # | Preview | Product | |
|---|---|---|---|
| 1 |

|
Rust-Oleum Black Abyss Chalked All-in-One Ultra Matte Paint | One Coat Coverage | No Primer,... | Buy on Amazon |
Imagine sleek black shiplap walls with a matte finish, creating a bold backdrop for metallic fixtures and accessories. The textured surface adds depth, catching light and shadow throughout the day. Pair with matte black or brushed nickel hardware to tie the look together. The contrast between the dark wall and light-colored fixtures makes everything pop, giving your bathroom a contemporary rustic vibe.
You can choose between painted planks or stained wood finished in black for a more natural look. Brighten the space with light-colored towels, mats, and accessories to prevent the room from feeling too dark. Incorporate natural textures like woven baskets or linen curtains for softness. This style works well in small bathrooms, where the dark walls add depth and intimacy.
Select high-quality shiplap with a smooth matte black finish or paint the planks yourself using durable, moisture-resistant paint. Install horizontally or vertically depending on your aesthetic preference. Use a level and spacers for even installation, and secure each plank with screws or nails suitable for moisture-prone areas. Seal the surface with an appropriate matte topcoat to protect the finish. Finish with fixtures and hardware in matching or contrasting metallic tones.
Add warmth with textured textiles like a plush white or neutral bath mat. Incorporate metallic accents—think gold or brass—to add a touch of luxury. Keep decor minimal to let the bold walls shine. Small sculptural objects or candles in metallic holders can add personal style without clutter.
Painted black shiplap transforms your bathroom into a sleek, modern rustic space full of dramatic flair. It’s a daring choice that pays off in style and personality. With a few finishing touches, your bathroom will feel both contemporary and cozy—proof that bold can be beautiful.
9. Mixed-Width Shiplap for Visual Interest and Texture
Bored with uniform, monotonous walls? Mixed-width shiplap adds a handcrafted, artistic touch that immediately captures attention. If you’re craving a space full of texture and visual intrigue, this approach offers a fresh twist on classic rustic decor. It’s perfect for those who want their bathroom to stand out.
Recommended Products to replicate this idea
| # | Preview | Product | |
|---|---|---|---|
| 1 |
|
STICKEEP Grey Wood Wall Panels Textured Wood Slats 3D Soundproof Wall Panels Peel and Stick Shiplap... | Buy on Amazon |
| # | Preview | Product | |
|---|---|---|---|
| 1 |
|
Art3d Premade Board and Batten Paintable Wainscoting Kit, MDF Accent Wall Panel for Kitchen Bedroom... | Buy on Amazon |
Picture planks of varying widths—some wide, some narrow—arranged in a seemingly random pattern. The different textures and grain directions create a lively, dynamic surface. When painted or stained, this variation becomes a canvas of subtle contrasts, adding depth and richness. The uneven edges and natural imperfections evoke a sense of craftsmanship and authenticity.
Choose a color palette that enhances the variation—neutral tones or subtle washes work well. For a more contemporary aesthetic, stick to clean, monochrome finishes. In traditional settings, leave wood natural or lightly stained to highlight the craftsmanship. This style pairs seamlessly with rustic fixtures or modern minimalism, depending on your overall vibe.
Select planks of different widths, ensuring they’re treated for moisture if needed. Install with a combination of nails and adhesive, staggering the boards to create a natural, handcrafted look. Sand down rough edges to smooth the surface, or leave them raw for added texture. Seal the wood to prevent water damage, and paint or stain in your chosen hue. Finish with trim or molding to tidy up the edges if desired.
Incorporate decorative elements like vintage hardware or textured textiles to complement the diverse surface. Use contrasting or complementary colors in towels and accessories to make the variation pop. Display small, crafted decor pieces or artwork that echo the handcrafted aesthetic. Personal touches make the space uniquely yours.
Mixed-width shiplap offers a handcrafted, artistic charm that elevates any bathroom. It’s a subtle way to add visual interest and showcase your style. Once installed, you’ll enjoy a space that feels rich, layered, and thoughtfully designed—proof that variety can be beautiful.
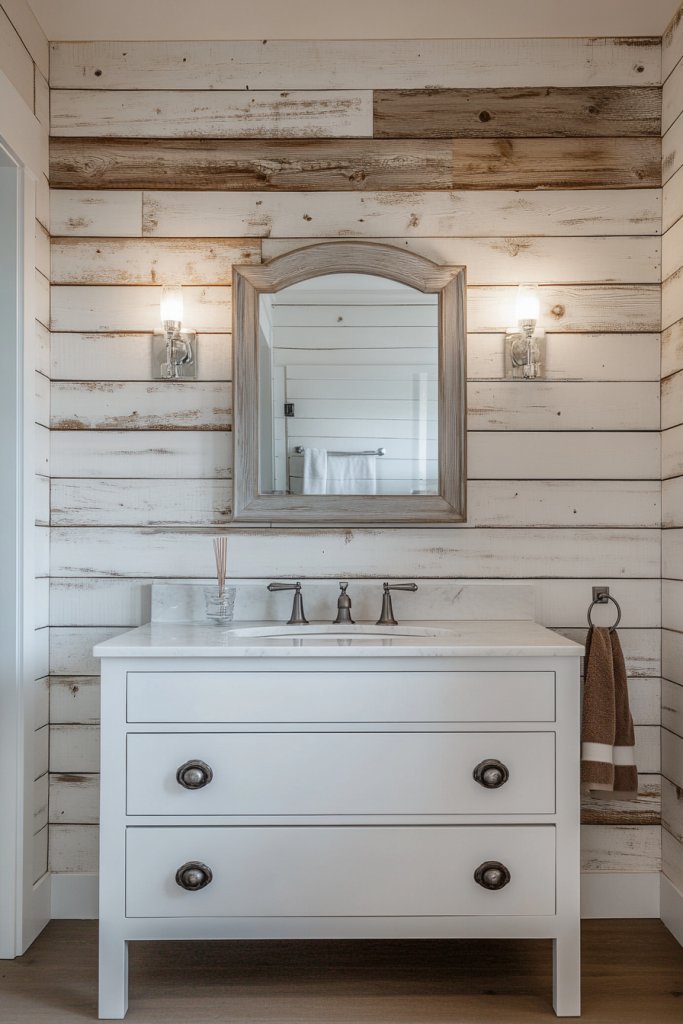
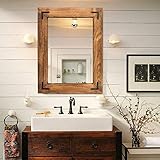
10. Shiplap Framed Mirror for a Rustic Vanity Statement
Want to upgrade your bathroom’s focal point without a full remodel? Framing your mirror with shiplap creates a charming, rustic vanity statement. If your current mirror feels plain or disconnected from the decor, this small detail can make a big difference. It’s a simple DIY project that packs a punch.
Recommended Products to replicate this idea
| # | Preview | Product | |
|---|---|---|---|
| 1 |
|
Luxdecor Real Wood Wall Planks - White Shiplap Boards 5" Peel and Stick - 10 Pieces, 12.5 Sq Ft | Buy on Amazon |
| # | Preview | Product | |
|---|---|---|---|
| 1 |
|
YOSHOOT Rustic Wooden Framed Wall Mirror, Natural Wood Bathroom Vanity Mirror for Farmhouse Decor,... | Buy on Amazon |
Visualize a large mirror surrounded by a border of white or weathered gray shiplap. The textured frame adds depth and character, making the mirror a true centerpiece. The rustic finish contrasts beautifully with modern fixtures or vintage-inspired hardware. When layered with warm lighting, the framed mirror becomes a focal point that draws the eye and adds personality.
Opt for a wide or narrow frame depending on your style—wider for traditional, narrow for minimalist. Stain or paint the shiplap in colors that complement your overall decor, from soft neutrals to bold hues. You can also add decorative trim or molding for an even more crafted look. This technique works well in small or large bathrooms, adding charm and character.
Measure your mirror and cut shiplap boards accordingly, ensuring they fit snugly around the perimeter. Attach the planks with nails or strong adhesive, making sure they are flush and level. Finish with caulk or trim for clean edges. Seal the wood to withstand moisture, especially in humid environments. Mount the finished frame around your existing mirror, ensuring stability and safety.
Add small decorative elements like vintage hardware or painted details on the shiplap for extra charm. Incorporate textured textiles nearby, such as a woven basket or plush towels, to soften the rustic look. Personal touches like a small shelf or lantern-style sconces can complete the setup. Play with contrasting colors or finishes to match your aesthetic.
A shiplap-framed mirror instantly elevates your vanity into a rustic focal point. It’s a straightforward upgrade that offers a big style payoff. With a little effort, you can craft a bathroom space that feels both cozy and curated—proof that small details make a big impact.
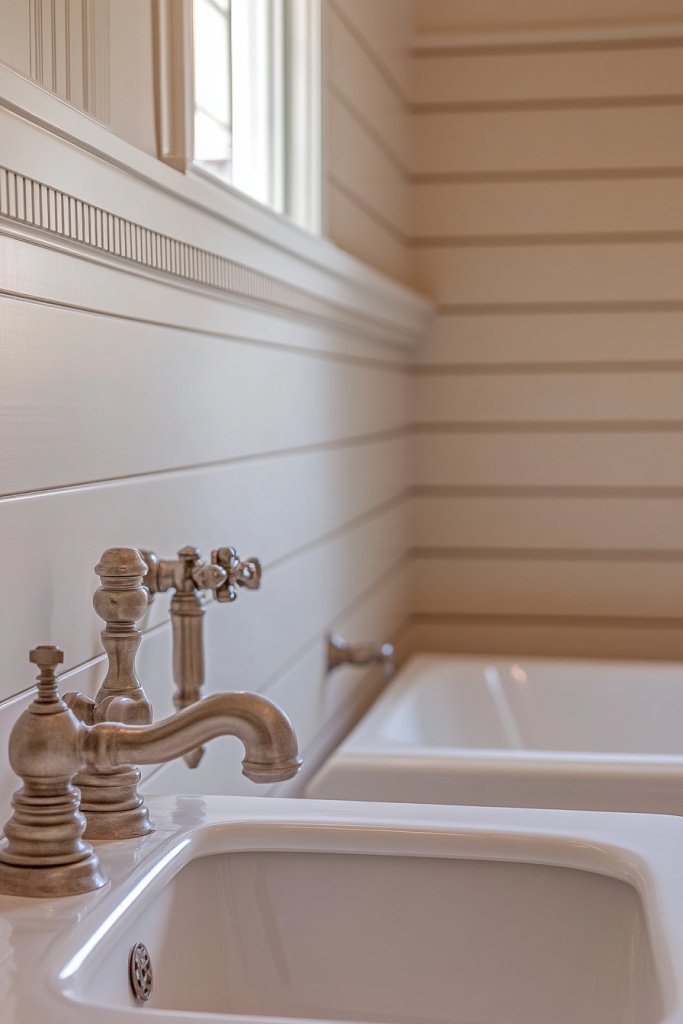
11. Shiplap Wainscoting Paired with Vintage Fixtures
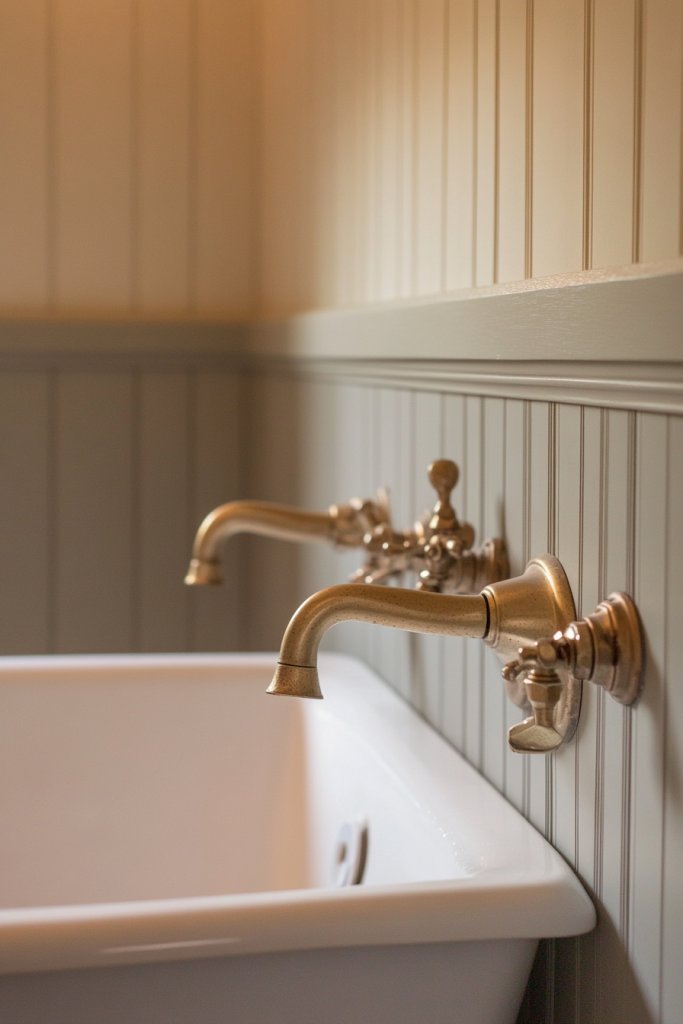
Looking to add classic charm and protect your walls? Shiplap wainscoting provides both functional wall protection and a rustic aesthetic. If your bathroom walls are prone to splashes or scratches, this idea offers a double win. Pair it with vintage fixtures, and you have a timeless, stylish space.
Recommended Products to replicate this idea
| # | Preview | Product | |
|---|---|---|---|
| 1 |
|
Art3d Premade Board and Batten Paintable Wainscoting Kit, MDF Accent Wall Panel for Kitchen Bedroom... | Buy on Amazon |
| # | Preview | Product | |
|---|---|---|---|
| 1 |

|
gotonovo Bathroom Faucet 3 Hole 8 Inch Widespread Bathroom Sink Faucet 2 Cross Handles Vintage... | Buy on Amazon |
Envision a lower wall section covered in horizontal shiplap, stained or painted in a warm hue. The upper wall remains a smooth, neutral surface, creating a balanced contrast. Vintage-inspired fixtures—like antique brass taps or clawfoot-style hardware—complement the rustic wood. The overall effect is a cozy, nostalgic atmosphere with practical benefits. The textured surface adds tactile interest and durability.
Choose between painted or stained shiplap depending on your decor. For a more refined look, opt for natural wood tones; for a bold statement, go dark or painted in contrasting colors. Pair with vintage brass or bronze fixtures to complete the look. Use decorative trim or beadboard accents to add layers of detail. This style adapts well to both small powder rooms and larger master baths.
Begin by measuring wall height and selecting durable, moisture-resistant shiplap planks. Attach the planks securely with nails or screws, using level guides for accuracy. Seal the wood with an appropriate finish to withstand humidity. Install vintage fixtures that match the rustic vibe—consider antique or reproduction pieces. Finish with caulk or molding at the edges for a seamless, polished appearance. Regular maintenance involves gentle cleaning and re-sealing as needed.
Add decorative touches like vintage soap dishes or textured towels in coordinating colors. Incorporate small antique accents or decorative hardware to reinforce the vintage feel. Use woven baskets or open shelves above the wainscoting for extra storage. Personalize with items that reflect your style—perhaps a small antique clock or a rustic ceramic container.
Shiplap wainscoting paired with vintage fixtures creates a charming, durable bathroom look rooted in tradition. It’s a practical upgrade that adds character and protects your walls. Once finished, you’ll enjoy a space that feels both nostalgic and stylish—proof that rustic details endure.
12. Pebble Tile Floor Complementing Shiplap Walls
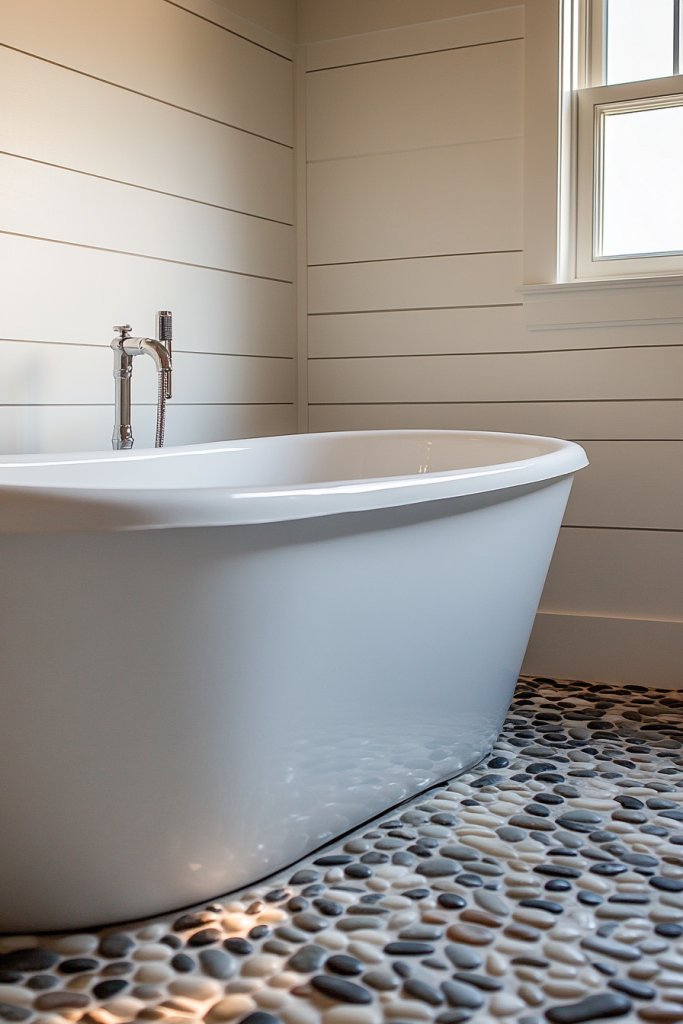
Craving a spa-like bathroom that feels connected to nature? Pebble tile floors combined with shiplap walls create a serene, tactile environment. If your current space lacks visual or textural interest, this pairing can instantly elevate the ambiance. It’s perfect for anyone wanting a calming retreat at home.
Recommended Products to replicate this idea
| # | Preview | Product | |
|---|---|---|---|
| 1 |

|
Soulscrafts Pebble Tile for Shower Floor, Natural Stone Mosaic Backsplash Tiles for Kitchen... | Buy on Amazon |
| # | Preview | Product | |
|---|---|---|---|
| 1 |
|
PVC Wall Panels - 3 Foot Accent Wall Panels Reversible for Interior Wall Decor, Easy to Install... | Buy on Amazon |
Picture a floor covered in textured pebble tiles—smooth, rounded stones in neutral earth tones. The walls feature crisp white or weathered gray shiplap, adding contrast and warmth. The combination invites you to touch and feel, creating a sensory experience. Soft lighting enhances the natural textures, making the space feel like a luxurious, outdoor-inspired sanctuary. It’s a perfect blend of rustic and refined.
Choose pebble tiles in natural shades—beige, gray, or taupe—for a subtle look or go bold with darker stones. For the walls, stick with classic white or weathered gray shiplap to keep the focus on the floor. Incorporate natural fiber textiles, like jute rugs or linen towels, to complement the earthy vibe. This style suits both small powder rooms and large spa baths.
Install pebble tiles using a flexible, waterproof adhesive suitable for textured surfaces. Use a grout color that matches or contrasts subtly with the stones—white for a clean look or darker for definition. Seal the entire surface with a penetrating grout and sealant to protect against water and stains. The shiplap walls should be sealed and painted or stained before installation. Finish with moisture-resistant fixtures and accessories aligned with the natural theme.
Layer in textured textiles—think a woven bath mat or linen towels—to reinforce the spa-like feel. Incorporate small natural decor items, such as driftwood or woven baskets, to enhance the organic aesthetic. Use candles or diffusers with natural scents to complete the calming environment. Keep the decor minimal to let the textures speak.
Pebble tile floors paired with shiplap walls craft a bathroom that feels like a retreat—calm, tactile, and beautiful. It’s a look that emphasizes natural beauty and serenity. With simple, thoughtful details, you can create a space that’s both stylish and restful—proof that nature-inspired design works anywhere.
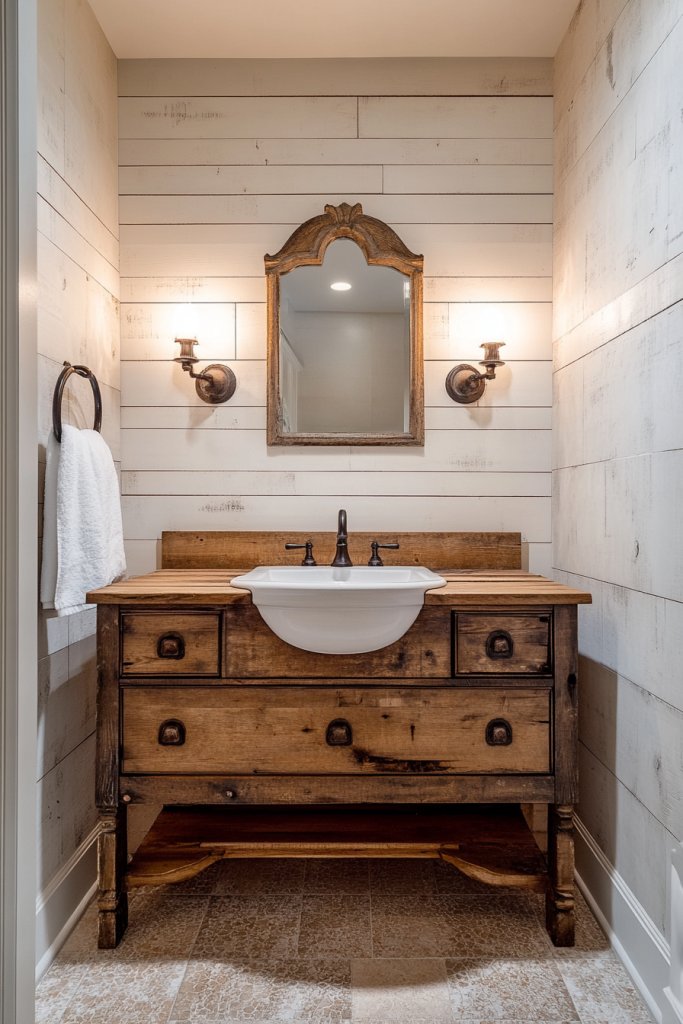
13. DIY Painted Shiplap with Soft Pastel Tones
Want a fresh, personalized look for your bathroom without breaking the bank? Painting shiplap in soft pastel tones offers an affordable way to brighten and soften rustic textures. If your space feels dull or outdated, this DIY project can rejuvenate it with minimal effort and cost. Plus, it’s a fun way to add your personal touch.
Recommended Products to replicate this idea
| # | Preview | Product | |
|---|---|---|---|
| 1 |
|
Luxdecor Real Wood Wall Planks - White Shiplap Boards 5" Peel and Stick - 10 Pieces, 12.5 Sq Ft | Buy on Amazon |
| # | Preview | Product | |
|---|---|---|---|
| 1 |

|
PRESTIGE Paints Interior Paint and Primer In One, 1-Gallon, Eggshell, Comparable Match of Benjamin... | Buy on Amazon |
Imagine shiplap planks painted in gentle shades like blush pink, mint green, or pale blue. The pastel hues create a calming backdrop that pairs beautifully with white fixtures and textiles. The textured planks catch the light subtly, adding depth without overwhelming the space. Soft, diffused lighting enhances the delicate color palette, resulting in a serene, inviting atmosphere. It’s like stepping into a calming coastal cottage.
Mix and match pastel shades for a playful, eclectic look or stick to one tone for a more cohesive feel. Incorporate white or neutral-colored fixtures and accessories to keep the focus on the color. Seasonal updates could include swapping out textiles or accessories in complementary shades. This approach works well in small bathrooms, where light colors make the space feel larger and brighter.
Start by sanding the shiplap for a smooth surface and applying a primer suitable for wood. Use high-quality, water-based paint in your chosen pastel shades, applying multiple thin coats for an even finish. Use painter’s tape to create clean edges and protect adjoining surfaces. Seal the painted surface with a clear matte or satin topcoat to enhance durability. Install the planks, ensuring they are level and attached securely. Finish with hardware and fixtures in neutral finishes.
Add decorative textiles—like a fluffy bath mat or soft towels—in coordinating pastel shades. Incorporate subtle metallic accents—like brushed nickel or gold—to add a touch of elegance. Personalize with small DIY art pieces or painted motifs on the walls or accessories. Keep the decor light and airy to match the painted shiplap’s cheerful vibe.
DIY painted shiplap in pastel tones is a cost-effective way to create a personalized, cheerful bathroom. It’s easy to customize and update as your tastes evolve. Once done, you’ll enjoy a space that feels fresh, bright, and uniquely yours—proof that a little paint can go a long way.
14. Shiplap with Open Shelving for Practical Storage

Struggling with clutter and lack of storage in your bathroom? Combining shiplap walls with open shelving offers both style and function. If your space feels cramped or disorganized, this idea provides easy access to essentials while adding rustic charm. It’s a win-win for practical beauty.
Recommended Products to replicate this idea
| # | Preview | Product | |
|---|---|---|---|
| 1 |
|
Luxdecor Real Wood Wall Planks - White Shiplap Boards 5" Peel and Stick - 10 Pieces, 12.5 Sq Ft | Buy on Amazon |
| # | Preview | Product | |
|---|---|---|---|
| 1 |

|
QEEIG Floating Shelves for Wall Bathroom Shelf Bedroom Kitchen Living Room Hanging Book Shelves... | Buy on Amazon |
Picture a shiplap wall painted in a soft neutral tone, with open wooden shelves mounted above or alongside the vanity. The shelves, made from matching or contrasting wood, hold neatly folded towels, jars, or decorative baskets. The textured surface of the shiplap combined with the open storage creates a warm, inviting look. The arrangement feels effortless yet curated, turning everyday items into decor.
Use floating shelves in natural wood, painted finishes, or stained wood for variety. For a balanced look, stagger the shelves at different heights or widths. Incorporate decorative storage boxes or baskets to hide less attractive items. This system adapts easily to small bathrooms by maximizing vertical space and can be styled seasonally or for daily use.
Measure wall space carefully and select sturdy brackets or floating shelf hardware. Secure the shelves with anchors suitable for drywall or studs, ensuring they can hold weight. Finish the edges with paint or stain for a cohesive look. Decorate with functional items—like soap dishes, toothbrush holders, or rolled towels—organized in baskets or jars. Regularly clean and reorganize for a fresh, tidy appearance.
Personalize by adding decorative labels or tags on baskets. Incorporate small accents like vintage jars or textured textiles on the shelves. Use lighting, such as LED strip lights underneath the shelves, to highlight the display. Keep the overall aesthetic consistent with your decor theme—be it rustic, modern, or eclectic.
Open shelving combined with shiplap walls offers a practical way to keep your bathroom organized and charming. It’s a customizable solution that emphasizes accessibility and style. With a little planning, your space will look both functional and inviting—proof that smart storage can be beautiful.
15. Incorporating Vintage Lantern-Style Lighting with Shiplap
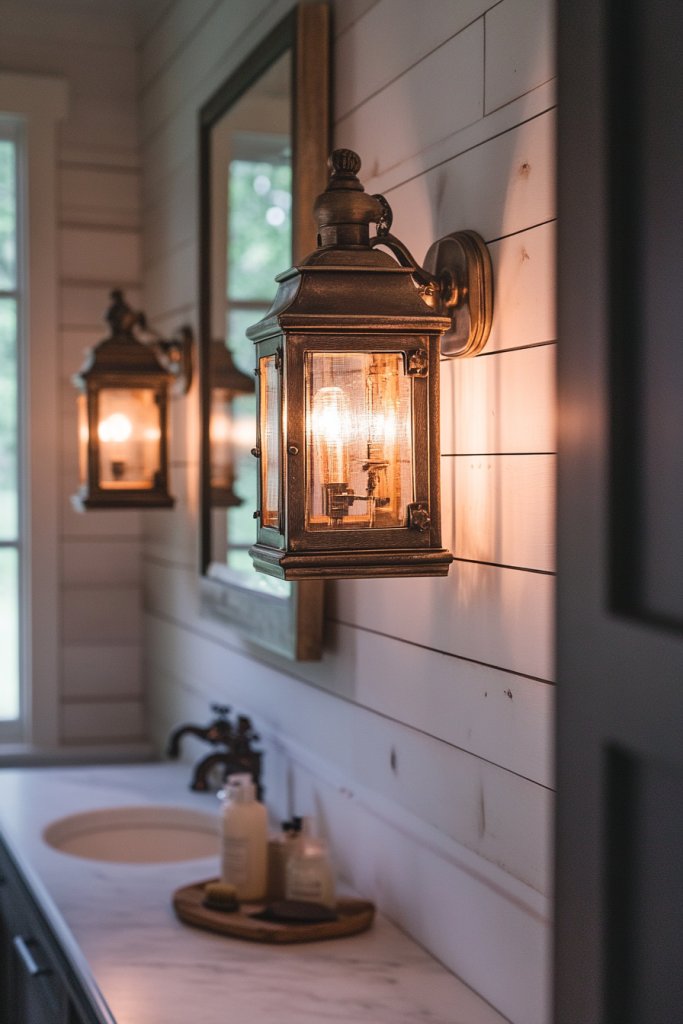
Want to add warm, inviting lighting that complements rustic decor? Vintage lantern-style fixtures paired with shiplap walls create an ambiance full of charm and character. If your bathroom needs a cozy glow, this idea blends function with style effortlessly. It’s a small change that makes a big impact.
Recommended Products to replicate this idea
| # | Preview | Product | |
|---|---|---|---|
| 1 |

|
NOXARTE Rustic Wall Sconce Lighting Lantern Mounted Light with Glass Lampshade for Hallway Farmhouse... | Buy on Amazon |
| # | Preview | Product | |
|---|---|---|---|
| 1 |
|
Luxdecor Real Wood Wall Planks - White Shiplap Boards 5" Peel and Stick - 10 Pieces, 12.5 Sq Ft | Buy on Amazon |
Imagine warm, amber-hued lantern sconces mounted on a shiplap wall, casting a soft, flickering glow. The textured wood reflects the light beautifully, creating shadows and depth. The vintage design adds an antique touch, reminiscent of rustic cottages or barnhouses. The overall effect is warm, inviting, and full of nostalgic appeal. It’s like lighting a fire without the smoke.
Choose fixtures in black, bronze, or distressed metal finishes to match your decor. For a more modern rustic look, opt for minimalist lanterns with clean lines. You can also incorporate hanging lantern pendants in the shower or above the vanity for added drama. Dimmer switches allow you to adjust lighting intensity for different moods. This style suits both small powder rooms and large master baths.
Securely mount vintage lantern fixtures on shiplap walls using appropriate anchors and screws. Ensure the electrical connections meet safety standards—consider hiring an electrician if unsure. Use warm-colored bulbs—LED or incandescent—for a cozy glow. Seal the fixtures against moisture and humidity. Position the lighting strategically around the vanity or bath area for maximum effect.
Add decorative accents like vintage-style switch plates or small metal hooks nearby. Incorporate textured textiles—such as burlap or linen towels—in warm hues. Personalize the space with small vintage accessories or antique jars on shelves. The goal is a harmonious blend of rustic charm and functional lighting.
Vintage lantern lighting with shiplap walls creates a warm, nostalgic atmosphere that elevates your bathroom’s style. It’s a simple upgrade that transforms ambiance and mood. Once installed, you’ll love the cozy glow that makes every bath or shower feel special—proof that good lighting is timeless.
16. Shiplap Paneling with Decorative Beadboard Trim
Looking to add a layer of elegance and texture to your bathroom walls? Combining shiplap paneling with decorative beadboard trim creates a sophisticated, layered look. If your space feels flat or lacks architectural detail, this approach adds depth and charm. It’s a subtle upgrade with a polished result.
Recommended Products to replicate this idea
| # | Preview | Product | |
|---|---|---|---|
| 1 |
|
PVC Wall Panels - 3 Foot Accent Wall Panels Reversible for Interior Wall Decor, Easy to Install... | Buy on Amazon |
| # | Preview | Product | |
|---|---|---|---|
| 1 |

|
Yefanxi 4-in White EVA molding Peel and Stick Panel, 3D Flexible Fluted self Adhesive Panels molding... | Buy on Amazon |
Visualize a wall where horizontal shiplap panels are framed with intricate beadboard trim. The trim acts as a border, accentuating the textured surface and creating a framed effect. The combination of textures—smooth, grooved, and detailed—adds visual richness. Soft lighting highlights the layered detail, making the space feel refined yet rustic. It’s like giving your bathroom a classic, crafted finish.
Choose beadboard trim in the same finish as your shiplap or in a contrasting color for a more dramatic look. For a traditional style, stain or paint both in similar tones; for a modern twist, mix neutrals with bold accents. The trim can be applied around the entire room or just as a decorative border. This technique suits both small powder rooms and larger master baths.
Install shiplap panels securely, ensuring they’re level and evenly spaced. Cut beadboard trim to size and attach with finishing nails or adhesive. Seal the wood surfaces with a moisture-resistant finish—paint or stain—to protect against humidity. Use a miter saw for precise cuts on the trim, and caulk gaps for a seamless appearance. Finish by painting or staining all elements in your chosen color palette.
Personalize with decorative corner brackets or small carved accents on the trim. Incorporate textured textiles, such as a plush rug or towels, to soften the look. Small vintage hardware or antique-inspired fixtures can enhance the layered detail. Keep the decor minimal to focus attention on the architectural features.
Shiplap with decorative beadboard trim adds elegance and depth, elevating your bathroom from basic to beautifully crafted. It’s a timeless detail that works in many decor styles. With a bit of craftsmanship, you’ll enjoy a space that feels both classic and personalized—proof that details matter.
17. Narrow Plank Shiplap in Dark Stain for Sophisticated Rustic
Thinking of a rustic look with a touch of sophistication? Narrow plank shiplap stained in a dark hue offers just that—bringing depth and elegance to your bathroom. If lighter woods feel too casual, this approach adds a refined, mature vibe. It’s ideal for creating a cozy yet upscale rustic retreat.
Recommended Products to replicate this idea
| # | Preview | Product | |
|---|---|---|---|
| 1 |

|
Brosisincorp Peel & Stick Wood Wall Panels - Real Paulownia Wood Shiplap Boards for Accent Walls,... | Buy on Amazon |
| # | Preview | Product | |
|---|---|---|---|
| 1 |
|
Art3d Premade Board and Batten Paintable Wainscoting Kit, MDF Accent Wall Panel for Kitchen Bedroom... | Buy on Amazon |
Imagine thin, dark-stained shiplap planks running horizontally across your walls, their fine grain and rich color adding depth. The dark stain contrasts beautifully with white fixtures or lighter textiles, creating a dramatic effect. When lit with warm ambient lighting, the textured surface appears velvety and inviting. The narrow planks give a sleek, tailored look, balancing rustic texture with modern elegance.
Choose a stain that enhances the natural grain—dark walnut or espresso for a luxurious feel. Pair with matte black or oil-rubbed bronze fixtures for a cohesive look. For a softer aesthetic, mix the dark shiplap with lighter accessories or textiles. This style works well in both small and large bathrooms, especially those with high ceilings or open layouts.
Select narrow, moisture-resistant shiplap boards stained in your preferred dark hue. Install horizontally using a level and appropriate fasteners, ensuring tight, even gaps. Seal the surface with a matte or satin topcoat to protect against humidity. Use trim to finish edges and corners for a polished appearance. Attach fixtures that complement the dark wood—think matte black or antique brass—and enjoy the sophisticated rustic vibe.
Add contrasting textiles—white or light-colored towels—to brighten the space. Incorporate metallic accents in fixtures or decor to enhance the luxurious feel. Keep the overall decor minimal to let the dark shiplap shine. Small decorative objects, like vintage jars or sculptural elements, can add interest without clutter.
Dark-stained narrow plank shiplap elevates rustic charm into a sophisticated, elegant space. It’s a bold choice that pays off with a timeless, refined look. With careful finishing, your bathroom will feel both cozy and upscale—proof that dark can be beautiful.
18. Shiplap with Built-In Storage Nooks
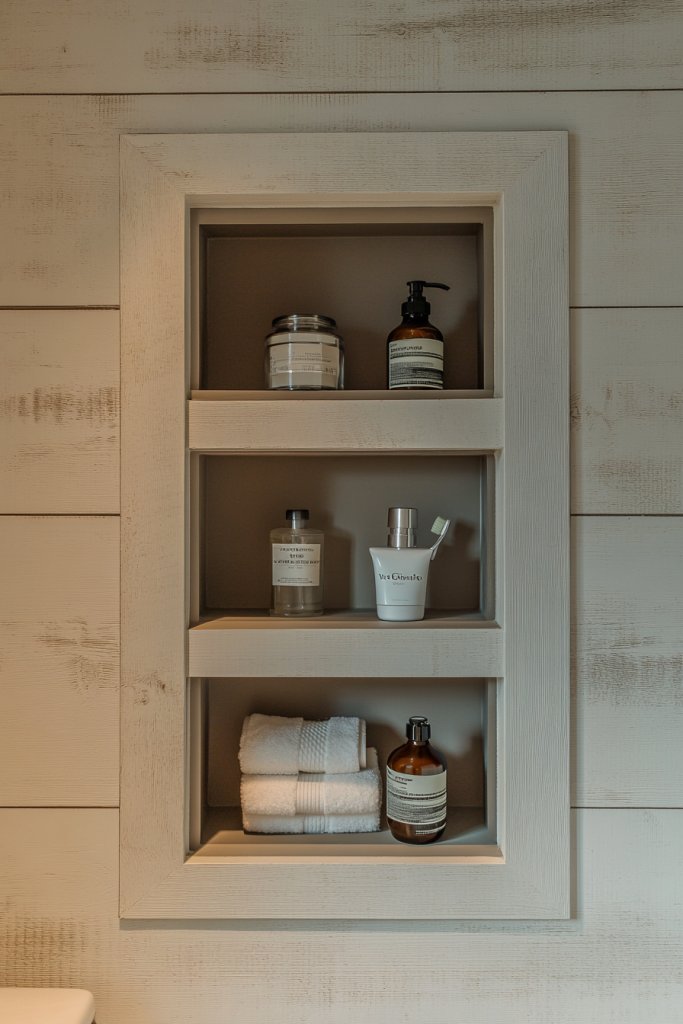
Struggling with clutter and lack of storage? Incorporating built-in niches within shiplap walls solves both problems stylishly. If your bathroom needs functional storage that doesn’t compromise design, this idea combines practicality with rustic appeal. It’s a clever way to maximize space and add architectural interest.
Recommended Products to replicate this idea
| # | Preview | Product | |
|---|---|---|---|
| 1 |
|
Art3d Premade Board and Batten Paintable Wainscoting Kit, MDF Accent Wall Panel for Kitchen Bedroom... | Buy on Amazon |
| # | Preview | Product | |
|---|---|---|---|
| 1 |

|
CHOEZON Recessed Wall Niche, 2-Tier Recessed Medicine Cabinet, Bathroom Cabinet Wall Mount, Bamboo... | Buy on Amazon |
Visualize a wall where sections of shiplap are recessed to form small storage nooks or shelves. These niches are framed with matching shiplap or decorative trim, creating a seamless look. They’re perfect for holding toiletries, candles, or decorative objects—placing essentials within easy reach. The textured surface surrounding the niches adds depth, making the space feel layered and intentional.
Design the niches at different heights or sizes depending on your needs. Stain or paint the framing in a contrasting color for visual pop or keep it consistent for a streamlined look. Use the shelves for functional storage or decorative displays—think woven baskets or textured containers. This approach works well in both small powder rooms and larger bathrooms.
Create the niches by framing sections of drywall or plywood with shiplap, securing with nails or adhesive. Finish the inside with waterproof paint or tile for easy cleaning. Install the shiplap around the niches, ensuring flush fit and even spacing. Seal all surfaces to prevent water damage, and add fixtures or hooks inside for hanging items. Regularly check and maintain the seals for longevity.
Personalize the niches with decorative baskets, textured towels, or small vintage accessories. Incorporate lighting—like LED strips inside the niches—for added functionality and ambiance. Use textured or patterned textiles nearby to soften the rustic look. Keep the decor simple to highlight the built-in features.
Built-in storage nooks within shiplap walls turn a cluttered bathroom into an organized retreat. They add architectural interest and maximize space. With careful planning, you’ll enjoy a practical, stylish bathroom that feels custom-made—proof that smart storage elevates your decor.
19. Minimalist Shiplap with Hidden Hardware for Clean Lines
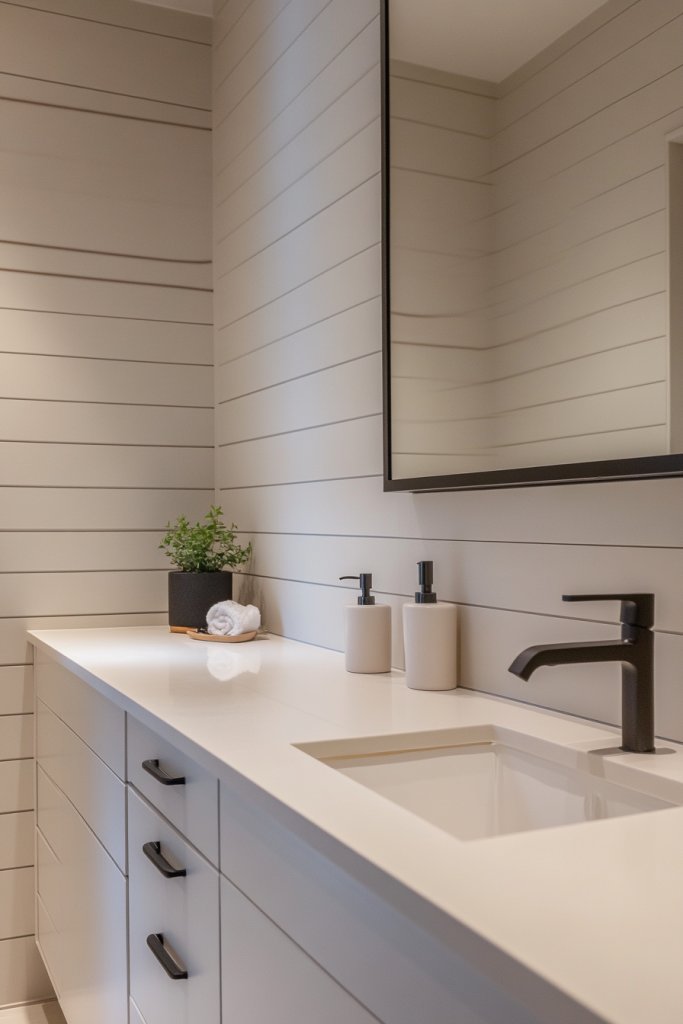
Craving a sleek, clutter-free bathroom that still retains rustic charm? Minimalist shiplap with hidden hardware delivers clean lines and a modern aesthetic. If visible nails and screws distract from your decor, this idea offers a neat, streamlined look. It’s perfect for lovers of rustic minimalism.
Recommended Products to replicate this idea
| # | Preview | Product | |
|---|---|---|---|
| 1 |
|
Interwood Reversible Beadboard Wainscoting Panels - Primed Tongue & Groove, 32” Tall, Solid Knot... | Buy on Amazon |
| # | Preview | Product | |
|---|---|---|---|
| 1 |

|
LifCratms 50Pcs Hidden Fasteners Clips for Deck Fastening, Black Nylon Plastic T Clips with Metal... | Buy on Amazon |
Imagine smooth shiplap panels with no visible nail heads or screws, thanks to concealed fastening systems. The surface appears flawless, emphasizing texture and color rather than hardware. The subtlety allows fixtures and accessories to stand out, creating a harmonious, clutter-free environment. Soft lighting enhances the seamless surface, making the space feel calm and sophisticated.
Choose shiplap with concealed fastening systems or install with adhesive and trim to hide fasteners. Keep the finish simple—paint in neutral tones or stain in natural hues. Pair with minimalist fixtures—think sleek faucets and handleless cabinets—to reinforce the clean aesthetic. This style suits small bathrooms where visual clutter is especially noticeable.
Select shiplap panels designed for hidden fastening—such as clip systems or adhesive-backed boards. Install carefully to ensure flush surfaces, using spacers to maintain even gaps. Finish with paint or stain, then add trim or beadboard to cover any gaps or fasteners. Use fixtures that have integrated handles or are handleless for a seamless look. Regular maintenance involves gentle cleaning to preserve the clean lines.
Personalize with subtle textured textiles—like a soft rug or plush towels—in neutral shades. Incorporate sleek, modern fixtures in matte black or brushed nickel. Keep decor minimal, emphasizing the smooth, clean surfaces. Small sculptural objects or a single statement mirror can add visual interest without clutter.
A minimalist shiplap design with hidden hardware offers a sophisticated, clutter-free space that feels both modern and rustic. It’s a timeless look that emphasizes quality craftsmanship and simplicity. Once finished, your bathroom will radiate calm and elegance—proof that less truly is more.
Conclusion
With a diverse selection of shiplap bathroom ideas, you now have plenty of inspiration to infuse your space with rustic elegance and cozy appeal. From subtle accents to full feature walls, these ideas encourage you to get creative and make your bathroom uniquely yours. Don’t wait—start experimenting with shiplap today and turn your bathroom into a charming retreat that reflects your personal style and love for rustic design!
Last update on 2026-02-15 / Affiliate links / Images from Amazon Product Advertising API