Dreaming of a cozy, character-filled bedroom? Slanted ceiling spaces have become a beloved design challenge, offering a unique blend of charm and creativity. Their distinctive angles can transform a simple room into a stunning retreat, making every inch feel special. Whether you’re working with a tiny attic or a spacious loft, sloped ceilings invite inventive decorating ideas that turn limitations into opportunities for style.
In this article, you’ll discover a wide variety of slanted ceiling bedroom ideas—from clever storage solutions and dreamy color palettes to eye-catching lighting and personalized touches. Get inspired to reimagine your space and make the most of those angled walls with fresh, functional, and beautiful design concepts. No matter your style, there’s something here to help you craft a bedroom that’s truly one-of-a-kind!
1. Cozy Nook with Built-In Shelving Under the Slope
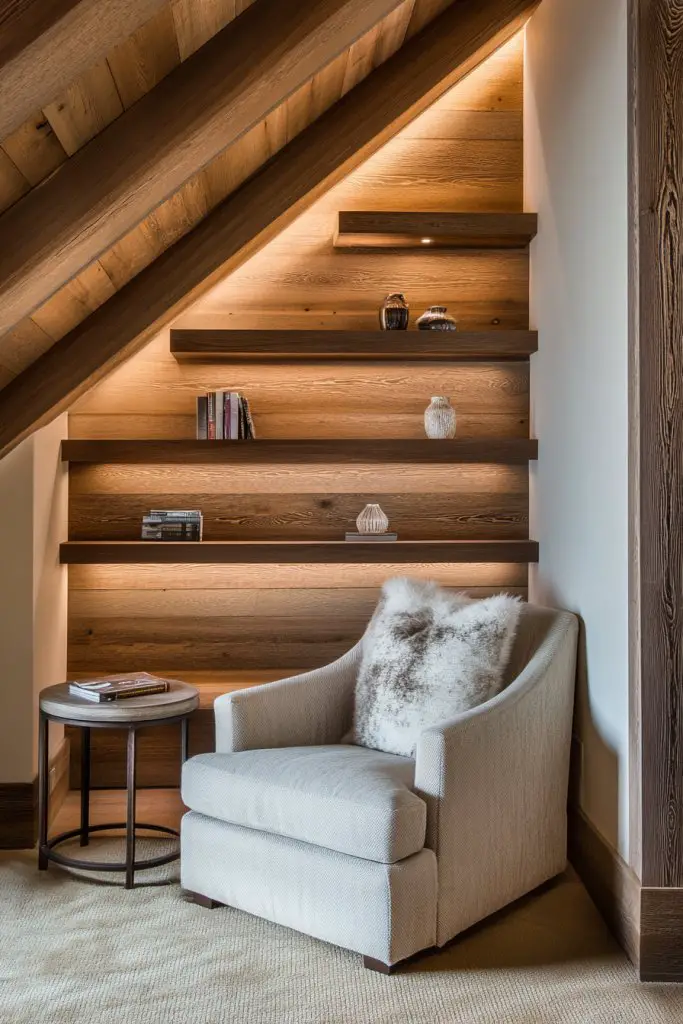
Ever felt like your bedroom lacks a cozy corner that invites you to unwind? With slanted ceilings, finding a snug space can seem impossible, but the solution is right under your nose. Creating a dedicated nook transforms an awkward spot into a personal retreat for reading, relaxing, or daydreaming. It’s all about turning cluttered angles into functional comfort zones.
Imagine a small, inviting corner tucked beneath the slant, lined with custom-built shelves filled with your favorite books, decorative boxes, or keepsakes. Soft lighting from hidden LED strips highlights this cozy space, while a plush armchair or cushion invites you to sit for hours. Warm wood tones or painted finishes add personality, making it feel like a secret sanctuary within your room. It’s a charming, space-efficient feature that adds character.
This idea adapts perfectly to different styles—from rustic with reclaimed wood shelves to sleek modern with floating units. For a more playful vibe, incorporate colorful cushions or patterned wallpaper on the back wall. In small rooms, keep the shelves minimal and functional, while larger spaces can support decorative accents like vintage lamps or framed photos. Seasonal updates, like cozy throws in winter or airy fabrics in summer, keep it fresh.
Start by measuring the space beneath your slant to customize shelves perfectly. Use sturdy, lightweight materials like MDF or plywood, and secure them with anchors into the wall studs for safety. Install floating shelves or built-ins with a simple drill and level; consider adding a small cushion or seat pad for comfort. Organize your collection with baskets or dividers to keep it tidy. Finish with paint, stain, or wallpaper to match your decor style.
Make it uniquely yours with decorative touches like a textured throw blanket, a cozy pouf, or personalized signage. Add a small side table for drinks or snacks, and incorporate a few decorative storage boxes for clutter. You could even hang a few string lights or place a small sculpture to add visual interest. The goal is to create a space that feels inviting and truly reflects your personality.
Transforming an awkward corner into a cozy nook makes your room feel more complete and tailored to your lifestyle. It’s a simple project with big impact, giving you a charming retreat without sacrificing space. Once done, you’ll wonder how you ever lived without this special little hideaway! Ready to turn your slant into a sanctuary? Let’s go!
2. Lofted Bed with Under-Storage Solutions
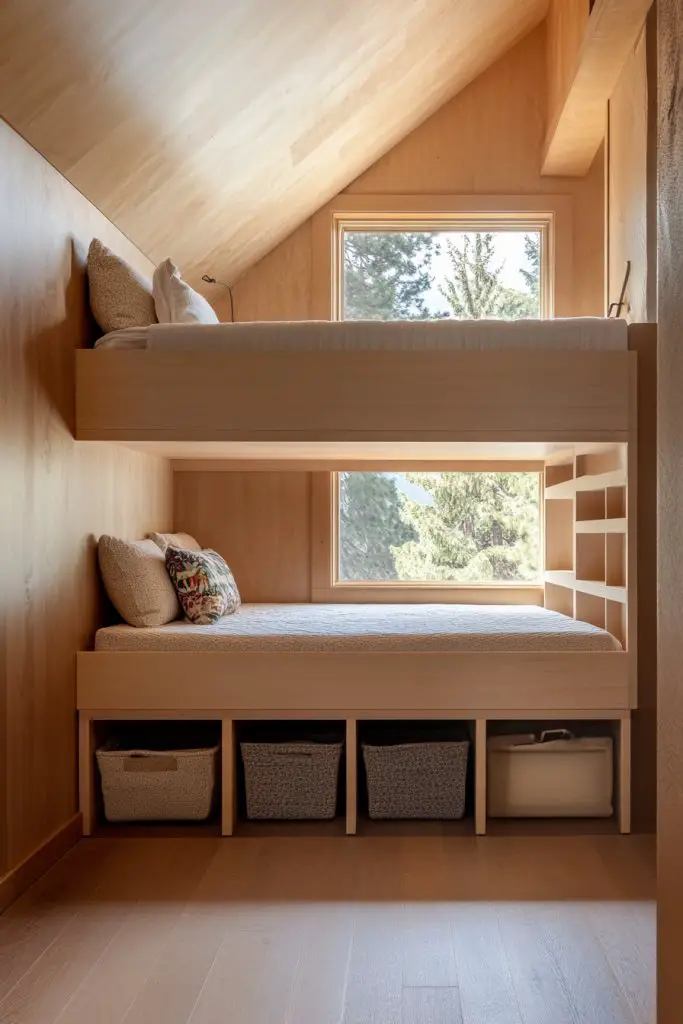
Struggling with limited space and craving a bedroom that feels open yet functional? A lofted bed is your answer—raising your sleeping area to free up valuable real estate below. It’s perfect for small rooms, especially with slanted ceilings where traditional beds just don’t fit. Want a clutter-free, airy space? This idea is your new best friend.
Picture a sleek elevated bed with a sturdy frame perched above a multifunctional zone—think desk, seating, or storage. The space underneath becomes a mini apartment, with open shelving, drawers, or even a small work nook. The elevated structure creates a sense of height, making the room feel larger and less cramped. Soft textiles, like a cozy duvet and layered cushions, add warmth and personality.
You can customize the look with different materials—metal for an industrial vibe or painted wood for a cozy feel. For a minimalist style, keep the underneath area open and airy, with sleek storage units. For a more playful look, incorporate colorful fabrics and decorative cushions. If space allows, add a small reading corner or a compact desk setup underneath for work or hobbies.
Begin by measuring the ceiling height and selecting a sturdy, safety-approved loft bed frame. Ensure the ladder or staircase offers easy access without blocking natural light or airflow. Use modular storage units or open shelves to maximize organization below. Secure the bed frame firmly into the wall or floor to prevent wobbling. Finish with a comfortable mattress and your favorite bedding, then set up the space beneath with functional furniture.
Personalize your loft area with decorative textiles, such as a soft rug underneath or a canopy around the bed for a magical touch. Add string lights or clip-on lamps on the frame to create ambient lighting. Use colorful storage bins or baskets to keep clutter out of sight. You could even hang personal photos or artwork on the walls to make the space truly yours.
A lofted bed not only saves space but also elevates your room’s style quotient. It’s a fun, practical solution that turns a challenging space into a haven of creativity and efficiency. Once set up, you’ll enjoy a room that feels bigger, brighter, and uniquely yours. Ready to elevate your bedroom game? Let’s do it!
3. Minimalist Wall-Mounted Bed for a Sleek Look
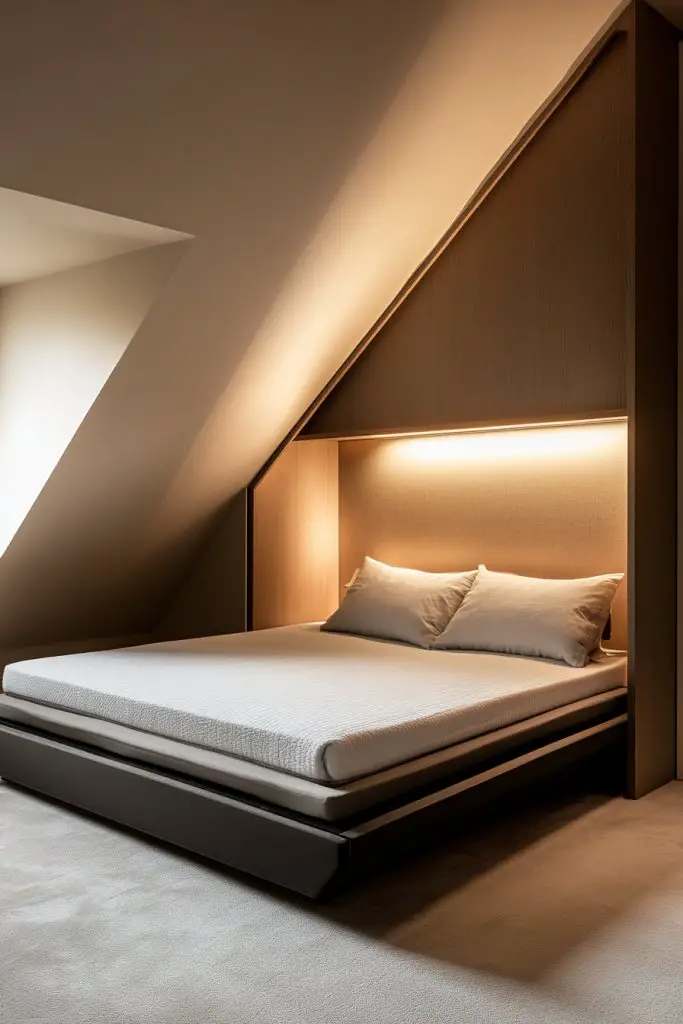
Feeling overwhelmed by clutter and cramped spaces? A wall-mounted bed could be your sleek, space-saving hero—especially with slanted ceilings where traditional beds dominate. It offers a clean, modern aesthetic that makes rooms appear larger and less busy. If you crave simplicity and elegance, this idea is calling your name.
Imagine a bed that appears to float against a wall, with hidden supports and a minimalist frame. When folded up during the day, it creates an open, unobstructed space perfect for lounging or working. At night, simply lower the bed, revealing a crisp, streamlined sleeping area. The surrounding decor remains uncluttered, with a few essential pieces for a serene, contemporary vibe.
Choose a wall-mounted fold-down bed with a sleek, upholstered headboard or a simple wooden panel for a Scandinavian feel. Add floating nightstands or shelves on either side for essentials, avoiding bulky furniture. For seasonal variation, swap out bedding covers or add a decorative throw for a pop of color. This setup works well in small or multi-use rooms needing flexibility.
Start with a sturdy wall-mount system designed for your mattress size. Ensure the wall can support the weight—studs or anchors are essential. Install the mechanism with a drill and level, then attach the bed frame securely. Choose a mattress that folds easily and provides enough comfort for nightly use. Finish with minimal bedding, and keep surrounding decor simple to emphasize the sleek look.
Personalize with textured bedding, decorative cushions, or a contrasting wall color behind the bed. Add a foldable side table or a slim storage unit for overnight essentials. Use wall-mounted lighting like sconces or adjustable reading lights to keep the floor clear. Keep decor minimal but meaningful, like a single statement art piece or a sculptural lamp.
A wall-mounted bed embodies modern elegance and practical efficiency. It’s perfect for minimalist lovers and those seeking a clutter-free sanctuary. Once installed, it dramatically transforms small spaces into stylish retreats. Ready for a bedroom that looks as good as it feels? You’re all set!
4. Floating Nightstands for a Clean, Airy Feel
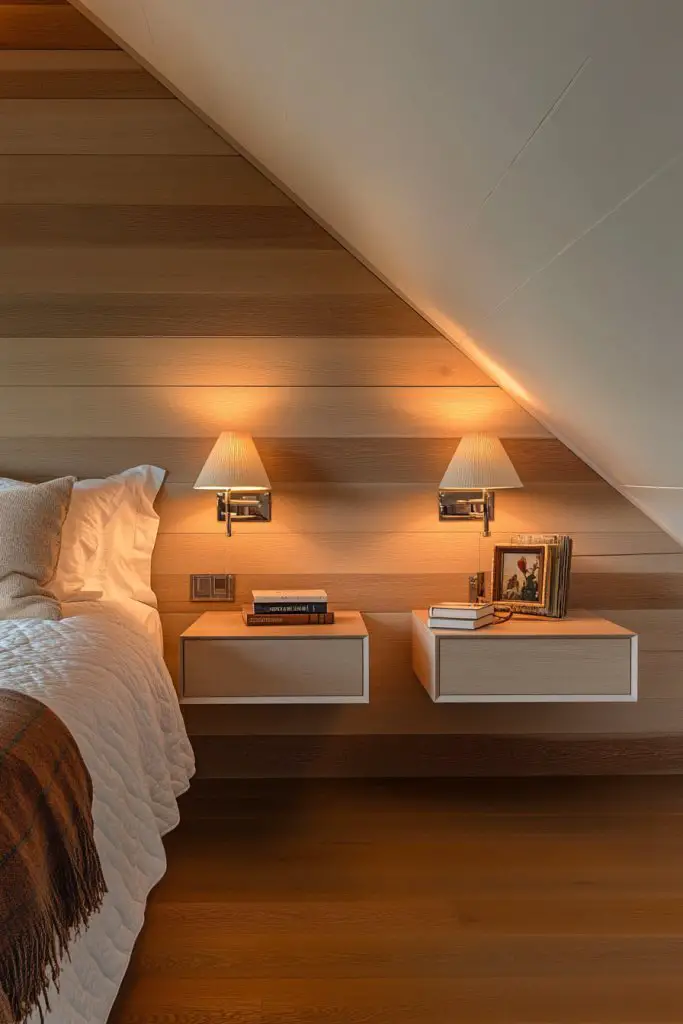
Cluttered nightstands can make even the prettiest bedrooms feel cramped and chaotic. If your space is limited by sloped ceilings, floating nightstands are a game-changer—keeping surfaces clear and the floor feeling open. They add a modern touch while maximizing functionality. Want a sleek, clutter-free look? Here’s your solution.
Picture a slim, wall-mounted shelf or cabinet that hovers beside your bed, holding essentials like a book or glasses. No bulky legs or bases to get in the way—just clean lines and minimalist design. Small wall sconces or LED strips can add soft lighting, highlighting the floating units. The overall effect is a seamless, airy bedroom that feels more spacious and organized.
Floating nightstands come in various styles—wooden, lacquered, or metallic—allowing you to match your decor. You can add a small drawer, open shelf, or even a combination for extra storage. In contemporary rooms, keep it simple; in eclectic spaces, incorporate decorative knobs or textured finishes. Seasonal updates include swapping out accessories or adding decorative trays for organization.
Start by measuring the space beside your bed and choosing a mounting bracket suitable for your wall type. Secure the bracket into studs or anchors for stability. Attach the shelf or cabinet to the bracket following the manufacturer’s instructions. Ensure the height is comfortable for easy access, and finish with a decorative item or small lamp (that’s not a pendant or table lamp). Keep wiring hidden for a tidy look.
Add small decorative touches like a soft fabric mat or a ceramic dish for jewelry. Use matching or contrasting colors for the floating units to create visual interest. Incorporate subtle lighting—like motion-activated LEDs—to enhance functionality without clutter. Personalize with meaningful objects, like a favorite book or a decorative sculpture, that reflect your style.
Floating nightstands deliver a fresh, modern vibe that’s perfect for maximizing small spaces. They make your bedroom look cleaner and more organized, boosting your overall mood. Once you see how much more open your room feels, you’ll wonder why you ever relied on bulky furniture. Ready to float your way to a more stylish bedroom? Let’s do it!
5. Skylight Installation for Natural Light and Ventilation
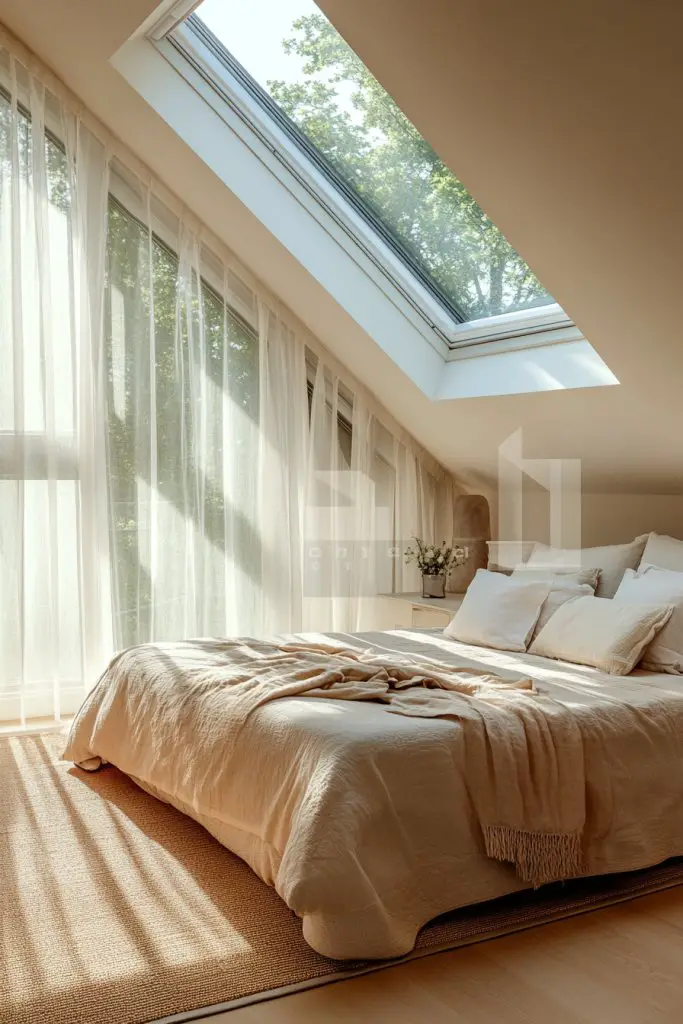
Do you ever wish your bedroom was brighter and more airy? Skylights are a fantastic way to flood your space with natural light and improve airflow—especially in rooms with sloped ceilings where windows are limited. They can transform a dark, dull bedroom into a vibrant sanctuary that feels connected to the outdoors. Want to boost your mood and save on electricity? This idea is perfect.
Imagine a sleek glass pane set into the slant of your roof, shimmering in the daylight. During the day, sunlight streams in, illuminating every corner of your room with a warm glow. At night, the skylight frames the stars, making you feel closer to nature. The glass surface is often frameless or minimally framed, blending seamlessly into your ceiling. When opened, fresh air circulates, adding a crisp, outdoor feeling.
Choose from fixed, vented, or hybrid skylights depending on your needs. Use blackout blinds or UV-protective films for privacy and sun control. The size and placement can vary—large skylights work well for main bedrooms, while smaller ones fit tight corners. Seasonal updates include adding thermal blinds or reflective coatings to optimize energy efficiency. They’re adaptable to different roof types and aesthetics.
Start by consulting with a professional to assess your roof’s structure and waterproofing requirements. The installation involves cutting into the roof, so proper sealing and flashing are critical to prevent leaks. Choose a high-quality, energy-efficient skylight with double or triple glazing. The process includes framing the opening, installing the glass unit, and sealing all edges. Consider adding a remote-controlled vent or rain sensor for convenience. Ensure electrical wiring for optional blinds or fans is handled safely.
Use light-colored, reflective interior paints to maximize daylight reflection. Complement with airy textiles like sheer curtains or light linen bedding to enhance the open feel. Incorporate outdoor-inspired decor or natural materials like driftwood or stone accents nearby. Seasonal touches such as cozy throws or decorative lanterns can add warmth when the weather cools.
Skylights open up endless possibilities for transforming your bedroom into a bright, fresh retreat. They connect your space to the outside world, boosting your well-being and natural energy. With professional installation, you can enjoy years of luminous comfort—no more dark, gloomy mornings. Ready to let the sunshine in? Your brighter bedroom awaits!
6. Hanging Pendant Lights or String Lights for Ambiance
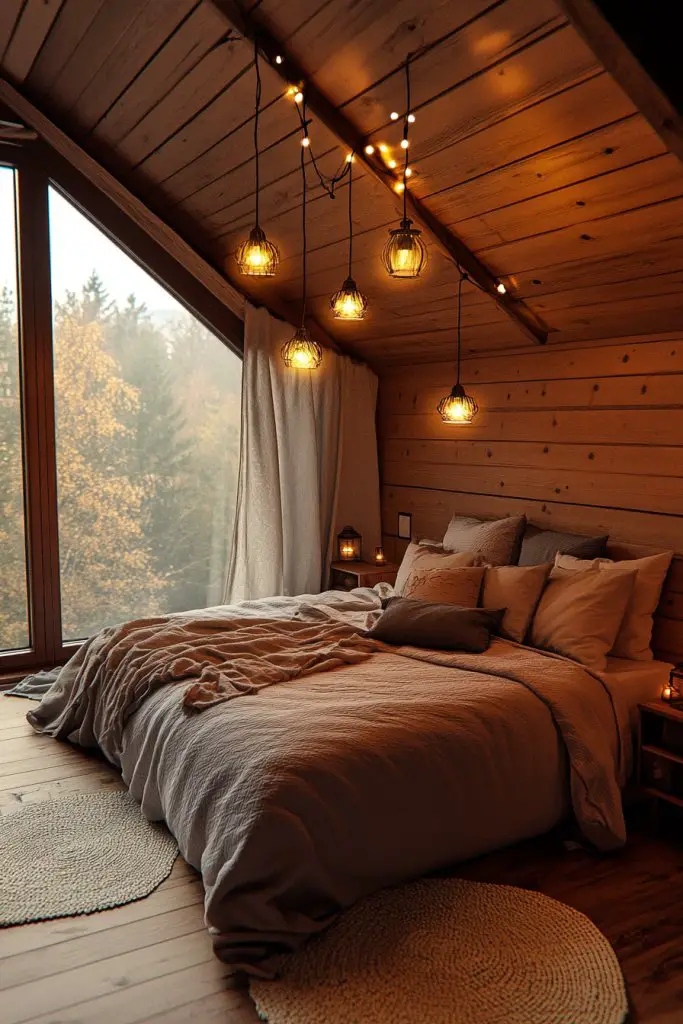
Ever felt your bedroom lighting was dull or uninspiring? Pendant lights and string lights offer a cozy, warm glow that instantly transforms the atmosphere. Especially with sloped ceilings, hanging fixtures add visual interest and height without cluttering the space. Want a room that feels inviting and stylish? This lighting trick is your new best friend.
Imagine a delicate pendant light hanging from the highest point of the ceiling, casting a soft pool of light over your bed. String lights drape along the slant, creating a canopy of tiny bulbs that twinkle at night. The gentle glow adds a layer of intimacy and comfort, making your bedroom feel like a personal retreat. The fixtures can be minimalist, vintage, or bohemian, depending on your vibe.
Choose fixtures that match your decor—metal and glass for modern, woven or fabric shades for boho, or vintage Edison bulbs for industrial charm. In rooms with limited space, opt for clip-on or plug-in string lights that don’t require hardwiring. Seasonal updates include swapping out bulbs or adding decorative shades for festivities or mood changes. You can also layer different types of lighting for versatility.
Select hanging fixtures with adjustable cords to suit your ceiling’s slope, ensuring the light hangs at a flattering height. Secure pendant fixtures into ceiling joists or anchors, following safety guidelines. For string lights, attach clips or hooks along the slant, ensuring they’re taut and evenly spaced. Use extension cords or wireless options to keep wiring neat and hidden. Add dimmers or smart bulbs for customizable ambiance.
Decorate with accessories like decorative bulbs or colored filters to match your mood or season. Incorporate small, matching LED candles or lanterns for variety. Use textiles like sheer curtains or fabric wraps to soften the light. Personalize your space with a few decorative elements that complement your fixture—think a cozy throw or a textured wall piece nearby.
Creative lighting adds personality and warmth, making your bedroom a cozy haven. It’s an easy upgrade that has a huge impact on mood and style. Once you experience the inviting glow, you’ll wonder how you ever slept in a dull space. Ready to light up your life? Let’s hang those fixtures!
7. Compact Desk Niche for a Functional Workspace
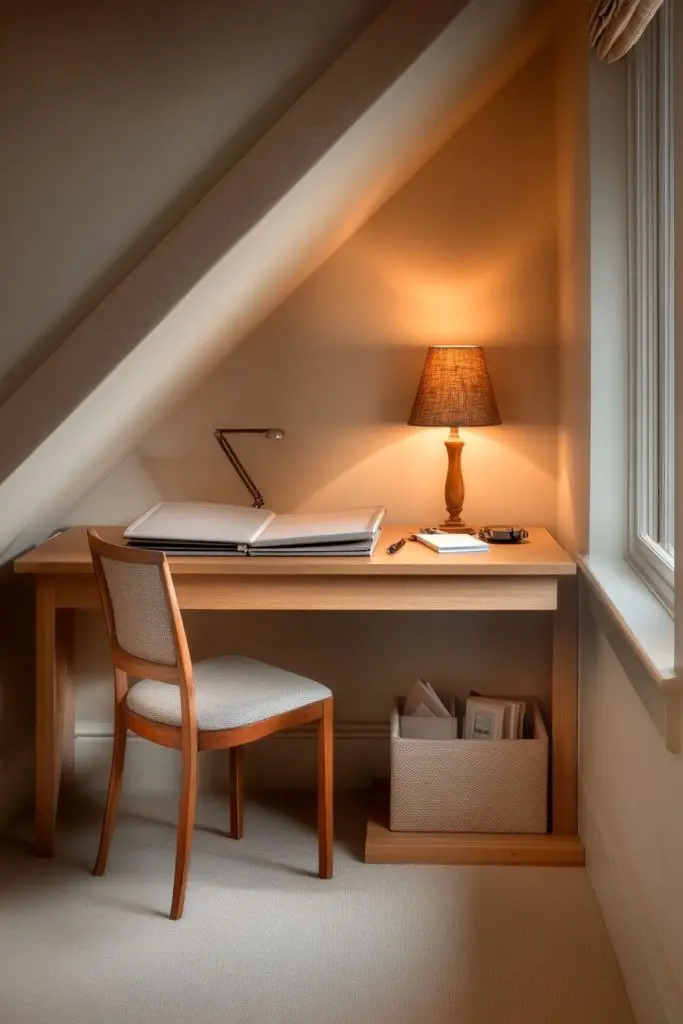
Struggling to carve out a dedicated workspace in your small bedroom? A compact desk tucked into a niche beneath the slant offers a practical solution. It provides a designated area for work, study, or hobbies without sacrificing precious space. Want to stay productive in style? This idea is perfect for maximizing every inch.
Picture a slim, built-in desk nestled into the lower part of the slant, with floating shelves above for storage and decor. The surface is clutter-free, with just a laptop or a favorite mug—everything you need at your fingertips. Soft task lighting, like a wall-mounted sconce, illuminates the workspace without taking up desk space. Clean lines and neutral tones keep it calm and focused.
Design your niche with materials that match your aesthetic—light wood for Scandinavian, sleek laminate for modern, or painted MDF for a pop of color. Incorporate shallow drawers or wall-mounted organizers to keep supplies tidy. In larger rooms, add a fold-down desk or extend the surface with a small table. Seasonal updates include switching out accessories or adding a decorative mat.
Measure the available space carefully to ensure the desk fits comfortably under the slope. Install a sturdy wall-mounted bracket or support system that can handle daily use. Attach a smooth, durable desktop surface—laminate or wood—and secure it at a comfortable height. Add a small wall sconce or LED strip for task lighting. Keep cords tidy with clips or sleeves, and organize supplies with wall-mounted bins or trays.
Personalize your workspace with a colorful or textured desk mat, and add decorative containers for pens and supplies. Incorporate motivational quotes or artwork nearby for inspiration. Use a small plant or decorative object on the shelf to bring life and personality. Keep the area tidy with minimal clutter for a stress-free environment.
A dedicated, well-designed workspace can boost your productivity and mood. It turns a tricky corner into a functional, stylish zone that motivates you every day. Once you see how efficiently it works, you’ll wonder how you ever did without it. Ready to work smarter in your bedroom? Let’s build it!
8. Playful Color Blocking to Define Zones
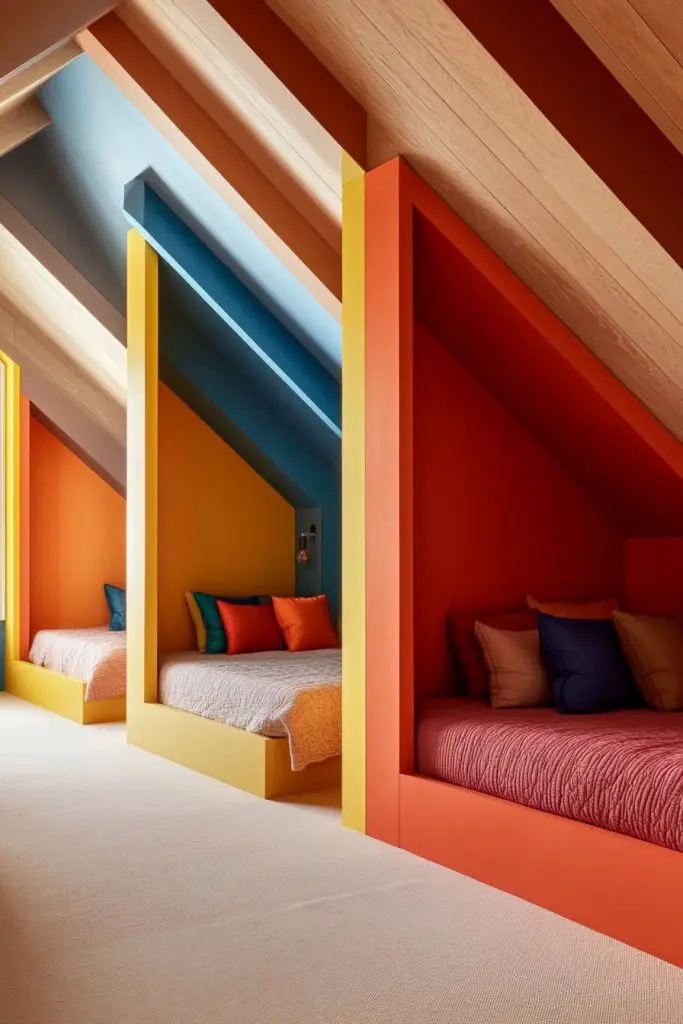
Do you find your room feels a bit scattered, especially with sloped ceilings creating visual chaos? Color blocking is an eye-catching way to segment your space into distinct zones—like sleeping, lounging, or dressing areas. It brings order and personality, making your room both fun and functional. Want to add a pop of color and structure? This idea is your new best friend.
Visualize a bold, contrasting hue on one section of the wall, like a deep navy behind your bed or a vibrant coral in a reading nook. Sharp lines separate the zones, creating a dynamic visual flow. The transition between colors is clean, often defined by painter’s tape or molding. This technique adds depth and interest, turning your bedroom into a lively, organized space.
Choose colors that reflect your personality—calm neutrals, energizing brights, or sophisticated darks. Use contrasting textiles like bedding, curtains, or rugs to reinforce each zone’s character. Seasonal updates might involve swapping out accessories or repainting sections for a fresh look. This approach works especially well in multi-purpose rooms or shared spaces.
Start by sketching your room layout and deciding on zones. Use painter’s tape to mark off sections and test paint colors on small patches first. Apply high-quality, matte or satin paint for clean lines and long-lasting results. For added definition, install narrow molding or ledges along the boundary. Finish with precise taping removal and touch-ups to keep lines sharp. This DIY project is straightforward with patience.
Add decorative textiles that match each zone’s theme—think textured throws, patterned cushions, or area rugs. Use wall-mounted hooks or small shelves within each section for personal items or decor. Incorporate artwork or framed photos that fit the color scheme for extra personality. Keep the zones functional and clutter-free, and enjoy your tailored space.
Color blocking transforms your bedroom into a vibrant, organized retreat that’s uniquely yours. It’s an inexpensive way to make a big visual impact while defining spaces clearly. Once you see the lively, cohesive look, you’ll feel inspired to experiment further. Ready to make your room pop? Let’s get started!
9. Rustic Wooden Beams for Warmth and Character
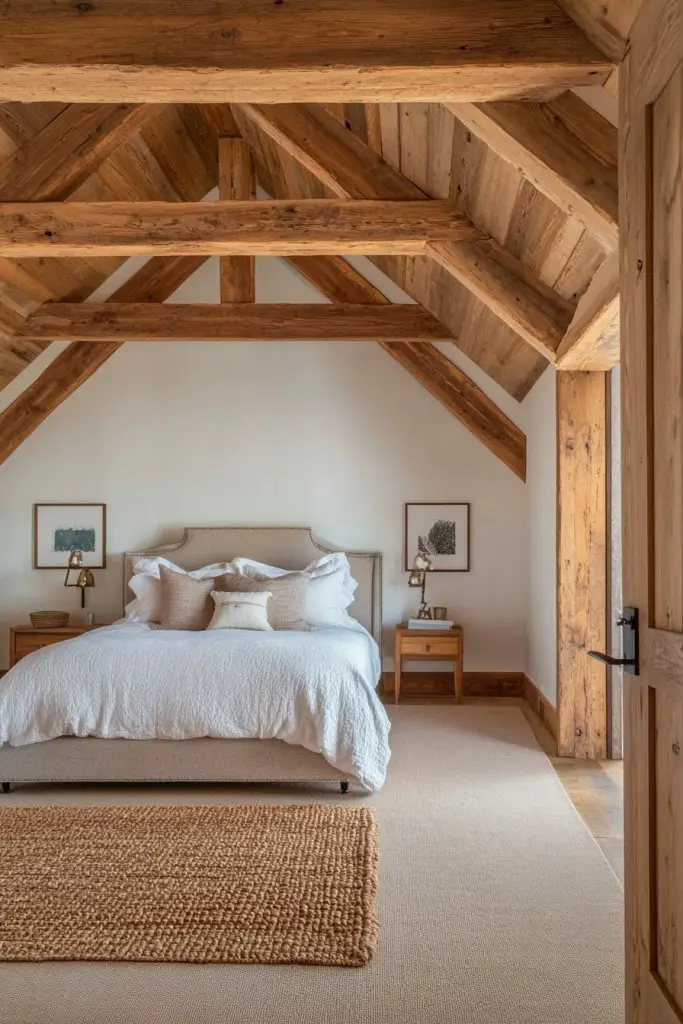
Feeling like your bedroom lacks personality and warmth? Rustic wooden beams can add instant charm, especially in rooms with sloped ceilings that need a cozy upgrade. They bring texture and history, transforming a plain space into a welcoming retreat. Want to elevate your bedroom’s character? This idea is a perfect fit.
Picture exposed or faux wooden beams running across the ceiling, contrasting beautifully with light-colored walls or modern finishes. The natural grain and knots of the wood add visual interest and texture, creating a warm, organic atmosphere. When paired with plush bedding and soft lighting, it feels like a mountain lodge or countryside retreat—no matter your style.
Choose reclaimed wood for authenticity or faux beams for ease and cost savings. Finish with a matte stain or paint for a contemporary twist. Combine with vintage or modern decor—think wrought iron fixtures or sleek metal accents—to balance rustic charm with modern elegance. Seasonal updates include adding cozy textiles or decorative lanterns nearby.
Begin by assessing your ceiling structure—faux beams are easier to install and require minimal support. Secure real wood beams with heavy-duty brackets or hangers into ceiling joists, ensuring safety and stability. For faux beams, use adhesive or clip-in systems that attach directly to the ceiling. Finish with protective sealants or stains if desired. Remember, safety first—don’t compromise structural integrity.
Decorate around the beams with vintage-inspired fixtures, textured textiles, or cozy throws. Add wall-mounted lanterns or sconces to highlight the wood’s texture and create ambient lighting. Incorporate natural elements like stone or woven baskets nearby to complete the rustic look. Personal touches like family heirlooms or handcrafted decor make it even more special.
Rustic beams instantly boost your room’s warmth and character, making it feel like a mountain cabin or countryside escape. They’re a timeless feature that adds depth and charm without overwhelming the space. Once installed, you’ll love how they transform your bedroom into a cozy, inviting haven. Ready to add rustic appeal? Let’s do it!
10. Soft, Neutral Tones for a Calm, Restful Atmosphere
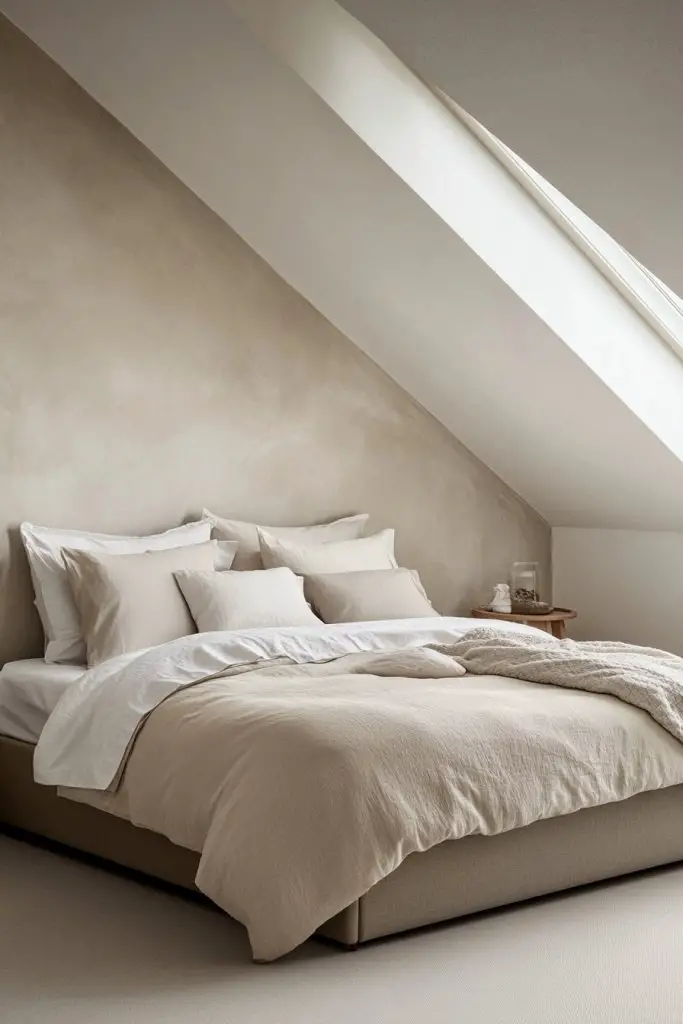
Feeling overwhelmed by loud colors or busy patterns in your bedroom? Soft, neutral tones create a calming environment that promotes relaxation and restful sleep. Especially with slanted ceilings, muted shades keep the space feeling open and soothing. Want a bedroom that feels like a retreat? This is your go-to strategy.
Imagine walls painted in warm beige, greige, or blush, paired with crisp white or soft taupe bedding. The gentle palette reflects light beautifully, making the room feel brighter and more spacious. Layered textiles like a cozy throw, plush cushions, or a textured rug add depth without overwhelming. Natural materials like linen or cotton enhance the serene vibe, inviting you to unwind.
Combine neutral shades with subtle textures—think woven fabrics, faux fur, or velvet. Seasonal changes are easy: switch out textiles or add a pop of muted color with accessories. For contrast, incorporate darker accents like charcoal or deep brown in picture frames, lamps, or furniture legs. This palette suits minimalist, coastal, or Scandinavian styles and adapts well to any room size.
Choose paints or wallpapers in shades that evoke calm—test samples first to see how they look in different lights. Use layered textiles to add warmth and visual interest, avoiding clutter. Keep furniture in light woods or painted finishes to maintain the airy feel. Incorporate soft lighting with dimmable fixtures or hidden LED strips. Keep decor minimal but meaningful to sustain the tranquil atmosphere.
Personalize with textured cushions, throws, or bedding in shades that complement your palette. Add a few decorative items like ceramic dishes or woven baskets—no plants or artwork if you want to stay neutral. Use candles or subtle lighting to enhance the calm ambiance. Small, meaningful accents make the space uniquely yours while maintaining serenity.
Soft neutrals cultivate a peaceful, elegant bedroom that’s perfect for rest and recharge. They’re timeless and versatile, making your space feel cozy yet sophisticated. Once you embrace this calming palette, you’ll love how it transforms your sleep quality and mood. Ready to create your sanctuary? Let’s do it!
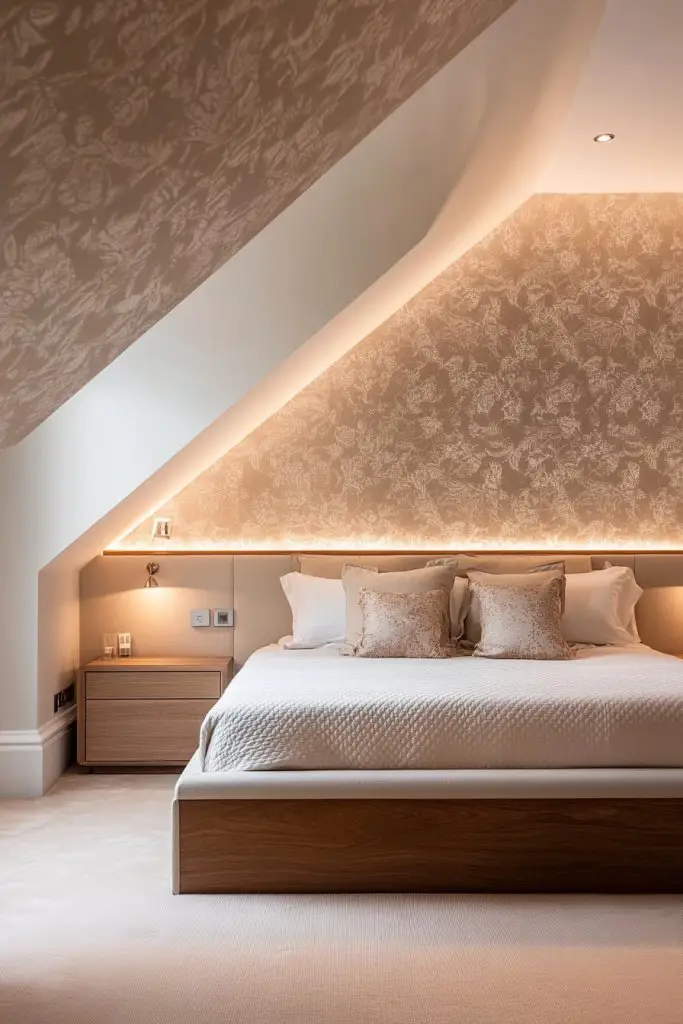
11. Creative Use of Space Behind the Headboard
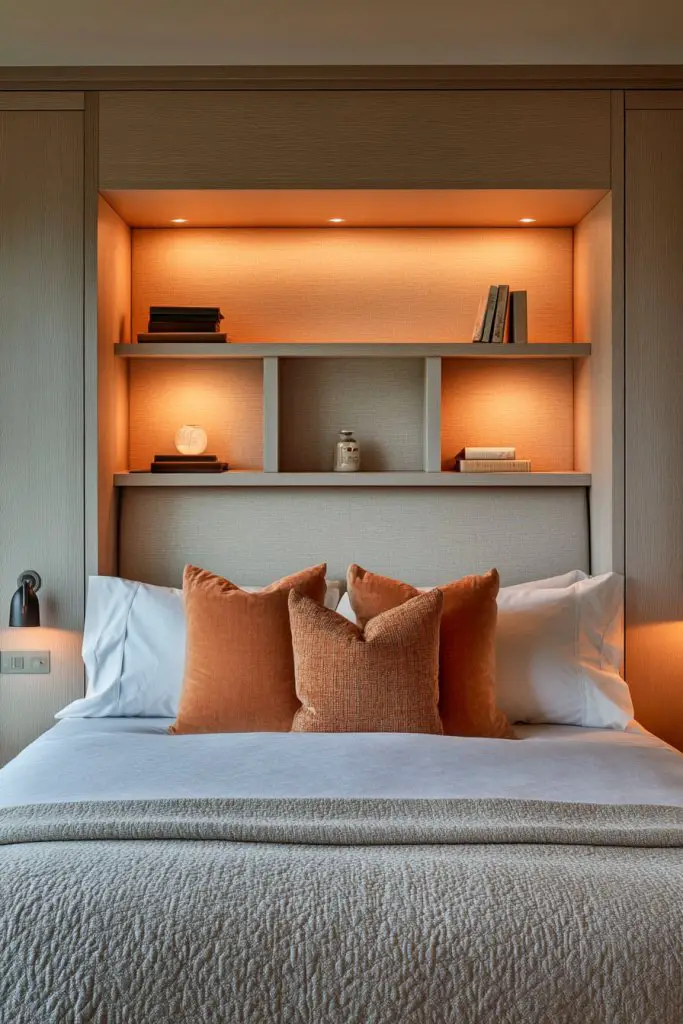
Does your bedroom feel like it’s missing that extra touch of personality? Utilizing the space behind your headboard can be a clever way to add function and style. It turns a simple wall into a focal point, offering storage or display options that save space. Want a more personalized, organized bedroom? This idea is your secret weapon.
Imagine a headboard with built-in shelves or hidden compartments, filled with books, decor, or personal items. The back panel can be painted in a contrasting color or decorated with wallpaper for added flair. LED strip lighting behind the headboard creates a soft glow, highlighting your collection and adding ambiance. It’s a sleek, space-efficient feature that elevates your entire room.
Opt for a custom headboard with integrated storage, or add a narrow shelf behind a simple upholstered headboard. Use decorative boxes or baskets inside the compartments for organization. For a rustic look, incorporate reclaimed wood; for modern, choose sleek, glossy finishes. Seasonal updates could include new decor or changing the back panel’s color to refresh the look.
Start by designing or purchasing a headboard with built-in storage or plan to attach a shelf or panel behind your existing headboard. Secure the piece into the wall using appropriate brackets, ensuring stability. Use small containers or baskets to organize your items inside the compartments. Finish with decorative touches like a small picture or a reading light (not a pendant or table lamp). Keep cords hidden for a tidy appearance.
Decorate with small decorative objects, framed quotes, or a textured fabric on the back panel. Use lighting accents like LED strips or puck lights to highlight your items. Incorporate personal mementos or favorite books for a lived-in feel. Keep it organized and clutter-free for maximum style and function.
A creative use of space behind the headboard adds both personality and practicality. It makes your bed a focal point and keeps essentials close at hand. Once you see how much more organized and stylish your bedroom becomes, you’ll wonder why you didn’t do it earlier. Ready to upgrade your headboard game? Let’s go!
12. Layered Textiles with Rugs, Throws, and Cushions

A plain bedroom can feel cold and uninviting, especially with sloped ceilings and minimal decor. Layering textiles—think rugs, throws, and cushions—adds warmth, texture, and visual interest. It transforms your space into a cozy haven that beckons you to relax. Want a bedroom that’s both stylish and inviting? This is your secret weapon.
Visualize a plush area rug layered with soft throws draped over the bed and a variety of cushions in different textures and sizes. Warm knit blankets, velvet cushions, and woven pillows create depth and tactile richness. The cozy textiles invite touch and snuggling, making the room feel multi-dimensional and layered. Subtle color coordination ties everything together beautifully.
Choose textiles that match your overall decor—neutral, bold, or patterned. Seasonal updates include swapping out lighter fabrics for heavier knits or faux fur for winter. Mix textures—smooth silk with chunky knits or soft cotton with embroidered cushions—for visual contrast. This approach works in any room, from master bedrooms to guest spaces, and adapts to your mood and style.
Start with a soft, textured rug that fits your space—large enough to anchor the bed. Layer throws and cushions on top, mixing fabrics and patterns for interest. Use decorative cushions with different shapes and sizes to add dimension. Incorporate textured or patterned bedding, and finish with a few accent pillows for extra comfort. Regular fluffing and washing keep everything looking fresh.
Personalize with cushions that reflect your personality—fun prints, monograms, or favorite colors. Add tactile throws that invite touch, or a faux fur blanket for winter coziness. Use coordinated textiles to unify the space or mix contrasting textures for a playful look. These layers make your bedroom inviting and uniquely yours.
Layered textiles turn a simple bedroom into a tactile paradise, boosting comfort and style. They make the space feel warm and personalized, encouraging relaxation. Once you see how textiles transform your room, you’ll want to keep experimenting. Ready to snuggle into your beautifully layered space? Let’s style it!
13. Statement Ceiling with Bright Paint or Wallpaper
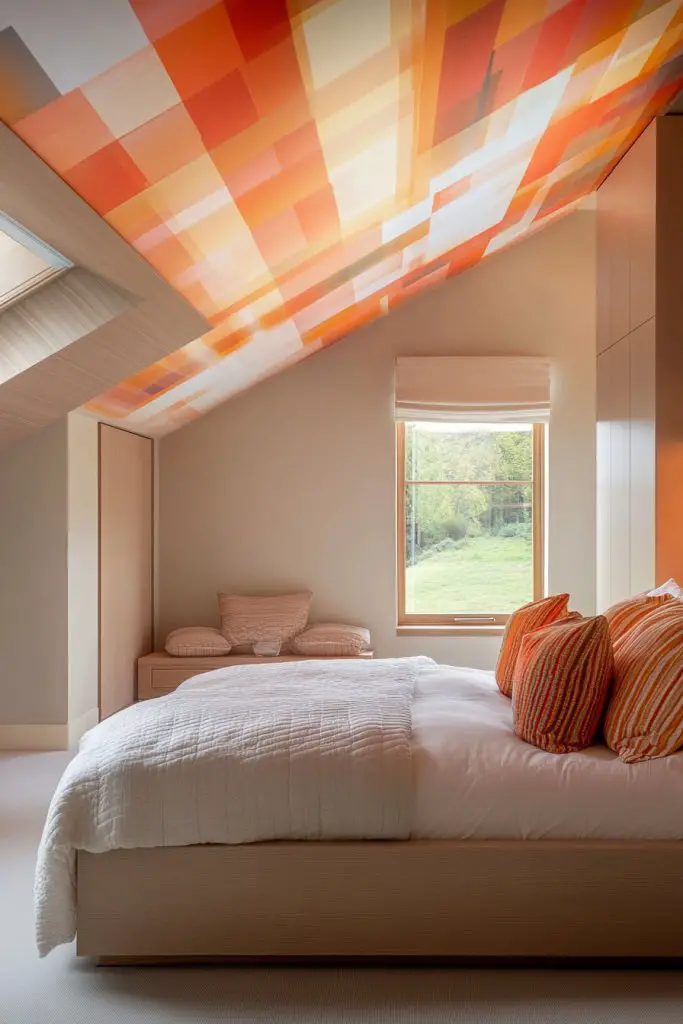
Tired of boring ceilings that fade into the background? Your slanted ceiling can become a stunning focal point with a bold paint color or patterned wallpaper. It’s an easy way to add personality and drama without major renovations. Want to turn your ceiling into a showstopper? This idea is your perfect match.
Imagine a ceiling painted in a vibrant hue—deep teal, sunset orange, or emerald green—that contrasts beautifully with neutral walls. Alternatively, patterned wallpaper with geometric or floral designs adds visual interest and texture. When paired with subtle lighting, the ceiling becomes a captivating feature that draws the eye upward. It’s a stylish, unconventional approach that elevates your entire room.
Choose bright, saturated colors for a bold impact or softer shades for a more subdued look. Wallpaper can range from subtle patterns to large, graphic prints—whatever fits your personality. Seasonal updates include repainting or re-wallpapering to keep the room fresh. This technique complements minimalist, boho, or eclectic decor styles and works well in bedrooms, studios, or reading nooks.
Prepare the ceiling surface—clean, smooth, and primed for paint or wallpaper. Use painter’s tape to mask edges and ensure crisp lines. For paint, apply multiple coats of high-quality, matte or satin finish. For wallpaper, carefully measure, cut, and align patterns, smoothing out bubbles with a wallpaper brush. Seal edges with a clear topcoat, especially in humid environments. The result is a stunning visual upgrade that’s surprisingly simple to execute.
Decorate the room with matching textiles, such as bed linens or curtains that pick up the ceiling’s color or pattern. Add a few decorative objects like sculptures or textured lamps that don’t compete with the ceiling’s statement. Use accent lighting—like spotlights or LED strips—to highlight the ceiling feature at night. Personal touches amplify the overall effect.
A statement ceiling dramatically transforms your space into something memorable and stylish. It’s an inexpensive upgrade with a big visual payoff, perfect for expressing your personality. Once you see the bold new focal point, you’ll be inspired to experiment further. Ready to elevate your ceiling game? Let’s paint or wallpaper!
14. Creative Use of Wallpaper or Decals on Lower Walls
Feeling like your bedroom lacks character or personality? Using wallpaper or decals on the lower walls creates visual interest without overwhelming the space. Especially with sloped ceilings, this technique adds depth and style while keeping the upper areas simple. Want to make your room uniquely yours? This idea is a game-changer.
Picture a subtle patterned wallpaper running along the lower half of the wall, with a clean paint or neutral tone above. Alternatively, decals in fun shapes or botanical motifs can be applied directly to the wall for a playful touch. The combination adds layers of texture and personality, making the space feel curated and lively. It’s a simple way to inject personality without clutter.
Choose wallpaper patterns that match your decor—geometric for modern, florals for romantic, or abstract for contemporary. Decals are versatile—easy to remove or change, perfect for renters or seasonal updates. For a cohesive look, coordinate colors with textiles or accessories in your room. Seasonal updates include swapping wallpapers or decals to refresh the vibe.
Prep the wall surface by cleaning and priming it. Measure and plan your pattern placement carefully, especially around corners or slants. Use painter’s tape to mark boundaries if applying wallpaper, and smooth out bubbles with a squeegee. For decals, peel and stick, starting from the center and working outward. Finish with a clear sealant or protective coating if needed. Keep edges neat for a polished look.
Add decorative molding or a chair rail to frame the wallpaper or decals, creating a finished look. Incorporate textiles or accessories that complement the wall design—think throw pillows, curtains, or rugs. Use small wall-mounted shelves nearby for personal objects or decor that matches your theme. The goal is a layered, personalized space that feels harmonious.
Using wallpaper or decals on lower walls is an affordable, creative way to define your space. It adds personality and depth while keeping the upper walls and ceiling simple. Once you see your transformed room, you’ll be inspired to experiment with other bold design moves. Ready for a playful, stylish upgrade? Let’s decorate!
15. Compact Seating Area with Floor Cushions or Poufs
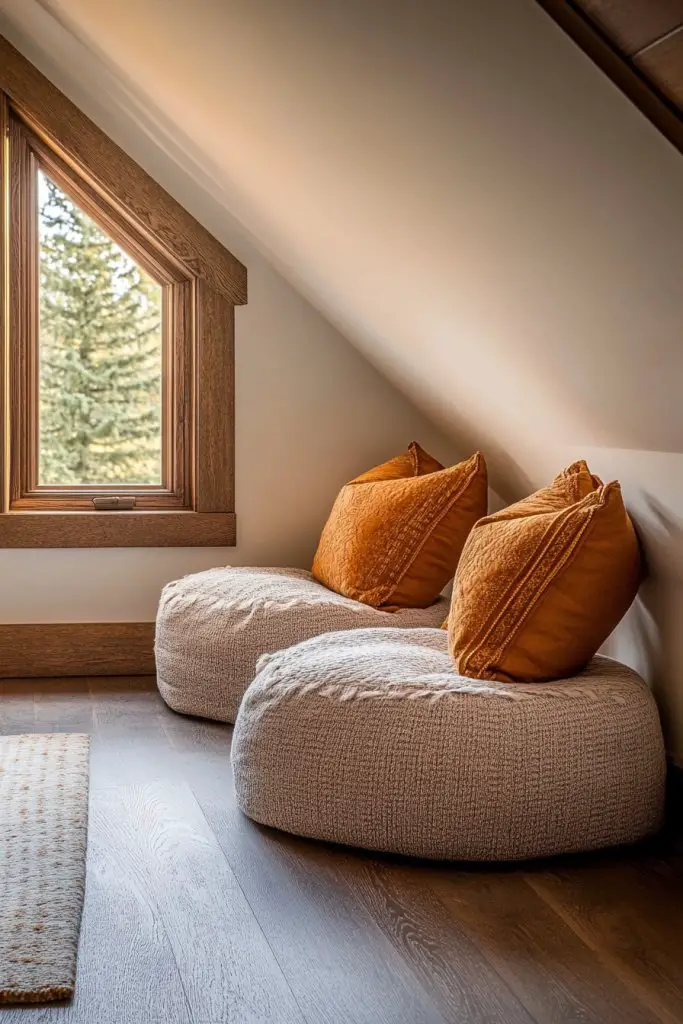
Need a cozy spot to relax, meditate, or read but short on space? A small seating area with floor cushions or poufs creates a casual, inviting nook without bulky furniture. Especially in rooms with sloped ceilings, this flexible setup maximizes comfort and style while saving space. Want a laid-back vibe? This idea is perfect.
Visualize a cluster of plush cushions in various sizes and textures arranged on a soft rug or directly on the floor. Mix and match fabrics—velvet, faux fur, or woven textiles—for a layered, inviting look. Scatter a few small poufs or ottomans for extra seating or footrests. Soft lighting and layered textiles complete the cozy scene, transforming an empty corner into a chill zone.
Choose cushions in colors and patterns that complement your decor—neutral tones for calm or bold hues for energy. Use different shapes and sizes to create visual interest. Seasonal updates might include swapping covers or adding decorative throws. This setup works well in bedrooms, bonus rooms, or small apartments, adaptable to your needs.
Lay down a soft rug or mat as your base, then arrange cushions and poufs for maximum comfort. Use durable, washable fabrics for easy maintenance. Add a small side table or nested ottomans for drinks or decor, keeping everything within reach. Incorporate layered lighting—like nearby floor lamps or fairy lights—to enhance the ambiance. Keep everything tidy for a relaxed, clutter-free look.
Customize with decorative cushions that reflect your personality—quirky patterns, monograms, or favorite colors. Add a cozy throw or textured blanket for extra warmth. Personalize the space with small decorative objects or a few favorite books (not restricted items!) nearby for a lived-in, welcoming feel. Keep the arrangement casual and inviting.
A cozy seating nook adds a relaxed, personal touch to your bedroom, encouraging downtime and comfort. It’s a simple, versatile addition that instantly makes the space feel more inviting. Once you create your perfect chill zone, you’ll love how it elevates your entire room. Ready to lounge in style? Let’s set it up!
16. Artful Display of Small Decor Items on Custom Shelves
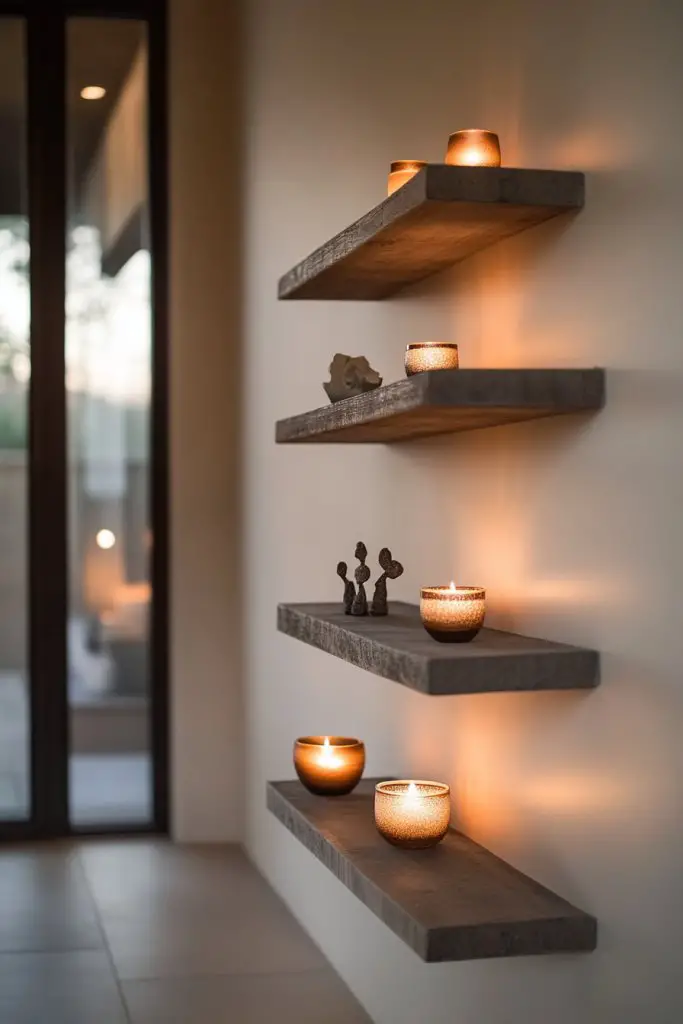
Feeling like your bedroom needs a dash of personality? Small decor items showcased on custom shelves introduce charm and style without clutter. Especially in rooms with sloped ceilings, narrow ledges or shelves can turn awkward angles into eye-catching displays. Want to add character and curated detail? This idea is your answer.
Imagine a series of slim, floating shelves along the wall or above the bed, adorned with mini sculptures, decorative boxes, or vintage collectibles. The layered arrangement creates visual interest and depth, making the space feel curated and thoughtful. The display is flexible—change out items seasonally or whenever you want a fresh vibe. It’s a personal gallery that reflects your style.
Choose shelves in different lengths, finishes, or styles—sleek glass, rustic wood, or painted MDF—to match your decor. Decorate with small, meaningful objects like travel souvenirs, tiny plants (not restricted), or handcrafted pieces. For a minimalist look, keep the display sparse; for maximalist, layer multiple items with varying heights and textures. Seasonal updates include swapping or rotating objects.
Measure the wall space and select or custom-build shelves to fit your style. Secure shelves into wall studs using appropriate brackets or anchors for stability—especially important for heavier objects. Arrange your decor thoughtfully, balancing colors and heights for visual harmony. Use small mounting hooks or adhesive strips for light objects. Keep the display tidy and avoid overcrowding for a polished look.
Personalize your shelf display with items that tell your story—favorite souvenirs, small framed photos (avoiding restricted wall art), or handcrafted objects. Incorporate small textiles or decorative containers to add texture and color. Change the display regularly to keep your space lively and interesting. Add subtle lighting, like small puck lights or LED strips, to highlight your collection.
A curated display of small decor items elevates your bedroom’s personality and charm. It’s an affordable, creative way to showcase what you love and make your space truly your own. Once you see your personalized gallery, you’ll be inspired to keep adding meaningful touches. Ready to craft your mini museum? Let’s decorate!
17. Layered Lighting with Recessed and Spotlights
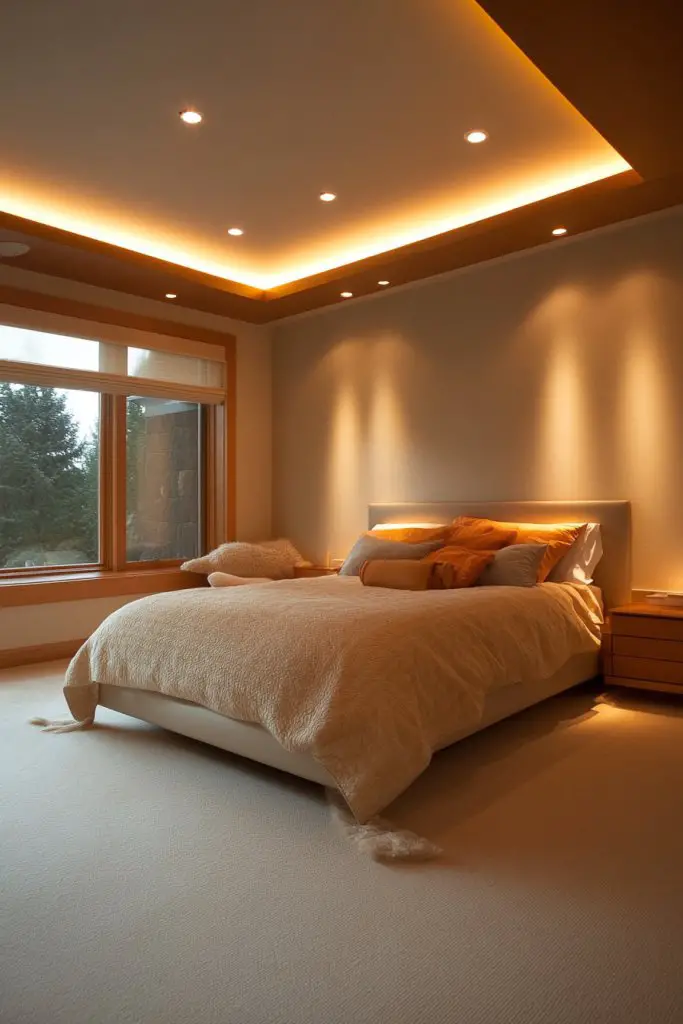
Dull or uneven lighting can kill the vibe in any bedroom, especially with tricky sloped ceilings. Layered lighting—combining recessed lights and spotlights—creates a flexible, inviting atmosphere. It highlights architectural features, adds depth, and allows you to set the mood with ease. Want a room that’s both functional and fabulous? This is your answer.
Picture recessed lights installed along the ceiling’s slope, providing a soft, ambient glow. Accent spotlights or adjustable mini-LEDs focus on artwork, shelves, or cozy corners, creating focal points. The layered setup offers options—bright for working, dim for relaxing. When dimmed, the room transforms into a warm, inviting space, perfect for winding down after a long day.
Choose dimmable fixtures for maximum control, and select warm or neutral color temperatures to match your mood. Use adjustable spotlights for flexible highlighting—great for artwork or architectural details. Incorporate smart lighting systems for remote control and customized scenes. Seasonal adjustments include changing bulb temperatures or adding decorative fixtures for special occasions.
Plan your lighting layout based on the room’s features—install recessed lights along the ceiling slope, ensuring proper spacing and wiring into your ceiling joists. Use mounting clips and a suitable voltage system, following electrical safety standards. Attach adjustable spotlights or track lighting for targeted illumination. Connect everything to a dimmer switch for mood control. Test the setup before finalizing to ensure even lighting coverage.
Add decorative bulbs or colored filters for special effects. Incorporate smart controls or voice activation for convenience. Use light diffusers or frosted covers to soften harsh spots. Personal touches like a cozy reading nook with focused lighting or subtle uplights near architectural features make your space uniquely yours.
Layered lighting elevates your room’s style while improving functionality—perfect for reading, relaxing, or working. It’s a versatile, high-impact upgrade that transforms your bedroom into a space of mood and atmosphere. Once you see the dynamic lighting options, you’ll wonder how you ever managed without them. Ready to light up your life? Let’s layer those lights!
Conclusion
With a diverse array of slanted ceiling bedroom ideas, you’re now equipped to transform your space into a stunning sanctuary. From playful and modern to cozy and traditional, these ideas demonstrate that sloped ceilings are a design opportunity, not a limitation. Don’t be afraid to experiment and bring your personal style into your unique space—your perfect bedroom awaits. Embrace the challenge and let your creativity soar!