A sloped backyard can be a challenge, but it also offers a unique opportunity to create a stunning outdoor space without breaking the bank. Many homeowners are drawn to the idea of transforming uneven terrain into functional, beautiful areas that enhance outdoor living and add value to their homes.
In this article, you’ll find a variety of budget-friendly sloped backyard ideas that cater to different styles and needs. From terraced gardens to creative seating solutions, these ideas will inspire you to make the most of your outdoor space, no matter the slope or size, turning it into a personal oasis that’s both practical and inviting.
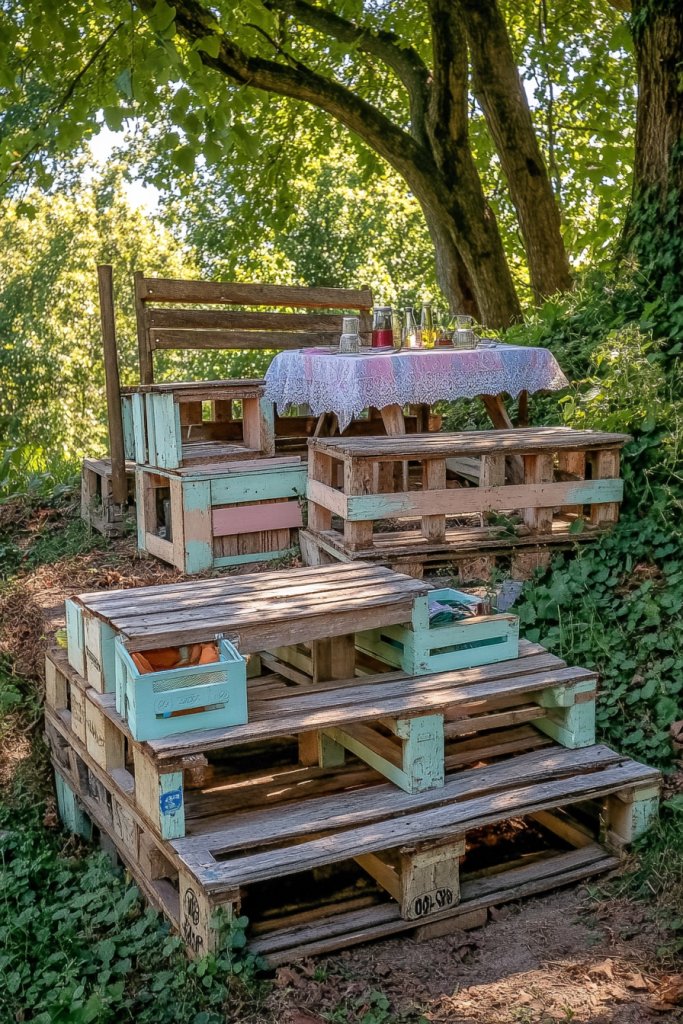
1. Create Tiered Flower Beds Using Reclaimed Pallets

Ever struggle with transforming a sloped backyard into something lively and colorful without breaking the bank? The idea of creating eye-catching garden layers might just be your ticket to a vibrant outdoor space. It’s a simple way to add dimension and personality while solving erosion issues. Plus, who doesn’t love the charm of recycled materials?
Recommended Products to replicate this idea
| # | Preview | Product | |
|---|---|---|---|
| 1 |
|
Wshxjzyay 63 * 83 inch Raised Garden Bed Liner, Non Woven Fabric Liner for Large Veg Trough, Keeps... | Buy on Amazon |
| # | Preview | Product | |
|---|---|---|---|
| 1 |

|
Petgrow Heavy Duty Weed Barrier Landscape Fabric for Outdoor Gardens, Non Woven Weed Blockr Fabric -... | Buy on Amazon |
Picture a series of staggered, rustic flower beds built from weathered pallets stacked neatly along the slope. Bright blooms like petunias, marigolds, and zinnias cascade down each layer, creating a lively tapestry of reds, yellows, and purples. The rough wood contrasts beautifully with soft, lush greenery and pops of colorful blossoms. As you walk by, you feel enveloped in a cozy, garden-inspired retreat.
You can customize this idea by painting pallets in fun colors or weatherproof finishes that match your style. For a more natural look, leave the pallets rustic and let vines or creeping ground covers soften the edges. Adjust the height and number of tiers depending on your slope’s steepness or your planting preferences. During different seasons, swap out flowers for plants suited to the climate or mood.
Gather reclaimed pallets, ideally with minimal splinters, and arrange them along the slope. Secure each pallet with stakes or wall anchors for stability. Fill the spaces with well-draining soil and consider incorporating compost for nutrients. Plant a mix of perennials and annuals for immediate color, and use mulch to retain moisture. Water regularly during establishment, and add edging or stones to contain the beds.
Add decorative touches like vintage garden signs, small solar lanterns, or painted motifs on the pallets. Incorporate different plant heights and textures to keep things interesting. Use recycled ceramics or sculptures as focal points within the beds. Personalize with favorite flower varieties, or even edible herbs for a functional touch. Change the plant combos each year for ongoing visual delight.
Creating tiered flower beds from reclaimed pallets is a budget-friendly way to elevate your landscape. It’s a project anyone can do, and the results are stunningly natural. Imagine your backyard bursting with color and texture every season—proof that you don’t need a big budget to craft a beautiful outdoor oasis.
2. Install a Stepping Stone Pathway for Easy Navigation
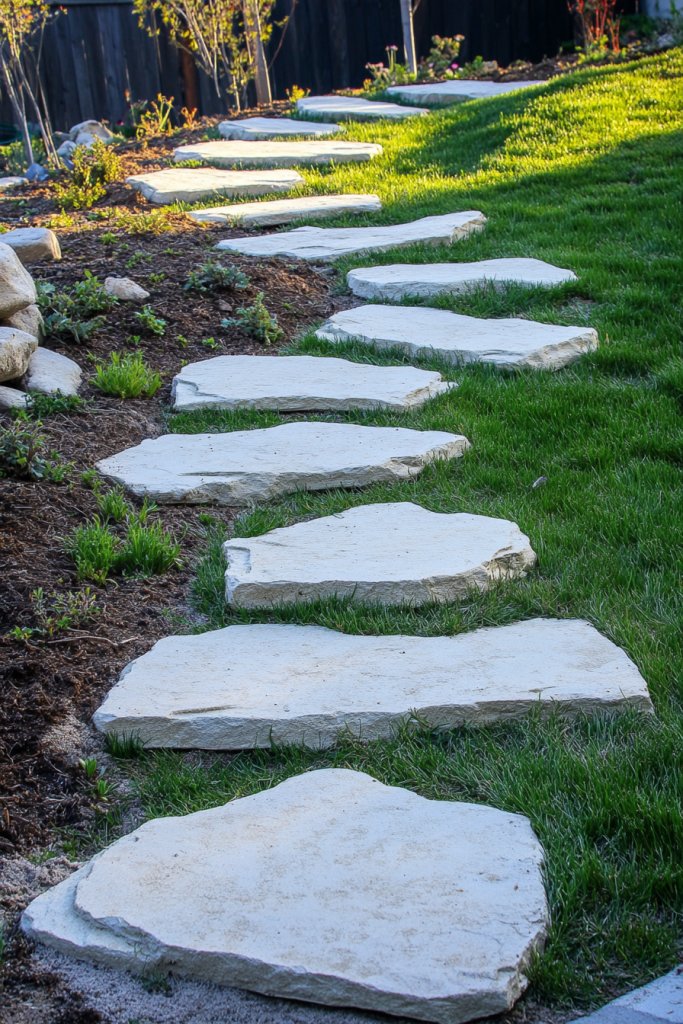
Do you find yourself tripping over uneven ground every time you want to enjoy your backyard? A simple, well-placed pathway can make your outdoor space more accessible and inviting. Plus, it prevents wear and tear on the grass or soil, especially on slopes that tend to erode.
Recommended Products to replicate this idea
| # | Preview | Product | |
|---|---|---|---|
| 1 |

|
4Pcs Large Stepping Stones Outdoor Garden Walkway, Durable Plastic Pavers for Patio, Pathway, and... | Buy on Amazon |
| # | Preview | Product | |
|---|---|---|---|
| 1 |

|
Gardzen Landscape Edging Kit, 40-Foot Long, 3-Inch Tall, No Dig Garden Edging Border for Flower... | Buy on Amazon |
Imagine a winding trail of irregular but charming stones laid out over a lush, green lawn or dirt. Each stone is large enough to step on comfortably, with gravel or moss filling the gaps. As you walk, the path guides your eye through flower beds, seating areas, or other features, transforming chaos into order. The natural textures contrast with the surrounding greenery, creating a rustic yet functional vibe.
Choose from flat flagstones, broken concrete pieces, or even recycled pavers. For a more natural look, use irregularly shaped stones and let them sit flush with the ground. You can also add solar-powered pathway lights along the edges for evening ambiance. Adjust the width of the path based on your needs—wider for wheelbarrows, narrower for a more delicate look.
Begin by mapping out your desired route and marking it with stakes or string. Dig shallow trenches for each stone, making sure they sit level and stable. Spread a base layer of gravel or sand to provide drainage and stability. Place each stone carefully, using a level to ensure flatness. Fill the gaps with gravel, sand, or even low-growing ground cover plants for added charm. Compact the surface for durability.
Decorate the edges with small flowering plants, creeping thyme, or moss to soften the look. Use stones with interesting textures or colors to add visual interest. Incorporate stepping stones of different sizes or shapes for a whimsical feel. During holidays, add lanterns or small sculptures along the path for seasonal flair.
A DIY stepping stone path is an easy upgrade that instantly improves accessibility and aesthetics. It’s budget-friendly, customizable, and can be completed in a weekend. Once done, you’ll find your backyard more inviting and safer to navigate—plus, it adds a charming, handcrafted touch that shows off your personal style.
3. Build a Rustic Retaining Wall with Mixture of Stones and Cinder Blocks
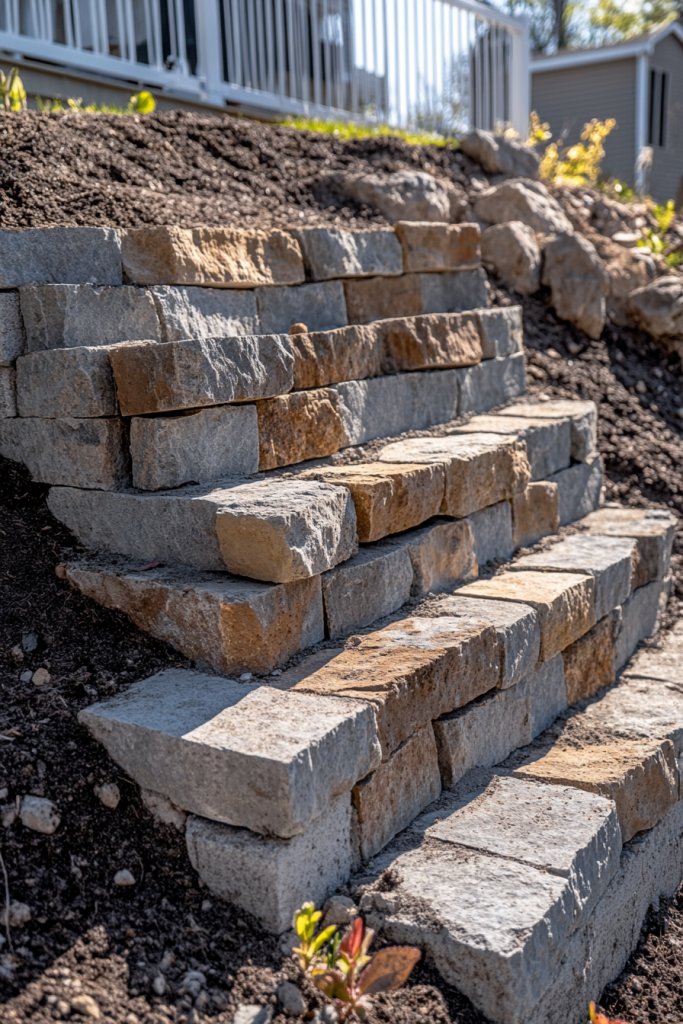
Is your sloped backyard prone to erosion or washouts? A sturdy retaining wall can solve these issues while adding a rustic charm. The idea of stacking stones or cinder blocks is not only budget-friendly but also surprisingly easy to pull off. It’s a practical project that makes your outdoor space safer and more structured.
Recommended Products to replicate this idea
| # | Preview | Product | |
|---|---|---|---|
| 1 |

|
Civaner 50 Pcs Miniature 1/12 Scale Mini Bricks Concrete Tiny Dollhouse Accessories for Kitchen... | Buy on Amazon |
| # | Preview | Product | |
|---|---|---|---|
| 1 |

|
Building Stone Walls | Buy on Amazon |
Picture a charming wall built from a mix of rough-hewn stones and simple cinder blocks, stacked unevenly for a natural look. Plants like succulents or ground covers spill over the edges, softening the hard lines. The wall’s warm earth tones contrast with lush greenery and vibrant flowers nearby. When sunlight hits the stones, they glow with a welcoming, timeless feel.
Mix materials for a more organic appearance, or stick to uniform cinder blocks for a sleek, modern look. You can paint cinder blocks in earthy tones or leave them raw for a more authentic vibe. Add a capstone layer of flat stones or bricks for a finished look. During winter, cover the wall with decorative lights or seasonal decorations to keep it lively.
Start by assessing your slope and marking the area. Dig a trench for the base to ensure stability. Lay a foundation of gravel or crushed stone to improve drainage. Stack the stones or cinder blocks, staggering joints for strength. Backfill with soil behind the wall and secure loose stones as needed. Use mortar or adhesive only if you want extra stability, but it’s not essential for a rustic look.
Add decorative elements like vintage lanterns, small sculptures, or fairy lights on or around the wall. Incorporate built-in planters or niches for seasonal decorations. Use contrasting paint or stain on cinder blocks to create patterns or accents. Personalize with your favorite stones or textures to make it uniquely yours.
A rustic retaining wall is a smart, attractive solution that boosts both function and style. It’s a project that, with a little effort, can turn a sloped eyesore into a focal point. Your backyard will look more polished, and erosion concerns will be a thing of the past—plus, you’ll get bragging rights for DIY craftsmanship.
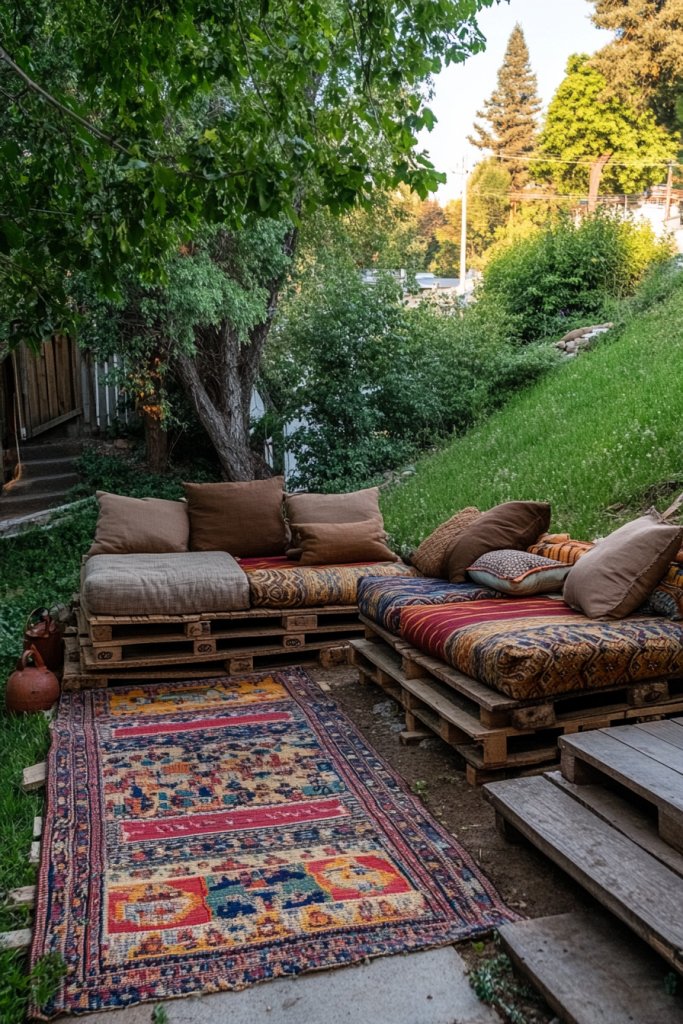
4. Design a Compact, Multi-Level Seating Area with Free Pallet Furniture
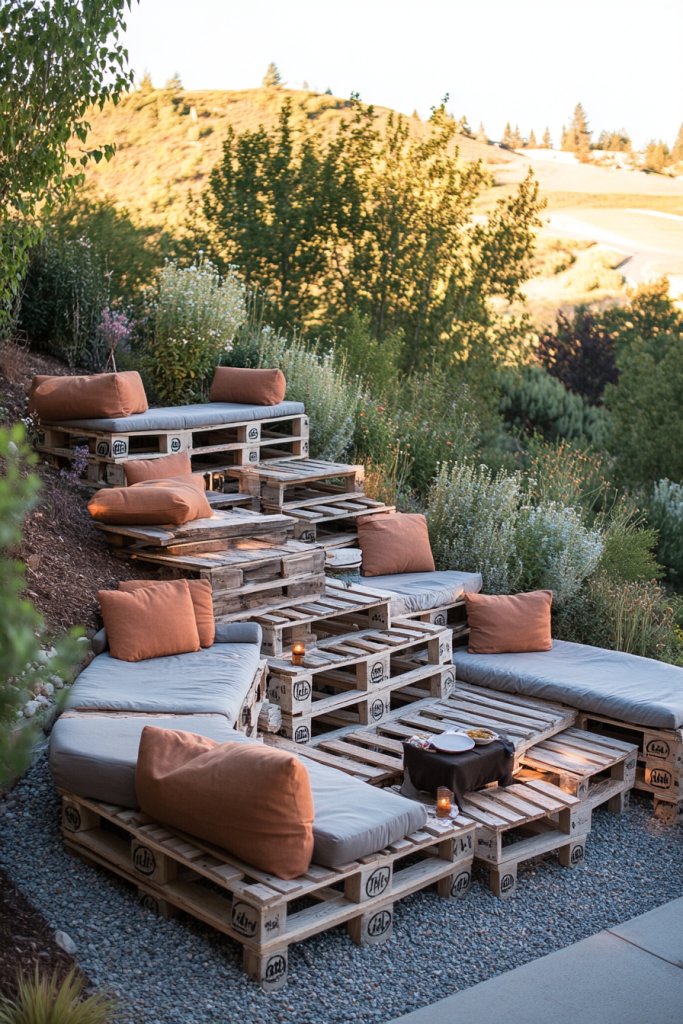
Longing for a cozy spot to gather outside without spending a fortune? Multi-level pallet furniture offers a stylish, budget-friendly way to create a functional seating area on a slope. It turns an awkward incline into a charming outdoor living space perfect for lounging or entertaining. Plus, it’s a project that’s surprisingly easy to customize.
Recommended Products to replicate this idea
| # | Preview | Product | |
|---|---|---|---|
| 1 |
|
vidaXL Pallet Cushion Anthracite 27.6"x27.6"x4.7" - Indoor/Outdoor Sofa Pad - Water- Polyester -... | Buy on Amazon |
| # | Preview | Product | |
|---|---|---|---|
| 1 |

|
LIONMAX Deck Screws 3 Inch, Wood Screws #10 x 3, 300 PCS, Rust Resistant, Exterior Epoxy Coated,... | Buy on Amazon |
Imagine a series of stacked pallets forming different levels—like a small amphitheater—complete with cushions and throws. The top level serves as a dining nook, while lower tiers become lounge spots. Bright, patterned fabrics and textured cushions make it inviting. Surround the area with string lights or lanterns for a warm glow after sunset, transforming your yard into a cozy retreat.
Use weather-resistant pallets and paint or stain them in colors that match your outdoor decor. Add removable cushions for easy cleaning, and incorporate small side tables made from pallets or crates. For a more permanent look, secure the pallets together or anchor them with stakes. During different seasons, change out cushions or add outdoor rugs for variety.
Start by selecting sturdy pallets with minimal splinters. Level the ground and arrange pallets in a way that creates distinct seating zones. Secure the pallets with screws or stakes for stability. Add foam or outdoor cushions on top for comfort. Incorporate small tables or storage crates as armrests or side tables, and finish with weatherproofing treatments if desired. Keep the setup flexible for easy rearrangement.
Decorate with colorful cushions, textured throws, and outdoor rugs for personality. Use decorative pillows or fabric wraps to add pattern and comfort. Incorporate personal items like vintage lanterns, or even small potted plants on pallets for a touch of greenery. Change accessories seasonally to keep the space fresh.
Transforming pallets into a multi-level seating area proves that you don’t need a big budget to create a stylish, functional outdoor space. It’s a fun project that adds charm and utility, making your backyard the go-to spot for gatherings. With a little creativity, your slope becomes a feature rather than a flaw.
5. Incorporate a Small, DIY Water Feature for Tranquility
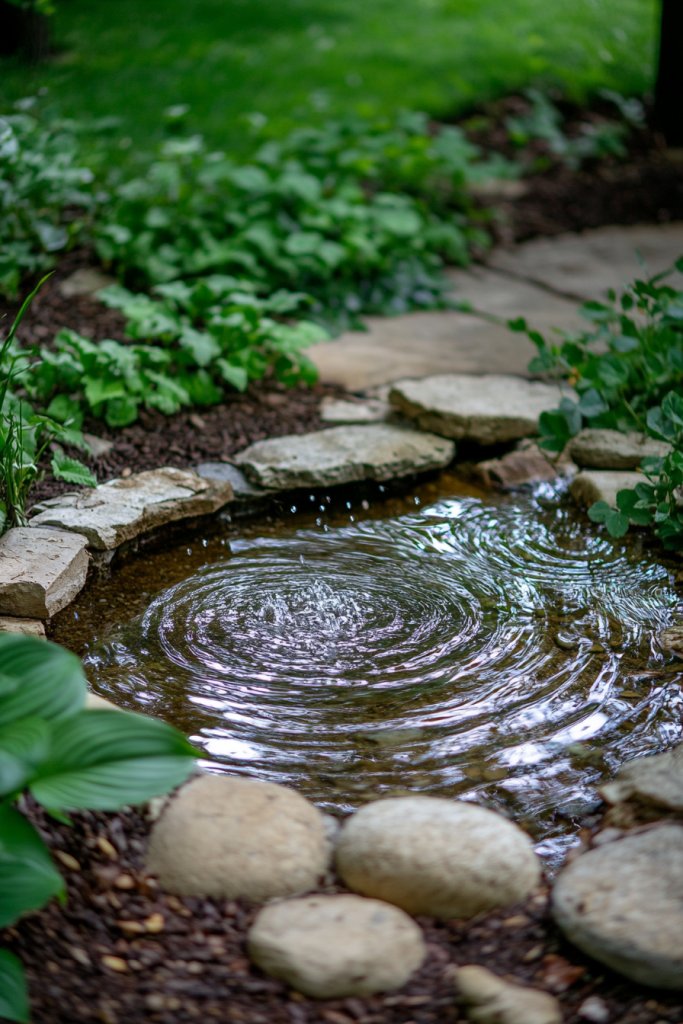
Craving a peaceful backyard escape that soothes your mind? A small, DIY water feature can bring serenity to even the tightest budgets. It creates calming sounds and a focal point that elevates your outdoor space’s ambiance. Who knew that a little water could make such a big difference?
Recommended Products to replicate this idea
| # | Preview | Product | |
|---|---|---|---|
| 1 |

|
Solar Fountain Pump Kit with Separate Solar Panel, 1.8 W Upgraded Solar Water Pump with 3 M Long... | Buy on Amazon |
| # | Preview | Product | |
|---|---|---|---|
| 1 |

|
Aquascape AquaBasin 30 Fountain and Water Feature Basin for Landscape and Garden | 78223, Black, 27... | Buy on Amazon |
Visualize a handcrafted pond or fountain using recycled containers like an old bucket or a large ceramic pot. Stones and pebbles line the edges, with water gently trickling or bubbling to produce a relaxing sound. Surround the feature with decorative gravel or driftwood, and add a few candles or solar lights nearby. The result is a tranquil nook that invites you to unwind.
Use different containers to match your style—think vintage buckets, metal troughs, or ceramic basins. For a natural look, incorporate natural stones, pebbles, or even aquatic plants (if your design allows). During colder months, cover or drain the feature to prevent damage. You can also build a small, tiered waterfall using stacked stones for added visual interest.
Choose a location with easy access to power if installing a pump, or opt for solar-powered options. Dig a shallow hole or create a frame for your container. Line it with pond liner or heavy-duty plastic to prevent leaks. Fill with water, add your chosen decorative elements, and set up the pump to circulate. Regularly clean the pump and top up water to prevent evaporation.
Add personal touches like floating candles, miniature statues, or seasonal decor. Incorporate textured stones and river rocks for a more natural appearance. Use waterproof LED lights for nighttime sparkle. For a DIY twist, craft your own fountain from repurposed items or create a small stream that meanders through your yard.
A simple water feature adds a peaceful vibe and elevates your backyard’s aesthetics without a hefty price tag. DIY options make it accessible for most DIY enthusiasts, and the calming sounds become a regular stress reliever. You’ll enjoy a more tranquil outdoor space that feels like a mini oasis—proof that serenity is within reach.
6. Plant a Vegetable or Herb Garden in Raised Beds
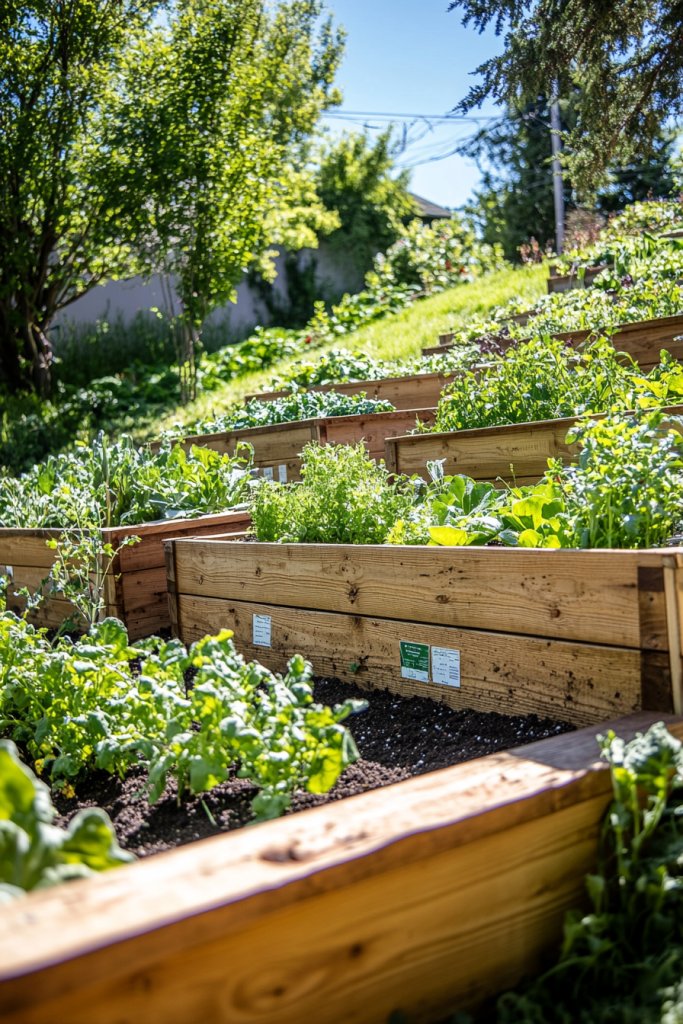
Ever wish your backyard could do double duty—look good and give you fresh food? A vegetable or herb garden in raised beds is a perfect solution, especially on a slope where soil erosion can be a pain. It’s an affordable way to add productivity to your outdoor space while keeping everything accessible.
Recommended Products to replicate this idea
| # | Preview | Product | |
|---|---|---|---|
| 1 |

|
Maple99 Raised Garden Bed with Legs 48x24x30 - Natural Cedar Wood Elevated Planter Box with Bed... | Buy on Amazon |
| # | Preview | Product | |
|---|---|---|---|
| 1 |

|
HOME GROWN Indoor Organic Herb Garden Kit, Unique Valentines Day Gift for Adults, Men, & Women,Grow... | Buy on Amazon |
Imagine a series of neat, wooden boxes filled with lush greenery—tomatoes, basil, lettuce, and peppers—lining the slope. The raised beds are painted in cheerful colors or left natural, with mulch or straw on top to keep weeds at bay. Small pathways between beds invite you to stroll and harvest at will. The vibrant greens and reds pop against the rustic backdrop of your yard.
Use different sizes and shapes of raised beds to fit your space and style. Materials can range from reclaimed wood to corrugated metal or bricks, depending on your budget. Incorporate trellises or cages for climbing plants like beans or cucumbers. During winter, cover with row covers or install cold frames to extend the growing season.
Start by leveling the ground and marking your preferred locations. Build or buy raised beds, making sure they’re deep enough for root growth—about 12 to 24 inches deep. Fill with quality soil mixed with compost or organic matter. Plant your chosen herbs and vegetables, then water regularly. Mulch the surface to retain moisture and suppress weeds. Maintain by rotating crops yearly.
Personalize your garden with decorative signs, paint on the beds, or even small sculptures. Use recycled materials for plant supports or watering cans. Incorporate companion planting strategies for pest control and yield improvement. During harvest, customize your garden’s look with seasonal decorations or fairy lights.
Growing your own vegetables and herbs proves that even small spaces can produce big results. It’s a rewarding, cost-effective way to enjoy fresh flavors and connect with nature. Plus, it’s a fun project that can evolve with your skills and tastes—making your backyard truly productive and personal.
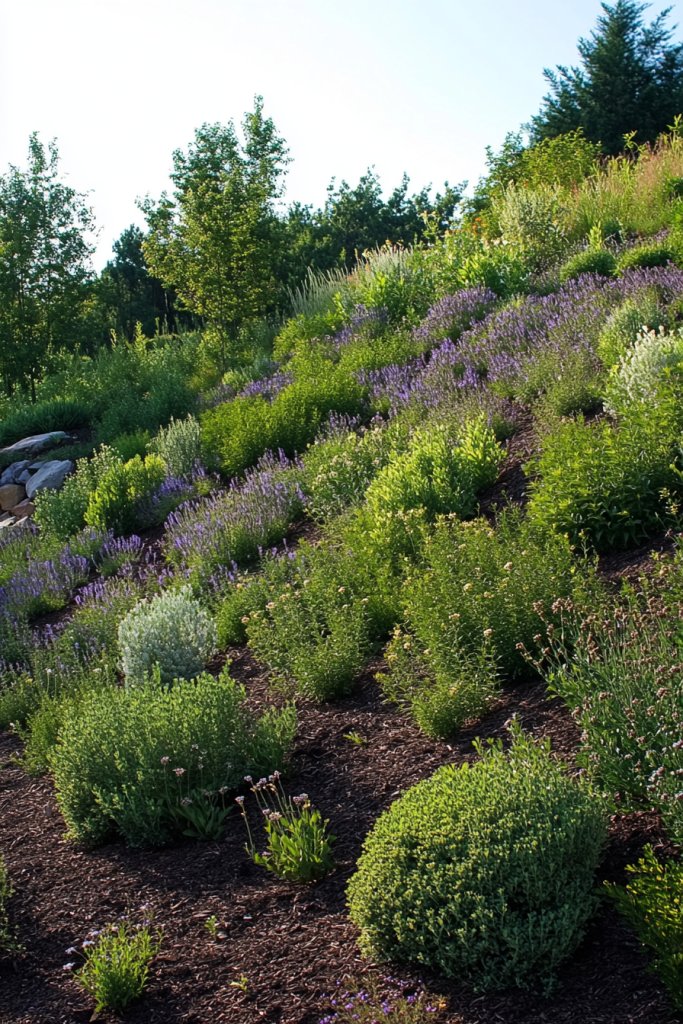
7. Wrap the Slope with Creeping Ground Cover for Erosion Control and Beauty

Dealing with soil erosion on a sloped backyard can be a real headache. Want a solution that’s both practical and pretty? Ground covers are your best friends—they prevent erosion while adding lush greenery. Plus, they’re budget-friendly and low-maintenance, making them perfect for a DIY project.
Recommended Products to replicate this idea
| # | Preview | Product | |
|---|---|---|---|
| 1 |

|
Mixrug Mix Creeping Dwarf Phlox Seeds for Planting, 1000+pcs Perennial Creeping Phlox Flower Seeds... | Buy on Amazon |
| # | Preview | Product | |
|---|---|---|---|
| 1 |

|
HUAALIUCHE Landscape Staples Driver, 39’’ Sod Staple Driver, Garden Stakes Installer for... | Buy on Amazon |
Visualize a blanket of dense, green creeping thyme, clover, or sedum spreading across the slope. Small flowers peek through, adding pops of color—pink, white, or yellow—while the textured foliage softens the harsh lines of the slope. The plants ripple with the breeze, creating a natural, living tapestry that’s both beautiful and functional.
Choose ground covers suited to your climate and sunlight—consider drought-tolerant options for hot, dry areas. Mix different varieties for texture and color variation. During winter, some ground covers stay evergreen, providing year-round greenery. For a more structured look, combine ground cover with decorative stones or mulch.
Prepare the soil by removing weeds and loosening the top layer. Spread a layer of compost or organic matter for nutrients. Plant ground cover cuttings or seedlings, spacing them according to their growth habits. Water thoroughly and regularly until established. Mulch around the plants to conserve moisture and suppress weeds. Maintain by trimming or dividing as needed.
Add decorative stones or small sculptures amid the greenery for visual interest. Use different ground covers in sections to create patterns or zones. During blooming seasons, enjoy the colorful display and consider adding small fairy lights or decorative edging. Keep the area tidy and free of invasive weeds for best results.
Ground covers are a simple, effective way to turn a slope into a lush, erosion-resistant patch. They require minimal effort once established and reward you with year-round greenery. It’s a natural solution that boosts your yard’s health and beauty—proof that eco-friendly landscaping can be both practical and pretty.
8. Erect a Privacy Screen with Reclaimed Wooden Fencing
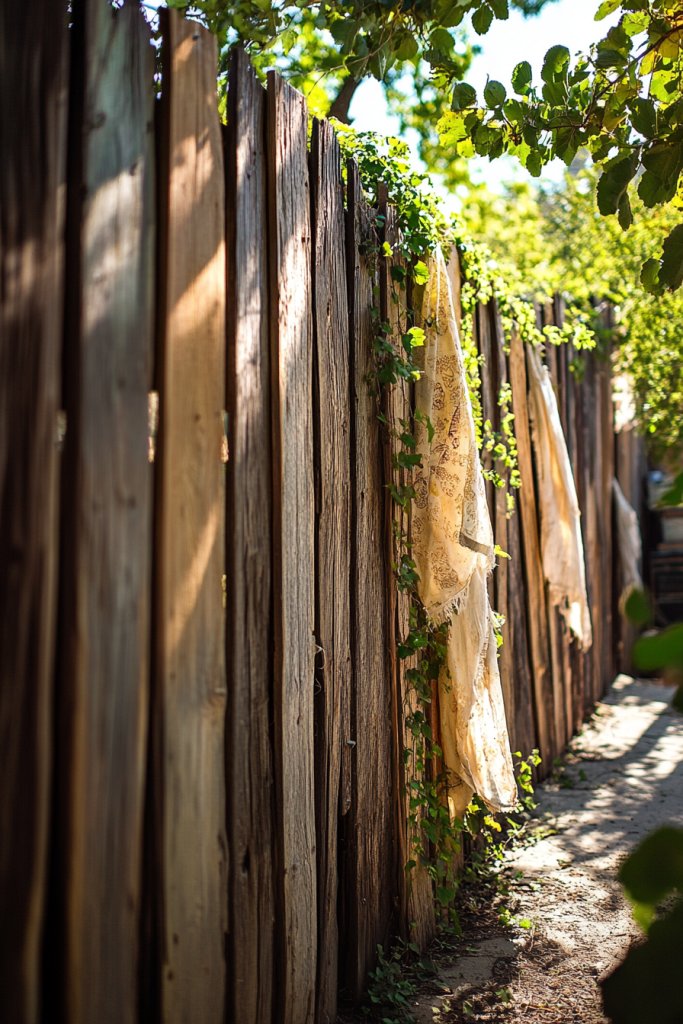
Want to create a private oasis without spending a fortune? Reclaimed wood fencing is an eco-friendly, budget-conscious way to add privacy and style to your backyard. It’s perfect for screening off noisy neighbors or ugly views while giving your outdoor space a rustic charm. Who says privacy can’t come with personality?
Recommended Products to replicate this idea
| # | Preview | Product | |
|---|---|---|---|
| 1 |

|
Amish Wares Country Reclaimed Barnwood Plain Picket Fence, Approximately 24" x 24" with Additional... | Buy on Amazon |
| # | Preview | Product | |
|---|---|---|---|
| 1 |
|
Enclo Privacy Screens EC18002 Lincoln WoodTek Vinyl Outdoor Privacy Screen, Perfect to Conceal Trash... | Buy on Amazon |
Imagine a tall, uneven fence made from weathered, mismatched planks nailed together with care. The wood’s natural patina adds character, while sparse gaps let dappled sunlight filter through. Climbing vines or decorative fabric can soften the barrier, creating a cozy, secluded nook. The overall effect is warm, inviting, and perfectly imperfect.
Paint or stain the reclaimed wood in weatherproof finishes for different looks—whitewash for shabby chic, dark stain for drama. Incorporate decorative cutouts or lattice panels for a custom touch. Adjust height based on privacy needs—taller for sound barriers, shorter for visual separation. During winter, add outdoor curtains or string lights for seasonal flair.
Start by measuring your space and gathering reclaimed wood—look for pallets, old fencing, or scrap lumber. Set posts securely in the ground, using concrete if necessary, and attach horizontal slats or panels. Reinforce with braces for stability. Seal or treat the wood to withstand weather, and add decorative elements like hooks or small shelves. Regular maintenance keeps it looking great.
Decorate with personal touches like hanging planters, vintage lanterns, or seasonal banners. Use different wood tones or paint for a layered, textured look. Incorporate small storage compartments or hooks for outdoor gear. During holidays, adorn the fence with banners or lights—making it a year-round feature.
A reclaimed wooden fence is a cost-effective way to add privacy and style to your yard. It’s a project that can be as simple or elaborate as you like, and it ages beautifully over time. With a little effort, you’ll create a secluded retreat that boosts your outdoor enjoyment and adds charm to your home.
9. Set Up a DIY Outdoor Lounge with Budget-Friendly Cushions and Rugs
Dreaming of a cozy spot to unwind or entertain outdoors without blowing your budget? A DIY outdoor lounge is your answer—using simple cushions, rugs, and furniture you can make or repurpose. It’s a quick way to turn a boring slope into a welcoming retreat where friends and family gather.
Recommended Products to replicate this idea
| # | Preview | Product | |
|---|---|---|---|
| 1 |
|
vidaXL Pallet Cushion Anthracite 27.6"x27.6"x4.7" - Indoor/Outdoor Sofa Pad - Water- Polyester -... | Buy on Amazon |
| # | Preview | Product | |
|---|---|---|---|
| 1 |
|
SAND MINE Waterproof Outdoor Rug 5x8 ft, Plastic Reversible Rug, Modern Area Rug, Large Floor Mat... | Buy on Amazon |
Picture a low, layered seating area made from pallets or old crates, topped with colorful cushions and textured rugs. String lights or solar lanterns hang overhead, casting a warm glow. The area feels inviting and relaxed, perfect for chatting or reading a book. The mix of textiles and natural elements creates a laid-back yet stylish vibe.
Choose weatherproof cushions and outdoor rugs in patterns and colors that reflect your personality. Mix and match different textures—knitted throws, woven mats, and plush pillows—to add depth. For a more polished look, frame the space with low dividers or planters. During the colder months, swap out cushions for waterproof ones or add a fire pit nearby.
Start by clearing and leveling a section of your slope. Lay down a durable outdoor rug or layer gravel for a stable base. Arrange pallets or crates as seating and secure them if desired. Add cushions and throws, selecting ones with removable covers for easy cleaning. Install solar-powered string lights or lanterns overhead for ambiance. Keep everything flexible for easy rearranging.
Decorate with personalized pillows, textured throws, or vintage accessories. Incorporate small side tables made from crates or buckets for drinks and snacks. Use outdoor-safe fabrics and colors to match your decor style. Seasonal additions like faux fur throws or decorative lanterns can keep the space fresh all year.
Creating an outdoor lounge from scratch shows that you don’t need fancy furniture to achieve comfort and style. It’s a versatile, budget-friendly project that instantly boosts your backyard’s vibe. Now, you have a dedicated space to relax, entertain, and enjoy the outdoors—proof that simple ideas can make a big impact.
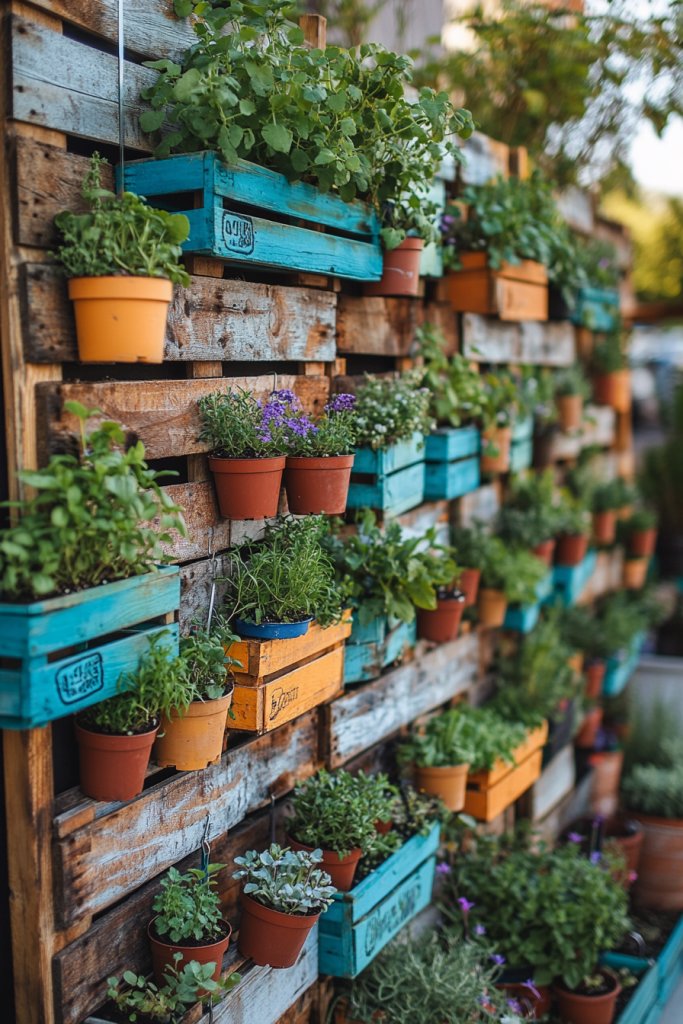
10. Add a Vertical Garden Wall Using Wooden Crates or Recycled Materials
Want to maximize greenery and save space in your sloped yard? A vertical garden wall is a clever, budget-friendly way to do just that. It adds lush color and texture without taking up precious ground area. Plus, it’s an eye-catching feature that boosts your outdoor style.
Recommended Products to replicate this idea
| # | Preview | Product | |
|---|---|---|---|
| 1 |

|
Wooden Wall Planter Vase Set of 2, Boho Hanging Planter for Indoor Plants & Flowers, Natural Wood... | Buy on Amazon |
| # | Preview | Product | |
|---|---|---|---|
| 1 |

|
Make Good PlantPod Luxe - Self-Watering Wall Planters (Set of 6) - Easy to Water and Install -... | Buy on Amazon |
Picture a wall lined with painted wooden crates or repurposed pallets, stacked or hung with care. Inside each crate, you fill small pots or pockets with herbs, succulents, or flowering plants—nothing fancy, just functional and pretty. The vibrant greens pop against the weathered wood, creating a lively canvas of nature. The scent of herbs and the sight of tiny blooms add to the sensory experience.
Use different sizes and arrangements—some crates stacked vertically, others hung horizontally—for visual interest. Incorporate reclaimed materials like old shutters, ladders, or metal frames for a unique look. During different seasons, swap out plants or add decorative elements like fairy lights or small ornaments. Keep it low-maintenance with drought-tolerant plants suited to your climate.
Secure sturdy hooks or brackets on your wall or fence. Attach your crates or pallets with heavy-duty brackets or nails. Fill with potting soil and plant your chosen herbs or succulents, ensuring good drainage. Water regularly, especially during dry spells, and prune as needed. Add decorative stones or small labels for a personalized touch. Maintain by replacing any dead plants promptly.
Decorate with painted patterns, inspirational quotes, or seasonal motifs on the crates. Incorporate small decorative items like mini lanterns or sculptures for added charm. Use color-coordinated pots or labels to keep it organized and attractive. During harvest or blooms, showcase your plants in creative ways or share your bounty with neighbors.
A vertical garden wall is a space-saving, budget-friendly project that transforms a plain wall into a lush, productive feature. It’s easy to customize and maintain, making it perfect for beginners. You’ll enjoy fresh herbs and vibrant blooms while adding a lively, personal touch to your backyard—an inspiring, eco-friendly upgrade.
11. Install Affordable Solar-Powered String Lights for Ambiance
Looking to extend your outdoor enjoyment into the evening without hefty electricity bills? Solar-powered string lights are a cheap, eco-friendly way to add warm ambiance to your sloped backyard. They’re easy to install, require no wiring, and instantly make your space more inviting.
Recommended Products to replicate this idea
| # | Preview | Product | |
|---|---|---|---|
| 1 |
|
Brightown 108FT 52 LED Solar String Lights Outdoor with Remote & USB Port, Shatterproof Bulbs,... | Buy on Amazon |
| # | Preview | Product | |
|---|---|---|---|
| 1 |

|
Ottsuls Shepherd-Hooks 60" Adjustable for Bird-Feeder Lantern Plant-Hook Garden-Stake - Plant Stand... | Buy on Amazon |
Imagine strings of tiny, warm bulbs hanging overhead or along fences and trees, casting a gentle glow. The lights shimmer as they sway in the breeze, creating a cozy atmosphere. Shadows dance on the ground, highlighting your landscaped features. It’s like bringing a little magic to your outdoor space, perfect for relaxing or entertaining.
Choose from different bulb shapes, lengths, and colors to match your style. String lights can be draped along fences, wrapped around poles, or hung in a zigzag pattern across seating areas. During holidays, swap out bulbs for themed or colored options. Use weatherproof clips or hooks for easy installation and removal.
Select high-quality, solar-powered string lights with sufficient battery capacity. Determine the best locations where sunlight hits most of the day—fences, trees, or posts. Secure the lights with hooks or zip ties, ensuring they’re taut and evenly spaced. Turn on the solar panels and let nature do the rest. Replace batteries periodically for optimal performance.
Add decorative elements like lanterns, fabric drapes, or wind chimes nearby. Use different light intensities or blinking modes for variety. Incorporate DIY features such as paper lantern covers or painted bulbs. Combine with outdoor speakers or fire pits for a complete evening experience.
Solar string lights are a simple upgrade that dramatically improves your yard’s nighttime ambiance. They’re budget-friendly, quick to install, and environmentally conscious. Once set up, you’ll enjoy a cozy, magical outdoor space that encourages more evening gatherings and relaxation—proof that small touches make a big impact.
12. Create a Mini Fire Pit Area with Salvaged Bricks
Craving cozy outdoor nights without spending a fortune? A DIY fire pit made from salvaged bricks is the perfect answer. It turns your backyard into a warm gathering spot, perfect for roasting marshmallows or just unwinding after a long day. Plus, it’s a project that’s budget-friendly and surprisingly simple.
Recommended Products to replicate this idea
| # | Preview | Product | |
|---|---|---|---|
| 1 |

|
SoulMate Outdoor 40-Inch Outer/36-Inch Inner Fire Pit Ring Smokeless,Duty Solid Metal Steel Round... | Buy on Amazon |
| # | Preview | Product | |
|---|---|---|---|
| 1 |

|
Fire Bricks, Food Grade Woodstove Firebricks, 3000F, Size 9″ x 4-1/2″ x 1-1/4″, 4-Pack,... | Buy on Amazon |
Picture a circular or square fire pit built from weathered bricks arranged neatly on your yard’s slope. A bed of gravel or fire-safe sand lines the bottom, with a ring of bricks creating a sturdy border. Around it, comfortable outdoor chairs and blankets invite you to settle in. The flickering flames cast a cozy glow, making your yard feel like a rustic retreat.
Use different brick styles or colors for a unique look—perhaps reclaimed red bricks or gray concrete blocks. Build a simple, portable fire pit or a more permanent structure with a raised seat. During colder months, add decorative stones or metal accents. For safety, keep a bucket of water or fire extinguisher nearby.
Gather salvaged bricks and plan your fire pit’s size and shape. Choose a level, clear spot and dig a shallow hole for drainage. Lay the bricks in a circular or square pattern, staggering joints for stability. Fill the interior with gravel or sand, and test the stability. Afterward, add seating around it using pallets or outdoor furniture to complete the scene.
Decorate the area with fairy lights or lanterns hung nearby. Use decorative stones or tiles on the top bricks for a personalized touch. Keep a stash of firewood or fire starters nearby for convenience. Seasonal touches like pumpkins or lanterns can make it festive.
A DIY fire pit is an affordable way to add warmth and ambiance to your backyard. It’s a project that’s both functional and decorative, perfect for creating memories with loved ones. Once built, it becomes your favorite spot for outdoor evenings, proving that with a little effort, you can craft your own cozy retreat.
13. Use Large Potted Plants to Define Zones and Add Visual Interest
Want to create distinct outdoor zones without permanent structures? Large potted plants are your secret weapon—they add height, color, and privacy while being easy to move around. It’s a budget-friendly way to enhance your yard’s layout and visual appeal, especially on a slope.
Recommended Products to replicate this idea
| # | Preview | Product | |
|---|---|---|---|
| 1 |

|
Keter Set of 2 Resin Modern Outdoor 22 Inch Tall Large Flower Pots, Tapered Wood Look Planters for... | Buy on Amazon |
| # | Preview | Product | |
|---|---|---|---|
| 1 |

|
YEMMEN 2 Pack 5ft Artificial Cedar Topiary Trees, Outdoor Artificial Plants for Front Porch Décor,... | Buy on Amazon |
Picture oversized ceramic or plastic pots filled with vibrant flowers, ornamental grasses, or even small trees. These containers act as natural dividers, creating cozy seating nooks or garden rooms. The plants sway gently in the breeze, adding movement and life. Their colors and textures draw the eye and anchor different zones beautifully.
Choose pots in various sizes, shapes, and colors to match your decor. Use lightweight materials for easy repositioning or heavier ones for stability. During different seasons, swap out plants for seasonal color or interest. Incorporate decorative stones or mulch in the pots for added style and moisture retention.
Select weather-resistant pots suitable for your climate. Arrange them strategically along your slope to define pathways, seating areas, or planting beds. Fill with quality potting soil, and plant your chosen flowers, shrubs, or small trees. Water regularly and fertilize as needed. Reposition as your landscape evolves or for special occasions.
Decorate pots with painted designs, ribbons, or fabric wraps to add personality. Use string lights or solar-powered lanterns around the pots for evening ambiance. Create themed zones—like a herb corner or a flower display—by grouping similar plants together. Regularly update your plant choices to keep the space fresh.
Large potted plants are a flexible, affordable way to shape your yard’s layout. They’re easy to move, update, and personalize, making your outdoor space dynamic and welcoming. With a little creativity, you can craft beautiful, functional zones that reflect your style and needs—no heavy lifting required.
14. Incorporate Recycled Tire Planters for a Playful Touch
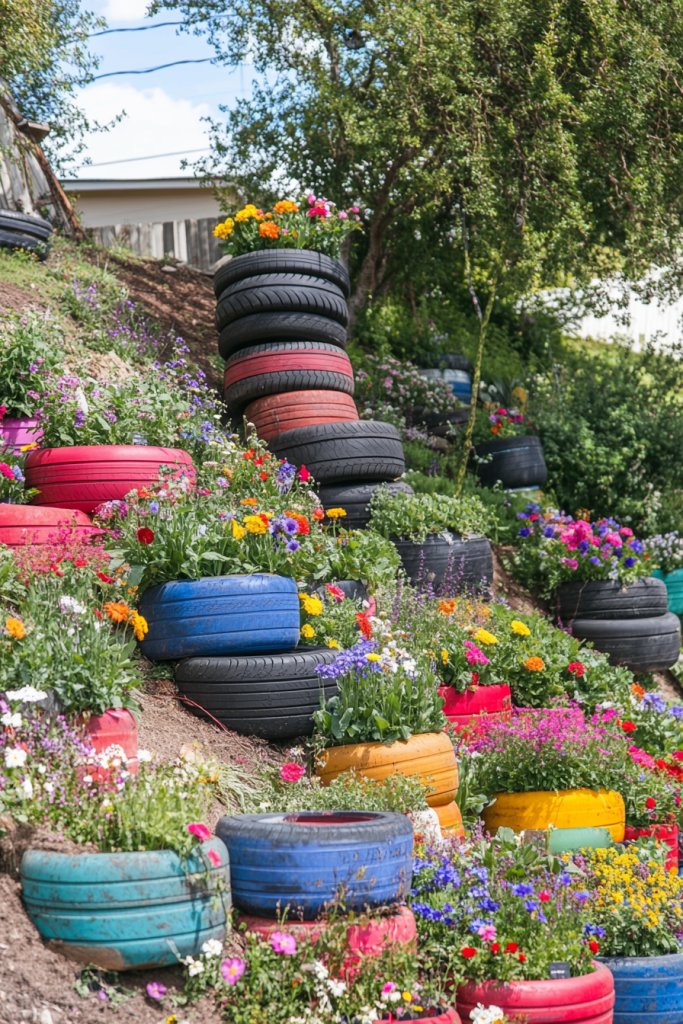
Looking for a fun, eco-friendly way to add color and whimsy to your backyard? Recycled tire planters are perfect—they’re cheap, easy to make, and bring a playful vibe to any outdoor space. Plus, they give old tires a second life, making your project sustainable and stylish.
Recommended Products to replicate this idea
| # | Preview | Product | |
|---|---|---|---|
| 1 |

|
LEETOLLA 𝐑𝐚𝐢𝐬𝐞𝐝 𝐆𝐚𝐫𝐝𝐞𝐧 𝐁𝐞𝐝 𝐎𝐮𝐭𝐝𝐨𝐨𝐫... | Buy on Amazon |
| # | Preview | Product | |
|---|---|---|---|
| 1 |

|
DANG Prime Spray Paint Set of 12 Popular Colors, 400ml Cans, Matte Graffiti Art Supplies, Weather... | Buy on Amazon |
Imagine bright, painted tires stacked or hung vertically, each filled with cheerful flowers or cascading greenery. The bold colors pop against the landscape, creating a lively, eye-catching display. Some tires are stacked to form small sculptures, or hung on fences or trees, adding height and dimension. The quirky look invites smiles and curiosity.
Paint tires in bold colors or patterns to match your theme. Use them as standalone planters or group several for a larger visual impact. Consider stacking tires for a mini-tiered garden or adding wheels for mobility. During different seasons, swap plants for fall foliage or winter greens for variety.
Collect old tires from local garages or recycling centers. Clean thoroughly and paint with outdoor-safe paints. Drill drainage holes in the bottom for proper water flow. Fill with potting soil and plant your favorite flowers, herbs, or succulents. Arrange the tires creatively—on the ground, hanging, or stacked—to suit your yard’s layout.
Decorate tires with painted patterns, stickers, or textured finishes for added flair. Use them as colorful borders or focal points in your yard. Incorporate small garden ornaments or fairy figurines inside or around them. Change out plants seasonally to keep the display lively and fresh.
Recycled tire planters are a playful, eco-conscious project that adds charm and color. They’re straightforward to create and customize, making outdoor gardening accessible for everyone. Your yard will look more vibrant and fun—proof that sustainability and style can go hand in hand.
15. Build a Sand or Gravel Play Zone for Kids
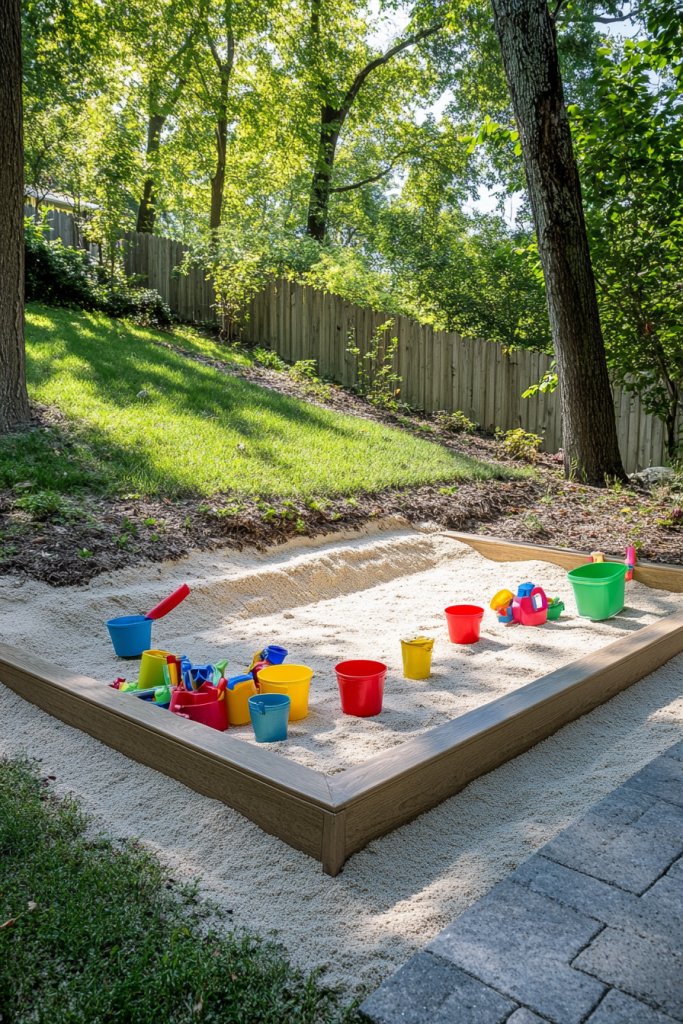
Want to keep the kids entertained outdoors without sacrificing your yard’s aesthetics? A simple sand or gravel play zone is an affordable, low-maintenance solution. It creates a designated area for fun while keeping the rest of your yard tidy. Plus, it’s a safe spot where children can be active and imaginative.
Recommended Products to replicate this idea
| # | Preview | Product | |
|---|---|---|---|
| 1 |

|
Kids Wooden Outdoor Sandbox with Cover,Sand Boxes with Canopy and Foldable Storage Bench Seats,... | Buy on Amazon |
| # | Preview | Product | |
|---|---|---|---|
| 1 |

|
All Purpose Pea Gravel 50 lb | Buy on Amazon |
Picture a flat, bordered section filled with soft sand or smooth gravel, nestled into your slope. Kids dig, build, and play freely, creating castles or pathways. Colorful buckets, shovels, and toys add pops of vibrancy. The textured surface contrasts with the surrounding greenery, giving a defined playground feel that’s both functional and inviting.
Use different borders—wooden planks, stones, or plastic edging—to contain the area. Cover gravel with a weed barrier for easier maintenance. During different seasons, add shade structures like umbrellas or fabric canopies. For older kids, consider incorporating a small climbing wall or outdoor chalkboard nearby.
Choose a flat, accessible spot on your slope and clear the area. Install edging materials to contain the gravel or sand. Fill with a layer of weed barrier fabric and then add your chosen material—sand or gravel—at a depth of at least 6 inches. Regularly rake or level the surface and replenish material as needed. Store toys in weatherproof containers.
Decorate the border with colorful stones or painted wooden stakes. Add a small bench or seating nearby for supervising adults. Incorporate themed accessories like pirate ships, dinosaurs, or fairy gardens. Seasonal decorations or painted stones can keep the play zone lively and engaging.
A DIY sand or gravel play area is a smart, budget-friendly way to encourage outdoor fun for kids. It’s easy to install, customize, and maintain, providing a safe, designated space for play. Plus, it keeps your yard organized while giving children a special spot to enjoy nature and imagination.
16. Use Wooden Crates as Storage and Plant Containers
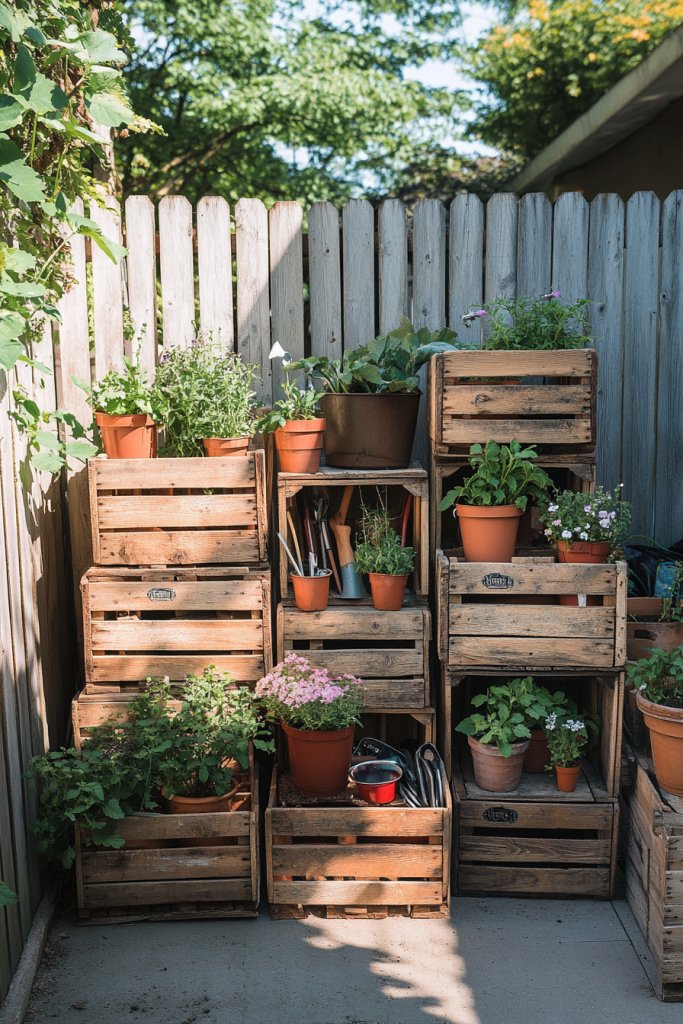
Is clutter taking over your yard, or do you lack stylish storage solutions? Wooden crates are an affordable, versatile option for organizing tools, supplies, or even plants. They add rustic charm while keeping your outdoor space tidy and functional. Who knew that a simple crate could do so much?
Recommended Products to replicate this idea
| # | Preview | Product | |
|---|---|---|---|
| 1 |

|
Edergoo Wooden Crates 2 Pack, Hollow Rabbit Wooden Crates for Display & Storage, Farmhouse Handmade... | Buy on Amazon |
| # | Preview | Product | |
|---|---|---|---|
| 1 |
|
LEIFEOSH 6 Pcs Rustic Wooden Boxes for Storage, Decorative, Display, Arts & Crafts, Rectangle Wooden... | Buy on Amazon |
Envision stacked or hung crates filled with seasonal tools, gardening supplies, or vibrant plants. Some are painted in pastel or bold colors, while others keep their natural wood finish. They sit neatly along your slope, creating a charming, organized look. You might see a small assortment of herbs, flowers, or even a collection of decorative items in them.
Paint or stain crates to match your decor or weatherproof them for durability. Use them as tiered plant stands or wall-mounted shelves. Combine different sizes for visual interest, and incorporate hooks or handles for easy mobility. During different seasons, change their contents to suit your needs or mood.
Source reclaimed or inexpensive wooden crates from thrift stores or online marketplaces. Arrange and secure them in your desired layout—stacked, tiered, or hung on fencing. Fill with soil and plants, or use for storing outdoor essentials like hoses, gloves, or small tools. Seal the wood if needed, and periodically check for stability or rot. Keep contents organized with labels or baskets.
Decorate with painted designs, decals, or fabric linings for a personalized touch. Use them to display seasonal decor or holiday ornaments. Incorporate small hooks or magnetic strips for tools or utensils. Repaint or refinish periodically to keep them looking fresh and match evolving outdoor styles.
Wooden crates are simple, budget-friendly, and endlessly customizable. They turn clutter into charm and offer both practical storage and decorative appeal. With a bit of creativity, your yard becomes more organized and inviting—showing that a little DIY effort goes a long way.
17. Craft a DIY Pergola or Shade Structure with Reclaimed Lumber
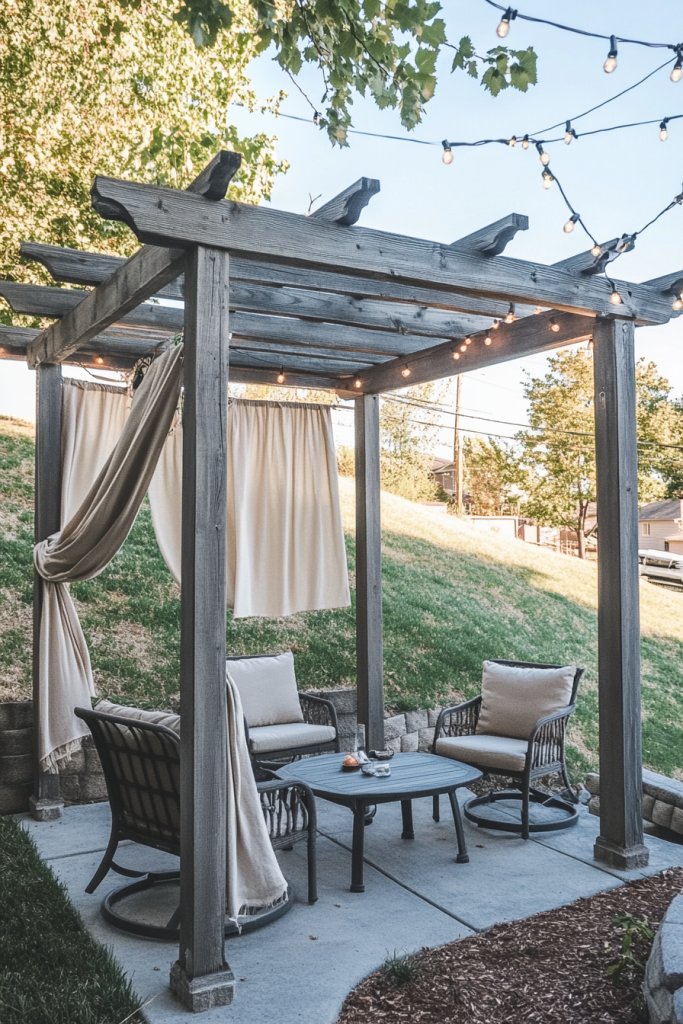
Looking for a shady retreat on a budget? A DIY pergola or shade structure made from reclaimed lumber can turn your slope into a cool, comfortable hangout spot. It’s a project that adds style and function without a hefty price tag. Who says you need to hire a pro for a great outdoor feature?
Recommended Products to replicate this idea
| # | Preview | Product | |
|---|---|---|---|
| 1 |

|
VEVOR Pergola Kit, 4x4 Inch 3-Way Slanted Bracket for 3.5x3.5 Inch Wood Beams in Actual Size, Carbon... | Buy on Amazon |
| # | Preview | Product | |
|---|---|---|---|
| 1 |

|
SUNNY GUARD Sun Shade Sail 10' x 13' Rectangle Sand UV Block Sunshade for Backyard Yard Deck Patio... | Buy on Amazon |
Picture a simple open-frame pergola with weathered beams and posts, draped with hanging fabric or climbing vines (if you’re into plants, which we said to avoid, so think textiles). The structure casts dappled shade over a seating or dining area, making it perfect for sunny afternoons. String lights or lanterns hang overhead, creating a cozy, inviting atmosphere.
Use reclaimed wood with interesting textures or paint it in neutral or vibrant colors. Build a freestanding pergola or attach it to your house or fence for partial coverage. Add a waterproof canopy or shade cloth for extra protection. During different seasons, swap out fabric or add decorative elements like hanging lanterns or wind chimes.
Measure your space and decide on the size and placement of your pergola. Cut and assemble the reclaimed lumber using basic tools—drill, saw, and screws. Secure posts into the ground with concrete or stakes. Attach beams and crosspieces, ensuring stability. Finish with weatherproof sealant or paint to prolong life. Decorate with fabric, lighting, or other accents.
Decorate with colorful outdoor cushions, hanging lanterns, or textured fabrics. Use decorative trim or paint patterns on the wood for a personalized touch. Incorporate small shelves or hooks for hanging lanterns or accessories. Seasonal decorations or string lights can keep your pergola lively year-round.
A DIY pergola is a rewarding project that instantly upgrades your yard’s style and comfort. It’s a versatile structure that you can customize to suit your taste and needs. Once finished, you’ll have a shady oasis where you can relax, entertain, and enjoy your outdoor space—proof that DIY can look professional.
18. Integrate a Folding Deck or Patio Area for Versatile Use
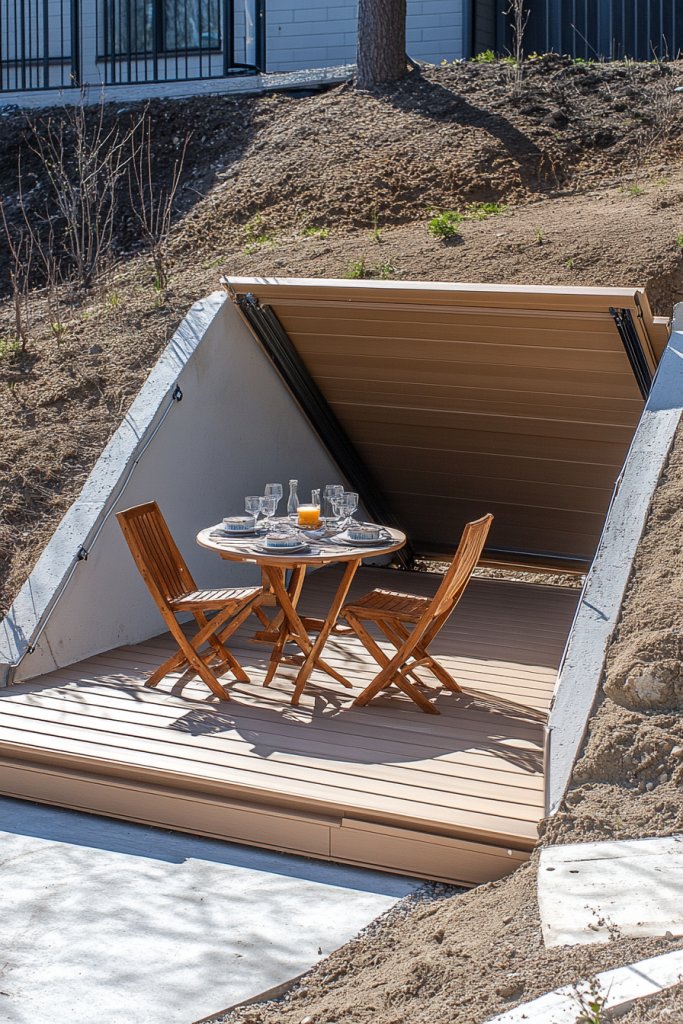
Want a flexible outdoor area that can be used for dining, lounging, or even storage? A folding deck or patio built from inexpensive materials offers a versatile solution for your sloped backyard. It’s a smart way to add usable space that can be moved or stored when not in use. Who says outdoor spaces have to be permanent?
Recommended Products to replicate this idea
| # | Preview | Product | |
|---|---|---|---|
| 1 |

|
36 PCS 12x12 Inch Interlocking Deck Tiles - Waterproof All-Weather Outdoor Patio Flooring for Pool,... | Buy on Amazon |
| # | Preview | Product | |
|---|---|---|---|
| 1 |
|
Adams Quik-Fold® Side Table - Gray | Buy on Amazon |
Imagine a simple platform made from pallets or reclaimed wood that folds out over your slope. When open, it’s a sturdy surface perfect for a table and chairs, with a textured outdoor rug underneath. When not needed, it folds or collapses into a compact stack, hiding away neatly. The setup creates a multi-functional area that’s both practical and stylish.
Use weather-resistant materials like treated wood or composite decking. Add foldable furniture, cushions, or removable covers to adapt to different occasions. Incorporate railings or side panels for safety and privacy. During winter, store or cover the deck to protect it from the elements. Customize with paint or stain to match your aesthetic.
Construct a frame from pallets or reclaimed lumber, ensuring it’s level and secure. Attach hinges or folding mechanisms for easy collapse. Install support legs with stakes or anchors for stability. Cover the surface with outdoor-grade decking boards or pallets. Finish with sealant or stain for durability. Keep the folding mechanism smooth with regular maintenance.
Decorate with outdoor cushions, portable tables, or hanging lanterns. Use colorful fabrics or paint to personalize the surface. Incorporate built-in storage or small planters for additional charm. Change accessories seasonally or for different events to keep the space fresh and inviting.
A folding deck or patio maximizes your outdoor space’s functionality with minimal cost and effort. It’s a clever addition that adapts to your needs and the weather, making your yard a versatile hub for relaxation and entertainment. With a little DIY spirit, you create a practical, stylish feature that transforms your backyard.
19. Add a DIY Bird Feeding Station to Attract Wildlife

Want to bring more life and activity to your backyard without spending much? A DIY bird feeding station is an easy, inexpensive way to attract local birds and enjoy nature up close. It’s a simple project that adds charm and liveliness to your outdoor space. Who doesn’t love watching feathered friends flutter around?
Recommended Products to replicate this idea
| # | Preview | Product | |
|---|---|---|---|
| 1 |

|
Kingsyard 2 Pack Tube Feeders with 6 Feeding Ports for Outdoors Hanging, Premium Hard Plastic... | Buy on Amazon |
| # | Preview | Product | |
|---|---|---|---|
| 1 |

|
Kaytee All American Wild Bird Food Seed Blend for Cardinals, Blue Jays, Finches & Other Outdoor Wild... | Buy on Amazon |
Imagine a small, rustic platform made from reclaimed wood or an old pallet, perched on a sturdy pole or hung from a tree. Birds of all colors and sizes flock to the feeder, pecking at seeds or suet. Nearby, a handmade perch or tray invites them to rest, while a decorative element like a painted sign or small sculpture adds personality. The scene is lively, cheerful, and full of motion.
Use different containers—old teapots, tin cans, or wooden boxes—to create varied feeders. Mount them on poles, hang from hooks, or place on garden tables. Fill with seeds, nuts, or suet depending on your local bird species. During winter, add extra insulation or shelter to keep the birds comfortable. Incorporate multiple feeders for variety.
Find a stable spot—preferably sheltered but visible from your house. Repurpose containers with drainage holes, fill with birdseed or suet, and secure in place. Use old poles, branches, or stakes to elevate the feeders. Clean and refill regularly to keep visitors coming. Position near windows for easy birdwatching and safety.
Paint or decorate the feeders with bright colors or patterns to add visual interest. Surround the station with native plants or shrubs to provide cover and additional food sources. Hang small wind chimes or add signs to create a welcoming environment. Seasonal decorations or themed feeders keep the scene fresh.
A DIY bird feeding station is a delightful, low-cost project that connects you with nature. It’s simple to build and maintain, yet incredibly rewarding when you see your yard come alive with birds. Plus, it’s a wonderful way to support local wildlife and enjoy peaceful moments outdoors—your yard just got a whole lot livelier.
20. Design a Small, Elevated Picnic Spot with Upcycled Materials
Craving a cozy spot for outdoor meals that’s budget-friendly and charming? An elevated picnic area crafted from upcycled materials can turn your sloped backyard into a delightful dining nook. It’s a practical project that adds personality and function without breaking the bank. Who says picnics can’t look stylish?
Recommended Products to replicate this idea
| # | Preview | Product | |
|---|---|---|---|
| 1 |

|
Furinno FG181110-C Tioman Outdoor Backless Bench, Natural,1-Pack | Buy on Amazon |
| # | Preview | Product | |
|---|---|---|---|
| 1 |

|
Picnic Table Cover with Bench Covers Farmhouse Waterproof Windproof Fitted Outdoor Tablecloth with... | Buy on Amazon |
Imagine a small raised platform made from old pallets or scrap wood, topped with a simple table and benches. The setup is nestled into your slope, with cushions or weatherproof fabrics for comfort. Surround it with string lights or lanterns, creating a cozy, inviting atmosphere. The scene invites family and friends to gather, dine, and enjoy the outdoors.
Use weatherproofed pallets or reclaimed wood, painted or stained to match your aesthetic. Add removable cushions or fabric covers for comfort. Incorporate built-in storage or shelves underneath for convenience. During colder months, add a shelter or canopy for year-round use. Personalize with painted designs or decorative elements.
Level the area and build a sturdy base from recycled pallets or planks. Secure the platform with stakes or anchors, ensuring stability on a slope. Attach a tabletop and benches, making sure they’re level and safe. Finish with weatherproof sealant or paint. Add cushions, lighting, or decorative touches to complete the look.
Decorate with personalized tableware, cushions, or seasonal decor. Use colorful or patterned fabrics to add flair. Incorporate small potted plants or ornaments around the area. Seasonal touches like pumpkins or holiday lights can make it festive throughout the year. Keep it flexible for different uses.
A small, elevated picnic spot turns your yard into a charming outdoor dining room. It’s a project anyone can do, with a big impact on your outdoor living experience. Now, you have a cozy, personal space to enjoy meals and gatherings, proving that a little creativity and recycling go a long way.
21. Plant Native Shrubs and Perennials for Low-Maintenance Beauty
Looking to add lush greenery without the hassle of high maintenance or frequent watering? Native shrubs and perennials are your best friends—they thrive naturally, require less care, and look great year-round. It’s a budget-friendly way to create a sustainable, beautiful backyard that’s easy to keep looking sharp.
Recommended Products to replicate this idea
| # | Preview | Product | |
|---|---|---|---|
| 1 |

|
Western Home Landscaping, Second Edition: 42 Landscape Designs, 300+ Plants & Flowers Best Suited to... | Buy on Amazon |
| # | Preview | Product | |
|---|---|---|---|
| 1 |

|
Wildflower Seeds Bulk Mix - 10,000+ Non-GMO Perennial & Annual Seeds - Texas, California & Florida... | Buy on Amazon |
Envision clusters of native bushes like elderberry, serviceberry, or spicebush, lining your slope with their varied textures and colors. Perennials like coneflowers, black-eyed Susans, and bee balm bloom each season, attracting butterflies and hummingbirds. The natural arrangement blends seamlessly into your landscape, adding layers of green, bursts of color, and wildlife activity. The scene feels alive, vibrant, and effortless.
Select plants suited to your soil type, sun exposure, and climate zone for best results. Mix tall, medium, and low-growing varieties for visual interest. Use mulch or native ground covers to suppress weeds and retain moisture. During different seasons, add ornamental grasses or seed heads for winter interest. Incorporate decorative stones or natural elements for a finished look.
Research native plants appropriate for your area and prepare the soil by removing invasive weeds. Plant early in spring or fall for best establishment. Group plants by similar water and sunlight needs to simplify care. Water well during the first year, then rely on natural rainfall. Mulch around plants to conserve moisture and suppress weeds. Regularly monitor for pests or diseases but avoid chemical treatments.
Create personalized plant labels or painted signs to identify your native species. Add decorative baskets or natural sculptures nearby. Incorporate small seating or stepping stones to encourage exploration. During flowering seasons, enjoy the colorful display and consider adding seasonal accents like pumpkins or decorative branches.
Planting native shrubs and perennials is a smart, eco-conscious choice that makes your yard low-maintenance and eco-friendly. It supports local wildlife and reduces your garden’s ecological footprint. With minimal effort, your backyard becomes a lush, resilient haven—proof that native plants can be both beautiful and practical.
Conclusion
Exploring these diverse sloped backyard ideas on a budget demonstrates that transforming uneven terrain into a charming outdoor retreat is entirely possible without overspending. Whether you choose to build tiered gardens, cozy seating nooks, or functional pathways, each idea can be adapted to fit your space and style. Get inspired, roll up your sleeves, and start turning your sloped yard into a captivating outdoor living area—your perfect backyard awaits!
Last update on 2026-03-01 / Affiliate links / Images from Amazon Product Advertising API