A small bathroom remodel can dramatically transform a cramped space into a cozy oasis, making it a popular choice for homeowners seeking both style and practicality. With limited square footage, clever updates can maximize functionality while adding a fresh, modern look that feels spacious and inviting.
In this article, you’ll discover a variety of creative ideas to upgrade your small bathroom efficiently. From smart storage solutions to eye-catching design tweaks, each idea is designed to make your space feel larger, brighter, and more organized—giving you the tools to create a bathroom you’ll love every day.
1. Brighten with Fresh Paint in Light, Neutral Tones
Ever looked at your tiny bathroom and felt it’s more cave than spa? Sometimes, all it takes is a fresh coat of paint to turn that cramped, dull space into something bright and welcoming. It’s a simple fix that can make your entire day better just by walking in. Who knew that changing wall colors could have such a big impact?
Recommended Products to replicate this idea
| # | Preview | Product | |
|---|---|---|---|
| 1 |

|
Heirloom Traditions ALL-IN-ONE Paint, Oxford (neutral gray), Quart - Durable cabinet and furniture... | Buy on Amazon |
| # | Preview | Product | |
|---|---|---|---|
| 1 |

|
Zinsser 02774 PERMA-WHITE Mold & Mildew Proof Interior Paint, Quart, Eggshell White | Buy on Amazon |
Picture walls painted in soft whites or warm beiges that bounce natural light around. Think of a space that feels airy and calm, with a subtle greige tone adding just enough warmth. The smooth, matte finish reflects light evenly, making the room seem larger. Add in a few textured towels or a fluffy bath mat and suddenly, it’s a whole vibe. It’s like giving your bathroom a fresh, clean slate.
Depending on your style, you can go ultra-minimalist with cool tones or add a hint of color with pastel accents. Seasonal changes? Swap out warmer shades for cooler hues in summer. For smaller bathrooms, sticking to lighter shades prevents the space from feeling crowded. Bigger bathrooms can handle darker or more saturated tones for a cozy feel.
Start by choosing high-quality, water-resistant paint designed for bathrooms. Light colors like off-white or soft gray are foolproof options. Prep the walls by cleaning and repairing any damages first. Use painter’s tape to protect edges and corners, and apply a primer if necessary. Two coats typically give the best coverage and color depth. Finish with a semi-gloss or satin for durability and easy cleaning.
Add personality with subtle accent walls or painted stripes for a playful touch. Consider creating a gradient or ombré effect for a modern twist. Personalize further with decorative borders or stencils that match your mood or season. The key is to keep it simple but reflective of your taste. Even a pop of color in the trim or ceiling can elevate the look.
A fresh coat of neutral paint transforms your bathroom into a serene retreat. It’s an inexpensive way to boost your home’s vibe and your mood. Plus, it’s DIY-friendly—so you can brag about your handiwork at your next gathering. Ready to paint your way to a brighter space?
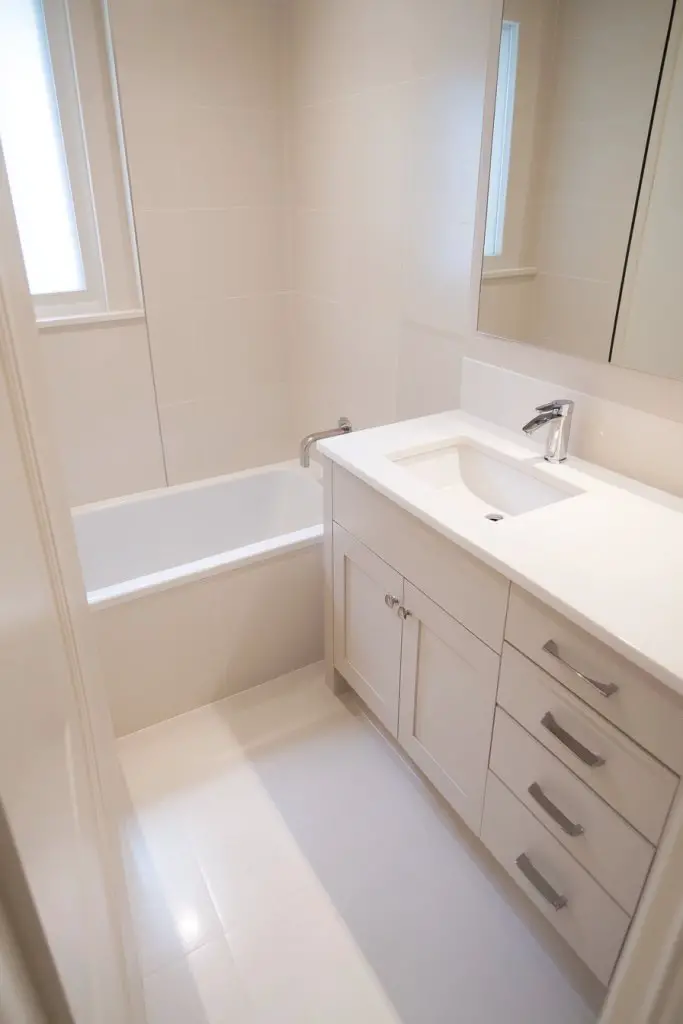
2. Install Space-Saving Floating Vanities
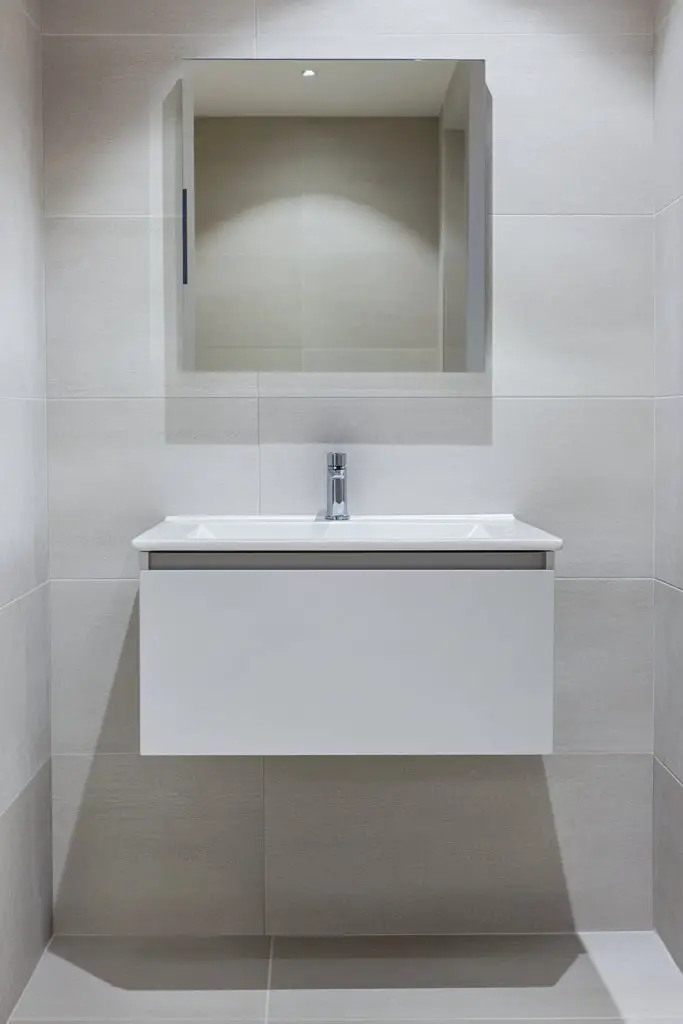
Does your bathroom feel cluttered even when it’s clean? A bulky vanity can eat up precious floor space and make the room feel cramped. Luckily, floating vanities are the sleek solution that combines style with practicality. They give you more room to move and breathe in your small bathroom.
Recommended Products to replicate this idea
| # | Preview | Product | |
|---|---|---|---|
| 1 |

|
ALIMORDEN Floating Shelf with Drawer, Wall Mounted Desk, 31 inch Surface, White | Buy on Amazon |
| # | Preview | Product | |
|---|---|---|---|
| 1 |

|
ONBRILL 24 Inch Bathroom Vanity with Sink Combo, Floating Bathroom Vanity with 2 Fluted Drawer &... | Buy on Amazon |
Imagine a slim, wall-mounted vanity with a minimalist countertop, floating just inches above the floor. It creates a visual illusion of more space, especially when paired with a large mirror. The open area underneath makes the room look less crowded. Soft lighting reflects off the smooth, modern surface, enhancing the clean aesthetic. It’s almost like your bathroom is floating on air.
Choose floating vanities with different materials—wood for warmth, stone for luxury, or sleek laminate for affordability. For a more eclectic look, combine open shelving with closed cabinets. Small bathrooms benefit from narrow, wall-hung units, while larger spaces can handle double sinks. Seasonal decor? Add a textured rug or decorative towels to match your style.
Select a vanity that fits your space and storage needs. Mount it securely to wall studs to ensure stability, especially if you plan to store heavier items. Use a level to align it perfectly. Connect plumbing carefully and seal all edges to prevent water damage. Consider a vessel sink or integrated basin for a seamless look. Finish with wall-mounted fixtures to keep everything sleek.
Personalize your floating vanity with unique hardware or colorful drawer pulls. Add a decorative tray or organizer on top for toiletries. Use a statement mirror or framed artwork above for visual interest—just avoid clutter. Underneath, add baskets or small bins for extra storage without sacrificing the airy vibe. It’s all about blending function with your personal flair.
Floating vanities are a game-changer for small bathrooms, making the space feel twice as big. They’re modern, easy to clean, and highly customizable. Once installed, your bathroom instantly looks more polished and organized. Ready to float your way to a smarter space?
3. Replace Old Fixtures with Modern, Water-Efficient Options
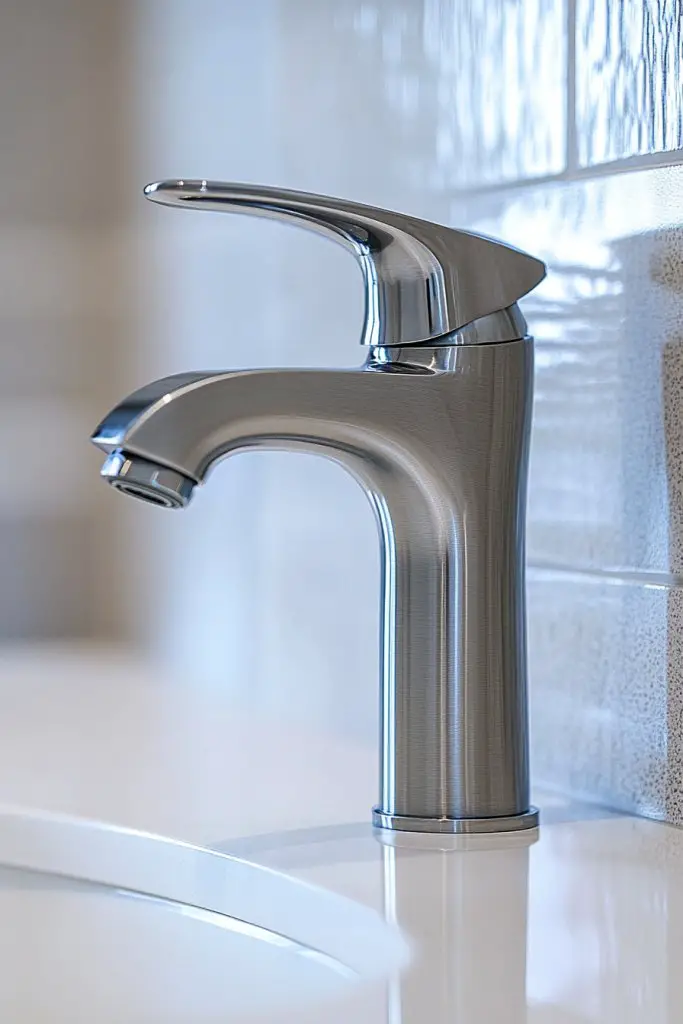
Are your old, leaky fixtures turning your bathroom into a water-wasting nightmare? Upgrading to modern, water-efficient fixtures not only saves you money but also adds a fresh, contemporary touch. It’s a win-win for your wallet and the environment.
Recommended Products to replicate this idea
| # | Preview | Product | |
|---|---|---|---|
| 1 |
|
Bathroom Faucets for Sink 3 Hole, Hurran 4 inch Brushed Nickel Bathroom Sink Faucet with Pop-up... | Buy on Amazon |
| # | Preview | Product | |
|---|---|---|---|
| 1 |

|
Niagara Conservation N2615CH Tri-Max 1-Spray with 0.5-1.5 GPM 2-in. Wall Mount Adjustable Fixed... | Buy on Amazon |
Envision sleek chrome or matte black faucets with minimalist handles that instantly elevate your space. The new showerhead boasts a slim profile with high-pressure, eco-friendly technology. Handles are smooth and ergonomic, making every turn satisfying. The overall effect is a bathroom that looks and feels more modern and eco-conscious.
Choose fixtures that match your aesthetic—industrial, modern, or classic. Matte finishes hide fingerprints better, while shiny chrome adds a pop of brightness. For smaller bathrooms, opt for compact fixtures that don’t overpower the space. Consider dual-function showerheads or touchless faucets for added convenience and style.
Start by selecting fixtures with high WaterSense ratings for efficiency. Turn off the main water supply before removing old fixtures, and carefully disconnect plumbing. Use plumber’s tape on threaded connections to prevent leaks. Install the new fixtures securely, ensuring proper alignment. Test all connections for leaks before finishing. Finish by cleaning excess sealant or tape for a polished look.
Add a modern touch with matching handles or a coordinated finish across fixtures. Consider a waterfall spout for a spa-like feel. Upgrade your hardware with sleek, contemporary designs that complement your overall decor. Personal touches like a soap dispenser or a matching toothbrush holder can tie everything together.
Modern, water-efficient fixtures are a simple upgrade that dramatically improves your bathroom’s look and function. They help reduce water bills and make your space more stylish and eco-friendly. Once installed, you’ll wonder why you waited so long to make the switch. Cheers to smarter, greener living!
4. Add Mirrored Wall Cabinets for Extra Storage
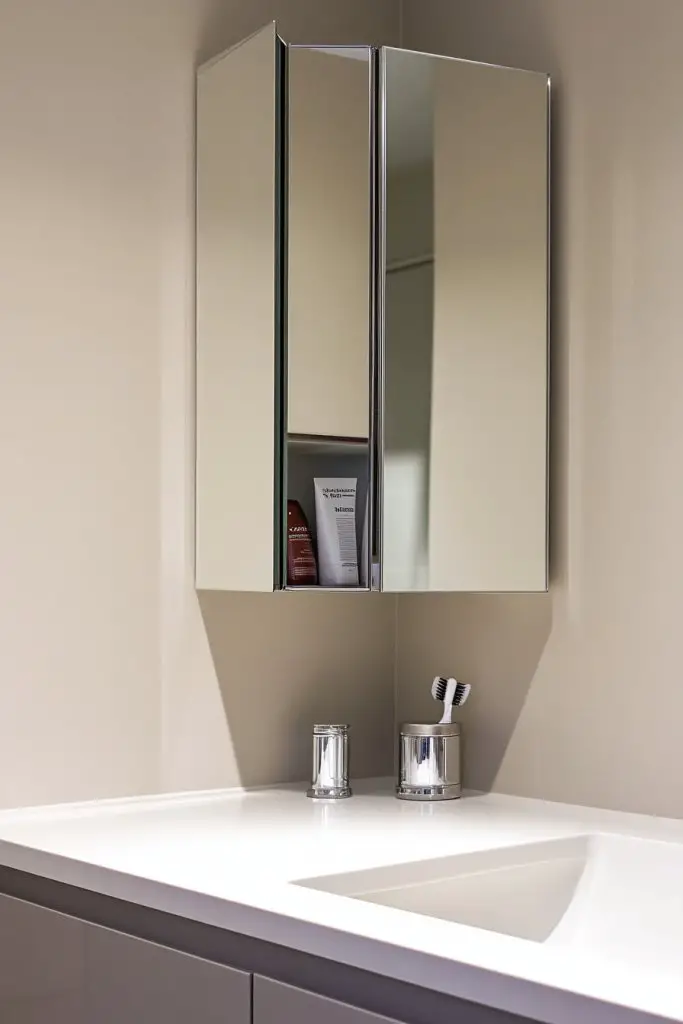
Cluttered countertops and limited storage make small bathrooms feel chaotic. Mirrored wall cabinets are an elegant solution that offers both storage and a sense of spaciousness. They keep essentials tucked away while adding a sleek, reflective surface that brightens the room.
Recommended Products to replicate this idea
| # | Preview | Product | |
|---|---|---|---|
| 1 |

|
TokeShimi 24x32 Mirrored Medicine Cabinet Recessed or Wall Mount, Aluminum Tempered Silver Bathroom... | Buy on Amazon |
| # | Preview | Product | |
|---|---|---|---|
| 1 |

|
Homleke Bathroom Wall Cabinet, Over Toilet Storage Cabinet with Barn Doors and Adjustable Shelves,... | Buy on Amazon |
Imagine a slim cabinet mounted above your sink, with mirrored doors that reflect light and make the space seem bigger. Inside, neatly organized shelves hold toiletries and small essentials. The mirror doubles as a functional surface for grooming, eliminating the need for a separate mirror. The clean design blends seamlessly into your decor, creating a minimalist yet practical look.
Choose cabinets with different finishes—stainless steel, painted wood, or frameless glass—to match your style. For a more classic look, opt for mirrored cabinets with ornate frames; for modern spaces, go frameless or with sleek edges. They work well in both large and tiny bathrooms, especially when sizes are tailored to your space.
Measure the available wall space carefully before purchasing. Use a level and stud finder to ensure secure mounting on wall studs. Attach the cabinet with appropriate anchors, and check alignment with a level. Organize the interior with small baskets or dividers. Regularly clean the mirror surface to keep reflections crystal clear.
Add LED backlighting behind the mirror for a glow effect, or install a frosted glass panel for soft illumination. Decorate the edges with subtle trims or color accents that match your vanity or wall paint. Use decorative handles or knobs to give it a custom feel. Keep accessories minimal to preserve the sleek look.
Adding mirrored wall cabinets boosts both function and style, making your bathroom look more organized and spacious. They’re a smart investment that pays off in everyday convenience. Once in place, you’ll love how they elevate your entire space—both practically and aesthetically.
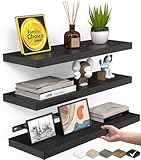
5. Incorporate Open Shelving for Practical Storage
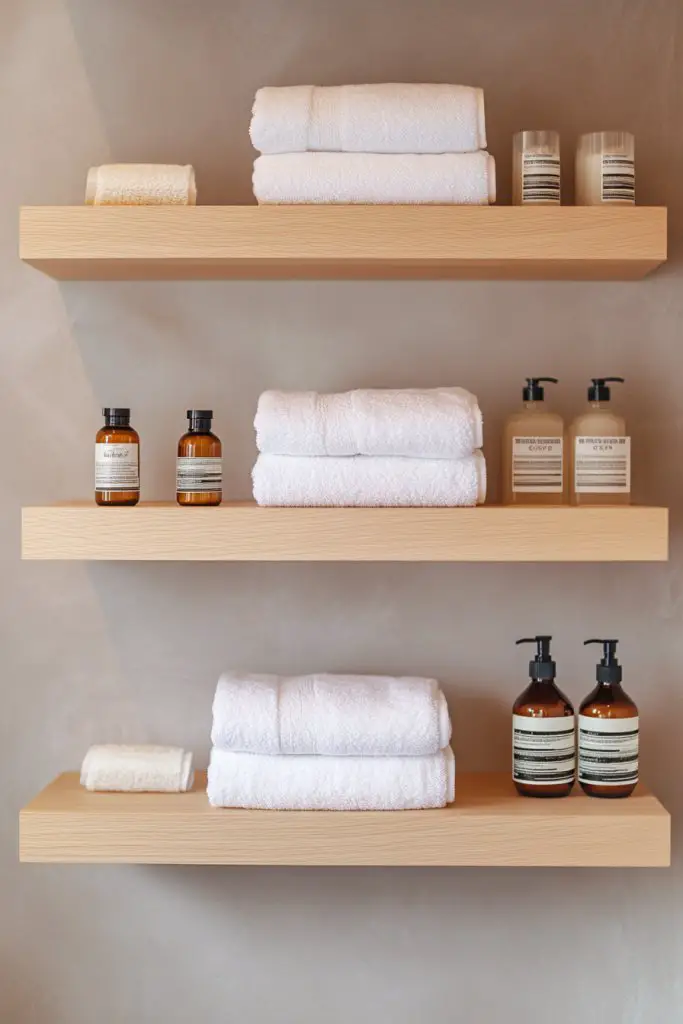
Is your bathroom counter always cluttered with towels, bottles, and brushes? Open shelving offers an easy way to keep essentials within arm’s reach while adding a stylish touch. It’s perfect for small spaces, giving you storage without the bulk of closed cabinets.
Recommended Products to replicate this idea
| # | Preview | Product | |
|---|---|---|---|
| 1 |

|
Forbena White Floating Shelves for Bathroom Organizer Over Toilet, Bathroom Shelves Wall Mounted... | Buy on Amazon |
| # | Preview | Product | |
|---|---|---|---|
| 1 |

|
WOPITUES Wood Floating Shelves Set of 6, Shelves for Wall Decor, Farmhouse Shelf for Bedroom,... | Buy on Amazon |
Picture floating wooden shelves mounted on a painted wall, holding rolled towels, decorative jars, and daily essentials. The open design makes everything visible but organized, creating a curated look. Pair it with a cute basket or two for hidden storage underneath. The textures and natural finishes add warmth and character to your space.
Mix and match materials like reclaimed wood, metal brackets, or sleek acrylic to fit your decor style. Install them at different heights for visual interest and accessibility. For seasonal updates, change out decorative items or swap towels for different textures. Open shelving works well in both modern and rustic bathrooms.
Start by measuring wall space and selecting sturdy brackets and shelves that can hold your items. Use a level to ensure perfect alignment. Secure the brackets into wall studs or use appropriate anchors for drywall. Decorate with a combination of functional and decorative items—think textured towels, ceramic jars, or small plants (if you’re into greenery). Regular dusting and organization keep it looking fresh.
Add decorative elements like vintage soap dishes, small sculptures, or textured textiles to personalize your shelves. Use coordinated color schemes for a harmonious look. For a minimalist approach, keep the shelves sparse and clean, emphasizing quality over quantity. You can also incorporate LED strip lighting underneath for a subtle glow.
Open shelving makes your bathroom feel more inviting and accessible. It’s a practical way to showcase your style while staying organized. Once styled, it transforms the space into a functional, aesthetically pleasing retreat—proof that small updates can make a big difference.
6. Enhance Lighting with Layered Fixtures
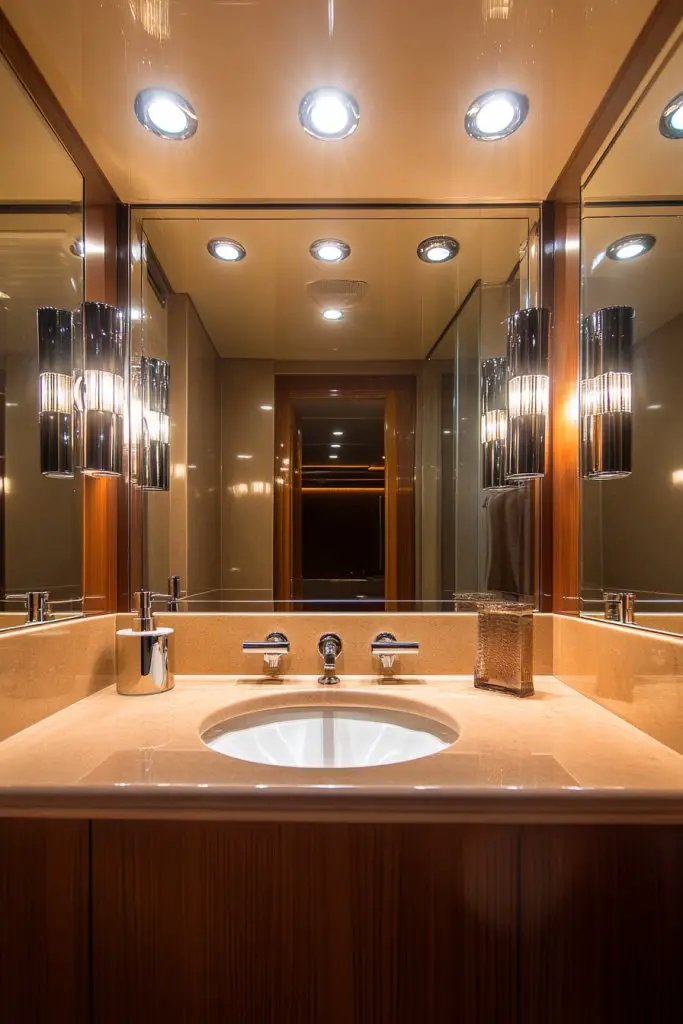
Is your bathroom lighting flat, dull, or uneven? Proper lighting can transform your space from functional to fabulous. Layered fixtures ensure every corner is lit, creating a bright, welcoming atmosphere. It’s not just about seeing—it’s about feeling good every time you step in.
Recommended Products to replicate this idea
| # | Preview | Product | |
|---|---|---|---|
| 1 |

|
Zarbitta 3-Light Bathroom Light Fixtures, 17.23" Black Modern Vanity Lights with Clear Glass Shade,... | Buy on Amazon |
| # | Preview | Product | |
|---|---|---|---|
| 1 |

|
Amico 12 Pack 6 Inch 5CCT Ultra-Thin LED Recessed Ceiling Light with Junction Box, 1050LM... | Buy on Amazon |
Picture a room with a combination of ceiling LEDs, wall sconces, and under-cabinet lighting. The ceiling lights provide general illumination, while sconces flank the mirror, eliminating shadows. Soft under-cabinet glow highlights countertops without harsh glare. The layered setup creates depth and warmth, making your bathroom feel cozy and well-designed.
Select fixtures that match your decor—brushed nickel for a contemporary look or matte black for industrial charm. Install dimmers to adjust brightness according to mood or time of day. In small bathrooms, focused task lighting helps with grooming, while larger spaces can handle more elaborate layered setups. Consider color-changing LED strips for a fun, customizable touch.
Start with a lighting plan that combines general, task, and accent lighting. Choose fixtures rated for damp or wet environments. Install ceiling-mounted LEDs that distribute light evenly, then add sconces or wall-mounted fixtures at eye level. Use a professional if wiring is complicated or if you want a clean, hidden look. Test each layer individually before final assembly. Finish by adjusting dimmers or smart controls for perfect ambiance.
Use decorative fixtures with unique designs or finishes to add character. Incorporate candles or LED candles for ambiance when desired—just avoid real flames near water sources. Change the color temperature of bulbs to match your mood, from cool daylight to warm cozy tones. Small details like dimmable lights can make your routine feel more luxurious.
Layered lighting turns a basic bathroom into a personalized retreat. It highlights your decor choices and makes daily routines more pleasurable. Once you see how well it works, you’ll wonder why you didn’t upgrade sooner. Brighten your space and your mood—your bathroom deserves it.
7. Choose Compact, Multi-Functional Fixtures
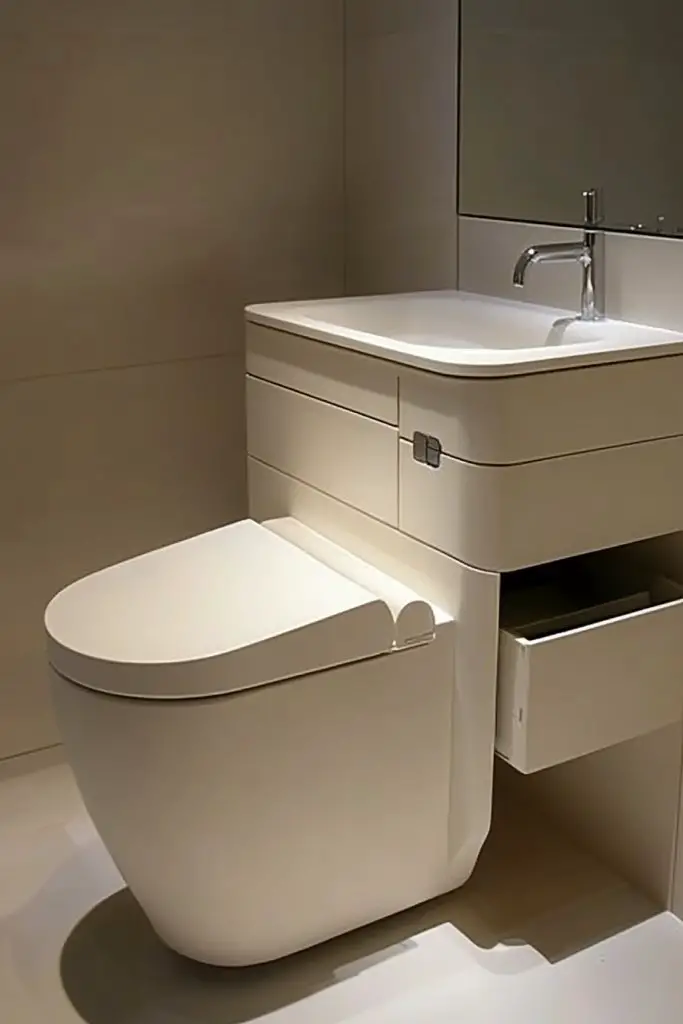
Limited space calls for smart solutions. Multi-functional fixtures help you do more with less, combining elements like toilets with bidets or sinks with storage. They’re perfect for maximizing utility without sacrificing style. It’s like getting more room to breathe and more functionality in one sleek package.
Recommended Products to replicate this idea
| # | Preview | Product | |
|---|---|---|---|
| 1 |

|
WITMYA Smart Toilet with Bidet Built In, One Piece Bidet Toilet with Auto Dual Flush, Foam Shield,... | Buy on Amazon |
| # | Preview | Product | |
|---|---|---|---|
| 1 |

|
IRONCK 42 Inch Bathroom Vanity with Sink Set, Bathroom Cabinet Vanity with 2 Visual Buffer Gate,... | Buy on Amazon |
Picture a compact toilet with an integrated bidet feature, saving space and adding a touch of luxury. Or a wall-mounted sink with built-in cabinets underneath, providing hidden storage for toiletries. These fixtures blend seamlessly into the design, reducing clutter and creating a clean, modern look. The clever use of space makes your tiny bathroom feel less cramped and more functional.
Select fixtures in finishes that match your overall aesthetic—brushed nickel, matte black, or polished chrome. For small bathrooms, opt for wall-hung models that free up floor space. Consider dual-purpose units, like a combined sink and vanity, for maximum efficiency. Seasonal or style updates? Swap out handles or hardware for a fresh look.
Choose fixtures that meet your size and functional needs, and ensure compatibility with existing plumbing. Measure carefully to avoid installation surprises. Hire professionals for wall-mounted or complex units to ensure stability and proper hookups. Use wall reinforcement if necessary. Test the fixtures thoroughly before sealing everything in. Regular maintenance keeps them working smoothly.
Add custom touches like matching hardware or coordinated colors. Install a sleek, fold-down seat or a hidden trash bin for extra convenience. Incorporate a small shelf or niche nearby for essentials. Keep the design simple but add a pop of personality with unique finishes or subtle accents.
Multi-functional fixtures are a smart way to upgrade your bathroom without expanding its footprint. They combine style and practicality, making daily routines easier. Once you see how much a well-chosen fixture can do, you’ll never go back to traditional setups. Embrace efficiency and style—your space will thank you.
8. Incorporate Vertical Storage Solutions
Struggling with clutter and limited space? Vertical storage is a game-changer, turning empty wall space into valuable storage real estate. It keeps your countertops clear and your essentials within reach. Plus, it adds visual height, making your bathroom feel more spacious.
Recommended Products to replicate this idea
| # | Preview | Product | |
|---|---|---|---|
| 1 |

|
Kalrin Over-The-Toilet Storage Rack, 4-Tier Bathroom Organizer Shelf Over Toilet with Adjustable... | Buy on Amazon |
| # | Preview | Product | |
|---|---|---|---|
| 1 |
|
BAYKA Floating Shelves for Wall, Wall Mounted Rustic Wood Shelves for Bathroom, Bedroom, Living... | Buy on Amazon |
Imagine tall, slim cabinets reaching from floor to ceiling, with sleek handles and a modern finish. Wall-mounted racks or open shelves hold towels, baskets, or decorative containers. The vertical lines draw the eye upward, creating an illusion of height. The organized setup looks neat and intentional, giving the room a polished feel.
Choose from open shelving, closed cabinets, or a combination of both. Use high gloss or matte finishes depending on your decor. Install in unused corners or above the toilet for maximum efficiency. Seasonal updates? Swap out baskets or decorative boxes to match your style or color scheme.
Measure wall space accurately before purchasing. Secure tall cabinets into wall studs for stability. Use wall anchors if mounting on drywall alone. Organize contents with labeled baskets or small containers to keep things tidy. Regularly check for dust or damage, especially in high-humidity zones. Consider adding hooks or towel bars underneath for additional functionality.
Decorate with stylish knobs or handles that match your hardware. Use decorative storage boxes or woven baskets to add texture. Incorporate labels for easy access to supplies. For a softer look, add fabric liners or textured finishes to open shelves. Keep it functional yet visually appealing.
Vertical storage unlocks hidden potential in your small bathroom. It keeps essentials organized and accessible while elevating your decor. Once optimized, your space feels less cluttered and more intentional. Ready to reach new heights with your storage?
9. Add a Slimline Towel Warmer or Rack

Nothing beats wrapping up in a warm towel after a shower. But bulky towel racks can take up valuable space and look bulky. A slimline towel warmer or rack solves this by providing cozy towels without crowding your small bathroom. Plus, it adds a touch of spa luxury.
Recommended Products to replicate this idea
| # | Preview | Product | |
|---|---|---|---|
| 1 |

|
Sawlece Freestanding Towel Warmer – 5-Bar Heated Towel Rack with Timer & Adjustable Temperature,... | Buy on Amazon |
| # | Preview | Product | |
|---|---|---|---|
| 1 |

|
STWWO Towel Racks for Bathroom, Bathroom Towel Storage Wall Mounted 30 inch with Shelf Can Holds 6... | Buy on Amazon |
Visualize a narrow, wall-mounted towel warmer with sleek metal bars that radiate gentle heat. It fits neatly into tight spaces and keeps towels dry and warm. The warm glow of the heater creates a relaxing ambiance, especially on chilly mornings. It’s a subtle upgrade that makes your bathroom feel more indulgent.
Choose from electric or hydronic models depending on your setup. Opt for finishes that match your fixtures—chrome, matte black, or brushed nickel. For smaller spaces, a vertical or corner-mounted rack maximizes utility. Seasonal use? You could switch between heated and regular racks to suit your needs.
Select a slim, wall-mounted model that fits your space perfectly. Install according to manufacturer instructions, ensuring proper electrical connections if electric. Mount it securely into wall studs or using heavy-duty anchors. Test the heater before hanging towels. Regular cleaning and maintenance keep it efficient and looking good.
Personalize your towel warmer with decorative covers or textured towels. Use matching hardware or integrate it into a larger wall feature. For a softer look, select racks with rounded edges or matte finishes. Keep towels organized with hooks or small baskets nearby.
A slimline towel warmer adds comfort and style without cluttering your space. It’s a small upgrade with a big impact on your daily routine. Once installed, you’ll enjoy warm towels every day and feel like you’re at a luxury spa—without leaving home.
10. Create the Illusion of Space with Strategic Mirror Placement
Feeling cramped every time you step into your bathroom? Mirrors are a simple but powerful tool to create the illusion of space. Proper placement can reflect light and depth, making even the smallest baths feel more open. It’s one of the easiest upgrades with a big visual payoff.
Recommended Products to replicate this idea
| # | Preview | Product | |
|---|---|---|---|
| 1 |

|
VooBang Large Full Length Mirror 78" x 35" - Shatterproof Floor Full Body Mirror with Aluminum Alloy... | Buy on Amazon |
| # | Preview | Product | |
|---|---|---|---|
| 1 |

|
LOAAO 24X32 LED Bathroom Mirror with Lights, Anti-Fog, Dimmable, Backlit + Front Lit, Lighted... | Buy on Amazon |
Imagine a large mirror mounted opposite a window or light source, bouncing natural rays throughout the room. Multiple smaller mirrors arranged thoughtfully can also amplify light and add visual interest. The reflections give your eyes a sense of depth, tricking the mind into perceiving a bigger space. The effect is both practical and aesthetically pleasing.
Opt for frameless, beveled, or decorative frames depending on your style. For narrow bathrooms, a full-length mirror can double as a door or wall feature. Use multiple mirrors in creative arrangements for a modern look or a single oversized mirror for simplicity. Seasonal updates? Change frame styles or add decorative trim.
Pick a strategic wall—preferably opposite windows or sources of light—and securely mount a large mirror. Use anchors and level tools to ensure perfect alignment. For a cohesive look, match the mirror finish with your fixtures or hardware. Keep safety in mind with properly supported mounting hardware. Regularly clean with glass cleaner to maintain clarity.
Frame your mirror with LED backlighting for a soft, ambient glow. Use decorative trim or paint the edges to match your decor theme. Incorporate multiple smaller mirrors for a gallery wall effect. Combine with sleek storage solutions nearby for a functional upgrade.
Strategic mirror placement is a simple trick that transforms your bathroom into a more spacious, brighter haven. It’s a budget-friendly upgrade that pays off instantly. Once you see how much a mirror can do, you’ll wonder why you didn’t think of it earlier—brighten up and expand your space with mirrors!
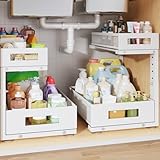
11. Install Under-Sink Storage Drawers or Baskets
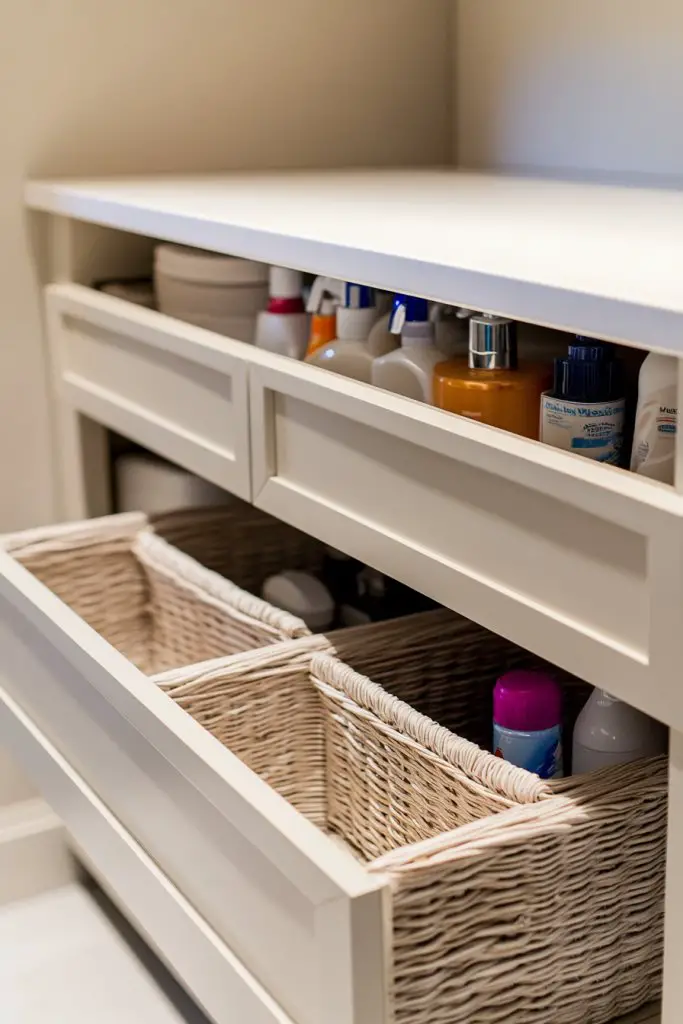
Is the space under your sink a chaotic mess of products and cleaning supplies? Organizing this area with dedicated drawers or baskets can save time and reduce stress. It turns a hidden space into a neat, accessible storage zone that keeps your countertop free.
Recommended Products to replicate this idea
| # | Preview | Product | |
|---|---|---|---|
| 1 |
|
2-Pack Under Sink Storage Organizer, Large 2-Tier Elegant Mesh Pull Out Shelf for Kitchen and... | Buy on Amazon |
| # | Preview | Product | |
|---|---|---|---|
| 1 |
|
BINO | Woven Plastic Basket | Small (Natural), 5-Pack | THE JUTE COLLECTION | Home Organization,... | Buy on Amazon |
Picture sleek, shallow drawers fitted beneath your sink, with labels for everything from toothbrushes to cleaning sprays. Or woven baskets lined up in a custom cabinet, each holding specific items. The neat arrangement makes everything easy to find and adds a cozy, organized feel to your bathroom. Clear containers or small dividers keep things tidy and visible.
Choose materials like plastic, bamboo, or metal, depending on your decor and budget. For small spaces, opt for slim, stackable drawers that maximize vertical space. Add decorative touches like colored liners or labels. Seasonal or style shifts? Swap out baskets or re-label for a fresh look.
Measure your under-sink area carefully to choose the right size drawers or baskets. Install sliding rails or baskets that fit snugly without obstructing plumbing. Use labels or color coding to keep everything organized. Regularly declutter and wipe down surfaces to maintain cleanliness. Keep frequently used items within easy reach, and store less-used supplies higher up.
Decorate baskets with fabric liners or painted labels for a personal touch. Use stackable units to increase storage vertically. Incorporate small hooks or clips inside cabinet doors for additional hanging storage. Keep your supplies organized by category—like skincare, haircare, or cleaning products.
Smart under-sink storage turns chaos into calm and helps you stay on top of your routine. It’s a practical upgrade that makes daily chores more efficient. Once you organize this hidden space, your entire bathroom feels more serene and functional. Ready to tidy up?
12. Incorporate Minimalist Accessories and Hardware
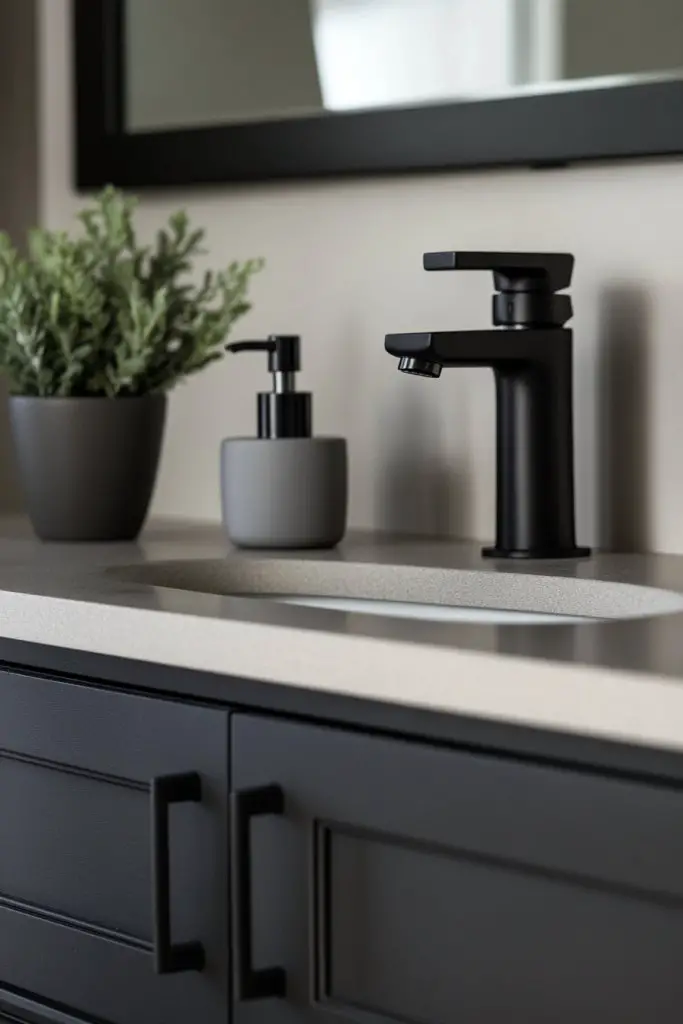
Cluttered or overstated accessories can make a small bathroom feel chaotic. Minimalist hardware and accessories bring a clean, cohesive look that emphasizes simplicity and elegance. They help create a calm, uncluttered environment perfect for relaxation.
Recommended Products to replicate this idea
| # | Preview | Product | |
|---|---|---|---|
| 1 |

|
10-Pieces Matte Black Bathroom Accessories Set, 23.6 Inch Bath Towel Bar Set, SUS 304 Stainless... | Buy on Amazon |
| # | Preview | Product | |
|---|---|---|---|
| 1 |

|
Ymiko Wall Mounted Towel Bar, Minimalist Bathroom Towel Holder with Acrylic Finish, Modern Space... | Buy on Amazon |
Visualize sleek, matte black handles on cabinets, simple chrome towel rings, and understated fixtures. The absence of ornate details allows your space’s natural lines and finishes to shine. Small touches like a minimal soap dish or a simple toothbrush holder keep everything functional yet unobtrusive. The overall effect is modern, refined, and calming.
Choose hardware with clean lines and understated finishes—brushed nickel, matte black, or satin brass. Keep accessories to a minimum: a single soap pump, a towel hook, and a small shelf. For seasonal updates, swap out hardware with different finishes or shapes. Consistency across fixtures enhances the cohesive feel.
Start by removing old hardware and cleaning the surface thoroughly. Measure existing screw holes to match new pieces or drill new holes if needed. Use a level and appropriate tools to ensure straight installation. Tighten screws securely, avoiding overtightening that can damage surfaces. Keep spare hardware for future updates or repairs.
Add subtle touches like textured grips or custom engraved handles for a personal feel. Use matching or complementary finishes for all fixtures. Incorporate small, functional accessories like a minimalist soap pump or a slim towel hook. Keep clutter out of sight for a sleek, tidy look.
Minimalist accessories make your bathroom look more modern and spacious. They’re easy to update and maintain, making your daily routine smoother. Once everything is in place, you’ll appreciate the clean, clutter-free environment—proof that less is more.
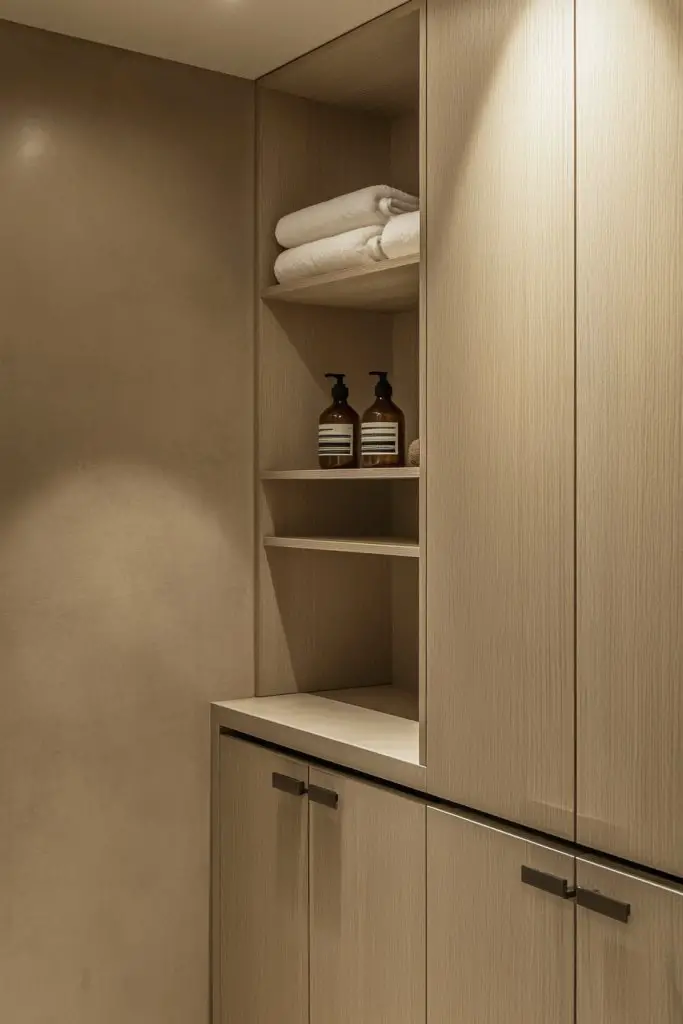
13. Implement Hidden or Recessed Shelving in Walls
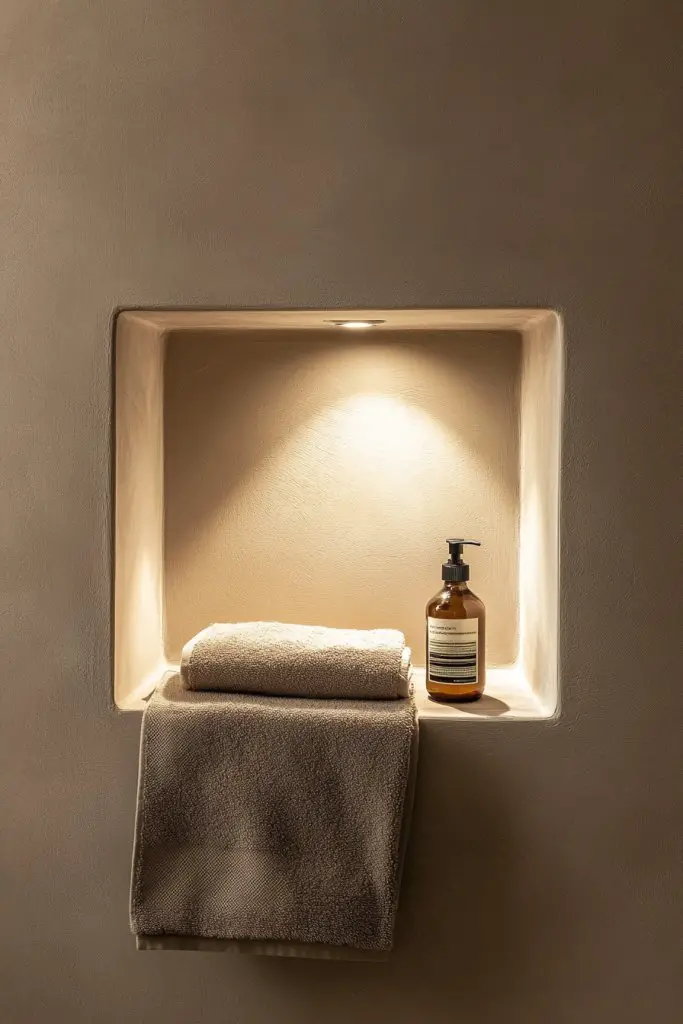
Cluttered countertops and visible shelves can make a small bathroom feel chaotic. Hidden or recessed shelving offers a sleek solution that keeps essentials out of sight but easily accessible. It’s a clever way to maximize your space and keep everything looking tidy.
Recommended Products to replicate this idea
| # | Preview | Product | |
|---|---|---|---|
| 1 |

|
Bernkot Stainless Steel Shower Niche 24" X 12" Matte Black No Tile Needed Niche Shower for Bathroom... | Buy on Amazon |
| # | Preview | Product | |
|---|---|---|---|
| 1 |

|
HAIDAIYA 14'' * 24'' Recessed Medicine Cabinet Wall Niche Wood, 3-Tier Bathroom Niche Insert for... | Buy on Amazon |
Imagine a small niche built into the wall, lined with waterproof tiles, holding your toiletries and grooming essentials. When closed, it’s flush with the wall, almost invisible. When opened, it reveals a neatly organized space that blends seamlessly into your decor. The clean lines and hidden storage make the room appear larger and more organized.
Recessed niches work well behind toilets, showers, or vanities. Use waterproof, mold-resistant materials for durability. Decorate with sleek baskets or small containers to keep items organized. Seasonal or style updates? Simply change the contents or re-tile for a fresh look.
Plan the location and size of your recessed shelves based on your storage needs. Frame the opening with waterproof drywall or cement board, and tile or paint the inside for a finished look. Use waterproof sealant to prevent water intrusion. Ensure the niche is level and securely anchored. Regularly check for moisture buildup and clean as needed.
Add LED strip lighting inside the niche for a subtle glow. Use decorative tiles or contrasting grout to make it stand out or blend in. Incorporate small, stylish containers for organization. Keep the design simple but functional for everyday use.
Recessed shelving cleverly hides clutter while adding architectural interest. It’s a practical upgrade that makes tiny bathrooms more spacious and organized. Once built, it feels like a custom feature that elevates your entire space—proof that smart design makes all the difference.
14. Use Light-Reflecting Finishes and Surfaces
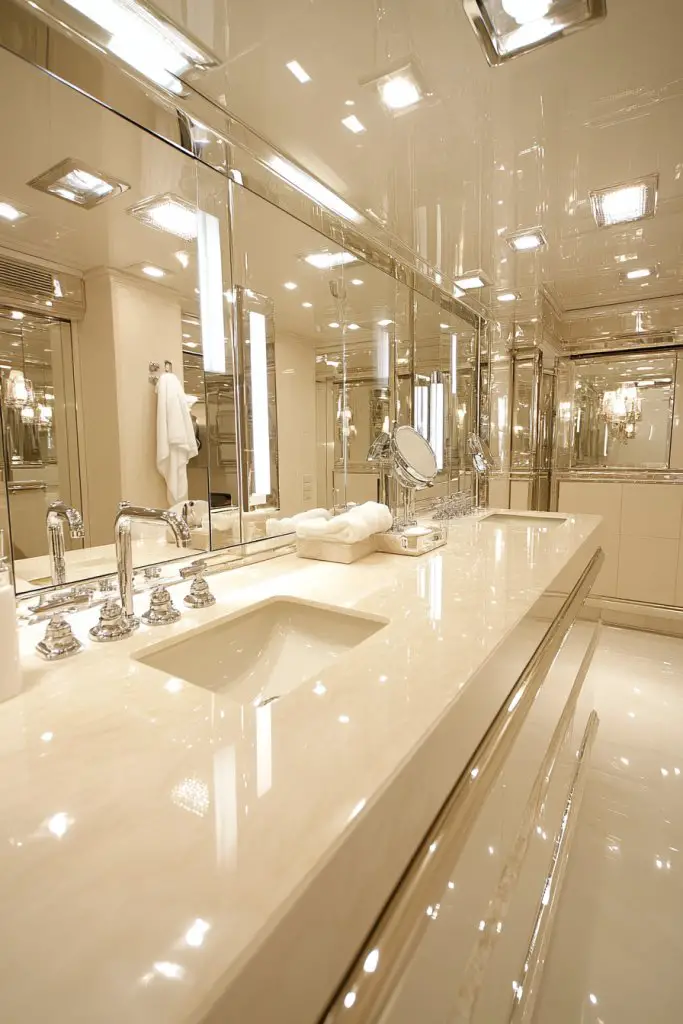
Dark, dull bathrooms can feel tiny and uninviting. Light-reflecting finishes and surfaces bounce light around, instantly brightening the space. They create an illusion of openness and cleanliness that makes your bathroom more welcoming.
Recommended Products to replicate this idea
| # | Preview | Product | |
|---|---|---|---|
| 1 |

|
OUMUSU Arched Backlit Mirror Bathroom 20"x30"- Frameless LED Bathroom Mirror with Lights, Fogless,... | Buy on Amazon |
| # | Preview | Product | |
|---|---|---|---|
| 1 |

|
Art3d 102-Piece Peel and Stick Wall Tile for Kitchen Backsplash, Bathroom, Fireplace, 3in. × 6in.... | Buy on Amazon |
Imagine glossy white tiles that shimmer when hit by light, or polished chrome fixtures that gleam with every turn. Metallic accents in faucets, handles, or trims add a touch of luxe while amplifying existing light sources. The combination of shiny surfaces and reflective tiles creates a luminous, airy environment that feels much larger than it is.
Opt for high-gloss or semi-gloss paint on walls to bounce light effectively. Use polished stone or ceramic tiles for floors and walls. Incorporate metallic hardware or decorative accents in silver, gold, or bronze to add sparkle. Seasonal or stylistic changes? Switch out matte finishes for gloss or add metallic accessories for extra shine.
Select finishes with high reflectivity and durability suitable for bathrooms. Use glossy tiles or paint, and install fixtures with polished surfaces. Keep surfaces clean and streak-free with gentle cleaners to maintain their reflective quality. When choosing paint or tiles, consider the overall color scheme to enhance brightness.
Incorporate metallic or mirrored accents selectively for a luxurious touch. Use reflective accessories like soap dishes or towel hooks—just avoid clutter that can break the shine. Add a large mirror or mirrored furniture pieces to amplify light and space further.
Light-reflecting finishes make your bathroom feel more spacious and luxurious without major renovations. They’re a simple way to boost brightness and style simultaneously. Once you embrace shiny surfaces, your small bathroom will feel like a high-end retreat—bright, fresh, and inviting.
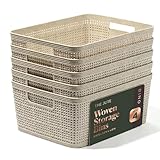
15. Declutter with Smart, Compact Storage Baskets and Containers
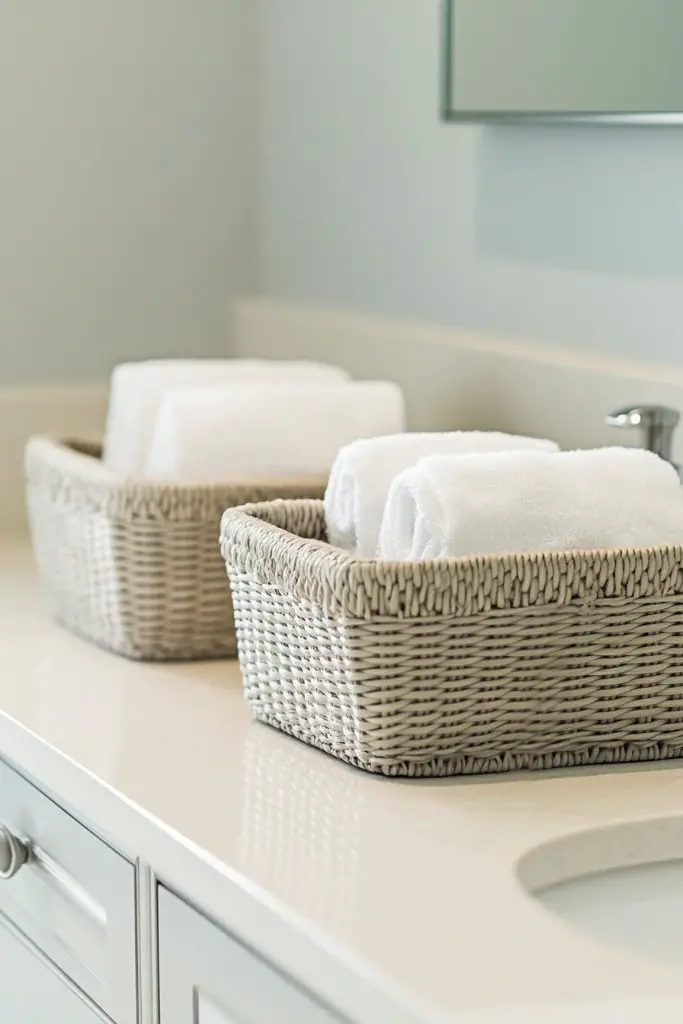
Cluttered surfaces and messy drawers make small bathrooms feel chaotic and stressful. Smart storage baskets and containers keep your essentials organized and accessible while hiding the mess. They’re a simple, stylish solution that transforms chaos into calm.
Recommended Products to replicate this idea
| # | Preview | Product | |
|---|---|---|---|
| 1 |

|
Vtopmart 6 Pack Clear Stackable Storage Bins with Lids, Large Plastic Containers with Handle for... | Buy on Amazon |
| # | Preview | Product | |
|---|---|---|---|
| 1 |

|
Maxuni Small Rope Baskets for Storage, Baskets for Gifts Empty, Cute Round Woven Basket, Decorative... | Buy on Amazon |
Visualize stackable, sleek containers in neutral tones arranged on open shelves or inside cabinets. Clear acrylic bins help you see everything at a glance, reducing search time. Woven or textured baskets add warmth and personality, making your space look thoughtful and curated. Everything has a place, and it shows.
Select containers in sizes and shapes suited to your needs—small for cosmetics, larger for towels or cleaning supplies. Match or mix materials—plastic, bamboo, or metal—for visual interest. Use labels or color coding for quick identification. Seasonal updates? Swap out or re-label for a fresh look. Keep the clutter contained and your mind at ease.
Start by decluttering and sorting your items. Choose containers that fit your storage space and organize by category. Use stackable units or modular baskets to maximize vertical space. Place frequently used items at the front or top for easy access. Regularly review and tidy to prevent buildup. Incorporate matching lids or covers for a cohesive look.
Decorate containers with custom labels or tags. Use decorative liners or fabric covers for baskets to match your decor. Incorporate stylish trays or small stands for items you use daily. Keep it neat with a routine to revisit and reorganize as needed. The goal is functional beauty that makes daily routines smoother.
Smart storage baskets turn clutter into order and make your bathroom more relaxing. They’re a simple upgrade with a big impact on your daily comfort. Once organized, you’ll find everything easily and enjoy a calming, tidy space—proof that small changes make big differences.
Conclusion
These small bathroom remodel ideas showcase a range of creative solutions to optimize space and enhance style. Whether you choose to update your fixtures, add innovative storage, or incorporate vibrant accents, each idea can bring new life to your bathroom. Don’t hesitate to try these tips and transform your small space into a functional and beautiful retreat—your perfect bathroom awaits!
Last update on 2026-02-11 / Affiliate links / Images from Amazon Product Advertising API