Imagine transforming a tiny outdoor corner into a charming retreat — small brick patios are the perfect way to do just that! Their timeless appeal, durability, and classic look make them a favorite among homeowners seeking cozy, inviting outdoor spaces.
In this article, you’ll find a delightful variety of ideas to inspire your own small brick patio makeover. From simple DIY touches to elegant design tips, these ideas will help you maximize your space and create a warm, welcoming outdoor haven tailored just for you.
1. Create a Charming Brick Corner Nook with Built-In Seating
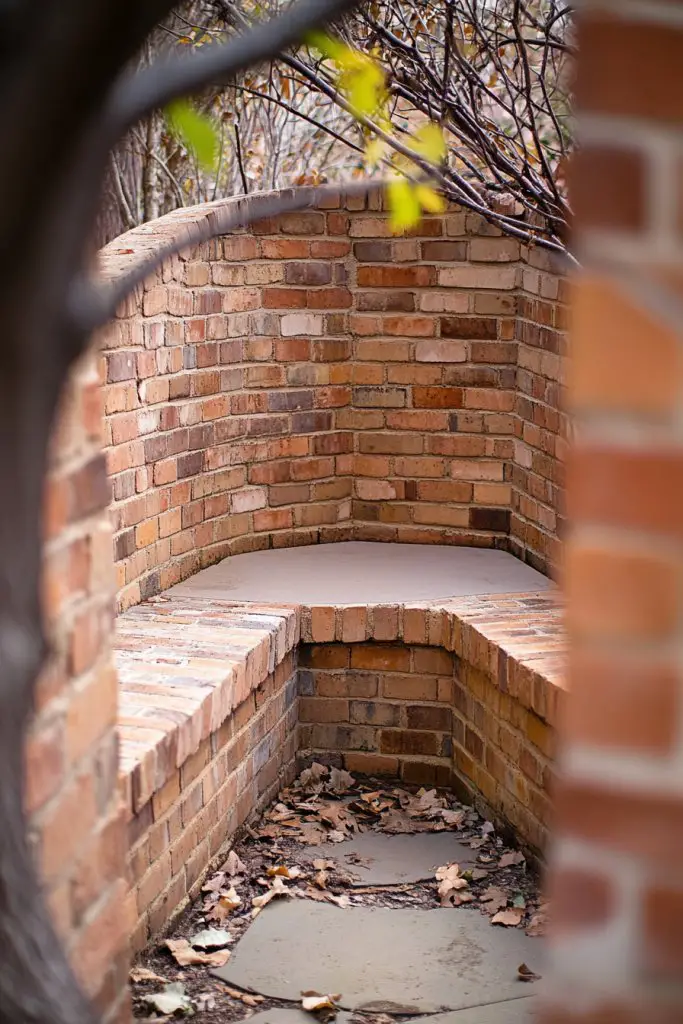
Ever wish you had a cozy little retreat right in your backyard where you can unwind without feeling overwhelmed by a huge space? Small patios often leave us craving a nook that feels private and inviting, but we think it has to be big to be beautiful. The good news? You can craft an intimate brick corner that screams comfort and charm, even in tight spots. It’s all about maximizing what you have and making it feel special.
Recommended Products to replicate this idea
| # | Preview | Product | |
|---|---|---|---|
| 1 |

|
TORURAL 100 Vintage Brown/Red Faux Brick Wall Tiles, 3D Thin Brick Veneers for Bedroom, Bathroom,... | Buy on Amazon |
| # | Preview | Product | |
|---|---|---|---|
| 1 |

|
cnsmak Wicker Furniture Cushions Set, Waterproof Patio Cushions for Outdoor Chairs 3 Pieces, 1... | Buy on Amazon |
Imagine a quaint corner tucked away with warm brick walls, rounded by built-in benches topped with plush cushions. The bricks create a rustic, textured backdrop that complements a soft cream throw blanket with chunky knit texture. String lights hang overhead, casting a gentle glow, while a small side table holds your favorite book or a cup of tea. This space feels like a secret hideaway, perfect for late-night chats or peaceful mornings.
You can customize this nook to match your style—go for sleek modern bricks with minimalist cushions, or choose weathered, vintage bricks paired with colorful textiles for a boho vibe. If space is super limited, opt for a corner with a single brick bench and a foldable table. For seasonal tweaks, swap out cushions or add a cozy outdoor rug in colder months. The key is blending function with your personal aesthetic.
Start by selecting durable bricks that can withstand outdoor conditions. Decide on the shape—L-shape, semi-circle, or straight—and build a low brick wall that contours your corner. Secure the bricks with mortar, ensuring a level surface. Incorporate a brick bench by building a sturdy base, then top with weather-resistant cushions. Finish with ambient lighting—solar-powered string lights or lanterns—mounted on nearby walls or overhead. Keep the space clutter-free for a relaxing vibe.
Make it uniquely yours by adding decorative elements like a vintage lantern, a small sculpture, or a textured outdoor pillow collection. You could hang a weatherproof artwork or install a narrow brick shelf for displaying small, non-greenery decor items. Use a mix of textiles—woven throws, patterned cushions—to bring color and texture. Personal touches turn a simple nook into your personal sanctuary.
Creating this brick corner nook proves that even small patios can harbor big comfort zones. It’s the perfect spot to relax, read, or entertain in a private setting. Once finished, you’ll feel proud knowing you transformed limited space into a charming retreat that suits your style. Ready to carve out your own little haven? It’s easier than you think and incredibly rewarding.
2. Incorporate a Brick Fire Pit for Warmth and Ambiance
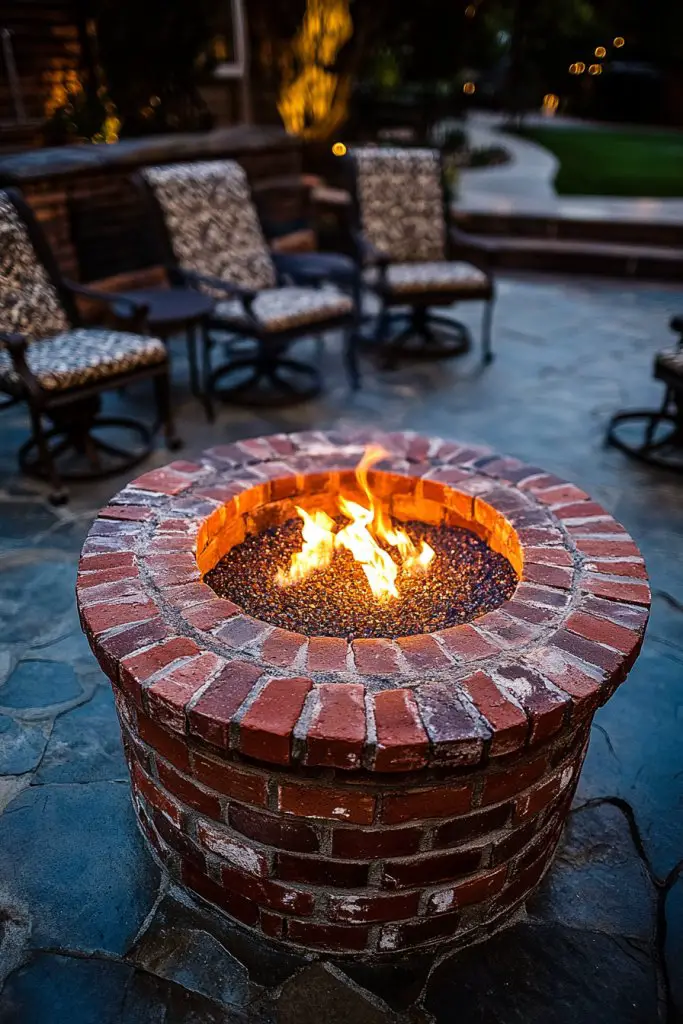
Who doesn’t love gathering around a fire on a cool evening? But building a big, sprawling fire pit in a small patio seems like overkill—yet, you still crave that cozy, crackling atmosphere. The solution? A compact brick fire pit that packs all the warmth and ambiance into a manageable size. It’s the perfect way to add a touch of magic without sacrificing precious space.
Recommended Products to replicate this idea
| # | Preview | Product | |
|---|---|---|---|
| 1 |

|
Protalwell Woodstove Firebricks, Upgrade Fire Bricks Replacement for US Stove FBP6, Size 9" x 4-1/2"... | Buy on Amazon |
| # | Preview | Product | |
|---|---|---|---|
| 1 |

|
Huchiz 36'' Fire Pit Mat for Solo Stove Bonfire, Double-Sided Fireproof Under Grill Mat Deck Patio... | Buy on Amazon |
Picture a circular brick fire pit nestled in the corner of your patio, its warm hues contrasting beautifully with sleek, modern furniture. The bricks are stacked evenly, topped with a metal bowl for safety, while a few smooth stones line the edges for a finished look. String lights or lanterns cast a soft glow, flickering as the flames dance. You can hear the gentle crackle of burning wood, filling the air with a rustic charm.
Choose between traditional red bricks for a classic look or go for grey or white bricks for a contemporary update. For a minimalist style, opt for a geometric shape—square or hexagon—built with clean lines. If you prefer eco-friendly options, consider using recycled bricks or concrete blocks. You can also add a small seating area around the fire pit with brick-built benches or low walls for a seamless look.
Begin by choosing a flat, stable surface for your fire pit. Lay bricks in a circle, stacking them securely with mortar or construction adhesive, ensuring a consistent height and diameter. Leave a gap for airflow and ventilation, and install a metal bowl or fire-safe insert. Surround the fire pit with heat-resistant bricks or pavers for safety and stability. For lighting, embed solar-powered lanterns or LED strips into the brickwork for a magical glow. Always follow safety guidelines for outdoor fires.
Personalize your fire pit area with outdoor cushions, a soft outdoor rug, or even a weatherproof sculpture nearby. You might add a brick-built tool holder or a small side table for snacks and drinks. For seasonal flair, incorporate decorative stones or colored bricks. This space can become your favorite gathering spot, customized for your entertainment style.
A small brick fire pit elevates your outdoor space instantly, making it inviting for friends or quiet nights alone. The warmth and flickering flames create a cozy ambiance that invites lingering moments. Once completed, you’ll be amazed at how a simple feature transforms your patio into an inviting retreat. Fire up your creativity—you’re just a few bricks away from outdoor bliss!
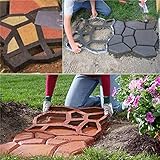
3. Design a Patterned Brick Floor with Herringbone or Basketweave
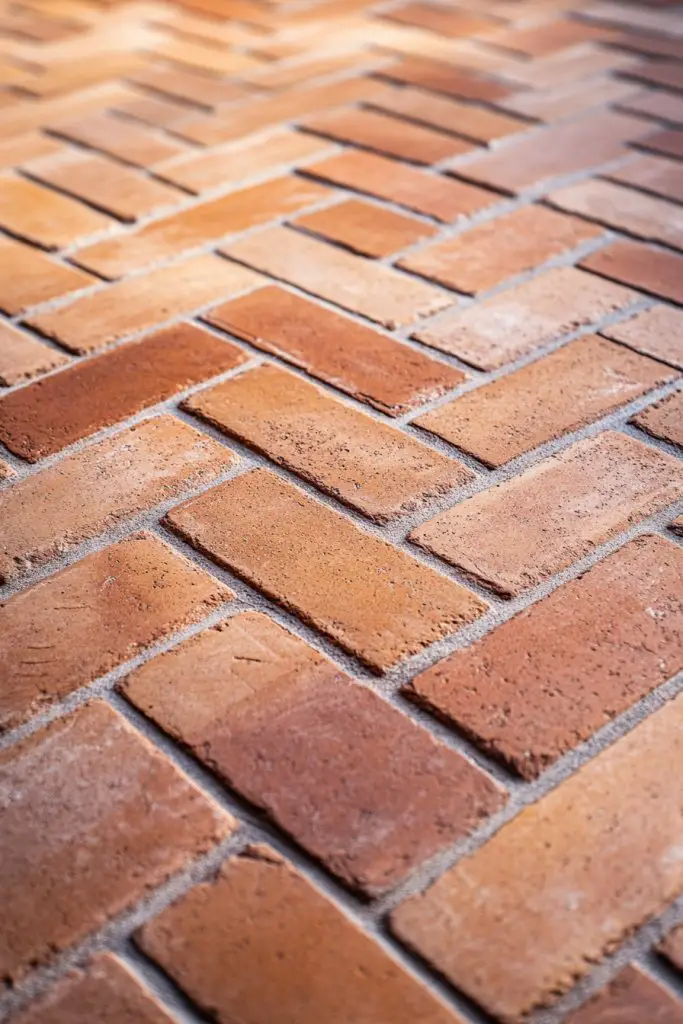
Ever feel like your small patio looks plain and uninspired? A floor can make or break the vibe, and a boring surface can make even the most charming space feel dull. Why settle for flat, uninspired concrete when you can turn your patio into a visual masterpiece? Patterned brick flooring, like herringbone or basketweave, adds instant style and sophistication.
Recommended Products to replicate this idea
| # | Preview | Product | |
|---|---|---|---|
| 1 |

|
Olde Town Herringbone Brick Concrete Stamp Set by Walttools | Classic Woven Paver Pattern, Sturdy... | Buy on Amazon |
| # | Preview | Product | |
|---|---|---|---|
| 1 |

|
Pavers 101: Patios and Other Projects You Can Do | Buy on Amazon |
Imagine walking onto a patio where the bricks are laid in a dynamic herringbone pattern, creating a zigzag effect that draws the eye across the space. The warm tones of the bricks contrast beautifully with lush outdoor furniture and soft lighting. The textured surface adds depth and character, inviting you to kick off your shoes and enjoy the tactile experience. Each step feels like stepping onto a piece of art.
Choose bricks in complementary shades—earth tones, reds, or even subtle greys—to match your overall aesthetic. For small patios, a simple basketweave pattern can maximize visual impact without overwhelming the space. If you prefer a more contemporary look, combine different brick sizes or colors for a modern mosaic effect. Seasonal accessories like outdoor rugs or cushions can also change the entire look.
Start by preparing a level base with crushed gravel and sand as a foundation. Lay out your pattern first, then begin stacking bricks according to your chosen design—either herringbone or basketweave. Use a rubber mallet to tap bricks into place and ensure a tight fit. Fill gaps with sand or gravel for stability. Seal the surface with a breathable outdoor sealer to enhance durability and color vibrancy. Regular maintenance involves sweeping and occasional re-sanding.
Add personalized touches by embedding decorative tiles or incorporating contrasting brick colors at key points. You could also integrate a border in a different pattern or color to frame the space. For extra flair, place outdoor sculptures or textured planters along the edges—just avoid plants in the actual flooring to keep it low maintenance. This layered approach makes your floor a focal point.
A patterned brick floor turns your small patio into a stylish sanctuary that impresses everyone. It reflects effort and creativity, boosting your confidence in DIY projects. Plus, it’s a timeless upgrade that remains fashionable through seasons and trends. Ready to lay your own mosaic masterpiece? It’s easier than you think and makes a bold statement.
4. Add a Brick Step-Up Platform for Elevated Seating Area

Feeling like your patio needs a little extra dimension? A flat surface is functional but can lack visual interest and separation. Sometimes, a simple step-up platform can define a cozy seating area or dining nook, giving your small patio a sense of structure and sophistication. It’s a clever way to add height without overwhelming the space.
Recommended Products to replicate this idea
| # | Preview | Product | |
|---|---|---|---|
| 1 |

|
2-in-1 Paver Removal Tool with Hex Wrench, 2 Pcs Set Paver Puller Tool with Double Joint Scraper,... | Buy on Amazon |
| # | Preview | Product | |
|---|---|---|---|
| 1 |

|
Aoxun Aluminum Outdoor Patio Furniture Set, 5 Seats Outdoor Sectional with Coffee Table, Patio... | Buy on Amazon |
Picture a low brick platform slightly raised above the main patio level, creating a natural boundary for a seating zone. The bricks are laid in a neat, uniform pattern, with a smooth top surface for comfortable sitting. The platform’s warm earthy tone contrasts with lush greenery or decorative gravel around it. Cushions or poufs sit atop, inviting guests to settle in and relax.
Opt for a simple rectangular shape for a clean look, or choose a circular or irregular outline for a more organic feel. You can match the bricks with your patio flooring or go for a contrasting color for emphasis. For seasonal flexibility, add weatherproof cushions or removable cloth covers in different colors. You could even integrate built-in storage underneath for practicality.
Begin by excavating a shallow area where your platform will sit. Lay a solid base of gravel, then build up with bricks in your chosen pattern—stacking securely with mortar or adhesive. Ensure the top surface is level and smooth for comfort. Finish with a sealant to protect against weathering. Consider adding steps or a gentle slope for easy access, especially if the platform is higher.
Personalize with inlaid tiles or decorative brick accents on the top surface. Use textured or patterned bricks to add visual interest. Surround the platform with outdoor rugs, lanterns, or sculptural elements to create a curated look. This elevated space becomes a focal point, perfect for entertaining or quiet mornings.
A brick step-up platform adds elegance and practicality to small patios, making outdoor living more dynamic. It visually elevates your space and creates a natural gathering spot. Once built, you’ll feel proud of transforming a simple patio into a multi-level oasis. Ready to elevate your outdoor game? It’s a straightforward project with high impact.
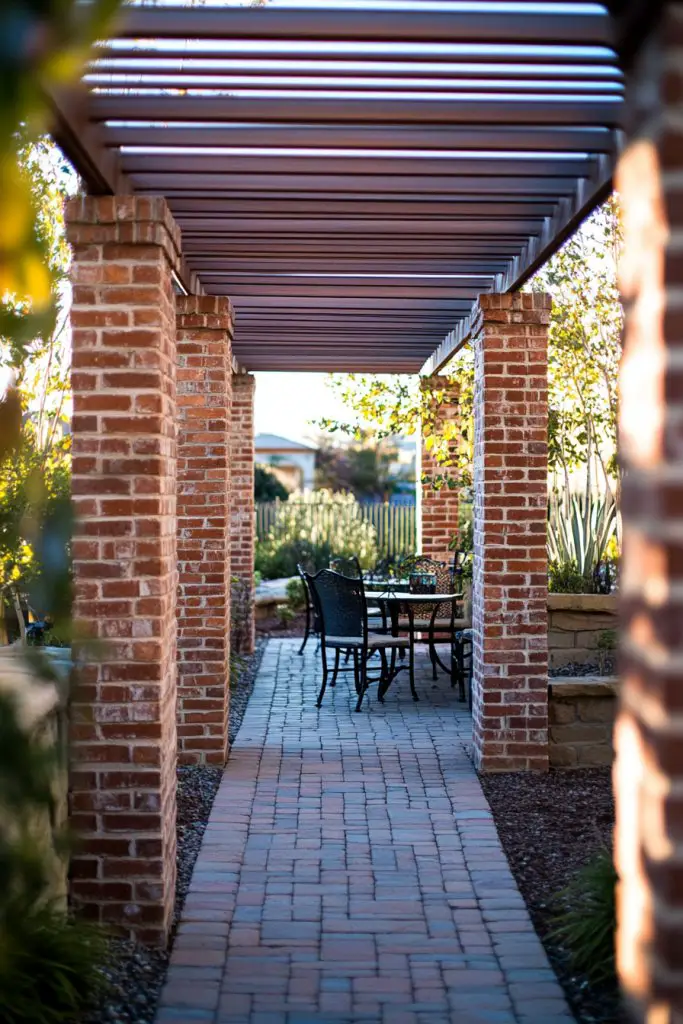
5. Install a Brick Pathway Leading to a Private Retreat
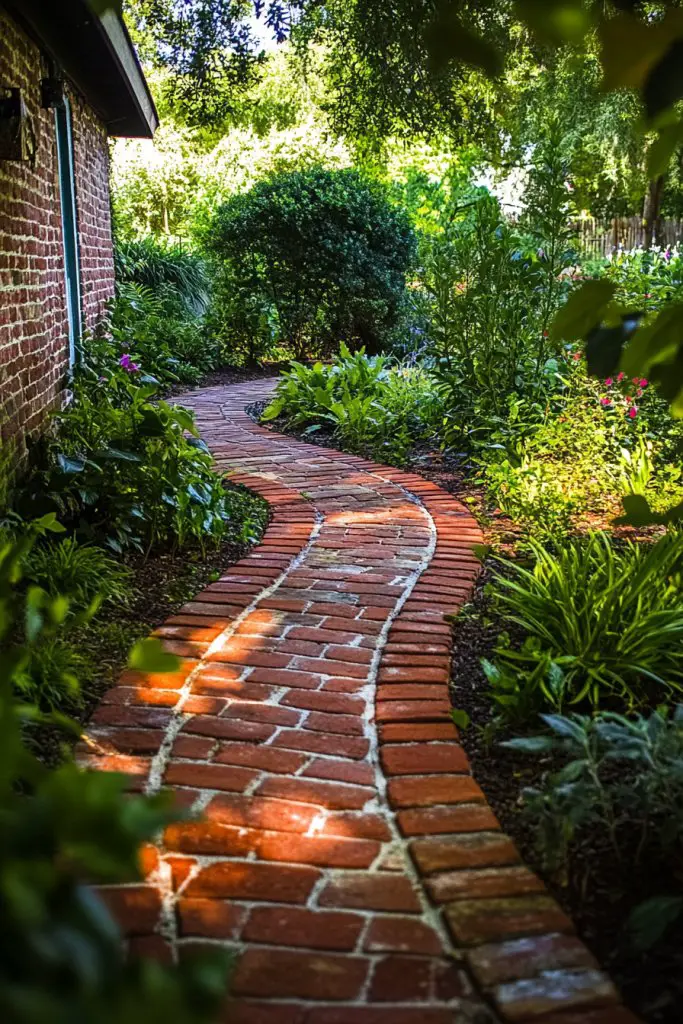
Ever wonder how to guide guests or create a sense of discovery in your small outdoor space? A charming brick pathway can do wonders, transforming a plain yard into a secret garden or tranquil retreat. It’s a simple upgrade that adds both function and style, making your outdoor area feel more inviting and intentional.
Recommended Products to replicate this idea
| # | Preview | Product | |
|---|---|---|---|
| 1 |

|
10 Pound Gray Beige DOMINATOR Polymeric Sand with Revolutionary Ceramic Flex Technology for... | Buy on Amazon |
| # | Preview | Product | |
|---|---|---|---|
| 1 |

|
Worth Garden 10-Pack Galvanized Steel Landscape Lawn Edging - 4.5in H Black Powder Coated Bendable... | Buy on Amazon |
Imagine a winding brick pathway, with bricks laid in a herringbone or running bond pattern, leading to a secluded corner of your yard. The path is bordered by low brick walls or edging, with soft lighting along the edges casting a warm glow. As you walk along, the textured bricks and gentle curves invite exploration and relaxation. It’s like a mini adventure right outside your door.
Use bricks in varying shades—blues, reds, or greys—to match your overall vibe. For a more natural look, incorporate irregularly shaped bricks or create a mosaic effect. Narrower paths suit small spaces, while wider ones can accommodate small outdoor furniture or planters. Seasonal touches like lanterns, fairy lights, or decorative stones can change the mood through the year.
Prepare the ground by removing any grass or debris, then lay a stable gravel or crushed stone base. Lay bricks in your chosen pattern, using a rubber mallet to ensure tight placement. Fill gaps with sand or fine gravel, then compact the surface with a tamper. Finish with a sealant or protective coating to resist weathering. For curves, cut bricks as needed for a seamless look. Regular maintenance involves sweeping and re-sanding.
Add personalized touches like engraved bricks or decorative inlays embedded in the pathway. Line the edges with small, durable planters or sculptures to add visual interest. Incorporate seasonal ornaments or fairy lights for evening ambiance. This pathway becomes both a practical route and a visual journey, guiding you to your favorite retreat.
A brick pathway transforms a simple yard into a curated outdoor experience. It creates a sense of flow and purpose, encouraging more outdoor use. Once installed, it’s a project that offers ongoing satisfaction and beauty. Ready to turn your yard into a scenic escape? It’s easier than you think and endlessly rewarding.
6. Use Mixed Brick Colors for a Rustic, Vintage Look
Feeling like your small patio lacks character? Uniform bricks can sometimes give a space a sterile feel, but mixing colors can add warmth, depth, and personality. Achieving a vintage or rustic vibe is easier than you think—just layer different shades of bricks for a charming, weathered look. It’s a simple trick that instantly elevates your outdoor aesthetic.
Recommended Products to replicate this idea
| # | Preview | Product | |
|---|---|---|---|
| 1 |

|
Rompox Easy Basalt – Color Update. Pre-Mixed Permeable Joint Compound for patios, pavers, & DIY... | Buy on Amazon |
| # | Preview | Product | |
|---|---|---|---|
| 1 |

|
Jusmioke 40 Pcs Red Thin Wall Brick Veneers, 2.4" x 7.9" for Kitchen Backsplash, Living Room,... | Buy on Amazon |
Picture a patio floor composed of bricks in varying tones—reds, browns, and greys—all laid in a random or herringbone pattern. The uneven coloration creates a textured, lived-in appearance that feels timeless and cozy. Over time, the bricks develop a natural patina, adding to the vintage charm. Accent the space with weathered furniture and textiles that complement the earthy tones.
Choose bricks with different textures and sizes for added interest. For a more curated look, select a palette of complementary shades and arrange them randomly. You can also create a focal point by using darker bricks in a central pattern or border. Seasonal accessories like throws and cushions can further enhance the rustic feel, changing the mood effortlessly.
Select a variety of bricks in different shades from your supplier, ensuring they are suitable for outdoor use. Prepare a compacted gravel base, then lay bricks in a random pattern, mixing and matching as you go. Use a rubber mallet to settle bricks into place, maintaining an even surface. Fill gaps with sand or gravel and compact again. Seal if desired, but a natural look often benefits from a matte finish.
Create a focal border with darker bricks, or embed decorative stones or tiles for added texture. Incorporate vintage-inspired furniture or accessories to reinforce the old-world charm. Use weathered wood or metal accents nearby to complete the rustic aesthetic. The varied brick colors tell a story and make your patio uniquely yours.
Using mixed brick colors is a simple way to add character and depth to your outdoor space. It’s a project that rewards patience and eye for detail, resulting in a space rich with personality. Your friends will admire the authentic, vintage vibe you’ve created. It’s proof that small changes can have a big impact—time to get mixing!
7. Incorporate Small Brick Planter Edges for Low Maintenance Greenery
Want greenery but hate fussing over plants every week? Small brick planter edges are a smart solution, providing a neat way to add low-maintenance plants directly into your patio. They create a natural boundary that’s both functional and decorative, giving your space a fresh look without the upkeep of a full garden. It’s the perfect compromise for busy or minimalist outdoor lovers.
Recommended Products to replicate this idea
| # | Preview | Product | |
|---|---|---|---|
| 1 |

|
Beuta Landscape Edging | Garden Edging Border | Faux Stone Bricks for Lawn edging, Flower beds,... | Buy on Amazon |
| # | Preview | Product | |
|---|---|---|---|
| 1 |

|
Keter Urban Bloomer 12.7 Gallon Raised Garden Bed and Outdoor Herb Garden Planter with Self Watering... | Buy on Amazon |
Visualize a narrow brick border running along the patio perimeter, filled with succulents or small flowering plants in weatherproof containers. The bricks form a clean, structured edge that keeps plants contained and prevents soil spillage. The textures and colors of the bricks contrast with the lush greenery, creating a balanced and inviting visual. Tiny fairy lights or solar path lights can highlight the border at night.
Opt for bricks in natural hues—terracotta, beige, or grey—to blend seamlessly with your outdoor decor. For a more modern look, go for sleek, uniform bricks paired with minimalist containers. For a whimsical touch, incorporate decorative bricks with engraved patterns or textured surfaces. You can also vary the width or height of the borders for different visual effects.
Lay a narrow trench around your patio edge, filling it with a compacted gravel base. Stack bricks in a single row, using mortar or adhesive for stability. Fill the interior with soil or gravel, then plant low-maintenance greenery such as succulents, herbs, or small perennials. Install edging along the border to prevent soil spillage and keep the look tidy. Regularly weed and water, but overall, these plants are fuss-free.
Customize your border with engraved or patterned bricks to add a personal touch. Use decorative stones, shells, or small sculptures within the planting area for extra flair. Change out seasonal plants or add colorful gravel for variety. This approach keeps your green space fresh and engaging without requiring much effort.
Brick planter edges are a simple way to introduce greenery into a small patio without the hassle. They add a polished, intentional look, making your outdoor space feel cared for and stylish. Once set, they require minimal maintenance, giving you more time to enjoy your outdoor haven. Who knew low fuss could look so good?
8. Integrate a Brick Garden Wall as a Backdrop and Privacy Screen
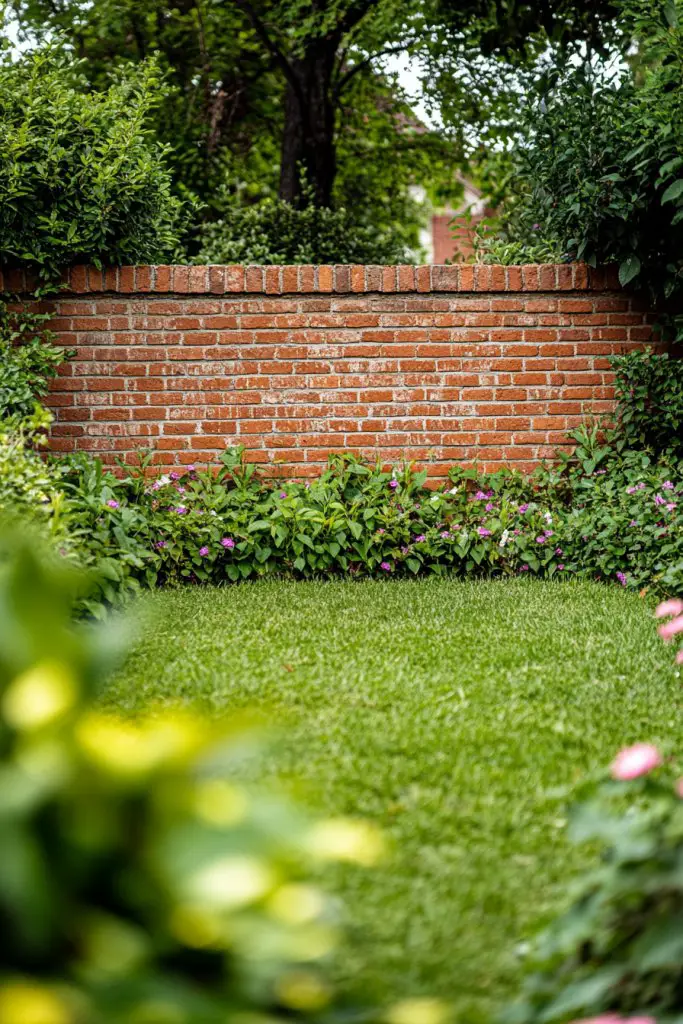
Struggling with neighbors or wanting a more private outdoor retreat? A small brick garden wall offers a charming solution. It creates a beautiful backdrop, blocks unwanted views, and adds a layer of privacy—all without overwhelming your small space. Plus, it’s a classic feature that never goes out of style.
Recommended Products to replicate this idea
| # | Preview | Product | |
|---|---|---|---|
| 1 |
|
TORURAL 100 Vintage Brown/Red Faux Brick Wall Tiles, 3D Thin Brick Veneers for Bedroom, Bathroom,... | Buy on Amazon |
| # | Preview | Product | |
|---|---|---|---|
| 1 |

|
2 Ft Room Divider Screen Rustic Red Brick Wall Weathered Texture Mortar Lines Portable Short Canvas... | Buy on Amazon |
Picture a short brick wall behind your seating area, built with rustic, weathered bricks for a vintage appeal. The wall’s texture adds depth and acts as a canvas for climbing vines or decorative lanterns (if plants are allowed). It frames your patio, making the space feel intimate and curated. The warm brick tones contrast softly with outdoor cushions and furniture, completing a cozy scene.
Choose bricks in earthy reds, browns, or greys to suit your aesthetic. For a sleek modern look, opt for uniform bricks arranged in a clean, straight line. For a more eclectic vibe, mix different shades and textures. You can also add built-in niches or small shelves for decorative items—and avoid overloading it with green plants, per restrictions.
Start by marking the area and excavating a shallow trench. Lay a gravel base for drainage, then stack bricks in your preferred pattern, using mortar or adhesive for stability. Leave space at the top for finishing details or a capstone. If privacy is a priority, build the wall higher but keep it within local height regulations. Seal the bricks for weather resistance and ensure a sturdy foundation.
Add personalized touches by embedding decorative tiles or textured bricks. Incorporate small built-in niches for decorative objects or outdoor lighting fixtures. You might also paint or stain some bricks for subtle accents. This wall becomes a focal point that enhances privacy and aesthetic appeal simultaneously.
A brick garden wall transforms your patio into a secluded oasis, elevating the overall feel. It’s a durable, timeless feature that provides privacy and style in one package. Once complete, you’ll enjoy a more intimate outdoor experience, free from prying eyes. Ready to build your own brick sanctuary? It’s easier than you think and endlessly rewarding.
9. Add String Lights or Lanterns for Soft, Cozy Lighting
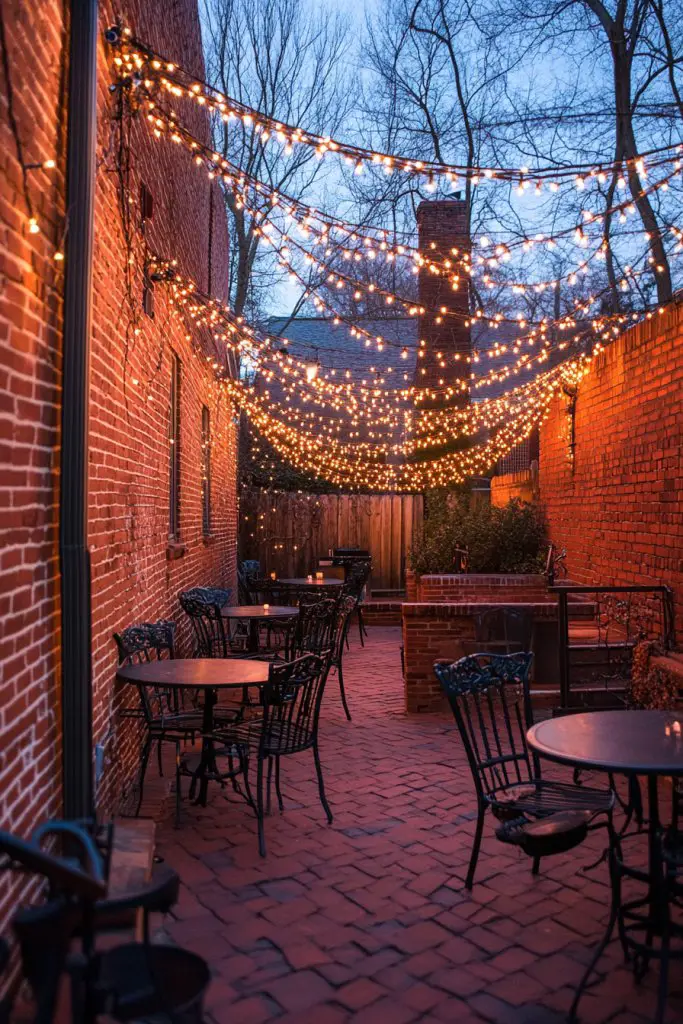
Ever find yourself wanting to enjoy your patio after sunset but struggle with harsh, unflattering lighting? Soft, cozy illumination can completely change the mood, transforming your space into an inviting haven. While string lights and lanterns aren’t strictly brick ideas, they perfectly complement brick features and enhance the overall ambiance.
Recommended Products to replicate this idea
| # | Preview | Product | |
|---|---|---|---|
| 1 |
|
Brightever LED Outdoor String Lights 100FT Patio Lights with 52 Shatterproof ST38 Vintage Edison... | Buy on Amazon |
| # | Preview | Product | |
|---|---|---|---|
| 1 |

|
WdtPro 4 Pack Solar Lantern Outdoor Lights, Upgraded Bright Solar Lanterns Outdoor Waterproof,... | Buy on Amazon |
Imagine warm golden string lights draped across a brick wall or hanging from a pergola, casting a gentle glow over textured bricks and outdoor furniture. Mason jar lanterns sit on brick steps or tables, flickering softly with candles or LED inserts. The subtle lighting highlights the rich hues of the bricks and creates a soothing, intimate atmosphere perfect for relaxing evenings. It’s like bringing the indoors out, but in a charming, understated way.
Choose string lights with warm white bulbs for classic coziness or go for multicolored options to add fun and personality. Lanterns can be hung from hooks or placed on brick surfaces, with some featuring weatherproof designs for durability. For a minimalist look, opt for sleek, woven LED fairy lights or solar-powered fixtures that blend seamlessly into your brick backdrop. Adjust the height and spacing to tailor the mood.
Secure hooks or brackets into your brick wall or pergola structure, ensuring they can bear the weight of your lighting. Drape string lights in a crisscross pattern or along the perimeter for maximum coverage. Use outdoor-rated extension cords and weatherproof bulbs to withstand the elements. Position lanterns on brick steps or tables, filling them with flameless candles or LED lights. Keep safety and accessibility in mind to avoid tripping hazards.
Customize your lighting by adding a mix of lantern styles—metal, glass, or rustic wood—to suit your vibe. Incorporate decorative elements like tassels or fabric wraps on string lights for extra flair. Use different color temperatures—warm or cool—to match your mood or season. Personal touches make your outdoor space feel warm, welcoming, and uniquely yours.
Lighting is the finishing touch that elevates your brick patio from good to extraordinary. It creates a cozy atmosphere that encourages lingering conversations and peaceful evenings. With a little planning, you can achieve a magical outdoor setting that feels both stylish and functional. Ready to light up your outdoor life? It’s simpler than you think and incredibly effective.
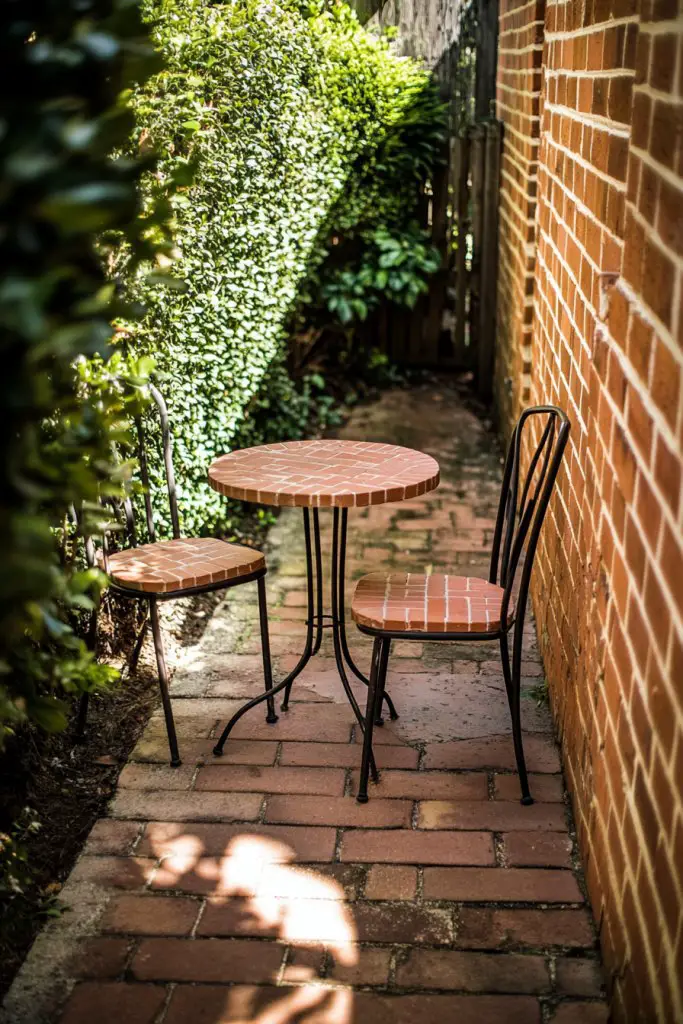
10. Place Compact Brick Bistro Sets for Intimate Dining
Craving a spot to enjoy coffee or a quick meal outdoors but worried about crowding your small patio? Compact brick bistro sets are the perfect fix—they’re space-friendly, stylish, and instantly elevate your outdoor dining game. Plus, they blend seamlessly with brick surroundings, making your patio look polished and inviting.
Recommended Products to replicate this idea
| # | Preview | Product | |
|---|---|---|---|
| 1 |

|
Bistro Table and Chairs Set of 2, 3 Piece Outdoor/Indoor Folding Patio Bistro Sets, 2 Chair Patio... | Buy on Amazon |
| # | Preview | Product | |
|---|---|---|---|
| 1 |

|
Area Rug Brick Wall Old Brick Wall Brickwall High Resolution Machine Washable Rugs Pet & Child... | Buy on Amazon |
Visualize a tiny brick platform with two or three brick bases topped with weather-resistant tables and chairs. The bricks match or complement your patio flooring, creating a cohesive look. The set is nestled under a brick-covered pergola or near a brick wall, with string lights overhead. You sip coffee or share a glass of wine, feeling cozy in your intimate outdoor nook.
Choose between classic metal bistro chairs with brick bases or opt for all-brick integrated tables for a seamless look. For a rustic feel, use reclaimed bricks and distressed finishes. Seasonally, add cushions or weatherproof throws to increase comfort. Small foldable options work well for limited space, and you can swap out tabletops for different seasons or occasions.
Start by creating small, stable brick bases—stack bricks in a square or round shape, mortared or glued for stability. Top with a weatherproof tabletop, such as treated wood or composite material. Position the set in a shaded area or under a brick pergola, with enough space for movement. Secure the bricks to prevent shifting, especially if you plan to move or rearrange the set. Finish with cushions to add comfort and style.
Personalize your bistro set with custom-painted brick bases or unique tabletops—think mosaic or tile inserts. Add outdoor cushions in your favorite colors or patterns to reflect your personality. Incorporate small decorative elements like lanterns, trays, or faux floral accents (if permitted) to enhance the cozy, inviting vibe. This setup turns simple outdoor dining into a charming experience.
A compact brick bistro set makes outdoor dining approachable and stylish, perfect for small spaces. It encourages you to enjoy more meals outside and entertain effortlessly. Once set up, it’s a space you’ll be proud of—simple, functional, and full of charm. Ready to dine outdoors in style? It’s easier than you think and so rewarding.
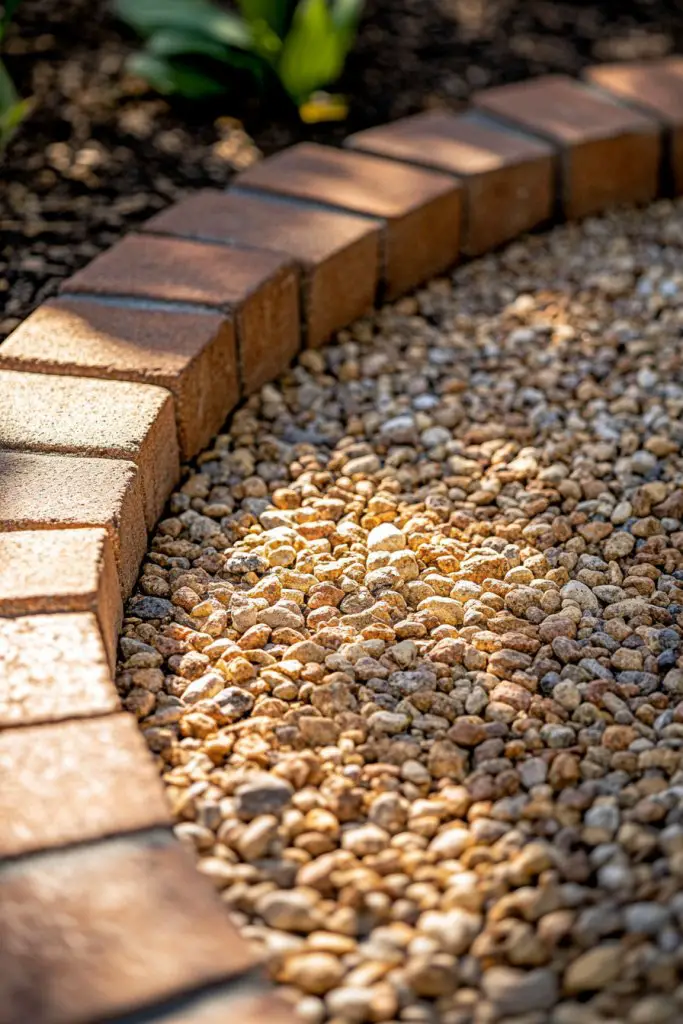
11. Create a Brick Border Around a Central Gravel or Mulch Area
Want to define a specific zone in your small patio without cluttering the space? A brick border around a gravel or mulch circle creates a clean, intentional look that separates functional areas like a fire bowl or outdoor rug. It adds a subtle touch of sophistication that elevates your overall design. Plus, it’s easy to install and maintain.
Recommended Products to replicate this idea
| # | Preview | Product | |
|---|---|---|---|
| 1 |

|
MASTER MARK Dig-Free Landscape Paver, Bricks, Stone Edging, No-Dig Patio Flex Border, Plastic 60 ft.... | Buy on Amazon |
| # | Preview | Product | |
|---|---|---|---|
| 1 |

|
LAVEVE 4FT x 100FT Weed Barrier Landscape Fabric, 3.2oz Premium Heavy Duty Garden Cloth, Ground... | Buy on Amazon |
Picture a circular gravel or mulch center, edged with a neat row of bricks that creates a crisp boundary. The bricks are laid in a running bond or stacked pattern, giving the edge a crafted feel. The border contrasts with the textured gravel, drawing the eye inward. Soft lighting or a small lantern nearby enhances the visual appeal at night, making the area feel cozy and purposeful.
Use bricks in warm tones—reds and browns—for a traditional look or cool greys for a modern vibe. Vary the height of the border for a more dynamic appearance, or keep it flat for a streamlined effect. For seasonal updates, swap out gravel or mulch colors or add decorative stones along the border. This flexible setup suits various aesthetic preferences.
Lay a trench around the designated area, then fill it with a stable gravel or mulch base. Stack bricks along the trench, securing each with mortar or adhesive, ensuring a level top. For a clean finish, cap the border with a row of bricks or a contrasting stone. Fill the interior with your chosen ground cover and add your focal feature—fire pit, outdoor rug, or seating—inside. Regularly tidy the border for a clean look.
Customize with engraved bricks or painted accents to add personality. Incorporate decorative stones or small sculptures along the border. Change ground cover seasonally—colored gravel, pine cones, or decorative mulch—to keep the space lively. This border not only defines the area but also becomes a decorative detail.
A brick border around a gravel or mulch circle adds structure and polish, making your patio feel thoughtfully designed. It’s a simple upgrade that makes your outdoor space look larger and more organized. Once finished, you’ll enjoy a visually appealing retreat that invites relaxation and gatherings. Ready to create your own defined outdoor zone? It’s easier than you think and makes a big impression.
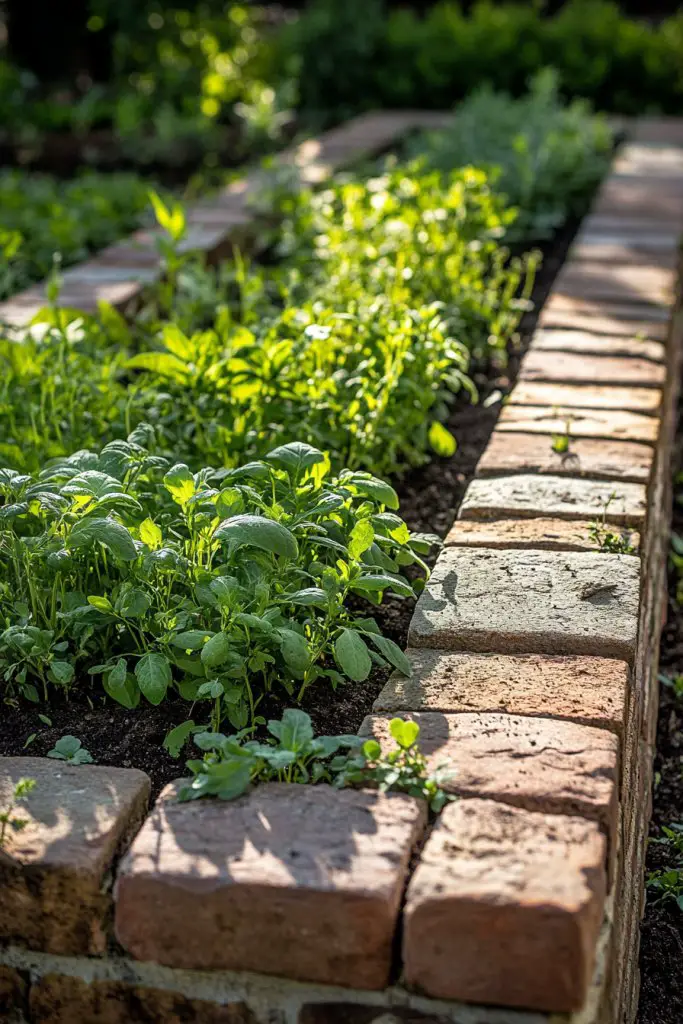
12. Install a Brick Border for a Garden Bed or Herb Garden
Craving a lush, edible garden in your small patio but worried about maintenance and clutter? A brick border around a compact garden bed keeps things tidy and visually appealing. It’s a simple way to delineate your green space and add a touch of rustic charm. Plus, it turns your patio into a mini oasis for herbs, flowers, or vegetables.
Recommended Products to replicate this idea
| # | Preview | Product | |
|---|---|---|---|
| 1 |
|
EasyFlex No-Dig Landscape Edging with Anchoring Spikes, 2.7 in Tall Decorative Stone-Look Garden... | Buy on Amazon |
| # | Preview | Product | |
|---|---|---|---|
| 1 |

|
LEETOLLA Elevate 32" Tall Raised Garden Bed Outdoor with Wheels & Shelf for Mobility, 400LBS... | Buy on Amazon |
Envision a narrow brick border framing a small garden bed filled with herbs like basil, thyme, and mint. The bricks form a neat, raised edge that prevents soil from spilling onto your patio surface. The warm tones of the bricks contrast with vibrant green leaves, while a brick pathway or stepping stones lead into the garden. Small garden tools or decorative signs can personalize the space.
Choose bricks in earthy shades—terracotta, reds, or browns—to evoke a natural vibe. For a modern twist, use bricks with a smooth finish or incorporate contrasting colors. Vary the height of the border to create a tiered effect or keep it low for easy access. Seasonal plantings or decorative mulch can refresh the look throughout the year.
Excavate a narrow trench around your chosen garden area, then lay a row of bricks on a compacted gravel or sand base. Secure with mortar or outdoor adhesive to prevent shifting. Fill inside with soil, then plant your chosen herbs, flowers, or vegetables. For added stability, install a mesh or liner beneath the soil. Regular maintenance involves weeding and watering, but the brick border keeps everything neat.
Add engraved or patterned bricks for a personalized touch. Use decorative stones or small sculptures within the garden bed to add visual interest. Change up plant varieties seasonally, or add colorful mulch for a fresh look. Incorporate small garden markers or signs to label your herbs or plants, making it both functional and charming.
A brick border around your garden bed transforms a simple patch into a structured, attractive feature. It’s a low-maintenance way to enjoy fresh herbs and flowers, boosting your outdoor living appeal. Once established, it requires minimal effort but offers maximum satisfaction. Ready to cultivate your outdoor oasis? It’s easier than you think and endlessly rewarding.
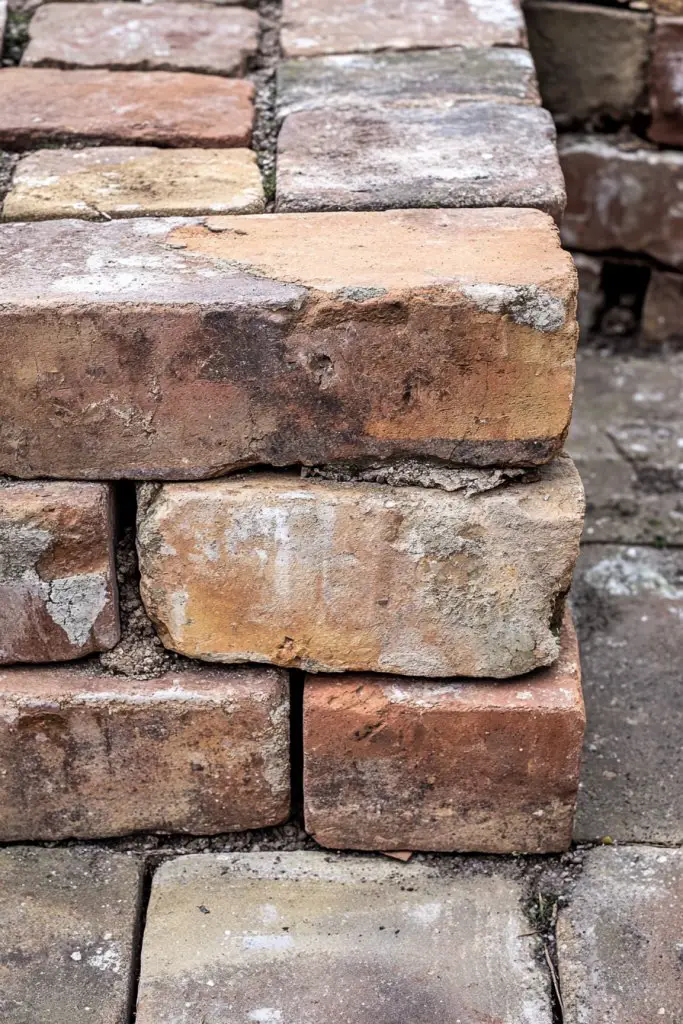
13. Use Reclaimed Bricks for a Vintage, Eco-Friendly Vibe
Looking to add charm and sustainability to your small patio? Reclaimed bricks offer a vintage, eco-friendly alternative to new materials. They add character, history, and a sense of craftsmanship that new bricks just can’t match. Plus, using recycled materials helps reduce waste and environmental impact—talk about a win-win.
Recommended Products to replicate this idea
| # | Preview | Product | |
|---|---|---|---|
| 1 |
|
MASTER MARK Dig-Free Landscape Paver, Bricks, Stone Edging, No-Dig Patio Flex Border, Plastic 60 ft.... | Buy on Amazon |
| # | Preview | Product | |
|---|---|---|---|
| 1 |

|
MasonryDefender All Purpose Brick Stone & Concrete Sealer - Transparent Penetrating Waterproof... | Buy on Amazon |
Picture a patio floor or border made from weathered, mismatched bricks with rich patinas and textures. Each brick tells a story, adding depth and authenticity to your outdoor space. The slight imperfections create a charming, imperfect mosaic that feels timeless. Weathered furniture and vintage accessories perfectly complement this reclaimed aesthetic, making your space feel warm and inviting.
Mix reclaimed bricks with modern elements for an eclectic look or keep it strictly vintage for a more rustic vibe. Use bricks with varying sizes, shapes, and colors for a layered, textured effect. Seasonal accessories like lanterns or woven textiles enhance the old-world charm. Keep the layout relaxed and irregular to emphasize the vintage feel.
Source reclaimed bricks from salvage yards or online marketplaces, ensuring they’re suitable for outdoor use. Prepare a level base with gravel and sand, then lay the bricks in your chosen pattern—irregular or herringbone. Secure with mortar or adhesive, but consider leaving some gaps for a more organic look. Seal or treat the bricks if desired, but often a natural finish works best. Regular cleaning reveals their beauty.
Personalize with engraved or painted bricks, or embed decorative tiles for added interest. Incorporate vintage furniture or repurposed items that match the reclaimed theme. Use weatherproof textiles or cushions to make seating cozy. Over time, the bricks develop a beautiful patina, adding even more character.
Using reclaimed bricks combines eco-consciousness with style, creating a truly unique outdoor space. It shows your creativity and commitment to sustainability. Once finished, you’ll enjoy a space that’s both beautiful and environmentally responsible. Ready to embrace vintage charm? It’s easier than you think and makes a statement.
14. Add a Corner Brick Bar or Serving Station
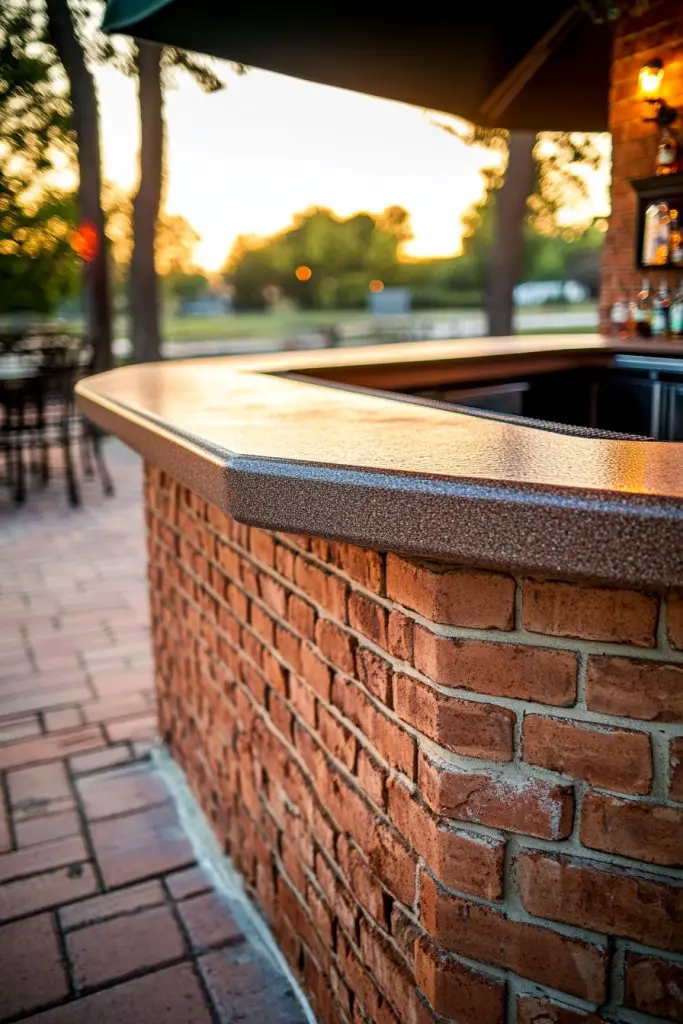
Craving an outdoor space that doubles as a social hub? A corner brick bar or serving station makes entertaining effortless, even in a small patio. It’s a practical upgrade that adds a touch of sophistication and convenience—perfect for casual gatherings or solo happy hours. Plus, it seamlessly integrates with your brick features for a cohesive look.
Recommended Products to replicate this idea
| # | Preview | Product | |
|---|---|---|---|
| 1 |
|
Keter Outdoor Rolling Table Cart for Food Prep, Storage, Bar & Grill, Dark Brown - Portable Kitchen... | Buy on Amazon |
| # | Preview | Product | |
|---|---|---|---|
| 1 |
|
TORURAL 100 Vintage Brown/Red Faux Brick Wall Tiles, 3D Thin Brick Veneers for Bedroom, Bathroom,... | Buy on Amazon |
Imagine a compact brick counter tucked into a corner, topped with a weatherproof surface like granite or treated wood. The brickwork matches or complements your patio, creating a unified aesthetic. Bottles, glasses, and snacks are arranged on the surface, while a brick backsplash or shelves hold tools or accessories. The setup invites friends to gather, chat, and sip in style.
Opt for a simple L-shaped counter or a small square bar—whatever fits your space and style. Use reclaimed bricks for a rustic look or sleek, modern bricks for a more contemporary vibe. Incorporate built-in storage or shelves beneath the counter for utensils, napkins, or drinks. Seasonal decor, like string lights or weatherproof cushions, can add personality.
Start by constructing a sturdy brick base in your corner, stacking bricks securely with mortar or adhesive. Build a flat surface on top suitable for serving—consider using a weatherproof tabletop or stone slab. Install a brick backsplash or small shelves for additional storage or display. Finish with weatherproof sealant to protect against outdoor elements. Arrange your supplies and start hosting.
Add custom signage, decorative tiles, or engraved bricks to make it personal. Use colorful outdoor cushions or a patterned tablecloth to brighten the space. Incorporate lighting options like LED strips or lanterns nearby for evening use. Personal touches turn a simple serving station into a memorable feature.
A brick corner bar elevates your outdoor entertaining, making your patio a go-to spot for friends and family. It’s a project that combines style with practicality, giving you a dedicated space to serve and relax. Once built, your outdoor gatherings will feel more polished and inviting. Ready to become the host with the most? It’s easier than you think and highly rewarding.
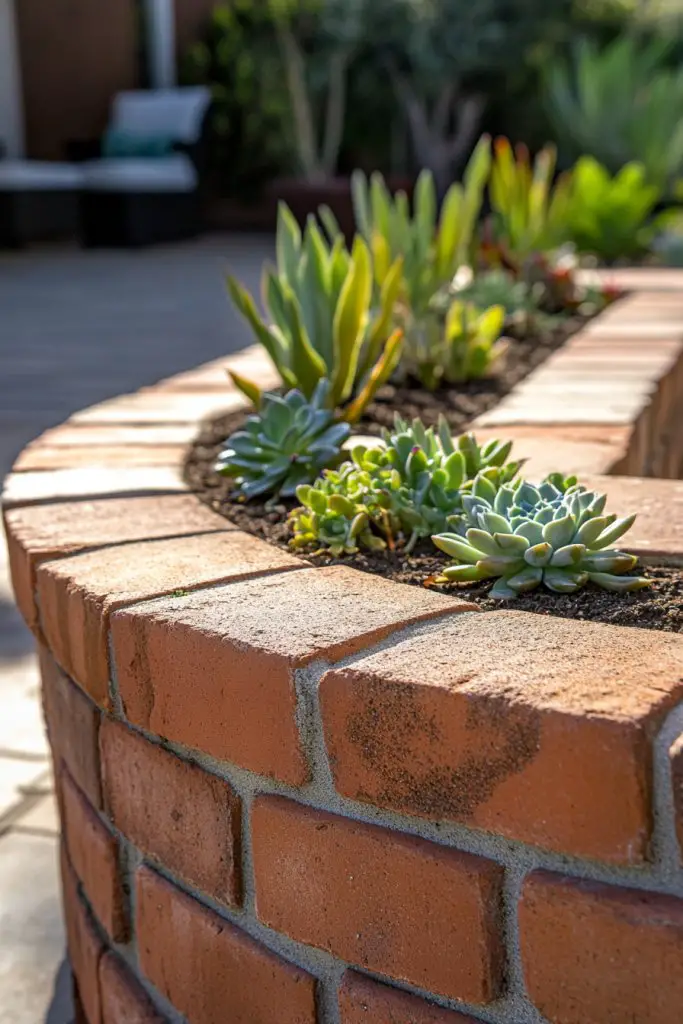
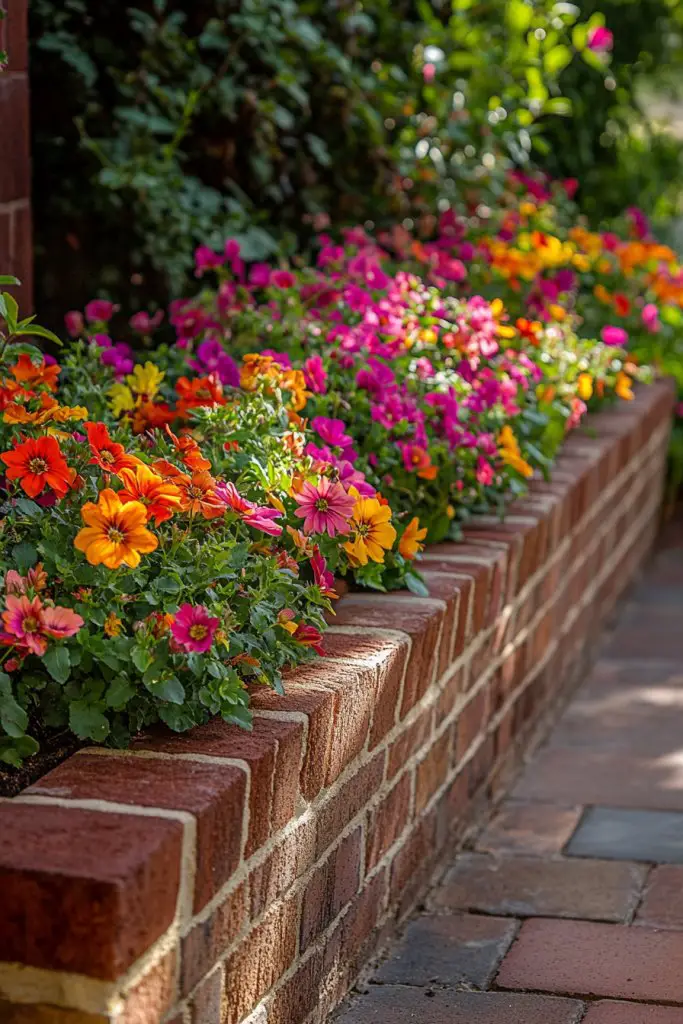
15. Incorporate Built-In Brick Planter Boxes for Flowering Plants
Ever dreamed of having a lush, vibrant outdoor space but feel overwhelmed by green thumb expectations? Building a small brick patio that includes built-in planter boxes can make urban gardening a breeze. It turns a plain outdoor area into a lively, colorful retreat without the hassle of maintaining large pots or scattered containers. Plus, it elevates your patio’s style with a touch of architectural charm.
Recommended Products to replicate this idea
| # | Preview | Product | |
|---|---|---|---|
| 1 |

|
A.D. Planter Box Reclaimed Wooden Brick Mold Rustic Rectangular Industrial Modern Design Indoor... | Buy on Amazon |
| # | Preview | Product | |
|---|---|---|---|
| 1 |

|
Sow Right Seeds - Coleus Rainbow Mix Seeds for Planting - Beautiful Flowers to Plant in a Home... | Buy on Amazon |
Imagine low brick walls integrated into your patio design, overflowing with blooming flowers and trailing greenery. The textured red bricks contrast beautifully with soft pastel blossoms, creating a natural mosaic of colors. The built-in planters add depth and dimension, framing your space with a cozy, garden-like feel. During warm evenings, you smell fresh blooms and feel a gentle breeze rustling through the foliage.
You can customize your planters to match your style—sleek and modern with clean lines or rustic with weathered bricks. For smaller spaces, compact rectangular boxes work best, while larger patios can incorporate multiple tiers for variety. Consider seasonal plantings to keep your space lively year-round, swapping out blooms for evergreen foliage in winter. If space is tight, vertical arrangements with climbing plants also work well.
Start by selecting durable bricks that withstand weather changes—common options include clay or concrete bricks. Construct the planters with sturdy mortar, ensuring they’re level and securely anchored to your patio surface. Reinforce the interior with a landscape fabric to prevent soil erosion. Fill with high-quality soil suited for your chosen plants, and install drainage holes if necessary. Regular watering and occasional fertilizing will keep your plants thriving.
Add decorative elements like small sculptures or colorful ceramic tiles as accents within the planters. Use different brick patterns—herringbone, running bond—to give each box a unique look. Incorporate lighting around the planters, such as solar stake lights, to highlight your floral displays at night. Personalize with your favorite plants—succulents, herbs, or flowering perennials—to match your lifestyle.
Built-in brick planters transform your patio into a charming, eco-friendly oasis that’s easy to care for. They boost curb appeal and can even increase your home’s value. With minimal effort, you create a lively outdoor environment that reflects your personality. Ready to turn your patio into a blooming paradise?
16. Design a Mini Brick Water Feature or Fountain

Craving the soothing sound of flowing water but stuck with a tiny outdoor space? A mini brick water feature or fountain can be your perfect answer. It adds tranquility and visual interest without taking up much room. Plus, it turns your small patio into a peaceful retreat where you can escape the noise of everyday life.
Recommended Products to replicate this idea
| # | Preview | Product | |
|---|---|---|---|
| 1 |

|
Biling Solar Fountain for Bird Bath, Solar Panel Kit Outdoor Solar Water Pump with 4ft Tubing for... | Buy on Amazon |
| # | Preview | Product | |
|---|---|---|---|
| 1 |
|
BAENRCY Arch Bridge Pond Building Blocks Fountain Sencery Accessories Street Set Building Bricks Kit... | Buy on Amazon |
Picture a petite brick fountain nestled in a corner, with water cascading over textured bricks that match your patio. The gentle trickle creates a calming ambiance, while the sound echoes softly in the quiet evening air. Warm light reflects off the water, shimmering against the earthy brick tones. It’s like having a tiny spa right outside your door.
Choose from various styles—tiered, bowl-shaped, or modern geometric designs—to suit your aesthetic. Incorporate natural stones or pebbles around the base for added texture. For seasonal flexibility, select a fountain with a simple pump system that can be drained during cold months. You can also add LED lighting to make your water feature glow at night.
Begin by selecting a compact pump suitable for small fountains, ensuring it’s quiet and energy-efficient. Construct a sturdy brick basin or pedestal as the foundation—consider stacking bricks with mortar to create a custom shape. Seal the interior with a water-resistant coating to prevent leaks. Install the pump, connect it to a power source, and fill with water. Add decorative stones or shells for extra flair. Regular cleaning will keep the water clear and prevent algae buildup.
Decorate the fountain with seasonal accents—like small lanterns or floating candles—to enhance ambiance. Incorporate textured bricks or tiles to match your patio’s style, making the feature a seamless part of your design. Use colored lighting for a dramatic effect or keep it simple with soft, warm illumination. Personal touches turn a basic fountain into a focal point of relaxation.
A brick water feature not only elevates your outdoor decor but also creates a calming environment that invites relaxation. It’s a DIY project that’s achievable and rewarding, adding value and tranquility to your small space. Imagine unwinding to the sound of water, feeling your stress melt away—sounds pretty perfect, right?
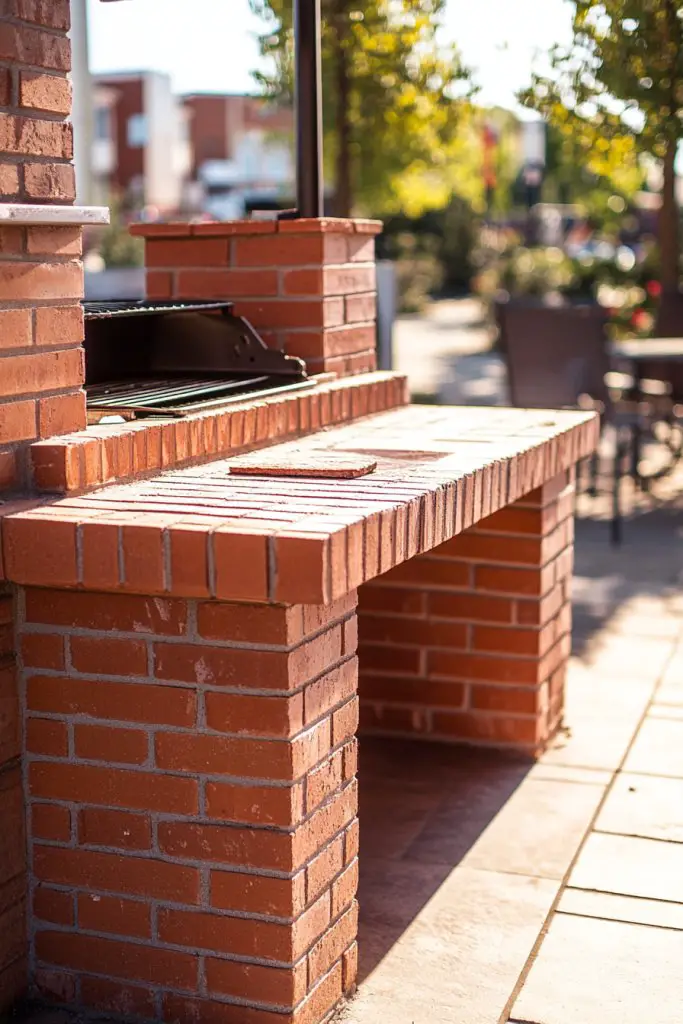
17. Use Brick as a Base for a Compact Outdoor Cooking Area
Ever wished you could whip up a quick grill session without lugging equipment in and out? A brick-based outdoor cooking station offers a sleek, permanent solution for small patios. It makes outdoor meals easier, more organized, and adds a rustic charm to your outdoor space. Plus, it keeps everything within arm’s reach during those summer BBQs.
Recommended Products to replicate this idea
| # | Preview | Product | |
|---|---|---|---|
| 1 |

|
Upgraded Griddle Cleaning Kit for Blackstone 18 Pieces Flat Top Grill Accessories Cleaner Tool Set... | Buy on Amazon |
| # | Preview | Product | |
|---|---|---|---|
| 1 |

|
GIRtech Heavy Duty Refractory Fire Bricks for Forge 3200F - Pack of 2 Extra High Temperature... | Buy on Amazon |
Visualize a sturdy brick countertop with a built-in grill or pizza oven, surrounded by a simple brick enclosure. The warm reddish hues of the bricks contrast with shiny cooking tools and a few decorative ceramic or metal accents. During evening gatherings, the glow from cooking fires creates a cozy, inviting atmosphere. The scent of grilled food wafts through the air, making everyone hungry.
You can customize your brick cooking area with different features—built-in prep stations, storage niches, or side tables. For compact spaces, choose a vertical setup with shelves for utensils. Consider adding a chimney or venting system if you plan on using a wood-fired oven. Seasonal modifications, like removable covers or weatherproof seating, make it adaptable year-round.
Start by designing a layout that fits your space—measure carefully and plan for ventilation and safety clearance. Use high-quality fire bricks for the cooking surface and regular bricks for the surround. Lay bricks with mortar, ensuring stable stacking and level surfaces. Install a durable, weather-resistant countertop surface on top of the brick base. Connect your grill or oven, then add accessories like a prep area or storage cabinets. Regular maintenance involves checking for cracks and cleaning soot buildup.
Personalize your outdoor kitchen with custom brick patterns or decorative accents like mosaic tiles. Add hooks or shelves for utensils, spice jars, or grilling tools—making everything accessible. Use weatherproof cushions or stools nearby for comfort during long cooking sessions. Incorporate a small prep sink if space allows, creating a fully functional outdoor culinary zone.
A brick outdoor cooking area turns your patio into a chef’s haven, perfect for entertaining or family dinners. It creates a rustic, timeless look that ages beautifully and requires minimal upkeep. Now, you can impress guests with your grilling skills right in your backyard—who needs a fancy restaurant?
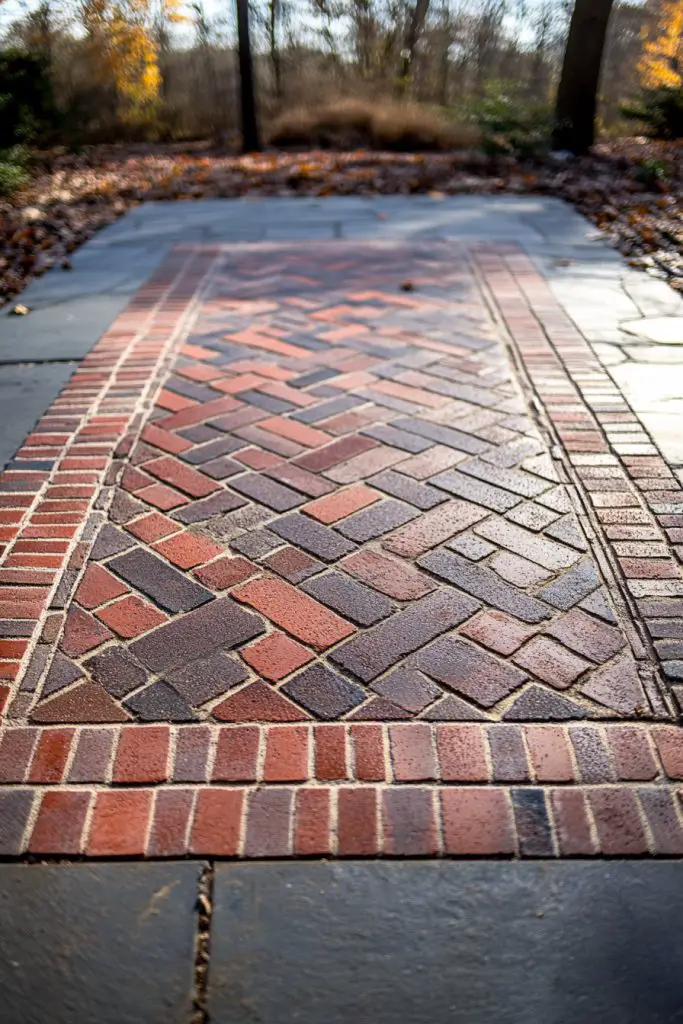
18. Create a Patterned Brick Border for the Entire Patio
Does your small patio feel a bit… unfinished or bland? Adding a patterned brick border can instantly elevate its look, giving it a polished, intentional vibe. It defines the space and adds a decorative touch that’s both classic and customizable. Plus, it’s a surprisingly easy upgrade that makes a big visual impact.
Recommended Products to replicate this idea
| # | Preview | Product | |
|---|---|---|---|
| 1 |
|
MASTER MARK Dig-Free Landscape Paver, Bricks, Stone Edging, No-Dig Patio Flex Border, Plastic 60 ft.... | Buy on Amazon |
| # | Preview | Product | |
|---|---|---|---|
| 1 |

|
10 Pound Titanium Gray DOMINATOR Polymeric Sand with Revolutionary Ceramic Flex Technology for... | Buy on Amazon |
Picture a neat border of bricks laid in a herringbone or basketweave pattern, framing your entire patio. The intricate patterns catch the eye, creating a sense of movement and elegance. The contrasting colors and textures of the bricks add depth, making the space feel larger and more refined. During sunset, the detailed brickwork glows warmly, highlighting your handiwork.
Choose from various brick patterns—running bond, herringbone, or even a diamond design—to suit your style. For a more rustic look, use weathered bricks or mix colors for a vintage feel. Seasonal accents like adding small lanterns or string lights along the border can enhance nighttime ambiance. Adapt the size of the border to your patio’s dimensions for a balanced look.
Begin by measuring your patio edges precisely. Lay out your chosen pattern on paper or directly on the ground with chalk for accuracy. Excavate a narrow trench around the perimeter, then fill it with gravel or sand for drainage. Lay the bricks in your pattern, ensuring tight joints and level surfaces. Use a rubber mallet to set the bricks firmly. Finally, fill gaps with sand or mortar, and sweep to finish.
Add decorative elements like small inlays or engraved bricks for a personal touch. Incorporate color variations or textured bricks to create visual interest. Consider embedding LED strip lighting into the border for subtle nighttime illumination. Personalize with engraved initials or motifs for a unique signature.
A patterned brick border transforms a simple patio into a sophisticated outdoor space. It’s a detail that shows effort and style, boosting your confidence as a DIYer. With a little patience, your small patio can look like a crafted masterpiece—ready for relaxing evenings or entertaining friends.
19. Incorporate a Small Brick Pergola or Shade Structure
Feeling exposed to the sun or rain, but your budget or space doesn’t allow for a full-sized pergola? A small brick pergola or shade structure offers a cozy, stylish solution. It provides just enough cover to enjoy your outdoor area comfortably, boosting usability and aesthetic appeal. Plus, it adds architectural charm to your tiny patio.
Recommended Products to replicate this idea
| # | Preview | Product | |
|---|---|---|---|
| 1 |

|
VEVOR Pergola Bracket Kit 4''x4'', 2pcs 4-Way Heavy Duty Corner Bracket Woodworks DIY Post Base Kit,... | Buy on Amazon |
| # | Preview | Product | |
|---|---|---|---|
| 1 |

|
SUNNY GUARD Sun Shade Sail 10' x 13' Rectangle Sand UV Block Sunshade for Backyard Yard Deck Patio... | Buy on Amazon |
Imagine slender brick columns supporting a lattice or slatted roof, creating a semi-enclosed space. The bricks add a warm, earthy texture that complements your patio furniture. During sunny days, dappled light filters through, casting playful shadows. In the evening, string lights or lanterns can hang from the structure, transforming the space into a charming nook.
Opt for open lattice designs or partial roofs to maximize airflow and sunlight. Use decorative brick patterns for the columns—stacked, running bond, or even diagonal layouts. Seasonal adaptations include adding weather-resistant fabric curtains or roll-down shades for more coverage. You can also incorporate climbing plants, like ivy, for a natural, green look.
Start by constructing sturdy brick columns with mortar, spaced appropriately for stability. Build a simple brick foundation or base to anchor the columns securely. For the roof, attach wooden slats or lattice panels across the top, secured to the brick columns. Seal all joints and ensure proper drainage. Finish by adding decorative touches like weatherproof cushions or hanging decor.
Personalize your pergola with custom brick patterns or engraved bricks on the columns. Incorporate solar-powered LED lights along the beams for nighttime ambiance. Use colorful weather-resistant fabrics or outdoor curtains for privacy and shade. Add hanging planters or decorative elements that reflect your style.
A small brick pergola or shade structure elevates your patio’s look and functionality. It creates a welcoming, cozy spot to relax or dine outdoors. With simple construction and creative touches, you’re building a space that feels both charming and personal—perfect for unwinding after a long day.
20. Use Brightly Colored or Patterned Bricks for a Playful Look
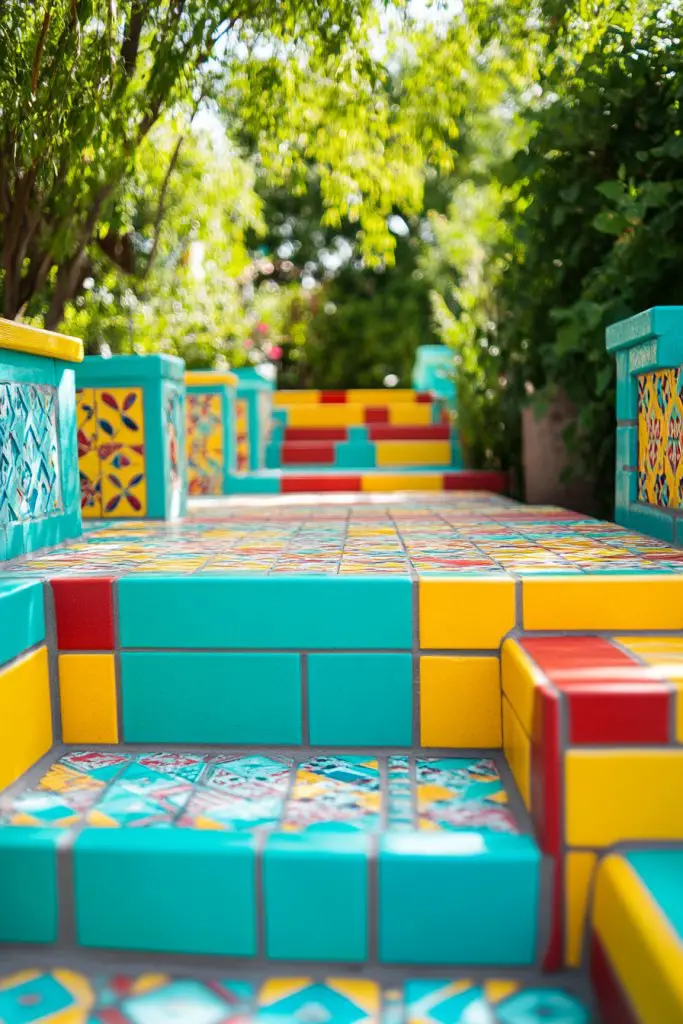
Tired of the usual neutral-toned patios that lack personality? Brightly colored or patterned bricks can inject fun and vibrancy into your small outdoor space. It’s an easy way to showcase your style and make your patio stand out. Plus, it’s surprisingly inexpensive to add a pop of color with creative brick choices.
Recommended Products to replicate this idea
| # | Preview | Product | |
|---|---|---|---|
| 1 |
|
Walk Maker, Pathmate Stone Moldings Paving Pavement Concrete Molds Stepping Stone Paver Walk Way... | Buy on Amazon |
| # | Preview | Product | |
|---|---|---|---|
| 1 |
|
Walk Maker, Pathmate Stone Moldings Paving Pavement Concrete Molds Stepping Stone Paver Walk Way... | Buy on Amazon |
Picture a playful mosaic of reds, blues, and yellows forming a lively pattern across your patio. The textured bricks catch the sunlight, creating a dynamic visual effect that changes with the angle of view. The bold colors contrast beautifully against neutral furniture or greenery, making the space feel cheerful and inviting. During sunny days, the vibrant hues seem to dance with the light.
Mix and match patterned bricks in geometric or abstract designs for a modern look, or go for a gradient effect with color transitions. You can create focal points like a colorful border or a central mosaic. Seasonal accessories like cushions or tablecloths in coordinating colors can enhance the playful vibe. For a more subdued look, use patterned bricks sparingly, as accents.
Source bricks in various colors or patterns—consider reclaimed bricks for a vintage look or specialty glazed bricks for bright hues. Lay the bricks in your chosen pattern using mortar, ensuring tight joints and consistent spacing. For added durability, seal the bricks with a weatherproof coating. Incorporate color into your design by using contrasting shades or creating a focal mosaic. Regular cleaning maintains the vibrancy.
Personalize your patio further by including custom inlays or initials with contrasting bricks. Use outdoor paint or tile decals for additional decorative elements. Incorporate bright textiles and accessories that complement the brick colors. Play with patterns—like spirals or checkerboards—to keep things lively.
Bright, patterned bricks turn a dull patio into a lively haven that reflects your personality. They make your outdoor space memorable and fun for family gatherings or quiet mornings. With a little creativity, your small patio becomes a colorful statement piece—proof that small spaces can pack a big punch.
21. Add Comfortable Weather-Resistant Cushions and Throws on Brick Benches
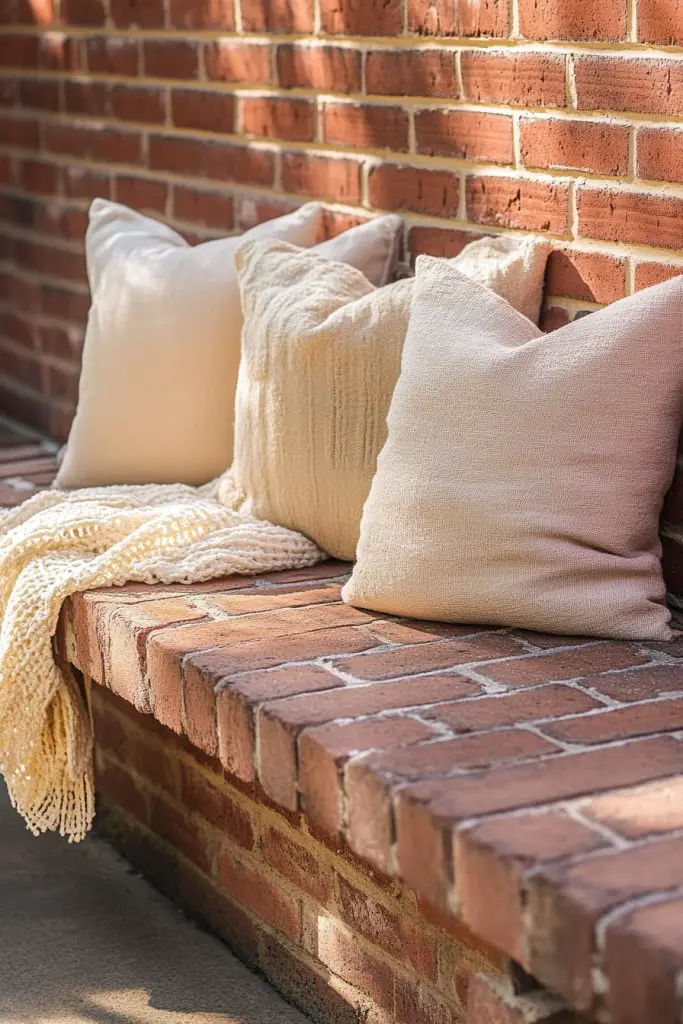
Ever sat on a cold, hard brick bench and wished for a bit more comfort? Adding weather-resistant cushions and throws can turn your outdoor seating into a cozy retreat. It’s a simple upgrade that makes your small patio inviting, especially during cooler evenings. Plus, it instantly boosts your space’s style with minimal effort.
Recommended Products to replicate this idea
| # | Preview | Product | |
|---|---|---|---|
| 1 |

|
IPYNBAP Outdoor Bench Cushion, 48x18x5 Inch, Waterproof Bench Cushion for Outdoor/Indoor Furniture,... | Buy on Amazon |
| # | Preview | Product | |
|---|---|---|---|
| 1 |

|
Cathay Home Coleman Indoor Outdoor Reversible Water Resistant and Sherpa Throw Blanket 50x60 Inch,... | Buy on Amazon |
Imagine plush cushions in vibrant or neutral fabrics layered on your brick benches, inviting you to sit down and relax. Soft throws are draped casually, ready to keep you warm as the evening cools. The textures and colors contrast with the rough brick, creating a layered, inviting look. During sunset, the soft fabrics catch the fading light, adding warmth to the scene.
Choose cushions with removable, washable covers for easy maintenance. Mix patterns and colors to match your overall decor or create a playful, eclectic vibe. Use weatherproof throws in durable fabrics like acrylic or polyester—ideal for outdoor use. For seasonal adjustments, swap out lighter cushions for thicker, insulated ones in winter.
Select cushions and throws designed for outdoor use—look for UV, water, and mildew resistance. Place them on your brick benches, layering for comfort and style. Secure cushions with ties or non-slip pads to prevent them from shifting. Store extras in waterproof containers during harsh weather to prolong their lifespan. Regularly clean covers to keep them fresh.
Personalize with embroidered initials or patterned fabrics that reflect your personality. Combine different textures—like velvet, linen, or faux fur—for a more luxurious feel. Add small side tables or ottomans with matching cushions for a cohesive look. Incorporate seasonal-themed throws for holidays or special occasions.
Cushions and throws make your small brick patio more comfortable and stylish, encouraging more outdoor lounging. They add a layer of warmth and personality that invites you to spend more time outside. With simple updates, your outdoor space becomes an extension of your home—cozy, stylish, and welcoming.
Conclusion
Exploring these diverse small brick patio ideas showcases endless ways to craft a cozy outdoor oasis, no matter your style or space constraints. Embrace these inspiration pieces and customize them to fit your unique home environment. Take the leap and turn your outdoor area into a charming retreat — your perfect patio awaits!
Last update on 2026-02-11 / Affiliate links / Images from Amazon Product Advertising API