Spring is the season of renewal, freshness, and vibrant colors, making it the perfect time to update your home decor with cheerful and charming wreaths. These spring wreath ideas are incredibly popular because they bring a touch of nature indoors, instantly uplifting your space and welcoming guests with a burst of seasonal joy.
In this article, you’ll find a variety of creative and beautiful spring wreath ideas that cater to every style — from rustic and boho to elegant and whimsical. Whether you’re a DIY enthusiast or prefer ready-made beauty, there’s something here to inspire your next spring decorating project and add a delightful touch of charm to your home.
1. Rustic Burlap and Dried Flowers Wreath
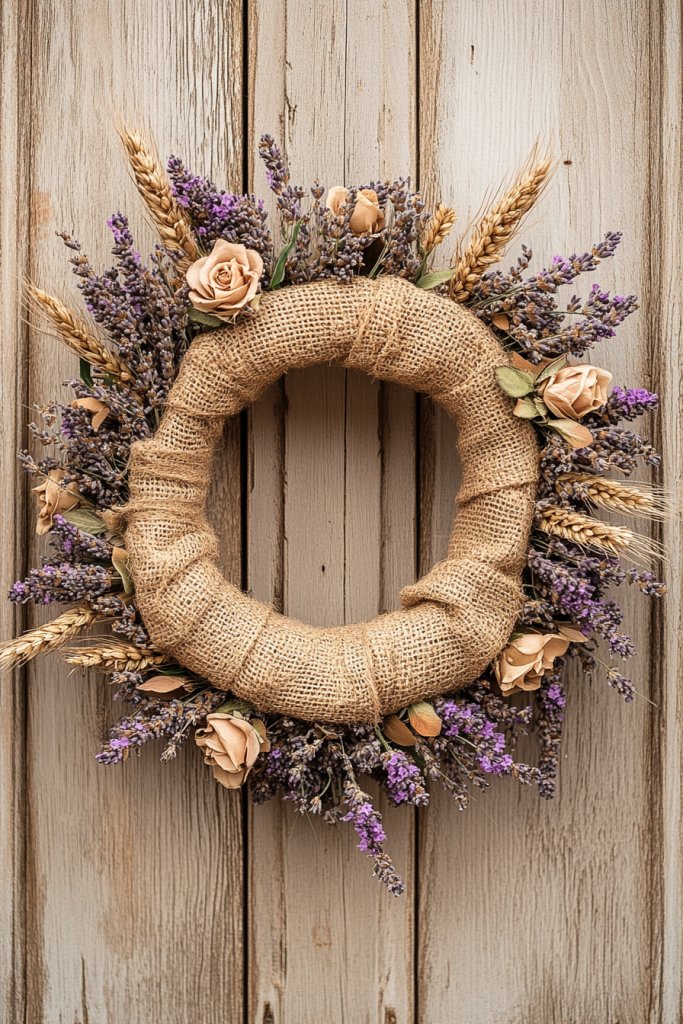
Ever wish your front door could instantly shout cozy farmhouse charm without breaking the bank? A rustic burlap and dried flowers wreath is the perfect fix to elevate your spring decor effortlessly. It combines rustic elegance with natural elements, making your entrance inviting and warm. If your current wreath feels dull or generic, this idea offers a fresh, authentic alternative that screams springtime. Plus, it’s surprisingly simple to craft—no fancy skills required.
Imagine a wreath wrapped in textured, earthy burlap ribbons that have a slightly frayed edge, adding a touch of rustic imperfection. Intertwined are sprigs of dried lavender, eucalyptus, and wildflowers, with their muted shades of purple, green, and cream creating a soft, natural palette. The rough burlap contrasts beautifully with the delicate, papery feel of the dried botanicals. It hangs on your door, exuding a relaxed charm that pairs perfectly with a weathered wooden porch or a cozy cottage aesthetic. The scent of dried flowers subtly wafts in the breeze, completing the sensory experience.
You can customize this wreath for different tastes—swap out dried lavender for fragrant rosemary or thyme for a culinary twist. For a more refined look, replace burlap with linen or muslin ribbons, or add a splash of color with pastel-colored fabric strips. Seasonal changes are easy—add faux berries or small twigs during winter or holiday seasons. For larger doors, opt for a wider wreath base, and for smaller entrances, create a mini version using thinner burlap strands. The beauty is in its versatility and rustic appeal.
Start by selecting a sturdy wreath frame, preferably wire or grapevine. Cut burlap ribbons into strips about 2-3 inches wide and 12-18 inches long, then tie or staple them around the frame, creating a textured, layered look. Gather dried flowers—lavender, eucalyptus, or wildflowers—and secure them with floral wire or hot glue, arranging them for a balanced, natural appearance. To finish, add a loop of twine or burlap for hanging. If you prefer a more polished finish, trim excess burlap and ensure all elements are firmly attached. This project takes about an hour but yields a stunning, handcrafted piece.
Inject your personality by painting the burlap ribbons with subtle pastel shades or stamping initials or spring motifs onto them. Incorporate small wooden accents, like tiny birds or bees, glued onto the wreath for a whimsical touch. You could also add a layer of protective spray to preserve the dried flowers longer, especially if your door sees lots of weather. For a more fragrant wreath, sprinkle dried herbs or essential oils onto the botanicals. The key is to blend rustic charm with your personal style to make it uniquely yours.
This wreath idea proves that beautiful spring decor doesn’t have to be complicated or costly. It’s a budget-friendly way to transform your entrance into a nature-inspired haven that’s full of character. With just a few materials, you can create an authentic, vintage look that friends will admire and ask about. Ready to channel your inner DIY pro and bring some rustic charm to your home? Your front door’s new look awaits!
2. Pastel Pom-Pom Wreath
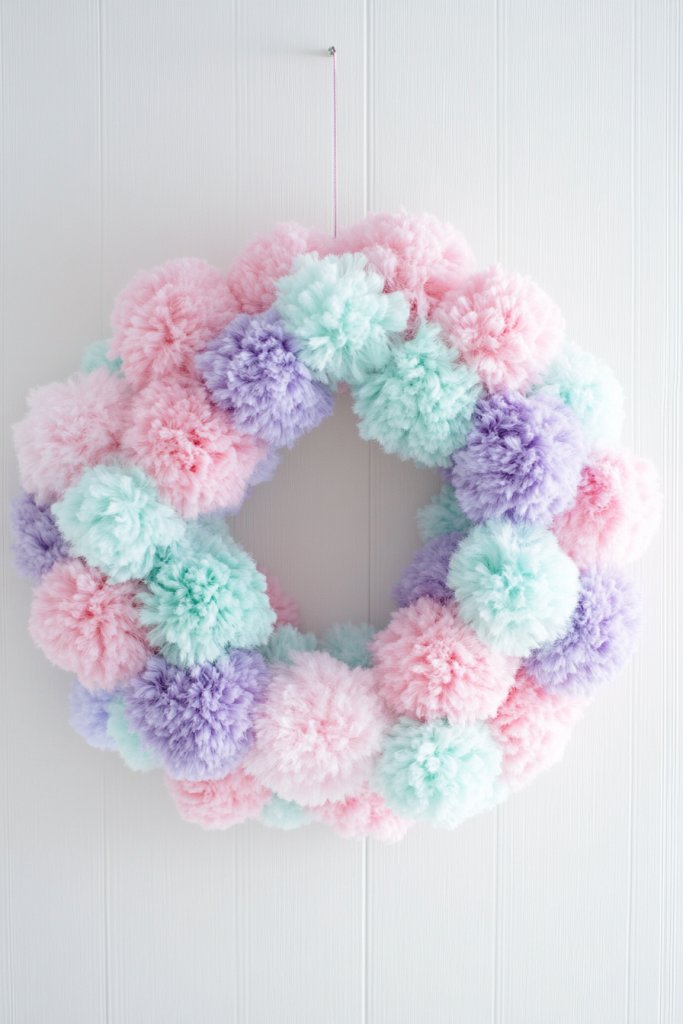
Tired of the same old wreath that just sits there looking pretty but doesn’t spark joy? A pastel pom-pom wreath injects playful energy and color into your spring decor, instantly brightening any entryway. It’s perfect for those who love a whimsical, fun vibe that’s also super easy to customize. If you want your front door to stand out with a cheerful, youthful touch, this is your go-to idea. Plus, it’s a great project for beginners or anyone who loves a bit of DIY fun.
Picture a fluffy wreath adorned with hundreds of tiny, soft pom-poms in shades of blush pink, mint green, lavender, and buttery yellow. The pom-poms cluster densely around a foam or wire base, creating a cloud-like effect that’s irresistibly tactile. As sunlight hits the fuzzy surface, the colors pop with a playful vibrancy. Hanging on your door, it looks like a springtime cotton candy cloud that invites everyone to smile. The texture adds dimension and a cozy, inviting feel to your outdoor space.
You can adjust the color palette to match your personal style—go bold with hot pinks and turquoise or keep it subtle with pastel blues and peaches. For a more sophisticated look, opt for smaller or more muted pom-poms, or combine with fabric flowers for added texture. Seasonal swaps are simple: swap out color schemes for brighter summer hues or deeper shades for early autumn. For a more minimalist approach, create a monochrome wreath with varying shades of one color. The key is in the playful combination of textures and hues.
Start by purchasing or making your own pom-poms—there are plenty of tutorials online for quick, no-sew options. Attach each pom-pom to a pre-cut foam or wire wreath with hot glue, working in tight clusters for fullness. Make sure to leave some space at the top for hanging or add a loop of ribbon or fabric for support. To keep everything secure, press each pom-pom firmly and hold for a few seconds. Adjust the density as you go along, filling any gaps for a lush, fluffy appearance. This project takes about 30-45 minutes and results in an irresistibly cheerful wreath.
Add a personal touch by attaching small fabric or paper banners with spring greetings or initials. Incorporate metallic accents—tiny gold or silver charms—embedded among the pom-poms for a touch of glam. You could also make matching mini pom-pom garlands to hang around your porch area for a coordinated look. For extra longevity, spray with fabric or craft sealant to prevent shedding and keep the colors vibrant longer. Play with different sizes and textures for a layered, eclectic style that reflects your personality.
This cheerful pom-pom wreath shows that decorating can be a delightful and playful experience. It’s a surefire way to spread happiness and invite positive vibes to your home. Plus, it’s a project that’s accessible to all skill levels, making it perfect for a quick weekend craft. Why not embrace the whimsy and let your personality shine through? Your door will thank you for the burst of color and joy every time you see it.
3. Floral Monogram Wreath

Looking for a way to add a personalized, elegant touch to your spring entrance? A floral monogram wreath is the perfect combination of custom charm and floral freshness. It transforms a simple wreath into a statement piece that reflects your personality or family initials. If plain wreaths leave you uninspired, this idea offers a stylish upgrade that’s both meaningful and beautiful. Plus, it’s a project that adds a sophisticated flair without requiring professional skills.
Envision a grapevine or wire wreath base wrapped with faux or fresh spring blooms—roses, peonies, or ranunculus—in soft pinks, whites, and greens. The monogram letter, crafted from wire or foam, sits prominently at the center, covered with a cascade of florals that spill around it. The blooms give a lush, romantic feel, while the monogram adds a personal touch. The overall look is both modern and vintage, fitting seamlessly into cottagecore, shabby chic, or elegant decor styles. It’s a striking focal point that invites admiration.
Personalize the wreath further by choosing flowers that match your seasonal palette or favorite colors. Instead of a letter, opt for a shape—like a heart or star—for a thematic twist. For a more rustic look, use dried flowers and natural twine accents. You can also incorporate small decorative elements like ribbon bows or miniature bird figures for extra charm. Adjust the size of the monogram to suit your door’s dimensions, making it as subtle or bold as you like. The style adapts easily to different aesthetics.
Begin with a sturdy wreath base, then attach faux or fresh blooms using floral wire or hot glue, starting from the edges inward. Shape your monogram letter from wire or foam, and secure it at the center of the wreath. Cover the attachment points with blooms for a seamless look. If using fresh flowers, consider using floral foam or oasis inside the monogram for stability. For faux flowers, simply glue or wire them in place, ensuring a dense, layered appearance. Finish by adding a loop or ribbon for hanging. This project takes about an hour but delivers a stunning, personalized piece.
Make your monogram wreath uniquely yours by adding decorative elements like tiny fairy lights, fabric ribbons, or metallic spray accents. Customize the color scheme to match your decor or mood—soft pastels for spring freshness or bold hues for a statement look. Incorporate your family’s initials, or spell out a word like “LOVE” or “JOY” for a festive touch. Using different flower types or foliage can also change the vibe, from romantic to modern. It’s all about making this piece an extension of your style.
A floral monogram wreath elevates your home’s curb appeal with a personal, artistic touch. It’s proof that you can create standout decor without professional help, just some creativity and a few supplies. This project celebrates your individuality while celebrating spring’s blooms. Why settle for generic when you can craft a meaningful display? Get inspired to make your entrance truly special and welcoming for everyone who visits.
4. Vintage Bird Nest Wreath
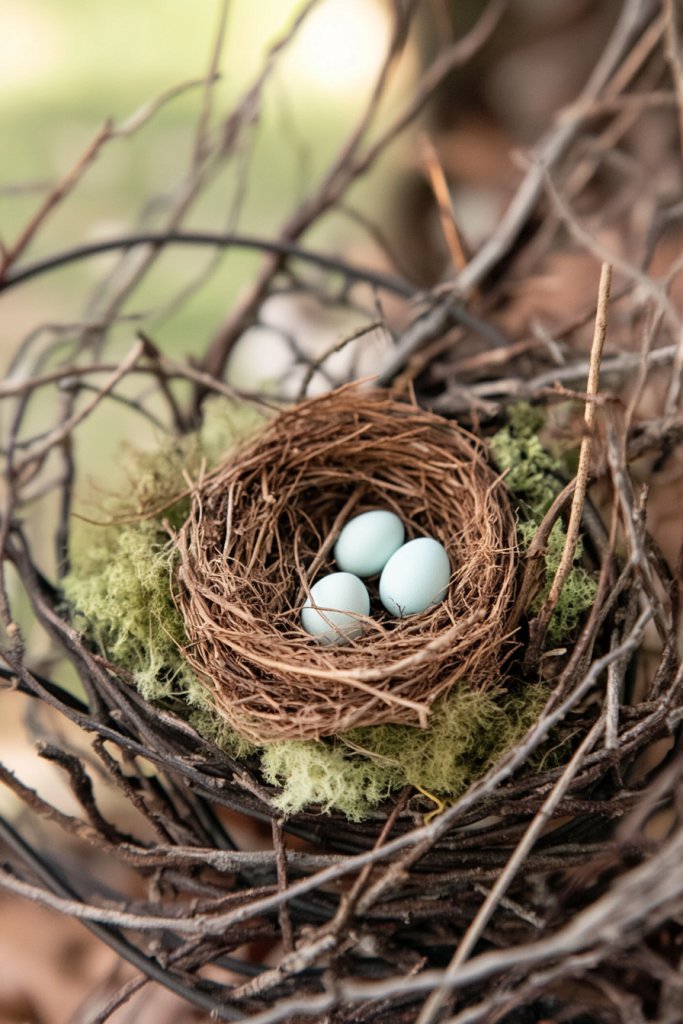
Craving a spring wreath that captures the charm of nature and vintage elegance? A vintage bird nest wreath offers a nostalgic, whimsical vibe that instantly transports your front door into a storybook scene. It’s perfect for bird lovers or anyone who appreciates a touch of rustic romance. If your current decor feels a bit stale, this idea injects life, texture, and a dash of springtime magic. Plus, it’s surprisingly easy to assemble with the right materials.
Picture a wreath made of intertwined grapevines, adorned with tiny faux or real bird nests nestled among sprigs of moss and twigs. Small, pastel-colored eggs peek out from the nests, while miniature bird figurines perch nearby. The natural textures of the vines, combined with the delicate eggs and nests, create a layered, earthy composition. The entire piece evokes a sense of early spring mornings, chirping birds, and budding nests. It’s a charming, vintage-inspired scene that feels both cozy and whimsical.
You can enhance the vintage look by incorporating elements like twine-wrapped accents or antique-style charms. For a more minimalist approach, use just a single bird nest with a few faux eggs on a simple wreath base. Seasonal updates might include tiny faux flowers or pastel ribbons woven into the vines. For a more rustic style, leave the moss and twigs visible for a natural, unpolished appearance. Adjust the size of the nests or add extra bird figurines to create a more dynamic scene. The key is to balance nature-inspired details with a nostalgic aesthetic.
Start with a grapevine wreath as your base, then attach small faux or real nests using hot glue or wire. Embellish with moss, twigs, and tiny eggs, arranging them for a natural, slightly asymmetrical look. Secure miniature bird figurines on or near the nests for added charm. Use natural-colored twine to wrap around sections of the wreath for texture. If you want a more aged, vintage feel, lightly distress the wreath with brown or gray paint or stain. Finish with a loop of twine for hanging. This project takes about 45 minutes and results in a nostalgic, nature-inspired decor piece.
Add sentimental touches by including small keepsakes like tiny vintage keys or charms hidden among the nests. Customize the eggs’ colors—light pinks, blues, or speckled patterns—for a personalized touch. For a more storybook feel, attach miniature banners with spring greetings or family initials. Incorporate faux moss or lichen for an even more authentic, aged look. Tailor the size and arrangement of nests to suit your porch’s space and your style preferences. It’s a simple, heartfelt way to celebrate spring’s renewal.
This vintage bird nest wreath combines nostalgia with nature, creating an eye-catching welcome. It’s a project that celebrates craftsmanship and childhood wonder, perfect for DIY enthusiasts of all skill levels. Your home will radiate charm and serenity, making visitors feel they’ve stepped into a spring fairy tale. Ready to build a nostalgic scene that’s full of life and stories? Your front door’s new favorite decor is just a few steps away.
5. Butterfly and Flower Ribbon Wreath

Want a wreath that feels lively, colorful, and full of motion? A butterfly and flower ribbon wreath is your ticket to a vibrant spring entrance that captures the essence of blooming gardens. It’s perfect if you love a touch of whimsy and enjoy crafting with ribbons and embellishments. If your current wreath is too static or dull, this idea brings a dynamic, animated vibe that catches every passerby’s eye. Plus, it’s surprisingly simple to create a stunning effect.
Imagine a large, lush bow at the top of the wreath, crafted from satin or grosgrain ribbons in cheerful spring hues—pinks, yellows, and greens. Cascading down from the bow are faux butterflies, made of delicate fabric or plastic, seemingly fluttering among silk or fabric flowers. The ribbons flow freely, creating a sense of movement, while the butterflies add pops of color and whimsy. The overall look is cheerful, energetic, and full of life, like a spring garden in motion. This wreath invites smiles and curiosity.
Change up the ribbon styles—try satin for elegance, burlap for rustic charm, or sheer organza for a fairy-tale look. Switch butterfly colors to match your decor or the season—bright and bold for summer, pastel for spring. Incorporate different flower types and sizes, from tiny daisies to large peonies, for a layered, textured appearance. For a more understated look, use a single ribbon color with minimalist butterfly accents. The concept adapts easily to your personal style and space constraints.
Begin with a sturdy wire wreath form and secure a large decorative ribbon into a bow at the top, tying it tightly with floral wire or hot glue. Attach faux butterflies around the bow and across the ribbons, using hot glue or craft wire. Arrange silk or fabric flowers along the ribbons to add fullness and color. For extra movement, let some ribbon tails hang loosely or curl with scissors. Make sure all elements are securely attached to withstand weather. Finish with a loop of ribbon or twine at the top for hanging. This project takes about 30-40 minutes but yields a lively, eye-catching wreath.
Add your signature by including custom embellishments like tiny fairy charms or personalized fabric tags. Use ribbons with patterns or textures that match your outdoor decor theme. Incorporate small LED fairy lights woven into the ribbons for a magical glow at dusk. Attach a small sign with a spring greeting or family name for extra charm. Play with ribbon lengths and butterfly placements to create a balanced, artistic design. The goal is a wreath that feels uniquely yours, bursting with personality.
This butterfly and flower ribbon wreath bursts with energy and joy, perfect for celebrating the beauty of spring. It shows that adding movement and color can make your decor memorable and fun. No matter your crafting skill level, you can achieve a professional-looking result that transforms your home’s curb appeal. Ready to create a cheerful, animated welcome? Your springtime masterpiece awaits!
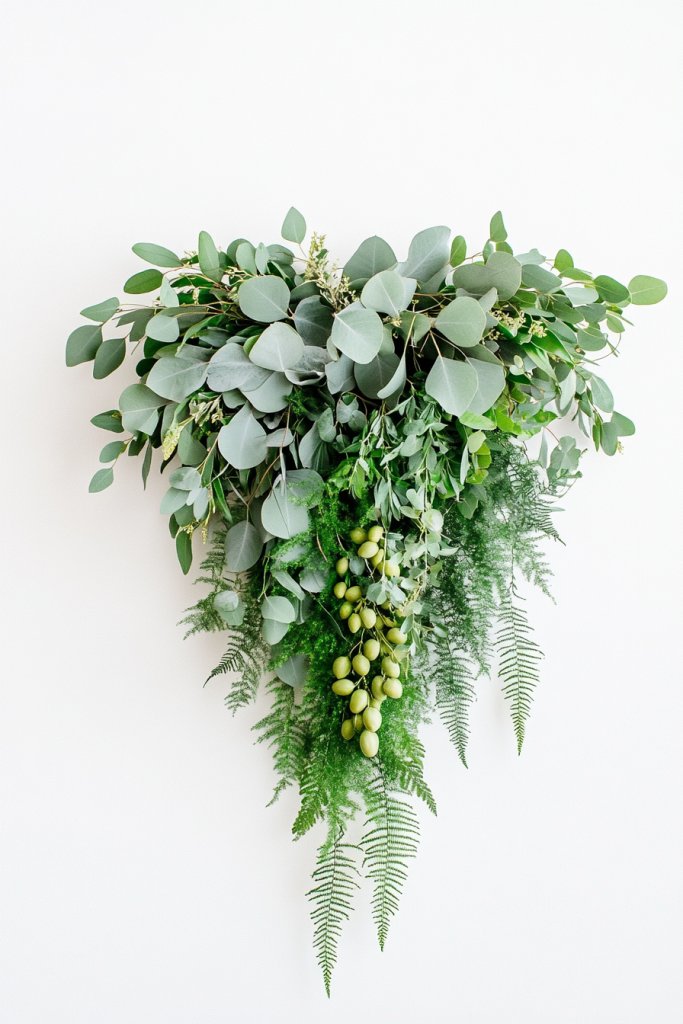
6. Minimalist Greenery Wreath
Feeling overwhelmed by cluttered or overly ornate wreaths? A minimalist greenery wreath offers a breath of fresh air—simple, elegant, and modern. It’s perfect for those who love clean lines and understated decor that still makes a statement. If your style leans toward contemporary or Scandinavian aesthetics, this idea fits seamlessly. Plus, it’s a low-maintenance, versatile piece that complements any exterior or interior. Ready to embrace simplicity with a touch of nature?
Visualize a sleek wire or foam ring wrapped in lush eucalyptus or boxwood foliage. The greenery is dense yet carefully arranged to highlight natural textures and shades of green, from silvery-gray to deep emerald. The wreath’s shape is clean and symmetrical, with no unnecessary embellishments—just pure, verdant beauty. It hangs on a neutral-colored door, its understated elegance inviting calm and serenity. The subtle scent of fresh leaves might even waft out as a bonus sensory detail, enhancing the zen-like vibe.
For a more personalized touch, incorporate different types of foliage—sage, ferns, or olive branches—for varied textures. During different seasons, swap in dried or faux greenery in subdued colors for a year-round look. For a slightly more decorative approach, add small wooden or ceramic accents, but keep the overall minimalist aesthetic. The shape can be altered to asymmetrical or elongated forms to suit your space and taste. This style is highly adaptable and easy to refresh annually.
Choose a sturdy wreath base, then layer your greenery using floral wire or hot glue, starting from the bottom and working upward for full coverage. Focus on creating a balanced, symmetrical look or an intentionally asymmetrical one for modern flair. Keep foliage tight and secure, trimming any excess stems. For longevity, spray the wreath with a clear sealant or floral preservative. Attach a simple loop of twine or wire at the top for hanging. Minimal tools are needed, and the process takes about 20-30 minutes.
Personalize by adding a single, subtle accent—like a small wooden initial or a tiny ceramic bird—placed off-center for visual interest. Change up the greenery seasonally to keep the look fresh and relevant. Incorporate a light dusting of white or metallic spray for a frosted or subtle shimmer effect during winter. Mix different shades of green or textures for a layered, sophisticated appearance. The key is to keep it simple but intentional, reflecting your personal style.
A minimalist greenery wreath demonstrates that less truly is more. It’s a stylish, timeless piece that elevates your home’s curb appeal without overwhelming your senses. This project is accessible and quick, perfect for a weekend craft. When you keep it simple, you allow natural beauty to shine through. Ready to bring a touch of modern serenity to your entrance?
7. Watercolor-Printed Fabric Wreath
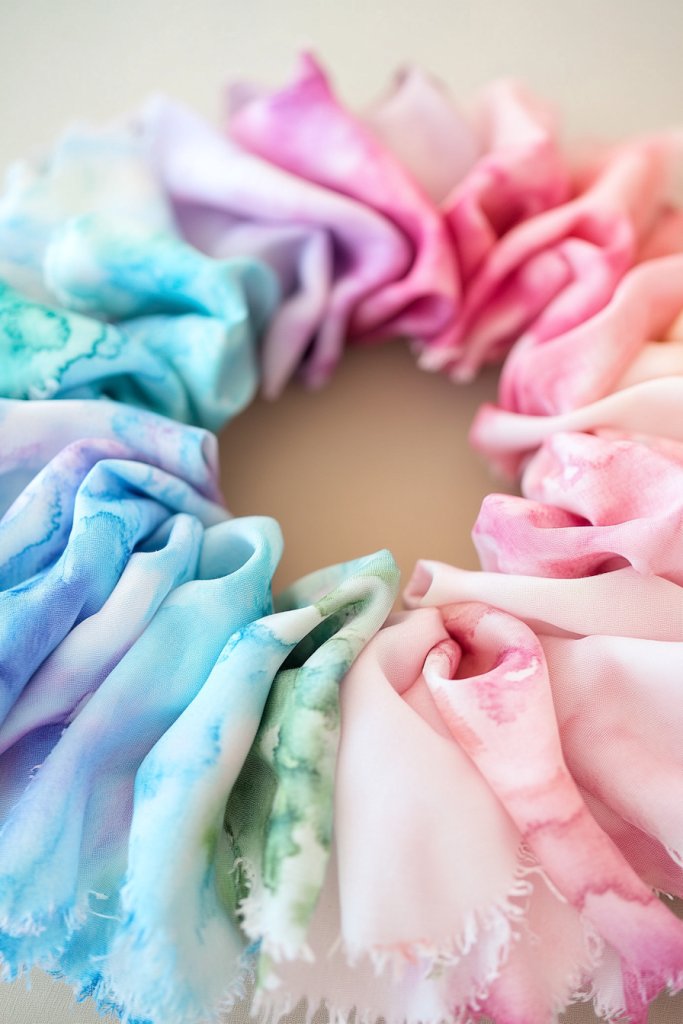
Looking for a unique, artsy way to welcome spring? A watercolor-printed fabric wreath combines creativity and color for a truly personalized touch. It’s ideal if you love DIY projects that feel more like art than decor. If your current wreath feels uninspired, this idea offers a soft, painterly aesthetic that’s both calming and eye-catching. Plus, it’s a fantastic way to showcase fabric scraps or prints you love.
Imagine a wreath wrapped in fabric featuring delicate watercolor floral prints—blush pinks, soft blues, and gentle greens blending seamlessly. The fabric is gathered and secured around a foam or wire base, creating a textured, layered look. Small fabric flowers or rosettes are added for dimension, mimicking brushstrokes on canvas. The overall effect is soft, artistic, and soothing, evoking a gentle spring garden. It hangs like a wearable piece of art, inviting admiration and curiosity.
Select fabrics with different watercolor patterns to match your mood or decor style—bright and cheerful or muted and sophisticated. You can also layer multiple fabrics for a patchwork effect or add lace or tulle for extra texture. During different seasons, swap in fabrics with seasonal motifs—pastel for spring, vibrant for summer, or muted for fall. For a more minimalist look, use a single, large piece of fabric with a subtle watercolor print. The style is highly customizable.
Cut fabric into strips or shapes—either simple rectangles or more intricate floral motifs. Wrap a wreath form with a base fabric or felt for stability, then secure your fabric strips using hot glue or sewing. Arrange the fabric in a layered, overlapping pattern, creating a painterly effect. Add small fabric flowers or rosettes by sewing or gluing, placing them to mimic watercolor brushstrokes. Finish with a fabric loop or ribbon for hanging. This project takes about 45 minutes and results in a soft, artistic wreath.
Add a personal touch by embroidering initials or small motifs onto the fabric before attaching to the wreath. Incorporate metallic or glitter accents to mimic shimmer in watercolor paintings. Use different textures—silk, cotton, or linen—for a layered, tactile effect. During holidays, swap out fabrics for themed patterns—Easter eggs or floral motifs. It’s a creative way to turn functional fabric into a stunning piece of decor.
This watercolor fabric wreath proves that art and decor can go hand in hand. It’s a creative project that lets your personality shine through with color and pattern. Plus, it’s accessible for all skill levels—no painting required! When you hang this soft, artistic piece, it’s like bringing a watercolor painting to life on your door. Ready to add a touch of gallery-worthy charm?
8. Rustic Twine and Button Wreath
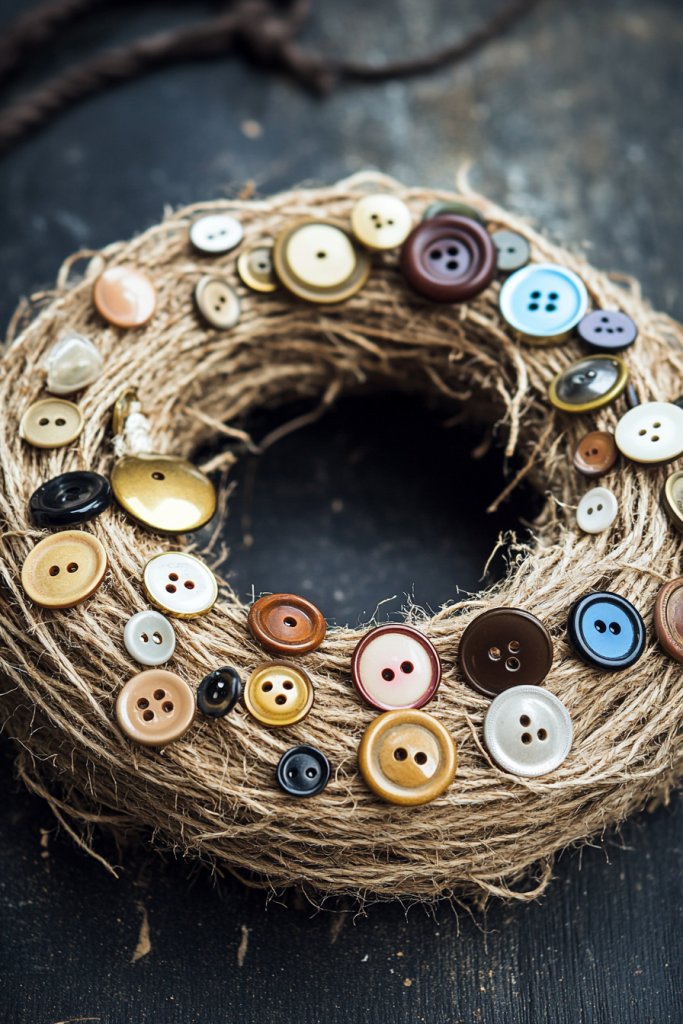
Want a wreath that feels handcrafted and full of personality? A rustic twine and button wreath offers a charming, homespun look that’s easy to make and endlessly customizable. It’s perfect for adding a crafty touch to your spring decor without needing advanced skills. If your current wreath is too polished or plain, this idea brings warmth and texture that invites closer inspection. Plus, it’s a fun project for a weekend afternoon.
Visualize a wreath base wrapped tightly with natural twine, creating a textured, earthy backdrop. Sew or glue colorful buttons—shaped like flowers, insects, or simply in cheerful hues—onto the twine in a random or patterned arrangement. The buttons add pops of color and a tactile element, contrasting beautifully with the rustic twine. It hangs on your door, exuding a cozy, vintage vibe reminiscent of country kitchens or garden sheds. The combination of textures and colors makes it both playful and inviting.
Choose buttons in different shapes and sizes to add visual interest—metallic, ceramic, or wooden buttons work well. For a more refined look, opt for pastel-colored buttons or create a specific pattern, like a flower or star. During different seasons, swap buttons for seasonal motifs—egg shapes for Easter or leaf-shaped for fall. For a minimal style, use monochrome buttons arranged symmetrically. This project easily adapts to your taste and the vibe of your home.
Wrap your wreath form with twine, starting at one point and working around in tight, overlapping circles. Secure the end with hot glue or a knot. Select buttons in your preferred color scheme and sew or glue them onto the twine, spacing evenly or clustering for a more organic look. Use a hot glue gun to attach larger buttons for added stability. For hanging, tie a loop of twine or attach a small hook at the top. The process takes about 30 minutes and yields a charming, textured wreath.
Personalize your wreath by choosing buttons that reflect your personality or home decor—vintage, modern, or rustic. Add charms, small charms, or miniature figurines along with buttons for extra whimsy. Incorporate different twine textures—jute, cotton, or colored threads—for variation. Customize the arrangement to spell out initials or words for a fun, personalized touch. It’s a simple project that pays off with a unique, handmade statement piece.
This twine and button wreath proves that a little creativity goes a long way. It’s a testament to how small details can make a big impact, adding personality and charm to your home. Whether you keep it simple or go all out with colors and motifs, you’ll end up with a piece that feels warm and welcoming. It’s an excellent project for DIY beginners and seasoned crafters alike. Ready to craft your own cozy, crafty wreath?
9. Mason Jar Lid Flower Wreath
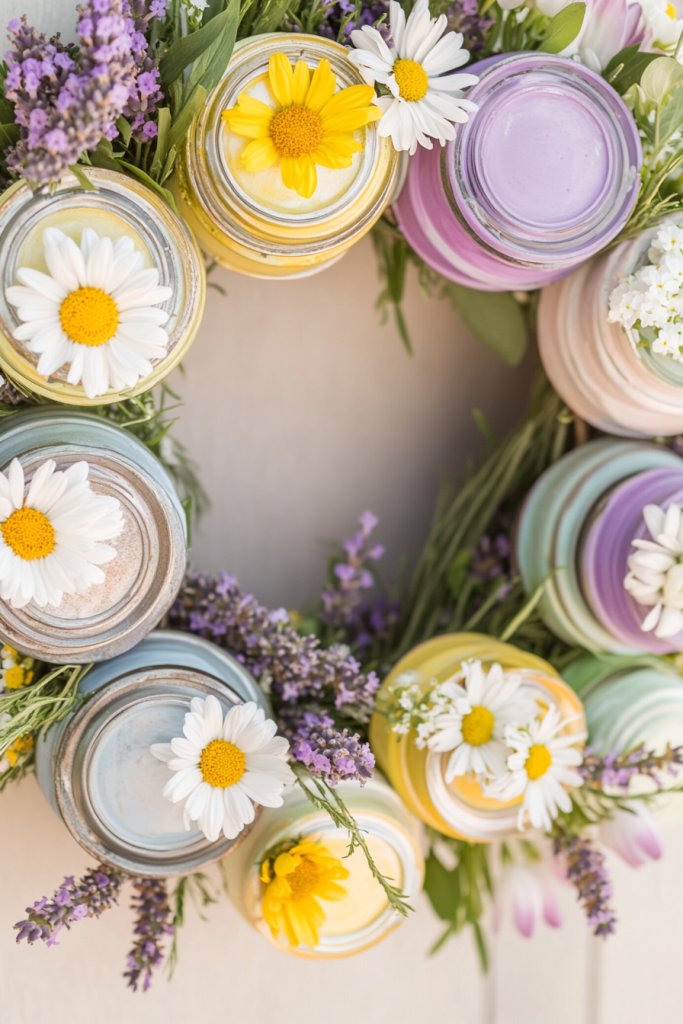
Looking for a charming, nostalgic way to brighten up your spring entrance? A mason jar lid flower wreath blends vintage charm with fresh blooms, creating a delightful focal point. It’s perfect for anyone who loves upcycling and wants a unique piece that’s both functional and decorative. If your current wreath feels too generic, this idea offers a personalized, handcrafted alternative that’s full of character. Plus, it’s an easy project with a big visual impact.
Picture a circular wreath made from vintage or repurposed mason jar lids, each filled with faux or dried spring flowers—daisies, small roses, or wildflowers. The lids are arranged tightly together, creating a textured, metallic border that frames the floral display. The flowers spill slightly over the edges, adding dimension and softness to the metallic base. It’s a nostalgic nod to old-time preserves, but with a fresh, floral twist that fits perfectly into a spring garden or cottage aesthetic. The whole piece exudes a homemade, heartfelt vibe.
Customize by painting the jar lids in pastel or metallic shades before filling them with flowers for a coordinated look. Use different sizes of lids, or alternate with vintage silver or brass finishes for variety. During different seasons, swap in seasonal flowers or add small decorative items like faux eggs or miniature birds. For a more rustic look, leave the lids unpainted and let the natural metal patina show. The design can be scaled up or down depending on your space and style preferences.
Start by cleaning and optionally painting the mason jar lids. Fill each lid with faux or dried flowers secured with hot glue or floral foam. Arrange the filled lids in a circular pattern on a sturdy wreath base—wire or grapevine. Secure each lid with hot glue or wire, ensuring they’re snugly attached. For extra flair, add small decorative accents like faux moss or twine around the edges. Attach a hanging loop at the top with wire or ribbon. This project takes about 40 minutes but results in a charming, vintage-inspired wreath.
Personalize by adding tiny charms, initials, or seasonal accents like faux eggs or butterflies. Paint the lids in colors that match your decor or mood—metallics for glam, pastels for spring. Incorporate small LED fairy lights inside the lids for a gentle glow at night. Mix in different flower types and colors for a layered, textured appearance. It’s a nostalgic piece that can be tailored to your style and the season.
This mason jar lid wreath shows that upcycling can be both creative and beautiful. It’s a fun project that blends vintage nostalgia with modern floral design. When you hang it on your door, you’re sharing a piece of craftsmanship and personality with everyone who visits. It’s proof that small details and creative reuse can make a big impact. Ready to craft a vintage-inspired floral display?
10. Upcycled Book Page Wreath

Want a wreath that’s full of character and a touch of literary charm? An upcycled book page wreath combines creativity with eco-friendly flair, perfect for book lovers or anyone who appreciates a vintage vibe. It’s a great way to breathe new life into old books and add a unique, textured piece to your spring decor. If you’re tired of mass-produced wreaths, this DIY project lets you craft something meaningful and stylish. Plus, it’s an eco-conscious choice that’s easy on the wallet.
Visualize a wreath made from tightly rolled or layered vintage book pages, arranged into rosettes or a textured surface. The pages are often torn or distressed for a shabby chic look, with edges curled outward for dimension. The neutral tones of aged paper—creamy whites, browns, and sepias—create a soft, nostalgic palette. Perhaps some pages are stamped or illustrated, adding artistic detail. The final piece looks like a literary garden, full of textured blooms and layered stories, perfect for a cozy reading nook or cottage porch.
You can choose pages from specific genres—poetry, classics, or children’s books—to add thematic depth. For a more colorful effect, incorporate pages with vintage illustrations or colored print. During holidays, use themed pages—Easter or spring-themed text or images. For a more refined look, roll pages into tight rosettes and glue them onto a wreath form, or create a layered collage with torn edges. Size and shape can be adjusted to suit your space—small, delicate wreaths or large statement pieces. It’s highly customizable.
Start by tearing pages from old books and folding or rolling them into rosettes or strips. Attach each piece with hot glue or craft adhesive onto a wreath base—wire, foam, or grapevine—covering evenly. For a textured, layered look, alternate sizes and orientations. If using rosettes, secure the base with extra glue for durability. For a vintage effect, lightly stain or ink the edges of the pages before attaching. Finish with a hanging loop—twine, ribbon, or wire—and hang for display. The process takes about 45 minutes but results in a charming, literary-themed wreath.
Add personal touches by stamping or writing quotes onto some pages before attaching. Incorporate other vintage elements like pressed flowers or small charms for added interest. Use colored ink or watercolor washes to highlight certain areas of the pages. For a more artistic touch, combine torn and rolled pages with painted or stamped sections. The goal is a textured, layered piece that tells a story—your story. It’s a creative project that celebrates both literature and eco-friendly design.
This book page wreath is a testament to how reusing old materials can create something beautiful and meaningful. It’s an affordable, eco-conscious project that adds a warm, vintage touch to your home. When guests see it, they’ll appreciate the effort and creativity behind it. It’s perfect for all skill levels and a great way to express your love for books or vintage style. Ready to turn pages into a stunning spring decoration?
11. Seashell and Sand Dollar Wreath

Craving a coastal-inspired wreath that instantly transports you to the beach? A seashell and sand dollar wreath is the perfect way to bring ocean vibes to your spring decor. It’s ideal for beach lovers or anyone dreaming of sandy shores and gentle waves. If your current wreath feels dull or generic, this idea adds a fresh, breezy charm that’s both relaxing and stylish. Plus, collecting shells can be a fun, meditative activity.
Imagine a neutral-toned wreath base—perhaps natural twigs or foam—adorned with faux seashells, starfish, and sand dollars. The shells are arranged in a harmonious pattern, with larger pieces at the bottom and smaller accents scattered throughout. White, cream, and light pink shells create a soft, soothing color palette reminiscent of a calm shoreline. The textured shells catch the light, creating a shimmering effect that mimics the sun reflecting on water. The overall look is breezy, tranquil, and inviting—like a seaside retreat.
You can customize this wreath by mixing real and faux shells, or choosing different types of shells to reflect your favorite coastlines. Add small pieces of driftwood or coral for extra texture. During different seasons, swap in brighter shells or include tiny faux sea creatures like crabs or seahorses. For a more rustic look, leave some shells unpolished and natural. The size of the wreath can be adjusted for small porches or large entryways, making this design highly adaptable.
Start with a sturdy wreath base and gather a collection of faux or real seashells and sand dollars. Attach larger shells directly with hot glue, spacing them evenly around the base. Fill in gaps with smaller shells, starfish, or tiny faux seaweed for added dimension. Secure each piece thoroughly and let the glue dry completely. For extra durability, you can spray the entire wreath with a clear sealant, protecting against weather and wear. Hang using a sturdy ribbon or wire loop, and you’re ready to impress. This project takes about 30-45 minutes.
Personalize your seaside wreath by adding tiny charms, initials, or meaningful keepsakes tucked among the shells. Incorporate faux sand or tiny pebbles to create a textured base or background. Use shells in colors that match your decor—white, pink, or even iridescent for a more glamorous look. You could also add small LED string lights woven among the shells for evening allure. It’s a simple way to make your coastal decor truly your own.
This seashell wreath celebrates the beauty of the ocean and the art of upcycling. It’s a relaxing, creative project that results in a stunning, beachy focal point. When you hang it up, it evokes calm and tranquility—perfect for spring and summer refreshes. No matter your crafting experience, you can create a piece that’s as unique as a beachside sunrise. Ready to bring the coast home?
12. Whimsical Fairy Garden Wreath
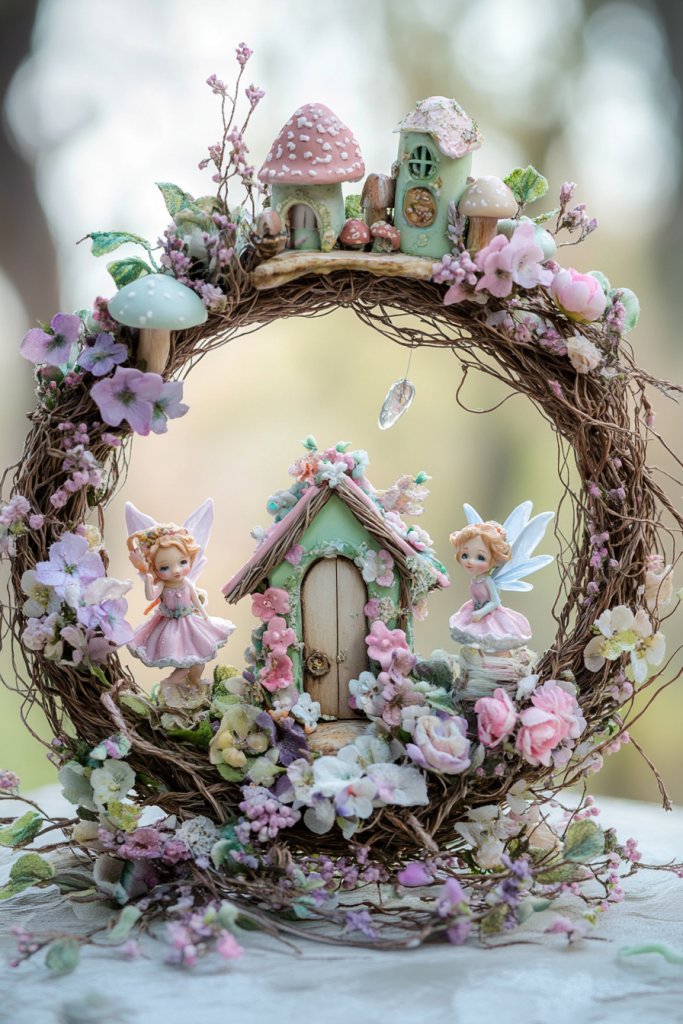
Dreaming of a magical, fairy-tale inspired entrance? A whimsical fairy garden wreath is the perfect way to add enchantment and charm to your spring decor. It’s ideal if you love fantasy, nature, or creating a miniature scene that sparks imagination. If your current wreath feels too ordinary, this idea transforms your door into a little fairy haven full of tiny wonders. Plus, it’s a fun, creative project that can be as detailed or simple as you like.
Picture a wreath decorated with miniature fairy figurines, tiny mushrooms, and faux moss, creating a lush, mystical scene. Tiny fairy doors or lanterns are nestled among faux greenery, while miniature toadstools and mushrooms add pops of red and white. Faux moss and twigs provide a woodland backdrop that feels alive and magical. The scene looks like a secret fairy garden, inviting curiosity and delight. It’s a playful, imaginative display that transforms a simple wreath into a storybook setting.
Customize the scene by choosing different fairy figurines—glow-in-the-dark, painted, or vintage-style. Use natural materials like small branches and dried moss for an authentic, woodland look. Add tiny fairy lights or glitter accents for a magical sparkle. During different seasons, swap fairy accessories—eggs and bunnies for spring, tiny pumpkins for fall. Adjust the scale of the scene to match your door size, from miniature to more elaborate setups. The design is flexible and highly personal.
Start with a sturdy wreath base—wire or grapevine—and arrange faux moss and twigs to create a woodland backdrop. Secure miniature fairy figures, mushrooms, and fairy doors using hot glue or wire, positioning them for a natural, layered look. Add small decorative elements like tiny lanterns or fairy dust spray for extra enchantment. Incorporate tiny LED lights woven among the scene for a glow at dusk. Finish with a hanging loop, ensuring all elements are firmly attached. Crafting takes about 45 minutes but results in a magical, fairy-tale display.
Personalize your fairy garden by including miniature signs with messages like “Welcome” or “Dreams.” Use glitter, metallic paints, or glow-in-the-dark elements for added magic. Incorporate tiny animal figurines or flowers to enhance the scene. Customize the colors—soft pastels or vibrant fantasy hues—to reflect your style. Embed meaningful tokens or charms that hold special memories. It’s a whimsical, enchanting project that sparks imagination and delight.
This fairy garden wreath proves that imagination and craftiness can create a truly magical entrance. It invites wonder and joy, perfect for inspiring a sense of fantasy in your home. The project is accessible and adaptable, making it suitable for crafters of all levels. When hung, it transforms your doorway into a portal to a fairyland. Ready to craft your own enchanted garden?
13. Bright Citrus and Green Leaf Wreath

Craving a fresh, zesty way to celebrate spring? A bright citrus and green leaf wreath brings vibrant energy and color to your home’s entrance. It’s perfect for those who love lively, cheerful decor that feels like a burst of sunshine. If your current wreath feels dull or muted, this idea adds a bold, invigorating statement. Plus, it’s a simple project that celebrates nature’s bounty and the joy of fresh fruit.
Imagine a circular wreath adorned with slices of faux or dried citrus—lemons, oranges, and grapefruits—interspersed with lush green leaves. The citrus slices are arranged in a radiating pattern, showing off their bright orange and yellow hues. The leaves, in deep green, add fullness and contrast, creating a lively, tropical-inspired scene. The texture of the fruit slices, combined with the glossy leaves, gives a vibrant, fresh feel that’s perfect for spring. It’s a cheerful, zesty display that energizes anyone approaching your door.
Switch up the citrus types—use lemon, lime, or kumquat slices for different looks. Incorporate faux or dried fruit, or even colorful fabric slices for a budget-friendly option. During summer, add small faux pineapple or watermelon accents; in winter, swap for berries and holly. Use a mix of real and faux elements to extend longevity. Adjust the size of the wreath based on your space—small for a subtle accent, large for a bold statement. It’s adaptable and easy to customize.
Start with a wire or foam wreath base, then attach citrus slices using hot glue or floral wire, working from the outside inward for even coverage. Layer green leaves in between or behind slices to add depth. Secure everything firmly and arrange for a balanced appearance. For extra durability, spray with a clear sealant, especially if using real fruit. Attach a hanging loop at the top with ribbon or wire. This project takes about 30 minutes and results in a fresh, lively wreath.
Make it your own by adding small accents like faux flowers, tiny umbrellas, or fruit-shaped charms. Incorporate a decorative ribbon in bright colors that match your porch decor. For a more refined look, choose citrus slices with a glossy finish or metallic accents. Use different shades of green or add a few sprigs of herbs like mint or basil for added freshness. It’s a vibrant, cheerful piece that’s easy to tailor to your style.
This citrus and green leaf wreath is a celebration of spring’s bounty and a reminder to enjoy life’s simple pleasures. It’s a lively, eye-catching way to welcome guests and boost curb appeal. The project is straightforward, even for beginners, and results in a piece that’s full of color and energy. When you hang it, you’re embracing the bright, joyful spirit of spring. Ready to add some zest to your decor?
14. Fabric Scraps and Lace Wreath
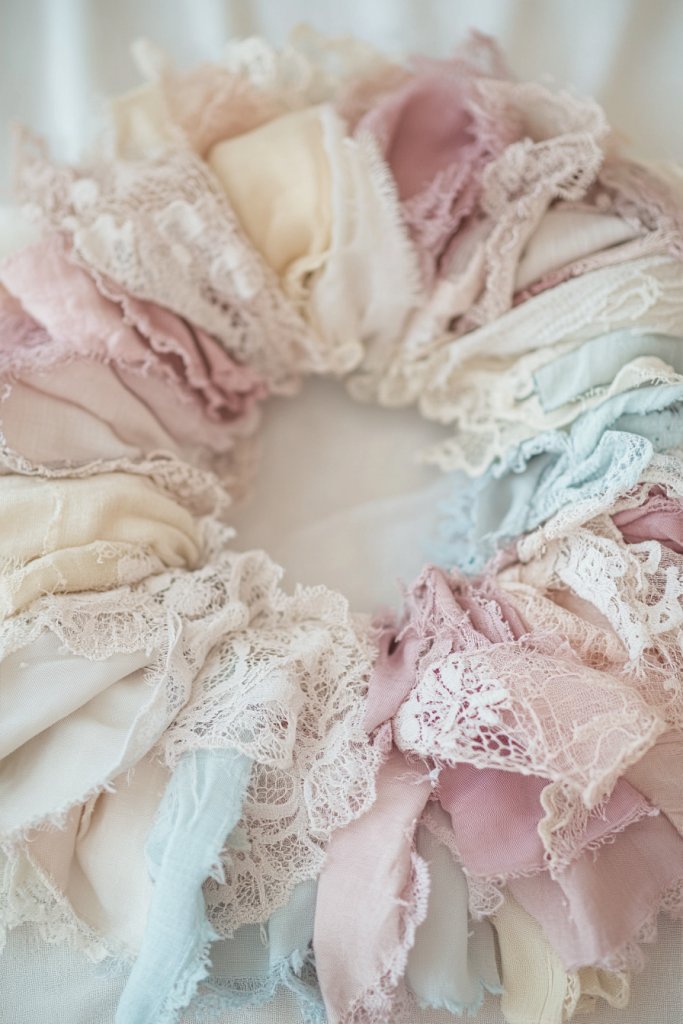
Looking for a way to add a touch of vintage charm without breaking the bank? Fabric scraps and lace wreaths offer a soft, nostalgic aesthetic that instantly warms up any entryway. They’re perfect for anyone craving a handmade, cozy vibe that feels both delicate and inviting. Plus, they’re simple enough for beginners but charming enough to impress guests.
Imagine a wreath layered with pastel-colored fabric strips, gently frayed at the edges, creating a textured, layered look. Tiny lace accents peek through, adding a vintage lace trim that catches the light softly. The overall effect is a patchwork of soft pinks, creams, and light blues, with delicate ruffles fluttering in the breeze. It’s like a cozy quilt brought to life on your door.
You can customize this wreath with seasonal fabrics—think floral prints for spring or plaid for fall. For a more rustic look, use burlap mixed with lace; for a more romantic aesthetic, opt for silk or satin scraps. Size and shape can vary depending on your door, from small and dainty to large and statement-making. Embellish further with vintage buttons or tiny bows for extra flair.
Gather fabric scraps in coordinating colors and textures. Cut strips about 1-2 inches wide and 8-12 inches long. Tie or sew these onto a plain wire or foam wreath base, layering and overlapping for fullness. Incorporate lace trims by sewing or gluing them between fabric layers. Secure everything tightly to withstand weather, and add additional decorative elements if desired. Using hot glue simplifies attachment and ensures durability.
Inject personality by adding small charms, vintage brooches, or embroidered patches into the fabric layers. Personalize with family initials sewn into the fabric or small fabric flowers for a springtime twist. You could even incorporate meaningful fabrics—like a piece of a favorite old shirt or a vintage handkerchief—to make it truly unique. Layering different textures enhances the tactile appeal.
This fabric and lace wreath proves that you don’t need to be a professional crafter to create something stunning. It’s a versatile project that boosts your DIY confidence while celebrating your creative side. Once finished, it instantly elevates your home’s charm and invites admiration from visitors. Ready to craft your own nostalgic masterpiece?
15. Cherry Blossom and Branch Wreath

Craving a romantic, orchard-inspired look that captures the fleeting beauty of spring? A cherry blossom and branch wreath offers just that, turning your front door into a blooming landscape. It’s perfect for nature lovers or anyone wanting a soft, elegant statement piece. Plus, it’s a great way to celebrate the season without actual trees.
Picture delicate faux cherry blossom branches intertwined with slender, textured twigs on a sturdy circular base. Soft pink blossoms cluster along the branches, creating a gentle cascade that mimics real flowering trees. The contrast of dark branches and pastel blooms enhances depth and realism. As you gaze, you feel transported to a peaceful orchard in full bloom, with petals fluttering gently in the breeze.
Adjust the density of blossoms for a more minimalist or lush appearance. Use darker or lighter pinks to match your aesthetic, or incorporate white blossoms for a more understated look. For different climates, opt for silk or faux branches that withstand weather. You can also nestle tiny decorative nests or birds for a whimsical touch.
Start by assembling faux cherry blossom branches and thin twigs, trimming to fit your wreath size. Secure the branches onto a wire or grapevine base with floral wire, weaving in the twigs for support. Cluster the blossoms along the branches, using hot glue for extra hold if needed. Arrange the elements to create a natural, flowing appearance. Finish by attaching any decorative accents, ensuring everything stays in place through weather changes.
Add your personal touch by including small painted wooden birds or tiny fairy lights for evening charm. Incorporate ribbons or fabric strips matching your color scheme to hang down slightly. To make it more personalized, attach a small sign with a welcoming message or family name. Seasonal variations could include mini Easter eggs or springtime ornaments.
This wreath captures the ephemeral beauty of spring and celebrates craftsmanship. It’s accessible even for novice crafters, offering a chance to create a stunning, romantic display. Your door will radiate elegance and freshness, inspiring compliments and envy alike. Who’s ready to bring a piece of spring’s magic home?
16. DIY Yarn Wrapped Wreath with Small Faux Blooms
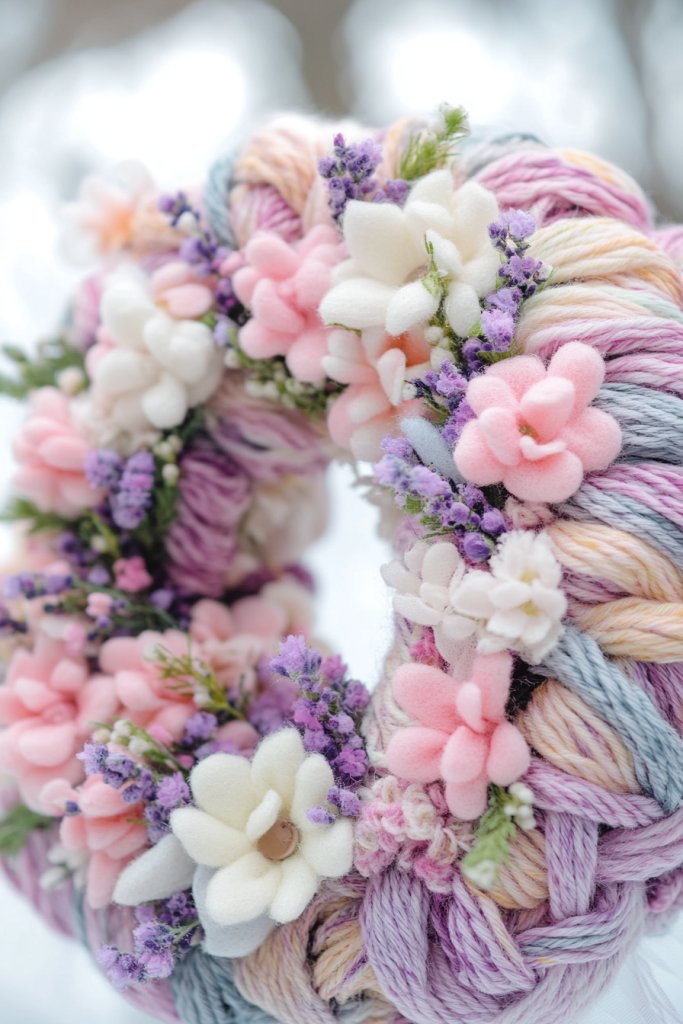
Looking for a cozy, handcrafted wreath that feels personal and inviting? Yarn wrapped wreaths are perfect for adding color and texture without needing advanced skills. They’re a fun project that results in a vibrant, tactile piece that instantly livens up your entrance or wall. Plus, they’re customizable to match your decor palette.
Imagine a neutral-toned wreath form entirely wrapped in soft, colorful yarns—think pastel pinks, blues, or even bold reds. Dot small faux blooms sporadically across the surface, adding pops of color and a three-dimensional effect. The yarn’s texture creates a warm, inviting visual, with a slight fuzziness that resembles a cozy sweater. It’s a playful yet elegant look, perfect for spring’s cheerful vibe.
Switch yarn colors to reflect different seasons or themes—warm oranges and browns for fall, icy blues for winter. Use variegated yarns for a multicolored effect, or stick to solids for a more streamlined look. For a boho twist, add small decorative beads or woven elements. You can also adjust the size of faux blooms for a more subtle or dramatic appearance.
Begin by securing your wreath base—wire or foam—with floral or craft wire. Wrap the yarn tightly around the entire form, overlapping slightly for even coverage. Use hot glue to affix small faux blooms at random points, concentrating on areas where you want extra visual interest. Mix and match yarn textures for added depth. Finish by trimming loose yarn ends and attaching a loop or ribbon for hanging. This project is forgiving and easy to adjust as you go.
Personalize your wreath by choosing yarn colors that match your decor or favorite hues. Incorporate small charms, tiny fabric bows, or even initials made from yarn or felt. You could also add tiny tassels or fringes at the bottom for a playful touch. Experiment with different shapes or asymmetrical designs for a modern twist.
Creating a yarn wrapped wreath is a delightful way to showcase your creativity and add a splash of color. It’s an affordable project that looks professionally made, boosting your confidence in DIY decor. Once finished, it becomes a conversation starter and a true reflection of your personal style. Ready to get wrapping?
17. Seasonal Fruit and Vegetable Wreath
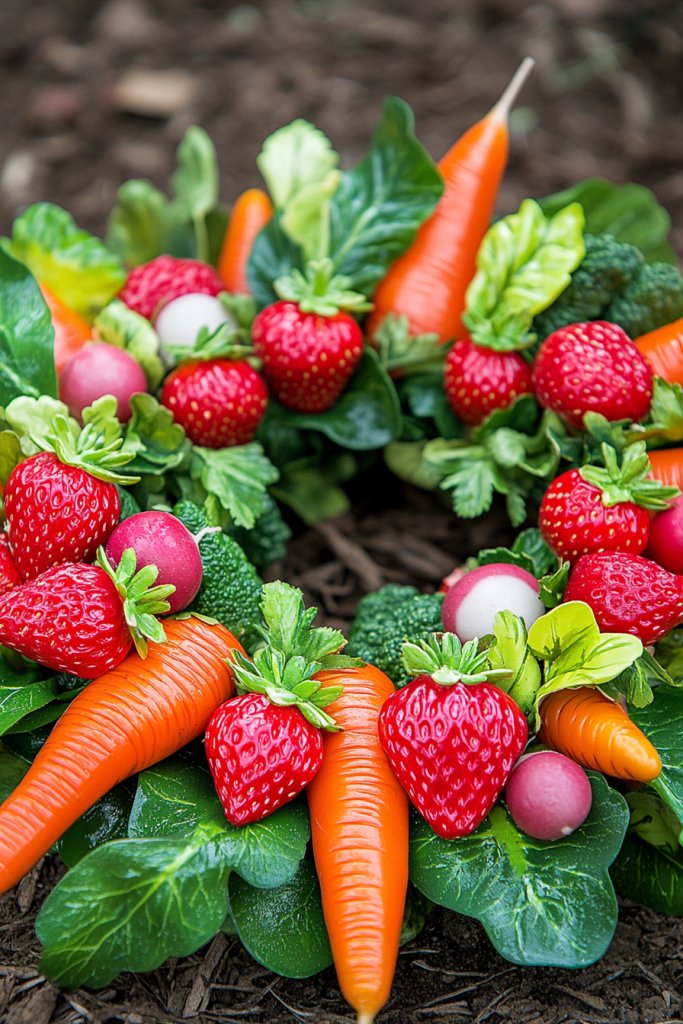
Want to celebrate the bounty of spring with a fresh, vibrant wreath? A fruit and vegetable wreath brings lively colors and a farm-to-table vibe right to your doorstep. It’s perfect for food lovers or anyone wanting a unique, edible-inspired decor piece. Plus, it’s a playful way to showcase seasonal harvests.
Picture a circular wreath adorned with faux radishes, carrots, strawberries, and leafy greens—each piece bursting with color and detail. The produce is arranged in a balanced, abundant display, resembling a farmers market stall. The textures of the fruits and veggies contrast beautifully with the natural grapevine base, creating a lively, inviting scene. It’s like a miniature garden of edible delights frozen in time.
Use dried or faux produce for long-lasting beauty, or incorporate fresh items if you plan to display it for only a few days. Switch out seasonal favorites—think cherries or peas in summer, apples or pumpkins in fall. Add decorative elements like twine or burlap ribbons to enhance the rustic look. For a modern twist, arrange the produce in geometric patterns or minimalist styles.
Start by selecting your faux or dried produce and a sturdy grapevine or wire wreath base. Attach larger pieces first with hot glue or floral wire, then fill in with smaller items for fullness. Position the items symmetrically or asymmetrically depending on your style. You can also add faux leaves or herbs for extra greenery and texture. Secure everything tightly to withstand outdoor weather. Consider a light spray of sealant for extra durability.
Customize with labels, mini chalkboards, or handwritten signs indicating freshness or fun farm names. Incorporate a few real seasonal produce for added authenticity. Attach a decorative bow or fabric ribbon matching your decor theme. You could even include small, faux potted herbs for a dual-purpose display—beautiful and functional.
This wreath celebrates the joys of spring’s harvest and allows your creativity to flourish. It’s an eye-catching centerpiece that invites conversation and admiration. Plus, it’s a wonderful project that makes you feel connected to nature and the food you eat. Ready to harvest some decorating magic?
18. Ombre Ribbon Cascade Wreath

Looking for a statement piece that combines color, movement, and elegance? An ombre ribbon cascade wreath creates a stunning visual flow that captures the eye instantly. It’s perfect for adding a touch of sophistication to your spring decor. Plus, it’s simple to customize to match any color scheme or mood.
Visualize a series of satin or organza ribbons arranged from soft pinks at the top, gradually transitioning to vibrant greens at the bottom. The ribbons cascade down in flowing layers, creating a sense of movement and grace. Small floral accents or delicate embellishments are tucked among the ribbons, enhancing the layered effect. The overall look is airy, colorful, and dynamic, like a waterfall of fabric.
Change the color palette to reflect different seasons or themes—pastel hues for spring, jewel tones for a more luxurious feel. Vary the ribbon textures by mixing satin, sheer, and grosgrain for added dimension. Adjust the length of the cascade depending on your space, from a full-length display to a subtle drape. Incorporate metallic or glitter accents for extra sparkle.
Start with a sturdy wreath base—wire or foam—and attach the ribbons using floral pins, hot glue, or sewing for durability. Arrange the ribbons in graduated shades, securing the top edge to the wreath. Layer ribbons in overlapping groups to create a flowing cascade, letting the ends hang freely. Add small floral or decorative elements sporadically along the ribbons for visual interest. Finish with a hanger or loop for easy display.
Personalize by choosing ribbon colors that match your decor or favorite seasonal shades. Add tiny charms, beads, or faux pearls along the ribbons for a touch of elegance. You can also tie small fabric or paper flowers into the cascade for extra charm. Experiment with asymmetric arrangements for a modern, artistic look.
This wreath makes a bold, colorful statement that elevates any space. It’s an easy yet impactful project that shows off your eye for design. Once finished, it creates a sense of movement and vibrancy that energizes your entire home. Who’s ready to cascade into spring style?
19. Boho Chic Feathers and Faux Fern Wreath
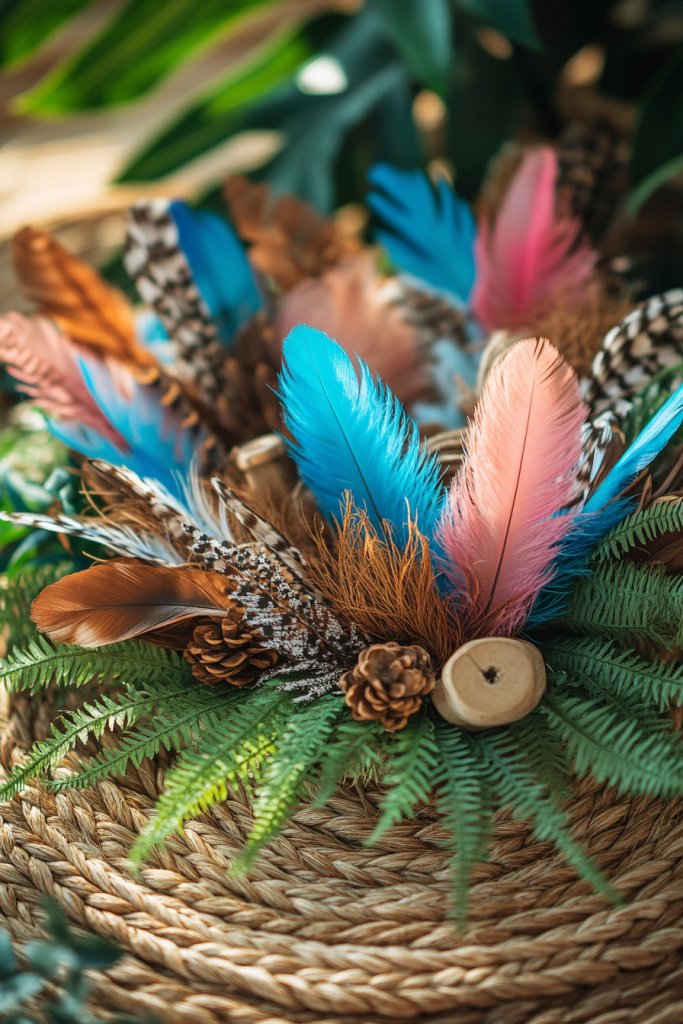
Craving a trendy, eclectic look that oozes boho charm? A feathers and faux fern wreath combines natural textures with playful colors to create a relaxed, artistic vibe. It’s perfect for those who love mixing textures and making a statement without overwhelming the space. Plus, it’s a fun way to show off your quirky side.
Picture a wreath decorated with colorful feathers in shades of turquoise, coral, and gold, interwoven with lush faux fern fronds. Feathers fan out in different directions, creating a lively, textured surface. Faux ferns add a touch of greenery, balancing the bright colors with natural elements. The overall effect is a whimsical, free-spirited arrangement that feels both earthy and fun. It’s like a bohemian jungle on your door.
Choose feathers with metallic accents or in gradient ombre styles for extra flair. Mix and match colors to match your mood or decor theme, from muted neutrals to bold hues. Incorporate small beads, charms, or tassels for added detail. For a more minimalist look, use fewer feathers and more open fern spaces, creating a breezy, airy feel.
Begin by attaching faux fern fronds onto a wire or grapevine base with floral wire, spreading them evenly. Insert feathers in a fan pattern, securing with hot glue or wire, ensuring they radiate outward. Mix different feather lengths and colors for variety. Secure everything tightly to withstand outdoor elements. Add small decorative charms or beads between the feathers and ferns for extra personality.
Personalize with meaningful charms, tiny dreamcatchers, or beads that reflect your style. Incorporate fabric or leather strips for a layered look. For a more tropical vibe, add tiny faux shells or beads. You can also personalize by painting or dyeing feathers to match seasonal themes or your interior palette.
This wreath combines trendy elements with natural textures, making your decor stand out effortlessly. It’s a playful project that encourages creativity and individual style. Your door will radiate free-spirited elegance, inspiring admiration and envy. Who’s ready to embrace boho chic?
Conclusion
With a diverse array of spring wreath ideas showcased, from floral arrangements to playful accents, there’s no shortage of inspiration to brighten your entryway or mantel. Feel empowered to try these creative designs and personalize them to match your unique style. Embrace the spirit of spring and let your home bloom with charm and character—your perfect wreath awaits!