Imagine transforming a plain bedroom into a vibrant playground of imagination and fun! Toca Boca bedroom ideas have become super popular among kids and parents alike because they inspire creativity, spark joy, and bring beloved digital characters into real-life spaces. These designs blend playful themes with clever decor, making any bedroom feel like a whimsical world straight out of a Toca Boca game.
In this article, you’ll discover a variety of exciting Toca Boca-inspired bedroom ideas that cater to different styles and preferences. Whether you’re aiming for a colorful, themed retreat or a cozy, imaginative nook, there’s something here for every young dreamer. Get ready to find inspiration and turn your child’s bedroom into a magical space filled with playful dreams and endless possibilities!
1. Bright Color Block Walls Inspired by Toca Boca Characters
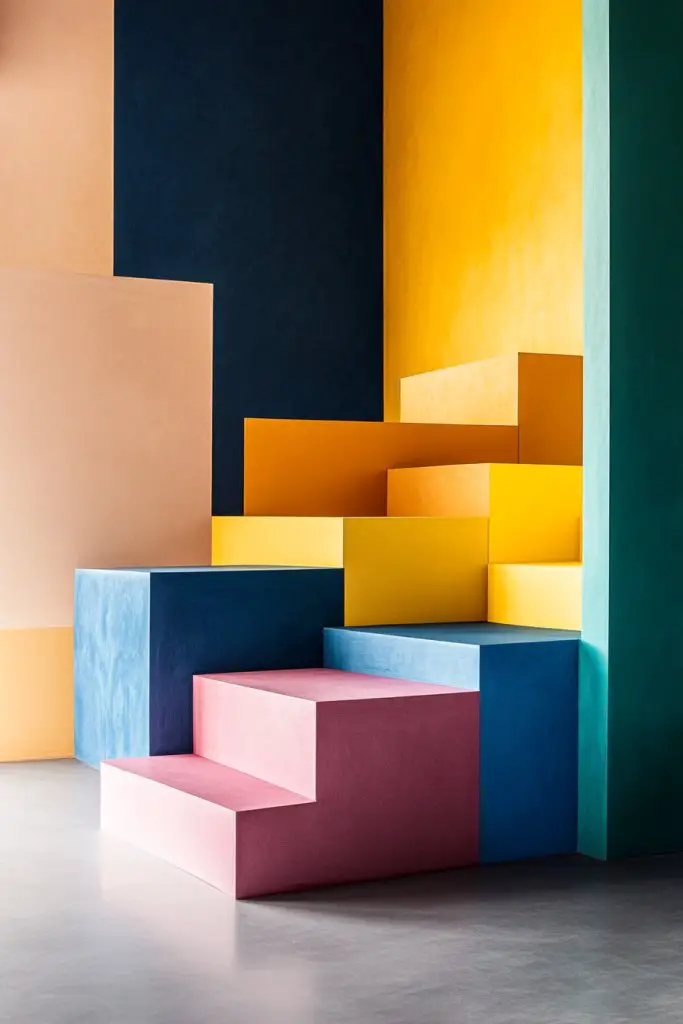
Ever wish your child’s room felt more lively and playful without breaking the bank? Boring walls just don’t cut it when you want a space that sparks imagination. Bright color blocks are an easy way to turn dull walls into a vibrant canvas. Plus, it’s a DIY project that adds personality without a huge expense. Who wouldn’t want a room that feels cheerful and energetic?
Picture walls divided into large, bold rectangles painted in shades like electric blue, sunny yellow, and bright pink. The colors are crisp and clean, creating a patchwork that feels playful yet cohesive. The edges are sharp, thanks to painter’s tape, giving a modern, geometric look. This visual pop makes the room feel dynamic and full of life, perfect for digital dreamers.
You can customize the color palette to match your child’s favorite characters or seasons. For a softer look, opt for pastel shades or muted tones. If space is tight, keep the blocks small or create a single accent wall. During holidays, swap out colors for themed shades like red and green for Christmas or orange and black for Halloween. The versatility makes this idea adaptable for any style.
Start by choosing a wall that’s a focal point, like behind the bed or a reading nook. Use painter’s tape to section off areas, then apply washable, vibrant wall paint for each block. Make sure to allow each section to dry thoroughly before removing tape for sharp lines. For best results, use a level or measuring tape to keep blocks even. You can also use stencils or tape to create interesting patterns. Clean up is simple with soap and water.
Add fun borders around the blocks using washi tape or glitter tape for extra flair. Incorporate decals or themed stickers within the blocks for even more character. Personalize the color choices to match your child’s favorite game or cartoon. Switching out colors seasonally keeps the room feeling fresh and exciting. You could even add glow-in-the-dark paint for a nighttime surprise.
Bright color block walls turn any bland space into a vibrant playground for imagination. Your kid will love having a room that feels unique and lively, perfect for digital adventures or quiet reading. DIY projects like this boost your confidence in creating a customized space. Ready to paint your way to a more playful room?
2. Themed Bed Frames with Cartoon-Inspired Headboards
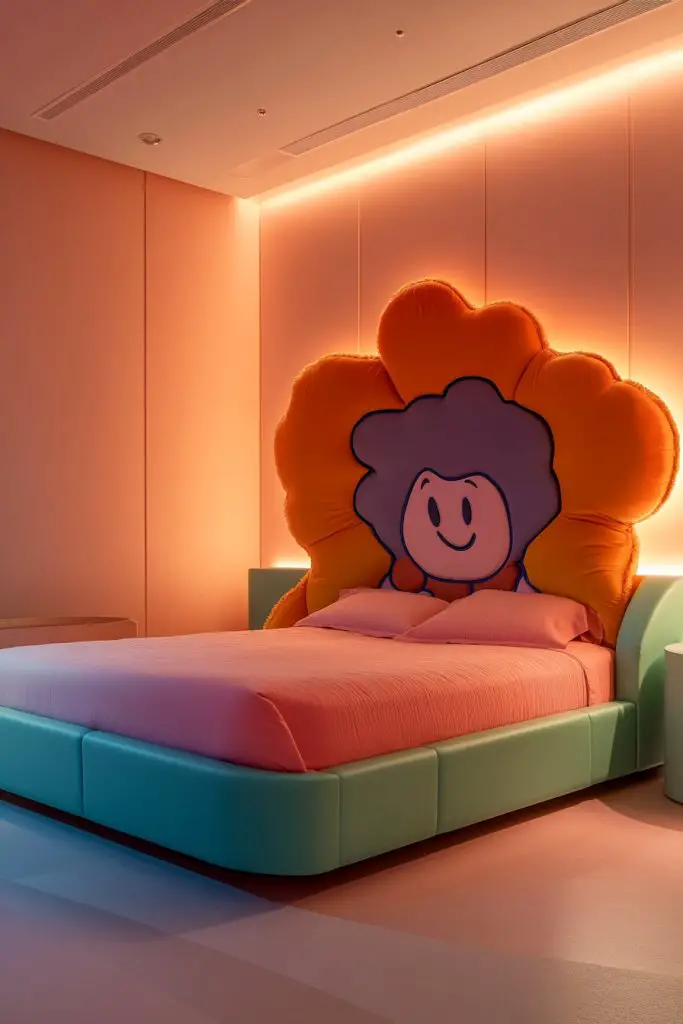
Tired of plain, uninspiring beds that don’t match your kid’s lively personality? A themed bed frame can instantly transform a boring sleeping area into a focal point full of fun. Custom headboards inspired by cartoons or characters make bedtime feel like an adventure. Plus, it’s a chance to get creative and add a personal touch. Who says sleeping can’t be playful?
Imagine a soft, rounded headboard shaped like a smiling cloud, or a bold, angular design resembling a superhero mask. Bright fabrics in coordinating colors add a cheerful vibe, while foam or plywood forms give structure. You might choose a headboard with appliquéd patches or sewn-in character motifs to bring the theme alive. This creates a cozy, imaginative space that invites your child to dream big.
Select different themes based on your child’s obsession—superheroes, animals, or favorite cartoon characters. Use vibrant fabrics or paint to match the theme’s color scheme. For smaller rooms, opt for wall-mounted headboards that save space. During holidays, incorporate seasonal elements like snowflakes or pumpkins into the design. Removable covers can make updating the theme quick and easy.
Start by sketching your design or finding inspiration from online images. Cut foam or plywood into your desired shape, then upholster with bright fabric or paint in bold shades. Secure the headboard to the wall or bed frame with brackets or screws. Add decorative stitching or appliqués for extra detail. Make sure all materials are lightweight and safe for children. Finish with a protective sealant or fabric spray for durability.
Decorate the headboard with embroidered initials or character patches for a personal touch. Use fabric trims, pom-poms, or tassels to add texture. Change the theme accessories as your child’s interests evolve, like swapping out plush toys or themed bedding. Consider adding LED light strips behind the headboard for a gentle glow. This makes the bed not just fun but also a cozy retreat.
A themed bed frame makes bedtime something to look forward to, fueling dreams of digital worlds and adventures. Creating a custom headboard boosts your confidence in DIY home decor. Plus, it’s a practical way to grow your child’s room alongside their changing interests. Ready to craft a bed that’s as playful as they are?
3. Colorful Hanging Lanterns and String Lights
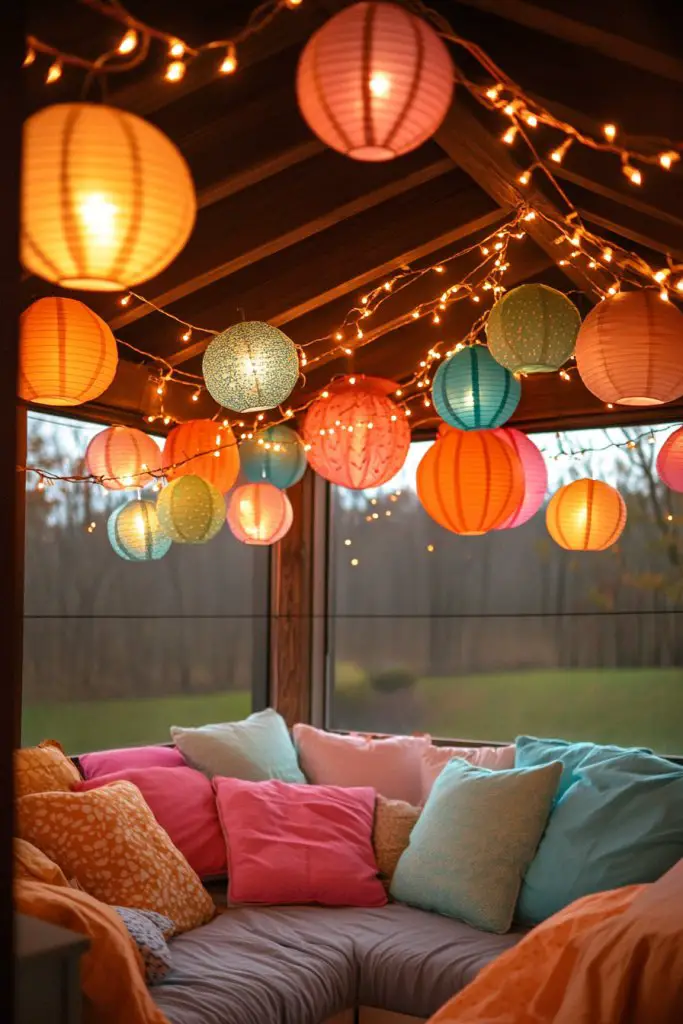
Looking for a way to add warmth and a dreamy vibe to your child’s room? Harsh overhead lighting can kill the cozy mood, but soft, colorful lanterns and string lights create a magical atmosphere. They make the space inviting without overwhelming brightness. Plus, they’re a fun, whimsical decor element that sparks joy and imagination.
Imagine strings of vibrant lanterns in shades like coral, mint, and lavender hanging across the ceiling or along shelves. The glow casts gentle shadows and creates a cozy glow that’s perfect for bedtime stories or digital dreams. Twinkling string lights in shapes like stars, hearts, or clouds add a playful touch, turning the room into a night sky full of wonder. These lights are lightweight and easily draped for a custom look.
Arrange lanterns in clusters for a bold statement or space them out for a subtle glow. Use themed shapes for special occasions or seasons—pumpkins for fall, snowflakes for winter. For small rooms, hang lights vertically to avoid cluttering the space. You can also layer different types of lights for a textured, layered effect. Dimmable options give control over the brightness for different activities.
Choose LED string lights or lanterns designed for indoor use to ensure safety. Hang them using removable hooks, adhesive clips, or even command strips—no damage to walls or ceilings. Arrange the lights at different heights for visual interest. For a DIY touch, create paper lantern covers or fabric shades to match your decor theme. Make sure cords are tucked away safely to avoid tripping hazards.
Personalize the lighting by choosing colors that match or contrast with your overall room palette. Add fairy lights with personalized charms or photos for a sentimental touch. Incorporate dimming switches for mood lighting, or add battery-operated lights for flexibility. Seasonal themes like fairy lights in autumn colors can keep the decor fresh year-round.
Soft, colorful lighting transforms any room into a dreamy sanctuary that encourages relaxation and imagination. Installing these lights is straightforward and affordable, making your space feel more magical with minimal effort. Your child will love the cozy glow, and you’ll feel proud of your DIY decor skills. Ready to light up your kid’s world?
4. Creative DIY Book Nooks with Toca Boca Themes
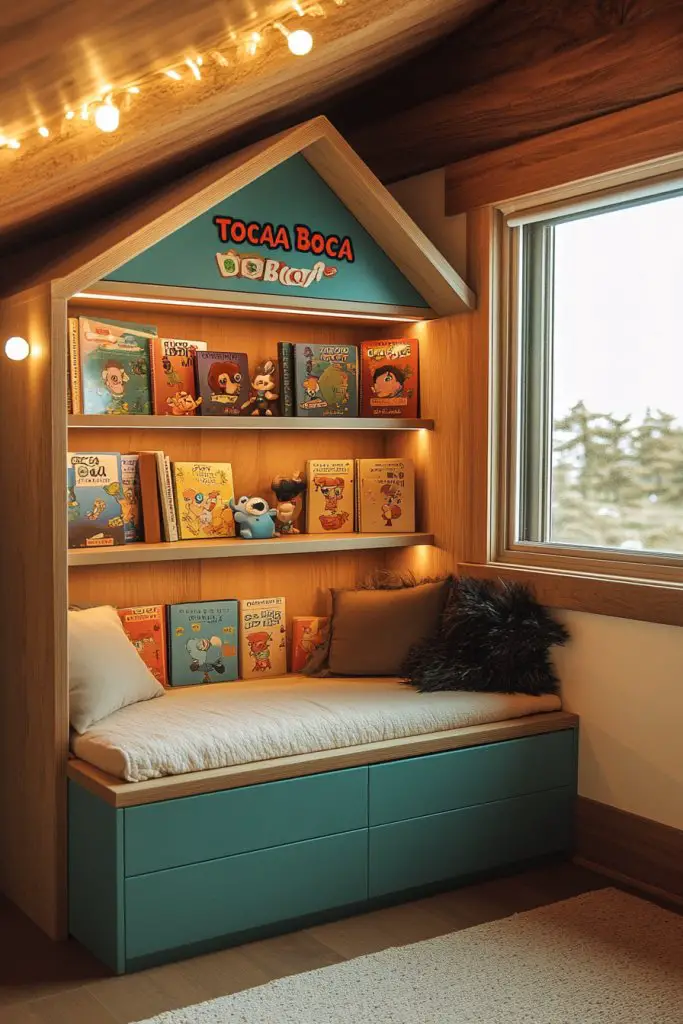
Does your kid have a mountain of books but nowhere to store or display them attractively? A dedicated reading nook can turn book storage into a charming feature. DIY book nooks tailored to Toca Boca themes make reading time exciting and immersive. It’s a win-win: organized shelves and a cozy spot to dive into digital worlds.
Visualize a small corner with built-in shelves shaped like a castle or a rocket, painted in bright colors matching your child’s favorite characters. Cushions and rugs in coordinating hues add comfort, making it a perfect hideaway. Decorative elements like small figurines or themed accessories complete the scene. When styled well, it looks like a secret portal to endless adventures.
Build the nook into a corner or under a window for space efficiency. Use open shelves for easy access or add doors for a tidy look. Change themes seasonally by repainting or adding decals—pirate ships, magical forests, or digital landscapes. For small rooms, opt for vertical shelving or wall-mounted units to save space. Incorporate lighting with clip-on lamps or LED strips for extra coziness.
Start by designing a compact shelving unit or repurpose existing furniture with added shelving. Use bright, durable paint or finish with child-safe stain. Decorate the edges with themed stickers or decals. Fill the shelves with books, toys, and themed decor. Add cushions or bean bags for comfort. Keep safety in mind—secure units to walls and choose non-toxic paints. Regularly update the theme to keep it fresh.
Personalize the nook with your child’s name or favorite characters painted directly or added as decals. Incorporate themed cushions or plush toys for extra comfort. Use storage baskets inside shelves for toys and crafts. Change the accessories to reflect current interests, like space or underwater themes. This space evolves with your child’s growing imagination.
A DIY book nook turns reading into an adventure and teaches organization. Your child will love having their own special spot for stories and digital worlds. Building it yourself boosts confidence and allows for endless customization. Ready to create a cozy, themed escape?
5. Playful Rug Designs Inspired by Digital Worlds
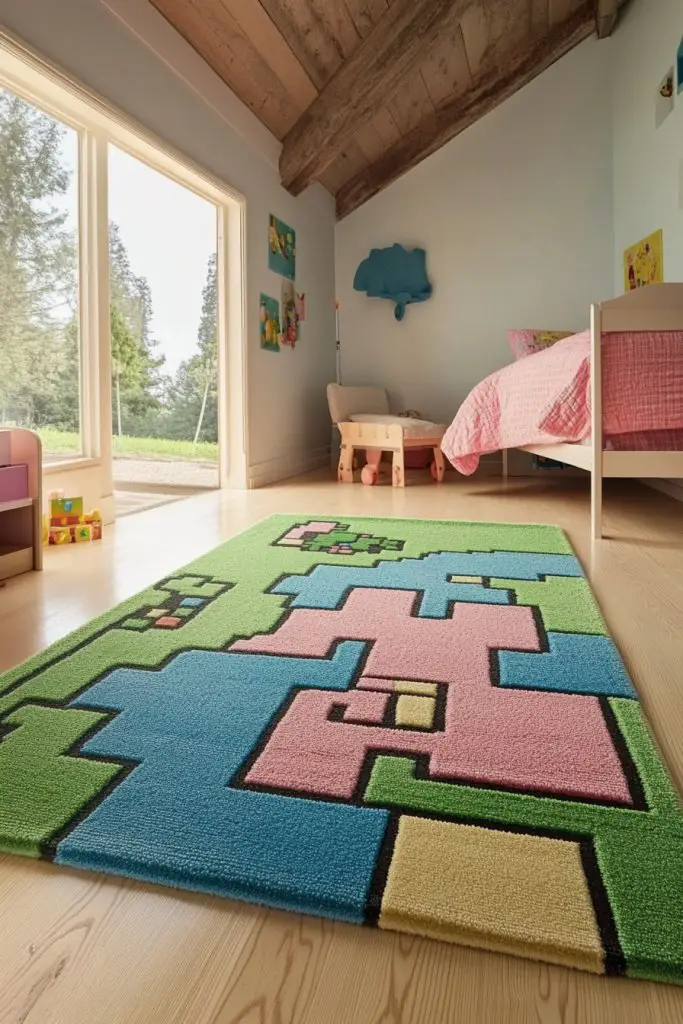
A dull, plain rug can kill the vibe of an otherwise lively room. But finding the right playful rug that ties into a digital theme isn’t always easy. Rug designs inspired by pixel art, game worlds, or colorful geometric patterns can set the tone. They also make playtime more fun and cozy. Who knew a simple rug could do so much?
Imagine a rug with pixelated characters running across a field of bright blocks in primary colors. Or a geometric pattern resembling a digital grid, with bold lines and vibrant hues. The textures are soft underfoot, with a slightly raised pattern for visual interest. It grounds the room’s theme and creates a playful, immersive environment for kids to explore.
Choose rugs with bold patterns for a statement or subtle designs for a more subdued look. Use circular or irregular shapes to add visual interest. Seasonal updates can include themed mats for holidays or special events. For small spaces, go for smaller rugs layered with larger ones, or opt for runners to define zones. Mix textures with plush or low-pile options for comfort and style.
Select a rug that’s durable, stain-resistant, and easy to clean. Match the colors to your room’s palette or choose contrasting shades for impact. Place the rug in a central spot under the bed or play area. Layer with smaller mats or add edging with tape for a finished look. Regular vacuuming keeps it fresh, and spot cleaning handles spills. For a DIY touch, paint or stencil designs onto plain mats.
Add themed cushions or plushies on or around the rug to create a cozy scene. Incorporate glow-in-the-dark elements for nighttime fun. Change the rug seasonally or when your child’s interests change. Coordinate the rug with wall decals or bedding for a cohesive look. This simple addition can transform the entire room’s vibe.
A fun rug anchors the room’s theme and makes play and sleep zones inviting. Selecting or creating the perfect design builds your confidence in decorating creatively. It’s an easy way to reflect your child’s digital passions and personality. Ready to step up your decor game?
6. Bright, Multicolored Bedding Sets with Fun Prints
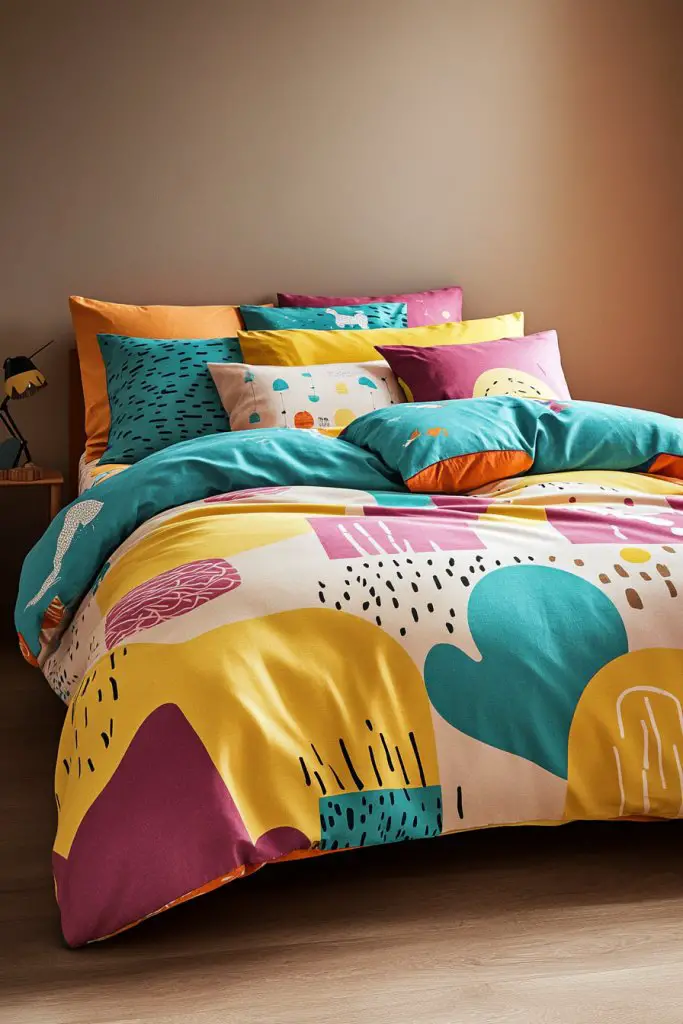
A dull bedding set can make bedtime a drag, especially if it clashes with a lively room theme. Bright, multicolored bedding with fun prints injects energy into the space and makes sleep feel like a cheerful occasion. It’s an easy way to refresh a room without a full overhaul. Who says bedtime can’t be playful?
Imagine a duvet cover covered in pixelated characters or cartoon icons in vibrant shades like lime, turquoise, and magenta. Sheets with bold geometric patterns or playful motifs complement the top layer. Textures are soft and cozy, inviting your child to snuggle in. Layered with plush pillows and themed accessories, the bedding creates a vibrant, inviting retreat that sparks imagination.
Mix patterns—stripes, polka dots, or characters—for a dynamic look. Use seasonal or holiday-themed bedding to keep the decor fresh. For a more subdued aesthetic, choose pastel shades or tone-down the brightness. Change pillowcases and sheets frequently to match emerging interests or themes. For smaller beds, opt for fitted sheets with bold borders to make a statement.
Start with high-quality, washable bedding in bright colors and fun prints. Mix and match patterns to keep visual interest. Use themed accessories like pillowcases or throws to tie everything together. Wash regularly to maintain freshness and brighten colors. For special occasions, swap bedding for seasonal or holiday designs. Keep extra sheets handy for quick refreshes.
Add personalized touches with embroidered initials or patches. Incorporate themed pillows or plush toys that match the bedding. Use decorative trims, ruffles, or piping for a custom look. Change bedding seasonally or when your child’s interests evolve. It keeps the room feeling new and exciting, encouraging happy dreams.
Bright, fun bedding sets turn sleep into a playful part of your child’s digital universe. They’re easy to update and personalize, giving you confidence in quick decor fixes. It’s a simple step that elevates the entire room’s vibe and makes bedtime something to look forward to. Ready to sleep in a colorful dream?
7. DIY Wall Art Using Digital Collages and Bright Frames
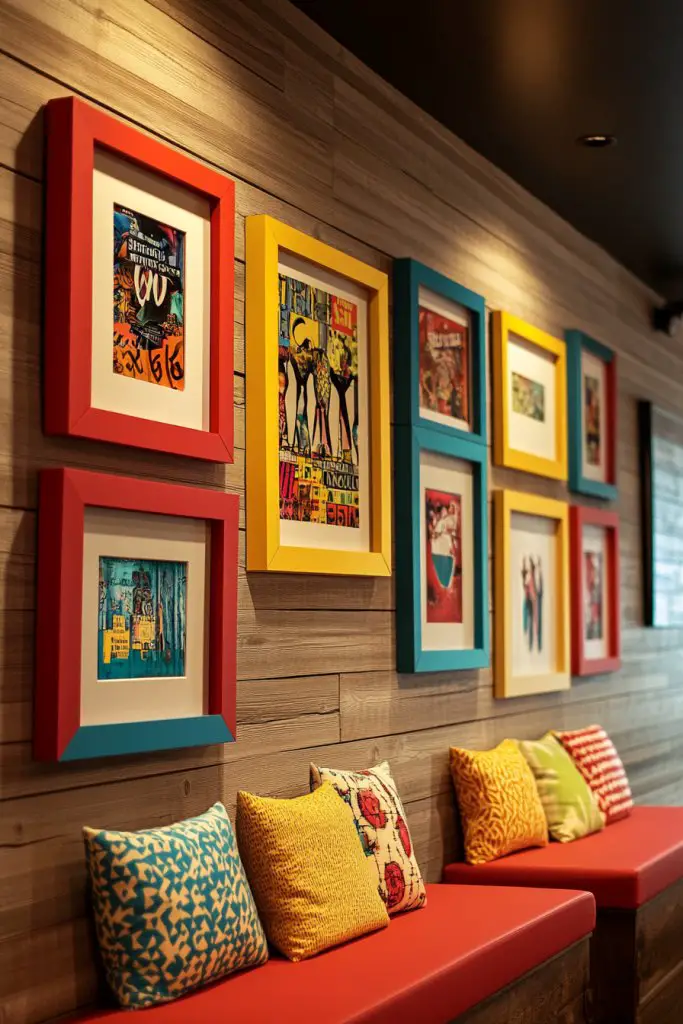
Tired of generic posters that don’t reflect your child’s unique digital interests? Custom wall art made from digital collages is a personal, creative way to decorate. It’s affordable, fun, and can be tailored to match your kid’s favorite characters or scenes. Who knew you could turn simple images into stunning art?
Visualize a gallery wall filled with bright, eclectic collages of digital screenshots, game scenes, or favorite memes. Mix them with colorful frames in mismatched shapes and sizes for an eclectic look. The images are vibrant and lively, creating a dynamic focal point. The arrangement invites curiosity and storytelling, turning blank walls into a digital art showcase.
Create themed collages around specific games, characters, or adventures. Use bold, colorful frames or even geometric shapes to add visual interest. Change the digital images periodically to keep the art fresh. For smaller rooms, focus on a single large piece or a small cluster of framed images. Incorporate decorative tape or mounting strips for easy swaps.
Gather high-resolution images or screenshots, then arrange them into a collage using photo editing software. Print on high-quality paper or canvas for durability. Frame your favorites in colorful or mismatched frames for a playful look. Mount the frames on the wall with command strips or hanging hooks. Regularly update the images for ongoing engagement. Avoid clutter by limiting the number of frames to keep a clean look.
Personalize with your child’s name or favorite quotes using digital design tools. Mix in themed stickers or decorative tapes around the frames. Use colorful mats or backing papers inside frames for extra pop. Encourage your child to select their favorite images for a sense of ownership. Rotate art seasonally or for special milestones.
DIY digital collages turn ordinary walls into a vibrant, personal art gallery. They boost your confidence by showing that creative, personalized decor is within reach. Plus, they celebrate your child’s digital passions in a stylish way. Ready to craft your own digital masterpiece?
8. Incorporating Digital Screens with Interactive Play Zones
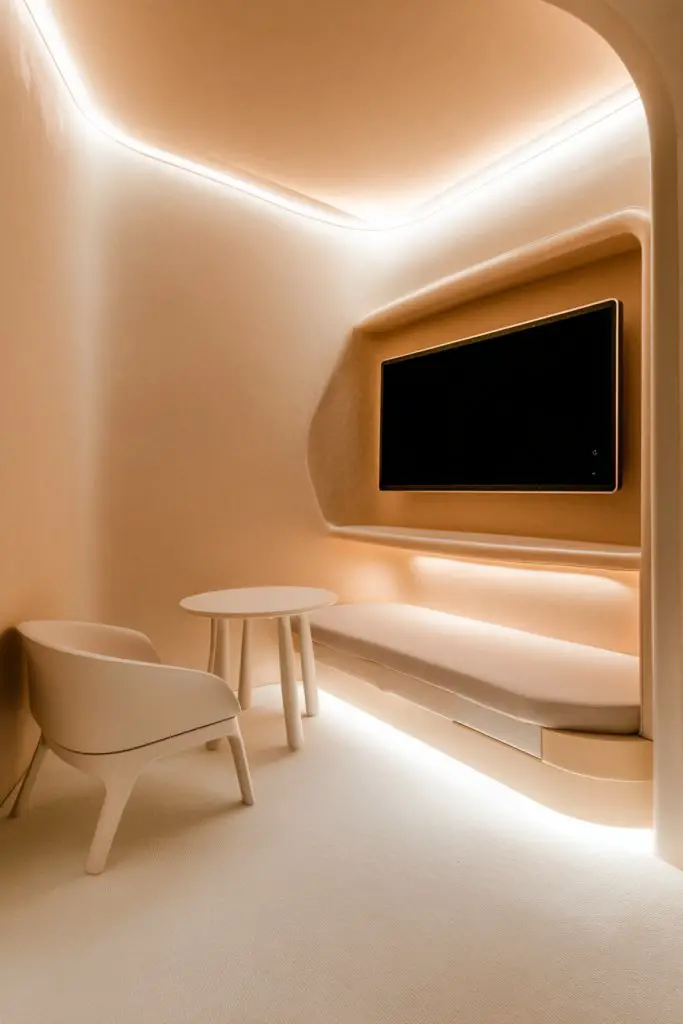
Looking for a way to combine tech and play without turning the room into a cluttered mess? Integrating digital screens into a dedicated play zone encourages interactive learning and entertainment. It’s a modern solution that keeps digital fun organized and contained. Who says tech can’t be stylish?
Imagine a sleek nook with a tablet or monitor mounted on a colorful, child-friendly stand. The area is framed with vibrant decals or a custom wallpaper that complements the digital device. Surrounding it are soft cushions or a padded mat, creating a safe space for interactive games or storytelling. Soft lighting enhances the experience, making it inviting and fun.
Use adjustable mounts or stands to grow with your child. Incorporate themed accessories or decals that match the digital content—space, animals, or pixel art. For small spaces, integrate the screen into a multifunctional furniture piece, like a desk or shelf. For older kids, create a tech corner with additional gadgets or learning tools. Keep cables hidden for a clean look.
Choose a durable, child-safe screen mount or stand. Set up the device with parental controls and appropriate content filters. Decorate the surrounding area with colorful, themed panels or backdrops. Use cable management systems to keep cords tidy and out of reach. Incorporate a small desk or table for accessories like headphones or styluses. Regularly update content to match your child’s evolving interests.
Add personalized decals or name tags around the device. Incorporate themed accessories like pixel art posters or 3D printed figures. Use colorful, ergonomic accessories to enhance interaction. Encourage your child to choose their favorite apps or stories, fostering ownership. Keep the setup flexible so it can adapt as their tech needs change.
A dedicated interactive play zone merges tech and fun, making digital skills enjoyable. Setting it up yourself boosts your confidence in creating functional, stylish spaces. It also encourages your child’s learning and creativity in a safe environment. Ready to build the ultimate digital play corner?
9. Colorful Floating Shelves for Toy and Accessory Display
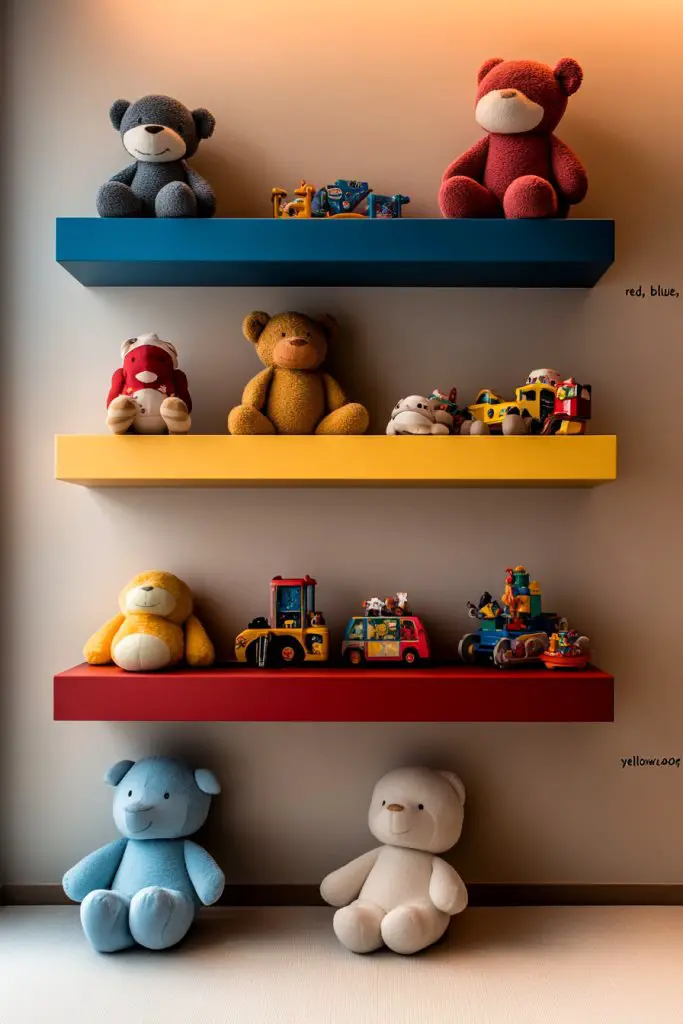
Cluttering shelves and desks can make a room feel chaotic instead of fun. Floating shelves in bright colors offer a stylish way to display toys, plushies, and accessories. They keep things organized and in sight, inspiring kids to tidy up. Plus, they add a pop of color and personality to any wall. Who knew organization could look this good?
Picture sleek, vibrant shelves in shades like orange, teal, or purple, floating along a wall full of character figurines and digital gadgets. The minimalist design makes everything look curated and intentional. They’re perfect for displaying small collectibles or themed decor without taking up floor space. The colors pop against neutral or pastel walls, creating a lively gallery-like vibe.
Arrange shelves in asymmetrical patterns for a modern look or in uniform rows for symmetry. Use brackets in contrasting colors for added visual interest. For tiny rooms, install shelves near the ceiling to maximize space. Seasonal or thematic swaps of objects can keep the display fresh and exciting. Combine with hooks or pegboards for extra storage options.
Pick sturdy, lightweight floating shelves with a bright finish or paint them yourself. Use a level and appropriate anchors to secure them safely into the wall. Decorate with your child’s favorite toys, character figures, or digital collectibles. Keep accessories organized with small bins or trays on the shelves. Regularly dust and rotate items for ongoing freshness and interest.
Create themed displays—space, underwater, or pixel worlds—by grouping related items. Add labels or mini signs for a playful touch. Incorporate LED strip lights behind the shelves for a gentle glow. Encourage your child to help arrange their treasures, fostering pride and ownership. Change out the display periodically to reflect new interests.
Colorful floating shelves turn storage into a design feature, making the room feel lively and organized. Installing them yourself boosts your DIY confidence and allows for total customization. It teaches your kid about organization in a fun, visual way. Ready to showcase your child’s digital treasures?
10. Whimsical Digital-Inspired Wall Murals

Plain walls can make a room feel dull and uninspired, especially when you want a digital theme that pops. Murals featuring pixel art, abstract digital patterns, or colorful geometric designs instantly transform the space. They create an immersive environment perfect for digital dreams and adventures. Who wouldn’t want a room that feels like a digital universe?
Visualize a large wall painted with bright, pixelated landscapes or abstract circuit patterns in bold colors. The mural covers an entire wall or a large section, drawing the eye and setting the tone. Textured paint or wallpaper with digital motifs adds depth and interest. The vibrant colors and patterns stimulate imagination and complement tech-inspired decor.
Choose murals with themes matching your child’s favorite games or digital worlds. For a softer look, opt for pastel or muted digital patterns. For smaller spaces, focus on a single wall or create a mural border. Seasonal updates can include themed decals or overlays to refresh the scene. Use textured or matte finishes for a modern, sleek look.
Use high-quality wallpaper or paint with a stencil for precise designs. Prepare the wall surface thoroughly, then apply mural elements carefully, following manufacturer instructions. For painted murals, sketch out the design lightly before filling in with vibrant colors. Seal the mural with a protective coating if needed. Regular cleaning keeps it vibrant without damaging the design.
Add digital-inspired decals or glow-in-the-dark accents to highlight parts of the mural. Incorporate your child’s digital art into the design to make it even more personalized. Use color-changing LED backlighting to create a dynamic, night-time digital sky. Change parts of the mural seasonally or when interests evolve.
A digital mural makes the room feel immersive and inspiring, perfect for digital enthusiasts. Creating or installing one boosts your confidence in DIY decor projects. It’s a statement piece that celebrates technology and creativity. Ready to turn a wall into a digital masterpiece?
11. Playful Digital-Themed Ceiling Decorations

Ceilings often get overlooked in room decor, yet they have huge potential to add charm and whimsy. Digital-themed mobiles, mobiles, or paper lanterns can create a dreamy sky that sparks imagination. They make the room feel complete and elevate the overall atmosphere. Who wouldn’t want a digital sky overhead?
Picture cloud-shaped mobiles with pixelated stars or floating planets dangling from the ceiling. Bright paper lanterns in jewel tones hang at varying heights, mimicking a vibrant digital universe. Mobile mobiles with glowing elements sway gently, creating a calming, magical environment. These decorations give the ceiling depth and a feeling of endless digital adventure.
Use themed mobiles that match your child’s favorite game or digital universe. Hang them at different heights for visual interest or cluster small lanterns for a bold statement. For small spaces, keep decorations minimal to avoid clutter. Incorporate glow-in-the-dark shapes for nighttime magic. Seasonal themes, like holiday stars or Halloween ghosts, keep the decor fresh.
Choose lightweight, child-safe mobiles and lanterns designed for indoor use. Secure them with ceiling hooks, adhesive strips, or ceiling mounts, ensuring stability. Arrange at different heights to create a layered effect. Use LED or glow-in-the-dark options to add a magical touch for nighttime. Regularly check fixtures for safety and replace worn elements.
Personalize ceiling decor with your child’s name or favorite digital symbols. Incorporate themed shapes or characters into hanging elements. Use color-changing LED lights or fiber optics for a customizable glow. Swap out seasonal decorations to keep the ceiling fresh and exciting. It’s a simple way to extend the digital theme into every corner.
Ceiling decorations add an immersive element that completes your child’s digital universe. Installing them is straightforward and fun, boosting your confidence in DIY decor. They transform the room into a dreamy sky, inspiring endless adventures. Ready to elevate your decor game by reaching for the ceiling?
12. Bright, Multi-Color Desk and Activity Zones
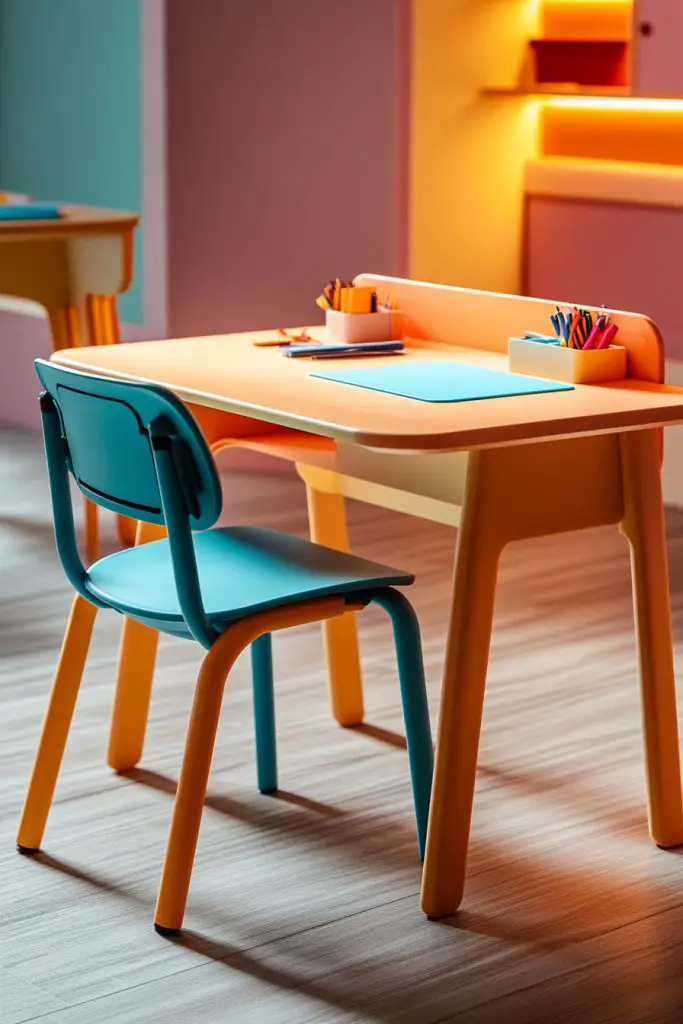
Ever tried working or crafting in a dull, uninspiring space? Kids need a spot that sparks their creativity and keeps them energized. A boring desk just kills motivation, right? Bright, colorful zones turn mundane routines into lively adventures. Who wouldn’t want a workspace that feels like a playground?
Imagine a compact desk painted in cheerful yellows and blues, with a matching swivel chair that invites play and focus. The surface is clutter-free, but decorated with vibrant organizers and a soft, textured mat underneath. Bright pendant or string lights cast a cozy glow, making the area inviting. Textured wall panels or colorful corkboards add personality without cluttering. It’s a space where work and fun seamlessly blend.
Switch out colors seasonally—think pastel for spring or deep jewel tones for winter. For smaller rooms, opt for wall-mounted desks with fold-down features to save space. Different age groups can customize with themed accessories, from space motifs to jungle prints. Multi-purpose zones can combine craft areas with homework stations, adjusting for your child’s evolving interests. Flexibility is key to keeping the space inspiring over time.
Start by measuring your available space and choosing a sturdy, vibrant desk that fits. Use colorful containers or bins for supplies, avoiding dull plastic drawers. Incorporate a comfortable, adjustable chair in a matching hue. Bright lighting options like LED strips or clip-on lamps help reduce eye strain. Add textured or patterned rugs to define the zone. Keep the setup simple for easy cleaning, and consider wall-mounted storage to free up floor space. DIY touches like painted initials or decals personalize it further.
Encourage your kid to pick their favorite colors or themes—pirates, princesses, or superheroes—then incorporate those into accessories. Swap out desk mats or cushion covers regularly to keep things fresh. Use decorative baskets or fabric bins to organize supplies creatively. Add a small corkboard or magnetic board for displaying art or notes. These small touches boost their ownership and make the zone uniquely theirs.
A vibrant, personalized activity zone boosts confidence and independence. Kids feel more motivated to learn or create when their space reflects their personality. Plus, a cheerful environment makes cleanup easier and less of a chore. Ready to turn a dull corner into a digital-inspired playground? Fun, functional, and full of personality — that’s the goal.
13. Character-Inspired Light Switch and Outlet Covers
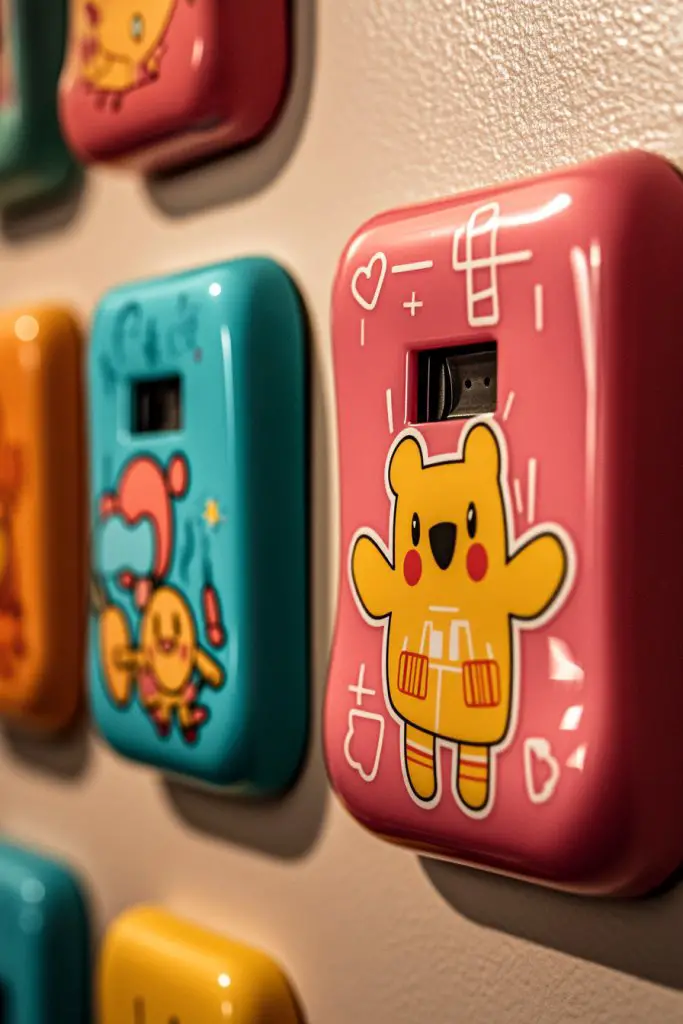
Standard light switches and outlet covers are so boring they could put a toddler to sleep. Want to add a splash of personality without a full room overhaul? Custom character-inspired covers are a simple, affordable way to inject fun into the room. They turn ordinary fixtures into mini art pieces that kids will love.
Picture a bright yellow switch plate featuring a cheerful Toca Boca character’s face, or a bold, geometric outlet cover in vivid colors. These small touches add visual interest and surprise, especially when hidden behind a door or near the bed. The textured or embossed surfaces make the fixtures playful, almost like little sculptures. Bright, contrasting colors make the room feel lively without overwhelming the decor.
Choose covers in themes matching your child’s favorite characters, or opt for abstract and geometric patterns for a modern twist. Seasonal or holiday-themed covers can add variety, and swap easily when tastes change. For a more subtle look, pick metallic or matte finishes in bold hues. These are perfect for bedrooms of all sizes, easily fitting into any style from minimalist to maximalist.
Start by measuring your existing switches and outlets carefully. Purchase character-themed or colorful covers from hardware stores or online retailers. Use a screwdriver to replace the existing covers, making sure to turn off the power first for safety. For a more cohesive look, match the colors to other decor elements like bedding or wall accents. Consider painting or customizing plain covers with stickers or decals for a personalized touch. Reinstall and enjoy instant character upgrades.
Let your child pick their favorite characters or colors for a truly personalized look. Mix and match different patterns or textures for variety. Use covers with embossed or textured details to add tactile interest. Coordinate covers with other decor elements like curtains or rugs for a unified theme. These small but impactful updates make the room feel more playful and curated.
Custom fixtures show your child that their space is special and reflects their personality. It encourages ownership and pride in their environment. Plus, it’s a quick DIY project that boosts confidence in their ability to personalize their space. Ready to upgrade those boring outlets? A small change can make a big difference!
14. Interactive Digital Art Boards with Magnetic or Chalk Surfaces

Does your kid love doodling, drawing, or creating digital art? But traditional walls or bland boards just don’t cut it? An interactive art board with magnetic or chalk surfaces offers endless creative opportunities. It’s a fun, functional feature that sparks imagination and keeps clutter off the furniture.
Imagine a large wall-mounted board in a vibrant frame, painted with chalkboard paint or fitted with a magnetic surface. Bright, colorful chalks or magnets invite kids to draw, write, or stick their latest creations. The surface is framed with a bold, playful trim, making it a focal point. The tactile experience of drawing or magnet-assembling adds an interactive element, turning the wall into a dynamic art studio.
Choose a size suitable for your space—small for bedrooms or large for playrooms. You can go for a chalkboard, whiteboard, or magnetic dry-erase surface depending on your child’s preferences. Add colorful border trim or paint the frame in their favorite hues for extra flair. For older kids, consider a combo wall with both chalk and magnetic surfaces to expand possibilities.
Start by selecting a wall or area that’s easily accessible and visible. Purchase a magnetic or chalkboard panel designed for wall mounting. Use painter’s tape or masking tape to create a clean border around the area. Secure the panel with appropriate hardware, ensuring it’s level and sturdy. Stock up on colorful chalks, magnets, and accessories like erasers or clips. Encourage your child to personalize their art space with stickers or decals if desired.
Add themed magnetic shapes or chalk decals to match favorite characters or motifs. Incorporate storage options like small shelves or containers for art supplies nearby. Let your kid decorate the border with washi tape or stickers for a personalized touch. Rotate in new colors or accessories to keep the space fresh and engaging. It becomes a true dedicated creative corner.
A dedicated interactive art wall fosters self-expression and confidence. Kids feel proud sharing their artwork and ideas, boosting their creative skills. It’s a space that evolves with their talents, making it a lasting feature. Ready to turn a blank wall into a masterpiece zone? Creativity has no limits here.
15. Multi-Color Modular Furniture for Flexibility
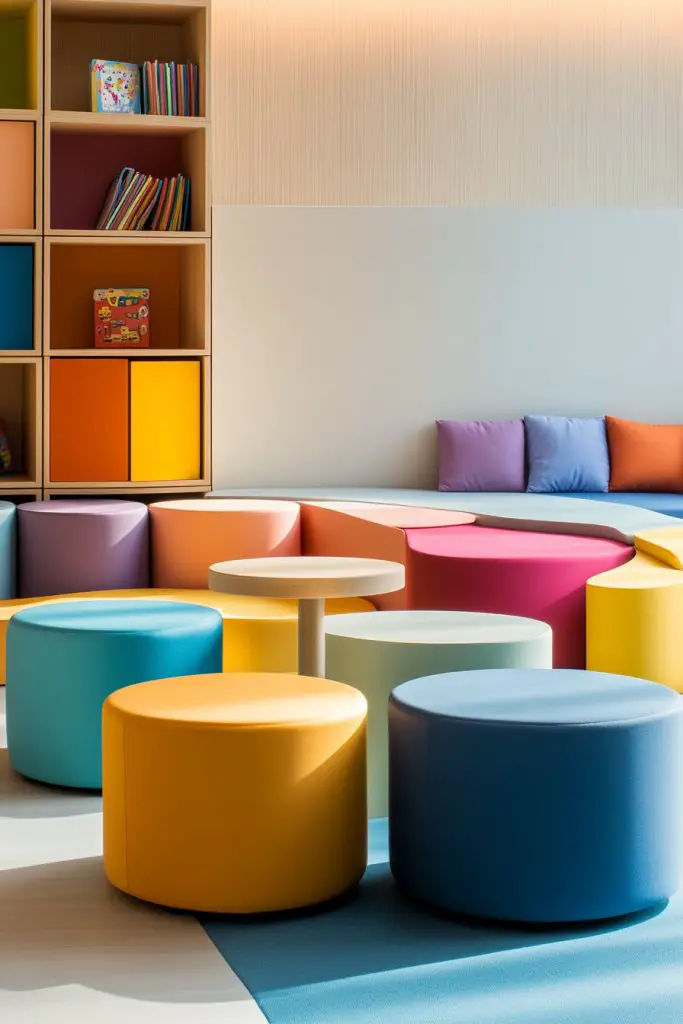
Ever feel like your kid’s room needs a makeover every few months? Their needs and tastes change rapidly, and static furniture just doesn’t cut it. Multi-color modular furniture offers a flexible solution that adapts as they grow. It’s like building with giant, colorful LEGO blocks that evolve with your child.
Imagine a set of vibrant, stackable cubes in bold primary colors that can be arranged into desks, beds, or storage units. The pieces slide and click into place, creating a lively, playful environment. When assembled, the furniture looks like a mini cityscape of bright blocks. The textures are smooth, with rounded edges for safety. It’s an interactive, customizable setup that sparks imagination.
Mix and match colors to suit current trends or favorite themes, then swap or reconfigure as tastes change. For small rooms, stack pieces vertically to save space; for larger rooms, spread them out for more organization. Add cushions in coordinating colors for comfort. Modular units can also serve as partitions or play zones, making the room feel larger and more dynamic.
Choose a modular set designed for durability and easy reconfiguration. Start with a base—like a bed frame or storage cube—and add units as needed. Secure pieces with connectors or stacking features to ensure stability. Use colorful textiles or mats to define play or study zones. Regularly rearrange to keep the room feeling fresh and exciting. This furniture grows with your child, reducing the need for frequent replacements.
Personalize with themed cushions or covers that match current interests. Incorporate stickers or decals on the units for extra character. Use baskets or fabric bins in matching shades for organization. Create a mural or wall decal behind the setup to anchor the space visually. The key is to keep it fun, flexible, and easy to adapt.
Flexible furniture encourages your child to take ownership of their space and experiment with different arrangements. It promotes creativity and problem-solving skills. Plus, it’s a practical way to keep their environment aligned with their evolving interests. Ready to build a room that grows as fast as they do? The possibilities are endless!
16. Fun, Digital-Inspired DIY Pin Boards and Memory Walls

Tired of cluttered surfaces and boring notice boards? Want a lively way to showcase your child’s digital art, photos, or favorite notes? DIY pin boards and memory walls inspired by digital themes turn chaos into curated coolness. They add personality and keep memories front and center.
Imagine a large cork board painted with bright, pixelated patterns or framed with colorful tape. Pins hold up artwork, photos, or notes in a playful, organized way. Surround the board with LED accents or decorative borders that match the digital theme. Kids love seeing their creations displayed proudly, and the wall becomes a focal point full of color and character. It’s a fun, ever-changing gallery of their digital journey.
Use different shapes—hexagons, squares, or circles—to create a dynamic layout. Incorporate themed paper, washi tape, or decals to frame or decorate the board. For a more interactive approach, add magnetic or chalk sections for versatility. Change out the display items seasonally or as new favorites emerge. Mix and match textures and colors to suit your decor style.
Choose a wall space or large door for the display. Prepare a base with paint or decorative tape in bright colors. Attach a cork or magnetic board using nails or adhesive strips. Use colorful pins, clips, or magnets to hold up artwork and notes. Encourage your child to curate their collection, switching items regularly for freshness. Add small shelves or ledges nearby for three-dimensional objects or mini trophies.
Frame favorite pieces with themed borders or add fun stickers and decals around the edges. Incorporate themed containers or clips for organizing supplies like washi tape or stickers. Let your child customize the layout with their favorite colors or motifs. Use string lights or small LED strips to highlight the display for extra flair. It becomes a dynamic, personal showcase.
A personalized memory wall encourages kids to celebrate their creativity and achievements. It fosters pride and inspires continued artistic expression. Plus, it helps keep their space tidy and meaningful. Ready to create a digital-inspired gallery that grows with your child? It’s a simple project with big impact.
Conclusion
From vibrant color schemes to themed decor and creative layouts, these Toca Boca bedroom ideas offer a fun and inspiring blueprint for transforming any space. Feel empowered to try out these concepts and add your personal touch to create a playful oasis that sparks joy and imagination. With a little creativity and enthusiasm, you can turn a simple bedroom into a delightful haven where dreams come to life. Let the transformation begin!