Ever wondered how to make the often-overlooked space atop your fridge both functional and fabulous? This area is a goldmine for creative decor that can add personality, practicality, and a splash of charm to your kitchen. Top of the fridge decor is gaining popularity because it transforms an awkward, unused space into a stylish display that can be easily customized to suit any taste.
In this article, you’ll find a variety of inspiring ideas to elevate your kitchen decor game. From clever storage solutions to eye-catching displays, these ideas are perfect for turning your fridge top into a focal point that’s both beautiful and useful. Get ready to unleash your creativity and give your kitchen a fresh, personalized touch!
1. Stylish Wire Baskets for Organized Storage
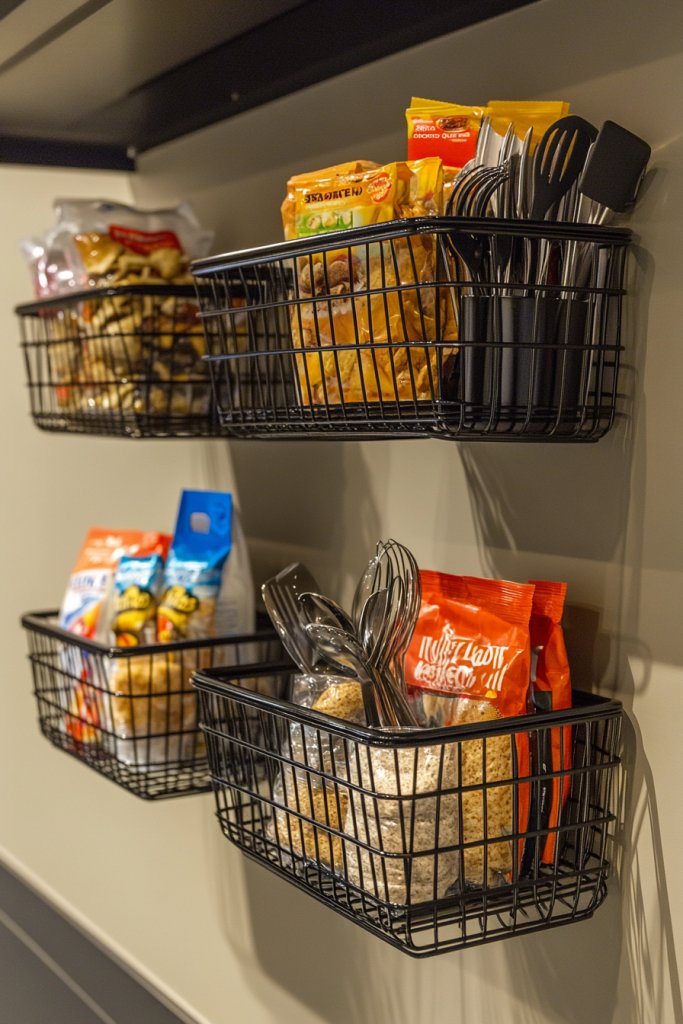
Tired of endless clutter on your kitchen counters and shelves? Wire baskets offer a stylish, practical way to corral snacks, utensils, or small appliances without sacrificing aesthetic appeal. They help you keep essentials within reach while maintaining a chic, orderly look. Who says storage can’t be attractive?
Picture a set of sleek, matte black wire baskets perched atop your fridge, filled with colorful snack packs and neatly stacked kitchen tools. The open design allows easy access while adding a touch of industrial charm. The baskets’ thin metal framework contrasts beautifully with smooth surfaces and wooden accents, creating a balanced visual harmony. They look light yet sturdy, perfect for a modern or rustic kitchen.
Choose baskets in different sizes and finishes—antique brass, matte black, or painted pastels—to match your decor. Stack or hang them for different effects, or place them inside cabinets for hidden storage. Seasonal options include adding festive ribbons or fabric liners for special occasions. For small spaces, wall-mounted wire baskets can serve as both storage and decor elements.
Start by measuring the space above your fridge or on open shelves. Select wire baskets with sturdy handles or mounting options based on your needs. Securely attach wall-mounted baskets with appropriate anchors, or place free-standing ones on flat surfaces. Use labels or color coding to categorize contents, making it easier to find what you need. Keep the baskets clean with regular dusting to preserve their sleek look. Reorganize periodically for freshness.
Add decorative liners, fabric wraps, or chalkboard tags for each basket to personalize and organize further. Mix and match finishes to create a layered, eclectic look or keep it uniform for a minimalist vibe. Incorporate small hooks or clips for hanging utensils or keys nearby. Change basket contents seasonally to keep the space lively and functional.
Wire baskets turn clutter into curated displays, elevating your kitchen’s style and function. They help you stay organized without sacrificing design integrity. With a little creativity, you can transform simple wire containers into statement pieces that reflect your personality. Feel confident about a clutter-free, stylish kitchen that works for your lifestyle.
2. Decorative Wooden Crates for Seasonal Decor
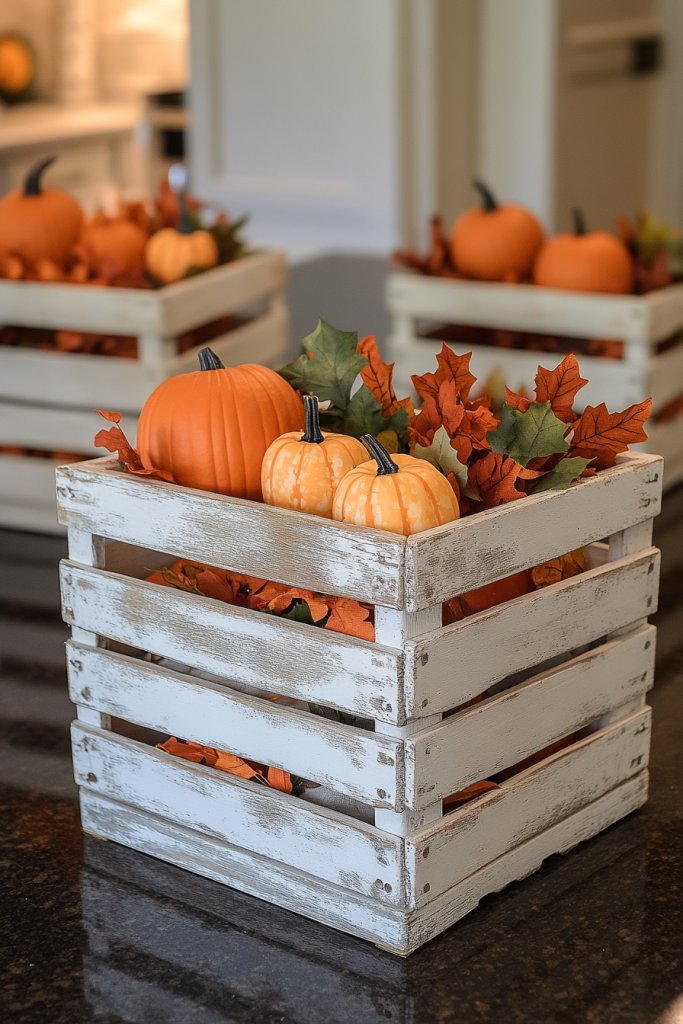
Looking for a versatile way to add rustic charm to your kitchen? Wooden crates are perfect for creating a cozy, inviting atmosphere while serving as storage or display units. They’re ideal for seasonal decor, cookbooks, or decorative accents, all while adding warmth and texture. Who says storage can’t be charming?
Visualize a stack of distressed wooden crates, painted in soft pastel hues or left natural. They sit neatly on top of your fridge, filled with seasonal items like mini pumpkins, holiday ornaments, or vintage kitchen tools. The rough-hewn texture and aged patina bring a farmhouse feel, contrasting beautifully with sleek appliances and modern finishes. They’re both functional and aesthetic, with a nostalgic vibe that invites touch.
Mix painted and natural crates for a layered look, or mount vintage crates horizontally to create open shelving. During holidays, swap out the contents for themed displays—spring flowers, summer shells, or autumn leaves. For compact spaces, use small crates as drawer dividers or stacking units. Personalize with stencils, stamps, or small decorative tags for extra flair.
Start with selecting crates that match your space and style. Reinforce or sand rough edges for safety and aesthetic. Use mounting brackets or heavy-duty adhesive if you plan to hang them, or simply stack for free-standing displays. Fill with lightweight items or decorative objects that won’t strain the structure. For added flair, line the insides with fabric or contact paper. Regularly clean and re-situate for seasonal updates.
Decorate crates with paint, stencils, or fabric linings to match your decor theme. Attach small metal or leather handles for a vintage look. Use chalkboard paint on sides for labeling contents or seasonal messages. Incorporate small hooks or knobs to hang utensils or keys on the sides. Change the display seasonally to keep your space fresh and inviting.
Wooden crates turn simple storage into a charming design statement. They evoke nostalgia while offering practical solutions, making your kitchen feel warm and lived-in. With a little creativity, your space becomes both functional and full of character. Ready to add rustic charm and seasonal flair? Your kitchen will thank you.
3. Clear Acrylic Jars for Bulk Storage
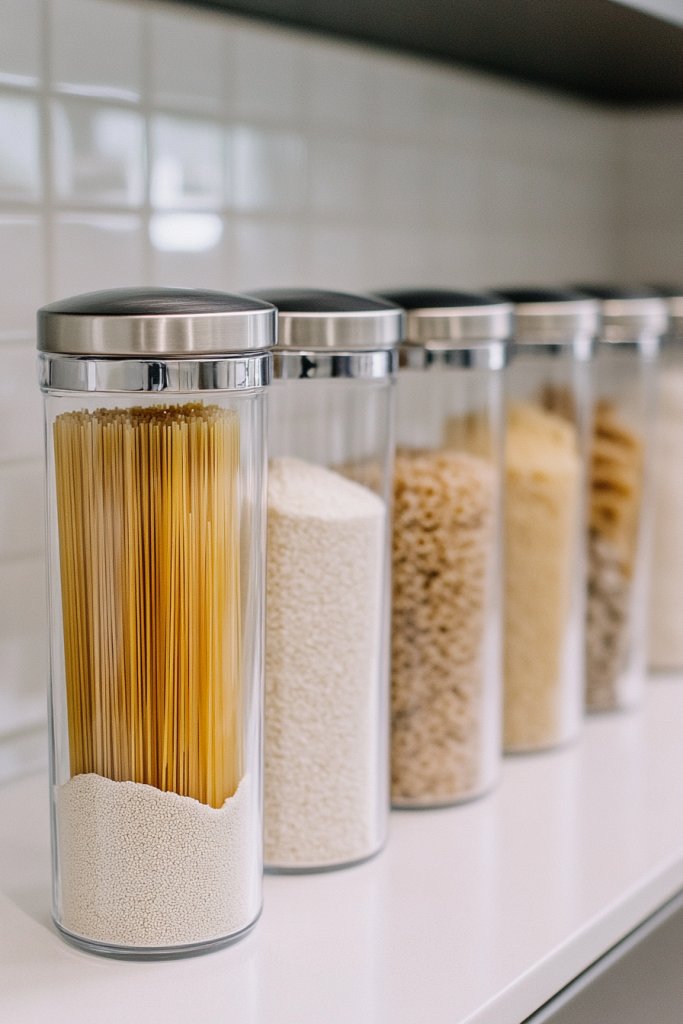
Are loose snacks and baking ingredients taking over your countertops? Clear acrylic jars offer a sleek, organized way to store staples like pasta, rice, or flour. They keep everything visible and accessible, reducing clutter and frustration. Who doesn’t love a clean, streamlined kitchen?
Picture a series of uniform, transparent jars lined up on your top fridge shelf, each filled with colorful grains, beans, or cookies. The glass-like finish catches the light, adding a bright, airy feel. Labels with chic typography adorn each jar, making it easy to identify contents at a glance. The neat, symmetrical arrangement lends a modern, minimalist vibe to the space.
Choose jars in different sizes for variety, or keep all uniform for a cohesive look. For seasonal decor, swap contents or add decorative touches like ribbons or seasonal labels. Use colored lids or silicone seals for a pop of contrast. Arrange jars on a decorative tray or in a dedicated storage section for extra organization. They work well in open shelving or inside pantry cabinets.
Select high-quality acrylic jars with airtight seals for freshness. Clean thoroughly before filling with your favorite staples. Label each jar using a chalk marker, adhesive labels, or a label maker for durability. Arrange jars by size or frequency of use for efficiency. Regularly check for cracks or cloudiness, and wash jars periodically to keep them looking pristine. For added style, display them on a decorative tray or stack in a corner.
Use decorative or themed labels to match holidays or seasons. Consider color-coding contents for quick identification—red for pasta, green for grains, etc. Add small chalkboard tags for a rustic look, or layer different textures with fabric or paper liners inside the jars. Incorporate a small spice rack nearby for complementary ingredients. Reorganize contents seasonally to keep things fresh.
Clear acrylic jars make your kitchen look polished and organized, transforming chaos into calm. They encourage you to keep essentials visible and within reach. With a little effort, your storage becomes both functional and beautiful, inspiring confidence in your organizational skills. Ready to turn clutter into a clean display? Your kitchen will shine.
4. Magnetic Spice Jars for Easy Access
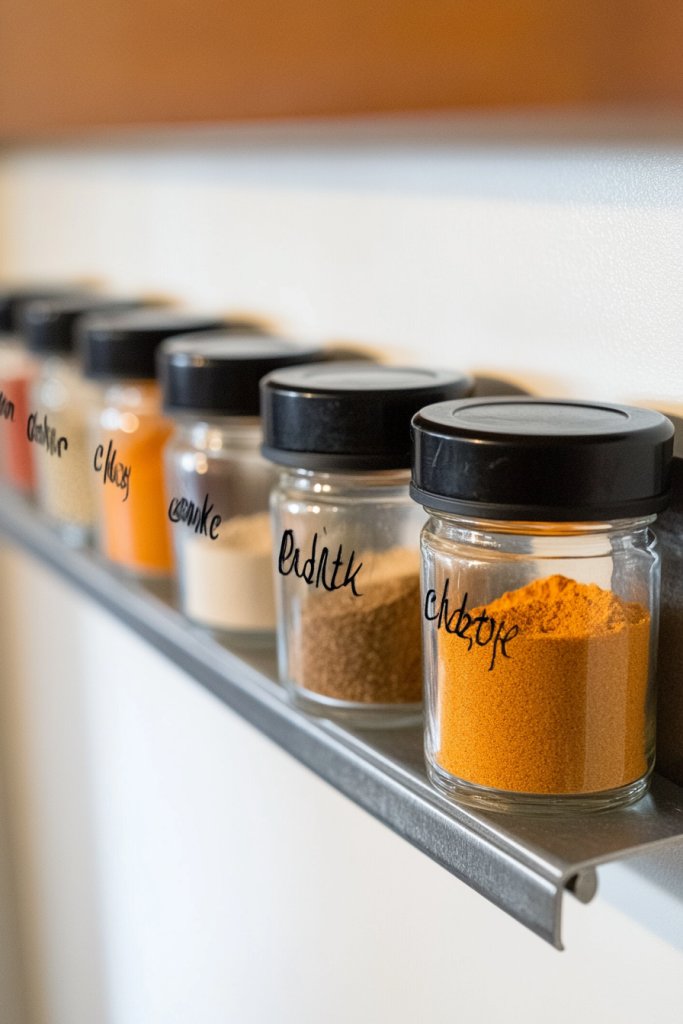
Spice jars scattered across counters or stuck in cabinets make cooking more frustrating than it should be. Magnetic spice jars offer a stylish, accessible solution to keep your most-used seasonings right at your fingertips. No more digging through clutter—just quick, easy flavoring.
Imagine sleek, small jars with clear fronts and uniform labels, mounted on a magnetic strip attached to your fridge or a nearby wall. The metallic sheen of the jars complements stainless appliances, offering a modern, streamlined look. When you open your fridge door, vibrant spices peek out, adding a splash of color and convenience. The arrangement is tidy yet highly functional, making spice management effortless.
Opt for minimalist labels, colorful caps, or even custom etched designs for a personalized touch. Mount the magnetic strip at different heights to match your height or kitchen layout. For seasonal variations, swap out spices or add themed labels. For a rustic kitchen, choose cork lids and wooden labels; for a contemporary look, go with sleek metallic or matte finishes. The system adapts easily to small or large spice collections.
Purchase magnetic jars with airtight lids and clear bodies for visibility. Clean the fridge surface thoroughly before attaching the magnetic strip. Fill each jar with your favorite spices, then label with a permanent marker or adhesive labels. Arrange on the strip in order of frequency or alphabetically for quick access. For extra stability, use small rubber pads under the jars. Regularly check for leaks or broken lids and refill as needed. Keep a small brush nearby for easy cleaning of the jars’ openings.
Create custom labels with your own fonts or designs for a unique look. Incorporate color coding—red for chili powders, green for herbs—to make identification even faster. Enhance with a small magnetic tray or caddy for organizing extra small containers or utensils. Change the arrangement seasonally or for different cuisines to keep your spice game exciting. Add a few decorative touches, like a chalkboard label or patterned cloth cover for a personalized feel.
Magnetic spice jars turn a chaotic spice drawer into a sleek display of flavor-ready ingredients. They make cooking more efficient and fun, boosting your confidence in the kitchen. Plus, they add a contemporary touch that elevates your entire space. Ready to spice up your storage? Your culinary adventures await!
5. Hanging Hooks for Utensils and Mugs
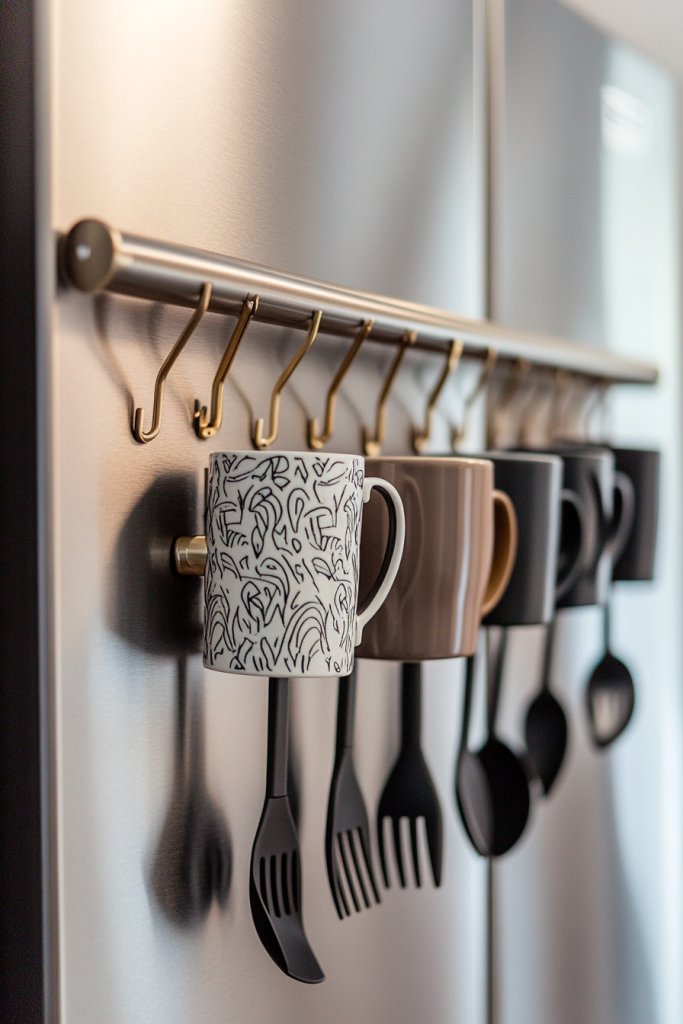
Constantly digging through drawers for utensils or mugs can ruin your cooking flow and clutter your counters. Hanging hooks provide a simple, stylish way to keep your essential tools within reach and add visual interest. Why hide your favorite mugs when they can be part of your decor?
Envision a row of decorative hooks mounted on a sleek metal rod or a wooden plank above your fridge. Mugs with unique patterns hang neatly, while sturdy hooks hold spatulas, ladles, or measuring spoons in an organized cascade. The display adds an inviting, lived-in vibe that combines practicality with personality. The hooks’ finishes—brushed brass, matte black, or rustic iron—complement various styles, from farmhouse to modern.
Select hooks that match your decor theme, or mix different styles for an eclectic look. Use them for hanging utensils, oven mitts, or small pots, depending on space. For seasonal touches, swap out hooks or add decorative charms. Mount a few hooks on a decorative board or directly on the fridge’s side for versatility. Keep the hooks clean and organized, and rotate items seasonally for variety.
Choose a sturdy mounting surface—wood, metal, or tile—and secure hooks with appropriate anchors. Arrange in a pattern that maximizes space and ease of access. Use matching or contrasting finishes to add visual interest. Hang frequently used utensils or mugs for daily convenience, and keep less-used items stored elsewhere. Regularly inspect hooks for stability and cleanliness. For added flair, incorporate decorative knobs or handles nearby.
Personalize by adding name tags or decorative charms to hooks. Use themed hooks for holidays or special occasions, like heart-shaped for Valentine’s or snowflakes for winter. Incorporate a small shelf above for storing spices or small jars, creating a multi-layered display. Keep it functional yet fun by mixing practical hooks with decorative elements. Change items seasonally to refresh the look and keep your kitchen lively.
Hanging hooks transform a cluttered mess into a curated display of your favorite tools and mugs. They boost your efficiency and add a personalized touch that makes your kitchen feel warmer. With just a few simple updates, you can elevate your space and enjoy cooking more. Ready to hang your way to a more organized kitchen? Your tools are waiting.
6. Small Potted Herbs in Magnetic Planters
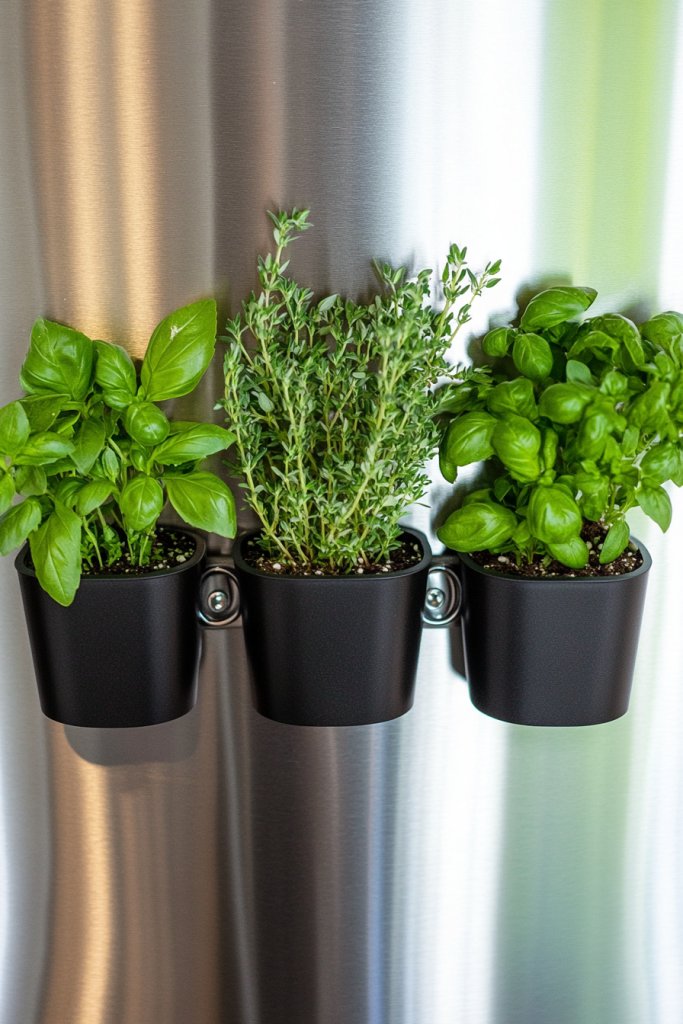
Craving fresh herbs but hate the clutter of traditional pots? Magnetic planters let you grow small herbs right on top of your fridge, saving space and adding greenery without mess. Fresh herbs elevate any dish, and having them handy makes cooking more enjoyable. Who knew that a little greenery could make such a difference?
Imagine tiny ceramic or metal planters with vibrant green sprouting herbs, attached securely to a magnetic strip mounted above your fridge. The herbs sway gently with kitchen breezes, filling the space with fresh aroma. The planters come in assorted colors—white, terracotta, or metallic—that contrast beautifully with your appliances. The lush greenery creates a lively, inviting focal point in an otherwise plain space.
Choose planters with different finishes or shapes to match your decor. For a rustic feel, go for terracotta pots; for a sleek modern look, opt for matte black or metallic planters. Grow a mix of herbs—basil, mint, cilantro—for variety and flavor. Change the arrangement seasonally or for different recipes, and add small labels for easy identification. You can also incorporate small decorative stones or pebbles for added charm.
Select magnetic planters with strong magnets and drainage holes if needed. Fill them with potting soil and your favorite herbs, then attach securely to the magnetic strip. Position them at a height that’s easy to reach while cooking. Water sparingly to avoid overloading the magnets, and prune regularly to encourage healthy growth. Clean the planters occasionally to keep them looking fresh. Consider the sunlight and choose herbs suitable for indoor growth.
Label each herb with custom tags or chalkboard labels for easy identification. Decorate the planters with patterns, stickers, or paint for a personalized touch. Rotate herbs seasonally or swap out with small flowering plants for variety. Incorporate a small watering can or spray bottle nearby for easy care. Keep the space lively and functional by changing herbs according to your cooking needs.
Growing herbs on top of your fridge brings freshness and a dash of nature into your kitchen. It’s a simple way to enhance your cooking and brighten your space. Plus, caring for your mini garden boosts your confidence in your green thumb, even if it’s just a small one. Ready to harvest your first herbs? Your culinary creations will thank you!
7. Tiered Tray for Miniature Decor and Essentials
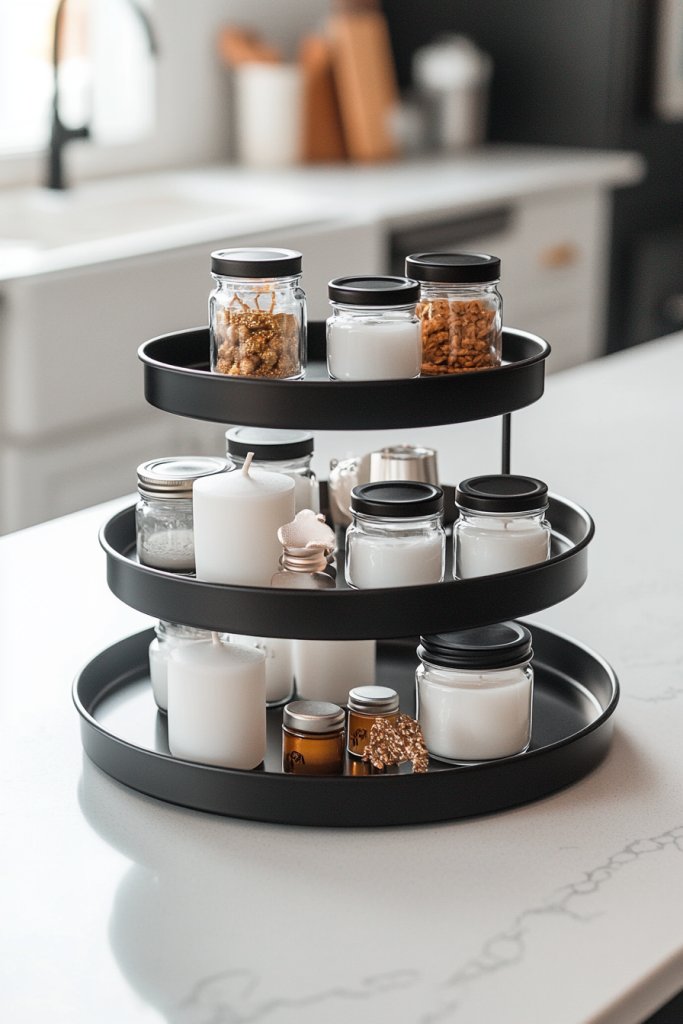
Cluttered counters and shelves can make your kitchen look chaotic and uninviting. A tiered tray offers a stylish way to display small decor items and keep essentials organized. It creates a focal point that combines function and fashion effortlessly. Who said your space can’t be both pretty and practical?
Imagine a three-tiered metal or wood tray sitting atop your fridge, filled with tiny jars, decorative candles, or themed accents. The layered design adds height and visual interest, making everything look curated and intentional. The different levels allow you to showcase a variety of objects—like mini plants, vintage spoons, or seasonal decorations—in a compact footprint. The overall effect is charming, organized, and inviting.
Opt for different materials—metal, wood, or ceramic—for varied styles. Change contents seasonally, swapping out miniatures for holidays, spring blooms, or cozy winter touches. Use small bowls or cups for serving or storage, or add decorative elements like faux greenery or fairy lights. Adjust the size of the tray to fit your space, or stack multiple trays for extra height and storage options.
Choose a sturdy tiered tray that matches your kitchen decor and fits your space. Arrange your small decor items or essentials, balancing visual weight for stability. Use small labels or tags to organize contents if necessary. Place the tray in a prominent spot for easy access and visual appeal. Clean regularly to prevent dust buildup, and refresh contents seasonally. For added charm, incorporate themed decorations or textiles around the tray.
Decorate the tray with seasonal motifs, mini figurines, or personalized tags. Incorporate fairy lights or decorative stones for added sparkle. Personalize with small framed photos or handwritten notes tucked among items. Use color-coordinated objects to match your overall decor palette. Rotate contents to keep the display fresh and engaging.
A tiered tray elevates your kitchen decor, making small items feel special and intentional. It encourages creativity and organization, transforming clutter into a charming display. With a little effort, your space becomes more inviting and personalized. Ready to elevate your kitchen with a simple tray? Your decor will thank you.
8. Repurposed Vintage Crates as Display Shelves
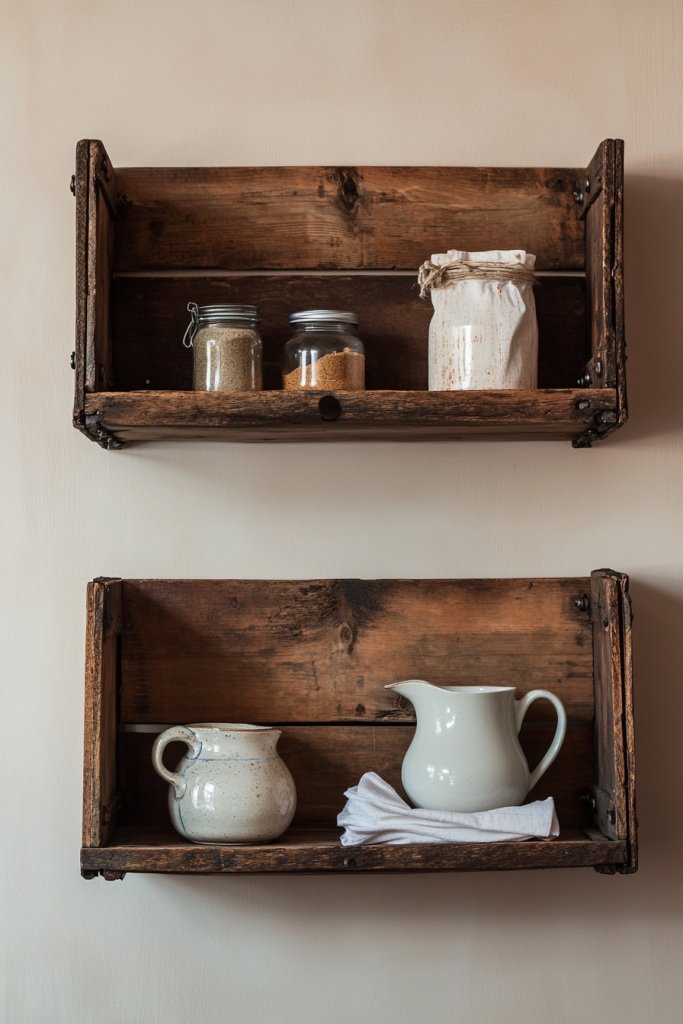
Looking to add character and storage to your kitchen without buying new furniture? Vintage crates are a perfect solution—they’re functional, charming, and eco-friendly. Repurposing them as shelves provides a nostalgic touch while keeping essentials accessible. Who says storage has to be boring?
Picture weathered, painted crates mounted horizontally or stacked vertically on your wall, filled with cookbooks, utensils, or decorative items. The aged wood and distressed paint add rustic charm, creating a focal point that feels warm and inviting. Pairing the crates with modern or vintage accessories enhances their visual appeal, blending old-world charm with contemporary style. The display feels both functional and full of history.
Mount crates in different orientations for varied visual interest—horizontal, vertical, or staggered. Decorate with seasonal items, small potted plants, or vintage kitchen tools. For a modern twist, paint the crates in bold colors or leave them distressed for authenticity. Use them inside cabinets, on open walls, or as room dividers. Combine multiple crates for larger storage or display areas.
Source authentic vintage crates from flea markets, thrift stores, or online marketplaces. Clean and lightly sand the surfaces, then paint or seal if desired. Mount securely using appropriate hardware—anchors for drywall or screws for wood. Arrange the crates in a pattern that maximizes space and accessibility. Fill with lightweight, organized items, and periodically refresh contents for seasonal updates. Regularly inspect for stability and wear.
Add decorative touches like stenciled patterns, personalized labels, or fabric liners. Incorporate small hooks or knobs inside or outside for keys or utensils. Use themed accessories for holidays or special occasions. Mix materials like metal, fabric, or ceramics within the crates. Personal touches turn functional storage into a statement piece that reflects your style.
Vintage crates bring warmth and history into your space, making every item feel curated. They help you organize with style, turning clutter into a nostalgic display. With a little effort, your kitchen gains character and charm. Ready to embrace vintage style? Your space will tell a story of creativity and history.
9. Magnetic Whiteboard for Meal Planning
Keeping track of weekly meals, shopping lists, and family notes can become a chaotic game of sticky notes and scraps. A magnetic whiteboard offers a sleek, organized solution that keeps everything in one place. It’s perfect for busy households wanting a clutter-free way to stay on top of schedules and meals.
Imagine a crisp white surface with magnetic clips holding colorful notes, photos, and lists. The board is mounted above your fridge, with a clean, modern frame that complements your decor. Magnetic markers or labels can be used to write messages directly on the surface, making updates quick and easy. The space feels fresh, organized, and ready for planning, turning chaos into clarity.
Choose a sleek, frameless whiteboard or a decorative frame to match your style. Use colorful magnets, markers, or themed stickers for seasonal updates. Create dedicated sections for meal planning, to-do lists, or motivational messages. For smaller kitchens, opt for a compact version or incorporate it into a cabinet door. Change the layout depending on your needs—weekly, monthly, or daily views.
Select a high-quality magnetic whiteboard with a smooth writing surface. Mount it securely with heavy-duty anchors on a clean wall or cabinet face. Use magnetic accessories to organize notes, recipes, or shopping lists. Write with dry-erase markers that wipe clean easily, and keep extra markers and erasers nearby. Regularly update the content to keep it relevant and motivating. Consider pairing with a small basket for storing extra supplies.
Add decorative magnets, labels, or washi tape borders to enhance visual interest. Use themed markers for holidays or special occasions. Create custom sections or tabs for specific categories like kids’ activities or chores. Incorporate small framed photos or artwork around the board for a personalized touch. Keep the space lively and organized by changing displays seasonally.
A magnetic whiteboard turns meal planning and scheduling into a fun, visual activity. It helps your family stay coordinated and motivated, reducing last-minute chaos. With a little effort, your space becomes more efficient and welcoming. Ready to organize with style? Your kitchen will be the hub of productivity.
10. Decorative Baskets for Recycling and Trash
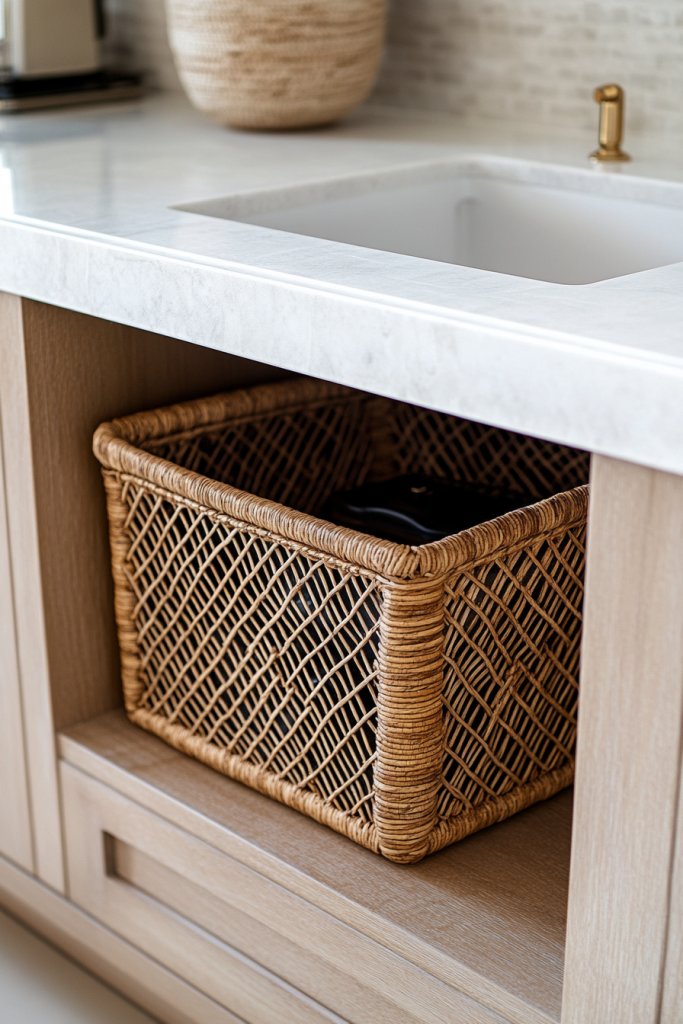
Recycling bins and trash cans can be eyesores, ruining the aesthetic of your kitchen. Decorative baskets hide those unsightly containers while keeping them accessible. They create a tidy, stylish environment that encourages eco-friendly habits without sacrificing design. Who says waste management can’t look good?
Picture woven or metal baskets with elegant patterns placed under the sink or next to your counters. They conceal standard recycling bins, making the space look intentional and coordinated. The baskets’ textures—rattan, wire, or fabric—add warmth and visual interest, softening the look of functional items. An open, airy design invites you to recycle more consciously while maintaining beauty.
Choose baskets in neutral tones for a minimalist look or vibrant colors for a playful touch. Add fabric liners or removable bags inside for easy cleaning. For a rustic feel, opt for wicker or natural fibers; for sleek modern spaces, go for metal or painted finishes. Use them for both recycling and trash, or designate separate baskets for each purpose. Seasonal covers can add a festive touch.
Select baskets with enough capacity to hide your bins completely. Ensure they fit well in your designated space and are easy to access for disposal. Line the baskets with removable, washable liners for cleanliness. Position them near your sink or in a corner that’s out of sight but still convenient. Regularly clean the baskets and replace liners to maintain a fresh look. Reorganize contents seasonally for variety.
Decorate baskets with labels, fabric wraps, or painted designs for a custom look. Use themed liners for holidays or seasons to add festivity. Incorporate small hooks or clips for hanging cleaning tools or trash bags nearby. Mix textures or patterns for an eclectic vibe that matches your overall decor. Keep the space functional yet stylish with thoughtful touches.
Decorative baskets elevate your waste disposal area, making it part of your decor. They encourage better recycling habits and keep your kitchen tidy. With a few simple updates, you turn a necessary chore into a design opportunity. Ready to hide the trash and love your space? Your kitchen will be both stylish and functional.
11. Canvas or Fabric Wall Pockets for Recipe Cards
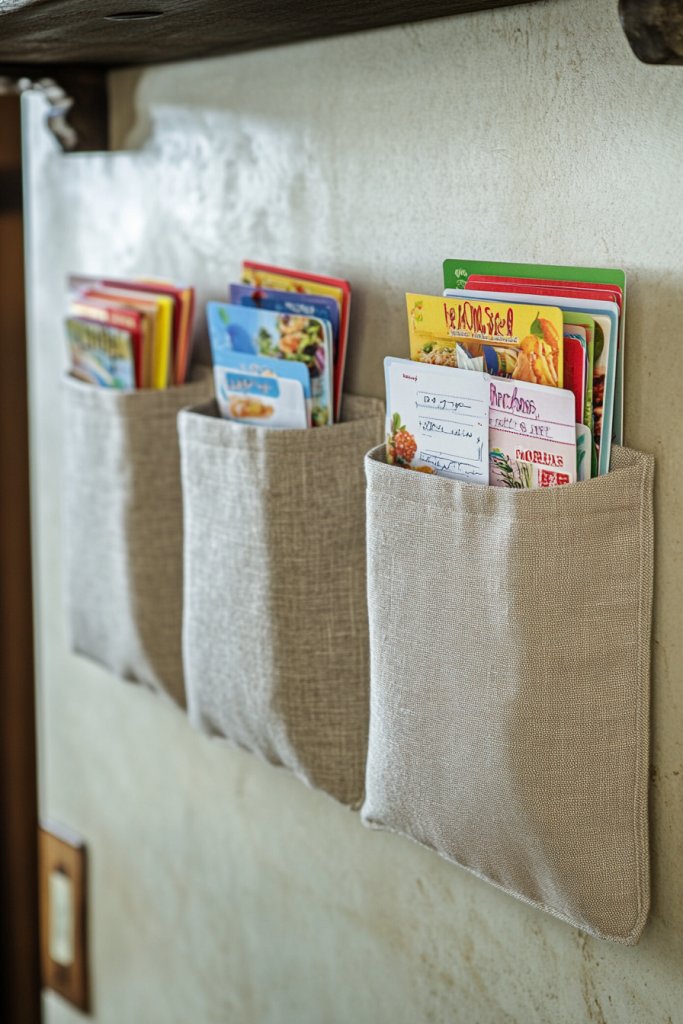
Messy counters and drawers make finding your favorite recipes a hassle. Wall pockets made of canvas or fabric offer a charming, organized way to keep recipe cards, shopping lists, or notes within easy reach. They turn clutter into a curated display, making your kitchen more functional and inviting. Who knew organization could be so cute?
Visualize a set of fabric or canvas pockets hanging neatly on the side of your fridge or wall. Each pocket holds a different recipe card, with colorful or handwritten notes peeking out. The textured fabric adds softness and warmth, contrasting with sleek appliances and smooth surfaces. Small decorative pins or clips attach the pockets securely, creating a charming, functional gallery of your culinary inspirations.
Choose pockets in patterns, colors, or textures that match your decor—florals for vintage, geometric for modern, or plain for minimal. Mount them in a grid, staggered pattern, or in a single row for visual interest. Change contents seasonally or for special occasions, swapping recipes or notes. Use different sizes for varied storage needs, or add decorative trim for extra flair. They’re versatile in kitchens, craft rooms, or home offices.
Securely attach pockets to a clean wall or fridge side with hooks, nails, or adhesive strips. Organize recipes or notes by frequency or theme. Use reinforced stitching or sturdy fabric to ensure durability. Insert your cards or notes into the pockets, and label if needed. Refresh the contents regularly to keep your collection current. For added style, coordinate with other fabric or textile elements in your space.
Decorate pockets with embroidery, fabric paint, or appliqué for a personalized touch. Use themed fabrics for holidays or seasons—florals, stripes, or polka dots. Incorporate small decorative pins or charms for added charm. Create a dedicated section for family recipes, or add a small chalkboard label for quick notes. Change the display periodically to keep it fresh and inspiring.
Canvas or fabric pockets turn recipe organization into a visual delight. They make cooking more intuitive and fun while adding a cozy, handcrafted vibe. With a little effort, your kitchen becomes a hub of inspiration and order. Ready to display your favorites stylishly? Your culinary adventures will be easier and more enjoyable.
12. Minimalist Floating Shelves for Display and Storage
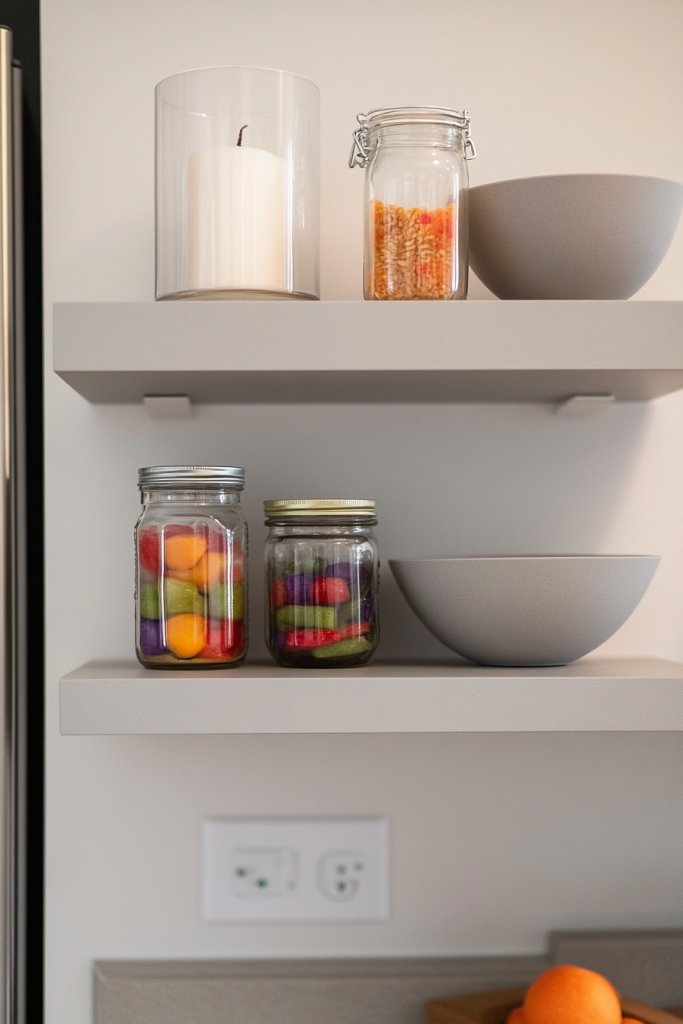
Counter clutter and overcrowded cabinets can make your kitchen feel cramped and chaotic. Floating shelves offer a sleek, clutter-free way to display your favorite dishes, jars, or decorative accents. They add a modern touch while maximizing vertical space. Who says your kitchen can’t be both functional and minimalist?
Imagine slim, matte-finished shelves mounted with hidden brackets, creating the illusion of floating effortlessly above your fridge. They showcase neatly arranged bowls, jars filled with colorful ingredients, or decorative items like candles or sculptures. The open design keeps everything visible, brightening the space and adding a sense of order. The clean lines and simple hardware blend seamlessly into contemporary decor.
Opt for wood, metal, or glass shelves depending on your style preference. Arrange items in a symmetrical or asymmetrical pattern for visual interest. Use them seasonally—displaying holiday-themed dishware or fresh greenery during different times of the year. Keep the overall look cohesive with matching colors or finishes. For small spaces, install just one or two shelves; larger kitchens can handle multiple for a layered effect.
Measure your available space carefully and select sturdy brackets or mounting hardware suited for your wall. Use a level to ensure perfect alignment before fixing the shelves securely. Organize your items with a mix of functional and decorative pieces, balancing weight and visual flow. Clean the surfaces regularly and avoid overcrowding to keep the minimalist aesthetic. Expand the setup over time by adding more shelves or adjusting the arrangement.
Decorate shelves with themed items—like seasonal dishware, small plants, or artful containers. Incorporate LED strip lighting underneath for ambiance or task lighting. Use labels or tags for jars or dishes to keep everything organized. Change the arrangement periodically for freshness, and match shelf materials with other hardware in your kitchen for a cohesive look. Personal touches like framed quotes or miniature sculptures can elevate the display.
Minimalist floating shelves redefine your kitchen’s style, making it look larger, cleaner, and more inviting. They encourage you to showcase your favorite pieces and keep essentials organized at eye level. With a simple upgrade, your space becomes both functional and visually appealing. Ready to embrace sleek, open storage? Your kitchen’s new look is just a shelf away.
13. Compact Fruit and Vegetable Baskets
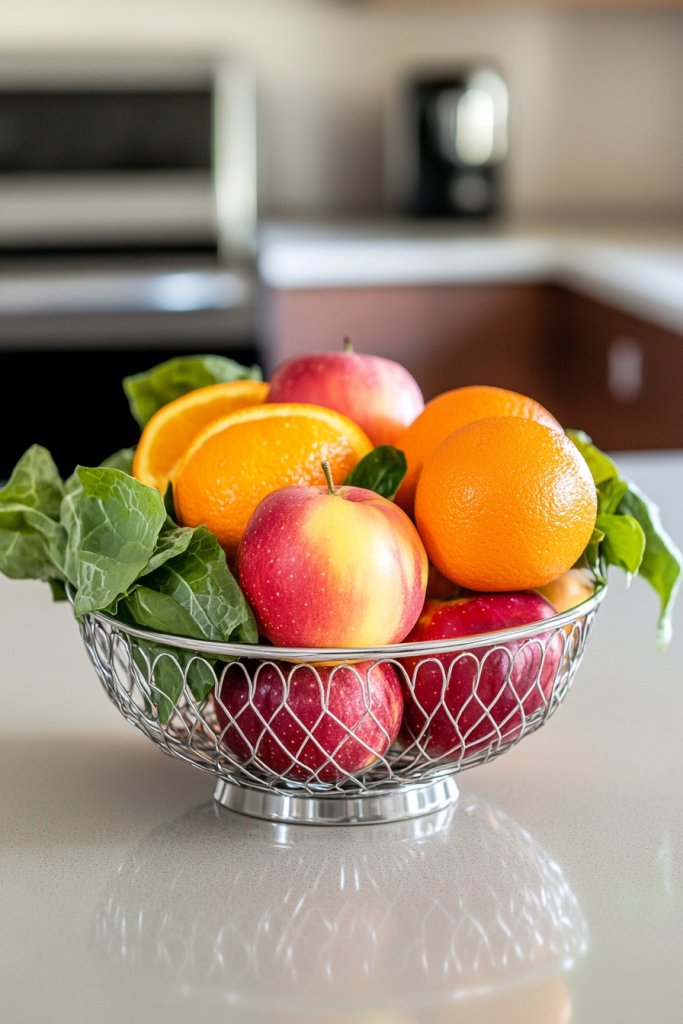
Fruit and veggies often end up scattered or hidden away, wasting space and freshness. Compact, ventilated baskets or bowls offer a stylish, accessible way to display produce while keeping it fresh. They add a splash of color and vitality to your kitchen, making healthy eating more tempting. Who says produce storage can’t be pretty?
Picture a decorative wire or ceramic bowl filled with bright apples, oranges, and leafy greens sitting atop your fridge or countertop. The open design enhances airflow, keeping produce fresh longer. The vibrant colors contrast with neutral countertops or sleek appliances, adding life and cheer to your space. The arrangement invites you to grab a snack or ingredient, encouraging healthy habits.
Choose baskets or bowls in various materials—metal, ceramic, or woven—to match your decor. Use seasonal liners, fabrics, or decorative stones to customize the look. For a modern vibe, opt for geometric or minimalist designs; for rustic charm, go for distressed wood or woven baskets. Change contents seasonally for variety, and add labels or tags for organization. Small stands or risers can elevate the display for added visual interest.
Select durable, ventilated baskets or bowls that fit your space and style. Place them in visible spots—countertops, open shelves, or the fridge top—where they’re easy to reach. Fill with fresh produce, making sure to rotate and remove spoiled items regularly. Keep the baskets clean by washing or wiping them down. Reorganize contents seasonally or as your produce supply changes. Pair with a small cutting board or knife for convenience.
Decorate baskets with seasonal fabrics, labels, or painted designs. Use color-coding to organize different produce types—green for vegetables, red for fruits, etc. Incorporate small decorative accents like faux herbs or mini flowers for added charm. Change contents regularly to keep things fresh and inviting. Add a dedicated section for prepped ingredients or snack items for quick access.
A well-organized produce display makes your kitchen more vibrant and encourages healthy choices. It transforms a simple item into a cheerful, functional focal point. With minimal effort, you can make your space more inviting and organized. Ready to enjoy fresh fruits and veggies every day? Your kitchen will look and feel better instantly.
14. Upcycled Crate or Box Display for Vintage Charm
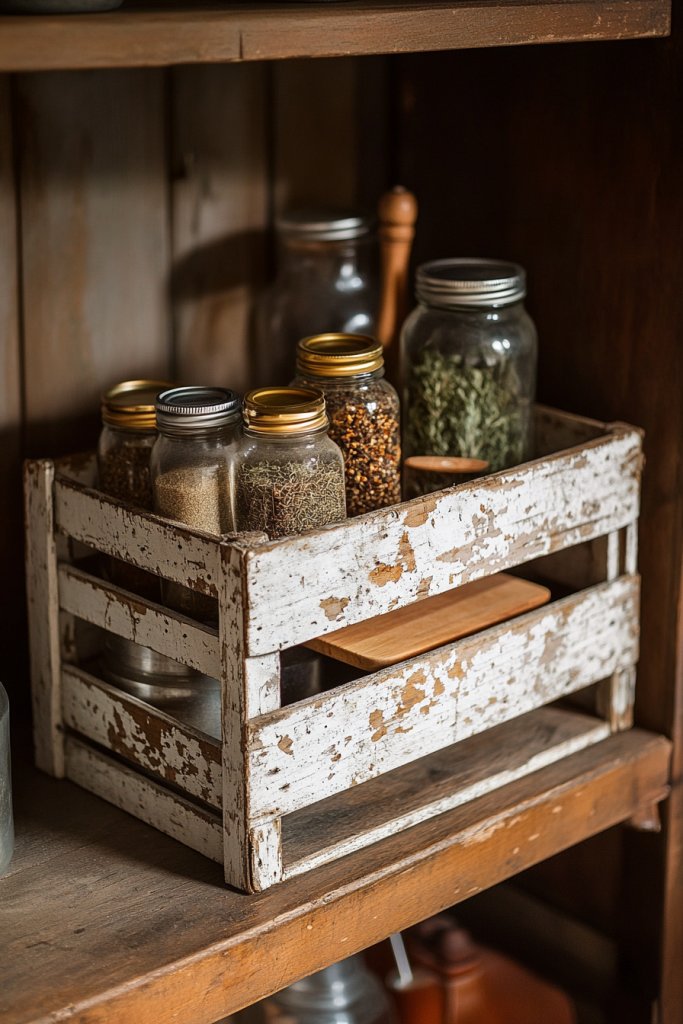
Want to add a touch of vintage charm without buying new decor? Upcycled crates or boxes are eco-friendly, inexpensive, and full of character. They offer a practical way to organize or display your kitchen essentials while adding a handcrafted, nostalgic vibe. Who says your kitchen can’t be both functional and full of personality?
Imagine painted or distressed crates stacked or mounted on the wall, filled with cookbooks, utensils, or decorative items like jars or candles. The weathered wood and imperfect finishes evoke a sense of history, warmth, and personality. They serve as both storage and art, blending rustic appeal with everyday utility. The layered arrangement creates visual depth and invites touch.
Paint or stain crates in colors that complement your decor—soft pastels, bold hues, or natural wood tones. Mount crates horizontally or vertically, or stack them for a dynamic display. Use them to organize seasonal items, display vintage collectibles, or hold everyday essentials. Add decorative tags, stencils, or decals for further customization. Mix different sizes and finishes for an eclectic, curated look.
Source authentic vintage crates from flea markets or thrift stores, or repurpose old wooden boxes. Clean thoroughly and sand rough edges for safety. Paint or stain as desired, then attach securely to walls with appropriate hardware. Fill with lightweight, organized items, or leave open for versatile use. Refresh the display seasonally by changing contents or finishes. Regularly check stability and condition.
Decorate crates with painted patterns, stenciled designs, or personalized labels. Incorporate small decorative accents like vintage knobs or handles. Use themed items for holidays or seasons—spring flowers, autumn leaves, or holiday ornaments. Layer multiple crates with different textures and colors for visual interest. Keep the look fresh by swapping out contents periodically.
Upcycled crates breathe new life into your space, combining function with vintage charm. They reflect your personal style and creativity, turning simple storage into a statement piece. With minimal investment, you create a warm, inviting atmosphere. Ready to embrace upcycled decor? Your kitchen will radiate personality and warmth.
15. Magnetic Organizer for Small Tools and Gadgets
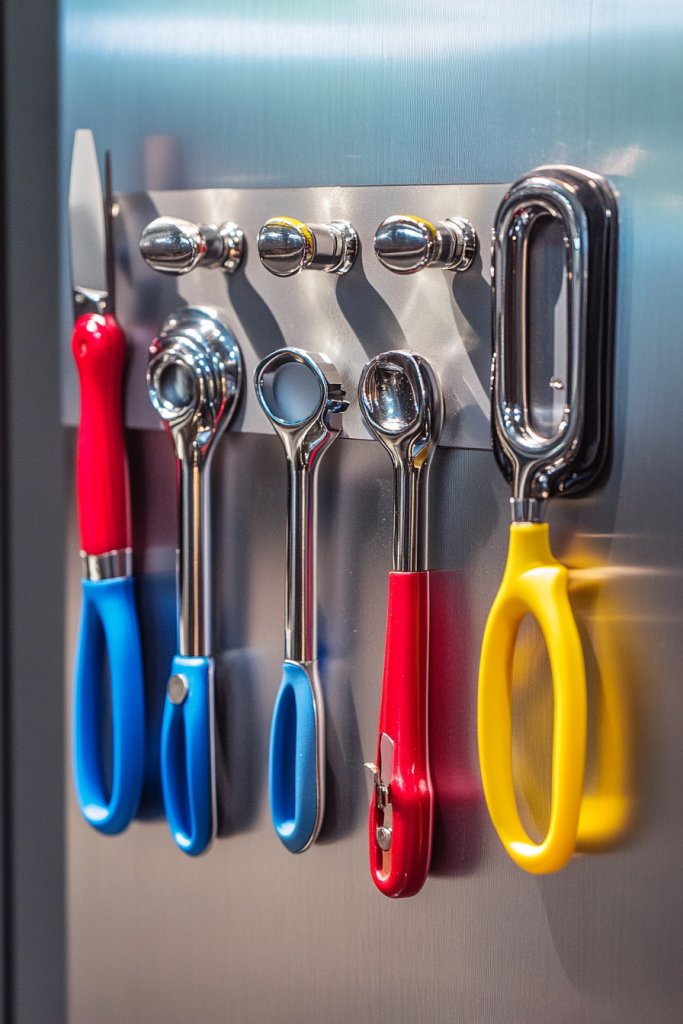
Small kitchen tools and gadgets often get lost in drawers or cluttered counters. A magnetic organizer provides a sleek, accessible way to keep your essentials within arm’s reach. It declutters your space and ensures you’re never hunting for that bottle opener or small spatula again. Who says organization can’t be magnetic?
Picture a magnetic strip or board mounted on the side of your fridge or wall, holding a variety of small tools—wine openers, scissors, or measuring spoons. The shiny surfaces and organized layout create a modern, streamlined look. Brightly colored handles or tool accents pop against the magnetic background, making everything easy to find and use. The display combines practicality with a touch of industrial chic.
Choose magnetic strips with different finishes—brushed metal, black matte, or colorful rubber—to match your decor. Use small magnetic containers or hooks for additional organization. Arrange tools by size or frequency of use, grouping similar items together. Seasonal or themed accessories can add a personalized touch. Mount near your prep area or inside cabinets for maximum convenience.
Select a heavy-duty magnetic strip or board with strong magnets capable of holding your tools securely. Clean the mounting surface thoroughly before attaching. Arrange your tools neatly, with frequently used items at the most accessible points. Use labels or color coding for quick identification. Regularly inspect for magnet strength and cleanliness, replacing or reorganizing as needed. Keep tools within easy reach to boost efficiency.
Customize by adding decorative magnets, labels, or color-coded handles. Incorporate themed or seasonal magnets for holidays or special occasions. Use small magnetic containers for tiny items like clips or batteries. Organize tools by task or type for faster access. Refresh the display periodically for variety and to keep your workspace inspiring.
A magnetic organizer turns a cluttered drawer into a visual display of your tools, boosting your confidence and efficiency. It simplifies your workflow and keeps your essentials organized in style. With a little effort, your kitchen becomes more functional and fun. Ready to magnetize your space? Your tools will thank you.
16. Decorative Labels and Chalk Markers for Customization
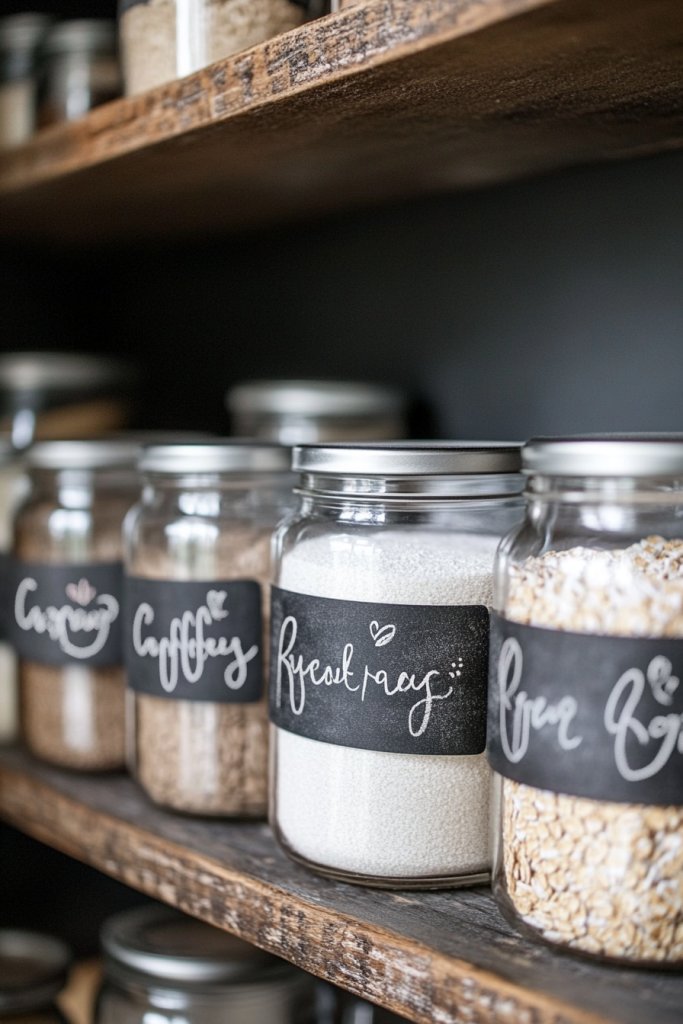
Finding stored items and ingredients quickly can be frustrating, especially when everything looks the same. Decorative labels and chalk markers allow you to customize storage containers, baskets, and jars, making everything more organized and visually appealing. Who says labels have to be boring?
Imagine clear glass jars or colorful baskets with handwritten labels in elegant or playful fonts. Chalk markers add a vibrant, customizable touch that can be easily erased and rewritten. The labels stand out against the containers, creating a cohesive, styled look. This setup makes your kitchen look curated, inviting, and easy to navigate. It’s a small detail that makes a big difference.
Use different fonts, colors, and decorative accents like icons or borders to match your decor style—rustic, modern, or eclectic. Create a labeling system for categories like spices, grains, or snacks, or add seasonal tags for holidays. Incorporate chalkboard labels on baskets or containers for versatility. Change labels regularly to keep the space fresh and organized. Pair with coordinating container styles for a polished look.
Choose durable, writable surfaces like glass jars or painted baskets. Use high-quality chalk markers for bold, smudge-proof writing, and keep a damp cloth nearby for corrections. Label each container clearly, and consider adding decorative borders or icons for visual interest. Organize items by frequency or category, and update labels seasonally. Regularly clean and re-label to maintain clarity and style.
Create custom labels with your own artwork or fonts for a unique touch. Use themed colors or motifs for holidays or special events. Incorporate small decorative stickers or washi tape around labels for extra flair. Use labels to tell a story—like “Grandma’s Spice Mix” or “Healthy Snacks.” Keep labels consistent for a cohesive look that elevates your organization.
Decorative labels and chalk markers turn simple storage into a personalized design feature. They make your space more organized and inviting, boosting your confidence in your DIY skills. With a few creative touches, your kitchen becomes a stylish, functional haven. Ready to label your way to a neater, prettier space? Your organization journey starts now.
17. Portable Rolling Cart for Flexible Storage and Decor
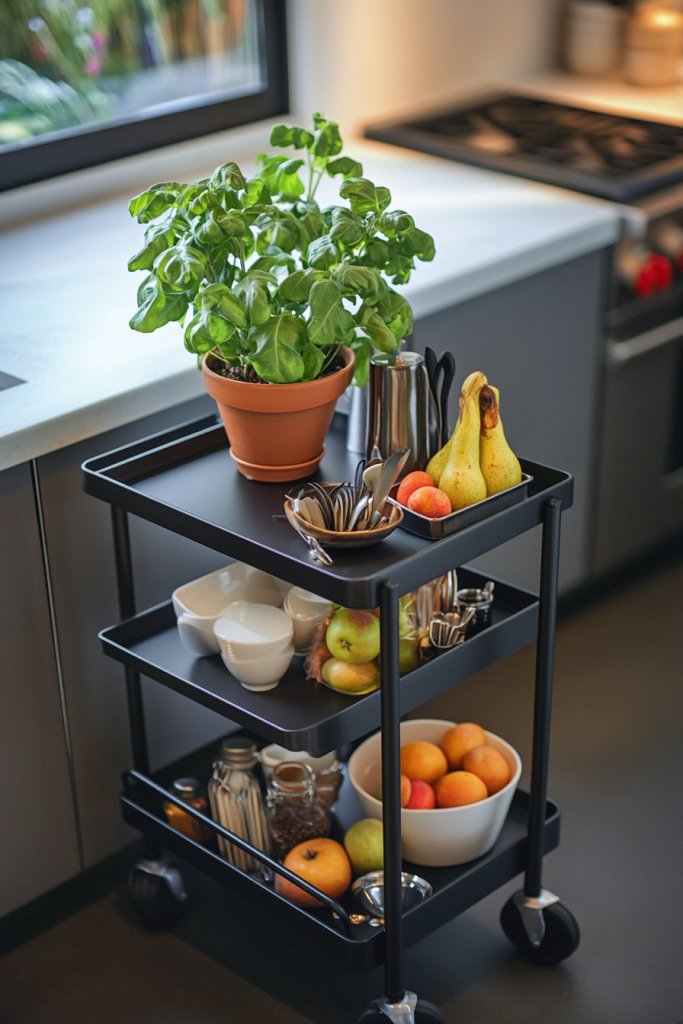
Limited counter space and changing needs can make storage a challenge. A portable rolling cart offers a flexible solution that can move from prep station to serving area with ease. It’s perfect for extra storage, decor, or quick access to your favorite tools. Who says your kitchen has to be static?
Picture a sleek, wheeled cart with multiple tiers, topped with a soft cloth or decorative tray. It holds everything from cutting boards and utensils to small appliances or decorative accents like candles or vases. The wheels allow you to reposition it easily, making your kitchen more dynamic. The finish—metal, wood, or painted—matches your style, blending practicality with aesthetic appeal.
Choose a cart with a modern metal frame, rustic wood, or colorful painted finish to suit your decor. Use it seasonally as a mobile display for holiday treats or everyday essentials. Add baskets or small containers to organize smaller items. For larger spaces, stack multiple carts for extra storage or create a multi-functional island. Adjust the height and layout based on your needs.
Select a sturdy, lightweight cart with smooth-rolling wheels and enough tiers for your needs. Set it up in a central location or near your prep area. Organize items on the cart, balancing weight and accessibility. Use decorative cloths, trays, or liners to enhance its look. Regularly check wheel functionality and clean surfaces. Reconfigure as your needs change or seasons shift.
Decorate the cart with themed fabrics, decals, or paint for a personalized touch. Add labels or tags for quick identification of contents. Incorporate decorative elements like mini plants, candles, or small artwork for visual interest. Use it for special occasions—serving, display, or extra storage. Keep styling fresh by changing accessories seasonally.
A portable rolling cart adds versatility and style, making your kitchen more adaptable and organized. It encourages creative use of space and easy reconfiguration for any occasion. With a little effort, you can turn a simple cart into a focal point of functionality and charm. Ready to move your storage and decor to new heights? Your space will feel more flexible and fun.
Conclusion
Exploring different ways to decorate the top of your fridge can truly revamp your kitchen’s look and feel. Whether you prefer decorative trays, colorful baskets, or seasonal displays, there’s something here to inspire your next decorating project. Don’t hesitate to try out these ideas and make this space uniquely yours. With a little imagination, your fridge top can become a charming and functional part of your home that reflects your style!