Imagine walking into a room that feels instantly polished and timeless—wainscoting can make that happen! This classic wall treatment has experienced a resurgence, charming homeowners with its ability to add texture, elegance, and architectural interest to any space. Whether you prefer a traditional, rustic, or modern vibe, wainscoting ideas are versatile and can elevate your home’s style effortlessly.
In this article, you’ll find a variety of inspiring wainscoting ideas that cater to different tastes and decor styles. From bold color choices to intricate panel designs, these ideas will help you discover the perfect way to enhance your walls. Get ready to transform your space with timeless charm and creative flair!
1. Classic Raised Panel Wainscoting for Elegant Living Rooms
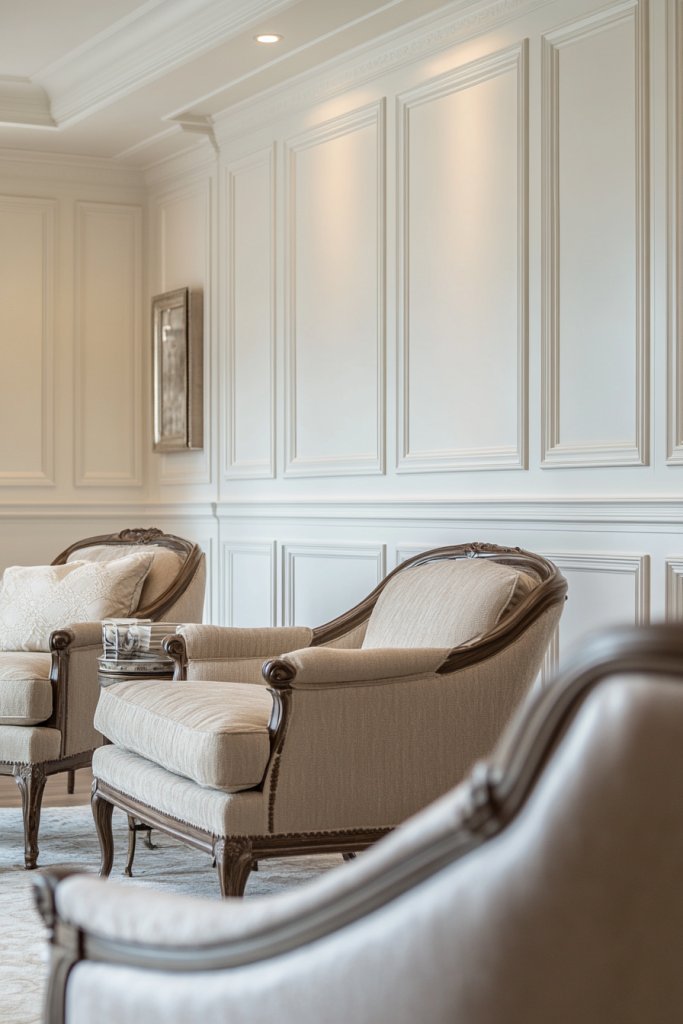
Ever dream of transforming your living room into a sophisticated retreat? Classic raised panel wainscoting offers that timeless elegance many crave but often think is out of reach. It’s perfect for adding a sense of grandeur without going overboard. If your space feels a little flat or uninspired, this detail could be the upgrade that makes everyone say wow.
Recommended Products to replicate this idea
| # | Preview | Product | |
|---|---|---|---|
| 1 |

|
Art3d Premade Board and Batten Paintable Wainscoting Kit, MDF Accent Wall Panel for Kitchen Bedroom... | Buy on Amazon |
| # | Preview | Product | |
|---|---|---|---|
| 1 |

|
Art3d Pre-Cut Wall Molding Set of 6 pcs, Ready-to-Assemble Wainscoting Panels for Interior Wall... | Buy on Amazon |
Picture crisp, symmetrical panels painted in soft neutrals or deep hues, framing your walls with architectural charm. The raised edges catch the light just right, creating subtle shadows that add depth and texture. Imagine walking into a room where the wainscoting complements plush velvet sofas and a vintage coffee table, all radiating classic refinement. It’s like stepping into a high-end magazine shoot.
You can keep it traditional with dark wood stains or go modern with painted whites or grays. For smaller spaces, narrow panels give a sleek look, while larger rooms can handle more elaborate designs with wider panels and intricate moldings. Seasonal tweaks, like adding warm, cozy tones in winter or crisp whites in summer, make this style versatile for any time of year.
Start by measuring your wall height and deciding on panel size. Choose high-quality wood or MDF that can be painted or stained. Use a level and a stud finder for precise placement, and secure panels with nails or adhesive. Consider adding decorative moldings at the top for a more ornate finish. A little patience with measuring will ensure perfect symmetry, and if you’re unsure, hiring a pro can save headaches.
Add custom touches like contrasting colors for panels and frames, or incorporate metallic accents with decorative nails or trim. For a more personalized look, install subtle detailing like corner blocks or rosettes. Pairing with statement artwork or textured fabrics can elevate the entire aesthetic, making the room uniquely yours without overwhelming the classic vibe.
This style stands the test of time, blending traditional craftsmanship with modern sensibilities. Whether you’re aiming for a stately library or a cozy lounge, classic raised panel wainscoting boosts your home’s elegance effortlessly. Trust in the timeless appeal, and soon you’ll be the envy of every guest who walks through your door.
2. Shiplap Wainscoting for Rustic Charm in Kitchens and Dining Areas
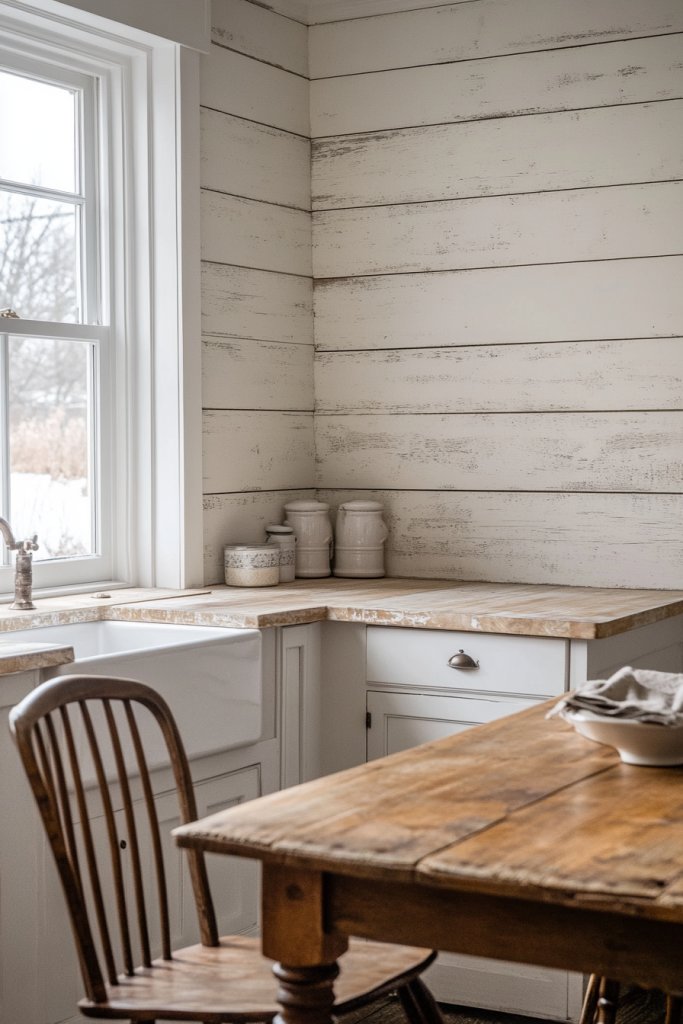
Feeling like your kitchen or dining space lacks warmth and personality? Shiplap wainscoting brings that cozy, farmhouse vibe that instantly makes a room feel welcoming. It’s a simple upgrade that packs a punch in creating a rustic yet chic environment. If you love the idea of a space that feels lived-in and loved, this could be your new go-to.
Recommended Products to replicate this idea
| # | Preview | Product | |
|---|---|---|---|
| 1 |
|
Art3d Premade Board and Batten Paintable Wainscoting Kit, MDF Accent Wall Panel for Kitchen Bedroom... | Buy on Amazon |
| # | Preview | Product | |
|---|---|---|---|
| 1 |
|
Art3d Pre-Cut Wall Molding Set of 6 pcs, Ready-to-Assemble Wainscoting Panels for Interior Wall... | Buy on Amazon |
Imagine horizontally aligned, tongue-and-groove boards with a slightly distressed finish painted in soft whites, grays, or even bold colors for a modern twist. The overlapping edges create subtle shadows, emphasizing texture and depth. Visualize a table with a chunky wood centerpiece, surrounded by shiplap walls that echo the charm of a country cottage. It’s warm, inviting, and effortlessly stylish.
You can opt for wide planks for a more dramatic look or narrow strips for a subtle texture. For a more contemporary feel, paint shiplap in vibrant hues like navy or emerald. During the holiday season, adding twinkling fairy lights or seasonal garlands can enhance the rustic charm. Even in small spaces, vertical accents or partial wall treatments keep it balanced and fresh.
Begin by selecting weathered or smooth shiplap boards, depending on your aesthetic. Measure your wall to determine how many planks you’ll need, and plan for a horizontal layout. Use a level to ensure each board is straight, and secure with nails or construction adhesive. If you prefer, pre-paint the boards before installation to save time. Seal with a clear matte or semi-gloss finish for durability, especially in high-moisture areas.
Personalize your shiplap by mixing painted and natural wood finishes or adding decorative hardware like vintage hooks or brackets. For a beach-inspired touch, incorporate sandy-colored tones or pale blues. You could also integrate open shelving above the shiplap for displaying functional items or rustic accessories. Throw in a few textured textiles like burlap or linen to complete the cozy look.
Shiplap wainscoting offers a timeless appeal that blends rustic charm with modern sensibilities. It’s surprisingly easy to install and customize, making it perfect for DIY enthusiasts. When you see your space transformed into a warm, inviting haven, you’ll wonder why you didn’t do it sooner. Get ready for compliments on your farmhouse flair!
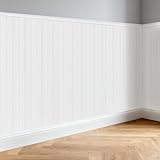
3. Beadboard Wainscoting for Bright, Cottage-Style Bedrooms

Ever wish your bedroom felt fresher and more charming without a complete overhaul? Beadboard wainscoting offers that light, airy cottage vibe that instantly brightens a space. It’s the perfect way to add character without overwhelming the room’s delicate balance. If your bedroom feels too plain or dull, this simple upgrade can make a huge difference.
Recommended Products to replicate this idea
| # | Preview | Product | |
|---|---|---|---|
| 1 |
|
Pre-Cut Wainscoting Panels Kit, WPC Slats Accent Wall Panel for Home Decor Covers 39 x 79 in, Ready... | Buy on Amazon |
| # | Preview | Product | |
|---|---|---|---|
| 1 |

|
Rust-Oleum 1993502 Painter's Touch Ultra Cover Multi-Purpose Brush-On Paint, 1 Quart, Semi-Gloss... | Buy on Amazon |
Imagine narrow vertical panels painted in soft whites, creams, or pastels, with evenly spaced beads adding subtle texture. The smooth finish and clean lines create a cozy, inviting atmosphere. Visualize soft sunlight streaming through sheer curtains, bouncing off the beadboard, and highlighting the gentle curves of the panels. It’s like a scene from a cozy seaside retreat.
Choose traditional white for a classic look, or experiment with subtle shades like pale blue or blush for a modern twist. For a more rustic feel, opt for natural wood finishes or distressed paint. In larger bedrooms, extend beadboard halfway up or all the way to the ceiling for maximum impact. Seasonal accents like plush throws or textured pillows can complement the playful, relaxed vibe.
Measure your wall height and decide on panel width—typically around 3-4 inches. Use MDF or wood panels with bead details, and pre-paint if desired. Attach the panels with nails or adhesive, ensuring even spacing. Use a level for precision, and add trim or molding at the top for a polished look. Sand lightly before painting to achieve a smooth, flawless finish. For added durability, seal with a clear protective topcoat.
Personalize your beadboard by adding decorative trim or molding, or painting individual panels in contrasting shades for a playful effect. Incorporate textured textiles like a soft cream throw blanket with chunky knit texture to complement the cottage feel. Put small floating shelves or hooks for practicality without disrupting the style. Layering different shades or finishes can add depth and personality.
Beadboard wainscoting is a classic for a reason—timeless, charming, and surprisingly easy to install. It instantly lifts the ambiance of any bedroom, making it feel more serene and inviting. With a little effort, you can craft a cozy haven that feels both stylish and personal. Your space will be the envy of all your friends!
4. Half-Wall Glossy Wainscoting for a Chic Entryway
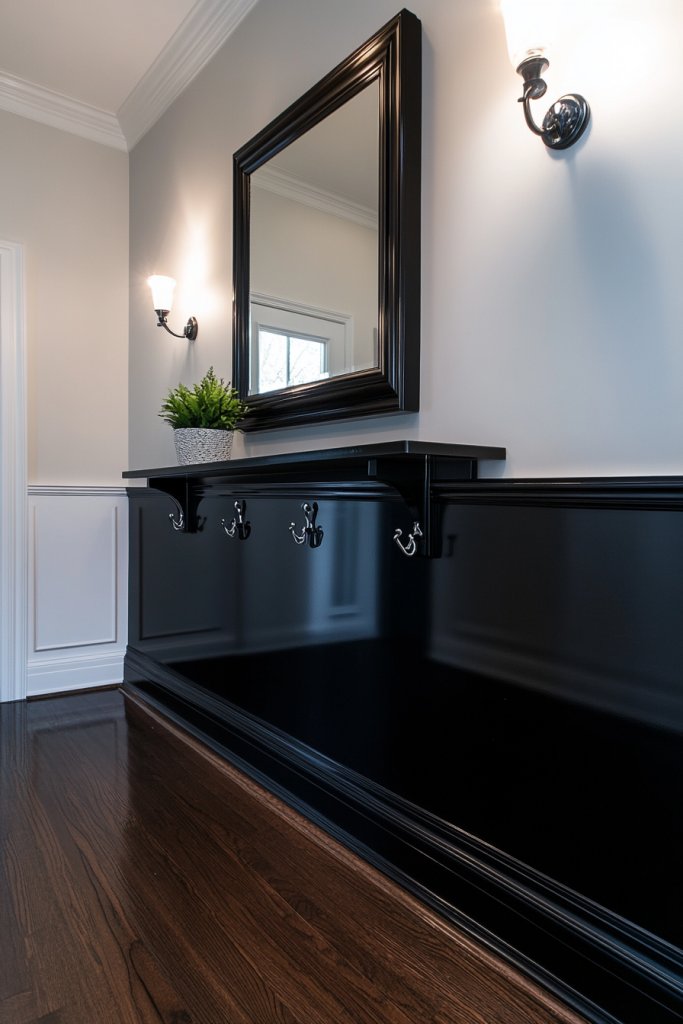
Is your entryway feeling a bit lackluster? A glossy half-wall wainscoting can turn it into a stunning focal point that guests will admire. It’s an effortless way to add sophistication and a modern edge. If you want to make a memorable first impression, this sleek update might be exactly what your space needs.
Recommended Products to replicate this idea
| # | Preview | Product | |
|---|---|---|---|
| 1 |
|
Art3d Premade Board and Batten Paintable Wainscoting Kit, MDF Accent Wall Panel for Kitchen Bedroom... | Buy on Amazon |
| # | Preview | Product | |
|---|---|---|---|
| 1 |

|
Rust-Oleum 1992502 Painter's Touch Latex Paint, Gloss White 32 Fl Oz, 1 Quarts (Pack of 1) | Buy on Amazon |
Picture high-shine painted panels in bold or neutral shades, covering just the lower half of your wall. The glossy surface reflects light, making the space appear brighter and more expansive. Imagine a minimalist console above the wainscoting, with a soft rug on the floor and a statement mirror. The reflective finish adds a touch of luxury and elegance, elevating even the simplest decor.
Choose vibrant colors like emerald or navy for a dramatic look, or stick to classic whites and grays for versatility. For small entryways, keep the panels narrow to avoid overwhelming the space. During different seasons, swap out accessories like a textured runner or metallic accents to keep the look fresh. Pair with modern hardware or sleek furniture to reinforce the chic vibe.
Start by measuring your wall height and marking the design line for the half-wall. Select high-gloss paint or lacquer in your preferred color. Use painter’s tape and a level to ensure crisp, straight lines. Apply multiple coats for a smooth, mirror-like finish, allowing proper drying time. Seal with a clear topcoat if extra durability is needed. Finish by installing a simple chair rail or molding at the top for a polished look.
Add visual interest with decorative trim or metallic accents on the panels, or incorporate textured textiles on the adjacent wall. Use sleek hooks or narrow wall-mounted shelves for functionality without cluttering the space. Consider adding a mirror with a bold frame above the wainscoting for a touch of glamour. Seasonal accessories like a cozy woven basket or metallic sculpture can also enhance the look.
A glossy half-wall wainscoting instantly adds a modern, luxurious feel to your entryway. It’s a simple project that makes a big impact, giving your home a fresh, sophisticated vibe. With a bit of paint and some careful measuring, you can create a space that feels both stylish and welcoming. Your guests will be impressed from the moment they step inside.
5. Modern Square-Panel Wainscoting with Bold Colors

Tired of traditional wainscoting that feels a bit stuffy? Modern square-panel designs in bold colors inject fresh energy into any room. They offer a sleek, minimalist aesthetic that’s perfect for contemporary homes. If you want to stand out and make a statement, this style is a game-changer.
Recommended Products to replicate this idea
| # | Preview | Product | |
|---|---|---|---|
| 1 |
|
Art3d Premade Board and Batten Paintable Wainscoting Kit, MDF Accent Wall Panel for Kitchen Bedroom... | Buy on Amazon |
| # | Preview | Product | |
|---|---|---|---|
| 1 |
|
Rust-Oleum 1992502 Painter's Touch Latex Paint, Gloss White 32 Fl Oz, 1 Quarts (Pack of 1) | Buy on Amazon |
Visualize crisp, square panels painted in vibrant reds, blues, or contrasting monochromes. The sharp lines and geometric shapes add a graphic punch, especially when paired with simple furniture and clean decor. Imagine a living room with a deep teal wall, accentuated by black-and-white art and bright yellow cushions—your space becomes a bold canvas.
Keep the panels uniform for a cohesive look or mix sizes for visual interest. Bright colors work well in children’s rooms or playful spaces, while deep jewel tones add sophistication. Incorporate metallic or matte finishes depending on your style. Seasonal updates, such as replacing cushions and accessories, allow you to refresh the overall vibe without a major overhaul.
Measure your wall carefully to determine panel size and spacing. Use MDF or wood panels, and pre-paint in your chosen bold color for efficiency. Attach with nails or adhesive, ensuring each panel is perfectly aligned with the others. Use a level to keep everything straight, and add trim or molding for a finished look. Consider sealing the paint with a clear coat for longevity. For a truly polished finish, you might opt for a matte or satin sheen.
Experiment with different color combinations or add textured elements like fabric inserts or metallic accents. Incorporate decorative shelving or LED accent lighting for extra flair. Personal touches like custom wall art or patterned textiles can further complement the bold look. Play with contrasting elements to keep the space lively and engaging.
Modern square-panel wainscoting is all about making a visual impact while keeping things simple. It’s easy to customize and perfect for those who love a contemporary edge. With bold colors and clean lines, your home will feel fresh, energetic, and uniquely yours. Embrace the bold—your space will thank you.
6. Vertical Tongue-and-Groove Wainscoting for Taller, Spacious Rooms

Does your room feel a bit cramped or short on height? Vertical tongue-and-groove wainscoting can visually stretch the space, making ceilings appear higher. It’s an easy trick to add architectural interest and create a sense of grandeur. If you’re tired of feeling boxed in, this style might be your new best friend.
Recommended Products to replicate this idea
| # | Preview | Product | |
|---|---|---|---|
| 1 |

|
The Millwork Outlet Primed Nickel Gap Shiplap, 8 Pieces, 5" x 72", Real American Wood | Buy on Amazon |
| # | Preview | Product | |
|---|---|---|---|
| 1 |

|
Real Wood Board and Batten Wainscoting Kit, Easy Installation, Real American Hardwood, The Millwork... | Buy on Amazon |
Imagine tall, slender panels running from floor to ceiling, painted in neutral tones or bold hues. The vertical lines draw your eye upward, enhancing the perception of height. Visualize a room with a high, airy feel, complemented by minimal furniture and soft lighting, emphasizing the openness. The textured grooves add subtle depth without overwhelming the space.
Opt for natural wood finishes or painted versions to match your decor. For a more dramatic effect, combine with crown molding or decorative ceiling details. Smaller rooms benefit from vertical patterns because they create an illusion of height, while larger spaces can handle wider panels for a balanced look. Seasonal changes can be made by swapping out paint colors or adding textured textiles.
Begin by measuring wall height and planning panel spacing to maximize height illusion. Use tongue-and-groove boards made of MDF or wood, pre-painted or stained. Attach with nails or adhesive, starting from the bottom and working upward. Use a level to ensure panels are perfectly vertical. Finish with a top molding or cap to hide seams and create a polished look. Seal or paint for durability and aesthetic appeal.
Add decorative trims or thin molding strips between panels for extra detail. Choose colors that contrast or complement your wall and ceiling colors. Incorporate textured or patterned fabrics on adjacent furniture to enhance the vertical theme. You can also add sconces or uplighting to accentuate the height and create a dramatic effect.
Vertical tongue-and-groove wainscoting is a simple way to make any room feel more spacious and elegant. It’s a timeless technique that works in both traditional and modern interiors. With a little effort, you’ll have a room that feels bigger and more refined, boosting your confidence in DIY or professional projects alike.
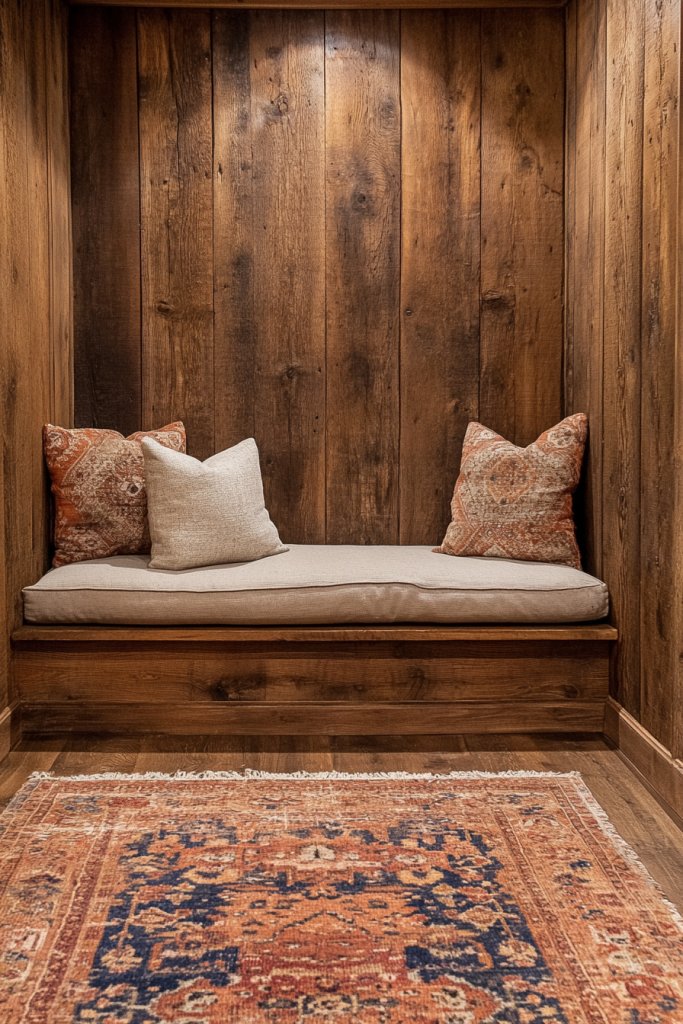
7. Wainscoting with Built-In Shelves for Functional Style
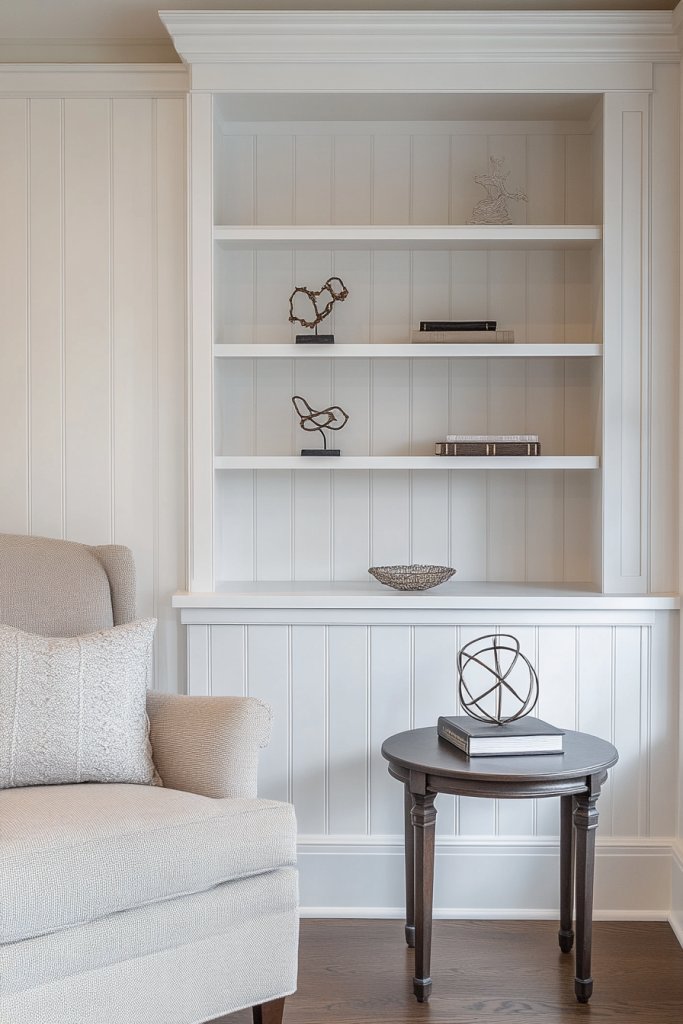
Looking for a way to combine style and storage without cluttering your space? Wainscoting with built-in shelves offers a practical solution that also elevates your room’s aesthetic. It’s perfect for creating a cozy reading nook or displaying your favorite decor items. If you find yourself constantly battling messy shelves or lack of surface space, this idea hits two birds with one stone.
Recommended Products to replicate this idea
| # | Preview | Product | |
|---|---|---|---|
| 1 |
|
Art3d Premade Board and Batten Paintable Wainscoting Kit, MDF Accent Wall Panel for Kitchen Bedroom... | Buy on Amazon |
| # | Preview | Product | |
|---|---|---|---|
| 1 |

|
upsimples Floating Shelves for Wall, Wall Shelves for Decor Storage Set of 6, Wall Mounted Wood... | Buy on Amazon |
Imagine classic panels framing open shelving units, painted in contrasting or complementary tones. The shelves can hold books, decorative boxes, or even small plants—if restrictions allowed 🙂 The combination of structured panels and functional storage creates a balanced, layered look. Visualize a corner with a comfy armchair, a soft throw, and your personalized shelves—like a magazine shot.
Opt for floating shelves for a minimalist look or traditional built-ins with decorative molding. Use different materials like wood or MDF, painted or stained to match your decor theme. Flexibility is key: in small rooms, narrow shelves work well, while larger areas can handle more extensive storage. Seasonal styling, like switching out decorative boxes or adding seasonal textiles, keeps it fresh.
Plan your wall layout carefully, deciding on the height and number of shelves. Use sturdy brackets or built-in units, securing them into studs for safety. Paint or stain the panels and shelves before installation for efficiency. Attach the panels first, then mount shelves with appropriate hardware. Finish with trim or molding for a refined look, and add hooks or small accessories for extra functionality.
Customize shelves with decorative brackets, colorful storage bins, or textured fabric liners. Incorporate small decorative elements like vintage knobs or sculptural accents on shelves. Use lighting under or above shelves to highlight your display. Mix and match materials or colors for a layered, personalized effect that reflects your style.
Wainscoting with built-in shelves balances beauty and practicality, making your space more livable and stylish. It’s a versatile upgrade that works in entryways, living rooms, or bedrooms. With thoughtful planning, you create a functional piece of art that boosts your home’s charm and your confidence to DIY or oversee projects.
8. Minimalist Flat-Panel Wainscoting for a Clean, Modern Look
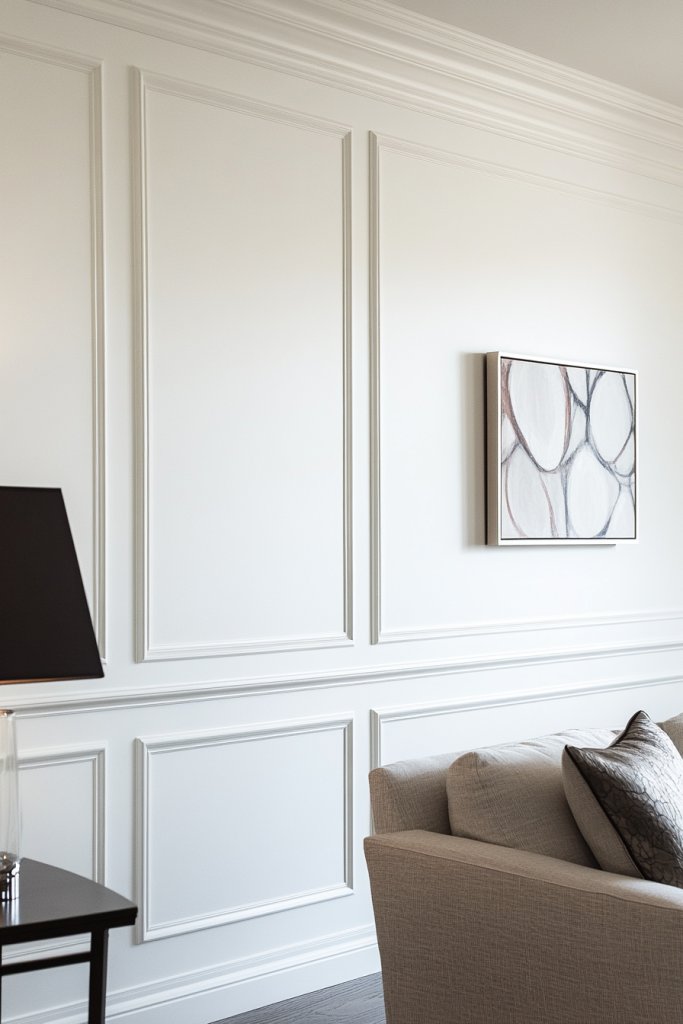
Craving a sleek, uncluttered aesthetic in your home? Flat-panel wainscoting offers a minimalist solution that emphasizes simplicity and modern elegance. It’s perfect for those who love clean lines and understated decor. If your space feels busy or chaotic, this style can bring calm and order.
Recommended Products to replicate this idea
| # | Preview | Product | |
|---|---|---|---|
| 1 |
|
Art3d Premade Board and Batten Paintable Wainscoting Kit, MDF Accent Wall Panel for Kitchen Bedroom... | Buy on Amazon |
| # | Preview | Product | |
|---|---|---|---|
| 1 |
|
Art3d Premade Board and Batten Paintable Wainscoting Kit, MDF Accent Wall Panel for Kitchen Bedroom... | Buy on Amazon |
Imagine smooth, flat panels painted in monochrome shades like matte black, soft gray, or crisp white. The absence of ornate details creates a seamless wall surface that makes rooms feel more spacious. Visualize a living room with a low-profile sofa, a simple coffee table, and perhaps a geometric rug—each element enhanced by the understated backdrop.
Stick to neutral tones for maximum versatility, or add a pop of color with the upper wall or accessories. Keep the panels uniform for a consistent, modern look, or vary the size for visual interest. Seasonal updates can be as simple as changing textiles or adding small decor accents. This style adapts well to open-plan spaces or smaller rooms seeking a sleek feel.
Measure wall height and determine panel dimensions. Use MDF or plywood, pre-painted or primed for easy finishing. Attach panels using adhesive and finishing nails, ensuring they stay flat and aligned. Use a level for accuracy, and fill any nail holes with putty before painting. For a truly seamless look, paint the entire wall in a single, flat color, and consider adding a subtle gloss varnish for durability.
Add subtle texture with matte or satin finishes, or incorporate narrow decorative trim for visual interest. Keep accessories minimal—think geometric sculptures or textured throws—so the focus remains on the clean lines. For a personal touch, consider integrating a small built-in desk or a sleek shelf above for practicality. The goal is a clutter-free, modern sanctuary.
Minimalist flat-panel wainscoting creates a timeless, versatile backdrop that elevates any room. Its simple design makes it easy to customize and maintain, while offering a sophisticated vibe. Once installed, you’ll enjoy a space that feels calm, polished, and effortlessly stylish. Go ahead—keep it simple, keep it stunning.
9. Wainscoting with Decorative Molding for Classic Detailing
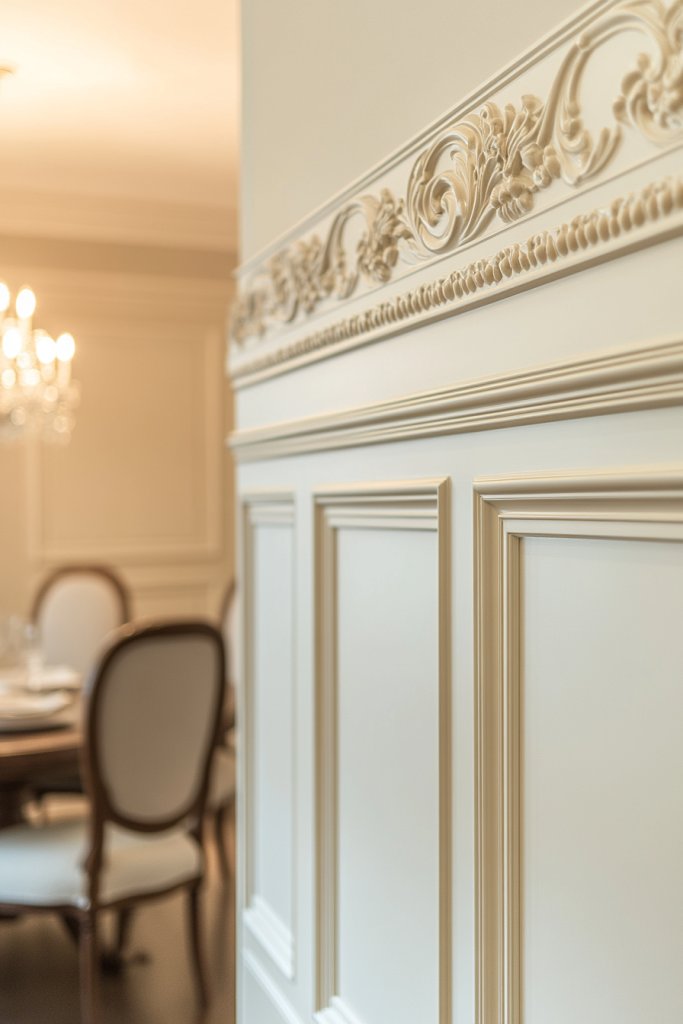
Do you love the idea of a traditional, ornate interior but don’t want to go full-on Victorian? Decorative molding combined with wainscoting strikes the perfect balance between classic elegance and subtle sophistication. It’s ideal for adding luxurious details that elevate your space without overwhelming it. If you’ve ever admired historic homes, this look might be your next project.
Recommended Products to replicate this idea
| # | Preview | Product | |
|---|---|---|---|
| 1 |
|
Art3d Premade Board and Batten Paintable Wainscoting Kit, MDF Accent Wall Panel for Kitchen Bedroom... | Buy on Amazon |
| # | Preview | Product | |
|---|---|---|---|
| 1 |

|
Storystore White Ornate Wall Molding Trim, 1.4 in x 19.7 FT Peel and Stick Wall Decor, Self-Adhesive... | Buy on Amazon |
Visualize intricately carved crown moldings and corner accents framing richly stained or painted panels. The layered textures create depth and highlight craftsmanship, making your walls look like historical masterpieces. Imagine a dining room with a statement chandelier, detailed crown molding, and wainscoting adorned with rosettes and intricate cornices—timeless beauty that commands attention.
Choose ornate moldings for a truly luxurious look, or opt for simpler profiles for a more understated elegance. Natural wood finishes or painted versions in neutral or jewel tones work well. Experiment with different trims, medallions, or corner blocks to customize the detail level. Seasonal accents like ribbons or small floral arrangements in vases can complement traditional decor.
Start by selecting high-quality molding in patterns and sizes that suit your space. Measure carefully and create templates for precise cuts. Attach moldings with finishing nails, ensuring they sit flush against the wall. Fill nail holes and seams with wood filler, then sand smoothly before painting or staining. Finish with a clear sealant or protective coat to preserve the intricate details and keep them looking pristine.
Personalize with contrasting colors, metallic accents, or faux gemstones embedded into the molding for added richness. Incorporate decorative medallions or plaques for a focal point. Pair with traditional furniture and textiles like velvet drapes or embroidered cushions. These details turn a simple wall into a work of art, reflecting your unique style.
Decorative molding wainscoting is a hallmark of craftsmanship and timeless style. It’s a project that adds significant value and visual interest to your home. With patience and attention to detail, you can create an interior that feels both historic and refined. Embrace the art of classic detailing—you’ll love the results.
10. Textured Wainscoting with Faux Brick or Stone Finish
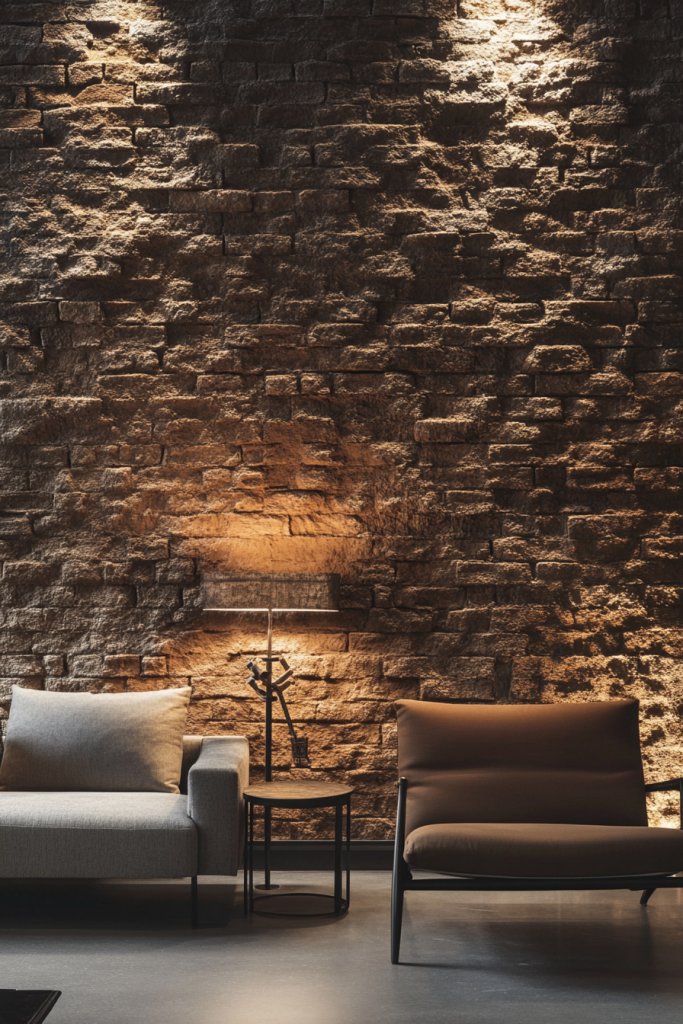
Wish your walls had more dimension and character? Textured wainscoting with faux brick or stone finishes offers an industrial-chic look that adds depth and personality. It’s perfect for creating statement walls in a living room, kitchen, or even a bathroom. If flat, boring walls are bringing you down, this textured approach could be your new favorite upgrade.
Recommended Products to replicate this idea
| # | Preview | Product | |
|---|---|---|---|
| 1 |

|
Art3d 20-Pack 105 Sq.Ft Faux Brick 3D Wall Panels Peel and Stick in Red Brown, Self Adhesive... | Buy on Amazon |
| # | Preview | Product | |
|---|---|---|---|
| 1 |

|
KASARO 3D Faux Stone Wall Panels, 4 PCS PU Wainscoting Panel - Cement Texture Thicker Design for... | Buy on Amazon |
Picture panels that mimic weathered brick or rugged stone, with rough textures that invite touch. The layered surfaces catch light at different angles, creating shadows that enhance the visual interest. Imagine a fireplace wall with faux brick, paired with sleek modern furniture and warm lighting—an inviting, edgy vibe that feels both rustic and contemporary. It’s raw, authentic, and full of character.
Choose lighter shades for a more modern look, or darker tones for a dramatic, moody feel. Mix textures by combining faux brick with smooth painted panels or wood accents. Seasonal styling can include cozy textiles or metallic accessories that pop against the textured background. Larger rooms can handle more extensive textured panels; smaller spaces benefit from accents or partial treatments.
Select faux brick or stone panels made of lightweight foam or polyurethane for easy installation. Measure your wall and cut panels to size, using a miter saw if needed. Secure panels with adhesive and nails, ensuring good contact and a tight fit. Finish edges with caulk or trim, then paint or seal as desired. For a truly realistic look, choose panels with varied textures and colors. Regular cleaning with a damp cloth keeps the textured surface looking fresh.
Personalize with metallic accents, LED strip lighting behind panels, or decorative brackets that mimic industrial fixtures. Incorporate complementary textures like rough linen or leather in adjacent furniture. Add small shelving or display ledges for decorative items that don’t interfere with the textured wall. This style lends itself to creative experimentation—have fun with it!
Faux brick or stone textured wainscoting transforms ordinary walls into bold architectural statements. It’s an easy way to introduce an industrial or rustic vibe that’s both trendy and timeless. With a little effort, you can craft a feature wall that breathes personality into your home. Confidence grows as you see your space evolve into something truly unique.
11. Two-Tone Wainscoting to Create Visual Contrast
Want to add visual interest and depth to your walls without overwhelming the senses? Two-tone wainscoting offers a simple yet effective way to create contrast and highlight architectural details. It’s a style that instantly elevates a room, making it more dynamic and personalized. If your decor feels flat or monotonous, this could be your secret weapon.
Recommended Products to replicate this idea
| # | Preview | Product | |
|---|---|---|---|
| 1 |
|
Art3d Premade Board and Batten Paintable Wainscoting Kit, MDF Accent Wall Panel for Kitchen Bedroom... | Buy on Amazon |
| # | Preview | Product | |
|---|---|---|---|
| 1 |

|
Car Interior Trim Strips,Universal 33ft Car Electroplating Decoration Styling Door Dashboard,... | Buy on Amazon |
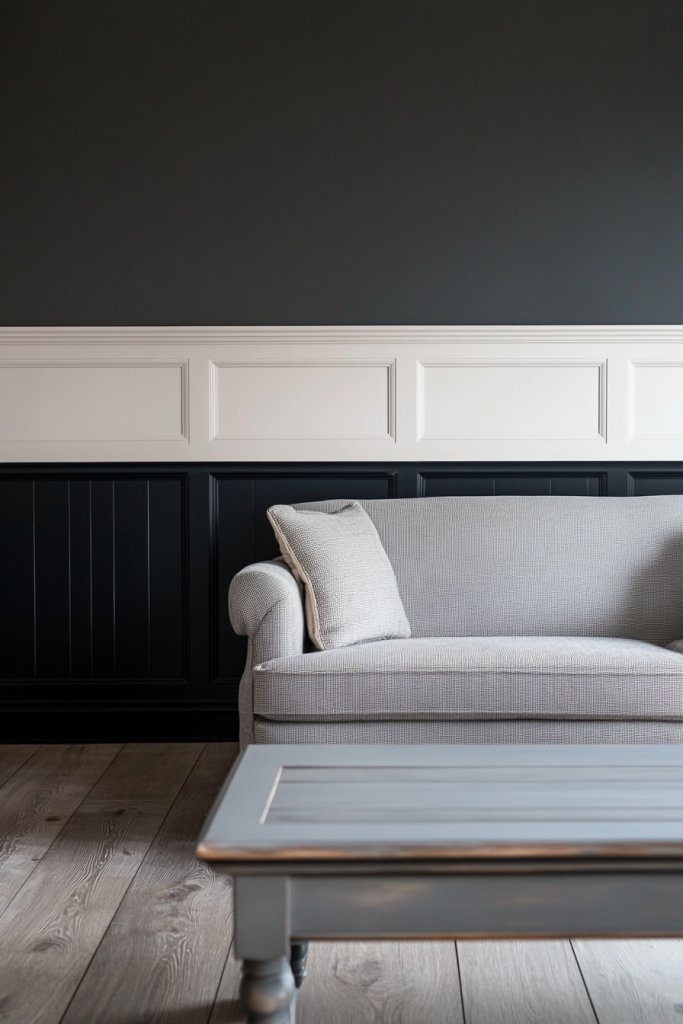
Imagine the lower half of your walls painted in a dark, rich hue like navy or charcoal, while the upper wall remains a crisp white or soft pastel. The stark contrast draws the eye downward and upward, emphasizing the room’s proportions. Visualize a cozy living room with a dark wainscot paired with light walls, accentuated by plush textiles and subtle lighting—all working together to create a layered, inviting space.
Experiment with different color combinations for a playful or sophisticated effect. For instance, pairing a dark bottom with a bright upper wall creates a bold statement, while softer shades result in a more subtle contrast. You can also vary the panel height or use different colors for molding and panels. Seasonal updates include swapping out colors or adding textured textiles for extra warmth.
Choose two complementary or contrasting colors, then measure your wall area. Paint the lower section first, using painter’s tape for crisp lines. Install wainscoting panels above in a neutral or matching shade, securing with nails or adhesive. Add trim or molding at the junction for a finished look. Seal the paint with a protective coat, and touch up as needed. Keep the transitions sharp for maximum impact.
Incorporate decorative trim or painted patterns within the contrasting sections for added flair. Use textured textiles on adjacent furnishings to complement the color scheme. For a more playful look, alternate panel colors or add graphic patterns. Functional accents like hooks or small shelves in the darker section can add utility without compromising style.
Two-tone wainscoting instantly adds sophistication and personality, making your space feel curated and complete. It’s an easy project that yields high visual impact with minimal effort. When you see how a simple color change can transform the room, confidence in your design choices grows. Your home will look polished and thoughtfully styled—ready for any occasion.
12. Wainscoting in Laundry Rooms for Practical Elegance
Laundry rooms often get overlooked when it comes to style, but that doesn’t mean they should be boring. Wainscoting adds a touch of elegance and durability to a space that’s all about function. It’s a clever way to make chores feel less mundane and more like a design statement. If you’re tired of looking at plain, scuffed walls, this upgrade is a game-changer.
Recommended Products to replicate this idea
| # | Preview | Product | |
|---|---|---|---|
| 1 |

|
Pangda 3 Set Peel and Stick Wall Molding Kit, 3D Premade Accent Molding Wainscoting Panel for... | Buy on Amazon |
| # | Preview | Product | |
|---|---|---|---|
| 1 |
|
Art3d Wainscoting Wall Panel Kit, 37.8" Tall Beadboard Panels for Walls, Polystyrene Board and... | Buy on Amazon |
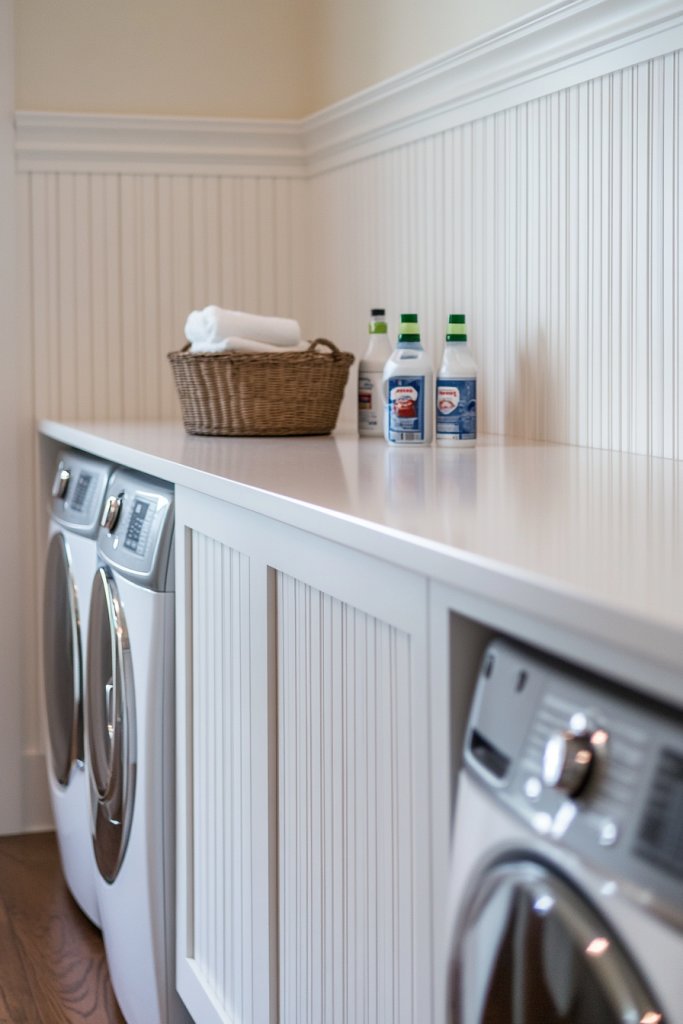
Imagine water-resistant panels in a soft gray or classic white, protecting your walls from splashes and stains. The textured surface adds visual interest, breaking up the monotony of painted drywall. Visualize a laundry nook with sleek cabinetry, a hanging rod, and a textured wainscot that creates a spa-like atmosphere—functional beauty that makes laundry day a little more enjoyable.
Choose moisture-resistant materials like PVC or treated MDF for durability. Keep the look simple with vertical or horizontal panels, or add decorative trim for a personalized touch. Seasonal updates can involve changing paint colors or adding decorative hooks for hanging supplies. Smaller laundry spaces benefit from lighter shades and minimal detailing to maximize brightness.
Start by measuring your laundry room walls and selecting waterproof panels. Attach panels with waterproof adhesive and nails, ensuring they’re flush and secure. Seal seams with waterproof caulk for added protection. Paint or finish panels with water-resistant paint, choosing shades that brighten the space. Install functional accessories like hooks or small shelves for detergents and supplies, ensuring they don’t interfere with the aesthetic.
Add decorative touches with color-coordinated baskets, textured textiles, or a small art piece that withstands humidity. Incorporate hooks or racks for hanging clothes or cleaning tools, blending utility with style. Use contrasting colors or patterns to create visual interest without cluttering the space. Keep it practical yet personalized for a space you’re proud of.
Wainscoting in laundry rooms combines durability with style, proving that utility spaces can be beautiful too. It elevates the room’s look while protecting walls from everyday wear. Once completed, you’ll enjoy a space that feels more like a retreat than a chore zone. Transform your laundry day experience and feel confident in your home’s thoughtful design.
13. Wainscoting with Integrated Lighting for Ambient Glow
Want to add a cozy, inviting atmosphere to your rooms? Wainscoting combined with integrated lighting offers a subtle yet powerful way to enhance ambiance. It’s perfect for creating mood lighting without cluttering your space with lamps or sconces. If your rooms lack warmth or a sense of intimacy, this idea might be just what you need.
Recommended Products to replicate this idea
| # | Preview | Product | |
|---|---|---|---|
| 1 |

|
hunhun 10-Pack 6.6ft/ 2Meter U Shape LED Aluminum Channel System with Milky Cover, End Caps and... | Buy on Amazon |
| # | Preview | Product | |
|---|---|---|---|
| 1 |
|
Govee Warm White LED Strip Lights, Bright 300 LEDs, 3000K Dimmable Light Strip 16.4ft with Control... | Buy on Amazon |
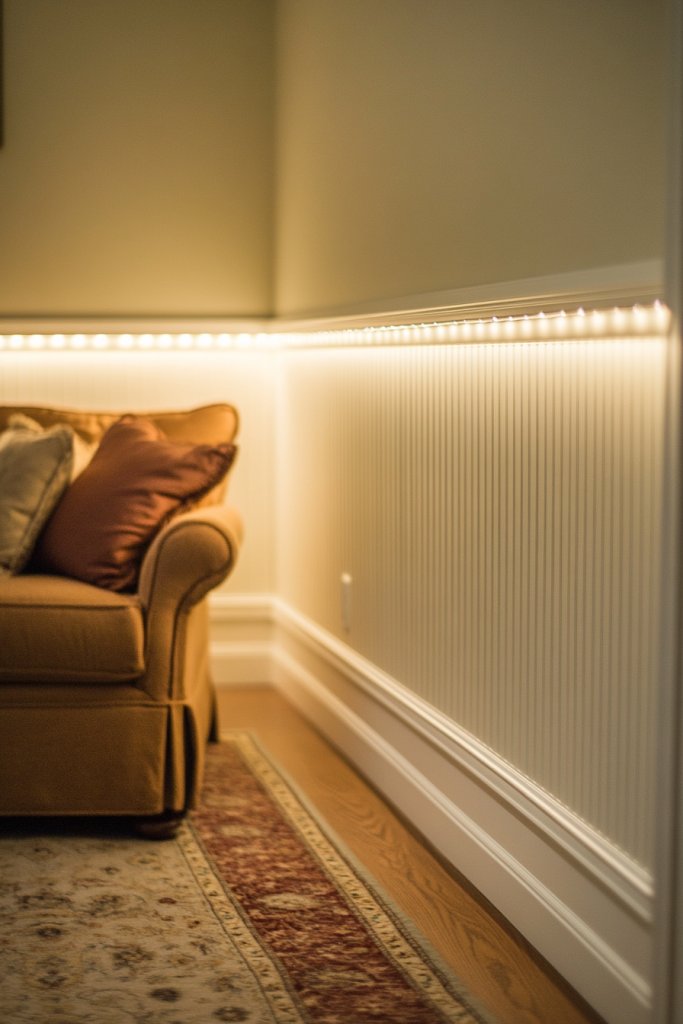
Imagine LED strip lights tucked behind the top edge of the wainscoting, casting a soft glow upward. The light highlights the texture and detail of the panels, creating a layered, luminous effect. Visualize a living room or bedroom with gentle illumination, making the space feel warm and welcoming, especially during evenings. The indirect lighting adds sophistication without harsh glare, transforming your walls into a feature.
Choose warm white or dimmable LED strips for flexibility. Install the lighting behind decorative molding or within recessed panels for a sleek look. Seasonal changes can include adding colored LED strips for festivities or mood lighting. Pair with minimalist furniture and soft textiles to maximize the subtle glow. This setup works well in modern, transitional, or even eclectic interiors.
Plan your lighting placement carefully, ensuring power sources are accessible. Use LED strip lights with adhesive backing for easy installation, hiding them behind the wainscoting’s top edge or within grooves. Connect to a dimmer switch for adjustable ambiance. Secure the wiring along the wall, hiding it behind panels or molding for a clean look. Test the lighting before final assembly to ensure even, flicker-free illumination.
Add decorative elements like small sconces or uplights in strategic spots to complement the integrated lighting. Use warm hues to create a relaxing atmosphere or cool tones for a modern edge. Incorporate dimming controls to adjust brightness for different moods or occasions. Pair with textured fabrics and soft rugs to enhance the cozy, ambient effect.
Integrated lighting turns ordinary wainscoting into a stunning design feature that elevates your entire space. It’s a subtle upgrade that makes your home feel thoughtfully curated and cozy. With simple wiring and smart placement, you can enjoy a warm glow that suits your mood and style. Confidence grows as you see how a little tech can make a big difference.
14. Curved or Arched Wainscoting for Architectural Softness
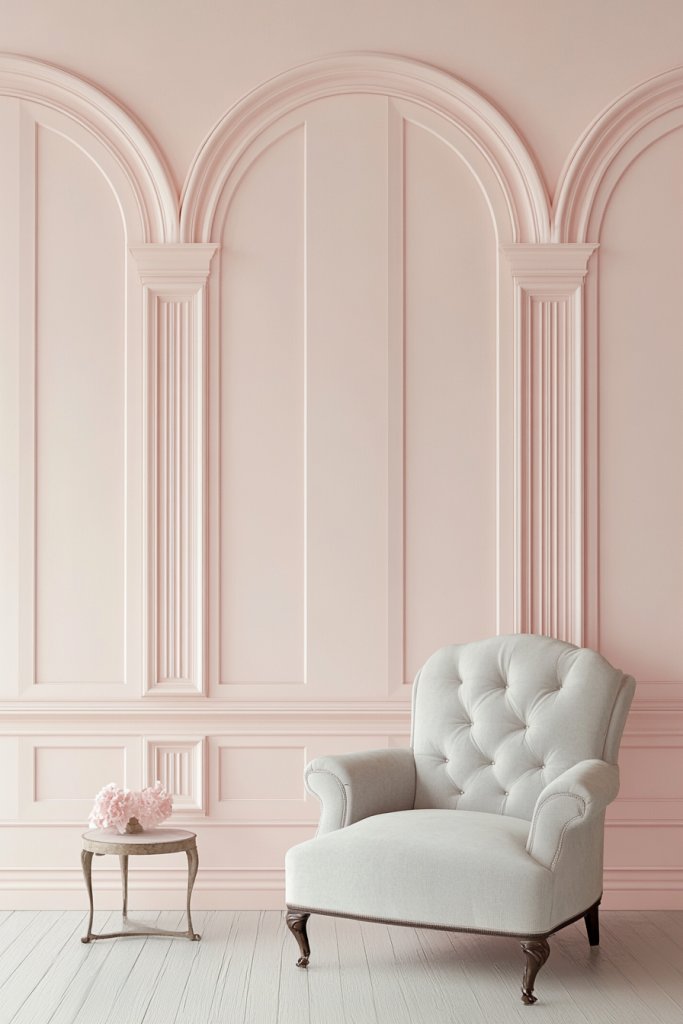
Feeling the need to soften sharp lines and add a touch of elegance? Curved or arched wainscoting introduces architectural softness that elevates any space. It’s perfect for creating a more inviting, romantic atmosphere or highlighting entryways and alcoves. If your home feels a little rigid or stark, this design can add that gentle flow you’re craving.
Recommended Products to replicate this idea
| # | Preview | Product | |
|---|---|---|---|
| 1 |

|
Art3d 48 x 96 Inch Natural Bamboo Wall Panel for Interior Wall Decor, Flexible Pole Wrap Wainscoting... | Buy on Amazon |
| # | Preview | Product | |
|---|---|---|---|
| 1 |

|
Art3d 30Ft Flexible Peel and Stick Crown Molding Trim, Self-Adhesive Panel Moulding Décor Lines for... | Buy on Amazon |
Imagine gracefully curved panels framing an arched doorway or a rounded alcove, painted in harmonious colors. The smooth, flowing lines contrast beautifully with angular furniture and fixtures, creating a balanced look. Visualize a cozy reading nook with rounded walls, plush cushions, and soft lighting—an inviting retreat that feels both artistic and refined. These subtle curves bring a sense of movement and elegance.
Choose gentle arches or more dramatic curves depending on your style. For a classic look, incorporate decorative molding along the curves. Modern designs favor sleek, minimalist arches with simple paint or stain. Use contrasting colors or textures to emphasize the shape, and consider combining with other architectural details like crown molding or decorative trim for a layered effect. Seasonal accents can include textiles or small decorative elements that complement the curves.
Hire a skilled carpenter or use templates to cut precise curves in MDF or wood panels. Attach using nails or adhesive, ensuring the shape maintains smooth, consistent arcs. Fill gaps and seams with wood filler and sand smooth before painting or staining. For a seamless finish, use painter’s tape and a steady hand to create clean lines along the curves. Seal with a durable finish to preserve the shape and color.
Highlight the curves with contrasting paint or metallic accents along the edges. Add decorative trim or small sculptural details to accentuate the architectural softness. Incorporate textiles or textured wall coverings in adjacent spaces to amplify the layered effect. Use lighting to cast gentle shadows that enhance the curves’ visual appeal and create a soothing ambiance.
Curved and arched wainscoting turns ordinary walls into works of art, blending craftsmanship with artistic flair. It’s a bold choice that adds personality and charm, making your home stand out. With careful planning and a steady hand, you can achieve a sophisticated look that feels both timeless and modern. Embrace the artistry—your space will thank you.
15. Wainscoting in Home Offices for Focused, Stylish Workspaces
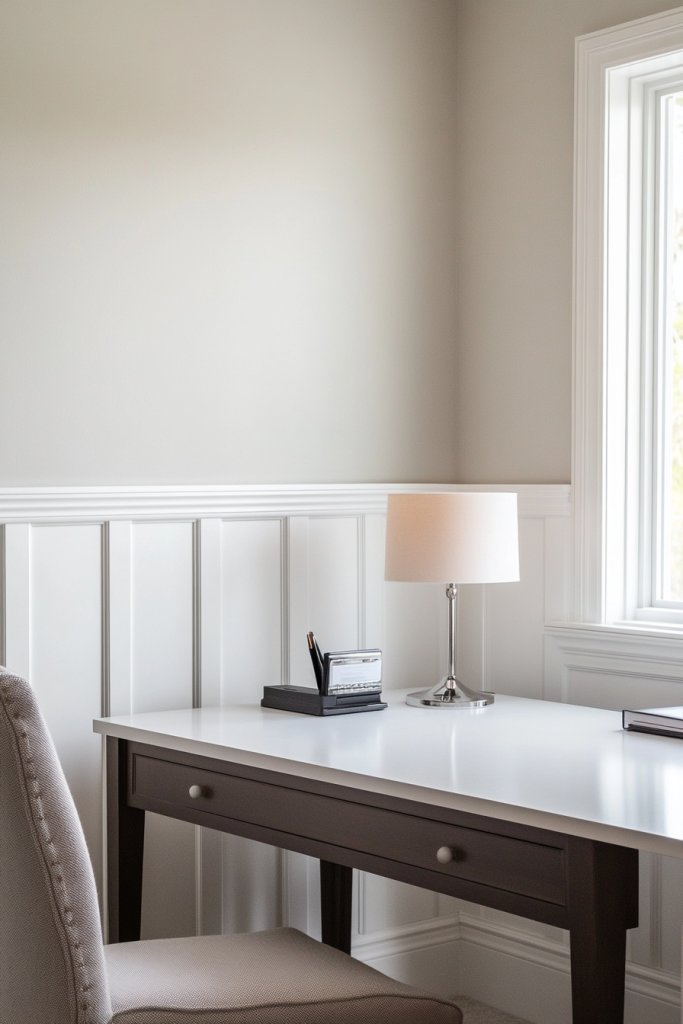
Struggling to stay focused in a home office that feels uninspiring? Wainscoting can transform your workspace into a stylish, motivating environment. It adds a sense of structure and professionalism, making work feel more official and less like a corner of clutter. If your home office needs a boost, this detail could be the game-changer.
Recommended Products to replicate this idea
| # | Preview | Product | |
|---|---|---|---|
| 1 |
|
Pangda 3 Set Peel and Stick Wall Molding Kit, 3D Premade Accent Molding Wainscoting Panel for... | Buy on Amazon |
| # | Preview | Product | |
|---|---|---|---|
| 1 |
|
Art3d Pre-Cut Wall Molding Set of 6 pcs, Ready-to-Assemble Wainscoting Panels for Interior Wall... | Buy on Amazon |
Visualize a sleek, painted panel wall behind your desk, perhaps in a calming color like muted blue or soft gray. The panels lend a sense of order, framing your workspace with architectural interest. Imagine a tidy desk with a modern chair, a few decorative but functional accessories, and a wall that exudes focus and calm. The textured surfaces subtly enhance concentration and elevate your decor.
Choose simple flat panels for a clean look or add decorative molding for a more refined vibe. Match the color of the wainscoting with your accent wall or keep it neutral for versatility. Seasonal updates could include swapping out accessories or adding textured textiles like a woven desk mat or upholstered chair for comfort. The design can adapt to small or large spaces, always maintaining a professional, inviting feel.
Measure your wall area and select suitable panels— MDF or wood, painted or stained. Attach panels with nails or adhesive, making sure they’re level and evenly spaced. Fill nail holes and seams, then sand smooth. Paint or finish the panels, choosing colors that promote focus. Add trim or molding at the top for a polished look, and incorporate smart storage solutions like floating shelves or organizers that complement the wainscoting.
Personalize your workspace with functional accents like a stylish corkboard or a textured fabric backdrop. Use coordinated colors for a cohesive look, and add subtle lighting to highlight the wall’s texture. Incorporate a few decorative elements like a sculptural clock or a sleek sculpture to keep the space feeling modern and inspiring. Keep clutter minimal to preserve the focus-enhancing effect.
Wainscoting in your home office creates a professional, stylish environment that enhances productivity. It’s a smart upgrade that elevates your work-from-home experience, making it feel more serious and less like a makeshift setup. With a little effort, you craft a workspace that’s both beautiful and functional, boosting your confidence to tackle any task.
16. Wainscoting with Two-Tier Paneling for Layered Depth
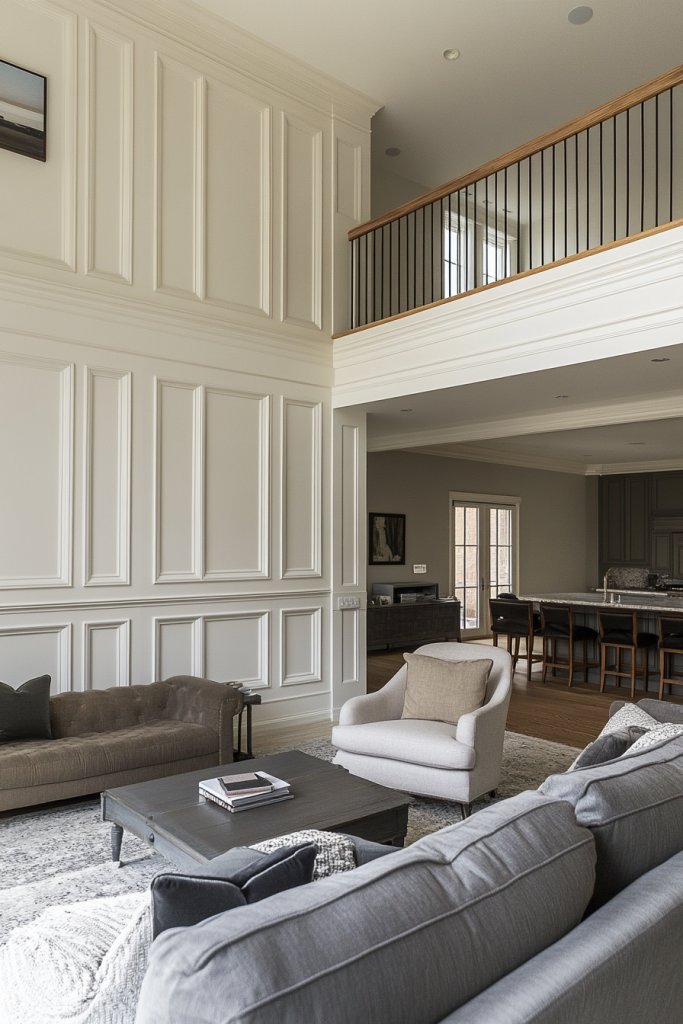
Feeling like your large open space needs more visual interest? Wainscoting with two-tier paneling introduces layered depth that adds sophistication and dimension. It’s a smart way to break up expansive walls and create a cozy, curated feel. If your room feels a bit flat or overly plain, this layered approach is the perfect fix.
Recommended Products to replicate this idea
| # | Preview | Product | |
|---|---|---|---|
| 1 |

|
3 Set Peel and Stick Wall Molding Kit,24" x 32" Premade Self Adhesive Wainscoting Panels,Ready to... | Buy on Amazon |
| # | Preview | Product | |
|---|---|---|---|
| 1 |
|
Art3d Pre-Cut Wall Molding Set of 6 pcs, Ready-to-Assemble Wainscoting Panels for Interior Wall... | Buy on Amazon |
Picture a room with a lower section of textured or painted panels, topped with a narrower, more detailed molding or panel above. The contrasting heights and textures create a sense of architectural richness. Imagine a spacious living area with a bold color on the lower panels and a neutral upper wall, accentuated with lighting that highlights the layered effect. It’s both elegant and inviting.
You can vary the heights of the panels or use different colors for each tier for dramatic contrast. Incorporate decorative trims, molding, or small ledges within the tiers for added detail. In large rooms, extend the lower panels to cover more wall area, or add a third tier for extra depth. Seasonal decor like textiles or art can be layered atop the upper panels to change the vibe throughout the year.
Measure your wall height and plan the proportions of each tier carefully. Install the lower panels first, securing them with nails or adhesive. Add the upper tier with a decorative molding or a narrow panel, making sure it aligns perfectly with the lower section. Fill seams and nail holes, then paint or finish each section separately for clarity. Use a level to maintain straight lines and ensure a cohesive layered look. Seal for durability.
Personalize by adding decorative accents like small shelves, lighting, or contrasting colors within each tier. Use textured or patterned textiles on adjacent furniture or wall decor to enhance layered depth. Incorporate metallic or glossy finishes on the top tier for a modern twist. These layers can reflect your personality and style, making the space uniquely yours.
Two-tier paneling creates a dynamic, layered look that adds architectural interest to any room. It’s a versatile technique that works with traditional, transitional, or modern decor. When you see your space transformed into a multi-dimensional masterpiece, confidence in your design skills will soar. Embrace the layered depth and enjoy a more sophisticated home.
17. Reclaimed Wood Wainscoting for Sustainable, Rustic Appeal
Looking to add warmth and character while also being eco-friendly? Reclaimed wood wainscoting offers a rustic, vintage charm that’s also sustainable. It’s perfect for creating a cozy, lived-in feel that celebrates history and craftsmanship. If you’re passionate about sustainability and unique design, this idea is a perfect match.
Recommended Products to replicate this idea
| # | Preview | Product | |
|---|---|---|---|
| 1 |

|
Holydecot Peel & Stick Real Wood Planks, Rustic Reclaimed Barn Wood Paneling, Brown Gray... | Buy on Amazon |
| # | Preview | Product | |
|---|---|---|---|
| 1 |
|
Art3d Premade Board and Batten Paintable Wainscoting Kit, MDF Accent Wall Panel for Kitchen Bedroom... | Buy on Amazon |
Visualize weathered planks with peeling paint, aged patina, or rough textures, giving walls instant personality. The natural imperfections add authenticity, making your space feel warm and inviting. Imagine a farmhouse kitchen or a cozy den with mismatched wood panels, complemented by vintage accessories and soft textiles—each piece telling a story. The textured surfaces invite touch and add depth.
Use different types of reclaimed wood—barn wood, pallet slats, or vintage flooring—depending on your aesthetic. Finish with natural oils or stains to enhance the wood’s character, or paint for a more uniform look. Incorporate mixed textures or colors for an eclectic vibe. Seasonal styling can include woven textiles or vintage accessories that reinforce the rustic appeal. Suitable for large or small spaces, it’s highly customizable.
Source reclaimed wood from local suppliers, thrift stores, or salvage yards. Measure your wall area and cut the planks to size, treating edges as needed for a seamless look. Attach with nails or heavy-duty adhesive, ensuring each piece is secure and level. Sand rough edges lightly to prevent splinters, and apply a protective finish or oil to preserve the aged look. Consider adding a clear sealant for moisture-prone areas.
Mix different wood tones or add decorative metal brackets or vintage hardware for more authenticity. Incorporate textured textiles like knitted throws or woven baskets nearby for a layered, cozy feel. Display vintage signs or framed photos on the panels, but avoid artwork or modern decor that clashes with the rustic vibe. The goal is a warm, inviting, eco-conscious space.
Reclaimed wood wainscoting adds both sustainability and style, creating a space that feels authentic and full of character. It’s a statement of eco-conscious living that also elevates your home’s design. With patience and some DIY effort, you can craft a striking feature wall that’s both beautiful and responsible. Your home will radiate personality and purpose.
Conclusion
Exploring these diverse wainscoting ideas showcases just how versatile and stylish this classic detail can be. Whether you choose a subtle upgrade or a statement-making design, these ideas are perfect for adding character and sophistication to any room. Don’t hesitate—try out these ideas in your own home and see how they transform your space. Embrace the timeless appeal of wainscoting and create a home that truly reflects your personal style!
Last update on 2026-02-15 / Affiliate links / Images from Amazon Product Advertising API