A kitchen island is often the heart of the home, and dressing it up with stylish wainscoting can completely transform its look. Wainscoting adds a touch of elegance and texture, making your kitchen feel more refined and inviting. Its popularity lies in its ability to blend classic charm with modern design, offering a versatile way to enhance your space.
In this article, you’ll discover a variety of creative wainscoting ideas specifically tailored for kitchen islands. Whether you prefer a traditional look, a bold statement, or something in between, these ideas will inspire your next kitchen makeover and help you achieve a truly customized style that reflects your personality and taste.
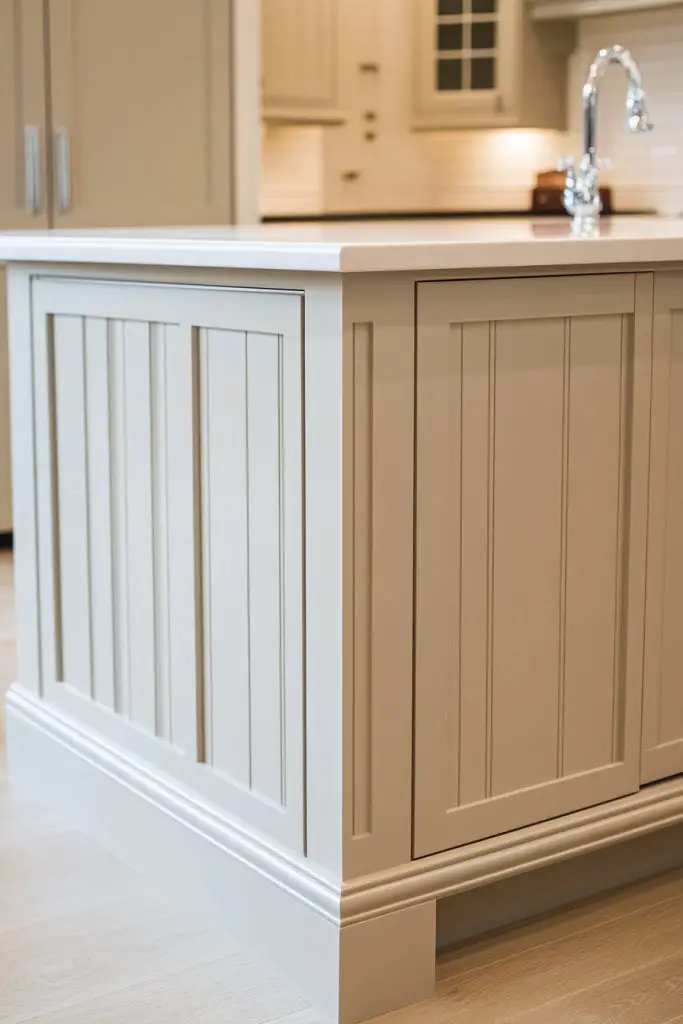
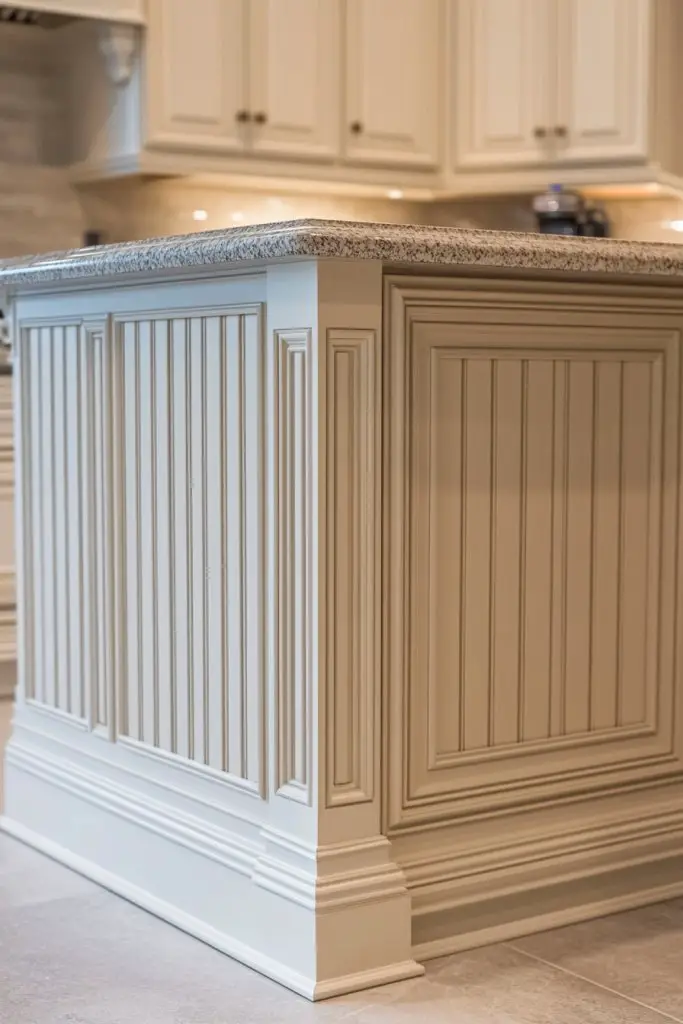
1. Classic Beadboard Wainscoting for a Timeless Kitchen Look
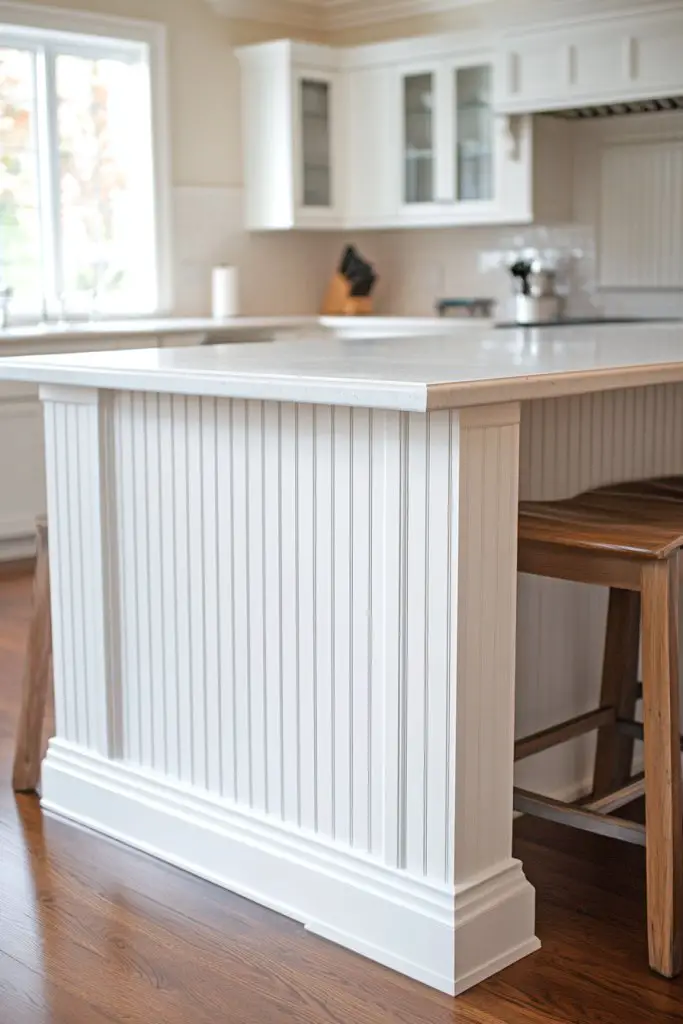
Ever felt your kitchen lacks that charming, classic vibe that makes you smile every time you step inside? Sometimes, the simplest design updates can turn a dull space into something memorable. Beadboard wainscoting offers a timeless appeal that can instantly elevate your kitchen’s style. It’s like giving your space a gentle hug of tradition with a modern twist.
Recommended Products to replicate this idea
| # | Preview | Product | |
|---|---|---|---|
| 1 |
|
Pre-Cut Wainscoting Panels Kit, WPC Slats Accent Wall Panel for Home Decor Covers 39 x 79 in, Ready... | Buy on Amazon |
| # | Preview | Product | |
|---|---|---|---|
| 1 |

|
Pangda Peel and Stick Wall Molding Kit, 3D Premade Accent Molding Wainscoting Panel for Interior... | Buy on Amazon |
Imagine soft, vertical panels running down your island in a crisp white or soft pastel hue. The beadboard’s narrow grooves add texture, catching the light and creating subtle shadows that add depth. Pair it with warm wood countertops and vintage-inspired fixtures for a cozy, inviting feel. It’s a look that whispers comfort and nostalgia, yet remains fresh and current.
You can customize beadboard by painting it in bold colors for a contemporary look or sticking with classic neutrals for a more traditional vibe. For seasonal updates, consider swapping out accessories or adding decorative trims for special occasions. If space is tight, keep the beadboard simple and let other design elements shine. It adapts beautifully to both small and large kitchens.
Start by measuring your island to determine the amount of beadboard needed. Choose tongue-and-groove panels for a seamless fit and easy installation. Prepare your surface by sanding and priming to ensure paint adheres well if you’re coloring it. Use a nail gun or adhesive suitable for wood paneling to attach the panels securely. Finish with a coat of paint or stain, and add decorative edge molding if desired for a polished look.
Personalize the beadboard by adding a contrasting top rail or decorative corner trim. Incorporate subtle painted accents or stenciled patterns within the panels for a DIY touch. Using vintage hardware or decorative hooks can further enhance the traditional charm. Don’t forget to seal the paint with a clear coat for durability, especially in a busy kitchen environment.
Classic beadboard wainscoting stands the test of time, blending style and function effortlessly. It’s a safe bet for anyone wanting a warm, welcoming kitchen with a touch of heritage. Feel free to experiment with colors and textures—your personal touch makes it uniquely yours. Ready to give your island that timeless makeover?
2. Shiplap Wainscoting for a Coastal or Rustic Charm
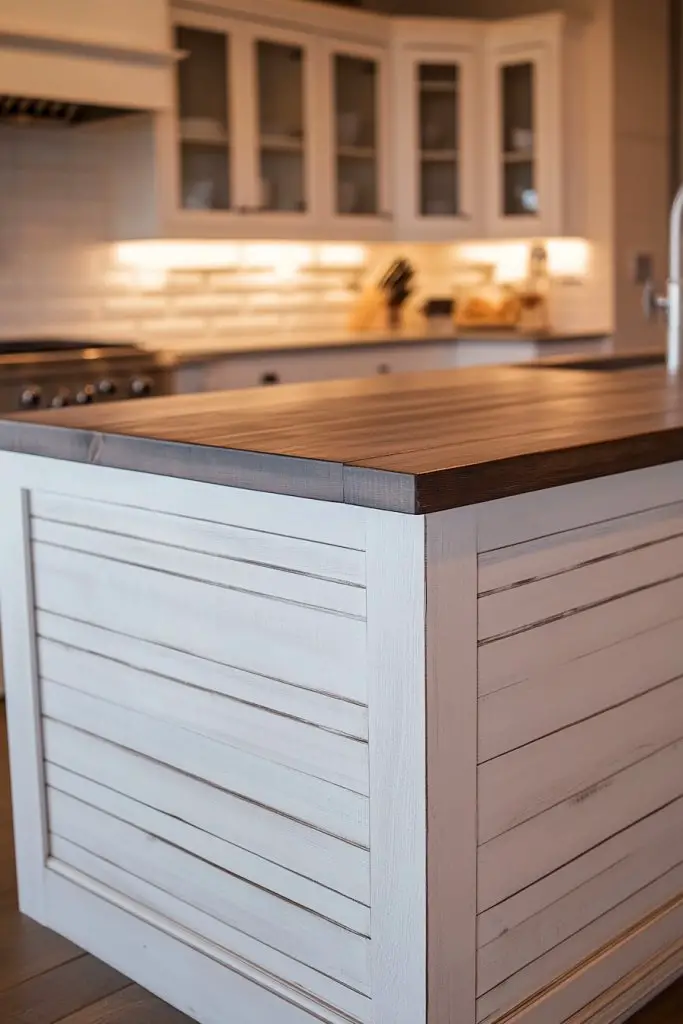
Craving that laid-back, farmhouse or coastal vibe without sacrificing style? Shiplap wainscoting offers a relaxed yet refined look that makes your kitchen feel like a cozy seaside retreat or a rustic barn. It’s perfect for those who love a bit of texture but want something easy to install and maintain.
Recommended Products to replicate this idea
| # | Preview | Product | |
|---|---|---|---|
| 1 |

|
Art3d Premade Board and Batten Paintable Wainscoting Kit, MDF Accent Wall Panel for Kitchen Bedroom... | Buy on Amazon |
| # | Preview | Product | |
|---|---|---|---|
| 1 |

|
CiCiwind Peel and Stick Wallpaper Wood Contact Paper White Shiplap Wall Paper Peel and Stick Modern... | Buy on Amazon |
Picture wide, horizontal planks arranged in a tight, tongue-and-groove fashion, painted in soft whites, blues, or natural wood tones. The overlapping edges create subtle shadows and visual interest that enhance the space’s warmth. Pair it with vintage accessories, woven baskets, or distressed finishes for that authentic farmhouse feel. The tactile quality of shiplap invites touch and brings character to your island.
Go for a weathered, reclaimed wood look for rustic appeal, or paint the shiplap in crisp whites or ocean-inspired hues for a coastal vibe. For a more modern twist, paint the planks a bold, contrasting color or add a glossy finish. Seasonal updates could involve swapping out decorative elements or adding fabric accents like linen or jute. It works well in open-concept kitchens or smaller spaces craving texture.
Begin by measuring your island to determine how many planks you’ll need. Choose tongue-and-groove panels for a tight fit that’s easy to install with nails or adhesive. Sand and prime the wood before painting or sealing, especially if you’re using reclaimed or distressed wood for authenticity. Attach the planks horizontally, ensuring they’re level and evenly spaced. Finish with a protective sealant if desired, especially in humid or busy kitchens.
Add decorative touches like metal or leather hardware, or incorporate a contrasting top trim to frame the shiplap. Incorporate shelves within the panel sections for display or storage, avoiding clutter. You could also stain the wood for a richer, darker look or whitewash for a breezy, beachy vibe. Personal touches like custom signage or vintage signs can complete the look.
Shiplap wainscoting effortlessly combines rustic charm with modern ease, making your island the star of your kitchen. It’s versatile, durable, and endlessly customizable. Whether you lean coastal or farmhouse, this style adds instant warmth and personality. Time to embrace that relaxed, inviting aesthetic?
3. Tongue and Groove Paneling for a Seamless, Elegant Finish
Looking for a sleek, polished look that elevates your kitchen without feeling stuffy? Tongue and groove paneling offers a seamless, elegant finish that exudes sophistication. It’s perfect for transitional or contemporary kitchens craving clean lines and refined details. Achieving a high-end aesthetic has never been easier or more affordable.
Recommended Products to replicate this idea
| # | Preview | Product | |
|---|---|---|---|
| 1 |

|
The Millwork Outlet Primed Nickel Gap Shiplap, 8 Pieces, 5" x 72", Real American Wood | Buy on Amazon |
| # | Preview | Product | |
|---|---|---|---|
| 1 |
|
Art3d Premade Board and Batten Paintable Wainscoting Kit, MDF Accent Wall Panel for Kitchen Bedroom... | Buy on Amazon |
Visualize long, narrow panels fitting tightly together, creating a smooth, uniform surface. The subtle grooves add just enough texture to break the monotony, while the finish can range from matte to glossy. Pair it with marble countertops, brushed nickel fixtures, or minimalist hardware for a modern, upscale vibe. The panels reflect light beautifully, making the space feel larger and more open.
Opt for painted or stained finishes depending on your style—dark espresso for drama or soft gray for understated elegance. For a more traditional look, add decorative molding or a chair rail to frame the panels. Seasonal flair can come through accessories like textured fabrics or sleek metallic accents. It adapts seamlessly to various kitchens, from large open plans to cozy apartments.
Start by measuring your island carefully to determine panel quantity. Use tongue-and-groove boards designed for wall or ceiling applications to ensure a tight fit. Prepare your surface by sanding and priming if painting, or sealing if staining. Attach panels with nails or adhesive, keeping them straight with a level. Finish with caulk or trim details to hide joints, then paint or stain as desired. This project requires patience but yields a stunning, uniform surface.
Add decorative accents like crown molding or a contrasting top rail to frame the panels. Incorporate subtle embellishments such as metallic studs or faux paneling for added depth. Consider implementing hidden storage behind panel sections for functional upgrades. Personalize with custom paint colors or gloss levels that match your overall decor theme, creating a cohesive look.
Tongue and groove paneling offers a timeless, refined aesthetic that elevates your kitchen instantly. Its clean lines and seamless finish make it suitable for any style, from modern to classic. Use it as a blank canvas for your unique touches, and watch your space transform. Ready to impress with a sophisticated update?
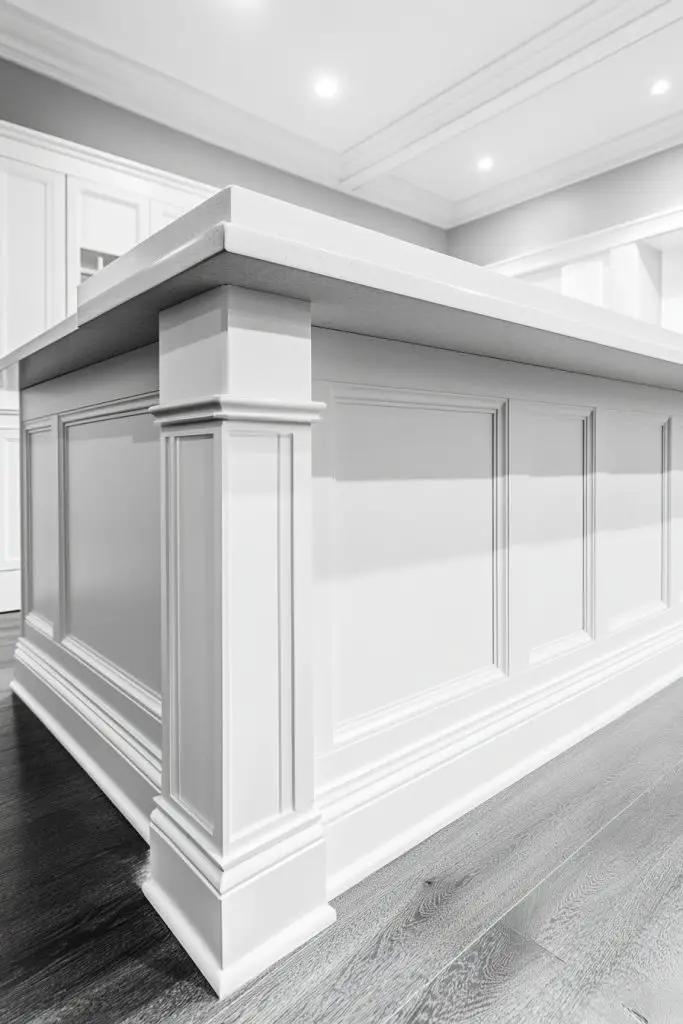
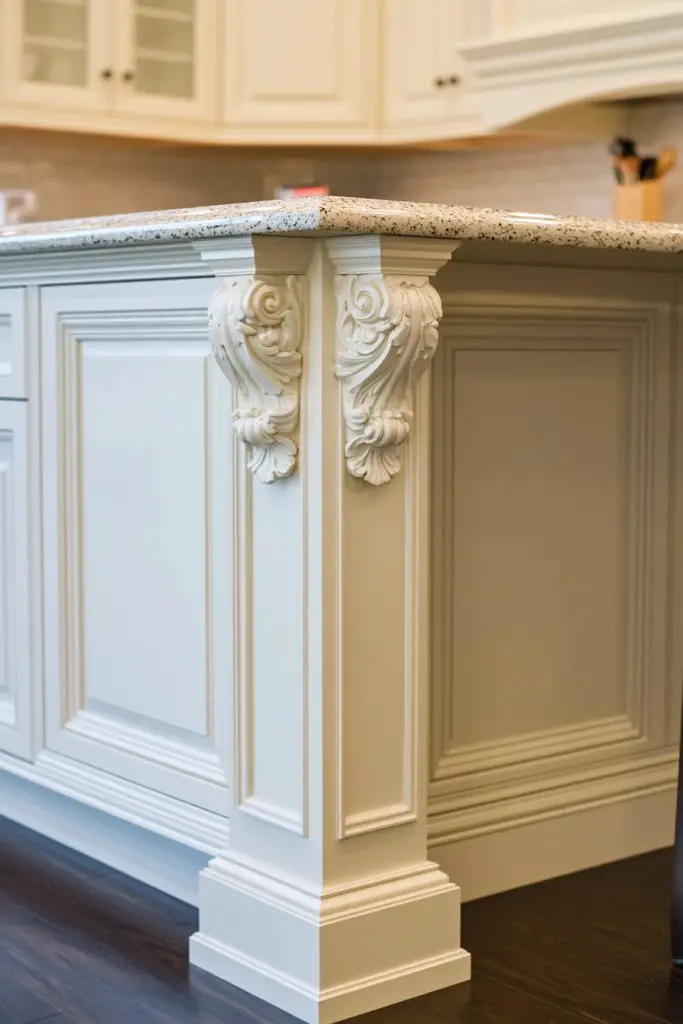
4. Vertical Panel Wainscoting with Decorative Moldings
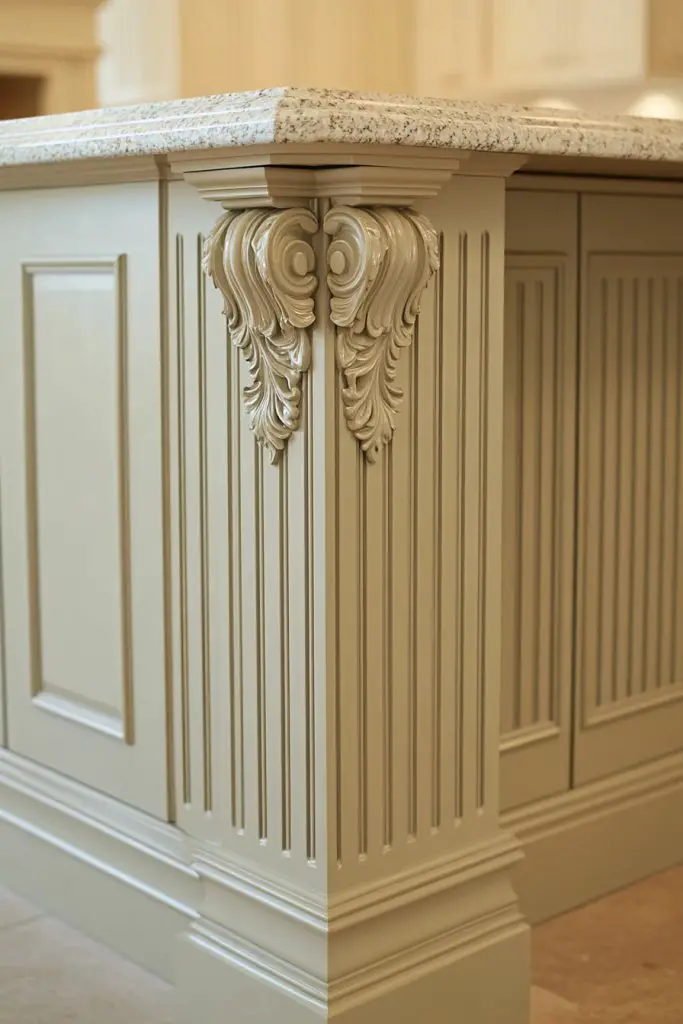
Ever want to add a touch of regal elegance to your kitchen island? Vertical panel wainscoting combined with decorative moldings can turn a simple surface into a statement piece. It’s perfect if you aim for a more upscale, architectural look that commands attention. Plus, it’s surprisingly straightforward to execute.
Recommended Products to replicate this idea
| # | Preview | Product | |
|---|---|---|---|
| 1 |

|
Art3d Pre-Cut Wall Molding Set of 6 pcs, Ready-to-Assemble Wainscoting Panels for Interior Wall... | Buy on Amazon |
| # | Preview | Product | |
|---|---|---|---|
| 1 |
|
Pre-Cut Wainscoting Panels Kit, WPC Slats Accent Wall Panel for Home Decor Covers 39 x 79 in, Ready... | Buy on Amazon |
Imagine tall, slender panels running from the countertop to the ceiling or a crown molding, topped with ornate trim details. The vertical lines draw the eye upward, elongating the space and adding grandeur. Accentuate with intricate corner moldings or medallions for a truly bespoke appearance. The combination of textures and shapes creates a layered, luxurious feel that elevates the entire room.
Choose bold, dark paints for a dramatic effect or soft neutrals for a subtle, sophisticated look. Incorporate decorative moldings in contrasting colors or metallic finishes for added richness. For seasonal updates, swap out accessories or add fabric accents like drapes or cushions nearby. This style works well in large kitchens with high ceilings or as a focal point in smaller spaces.
Begin by framing your panels with vertical wooden battens or MDF strips to ensure even spacing. Install each panel carefully using nails or adhesive, making sure they’re perfectly plumb. Attach decorative moldings using a nail gun or adhesive, and fill any gaps or nail holes with putty. Finish by painting or staining the panels and moldings for a polished look. It’s a bit more involved but creates a highly refined finish.
Personalize with decorative corner rosettes or medallions to add a custom touch. Use metallic or painted trim to highlight the moldings and create contrast. Incorporate subtle lighting behind or above the panels to emphasize their architectural features. Add fabric or textured wallpaper above the wainscoting for a layered, personalized effect.
Vertical paneling with decorative moldings instantly upgrades your kitchen’s style, making it feel more like a designer space. It’s a timeless choice that lends an air of sophistication without excessive cost. Your island will become a conversation starter, showing off your eye for detail. Embrace the elegance and start planning that luxe makeover.
5. Two-Tone Wainscoting Color Combos for Visual Impact
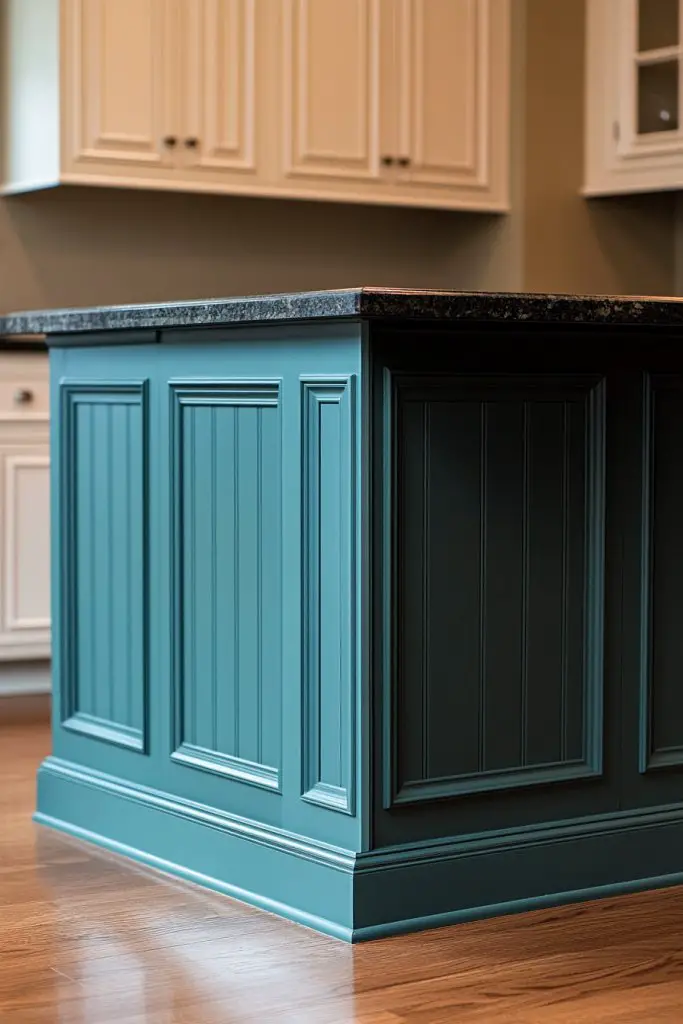
Feeling bored with monochrome kitchens? Want to add a punch of personality without a complete overhaul? Two-tone wainscoting delivers just that—bold, contrasting colors that create instant visual impact. It’s a fun way to make your island stand out and reflect your unique style. Plus, it’s surprisingly easy to do.
Recommended Products to replicate this idea
| # | Preview | Product | |
|---|---|---|---|
| 1 |
|
Pangda Peel and Stick Wall Molding Kit, 3D Premade Accent Molding Wainscoting Panel for Interior... | Buy on Amazon |
| # | Preview | Product | |
|---|---|---|---|
| 1 |
|
JONYEE Colored Masking Tape, Colored Painters Tape for Arts & Crafts, Labeling or Coding - Art... | Buy on Amazon |
Picture a crisp white wainscoting paired with deep navy or charcoal accents. The contrast draws the eye, highlighting the architectural details and creating a layered look. Incorporate a different color on the top rail or decorative trims to add further depth. This playful approach can be subtle or striking, depending on your palette and mood.
Mix and match colors based on your overall palette—think jewel tones for luxe, pastels for softness, or bold primaries for a playful vibe. Seasonal updates might include swapping out accessories or adding patterned textiles that complement the colors. For small kitchens, keep the contrast subdued to avoid visual overload. Larger spaces can handle more dramatic combinations.
Start by choosing two complementary or contrasting colors that suit your decor. Prepare your panels by sanding and priming, then paint each section carefully using painter’s tape for clean lines. Use different brushes or rollers to control textures, and allow ample drying time. For a professional look, consider hiring a painter or practicing on scrap before tackling the main project. Finish with a clear sealant for durability.
Add personalized touches with painted patterns, stripes, or even stenciled accents within the panels. Incorporate decorative hardware or trims in metallic or matte finishes to enhance the contrast. Use textiles or accessories in matching or complementary colors to tie the look together. This style invites creativity and personal flair.
Two-tone wainscoting opens a world of design possibilities, making your kitchen a true showcase of your personality. It’s bold but versatile, suitable for both modern and traditional styles. Don’t be afraid to experiment with colors and patterns—your dream kitchen is just a paintbrush away. Ready to make a statement?
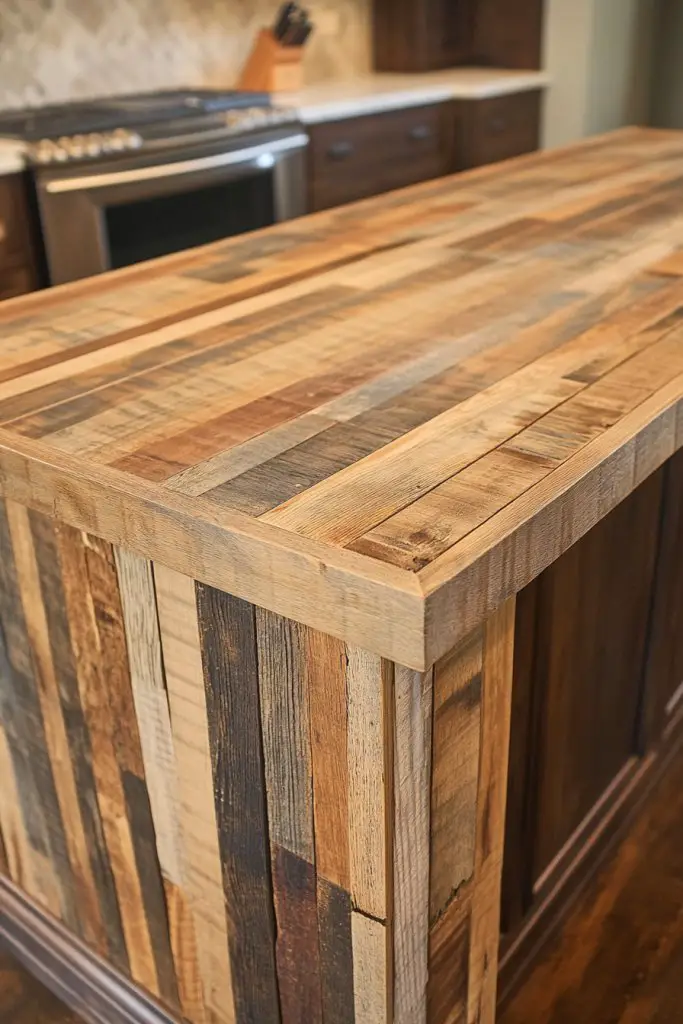
6. Reclaimed Wood Wainscoting for Rustic Warmth
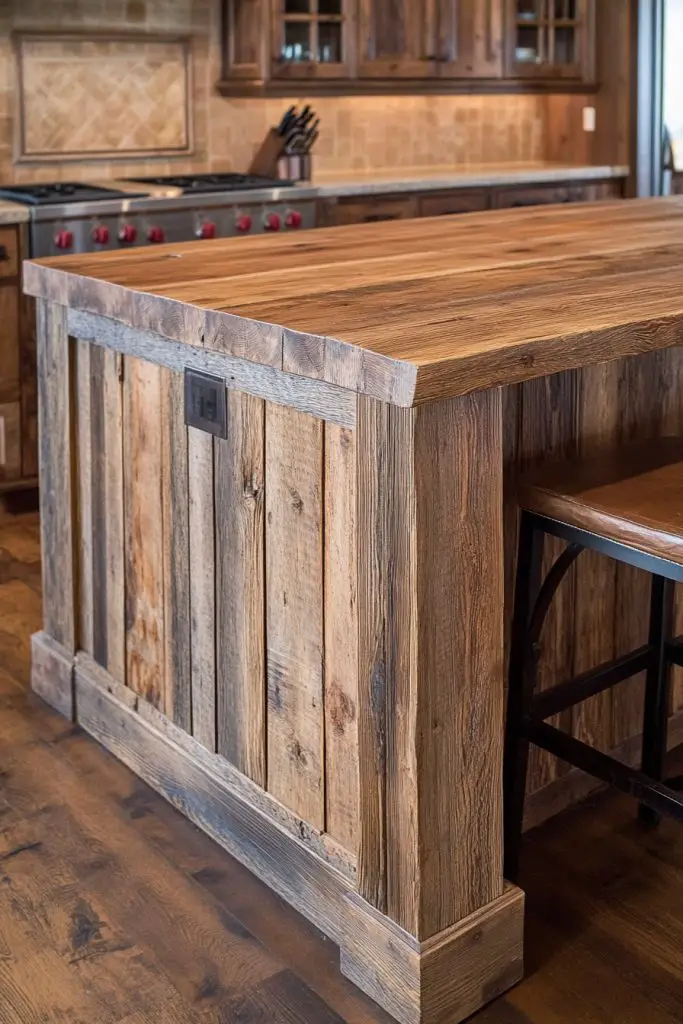
Craving the warmth and charm of rustic or farmhouse style, but worried about sustainability and cost? Reclaimed wood wainscoting offers an eco-friendly solution that adds natural texture and character. It’s perfect for creating a cozy, lived-in feel that still looks stylish enough for modern kitchens. Plus, each piece has its own story, making your space unique.
Recommended Products to replicate this idea
| # | Preview | Product | |
|---|---|---|---|
| 1 |

|
Holydecot Peel & Stick Real Wood Planks, Rustic Reclaimed Barn Wood Paneling, Brown Gray... | Buy on Amazon |
| # | Preview | Product | |
|---|---|---|---|
| 1 |
|
Art3d Premade Board and Batten Paintable Wainscoting Kit, MDF Accent Wall Panel for Kitchen Bedroom... | Buy on Amazon |
Imagine weathered, textured planks with knots and imperfections, arranged horizontally or vertically. The rich, earthy tones bring warmth to your island, contrasting beautifully with sleek countertops or modern hardware. The rough-hewn finish invites touch and adds depth to your space. Pair it with vintage-inspired accessories or simple, understated fixtures for a harmonious look.
Choose lighter or darker reclaimed wood depending on your aesthetic—think honey tones for warmth or deep charred finishes for drama. For seasonal updates, incorporate textiles like burlap or linen to soften the look. You can also stain or seal the wood for different effects, from matte to semi-gloss. It’s adaptable to both small and large kitchens, adding instant charm.
Begin by sourcing reclaimed wood from local suppliers or repurposed materials. Measure your island to determine how many planks are needed. Prepare the wood by cleaning and sanding to remove splinters, then apply a protective finish if desired. Attach the planks with nails or adhesive, ensuring they are level. For a seamless look, consider installing a backing board or framing for extra stability. Seal the surface for protection against moisture and stains.
Display your eco-conscious values by adding handcrafted signs or vintage hardware. Incorporate decorative shelving made from the same reclaimed wood for a cohesive look. Use natural textiles or woven baskets nearby to enhance the rustic vibe. Personal touches like custom stains or distressing techniques can make the wood uniquely yours.
Reclaimed wood wainscoting combines sustainability with timeless style, making your kitchen a conversation piece. It’s a statement of eco-awareness and craftsmanship that adds warmth and authenticity. Your island will feel inviting and special, echoing the beauty of nature. Time to embrace the rustic charm and start sourcing those planks?
7. Mirrored Wainscoting for a Bright, Spacious Effect
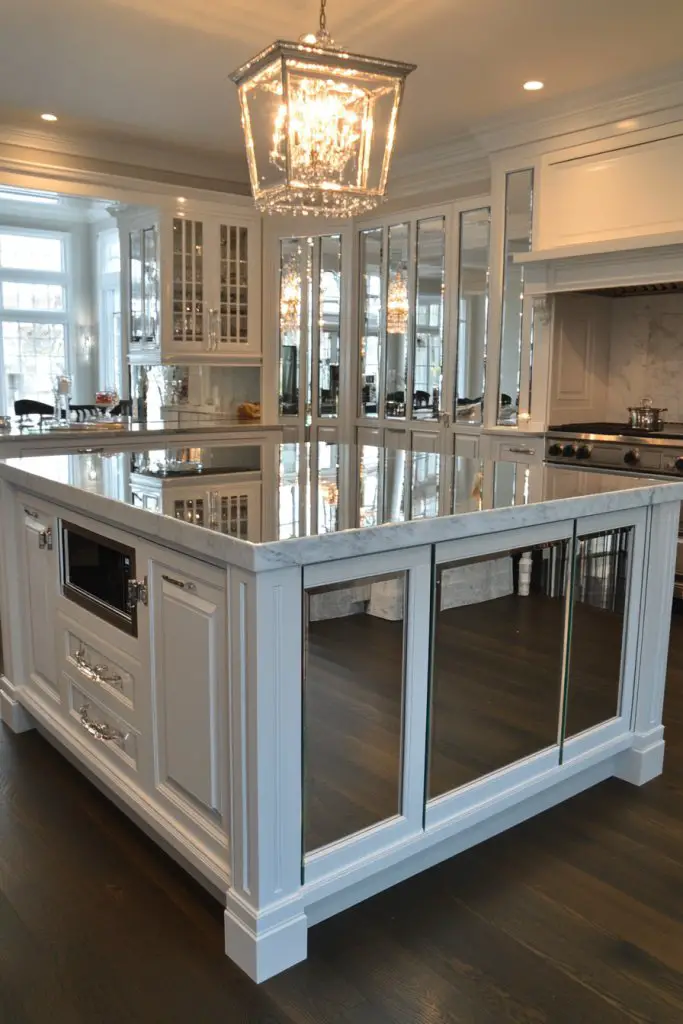
Ever wish your kitchen felt bigger and more open without knocking down walls? Mirrored wainscoting can do just that by reflecting light and creating an illusion of space. It adds a glamorous touch while making your island a focal point. Perfect for small or windowless kitchens that need a brightness boost.
Recommended Products to replicate this idea
| # | Preview | Product | |
|---|---|---|---|
| 1 |
|
Art3d Wainscoting Wall Panel Kit, 37.8" Tall Beadboard Panels for Walls, Polystyrene Board and... | Buy on Amazon |
| # | Preview | Product | |
|---|---|---|---|
| 1 |

|
Lovdeco Peel and Stick Beveled Silver Mirror Tile Subway Mirror Glass Backsplash 3x12 Inch for... | Buy on Amazon |
Visualize sleek glass or mirrored panels installed vertically or horizontally on your island. The reflective surface bounces natural and artificial light around, instantly enlarging the space. Pair it with minimalist hardware and monochrome tones for a modern, chic aesthetic. The mirror’s surface creates a dynamic visual effect that changes with your lighting and decor.
Choose from framed mirrors for a classic look or seamless glass panels for a sleek, contemporary vibe. You can add decorative trim or use LED strip lighting behind the panels for extra glow. For a more eclectic style, incorporate textured or frosted glass. It’s versatile enough to fit in with glamour, modern, or transitional themes.
Start by measuring your island and selecting suitable mirrored panels—consider tempered glass for safety. Prepare the surface by ensuring it is clean, smooth, and dry. Attach the panels using heavy-duty adhesive or mounting hardware designed for glass. Frame the edges with decorative molding or trim if desired. Seal the edges with silicone to prevent moisture ingress and ensure longevity.
Create a custom frame or border in metallic or painted finishes to highlight the mirrors. Add LED backlighting or sconces to enhance the reflective quality and ambiance. Incorporate decorative decals or etchings for a personalized touch. Keep maintenance in mind, cleaning with glass cleaner is essential for a pristine look.
Mirrored wainscoting transforms your kitchen into a bright, airy space filled with light and elegance. It’s a functional design that also serves as art—reflecting your style and personality. Confidence in this choice grows as you see your space expand visually, making every meal feel like a special occasion. Ready to reflect your style?
8. Beadboard with Contrasting Top Rail for a Layered Look
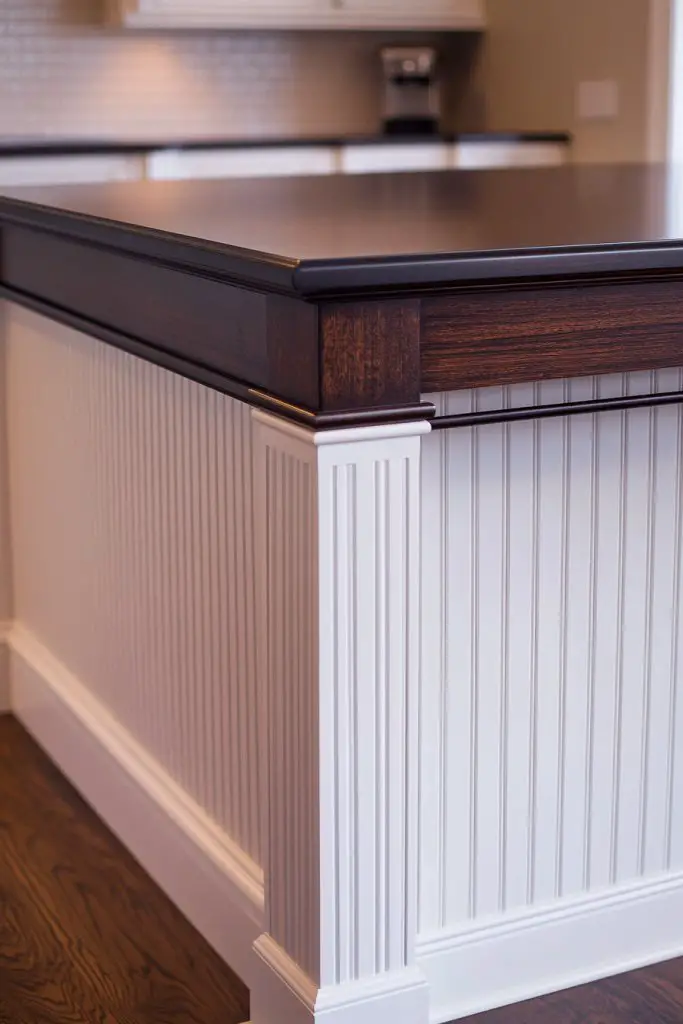
Tired of flat, uninspired kitchen updates? A beadboard wainscoting with a contrasting top rail offers a layered, textured look that instantly adds depth. It’s a simple tweak that makes your island stand out without a total overhaul. Perfect for those who love classic touches with a modern twist.
Recommended Products to replicate this idea
| # | Preview | Product | |
|---|---|---|---|
| 1 |
|
Pre-Cut Wainscoting Panels Kit, WPC Slats Accent Wall Panel for Home Decor Covers 39 x 79 in, Ready... | Buy on Amazon |
| # | Preview | Product | |
|---|---|---|---|
| 1 |

|
MOLLOR Wood Stain, 16 Oz Water Based Wood Stain and Sealer in One - No Priming, No Top Coat... | Buy on Amazon |
Visualize beadboard panels painted in a soft neutral, topped with a bold, contrasting trim or rail in dark or metallic shades. The difference in color and texture creates a visual break that draws attention upward. Surround the panels with decorative brackets or molding for added detail. The layered look adds richness and dimension, making your island a centerpiece.
Mix colors—perhaps a light pastel with a dark espresso top rail—for a subtle contrast, or go for bold black and white for high drama. Use textured or matte finishes to play with light reflection. Seasonal updates could involve swapping out the top rail for a different finish or color. It adapts well to both traditional and contemporary kitchens.
Begin by measuring your panels and selecting a contrasting material for the top rail—wood, MDF, or decorative molding. Install the beadboard panels first, ensuring they’re level and evenly spaced. Attach the top rail with nails or adhesive, then finish with paint or stain. Use painter’s tape for clean edges and apply multiple coats for vibrancy. Seal the finish with a protective coat for durability.
Personalize with decorative corner blocks or rosettes, and consider adding metallic or painted accents to the top rail. Incorporate LED strip lighting underneath the top rail for a glow effect. Use fabric or textured wallpaper above for a layered effect that plays with height and color. It’s all about creating a custom, layered visual story.
This layered beadboard approach adds sophistication and a bespoke feel to your kitchen. It’s a simple, impactful upgrade that’s easy to personalize and maintain. Your island will radiate charm and character, showcasing your attention to detail. Time to layer up and make your space truly yours?
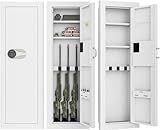
9. Vertical Wainscoting with Hidden Storage Features
Struggling with clutter and limited storage in your kitchen? Vertical wainscoting with hidden compartments offers a clever way to hide away essentials while keeping your space stylish. It’s a functional upgrade that doesn’t compromise on beauty. Who says storage can’t be discreet and elegant?
Recommended Products to replicate this idea
| # | Preview | Product | |
|---|---|---|---|
| 1 |
|
Art3d Premade Board and Batten Paintable Wainscoting Kit, MDF Accent Wall Panel for Kitchen Bedroom... | Buy on Amazon |
| # | Preview | Product | |
|---|---|---|---|
| 1 |
|
INTERGREAT 43" H Wall Gun Safe Between Stud, Black Heavy Duty Flush in Wall Safe with Digital Keypad... | Buy on Amazon |
Imagine tall, slim panels with concealed doors or drawers seamlessly integrated into the design. When closed, they look like part of the wainscoting, blending form and function. The vertical lines add height and sophistication, while the hidden storage keeps clutter out of sight. It’s like having secret compartments in your favorite novel.
Use sleek, modern hardware or push-to-open mechanisms for a clean look. Choose colors that match your overall decor or add a pop of contrast for visual interest. Seasonal updates could involve replacing handles or adding decorative trims around the compartments. It’s perfect for small kitchens that need to maximize every inch.
Plan your storage layout carefully—decide what will be hidden and how accessible it should be. Install vertical panels and frame the concealed compartments with cabinet-grade hinges or sliders. Use high-quality hardware to ensure smooth operation. Finish the panels with paint or stain, and add handles or push latches for easy access. Test the functionality thoroughly before finalizing.
Add personalized touches with engraved handles or decorative trims. Incorporate lighting inside the compartments for visibility. Use labels or custom signage for a unique, organized look. This approach combines practicality with style, making your island both beautiful and highly functional.
Hidden storage wainscoting transforms your kitchen into a clutter-free sanctuary. It’s a smart, stylish solution for modern living. With a bit of planning, your island becomes a sleek centerpiece that’s as practical as it is beautiful. Ready to hide away the chaos?
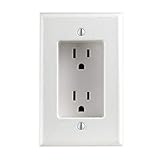
10. Wainscoting with Integrated Electrical Outlets for Practicality
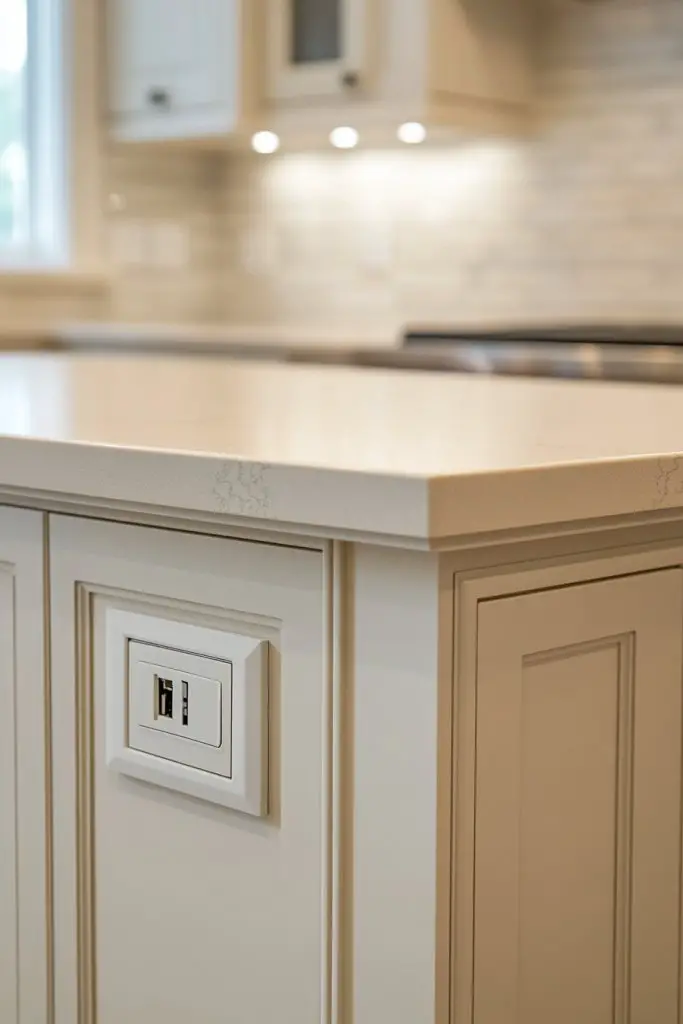
Ever struggle with cluttered counters and unsightly cords? Wainscoting with built-in outlets offers a neat, practical solution that keeps your workspace tidy. It’s perfect for those who love gadgets and need power sources close at hand without sacrificing style. Let’s face it—your kitchen deserves better than extension cords trailing everywhere.
Recommended Products to replicate this idea
| # | Preview | Product | |
|---|---|---|---|
| 1 |

|
ZEXMTE in Wall Cable Management Kit with AC Outlets & USB Ports, Recessed Outlet Box,in Wall TV... | Buy on Amazon |
| # | Preview | Product | |
|---|---|---|---|
| 1 |
|
Leviton 689-W 15 Amp 1-Gang Recessed Duplex Receptacle, Residential Grade, with Screws Mounted to... | Buy on Amazon |
Visualize sleek panels with discreetly integrated outlets hidden behind decorative trim or within the molding. When not in use, outlets blend seamlessly into the design, maintaining a clean appearance. You can add USB ports or charging stations for extra convenience. The result is a streamlined, functional surface that looks modern and organized.
Choose outlets in finishes matching your hardware—brushed nickel, matte black, or white—to blend in. Incorporate pop-up or retractable outlets for a sleek, hidden look when not in use. Seasonal updates could include swapping cover plates or adding decorative caps. It’s adaptable to both contemporary and transitional styles.
Plan your electrical layout carefully, ensuring outlets are positioned for maximum accessibility. Hire a licensed electrician if necessary to install wiring and outlets behind panels. Attach the panels securely, then cut openings for outlets, ensuring they are flush and accessible. Finish by installing cover plates that match your decor. Test all outlets for safety and functionality before use.
Add decorative trim or molding around outlets for a customized look. Incorporate smart outlets or charging stations with USB ports for added tech convenience. Use labels or custom decals to identify different charging zones. This functional upgrade makes your island smarter and more efficient.
Integrated outlets make your kitchen more user-friendly while keeping it stylish. It’s a practical solution for modern living, perfect for busy families or home offices. With careful planning, your island will be both beautiful and highly functional. Time to upgrade your workspace?
11. Bold Colored Wainscoting for a Modern, Playful Vibe
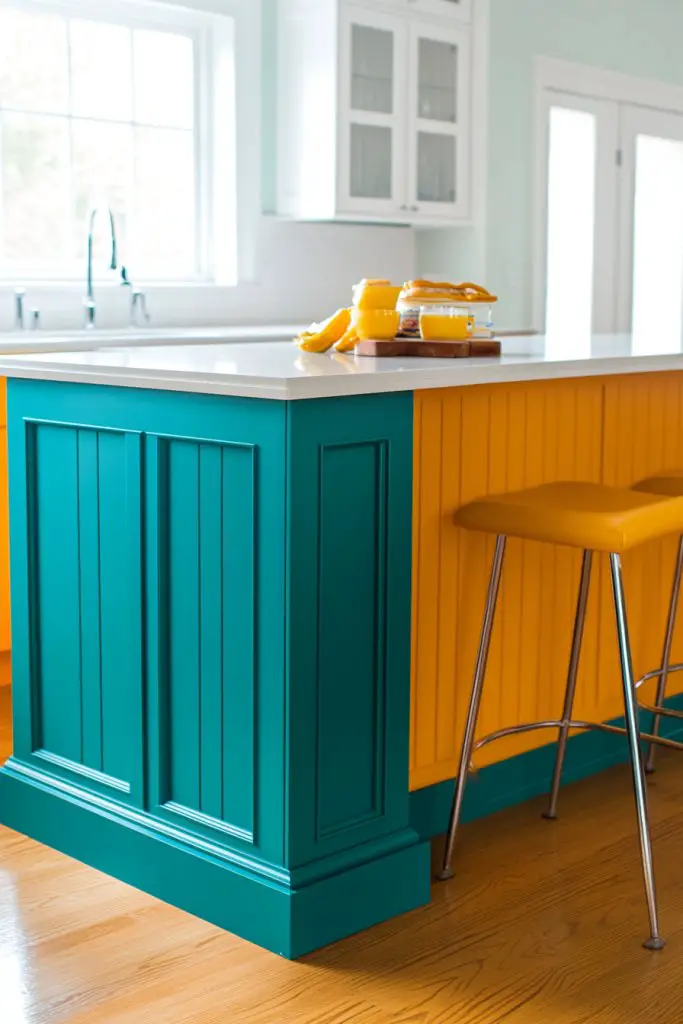
Feeling like your kitchen needs a splash of personality? Bold, vibrant wainscoting can turn a plain island into a lively centerpiece. It’s an easy way to inject fun and energy into your space without a full renovation. Who says kitchens have to be dull?
Recommended Products to replicate this idea
| # | Preview | Product | |
|---|---|---|---|
| 1 |
|
Art3d Premade Board and Batten Paintable Wainscoting Kit, MDF Accent Wall Panel for Kitchen Bedroom... | Buy on Amazon |
| # | Preview | Product | |
|---|---|---|---|
| 1 |
|
Rust-Oleum 372007 Transformations Basics Cabinet & Trim Paint, Quart, Pure White, 32 Fl Oz (Pack of... | Buy on Amazon |
Imagine a striking navy, emerald green, or matte black covering your island’s wainscoting. The vibrant color contrasts with neutral cabinetry or countertops, creating a focal point that draws everyone in. Finish with matte or satin finishes to keep it modern and chic. Pair with metallic hardware or sleek fixtures to complete the bold look.
Choose colors that complement your overall palette or go for unexpected combinations for a playful touch. Seasonal updates might mean swapping out accessories or adding colorful textiles nearby. For smaller kitchens, stick with more subdued shades to avoid overwhelming the space. Larger kitchens can handle more daring hues.
Prep your surface by sanding and priming the panels thoroughly. Use high-quality interior paint in your chosen bold color, applying multiple coats for richness. Consider using painter’s tape to create geometric patterns or stripes for added visual interest. Finish with a clear protective coat to keep the color vibrant and durable. Regular cleaning will keep it looking fresh.
Add decorative decals or stenciled patterns for extra flair. Incorporate metallic or contrasting trim to frame the panels. Use accessories like colorful bowls, textiles, or artwork to tie the look together. It’s all about creating a fun, energetic vibe that reflects your personality.
Bold-colored wainscoting makes a statement that’s hard to ignore, transforming your kitchen into a lively space full of personality. It’s an easy project that pays off by boosting your mood and impressing guests. Embrace your creative side and make your island a showstopper!
12. Textured Wainscoting with Beaded or Ruffled Details
Want your kitchen to feel not just stylish but also tactile and inviting? Textured wainscoting with beaded or ruffled details offers a unique, sensory-rich experience. It’s perfect if you love adding layers of visual interest and want a space that feels crafted and personal. Who says walls have to be flat?
Recommended Products to replicate this idea
| # | Preview | Product | |
|---|---|---|---|
| 1 |
|
Pre-Cut Wainscoting Panels Kit, WPC Slats Accent Wall Panel for Home Decor Covers 39 x 79 in, Ready... | Buy on Amazon |
| # | Preview | Product | |
|---|---|---|---|
| 1 |

|
CRASPIRE 266 x 2in Crown Molding 88.6in/Roll Peel and Stick Foam White Self Adhesive Flexible Trim... | Buy on Amazon |
Picture panels with raised bead patterns, ruffled fabric-inspired textures, or embossed designs. The tactile surface adds depth, creating shadows and highlights that change with the light. Pair it with soft textiles, textured rugs, or matte finishes to enhance the sensory experience. These details give your island a distinctive, artisanal feel.
Choose subtle beaded patterns for a refined look or bold ruffles for a playful vibe. Combine textures with smooth painted surfaces for contrast. Seasonal updates could involve swapping out fabric covers or adding decorative trims. It suits eclectic, boho, or vintage-inspired kitchens perfectly.
Select textured panels made from embossed MDF, ceramic, or fabric-covered materials. Install panels using adhesive or nails, ensuring they are securely attached. Finish with a protective coating or sealant to preserve the texture and prevent damage. For fabric or ruffled details, consider sewing or adhering decorative elements for a custom touch.
Incorporate trims, tassels, or decorative studs to emphasize the textures. Use contrasting paint or metallic accents nearby to highlight the details. Add fabric or textile accents that can be changed seasonally. Personal touches like embroidery or hand-painted patterns make your island truly one-of-a-kind.
Textured wainscoting adds personality and depth that elevates your kitchen’s style. It’s a creative choice that invites touch and admiration. Your space will stand out as a curated, artisanal retreat ready for your personal touch. Go ahead, get tactile and make it memorable!
13. Wainscoting with Vertical Slats and Decorative Accents
Looking for a subtle yet stylish way to give your island a fresh update? Vertical slats with decorative accents create a refined, modern look that’s both simple and sophisticated. It’s ideal if you want clean lines with a bit of architectural detail. Who says minimal can’t be impactful?
Recommended Products to replicate this idea
| # | Preview | Product | |
|---|---|---|---|
| 1 |
|
Art3d 6-Pack Acoustic Wood Slat Wall Panels for Interior Decor, 3D Fluted Sound Absorbing Wood... | Buy on Amazon |
| # | Preview | Product | |
|---|---|---|---|
| 1 |

|
YEFANXI Self-Adhesive Flexible Chair Rail Classic Wall Molding PVC Decorative White Trim -... | Buy on Amazon |
Visualize evenly spaced vertical slats running from the countertop to the ceiling, accented with decorative corner or mid-panel details. The vertical lines draw the eye upward, elongating the space and adding height. Finish with a sleek paint or stain for a contemporary vibe, or add subtle metallic accents for a touch of glamour.
Go for natural wood tones for warmth or paint in bold or pastel hues for a modern or playful look. Incorporate decorative brackets or small carved details for added flair. Seasonal updates might include changing accent colors or adding textiles nearby. It adapts well in both small and large kitchens, providing a crisp, architectural element.
Start by framing your vertical slats with evenly spaced battens or spacers for consistency. Attach each slat securely using nails or adhesive, ensuring they are perfectly plumb and evenly aligned. Add decorative accents at corners or mid-panel points for visual interest. Finish with paint, stain, or varnish for protection and style. Regular touch-ups keep the look fresh.
Personalize with painted or metallic decorative accents, or incorporate small carvings or molding details. Use complementary or contrasting colors for slats and accents to create depth. Add LED lighting or small decorative fixtures above or below the panels to highlight their architectural details. It’s a simple but effective way to add character.
Vertical slats with decorative accents introduce a tailored, architectural feel that elevates your kitchen design. It’s a versatile, clean look that works across various styles. Your island will look intentional and refined, making your space feel more custom. Ready to add those vertical lines?
14. Wainscoting with Integrated Seating or Storage Nooks
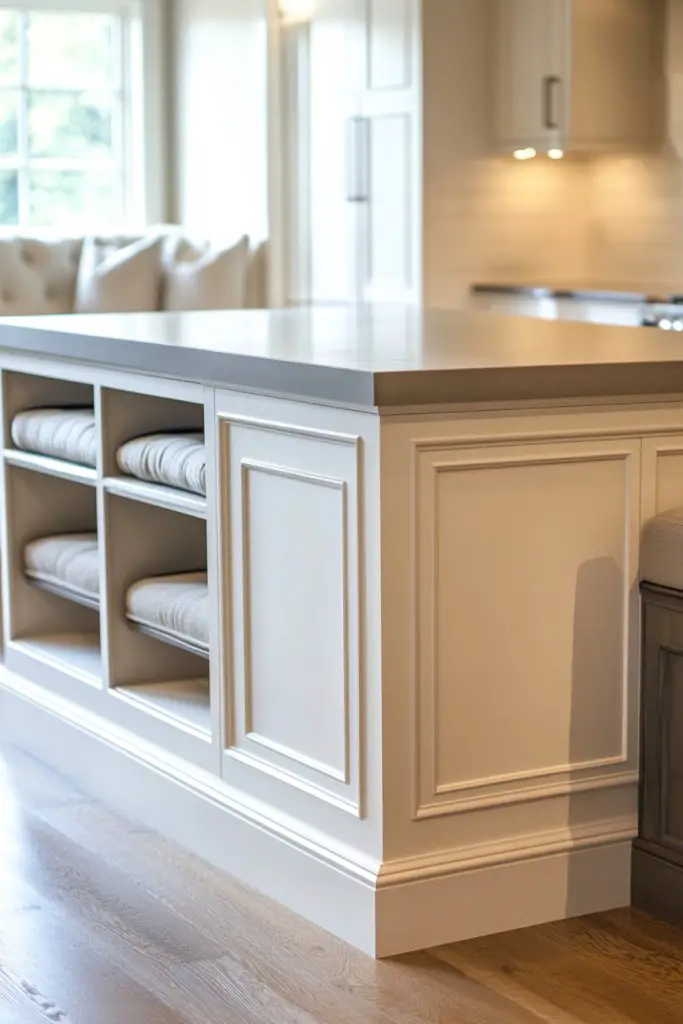
Dreaming of a kitchen island that’s not just beautiful but also super functional? Wainscoting that incorporates seating or storage nooks transforms your space into a cozy, multi-purpose hub. It’s perfect for small kitchens or social cooks who love a bit of everything. Who says style and utility can’t go hand in hand?
Recommended Products to replicate this idea
| # | Preview | Product | |
|---|---|---|---|
| 1 |

|
VASAGLE CUSTOS Collection - Storage Bench, Entryway Bench with Cushion, Drawer and Open... | Buy on Amazon |
| # | Preview | Product | |
|---|---|---|---|
| 1 |
|
ZYKZYK 2 Pack Breakfast Nook Bench - 52" L-Shaped Bench Backless Kitchen Banquette with Hidden... | Buy on Amazon |
Imagine built-in bench seating with cushioned tops nestled into the wainscoting, or open cubbies for cookbooks and utensils. These elements blend seamlessly with the panels, making the island a true centerpiece. The combination of smooth surfaces and functional nooks creates a warm, inviting atmosphere perfect for casual gatherings.
Use upholstered cushions or colorful fabrics for added comfort. Incorporate open or closed storage options depending on your needs, from baskets to drawers. Seasonal changes could involve swapping cushion covers or reorganizing cubbies. It’s adaptable to various needs, from family-friendly to minimalist setups.
Design your seating or storage areas first, then frame the wainscoting around them. Use sturdy materials like plywood or MDF for the nooks, finishing with paint or stain. Attach the panels securely with nails or adhesive, ensuring the seating area is comfortable and stable. Finish with cushions or decorative elements for a welcoming feel. Regular maintenance keeps it functional and attractive.
Add personalized cushions, throws, or decorative pillows to enhance comfort and style. Incorporate labels or tags for organizational cubbies. Use decorative trims or paint accents to highlight the integrated features. It’s a fun way to make your island both practical and charming.
Integrated seating and storage turn your kitchen island into a social hub that’s as functional as it is beautiful. It’s a smart upgrade that maximizes space and encourages gathering. Your family and friends will love how inviting your kitchen feels now. Ready to make it happen?
15. Minimalist Flat Panel Wainscoting for a Contemporary Look
Craving a sleek, clutter-free kitchen with a modern edge? Flat panel wainscoting offers a minimalist approach that emphasizes clean lines and simplicity. It’s perfect if you love contemporary design and want your island to look effortlessly stylish. Less is more, after all.
Recommended Products to replicate this idea
| # | Preview | Product | |
|---|---|---|---|
| 1 |
|
Art3d Premade Board and Batten Paintable Wainscoting Kit, MDF Accent Wall Panel for Kitchen Bedroom... | Buy on Amazon |
| # | Preview | Product | |
|---|---|---|---|
| 1 |

|
Art3d 4-Piece Wood Slat Acoustic Panels for Stylish Decor and Noise Reduction, 3D Textured Panel for... | Buy on Amazon |
Picture smooth, flat panels with no visible joints or moldings, finished in a matte or low-gloss paint. The understated panels reflect light softly, creating a calm, uncluttered atmosphere. Pair the panels with streamlined hardware or handle-less drawers for a cohesive, modern aesthetic. The overall look is crisp, fresh, and timeless.
Choose neutral shades like white, gray, or black for maximum impact, or add a subtle texture with faux finishes. For seasonal updates, incorporate textiles or accessories with geometric patterns or metallic accents. It adapts easily to small or large kitchens, maintaining an uncluttered, high-end feel.
Start by measuring your island and selecting flat panels designed for wall application. Prepare the surface by cleaning and priming. Attach panels with adhesive or nails, ensuring they’re perfectly aligned and flush. Finish with paint, stain, or lacquer, and add minimalistic hardware if needed. Seal the surface to prevent damage and keep the look pristine. It’s a straightforward, high-impact project.
Incorporate subtle metallic or matte trims to frame the panels. Add integrated lighting or hidden LED strips for a sleek glow. Use simple, elegant hardware or do away with hardware altogether for a seamless appearance. Personal touches like custom paint colors or textured finishes can make your space uniquely yours.
Minimalist flat panel wainscoting offers a chic, modern upgrade that’s both functional and stylish. It’s a versatile choice that works with any decor and ages gracefully. Your kitchen will look polished, organized, and effortlessly contemporary. Ready for a sleek transformation?
16. Wainscoting with Subtle Textured Paint or Faux Finish
Want to add depth and personality without bulky materials? Wainscoting combined with textured paint or faux finishes offers a subtle yet impactful upgrade. It’s a budget-friendly way to create visual interest and hide imperfections on your island’s surface. Who says walls have to be flat?
Recommended Products to replicate this idea
| # | Preview | Product | |
|---|---|---|---|
| 1 |
|
Pangda Peel and Stick Wall Molding Kit, 3D Premade Accent Molding Wainscoting Panel for Interior... | Buy on Amazon |
| # | Preview | Product | |
|---|---|---|---|
| 1 |

|
Pro Grade - Paint Roller Covers - 1/2 X 9 Inch Microfiber 5 Pack | Buy on Amazon |
Imagine your panels coated with a soft, textured finish resembling plaster, linen, or stone. The tactile surface adds depth and complexity, catching light in interesting ways. Pair it with smooth, painted upper walls for contrast, or keep the entire surface textured for a dramatic effect. It’s a versatile approach that invites touch and curiosity.
Choose faux finishes that mimic marble, stone, or aged plaster for a luxe look, or opt for subtle textured paints in neutral tones for a calming vibe. Seasonal updates might involve changing paint colors or adding decorative accents nearby. It suits both traditional and contemporary kitchens, adding richness without overwhelming the space.
Prepare your surface by cleaning and sanding. Apply a primer suited for textured finishes. Use sponges, brushes, or rollers to create your desired texture, layering coats as needed. Finish with a clear sealer or protective topcoat to preserve the look and make cleaning easier. It’s a forgiving process that rewards patience with a unique, handcrafted appearance.
Incorporate metallic or matte accents in trims or hardware to enhance the textured effect. Add decorative moldings or borders to frame the panels. Use coordinated textiles or accessories to complement the textured finish. It’s about creating a layered, sophisticated look that feels both modern and artistic.
Textured paint and faux finishes add depth and character that elevate your kitchen’s style. It’s an affordable, DIY-friendly option that delivers big visual results. Your island will feel richer, more inviting, and uniquely yours. Time to get creative with textures?
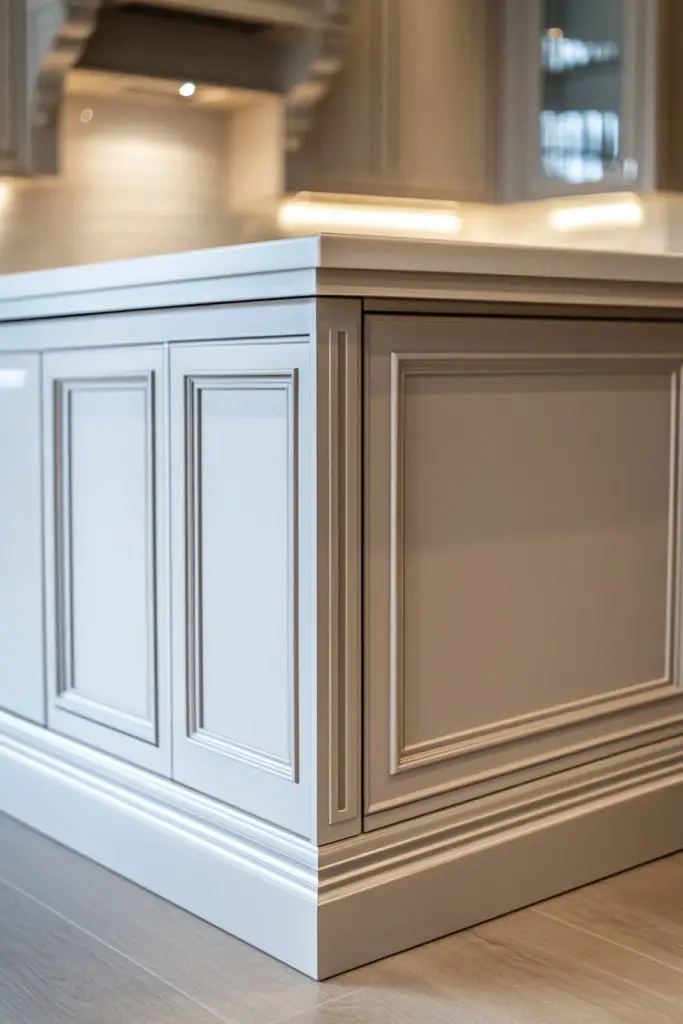
17. Wainscoting with Decorative Corner Mouldings and Trim
Looking to add a finishing touch that elevates your kitchen’s aesthetic? Decorative corner mouldings and trim can turn simple panels into a refined, architectural statement. It’s ideal if you love details and want a look that’s both polished and personalized. Who says walls have to be plain?
Recommended Products to replicate this idea
| # | Preview | Product | |
|---|---|---|---|
| 1 |

|
1 3/4" x 1 3/4" x 6" Poplar (Paint Grade) Inside Corner Base Block, Trim Molding (6) | Buy on Amazon |
| # | Preview | Product | |
|---|---|---|---|
| 1 |
|
Art3d Premade Board and Batten Paintable Wainscoting Kit, MDF Accent Wall Panel for Kitchen Bedroom... | Buy on Amazon |
Picture ornate corner blocks, crown moldings, or decorative trims framing your panels, adding depth and character. The detailed mouldings draw the eye and create a sense of craftsmanship. Finish with paint or stain that complements your overall decor, highlighting the intricate details. It’s like jewelry for your walls—subtle but stunning.
Opt for classic white or neutral tones for a timeless look, or go bold with metallic finishes or contrasting colors. Incorporate decorative rosettes or medallions for added flair. Seasonal updates could involve swapping out trims or adding decorative decals. It’s versatile enough to suit traditional, transitional, or eclectic styles.
Begin by planning your trim layout carefully, using a level and measuring tape for accuracy. Attach mouldings with nails or adhesive, ensuring they’re flush and aligned. Fill nail holes with wood filler or putty, then sand smooth. Finish with paint, stain, or varnish, emphasizing the decorative details. Regular touch-ups keep the details crisp.
Add metallic or painted accents to highlight the trim details. Incorporate small decorative elements like medallions or appliqués for a custom look. Use LED lighting behind the mouldings to add ambiance and draw attention. Personal touches make your island a true showcase of craftsmanship.
Decorative corner mouldings and trim bring a high-end, architectural feel that instantly upgrades your kitchen. It’s a refined, elegant choice that adds personality and sophistication. Your island will look like a piece from a design magazine, making you proud of your eye for detail. Ready to add those finishing touches?
18. Lighted Wainscoting with Concealed LED Strips
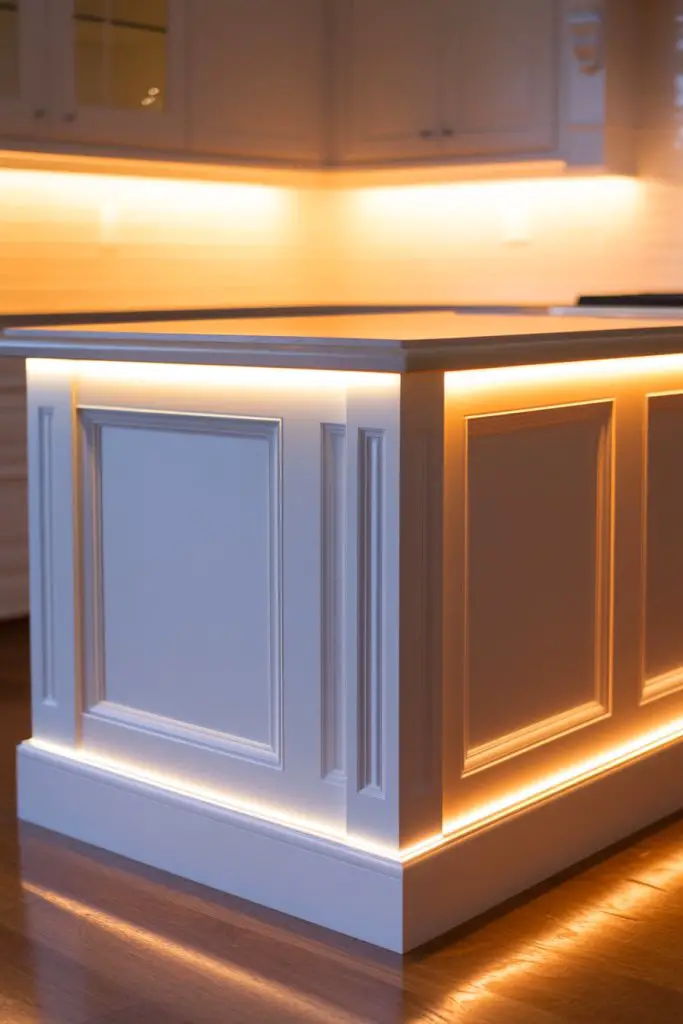
Want to create a kitchen that feels warm, inviting, and a little bit magical? Lighted wainscoting with concealed LED strips offers a stunning visual effect that transforms your space after dark. It’s perfect for adding ambiance and highlighting architectural details. Who says lighting has to be obvious?
Recommended Products to replicate this idea
| # | Preview | Product | |
|---|---|---|---|
| 1 |
|
Art3d Premade Board and Batten Paintable Wainscoting Kit, MDF Accent Wall Panel for Kitchen Bedroom... | Buy on Amazon |
| # | Preview | Product | |
|---|---|---|---|
| 1 |

|
PAUTIX COB LED Strip Light,LED Lights 16.4ft,UL Listed Warm White 2700K Dotless Strip Lights,CRI93+... | Buy on Amazon |
Picture subtle LED strips hidden behind molding or under the top edge of your panels, casting a soft glow upward or downward. The indirect lighting creates depth and warmth, making your island glow with a cozy, sophisticated aura. Pair it with dimmable switches for adjustable mood lighting. The effect is both functional and enchanting.
Choose warm white, cool white, or colored LED options to match your mood or season. Install the strips behind decorative trims or within recessed channels for a seamless look. Seasonal updates could involve changing the lighting color or adding programmable controls. It’s adaptable to modern or transitional aesthetics.
Plan the lighting layout carefully, measuring distances and choosing LED strips rated for indoor use. Hire an electrician if needed for safe wiring and connections. Attach the strips with mounting clips or adhesive, ensuring they are hidden behind moldings or trims. Connect to dimmers or controllers for mood adjustments. Test thoroughly before final sealing or finishing.
Add color-changing LED options for dynamic effects during parties or holidays. Incorporate decorative trims or diffusers to soften the light and hide the strips completely. Use remote controls or smartphone apps for easy adjustments. It’s a tech-savvy upgrade that adds a wow factor.
Concealed LED lighting elevates your kitchen’s ambiance, making it perfect for entertaining or relaxing. It’s a subtle upgrade that delivers a big impact—transforming your space into a cozy retreat or a modern showpiece. Light up your island and see your decor in a whole new light!
19. Upcycled and DIY Wainscoting Projects for a Personal Touch
Craving a custom look but on a budget? Upcycled and DIY wainscoting projects let you craft a unique, personal style without breaking the bank. It’s a rewarding project that combines sustainability with creativity. Who says you need a big budget to achieve designer-level results?
Recommended Products to replicate this idea
| # | Preview | Product | |
|---|---|---|---|
| 1 |
|
Pangda Peel and Stick Wall Molding Kit, 3D Premade Accent Molding Wainscoting Panel for Interior... | Buy on Amazon |
| # | Preview | Product | |
|---|---|---|---|
| 1 |

|
Plastpro Trim Kit Wainscoting Panels | Easy to Install Accent Wall Panels PVC Trim Planking Kit for... | Buy on Amazon |
Imagine using reclaimed wood, vintage doors, or repurposed panels to create one-of-a-kind wainscoting. The mix of textures and histories adds character and charm. You can paint, stain, or leave the materials raw for a rustic, eclectic vibe. The result is a space that’s truly yours, full of stories and personality.
Mix and match different materials—wood, metal, fabric—for a layered look. Incorporate personal artifacts, signage, or hand-painted designs for a truly bespoke finish. Seasonal updates could involve changing out fabric or repainting. It’s adaptable to any style, from shabby chic to industrial.
Gather your materials—look for reclaimed wood, pallets, or leftover panels. Prepare your surface by cleaning and sanding. Attach your materials with nails, screws, or strong adhesive, depending on the weight. Finish with paint or sealant, and add any decorative touches like stenciling or hardware. It’s a DIY adventure that pays off with a heartfelt, customized look.
Include personal touches such as hand-painted murals, quote decals, or family photos mounted on the panels. Use upcycled hardware or decorative elements to add flair. Incorporate functional elements like hooks or shelves made from repurposed materials. The goal is a space that reflects your story.
Upcycled and DIY projects empower you to create a truly personalized kitchen island. They foster creativity and sustainability while showcasing your craftsmanship. Your space will be full of character, charm, and your unique personality. Time to get hands-on and make your vision real!
Conclusion
From classic panels to contemporary designs, these wainscoting kitchen island ideas showcase a range of styles to suit any home. Incorporate these creative touches to add depth, character, and charm to your kitchen space. Don’t hesitate to experiment and make your kitchen uniquely yours—your perfect island awaits to be styled with flair and confidence!
Last update on 2026-02-11 / Affiliate links / Images from Amazon Product Advertising API